
DSXA210UI - Car stereo SONY - Free user manual and instructions
Find the device manual for free DSXA210UI SONY in PDF.
| Product Type | Car Radio |
| Brand | Sony |
| Model | DSXA210UI |
| Dimensions (W x H x D) | 178 mm x 50 mm x 119 mm |
| Weight | 0.7 kg |
| Power Supply | 12 V DC (negative ground) |
| Rated Current | 10 A |
| Max Output Power | 55 W x 4 (at 4 Ω) |
| Radio Bands | FM, AM, LW |
| RDS System | Yes |
| USB Audio Formats | MP3, WMA, FLAC |
| AUX Input | Stereo mini-jack |
| Equalizer | 10 preset bands + customizable |
| Extra Bass | Yes (3 levels) |
| Detachable Front Panel | Yes |
| Warning Alarm | Yes |
| AUTO OFF Function | Yes (30 min) |
| Steering Wheel Remote Compatibility | Yes (wired) |
| Display | Adjustable backlight |
| Maintenance | Clean connectors with cotton swab |
| Security | Detachable face, alarm, AUTO OFF |
| Spare Parts | Fuse, release keys |
| Repairability | Firmware update via USB |
| General Information | Manufactured in Thailand, EU importer Sony Europe B.V. |
Frequently Asked Questions - DSXA210UI SONY
User questions about DSXA210UI SONY
0 question about this device. Answer the ones you know or ask your own.
Ask a new question about this device
Download the instructions for your Car stereo in PDF format for free! Find your manual DSXA210UI - SONY and take your electronic device back in hand. On this page are published all the documents necessary for the use of your device. DSXA210UI by SONY.
USER MANUAL DSXA210UI SONY
FM/MW/LW Digital Media Player
LIMPOBOI PECNBEP
Operating Instructions
GB
Bedienungsanleitung
DE
Mode d'emploi
FR
To cancel the demonstration (DEMO) display, see page 11.
For the connection/installation, see page 19.
For safety, be sure to install this unit in the dashboard of the car as the rear side of the unit becomes hot during use.
For details, see "Connection/Installation" (page 19).
Made in Thailand
The nameplate indicating operating voltage, etc., is located on the bottom of the chassis.

Hereby, Sony Corporation declares that this equipment is in compliance with Directive 2014/53/EU.
The full text of the EU declaration of conformity is available at the following internet address: http://www.compliance.sony.de/
This equipment is intended to be used with the approved version(s) of software that are indicated in the EU Declaration of Conformity.
The software loaded on this equipment is verified to comply with the essential requirements of the Directive 2014/53/EU.
Software version: 1
The software version can be checked in the firmware setup item of the general setup menu.
Notice for customers: the following information is only applicable to equipment sold in countries applying EU Directives
This product has been manufactured by or on behalf of Sony Corporation.
EU Importer: Sony Europe B.V.
Inquiries to the EU Importer or related to product compliance in Europe should be sent to the manufacturer's authorized representative, Sony Belgium, bijkantoor van Sony Europe B.V., Da Vincilaan 7-D1, 1930 Zaventem, Belgium.

Disposal of waste batteries and electrical and electronic equipment (applicable in the European Union and other European countries with separate
collection systems)
This symbol on the product, the battery or on the packaging indicates that the product and the battery shall not be treated as household waste. On certain batteries this symbol might be used in combination with a chemical symbol. The chemical symbols for mercury (Hg) or lead (Pb) are added if the battery contains more than 0.0005% mercury or 0.004% lead. By ensuring these products and batteries are disposed of correctly, you will help prevent potentially negative consequences for the environment and human health which could otherwise be caused by inappropriate waste handling. The recycling of the materials will help to conserve natural resources.
In case of products that for safety, performance or data integrity reasons require a permanent connection with an incorporated battery, this battery should be replaced by qualified service staff only. To ensure that the battery and the electrical and electronic equipment will be treated properly, hand over these products at end-of-life to the applicable collection point for the recycling of electrical and electronic equipment. For all other batteries, please view the section on how to remove the battery from the product safely. Hand the battery over to the applicable collection point for the recycling of waste batteries. For more detailed information about recycling of this product or battery, please contact your local Civic Office, your household waste disposal service or the shop where you purchased the product or battery.
CAUTION
The following frequency 65 - 74 MHz range is not allocated to sound broadcasting in the European Common Allocations table and cannot be used in Europe.
Warning if your car's ignition has no ACC position
Be sure to set the AUTO OFF function (page 11). The unit will shut off completely and automatically in the set time after the unit is turned off, which prevents battery drain. If you do not set the AUTO OFF function, press and hold OFF until the display disappears each time you turn the ignition off.
Disclaimer regarding services offered by third parties
Services offered by third parties may be changed, suspended, or terminated without prior notice. Sony does not bear any responsibility in these sorts of situations.
Table of Contents
Guide to Parts and Controls 4
Getting Started
Detaching the Front Panel 5
Resetting the Unit 6
Setting the Clock 6
Checking the Battery Voltage. 6
Connecting a USB Device 6
Connecting Other Portable Audio Device 7
Listening to the Radio
Listening to the Radio. 7
Using Radio Data System (RDS) 8
Playback
Playing a USB Device. 9
Searching and Playing Tracks. 10
Settings
Canceling the DEMO Mode. 11
Basic Setting Operation 11
General Setup (GENERAL) 11
Sound Setup (SOUND). 12
Display Setup (DISPLAY) 13
Additional Information
Updating the Firmware 13
Precautions 13
Maintenance 14
Specifications. 14
Troubleshooting 16
Messages 18
Connection/Installation
Cautions 19
Parts List for Installation 19
Connection. 20
Installation 22
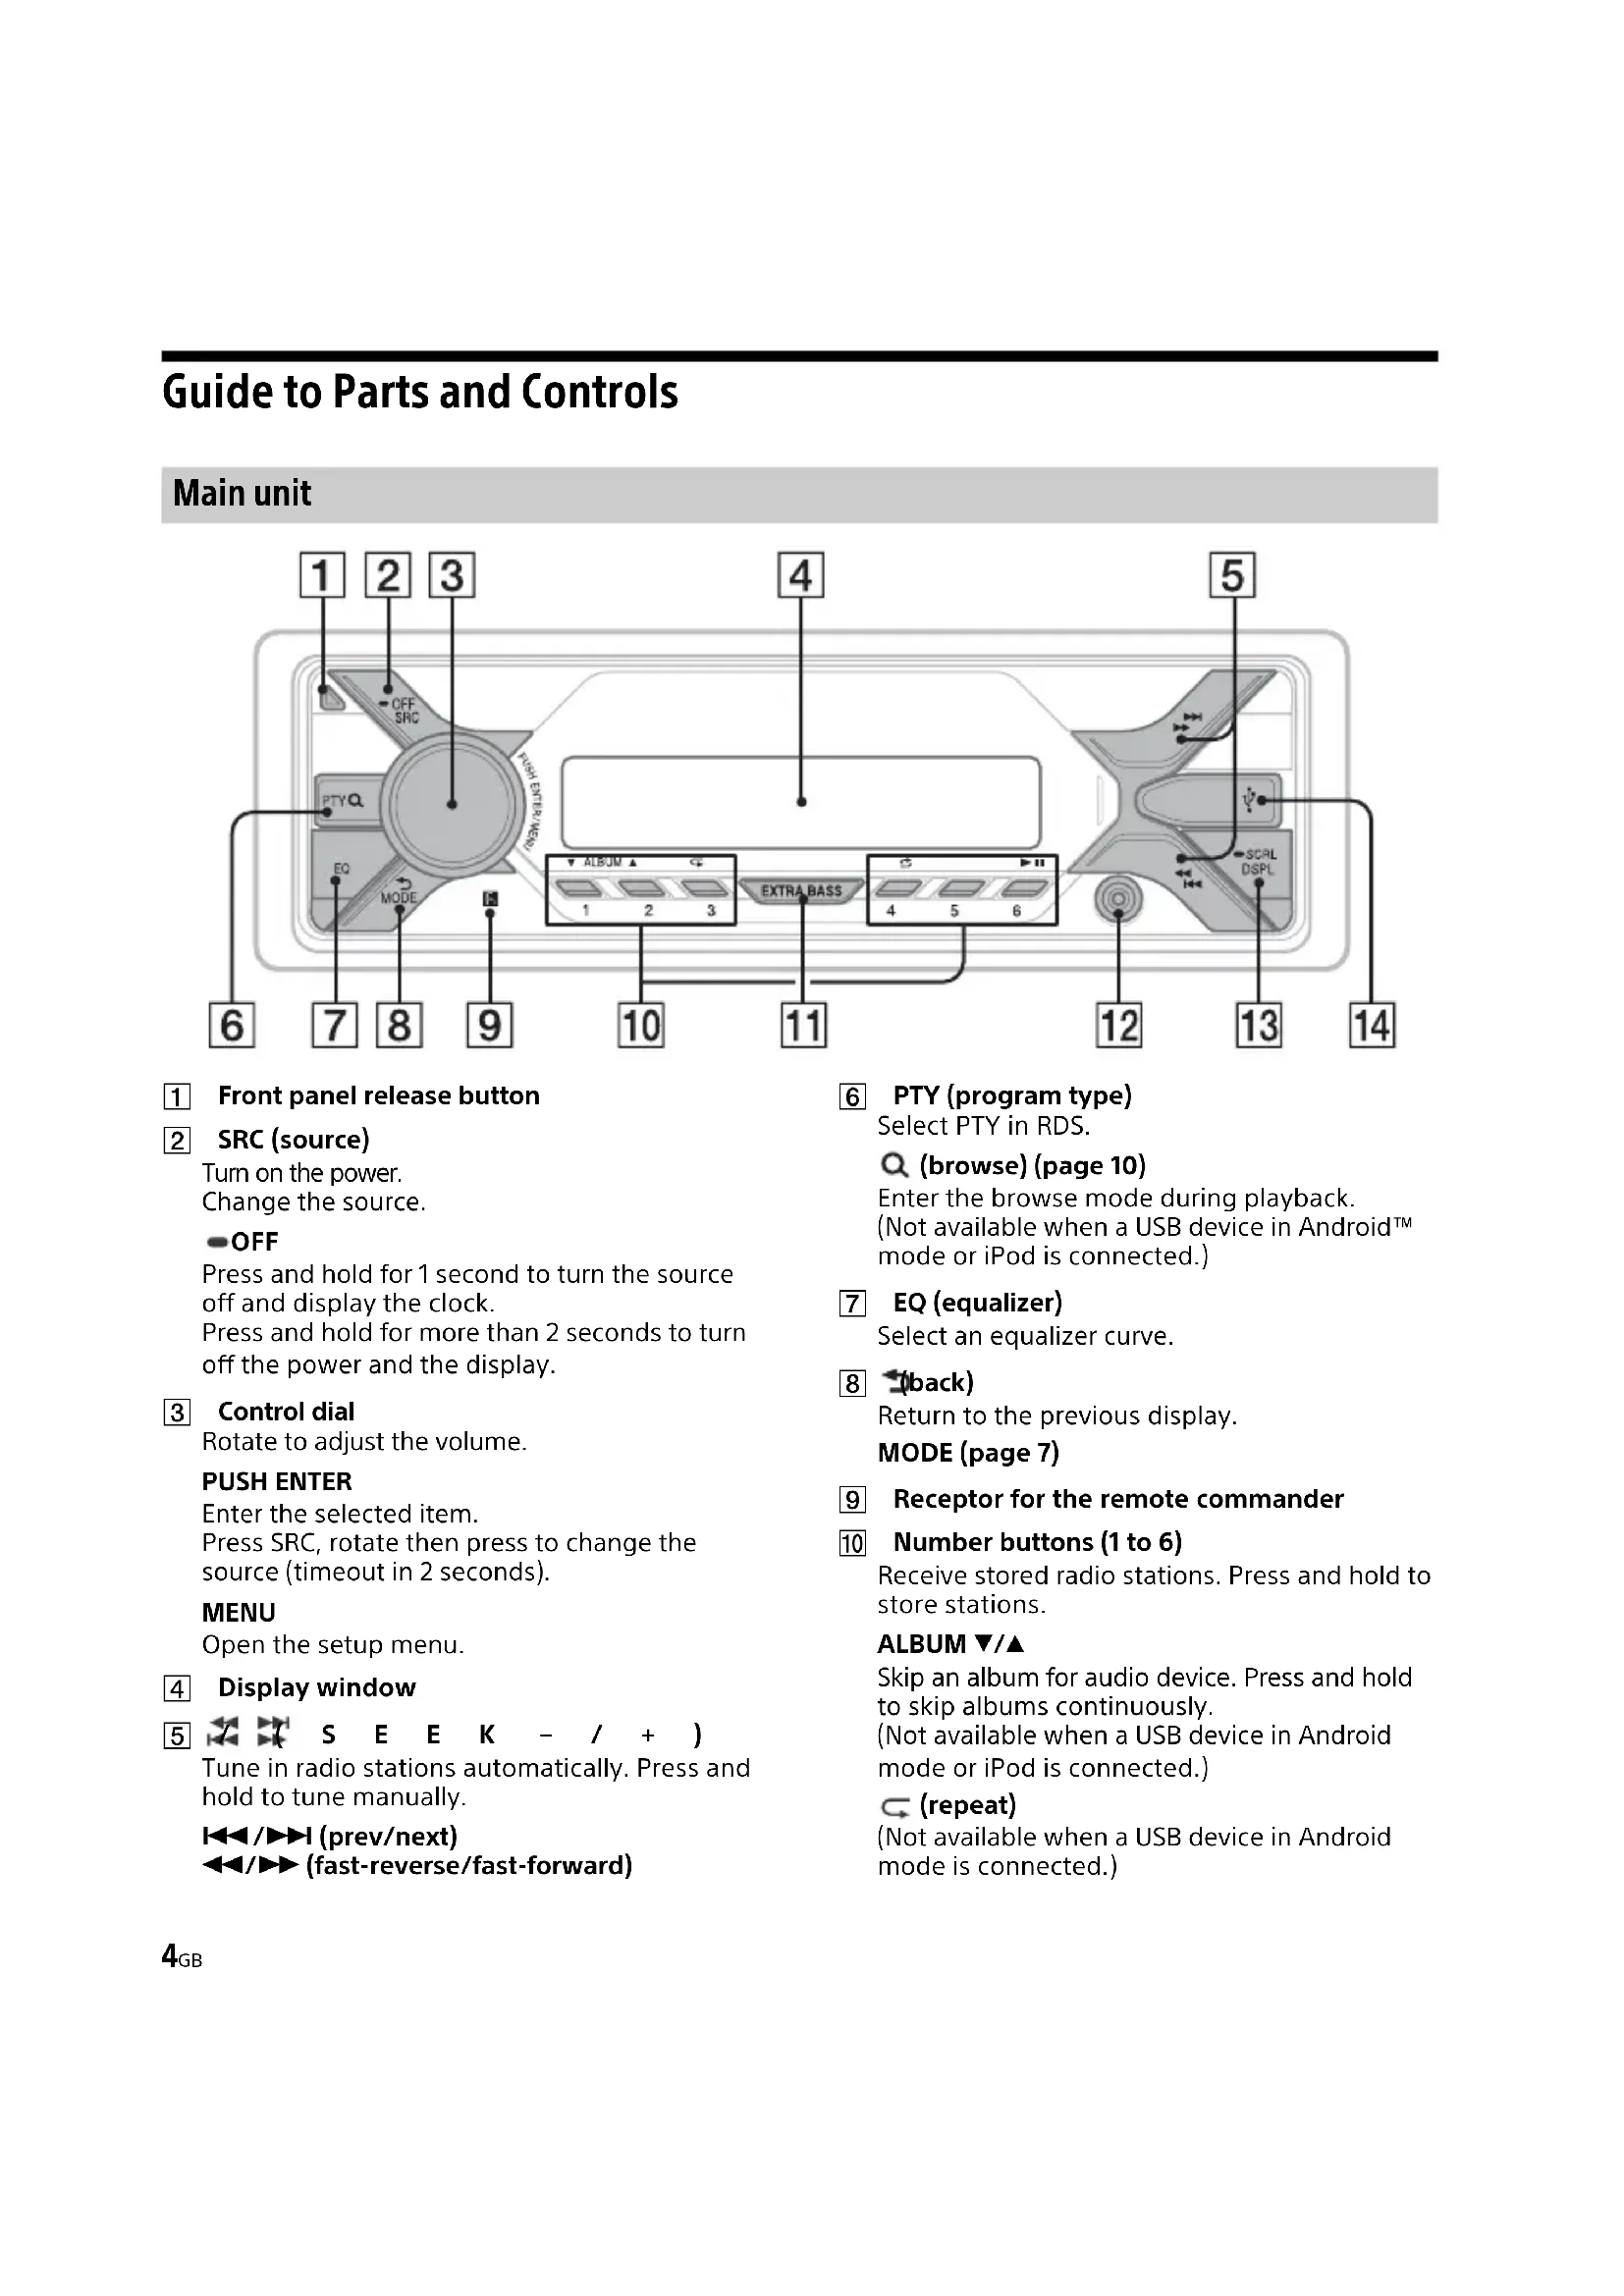
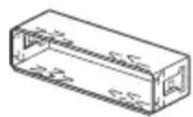
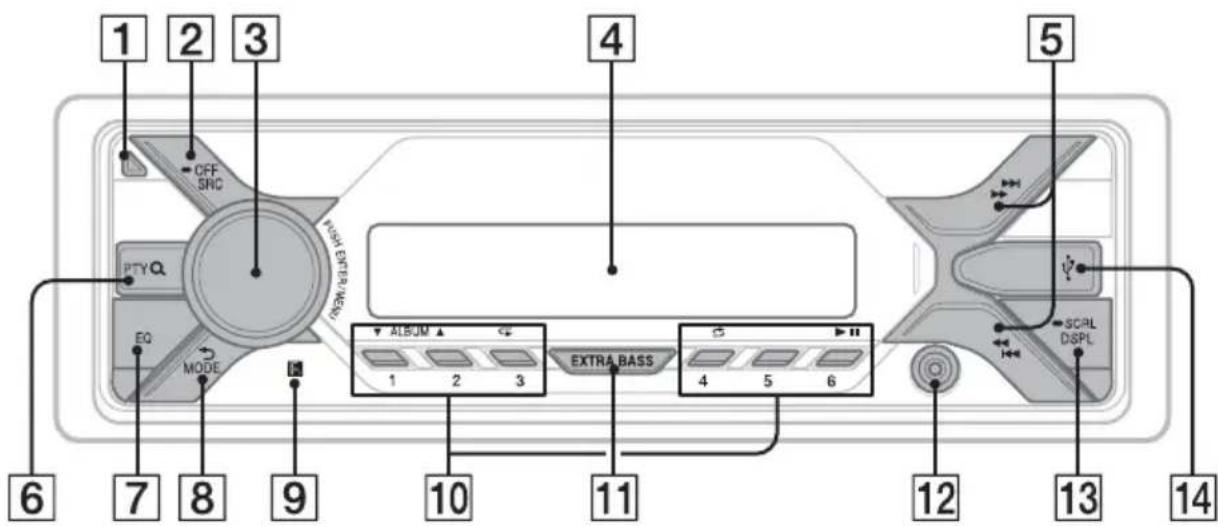
Guide to Parts and Controls
Main unit

1 Front panel release button
2 SRC (source)
Turn on the power.
Change the source.
OFF
Press and hold for 1 second to turn the source off and display the clock.
Press and hold for more than 2 seconds to turn off the power and the display.
3 Control dial
Rotate to adjust the volume.
PUSH ENTER
Enter the selected item.
Press SRC, rotate then press to change the source (timeout in 2 seconds).
MENU
Open the setup menu.
4 Display window
5 S E E K - / + )
Tune in radio stations automatically. Press and hold to tune manually.
I/(prev/next)
( fast-reverse/fast-forward)
6 PTY (program type)
Select PTY in RDS.
Q (browse) (page 10)
Enter the browse mode during playback.
Not available when a USB device in AndroidTM mode or iPod is connected.)
EQ (equalizer)
Select an equalizer curve.
back)
Return to the previous display.
MODE (page 7)
Receptor for the remote commander
10 Number buttons (1 to 6)
Receive stored radio stations. Press and hold to store stations.
ALBUM▼/▲
Skip an album for audio device. Press and hold to skip albums continuously.
(Not available when a USB device in Android mode or iPod is connected.)
(repeat)
Not available when a USB device in Android mode is connected.)
(shuffle)
(Not available when a USB device in Android mode is connected.)
II (play/pause)
11 EXTRA BASS
Reinforces bass sound in synchronization with the volume level. Press to change the EXTRA BASS setting: [1], [2], [OFF].
12 AUX input jack
13 DSPL(display)
Press to change display items.
SCRL (scroll)
Press and hold to scroll a display item.
14 USB port
Getting Started
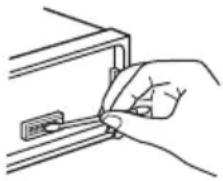
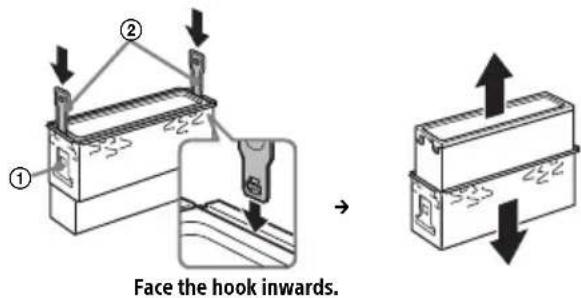
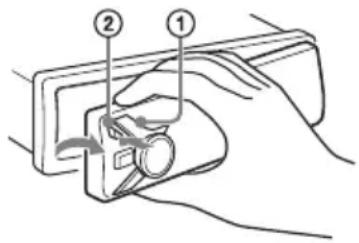
Detaching the Front Panel
You can detach the front panel of this unit to prevent theft.
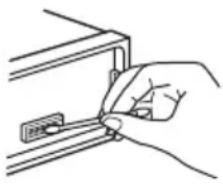
1 Press and hold OFF ① until the unit turns off, press the front panel release button ②, then pull the panel towards you to remove.
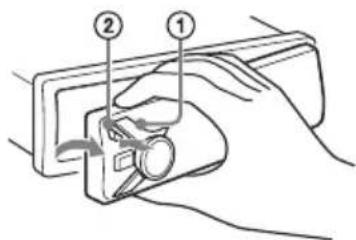
Caution alarm
If you turn the ignition switch to the OFF position without detaching the front panel, the caution alarm will sound for a few seconds. The alarm will only sound if the built-in amplifier is used.
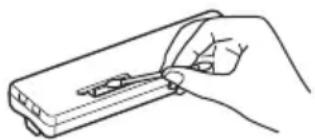
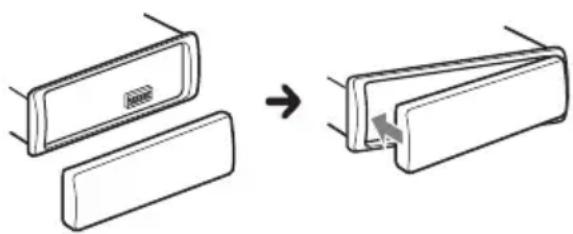
Attaching the front panel
Resetting the Unit
Before operating the unit for the first time, or after replacing the car battery or changing connections, you must reset the unit.
1 Press DSPL and (back)/MODE for more than 2 seconds.
Note
Resetting the unit will erase the clock setting and some stored contents.
Setting the area/region
After resetting the unit, the area/region setting display appears.
1 Press ENTER while [SET AREA] is displayed.
The area/region currently set appears.
2 Rotate the control dial to select [EUROPE] or [RUSSIA], then press it.
3 Rotate the control dial to select [YES] or [NO], then press it.
If the setting area/region is changed, the unit is reset, then the clock is displayed.
This setting can be configured in the general setup menu (page 11).
Setting the Clock
1 Press MENU, rotate the control dial to select [GENERAL], then press it.
2 Rotate the control dial to select [SET CLOCK-ADJ], then press it.
The hour indication flashes.
3 Rotate the control dial to set the hour and minute.
To move the digital indication, press / (SEEK-/+).
4 After setting the minute, press MENU.
The setup is complete and the clock starts.
To display the clock
Press DSPL.
Checking the Battery Voltage
You can check the current battery voltage. (Not available while the source is off and the clock is displayed.)
1 Press DSPL repeatedly until the battery voltage display appears.
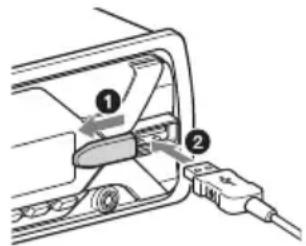
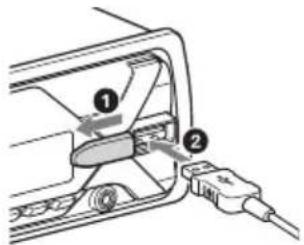
Connecting a USB Device
1 Turn down the volume on the unit.
2 Connect the USB device to the unit.
To connect an iPod/iPhone, use the USB connection cable for iPod (not supplied).
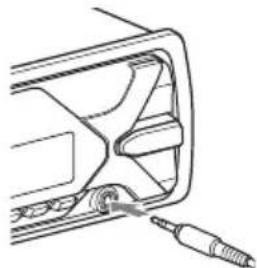
Connecting Other Portable Audio Device
1 Turn off the portable audio device.
2 Turn down the volume on the unit.
3 Connect the portable audio device to the AUX input jack (stereo mini jack) on the unit with a connecting cord (not supplied)*.
- Be sure to use a straight type plug.
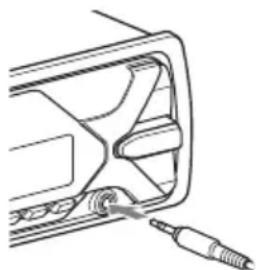
4 Press SRC to select [AUX].
To match the volume level of the connected device to other sources
Start playback of the portable audio device at a moderate volume, and set your usual listening volume on the unit. Press MENU, then select [SOUND] [SET AUX VOL] (page 13).
Listening to the Radio
Listening to the Radio
To listen to the radio, press SRC to select [TUNER].
Storing automatically (BTM)
1 Press MODE to change the band (FM1, FM2, FM3, MW or LW).
2 Press MENU, rotate the control dial to select [GENERAL], then press it.
3 Rotate the control dial to select [SET BTM], then press it. The unit stores stations in order of frequency on the number buttons.
Tuning
1 Press MODE to change the band (FM1, FM2, FM3, MW or LW).
2 Perform tuning.
To tune manually
Press and hold 1 / >1 (SEEK-/+ to locate the approximate frequency, then press 1 / >1 (SEEK-/+ ) repeatedly to fine adjust to the desired frequency.
To tune automatically
Press I / I (SEEK-/+).
Scanning stops when the unit receives a station.
Storing manually
1 While receiving the station that you want to store, press and hold a number button (1 to 6) until [MEM] appears.
Receiving the stored stations
1 Select the band, then press a number button (1 to 6).
Using Radio Data System (RDS)
Setting alternative frequencies (AF) and traffic announcement (TA)
AF continuously retunes the station to the strongest signal in a network, and TA provides current traffic information or traffic programs (TP) if received.
1 Press MENU, rotate the control dial to select [GENERAL], then press it.
2 Rotate the control dial to select [SET AF/ TA], then press it.
3 Rotate the control dial to select [SET AF-ON], [SET TA-ON], [SET AF/TA-ON] or [SET AF/TA-OFF], then press it.
To store RDS stations with the AF and TA setting
You can preset RDS stations along with an AF/TA setting. Set AF/TA, then store the station with BTM or manually. If you preset manually, you can also preset non-RDS stations.
To receive emergency announcements
With AF or TA on, emergency announcements will automatically interrupt the currently selected source.
To adjust the volume level during a traffic announcement
Level will be stored into memory for subsequent traffic announcements, independently from the regular volume level.
To stay with one regional program (REGIONAL)
When the AF and REGIONAL functions are on, you will not be switched to another regional station with a stronger frequency. If you leave this regional program's reception area, set [SET REG-OFF] in [GENERAL] during FM reception (page 12). This function does not work in the UK and some other areas.
Local Link function (UK only)
This function enables you to select other local stations in the area, even if they are not stored on your number buttons. During FM reception, press a number button (1 to 6) on which a local station is stored. Within 5 seconds, press again a number button of the local station. Repeat this procedure until the local station is received.
Selecting program types (PTY)
1 Press PTY during FM reception.
2 Rotate the control dial until the desired program type appears, then press it. The unit starts to search for a station broadcasting the selected program type.
Type of programs
NEWS (News), AFFAIRS (Current Affairs), INFO (Information), SPORT (Sports), EDUCATE (Education), DRAMA (Drama), CULTURE (Culture), SCIENCE (Science), VARIORED (Varied), POP M (Pop Music), ROCK M (Rock Music), EASY M (M.O.R. Music), LIGHT M (Light classical), CLASSICS (Serious classical), OTHER M (Other Music), WEATHER (Weather), FINANCE (Finance), CHILDREN (Children's program), SOCIAL A (Social Affairs), RELIGION (Religion), PHONE IN (Phone In), TRAVEL (Travel), LEISURE (Leisure), JAZZ (Jazz Music), COUNTRY (Country Music), NATION M (National Music), OLDIES (Oldies Music), FOLK M (Folk Music), DOCUMENT (Documentary)
Setting clock time (CT)
The CT data from the RDS transmission sets the clock.
1 Set [SET CT] in [GENERAL] to [SET CT-ON] (page 12).
Playback
Playing a USB Device
In these Operating Instructions, "iPod" is used as a general reference for the iPod functions on an iPod and iPhone, unless otherwise specified by the text or illustrations.
For details on the compatibility of your iPod, see "About iPod" (page 14) or visit the support site on the back cover.
AOA (Android Open Accessory) 2.0, MSC (Mass Storage Class) and MTP (Media Transfer Protocol) type USB devices* compliant with the USB standard can be used. Depending on the USB device, the Android mode or MSC/MTP mode can be selected on the unit.
Some digital media players or Android smartphones may require setting to MTP mode.
- e.g., a USB flash drive, digital media player, Android smartphone
Notes
- For details on the compatibility of your USB device, visit the support site on the back cover.
- Smartphones with Android OS 4.1 or higher installed support Android Open Accessory 2.0 (AOA 2.0).
However, some smartphones may not fully support AOA 2.0 even if Android OS 4.1 or higher is installed. For details on the compatibility of your Android smartphone, visit the support site on the back cover.
- Playback of the following files is not supported.
MP3/WMA/FLAC:
copyright-protected files
DRM (Digital Rights Management) files
Multi-channel audio files
MP3/WMA:
- lossless compression files
Before making a connection, select the USB mode (Android mode or MSC/MTP mode) depending on the USB device (page 12).
1 Connect a USB device to the USB port (page 6).
Playback starts.
If a device is already connected, to start playback, press SRC to select [USB] ([IPD]
appears in the display when the iPod is recognized).
2 Adjust the volume on this unit.
To stop playback
Press and hold OFF for 1 second.
To remove the device
Stop playback, then remove the device.
Caution for iPhone
When you connect an iPhone via USB, phone call volume is controlled by the iPhone, not the unit. Do not inadvertently increase the volume on the unit during a call, as a sudden loud sound may result when the call ends.
Searching and Playing Tracks
Repeat play and shuffle play
Not available when a USB device in Android mode is connected.
1 During playback, press (repeat) or (shuffle) repeatedly to select the desired play mode.
Playback in the selected play mode may take time to start.
Available play modes differ depending on the selected sound source.
Searching a track by name (QuickBrowZerTM)
Not available when a USB device in Android mode or iPod is connected.
1 During USB playback, press (Browse) to display the list of search categories.
When the track list appears, press back) repeatedly to display the desired search category.
During USB playback, press (Browse) for more than 2 seconds to directly return to the beginning of the category list.
2 Rotate the control dial to select the desired search category, then press it to confirm.
3 Repeat step 2 to search the desired track. Playback starts.
To exit the Quick-BrowZer mode
Press (browse).
Searching by skipping items (Jump mode)
Not available when a USB device in Android mode or iPod is connected.
1 Press Q (browse).
2 Press (SEEK +).
3 Rotate the control dial to select the item.
The list is jumped in steps of 10% of the total number of items.
4 Press ENTER to return to the QuickBrowZer mode.
The selected item appears.
5 Rotate the control dial to select the desired item, then press it.
Playback starts.
Settings
Canceling the DEMO Mode
You can cancel the demonstration display which appears when the source is off and the clock is displayed.
1 Press MENU, rotate the control dial to select [GENERAL], then press it.
2 Rotate the control dial to select [SET DEMO], then press it.
3 Rotate the control dial to select [SET DEMO-OFF], then press it. The setting is complete.
4 Press back) twice. The display returns to normal reception/play mode.
Basic Setting Operation
You can set items in the following setup categories: General setup (GENERAL), Sound setup (SOUND), Display setup (DISPLAY)
1 Press MENU.
2 Rotate the control dial to select the setup category, then press it. The items that can be set differ depending on the source and settings.
3 Rotate the control dial to select the options, then press it.
To return to the previous display
Press (back).
General Setup (GENERAL)
AREA
Specifies the area/region to use this unit: [EUROPE], [RUSSIA]. If the area/region currently set is changed, this unit is reset, then the clock is displayed. (Available only while the source is off and the clock is displayed.)
DEMO (demonstration)
Activates the demonstration: [ON], [OFF].
CLOCK-ADJ (clock adjust) (page 6)
CAUT ALM (caution alarm)
Activates the caution alarm: [ON], [OFF] (page 5).
(Available only while the source is off and the clock is displayed.)
BEEP
Activates the beep sound: [ON], [OFF].
AUTO OFF
Shuts off automatically after a certain time when the unit is turned off: [ON] (30 minutes), [OFF].
STEERING
- Registers/rewires the setting of the steering wheel remote control.
(Available when connected with the connection cable (not supplied).) (Available only while the source is off and the clock is displayed.)
STR CONTROL (steering control)
Selects the input mode of the connected remote control. To prevent a malfunction, be sure to match the input mode with the connected remote control before use.
CUSTOM
Input mode for the steering wheel remote control
PRESET
Input mode for the wired remote control excluding the steering wheel remote control (automatically selected when [RESET CUSTOM] is performed.)
EDIT CUSTOM
Registers the functions (SOURCE, ATT, VOL +/-, SEEK +/-) to the steering wheel remote control:
Rotate the control dial to select the function you want to assign to the steering wheel remote control, then press it.
2 While [REGISTER] is blinking, press and hold the button on the steering wheel remote control you want to assign the function to. When registration is complete, [REGISTERED] is displayed.
3 To register other functions, repeat steps 1 and 2.
(Available only when [STR CONTROL] is set to [CUSTOM].)
RESET CUSTOM
Resets the setting of the steering wheel remote control: [YES], [NO].
(Available only when [STR CONTROL] is set to [CUSTOM].)
Notes
- While making settings, only button operation on the unit is available. For safety, park your car before making this setting.
If an error occurs while registering, all the previously-registered information remains. Restart registration from the function where the error occurred. - This function may not be available on some vehicles. For details on the compatibility of your vehicle, visit the support site on the back cover.
USB MODE
Changes the USB mode: [ANDROID], [MSC/MTP]. (Available only when the USB source is selected.)
CT (clock time)
Activates the CT function: [ON], [OFF].
AF/TA (alternative frequencies/traffic announcement)
Selects the alternative frequencies (AF) and traffic announcement (TA) setting: [AF-ON], [TA-ON], [AF/TA-ON], [AF/TA-OFF].
(Available when any source is selected.)
REGIONAL
Restricts reception to a specific region: [ON], [OFF]. (Available only when FM is received.)
BTM (best tuning memory) (page 7)
(Available only when the tuner is selected.)
FIRMWARE
(Available only while the source is off and the clock is displayed.)
Checks/updates the firmware version. For details, visit the support site on the back cover. FW VERSION (firmware version)
Displays current firmware version.
FW UPDATE (firmware update)
Enters firmware update process: [YES], [NO]
Updating the firmware takes a few minutes to complete. During the update, do not turn the ignition to the OFF position, nor remove the USB device.
Sound Setup (SOUND)
This setup menu is available when any source is selected.
EQ10 PRESET
Selects an equalizer curve from 10 equalizer curves or off:
[OFF], [R&B], [ROCK], [POP], [HIP-HOP], [EDM], [JAZZ], [SOUL], [COUNTRY], [KARAOKE]*, [CUSTOM].
The equalizer curve setting can be memorized for each source.
- [KARAOKE] reduces the vocal sound but cannot be fully removed during playback. Also, using a microphone is not supported.
EQ10 CUSTOM
Sets [CUSTOM] of EQ10.
Setting the equalizer curve:
[BAND1] 32 Hz, [BAND2] 63 Hz, [BAND3] 125 Hz, [BAND4] 250 Hz, [BAND5] 500 Hz, [BAND6] 1 kHz, [BAND7] 2 kHz, [BAND8] 4 kHz, [BAND9] 8 kHz, [BAND10] 16 kHz.
The volume level is adjustable in 1 dB steps, from -6 dB to +6 dB.
BALANCE
Adjusts the sound balance: [RIGHT-15] - [CENTER] - [LEFT-15].
FADER
Adjusts the relative level: [FRONT-15] - [CENTER] - [REAR-15].
AUX VOL (AUX volume)
Adjusts the volume level for each connected auxiliary device: [+18dB] - [0dB] - [-8dB]
This setting negates the need to adjust the volume level between sources.
(Available only when the AUX is selected.)
Display Setup (DISPLAY)
DIMMER
Changes the display brightness: [ON], [OFF], [CLK] (clock).
To set this function to be active only during a fixed period, select [CLK], then set the start and end times.
- To set the brightness when the dimmer function is activated: Set [DIMMER] to [ON], then adjust [BRIGHTNESS].
- To set the brightness when the dimmer function is deactivated: Set [DIMMER] to [OFF], then adjust [BRIGHTNESS].
The brightness setting is stored and applied when the dimmer function is activated or deactivated.
BRIGHTNESS
Adjusts the display brightness. The brightness level is adjustable: [1] - [10].
SND SYNC (sound synchronization)
Activates the synchronization of the illumination with the sound: [ON], [OFF].
AUTO SCR (auto scroll)
Scrolls long items automatically: [ON], [OFF]. (Not available when the AUX or tuner is selected.)
Additional Information
Updating the Firmware
To update the firmware, visit the support site on the back cover, then follow the online instructions.
Notes
- Using a USB device (not supplied) is required for updating the firmware. Store the updater in the USB device, and connect the device to the USB port, then perform the update operation.
- Updating the firmware takes a few minutes to complete. During the update, do not turn the ignition to the OFF position, nor remove the USB device.
Precautions
Cool off the unit beforehand if your car has been parked in direct sunlight.
- Do not leave the front panel or audio devices brought in inside the car, or it may cause malfunction due to high temperature in direct sunlight.
Power antenna (aerial) extends automatically.
To maintain high sound quality
Do not splash liquid onto the unit.
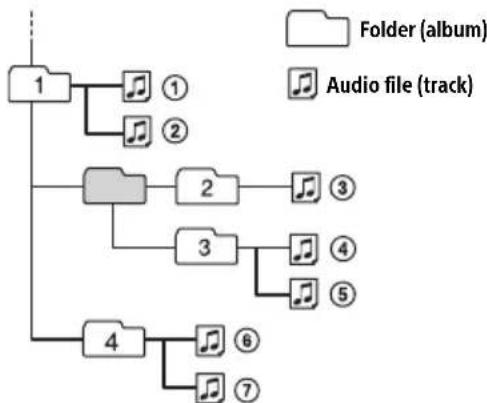
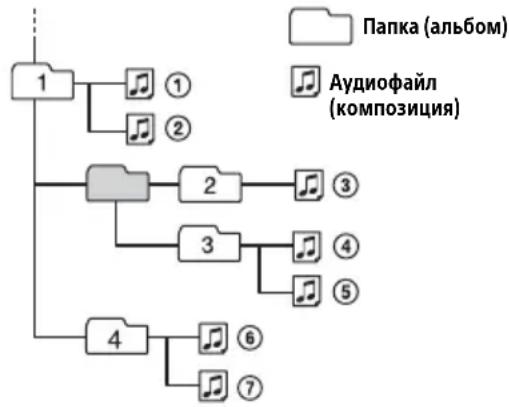
Playback order of audio files
About iPod
- You can connect to the following iPod models. Update your iPod devices to the latest software before use.
Compatible iPhone/iPod models
| Compatible Model USB | |
| iPhone 7 √ | |
| iPhone 7 Plus √ | |
| iPhone SE √ | |
| iPhone 6s √ | |
| iPhone 6s Plus √ | |
| iPhone 6 √ | |
| iPhone 6 Plus √ | |
| iPhone 5s √ | |
| iPhone 5c √ | |
| iPhone 5 √ | |
| iPhone 4s √ | |
| iPod touch (6th generation) √ | |
| iPod touch (5th generation) √ | |
| iPod nano (7th generation) | √ |
- Use of the Made for Apple badge means that an accessory has been designed to connect specifically to the Apple product(s) identified in the badge, and has been certified by the developer to meet Apple performance standards. Apple is not responsible for the operation of this device or its compliance with safety and regulatory standards.
Please note that the use of this accessory with an Apple product may affect wireless performance.
If you have any questions or problems concerning your unit that are not covered in this manual, consult your nearest Sony dealer.
Maintenance
Cleaning the connectors
The unit may not function properly if the connectors between the unit and the front panel are not clean. In order to prevent this, detach the front panel (page 5) and clean the connectors with a cotton swab. Do not apply too much force. Otherwise, the connectors may be damaged.
Notes
- For safety, turn off the ignition before cleaning the connectors, and remove the key from the ignition switch.
- Never touch the connectors directly with your fingers or with any metal device.
Specifications
Tuner section
FM
Tuning range:
When [AREA] is set to [EUROPE]:
87.5 MHz - 108.0 MHz
When [AREA] is set to [RUSSIA]:
FM1/FM2: 87.5 MHz - 108.0 MHz (at 50 kHz step)
FM3: 65 MHz - 74 MHz (at 30 kHz step)
Antenna (aerial) terminal:
External antenna (aerial) connector
Intermediate frequency:
When [AREA] is set to [EUROPE]:
FM CCIR: -1,956.5 kHz to -487.3 kHz and +500.0 kHz to +2.095.4 kHz
When [AREA] is set to [RUSSIA]:
FM CCIR: -1,956.5 kHz to -487.3 kHz and +500.0 kHz to +2,095.4 kHz
FM OIRT: -1,815.6 kHz to -943.7 kHz and +996.6 kHz to +1,776.6 kHz
Usable sensitivity: 7 dBf
Selectivity: 75 dB at 400 kHz
Signal-to-noise ratio: 73 dB
Separation: 50 dB at 1 kHz
Frequency response: 20Hz - 15,000Hz
MW/LW
Tuning range:
MW: 531 kHz - 1,602 kHz
LW: 153 kHz - 279 kHz
Antenna (aerial) terminal:
External antenna (aerial) connector
Sensitivity: MW: 26 V , LW: 50 V
USB Player section
Interface: USB (Full-speed)
Maximum current: 1 A
Maximum number of recognizable folders and files:
Folders (albums): 256
Files (tracks) per folder: 256
Compatible Android Open Accessory protocol (AOA): 2.0
Corresponding codec:
MP3 (.mp3)
Bit rate: 8 kbps - 320 kbps (Supports VBR
(Variable Bit Rate))
Sampling rate: 16 kHz - 48 kHz
WMA (.wma)
Bit rate: 32 kbps - 192 kbps (Supports VBR
(Variable Bit Rate))
Sampling rate: 32kHz 44.1 kHz, 48 kHz
FLAC(.flac)
Bit depth: 16 bit, 24 bit
Sampling rate: 44.1 kHz, 48 kHz
Power amplifier section
Output: Speaker outputs
Speaker impedance: 4 -8
Maximum power output: 55W× 4 (at 4
General
Outputs:
Audio outputs terminal (REAR)
Power antenna (aerial)/Power amplifier control terminal (REM OUT)
Inputs:
Remote controller input terminal
Antenna (aerial) input terminal
Power requirements: 12 V DC car battery (negative ground (earth))
Rated current consumption: 10 A
Dimensions:
Approx. 178mm× 50mm× 119mm
(7 1/8 in × 2 in × 4 3/4 in) (w/h/d)
Mounting dimensions:
Approx. 182mm× 53mm× 102mm
(7 1/4 in × 2 1/8 in × 4 1/8 in) (w/h/d)
Mass: Approx. 0.7kg (1 lb 9 oz)
Package contents:
Main unit (1)
Parts for installation and connections (1 set)
Your dealer may not handle some of the above listed accessories. Please ask the dealer for detailed information.
Design and specifications are subject to change without notice.
Copyrights
Windows Media is either a registered trademark or trademark of Microsoft Corporation in the United States and/or other countries.
This product is protected by certain intellectual property rights of Microsoft Corporation. Use or distribution of such technology outside of this product is prohibited without a license from
Microsoft or an authorized Microsoft subsidiary.
Apple, iPhone, iPod, iPod nano, and iPod touch are trademarks of Apple Inc., registered in the U.S. and other countries.
Android is a trademark of Google LLC.
libFLAC
Copyright (C) 2000-2009 Josh Coalson
Copyright (C) 2011-2013 Xiph.Org Foundation
Redistribution and use in source and binary forms, with or without modification, are permitted provided that the following conditions are met:
- Redistributions of source code must retain the above copyright notice, this list of conditions and the following disclaimer.
- Redistributions in binary form must reproduce the above copyright notice, this list of conditions and the following disclaimer in the documentation and/or other materials provided with the distribution.
- Neither the name of the Xiph.org Foundation nor the names of its contributors may be used to endorse or promote products derived from this software without specific prior written permission.
THIS SOFTWARE IS PROVIDED BY THE COPYRIGHT HOLDERS AND COLLECTORS "AS IS" AND ANY EXPRESS OR IMPLIED WARRANTY, INCLUDING, BUT NOT LIMITED TO, THE IMPLIED WARRANTY OF MERCHANTABILITY AND FITNESS FOR A PARTICULAR PURPOSE ARE DISCLAIMED. IN NO EVENT SHALL THE FOUNDATION OR COLLECTORS BE LIABLE FOR ANY DIRECT, INDIRECT, INCIDENTAL, SPECIAL, EXEMPLARY, OR CONSEQUENTIAL DAMAGES (INCLUDING, BUT NOT LIMITED TO, PROCUREMENT OF SUBSTITUTE GOODS OR SERVICES; LOSS OF USE, DATA, OR PROFITS; OR BUSINESS INTERRUsION) HOWEVER CAUSED AND ON ANY THEORY OF LIABILITY, WHETHER IN CONTRACT, STRICT LIABILITY, OR TORT (INCLUDING NEGLIGENCE OR OTHERWISE) ARISING IN ANY WAY OUT OF THE USE OF THIS SOFTWARE, EVEN IF ADVISED OF THE POSSIBILITY OF SUCH DAMAGE.
Troubleshooting
The following checklist will help you remedy problems you may encounter with your unit.
Before going through the checklist below, check the connection and operating procedures.
For details on using the fuse and removing the unit from the dashboard, see "Connection/Installation" (page 19).
If the problem is not solved, visit the support site on the back cover.
General
No sound or the sound is very low.
The position of the fader control [FADER] is not set for a 2-speaker system.
The volume of the unit and/or connected device is very low.
- Increase the volume of the unit and connected device.
No beep sound.
An optional power amplifier is connected and you are not using the built-in amplifier.
The contents of the memory have been erased.
The power supply lead or battery has been disconnected or not connected properly.
Stored stations and correct time are erased.
The fuse has blown.
Makes a noise when the position of the ignition is switched.
The leads are not matched correctly with the car's accessory power connector.
During playback or reception, the demonstration mode starts.
If no operation is performed for 5 minutes with [DEMO-ON] set, the demonstration mode starts.
- Set [DEMO-OFF] (page 11).
The display disappears from/does not appear in the display window.
The dimmer is set to [DIM-ON] (page 13).
The display disappears if you press and hold OFF. Press OFF on the unit until the display appears.
The connectors are dirty (page 14).
The display/illumination flashes.
The power supply is not sufficient.
- Check that the car battery supplies enough power to the unit. (The power requirement is 12 V DC.)
The operation buttons do not function.
Press DSPL and (back)/MODE for more than 2 seconds to reset the unit.
The contents stored in memory are erased.
For your safety, do not reset the unit while you are driving.
Radio reception
Stations cannot be received. The sound is hampered by noise
The connection is not correct. Check the connection of the car antenna (aerial). If the auto antenna (aerial) will not extend, check the connection of the power antenna (aerial) control lead.
Preset tuning is not possible.
The broadcast signal is too weak.
65 MHz to 74 MHz in FM3 cannot be tuned in.
[AREA] is set to [EUROPE]. Set [AREA] to [RUSSIA] (page 11).
RDS
RDS services cannot be received (when [AREA] is set to [RUSSIA]).
FM3 is selected. Select FM1 or FM2.
RDS services are unavailable in the current region.
The SEEK starts after a few seconds of listening.
The station is non-TP or has weak signal. Deactivate TA (page 8).
No traffic announcements.
Activate TA (page 8).
The station does not broadcast any traffic announcements despite being TP. -Tune in another station.
PTY displays [- - - -]
The current station is not an RDS station.
RDS data has not been received.
The station does not specify the program type.
Program service name flashes.
There is no alternative frequency for the current station.
- Press / (SEEK -/+ ) while the program service name is flashing. [PI SEEK] appears and the unit starts searching for another frequency with the same PI (program identification) data.
USB device playback
You cannot play items via a USB hub.
This unit cannot recognize USB devices via a USB hub.
A USB device takes longer to play.
The USB device contains files with a complicated tree structure.
The sound is intermittent.
The sound may be intermittent at a high-bit-rate.
DRM (Digital Rights Management) files may not be playable in some cases.
Audio file cannot be played.
USB device formatted with file systems other than FAT16 or FAT32 are unsupported.
This unit supports FAT16 and FAT32, but some USB device may not support all of these FAT. For details, refer to the operating instruction of each USB device or contact the manufacturer.
Operations for skipping an album, skipping items (Jump mode), and searching a track by name (Quick-BrowZer) cannot be performed.
These operations cannot be performed when a USB device in Android mode or iPod is connected.
Set [USB MODE] to [MSC/MTP] (page 12).
- Remove the iPod.
The USB mode of the device is not set to the appropriate mode.
Make sure that the USB mode of the device is set to MSC/MTP mode.
The sound cannot be output during playback in Android mode.
While the unit is in Android mode, the sound outputs only from the Android smartphone.
- Check the status of the audio playback application on the Android smartphone.
- Playback may not perform properly depending on the Android smartphone.
Messages
The following messages may appear or flash during operation.
HUB NO SUPRT: USB hubs are not supported.
INVALID
The selected operation could be invalid.
[USB MODE] cannot be changed during iPod playback.
IPD STOP: iPod playback has finished.
OperateryouriPod/iPhone to start playback.
NO AF: No alternative frequencies.
Press 14 / 2 (SEEK-/+)while the program service name is flashing. The unit starts searching for another frequency with the same PI (program identification) data ([PI SEEK] appears).
NO TP: No traffic programs.
The unit will continue searching for available TP stations.
NOT SUPPORT -Android MODE
A USB device not supporting AOA (Android Open Accessory) 2.0 is connected to the unit while [USB MODE] is set to [ANDROID].
Set [USB MODE] to [MSC/MTP] (page 12).
OVERLOAD: The USB device is overloaded.
Disconnect the USB device, then press SRC to select another source.
The USB device has a fault, or an unsupported device is connected.
READ: Now reading information.
Wait until reading is complete and playback starts automatically. This may take some time depending on the file organization.
USB ERROR: The USB device cannot be played.
Connect the USB device again.
USB NO DEV: A USB device is not connected or recognized.
Make sure the USB device or USB cable is securely connected.
USB NO MUSIC: There is no playable file.
Connect a USB device containing playable files (page 15).
USB NO SUPRT: The USB device is not supported.
For details on the compatibility of your USB device, visit the support site on the back cover.
For steering wheel remote control operation:
ERROR: An error occurred during the function registration.
Register again from the function where the error occurred (page 12).
TIMEOUT: The function registration failed due to a timeout.
Try completing the registration while [REGISTER] is blinking (about 6 seconds) (page 12).
For firmware update operation:
FILE ERROR: The updater is not stored in the USB device.
Store the updater in the USB device, then try again (page 13).
UPDATE ERROR PRESS ENTER: Firmware update is not completed properly.
Press ENTER to clear the message, then try again. During the update, do not turn the ignition to the OFF position, nor remove the USB device (page 13).
Insert the USB device storing the updater, and then press ENTER.
If these solutions do not help improve the situation, consult your nearest Sony dealer.
Connection/Installation
Cautions
- Run all ground (earth) leads to a common ground (earth) point.
- Do not get the leads trapped under a screw, or caught in moving parts (e.g., seat railing).
- Before making connections, turn the car ignition off to avoid short circuits.
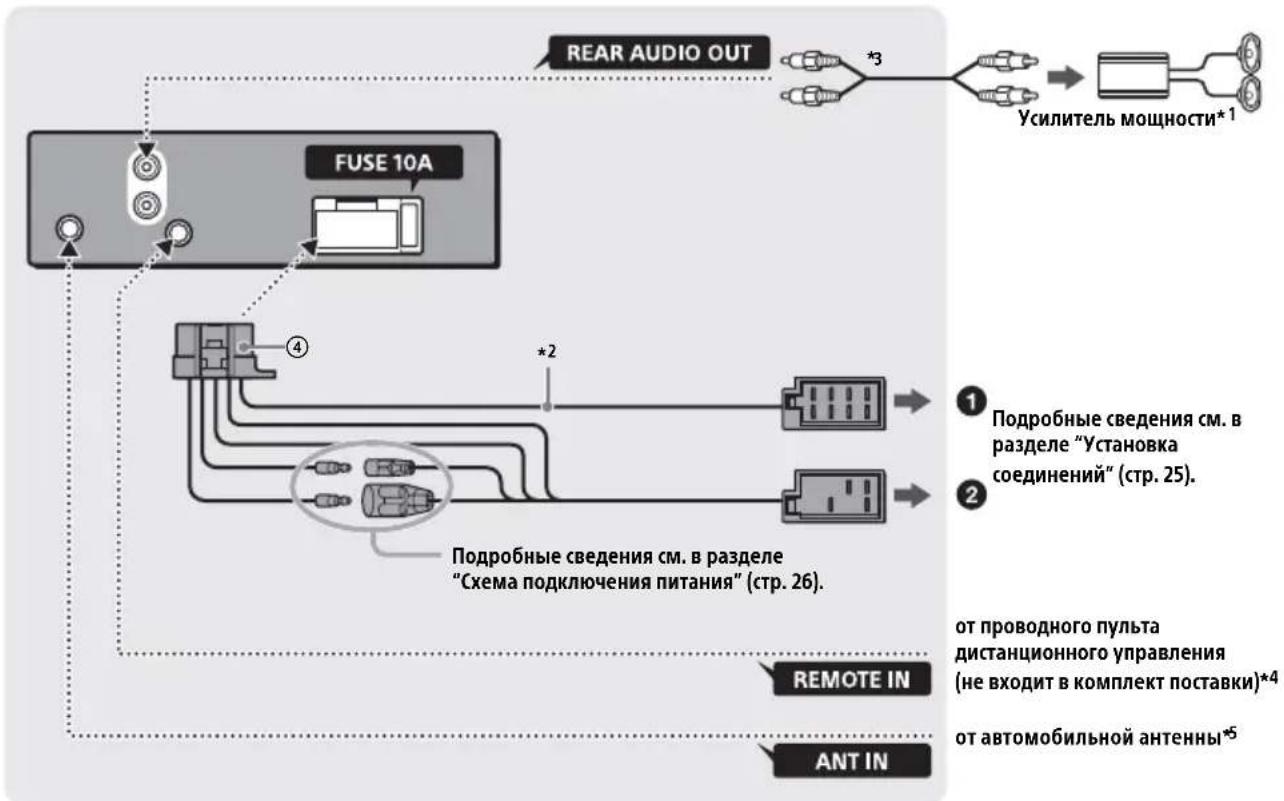
- Connect the power supply lead ④ to the unit and speakers before connecting it to the auxiliary power connector.
- Be sure to insulate any loose unconnected leads with electrical tape for safety.
Precautions
- Choose the installation location carefully so that the unit will not interfere with normal driving operations.
- Avoid installing the unit in areas subject to dust, dirt, excessive vibration, or high temperature, such as in direct sunlight or near heater ducts.
- Use only the supplied mounting hardware for a safe and secure installation.
Note on the power supply lead (yellow)
When connecting this unit in combination with other stereo components, the amperage rating of the car circuit to which the unit is connected must be higher than the sum of each component's fuse amperage rating.
Mounting angle adjustment
Adjust the mounting angle to less than 45^ .
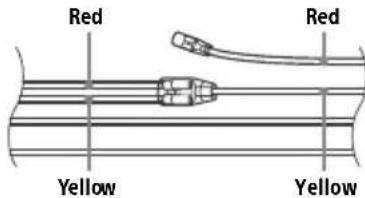
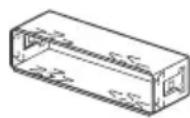
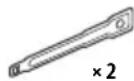
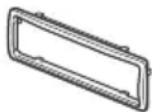
Parts List for Installation
①
②
(3)
(4)
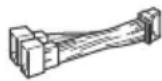
- This parts list does not include all the package contents.
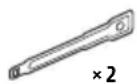
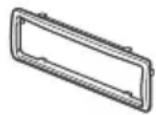
- The bracket ① and the protection collar ③ are attached to the unit before shipping. Before mounting the unit, use the release keys ② to remove the bracket ① from the unit. For details, see "Removing the protection collar and the bracket" (page 22).
- Keep the release keys ② for future use as they are also necessary if you remove the unit from your car.
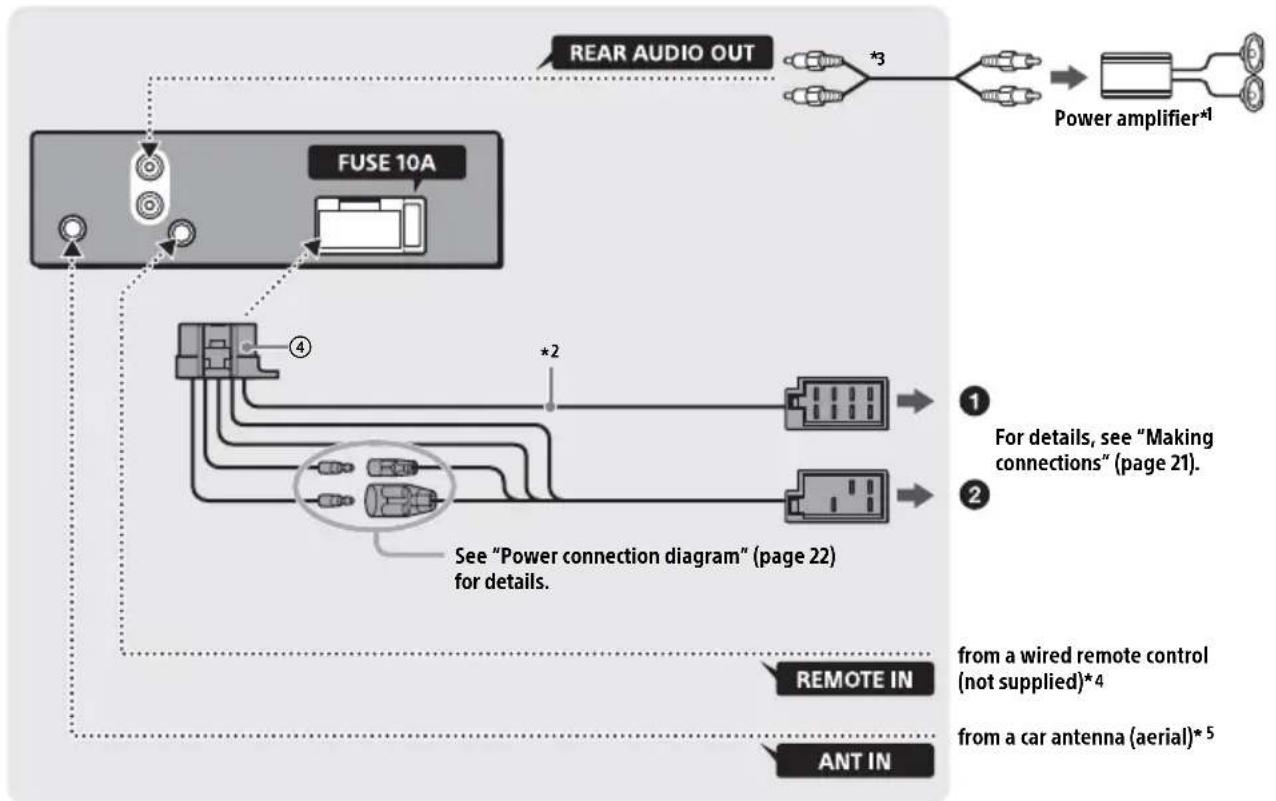
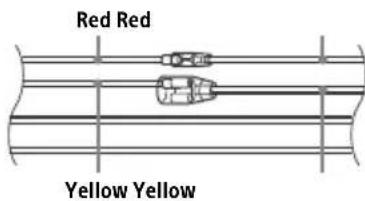
Connection
1 Not supplied
2 Speaker impedance: 4 - 8 × 4
*3 RCA pin cord (not supplied)
4 Depending on the type of car, use an adaptor for a wired remote control (not supplied). For details on using the wired remote control, see "Using the wired remote control" (page 22).
5 Depending on the type of car, use an adaptor (not supplied) if the antenna connector does not fit.
Making connections
If you have a power antenna (aerial) without a relay box, connecting this unit with the supplied power supply lead ④ may damage the antenna (aerial).
To the car's speaker connector
| 1 | Rear speaker (right) | ⊕ | Purple |
| 2 | ⊗ | Purple/black striped | |
| 3 | Front speaker (right) | ⊕ | Gray |
| 4 | ⊗ | Gray/black striped | |
| 5 | Front speaker (left) | ⊕ | White |
| 6 | White/black striped | ||
| 7 | Rear speaker (left) | ⊕ | Green |
| 8 | Green/black striped |
To the car's power connector

| 12 | continuous power supply | Yellow |
| 13 | power antenna (aerial) / power amplifier control (REM OUT) | Blue/white striped |
| 15 | switched power supply Red | |
| 16 | ground (earth) Black |
Subwoofer Easy Connection
You can use a subwoofer without a power amplifier when it is connected to a rear speaker cord.
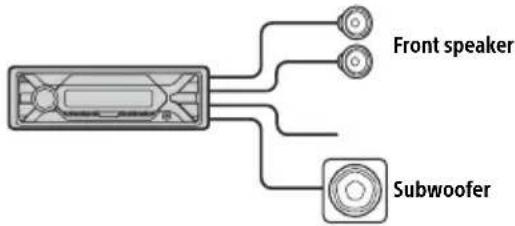
Notes
- Preparation of the rear speaker cords is required.
- Use a subwoofer with an impedance of 4 Ω to 8 Ω, and with adequate power handling capacities to avoid damage.
Memory hold connection
When the yellow power supply lead is connected, power will always be supplied to the memory circuit even when the ignition switch is turned off.
Speaker connection
Before connecting the speakers, turn the unit off.
- Use speakers with an impedance of 4 to 8 , and with adequate power handling capacities to avoid damage.
Power connection diagram
Make sure your car's auxiliary power connector, and match the connections of cords correctly depending on the car.
Auxiliary power connector
Common connection
| 12 | continuous power supply | Yellow |
| 15 | switched power supply Red |
When the positions of the red and yellow leads are inverted
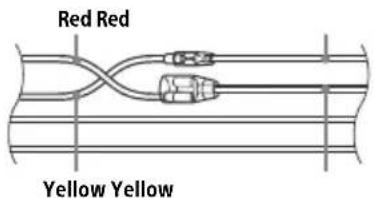
| 12 s | switched power supply | Yellow |
| 15 | continuous power supply | Red |
When the car without ACC position
After matching the connections and switching power supply leads correctly, connect the unit to the car's power supply. If you have any questions and problems connecting your unit that are not covered in this manual, consult the car dealer.
Using the wired remote control
1 To enable the wired remote control, set [STR CONTROL] in [SET STEERING] to [PRESET] (page 11).
Installation
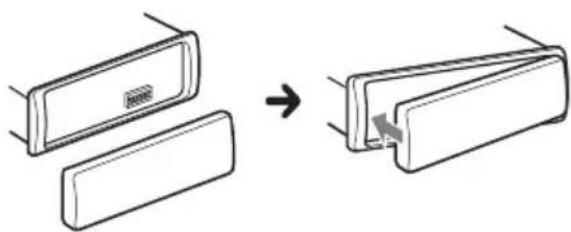
Removing the protection collar and the bracket
Before installing the unit, remove the protection collar ③ and the bracket ① from the unit.
1 Pinch both edges of the protection collar ③ then pull it out.
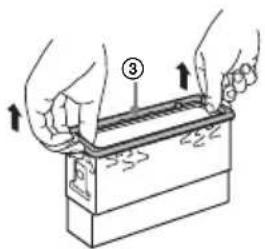
2 Insert both release keys ② until they click, and pull down the bracket ①, then pull up the unit to separate.
Mounting the unit in the dashboard
Before installing, make sure the catches on both sides of the bracket 1 are bent inwards 2mm (3 / 32 in).
1 Position the bracket ① inside the dashboard, then bend the claws outward for a tight fit.
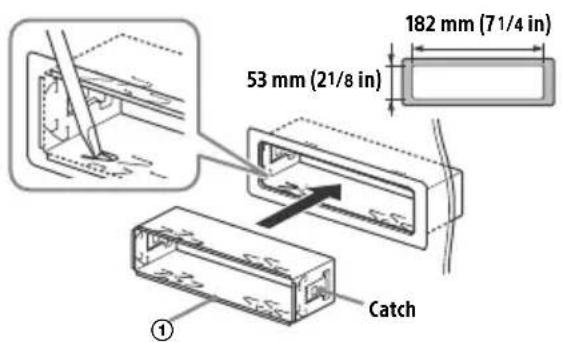
2 Mount the unit onto the bracket ①, then attach the protection collar ③.

Notes
- If the catches are straight or bent outwards, the unit will not be installed securely and may spring out.
Make sure the 4 catches on the protection collar ③ are properly engaged in the slots of the unit.
Detaching and attaching the front panel
For details, see "Detaching the Front Panel" (page 5).
Resetting the unit
For details, see "Resetting the Unit" (page 6).
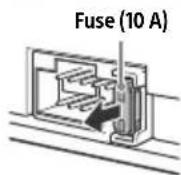
Fuse replacement
When replacing the fuse, be sure to use one matching the amperage rating stated on the original fuse. If the fuse blows, check the power connection and replace the fuse. If the fuse blows again after replacement, there may be an internal malfunction. In consult your nearest Sony dealer.
Abstrate: 16 kHz - 48 kHz
WMA (.wma)
Bitrate: 32 Kbps - 192 Kbps (Unterstutz VBR (variable Bitrate))
Abtastrate: 32kHz 44,1 kHz, 48 kHz
FLAC (.flac)
Copyright (C) 2000-2009 Josh Coalson
Copyright (C) 2011-2013 Xiph.Org Foundation
Raccordement/Installation
Attention 23
La lecture commence.
La lecture commence.
La lecture commence.
Réglages
Désactivation du mode DEMO
DEMO (demonstration)
Permet d'activer la démonstration : [ON], [OFF].
Protocole AOA (Android Open Accessory)
compatible:2.0
Appareil principal (1)
Copyright (C) 2000-2009 Josh Coalson
Copyright (C) 2011-2013 Xiph.Org Foundation
Raccordement/Installation
Attention
Interfaccia: USB (Full speed)
Cartelle (album): 256
Copyright (C) 2000-2009 Josh Coalson
Copyright (C) 2011-2013 Xiph.Org Foundation
PCT EAC CdeIaHO B TaJIaHne
Pon3BODntelb: CoHn KopnpoeuH 1-7-1KoHaH, MnHaTo-Ky, TokNo 108-0075, JnoHna
B ueJx 6e3oNaChOCTNo o6raTeIbHo
yctaHaBnBaIte 3To yCTpoiCTBO Ha np6OpHoi
naHeJI aBTOMoBnJI, TaK KaE rO 3aDnH YAcTb
HarpeBaETcBO BVPempaobtbl.
IpOp6Hee cm."YCTaHOBka/IOdkNIOueHne" (cTp.23).
Tabnukac yka3aHneM pa6oery HapjxHnna Dpyrnx xapaKTePncTnK haoDntcHa HnXHe nahen KOpnyca.
ДаТа n3ROTOBNeHЯ yKa3aHa Ha TOBape, a TAKKe H aynakOBKe B CneIyIOUeM oOpMaTe: MM.YYYY, rDe MM-Mecu n YYYYY-YroD n3ROTOBHeHn.
DaHb annapat npedctabnreT n3 ce6aBtOMo6nIbHyIO aynocnCTemy, KOtopa Daet BamBO3MOxHOCTb IpocnyuINBaT b ayNo3aNcN,NCNOJb3yB TOM uCJIe My3bIKaJIbHbIe npINOKeHn I clyX6bl.
YcnoBna XpaHnna
Tobapbl coxpanbIOT B ynaKOBaHHOM BnDE B
Temhbx,CyHX,NUCTbIX,XOPOoBeHTUNpyeMbIX
NomeueHnx,N0JInpoBaHHbIX OT MeCT XpaHnna
KNCNOT NZeNoeY.
Temnepatypa xpaHnna:ot-20do +60^. OTHOCTNBHa BJaxHoCTb XpaHnna:80%.
Pa6oay Temnepatypa:ot 0do 40^ Pa6oay OTHOCtBnha BJaxHoCTb:40-60%
CpOK XpaHnna He yctaHOBJeH.
YTNIN3aUNI NcNOJb3OBaHHbIX 3JIeMeHToB NITaHnI OTCnyKINBWeO 3JIeKTPnueCKoro I 3JIeKTPoHHoro 6OpUoBaHnI (DInpeKTHBa npIMeHReTcB CtpaHax EbpocIO3a n dpyrnx ebPonecknx CtpaHax, rIe deNCTBYOT cNCTembl pa3dJIbHOro c6opa OTXoIOB)
IpeynpeKdeneHne IJn CnyaEB, KOrda B 3amKe 3axnraHna Het noLoXeHnA CC Y6eintecb, yTO hAcTpoEHa fYHKuia AUTO OFF (ctp.12).NocLe BBkNoeHnA yCTpoiCTBa erO NITAHne 6yJeT aBTOMaTHueCKN OTKIOUeHo Upe3 yCTaHOBJIeHHoe BpeM, yTO IpeoTbpaauet pa3pRky akKymJaTopa.EcNf FyHKua AUTO OFF He 3aDaHa, To npKaJdoM BBkIOUeHn 3axnraHna HxKMaIte N yDepKNaBe TKHONKY OFF Do Tex nop, noka DInCnNe He noracHeT.
OTka3 OT OTBETCTBEHHOCTN B OTHoUeHn YcIyr, IpeIOCTaJIraEMbIX CTOPOHHMn NOCTaBUNKAMN
Cnyk6bl, npdeoctabnemble ctopoHnMn
noCTaBnKamM, MOyT 6bITb N3MeHehbl,
npnoctaHOBLeHbl nIIN OTMeHehbl 6e3
npedBapntelbHoro yBeOMJIeHn. KomnaHry Sony
He HecET OTBetCTBeHHOCTN 3a CNTyaUu
NoDobHOro poJa.
Copepkanne
CnpaBoUHnK no DeTaJIaM n OprHaHm ynpaBJIeHnI 4
Haayano pa6oTbI
ChyTne nepeDne nane 5
IpeepaRpy3ka yCTpoiCTBa 6
YcTaHOBka YacOB 6
PpOBepKa HApRjKeHnB aAkkymyIaTope. 6
IopKnHueHne yctpoNCTBa USB 7
IopKIOueHne IpyrOIO nepeHocHoro ayIOuOCTpOyCTBa 7
PpocnyuBHaHne paDnO
PpocnyuBbAHne paIIO 8
CnCTemblpaIIOaHbIX(RDS) 8
Bocnpon3BeJeHne
BocnpoN3BeDeHne yctpoNCTBa USB 10
Ponckn Bocnpoun3BeDeHne KOMno3nui. 17
NapametpbI
OTmeHa peKIma DEMO 12
OchOBHbIe Oepaunn HactpoiKn npapameTPOB 12
HacpoKa o6uNx npaMeTPOB (GENERAL) 12
HactpoKa 3ByKa (SOUND) 14
Hactpoika dincpJeA (DISPLAY). 14
DOnOpHnTeJbHa nHΦopMaζηa
O6HOBJIeHHe MmKpOIpoPpaMMbl 15
MepbI npedoctopoxhoctn 15
YxOa yCTPOINCTBOM 16
Texnueckne xapaKTepeNCTnKn. 16
Ponck n ycTaPaHHe HeucnPaBHoCTei 19
Co06ueHnra 21
YctahOBKa/NoDKJIIOUeHne
BHHMaHHe! 23
IpeueHb detaeJ yCTaHOBKn. 23
IopKluueHne 24
YcTaHOBka 26
CnpaBoUHnK no Detajm n opraHaM ynpabJeHn
OchOBHoe yctpoiCTBO
1 Khonka cHTnna nepedne nane
2 SRC (NCTOHTHnK)
BknHueHne nHTaHn.
CmeHa nCTouHnka.
OFF
HaKMTe uYdePknBaIte B TeueHne 1 cekyHdbI DnBbIKJIOUeHnN NCTOCHNkA N OTO6paXeHn YacOB.
HaKMTe uYdepKuBaIte 6oJIee 2 cekyHd dJa BbIKUOeHn NITaHn n DnCnJe.
3 DnckobbinyperyIaTOp
IobopaunBaTe IJIpeRyIpOBAHnYpOBHr rpOMKoCTN.
PUSH ENTER
OTkpblte BbIbpaHHoro nyHKta MeHIO.
YTo6bI Bb6paTb Dpyro NCTOCHNK CnHana, HaxMNTe KHOKky SRC, NOBepHNTe INCKOBBI peryIaTOp, a 3aTeM HaxMNTe erO (BpeMa OxndaHna -2cekyHdbI).
MENU
BXoD B MeHIO HaCTpoiKn.
4 Okouko ducnneer
5 S E E K - / + )
ABTomatnuecka HactpoKa Ha paAnocTaHcun.
HaKmTe n yepxnbAte dJa HactpoKn
BpyHyIO.
1/>I (npebdyuəa/cneyuoua)
<4/> (yckopenha nepemotka Ha3a#/ yckopenha nepemotka Bnepe)
6 PTY (tnnporpaMmbi)
Bb6op Tuna nporpaMMbl (PTY) B RDS.
Q (o63op) (ctp. 11)
PepexoBpeximO630pa npn Bocnpou3BeJeHH.
(Heoctynho, ecn noKnoeH iPod nnuycToBOSUBBpeKmEAndroidTM.)
EQ(3Kbana3ep)
Bb60KpB0N3kBaIaI3epa.
8 Ha3aD)
Bo3BpaT K npeIbIyUcEmy 3KpaHy.
MODE (ctp.8)
9 PnpemHnK CnHaIOB CnyIbTa DuctaHcNoHHoro ynpabHeHna
10 HOMepHbIe KhoNkn (1-6)
PpneM coxpaHeHHbX B namrtn paNIOCTaHcN. HaxmTe u ydepXnBaIte dIra coxpaHEnia cTahcN.
ALBUM▼/▲
Pponyck aIb60Ma dny ayduOyctpoiCTBa.
Haxmnte u ydepKuBaIte nIy HenpepbIBHoro
nponycka aIb60MOB.
(Heioctynho,ecnnoKIOUOeHO yCTPOIcTBO USBBpeXmEAndroidnnyCTPOIcTBo iPod.)
(noBtop)
(Heioctyno,ecnnoKIOUeHO yCTPOIcTBO USB bpekme Android.)
(cnyaHna nocJeDoBATEbHOCTb)
(Heioctynho,ecnnoKIOUeHO yCTpOINCTBO USBBpekmeAndroid.)
II (Bocnpon3BepeHne/nay3a)
11 EXTRA BASS
YcHHe 3ByaHa 6acOBOro 3Byka B CnHXPOHN3aCIN CypOBHErPOMKOCTN. HaxMITE, TTO6bI N3MeHHTb HAcTpoNky EXTRA BASS: [1], [2], [OFF].
12 BxoJHOe rHe3do AUX
13 DSPL(ducnnei)
HaKmTeIraI3MeHnIuHKaunIuCnJeA.
SCRL (npokpyTka)
HaxmTe u yepkuaTe nI npokpyTKn Hndkaun.
14 Nopr USB
Hauano pa60tbI
Сятыпешени панели
Bo n36exaHne kpaXn yCTpoNCTBa MOxHO CHaTb C Hero nepedHIO naHeJIb.
1 HaxMnte n ydepxnBaIte KhoNky OFF ① Do Tex nop, Noka ycTpoNCTBO He OTKIOUHTc. HaxMnte KHOKNy CHaTnnapeDHei NaHEn ②, a 3aTeM NOTAHNTe NaHEnb Ha Ce6n ChmMnte ee.
PpeynpeinteIbHbI 3ByKOBoCnHaJ
Ecni Do nobopoTa BbIKIOUaTeJIa3aKunraHnB
NoIooKeHne OFF c yCTpoiCTBa He 6bla ChrTa
pepeHnaHeIb,TO B TeueHne HeCKOJbKnx
ceKyHd 6yDet CblIeH npeDynpeDuNTeHbHb
3ByKOBOu CnHaJ. 3ByKOBOu CnHaJ 6yDet
CblIeH,ToIbKO eCNI NcNOJb3YeTcR BCTPOeHHbI
YCUNITeJIb.
YctaHOBka nepedne naheJI
Ipee3arpy3ka yctpoiCTBa
Ipeed nepBbIM nCNoJb3OBAHHe m yCTpoiCTBa, nocJe 3aMeHbl aBTOMo6nIbHO rAKKymyTTopa nn NOBTOPO rNOcOeHNHeHn Ka6JIeN Heo6xOdmo nepe3arpy3ntb yCTpoiCTBO.
1 HaKmTe u yepKuBaIe KhoNk DSPL n (Ha3aD)/MODE 6oJe e 2 cekyHd.
PpmeaHne
Ipe3arpy3ka yctpOcTbA npBBeTeK ydaJIeHIO HaCTpoE YacOB N HeKOTOpbIX COxpaHeHHbIX 3JIeMeHToB COePXMOrO.
YcTaHOBKa cTpaHbI/perNoHa
Iocne nepe3arpy3kn yctpoiCTBa OTkpoeTcMeHIO NaCTPOIK CTpaHbI/perNoHa.
1При отообрахен [SET AREA]нжмп Te KhoIGNKY ENTER.
OTo6pa3ntcTeyuəaCTpaHa nIi peHNOH.
2 NobopaunBaJnCKOBbI peYyIaTOp, Bbl6epnte [EUROPE] nIn [RUSSIA], a 3aTeM HaxMMte DnCKOBbI peYyIaTOp.
3 NobopaunBaJnCKOBbI peYJrTOp, Bbl6epnte [YES] nJn [NO], a 3aTeM HaxMMTE DnCKOBbI peYJrTOp.
Pn n3MeHnn pernoHa nn CTpaHbI yCTpoiCTBO nepe3aRpy3ntc, noCne yero Ha dncnnee oTo6pa3raTc yaCbl.
3TOTnapaMeTpMOxHOHaCTpOHTbBMehHO06uNX npapaMeTPOB (cTp.12).
YctaHOBka yacob
1 HaKMITE KhoNky MENU, noBepHnTe DnCKOBbl peYJrTOp dJa BbIbopa [GENERAL], 3aTeM HaKMITE nCKOBbl peryJrTOp.
2 NOBOPaUNBaI dNcKObI peYJrTOp, Bbl6epnte [SET CLOCK-ADJ], 3aTeM HaxMMTe dNcKObI peYJrTOp. HayHET MIRatb INHINKaUra Yaca.
3ПоворачиBaTeДИСКOBыpeгларTopДЯУCTaHOBKN 3HaueHnAycOBmMHyT.ДЯВыбopaнactpanBaemoro pa3рдаИспοлььуTe KHONKl />I (SEEK-/+).
4 NocJe yCTaHOBKn MmHyT HaXMMTe KhoNky MENU.
YctaHObKa 3aBepSeHa, nocJe Yero Yacbl NaHyT OTCyET BpeMeHn.
Длго OTбрахеня уасов Haxмте кногу DSPL.
Поберka наразжени вдаKKултоpe
Bb mojke Te npoBepntb Tekyuyn ypoBeHb HaprajKeHn B aKKymyJrTope. (HeocTynHO npn BblIOueHHOM NCTOChNKe, KOrDa OTObpaXaOTcY acbl.)
1 HaximaiTe KhoNky DSPL, noka He oTo6pa3ntcA dncJIeHnapJxHeHn aKKyMylrTopa.
Подклочене устpoиства USB
1ymehbwnTe rpoMkoctb Ha annapate.
2 PoiKJIIOUHTe yCTpoIcTBO USB K aannapaty.
ДлnoДкЛюченi iPhone nIи iPod
Исплььут e Kaбел USB dЯ iPod (He BXODNT B
КOMПлeКТ NOCTaBKN).
Подкlioчene dpyroro nepehoCHoro aydnoyctpoiCTBa
1 BbIKIOUHTe nepeHocHoe ayDNOyCTPOICTBO.
2 yMeHbWnte rpoMkoctb Ha annapaTe.
3 NookuHte nepeHochoe ayIOyCTpOJCTBO KO BXODHOMY rHe3dY AUX (MHNc-Tepeopa3bemy) Ha annapate npn nOmoi coeHHntbHoro Ka6eIa (He BXoNT B KOMNJIeKT NOCTaBKN)
- 0683aTeIbHo nCNoJIb3yIte pa3bEm npMOrToTnna.
4 Haximam KhoNky SRC, BbIepePte [AUX].
BbipabHnBaHne ypOBHr rPOMKoCTn NOkIIOeHHoro yCTpOcTBa C dpyrMM nCTOuHKamn
3anyCTne BOCnpOn3BeHeHne Ha nepeHoCHOM ayDnOyCTpoIcTBcCyMepeHHoI rPOMKocTbIO U yCTaHOBtte Ha annapate ObHyI rPOMKOctb npocJyUWBaHna.
HaKMTe KhoNky MENU, 3aTeM BbI6epnTe [SOUND]
[SET AUX VOL] (ctp. 14).
PpocnyuWBaHne paIIO
Послшване радио
ABTOMaTnueckoe coxpaHenne (BTM)
1 Haximam KhoNky MODE, n3MeHnte dnaana30n (FM1, FM2, FM3, MW nn LW).
2 HaxmTe KhoNky MENU, noBepHnTe DnCKOBbl peYJrTOp dIra BbIbopa [GENERAL], 3aTeM HaxmTe DnCKOBbl peryJrTOp.
3 Поворачивая дисковый ретуларop, bbl6epnte [SET BTM], 3aTeM haXmUte disckobby peyIarTop.
PaHIOCTaHcN 3aKpENJIOTc 3a HOMepHBIMn KHOJKAmN COXpaHJOTcB NAMrTu YCTPOINCTBa B NOPdKe YAcTOT.
Hactpoika
1 Haximam KhoNky MODE, n3MeHnte dnaana30n (FM1, FM2, FM3, MW nn LW).
2 BbInOnHnTe HaCTpoKy.
ДлгНастрочь Вручны Hakimmaи удржимая конки /▶/(SEEK-/+),задаite пибліnteьнучсToTу, Затм КраTKOBpeMeHHbIMи HaЖКТЯМИ KHOПОК /▶/(SEEK-/+)TOUHоHaCTpoJTe HxKHyIO ЧаСТOTY.
ДлЯ abTomatnuecko Habtpoikn
Исплььтуг Кногн (SEEK-/+).
ПОИС OCTaHOBuTc, KOrDa yCTpoiCTBO HaIdet
paHIOCTaHcNIO.
CoxpaheHne BpyHyIO
1 Bo Bpem npnema paHIOCTaHcnn, KOtopyu Heo6xOdImo COxpaHntb, HaxMnte uYdePKNBaIte HOMepHyIO KhONKy (1-6), noka He NoRbITcra INHdkaun [MEM].
PpneM padnoctaHcH, coXpaHeHHbIX B namrtn
1 BbI6epuTe dHaana3OH, 3aTeM HaXMMTe HOMePHyIO KHonKy (1-6).
CnCTemblpaIIOaHHbIX (RDS)
YcTaHOBka aIbTepHaTnBhblX qAcTOT (AF) n coo6uHm o TeKyuSei cnTuaunn Ha doporax (TA)
Функця AF bblnoJHЯET NOCTOHHYIOpeHaCTpoIky paIIOCTaHcI, IMeIoUx cMbI CNbHbI CnHaN B CeTn, aФунKzIy TA OBeCneuBaet npIeM COo6ZeHn IIN npOrpaMM (TP) o Tekyuei cnTuaun Ha doporax, ecIn nx npIeM BO3MOXeH.
1 HaXMMTe KhoNky MENU, noBepHnTe DnCKOBbl peYJrTOp dIa BbIbopa [GENERAL], 3aTeM HaXMMTe DnCKOBbl peryJrTOp.
2 NobopaunBaJnCKOBbI peRyIaTOp, Bbl6epnte [SET AF/TA], 3aTeM haxmTe nCKOBbl peRyIaTOp.
3 Поворачивая дисковый ретуларot, bblберпгe [SET AF-ON], [SET TA-ON], [SET AF/TA-ON] nii [SET AF/TA-OFF], 3aTe m NaЖмпe дисковый ретуларot.
AaHbIe CT, nepeBaemble c cnHaJaRDS, NcNoB3yOTc dIy yCTaHOBKn YacOB yCTpoNCTBa.
1 YCTaHOBNTeДЯ NaCTpoIKN [SET CT] B MeHIO [GENERAL] napameTp [SET CT-ON] (cTp. 13).
Bocnpon3BedeHne
Bocnpo3BeJeHne yCTpoiCTBa USB
B daHno nHCTpyKu nn O KcNlyaTaun TepMnH "iPod" npmehraTc nn o6o6eHna CbIok Ha cyHKnn iPod B iPod n iPhone, ecnn HHOe He cka3aHO B TeKCTe nn Ha pncyHke.
CbeHnO cOBMeCTMIOCTNaIeO yCTPOINCTBa iPod cm. B pa3JeNe "CbeHnO 6yCTPOINCTBe iPod" (ctp. 15) nHa Be6-caTe noDpeKKn, yKa3aHHOM Ha nocneJHe CTpaHnue oBLOKKn.
Moryt nCnoJb3OBAbC8 yCTpoNCTBa USB* Tnna AOA (Android Open Accessory) 2.0, MSC (3aONMaHauoee yCTpoNCTBO 6oNbWoE mKocTn) n MTP (npotokon nepeaun MyIbTmMeDna), COBmeCTmblc co CTaNdApTom USB. B 3aBncMocTn OT Tnna nCNoJb3yeMoro yCTpoNCTBa USB Ha annapate MoXHo BbIbpaTb peXm Android nn MSC/MTP.
Дя HeKOTopbIX MoTeJIe uNΦpObIx NHeepOB NmCMaprTfoHOB c OC Android moXeT nOtpe6oBaTbcRpeXIM MTP.
- Hanpimep, Φlleu-HaKoNtTeIb USB, ΙnΦpoBoI nIeep, cMaprTfoH c OC Android.
PpmeaHn
-Дяплуеня порбьх сөдэнгд о COBmecTmocstn yctpoiCtba USB nocetnte Be6-caNT PОДдерЖК, yKa3aHHbI Ha 3aDHeN CTopoHc OБLOKKN.
- CmapTfoHbI c yctaHOBHeHHoC Android 4.1 nnn 60nee no3dneBepnnoDpekNBAOT Android Open Accessory 2.0 (AOA 2.0).OHaKo HeKOtOpBe cMapTfoHbIMorTy He NOJIHOCTbIO NOJdePKeNBaTB AOA 2.0, daXe eCnYcTaHOBJeHa OC Android 4.1 nnn 60nee no3dHApBecnna. Iy nanyehnNoDpO6hBX CBeHn o COBMeCTmOCtN BaWero cMapTfoHa c OC Android Nocetnte Be6-caIT NoDpeKKu, yKa3aHHbI Ha 3aHDne CTopoHE 6bLOxKn.
BocnpoN3BeHeHnepeueHCJIeHHbIX HIXKe aIIOB He IIOJIepXINBaETcJ.
MP3/WMA/FLAC:
- aaiblb, 3aunuueHHbte aBTOPCKmM npabam;
- faIbIc DRM (ynpaBHeHne uΦpoBbIMn npaBaM);
MHOROKaHaJaHbHbe 3ByKObIe aHJIbl.
MP3/WMA: - faHbI, cXaTbIe 6e3 noTepeu daHHbIX
Ipepe yctahOBKo coeHHeHn Bbl6epnte peXm USB (peXm Android nnn MSC/MTP)B 3aBncMocTn OT Tnna NcNoJb3yEmOro yCTpoiCTBa USB (ctp.13).
1ПодключITE yctpoиCTBO USB K nopty USB (ctp.7).
HaHHeTcBocnpOn3BeJeHne.
YTo6bHaayatb Bocnpo3BedeHne,ecn
yCTpoiCTBO yXe NOkIooHeHO,HaKMnTe KHOKNKy
SRC n Bb6epnte [USB] (noCne TOrO ka
ycTpoiCTBO iPod 6ydt paCNo3HaHo,Ha
dncnlee oTo6pa3ntcra [IPD]).
2 OtperynpyTe rpoMkoCTb Ha daHHOM yctpoiCTBe.
ДлгocTaHOBKn BOCPon3BeDeHnA
HaxmTe u ydepKnBaTc KhoNky OFF b TeueHne 1 ceKyHdbI.
CLOCK-ADJ (yCTaHOBka yacOB) (CTp. 6)
CAUT ALM (npeynpeuTeJbHbI 3BYKOBOI cnHaJI)
BkIIOueHHe npDeynpEnIteNbHO 3ByKOBOrO cnHaJa: [ON], [OFF] (cTp.5).
(OCTyHNO TOJIbKO npn BblKIOUeHHOM NTOUHNKe, KOrda OTo6paKaIOTcYacbl.)
BEEP
AKTINBUN3aun 3BykoBOrO cnHana: [ON], [OFF].
AUTO OFF
AToMaTuNeCKeO tKlUoyHeHne uepe3 onpeJeIeHHoe BpeM,ecn yCTpOnCTBO BbIKluyeHo: [ON] (30 MNHyT), [OFF].
STEERING
Perncpaun/UnMeHeHne HAcTpoKn NylbTa
DnCTaHNoHHoro UnpaBHeHna Ha pyJe.
(DocTyNHO npn NOkIooHnn
coeHNHTelbHoro Ka6JIe (He BXoNT B
KOMnJIeKT NoCTaBKn.) (OocTyNHO TOnbKO npn
BblKnOChEHHOM NCTOCHNe, KOrDa
OTo6paKaIoTcYacbl.)
STR CONTROL (nybT dNCTaHIOHHO ynpabHeHa pyne)
Bb6oppeKIMABBOda NOdkJIOUeHHORO NylbTa DNCTaHcNIOHOro ynpabLeHn.Bo n36exKaHne HeNCpabHOCTe nepeI NCNoJIb3OBaHnEM POn6epnte COOTBeTCTBYUuI pyekim BBOda DnIPOkJIIOUeHHORO NylbTa DNCTaHcNIOHOro ynpabLeHn.
CUSTOM
PexnmbBbOdaIyIyIbTaNCTaHcNOHHOR ynpabHeHa pyne.
PRESET
PexnmbBbOdaIpyoBOHOrOyIbTa
DnCTaHcNoHHoroYnpabLeHnna 3a
NCKJIIOUeHnEMnyIbTaDnCTaHcNoHHoro
ynpabLeHnHa pyJe(BbIbnpaETcra
aBTOMaTneckn npn BblOnHeHn [RESET
CUSTOM]).
EDIT CUSTOM
Perncpaun yHKn (SOURCE, ATT, VOL +/-, SEEK + / - ) nnybTa nctaHnOHHoro ynpabHeHa pyne:
1 NobopaunBaJNCKOBbIpeyIaTOp, BbI6epnte yHKUIO,KOTOPyIO HxHHO Ha3HaHTb IJIpyJIbTa INCTaHcUOHHOro UnpaBHeHnHa pyJe,a 3aTeM HaxMMTe DnCKOBbI peYIaTOp.
2ПиMuIraHoueM COo6uHEnn [REGISTER] HaxMMTe N yIepXkUBAaTe KHOKNy Ha nYJIbTe IINCTaHcUNOHOrO YnpaBLeHnHa pyJe, KOtOpO Tpe6ByETcHa3NaHTb FyHKcNIO. No 3aBePseHn PerNCtpaCmN OTo6pa3NTcR [REGISTERED].
3ДяpernctpaundpyunxФyHKuIN NOBTOPNTe DeiCTBnA 1 n2.
(Doctynho, Tolsko ecn 3naueHne napaMeTpa [STR CONTROL] yctaHObNeHo Ha [CUSTOM].) RESET CUSTOM
I3meHeHne HAcTPOe KnybTa DnCTaHcUHOHorO ynpabLeHna Ha pyne:[YES],[NO].
(Doctynho,ToIbKO ecn 3NaueHne napaMeTpa [STR CONTROL] yctahOBNeHo Ha [CUSTOM].)
Ppimechan
Bo Bpemn 3MeHeHnHaCTpoek DoCTyHToJbKO KHONoHoe YnpabLeHne Ha DaHHOM yCTpoIcTBe. B cEJx 6eONaCHOCTn OCTaHOBnTe aBTOMoBnJIb nepei n3MeHeHnEM 3TNX HAcTpoEK.
- Ecni BO Bpem pernctpaqnn npo3oJdeT own6ka, Bcra paHee 3apeNCTpnpoBaHHa nHfopmauncoxpaHntc. BbInolHnTe npoueDpy pernctpaqnn 3aHOBo, HauHna C Toi fynKuinn, rIpe npo3oWna own6ka.
3TaФyHKUIMOKeT6bITbHeIOCTynHbHEKOTOpbIX TpaHCnOpTHbIX CpeCTBax.ДЯNOJyueHIN NOpO6bHbIX CBeJeHIn OCOBMeCTMOCCTNaWero TpaHCnOpTHoroCpeDCTBa NocETtTe Be6-caNTNoIDepKKn,YKa3aHHbHa 3aJHNe CTopoHE 06LOXKN.
USB MODE
ИзмениpeхимаUSB:[ANDROID], [MSC/MTP].
(DOCTYNHO, TOJIbKO KOrJa Bbl6paH NCTOCHNK USB.)
CT(BpemHa yacax)
MepblnpedoctopoXHOCTN
- EcIn aBTOMoBnIb 6bl npnPapKOBaH B COJIHeuHOM MeCTe, He BKIOUaIte yCTpOiCTBO Do TEX NOp, NOKa OHO He OXlaIaNTcra.
He octabnIte nepeHIO npaHb nI npepHOChbIe ayuOyCTpoiCTBa BHyTpI aBTOMo6nJI, NocKoJbKY BbICOKa TeMnepaTpya B pe3yNbTaTe BO3JeICTBna IprMbIX COJIHeHbIX JnyeM MoKeT pInBeCTN K IN NOBpeXdEHNIO. - Pnp pa6oTe yCtpoiCTBa aBTOMaTnueCKN BblBnraeTcAHTeHHa C 3JIeKTpnuYeCKM npuBODOM.
Для подерхань ВсICOKORO KaYeCTBa 3Byka
He npoJInBaIe XnDkoCTHa yCTpoNCTBO.
Popdk Bocnp0n3BedeHnaaynofoaioB
CbeHnO6yctpoiCTBe iPod
KdAnHomy annapaTy MoXHO NOdkIouaTb yKa3aHHbIe HIXe MoJEni iPod. Ipeed nCnoJIb3ObaHem ycToPoiCTBa iPod ycTaHOBnte Ha HEM nporpaMMHoe oBeceueHne noCneHne BepCuN.
CobmteMbte mojenn iPhone n iPod
| Сов mintимая м odeл USB | |
| iPhone 7✓ | |
| iPhone 7 Plus✓ | |
| iPhone SE✓ | |
| iPhone 6s✓ | |
| iPhone 6s Plus✓ | |
| iPhone 6✓ | |
| iPhone 6 Plus✓ | |
| iPhone 5s✓ | |
| iPhone 5c✓ | |
| iPhone 5✓ | |
| iPhone 4s✓ | |
| iPod touch (6- ro nokolenia)✓ | |
| iPod touch (5- ro nokolenia)✓ | |
| iPod nano (7- ro nokolenia)✓ |
- IcnoIb3OBAHnE 3HaUka "I3rOTOBHeNo dJa Apple" O3HaauaET, YTO akceccyap pa3pa6oTaH cneuaJIbHO dJa NpOKJIIOUeHnK PPOyKTaM Apple, yKa3aHHbIM B 3HaUKe, n cepTnФuNpOBaH pa3pa6oTuNKOM Ha COOTBeCTBnE CTaHdApTaM KaueCTBa Apple. Apple He Hecet OTBETCTBeHHOCTn 3a pa6OBy 3TOr YoCTPOJCTBa nn erO COOTBeCTBnE CTaHdApTaM 6e3OnaCHOCTn HOpMaTHNBbIM Tpe6OBaHnM. ObpatITE BHMaHne, YTO IcnoIb3OBAHne 3TOr aKCECCyapa C npOdyKTom Apple moXeT NOBInraTb Ha KaueCTBO pa6OtBi 6ecnpoBOdHoi ceTn.
B clyuae BO3HKnHOBeHHN BONpocOB nIIN npo6JeM, KacaUOxxCra DaHHoro YCTPOiCTBa, KOToPbIe He OONcaHbIB 3TOM pyKOBODCTBe, o6paTNTecb K 6bnXaIWeMy dInepy Sony.
YxOa yCTpO'CTBOM
ЧИстка KOHTAKTOB
Bo3MOxHo, yCTpoiCTBO He 6yIeT pa6oTaB
HaJIeXaUIM O6pa3OM n3-3a 3aIrp3HeHnA
KOHTaKToB, clyXaUIN X IJRA CoEINHeHnI NpeDHeN
NaHeIn C yCTPOIcTBom. Bo n3bExKaHne 3TOrO
OTcoEINHInTe NpeDHIIO NaHeIn (ctp. 5) n
NPOTPte KOHTaKtbl BaTHbIM TaMNoHOM. He
PnIKaIbIbAIte n3LIuHNX ycINn. B npOTNBOM
Clyuae MOxHO IOBpeDiNb KoHTaKtbl.

PpIMeuaHn
B ceJx 6e3onacHcTn nepeI qNCTKo pa3beMOB BbIKIOUHTe 3axuHaHne N BbIHbTe KIOUvN3 BbIKIOUaTeJIaXuHaHnI.
HnKoIa He npKaacaiTecb K KOHTaTAM naIbcaMn nn MeTaJIuYeCKMn PpeMeTaMn.
Texhnueeckne xapaktepnctnkn
Tiohep
FM
Диаэнн actpoikn:
ДяnapaMeTpa [AREA]3aDaHo 3NaYeHne[EUROPE]:87,5MΓ-108,0MΓ
ДяnapaMeTpa [AREA]3aDaHo 3NaYeHne[RUSSIA]:FM1/FM2:87,5MΓ-108,0MΓ(cwarom50KΓ)FM3:65MΓ-74MΓ(cwarom30KΓ)
AHTeHHoe rHe3do:
Pa3bem BHeuHne aHTeHHbI
Ppomexytohna yactota:
Дляnapametpa [AREA]Задано 3начене [EUROPE]:
U36bnpaTeIbHocTb:75d npn 400 K
OTHOWeHne "CnHnAaI-Whm":73D6
Pa3deneHne:50 dB npn 1 KfU
ДиаэзOH BOCPON3BOIDIMbIX acTOT: 20Γι - 15000 Γι
MW/LW
Диаэзов Настрочь:
MW:531KΓι-1602KΓι
LW: 153 kTg - 279 kTg
ANTehHoe rHe3do:
Pa3bem BHeuHne aHTeHHbI
UyBCTBNTeJIbHOCtB:MW:26MKB,LW:50MKB
PonrpblBaTeIb USB
COOTBeTCTBvUOuN KOJeK: MP3 (.mp3)
Ckopooctb nepeaun daHHbIX: 8KbNT/c-320KbNT/c (noepxka VBR (nepeMeHHaerckopoctb nepeaun daHHbIX))
Uactota dinckpetn3aun: 16 kTc - 48 kTc, mA (.wma)
Ckopoocb nepepaun daHHbIX: 32K6nt/c-192K6nt/c (noJepejka VBR (nepeMeHHaay ckopoctb nepepaun daHHbIX))
Yactota dncckpeTn3aun: 32 KU, 44,1 KU, 48KU
FLAC(.flac) Pa3pIaHocTb:16 6nt,24 6nt
Yactota dNckpeTn3aun: 44,1 KfU, 48 KfU
YcHnIteJIb MoUHOCTH
BbIXoD: BbIXOdbI rPOMKOrOBOpuTeNei
IolHoe cOIpOTnBHeHne rpoMkoROBOpnteJeN: 4Ω-8Ω
MaKcMaJIbHaB BIXOJaH MaOuHocTb:55BTx4 (npn conpoTnBJeHn 4 Ω)
06uaHΦopMaun
BbIXoIbI: TepmHaJ ayuNoBbIXoIOB (REAR)
CnloBa aHTeHHa/TepmHaN ynpabHeHn
ycnInteJem (REM OUT)
BxOdbI:
BxoHNo TepMnHaI NylbTa IInCTaHcNHOHor ynpabLeHH
BxoHnpoaBeMaHTeHHbI
BxOJHoe rHe3do AUX (MHN-CTepeopa3bem) IopT USB
Tpe6oBaHnK nCTOuHNky NtTaHn:
abTomobnblbniakkymyIaTOp 12B
NOCTOHHO TOKa (C OTPuIaTeJIbHbIM 3a3eMJIeHNEM)
HOMHaJIbHbI TOK:10A
Pa3mepbl:
πριδη. 178 MM × 50 MM × 119 MM (山/B/r)
MOHTaxHbIe pa3Mepbl:
πριδπ. 182 MM × 53 MM × 102 MM (μ/ν/r)
Macc: npn6J. 0,7 Kr
KOMNJIeKT NOCTABKN:
OchOBHOy yCTPOuCTBO (1)
TeTANIyUCTAHOBKNIOKJIouyeHn (1KOMNJIeKT)
YBaIero DNJIepa MoKeT He 6bITb HHaJIuHnHEKOToPbIX n3 npHaJdJIeXHocTei,nepeUcJIeHHbIXBbIe.ObpatNTecb K dJIepy Ira noJyuHeHnnoDpO6HoHnHΦOpMaun.
KoHCTpykunn xapaKTePNCN MOYr N3MeHrTbc8e3 npedBapntelbHoro yBeDOMHeHn.
TpaHcnpTIpOBAbTB B opuRnHaJIbHOy yNaKOBKe, BO BpeMraTpaHcnpTIpOBAKn He 6pocaTb, oBepeRaTb OT NaDeHn, YdaOpB, He NoDBePraTb n3JInuHei Bn6paun.
PeaIIN3aIIO OCUJIeCTBnTb B COOTBeTCTBnC DeIeCTBYIOUIMM Tpe6OBAHnAIM 3aKoHOJaTeJIbCTBa.OTcnyKnIBWee N3dEJIne yTNIIN3NpOBaTb B COOTBeTCTBnC DeIeCTBYIOUIMN Tpe6OBAHnIAIM 3aKoHOJaTeJIbCTBa.
EcnHeNCpPaBHOCTb He ydaetcYCTpaHNTb CNeDy
DaHHoIN HNCTpyKcun - O6patntecb B 6nKaun
aBTOP3OBaHHbI SONY cHTp no pemOHTu n
06CnyXnBaHIO.
Abtopckne npaba
Windows Media JBIAETC TOBAPHBIM 3HaKOM nJn 3apeRNCTPINPOBAHHbIM TOBAPHBIM 3HaKOM KOpnpaun Microsoft Corporation B CLJA n/nJn Dpyrnx CTpaHax.
Данhoeиздени Зашишени Oпр徴денинblimnpabamn INHTeJIKeTyaJIbHOn CO6CTBeHOCTNMicrosoftCorporation.Испльбовны п��pacnpocstpahene побнг ТхнOLоги,КpOMEkaBДaHHOM npodyKTe,6e3лцeнЗкорpopаMu Microsoft nIи abTopu3OBaHOROpedctaBtelenbCTBa KopnapaMu Microsoft 3anpeшero.
He cIbIweH 3ByKOBoN cnHaJ.
→ ΠΟДΚΙΝΥΕN ΣΟΝΙΝΗΝΕλθΗΙν ΑγιΝΙΝΤΑλΜΟΥΝΟΥΝΑ, a BCTροΕΗΗΠ Ḍε ΚΝΟΝΑβγεΤΑγ.
YdaJIeHbI daHHbIe n3 naMaTn.
OToeHnHnCn Hn HnpeBaNbHo NoDKnIOueH npoBOD nHTaHn, N60 N3BneHa 6aTaepKa.
I3namrTu ydaJeHb 3anporpaMMnpoBaHHbie paNaocTaHcN u YctaHOBka BpeMeHN. Ipeperopel npedoxpAHnteJb.
CbIweH wym npn nepeKIOUeHN nOLOXeHN KIOUa 3axuRaHn.
PpOBoJa HnPpAunIbHO nOcOeDnHHeHbK pa3bemy 3JekTpOnuTaHn BcNOMoRaTeBHorO 6OpyDoBaHn aBTOMoBuJ.
Bo BpemBocnpoun3BeDeHnN npneMa NaHHaetc demOHCTpaun.
Ecnn npn BkIIOueHHOM demOHCTpaUHOHHom pexKme [DEMO-ON]B TeueHne 5 MInHT He BblNOJIHraIOTc HnKaKne OePaun,HaunHaetcJ deMOHCTpaUN.
- YcTaHOBnTe 3NaueHne [DEMO-OFF] (ctp. 12).
Ipona/He OTo6paXaetcNnDnKaunB Okouke ducnner.
→ДяДИММЕра установленьо 3начени [DIM-ON] (ст.14).
→Диспл征ОТКИQUHITС,ЕСИнHAЖАТБУДерЖИВАТКHOПКу OFF.
HaxmTe KhoNky OFF ha yctpoiCTBe n ydepXnBaIe ee HaxaTo, noka dncnJe Hb BKJIIOHTcra.
→ KOHTaKbI 3aTpy3HeHbI (CTp.16).
Dncnnei/NoCDBeTKa Muraet.
HeDocTaOuHaNoDaa NtAHHa.
- Y6eHNTecb, yTO Ha yCTpoNCTBO nOdaETcA DOCTaTOUHO NITAHN O T A BTOMOBnIbHOrO aKKyMylTOpa. (Tpe6oBaHne K nCtOuHky NITAHN: 12 B NoctOraHHoro ToKa.)
He pa6oTaIOT KHonKu npabLeHna.
→Haxmnte n ydepxnBaayte KhoNk DSPL n
(Ha3a,d)/MODE 6oJee 2 ceKyH, yTo6bI nepe3arpy3ntb yCTpoiCTBO.
Copekmoe namTn 6ydt ydaJeHO. Buejx 630nacnoctn He BbInonHnTe nepe3arpy3ky BO Bpem BoKdEHHa.
PpneMpaNocTaHcN
He ydaetc npnHb paHnoctaHm. 3Byk coppOboXdaetc nomexAmn.
HenpaBnIbHoe coeHHeHne.
- PpOBepeTe IoDCoeDINHeHne aBtOMobnIbHOaHTeHHbl.
- Ecn He BbBnraeTc aBTOMaTnecka aHTeHHa, nPoBepbTe COeINHeHne npoBOda ynpabLeHna aHTeHHoC 3JIeKtpnueckm npuBOdom.
He ydaetcBbINOHNHTb npeBapntbHyIO NaTpoiKy.
→ PpepaBaeMb paDnOcHnCnIbKOM cIa6.
B dnaana3oHe FM3 He ydaTcHacptpntb 74 Mf.
Дя [AREA] Bbl6paHo [EUROPE]. - YctaHOBte Дя [AREA] 3HaueHne [RUSSIA] (cTp.12).
RDS
He ydaetc npneta b ycnyr RDS (korda nnapaMeTpa [AREA] 3adaHO 3naueHne [RUSSIA]).
→ Bb6paH nnana3OH FM3.
BbI6epnTe FM nJn FM2.
YcnyrRDS HeocTyNbI B daHHom perNoHe.
Iocne HeckoBkx CekyH npocLyuBaHHa BKnOuaeTc FyHKun SEEK.
CtaHnIa He nepedaet daHHbIe TP nnn nepedaet cnNtKOM cna6blcunHaI. OTKJIIOuHTe TA (ctp. 8).
Dopoxhble coo6eHnHe nepepaTc.
→ BkIIOuNTeTA(cTp.8).
→ CtaHnIa He TpaHcInpyeT DopoKhbIX coo6uEHH, XOTa N OTHOCNTc K TtNpy TP. - HacTpOHTecb Ha dpyrYIO cTaHcuIO.
Пи ВКIOUчEHи ФункцИ NTY OTO6paKaetcI HДИКацИ [--- - - - - - - ]
→ПинmaemЯ CTaHцЯ He nepedaet daHHbIe RDS.
→ДаHHbIe RDS He npHmAIOCTa.
→ CtaHnIa He yKa3bIBae TIN nporpaMMbl.
Ha3BaHne nporpamMHOyN MuraeT.
→Дя ВьбраHHоВ ДаHHьМОмeHT CTaHцИн He ИСПОЛьЗуETСАЛБТeрHAТиВНЯЧАТОТA. -НжмITE KнОнКY /■/ (SEEK -/+), пoka MURAET Ha3BaHHe nporpaMMHoi услги. ПОЯВИСТЯ ИДИКAZUG [PI SEEK], u yCтpoIcTBO HaCHET ПONСК ДPy罗ЧУЧАТOTы C TAKIMN Ze ДaHHbIMN PI (nporpaMMHа ndeHTnФИкAZUG).
Bocnpon3BeJeHne c yctpoiCTBa USB
HeB03MOxHObCnPOn3BOOHTb daHHbIe c nCNoJIb3OBaHHeM KOHcEHTpaTopa USB.
Ha daHHOM yCTpoNCTBe HeBO3MOxHO paCnO3HaBaHne ycTPONCTB USB, noDKnIOueHHbIX uepe3 KOHcEHTpaTop USB.
YcTpoiCTBO USB Tpe6yeT 6oIbwe BpeMeHn dIra BocnpOn3BeDeHn.
YcTpoNCTBOUSBcoJepeKxntfaiNbIcoCnOxHOn pa3BeTBHeHHoI cTpkyTpyoN naOK.
NpepbIBNUCTOCTb 3Byka.
→ 3ByK MoXeT 6bItb npepbBnCTbIM npu BbcOKoNCKopoCTn nepaau DaHHbx.
→ B HeKoTOpbIX cIyayax BOCpOn3BedeHne faaiNoB c DRM (ynpaBHeHne uΦpoBbIMn npaBaMn) HeBO3MOxHO.
He ydaetc Bocnpoun3Bectn aydnofoaui.
YcTpoNCTBa USB,OTΦOpMaTnpoBaHHbIe c NOMOuBIO foAInIOBbIX CnCTEm,OTINuHbIX OT FAT16 nIN FAT32,He NOdEprXNBaIOTc*.
* DaHHe OyCTpoiCTBO NOIeepKuBAeT oOpMaTbI
OaIIIOBOI CnCTeMbI FAT16 n FAT32, Ondako
HeKOtOpBle yCTpoiCTBa USB MOrY He NoIeepKuBaTB
Bce 3TN oOpMaTbI OaIIIOBOI CnCTeMbI FAT. IJI
NoJUYeHnI NIOpObHO INHOpMaunn CM.
INCHpyKuNIO NO EKcNlNyatauN KOnKpeTHORO
yCTpoiCTBa USB nnn CBxNtEcB c PPOUN3BOIDNTeNm.
He ydaetc BbInoHnHt b onepaun nponycka anb6oma, nponycka 3JeMeHTOB (pexm nepexoda) INONCKA KOMno3uIN NO Ha3BaHIO (Quick-BrowZer).
→ Θи onepaunn HeoctynHbI, ecn noKIOUeHO yctpoiCTBO iPod nnn yctpoiCTBO USB b pexkme Android.
-ДляnapaMeTppa[USB MODE]yctahOBuTe 3haueHne MSC/MTP. -OTKlnOHTe yCTpOJcTBo iPod.
Ha yctpoiCTBe 3aDaH HeBepHbI pexIM USB.
- Y6eIntecb, yTO B kaueCTBe peKIma USB ha yctpoiCTBe 3aJaH peKIm MSC/MTP.
B pexnme Android 3Byk c annapata He BocnpoN3BODNTc.
Kornda annapat haoundtcB pekime Android, 3ByK BOCnpoN3BOUNTCa TOnbKO CO CMapTfoHa C OC Android.
- ПоверпсocToHne npIIOxeHnДЯ BOCPOn3BeDeHn aYdno Ha cMapTfoHe c OC Android.
B 3aBnCmOCTOn OT cMapTfoHa c OC Android BO3MOXHbI npo6JIembl C BOCnPON3BeDeHneM.
Co06eHn
Bo BpempaobToB yctpoNCTBa MoryT OTo6paKaTbCnIIMrTaTb CNeDyUoune coo6uHn.
HUB NO SUPRT: He noDiepKnBaIOTcKaOHueHTpaTopb USB.
INVALID
→ BbIbpaHHa onepaun MoKeT He nOndepKnBaTbc.
BoBpeMBOcnpOn3BeDeHnC yCTpoNCTBa iPod He ydaetc npEeKJIIOuHTbcra C pexIma [USB MODE]Ha npyroin pexim.
IPD STOP: BOCPON3BeHne C yCTpoiCTBa iPod 3aKOHyeHO.
→Ha iPod nnn iPhone BKHouHTe yHKUIO BOCnpoN3BeDeHn.
NO AF:OTCyTCTBYIOT aIbTePHaTINBHBie yactoTbI.
→Haxmnte KhoNkU I/1/1 (SEEK-/+), noka Mmraet Ha3BaHne nporpaMMHOY cIyTu. YcTpoiCTBO HauHaeT nonck dpyroYacTObl C TeMn Jx DaHHbIMu PI (nporpaMMHaJ NDeHTnΦnKaun) (NoBnEeTcNnDnKaun [PI SEEK]).
NO TP: Het coo6uHn O Tekyue CNTyaCnN Ha doporax.
YcTPOINCTBO npoOJNXnT NOINCK CTaHnI, nepeDaIOxNx nporpaMMy TP.
NOT SUPPORT -Android MODE
→ Kannapaty noKJIIOHeO yCTpoIcTBO USB, He noJdePknBaIOoee npoToKoJ AOA (Android Open Accessory) 2.0, Korla dJa npaMeTp a [USB MODE] 3aHaHO 3NaUeHne [ANDROID]. — Nja npaMeTp a [USB MODE] yCTaHOBnte 3NaUeHne [MSC/MTP] (ctp.13).
OVERLOAD: yctpoictBO USB nepenonHeNo.
→ OTKHIOHTe YCTPOINCTBO USB, a 3aTeM HaxMMTE KHOKNy SRC dIra BbIbopa dpyrOro nctouHNka.
YcTpoNCTBO USB noBpeXJdeHo, nIN NOIDCOEINHeHO HeNoIePxNBaEMoe YcTpoNCTBO.
READ: nDet CHTbBaHne.
Doxintecb 3aBepWeHnCHTbIBAHn. Bocnpon3BeHeHne HaHHeTcA BtOMaTnueckn. 3TO MoXeT 3aHrTb HeKOTOpoe BpeM B 3abNCIMOCTN OT ctpyKTypbl aJna.
USB ERROR: HeBO3MOXHO BOCnpon3BecTN yCTpoNCTBO USB.
→ CHOBA nOdkJIIOUHTe yCtpoINCTBO USB.
USB NO DEV: yCTpoiCTBO USB He nOdkJIIOUeHO nnHe paCnO3HaHO.
Y6eIntecb,yTO yCTpoiCTBO USB nn Ka6eJIb USB HaJeXHO NOKIIIOUeHbl.
USB NO MUSIC: oTCyTCTByeT faHJ DnA BOCPON3BedeHn.
→ POnCoeDnHnTe yCTpoIcTbO USB C BOCnpON3BOIDMbIMn φaNJaMn (CTp. 17).
USB NO SUPRT: yctpoiCTBO USB He noDepKuBaeTc.
→Дя NOJUyeHnnoIpo6HbIX cBeJeHnO COBMeCTmIOcTn yCTpOInCTBa USB nocTe Be6- CaIT NOJdEpeKKn, yKa3aHHbIn Ha 3aDHei CTopoHE o6JNoKKn.
PpimMeaHn no pa6ote npIbTa DnCTaHcNoHHoro ynpabLeHna pyne
ERROR: BO Bpem pernctpaunyHKuIN npoun3oJLa own6ka.
→ BbIIOJIHnTe peRncTpaunO ChOBa,HaUNHa cToI ΦyHKuIN, rIe npOn3oUna OUn6Ka (cTp. 13).
TIMEOUT: npoceDpya perncTpaun He BbINOJHeHa B CBA3N C ppeBblIeHEm JIMMta BpeMeHn.
Празу ретистрашин Heo6xOДmo 3aBepuTb, noka muraet [REGISTER] (okono 6 ceKynd) (cTp.13).
PpimMeaHnno 06HOBLeHnIO mKpOnporpaMMHoro o6ecneueHnra
FILE ERROR: cpeДСТВО 06Новлесь He coхpaHeNo Ha yCтpoИСТВО USB.
CoxpaHnTe cpeIcTBo 06HOBJIeHnHa yctpoIcTBo USB nnoBTOpIte nonblTKy (ctp. 15).
UPDATE ERROR PRESS ENTER:
MnKpOnpOrpaMMHoe 6OBHeNHe He 3aBepSeHo HndIeXaUIM O6pa3OM.
→ Haxmnte ENTER, yTo6bI 3akpbItb coo6ueHne, a 3aTeM NOBtOpnte NOnbItKy.
Bo Bpemr o6HOBJIeHn He nepeBOJNTe KJIouy 3aKnIraHn B nOLOXKeHne OFF n He n3BNeKaITe yCTpoIcTbOSB (ctp.15).
BCTaBbTe yCTpoIcTBO USB c faJlOM 06HOBHeHn HnHaKMITE ENTER.
Ecnn B pe3yIbTaTe npednaeraembIX DeiCTBn He ydaCTcra YcTpaHntb HenoJaKy, o6paTntecb K 6bnkaWemy dUnepey Sony.
YctaHOBka/NoDKJIIOUeHne
BHMaHne!
- Поведи经 Bce 3a3eMЯIoUe npOBoJa K O6uE ToUKe 3a3eMJIeHnJ.
HeOnyckaIteNoIaHaHnI npOBoIOB NOB BnHTbI NmMeKdy NoDBNkHbIMn DeTaJIaMn (HaNPUMep, MeKdy HAnpaBraIOuMn CnDEHn).
Bo n36eXaHne KOpOTKOrO 3aMbIkaHnI nepeYcTaHOBko CoEiHHeHn BbIKIOUHTe 3aXnIraHne aBTOMo6nJI. - Chaujana noDcoeHInTe npOBd NtAHn ④ K yCTpoiCTBy n rPOMKOrOBOpNTeJAM, a 3aTeM - K KOHTaKTam BHeUHero NCTOCHNka NtAHn.
Buejx6e3oNaChocnO6raTeNbHOu30JnpyIte BCE CBO6OHNbHe HEnoDCoeINHeHHbIe npOBoDa 3NeKTPOn3OJIauOHHOJeHTOn.
MepbI npedocTopoxKHOCTN
TuaTeBHO BbIbnpaIte MeCTO IyUcTaHOBKn annapata, UTObI OH He MeuAn ynpabHeHIO abTomo6nJEM.
He yctahabnBaIte annapaT am, rde OH 6ydet NOBvepKeH BO3dEInCTBnIO PbIN, rpy3N, Upe3MepHO Bn6paunn nn BbICOKnx TemnepaTyp, HapnPmep B MeCTax, Kyda nonadaOT npramble coJnHeuHbIe LyuN, nNn B6n3N BeHTnlaOnHHbx peWeTOK o6OrpeBaTeJeN.
Buejx oecneehnna HaeXHO n 6e3oanHou YCTaHOBKn NCIOJIb3yIte JINb BXOJaUe B KOMNJIeKT MOHTaXHbIe DeTaII.
PpmeaHne OTHoTeIbHO npOBOa nTuHaN (XeJIbI)
PnnoKJIoueHn DaHHoro yCTpoNCTBa BMeCTe C Dpyrnn CTpeoKOMNOHEHTamn HOMHaJIbHOE 3NaueHne Cnbl TOKa B KOHType NITaHn ABTOMO6NJy DOJXHO npeBbIaTb CyMMapHoe 3NaueHne Cnbl TOKa, Yka3aHHoe Ha NpeDOxpaHNTeJIax BCEx KOMNoHEHTOB.
PerylnpOBka yrna yctaHOBKn
OtperynpyTe yroI yctahOBKn TaK, YTO6bl OH coCTaBJI MeHee 45^
Ipeuehb deTaJei IJyCTaHOBKn
①
②
③
(4)
B 3TOT cncOK BXOJNT He BCE copepknmoe KOMNJIeKTA NOCTaBKn.
KpoHHTeIN ① n 3aunTHa MaHKeTa ③ npNKpeNnHeBly K yCTPOiCTBy Do NoCTaBKn. Npeed YCTaHOBkoY CTOPOiCTBa BOCNoIb3yNTecb KIOUAMN DnA DeMOHTaxa ②, YTObI OTcoeHNHT b KPOHHTeIN ① OT yCTPOiCTBa. IopO6HbIe CBeDeHnA cm. B pa3dJe "OTcoeDInHeHne 3aunTHoM MaHXeTbl N KPOHHTeHa" (cTp.26).
CoxpaHnTe KInOuN nIa demoHTaxa ② IINcNoJIb3OBAHnB B6yDyuEe, NocKoJbKy OHN TaXke Notpe6yOTc npI demoHTaxe annapaTa n3 aBTOMo6nIy.
Повлочене
1 He BXOДNT B KOMПЛЕKT ПОCTАВК.
2 Понhoe conpoTnBHeHne rpOMKOrOBOpnteJeN: 4Ω-8Ω×4
*3 Ka6eJIb c pa3beMaMu RCA (He BXoIIT B KOMnJIeKT NOCTaBKn).
*4B3aBnCmOCTOnOTTnAABTOMO6nJI,BO3MOxHO, NOTpe6yeTcNcNoJIb3OBaTb aadntep dIg NPOBOHOro NylbTa NCTaHtUOHOrO ynpabLeHH (He BXoDIT B KOMNJIeKT NoCTaBKn).PiOp6HbIe CBeJeHrO6 NcNoJIb3OBaHnn NPOBOHOro NylbTa IInCTaHtUOHOrO ynpabLeHH CM.B pa3dene "NcNoJIb3OBaHne NpOBoHOro NylbTa IInCTaHtUOHOrO ynpabLeHH" (ctp.26).
*5 B 3aBucmocn OT Tnna aBTOMO6nla nCNoJb3ynte aanTep (He BXoNT B KOMNJIeKT NOCTaBK), eCIn pa3bem aHTehHbI He NoDxOaNT.
YcTaHOBKa CoeMHHeHn
EcIn nCnObl3yETcBHeuHra aHTeHHa C 3JIeKtpoPnpBODOM6e3peJeHOro6NoKa, NOcOeDnHEHne 3TOrO yCTPOINCTBa C NOMOUsIO npNlaeMOrO npOBoDa nTuHnra 4 MoXeT npNBecTn K NobpeXdEHNO aHTeHHbI.
Kpa3bemy rpoMkoROBOpTeTnABTOmO6nla
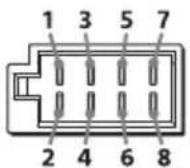
EcnKpaChbI N JeJIbI npOBoa nepeCTaBHeH MeCTAmN

KpacHbI KpacHbI
XeIbI XeIbI
OTcoeHHeHne 3aunTHoM MaHXeTbI N KPOHsTeHnA
IpeenMOHTaxkom yCTpOuCTBa OTcoeHNHTe 3aunTHyMoHKeTy ③ IN KPOHHTeH ① OT yCTpOuCTBa.
13axBaNTe o6a kpa 3aunTHoH MaHKeTbI ③ a3aTEM BbITauNTe ee.
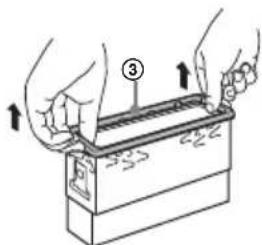
2 BCTaBbTe o6a KJIouca dIra demoHTaxa ② Do IeJyKa, NotaHInTe KPOHtEnH ① BHN3, a 3aTeM NotaHInTe yCTpOcTBO BBepx, YTO6bl OTcoEINHTb erO.

YcTaHOBKa yCtpoiCTBa B npu6OpHo nHaHeN
Ipeen yctaHOBkoY6eHNTecb, YTO ΦHKCaTOpbl C o6eHX CTOpOH KPOHHTeHa ① cOrHyTbI BOBHHTpb Ha 2 MM.
1 YctaHOBNTe KPOHHTeH ① B np6OpHyo NaHeJb,3aTeM BblHnTe BblCTynbl HApxKy,TO6bl OBeCneuTb PLOTHyO FHKcaUIO.
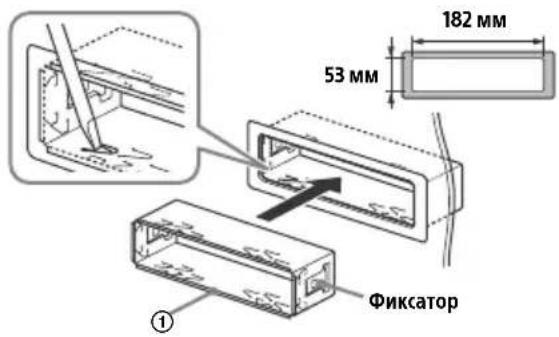
2ПикpenTe yctpoIcTBO K KpoHHTeHy ①,3aTEM BCTaBbTe 3aUHTHyIO MaHXeTy ③.
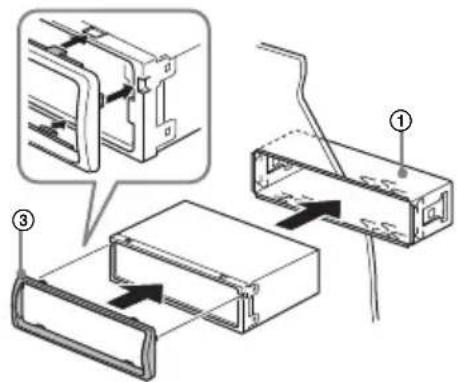
PpIMeuaHn
- EcnnnФнкcatOpbI He corHytbl NIN BbIrHyTbI HApyKy, yCTPOINCTBO He 6ydt YCTaHOBNeHO HaJIeKaUIM O6pa3OM M MoKET BBInactb.
- Y6eIntecb,HTO 4 pKcaTopa Ha 3aunTHoMaHKeTe ③ HApJexKaUIM Opa3OM BCTaBHeHb B OTBepCTn, NMeIOUneCBy CTPoNCTBe.
ChyTne u yctaHOBka nepeDnei naHei
Iopob6HbIe CbeHnA cm. B pa3JeIe "ChrTne nepeDHe naneHn" (cTp.5).
Ipee3arpy3ka yctpoiCTBa
Ioppo6hble cBeDeHnCm.Bpa3eJe "Ipe3arpy3ka yctpoiCTBa" (cTp.6).
3aMeHa npedeoxpaHnteJia
Ipn 3aMeHe npeOxpaHnteJe
06raTeNbHO uCNoJIb3yIte ToJIbKO
Te, KOToPbIe COOTBeTCTByIOT cNJIe
TOka, yKa3aHHo Ha
OpuHaHbHom npeOxpaHnte.
Ecnn nepeRopen
npeOxpaHnteJb, npOBepbTe
NoDKluoyHne NHTAHn I
3aMeHnTe npedoxpaHnTeIb. Ecnn nocne 3aMeHbl npedeoxpaHnTeIb cHOba neperopeI, 3TO MOKeT O3Haayt HeNCnpaBHOCTyCtpoiCTBa. B 3Tom cnUyae o6patntecb K 6bnxkaWemy dInnepy Sony.
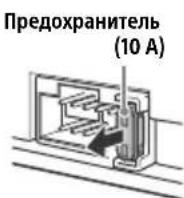
C
Блгарский
Спостац�To, Sony Corporation Деклариpa,ЧЕТОВа оборудвае в СбOTВЕТСВЕ сДиpeктИВа2014/53/EU.
LJIOCTHnT TeKCT Ha EC JeKnapaunTa 3a CbOTBeTCTBnE MoKe Da ce HAmepn Ha CJIeHNr INHTepHET aDpec:
http://www.compliance.sony.de/
Hrvatski
Sony Corporation ovime izjavljube da je ova opremu skladu s Direktivom 2014/53/EU.
Hereby, Sony Corporation declares that this equipment is in compliance with Directive 2014/53/EU.
The full text of the EU declaration of conformity is available at the following internet address:
http://www.compliance.sony.de/
Eesti keel
If you have any questions or for the latest support information on this product, please visit the web site below:
Site d'assistance
Register your product online now at: