
DSX-S310BTX - Car radio SONY - Free user manual and instructions
Find the device manual for free DSX-S310BTX SONY in PDF.


| Product Type | Car Stereo / CD Receiver |
| Brand | Sony |
| Model | DSX-S310BTX |
| Dimensions (W x H x D) | 178 x 50 x 160 mm (approx.) |
| Weight | 1.0 kg (approx.) |
| Power Output (Max) | 50 W x 4 |
| CD Playback | Yes, CD, CD-R, CD-RW |
| Bluetooth | Hands-free calling & audio streaming (A2DP, HFP) |
| USB Port | Front USB, supports MP3/WMA playback |
| AUX Input | 3.5 mm front AUX |
| Tuner | FM/AM with RDS |
| Equalizer | 10-band equalizer with presets |
| Display | LCD with adjustable illumination |
| Steering Wheel Control | Compatible with adapter (not included) |
| Detachable Face | Yes, for theft prevention |
| Maintenance | Clean with soft dry cloth; avoid liquid cleaners |
| Safety | Use only 10A fuse; disconnect battery before installation |
| Spare Parts | Contact Sony service center for genuine replacements |
| Repairability | Service manual available; recommend professional repair |
Frequently Asked Questions - DSX-S310BTX SONY
User questions about DSX-S310BTX SONY
0 question about this device. Answer the ones you know or ask your own.
Ask a new question about this device
Download the instructions for your Car radio in PDF format for free! Find your manual DSX-S310BTX - SONY and take your electronic device back in hand. On this page are published all the documents necessary for the use of your device. DSX-S310BTX by SONY.
USER MANUAL DSX-S310BTX SONY
FM/AM Digital Media Player
Operating Instructions US
The model and serial numbers are located on the bottom of the unit.
Record the serial number in the space provided below.
Refer to these numbers whenever you call upon your Sony dealer regarding this product.
Model No. DSX-S310BTX Serial No.
To cancel the demonstration (Demo) display, see page 8.
Be sure to install this unit in the dashboard of the car for safety. For installation and connections, see the supplied installation/connections manual.
Warning
This equipment has been tested and found to comply with the limits for a Class B digital device, pursuant to Part 15 of the FCC Rules. These limits are designed to provide reasonable protection against harmful interference in a residential installation. This equipment generates, uses, and can radiate radio frequency energy and, if not installed and used in accordance with the instructions, may cause harmful interference to radio communications. However, there is no guarantee that interference will not occur in a particular installation. If this equipment does cause harmful interference to radio or television reception, which can be determined by turning the equipment off and on, the user is encouraged to try to correct the interference by one or more of the following measures:
– Reorient or relocate the receiving antenna. – Increase the separation between the equipment and receiver. – Connect the equipment into an outlet on a circuit different from that to which the receiver is connected. – Consult the dealer or an experienced radio/TV technician for help.
You are cautioned that any changes or modifications not expressly approved in this manual could void your authority to operate this equipment.
This device complies with Part 15 of the FCC Rules. Operation is subject to the following two conditions: (1) this device may not cause harmful interference, and (2) this device must accept any interference received, including interference that may cause undesired operation.
This transmitter must not be co-located or operated in conjunction with any other antenna or transmitter.
This equipment complies with FCC radiation exposure limits set forth for an uncontrolled environment and meets the FCC radio frequency (RF) Exposure Guidelines in Supplement C to OET65. This equipment has very low levels of RF energy that it deemed to comply without maximum permissive exposure evaluation (MPE). But it is desirable that it should be installed and operated keeping the radiator at least 20 cm or more away from person's body (excluding extremities: hands, wrists, feet and ankles).
For the State of California, USA only
Perchlorate Material – special handling may apply, See www.dtsc.ca.gov/hazardouswaste/perchlorate Perchlorate Material: Lithium battery contains perchlorate
HD Radio™ is a proprietary trademark of iBiquity Digital Corp.

The “SAT Radio Ready” logo indicates that this product will control a satellite radio tuner module (sold separately). Please see your nearest authorized Sony dealer for details on the satellite radio tuner module.
Please refer to the manuals included in the satellite radio tuner module. Sirius or XM Subscription required.
“SAT Radio,” “SAT Radio Ready,” the SAT Radio and SAT Radio Ready logos and all related marks are trademarks of Sirius XM Radio Inc. and XM Satellite Radio Inc.
ZAPPIN and Quick-BrowZer are trademarks of Sony Corporation.
The Bluetooth word mark and logos are owned by the Bluetooth SIG, Inc. and any use of such marks by Sony Corporation is under license. Other trademarks and trade names are those of their respective owners.

12 TONE ANALYSIS and its logo are trademarks of Sony Corporation.

"WALKMAN" and "WALKMAN" logo are registered trademarks of Sony Corporation.

SensMe and the SensMe logo are trademarks or registered trademarks of Sony Ericsson Mobile Communications AB.

Music recognition technology and related data are provided by Gracenote®. Gracenote is the industry standard in music recognition technology and related content delivery. For more information, please visit www.gracenote.com.
CD, DVD, Blu-ray Disc, and music and videorelated data from Gracenote, Inc., copyright © 2000 to present Gracenote. Gracenote Software, copyright © 2000 to present Gracenote. One or more patents owned by Gracenote apply to this product and service. See the Gracenote website for a non-exhaustive list of applicable Gracenote patents.
Gracenote, CDDB, MusicID, MediaVOCS, the Gracenote logo and logotype, and the "Powered by Gracenote" logo are either registered trademarks or trademarks of Gracenote in the United States and/or other countries.
Microsoft, Windows, Windows Vista and Windows Media and logos are trademarks or registered trademarks of Microsoft Corporation in the United States and/or other countries.
This product contains technology subject to certain intellectual property rights of Microsoft. Use or distribution of this technology outside of this product is prohibited without the appropriate license(s) from Microsoft.
iPhone®, iPod®, iPod classic®, iPod nano®, and iPod touch® are trademarks of Apple Inc., registered in the U.S. and other countries.
Apple, Macintosh and iTunes are trademarks of Apple Inc., registered in the U.S. and other countries.
MPEG Layer-3 audio coding technology and patents licensed from Fraunhofer IIS and Thomson.
PANDORA, the PANDORA logo, and the Pandora trade dress are trademarks or registered trademarks of Pandora Media, Inc., used with permission.
Android is a trademark of Google Inc. Use of this trademark is subject to Google Permissions.
BlackBerry® is the property of Research In Motion Limited and is registered and/or used in the U.S. and countries around the world. Used under license from Research In Motion Limited.
Warning if your car's ignition has no ACC position
Be sure to set the Auto Off function (page 42). The unit will shut off completely and automatically in the set time after the unit is turned off, which prevents battery drain. If you do not set the Auto Off function, press and hold SOURCE/OFF until the display disappears each time you turn the ignition off.
Table of Contents
Getting Started
Notes on Bluetooth 7
Resetting the unit. 7
Canceling the Demo mode 8
Preparing the card remote commander ..... 8
Setting the clock 8
Detaching the front panel 8
Attaching the front panel 9
Quick Guide for Bluetooth function
3 steps to Bluetooth function. 10
Buttons and icons 11
① Pairing 12
② Connecting 12
③ Handsfree calling/Music streaming/Playing back Pandora....13
Location of controls and basic operations
Main unit....14
RM-X306 Card Remote Commander ..... 16
Radio
Storing and receiving stations ..... 18
Storing automatically — BTM ..... 18
Storing manually....18
Receiving the stored stations ..... 18
Tuning automatically 18
RDS 19
Overview....19
Selecting PTY 19
Setting CT....19
USB devices
Playing back a USB device.... 20
Playing back via the USB (internal) connector 20
Playing back via the USB (external) connector.... 21
Display items 21
Repeat play.... 22
Shuffle play 22
Enjoying music according to your mood — SensMe™ 22
Before using the SensMe™ function ..... 22
Installing “SensMe™ Setup” and “Content Transfer” in your computer 23
Registering a USB device using “SensMe™ Setup”.... 23
Transferring tracks to the USB device using "Content Transfer".... 23
Playing tracks in the channel — SensMe™ channels. 24
iPod
Playing back iPod 25
Playing back via the USB (internal) connector 25
Playing back via the USB (external) connector 26
Display items 27
Repeat play.... 27 Shuffle play.... 28
Operating an iPod directly — Passenger control ..... 28
Pandora® via USB (iPhone)
Playing back Pandora 29
Playing back via the USB (external) connector 29
"Thumbs" feedback 29
Station list. 30
Bookmarking 30
Searching for a track
Searching a track by name
— Quick-BrowZer™....30
Searching by skip items — Jump mode....30
Searching by alphabetical order — Alphabet search .... 31
Searching a track by listening to track passages
— ZAPPIN™ 31
In the case of “SensMe™ channels” playback .... 31
Bluetooth (Handsfree calling and Music streaming)
Bluetooth Operations....32
About Bluetooth icons 32
Installing the microphone ..... 32
Pairing 32
Connecting....33
Connecting a cellular phone ..... 33
Connecting an audio device ..... 33
Handsfree calling....34
Making calls 34
Receiving calls 34
Operations during a call 34
Call transfer. 35
Phonebook management 35
Preset dial 36
Voice dial activation 36
SMS indicator 36
Music streaming 37
Listening to music from an audio device....37
Operating an audio device with this unit 37
Other settings....37
Initializing Bluetooth Settings ..... 37
Pandora via Bluetooth (Android™ & BlackBerry® phones)
Playing back Pandora 38
Playing back via Bluetooth 38
"Thumbs" feedback 38
Station list 39
Bookmarking 39
Sound Settings and Setup Menu
Changing the sound settings 39
Adjusting the sound characteristics ..... 39
Enjoying sophisticated sound functions
— Advanced Sound Engine .... 40
Selecting the sound quality — EQ7 Preset. 40
Customizing the equalizer curve — EQ7 Parametric Tune ..... 40
Optimizing sound by Time Alignment — Listening Position ..... 41
Precisely calibrating by Time Alignment — Listening Position Custom Tune ..... 41
DM+ Advanced 42
Using rear speakers as subwoofer — Rear Bass Enhancer .... 42
Compensating volume level — Dynamic Loudness .... 42
Adjusting setup items — MENU ..... 42
Additional Information
Precautions 44
Playback order of MP3/WMA/AAC files 44
About Device Inside Alert 44
About iPod 44
About Bluetooth function .... 44
Maintenance 45
Removing the unit. 46
Specifications 47
Troubleshooting 48
Error displays/Messages.... 50
Support site
If you have any questions or for the latest support information on this product, please visit the web site below:
http://esupport.sony.com http://www.sony.com/mobileAV
Provides information on:
- Models and manufacturers of compatible digital audio players • Supported MP3/WMA/AAC files
- Models and manufacturers of compatible cellular phones and the FAQ about Bluetooth function
- System requirements for using SensMe™
Getting Started
Notes on Bluetooth
Caution
IN NO EVENT SHALL SONY BE LIABLE FOR ANY INCIDENTAL, INDIRECT OR CONSEQUENTIAL DAMAGES OR OTHER DAMAGES INCLUDING, WITHOUT LIMITATION, LOSS OF PROFITS, LOSS OF REVENUE, LOSS OF DATA, LOSS OF USE OF THE PRODUCT OR ANY ASSOCIATED EQUIPMENT, DOWNTIME, AND PURCHASER'S TIME RELATED TO OR ARISING OUT OF THE USE OF THIS PRODUCT, ITS HARDWARE AND/OR ITS SOFTWARE.
IMPORTANT NOTICE!
Safe and efficient use
Changes or modifications to this unit not expressly approved by Sony may void the user's authority to operate the equipment.
Please check for exceptions, due to national requirements or limitations, in usage of Bluetooth equipment before using this product.
Driving
Check the laws and regulations on the use of cellular phones and handsfree equipment in the areas where you drive.
Always give full attention to driving and pull off the road and park before making or answering a call if driving conditions so require.
Connecting to other devices
When connecting to any other device, please read its user guide for detailed safety instructions.
Radio frequency exposure
RF signals may affect improperly installed or inadequately shielded electronic systems in cars, such as electronic fuel injection systems, electronic antiskid (antilock) braking systems, electronic speed control systems or air bag systems. For installation or service of this device, please consult with the manufacturer or its representative of your car. Faulty installation or service may be dangerous and may invalidate any warranty that may apply to this device.
Consult with the manufacturer of your car to ensure that the use of your cellular phone in the car will not affect its electronic system.
Check regularly that all wireless device equipment in your car is mounted and operating properly.
Emergency calls
This Bluetooth car handsfree and the electronic device connected to the handsfree operate using radio signals, cellular, and landline networks as well as user-programmed function, which cannot guarantee connection under all conditions.
Therefore do not rely solely upon any electronic device for essential communications (such as medical emergencies).
Remember, in order to make or receive calls, the handsfree and the electronic device connected to the handsfree must be switched on in a service area with adequate cellular signal strength.
Emergency calls may not be possible on all cellular phone networks or when certain network services and/or phone features are in use.
Check with your local service provider.
Resetting the unit
Before operating the unit for the first time, or after replacing the car battery or changing the connections, you must reset the unit.
Detach the front panel (page 8) and press the RESET button (page 14) with a pointed object, such as a ball-point pen.
Note
Pressing the RESET button will erase the clock setting and some stored contents.
Canceling the Demo mode
You can cancel the demonstration display which appears during turning off.
1 Press and hold the multi-way encoder. The setup display appears. 2 Rotate the multi-way encoder to select "Demo," then press it. 3 Rotate the multi-way encoder to select "off." 4 Press and hold the multi-way encoder. The setup is complete and the display returns to normal reception/play mode.
Preparing the card remote commander
Remove the insulation film.
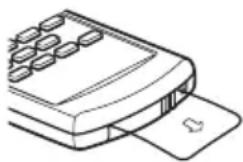
Tip
For how to replace the battery, see page 45.
Setting the clock
The clock uses a 12-hour digital indication.
1 Press and hold the multi-way encoder. 2 Rotate the multi-way encoder to select "Clock Adjust," then press it. The clock adjustment display appears. 3 Rotate the multi-way encoder to set the hour and minute. To move the digital indication, push the multi-way encoder left/right. 4 After setting the minute, press the multi-way encoder. The clock starts.
Tip
You can set the clock automatically with the RDS feature (page 19).
Detaching the front panel
You can detach the front panel of this unit to prevent theft.
Caution alarm
If you turn the ignition switch to the OFF position without detaching the front panel, the caution alarm will sound for a few seconds. The alarm will only sound if the built-in amplifier is used.
1 Press and hold SOURCE/OFF. The unit is turned off.
2 Press (OPEN).
The front panel is flipped down.
3 Slide the front panel to the right, then gently pull out the left end of the front panel.

Notes
- Do not drop or put excessive pressure on the front panel and display window.
- Do not subject the front panel to heat/high temperature or moisture. Avoid leaving it in a parked car or on a dashboard/rear tray.
- Do not detach the front panel during playback of the USB device, otherwise USB data may be damaged.
- If "Device Inside" (page 44) appears in the display or the Device Inside Alert LED flashes, detach the front panel and remove the USB device or iPod.
Attaching the front panel
Place the hole Ⓐ of the front panel onto the spindle Ⓑ on the unit, then lightly push the left side in.
Press SOURCE/OFF on the unit to operate the unit.

Note
Do not put anything on the inner surface of the front panel.
Quick Guide for Bluetooth function
For full details on operation, see "Bluetooth (Handsfree calling and Music streaming)" (page 32) and the Bluetooth device operating instructions.
3 steps to Bluetooth function
1 Pairing
First, register ("pair") the Bluetooth device (cellular phone, etc.) with this unit. Pairing is no longer required after the first time.
2 Connecting
After pairing is made, connect this unit and the Bluetooth device. Depending on the device, connection is automatically made along with the pairing.
3 Handsfree calling/Music streaming/Playing back Pandora
You can make/receive a handsfree call, listen to audio and Pandora internet radio through this unit.
Support site
http://esupport.sony.com http://www.sony.com/mobileAV

Icon status descriptions
| ※ | [3022] Lit Bluetooth signal is on. | |
 Flashing Pairing is in standby mode. Flashing Pairing is in standby mode. | ||
| None Bluetooth signal is off. | ||
 Lit Connected to a cellular phone. Lit Connected to a cellular phone. | ||
 Flashing Connection is in progress. Flashing Connection is in progress. | ||
| None No cellular phone is connected for handsfree calling. | ||
 Lit Connected to a device. Lit Connected to a device. | ||
 Flashing Connection is in progress. Flashing Connection is in progress. | ||
| None No device is connected for music streaming. | ||
| [5C2D] Lit Some unread SMS messages exist. | ||
 Flashing A new SMS message has been received. Flashing A new SMS message has been received. | ||
| None No unread SMS messages exist. | ||
① Pairing
| Operated device | Operation | ||
| 1 |  | Press and hold [BLUETOOTH] for 2 or more seconds.→ | |
| 2 |  | Search for this unit. | |
| 3 |  |  Select “Sony Automotive.” Select “Sony Automotive.” | |
| 4 |  | If passkey input is required on the display of the device to be connected, input “0000.” | |
| 5 |  | Follow the display directions. | |
| 6 |  |  | (Pairing successful) |
②Connecting
| Operated device | Operation | |
| 1 |  | Press BLUETOOTH.→ |
| 2 |  | Connect to this unit using a cellular phone.→ |
 | Connect to this unit using an audio device.→ |
Note
You can connect from this unit to a Bluetooth device (page 33).
If you cannot connect from this unit to the Bluetooth device, start pairing again.
③Handsfree calling/Music streaming/Playing back Pandora

Handsfree calling
To Operation
Receive a call/end a call Press the multi-way encoder.
Reject a call Press SOURCE/OFF.
Redial
1 Press SOURCE/OFF repeatedly until "Bluetooth Phone" appears.

2 Press and hold the multi-way encoder for 2 or more seconds.
Transfer a call: Press MODE.

Music streaming
To Operation
Listen
1 Press SOURCE/OFF repeatedly until "Bluetooth Audio" appears.

2 Start playback on the audio device.
Playback/pause*: Press PAUSE.
Skip tracks*: Push the multi-way encoder left/right.
* The operation may differ depending on the audio device.

Playing back Pandora
To Operation
Listen
1 Press SOURCE/OFF repeatedly until “Please launch Pandora App on mobile device and press PAUSE on this unit.” appears.

2 Launch Pandora on the Bluetooth device.
3 Press PAUSE.
Playback/pause: Press PAUSE.
Skip tracks: Push the multi-way encoder right.
Location of controls and basic operations
Main unit

Front panel removed
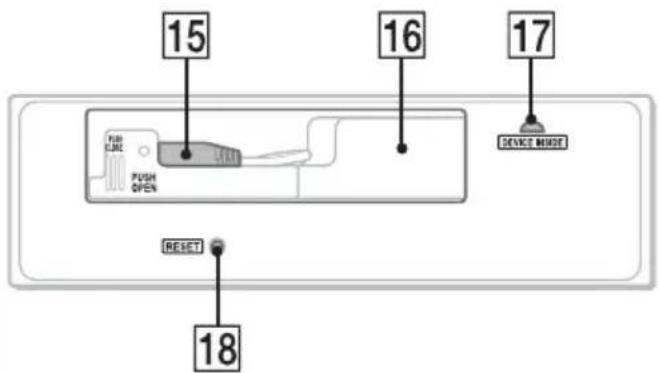
This section contains instructions on the location of controls and basic operations. For details, see the respective pages.
1 SOURCE/OFF button* 1
Press to turn on the power/change the source (Radio/USB/SensMe™*2/Pandora USB/Bluetooth Audio/Bluetooth Pandora/Bluetooth Phone).
Press for 1 second to turn off the power. Press for 2 seconds or more to turn off the power and the display disappears.
2 (BROWSE) button* 3 page 18, 30, 33, 34, 35
To list up (Radio); enter the Quick-BrowZer™ mode (USB); list the station (Pandora USB/Bluetooth Pandora); list the phonebook (Bluetooth Phone).
3 PAUSE button
To pause playback. To cancel, press again.
4 (SensMe™) button page 24
5 Multi-way encoder (ENTER/SOUND/MENU/(handsfree)/ (end call) button)

Rotate to: Adjust the volume/select a menu item.
Push up/down/left/right to: Select a menu item.
Press to: Enter sound setting/apply a setting. Press and hold to: Enter menu.
Radio:
Push up/down to:
- Receive stored station.
Push left/right to:
– Tune in stations automatically (push).
– Find a station manually (push and hold).
USB:
Push up/down to:
- Skip albums (push).
- Skip albums continuously (push and hold).
Push left/right to:
- Skip tracks (push).
- Skip tracks continuously (push, then push again within about 2 seconds and hold).
- Reverse/fast-forward a track (push and hold).
Pandora USB:
Push right to:
- Skip tracks
Push up/down to:
- Thumbs up/down (push for 1 second).
Bluetooth Audio*4:
Push left/right to:
- Skip tracks (push).
- Reverse/fast-forward a track (push and hold).
Bluetooth Pandora:
Push right to:
-Skip tracks
Push up/down to:
-Thumbs up/down (push for 1 second).
Bluetooth Phone:
Press to receive/end a call.
Press and hold to redial.
6 Receptor for the card remote commander
7 Display window
8 OPEN button page 8
9 USB (external) connector page 21, 26
To connect to the USB device.
10 (BACK)/MODE button
Press to: Select the radio band (FM/AM)* 1/ switch the USB device (internal/external)/ return to the previous display.
Press and hold to: Enter/cancel the passenger control*5/enter the bookmark mode (Pandora USB/Bluetooth Pandora).
11 BLUETOOTH button page 32
For Bluetooth signal on/off, pairing.
12 ZAP/SHUF button page 22, 28, 31
To enter ZAPPIN™ mode (press); select shuffle play mode (press and hold).
13 PTY/CAT button*6 page 19
To select PTY in RDS.
14 DSPL (display)/SCRL (scroll) button page 21, 27
To change display items (press); scroll the display item (press and hold).
15 USB (internal) connector page 20, 25
To connect to the USB device.
16 TUNE TRAY page 20, 25
Tray unit to place a USB device or an iPod.
17 Device Inside Alert LED page 44
18 RESET button page 7
*1 If an HD Radio tuner or SAT tuner is connected: when SOURCE/OFF is pressed, the connected device ("HD," "XM" or "SR") will appear in the display. Furthermore, if MODE is pressed, you can switch the HD Radio tuner band or SAT tuner band.
*2 When a USB device set up for the SensMe™ function is connected.
*3 If an HD Radio tuner or SAT tuner is connected: the list will include HD Radio or SAT Radio accordingly.
*4 When a Bluetooth audio device (supports AVRCP of Bluetooth technology) is connected. Depending on the device, certain operations may not be available.
*5 When an iPod is connected to the USB (external) connector.
*6 When the SAT tuner is connected.
RM-X306 Card Remote Commander![graph TD 1["1"] --> CALL 2["2"] --> SRC 3["3"] --> MODE 4["4"] --> MENU 5["5"] --> CAT 6["6"] --> DSPL 7["7"] --> REP 8["8"] --> REP 9["9"] --> REP CALL --> MODE MODE --> MENU MENU --> CAT CAT --> DSPL DSPL --> MODE MODE --> ENTER ENTER --> MODE MODE --> SOUND SOUND --> SCRL APPS --> MODE MODE --> E…](/content/2026/06/1339517/images/b8e4105f66ad0e66080cb0fd4fb1ca1142ec16a9e6bd21b121ee98f042833764.jpg)
Remove the insulation film before use (page 8).
1 CALL/ (handsfree) button
To change the source (Bluetooth Phone).
Bluetooth Phone:
To receive a call.
2 SRC (source) button* 1
To turn on the power; change the source (Radio/USB/SensMe™*2 /Pandora USB/Bluetooth Audio/Bluetooth Pandora/Bluetooth Phone).
3 ENTER button
To apply a setting.
4 MODE button
Press to: Select the radio band (FM/AM)* 1/ switch the USB device (internal/external). Press and hold to: Enter/cancel the passenger control*3/enter the bookmark mode (Pandora USB/Bluetooth Pandora).
5 MENU button
To enter menu.
6 (BROWSE)/CAT* 4 button
To list up (Radio); enter the Quick-BrowZer™ mode (USB); list the station (Pandora USB/Bluetooth Pandora); list the phonebook (Bluetooth Phone).
7 DSPL (display) button
To change display items.
8 Number buttons
Radio:
① to ⑥: To receive stored stations (press); store stations (press and hold).
USB:
①: REP page 22, 27
②: SHUF page 22, 28
⑥: PAUSE
To pause playback. To cancel, press again.
Pandora USB:
⑥: PAUSE page 29 To pause playback. To cancel, press again.
Bluetooth Audio*5:
①: REP page 37
②: SHUF page 37
⑥: PAUSE page 37
To pause playback. To cancel, press again.
Bluetooth Pandora:
⑥: PAUSE page 38
To pause playback. To cancel, press again.
Bluetooth Phone:
To input numbers (phone number, etc.).
9 button page 34, 35
10 OFF/ (end call) button
To turn off the power; stop the source; end or reject a call.
11 BLUETOOTH button page 32
For Bluetooth signal on/off, pairing.
12↑ (+)/↓ (-) buttons
The same as pushing the multi-way encoder up/down on the unit.
13 ← (I◄◄) / → (►►I) buttons
The same as pushing the multi-way encoder left/right on the unit.
14 SCRL (scroll) button
To scroll the display item.
15 SOUND button
To enter sound setting.
16 ATT (attenuate) button
To attenuate the sound. To cancel, press again.
17 VOL (volume) +/- button
To adjust volume.
18 button page 34, 35
*1 If an HD Radio tuner or SAT tuner is connected: when SRC is pressed, the connected device ("HD," "XM" or "SR") will appear in the display. Furthermore, if MODE is pressed, you can switch the HD Radio tuner band or SAT tuner band. *2 When a USB device set up for the SensMe™ function is connected. *3 When an iPod is connected to the USB (external) connector. *4 When the SAT tuner is connected. *5 When a Bluetooth audio device (supports AVRCP of Bluetooth technology) is connected. Depending on the device, certain operations may not be available.
Note
If the unit is turned off and the display disappears, it cannot be operated with the card remote commander unless SOURCE/OFF on the unit is pressed to activate the unit first.
Radio
Storing and receiving stations
Caution
When tuning in stations while driving, use Best Tuning Memory (BTM) to prevent an accident.
Storing automatically — BTM
1 Press SOURCE/OFF repeatedly until "TUNER" appears.
To change the band, press MODE repeatedly. You can select from FM1, FM2, FM3, AM1 or AM2.
2 Press and hold the multi-way encoder.
3 Rotate the multi-way encoder to select "BTM," then press it.
The unit stores stations in order of frequency in the preset list.
A beep sounds when the setting is stored.
Storing manually
1 While receiving the station that you want to store, press (BROWSE). The preset list appears. 2 Push the multi-way encoder up/down to select the preset number. 3 Press and hold the multi-way encoder until "MEM" appears.
(with the card remote commander)
1 While receiving the station that you want to store, press and hold a number button (① to ⑥) until "MEM" appears.
Note
If you try to store another station on the same number button, the previously stored station will be replaced.
Receiving the stored stations
You can list up the frequency.
1 Select the band, then press Q (BROWSE).
The preset list appears.
2 Push the multi-way encoder up/down to select the desired station.

3 Press the multi-way encoder to receive the station.
The display returns to normal reception mode.
(with the card remote commander)
1 Select the band, then press a number button (① to ⑥).
Tuning automatically
1 Select the band, then push the multi-way encoder left/right to search for the station.
Scanning stops when the unit receives a station. Repeat this procedure until the desired station is received.
Tip
If you know the frequency of the station you want to listen to, push and hold the multi-way encoder left/right to quickly locate the approximate frequency, then push the multi-way encoder left/right repeatedly to fine adjust to the desired frequency (manual tuning).
Overview
FM stations with Radio Data System (RDS) service send inaudible digital information along with the regular radio program signal.
Display items![graph TD A["A"] --> B["B"] C["C"] --> D["D"] A --> E["Process Step 1"] B --> F["Process Step 2"] C --> G["Process Step 3"] D --> H["Process Step 4"]](/content/2026/06/1339517/images/3e4edb59fcd66d04ae0db2fc4d59ed2f4ab515cae1b618d012d30b93c6afd124.jpg)
A Radio band
B Clock
C Preset number
D Frequency* (Program service name), RDS data
* While receiving the RDS station, "RDS" is displayed on the left of the frequency indication.
RDS services
This unit automatically provides RDS services as follows:
PTY (Program Types)
Displays the currently received program type. Also searches for your selected program type.
CT (Clock Time)
The CT data from the RDS transmission sets the clock.
Notes
- Depending on the country/region, not all RDS functions may be available.
- RDS will not work if the signal strength is too weak, or if the station you are tuned to is not transmitting RDS data.
Selecting PTY
1 Press PTY during FM reception.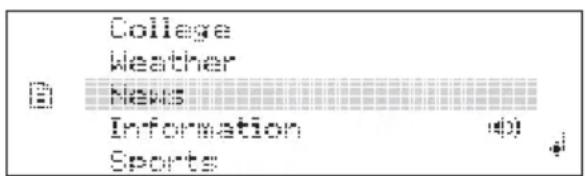
The current program type name appears if the station is transmitting PTY data.
2 Rotate the multi-way encoder to select the desired program type.
3 Press the multi-way encoder.
The unit starts to search for a station broadcasting the selected program type.
Type of programs
News, Information, Sports, Talk, Rock, Classic Rock, Adult Hits, Soft Rock, Top 40, Country, Oldies, Soft, Nostalgia, Jazz, Classical, Rhythm and Blues, Soft R&B, Foreign Language, Religious Music, Religious Talk, Personality, Public, College, Weather
Notes
- You cannot use this function in countries/regions where no PTY data is available.
- You may receive a different radio program from the one you select.
Setting CT
1 Set "CT on" in setup (page 42).
Notes
- The CT function may not work even though an RDS station is being received.
- There might be a difference between the time set by the CT function and the actual time.
USB devices
For details on the compatibility of your USB device, visit the support site.
Support site
http://esupport.sony.com http://www.sony.com/mobileAV
- MSC (Mass Storage Class) type USB devices compliant with the USB standard can be used.
- Corresponding codec is MP3 (.mp3), WMA (.wma), AAC (.m4a) and AAC (.mp4).
- Backup of data in a USB device is recommended.
Notes
- Connect the USB device after starting the engine. Depending on the USB device, malfunction or damage may occur if it is connected before starting the engine.
- Do not place a cellular phone or a device with wireless communication functions on the TUNE TRAY, as it may not receive phone signals or communication may be terminated.
- Do not leave a USB device in a parked car, as malfunction may result.
Playing back a USB device
A USB device can be connected to the internal/external or both USB connectors. To switch between USB devices, press MODE.
Playing back via the USB (internal) connector
1 Press OPEN. The front panel is flipped down.
2 Press PUSH OPEN on the TUNE TRAY. The TUNE TRAY opens slowly.

TUNE TRAY
3 Connect the USB device to the USB connector.

4 Slide in the TUNE TRAY by pressing PUSH CLOSE on the TUNE TRAY until it locks shut.

5 Close the front panel.
6 Press SOURCE/OFF repeatedly until "USB" appears, and then press MODE to switch the USB device.
"USB Internal" appears, and playback starts.
If a USB device is already connected, to start playback, repeat step 6.
Press and hold SOURCE/OFF for 1 second to stop playback.
Removing the USB device
1. Stop the USB device playback. 2. Press OPEN. 3. Press PUSH OPEN on the TUNE TRAY. 4. Remove the USB device. 5. Slide in the TUNE TRAY, and close the front panel.
Playing back via the USB (external) connector
1. Slide the USB cover.

2. Connect the USB device to the USB connector.
When using a cable, use the one supplied with the USB device to connect.

3. Press SOURCE/OFF repeatedly until "USB" appears, and then press MODE to switch the USB device.
"USB External" appears, and playback starts.
If a USB device is already connected, to start playback, repeat step 3.
Press and hold SOURCE/OFF for 1 second to stop playback.
Removing the USB device
1. Stop the USB device playback.
2. Remove the USB device.
Notes for USB devices
- Do not remove the USB device during playback, otherwise USB data may be damaged.
- Do not place non-USB devices on the TUNE TRAY, or foreign objects, such as coins, keys, cards, liquids, etc.
- Do not place a flammable object such as a lighter on the TUNE TRAY, as this may cause smoke, fire, or other accident.
- Capacity of the tray: Approx. 65 × 17 × 118 mm (2 9/16 × 21/32 × 4 5/8 in) (w/h/d)
- If the size of the USB device alone or combined with the USB cable cannot be placed easily in the TUNE TRAY, the device may be exceeding the tray capacity. Do not slide in the TUNE TRAY or the USB cable forcefully.
- For "WALKMAN" users, use of the optional adaptor XA-50WM is recommended. It is designed for use with this unit (in the TUNE TRAY) only, and should not be used with the other USB devices.
- This unit cannot recognize USB devices via a USB hub.
- Slide in the TUNE TRAY and close the front panel before playback, as damage may result in the case of an obstruction in the car, etc.
- If the front panel does not fully open because of the dashboard shape at the installation position, detach the front panel and open the TUNE TRAY manually. For how to detach the front panel, see page 8.
- It is extremely dangerous to connect or remove the USB device while driving.
- Do not use USB devices so large or heavy that they may fall down due to vibration, or cause a loose connection.
- If the USB is disconnected during playback, "NO Device" appears in the display of the unit.
Display items

A Source (MP3/WMA/AAC) indication
B Clock
C Artist name/Album name, Track name, Folder number/Track number/Elapsed playing time
To change display items A, press DSPL.
Notes
- Displayed items will differ, depending on the USB device, recorded format and settings. For details, visit the support site.
- The maximum number of displayable data is as follows: – folders (albums): 65,535*
- files (tracks): 5,000
- Do not leave a USB device in a parked car, as malfunction may result.
- It may take time for playback to begin, depending on the amount of recorded data.
- DRM (Digital Rights Management) files may not be played.
- During playback or fast-forward/reverse of a VBR (Variable Bit Rate) MP3/WMA/AAC file, elapsed playing time may not display accurately.
- Playback of the following MP3/WMA/AAC files is not supported.
- lossless compression – copyright-protected * The maximum recommended number of folders is 5,000. If the number of folders exceeds 5,000, it may take a long time to search for folders or files. The number of folders may not be displayed correctly beyond 9,999.
Repeat play
1 Press and hold the multi-way encoder. 2 Rotate the multi-way encoder to select "Repeat," then press it. 3 Rotate the multi-way encoder to select the setting, then press it. The setting is complete.
4 Press → (BACK).
The setting is complete and the display returns to normal reception/play mode.
(with the card remote commander)
1 During playback, press ① (REP) repeatedly until the desired setting appears.
After 3 seconds, the setting is complete.
Select To play
| Repeat Track track repeatedly. | |
| Repeat Album*1 | album repeatedly. |
| Repeat Artist*2 | artist repeatedly. |
*1 Available when selecting track by "Album" or "Folder & File" with Quick-BrowZer (see page 30).
*2 Available when selecting track by "Artist" with Quick-BrowZer (see page 30).
To return to normal play mode, select "Repeat off."
Shuffle play
1 During playback, press and hold ZAP/SHUF. 2 Press ZAP/SHUF repeatedly until the desired setting appears.

(with the card remote commander)
1 During playback, press ② (SHUF) repeatedly until the desired setting appears.
After 3 seconds, the setting is complete.
Select "To play".
| Shuffle Album*1 | album in random order. |
| Shuffle Artist*2 | artist in random order. |
| Shuffle Device*3 | device in random order. |
*1 Available when selecting track by "Album" or "Folder & File" with Quick-BrowZer (see page 30).
*2 Available when selecting track by "Artist" with Quick-BrowZer (see page 30). *3 Available when selecting track by "Track" or "Folder & File" with Quick-BrowZer (see page 30).
To return to normal play mode, select "off."
Note:
Playing tracks on shuffle play is selected from a current USB device.
Enjoying music according to your mood — SensMe™
Sony's unique "SensMe™ channels" features automatically group tracks by channel, and allow you to enjoy music intuitively.
Before using the SensMe™ function
The following is the basic procedure required to enjoy the SensMe™ function on the unit.
Download the "SensMe™ Setup" and "Content Transfer" software from the support site. ② Install the software on your computer.
For more details on the installation, visit http://esupport.sony.com or http://www.sony.com/mobileAV.
③ Registering a USB device using "SensMe™ Setup"
Connect a USB device to your computer, and perform registration using "SensMe™ Setup" to enable the SensMe™ function on this unit.
![graph TD A["SensMe™ Setup"] --> B["Switch"] B --> C["Device"]](/content/2026/06/1339517/images/6d24ac295a1374f11139148681bf7b775616fc708aa845e248cb1465e1450a89.jpg)
Tip
Registration can be performed either along with the installation procedure or after installation.
*1 Available when selecting track by "Album" or "Folder & File" with Quick-BrowZer (see page 30).
④Transferring tracks to the USB device using “Content Transfer”
In order to group tracks by channel, track sound patterns need to be analyzed by 12 TONE ANALYSISTM, which is loaded in "Content Transfer."
With the USB device connected to your computer, drag and drop tracks from Windows Explorer or iTunes, etc., to “Content Transfer.”
Both analysis and transfer of tracks will be performed by “Content Transfer.”
![graph TD A["Music Icon"] --> B["Content Transfer"] B --> C["Mobile Device"]](/content/2026/06/1339517/images/9c8e73c16e144a48dbfb01d18511b4be57d3fae7616e613cd08e81f66d2fb29d.jpg)
⑤Connecting the USB device and enjoying the SensMe™ function on the unit
Connect the set up USB device. You can then enjoy “SensMe™ channels” on this unit.

Installing "SensMe™ Setup" and "Content Transfer" in your computer
The software (“SensMe™ Setup” and “Content Transfer”) is required to enable the SensMe™ function on this unit.
1 Download the "SensMe™ Setup" and "Content Transfer" software from the support site.
2 Install the software in your computer.
For more details on the installation, visit http://esupport.sony.com
or
Registering a USB device using "SensMe™ Setup"
USB device registration is required to enable the SensMe™ function on the unit.
If registration is not performed along with the installation procedure, follow the steps below.
1 Start "SensMe™ Setup" on your computer. 2 Connect a USB device to your computer. 3 Complete registration following the on-screen instructions.
Tip
If you connect a registered USB device containing analyzed tracks, the USB device can be unregistered again.
Transferring tracks to the USB device using "Content Transfer"
To enable the SensMe™ function on this unit, tracks need to be analyzed and transferred to the registered USB device, using "Content Transfer."
1 Connect the registered USB device to your computer.
For USB devices, connect with the MSC mode.
"Content Transfer" starts automatically.
If a message appears, follow the on-screen instructions to proceed.
2 Drag and drop tracks from Windows Explorer or iTunes, etc., to "Content Transfer."
The analysis and transfer of tracks start.
For details on operations, see the Help of "Content Transfer."
Note
The track analysis by 12 TONE ANALYSISTM may take time, depending on the computer environment.
Playing tracks in the channel — SensMe™ channels
“SensMe™ channels” automatically group tracks into channels by their tunes. You can select and play a channel that fits your mood, activity, etc.
This function works for USB devices connected to the internal/external or both USB connector. To switch the USB device, press MODE.
1 Connect a USB device set up for the SensMe™ function.
2 Press ♥ (SensMe™).
The channel list appears, and the most melodic or rhythmical sections* of tracks are shuffle played.
* May not be detected correctly.

3 Selecting a track from the channel list using the multi-way encoder.
- Change the channel
Push the multi-way encoder up/down to select the desired channel.
- Change the track
Push the multi-way encoder left/right until the desired track appears, then press it. Playback starts from the beginning of the current track.
If you do not operate anything for 10 seconds, the display returns to normal play mode.
Notes
- Depending on the track, it may not be detected correctly or may be grouped in a channel not suited to the track's mood.
- If the connected USB device contains many tracks, it may take time for "SensMe™ channels" to start, due to data reading.
Tip
Tracks are played in random order. The order will vary at each channel selection.
Channel list
■Recommended, Shuffle All
"Morning" (5:00 AM - 9:59 AM)
"Daytime" (10:00 AM - 3:59 PM)
"Evening" (4:00 PM - 6:59 PM)
"Night" (7:00 PM - 11:59 PM)
"Midnight" (12:00 AM - 4:59 AM)
Tracks recommended for each time of day. Set the clock (page 8) for the channel to be displayed accurately.
“Shuffle All”: Plays all analyzed tracks in random order.
Basic channels
Plays tracks according to the music type.
"Energetic": High-spirit tracks.
"Relax": Calm tracks.
"Mellow": Mellow, melancholy tracks.
"Upbeat": Happy tracks to improve your mood.
"Emotional": Ballad tracks.
"Lounge": Lounge music.
"Dance": Rhythm and rap, rhythm and blues tracks.
"Extreme": Intense rock tracks.
In-car channels
Plays tracks that are suitable while driving.
"Freeway": Speedy, high-spirit tracks.
"Chillout Drive": Intoned, healing ballad tracks.
"Weekend Trip": Delightful, bright and happy tracks.
"Midnight Cruise": Jazz or piano-featured tracks with mature mood.
"Party Ride": Up-tempo and alive tracks.
"Morning Commute": Bright and breezy tracks.
"Goin' Home": Warm and relaxing tracks.
iPod
For details on the compatibility of your iPod, see "About iPod" (page 44) or visit the support site.
In these Operating Instructions, "iPod" is used as a general reference for the iPod functions on the iPod and iPhone, unless otherwise specified by the text or illustrations.
Support site
http://esupport.sony.com http://www.sony.com/mobileAV
Notes
- Do not place a cellular phone or a device with wireless communication functions on the TUNE TRAY, as it may not receive phone signals or communication may be terminated.
- Do not leave an iPod in a parked car, as malfunction may result.
Playing back iPod
The iPod can be connected to the internal/external or both USB connectors. To switch between USB devices, press MODE.
Playing back via the USB (internal) connector
Before connecting the iPod, turn down the volume of the unit.
1 Press OPEN.
The front panel is flipped down.
2 Press PUSH OPEN on the TUNE TRAY.
The TUNE TRAY opens slowly.

TUNE TRAY
3 Connect the supplied adaptor to the USB connector.

4 Connect the iPod to the supplied adaptor.

5 Slide in the TUNE TRAY by pressing PUSH CLOSE on the TUNE TRAY until it locks shut.

6 Close the front panel.
7 Press SOURCE/OFF repeatedly until "USB" appears, and then press MODE to switch the USB device.
"USB Internal" appears.
The iPod will turn on automatically, and the display will appear on the iPod screen as below.*

The tracks on the iPod start playing automatically from the point last played. If an iPod is already connected, repeat step 7. ("iPod" appears in the display when iPod is recognized.)
* Display differs depending on the iPod, or may not appear in the case of an iPod touch being connected.
8 Adjust the volume.
Press and hold SOURCE/OFF for 1 second to stop playback.
Removing the iPod
1 Stop the iPod playback. 2 Press OPEN. 3 Press PUSH OPEN on the TUNE TRAY. 4 Remove the iPod. 5 Slide in the TUNE TRAY, and close the front panel.
Playing back via the USB (external) connector
Before connecting the iPod, turn down the volume of the unit.
1 Slide the USB cover.

2 Connect the iPod to the USB connector via the dock connector to USB cable.

3 Press SOURCE/OFF repeatedly until "USB" appears, and then press MODE to switch the USB device.
"USB External" appears.
The iPod will turn on automatically, and the display will appear on the iPod screen as below.*

Tip We recommend the RC-100IP USB cable (not supplied) to connect the dock connector.
The tracks on the iPod start playing automatically from the point last played. If an iPod is already connected, to start playback, repeat step 3. (“iPod” appears in the display when iPod is recognized.)
* In the case of an iPod touch or iPhone being connected, or that the iPod was last played back using passenger control, the logo will not appear on the screen.
4 Adjust the volume.
Press and hold SOURCE/OFF for 1 second to stop playback.
Removing the iPod
1 Stop the iPod playback. 2 Remove the iPod.
Caution for iPhone
When you connect an iPhone via USB, telephone volume is controlled by iPhone itself. In order to avoid sudden loud sound after a call, do not increase the volume on the unit during a telephone call.
Notes
- Do not remove the iPod during playback, otherwise data may be damaged.
- Do not place non-USB devices on the TUNE TRAY, or foreign objects, such as coins, keys, cards, liquids, etc.
- Do not place a flammable object such as a lighter on the TUNE TRAY, as this may cause smoke, fire, or other accident.
- For iPod users, use the supplied adaptor XA-50IP. It is designed for use with this unit (in the TUNE TRAY) only, and should not be used with the other USB devices.
- This unit cannot recognize iPod via a USB hub.
- Slide in the TUNE TRAY and close the front panel before playback, as damage may result in the case of an obstruction in the car, etc.
- If the front panel does not fully open because of the dashboard shape at the installation position, detach the front panel and open the TUNE TRAY manually. For how to detach the front panel, see page 8.
- It is extremely dangerous to connect or remove the iPod while driving.
Tips
- When the ignition key is turned to the ACC position, and the unit is on, the iPod will be recharged.
- If the iPod is disconnected during playback, "NO Device" appears in the display of the unit.
Resuming mode
When the iPod is connected to the dock connector, the mode of this unit changes to resuming mode and playback starts in the mode set by the iPod.
In Resuming mode, repeat/shuffle play does not function.
Display items
A Source (iPod) indication BClock © Artist name/Album name, Track name, Album number/Track number/Elapsed playing time
To change display items Ⓐ, press DSPL.
Tip
When album/podcast/genre/artist/playlist is changed, its item number appears momentarily.
Notes
- Playing tracks in shuffle play is selected from a current iPod.
- Some letters stored in iPod may not be displayed correctly.
Repeat play
1 Press and hold the multi-way encoder. 2 Rotate the multi-way encoder to select "Repeat," then press it. 3 Rotate the multi-way encoder to select the setting, then press it. The setting is complete.
4 Press → (BACK).
The setting is complete and the display returns to normal reception/play mode.
(with the card remote commander)
1 During playback, press ① (REP) repeatedly until the desired setting appears.
After 3 seconds, the setting is complete.
Select To play
| Repeat Track track repeatedly. | |
| Repeat Album*1 | album repeatedly. |
| Repeat Podcast*2 | podcast repeatedly. |
| Repeat Artist*3 | artist repeatedly. |
| Repeat Playlist*4 | playlist repeatedly. |
| Repeat Genre*5 | genre repeatedly. |
*1 Available when selecting track by "Album" with Quick-BrowZer (see page 30). *2 Available when selecting track by "Podcast" with Quick-BrowZer (see page 30). *3 Available when selecting track by "Artist" with Quick-BrowZer (see page 30). *4 Available when selecting track by "Playlist" with Quick-BrowZer (see page 30). *5 Available when selecting track by "Genre" with Quick-BrowZer (see page 30).
To return to normal play mode, select "Repeat off."
Shuffle play
1 During playback, press and hold ZAP/SHUF. 2 Press ZAP/SHUF repeatedly until the desired setting appears.

[SHUF]
(with the card remote commander)
1 During playback, press ② (SHUF) repeatedly until the desired setting appears.
After 3 seconds, the setting is complete.
| Select To play | |
| Shuffle Album*1 | album in random order. |
| Shuffle Podcast*2 | podcast in random order. |
| Shuffle Artist*3 | artist in random order. |
| Shuffle Playlist*4 | playlist in random order. |
| Shuffle Genre*5 | genre in random order. |
| Shuffle Device*6 | device in random order. |
*1 Available when selecting track by "Album" with Quick-BrowZer (see page 30). *2 Available when selecting track by "Podcast" with Quick-BrowZer (see page 30). *3 Available when selecting track by "Artist" with Quick-BrowZer (see page 30). *4 Available when selecting track by "Playlist" with Quick-BrowZer (see page 30). *5 Available when selecting track by "Genre" with Quick-BrowZer (see page 30). *6 Available when selecting track by "Track" with Quick-BrowZer (see page 30).
To return to normal play mode, select "off."
Operating an iPod directly — Passenger control
You can operate an iPod connected to the dock connector directly. This function works when the iPod is connected to the USB (external) connector only.
1 During playback, press and hold MODE.
“Mode iPod” appears and you will be able to operate the iPod directly.
To exit the passenger control
Press and hold MODE.
Then “Mode Audio” will appear and the play mode will change to “Resuming.”
Notes
- The volume can be adjusted only by the unit.
- If this mode is canceled, the repeat setting will be turned off.
Pandora® via USB (iPhone)
Pandora Radio is a FREE personalized radio service, now available to stream music through your iPhone.
Simply start with the name of one of your favorite artists, songs or classical composers and Pandora will create a “station” that plays their music and other music like it.
You can control Pandora on a USB-connected iPhone from this unit.
Download the latest version of Pandora and obtain more information from www.pandora.com
For details on usable devices, visit the following support site.
Support site
- Do not place a cellular phone or a device with wireless communication functions on the TUNE TRAY, as it may not receive phone signals or communication may be terminated.
- Certain Pandora service functions may not be available.
- Pandora's service is currently only available in the U.S.
Playing back Pandora
Playing back via the USB (external) connector
Before connecting the iPhone, turn down the volume of the unit.
1 Slide the USB cover.

2 Connect the iPhone to the USB connector via the dock connector to USB cable.

3 Press SOURCE/OFF repeatedly until "Pandora USB" appears, and then press MODE to switch the USB device.
"Pandora USB EXT" and "Please launch Pandora Application on mobile device." appear.
4 Launch Pandora on the iPhone.
5 Adjust the volume on this unit.
To pause playback
Press ☐ PAUSE. To cancel, press again.
To skip a song
Push the multi-way encoder right.
Notes
- You cannot skip back to the previous song.
- Pandora limits the number of skips allowed.
"Thumbs" feedback
The “Thumbs Up” or “Thumbs Down” feedback allows you to personalize stations to suit your preference.

Thumbs Up
During playback, push and hold the multi-way encoder up for 1 second.
Thumbs Down
During playback, push and hold the multi-way encoder down for 1 second.
Note
Under certain circumstances, "Thumbs" feedback may be unavailable, and "Cannot Thumbs Up/Down" will be displayed.
Station list
The station list allows you to easily select a desired station.
1 During playback, press (BROWSE). Pandora stations on your list appear.
2 Push the multi-way encoder right to select the sorting order: "Date" or "A-Z."
"Date" sorts stations by the date they were added to the account, and "A-Z" sorts station names in alphabetical order.
3 Rotate the multi-way encoder to select the desired station, then press it. Playback starts.

A Current sort order B Current station © Shared Icon
QuickMix
QuickMix allows you to listen to songs played on one or more Pandora stations in your station list randomly.
Edit your QuickMix station selections on the device before connection.
Bookmarking
The song or artist currently being played can be bookmarked and stored in your Pandora account.
1 During playback, press and hold MODE until "Bookmark" appears.
2 Rotate the multi-way encoder to select "Song" or "Artist", then press it.
The bookmark is stored, and the system returns to the previous display.
Note
Under certain circumstances, bookmark store may fail, and "Bookmark Error" will be displayed. In this case, try to bookmark again later.
Searching for a track
Searching a track by name — Quick-BrowZer™
You can search for a track in a USB device easily by category.
1 Press Q (BROWSE). The unit enters the Quick-BrowZer mode, and the list of search categories appears.
2 Rotate the multi-way encoder to select the desired search category, then press it to confirm.
3 Repeat step 2 until the desired track is selected.
Playback starts.
To return to the previous display
Press ↩ (BACK).
To exit the Quick-BrowZer mode
Press Q (BROWSE).
Note
When entering the Quick-BrowZer mode, the repeat/shuffle setting is canceled.
Searching by skip items — Jump mode
When many items are in a category, you can search for a desired item quickly.
1 Push the multi-way encoder right in Quick-BrowZer mode.
The following display appears.
![graph TD A["A"] --> B["B"] C["C"] --> D["Block"] style A fill:#fff,stroke:#000 style B fill:#fff,stroke:#000 style C fill:#fff,stroke:#000 style D fill:#fff,stroke:#000](/content/2026/06/1339517/images/c8ba059cec0aec20721c67fa4e4f480004326a85ca94cf6d8f9129f29e7b34a8.jpg)
A Current item number B Total item number in the current layer ©Item name
Then the item name will appear.
2 Rotate the multi-way encoder until the desired item or one near the desired item appears.
It skips in steps of 10% of the total item number.
3 Press the multi-way encoder.
The display returns to the Quick-BrowZer mode and the selected item appears.
4 Push the multi-way encoder up/down to select the desired item, then press it.
Playback starts if the selected item is a track.
To cancel Jump mode
Press (BACK) or push the multi-way encoder left. A list of the search categories appears.
Searching by alphabetical order — Alphabet search
When an iPod or USB device containing song information is connected to the unit, you can search for a desired item by alphabetical order. While this unit is reading song information, "💡" appears on the display. You can use the Alphabet search function when "💡" disappears. For a USB device, the maximum number of searchable files (tracks) is 5,000.
1 Push the multi-way encoder right in Quick-BrowZer mode.
An alphabet list appears.

2 Rotate the multi-way encoder to select the first letter of the desired item, then press it.
A list of items in the selected category appears in alphabetical order.
If there is no song beginning with the desired letter, "Not Found" appears.
3 Push the multi-way encoder up/down to select the desired item, then press it.
Playback starts if the selected item is a track.
To cancel Alphabet search
Press (BACK) or push the multi-way encoder left. A list of the search categories appears.
Notes
- For a USB device, it may take time to read song information after connecting to the unit. While reading song information, "" appears in the top left of the display.
- Only the song information of the USB device last connected can be stored.
- If replacing the car battery, changing connections or resetting the unit, the stored song information will be erased.
Searching a track by listening to track passages — ZAPPIN™
While playing back short track passages in a USB device in sequence, you can search for a track you want to listen to.
ZAPPIN mode is suitable for searching for a track in shuffle or shuffle repeat mode.
1 Press ZAP/SHUF during playback.
After “ZAPPIN” appears in the display, playback starts from a passage of the next track.
The passage is played for the set time, then a click sounds and the next passage starts.
Track

2 Press the multi-way encoder or ZAP/SHUF when a track you want to listen is played back.
The track that you select returns to normal play mode from the beginning.
To search a track by ZAPPIN mode again, repeat steps 1 and 2.
In the case of "SensMe™ channels" playback
If the track being searched is transferred by “Content Transfer,” the most melodic or rhythmical sections* of tracks are played. For details on the SensMe™ function, see page 22.
* May not be detected correctly.
Tips
- You can select the playback time from about 6 seconds/15 seconds/30 seconds (page 43). You cannot select the passage of the track to playback.
- Push the multi-way encoder left/right in ZAPPIN mode to skip a track.
- Push the multi-way encoder up/down in ZAPPIN mode to skip album.
Bluetooth (Handsfree calling and Music streaming)
Bluetooth Operations
To use the Bluetooth function, the following procedure is necessary.
① Pairing
When connecting Bluetooth devices for the first time, mutual registration is required. This is called “pairing.” This registration (pairing) is required only for the first time, as this unit and other devices will recognize each other automatically from the next time. You can pair with up to 9 devices.
② Connecting
After pairing is made, connect this unit and the Bluetooth device. Depending on the device, connection automatically made along with the pairing.
③ Handsfree calling/Music streaming
You can make/receive a handsfree call, or listen to audio through this unit.
For details of usable devices, visit the following support site.
Support site
http://esupport.sony.com http://www.sony.com/mobileAV
About Bluetooth icons
The following icons are used by this unit.
| Lit:Bluetooth signal is on.Flashing: Pairing is in standby mode.None: Bluetooth signal is off. | ||
| Lit: Connected to a cellular phone.Flashing: Connection is in progress.None: No cellular phone is connected for handsfree calling. | ||
| Lit: Connected to a device.Flashing: Connection is in progress.None: No device is connected for music streaming. | ||
| Lit: Some unread SMS messages exist.Flashing: A new SMS message has been received.None: No unread SMS messages exist. | ||
| Signal strength status of connected cellular phone.* | |
| Remaining battery status of connected cellular phone.* |
* Turns gray without handsfree connection. Differs in the case of a cellular phone.
Installing the microphone
To capture your voice during handsfree calling, you need to install the microphone (supplied).
For details on how to connect the microphone, refer to the supplied “Installation/Connections” guide.
Pairing
First, register (“pair”) a Bluetooth device (cellular phone, etc.) and this unit with each other. You can pair up to 9 devices. Once pairing is established, there is no need for pairing again.
1 Press and hold BLUETOOTH.
“*flashes (pairing is in standby mode).
2 Set the Bluetooth device to search for this unit.
A list of detected devices appears in the display of the device to be connected. This unit is displayed as “Sony Automotive” on the device to be connected.

3 If passkey* input is required on the display of the device to be connected, input "0000."

This unit and the Bluetooth device memorize each other's information, and when pairing is made, this unit is ready for connection to the device.
4 Set the Bluetooth device to connect to this unit.
"Connection Complete" appears and connection is complete.
“” or “” appears when the connection is made.
* Passkey may be called "passcode," "PIN code," "PIN number" or "password," etc., depending on the device. If the device supports Bluetooth version 2.1, passkey input is not required.
Notes
- While connecting to a Bluetooth device, this unit cannot be detected from another device. To enable detection, enter the pairing mode and search for this unit from another device.
- It may take time to search or connect.
- Depending on the device, the confirmation display of the connection appears before inputting the passkey.
- The time limit for inputting the passkey differs depending on the device.
- This unit cannot be connected to a device that supports only HSP (Head Set Profile).
Connecting
If pairing has already been achieved, start operation from here.
Connecting a cellular phone
1 Be sure that both this unit and the cellular phone are switched to Bluetooth signal on.
2 Connect to this unit using the cellular phone.
“” appears when the connection is made. If you select the Bluetooth Phone source after the connection is made, the network name and the connected cellular phone name also appear in the display.
Connecting to the cellular phone last-connected from this unit
1 Be sure that both this unit and the cellular phone are switched to Bluetooth signal on. 2 Press SOURCE/OFF repeatedly until "Bluetooth Phone" appears. 3 Press the multi-way encoder. "flashes while the connection is being made. "stays lit when the connection is made.
Notes
- Some cellular phones require permission to access their phonebook data during handsfree connection to this unit. Obtain permission via the cellular phone.
- While streaming Bluetooth audio, you cannot connect from this unit to the cellular phone. Connect from the cellular phone to this unit instead. A connecting noise may be heard over playback sound.
Tips
- With Bluetooth signal on: when the ignition is switched to on, this unit reconnects automatically to the last-connected cellular phone. But automatic connection also depends on the cellular phone's specification. If this unit does not reconnect automatically, connect manually.
- You can also select the Bluetooth Phone source by pressing and holding (BROWSE) on this unit for 2 or more seconds, or pressing CALL on the card remote commander.
Connecting an audio device
1 Be sure that both this unit and the audio device are switched to Bluetooth signal on.
2 Connect to this unit using the audio device.
""appears when the connection is made.

Connecting to the audio device last-connected from this unit
1 Be sure that both this unit and the audio device are switched to Bluetooth signal on. 2 Press SOURCE/OFF repeatedly until "Bluetooth Audio" appears. 3 Press PAUSE.
"flashes while the connection is being made. "stays lit when the connection is made.
Handsfree calling
Once the unit is connected to the cellular phone, you can make/receive handsfree calls by operating this unit.
Making calls
Calling from the phonebook
You need to make sure the appropriate phonebook has been selected. For details on how to select a phonebook, see “Selecting a phonebook” (page 35).
1 Press SOURCE/OFF repeatedly until "Bluetooth Phone" appears. 2 Press Q (BROWSE). The phonebook appears. 3 Rotate the multi-way encoder to select an initial from the initial list, then press it. 4 Rotate the multi-way encoder to select a name from the name list, then press it. 5 Rotate the multi-way encoder to select a number from the number list, then press it. The phone call starts.
Calling from the call history
1 Press SOURCE/OFF repeatedly until "Bluetooth Phone" appears. 2 Press and hold (BROWSE) for 2 or more seconds. A list of the call history appears. 3 Rotate the multi-way encoder to select a name and phone number from the call history, then press it. The phone call starts.
Note
You can call from the call history (up to 20).
Calling by direct phone number input
You can call by direct phone number input using only the card remote commander.
1 Press CALL on the card remote commander to select the Bluetooth Phone source. 2 Press the number buttons (0-9, *or) on the card remote commander to enter the phone number. 3 Press ENTER on the card remote commander. The phone call starts.
To input “+,” press and hold the 0 button on the card remote commander.
Calling by preset number
You can store up to 6 contacts in the preset dial. For details on how to store, see “Preset dial” (page 36).
1 Press SOURCE/OFF repeatedly until "Bluetooth Phone" appears. 2 Push the multi-way encoder up/down to select the contact you want to call, then press it. The phone call starts.
To end a call
Press the multi-way encoder again, or SOURCE/OFF.
Note
Even if the call is ended, the Bluetooth connection is not canceled.
Calling by redial
1 Press SOURCE/OFF repeatedly until "Bluetooth Phone" appears. 2 Press and hold the multi-way encoder for 2 or more seconds. The phone call starts.
Receiving calls
When receiving a call, a ringtone is output from your car speakers. The name and the phone number appear in the display.
1 Press the multi-way encoder when a call is received with a ringtone.
The phone call starts.
Note
Only the phone number may appear, depending on the cellular phone.
Auto Answer setting
You can select an auto answer setting from "off," "Short" or "Long" (page 43).
Ringtone setting
You can switch the ringtone from “Default” or “Cellular” (page 43).
* Depending on the cellular phone, this unit's ringtone may be output even if set to "Cellular."
To reject a call
Press SOURCE/OFF.
Operations during a call
Presetting the volume of the ringtone and talker's voice
You can preset the volume level of the ringtone and talker's voice.
To adjust the ringtone volume:
Rotate the multi-way encoder while receiving a call. “Ring Volume” appears and ringtone volume can be adjusted.
To adjust the talker's voice volume:
Rotate the multi-way encoder during a call. “Talk Volume” appears and the talker’s voice volume can be adjusted.
Note
If the Bluetooth Phone source is selected, rotating the multi-way encoder will only adjust the talker's volume.
EC/NC Mode (Echo Canceller/Noise Canceller Mode)
You can reduce echo and noise.
Push the multi-way encoder left/right to set to "EC/NC Mode 1" or "EC/NC Mode 2."
Note
Configurable during a call.
Sending DTMF (Dual Tone Multiple Frequency) tones
You can send DTMF tones.
Press the required number buttons (0 - 9, * or
#) on the card remote commander to send DTMF tones.
MIC Gain adjustment
You can adjust the volume for the other party.
Push the multi-way encoder up/down to adjust the volume levels ("MIC Gain LOW," "MIC Gain MID," "MIC Gain HI").
Note
Configurable during a call.
Call transfer
To activate/deactivate the appropriate device (this unit/cellular phone), check the following.
1 Press MODE or use your cellular phone.
For details on cellular phone operation, refer to your cellular phone manual.
Note
Depending on the cellular phone, handsfree connection may be cut off when call transfer is attempted.
Phonebook management
Notes on phonebook data
- Prior to disposal or changing ownership of your car with this unit still installed, be sure to press the RESET button to erase all the phonebook data in this unit to prevent possible unauthorized access. Disconnecting the power supply lead will also erase all the phonebook data.
- Downloaded phonebook data from a cellular phone cannot be overwritten by subsequent data. However, some data (name, etc.,) may be duplicated as a result.
- If you press the RESET button, the stored phonebook data will be erased.
- Phonebook data may be lost if this unit is damaged.
- When disposing of this unit, phonebook data should be deleted with "BT Initialize" (page 37).
- Up to 500 contacts can be stored in the phonebook. If you try to register more than 500 contacts, "Memory Full" appears.
Selecting a phonebook
Before making a call, make sure the appropriate phonebook has been selected: cellular phone or this unit.
If you select “Cellular,” you can access the phonebook in a cellular phone via this unit*.
* If the cellular phone does not support PBAP, the phonebook in the cellular phone cannot be selected.
1 Press and hold SOURCE/OFF for 1 second. 2 Press and hold the multi-way encoder. 3 Rotate the multi-way encoder until "PhoneBook Select" appears, then press it. 4 Rotate the multi-way encoder to select "Cellular" or "Head Unit," then press it.

5 Press ↩ (BACK).
Receiving phonebook data from a cellular phone
1 Press SOURCE/OFF repeatedly until "Bluetooth Phone" appears. 2 Press Q (BROWSE). The phonebook appears. 3 Rotate the multi-way encoder to select "Add Contact," then press it. "Waiting…" appears. 4 Send the phonebook data by operating the cellular phone. "Data Receiving…" appears while receiving the phonebook data. "Complete" appears when the phonebook data is stored on this unit.
Notes
- When connecting to this unit, depending on the cellular phone, you may be asked to give this unit permission to access the phonebook in the cellular phone. Permission is required from the cellular phone.
- Before receiving phonebook data, disconnect any cellular phone or audio device.
- To cancel the transfer of phonebook data, operate the cellular phone.
- If the power supply lead is disconnected, the stored phonebook data will be erased.
Deleting from the phonebook in this unit
1 Press SOURCE/OFF repeatedly until "Bluetooth Phone" appears. 2 Press Q (BROWSE). The phonebook appears. 3 Rotate the multi-way encoder to select an initial from the initial list, then press it. 4 Rotate the multi-way encoder to select a name from the name list, then press it. 5 Rotate the multi-way encoder to select "Delete Contact" from the number list, then press it. 6 Rotate the multi-way encoder to select "Yes," then press it.
To clear all phonebook data, select "Delete All" in step 3. After clearing, confirm that all phonebook data has been cleared properly.
Preset dial
Contacts (up to 6) of the phonebook in a cellular phone can be stored in the preset dial.
1 Press SOURCE/OFF repeatedly until "Bluetooth Phone" appears. 2 Push the multi-way encoder up/down to select the preset number ("Preset 1" to "Preset 6") to store. 3 Push the multi-way encoder right to enter storing mode.
"Waiting..." appears.
4 Send the phonebook data by operating the cellular phone.
The contact is stored in the selected preset number.
Voice dial activation
You can activate voice dialing with a cellular phone connected to this unit by saying the voice tag stored on the cellular phone, then make a call.
1 Press SOURCE/OFF repeatedly until "Bluetooth Phone" appears. 2 Press the multi-way encoder.
"Please say the name..." appears.
3 Say the voice tag stored on the cellular phone.
Your voice is recognized, and the call is made.
Notes
- Check that unit and cellular phone are connected beforehand.
- Store a voice tag on your cellular phone beforehand.
- If you activate voice dialing with a cellular phone connected to this unit, this function may not work in some cases.
- Noises such as the engine running may interfere with sound recognition. In order to improve recognition, operate under conditions where noise is minimized.
- Voice dialing may not work in some situations, depending on the effectiveness of the cellular phone's recognition function. For details, see the support site.
- Do not use voice dialing on the cellular phone during handsfree device connection.
Tips
- Speak in the same way as you did when you stored the voice tag.
- Store a voice tag while seated in the car, via this unit with Bluetooth Phone source selected.
SMS indicator
While connecting a cellular phone to this unit, the SMS indicator informs you of any incoming or unread SMS messages.
If you receive a new SMS message, the SMS indicator flashes.

If there are any unread SMS messages, the SMS indicator stays lit.

Note
Function of the SMS indicator may depend on the cellular phone.
Music streaming
Listening to music from an audio device
You can listen to music of an audio device on this unit if the audio device supports A2DP (Advanced Audio Distribution Profile) of Bluetooth technology.
1 Connect this unit and the Bluetooth audio device (page 33). “” appears during connection.
2 Turn down the volume on this unit.
3 Press SOURCE/OFF repeatedly until "Bluetooth Audio" appears.
4 Operate the audio device to start playback.
5 Adjust the volume on this unit.
Adjusting the volume level
The volume level is adjustable for any difference between the unit and the Bluetooth audio device.
1 Start playback of the Bluetooth audio device at a moderate volume. 2 Set your usual listening volume on the unit. 3 Press the multi-way encoder. 4 Rotate the multi-way encoder until "Bluetooth Audio Level" appears, then press it. 5 Rotate the multi-way encoder to adjust the input level ("+ 18dB" – "0dB" – "- 8dB").
Operating an audio device with this unit
You can perform the following operations on this unit if the audio device supports AVRCP (Audio Video Remote Control Profile) of Bluetooth technology. (The operation differs depending on the audio device.)
To Do this
| Play Press PAUSE .* | 1 | |
| Pause Press PAUSE .* | 1 | |
| Skip tracks Push the multi-way encoder left/right [once for each track]. | ||
| Reverse/ Fastforward | Push and hold the multi-way encoder left/right. | |
| Repeat play Press REP on the card remote commander.*2 | ||
| Shuffle play | Press SHUF on the card remote commander.*2*3 | |
Skip albums Push the multi-way encoder up/down.
*1 Depending on the device, it may be necessary to press twice. *2 Press repeatedly until the desired setting appears. *3 You can also shuffle play by pressing and holding ZAP/SHUF on this unit.
Operations other than the above should be performed on the audio device.
Notes
- Depending on the audio device, its information, such as title, track number/time, playback status, etc., may not be displayed on this unit. The information is displayed during Bluetooth Audio playback only.
- Even if the source is changed on this unit, playback of the audio device does not stop.
Tip
You can connect a cellular phone that supports A2DP (Advanced Audio Distribution Profile) as an audio device and listen to music.
Other settings
Initializing Bluetooth Settings
You can initialize all the Bluetooth-related settings from this unit.
1 Press and hold the multi-way encoder. The menu list appears. 2 Rotate the multi-way encoder to select "BT Initialize," then press it. The confirmation appears.
3 Rotate the multi-way encoder to select "Yes."
"Initializing..." appears while initializing the Bluetooth settings.
4 Press ↩ (BACK).
The display returns to normal reception/play mode.
Note
When disposing of this unit, phonebook data should be deleted with "BT Initialize."
Pandora via Bluetooth (Android™ & BlackBerry® phones)
Pandora Radio is a FREE personalized radio service, now available to stream music through your Android and BlackBerry phone. Simply start with the name of one of your favorite artists, songs or classical composers and Pandora will create a "station" that plays their music and other music like it.
You can control Pandora on Bluetooth-connected Android and BlackBerry phones that have the latest version of Pandora installed from this unit.
Download the latest version of Pandora and obtain more information from www.pandora.com
For details of usable devices, visit the following support site.
Support site
http://esupport.sony.com http://www.sony.com/mobileAV
Notes
- Do not place a cellular phone or a device with wireless communication functions on the TUNE TRAY, as it may not receive phone signals or communication may be terminated.
- Certain Pandora service functions may not be available.
- You cannot control Pandora on smartphones other than Android and BlackBerry phones.
- Pandora's service is currently only available in the U.S.
To use the Bluetooth function, the following procedure is necessary.
① Pairing
When connecting Bluetooth devices for the first time, mutual registration is required. This is called “pairing.” This registration (pairing) is required only for the first time, as this unit and other devices will recognize each other automatically from the next time. You can pair with up to 9 devices.
② Connecting
After pairing is made, connect this unit and the Bluetooth device. Depending on the device, connection is made automatically along with the pairing.
Playing back Pandora
You can listen to Pandora internet radio through this unit.
Playing back Pandora
Playing back via Bluetooth
1 Connect this unit and the Bluetooth device (page 33). 2 Turn down the volume on this unit. 3 Press SOURCE/OFF repeatedly until "Please launch Pandora App on mobile device and press PAUSE on this unit." appears. 4 Launch Pandora on the Bluetooth device. 5 Press PAUSE on this unit.*1 6 Adjust the volume on this unit.
To pause playback
Press ☐ PAUSE. To cancel, press again.
To skip a song
Push the multi-way encoder right.
Notes
- You cannot skip back to the previous song.
- Pandora limits the number of skips allowed.
*1 When the mobile device is connected, the following message may appear. Make sure that the number of the device is displayed (e.g., 123456), and then select "Yes" on both the device and the unit.

"Thumbs" feedback
The “Thumbs Up” or “Thumbs Down” feedback allows you to personalize stations to suit your preference.

Thumbs Up
During playback, push and hold the multi-way encoder up for 1 second.
Thumbs Down
During playback, push and hold the multi-way encoder down for 1 second.
Note
Under certain circumstances, “Thumbs” feedback may be unavailable, and “Cannot Thumbs Up/Down” will be displayed.
Station list
The station list allows you to easily select a desired station.
1 During playback, press (BROWSE). Pandora stations on your list appear. 2 Push the multi-way encoder right to select the sorting order: "Date" or "A-Z." “Date” sorts stations by the date they were added to the account, and “A-Z” sorts station names in alphabetical order.
3 Rotate the multi-way encoder to select the desired station, then press it.
Playback starts.
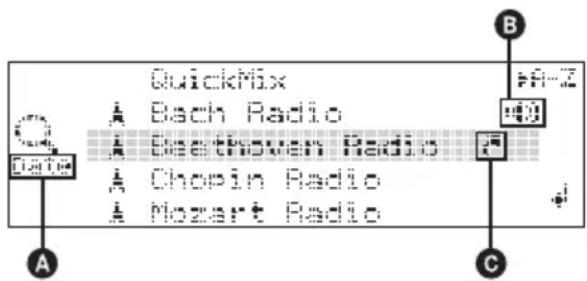
A Current sort order
B Current station
© Shared Icon
QuickMix
QuickMix allows you to listen to songs played on one or more Pandora stations in your station list randomly.
Edit your QuickMix station selections on the device before connection.
Bookmarking
The song or artist currently being played can be bookmarked and stored in your Pandora account.
1 During playback, press and hold MODE until "Bookmark" appears.
2 Rotate the multi-way encoder to select "Song" or "Artist", then press it.
The bookmark is stored, and the system returns to the previous display.
Note
Under certain circumstances, bookmark store may fail, and "Bookmark Error" will be displayed. In this case, try to bookmark again later.
Sound Settings and Setup Menu
Changing the sound settings
Adjusting the sound characteristics
1 During reception/playback, press the multi-way encoder. 2 Rotate the multi-way encoder until the desired menu item appears, then press it. 3 Use the multi-way encoder to select the setting, then press it.
4 Press ↩ (BACK).
The setting is complete and the display returns to normal reception/play mode.
The following items can be set: The operation of the multi-way encoder will differ depending on the items.
↑↓ : Push the multi-way encoder up/down ←→: Push the multi-way encoder left/right Ω : Rotate the multi-way encoder
EQ7 Preset (page 40)
EQ7 Parametric Tune (page 40)
Listening Position Front/Rear (page 41)
Listening Position Subwoofer (page 41)
Listening Position Custom Tune (page 41)
Fader & Balance
Front/Rear/Center (↑↓)
Adjusts the relative level.
Right/Left/Center (←→)
Adjusts the sound balance.
Subwoofer Tune & LPF
Phase (Ω)
Selects the phase: "Normal," "Reverse."
FREQ (↔)
Selects the subwoofer cut-off frequency:
“50Hz,” “60Hz,” “80Hz,” “100Hz,” “120Hz.”
Slope (↑↓)
Selects the LPF slope: "1," "2," "3."
Subwoofer Level (↑↓)
Adjusts the subwoofer volume: “+10 dB” – “0 dB” – “-10 dB.”
(“-∞” is displayed at the lowest setting.)
continue to next page →
HPF
FREQ (↔)
Selects the cut-off frequency: "off," "50Hz,"
“60Hz,” “80Hz,” “100Hz,” “120Hz.”
Slope (↑↓)
Select the HPF slope: "1," "2," "3."
DM+ Advanced (page 42)
Rear Bass Enhancer (page 42)
Dynamic Loudness (page 42)
Bluetooth Audio Level (page 37)
Enjoying sophisticated sound functions — Advanced Sound Engine
Advanced Sound Engine, Sony's new sound engine, creates an ideal in-car sound field with digital signal processing. Advanced Sound Engine contains the following features: EQ7, Listening Position, DM+ Advanced, Rear Bass Enhancer, Dynamic Loudness.
Selecting the sound quality — EQ7 Preset
You can select an equalizer curve from 7 equalizer curves (“Xplod,” “Vocal,” “Edge,” “Cruise,” “Space,” “Gravity,” “Custom” or “off”).
1 During reception/playback, press the multi-way encoder. 2 Rotate the multi-way encoder until "EQ7 Preset" appears, then press it. 3 Push the multi-way encoder up/down until the desired equalizer curve appears, then press it. 4 Press ↩ (BACK).
The display returns to normal reception/play mode.
To cancel the equalizer curve, select "off" on step 3.
Tip
Adjusted equalizer curve settings can be memorized separately for Tuner, USB (SensMe™, Pandora USB) and Bluetooth Audio (Bluetooth Pandora) sources.
Customizing the equalizer curve — EQ7 Parametric Tune
“Custom” of EQ7 allows you to make your own equalizer settings.
Select "Custom" of EQ7 Preset.
If you set "off" for EQ7 Preset, "EQ7 Parametric
Tune" does not appear in the sound settings menu.
1 Select a source, then press the multi-way encoder. 2 Rotate the multi-way encoder until "EQ7 Parametric Tune" appears, then press it. 3 Setting the equalizer curve.
- Frequency range
Rotate the multi-way encoder to select “Band1” to “Band7.”
- Center frequency
Push the multi-way encoder left/right to select the center frequency.
Selectable center frequency in each band:
Band1: “40 Hz” or “63 Hz”
Band2: “100 Hz” or “160 Hz”
Band3: “250 Hz” or “400 Hz”
Band4: “630 Hz” or “1.0 kHz”
Band5: “1.6 kHz” or “2.5 kHz”
Band6: “4.0 kHz” or “6.3 kHz”
Band 7: “10.0 kHz” or “16.0 kHz”

- Volume level
Push the multi-way encoder up/down to adjust the equalizer curve.
The volume level is adjustable in 1 dB steps, from -6 dB to +6 dB.

4 Press the multi-way encoder when you finish all equalizer settings.
5 Press ↩ (BACK).
The display returns to normal reception/play mode.
To restore the factory-set equalizer curve, select “Initialize” and “Yes” in step 3.
Optimizing sound by Time Alignment — Listening Position
The unit can change the localization of sound by delaying the sound output from each speaker to suit your position, and simulate a natural sound field with the feeling of being in the center of it wherever you sit in the car.
The options for “Listening Position Front/Rear” are indicated below.
"Front R" (①): Front right
"Front L" (②): Front left
"Front" (③): Center front
“All” (4): In the center of your car
"Custom": Precisely calibrated position (page 41)
"off": No position set

You can also set the approximate subwoofer position from your listening position if:
– the subwoofer is connected
– the listening position is set to “Front R,” “Front L,” “Front” or “All.”
The options for “Listening Position Subwoofer” are indicated below.
"Near" (A): Near
"Normal" (B): Normal
"Far" (C): Far
1 During reception/playback, press the multi-way encoder.
2 Rotate the multi-way encoder until "Listening Position Front/Rear" appears, then press it.
3 Push the multi-way encoder up/down to select from "Front R," "Front L," "Front," "All" or "Custom," then press it.
4 Rotate the multi-way encoder until "Listening Position Subwoofer" appears, then press it.
If you select “Front R,” “Front L,” “Front” or “All” in step 3 above, you can set the subwoofer position. Push the multi-way encoder up/down to select from “Near,” “Normal” or “Far,” then press it.
5 Press ↩ (BACK).
The display returns to normal reception/play mode.
To cancel the listening position, select "off" in step 3.
Note
If you select "Custom" in step 3 above, you cannot set the subwoofer position.
Precisely calibrating by Time Alignment
— Listening Position Custom Tune
You can precisely calibrate your listening position from each speaker so that the sound delay reaches the listener more correctly.
Before starting, measure the distance between your listening position and each speaker.
Select "Custom" of Listening Position Front/Rear.
1 During reception/playback, press the multi-way encoder.
2 Rotate the multi-way encoder until "Listening Position Custom Tune" appears, then press it.
3 Setting for the listening position.
- Speaker Select
Push the multi-way encoder left/right to select the speaker.
- Distance
Push the multi-way encoder up/down to set the distance between your listening position and speakers.
The distance is adjustable in 2 cm (4/5 in) steps, between 30 and 300 cm (0.99 and 9.9 ft).

4 Press the multi-way encoder when you complete all settings.
5 Press ← (BACK).
The display returns to normal reception/play mode.
DM+ Advanced
DM+ Advanced improves digitally compressed sound by restoring high frequencies lost in the compression process.
This function works when the USB, SensMe™, Pandora USB, Bluetooth Audio or Bluetooth Pandora source is selected only.
1 During playback, press the multi-way encoder. 2 Rotate the multi-way encoder until "DM+ Advanced" appears, then press it. 3 Push the multi-way encoder up/down to select "on," then press it.
4 Press ← (BACK).
The display returns to normal reception/play mode.
Tip
Adjusted DM+ settings can be memorized separately for USB (SensMe™, Pandora USB) and Bluetooth Audio (Bluetooth Pandora) sources.
Using rear speakers as subwoofer — Rear Bass Enhancer
Rear Bass Enhancer enhances the bass sound by applying the low pass filter setting (page 39) to the rear speakers. This function allows the rear speakers to work as a subwoofer if one is not connected.
1 During reception/playback, press the multi-way encoder. 2 Rotate the multi-way encoder until "Rear Bass Enhancer" appears, then press it. 3 Push the multi-way encoder up/down to select from "Level 1," "Level 2" or "Level 3," then press it.
4 Press → (BACK).
The display returns to normal reception/play mode.
Compensating volume level — Dynamic Loudness
“Dynamic Loudness” refers to compensating for volume level and signal gain.
1 During reception/playback, press the multi-way encoder. 2 Rotate the multi-way encoder until "Dynamic Loudness" appears, then press it. 3 Push the multi-way encoder up/down to select "on," then press it.
4 Press ↩ (BACK).
The display returns to normal reception/play mode.
Adjusting setup items — MENU
1 Press and hold the multi-way encoder. 2 Rotate the multi-way encoder to select the desired menu item, then press it. 3 Push the multi-way encoder up/down to select the setting, then press it. The setting is complete.
4 Press ↩ (BACK).
The setting is complete and the display returns to normal reception/play mode.
The following items can be set (follow the page reference for details):
Setup
Clock Adjust (page 8)
CT (Clock Time) (page 19)
Beep
Activates the beep sound: "on," "off."
RM (Rotary Commander)
Changes the operative direction of the rotary commander controls: “NORM,” “REV.”
Auto Off
Shuts off automatically after a desired time when the unit is turned off: “NO,” “30sec (seconds),” “30min (minutes),” “60min (minutes).”
DEV Inside Alert
Activates the Device Inside Alert function: "off," "on."

Display
Demo (Demonstration)
Activates the demonstration: "on," "off."
Image
Sets various display images.
- “All”: to display all images.
- "Movie": to display a movie.
- "SA 1 - 3, All": to display the Spectrum Analyzer.
- "Wall.P 1 - 4, All": to display a wallpaper.
- "off": to not display any image.
Information
Displays the items (depending on the source, etc.): "on," "off."
Dimmer
Changes the display brightness.
- "Auto": to dim the display automatically when you turn lights on. (Available only when the illumination control lead is connected.)
- "on": to dim the display.
- "off": deactivate the dimmer.
Illumination
Changes the illumination color: "Blue," "Red."
Auto Scroll
Scrolls long items automatically: "on," "off."

Play Mode
Repeat (page 22, 27)
ZAPPIN Tone*1
Turns the beep sound between track passages on or off.
ZAPPIN Time*1
Selects the playback time for the ZAPPIN function: "1 (about 6 seconds)," "2 (about 15 seconds)," "3 (about 30 seconds)."
Local (Local Seek Mode)
- "on": to tune only into stations with stronger signals.
- "off": to tune normal reception.
Mono*2 (Monaural Mode)
Selects monaural reception mode to improve poor FM reception: "on," "off."
BTM (page 18)

Bluetooth
PhoneBook Select
Select the phonebook: "Cellular," "Head Unit."
Ringtone
Uses the ringtone of this unit or the connected cellular phone: "Default," "Cellular."
Auto Answer
Answers an incoming call automatically. - "off": to not answer automatically until the multi-way encoder is pressed. - "Short": to answer automatically after 3 seconds. - "Long": to answer automatically after 10 seconds.
BT Initialize* 3 (page 37)
*1 When USB/SensMe™/iPod source is activated. *2 When FM is received. *3 When the unit is turned off.
Additional Information
Precautions
- Cool off the unit beforehand if your car has been parked in direct sunlight. • Power antenna (aerial) extends automatically.
Playback order of MP3/WMA/AAC files
![graph TD A["MP3/WMA/AAC"] --> B["1"] B --> C["1"] B --> D["2"] B --> E["3"] B --> F["4"] C --> G["1"] D --> H["2"] E --> I["3"] F --> J["4"] G --> K["Folder (album)"] H --> L["Folder (track)"] I --> M["Folder (track)"] J --> N["Folder (track)"]](/content/2026/06/1339517/images/4642dc9b0b6d710c27616b9e5b3c979c6e1e60231ef6ec5aaf45188c007de810.jpg)
About Device Inside Alert
If you turn the ignition switch to the OFF position without removing the USB device or iPod, "Device Inside" will appear in the display.
Device Inside
Open the front panel to remove the USB device or iPod.
If the front panel is detached when the ignition is turned off.
The Device Inside Alert LED flashes.

Tip
For how to remove the USB device or iPod, see page 20 (USB), 26 (iPod).
Notes
- The Device Inside Alert will only sound if the built-in amplifier is used.
- For how to disable the Device Inside Alert function, see page 42.
About iPod
- You can connect to the following iPod models. Update your iPod devices to the latest software before use.
Made for
- iPod touch (4th generation)
- iPod touch (3rd generation)
- iPod touch (2nd generation)
- iPod touch (1st generation)
- iPod classic
- iPod with video*
- iPod nano (6th generation)
- iPod nano (5th generation)
- iPod nano (4th generation)
- iPod nano (3rd generation)
- iPod nano (2nd generation)
- iPod nano (1st generation)* -iPhone 4
- iPhone 3GS
- iPhone 3G -iPhone
* Passenger control is not available for iPod nano (1st generation) or iPod with video. - “Made for iPod,” and “Made for iPhone” mean that an electronic accessory has been designed to connect specifically to iPod or iPhone, respectively, and has been certified by the developer to meet Apple performance standards. Apple is not responsible for the operation of this device or its compliance with safety and regulatory standards. Please note that the use of this accessory with iPod or iPhone may affect wireless performance.
About Bluetooth function
What is Bluetooth technology?
- Bluetooth wireless technology is a short-range wireless technology that enables wireless data communication between digital devices, such as a cellular phone and a headset. Bluetooth wireless technology operates within a range of about 10 m (about 33 feet). Connecting two devices is common, but some devices can be connected to multiple devices at the same time.
- You do not need to use a cable for connection since Bluetooth technology is a wireless technology, neither is it necessary for the devices to face one another, such is the case with infrared technology. For example, you can use such a device in a bag or pocket.
- Bluetooth technology is an international standard supported by millions of companies all over the world, and employed by various companies worldwide.
On Bluetooth communication
- Bluetooth wireless technology operates within a range of about 10 m.
Maximum communication range may vary depending on obstacles (person, metal, wall, etc.) or electromagnetic environment.
- The following conditions may affect the sensitivity of Bluetooth communication.
- There is an obstacle such as a person, metal, or wall between this unit and Bluetooth device.
- A device using 2.4 GHz frequency, such as a wireless LAN device, cordless telephone, or microwave oven, is in use near this unit.
- Because Bluetooth devices and wireless LAN (IEEE802.11b/g) use the same frequency, microwave interference may occur and result in communication speed deterioration, noise, or invalid connection if this unit is used near a wireless LAN device. In such a case, perform the following.
- Use this unit at least 10 m away from the wireless LAN device.
- If this unit is used within 10 m of a wireless LAN device, turn off the wireless LAN device.
- Install this unit and Bluetooth device as near to each other as possible.
- Microwaves emitting from a Bluetooth device may affect the operation of electronic medical devices. Turn off this unit and other Bluetooth devices in the following locations, as it may cause an accident.
- where inflammable gas is present, in a hospital, train, airplane, or petrol station - near automatic doors or a fire alarm
- This unit supports security capabilities that comply with the Bluetooth standard to provide a secure connection when the Bluetooth wireless technology is used, but security may not be enough depending on the setting. Be careful when communicating using Bluetooth wireless technology.
- We do not take any responsibility for the leakage of information during Bluetooth communication.
- Connection with all Bluetooth devices cannot be guaranteed.
- A device featuring Bluetooth function is required to conform to the Bluetooth standard specified by Bluetooth SIG, and be authenticated.
- Even if the connected device conforms to the above mentioned Bluetooth standard, some devices may not be connected or work correctly, depending on the features or specifications of the device.
- While talking on the phone handsfree, noise may occur, depending on the device or communication environment.
- Depending on the device to be connected, it may require some time to start communication.
Others
- Using the Bluetooth device may not function on cellular phones, depending on radio wave conditions and location where the equipment is being used.
- If you experience discomfort after using the Bluetooth device, stop using the Bluetooth device immediately. Should any problem persist, consult your nearest Sony dealer.
If you have any questions or problems concerning your unit that are not covered in this manual, consult your nearest Sony dealer.
Maintenance
Replacing the lithium battery of the card remote commander
Under normal conditions, the battery will last approximately 1 year. (The service life may be shorter, depending on the conditions of use.) When the battery becomes weak, the range of the card remote commander becomes shorter. Replace the battery with a new CR2025 lithium battery. Use of any other battery may present a risk of fire or explosion.

Notes on the lithium battery
- Keep the lithium battery out of the reach of children. Should the battery be swallowed, immediately consult a doctor.
- Wipe the battery with a dry cloth to assure a good contact.
- Be sure to observe the correct polarity when installing the battery.
- Do not hold the battery with metallic tweezers, otherwise a short-circuit may occur.
WARNING
Battery may explode if mistreated.
Do not recharge, disassemble, or dispose of in fire.
Fuse replacement
When replacing the fuse, be sure to use one matching the amperage rating stated on the original fuse. If the fuse blows, check the power connection and replace the fuse. If the fuse blows again after replacement, there may be an internal malfunction. In such a case, consult your nearest Sony dealer.

Fuse (10 A)
Cleaning the connectors
The unit may not function properly if the connectors between the unit and the front panel are not clean. In order to prevent this, detach the front panel (page 8) and clean the connectors with a cotton swab. Do not apply too much force. Otherwise, the connectors may be damaged.

Main unit

Back of the front panel
Notes
- For safety, turn off the ignition before cleaning the connectors, and remove the key from the ignition switch.
- Never touch the connectors directly with your fingers or with any metal device.
Removing the unit
1 Remove the protection collar.
① Detach the front panel (page 8). ② Pinch both edges of the protection collar, then pull it out.

2 Remove the unit.
① Insert both release keys simultaneously until they click.

② Pull the release keys to unseat the unit.

③ Slide the unit out of the mounting.
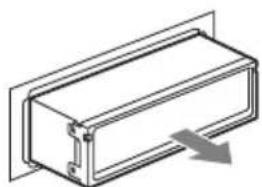
Specifications
AUDIO POWER SPECIFICATIONS

CEA2006 Standard
Power Output: 17 Watts RMS×4 at
4 Ohms < 1% THD+N
SN Ratio: 80 dBA
(reference: 1 Watt into 4 Ohms)
Tuner section
FM
Tuning range: 87.5 - 107.9 MHz
Antenna (aerial) terminal:
External antenna (aerial) connector
Intermediate frequency: 150 kHz
Usable sensitivity: 10 dBf
Selectivity: 75 dB at 400 kHz
Signal-to-noise ratio: 70 dB (mono)
Separation: 40 dB at 1 kHz
Frequency response: 20 - 15,000 Hz
AM
Tuning range: 530 - 1,710 kHz
Antenna (aerial) terminal:
External antenna (aerial) connector
Intermediate frequency: 25 kHz
Sensitivity: 26 μV
USB Player section
Interface: USB (Full-speed)
Maximum current: 500 mA
Wireless Communication
Communication System:
Bluetooth Standard version 2.1 + EDR
Output:
Bluetooth Standard Power Class 2 (Max. +4 dBm)
Maximum communication range:
Line of sight approx. 10 m (33 ft)*1
Frequency band:
2.4 GHz band (2.4000 - 2.4835 GHz)
Modulation method: FHSS
Compatible Bluetooth Profiles *2*:
A2DP (Advanced Audio Distribution Profile) 1.2
AVRCP (Audio Video Remote Control Profile) 1.3
HFP (Handsfree Profile) 1.5
PBAP (Phone Book Access Profile)
OPP (Object Push Profile)
*1 The actual range will vary depending on factors such as obstacles between devices, magnetic fields around a microwave oven, static electricity, reception sensitivity, antenna's performance, operating system, software application, etc.
*2 Bluetooth standard profiles indicate the purpose of Bluetooth communication between devices.
Power amplifier section
Output: Speaker outputs
Speaker impedance: 4 - 8 ohms
Maximum power output: 52 W × 4 (at 4 ohms)
General
Outputs:
Audio outputs terminal (front/rear)
Subwoofer output terminal (mono)
Power antenna (aerial) relay control terminal
Power amplifier control terminal
Inputs:
Remote controller input terminal
Antenna (aerial) input terminal
Telephone ATT control terminal
Illumination control terminal
BUS control input terminal
BUS audio input terminal
USB signal input connector (internal/external)
MIC input terminal
Power requirements: 12 V DC car battery (negative ground (earth))
Dimensions: Approx. 178 × 50 × 180 mm (7 1/8 × 2 × 7 1/8 in) (w/h/d)
Mounting dimensions: Approx. 182 × 53 × 163 mm
(7 1/4 × 2 1/8 × 6 1/2 in) (w/h/d)
Mass: Approx. 1.1 kg (2 lb 7 oz)
Supplied accessories:
Card remote commander: RM-X306
USB connector for iPod: XA-50IP
Parts for installation and connections (1 set)
Microphone
Optional accessories/equipment:
Source selector: XA-C40
USB connection cable for iPod: RC-100IP
HD Radio ™ tuner: XT-100HD
Walkman adaptor: XA-50WM
Your dealer may not handle some of the above listed accessories. Please ask the dealer for detailed information.
Design and specifications are subject to change without notice.
System requirements for using SensMe™
Computer
- CPU/RAM
- IBM PC/AT compatible machine
– CPU: Intel Pentium III Processor 450 MHz or higher
- RAM: 256 MB or more (For Windows XP), 512
MB or more (For Windows Vista or later)
- USB port
OS
Windows XP, Windows Vista, Windows 7
For details on compatible editions or Service Pack, visit the following support site:
continue to next page →
Monitor
High color (16-bit) or more, 800 × 600 dots or more
Other
Internet connection
Notes
- The following system environments are not supported. – Non IBM PC type computers, such as Macintosh, etc. – Homemade computers
- OS upgraded computers – Multi-display environment
- Multi-boot environment – Virtual machine environment
- Depending on the computer condition, operation may not be possible even with the recommended environment.
Troubleshooting
The following checklist will help you remedy problems you may encounter with your unit.
Before going through the checklist below, check the connection and operating procedures.
If the problem is not solved, visit the following support site.
Support site
No power is being supplied to the unit.
- Check the connection or fuse.
- If the unit is turned off and the display disappears, it cannot be operated with the remote commander. →Turn on the unit.
The power antenna (aerial) does not extend.
The power antenna (aerial) does not have a relay box.
No sound.
- The ATT function is activated, or the Telephone ATT function (when the interface cable of a car telephone is connected to the ATT lead) is activated.
- The position of the fader control “Fader & Balance” is not set for a 2-speaker system.
The contents of the memory have been erased.
- The RESET button has been pressed. → Store again into the memory.
- The power supply lead or battery has been disconnected or it is not connected properly.
Stored stations and correct time are erased.
The fuse has blown.
Makes noise when the position of the ignition is switched.
The leads are not matched correctly with the car's accessory power connector.
During playback or reception, demonstration mode starts.
If no operation is performed for 5 minutes with “Demo on” set, demonstration mode starts.
→ Set “Demo off” (page 43).
The display disappears from/does not appear in the display window.
- The dimmer is set "Dimmer on" (page 43).
- The display disappears if you press and hold (SOURCE/OFF). → Press SOURCE/OFF on the unit until the display appears. • The connectors are dirty (page 46).
The Auto Off function does not operate.
The unit is turned on. The Auto Off function activates after turning off the unit.
→Turn off the unit.
Radio reception
The stations cannot be received. The sound is hampered by noises.
• The connection is not correct. → Connect a power antenna (aerial) control lead (blue) or accessory power supply lead (red) to the power supply lead of a car's antenna (aerial) booster (only when your car has built-in FM/AM antenna (aerial) in the rear/side glass). →Check the connection of the car antenna (aerial). →If the auto antenna (aerial) will not go up, check the connection of the power antenna (aerial) control lead.
Preset tuning is not possible.
- Store the correct frequency in the memory.
• The broadcast signal is too weak.
Automatic tuning is not possible.
- Setting of the local seek mode is not correct. →Tuning stops too frequently: Set "Local on" (page 43). →Tuning does not stop at a station: Set "Local off" (page 43). • The broadcast signal is too weak. →Perform manual tuning.
During FM reception, the "ST" indication flashes.
- Tune in the frequency accurately. • The broadcast signal is too weak. →Set "Mono on" (page 43).
An FM program broadcast in stereo is heard in monaural.
The unit is in monaural reception mode.
→Set "Mono off" (page 43).
RDS
PTY displays “----.”
• The current station is not an RDS station. • RDS data has not been received. - The station does not specify the program type.
USB playback
You cannot play back items via a USB hub.
This unit cannot recognize USB devices via a USB hub.
Cannot play back items.
A USB device does not work.
→Reconnect it.
The USB device takes longer to play back.
The USB device contains files with a complicated tree structure.
The display items do not scroll.
• A large number of characters may not scroll. - “Auto Scroll” is set to “off.” →Set "Auto Scroll on" (page 43). →Press and hold DSPL (SCRL).
The sound is intermittent.
The sound may be intermittent at a high-bit-rate of more than 320 kbps.
Pandora connection is not possible.
Shut down Pandora on the mobile device, and then launch again.
Bluetooth function
The connecting device cannot detect this unit.
- Before the pairing is made, set this unit to pairing standby mode.
- While connected to a Bluetooth device, this unit cannot be detected from another device. Disconnect the current connection and search for this unit from another device.
- When the device pairing is made, set the Bluetooth signal output to on (page 33).
Connection is not possible.
Check the pairing and connection procedures in the manual of the other device, etc., and perform the operation again.
The name of the detected device does not appear.
Depending on the status of the other device, it may not be possible to obtain the name.
No ringtone.
- Adjust the volume in "Ring Volume" level.
- Depending on the connecting device, the ringtone may not be sent properly. →Set "Ringtone" to "Default" (page 34).
The talker's voice volume is low.
Adjust the volume in "Talk Volume" level.
A call partner says that the volume is too low or high.
Adjust the volume accordingly using MIC Gain adjustment (page 35).
Echo or noise occurs in phone call conversations.
- Lower the volume.
- Set "EC/NC Mode" to "EC/NC Mode 1" or "EC/NC Mode 2" (page 35).
- If the ambient noise other than the phone call sound is loud, try reducing this noise. For example, if a window is open and road noise is loud, shut the window. If the air conditioner is loud, lower the air conditioner.
The phone is not connected.
When the Bluetooth audio is played back, the phone is not connected even if you press the multi-way encoder. Connect from the phone.
The phone sound quality is poor.
Phone sound quality depends on reception conditions of the cellular phone.
Move your car to a place where you can enhance the cellular phone's signal if the reception is poor.
The volume of the connected audio device is low (high).
Volume level will differ depending on the audio device. Adjust the volume of the connected audio device or this unit.
No sound is heard from the Bluetooth audio device.
The audio device is paused.
Cancel the pause of the audio device.
The sound skips during playback of a Bluetooth audio device.
- Reduce the distance between the unit and the Bluetooth audio device.
- If the Bluetooth audio device is stored in a case that interrupts the signal, remove the audio device from the case while using.
- Several Bluetooth devices or other devices that emit radio waves are used nearby. Turn off the other devices. Reduce the distance from the other devices.
- The playback sound stops momentarily when the connection between this unit and the cellular phone is being made. This is not a malfunction.
The connected Bluetooth audio device cannot be controlled.
Check that the connected Bluetooth audio device supports AVRCP.
Some functions do not work.
Check that the connecting device supports the functions in question.
The name of the other party does not appear when a call is received.
- The other party is not stored in the phonebook. Store in the phonebook (page 35).
- The calling phone is not set to send the phone number.
A call is answered unintentionally.
- The connecting phone is set to start a call automatically.
- “Auto Answer” of this unit is set to “Short” or “Long” (page 34).
Pairing failed due to time out.
Depending on the connecting device, the time limit for pairing may be short. Try completing the pairing within the time.
Bluetooth function cannot operate.
Turn off the unit by pressing SOURCE/OFF for 2 seconds, then turn the unit on again.
No sound is output from the car speakers during handsfree call.
If the sound is output from the cellular phone, set the cellular phone to output the sound from the car speakers.
Pandora connection is not possible.
Shut down Pandora on the mobile device, and then launch again.
Error displays/Messages
Busy now... Please try later
This unit is busy.
→After waiting a moment, try again.
Checking
The unit is confirming the connection of a USB device.
→Wait until confirming the connection is finished.
Connection Failed
Accessing the phonebook was terminated from the cellular phone.
→Access the phonebook in the cellular phone again.
Device Inside
If you turn the ignition switch to the OFF position without removing the USB device or iPod, “Device Inside” will appear in the display.
Empty
• The call history is empty. • The phonebook is empty.
Error
- USB device was not automatically recognized. →Reconnect it again.
- Phonebook content was changed while accessing the cellular phone. →Access the phonebook in the cellular phone again.
Failure (Illuminates until any button is pressed.)
The connection of speakers/amplifiers is incorrect.
→See the installation guide manual of this model to check the connection.
Failure (Illuminates for about 1 second.)
When the SAT tuner is connected, storing an SAT radio channel into a preset failed.
→Be sure to receive the channel that you want to store, then try it again.
HF Device is not available
A cellular phone is not connected.
→Connect to a cellular phone.
Hubs Not Supported
USB hub is not supported on this unit.
Invalid channel file
A file in the music folder may have been edited without using “Content Transfer.”
→Perform “SensMe™ Setup” for the USB device or Walkman again. For details on “SensMe™ Setup”, see page 22.
Local Seek +/-
The local seek mode is on during automatic tuning.
NO Device
USB is selected as source without a USB device connected. A USB device or a USB cable has been disconnected during playback.
Be sure to connect a USB device and USB cable.
NO Music
The USB device does not contain a music file.
Connect a USB device with a music file in it.
NO Name
An album/artist/track name is not written in the track.
No SensMe™ data on device.
The connected USB device does not contain data for the SensMe™ function, or the data has been moved to an improper location in the USB device.
NO Track
The selected item in the USB device does not contain an album/track.
Not Found
There is no item beginning with the desired letter in Alphabet search.
Not Supported
The connected USB device is not supported.
For details on the compatibility of your USB device, visit the support site.
Offset
There may be an internal malfunction.
→Check the connection. If the error indication remains on in the display, consult your nearest Sony dealer.
Overload
USB device is overloaded.
→Disconnect the USB device, then change the source by pressing SOURCE/OFF.
→Indicates that the USB device is out of order, or an unsupported device is connected.
Read
The unit is reading all track and album information on the USB device.
→Wait until reading is complete and playback starts automatically.
Push Reset
USB device cannot be operated due to a problem.
→Press the RESET button (page 7).


During reverse or fast-forward, you have reached the beginning or the end of the USB device and you cannot go any further.

The character cannot be displayed with the unit.
Please launch Pandora Application on mobile device.
Pandora does not start up.
→Start up Pandora on iPhone.
Please launch Pandora App on mobile device and press PAUSE on this unit.
Pandora does not start up.
→Start up Pandora on the Bluetooth device, then press PAUSE.
Application error on mobile device. Do not check the mobile device while driving.
Pandora does not start up.
→Start up Pandora and log in your account.
USB External Not Supported
The connected USB device is not Pandora device.
→Please connect iPhone.
NO Station
There is no station on your Pandora account.
→Create the station on the mobile device.
Cannot Skip
Skipping tracks on Pandora is not allowed.
→Wait until the commercial ends.
→Pandora limits the number of skips allowed on their service. Wait until the next song begins, or select another station on the list.
Cannot Thumbs Up/Down
"Thumbs" feedback is not allowed.
→Wait until the commercial ends.
→Some functions, such as Shared Station, do not permit feedback. Wait until the next song begins, or select another station on the list.
Thumbs Up/Down Error
"Thumbs" feedback failed.
→Try "Thumbs Up/Down" again.
Bookmark Not Allowed
Bookmark is not allowed.
→Wait until the commercial ends.
→Select another song or station, then try it again.
Bookmark Error
Bookmarking failed.
→Try bookmarking again.
If these solutions do not help improve the situation, consult your nearest Sony dealer.
Sugerencia
Notas
Nota
TUNE TRAY
TUNE TRAY
Nota
Front/Rear/Center (↑↓)
Band1: “40 Hz” or “63 Hz”
Band2: “100 Hz” or “160 Hz”
Band3: “250 Hz” or “400 Hz”
Band 4: “630 Hz” or “1.0 kHz”
Band 5: “1.6 kHz” or “2.5 kHz”
Band 6: “4.0 kHz” or “6.3 kHz”
Band 7: “10.0 kHz” or “16.0 kHz”

- Volume level
"Front" (③): front center
"Normal" (B): normal
“Far” (©): far
Select “Custom” from Listening Position Front/Rear.
Hint
Main unit

Specifications
A2DP (Advanced Audio Distribution Profile) 1.2
AVRCP (Audio Video Remote Control Profile) 1.3
HFP (Handsfree Profile) 1.5
PBAP (Phone Book Access Profile)
OPP (Object Push Profile)
Busy now... Please try later
HF Device is not available
Invalid channel file
Please launch Pandora Application on mobile device.
Pandora does not start.
Please launch Pandora App on mobile device and press PAUSE on this unit.
Pandora does not start.
Application error on mobile device. Do not check the mobile device while driving.
Pandora does not start.
USB External Not Supported
Bookmark Not Allowed
If you have any questions/problems regarding this product, try the following:
1 Read Troubleshooting in these Operating Instructions. 2 Reset the unit.
Note: Stored data may be erased.
3 Please contact (U.S.A. only);
Call 1-800-222-7669
URL: http://www.SONY.com
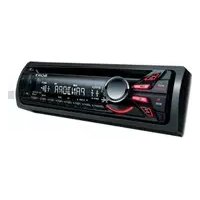
- FM/AM DIGITAL MEDIA PLAYER
- WARNING
- FOR THE STATE OF CALIFORNIA, USA ONLY
- WARNING IF YOUR CAR'S IGNITION HAS NO ACC POSITION
- TABLE OF CONTENTS
- GETTING STARTED
- QUICK GUIDE FOR BLUETOOTH FUNCTION
- LOCATION OF CONTROLS AND BASIC OPERATIONS
- RADIO
- USB DEVICES
- IPOD
- PANDORA® VIA USB (IPHONE)
- SEARCHING FOR A TRACK
- BLUETOOTH (HANDSFREE CALLING AND MUSIC STREAMING)
- PANDORA VIA BLUETOOTH (ANDROID™ & BLACKBERRY® PHONES)
- SOUND SETTINGS AND SETUP MENU
- ADDITIONAL INFORMATION
- SUPPORT SITE
- HTTP://ESUPPORT.SONY.COM HTTP://WWW.SONY.COM/MOBILEAV
- NOTES ON BLUETOOTH
- CAUTION
- IMPORTANT NOTICE
- SAFE AND EFFICIENT USE
- DRIVING
- CONNECTING TO OTHER DEVICES
- RADIO FREQUENCY EXPOSURE
- EMERGENCY CALLS
- RESETTING THE UNIT
- NOTE
- CANCELING THE DEMO MODE
- PREPARING THE CARD REMOTE COMMANDER
- TIP
- SETTING THE CLOCK
- DETACHING THE FRONT PANEL
- CAUTION ALARM
- NOTES
- ATTACHING THE FRONT PANEL
- STEPS TO BLUETOOTH FUNCTION
- PAIRING
- CONNECTING
- HANDSFREE CALLING/MUSIC STREAMING/PLAYING BACK PANDORA
- ① PAIRING
- ②CONNECTING
- ③HANDSFREE CALLING/MUSIC STREAMING/PLAYING BACK PANDORA
- HANDSFREE CALLING
- TO OPERATION
- MUSIC STREAMING
- PLAYING BACK PANDORA
- MAIN UNIT
- FRONT PANEL REMOVED
- USB
- PANDORA USB
- BLUETOOTH AUDIO
- BLUETOOTH PANDORA
- BLUETOOTH PHONE
- RECEPTOR FOR THE CARD REMOTE COMMANDER
- DISPLAY WINDOW
- OPEN BUTTON PAGE
- USB (EXTERNAL) CONNECTOR PAGE
- (BACK)/MODE BUTTON
- BLUETOOTH BUTTON PAGE
- ZAP/SHUF BUTTON PAGE
- PTY/CAT BUTTON*6 PAGE
- DSPL (DISPLAY)/SCRL (SCROLL) BUTTON PAGE
- USB (INTERNAL) CONNECTOR PAGE
- TUNE TRAY PAGE
- DEVICE INSIDE ALERT LED PAGE
- RESET BUTTON PAGE
- CALL/ (HANDSFREE) BUTTON
- SRC (SOURCE) BUTTON
- ENTER BUTTON
- MODE BUTTON
- MENU BUTTON
- (BROWSE)/CAT* 4 BUTTON
- DSPL (DISPLAY) BUTTON
- NUMBER BUTTONS
- STORING AND RECEIVING STATIONS
- STORING AUTOMATICALLY — BTM
- STORING MANUALLY
- RECEIVING THE STORED STATIONS
- TUNING AUTOMATICALLY
- OVERVIEW
- RDS SERVICES
- SELECTING PTY
- PRESS THE MULTI-WAY ENCODER
- TYPE OF PROGRAMS
- SETTING CT
- SET "CT ON" IN SETUP (PAGE 42)
- PLAYING BACK A USB DEVICE
- PLAYING BACK VIA THE USB (INTERNAL) CONNECTOR
- REMOVING THE USB DEVICE
- PLAYING BACK VIA THE USB (EXTERNAL) CONNECTOR
- SLIDE THE USB COVER
- CONNECT THE USB DEVICE TO THE USB CONNECTOR
- PRESS SOURCE/OFF REPEATEDLY UNTIL "USB" APPEARS, AND THEN PRESS MODE TO SWITCH THE USB DEVICE
- NOTES FOR USB DEVICES
- DISPLAY ITEMS
- REPEAT PLAY
- (WITH THE CARD REMOTE COMMANDER)
- SHUFFLE PLAY
- ENJOYING MUSIC ACCORDING TO YOUR MOOD — SENSME™
- BEFORE USING THE SENSME™ FUNCTION
- ④TRANSFERRING TRACKS TO THE USB DEVICE USING “CONTENT TRANSFER
- ⑤CONNECTING THE USB DEVICE AND ENJOYING THE SENSME™ FUNCTION ON THE UNIT
- INSTALLING "SENSME™ SETUP" AND "CONTENT TRANSFER" IN YOUR COMPUTER
- DOWNLOAD THE "SENSME™ SETUP" AND "CONTENT TRANSFER" SOFTWARE FROM THE SUPPORT SITE
- INSTALL THE SOFTWARE IN YOUR COMPUTER
- REGISTERING A USB DEVICE USING "SENSME™ SETUP
- TRANSFERRING TRACKS TO THE USB DEVICE USING "CONTENT TRANSFER
- CONNECT THE REGISTERED USB DEVICE TO YOUR COMPUTER
- DRAG AND DROP TRACKS FROM WINDOWS EXPLORER OR ITUNES, ETC., TO "CONTENT TRANSFER
- PLAYING TRACKS IN THE CHANNEL — SENSME™ CHANNELS
- CONNECT A USB DEVICE SET UP FOR THE SENSME™ FUNCTION
- PRESS ♥ (SENSME™)
- SELECTING A TRACK FROM THE CHANNEL LIST USING THE MULTI-WAY ENCODER
- CHANGE THE CHANNEL
- CHANGE THE TRACK
- CHANNEL LIST
- RECOMMENDED, SHUFFLE ALL
- BASIC CHANNELS
- IN-CAR CHANNELS
- PLAYING BACK IPOD
- REMOVING THE IPOD
- CAUTION FOR IPHONE
- TIPS
- RESUMING MODE
- OPERATING AN IPOD DIRECTLY — PASSENGER CONTROL
- TO EXIT THE PASSENGER CONTROL
- TO PAUSE PLAYBACK
- TO SKIP A SONG
- THUMBS" FEEDBACK
- THUMBS UP
- THUMBS DOWN
- STATION LIST
- QUICKMIX
- BOOKMARKING
- SEARCHING A TRACK BY NAME — QUICK-BROWZER™
- TO RETURN TO THE PREVIOUS DISPLAY
- TO EXIT THE QUICK-BROWZER MODE
- SEARCHING BY SKIP ITEMS — JUMP MODE
- PUSH THE MULTI-WAY ENCODER UP/DOWN TO SELECT THE DESIRED ITEM, THEN PRESS IT
- TO CANCEL JUMP MODE
- SEARCHING BY ALPHABETICAL ORDER — ALPHABET SEARCH
- PUSH THE MULTI-WAY ENCODER RIGHT IN QUICK-BROWZER MODE
- ROTATE THE MULTI-WAY ENCODER TO SELECT THE FIRST LETTER OF THE DESIRED ITEM, THEN PRESS IT
- TO CANCEL ALPHABET SEARCH
- SEARCHING A TRACK BY LISTENING TO TRACK PASSAGES — ZAPPIN™
- PRESS ZAP/SHUF DURING PLAYBACK
- TRACK
- PRESS THE MULTI-WAY ENCODER OR ZAP/SHUF WHEN A TRACK YOU WANT TO LISTEN IS PLAYED BACK
- IN THE CASE OF "SENSME™ CHANNELS" PLAYBACK
- BLUETOOTH OPERATIONS
- ② CONNECTING
- ③ HANDSFREE CALLING/MUSIC STREAMING
- ABOUT BLUETOOTH ICONS
- INSTALLING THE MICROPHONE
- PRESS AND HOLD BLUETOOTH
- SET THE BLUETOOTH DEVICE TO SEARCH FOR THIS UNIT
- IF PASSKEY* INPUT IS REQUIRED ON THE DISPLAY OF THE DEVICE TO BE CONNECTED, INPUT
- SET THE BLUETOOTH DEVICE TO CONNECT TO THIS UNIT
- CONNECTING A CELLULAR PHONE
- BE SURE THAT BOTH THIS UNIT AND THE CELLULAR PHONE ARE SWITCHED TO BLUETOOTH SIGNAL ON
- CONNECT TO THIS UNIT USING THE CELLULAR PHONE
- CONNECTING TO THE CELLULAR PHONE LAST-CONNECTED FROM THIS UNIT
- CONNECTING AN AUDIO DEVICE
- BE SURE THAT BOTH THIS UNIT AND THE AUDIO DEVICE ARE SWITCHED TO BLUETOOTH SIGNAL ON
- CONNECT TO THIS UNIT USING THE AUDIO DEVICE
- CONNECTING TO THE AUDIO DEVICE LAST-CONNECTED FROM THIS UNIT
- MAKING CALLS
- CALLING FROM THE PHONEBOOK
- CALLING FROM THE CALL HISTORY
- CALLING BY DIRECT PHONE NUMBER INPUT
- CALLING BY PRESET NUMBER
- TO END A CALL
- CALLING BY REDIAL
- RECEIVING CALLS
- PRESS THE MULTI-WAY ENCODER WHEN A CALL IS RECEIVED WITH A RINGTONE
- AUTO ANSWER SETTING
- RINGTONE SETTING
- TO REJECT A CALL
- OPERATIONS DURING A CALL
- PRESETTING THE VOLUME OF THE RINGTONE AND TALKER'S VOICE
- TO ADJUST THE RINGTONE VOLUME
- TO ADJUST THE TALKER'S VOICE VOLUME
- EC/NC MODE (ECHO CANCELLER/NOISE CANCELLER MODE)
- SENDING DTMF (DUAL TONE MULTIPLE FREQUENCY) TONES
- MIC GAIN ADJUSTMENT
- CALL TRANSFER
- PRESS MODE OR USE YOUR CELLULAR PHONE
- PHONEBOOK MANAGEMENT
- NOTES ON PHONEBOOK DATA
- SELECTING A PHONEBOOK
- RECEIVING PHONEBOOK DATA FROM A CELLULAR PHONE
- DELETING FROM THE PHONEBOOK IN THIS UNIT
- PRESET DIAL
- VOICE DIAL ACTIVATION
- SMS INDICATOR
- LISTENING TO MUSIC FROM AN AUDIO DEVICE
- ADJUSTING THE VOLUME LEVEL
- OPERATING AN AUDIO DEVICE WITH THIS UNIT
- OTHER SETTINGS
- INITIALIZING BLUETOOTH SETTINGS
- PLAYING BACK VIA BLUETOOTH
- CHANGING THE SOUND SETTINGS
- ADJUSTING THE SOUND CHARACTERISTICS
- HPF
- ENJOYING SOPHISTICATED SOUND FUNCTIONS — ADVANCED SOUND ENGINE
- SELECTING THE SOUND QUALITY — EQ7 PRESET
- CUSTOMIZING THE EQUALIZER CURVE — EQ7 PARAMETRIC TUNE
- OPTIMIZING SOUND BY TIME ALIGNMENT — LISTENING POSITION
- PRESS ↩ (BACK)
- PRECISELY CALIBRATING BY TIME ALIGNMENT
- LISTENING POSITION CUSTOM TUNE
- DM+ ADVANCED
- USING REAR SPEAKERS AS SUBWOOFER — REAR BASS ENHANCER
- COMPENSATING VOLUME LEVEL — DYNAMIC LOUDNESS
- ADJUSTING SETUP ITEMS — MENU
- SETUP
- CLOCK ADJUST (PAGE 8)
- BEEP
- AUTO OFF
- DEV INSIDE ALERT
- DISPLAY
- DEMO (DEMONSTRATION)
- IMAGE
- INFORMATION
- DIMMER
- ILLUMINATION
- AUTO SCROLL
- PLAY MODE
- ZAPPIN TONE
- ZAPPIN TIME
- LOCAL (LOCAL SEEK MODE)
- MONO*2 (MONAURAL MODE)
- BLUETOOTH
- PHONEBOOK SELECT
- RINGTONE
- AUTO ANSWER
- BT INITIALIZE* 3 (PAGE 37)
- PRECAUTIONS
- PLAYBACK ORDER OF MP3/WMA/AAC FILES
- ABOUT DEVICE INSIDE ALERT
- IF THE FRONT PANEL IS DETACHED WHEN THE IGNITION IS TURNED OFF
- ABOUT IPOD
- MADE FOR
- ABOUT BLUETOOTH FUNCTION
- WHAT IS BLUETOOTH TECHNOLOGY
- ON BLUETOOTH COMMUNICATION
- OTHERS
- MAINTENANCE
- REPLACING THE LITHIUM BATTERY OF THE CARD REMOTE COMMANDER
- NOTES ON THE LITHIUM BATTERY
- FUSE REPLACEMENT
- CLEANING THE CONNECTORS
- REMOVING THE UNIT
- REMOVE THE PROTECTION COLLAR
- REMOVE THE UNIT
- SPECIFICATIONS
- AUDIO POWER SPECIFICATIONS
- TUNER SECTION
- FM
- AM
- USB PLAYER SECTION
- WIRELESS COMMUNICATION
- POWER AMPLIFIER SECTION
- GENERAL
- SYSTEM REQUIREMENTS FOR USING SENSME™
- COMPUTER
- OS
- MONITOR
- OTHER
- TROUBLESHOOTING
- NO POWER IS BEING SUPPLIED TO THE UNIT
- THE POWER ANTENNA (AERIAL) DOES NOT EXTEND
- NO SOUND
- THE CONTENTS OF THE MEMORY HAVE BEEN ERASED
- STORED STATIONS AND CORRECT TIME ARE ERASED
- THE FUSE HAS BLOWN
- MAKES NOISE WHEN THE POSITION OF THE IGNITION IS SWITCHED
- DURING PLAYBACK OR RECEPTION, DEMONSTRATION MODE STARTS
- THE DISPLAY DISAPPEARS FROM/DOES NOT APPEAR IN THE DISPLAY WINDOW
- THE AUTO OFF FUNCTION DOES NOT OPERATE
- RADIO RECEPTION
- THE STATIONS CANNOT BE RECEIVED. THE SOUND IS HAMPERED BY NOISES
- PRESET TUNING IS NOT POSSIBLE
- AUTOMATIC TUNING IS NOT POSSIBLE
- DURING FM RECEPTION, THE "ST" INDICATION FLASHES
- AN FM PROGRAM BROADCAST IN STEREO IS HEARD IN MONAURAL
- RDS
- PTY DISPLAYS
- USB PLAYBACK
- YOU CANNOT PLAY BACK ITEMS VIA A USB HUB
- CANNOT PLAY BACK ITEMS
- THE USB DEVICE TAKES LONGER TO PLAY BACK
- THE DISPLAY ITEMS DO NOT SCROLL
- THE SOUND IS INTERMITTENT
- PANDORA CONNECTION IS NOT POSSIBLE
- BLUETOOTH FUNCTION
- THE CONNECTING DEVICE CANNOT DETECT THIS UNIT
- CONNECTION IS NOT POSSIBLE
- THE NAME OF THE DETECTED DEVICE DOES NOT APPEAR
- NO RINGTONE
- THE TALKER'S VOICE VOLUME IS LOW
- A CALL PARTNER SAYS THAT THE VOLUME IS TOO LOW OR HIGH
- ECHO OR NOISE OCCURS IN PHONE CALL CONVERSATIONS
- THE PHONE IS NOT CONNECTED
- THE PHONE SOUND QUALITY IS POOR
- THE VOLUME OF THE CONNECTED AUDIO DEVICE IS LOW (HIGH)
- NO SOUND IS HEARD FROM THE BLUETOOTH AUDIO DEVICE
- THE SOUND SKIPS DURING PLAYBACK OF A BLUETOOTH AUDIO DEVICE
- THE CONNECTED BLUETOOTH AUDIO DEVICE CANNOT BE CONTROLLED
- SOME FUNCTIONS DO NOT WORK
- THE NAME OF THE OTHER PARTY DOES NOT APPEAR WHEN A CALL IS RECEIVED
- A CALL IS ANSWERED UNINTENTIONALLY
- PAIRING FAILED DUE TO TIME OUT
- BLUETOOTH FUNCTION CANNOT OPERATE
- NO SOUND IS OUTPUT FROM THE CAR SPEAKERS DURING HANDSFREE CALL
- ERROR DISPLAYS/MESSAGES
- BUSY NOW... PLEASE TRY LATER
- CHECKING
- CONNECTION FAILED
- DEVICE INSIDE
- EMPTY
- ERROR
- FAILURE (ILLUMINATES UNTIL ANY BUTTON IS PRESSED.)
- FAILURE (ILLUMINATES FOR ABOUT 1 SECOND.)
- HF DEVICE IS NOT AVAILABLE
- HUBS NOT SUPPORTED
- INVALID CHANNEL FILE
- LOCAL SEEK
- NO DEVICE
- NO MUSIC
- NO NAME
- NO SENSME™ DATA ON DEVICE
- NO TRACK
- NOT FOUND
- NOT SUPPORTED
- OFFSET
- OVERLOAD
- READ
- PUSH RESET
- PLEASE LAUNCH PANDORA APPLICATION ON MOBILE DEVICE
- PLEASE LAUNCH PANDORA APP ON MOBILE DEVICE AND PRESS PAUSE ON THIS UNIT
- APPLICATION ERROR ON MOBILE DEVICE. DO NOT CHECK THE MOBILE DEVICE WHILE DRIVING
- USB EXTERNAL NOT SUPPORTED
- NO STATION
- CANNOT SKIP
- CANNOT THUMBS UP/DOWN
- THUMBS UP/DOWN ERROR
- BOOKMARK NOT ALLOWED
- BOOKMARK ERROR
- SUGERENCIA
- NOTAS
- NOTA
- HINT
- IF YOU HAVE ANY QUESTIONS/PROBLEMS REGARDING THIS PRODUCT, TRY THE FOLLOWING
Brand : SONY
Model : DSX-S310BTX
Category : Car radio