
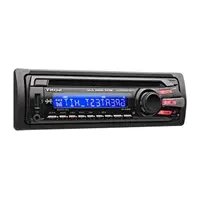
CDX-GT700HD - Car radio SONY - Free user manual and instructions
Find the device manual for free CDX-GT700HD SONY in PDF.


| Product Type | Car Stereo / Autoradio |
| Brand | Sony |
| Model | CDX-GT700HD |
| Dimensions (Approx.) | 178 x 50 x 160 mm (1-DIN) |
| Weight | Approx. 1.2 kg |
| Power Supply | 12 V DC (car battery) |
| Maximum Power Output | 50 W x 4 |
| Playable Media | CD, CD-R/RW, MP3, WMA |
| Tuner | FM/AM with RDS |
| Auxiliary Input | Front AUX input (3.5 mm) |
| Audio Controls | Bass, Treble, Balance, Fader |
| Display | LCD with backlight |
| Security | Detachable faceplate |
| Steering Wheel Control | Compatible (with adapter) |
| Maintenance | Clean with soft dry cloth; avoid solvents |
| Spare Parts & Repairability | Available through Sony service centers |
Frequently Asked Questions - CDX-GT700HD SONY
User questions about CDX-GT700HD SONY
0 question about this device. Answer the ones you know or ask your own.
Ask a new question about this device
Download the instructions for your Car radio in PDF format for free! Find your manual CDX-GT700HD - SONY and take your electronic device back in hand. On this page are published all the documents necessary for the use of your device. CDX-GT700HD by SONY.
USER MANUAL CDX-GT700HD SONY
FM/AM Digital Radio CD Player
Operating Instructions US
The model and serial numbers are located on the bottom of the unit.
Record the serial number in the space provided below.
Refer to these numbers whenever you call upon your Sony dealer regarding this product.
Model No. CDX-GT700HD Serial No. ____
To cancel the demonstration (DEMO) display, see page 6.
Be sure to install this unit in the dashboard of the car for safety. For installation and connections, see the supplied installation/connections manual.
Warning
This equipment has been tested and found to comply with the limits for a Class B digital device, pursuant to Part 15 of the FCC Rules. These limits are designed to provide reasonable protection against harmful interference in a residential installation. This equipment generates, uses, and can radiate radio frequency energy and, if not installed and used in accordance with the instructions, may cause harmful interference to radio communications. However, there is no guarantee that interference will not occur in a particular installation. If this equipment does cause harmful interference to radio or television reception, which can be determined by turning the equipment off and on, the user is encouraged to try to correct the interference by one or more of the following measures:
– Reorient or relocate the receiving antenna. – Increase the separation between the equipment and receiver. - Connect the equipment into an outlet on a circuit different from that to which the receiver is connected. - Consult the dealer or an experienced radio/TV technician for help.
You are cautioned that any changes or modifications not expressly approved in this manual could void your authority to operate this equipment.
CAUTION
The use of optical instruments with this product will increase eye hazard.
For the State of California, USA only
Perchlorate Material – special handling may apply. See www.dtsc.ca.gov/hazardouswaste/perchlorate. Perchlorate Material: Lithium battery contains perchlorate.
HD Radio®
HD Radio™ Technology Manufactured Under License From iBiquity Digital Corp. U.S. and Foreign Patents. HD Radio™ and the HD Radio logo are proprietary trademarks of iBiquity Digital Corp.

The “SAT Radio Ready” logo indicates that this product will control a satellite radio tuner module (sold separately).
Please see your nearest authorized Sony dealer for details on the satellite radio tuner module.
“SAT Radio,” “SAT Radio Ready,” the SAT Radio and SAT Radio Ready logos and all related marks are trademarks of Sirius XM Radio Inc. and XM Satellite Radio Inc.
ZAPPIN is a trademark of Sony Corporation.

Windows Media and the Windows logo are trademarks or registered trademarks of Microsoft Corporation in the United States and/or other countries.
iPhone, iPod, iPod classic, iPod nano, and iPod touch are trademarks of Apple Inc., registered in the U.S. and other countries.
iPhone, iPod, iPod classic, iPod nano, and iPod touch are trademarks of Apple Inc., registered in the U.S. and other countries.
MPEG Layer-3 audio coding technology and patents licensed from Fraunhofer IIS and Thomson.
This product is protected by certain intellectual property rights of Microsoft Corporation. Use or distribution of such technology outside of this product is prohibited without a license from Microsoft or an authorized Microsoft subsidiary.
Content providers are using the digital rights management technology for Windows Media contained in this device (“WM-DRM”) to protect the integrity of their content (“Secure Content”) so that their intellectual property, including copyright, in such content is not misappropriated. This device uses WM-DRM software to play Secure Content (“WM-DRM Software”). If the security of the WM-DRM Software in this device has been compromised, owners of Secure Content (“Secure Content Owners”) may request that Microsoft revoke the WM-DRM Software’s right to acquire new licenses to copy, display and/or play Secure Content. Revocation does not alter the WM-DRM Software’s ability to play unprotected content. A list of revoked WM-DRM Software is sent to your device whenever you download a license for Secure Content from the Internet or from a PC. Microsoft may, in conjunction with such license, also download revocation lists onto your device on behalf of Secure Content Owners.
Warning if your car's ignition has no ACC position
Be sure to set the Auto Off function (page 20). The unit will shut off completely and automatically after the set time once the unit is turned off, which prevents battery drain. If you do not set the Auto Off function, press and hold OFF until the display disappears each time you turn the ignition off.
Table of Contents
Getting Started
Playable discs on this unit 6
Resetting the unit. 6
Canceling the DEMO mode 6
Preparing the card remote commander ..... 6
Setting the clock 6
Detaching the front panel 7
Attaching the front panel 7
Location of controls and basic operations
Main unit. 8
Card remote commander RM-X151 ..... 10
Searching for a track ..... 11
Searching a track by name — Quick-BrowZer....11
Searching a track by listening to track passages — ZAPPIN™....12
Radio
What is HD Radio™ Technology? ..... 12
Display items 12
Storing and receiving stations ..... 13
Storing automatically — BTM ..... 13
Storing manually....13
Receiving the stored stations ..... 13
Tuning automatically 13
About FM Multicasting 13
iTunes Tagging 14
Using iTunes Tagging....14
CD
Playing a disc....15
Display items 15
Repeat and shuffle play....15
USB devices
Playing back a USB device ..... 15
Display items 16
Repeat and shuffle play....16
iPod
Playing back iPod 17
Display items 18
Setting the play mode 18
Repeat and shuffle play 18
Operating an iPod directly
— Passenger control .... 18
Other functions
Changing the sound settings 19
Adjusting the sound characteristics ..... 19
Customizing the equalizer curve — EQ3 .... 19
Adjusting setup items — SET ..... 19
Using optional equipment. 20
Auxiliary audio equipment. 20
Additional Information
Precautions 21
Notes on discs 21
Playback order of MP3/WMA/AAC files.... 21
About iPod 21
Maintenance 22
Removing the unit. 23
Specifications 23
Troubleshooting 24
Error displays/Messages.... 26
Support site
If you have any questions or for the latest support information on this product, please visit the web site below:
- Models and manufacturers of compatible digital audio players • Supported MP3/WMA/AAC files
Getting Started
Playable discs on this unit
This unit can play CD-DA (also containing CD TEXT) and CD-R/CD-RW (MP3/WMA/AAC files (page 21)).
| Type of discs Label on the disc | ||
| CD-DA |  |  |
| MP3WMA AAC |  |  |
Resetting the unit
Before operating the unit for the first time, or after replacing the car battery or changing the connections, you must reset the unit. Detach the front panel (page 7) and press the RESET button (page 8) with a pointed object, such as a ball-point pen.
Note
Pressing the RESET button will erase the clock setting and some stored contents.
Canceling the DEMO mode
You can cancel the demonstration display which appears during turning off.
1 Press and hold the select button. The setup display appears. 2 Press the select button repeatedly until "DEMO" appears. 3 Rotate the control dial to select "DEMO-OFF."
4 Press and hold the select button. The setup is complete and the display returns to normal reception/play mode.
Preparing the card remote commander
Remove the insulation film.

Tip
For how to replace the battery, see page 22.
Setting the clock
The clock uses a 12-hour digital indication.
1 Press and hold the select button. The setup display appears. 2 Press the select button repeatedly until "CLOCK-ADJ" appears. 3 Press SEEK +. The hour indication flashes. 4 Rotate the control dial to set the hour and minute. To move the digital indication, press SEEK -/+ 5 After setting the minute, press the select button. The setup is complete and the clock starts.
To display the clock, press DSPL. Press DSPL again to return to the previous display.
Detaching the front panel
You can detach the front panel of this unit to prevent theft.
Caution alarm
If you turn the ignition switch to the OFF position without detaching the front panel, the caution alarm will sound for a few seconds. The alarm will only sound if the built-in amplifier is used.
1 Press OFF.
The unit is turned off.
2 Press OPEN.
The front panel is flipped down.
3 Slide the front panel to the right, then gently pull out the left end of the front panel.

Notes
- Do not drop or put excessive pressure on the front panel and display window.
- Do not subject the front panel to heat/high temperature or moisture. Avoid leaving it in a parked car or on a dashboard/rear tray.
- Do not detach the front panel during playback of the USB device, otherwise USB data may be damaged.
Attaching the front panel
Place the hole Ⓐ of the front panel onto the spindle Ⓑ on the unit, then lightly push the left side in.
Press SOURCE on the unit (or insert a disc) to operate the unit.

Note
Do not put anything on the inner surface of the front panel.
Location of controls and basic operations
Main unit

Front panel removed. This section contains instructions on the location of controls and basic operations. For details, see the respective pages.

of controls and basic operations. For details, see the respective pages.
1 OFF button: To turn off; stop the source. 2 (BACK) button: page 11, to return to the previous display. 3 SOURCE button* 1: To turn on; change the source (Radio/CD/USB/AUX). 4 ZAP button: page 12, to enter ZAPPIN™ mode. 5 Control dial/select button: page 19, to adjust volume (rotate); select setup items (press and rotate). 6 Receptor for the card remote commander. 7 Display window. 8 OPEN button: page 7, 15. 9 USB connector: page 15, 17, to connect to the USB device.
CD/USB:
CD/USB:
To skip tracks (press); skip tracks continuously (press, then press again within about 1 second and hold); reverse/fast-forward a track (press and hold).
Radio:
To tune in stations automatically (press); find a station manually (press and hold).
11 MODE button* 1 page 13, 17, 18
Press to select the radio band (FM/AM)/select the play mode of iPod.
Press and hold to enter/cancel the passenger control.
12 (BROWSE) button page 11
To enter the Quick-BrowZer mode.
13 TAG/CAT* 2 button page 14
To retrieve song information broadcast on an HD Radio station.
14 Number buttons
CD/USB:
①/②: ALBUM -/+ (during MP3/WMA/
AAC playback)
To skip albums (press); skip albums continuously (press and hold).
③: REP*3 page 15, 16, 18
④: SHUF page 15, 16, 18
⑤: DM+
Improves digitally compressed sound, such as MP3.
To activate the DM+ function, set "ON." To cancel, set "OFF."
⑥: PAUSE
To pause playback. To cancel, press again.
Radio:
To receive stored stations (press); store stations (press and hold).
15 DSPL (display)/SCRL (scroll) button
page 12, 15, 16, 18
To change display items (press); scroll the display item (press and hold).
16 AUX input jack page 20
To connect a portable audio device.
17 RESET button page 6
18 ▲ (eject) button
To eject the disc.
19 Disc slot
Insert the disc (label side up), playback starts.
*1 If a SAT tuner is connected: when SOURCE is pressed, the connected device ("XM" or "SR") will appear in the display. Furthermore, if MODE is pressed, you can switch the SAT tuner band.
*2 When the SAT tuner is connected.
*3 This button has a tactile dot.
Note
When ejecting/inserting a disc, keep any USB devices disconnected to avoid damage to the disc.
Card remote commander RM-X151

Remove the insulation film before use (page 6).
1 OFF button
To turn off; stop the source.
2 SOURCE button*1
To turn on; change the source (Radio/CD/USB/AUX).
3 ← (I◄◄) / → (►►I) buttons
To control Radio/CD/USB, the same as SEEK -/+ on the unit.
Setup, sound setting, etc., can be operated by ↔→.
4 DSPL (display) button
To change display items.
5 VOL (volume) +* 2/- button
To adjust volume.
6 ATT (attenuate) button
To attenuate the sound. To cancel, press again.
7 SEL (select) button
The same as the select button on the unit.
8 MODE button* 1
Press to select the radio band (FM/AM)/select the play mode of iPod. Press and hold to enter/cancel the passenger control.
9↑ (+)/↓ (-) buttons
To control CD/USB, the same as ①/② (ALBUM -/+ ) on the unit.
Setup, sound setting, etc., can be operated by .
10 SCRL (scroll) button
To scroll the display item.
11 Number buttons
To receive stored stations (press); store stations (press and hold).
*1 If a SAT tuner is connected: when SOURCE is pressed, the connected device ("XM" or "SR") will appear in the display. Furthermore, if MODE is pressed, you can switch the SAT tuner band.
*2 This button has a tactile dot.
Note
If the unit is turned off and the display disappears, it cannot be operated with the card remote commander unless SOURCE on the unit is pressed, or a disc is inserted to activate the unit first.
Searching for a track
Searching a track by name — Quick-BrowZer
You can search for a track in a CD or USB device easily by category.

1 Press Q (BROWSE).
The unit enters the Quick-BrowZer mode, and the list of search categories appears.
2 Rotate the control dial to select the desired search category, then press it to confirm.
3 Repeat step 2 until the desired track is selected.
Playback starts.
To return to the previous display
Press ↩ (BACK).
To exit the Quick-BrowZer mode
Press Q (BROWSE).
Note
When entering the Quick-BrowZer mode, the repeat/shuffle setting is canceled.
Searching by skip items — Jump mode
When many items are in a category, you can search the desired item quickly.
1 Press (SEEK) + in Quick-BrowZer mode. The following display appears.

A Current item number B Total item number in the current layer
Then the item name will appear.
2 Rotate the control dial to select the desired item, or one near the desired item. It skips in steps of 10% of the total item number. 3 Press the select button. The display returns to the Quick-BrowZer mode and the selected item appears. 4 Rotate the control dial to select the desired item and press it. Playback starts if the selected item is a track.
To cancel Jump mode
Press (BACK) or SEEK -.
Searching a track by listening to track passages — ZAPPIN™
While playing back short track passages in a CD or USB device in sequence, you can search for a track you want to listen to.
ZAPPIN mode is suitable for searching for a track in shuffle or shuffle repeat mode.

1 Press ZAP during playback.
After “ZAPPIN” appears in the display, playback starts from a passage of the next track.
The passage is played for the set time, then a click sounds and the next passage starts.
Track
2 Press the select button or ZAP when a track you want to listen is played back.
The track that you select returns to normal play mode from the beginning.
To search a track by ZAPPIN mode again, repeat steps 1 and 2.
Tips
- You can select the playback time from about 6 seconds/9 seconds/30 seconds (page 20). You cannot select the passage of the track to playback.
- Press SEEK +/- or ①/② (ALBUM -/+) in ZAPPIN mode to skip a track or album.
- Pressing (BACK) also confirms a track to playback.
Radio
What is HD Radio™ Technology?
HD Radio Broadcasting was approved by the Federal Communications Commission in October 2002 as the system for digital AM and FM broadcasting in the U.S.
HD Radio technology features include:
• Static-free, clear radio reception. - FM Multicasting - the ability to broadcast multiple program streams over a single FM frequency. - A variety of “data services,” including text-based information - artist name, song title, etc., scrolled across your receiver display. - Digital broadcasts in the same frequencies as analog broadcasts; listeners do not need to learn a new station number and today's stations remain at their current place on the dial.
HD Radio technology is developed and licensed by iBiquity Digital Corporation and supported by the leaders of the broadcasting, consumer electronics and automotive industries.
Display items
HD Radio information is available on the display.

A Radio Band B Frequency*, Station name, Song title, Artist name, Album name, Clock
* During digital broadcasting reception, “*” is displayed on the left of the frequency indication.
To change display item Ⓑ, press DSPL.
When a station name is displayed

©Station name
DFM/AM: Receiving analog FM/AM broadcast (if digital broadcast has been received before)*1
HD: Receiving digital FM/AM broadcast without supplemental program *2
HD1: Receiving a main program of digital FM broadcast with supplemental program
HD2-8: Receiving a supplemental program of digital FM broadcast
*1 If a digital broadcast is not received, "NO NAME" appears. *2 For details, see "About FM Multicasting" on page 13.
Note
The display item differs depending on the content of broadcast.
Storing and receiving stations
Caution
When tuning in stations while driving, use Best Tuning Memory (BTM) to prevent an accident.
Storing automatically — BTM
1 Press SOURCE repeatedly until "TUNER" appears.
To change the band, press MODE repeatedly. You can select from FM1, FM2, FM3, AM1 or AM2.
2 Press and hold the select button.
The setup display appears.
3 Press the select button repeatedly until "BTM" appears.
4 Press SEEK +.
The unit stores stations in order of frequency on the number buttons.
A beep sounds when the setting is stored.
Storing manually
1 While receiving the station that you want to store, press and hold a number button (① to ⑥) until "MEM" appears.
Note
If you try to store another station on the same number button, the previously stored station will be replaced.
Receiving the stored stations
1 Select the band, then press a number button (① to ⑥).
Tuning automatically
1 Select the band, then press SEEK +/- to search for the station.
Scanning stops when the unit receives a station. Repeat this procedure until the desired station is received.
Tip
If you know the frequency of the station you want to listen to, press and hold SEEK +/- to locate the approximate frequency, then press SEEK +/- repeatedly to fine adjust to the desired frequency (manual tuning).
About FM Multicasting
Some FM HD Radio stations provide a main program and supplemental program(s) (up to 7) at the same frequency.
“HD1” appears when a station with supplemental program is received while a station name is displayed.
Selecting a supplemental program
During main program reception, press SEEK +.
The program changes as follows:
(Preceding station →) Main program → Supplemental program 1 → Supplemental program 2... (→ Succeeding station)
Press SEEK – to return to the above.
If the stored FM station has a supplemental program, you can also select by pressing the number button repeatedly until the desired supplemental program is received.
The program changes as follows:
Main program → Supplemental program 1 → Supplemental program 2... → Main program
Note
If this unit is turned off when a supplemental program is selected, the next time the unit is turned on, the main program will be selected.
iTunes Tagging
The iTunes Tag button on this unit allows you to tag songs you like that are broadcast by HD Radio stations. Information about these tagged songs is stored by the receiver and transferred to your iPod. When you connect your iPod to your computer, iTunes automatically presents songs in a new Tagged playlist so you can preview, buy, and download them. iTunes Tagging is a great way to discover new music, and add it to your collection!
Using iTunes Tagging
You can save the name of a song broadcast on an HD Radio station to this unit with a few easy steps.
After transferring the song information to the connected iPod using this unit, sync your iPod to your computer. These songs will show up in a “Tagged” playlist in iTunes, enabling easy preview or purchase of songs.
For details on iTunes Tagging and the latest iTunes Tagging compatible models, check the iTunes website at - http://www.apple.com/itunes/
For details on purchasing a song using “Tagged” information, check the iTunes website at - http://www.apple.com/support/itunes/
Retrieving song information
The Tag indicator lights up when song information is broadcast on an HD Radio station.
1 Press TAG when it is lit.
The TAG button starts blinking and the unit starts retrieving song information. After retrieving the song information, the unit starts saving the data, and “STORE” appears in the display for 2 seconds. The TAG button blinks while saving the song information.
The TAG button light goes off after the unit completes saving the song information.
The TAG button lights up again at the beginning of the next song.
Notes
- If the song information is not included in the HD Radio station broadcast, the Tag indicator does not light up.
- It takes about 10 seconds maximum to retrieve song information.
- If the TAG button is pressed right after the beginning of a song, the unit may retrieve the information of the previously broadcast song as well as the current song.
- If the TAG button is pressed just before the end of a song, the unit may retrieve the information of the next song, in addition to the current song.
- The maximum number of tagged songs that you can save to this unit is 50. If you press the TAG button when 50 tagged songs are already saved, "MEMORY FULL" will appear in the display and song information will not be retrieved.
Transferring retrieved song information
You can transfer song information retrieved and saved to an iPod using this unit.
For details on compatible iPod models, see "About iPod" on page 21.
1 Place your iPod on the connector of the unit. The unit automatically starts transferring saved song information, and "TRANSFER" appears in the display and starts blinking during the transfer.
If an iPod is inserted into the unit during tagged song retrieval, the unit immediately starts transferring the data to the iPod, after the data is saved.
Once the unit completes transferring tagged song information to the iPod, the saved data will be erased from the unit.
Notes
- Do not remove the iPod or open the front panel while "TRANSFER" is blinking in the display. The unit cannot transfer song information if the iPod is removed.
- If the connected iPod does not support iTunes Tagging, song information will not be transferred, even after this unit saves the data, and the message "NO SUPRT" will appear in the display.
- If the connected iPod does not have enough free space in the memory, song information will not be transferred even after this unit saves the data, and the message "IPOD FULL" appears in the display.
Deleting tagged song information
You can delete all tagged song information before transferring to iPod.
1 Press SOURCE repeatedly until "TUNER" appears. 2 Press and hold the select button. 3 Press the select button repeatedly until "TAG ERASE" appears. 4 Press SEEK +.
Note
Song information once deleted cannot be restored.
CD
Playing a disc
1 Press OPEN. 2 Insert the disc (label side up). 3 Close the front panel.
Playback starts automatically.
Ejecting the disc
1 Press OPEN. 2 Press ▲. The disc is ejected. 3 Close the front panel.
Display items

A Source BTrack name* 1, Disc/artist name*1, Artist name*1, Album number*2, Album name*1, Track number/Elapsed playing time, Clock
*1 The information of a CD TEXT, MP3/WMA/AAC is displayed. *2 Album number is displayed only when the album is changed.
To change display items B, press DSPL.
Tip
Displayed items may differ depending on model, disc type, recording format and settings.
Repeat and shuffle play
1 During playback, press ③ (REP) or ④ (SHUF) repeatedly until the desired setting appears.
Select To play
← TRACK track repeatedly.
ALBUM* album repeatedly.
SHUF ALBUM* album in random order.
SHUF DISC disc in random order.
* When an MP3/WMA/AAC is played.
To return to normal play mode, select "OFF" or "SHUF OFF."
USB devices
For details on the compatibility of your USB device, visit the support site.
Support site
- MSC (Mass Storage Class) and MTP (Media Transfer Protocol) type USB devices compliant with the USB standard can be used.
- Corresponding codec is MP3 (.mp3), WMA (.wma) and AAC (.m4a).
- Backup of data in a USB device is recommended.
Note
Connect the USB device after starting the engine. Depending on the USB device, malfunction or damage may occur if it is connected before starting the engine.
Playing back a USB device
1 Slide the USB cover.

2 Connect the USB device to the USB connector.
When using a cable, use the one supplied with the USB device to connect.

Playback starts.
If a USB device is already connected, to start playback, press SOURCE repeatedly until "USB" appears.
Press OFF to stop playback.
continue to next page →
Removing the USB device
1 Stop the USB device playback. 2 Remove the USB device.
If you remove your USB device during playback, data in the USB device may be damaged.
Notes
- Do not use USB devices so large or heavy that they may fall down due to vibration, or cause a loose connection.
- Do not open the front panel during playback of the USB device, otherwise USB data may be damaged.
- This unit cannot recognize USB devices via a USB hub.
Display items

Source, Track name, Artist name, Album number*, Album name, Track number/Elapsed playing time, Clock
* Album number is displayed only when the album is changed.
To change display items, press DSPL.
Notes
- Displayed items will differ, depending on the USB device, recorded format and settings. For details, visit the support site.
- The maximum number of displayable data is as follows: – folders (albums): 128 – files (tracks) per folder: 500
- Do not leave a USB device in a parked car, as malfunction may result.
- It may take time for playback to begin, depending on the amount of recorded data.
- DRM (Digital Rights Management) files may not be played.
- During playback or fast-forward/reverse of a VBR (Variable Bit Rate) MP3/WMA/AAC file, elapsed playing time may not display accurately.
- Playback of the following MP3/WMA/AAC files is not supported:
- lossless compression
- copyright-protected
Repeat and shuffle play
1 During playback, press ③ (REP) or ④ (SHUF) repeatedly until the desired setting appears.
Select To play
TRACK: track repeatedly. ALBUM: album repeatedly.
SHUF ALBUM: album in random order.
SHUF DEVICE: device in random order.
After 3 seconds, the setting is complete.
To return to normal play mode, select “OFF” or “SHUF OFF.”
iPod
For details on the compatibility of your iPod, see “About iPod” on page 21 or visit the support site.
In these Operating Instructions, “iPod” is used as a general reference for the iPod functions on the iPod and iPhone, unless otherwise specified by the text or illustrations.
Support site
Before connecting the iPod, turn down the volume of the unit.
1 Slide the USB cover.
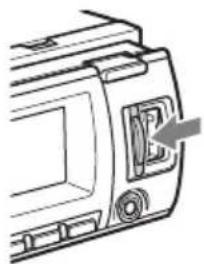
2 Connect the iPod to the USB connector via the dock connector to USB cable.

The iPod will turn on automatically, and the display will appear on the iPod screen as below.*

Tip
We recommend the RC-100IP USB cable (not supplied) to connect the dock connector.
The tracks on the iPod start playing automatically from the point last played. If an iPod is already connected, to start playback press SOURCE repeatedly until "USB" appears. ("IPD" appears in the display when iPod is recognized.)
* In the case of an iPod touch or iPhone being connected, or that the iPod was last played back using passenger control, the logo will not appear on the screen.
3 Press MODE to select the play mode.
The mode changes as follows:
RESUMING → ALBUM → TRACK → PODCAST* → GENRE → PLAYLIST → ARTIST
* May not appear depending on iPod setting.
4 Adjust the volume.
Press OFF to stop playback.
Removing the iPod
1 Stop the iPod playback.
2 Remove the iPod.
Caution for iPhone
When you connect an iPhone via USB, telephone volume is controlled by iPhone itself. In order to avoid sudden loud sound after a call, do not increase the volume on the unit during a telephone call.
Notes
- Do not detach the front panel during playback of the iPod, otherwise data may be damaged.
- This unit cannot recognize iPod via a USB hub.
Tips
- When the ignition key is turned to the ACC position, and the unit is on, the iPod will be recharged.
- If the iPod is disconnected during playback, "NO DEV" appears in the display of the unit.
Resuming mode
When the iPod is connected to the dock connector, the mode of this unit changes to resuming mode and playback starts in the mode set by the iPod.
In resuming mode, the following buttons do not function.
- ③ (REP)
- ④ (SHUF)
Display items

A Source (iPod) indication BTrack name, Artist name, Album name, Track number/Elapsed playing time, Clock
To change display items Ⓑ, press DSPL.
Tip
When album/podcast/genre/artist/playlist is changed, its item number appears momentarily.
Note
Some letters stored in iPod may not be displayed correctly.
Setting the play mode
1 During playback, press MODE.
The mode changes as follows:
ALBUM → TRACK → PODCAST* →
GENRE → PLAYLIST → ARTIST
* May not appear depending on iPod setting.
Skipping albums, podcasts, genres, playlists and artists
| To Pres s | |
| Skip | 1/2(ALBUM -/+)[press once for each] |
| Skipcontinuously | 1/2(ALBUM -/+)[hold to desired point] |
Repeat and shuffle play
1 During playback, press ③ (REP) or ④ (SHUF) repeatedly until the desired setting appears.
Select To play
← TRACK track repeatedly.
← ALBUM album repeatedly.
← PODCAST podcast repeatedly.
ARTIST artist repeatedly.
PLAYLIST playlist repeatedly.
GENRE genre repeatedly.
SHUF ALBUM album in random order.
SHUF PODCAST podcast in random order.
SHUF ARTIST artist in random order.
SHUF PLAYLIST playlist in random order.
SHUF GENRE genre in random order.
SHUF DEVICE device in random order.
After 3 seconds, the setting is complete.
To return to normal play mode, select “OFF” or “SHUF OFF.”
Operating an iPod directly — Passenger control
You can operate an iPod connected to the dock connector directly.
1 During playback, press and hold MODE.
“MODE IPOD” appears and you will be able to operate the iPod directly.
To change the display item
Press DSPL.
The display items change as follows:
Track name → Artist name → Album name → MODE IPOD → Clock
To exit the passenger control
Press and hold MODE.
Then “MODE AUDIO” will appear and the play mode will change to “RESUMING.”
Notes
- The volume can be adjusted only by the unit.
- If this mode is canceled, the repeat setting will be turned off.
Other functions
Changing the sound settings
Adjusting the sound characteristics
1 Press the select button repeatedly until the desired item appears. 2 Rotate the control dial to adjust the selected item. 3 Press ← (BACK).
The setting is complete and the display returns to normal reception/play mode.
The following items can be set (follow the page reference for details):
EQ3
Selects an equalizer curve from 7 music types (XPLOD, VOCAL, EDGE, CRUISE, SPACE, GRAVITY, CUSTOM or OFF).
DSO (Dynamic Soundstage Organizer)
Creates a more ambient sound field.
To select the DSO mode: “1,” “2,” “3” or “OFF.”
The larger the number, the more enhanced the effect.
LOW 1 , MID 1 , HI *1 (page 19)
BAL (Balance)
Adjusts the sound balance between the left and right speakers.
FAD (Fader)
Adjusts the relative level between the front and rear speakers.
SUB*2 (Subwoofer volume)
Adjusts the subwoofer volume.
AUX*3 (AUX level)
Adjusts the volume level for each connected auxiliary equipment: “+18 dB” – “0 dB” – “-8 dB.”
This setting negates the need to adjust the volume level between sources.
*1 When EQ3 is activated. *2 "ATT" is displayed at the lowest setting, and can be adjusted up to 21 steps. *3 When AUX source is activated (page 20).
Customizing the equalizer curve — EQ3
“CUSTOM” of EQ3 allows you to make your own equalizer settings.
1 Select a source, then press the select button repeatedly to select "EQ3." 2 Rotate the control dial to select "CUSTOM." 3 Press the select button repeatedly until "LOW," "MID" or "HI" appears. 4 Rotate the control dial to adjust the selected item.
The volume level is adjustable in 1 dB steps, from -10 dB to +10 dB.

Repeat steps 3 and 4 to adjust the equalizer curve.
To restore the factory-set equalizer curve, press and hold the select button before the setting is complete.
5 Press ↩ (BACK).
The setting is complete and the display returns to normal reception/play mode.
Tip
Other equalizer types are also adjustable.
Adjusting setup items — SET
1 Press and hold the select button. The setup display appears. 2 Press the select button repeatedly until the desired item appears. 3 Rotate the control dial to select the setting (example "ON" or "OFF"). 4 Press and hold the select button.
The setup is complete and the display returns to normal reception/play mode.
Note
Displayed items will differ, depending on the source and setting.
The following items can be set (follow the page reference for details):
CLOCK-ADJ (Clock Adjust) (page 6)
BEEP
Activates the beep sound: "ON," "OFF."
AUX-A* (AUX Audio)
Activates the AUX source display: "ON," "OFF" (page 20).
AUTO OFF
Shuts off automatically after a desired time when the unit is turned off: "NO," "30S (Seconds)," "30M (Minutes)," "60M (Minutes)."
DEMO (Demonstration)
Activates the demonstration: "ON," "OFF."
DIMMER
Changes the display brightness.
- “AT”: to dim the display automatically when you turn lights on. (Available only when the illumination control lead is connected.)
- “ON”: to dim the display.
- "OFF": deactivate the dimmer.
CONTRAST
Adjusts the contrast of the display. The contrast level is adjustable in 7 steps.
ILLUMI (Illumination)
Changes the illumination color: "ILLUMI-1," "ILLUMI-2."
M.DSPL (Motion Display)
Selects the Motion Display mode.
- “SA”: to show moving patterns and spectrum analyzer.
- “ON”: to show moving patterns.
- “OFF”: to deactivate the Motion Display.
A.SCRL (Auto Scroll)
Scrolls long items automatically: "ON," "OFF."
ZAP.TIME (Zappin Time)
Selects the playback time for the ZAPPIN function.
- "ZAP.TIME-1 (about 6 seconds)," "ZAP.TIME-2 (about 9 seconds)," "ZAP.TIME-3 (about 30 seconds)."
LPF (Low Pass Filter)
Selects the subwoofer cut-off frequency: "OFF," "80Hz," "100Hz," "120Hz," "140Hz," "160Hz."
LPF NORM/REV (Low Pass Filter Normal/Reverse)
Selects the subwoofer phase: "NORM," "REV."
HPF (High Pass Filter)
Selects the front/rear speaker cut-off frequency: "OFF," "80Hz," "100Hz," "120Hz," "140Hz," "160Hz."
LOUD (Loudness)
Reinforces bass and treble for clear sound at low volume levels: "ON," "OFF."
BTM (page 13)
TAG ERASE (page 14)
Using optional equipment
Auxiliary audio equipment
By connecting an optional portable audio device to the AUX input jack (stereo mini jack) on the unit and then simply selecting the source, you can listen on your car speakers. The volume level is adjustable for any difference between the unit and the portable audio device. Follow the procedure below:
Connecting the portable audio device
1 Turn off the portable audio device. 2 Turn down the volume on the unit. 3 Connect to the unit.

Adjust the volume level
Be sure to adjust the volume for each connected audio device before playback.
1 Turn down the volume on the unit. 2 Press SOURCE repeatedly until "AUX" appears. After that, "AUX FRONT IN" appears. 3 Start playback of the portable audio device at a moderate volume. 4 Set your usual listening volume on the unit. 5 Adjust the input level (page 19).
Additional Information
Precautions
- Cool off the unit beforehand if your car has been parked in direct sunlight.
- Power antenna (aerial) extends automatically.
Moisture condensation
Should moisture condensation occur inside the unit, remove the disc and wait for about an hour for it to dry out; otherwise the unit will not operate properly.
To maintain high sound quality
Do not splash liquid onto the unit or discs.
Notes on discs
- Do not expose discs to direct sunlight or heat sources such as hot air ducts, nor leave it in a car parked in direct sunlight.
- Before playing, wipe the discs with a cleaning cloth from the center out. Do not use solvents such as benzine, thinner, commercially available cleaners.
- This unit is designed to playback discs that conform to the Compact Disc (CD)
standard. DualDiscs and some of the music discs encoded with copyright protection technologies do not conform to the Compact Disc (CD) standard, therefore, these discs may not be playable by this unit.
• Discs that this unit CANNOT play
– Discs with labels, stickers, or sticky tape or paper attached. Doing so may cause a malfunction, or may ruin the disc. – Discs with non-standard shapes (e.g., heart, square, star). Attempting to do so may damage the unit. -8 cm (3/4 in) discs.
Notes on CD-R/CD-RW discs
• The maximum number of: (CD-R/CD-RW only) – folders (albums): 150 (including root folder) – files (tracks) and folders: 300 (may less than 300 if folder/file names contain many characters) – displayable characters for a folder/file name: 32 (Joliet)/64 (Romeo)
- If the multi-session disc begins with a CD-DA session, it is recognized as a CD-DA disc, and other sessions are not played back. • Discs that this unit CANNOT play
- CD-R/CD-RW of poor recording quality.
- CD-R/CD-RW recorded with an incompatible recording device.
- CD-R/CD-RW which is finalized incorrectly.
- CD-R/CD-RW other than those recorded in music CD format or MP3 format conforming to ISO9660 Level 1/Level 2, Joliet/Romeo or multi-session.
Playback order of MP3/WMA/AAC files
![graph TD A["MP3/WMA/AAC"] --> B["1"] B --> C["①"] B --> D["②"] B --> E["③"] B --> F["④"] B --> G["⑤"] B --> H["⑥"] B --> I["⑦"] style A fill:#f9f,stroke:#333 style B fill:#ccf,stroke:#333 style C fill:#cfc,stroke:#333 style D fill:#fcc,stroke:#333 style E fill:#cff,stroke:#333 style F fill:#ffc,stro…](/content/2026/06/1338445/images/18bab4add231758ef37eb49bbfc84f1ca3a58d9b89e0b013ff9fb41450a5643e.jpg)
About iPod
- You can connect to the following iPod models. Update your iPod devices to the latest software before use.
Made for
- iPod touch (2nd generation)
- iPod touch (1st generation)
- iPod classic
- iPod with video 1 2
- iPod nano (5th generation)
- iPod nano (4th generation)
- iPod nano (3rd generation)
- iPod nano (2nd generation) *2 -iPod nano (1st generation)*1 *2
- iPhone 3GS
- iPhone 3G
- iPhone
*1 Passenger control is not available for iPod nano 1st generation model or iPod with video. *2 iTunes Tagging is not available for iPod nano 1st or 2nd generation models, or iPod with video.
- “Made for iPod” and “Made for iPhone” mean that an electronic accessory has been designed to connect specifically to iPod or iPhone respectively, and has been certified by the developer to meet Apple performance standards.
- Apple is not responsible for the operation of this device or its compliance with safety and regulatory standards.
If you have any questions or problems concerning your unit that are not covered in this manual, consult your nearest Sony dealer.
Maintenance
Replacing the lithium battery of the card remote commander
Under normal conditions, the battery will last approximately 1 year. (The service life may be shorter, depending on the conditions of use.) When the battery becomes weak, the range of the card remote commander becomes shorter. Replace the battery with a new CR2025 lithium battery. Use of any other battery may present a risk of fire or explosion.

Notes on the lithium battery
- Keep the lithium battery out of the reach of children. Should the battery be swallowed, immediately consult a doctor.
- Wipe the battery with a dry cloth to assure a good contact.
- Be sure to observe the correct polarity when installing the battery.
- Do not hold the battery with metallic tweezers, otherwise a short-circuit may occur.
WARNING
Battery may explode if mistreated. Do not recharge, disassemble, or dispose of in fire.
Fuse replacement
When replacing the fuse, be sure to use one matching the amperage rating stated on the original fuse. If the fuse blows, check the power connection and replace the fuse. If the fuse blows again after replacement, there may be an internal malfunction. In such a case, consult your nearest Sony dealer.

Fuse (10 A)
Cleaning the connectors
The unit may not function properly if the connectors between the unit and the front panel are not clean. To prevent this, detach the front panel (page 7) and clean the connectors with a cotton swab. Do not apply too much force, as this may damage the connectors.

Main unit

Back of the front panel
Notes
- For safety, turn off the ignition before cleaning the connectors, and remove the key from the ignition switch.
- Never touch the connectors directly with your fingers or with any metal device.
Removing the unit
1. Remove the protection collar.
① Detach the front panel (page 7). ② Pinch both edges of the protection collar, then pull it out.

2. Remove the unit.
① Insert both release keys simultaneously until they click.

② Pull the release keys to unseat the unit.

③ Slide the unit out of the mounting.
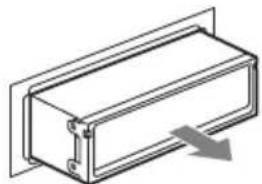
Specifications
AUDIO POWER SPECIFICATIONS

CEA2006 Standard
Power Output: 17 Watts RMS×4 at
4 Ohms < 1% THD+N
SN Ratio: 82 dBA
(reference: 1 Watt into 4 Ohms)
Tuner section
FM
Tuning range: 87.5 - 107.9 MHz
Antenna (aerial) terminal:
External antenna (aerial) connector
Intermediate frequency: 10.7 MHz
Usable sensitivity: 8 dBf
Selectivity: 75 dB at 400 kHz
Signal-to-noise ratio:
71 dB (mono)
80 dB (HD Radio broadcast)
Separation at 1 kHz:
50 dB (Conventional broadcast)
80 dB (HD Radio broadcast)
Frequency response:
20 - 15,000 Hz (Conventional broadcast)
20 - 20,000 Hz (HD Radio broadcast)
AM
Tuning range: 530 - 1,710 kHz
Antenna (aerial) terminal:
External antenna (aerial) connector
Intermediate frequency: 10.7 MHz
Sensitivity: 26 μV
CD Player section
Signal-to-noise ratio: 120 dB
Frequency response: 10 - 20,000 Hz
Wow and flutter: Below measurable limit
USB Player section
Interface: USB (Full-speed)
Maximum current: 500 mA
Power amplifier section
Output: Speaker outputs (sure seal connectors)
Speaker impedance: 4 - 8 ohms
Maximum power output: 52 W × 4 (at 4 ohms)
General
Outputs:
Audio outputs terminal (front/rear)
Subwoofer output terminal (mono)
Power antenna (aerial) relay control terminal
Power amplifier control terminal
continue to next page →
Inputs:
BUS control input terminal
BUS audio input terminal
Remote controller input terminal
Antenna (aerial) input terminal
Telephone ATT control terminal
Illumination control terminal
USB signal input connector
Tone controls:
Low: ±10 dB at 60 Hz (XPLOD)
Mid: ±10 dB at 1 kHz (XPLOD)
High: ±10 dB at 10 kHz (XPLOD)
Power requirements: 12 V DC car battery (negative ground (earth))
Dimensions: Approx. 178 × 50 × 182 mm (7 1/8 × 2 × 7 1/4 in) (w/h/d)
Mounting dimensions: Approx. 182 × 53 × 162 mm (7 1/4 × 2 1/8 × 6 1/2 in) (w/h/d)
Mass: Approx. 1.3 kg (2 lb 14 oz)
Supplied accessories:
Card remote commander: RM-X151
Parts for installation and connections (1 set)
Optional accessories/equipment:
BUS cable (supplied with an RCA pin cord):
Source selector: XA-C40
AUX-IN selector: XA-300
USB connection cable for iPod: RC-100IP
Your dealer may not handle some of the above listed accessories. Please ask the dealer for detailed information.
Design and specifications are subject to change without notice.
- Halogenated flame retardants are not used in the certain printed wiring boards.
- Halogenated flame retardants are not used in cabinets.
- Packaging cushions are made from paper.
Troubleshooting
The following checklist will help you remedy problems you may encounter with your unit.
Before going through the checklist below, check the connection and operating procedures.
If the problem is not solved, visit the following support site.
Support site
No power is being supplied to the unit.
- Check the connection or fuse.
- If the unit is turned off and the display disappears, it cannot be operated with the remote commander. →Turn on the unit.
The power antenna (aerial) does not extend.
The power antenna (aerial) does not have a relay box.
No sound.
- The ATT function is activated, or the Telephone ATT function (when the interface cable of a car telephone is connected to the ATT lead) is activated.
- The position of the fader control “FAD” is not set for a 2-speaker system.
No beep sound.
• The beep sound is canceled (page 19). - An optional power amplifier is connected and you are not using the built-in amplifier.
The contents of the memory have been erased.
- The RESET button has been pressed. → Store again into the memory.
- The power supply lead or battery has been disconnected or it is not connected properly.
Stored stations and correct time are erased. The fuse has blown.
Makes noise when the position of the ignition is switched.
The leads are not matched correctly with the car's accessory power connector.
During playback or reception, demonstration mode starts.
If no operation is performed for 5 minutes with "DEMO-ON" set, demonstration mode starts.
→ Set "DEMO-OFF" (page 20).
The display disappears from/does not appear in the display window.
- The dimmer is set "DIMMER-ON" (page 20).
- The display disappears if you press and hold OFF. → Press and hold OFF on the unit until the display appears.
• The connectors are dirty (page 22).
The display items do not scroll.
- Display items with many characters may not scroll.
- “A.SCRL” is set to “OFF.” → Set “A.SCRL-ON” (page 20). → Press and hold DSPL (SCRL).
The Auto Off function does not operate.
The unit is turned on. The Auto Off function activates after turning off the unit.
→ Turn off the unit.
DSO does not function.
Depending on the type of car interior or type of music, DSO may not have a desirable effect.
Radio reception
The stations cannot be received. The sound is hampered by noises.
• The connection is not correct. → Connect a power antenna (aerial) control lead (blue) or accessory power supply lead (red) to the power supply lead of a car's antenna (aerial) booster (only when your car has built-in FM/AM antenna (aerial) in the rear/side glass). → Check the connection of the car antenna (aerial). → If the auto antenna (aerial) will not go up, check the connection of the power antenna (aerial) control lead. → When the DSO mode is on, the sound is sometimes hampered by noises. Set the DSO mode to "OFF" (page 19).
Preset tuning is not possible.
- Store the correct frequency in the memory. • The broadcast signal is too weak.
Automatic tuning is not possible.
The broadcast signal is too weak.
→ Perform manual tuning.
During FM reception, the "ST" indication flashes.
Tune in the frequency accurately.
The sound skips or repeats.
This may happen while this unit switches from analog signal to digital signal or vice versa, because the radio station does not synchronize the signal.
The supplemental program cannot be stored.
The main program of the frequency is stored, even if you store a supplemental program.
CD playback
The disc cannot be loaded.
- Another disc is already loaded.
- The disc has been forcibly inserted upside down or in the wrong way.
The disc does not playback.
- Defective or dirty disc.
- The CD-Rs/CD-RWs are not for audio use (page 21).
MP3/WMA/AAC files cannot be played back.
The disc is incompatible with the MP3/WMA/AAC format and version. For details on playable discs and formats, visit the support site.
MP3/WMA/AAC files take longer to play back than others.
The following discs take a longer time to start playback.
- A disc recorded with a complicated tree structure.
- A disc recorded in Multi Session.
- A disc to which data can be added.
The sound skips.
• Installation is not correct. →Install the unit at an angle of less than 45° in a sturdy part of the car. - Defective or dirty disc.
The operation buttons do not function. The disc will not eject.
Press the RESET button (page 6).
USB playback
You cannot play back items via a USB hub.
This unit cannot recognize USB devices via a USB hub.
Cannot play back items.
A USB device does not work.
→Reconnect it.
The USB device takes longer to play back.
The USB device contains files with a complicated tree structure.
A beep sounds.
During playback, the USB device has been disconnected.
→Before disconnecting a USB device, make sure to stop playback first for data protection.
The sound is intermittent.
The sound may be intermittent at a high-bit-rate of more than 320 kbps.
Error displays/Messages
CHECKING
The unit is confirming the connection of a USB device. → Wait until confirming the connection is finished.
ERROR
- The disc is dirty or inserted upside down. →Clean or insert the disc correctly.
- A blank disc has been inserted.
- The disc cannot play due to a problem. →Insert another disc.
- USB device was not automatically recognized. →Reconnect it again.
- Press ▲ to remove the disc.
FAILURE (Illuminates until any button is pressed.) The connection of speakers/amplifiers is incorrect.
→See the installation/connections manual of this model to check the connection.
FAILURE (Illuminates for about 1 second.)
- When the SAT tuner is connected, storing an SAT radio channel into a preset failed.
→Be sure to receive the channel that you want to store, then try it again.
- Failed to transfer song information.
- “TAG ERASE” was selected while saving other song information.
→Try again.
HUB NO SUPRT (HUB Not Support)
USB hub is not supported on this unit.
IPOD FULL
There is no memory space on the iPod while transferring song information.
MEMORY FULL
TAG was pressed with 50 tagged songs already saved.
NO DEV (No Device)
USB is selected as source without a USB device connected. A USB device or a USB cable has been disconnected during playback.
→Be sure to connect a USB device and USB cable.
NO MUSIC
The disc or USB device does not contain a music file.
→Insert a music CD in this unit.
→Connect a USB device with a music file in it.
NO NAME
Radio:
When this unit receives analog broadcasting (if digital broadcasting has never been received), station name does not appear.
Some radio stations do not provide this information.
CD/USB:
A disc/album/artist/track name is not written in the track.
NO INFO (No Information)
When this unit receives analog broadcasting, song title/artist name/album name does not appear.
Some radio stations do not provide this information.
LINKING
The reception of the supplemental program is interrupted.
OFFSET
There may be an internal malfunction.
→Check the connection. If the error indication remains on in the display, consult your nearest Sony dealer.
OVERLOAD
USB device is overloaded.
→Disconnect the USB device, then change the source by pressing SOURCE.
→Indicates that the USB device is out of order, or an unsupported device is connected.
PREV STORED (Previous Stored)
TAG was pressed with the same song information already saved.
READ
The unit is reading all track and album information on the disc.
→Wait until reading is complete and playback starts automatically. Depending on the disc structure, it may take more than a minute.
RESET
This unit or USB device cannot be operated due to a problem.
→Press the RESET button (page 6).
STORE FAIL
Trying to retrieve song information again when already retrieving song information.
STORING
TAG was pressed while retrieving song information.
TAG NO SUPRT (Tagging Not Support)
An iPod not compliant with iTunes Tagging was connected to the unit with song information saved.
USB NO SUPRT (USB Not Support)
The connected USB device is not supported.
→For details on the compatibility of your USB device, visit the support site.
During reverse or fast-forward, you have reached the beginning or the end of the disc and you cannot go any further.
The character cannot be displayed with the unit.
If these solutions do not help improve the situation, consult your nearest Sony dealer.
If you take the unit to be repaired because of CD playback trouble, bring the disc that was used at the time the problem began.
Suggestion
Notes
Note
Main unit

Specifications
Bass: ±10 dB at 60 Hz (XPLOD)
Midrange: ±10 dB at 1 kHz (XPLOD)
Treble: ±10 dB at 10 kHz (XPLOD)
If you have any questions/problems regarding this product, try the following:
1 Read Troubleshooting in these Operating Instructions. 2 Reset the unit.
Note: Stored data may be erased.
3 Please contact (U.S.A. only);
Call 1-800-222-7669
URL: http://www.SONY.com
- FM/AM DIGITAL RADIO CD PLAYER
- WARNING
- CAUTION
- FOR THE STATE OF CALIFORNIA, USA ONLY
- HD RADIO®
- WARNING IF YOUR CAR'S IGNITION HAS NO ACC POSITION
- TABLE OF CONTENTS
- GETTING STARTED
- LOCATION OF CONTROLS AND BASIC OPERATIONS
- RADIO
- CD
- USB DEVICES
- IPOD
- OTHER FUNCTIONS
- ADDITIONAL INFORMATION
- SUPPORT SITE
- PLAYABLE DISCS ON THIS UNIT
- RESETTING THE UNIT
- NOTE
- CANCELING THE DEMO MODE
- PREPARING THE CARD REMOTE COMMANDER
- TIP
- SETTING THE CLOCK
- DETACHING THE FRONT PANEL
- CAUTION ALARM
- NOTES
- ATTACHING THE FRONT PANEL
- MAIN UNIT
- CD/USB
- CARD REMOTE COMMANDER RM-X
- SEARCHING FOR A TRACK
- SEARCHING A TRACK BY NAME — QUICK-BROWZER
- SEARCHING BY SKIP ITEMS — JUMP MODE
- SEARCHING A TRACK BY LISTENING TO TRACK PASSAGES — ZAPPIN™
- PRESS ZAP DURING PLAYBACK
- PRESS THE SELECT BUTTON OR ZAP WHEN A TRACK YOU WANT TO LISTEN IS PLAYED BACK
- TIPS
- WHAT IS HD RADIO™ TECHNOLOGY
- DISPLAY ITEMS
- WHEN A STATION NAME IS DISPLAYED
- STORING AND RECEIVING STATIONS
- STORING AUTOMATICALLY — BTM
- STORING MANUALLY
- RECEIVING THE STORED STATIONS
- TUNING AUTOMATICALLY
- ABOUT FM MULTICASTING
- SELECTING A SUPPLEMENTAL PROGRAM
- MAIN PROGRAM → SUPPLEMENTAL PROGRAM 1 → SUPPLEMENTAL PROGRAM 2... → MAIN PROGRAM
- ITUNES TAGGING
- USING ITUNES TAGGING
- RETRIEVING SONG INFORMATION
- TRANSFERRING RETRIEVED SONG INFORMATION
- DELETING TAGGED SONG INFORMATION
- PLAYING A DISC
- EJECTING THE DISC
- REPEAT AND SHUFFLE PLAY
- SELECT TO PLAY
- PLAYING BACK A USB DEVICE
- REMOVING THE USB DEVICE
- DURING PLAYBACK, PRESS ③ (REP) OR ④ (SHUF) REPEATEDLY UNTIL THE DESIRED SETTING APPEARS
- SLIDE THE USB COVER
- CONNECT THE IPOD TO THE USB CONNECTOR VIA THE DOCK CONNECTOR TO USB CABLE
- PRESS MODE TO SELECT THE PLAY MODE
- ADJUST THE VOLUME
- REMOVING THE IPOD
- CAUTION FOR IPHONE
- RESUMING MODE
- SETTING THE PLAY MODE
- DURING PLAYBACK, PRESS MODE
- SKIPPING ALBUMS, PODCASTS, GENRES, PLAYLISTS AND ARTISTS
- OPERATING AN IPOD DIRECTLY — PASSENGER CONTROL
- DURING PLAYBACK, PRESS AND HOLD MODE
- TO CHANGE THE DISPLAY ITEM
- TO EXIT THE PASSENGER CONTROL
- CHANGING THE SOUND SETTINGS
- ADJUSTING THE SOUND CHARACTERISTICS
- EQ
- CUSTOMIZING THE EQUALIZER CURVE — EQ
- ADJUSTING SETUP ITEMS — SET
- AUX-A* (AUX AUDIO)
- AUTO OFF
- DEMO (DEMONSTRATION)
- DIMMER
- CONTRAST
- ILLUMI (ILLUMINATION)
- M.DSPL (MOTION DISPLAY)
- A.SCRL (AUTO SCROLL)
- ZAP.TIME (ZAPPIN TIME)
- LPF (LOW PASS FILTER)
- LPF NORM/REV (LOW PASS FILTER NORMAL/REVERSE)
- HPF (HIGH PASS FILTER)
- LOUD (LOUDNESS)
- BTM (PAGE 13)
- TAG ERASE (PAGE 14)
- USING OPTIONAL EQUIPMENT
- AUXILIARY AUDIO EQUIPMENT
- CONNECTING THE PORTABLE AUDIO DEVICE
- ADJUST THE VOLUME LEVEL
- PRECAUTIONS
- MOISTURE CONDENSATION
- TO MAINTAIN HIGH SOUND QUALITY
- NOTES ON DISCS
- NOTES ON CD-R/CD-RW DISCS
- PLAYBACK ORDER OF MP3/WMA/AAC FILES
- ABOUT IPOD
- MAINTENANCE
- REPLACING THE LITHIUM BATTERY OF THE CARD REMOTE COMMANDER
- NOTES ON THE LITHIUM BATTERY
- FUSE REPLACEMENT
- CLEANING THE CONNECTORS
- REMOVING THE UNIT
- REMOVE THE PROTECTION COLLAR
- REMOVE THE UNIT
- SPECIFICATIONS
- AUDIO POWER SPECIFICATIONS
- TUNER SECTION
- FM
- AM
- CD PLAYER SECTION
- USB PLAYER SECTION
- POWER AMPLIFIER SECTION
- GENERAL
- OUTPUTS
- INPUTS
- TONE CONTROLS
- SUPPLIED ACCESSORIES
- OPTIONAL ACCESSORIES/EQUIPMENT
- TROUBLESHOOTING
- NO POWER IS BEING SUPPLIED TO THE UNIT
- THE POWER ANTENNA (AERIAL) DOES NOT EXTEND
- NO SOUND
- NO BEEP SOUND
- THE CONTENTS OF THE MEMORY HAVE BEEN ERASED
- STORED STATIONS AND CORRECT TIME ARE ERASED. THE FUSE HAS BLOWN
- MAKES NOISE WHEN THE POSITION OF THE IGNITION IS SWITCHED
- DURING PLAYBACK OR RECEPTION, DEMONSTRATION MODE STARTS
- THE DISPLAY DISAPPEARS FROM/DOES NOT APPEAR IN THE DISPLAY WINDOW
- THE DISPLAY ITEMS DO NOT SCROLL
- THE AUTO OFF FUNCTION DOES NOT OPERATE
- DSO DOES NOT FUNCTION
- RADIO RECEPTION
- THE STATIONS CANNOT BE RECEIVED. THE SOUND IS HAMPERED BY NOISES
- PRESET TUNING IS NOT POSSIBLE
- AUTOMATIC TUNING IS NOT POSSIBLE
- DURING FM RECEPTION, THE "ST" INDICATION FLASHES
- THE SOUND SKIPS OR REPEATS
- THE SUPPLEMENTAL PROGRAM CANNOT BE STORED
- CD PLAYBACK
- THE DISC CANNOT BE LOADED
- THE DISC DOES NOT PLAYBACK
- MP3/WMA/AAC FILES CANNOT BE PLAYED BACK
- MP3/WMA/AAC FILES TAKE LONGER TO PLAY BACK THAN OTHERS
- THE SOUND SKIPS
- THE OPERATION BUTTONS DO NOT FUNCTION. THE DISC WILL NOT EJECT
- USB PLAYBACK
- YOU CANNOT PLAY BACK ITEMS VIA A USB HUB
- CANNOT PLAY BACK ITEMS
- THE USB DEVICE TAKES LONGER TO PLAY BACK
- A BEEP SOUNDS
- THE SOUND IS INTERMITTENT
- ERROR DISPLAYS/MESSAGES
- CHECKING
- ERROR
- IPOD FULL
- MEMORY FULL
- NO MUSIC
- NO NAME
- LINKING
- OFFSET
- OVERLOAD
- READ
- RESET
- STORE FAIL
- STORING
- SUGGESTION
- IF YOU HAVE ANY QUESTIONS/PROBLEMS REGARDING THIS PRODUCT, TRY THE FOLLOWING
Brand : SONY
Model : CDX-GT700HD
Category : Car radio