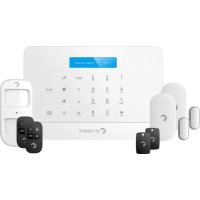
USER MANUAL S5 SIM WiFi Secual eTiger
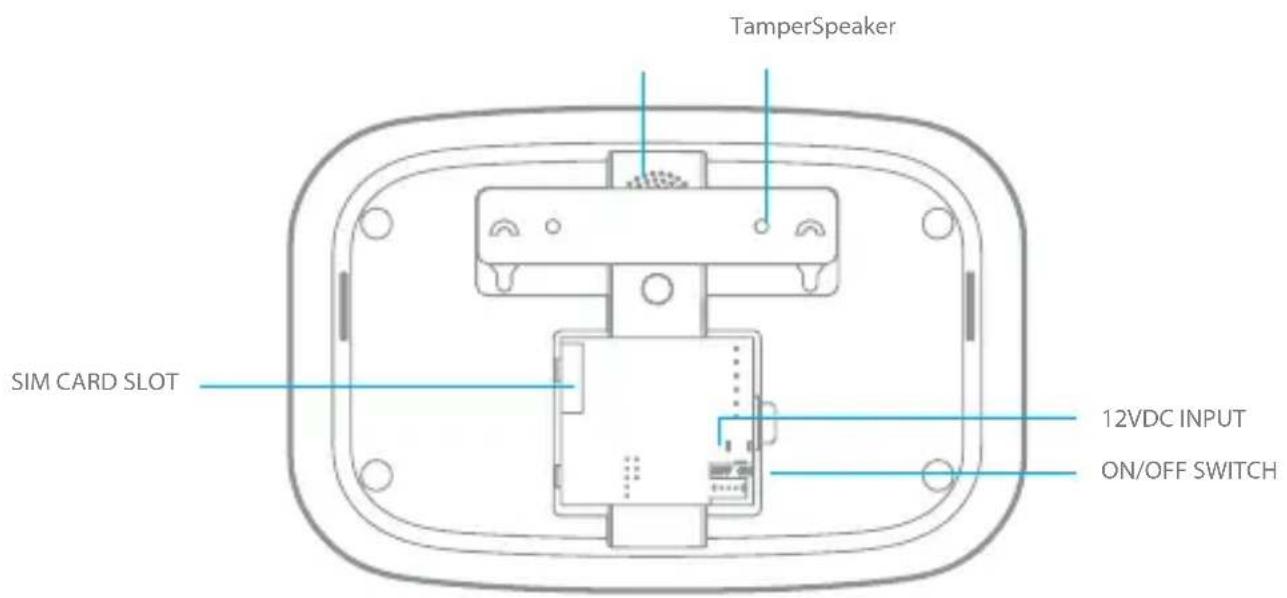
-SIM adaptor
Panel design
Specifications
Product name
S5 SIM Wi-Fi Secual
Backup batteries
Lithium Batteries: 7.4V / 600 mAh
Power Supply
Input: AC 110-240V / 50-60 Hz
Output: DC 12V / 1A
Internal siren
95dB
Wi-Fi
2.4GHz 802.11 b/g/n
Housing material
ABS plastic
GSM- frequency
GSM:850/900/1800/1900MHz
Operating conditions
Temperature: -10^ 55^
Humidity: 80% (non-condensing)
Radio-frequency
433 + 868MHz
Control panel dimensions (L x W x H)
205 × 135 × 28 ~mm
Transmission distance
< 80M in open space
Transmission power
Max. radio transmit power: 10 dBm
antenna gain : 2 dBi
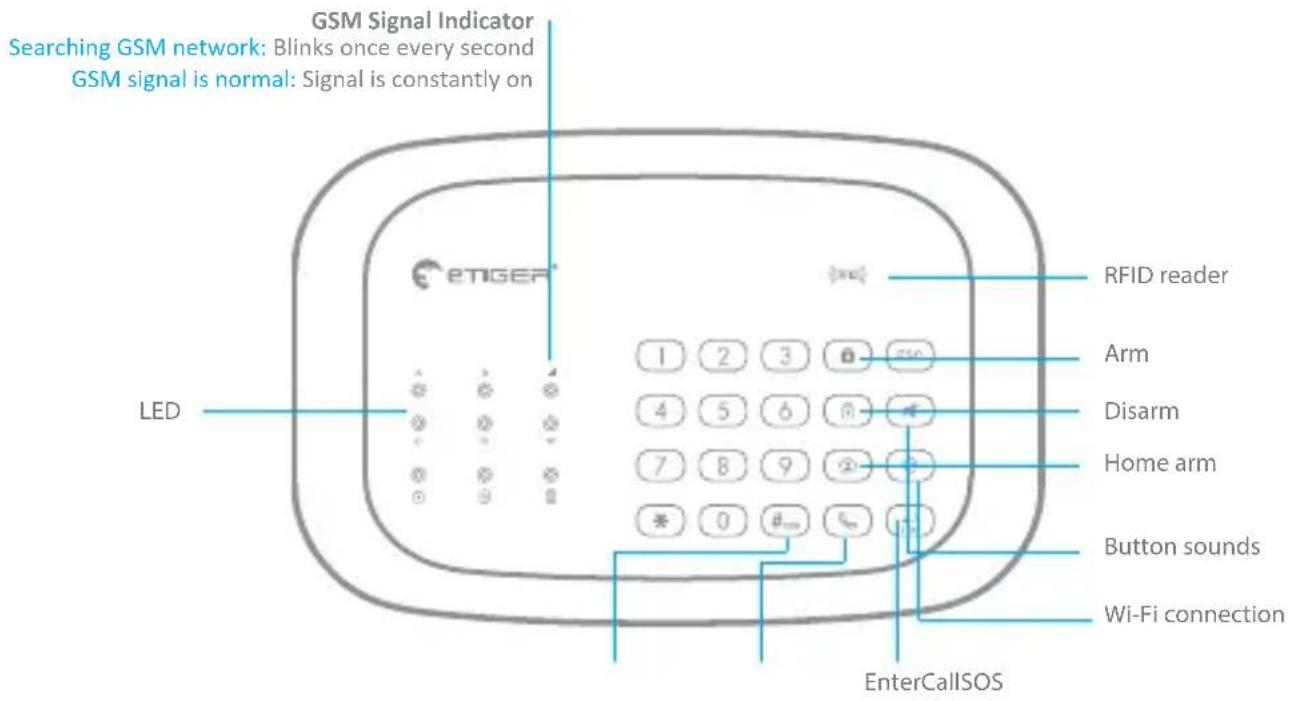
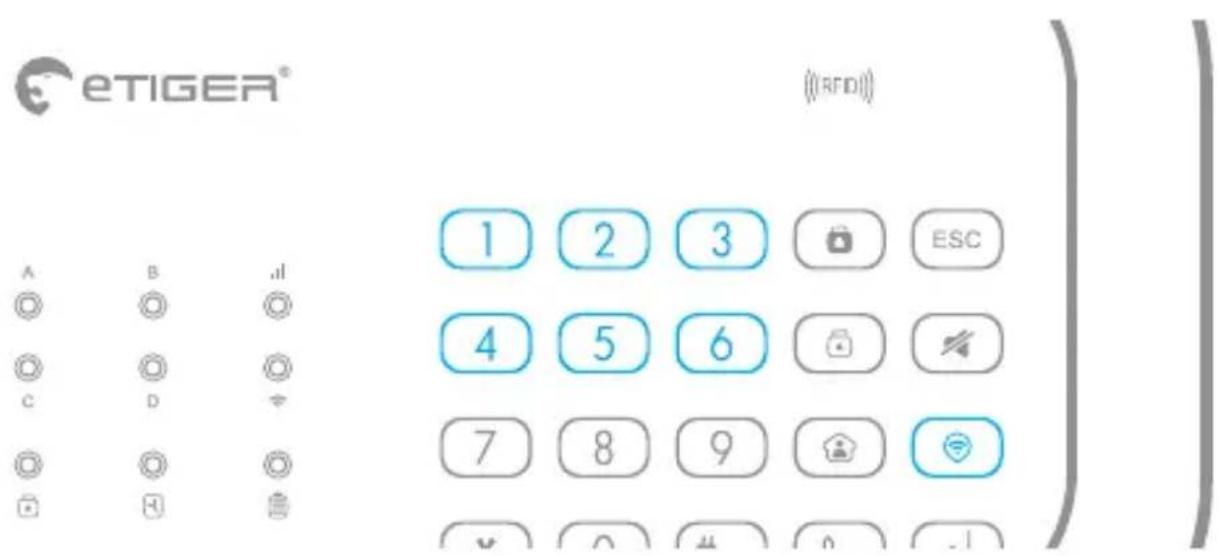
Panel LED signals
| A B
C D | Alarm status White LED | OFF: There is not alarm triggered
LED“A”Blinking: When the alarm is triggered from Normal Zone sensor
LED“B”Blinking: When the alarm is triggered from Home Zone sensor
LED“C”Blinking: When the alarm is triggered from Delay Zone sensor
LED“D”Blinking: When the alarm is triggered from 24H Zone sensor
LED“ABCD”Blinking: When the alarm is triggered from SOS or Panel tamper |
| II | GSM Status White LED | OFF: No SIM card or GSM function is disable ON: GSM network is ready
Blinking: Search GSM network |
| Wi-Fi Status White LED | OFF: WIFI is disable
ON: Connect to the servers
Blinking: During Wi-Fi setting mode |
| System Status Blue LED | ON—System armed
OFF—System disarmed
Blinking—System armed in home mode |
| Settings Status White LED | ON—RF connection mode
Continue Blinking—System settings mode |
| Power Status Green LED | OFF—There is no signal detected
ON—DC power is connected
Blinking—DC power is disconnected |
This step only applies
if you are using your system with a SIM card.
1

Insert a SIM card in the control panel
You will need a SIM card if you wish to interact with your alarm by SMS and phone calls.
Important
- Make sure the SIM card is not protected by a PIN code.
- We advise you to choose a plan with unlimited text and 1 or 2 hours of call. The SIM card must be compatible with a 2G GSM network. Contact your carrier for more information.
- Insert the SIM card before turning on your system.
- For more SMS options download the manual on www.etiger.com
2
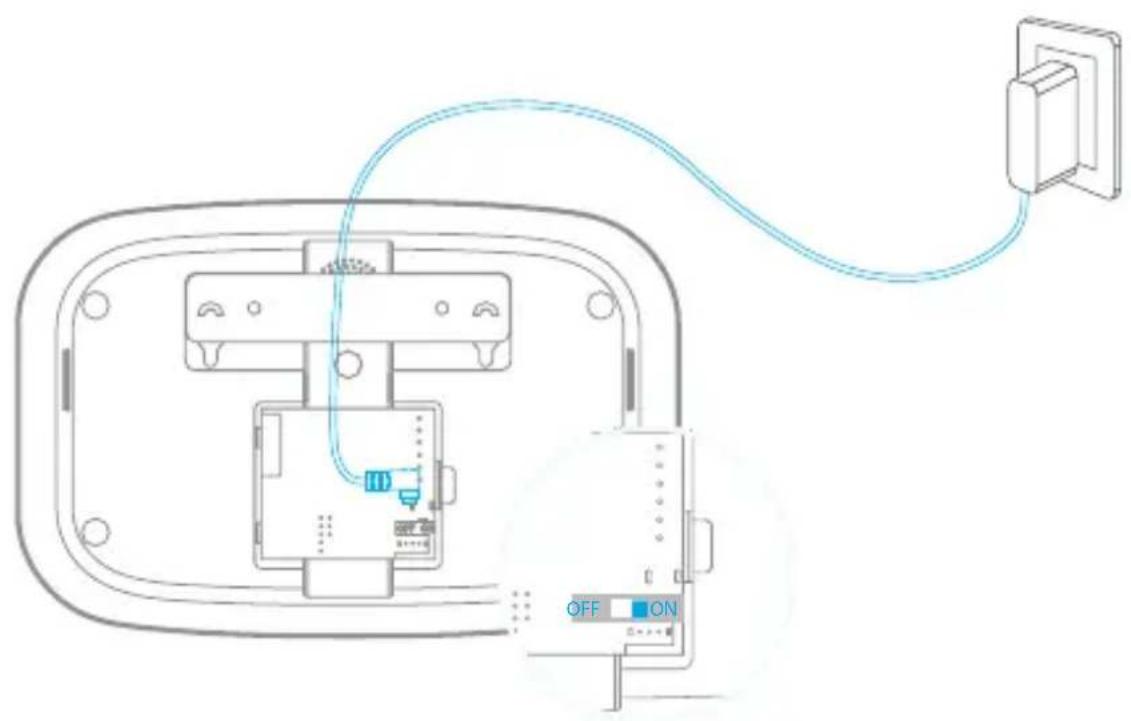
Turn the control panel on
Plug the output connector of the AC adaptor into the adaptor interface in the battery compartment at the back of the control panel. Plug the AC adaptor to an AC socket. Turn the power switch to "ON" and put back the cover of the battery compartment. The control panel is turning on.
Attention!
Make sure you have inserted a SIM card in the control panel before turning it on. If you insert a SIM card after first connection, always make sure to turn the control panel "OFF" before inserting the SIM card.
EN
3
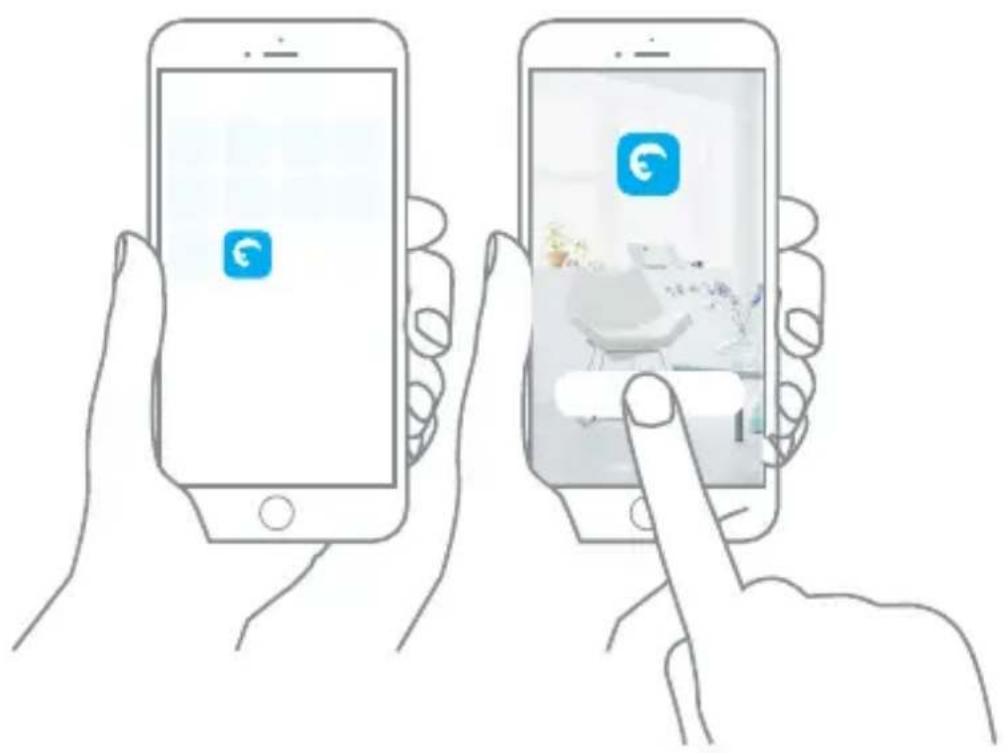
Get your app ready
- Download the "eTIGER Home" app on your smartphone (on the App Store and Google Play).
- Open the "eTIGER Home" app on your smartphone.
- Register by your Mobile number and/or e-mail address.
- Login and create a location (or home) for your alarm. Make sure you are connected to your home network.
"SIM card only" users
If you are using the this alarm with a SIM card and cannot use the iOS and Android apps, read the full manual to learn more about interaction by SMS and phone call. Full manual is available on etiger.com
4
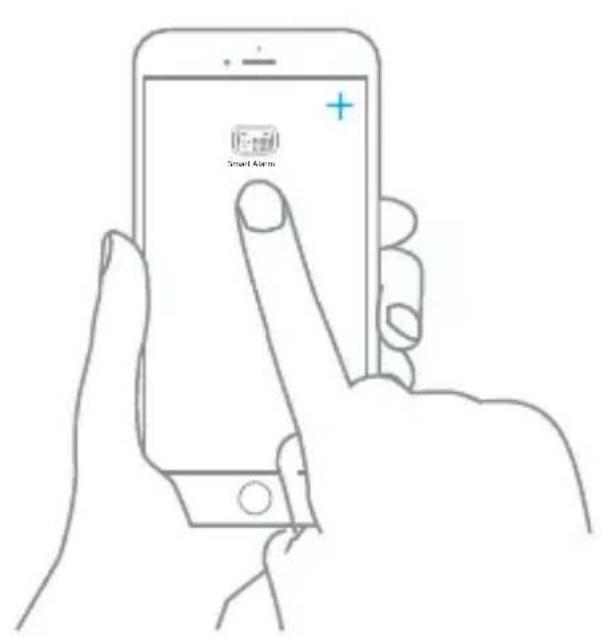
Connect the alarm to your app (EZ mode)
Step 1: Enter Wi-Fi Connection Mode on your alarm.
Press the Admin code 123456+
Attention
Ensure the system is disarmed, the Blue LED is OFF. After entering Wi-Fi connection mode, the Wi-Fi white LED starts to blink fast. now your alarm is ready to connect to your home network.
Step 2: In your app, choose the device you will add: choose "Add device" or "+" and "Smart Alarm". The app will ask if the LED is blinking fast. Confirm if this is the case.
Note ①
Make sure to connect your alarm system to a 2.4 GHz network. eTIGER alarms systems do not work with 5.0 Ghz network. If experincing any problems, please first contact your network provider.
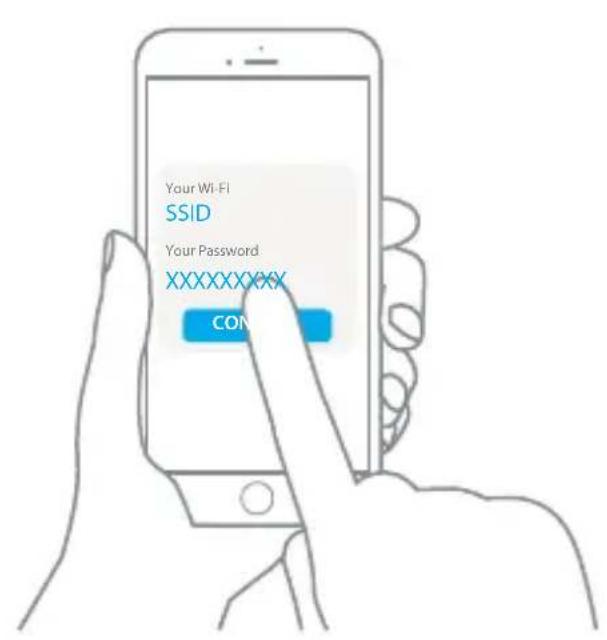
Step 3: Set the Wi-Fi network you will need your alarm to connect with. If your are already connected to your home network the app will automatically use this network.
Enter the Wi-Fi password of the router, confirm, and wait for about 20 seconds to get a response (until the % -circle in the app reached 100% )
Step 4: After connection procedure is complete, you can set the alarm name to complete the connection.
Note

There are two ways to connect the alarm to your app : EZ and AP mode. please use the AP mode when you cannot connect your alarm as described above. A Full manual is available on etiger.com
Your system is ready.
Now what happens if the alarm is triggered?
Notifications over Wi-Fi
- The siren of the control panel rings out.
- You will receive a notification over Wi-Fi or 4G that the alarm has been triggered.
When using a SIM card*
- If there is a SIM card in your control panel, you also receive an SMS notifying you that the alarm has been triggered.
- You receive a phone call. Pick up the call: you hear a voice prompt giving you a list of options (stop the siren, disarm the system, start audio surveillance etc.)
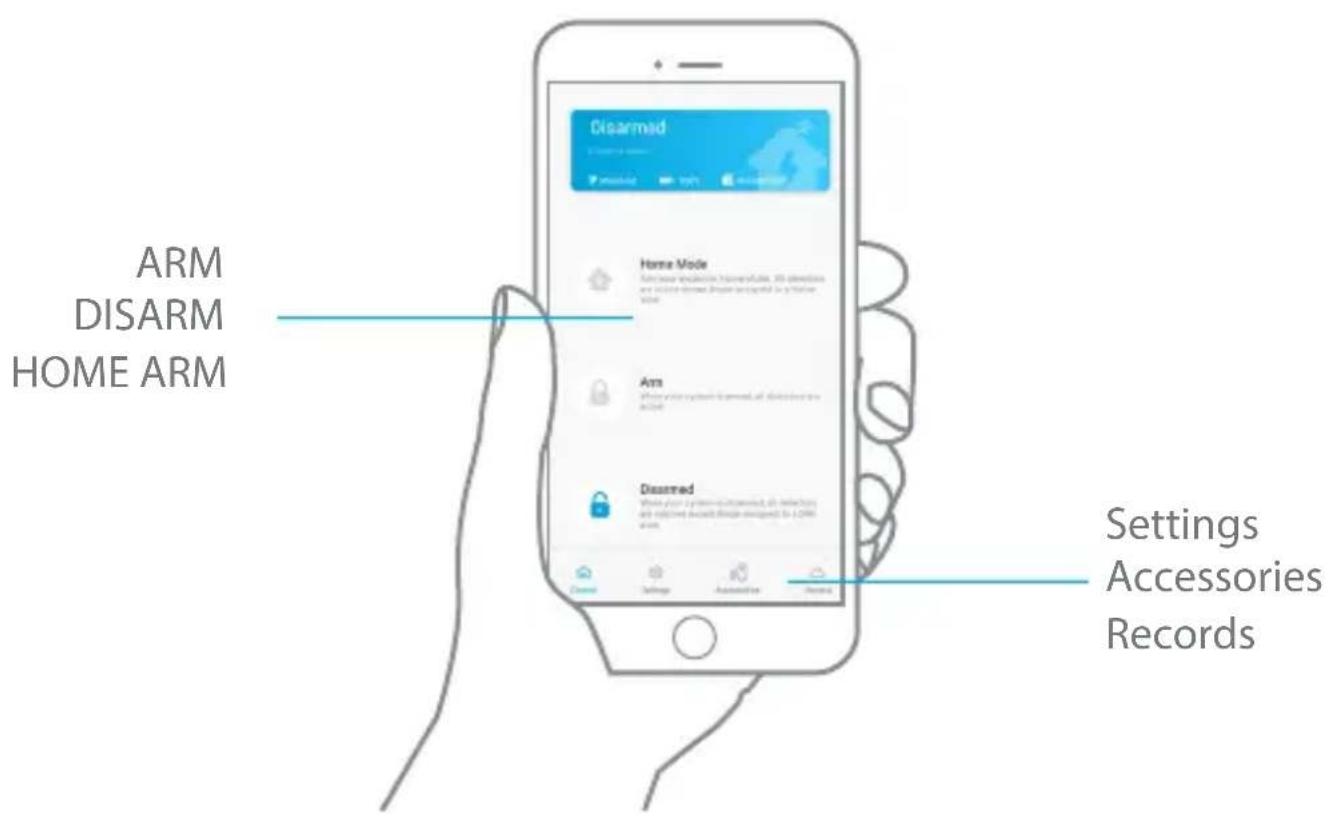
APP interface
Accessories
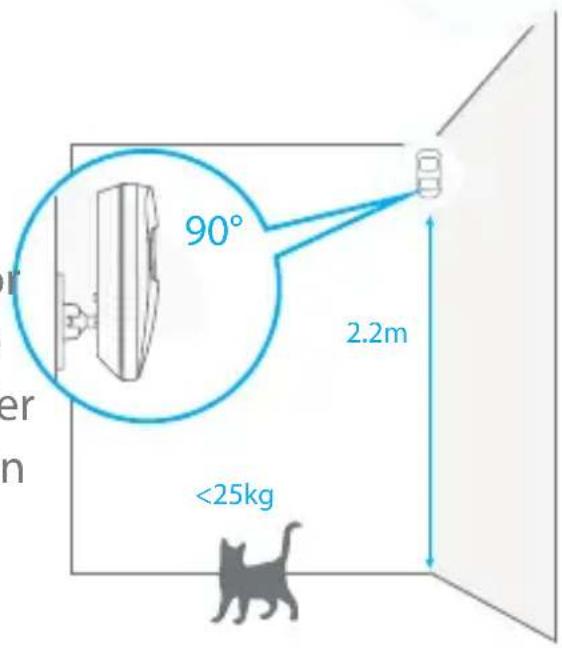
Motion detector
We recommend to mount the detector at a height of 2.2m in a 90^ angle. The detector does not detect animals under 25kg . Avoid mounting the detectors in areas with a large amount of metal or electrical devices.
Understanding the standby mode

If the detector is triggered more than twice within 3 minutes, it switches to standby mode to save power. During standby mode, the detector is inactive. If within the next 3 minutes a new movement is detected, the standby mode is extended by 3 minutes. If no movement is detected within the next 3 minutes, the sensor is activated again.
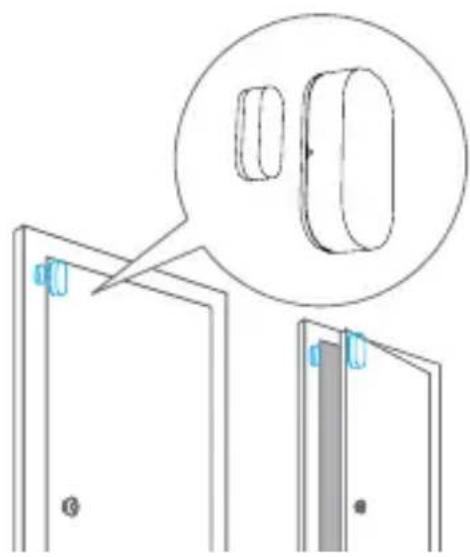
Mount the magnet with double-sided tape on the door and the door frame respectively.
Advanced settings
Advanced setup
For more settings, please refer to the user manual of the control panel, available for download on www.etiger.com
Connect more accessories
On the control panel, type your admin code (default code: 123456*) followed by the key : your control panel is now in Connection mode.
Within the next 15 seconds, trigger the accessory you wish to connect (for a RFID tag, swipe it in front of the RFID reader of the control panel). You hear one beep: the accessory is registered.
A piece of advice
All eTIGER accessories in the box are already preconfigured to your control panel. You do not need to add them again.
Change the access code
Do not forget to change your access code. To change your access code, send "13" by SMS to the control panel or change your code by app in the settings menu of your device.
Full manual
For more settings, please refer to the user manual of the control panel, which can be downloaded at www.etiger.com
Precaution
For a safer use of the product and to optimize the lifespan of the product, we recommend you to follow the precautions below:
- The wireless accessories must be connected to the control panel.
- Low power voltage may affect transmission distance.
- Do not press the SOS key on the remote control if it is unnecessary to avoid disturbing neighborhood.
- Check the system regularly to make sure the system works properly.
- The control panel is neither waterproof nor moisture-proof, install it in a shady, cool and dry place.
- The case of the control panel is made of ABS plastic. Keep away from bright light for a longer lifespan.
- The control panel is not explosion-proof. Keep away from fire and flames.
- Install the control panel away from objects such as heater, air conditioner, microwave oven etc. that generate heat or electromagnetic fields.
- Dispose of the batteries according to local regulations.
- Dismantling of this product must be done by professional personnel only.
Images, illustrations and text are non-contractual. eTIGER and the eTIGER logo are registered trademarks and the property of eTIGER. Copyright © 2019 eTIGER. All rights reserved.
Standards

This product bears the selective sorting symbol for waste electrical and electronic equipment (WEEE). This means that this product must be handled pursuant to European Directive 2012/19/EU in order to be recycled or dismantled to minimize its impact on the environment.
For further information, please contact your local or regional authorities.
Electronic products not included in the selective sorting process are potentially dangerous for the environment and human health due to the presence of hazardous substances.

In compliance with European laws. This product is in compliance with the essential requirements and other relevant provisions of Directive 2014/53/EU.

This product was designed and manufactured in compliance with Directive 2011/65/EU of the European Parliament and of the Council on the restriction of use of certain hazardous substances in electrical and electronic equipment (RoHS Directive - RoHS) and is deemed to comply with the maximum concentration values set by the European Technical Adaptation Committee (TAC).
Manufactured in China.

Images, illustrations and text are non-contractual. eTIGER and the eTIGER logo are registered trademarks and the property of eTIGER.
Copyright © 2019 eTIGER. All rights reserved.
DE
Inhalt
-Netzteil x1
Notifications via Wi-Fi
Uw systeem is gereed.
Images, illustrations and text are non-contractual. eTIGER and the eTIGER logo are registered trademarks and the property of eTIGER. Copyright © 2019 eTIGER. All rights reserved.
For additional support

Visit our website www.etiger.com

Contact us service@etiger.com

eTIGER