Classic 10 - Digital photo frame Dragon Touch - Free user manual and instructions
Find the device manual for free Classic 10 Dragon Touch in PDF.

| Product type | Digital photo frame |
| Brand | Dragon Touch |
| Model | Classic 10 |
| Screen type | Touchscreen IPS |
| Screen size | 10.1 inches |
| Screen resolution | 1280 x 800 pixels |
| Internal memory | 16 GB |
| Wi-Fi connectivity | Wi-Fi 2.4 GHz |
| Mobile app | OurPhoto (iOS/Android) |
| Supported file formats | Photos and videos (video max 30 seconds or 100 MB) |
| Power source | Mains (adapter included) |
| Built-in battery | No |
| Main functions | Slideshow, sharing via app, email, USB drive, SD card, PC control, auto rotation |
| External storage | SD card up to 32 GB, USB drive |
| Box content | Frame, stand, power adapter, USB cable, remote control |
| Maintenance | Wipe with a soft dry cloth |
| Safety | Use only the supplied adapter |
| Approximate weight | Approximately 500 g |
| Approximate dimensions | 27 x 18 x 3 cm |
Frequently Asked Questions - Classic 10 Dragon Touch
User questions about Classic 10 Dragon Touch
0 question about this device. Answer the ones you know or ask your own.
Ask a new question about this device
Download the instructions for your Digital photo frame in PDF format for free! Find your manual Classic 10 - Dragon Touch and take your electronic device back in hand. On this page are published all the documents necessary for the use of your device. Classic 10 by Dragon Touch.
USER MANUAL Classic 10 Dragon Touch
natural_image
Simple diagram with a blue arrow pointing to a numbered point '1' on a rectangular frame (no text or symbols)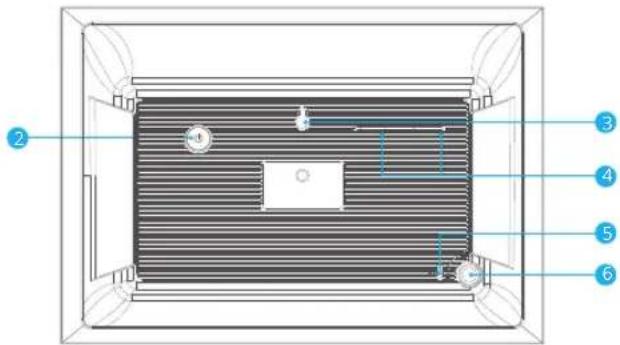

1 10.1" IPS Touch Screen
2 Power Button
3 Wall Mount Hole
4 Speakers
5 Security Lock Slot
6 Stand Port
7 SD Card Slot
8 3.5mm Headphone Jack
9 USB-A Port
10 Mini USB Port
11 DC Power Port
12 Stand
GETTING STARTED
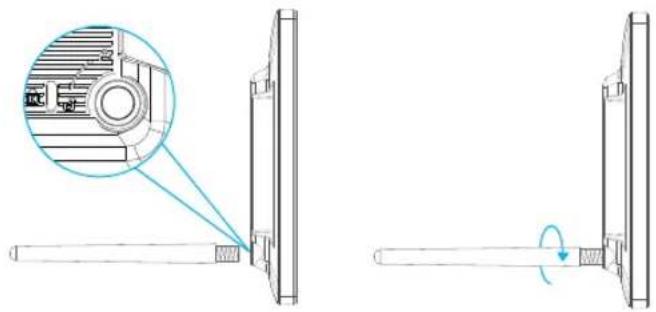
1. Install the stand
Screw in the frame stand on the back. You can place the frame either in landscape or portrait (we recommend you place it in landscape during the first setup). You can also mount the frame on the wall with the Wall Mount Hole on the back.
natural_image
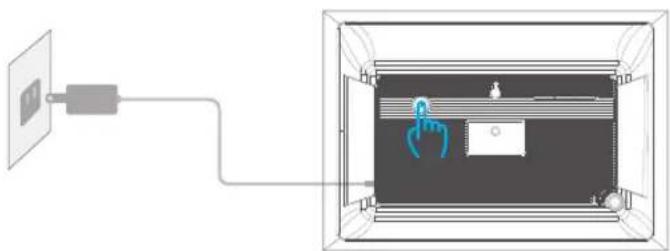
Technical line drawing showing a mechanical assembly with a magnified inset of a component detail (no text or symbols)2. Power on
Connect the Power Cable to your frame and plug the Power Adapter into the wall socket, the frame will enter the system in seconds.
natural_image
Diagram showing a device connected to a wall-mounted cable, with a close-up of the interior panel (no text or symbols visible)3. Initial settings
There are several initial settings (Wifi, Device info, Sleep Mode, etc.) when you enter the system for the first time.
4. Connect to Wifi
Select the Wifi network you would like to connect and enter the password if required. If your Wifi network is not on the list, move your frame closer to your router, wait for seconds and check it again.
Note:
① Classic 10 supports 2.4GHz Wifi network only.
② Private Wifi network is highly recommended.
OURPHOTO APP
1. Download the OurPhoto App
Please download and install the OurPhoto App in your smartphone or tablet by searching OurPhoto in the App Store or Google Play.


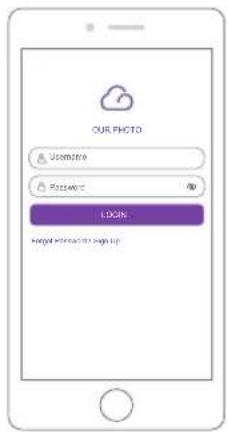
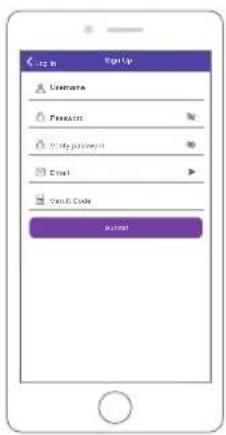
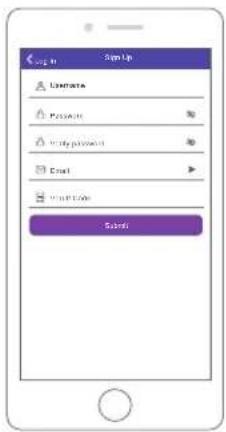
2. Log in your account in the App
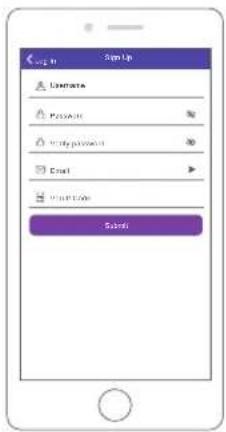
① Open OurPhoto App, select Sign Up and fill in all the required information (if you already have an account, please log in directly).
② Click the right arrow icon to verify the email address you provide. A verify code is to be sent to your email address.
③ Collect and fill in the verify code, then click Submit to complete the account registration.
3. Invite friends to download and log in the App
If your friends or families would like to share their photos and videos to your frame via App, we recommend your them download and install the OurPhoto App in their smartphones or tablets, and log in their accounts in the App (refer to step 2).
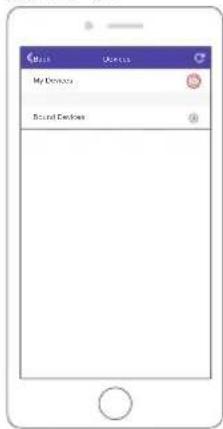
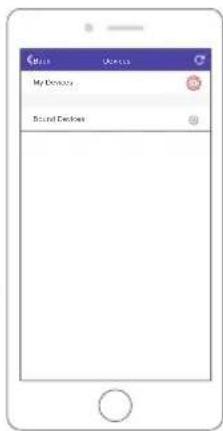
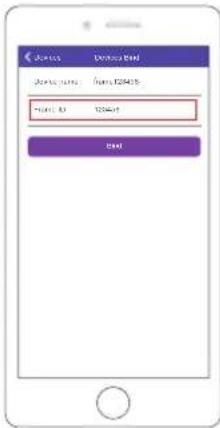
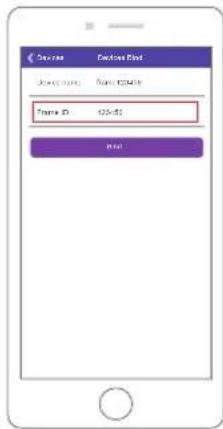
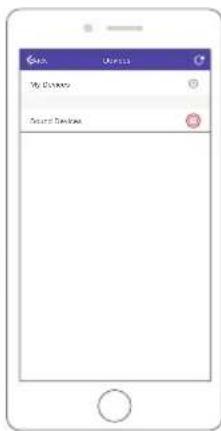
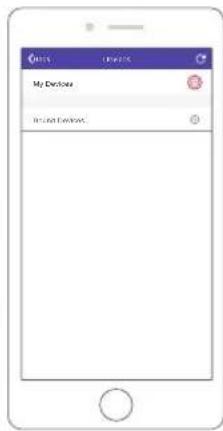
BIND YOUR FRAME
1. Bind your frame with App
Following instructions are only applicable to the frame owner or the user who is the first one to bind the frame.
① Please confirm you have signed in OurPhoto App.
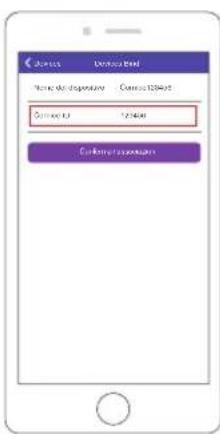
② Select Devices.
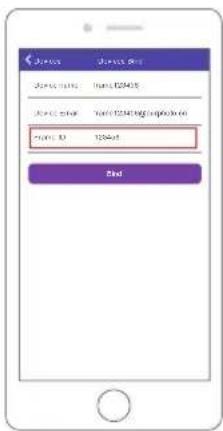
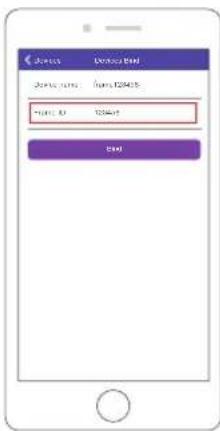
③ Click the "+" next to My Devices.
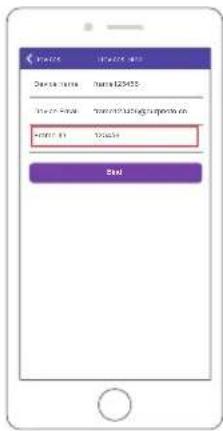
④ Enter the Frame ID.
Note: Frame ID is a 6-digit series number which can be found in your frame, Settings → Device Info.
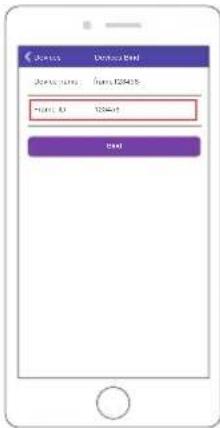
⑤ Create a Device Name for your frame.
Note: We recommend you to name your frame after the Frame ID for easy identification, for example, Frame ID is 123456, please name your frame Frame123456.
⑥ Create a unique email account for your frame.
Note: We recommend you to create the account with the Frame ID for easy identification, for example, Frame ID is 123456, please create such an email account frame123456@curphoto.cn.
⑦ Then click Bind.
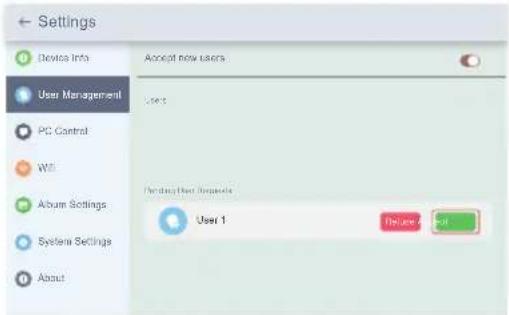
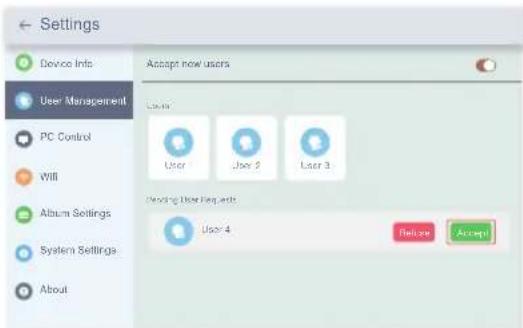
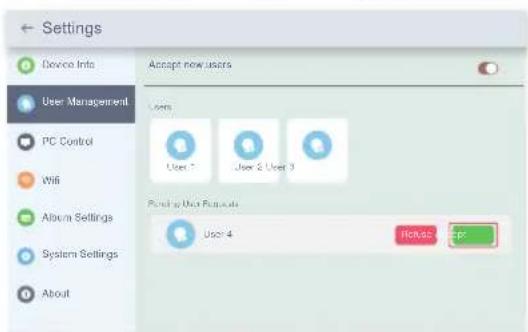
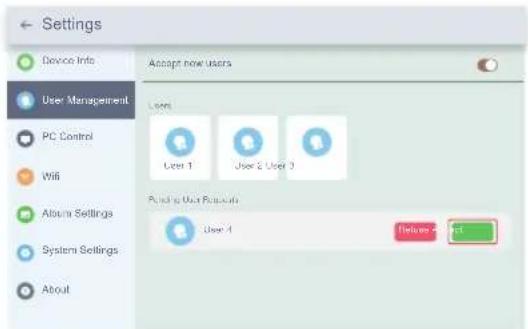
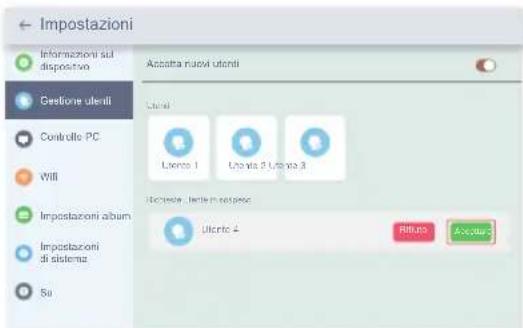
⑧ Confirm the binding request on your frame, Settings → User Management → Pending User Requests, click Accept.
Note: Please make sure that you turn on the "Accept New Users" to accept binding request.
⑨ Now this account is bound to your frame, and it will be the main account of your frame.
Note: The above screen shot is for reference, please update to the latest firmware version.
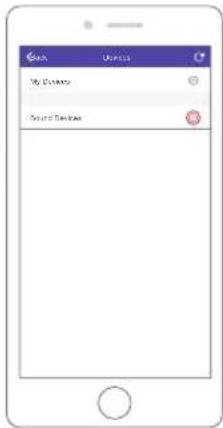
2. Invite others to bind your frame with App
Following instructions are only applicable to the non-frame owner to bind the frame. And binding requires the frame owner to operate and confirm on the frame.
① Make sure your friends have downloaded the OurPhoto App and logged in their accounts in the App.
② On their way, operate in the App with their accounts, select Devices → Bound Devices, then click "+".
③ Enter the Frame ID.
Note: Frame ID is a 6-digit series number which can be found in your frame, Settings → Device Info. Please inform this Frame ID to your friends.
④ Create a Device Name for the frame.
Note: We recommend your friends to name the frame after the Frame ID for easy identification, for example, Frame ID is 123456, please name the frame Frame123456.
⑤ Then click Bind.
⑥ On your way, you confirm the binding request on your frame, Settings → User Management → Pending User Requests, click Accept.
⑦ You can find the bound users in User Management Interface.

Note: The above screen shot is for reference, please update to the latest firmware version.
3. Bind your frame with Email
You and your friends can also bind your email accounts to the frame, so that you can share photos to the frame via email.
① Send an email with the subject "bd+Frame ID" to the email account of your frame (the one you created when you bound your frame). For example, Frame ID is 123456, thus send an email with the subject "bd123456" to the email account of your frame.
② Wait for seconds, you will receive a confirm email from OurPhoto team, and your email account is successfully bound to the frame. You can also find the bound email accounts in User Management interface.
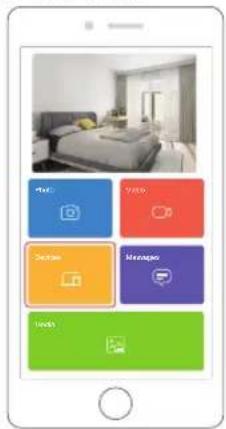
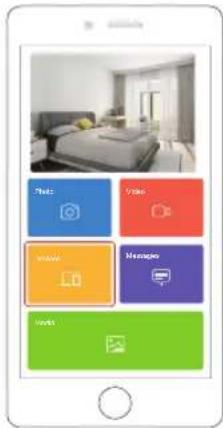
UPLOAD PHOTOS AND VIDEOS
1. Upload photos and videos via App
① Open OurPhoto App and log in your account. Make sure you have bound your account to your frame before.
② Click Media to upload your photos or videos in your smartphone or tablet. Select the photos or videos you would like to upload, and choose the frame you would like to send to. Click the right arrow icon to confirm.
③ Click Photo or Video to take new photos or videos, and choose the frame you would like to send to. Click the right arrow icon to confirm.
④ Your photos or videos will be received in seconds, you can check the photo or video library on the frame.
Note:
• Video clip is limited to 30 seconds or 100MB.
- The App support sending Full Image to the frame. Please check your App version is 1.1.94 (iOS)/1.0.4 (Android) or above.
2. Upload photos via Email
Send an email with photos attached to the email address of the frame. Your photos will be received in seconds, you can check the photo or video library on the frame. Note: Videos cannot be uploaded via email.
3. Upload photos and videos via computer
① Make sure your frame and computer are in the same Wifi network.
② On your frame, enter the PC Control interface, Settings → PC Control. Click Start button, you will find an FTP address in the screen.
③ On your computer, open File Explorer. In the File Explorer, enter the FTP address in the address bar.
④ Then you can drag and drop the photos and videos in the computer that you would like to transfer to the folder showed up.
⑤ Click Stop on the frame to end PC connecting and uploading.
⑥ Your photos or videos will be received in seconds, you can check the photo or video library on the frame.
Note: The above screen shot is for reference, please update to the latest firmware version.
4. Upload photos and videos via USB drive
(1) Insert USB drive into the frame, and wait for seconds, the frame will let you know when the USB drive is successfully connected.
② Enter Photo or Video library, click USB and you will see all the photos or videos stored in the USB drive.
③ Click More icon at the right upper corner, and select the photos or videos you would like to import to the internal memory of the frame.
④ Click Share icon at the top then choose OK to import the photos or videos.
⑤ Your photos or videos will be received in seconds, you can check the photo or video library on the frame.
Note:
- If you have too many files stored in the USB drive, it will take more time to read.
- The system will protect and lock the USB drive if there is no action after the USB drive has been inserted for a while. To activate it, you need to take it out and insert again.
- Please remove all your external devices when you reset the photo frame.
Note: The above screen shot is for reference, please update to the latest firmware version.
5. Upload photos and videos via SD card
① Insert SD card into the frame, and wait for seconds, the frame will let you know when the SD card is successfully connected.
② Enter Photo or Video library, click SD card and you will see all the photos or videos stored in the SD card.
③ Click More icon at the right upper corner, and select the photos or videos you would like to import to the internal memory of the frame.
④ Click Share icon at the top then choose OK to import the photos or videos.
⑤ Your photos or videos will be received in seconds, you can check the photo or video library on the frame.
Note:
• Max support 32GB SD card.
- If you have too many files stored in the SD card, it will take more time to read.
• The system will protect and lock the SD card, if there is no action after the SD card has been inserted for a while. To activate it, you need to take it out and insert again.
- Please remove all your external devices when you reset the photo frame.
DELETE PHOTOS AND VIDEOS
1. Delete files in Photo or Video library
① Enter Photo or Video library and choose Internal Storage, you will see all the photos or videos stored in the internal memory.
② Click More icon at the right upper corner, and select the photos or videos you would like to delete from your frame.
③ Click Delete icon at the top then choose OK to delete the photos or videos.
2. Delete files on slideshow
① During the photos or videos are displayed on the screen, click the photos or videos you would like to delete.
② Click Delete icon on the menu below, then choose OK to delete the photos or videos.
3. Delete files in Album Settings
Delete all the photos from internal storage.
MAIN MENU
Device Info
You can find the Frame ID and App download information.
User Management
Turn on/off the Accept New Users button to receive or reject new user requests. You can see and manage the bound users under the Users. Click the account you want to manage, and a submenu will allow you to view the account's photos, remark name, delete user and delete user & photos. Accept or refuse the New User Requests under the Pending User Requests.
PC Control
Wifi connection status is shown on the screen. To activate the PC Control function and upload files from computer, make sure your frame and your computer are in the same Wifi network.
Click Start and enter the FTP address on your computer to upload files (please refer the Upload Photos and Video instruction before), and click Stop to end.
Wifi
You can choose the Wifi network you would like to connect on the list.
Album Settings
-
Full Screen
Turn on the button to make the photo displayed in full screen. -
Slideshow
You can set Slideshow time to make the frame automatically displays photos after a period time of inactivity.
- Slideshow Mode
You can choose either Sequential or Random mode to display photos.
- Slideshow Interval
You can set Slideshow Interval to adjust the duration of each photo displays.
- Slideshow Transition Effect
You can choose the effect of slideshow transition.
- Delete Photos
Delete all the photos from internal storage.
It will remove all your user info, settings and files on your frame.
System Settings
1. Sound
You can adjust the Media Volume as you like.
2. Display
① Brightness
You can adjust the Brightness as you like.
② Suspended ball
Turn on this button, a suspended ball will appear on the screen. It is a quick navigation key to help you easily go to Home page and adjust the volume.
③ Auto-rotate screen
Turn on this button, the display will automatically adjust to either landscape or portrait position according to the frame placement.
3. Date and Time
You can set date and time according to your preference.
4. Language
Choose the system language. English, Français, Deutsch, Italiano, Español, 日本語
5. Auto On & Off
You can set the Auto-On/Off time to make the frame automatically on and off.
6. Factory data reset
① Please disconnect your frame to Wifi network first.
② Uncheck the "Delete all users and restore the device to inactive".
③ Click OK to reset your frame.
About
You can find all the related information about this frame.
Note: Please update the system as soon as possible when the frame receives system updates notification.
FAQ
-
Do I have to keep this photo frame plugged all the time?
Yes, you have to keep it plugged in to keep the frame on as it has no built-in battery. -
Does this frame have to be Wifi connected to work or just in the setup process? This frame needs to connect to a Wifi network for setup, receiving new photos/videos, receive user requests and software updates. Other than that, the frame can only play the photos/videos without Wifi connection.
3. Why this frame cannot connect to Wifi?
It supports only 2.4GHz Wifi network, select the Wifi network you would like to connect and enter the password correctly if required. If your Wifi network is NOT on the list, move your frame closer to your router or restart your frame, wait for seconds and check it again.
4. Can this frame be hanged on the wall?
You can hang it on the wall by the wall mount hole on the back.
5. Can I place the frame in portrait or landscape position?
It can be positioned landscape or portrait after the Auto-rotate setting is on.
6. Where can I find the Frame ID?
Frame ID is a 6-digit series number which can be found in your frame, Settings → Device Info.
7. Why I cannot bind my frame via App?
If you are the frame owner or the first to bind the frame, please follow the instructions "Bind your frame with App" to bind the frame, if you are non-frame owner, please follow the instructions "Invite others to bind your frame with App" to bind the frame. After sending binding request from App, it requires frame owner operate on the photo frame and click "Accept" under the User Management menu. If the binding succeeds, the user account will appear on the Users.
- How do I unbind an account?
If you would like to unbind an Email or App account, please go to the User Management menu and click the bound user you want to delete, you will see there is an option for deleting user.
- Can I share photos and videos to the frame?
Yes, you can share both photo and video (max 30 second or 100MB) to the frame.
- Can I transfer photos or videos from computer?
Yes, you can transfer your files from computer by using PC Control feature, but this feature only supports Windows system now.
- Where do the photos and video store?
All the received photos and videos will be stored in the built-in 16GB memory. It is estimated to keep over 40,000 photos of 300KB/pc. The Dragon Touch server will only cache the data for 30 days, and all the photos will be encrypted and deleted after 30 days. It can enable your photo frame to receive the photos sent when the photo frame is offline.
- How can I delete photos and videos?
Enter Photo or Video Library, click "more" button on the top. Select the photos or videos you would like to delete and click "delete".
- Can I export the photos and videos?
You can export photos and videos via extended SD card (max support 32GB) and USB drive. After SD card or USB drive inserts in the port, you can select the photos and videos you would like to export in the library, click "share" to export your files.
- Is it possible to manage the photos and videos in the frame remotely?
You can only manage/export/delete photos and videos in the frame directly.
- Can I adjust the speed the photos changes?
You can choose your preferred slideshow mode, interval and transition effect in Album Settings.
- Can this frame automatically turn on/off at a specific time?
You can enter Auto On/Off setting and set the auto on/off time as you want.
- Can I cycle pictures and videos together?
You could only play photos or videos separately.
If you cannot find the answer for your question, please contact our customer support team, thank you.
CONTACT US
For any inquiries with Dragon Touch products, please feel free to contact us, we will respond within 24 hours.
E-mail: cs@dragontouch.com
Tel: 888-811-1140 (US) Mon-Fri (except holidays) 9am-5pm (EST)
Official website: www.dragontouch.com
Deutsch
LIEFERUMFANG

natural_image
Simple diagram with a blue dot labeled '1' pointing to a rectangular frame (no text or symbols within the frame)
natural_image
Technical line drawing showing a mechanical assembly with a magnified inset of a component detail (no text or symbols)2. Einschalten
natural_image
Diagram showing a device connected to a wall-mounted power outlet, with no visible text or symbols.
CARACTERÍSTICAS DE MARCO

natural_image
Simple diagram with a blue dot labeled '1' pointing to a rectangular frame (no text or symbols within the frame)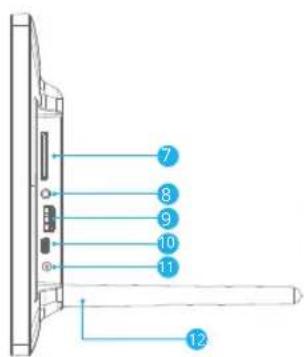
natural_image
Technical line drawing showing a mechanical assembly with an inset close-up of a component detail (no text or symbols)2. Encendido
natural_image
Diagram showing a device connected to a wall-mounted cable, with a hand icon and control panel inside (no text or symbols)3. Ajustes iniciales
VINCULE SU MARCO
CARACTÉRISTIQUES DU CADRE

natural_image
Simple diagram with a blue dot labeled '1' pointing to a horizontal line inside a rectangular frame (no text or symbols beyond the label)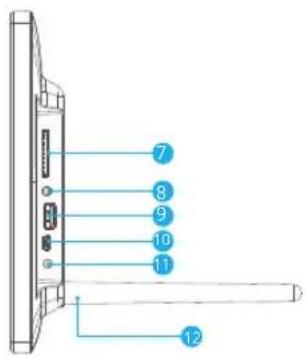
natural_image
Technical line drawing showing a mechanical assembly with an inset close-up of a component detail (no text or symbols)2. Allumer
natural_image
Diagram showing a device connected to a wall-mounted cable, with a central display and a blue indicator light (no text or symbols present)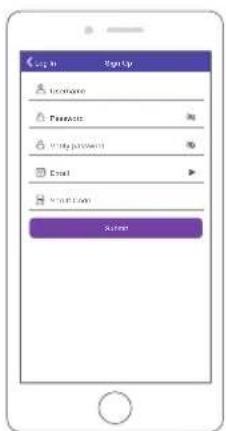
LIEZ VOTRE CADRE
CARATTERISTICHE DELLA CORNICE

natural_image
Simple diagram with a blue arrow pointing to a numbered point '1' on a rectangular frame (no text or symbols within the frame)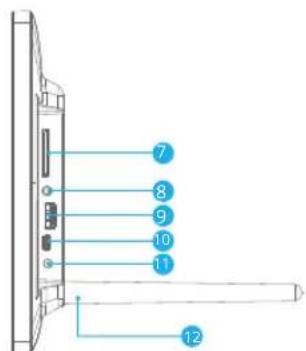
natural_image
Technical diagram showing a mechanical assembly with a magnified inset of a component detail (no text or symbols)2. Accensione
natural_image
Diagram showing a device connected to a wall-mounted cable, with a close-up of a device interior (no text or symbols visible)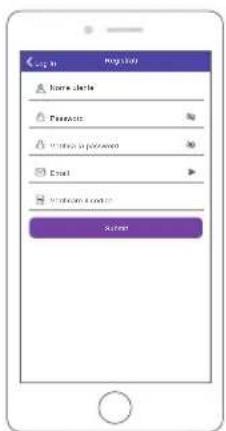
ASSOCIA LA TUA CORNICE
1. Associa la tua cornice con l'App
2. Carica foto via e-mail
If you would like to unbind an Email or App account, please go to the User Management menu and click the bound user you want to delete, you will see there is an option for deleting user.
各部一覧

natural_image
Simple diagram with a blue arrow pointing to a numbered point on the left side of a rectangular frame (no text or symbols)
natural_image
Technical diagram showing a mechanical assembly with a magnified inset of a component detail (no text or symbols)2. 電源オン
natural_image
Diagram showing a device connected to a wall-mounted cable, with no visible text or symbols.3. 初期設定
フレームをバインドする
1. フレームをアプリにバインドする