VC002 Smart - Robot vacuum Clean Air Optima - Free user manual and instructions
Find the device manual for free VC002 Smart Clean Air Optima in PDF.
| Product type | Robotic vacuum cleaner with automatic emptying station |
| Model | VC002 Smart (RVC-002B Smart) |
| Dimensions (robot) | 330 x 96 mm (diameter x height) |
| Dimensions (station) | 250 x 206 x 357 mm |
| Weight (robot) | 2.7 kg |
| Weight (station) | 4 kg |
| Power supply | 220-240 V ~ 50 Hz |
| Rated power (robot) | 32 W |
| Rated power (station) | 900 W |
| Suction power | 2500 Pa (low mode) / 4000 Pa (high mode) |
| Dust bin capacity | 600 ml |
| Water tank capacity | 360 ml |
| Battery | Lithium-ion 3200 mAh |
| Runtime | Approximately 120 minutes (depending on mode) |
| Charging time | Approximately 6 hours |
| Maximum area | Up to 200 m² |
| Filtration | Pre-filter, activated carbon filter, True HEPA H13 filter, UV-C lamp |
| Noise level | < 50 dB(A) in low mode, < 60 dB(A) in high mode |
| Main functions | Automatic cleaning, spot cleaning, mopping, WiFi app control, remote control, virtual wall, scheduling, automatic emptying |
| Maintenance and cleaning | Removable main and side brushes, dust bin can be emptied, replaceable HEPA filter, machine washable mop at 40°C max |
| Safety | Anti-drop sensors, obstacle detection, automatic stop when lifted, overload protection |
| Spare parts and repairability | Brushes, filters, dust bag, water tank, mop available on cleanairoptima.com; battery replaceable by a professional |
| General information | 2-year warranty, CE/WEEE/RoHS compliance, manufactured in the Netherlands |
Frequently Asked Questions - VC002 Smart Clean Air Optima
User questions about VC002 Smart Clean Air Optima
0 question about this device. Answer the ones you know or ask your own.
Ask a new question about this device
Download the instructions for your Robot vacuum in PDF format for free! Find your manual VC002 Smart - Clean Air Optima and take your electronic device back in hand. On this page are published all the documents necessary for the use of your device. VC002 Smart by Clean Air Optima.
USER MANUAL VC002 Smart Clean Air Optima
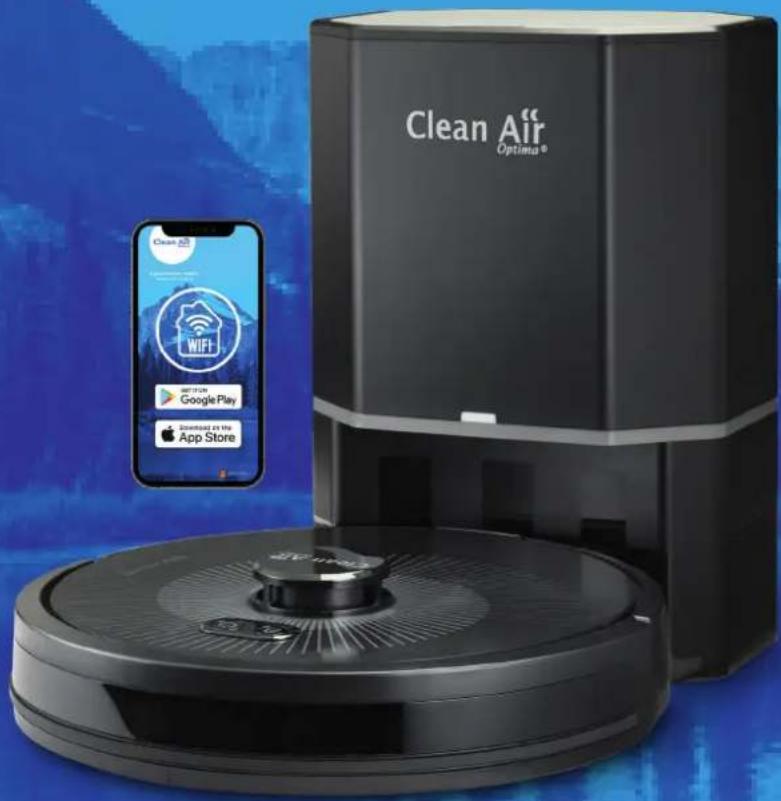
Clean Air Optima® 2in1: Robot Vacuum Cleaner with self empty station, mop function and UVC sterilization
Model: RVC-002B Smart
(EN) User manual
(DE) Gebrauchsanweisung
(NL) Gebruiksaanwijzing
(FR) Moded'emploi
(ES) Manual del usuario
(IT) Manuale d'uso
(PL)Instrukcja obstugi
(CZ) Uživotalská prírodučka
(RO) Manual de utiliser
(LT) Naudotojo vadovas
(EE) Kasutusjuhend
(LV) Lietošanas pamáčíba
Find more languages on: www.cleanairoptima.com/ info/manuals
Read these instructions carefully before you start using this Clean Air Optima device and keep the manual for future reference..
Clean Air Optima
| Table of contents | Page | |||
| English | 3 | |||
| German | 29 | |||
| Dutch | 55 | |||
| French | 83 | |||
| Spanish | 109 | |||
| Italian | 135 | |||
| Polish | 161 | |||
| Czech | 187 | |||
| Romanian | 213 | |||
| Lithuanian | 239 | |||
| Estonian | 265 | |||
| Latvian | 292 | |||
English
RVC-002B Smart
Main unit
What is in the box?
- Robot vacuum cleaner
- Self empty station and adapter
- Dustbin and watertank
- Mop
- Side brushes
- Hepa filter, pre-filter, sponge filter
- Main brush, cleaning brush
- Remote control, user manual
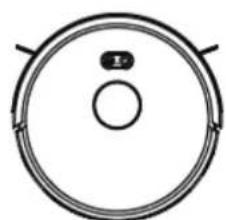
Robot cleaner
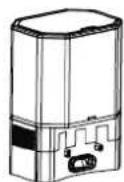
Self empty station
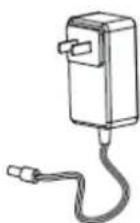
Adapter
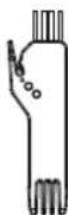
Watertank
Side brush

HEPA filter, pre-filter,
sponge filter
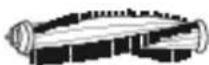
Main brush
Cleaning brush
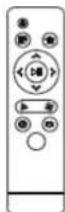
Remote control

User manual
Clean Air Optima
English
Thank you for purchasing the Clean Air Optima® 2in1: Robot vacuum cleaner with self empty station, mop function and UVC sterilization RVC-002B Smart.
We wish you many years of pleasure with this efficient and effective product.
Ensure that all safety precautions are followed when using this electrical appliance for the proper operation of the device. These instructions describe the safety precautions to be observed during operation. They are meant to prevent injuries and to avoid damaging the device.
Safety warnings general
This device may only be used in accordance with this safety instructions. Take the following steps to minimize the risk of personal injury caused by for example electric shocks or fire.
- Use only the original rechargeable battery and charging station specially equipped by the manufacturer. Non-rechargeable batteries are strictly prohibited, please refer to "product parameters" for battery specification information.
- Do not use this device in environments with open flames or fragile objects.
- Do not use this device in extremely hot (above 40^ ) or extremely cold (below 0^ ) environments.
- Disassemble or open this device only as instructed in the user guide. There are no user-serviceable parts inside. Have maintenance carried out by qualified service personnel.
- Human hair, clothing, fingers or other parts should not come near the opening and operating parts of the device.
- Do not use the device on a wet or uneven surface, only use the device indoors in dry places.
- Do not use the device near burning or extremely hot object, for example a burning fireplace.
- This device can be used by children aged from 8 years and above and persons with reduced physical, sensory or mental capabilities or lack of experience and knowledge if they have been given supervision or instruction concerning use of the device in a safe way and understand the hazards involved. Children shall not play with the device. Cleaning and user maintenance shall not be made by children without supervision.
- This device is not a toy. Supervise small children and pets when your device is operating. Do not sit or stand on the device or charging station.
- This device is not intended to be sat or stood on.
- Do not touch this device with wet hands.
- Do not allow the device and the charging station to get wet.
- Only store and use this device in rooms at room temperature.
- Do not use unapproved chargers. Using an unapproved charger may cause the battery to generate heat or smoke, catch fire, or explode.
- If the room to be cleaned has a balcony, block access to the balcony with a physical barrier to ensure safe operation.
- If the room to be cleaned contains equipment such as a stove, fan, electric heater, or humidifier, remove the equipment before starting the device to clean. There is a risk of injury, accident, or malfunction if the robot comes into contact with and pushes the equipment.
- Clean the ground sensors to prevent dirt build-up.
-
Please note that floors may be slippery after being mopped by the device.
-
Do not add liquids such as hot water, detergent or disinfectant as these may damage the device.
- Do not use this device in areas with open sockets or gas shutoff valves in the floor.
- Do not use this device to pick up sharp objects, glass, or burning or smouldering objects.
- Please note that the device moves on its own. Be careful when walking in areas where the device is operating to avoid stepping on it.
- If the device runs over and pulls a cord, it may pull objects off a table or shelf. Before using this device, remove objects such as clothing, loose papers, blind or curtain cords, cords, and fragile objects. Extinguish candles. Turn off electric heaters.
- Perform required maintenance according to the user guide to ensure safe operation of the device and charging station.
- If using the device on a staircase, remove any debris from the top step.
- Do not turn the robot over with the watertank in place.
- This robot is intended for use on dry floors only. Do not use this appliance to vacuum up spilled liquids. Do not allow the robot or charging station to get wet.
- Do not place anything on top of the robot or charging station.
- Failure to keep the charger contacts clean may result in the robot being unable to charge the battery and the contacts becoming hot.
- Before using the robot on a hard floor, test it on a small area of 'hard floor to ensure it is suitable. Using the robot on an unsuitable hard floor may damage the floor. Contact the manufacturer of the hard floor if you have any questions regarding suitability.
- Before running the robot over carpet or rug, ensure that the carpet or rug is compatible with the dual rubber brushes for all floor types on your robot, also known as rotating brushes. Using the robot on an unsuitable carpet or rug may damage the carpet or rug. Please contact the manufacturer of the carpet or rug if you have any questions about compatibility.
- Use, maintain and clean the device as described in this manual.
Safety warnings self empty station
- If the device is not working properly, has been dropped, damaged, left outside in all weather conditions or has fallen into water, take the device to a service center.
- Do not use a charging station with a damaged cord or plug. If the cord or plug is damaged, it must be replaced
- Always disconnect the robot from the charging station before cleaning or performing maintenance on the robot.
- Do not use the charging station as a step.
- Only charge the robot using the supplied power supply. The supplied power supply provides a safety extra low voltage according to the input voltage indication on the robot, which is required to ensure safe operation.
- To prevent your robot from falling down stairs, make sure that the charging station is at least 1.2 meters away from the stairs.
- Do not allow liquids to spill onto or into the charging station.
Safety warnings battery
- Do not open, crush, heat above 80^ or incinerate the battery. Follow the instructions in the user guide for proper use, maintenance, handling and disposal.
- Do not short circuit the battery by allowing metal objects to come into contact with the battery terminals or by immersing the battery in water. Do not subject batteries to mechanical shock.
Clean Air Optima
- Lithium-ion batteries and products containing lithium-ion batteries are subject to strict transportation regulations. If you need to send this product (with battery) for repair, travel or otherwise transport it, please refer to the Troubleshooting section of the user guide or contact customer service for transportation instructions.
- Do not charge damaged or leaking batteries. Do not allow the liquids to come into contact with the skin or eyes. If this does happen, immediately rinse the skin or eyes with plenty of water and seek medical attention. Keep the battery clean and dry. Wipe the button cell/battery contacts with a clean, dry cloth if they become dirty.
- The product must not be used with an inverter of any type. Using an inverter will immediately void the warranty.
- If you live in an area where thunderstorms are common, we recommend that you use additional surge protection. Your robot's charging station can be protected from damage that may occur during heavy thunderstorms with a surge protector.
- Make sure that this device is not powered on when you remove the battery.
- Recycle the discarded batteries safely.
Safety warnings battery remote control
- Do not ingest the battery, the battery is a Chemical Burn Hazard.
- Always follow the instructions carefully. Use only the recommended battery type and check that the batteries are installed correctly. Pay attention to the position of + and -!
- The batteries contain materials, which are hazardous to the environment, they must be removed from the remote control before it is scrapped and that they are disposed safely.
- Keep new and used batteries away from children.
- If the battery compartment does not close securely, stop using the device and keep it away from children.
- If you think batteries might have been swallowed or placed inside any part of the body, seek immediate medical attention.
- Do not mix old and new batteries, or standard and alkaline batteries.
- Remove empty batteries from the product.
- Remove the batteries if the product is not going to be used for a long time.
- If you think batteries might have been swallowed or placed inside any part of the body, seek immediate medical attention
- Beware of short circuits. Do not make contact between the two poles of the battery.
- RECHARGEABLE BATTERIES: Never use rechargeable batteries together with other battery types. Always remove rechargeable batteries from the product before charging. Adult supervision is required when charging.
NEVER ATTEMPT TO CHARGE OTHER TYPES OF BATTERIES
Notifications
The battery must be removed from the robot before the robot is recycled or destroyed. Unscrew the two screws to access the battery for recycling or disposal. Remove the battery compartment cover and disconnect the battery cable.
Remove the screws and open the battery cover
Take out the battery
symbol on the battery indicates that the battery must not be disposed of in a bin with unsorted household waste. As the end user, it is your responsibility to dispose of the old battery of the device in an environmentally friendly manner. You can do this
- Return the device to the shop where you purchased it; or
- Return the battery to a designated collection point for small chemical waste.
The separate collection and recycling of used batteries helps to conserve natural resources and ensures that the end-of-life product is recycled in a manner that protects human health and the environment. For more information, contact your local authority or the shop where you purchased the product. Failure to dispose of used batteries correctly can have negative consequences for the environment and human health because batteries contain harmful substances. Information on the effects of problematic substances from batteries in waste streams can be found on the following web page:
http://ec.europa.eu/environment/waste/batteries
Clean Air Optima
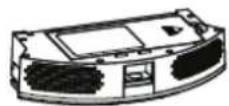
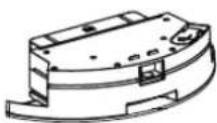
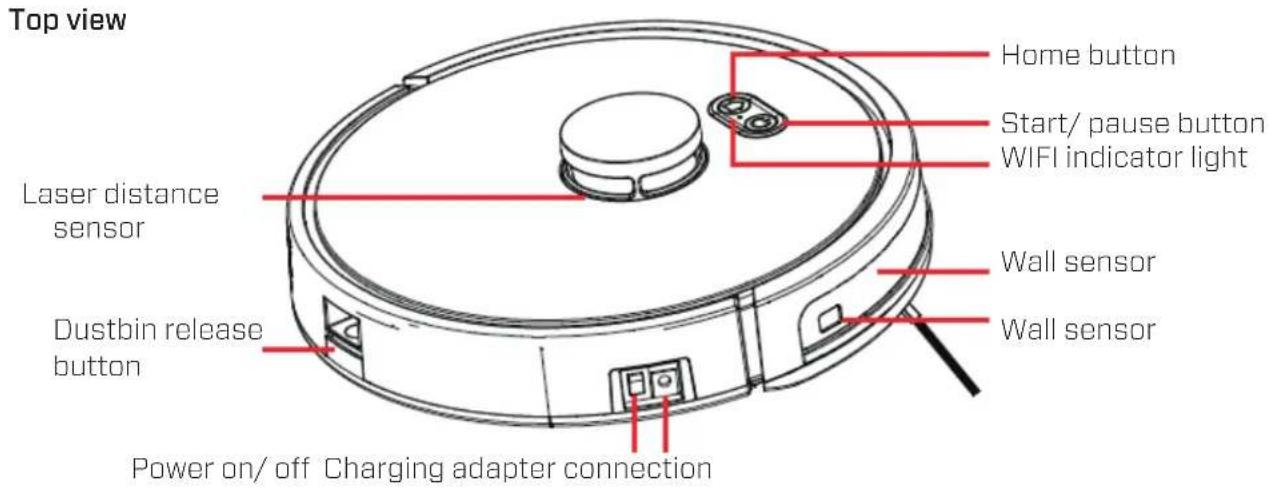
Description
This Clean Air Optima device consists of the following main components:
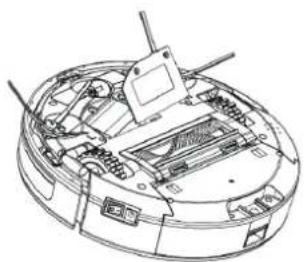
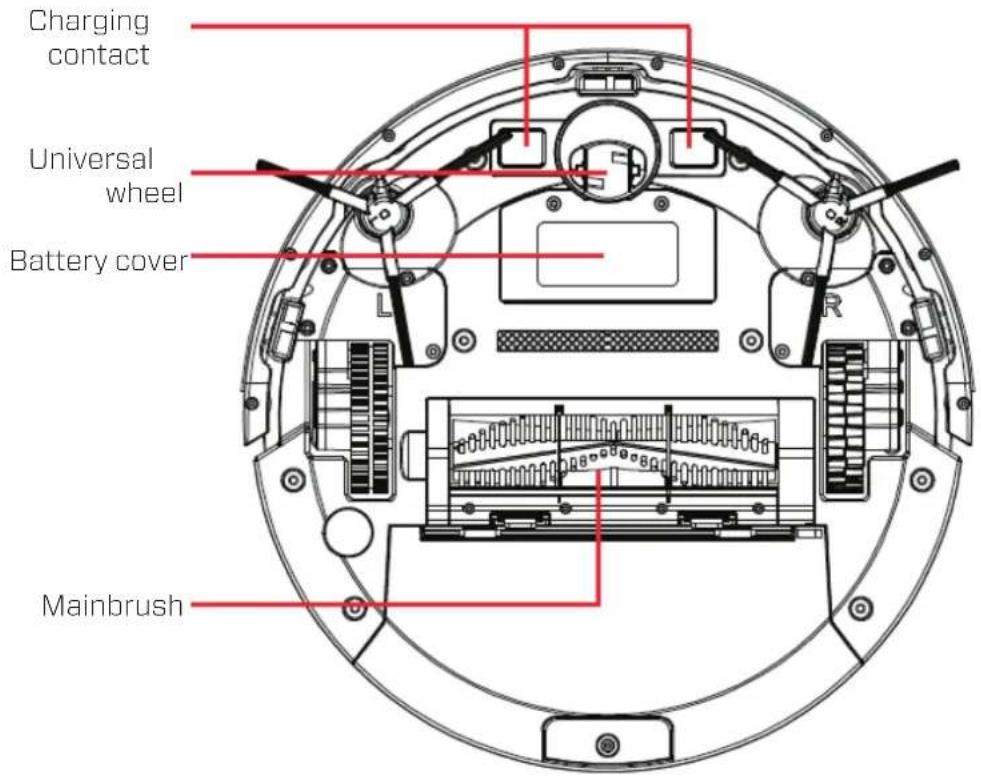
Bottom view
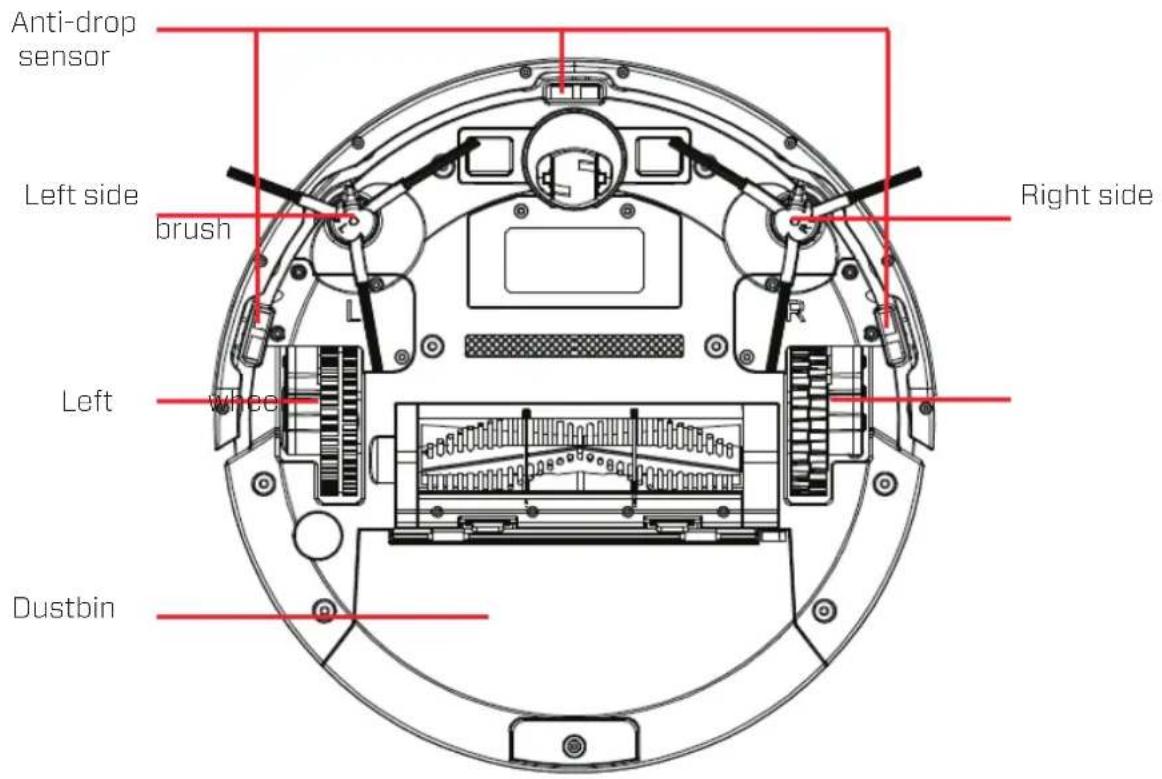

Dustbin
Clean Air Optima
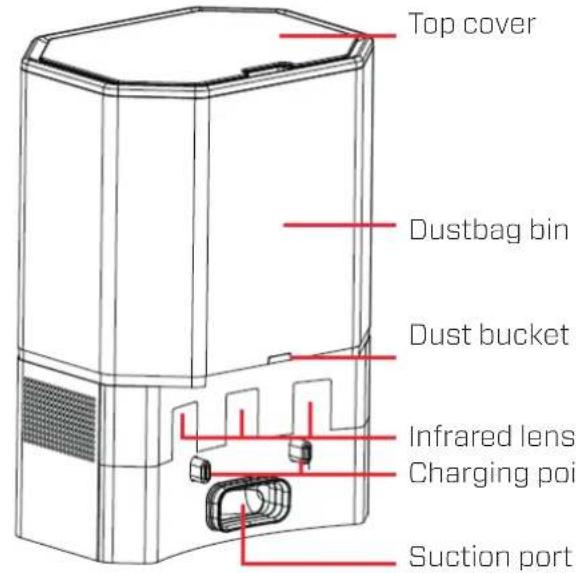
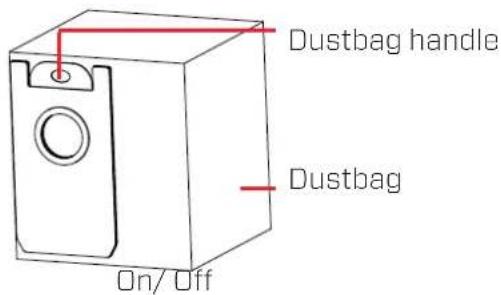
Self empty station
Dustbag bin
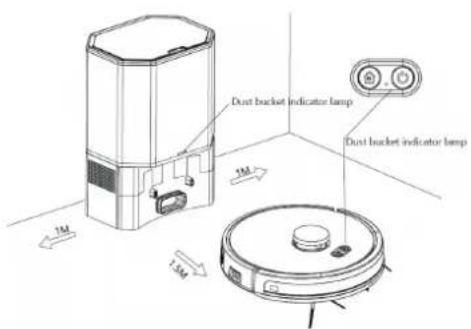
Dust bucket indicator light
Infrared lens
Charging points and dust collection sensor
Suction port
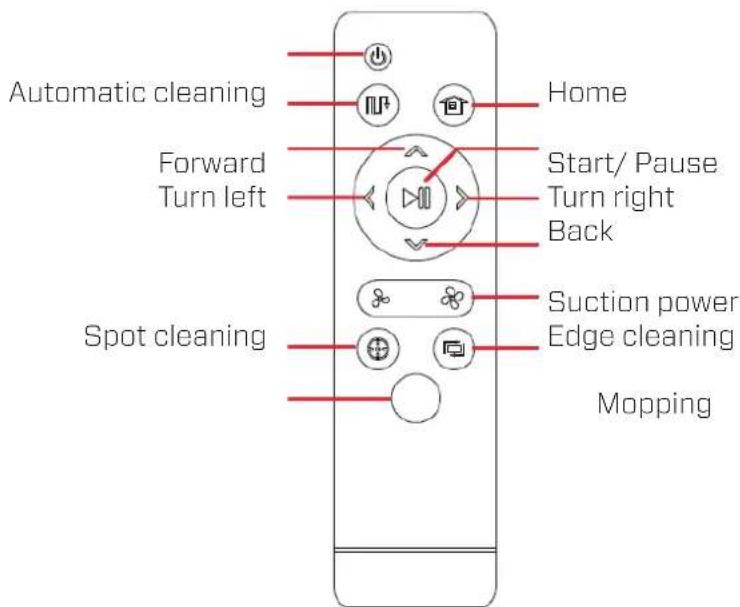
Remote control
Insert 2 AA alkaline batteries - note the correct position of plus (+) and
minus (-) as indicated in the remote control.
IMPORTANT: BATTERIES MUST BE INSTALLED AND REPLACED BY AN ADULT.
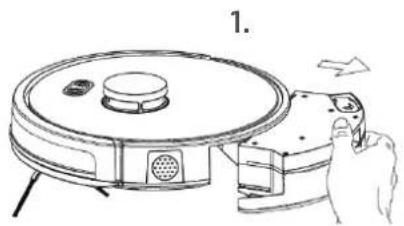
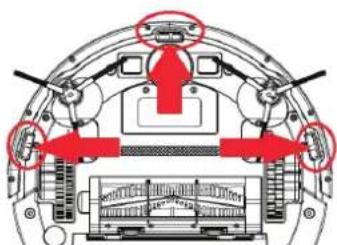
Installation instruction robot vacuum cleaner
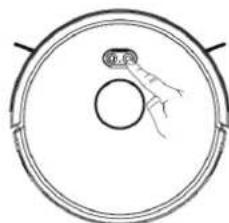
-
Remove the bumper protective strip.
-
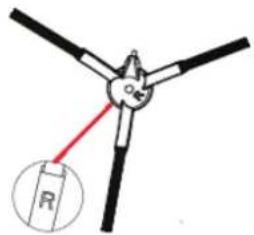
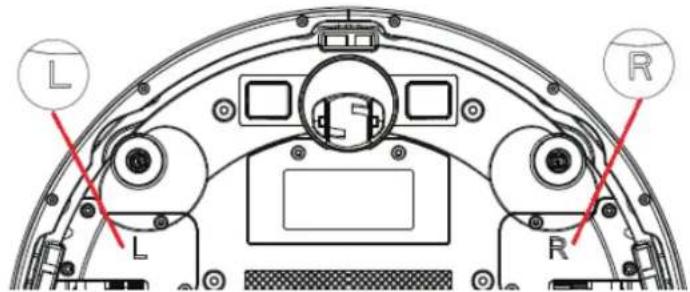
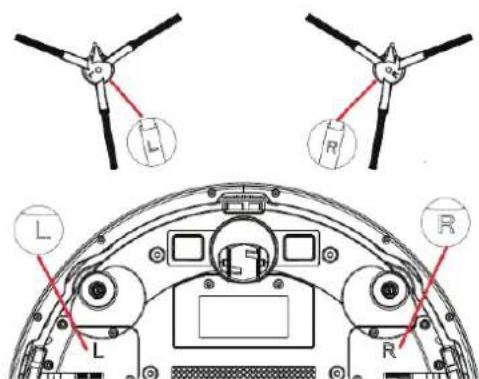
Install the side brushes. Make sure that the left
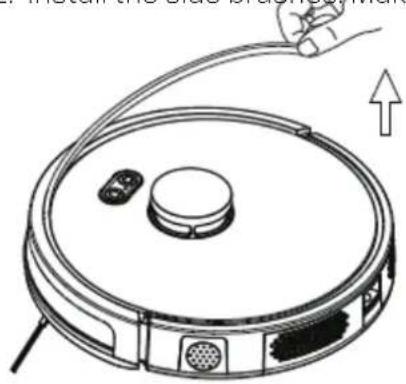
side brush (L) and the right side brush (R) match
L and R on the lower housing and press the side brushes onto the mechanism.
They are installed when you hear a "click" sound.

-
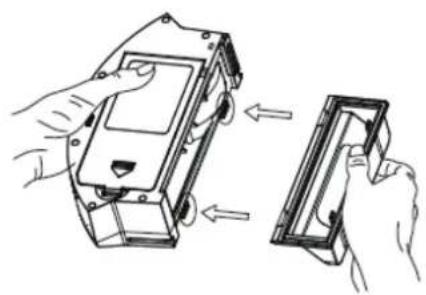
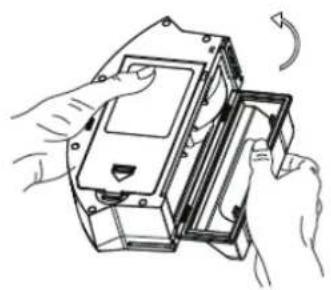
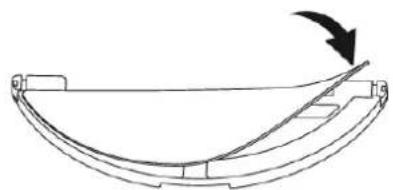
Install the dust container side cover:
-
Close the side cover of the dust
Press the side cover firmly into the cor indicated position as shown in the figure.
container: turn the side cover of the ure. dust container as indicated by the
arrow.
- Install the dustbin inside the robot vacuum cleaner.
Clean Air Optima
Charging/ Self empty station
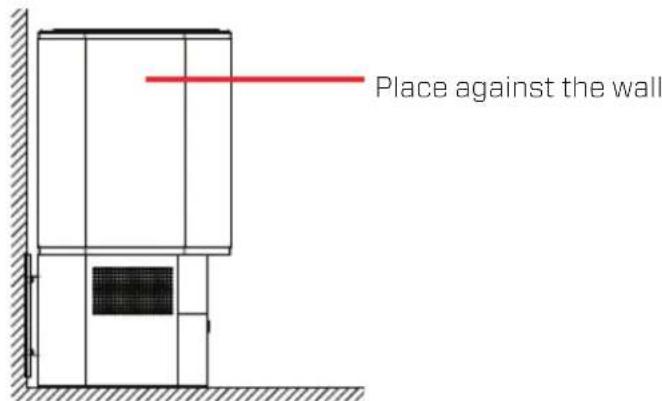
Place the self empty station against the wall and on a hard, flat surface. Don't place the self empty station in direct sunlight. Give the self empty station a free space of about 30 to 50~cm on the left and right. Provide a clear view of the self empty station at the front from one meter to one and a half meters. Make sure the area around the self empty station is clear so that the device can navigate easily.
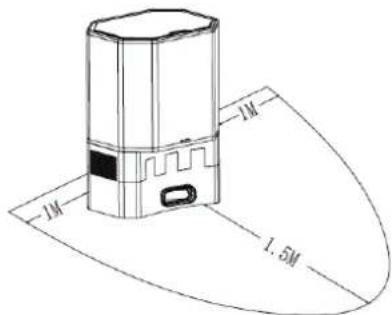
Warning: To prevent your robot from falling down stairs, make sure the self empty station is at least 1.2 meters away from the stairs.
Charging:
Put the power cord into the socket.
Connect the robot vacuum cleaner to the self empty base/ charging station.
Press the 'HOME' button for automatically charging.
During charging, the indicator light
flashes. Once charging is complete,
the indicator light turns green.
During the cleaning process, the robot vacuum cleaner may conclude that its battery power is insufficient and automatically enter the charging mode to find the self emtpy base for charging.
You can also instruct the robot vacuum cleaner to enter the charging mode with the charging button on the remote control or via the APP.
Pay attention to charging:
- The self emtpy station cannot be used in an environment with strong reflection, such as direct sunlight or nearby mirrors.
- The charging time is about 6 hours.
- When charging, do not install the water tank on the robot vacuum cleaner, to ensure the safety of charging and prevent wet mops from damaging the floor.
Please fully charge the robot vacuum cleaner before first use.
If the self empty station/ charging station has been moved, the robot may lose positioning and the map. Then when the robot is restarted, it will rebuild and remember the map.
Cleaning mode
First use
During the first use, the robot will scan the room(s) and then provide insight into the room via a map. This map can then be used in the future. This also improves the robot's process, because it better knows where it is.
Cleaning modes
Depending on the different cleaning needs, the product has a variety of cleaning modes to choose from.
You can start different cleaning modes through the remote control or through the APP.
NOTE:
Do not move the robot randomly or frequently during cleaning. After moving, place the robot near its original position. When it restarts, it will try to position itself again.
After successful positioning, it will follow the planned path and continue working.
If positioning fails, the robot will abort the previous mission, create a new map and clean again.
Automatic cleaning
After the first use, the robot generates a map according to the actual home environment after booting. You press cleaning on the remote control or in the APP.
Spot cleaning APP
When a local area needs extra cleaning, you can select this spot in the app on the map. The robot will then clean within a radius of 1.5m× 1.5m with the starting position as a central point. Remove any obstacles from the path of the SPOT cleaning. After the SPOT cleaning is complete, the robot will end the task. To send the robot back to its charging station, tap
Spot cleaning remote control
When a local area needs extra cleaning, you can select this spot by remote control , if the robot cannot be controlled with the mobile APP. Move the robot to the place you want to clean. The robot will then clean within a radius of 1.5m× 1.5m with the starting position as a central point. Remove any obstacles from the path of the SPOT cleaning.
After the SPOT cleaning is complete, the robot will end the task. To send the robot back to its charging station, tap
Route after the room(s) have been
Suction adjustment
Press the button in the APP or on the remote control, to adjust the suction power (low/ high).
Manual control
Press direction button in APP (settings -> manual) or remote control control robot going forward, backward, right or left.
Virtual wall
Select the "map edit" function in the APP to isolate an area that does not require cleaning. You can use this function to isolate areas that don't need cleaning.
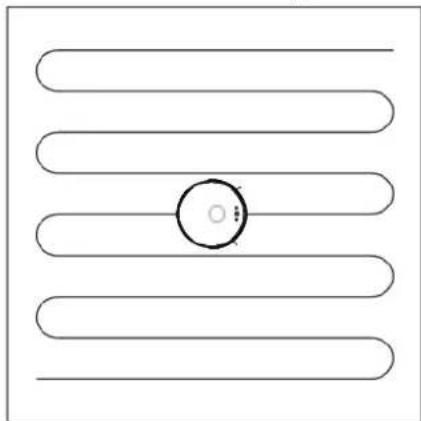
mapped.
Clean Air Optima
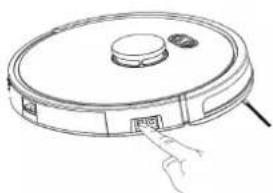
Operation instruction
Remove loose objects from the floor before cleaning the floor.
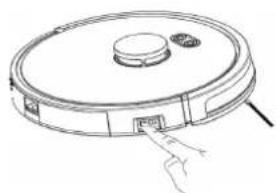
- Turn on power, press the main switch.
"I" means turn on the robot vacuum cleaner.
"0" means turn off the robot vacuum cleaner.
- Press the button start/ pause
the button once again for a pause.

to start cleaning. Press
- Standby mode
The robot (in standby mode) will go into sleep mode after 3 minutes and all indicators will go off. You can use any button on the robot, remote control or APP to restart the robot.
- Switch off:
After the host stops working, you can manually turn off the main power switch and the robot will shut down.
After the robot has finished cleaning, leave the robot on and charge the robot for the next time you will use it. If you don't use the robot for a long time, turn off the power switch.
Operation instruction remote control/APP
- Timer (APP control)
Set a timer that indicates when the robot should start cleaning at specific times.
- Manual (APP control and remote control)
Control the robot manually with the remote control or the APP.
- Find robot (APP control)
Select this option if you have lost your robot. Then the robot will tell you where it is located.
- Room manage (APP control)
Use this function to manage your rooms.
- Mopping (APP control and remote control)
Start mopping function/ Stop mopping function.
- Water dosing (APP control)
Control the water dosage and choose between low, medium or high. This will regulate the mop's wetness.
- Record (APP control)
This allows you to view all your previous cleaning sessions. Here you can see the number of square meters that have already been cleaned and how long it took.
You can also find previously saved folders, which is ideal if you use the robot on different floors.
- Voice and volume (APP control)
Set your preferred language and adjust the volume.
- Do not disturb mode (APP control)
Here you can set a period of time in which the robot should not disturb you.
- Set up virtual wall / restricted area (APP control)
Use this function to mark no-go zones in a room. For example, you can draw a virtual wall in the map where the robot is not allowed to pass. Or you can create a prohibited area for vacuuming and/or mopping in the map. You can start this function in the APP under the device in the menu 'Map edit'.
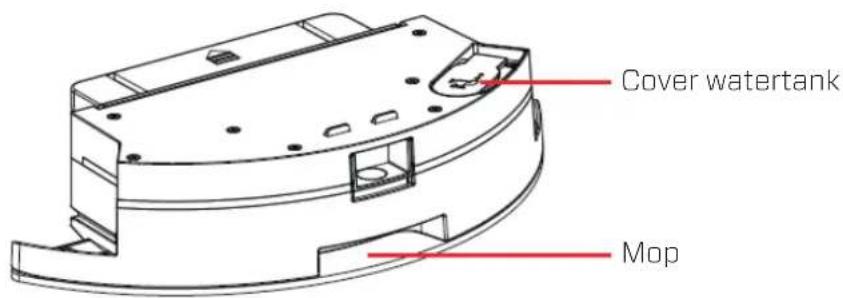
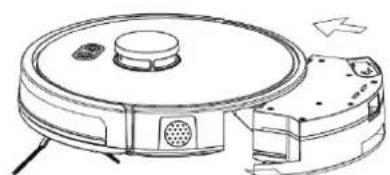
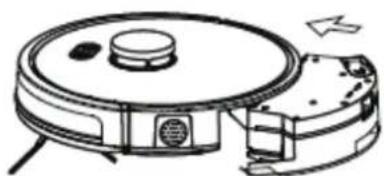
Use watertank/ mop function
- Stick the mop flat on the bottom 2. Fill the water tank: open the water tank lid of the water tank. and fill the water tank with water.
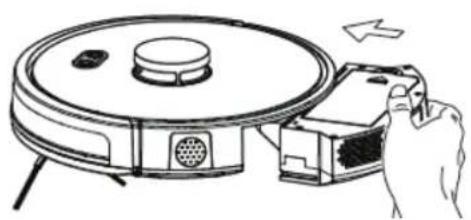
- Hold down the button in the middle of the water tank and push it horizontally along the back of the robot. The module is correctly installed in place when you hear a "click".
- Start mopping the floor. Press the clean button robot.

the
- When the robot has finished mopping, press the button in the middle of the water tank. This will allow you to remove the water tank from the back, then empty the water tank and clean the mop.
Caution: do not turn the robot over.
Water dosing (APP control)
Control the water dosage and choose between low, medium or high. This will regulate the mop's wetness.
Mopping instructions
- For safety reasons, you should remove the water tank when the robot is charging or not in use.
- Do not use the mopping function on carpets. Set a prohibited area via the APP to prevent the robot from entering the carpet during mopping or temporarily remove the carpet.
Clean Air Optima
- For a better mopping result, the floor should be vacuumed first, then start mopping.
- To add water or clean the mop, first turn off the robot. Then reassemble the water tank. Do not move or turn the robot, otherwise the positioning may fail, the map may be lost, and the prohibited areas that have been programmed may disappear.
- The mopping function of the robot is intended for wiping the floor and is not conducive to thorough deep cleaning. Stubborn stains may not be removed effectively and will have to be removed by hand.
- Please do not use detergent in the water tank to prevent clogging.
- Do not use the robot vacuum cleaner to remove water from the floor.
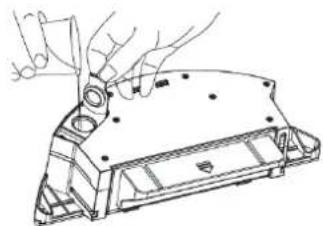
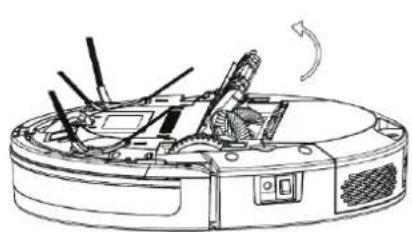
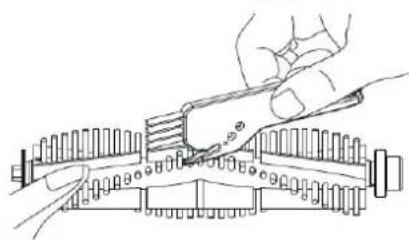
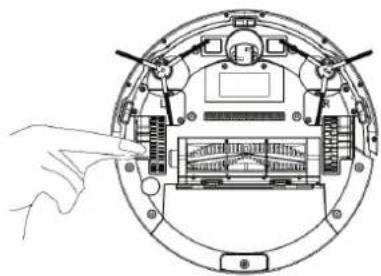
Maintenance main brush and side brushes
- Turn the robot over and press the two clamps on the lid main brush to open it and take the main brush out.
- Remove the dust from the main brush using a small brush and clean the main brush.
- Put the main brush back into the robot and press the main brush and cover firmly to close the clamps completely.
Cleaning brush
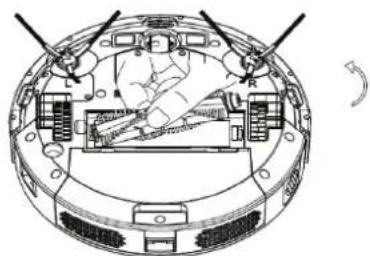
Clean the side brushes
- Remove the side brushes by pulling them.
- Remove hair and dirt with the cleaning brush and put the side brushes back into the robot.
- Make sure the left side brush (L) and the right side brush (R) match L and R on the bottom of the robot.
Maintenance dustbin and clean the dust bin
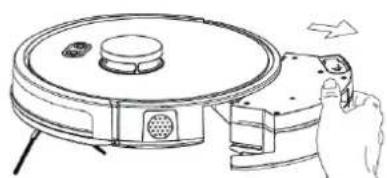
- Press the dustbin release button to remove 2. Open the lid to empty the dustbin and the dustbin from the robot. clean it with the cleaning brush.
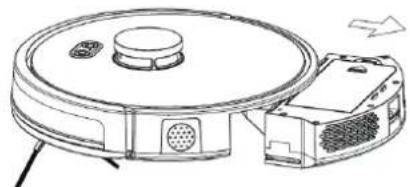
- Place the dustbin back into the robot.
Important:
Do not rinse or soak the dustbin. Clean the dustbin regularly to prevent accumulation of dirt.
Clean the mop
The mop may be washed at a maximum of 40 degrees by hand or in a washing machine. Do not put the mop in a dryer afterwards.
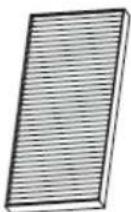
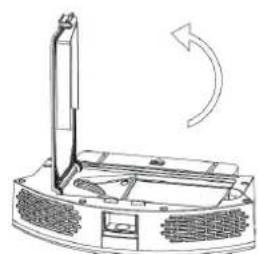
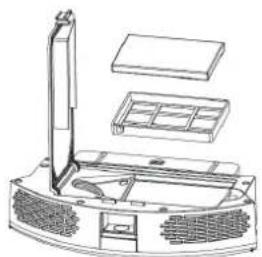
Replace HEPA filter and carbon filter in the dustbin
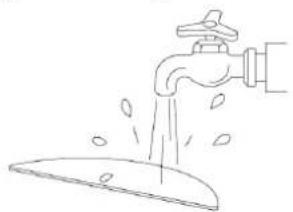
Open the HEPA filter cover and remove the HEPA filter, carbon filter and pre-filter (1. & 2.). The pre-filter can be cleaned with water (3.). Replace the carbon filter and HEPA filter if necessary.
1.
2.
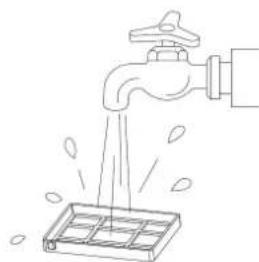
3.
Install the parts in the following order:
Pre-filter first, then carbon filter and finally the HEPA filter.
Warning!
Do not damage the filters, the filters must not be cracked. Damaged filters needs to be replaced.
Never wet or rinse the carbon filter and HEPA filter with water. The carbon filter and HEPA filter, which are rinsed with water, needs to be replaced.
Signs for used up HEPA filter that needs to be replaced
Increased sound, congested filters, rising presence of smells.
Filters needs also to be replaced by new ones when the HEPA Filter changes its color from white to grey or black. If the HEPA Filter remains white, there is NO need to replace the filters.
How to order filters:
Contact Clean Air Optima Customer Service tel. +31 (0) 742670145 or visit our webshop: https://www.cleanairoptima.com/-accessoires
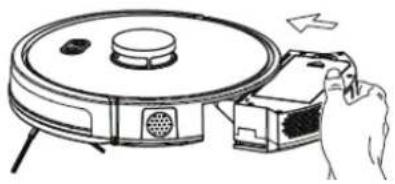
Cleaning and maintenance
Watertank maintenance.
- Take out the water tank from the robot vacuum cleaner.
- Remove the mop and drain the water from the water tank.
- Clean the mop (by hand) and let the water tank and mop dry.
Do not put the mop in a dryer afterwards.
- Put the water tank back in the robot vacuum cleaner.


3.
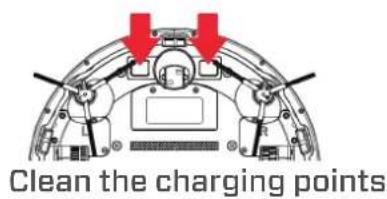
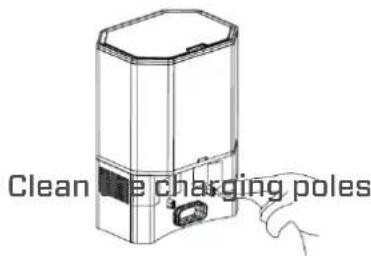
Clean drive wheels, universale wheel sensors and charging pole.
Use the cleaning brush to remove hair and dirt from the front caster wheel.
Important:
If the front wheel is stuck with hair or dirt, the floor may be damaged.
If the wheel does not spin freely after cleaning it, please contact customer service.

Clean the universal wheel
Clean the drive wheels
Clean the sensors using a clean, dry cloth.
Clean the sensors
Clean the chargingpoints and the charging poles with a clean, dry cloth, before charging.
Maintenance / cleaning self emtpy station
Replace the dustbag.
When the dust bag is full, the red light on the self empty station flashes.
Replace the dust bag in time.
The green light illuminates if the dust bag is not full.
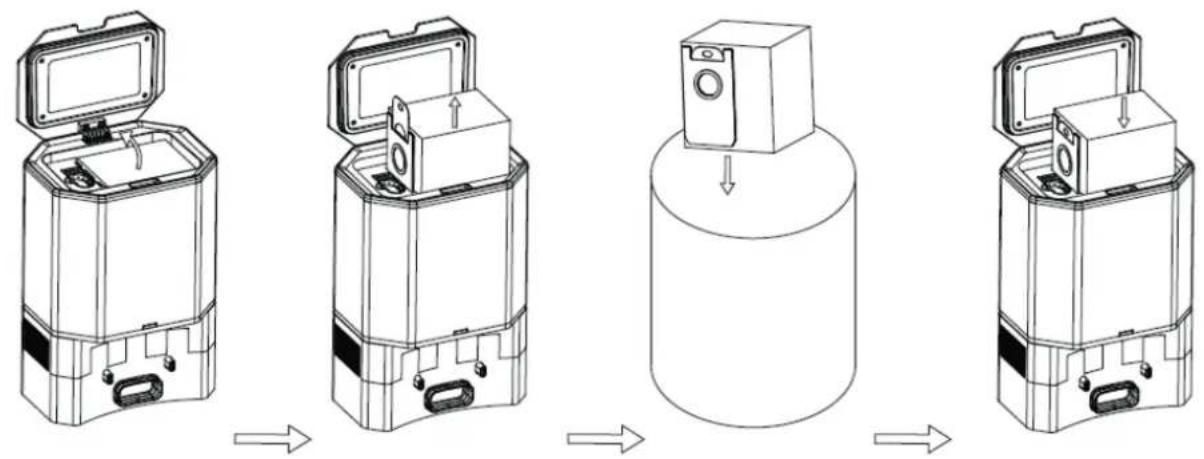
Open upper cover. out the
Pull up the bag handle and take
Throw away the old dust bag.
Put in a new dust bag and cover it.
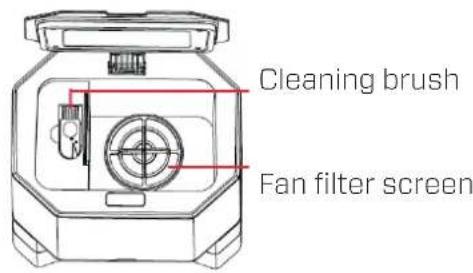
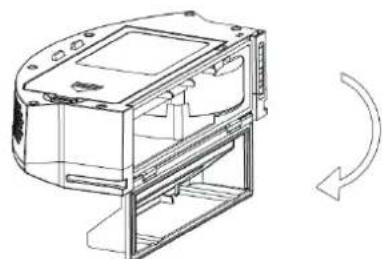
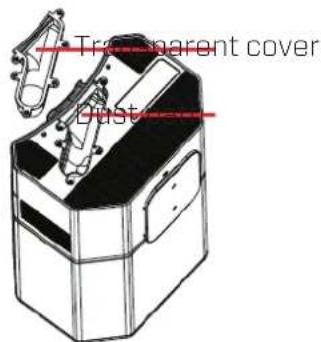
Cleaning the self empty station
- If the indicator light of the dust bin is still flashing red after replacing the dust bag, it is recommended to unplug the power cord, turn the self empty station over, and check if there is anything blocking the dust tunnel or suction port.
- If the dust tunnel is blocked, refer to the following figure to remove the transparent cover of the dust tunnel to clean it.
- Assemble it after cleaning.
Clean Air Optima
Maintenance Battery
The robot is equipped with powerful lithium-ion batteries. To maintain battery performance, keep the robot charged during daily use.
If the device is not used for a long time, turn it off and store it properly. Turn off power, press the main switch.
Charge the robot at least every three months to prevent
damage to the batteries due to excessive discharge.
Main switch
Safely ship or transport the robot vacuum cleaner including battery
Lithium-ion batteries and products containing lithium-ion batteries are subject to strict shipping regulations. If you need to send this product for repair, travel with it, or transport it for any other reason, you MUST follow the instructions below.
- The battery must be turned off before shipping.
- Turn off the battery by removing the robot from the charging station and turn off power by pressing the main switch.
- Pack the robot properly before shipping.
If you need further assistance, you can contact our customer service.
Clean Air Optima® robot vacuum cleaner storage
If the robot vacuum cleaner will not be used for an extended period of time:
- Drain the water tank completely and make sure that there is no water stocked inside the water tank.
- Empty the dustbin and clean the dustbin with the cleaning brush.
- Remove and clean the filters. After cleaning reinstall the filters back into the robot vacuum cleaner.
- Unplug the robot vacuum cleaner from the charging station and fold up the power supply cord from the charging station.
- Store the robot vacuum cleaner in a dry location, away from direct sunlight, extreme temperature and excessive dust.
- If the robot vacuum cleaner is not used for a long time, apply a protective cover to cover the robot vacuum cleaner to prevent dust deposits, which may cause cleaning and maintenance problems in the future.
Operation with Clean Air Optima® App
Connectivity
Compatibility with smartphone and tablet:
iPhone, iPad and Android devices
Device connets via WiFi with App:
CleanAirOptima
Attention: The router must be set to the 2.4 GHz broadband. If the router is set to the 5.0 GHz, it is impossible to establish a connection.
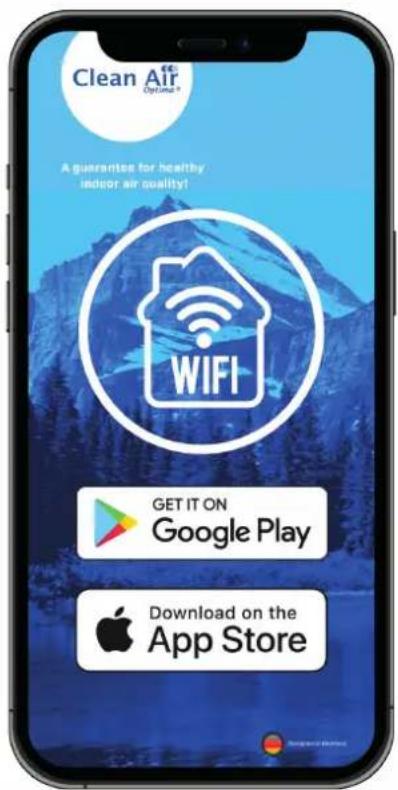
SetupWiFiconnection
- Download and install the "CleanAirOptima" App in the App Store or Google Play Store.
- Make an account and log in.
- The router must be set to the 2.4 GHz broadband. If the router is set to the 5.0 GHz, no connection can be established.
- Make sure Bluetooth is enabled on your smartphone.
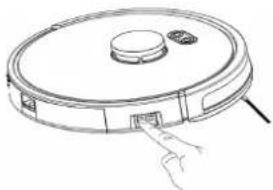
- Turn on power, press the main switch. Press the ON/OFF button twice for 5 seconds. Then the WIFI light will flash quickly. If the WIFI light (light between HOME and
ON/OFF button) blinks quickly, the device is ready to connect.
- Make sure that your smartphone or tablet is successfully connected to your WiFi network.
- Open the 'CleanAirOptima' App and click on 'Add device'. Your device is listed and you can select it. If not choose 'Auto Scan'. Follow the on-screen instructions to connect the device to your network.
- Choose to add the Clean Air Optima device on the App, follow the instructions in the App.
- When the device is paired, the WiFi indicator light stays on constantly.
- After the configuration is successful, you can use the Clean Air Optima App to operate the device.
Note:
- If your default network has changed, reset the WiFi connection, follow step 1 to 9 in the 'Set up WiFi connection' section.
- If you want to pair multiple devices to your smartphone or tablet, you have to do this one after the other.
- Make sure that the distance between your smartphone or tablet and the device is less than 5 meters and there are no obstacles. Also make sure you are in the same room as the device.
Clean Air Optima
Reset the WiFi function:
- Reset the WiFi by pressing the 'ON/ OFF' button for 5 seconds, the indicator light of the WiFi will blink rapidly.
Turn off WiFi function:
Disconnect the APP from the robot vacuum cleaner.
Press the main switch and turn off the robot vacuum cleaner.
Press the main switch and turn on the robot vacuum cleaner.
The WiFi indicator light will not blink and the WiFi function is off
Connect devices to multiple phones
Note: First the other person needs to install the Clean Air Optima® App on his/her phone and create a new account.
Share the device with limited access:
You can choose to share 1 device with several persons. This person will then have access, but will not be able to manage all the settings.
Follow the instructions below to share the device with several persons:
- Go to the relevant device.
- Go to the pencil or three dots in the top right.
- Select Share device.
- Choose 'Add sharing'.
- Choose the sharing method e.g. via email, Whatsapp, sms etc, and continue.
- The device will automatically appear in the Clean Air Optima® App with the other account.
Share device with full access:
You can add a person or several persons to your home management. That person will then have access to all your devices that are already linked and has full rights and permissions. You will always remain the main administrator.
Follow the instructions below to add someone to your home management:
- Open the Clean Air Optima App and go to 'Me'.
- Then choose 'Home Management'.
- Choose 'Create a home'.
- Select the relevant 'Home' and 'Add member'.
- Choose the sharing method e.g. via email, Whatsapp, sms etc. and continue.
- The corresponding 'Home' will automatically appear in the Clean Air Optima® App of the person with whom you have shared your 'Home'.
- On the other account: Go to the home screen from the Clean Air Optima App. Go to the top left and select the 'Home'.
Troubleshooting
The following is a troubling shooting guide to help you solve any issues that you may have using the Clean Air Optima® robot vacuum cleaner RVC-002B Smart.
| Problem Solution | |
| The Robot vacuum cleaner does not switch on. | ·If the battery is low, place the robot on the charging station and make sure that the charging plates of the robot and the charging station are connected. The robot will start automatically (if the robot is completely turned off, it can be started automatically after charging for a while). ·The ambient temperature should not be lower than 0°C or higher than 50°C. |
| The vacuum cleaner cannot be charged. | ·Move the robot away from the charging station and check that the charging station indicator light lights up. Check that both ends of the charging station power adapter are properly connected. Make sure that the charging station is placed correctly in front of the robot and that the distance between the front of the robot and the charging station is approximately 2 cm. ·Check if there is poor contact between the robot's charging plates and the Charging Station, clean the charging plates or push the side brushes aside if they block the connection between the charging plates |
| Abnormal sound. ·Check the wheels, clean them if necessary. ·Check to see if the wheels are blocked. | |
| Cleaning capacity reduces. | ·The dustbin is full, clean the dustbin. ·The filters are clogged, please clean them/ replace them. ·Check to see if the mainbrush is blocked, please clean it. |
| The robot continues to rotate. | ·Remove the water tank or dustbin and reinstall it. ·Switch off the robot using the main switch and switch it on again after 2 minutes. |
| Operation with Clean Air Optima® App does not work. | ·The WiFi signal is poor, try to start a connection close to the router. ·Password WiFi is incorrect. ·The wifi works either on the 5 Ghz frequency band or on a mixed band of 2.4 and 5 Ghz. The cleaning robot only uses the 2.4 Ghz frequency band. Log in to your router and make sure that the two Ghz frequencies are split into 2.4 and 5 Ghz and give them different names. Instructions on how to do this can be found in the manual of your router. ·Read chapter: Operation with Clean Air Optima® App. |
WARNING!
If the above recommended solutions do not work, please contact Clean Air Optima® technical support at the telephone number for your region. Do not attempt to disassemble, reassemble, or repair the device as this may void the warranty.
Troubleshooting
The following is a troubling shooting guide to help you solve any issues that you may have using the Clean Air Optima® robot vacuum cleaner RVC-002B Smart.
| Problem Solution | |
| The mop is dirty. | ·The mop may be washed at a maximum of 40 degrees by hand or in a washing machine. ·Do not put the mop in a dryer afterwards. |
| Anti drop sensor detects no abyss. | ·Clean all the sensor on the bottom. Check bottom view for the position of the sensors. |
| Robot vacuum cleaner jammed. | ·Check if the entrance to the dustbin is blocked. |
| Indicator light self empty station flashes red. | ·Install the dustbag. ·Clean the dust tunnel. ·Replace the dustbag. |
| The indicator light of the dust bin is still flashing red after replacing the dust bag. | ·Clean the dust tunnel. ·Check if the dustbag has been installed correctly. |
WARNING!
If the above recommended solutions do not work, please contact Clean Air Optima technical support at the telephone number for your region. Do not attempt to disassemble, reassemble, or repair the device as this may void the warranty.
Specifications RVC-002B Smart
| Model | RVC-002B | Smart |
| For rooms up to | 200m² / 500m³ / 2140ft² | |
| Rated voltage | 220V - 240V, 50Hz | |
| Rated power | 32W | |
| Suction power | 2500pa (low), 4000pa (high) | |
| Water tank capacity | 360 ml | |
| Dustbin capacity | 600 ml | |
| Working temperature range | 0°C - 40°C | |
| Cleaning specifications | Pre-Filter, Activated Carbon Filter, True HEPA H13 Filter, UV-C | lamp, |
| Sound level | Suction power < 50dB(A) Low / 60dB(A) High | |
| Battery | 3200mah | lithium |
| Product size (dxh) | 330 x 96 mm | |
| Weight | 2,7 kg | |
| Colour | Black/ | grey |
| Complies with EU regulations | CE / WEEE / RoHS | |
Specifications self empty station
| Rated voltage | 220V - 240V, 50/ 60Hz |
| Rated power | 900W |
| Output | DC20V1A |
| Working temperature range | 0°C - 40°C |
| Product size | 250 x 206 x 357 mm |
| Weight | 4 kg |
| Colour | Black |
| Complies with EU regulations | CE / WEEE / RoHS |
Clean Air Optima
This symbol on the product indicates that the device must not be disposed of in a bin with household residual waste. As the end user, it is your responsibility to dispose of the device in an environmentally friendly manner at the end of its life. You can do this as follows:
(1) return the device to the shop where you purchased it; or
(2) return the battery to a designated collection point for small chemical waste.
By recycling and destroying this product instead of throwing it in the bin, you will help to conserve valuable natural resources and prevent potential negative effects on human health and the environment that could occur if this device were disposed of with normal household waste.
Contact your local authority for more information and a list of designated collection points for small chemical waste. There may be penalties for improper disposal of this type of waste, based on legislation in your country.
More information can be found on the following website: https://ec.europa.eu/environment/ topics/waste-and-recycling/waste-electrical-and-electronic-equipment-weee_en
Service
Warranty Certificate for the Clean Air Optima® Robot vacuum cleaner RVC-002B Smart.
Date of purchase:
Customers name:
Address:
Telephone:
Email:
Seller's name:
Address:
- Please fill in completely this Warranty Certificate. Send it with the invoice and the unit, postage pre-paid and using the original packing box, to your distributor. Make sure to include the appropriate return postage for the package.
- Please enclose a short description of the damage, fault or malfunction, and the circumstances under which these problems arose.
The Clean Air Optima® Robot vacuum cleaner RVC-002B Smart is subjected to strict testing procedures before leaving the factory. If within two years from the date of purchase the product does not perform according to the specifications, because of factory defects, the purchaser is entitled to free repairs or replacement of parts upon presentation of this warranty (provided that the malfunction or damage to the device and/or parts occurred under normal operating conditions). What is covered: All parts defective in material and workmanship. For how long: two years from purchase date. What we will do: Repair or replace any defective parts.
Other Conditions
The provisions of this warranty are in lieu of any other written warranty whether express or implied, written or oral, including any warranty of merchantability or fitness for a particular purpose. The manufacturer's maximum liability shall not exceed the actual purchase price paid by you for the product. In no event shall the manufacturer be liable for special, incidental, consequential, or indirect damages. This warranty does not cover a defect that has resulted from improper or unreasonable use or maintenance, faulty assembly, accident, natural catastrophes, improper packing, or unauthorized tampering, alteration, or modification as determined solely by us. This warranty is void if the label bearing the serial number has been removed or defaced.
Thank you for reading!

Share your feedback about the Clean Air Optima® Robot vacuum cleaner RVC-002B Smart on: www.cleanairoptima.com
For frequently asked questions about the RVC-002B Smart www.cleanairoptima.com search for the RVC-002B Smart
Download PDF instruction manual on: leanairoptima.com/info/manuals

Watch all Clean Air Optima® Product video's on: www.youtube.com
Clean Air Optima International B.V. | David Ricardostraat 9-7 / 9-9 | 7559 SH Hengelo (ov) The Netherlands | Phone: +31 (0) 74 - 2670145
Clean Air Optima Germany GmbH | Enschedestraße 14 | 48529 Nordhorn | Germany Phone: +49 (0) 5921 879-121
E-mail: info@cleanairoptima.com
Internet: www.cleanairoptima.com
Deutsch
http://ec.europa.eu/environment/waste/batteries
Clean Air Optima
Beschrijving
- Robot vinden (APP-bediening)
- Waterdosering (APP-bediening)
- Opnemen (APP-bediening)
Waterdosering (APP-regeling)
Specifications RVC-002B Smart
http://ec.europa.eu/environment/waste/batteries
Clean Air Optima
http://ec.europa.eu/environment/waste/batteries
Clean Air Optima
Descripción
Interruptor principal
http://ec.europa.eu/environment/waste/batteries
Clean Air Optima
Descrizione
http://ec.europa.eu/environment/waste/batteries
Clean Air Optima
Popis
http://ec.europa.eu/environment/waste/batteries
Clean Air Optima
Descriere
Specifications RVC-002B Smart
Model RVC-002B Smart
Pentru incaperi de pana la 200m^2 /500m^3 /2140ft^2
Tensiune nominal' 220V - 240V/50 Hz
http://ec.europa.eu/environment/waste/batteries
Clean Air Optima
Apras
Maintenance / cleaning self emtpy station
Device connets via WiFi with App:
CleanAirOptima
Démesio: Marsrutizatorius turi buti nustatyas j 2,4 GHz plačiajuostj ryšj. Jei marsrutizatorius nustatyas j 5,0 GHz, nejmanoma užmegzti ryšio.

"Wi-Fi" rysio nustatymas
Siukshiadezestalpa600ml
Darbinés temperaturos diapazonas 0^ - 40^
waste-and-recycling/waste-electrical-and-electronic-equipment-weene_en
Apkope
Garantijas tertifikats Clean Air Optima® robotu puteklsucceja RVC-002B Smart.
legades datumss:
Klenta vards/nosaukums:
Adrese:
Talrunis:
E-pasts:
Pardeveja vards/nosaukums:
Adrese: