Disk Grow iSize - Car seat Foppapedretti - Free user manual and instructions
Find the device manual for free Disk Grow iSize Foppapedretti in PDF.
User questions about Disk Grow iSize Foppapedretti
0 question about this device. Answer the ones you know or ask your own.
Ask a new question about this device
Download the instructions for your Car seat in PDF format for free! Find your manual Disk Grow iSize - Foppapedretti and take your electronic device back in hand. On this page are published all the documents necessary for the use of your device. Disk Grow iSize by Foppapedretti.
USER MANUAL Disk Grow iSize Foppapedretti
natural_image
Line drawing of a car comfort seat with seatbelt and seat, no text or symbols presentEN CAR SEAT - Assembly instructions
م Expected Kingsularity - Technologies Descentive
AR
natural_image
Simple icon of a person sitting in a car seat, enclosed in a rounded square (no text or symbols)ECE R129-04
IT. IMPORTANTE - LEGGERE ATTENTAMENTE E CONSERVARE PER FUTURO RIFERIMENTO
EN. IMPORTANT! READ THE INSTRUCTIONS CAREFULLY AND KEEP FOR FUTURE REFERENCE
FR. IMPORTANT! LIRE ATTENTIVEMENT ET CONSERVER SOIGNEUSEMENT A PORTEE DE MAIN POUR UNE UTILISATION ULTERIEURE
natural_image
Diagram showing two mechanical components with blue arrows indicating motion, no text or symbols present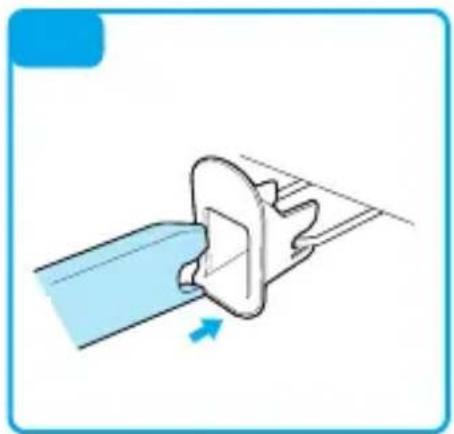
natural_image
Diagram of a mechanical component with a blue arrow indicating direction (no text or symbols)
text_image
Diagram illustrating a robotic arm joint with labeled parts and directional arrows indicating movement or positioning.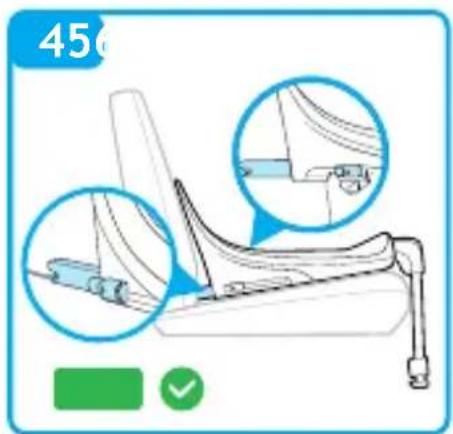
text_image
456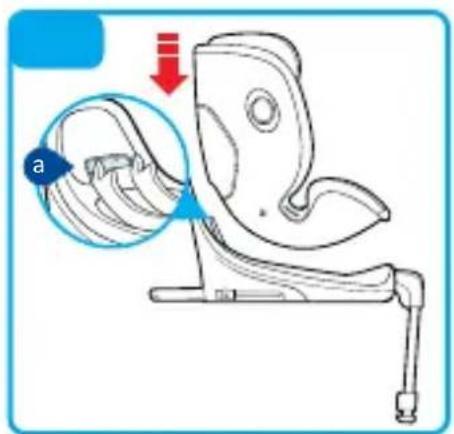
text_image
Diagram illustrating a baby seat with a magnified view of the seat being lifted, labeled with 'a' and a red arrow indicating downward motion.
natural_image
Line drawing of a baby car seat with adjustable arm and seat plate (no text or symbols)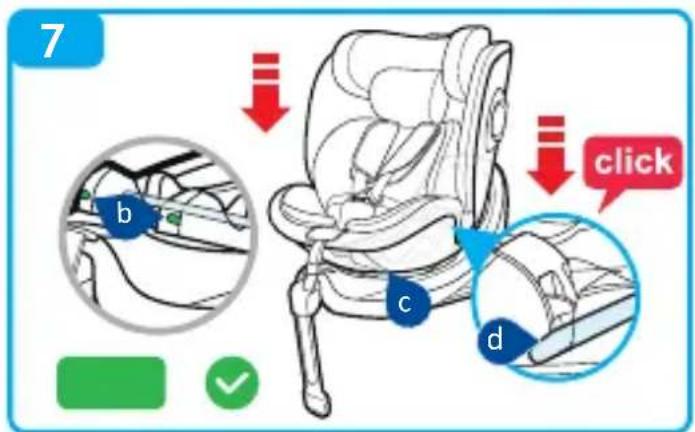
text_image
7 b c d click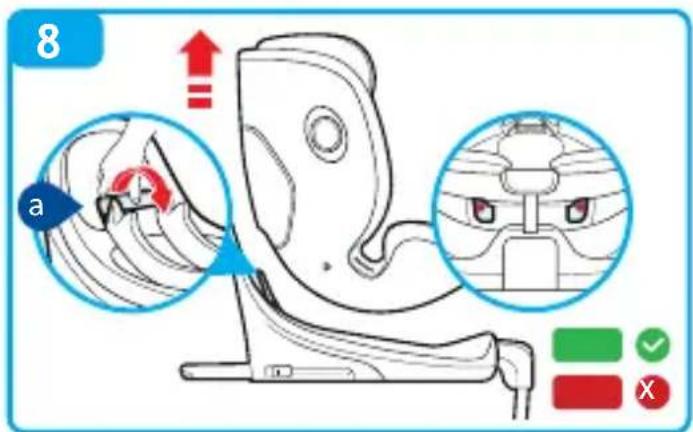
text_image
8 a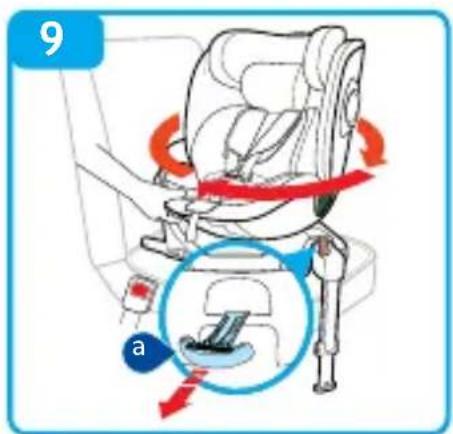
text_image
9 a
text_image
10 e
text_image
10A uso 40-105 cm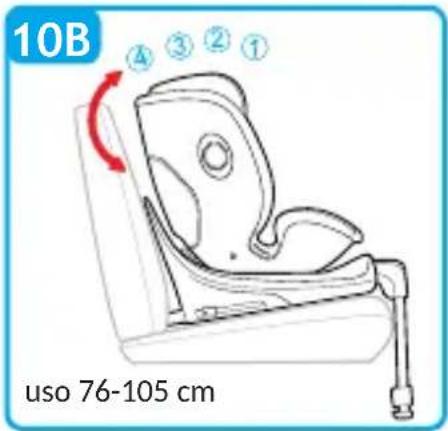
text_image
10B 4 3 2 1 uso 76-105 cm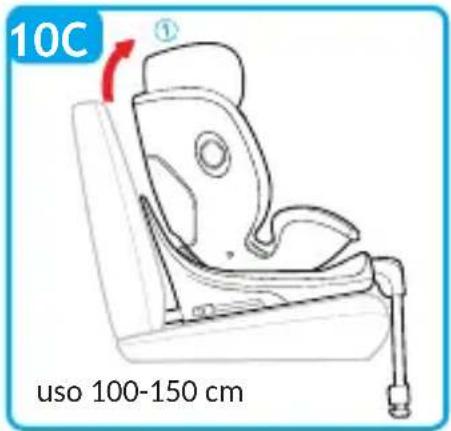
text_image
10C ① uso 100-150 cm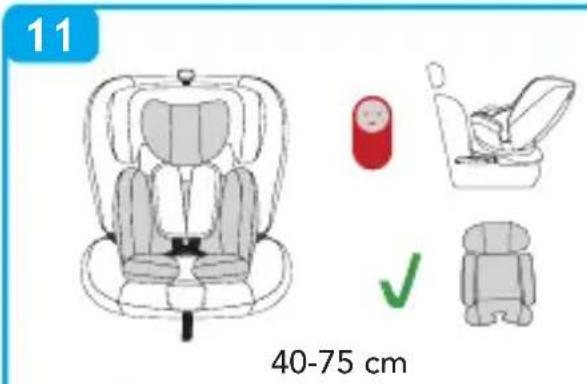
text_image
11 40-75 cm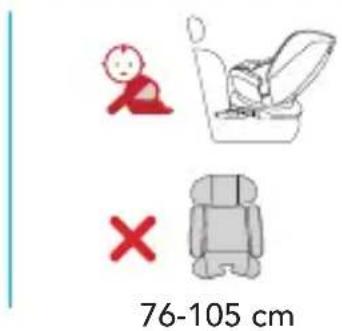
text_image
76-105 cm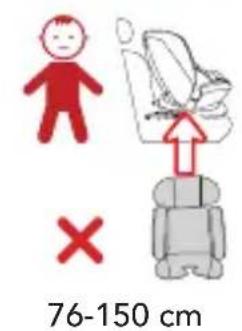
text_image
76-150 cm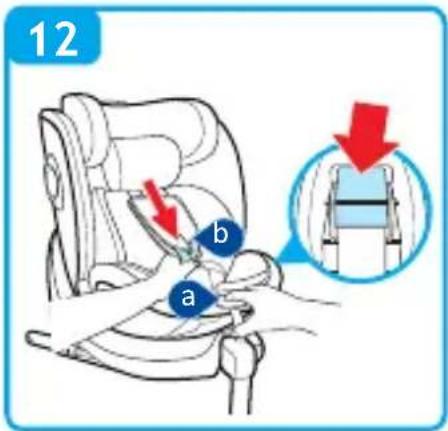
text_image
12 a b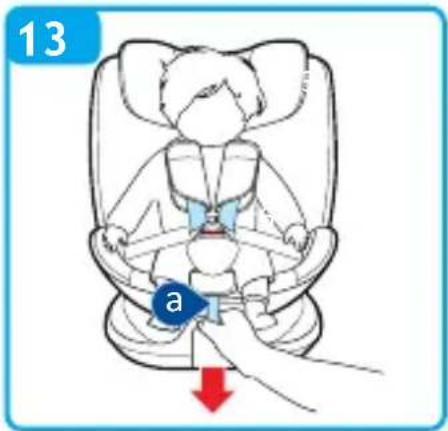
text_image
13 a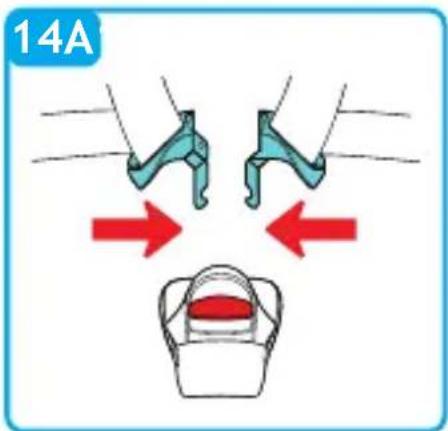
text_image
14A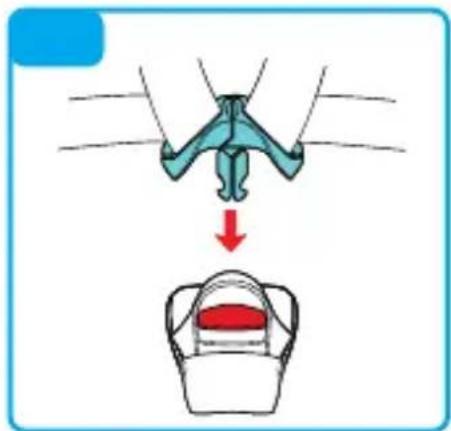
text_image
Diagram illustrating a medical procedure with labeled anatomical structures and a red arrow indicating direction of movement or force.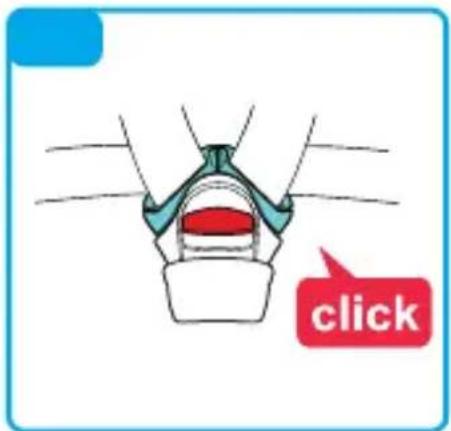
text_image
click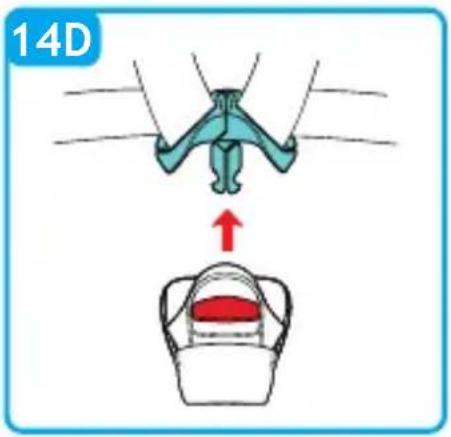
text_image
14D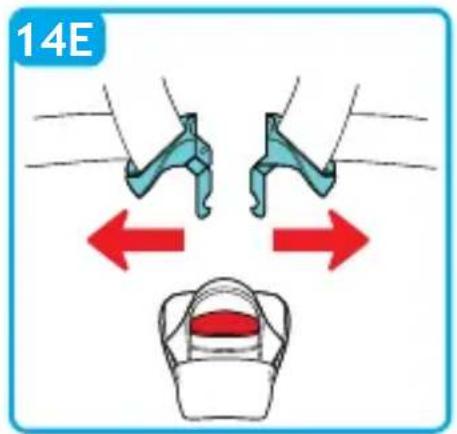
text_image
14E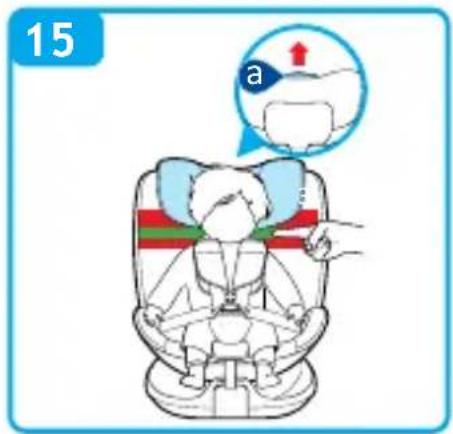
text_image
15 a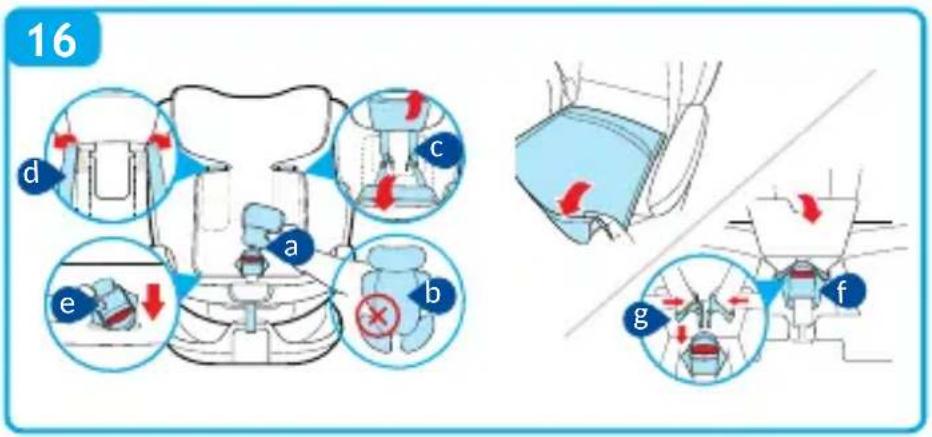
text_image
16 d c a b e g f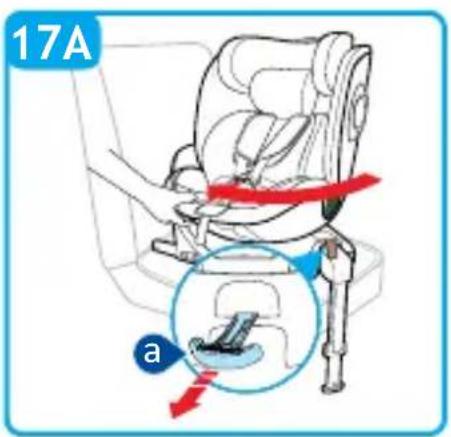
text_image
17A a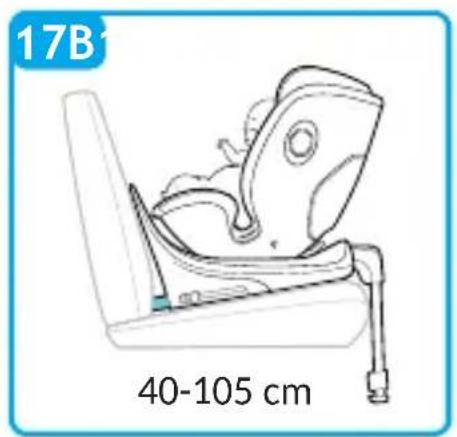
natural_image
Line drawing of a baby seat with adjustable arm and seat plate, labeled '40-105 cm' (no other text or symbols)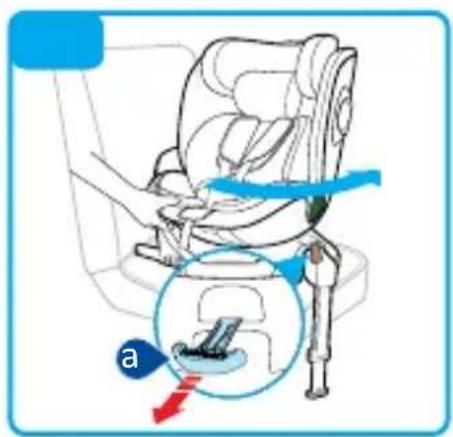
text_image
Diagram showing car seatbelt usage with labeled parts and directional arrows indicating force or movement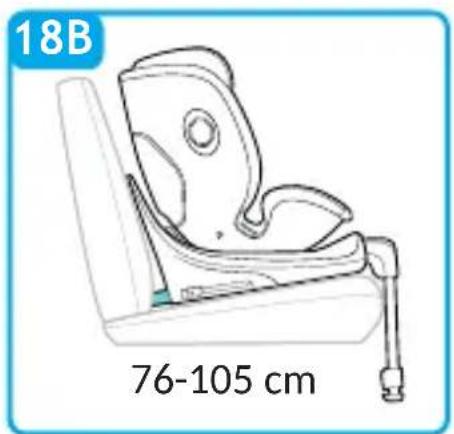
natural_image
Line drawing of a baby car seat with adjustable arm and seat, labeled '18B' and '76-105 cm' (no other text or symbols)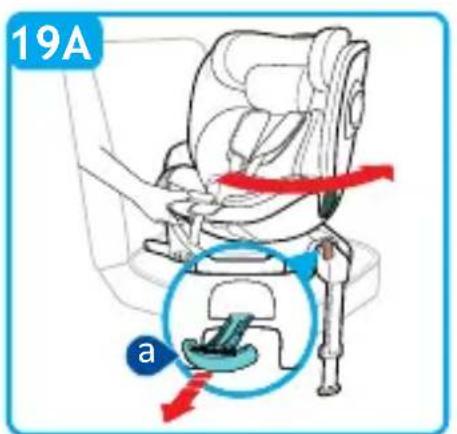
text_image
19A a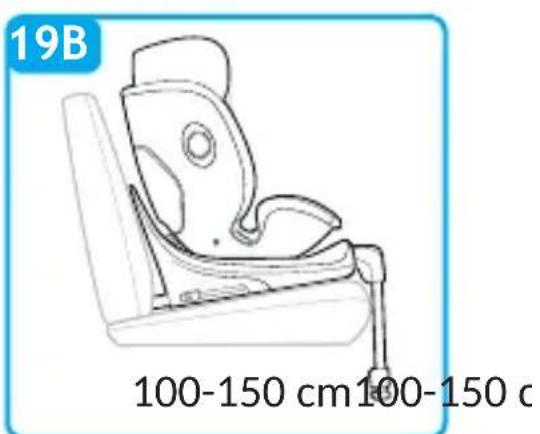
natural_image
Line drawing of a baby car seat with adjustable arm and seat plate (no text or symbols on the diagram itself)20
text_image
c a c e click d b21
text_image
Diagram illustrating car seatbelt usage with a magnified inset showing the needle inserted into the seat.222
text_image
S.I.P.S. 40-105 cm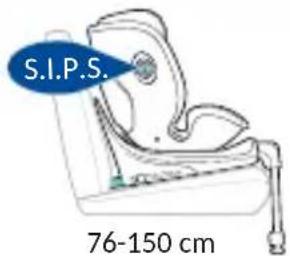
text_image
S.I.P.S. 76-150 cm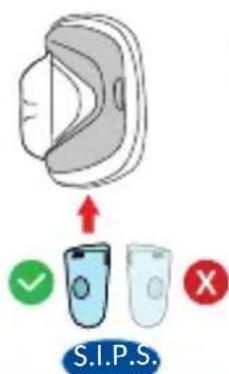
text_image
S.I.P.S.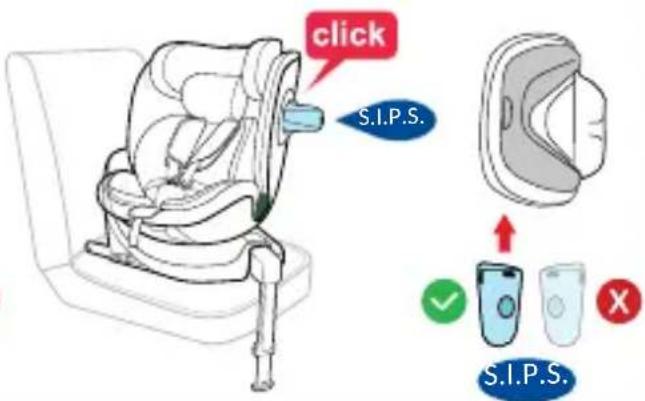
text_image
click S.I.P.S. S.I.P.S. ✓ X S.I.P.S.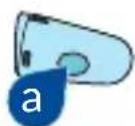
text_image
a a242
natural_image
Illustration of a hand using a tool to lift a car head (no text or symbols visible)
natural_image
Diagram of a device inserted into a chair, showing a knife inserted into a slot (no text or symbols present)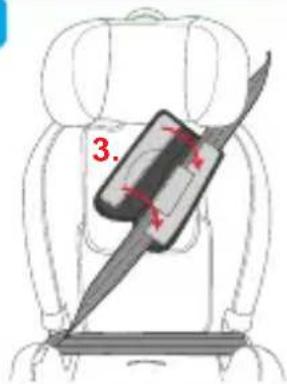
text_image
3.25C1
natural_image
Line drawing of a car seatbelt with a black bandage and a white stripe, no text or symbols present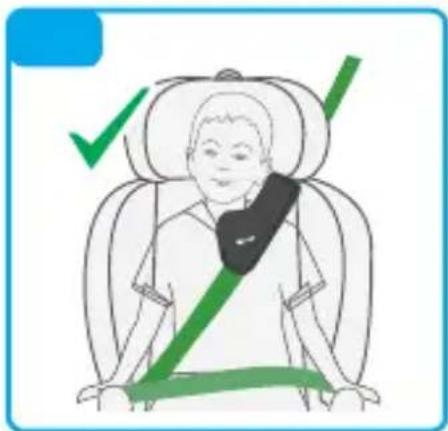
text_image
Diagram showing a person seated in a car seat with a green checkmark and arrow indicating safety or comfort.
text_image
Safety warning illustration showing four scenarios of a child wearing a seatbelt, with a red prohibition symbol indicating no liability.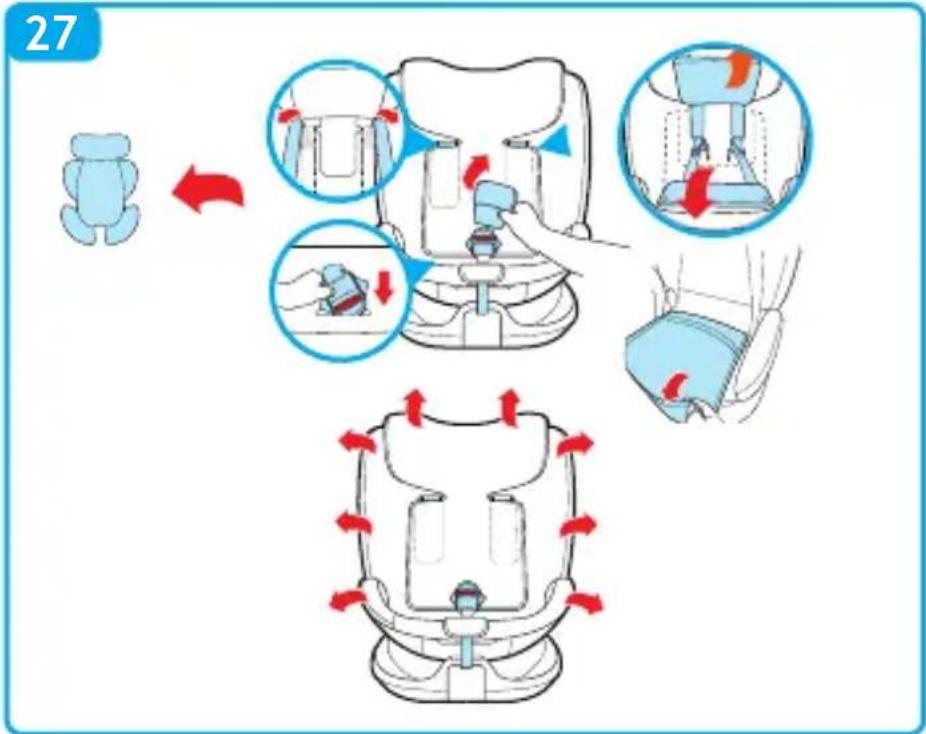
text_image
27INDICE
natural_image
Line drawing of a car seat assembly with labeled parts (no text or symbols present)

natural_image
Simple line drawing of a mechanical component or bracket (no text or symbols)9

natural_image
Simple line drawing of a green abstract shape with curved lines, no text or symbols present10

natural_image
Simple illustration of a brown baby or infant with no text or symbols11
natural_image
Anatomical illustration of human upper body and lower body with visible internal structures (no text or labels)5A
5B
text_image
Diagram showing a green checkmark and a green cable or cable tied at the bottom of a gray structure, with partial text visible on the right.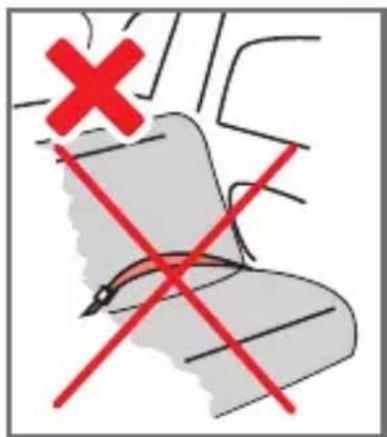
text_image
Diagram showing a cross symbol with red X and two intersecting red lines, possibly indicating a warning or rejection point.| Warnings | PAG 31 |
| Components | PAG 35 |
| Restrictions and requirements regarding the use of the product and vehicle seat | PAG 36 |
| Installation of ‘Disk i-Size’ rotating base component | PAG 38 |
| Fasten the car seat ‘Disk grow i-Size (type C010) for children 40-150 cm’ to the base | PAG 38 |
| Removing the ‘Disk grow i-Size (type C010) car seat for children 40-150 cm’ from the base | PAG 38 |
| 360° Seat rotation | PAG 38 |
| Reclining the seat | PAG 38 |
| Using the reducer | PAG 39 |
| Adjusting the height of the headrest and straps | PAG 39 |
| Adjusting the seat belt (harness) (From 76 cm to 105 cm) | PAG 40 |
| Using the buckle - (from 40 cm to 105 cm) | PAG 40 |
| Headrest adjustment | PAG 40 |
| Removing the harness (Storing the safety harness away) | PAG 40 |
| Placing the car seat in the rear-facing position(Children between 40 and 105 cm) | PAG 41 |
| Installation in the forward-facing position(Children between 76 and 105 cm) | PAG 42 |
| Installation in forward direction(Children between 100 and 150 cm) | PAG 43 |
| USE of additional side impact protection S.I.P.S. | PAG 45 |
| KID-PAD installation | PAG 45 |
| Removing the lining | PAG 45 |
| Maintenance and cleaning | PAG 46 |
| Formal guarantee | PAG 47 |
WARNINGS
ATTENTION:
- Before use, it is recommended that you carefully read the instructions, which you will need to follow strictly in order to have the highest levels of product safety.
- Store these instructions carefully for future reference. These instructions can be stored in the special compartment on the car seat during the period of use.
- Failure to follow the car seat installation instructions carefully could pose a risk to your baby.
- Do not use a car seat on the front seat where active airbags are fitted, as this can be dangerous. This risk does not apply to the side airbags.
- WARNING! Deactivate the passenger airbag when the child is in the front seat in the rear facing direction.
-
This car seat is approved according to the ECE R129/04 regulation for the transport of children between 40 cm and 150 cm in height, and can be installed:
-
In the rear-facing position (children between 40 and 105 cm in height), with the ISOFIX anchoring system + support leg.
- In the forward-facing position (children between 76 and 105 cm in height), with the ISOFIX anchoring system + support leg.
- In the forward-facing position (children between 100 and 150 cm in height), with the ISOFIX anchoring system + support leg + the vehicle 3-point seat belt.
- IMPORTANT: Do not use forward facing before the child's age exceeds 15 months.
- The car seat can be installed facing forward once the child is at least 76 cm tall.
- NOTICE: This is an i-Size Enhanced Child Restraint System. It is approved according to UN Regulation No. 129, for use in, i-Size compatible vehicle seating positions as indicated by vehicle manufacturers in the vehicle users' manual. If in doubt, consult either the Enhanced Child Restraint System manufacturer or the retailer.
- NOTICE: This is a i-Size booster seat Enhanced Child Restraint System. It is approved according to UN Regulation No. 129. for use primarily in “i-Size seating positions” as indicated by vehicle manufacturers in the vehicle user’s manual. If in doubt, consult either the Enhanced Child Restraint System manufacturer or the retailer.
- WARNING: NEVER leave your child unattended – your child's safety is your responsibility.
- WARNING: Adult assembly required.
- WARNING: The child car seat must be fitted in accordance with the manufacturer's instructions. Incorrect installation could be dangerous.
- WARNING: Always ensure that new or occasional users [e.g. grandparents] have read the instructions or been taught the correct installation by someone who has read and understood the instructions.
WARNINGS
- WARNING: Always keep this instruction manual with the child car seat, or in the vehicle in which you are carrying the child car seat. Some models of child car seat have a pocket to store the instructions.
- WARNING: If in doubt regarding the installation and correct use of the car seat, contact the manufacturer of the child restraint device.
BEFORE STARTING
- WARNING: Do not fit the child car seat in a rearward facing position
- WARNING: Before installing the child car seat ensure that the passenger seat you are using is locked in the upright position.
- WARNING: Do not use the child car seat in the home - it has only been designed to be used in the car.
- WARNING: Do not leave loose/unsecured objects on the back seat of your car or the parcel shelf. They may be dangerous to your child if you are forced to brake suddenly.
WHEN USING THE CHILD CAR SEAT
- WARNING: WARNING: Make sure that the child car seat is placed somewhere so that rigid items and plastic parts do not become trapped in doors or movable seat units when the seat is in everyday use.
- WARNING: Always use the vehicle's door child safety lock system, if one is available, to make it impossible for the child to open the car doors from inside.
- WARNING: Allow the child a break during long car journeys and make sure they don't get out of the car seat unaided and without supervision.
- WARNING: NEVER leave your child unattended – your child's safety is your responsibility.
- WARNING: Ensure that the child car seat is secured to the car seat at all times even when not in use.
- WARNING: The child car seat must be fitted securely to the passenger seat. Ensure that it is not loose or wobbly after you have fitted it.
- WARNING: The child seat shall not be used without the cover.
- WARNING: The seat cover should not be replaced with any other than the one recommended by the manufacturer, because the cover constitutes an integral part of the restraint performance.
- WARNING: Allow the child a break during long car journeys and make sure they don't get out of the car seat unaided and without supervision.
- WARNING: In the event of an emergency it is important to be able to release the
WARNINGS
child quickly (as defined by British Standards). This means that seat buckle cannot be fully tamper proof and you should actively discourage your child from playing with or using the buckle.
- You should actively discourage your child from playing with or using the buckle.
SEAT BELT
- WARNING: NEVER use any load bearing contact points other than those described in these instructions.
- WARNING: Ensure that the lap section of the seatbelt or harness is worn low down, so that pelvis is firmly engaged. The harness must be tight enough, the space between the pectoral belt and the child's chest must not be more than two fingers thick. The abdominal belt of the harness should be in the lowest possible position to adequately restrain the child's pelvis.
- WARNING: Make sure that ALL the passengers in your vehicle have their seatbelts fastened, as unrestrained people can be very dangerous to the child in an accident..
- WARNING: NEVER use a seatbelt routing scheme that differs from these instructions.
- WARNING: The lap and diagonal seatbelt must be used at all times when your child is in the child car seat.
SUNLIGHT/HOT DAYS
- WARNING: Do not leave your child in the child car seat while parked in direct sunlight or on a hot day.
- WARNING: Do not subject the child car seat to prolonged direct sunlight as this may be dangerous for your child (the metal and plastic fittings could become hot) and may cause the fabric to fade. You can reduce this problem by covering the child car seat with a sheet when not in use.
SECOND HAND OR DAMAGED CHILD CAR SEATS AND SEATBELTS
- WARNING: Never buy a second hand child car seat. It may have unseen damage.
- WARNING: The manufacturer only guarantees this product when the original owner uses it.
- WARNING: You MUST replace the child car seat and your vehicles seatbelts if they become badly worn or amaged.
- WARNING: You MUST replace the child car seat if it is involved in an accident it may have unseen damage and may not protect your child as well as it should. At the very least send the child car seat to your retailer for inspection, together with the
WARNINGS
accident report.
- The FOPPAPEDRETTI company declines all responsibility for improper use of the product and for any use that does not comply with these instructions.
IMPORTANT WARNING
The separately sold 'Disk i-Size' rotating base component is required to use the Disk grow i-Size product.
From 40 to 105 cm (i-Size universal ISOFIX)
- This is an i-Size Enhanced Child Restraint System. It is approved according to UN Regulation No. 129, for use in, i-Size compatible vehicle seating positions as indicated by vehicle manufacturers in the vehicle users' manual. "Disk grow i-Size with Disk i-Size" can be used in all i-Size seating positions and in any ISOFIX seating positions. If in doubt, consult either the Enhanced Child Restraint System manufacturer or the retailer.
- From 40 cm to 105 cm it must be installed on seats equipped with the Isofix System and support leg.
From 100 cm to 150 cm (i-Size booster seat)
- This is a i-Size booster seat Enhanced Child Restraint System. It is approved according to UN Regulation No. 129, for use primarily in “i-Size seating positions” as indicated by vehicle manufacturers in the vehicle user’s manual. “Disk grow i-Size with Disk i-Size” can be used in all i-Size seating positions and, it can be used also in any UNIVERSAL seating position provided that it does not conflict with the interior of the car. If in doubt, consult either the Enhanced Child Restraint System manufacturer or the retailer.
- WARNING! When using the 3-point adult safety belt, make sure that the lap portion is positioned correctly on the pelvic area.
text_image
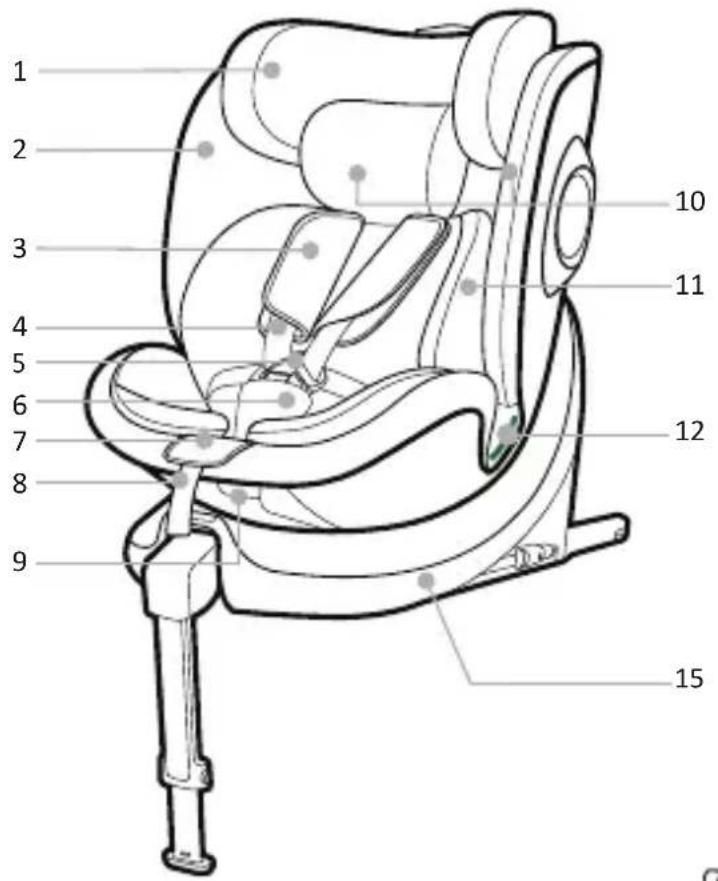
1 2 3 4 5 6 7 8 9 10 11 12 15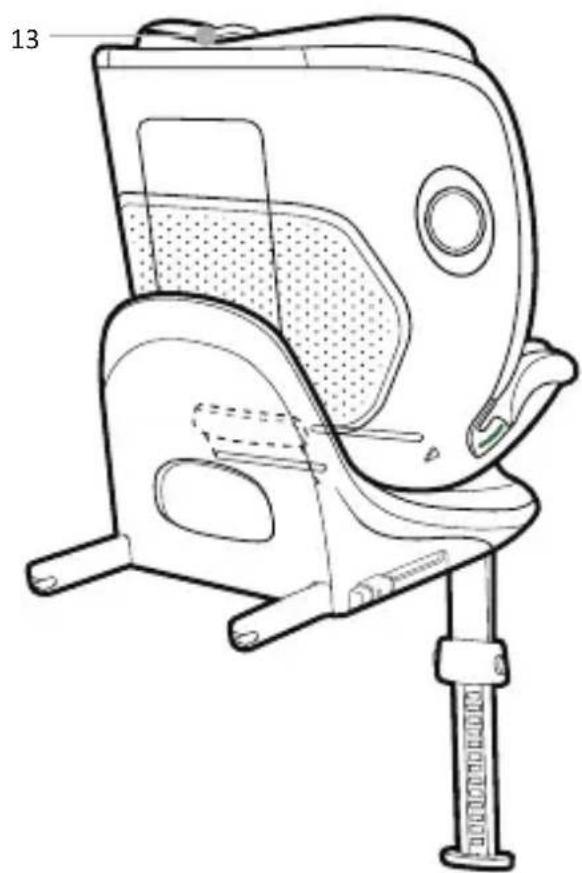
natural_image
Line drawing of a car seat assembly with labeled part 13 (no text or symbols on the diagram itself)
natural_image
Simple line drawing of a mechanical component or bracket (no text or symbols)9
natural_image
Simple line drawing of a green abstract shape with curved lines, no text or symbols present10
natural_image
Simple illustration of a stylized human figure in brown outline, no text or symbols present11

natural_image
Anatomical illustration of human upper body and lower body with internal organs (no text or labels)5A
5B
- Headrests
- Covering
- Chest belt protection
- 5-point seat belt
- Buckle (5A Buckle points, 5B Buckle button)
- Inguinal protection
- Shoulder strap adjustment button
- Shoulder strap adjustment strap
- Lever for reclining the seat
-
Guide loop for chest belt
-
Reducer
- Guide loop for lap belt
- Lever for headrest height adjustment
- S.I.P.S-System (Additional side impact protection)
- Disk i-Size rotating base required for car seat use (sold separately)
USE IN THE VEHICLE
RESTRICTIONS AND REQUIREMENTS REGARDING THE USE OF THE PRODUCTAND VEHICLE SEAT
WARNING! Follow the restrictions at all times:
- This child car seat can be installed so that it faces opposite of the car driving direction. The car seat can be installed in the rear facing position when the height of the child is between 40 cm and 105 cm. The car seat can be installed
- facing forward once the child is at least 76 cm tall.
- IMPORTANT! Do not use forward facing before the child's age exceeds 15 months.
- WARNING! Deactivate the passenger airbag when the child is in the front seat in the rear facing direction.
- The car seat can be used on all i-Size approved vehicle seats (check the vehicle's instruction manual) and on seats of vehicles included in the "Vehicle compatibility list" given with the car seat.
- The vehicle seat must be forward facing. Never use this car seat on vehicle seats facing the sides or opposite to the direction of the driver's seat.
| CAR SEAT | GROUP ORIENTATION INSTALLATION METHODS TYPE | |||
| Disk grow i-Size + Disk i-Size | 40 - 105 cm | Rear-facing | ISOFIX + support leg | i-Size |
| 76 - 105 cm | Forward-facing | ISOFIX + support leg | i-Size | |
| 100 - 150 cm | Forward-facing | ISOFIX + support leg + 3-point Seat Belt | i-Size booster seat | |
natural_image
Diagram showing a green checkmark and a blue checkmark on a gray mechanical component (no text or symbols)
text_image
Diagram showing a crosshair symbol with red X and diagonal lines, indicating a threshold or exclusion point.The car seat can be fitted only if the vehicles considered as suitable are equipped with 3-point seat belts approved pursuant to Regulation UN/ECE n.16 or other equivalent standards
USE IN THE VEHICLE
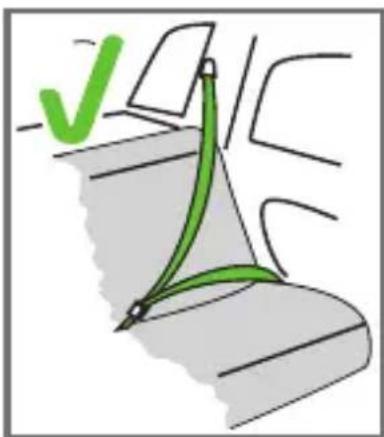
THE CAR SEAT CAN BE INSTALLED AS SHOWN IN THE FIGURE:
| • Forward-facing | YES |
| • Rear-facing | YES |
| • With a 2-point seat beltThe use of two-point seat belts significantly increases the risk of injury to the child in the event of an accident. | NO |
| • With a 3-point seat beltThe seat belt must be approved according to the ECE R16 regulation or other equivalent standards | YES |
| • With the ISOFIX and support leg | YES |
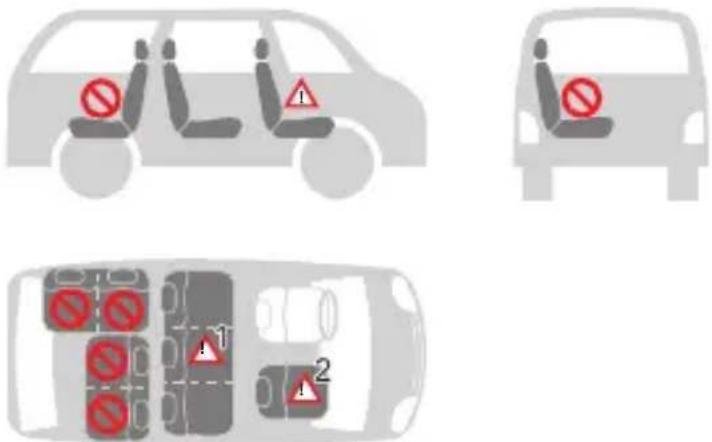
| • On the front passenger seatDO NOT USE ON PASSENGER SEATS EQUIPPED WITH ACTIVE FRONT AIRBAGS!The car seat can be attached to the front passenger seat using the ISOFIX systems, or alternatively without these, by following the same warnings as for these systems (slide the passenger seat backwards and consult the instructions in the vehicle user manual). | YES ^2 |
| • On the two rear side passenger seat | YES |
| • On the rear centre passenger seatThe car seat can be used on the central rear passenger seat if it is equipped with a three-point seat belt. | YES ^1 |
(You must comply with local regulations in force in your country of residence).
USE IN THE VEHICLE
IMPORTANT: The separately sold 'Disk i-Size' rotating base component is required to use the Disk grow i-Size product.
Installation of 'Disk i-Size' rotating base component (fig. 1, fig. 2, fig. 3, fig. 4)
See Disk i-Size rotating base user manual.
FASTEN THE CAR SEAT 'Disk grow i-Size (type C010) for children 40-150 cm' to the BASE
Make sure the rotating base is oriented as in the figure, with the car seat release lever 'a' facing the anti-rebound bar (vehicle seat backrest side) (fig. 5)
Position the car seat, facing the direction of travel, on the ISOFIX base (Fig. 6).
Press down on the base to engage it, a click will indicate successful engagement (fig. 7).
IMPORTANT: After attaching the seat to the base, the control indicator 'b' on the front of the ISOFIX base should change from red to green on both sides to indicate correct attachment (fig. 7).
Lift the car seat to check that it is correctly engaged/locked and that all the attachments are correctly engaged, both the front metal bar 'c' and the rear metal bar 'd'. Check that the indicators have changed from red to green.
REMOVING THE 'Disk grow i-Size (type C010) car seat for children 40-150 cm' from the BASE
Recline the seat to the upright position;
Press the car seat release lever (a) and at the same time raise the car seat (Fig. 8).
TIP! In the case of daily use, the ISOFIX base can be left mounted in the vehicle by simply removing the seat.
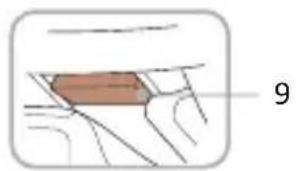
360° SEAT ROTATION
The 360-degree rotation of the seat makes it easy to change the direction to forwardfacing or rear-facing and facilitates the process of putting the child in the car seat and removing them. Pull the rotation lever (fig. 9) and rotate the seat towards the door, to place your child in the car seat easily. To secure the child, see section “Harness adjustment”. Rotate the seat into the forward-facing or rear-facing position, and a click will indicate that it has locked in place correctly.
RECLINING THE SEAT
The seat of the car seat can be reclined in multi-positions.
To adjust the tilt: Press the adjustment handle "e" located under the front of the car seat and, holding it down, pull or push the seat forwards or backwards. Release the handle when the seat is in the desired position and make sure that it is locked correctly; you will hear a "click" when the seat has attached (fig. 10).
USE IN THE VEHICLE
(Fig. 10A) In the rear-facing position (children between 40 and 105 cm in height):
the seat of the car seat can be reclined in 4 different positions (5-6-7-8);
(Fig. 10B) In the forward-facing position (children between 76 and 105 cm in
height): the seat of the car seat can be reclined in 4 different positions (1-2-3-4);
(Fig. 10C) In the forward-facing position (children between 100 and 150 cm in
height): the seat may only be used in the upright position, position 1.
USING THE REDUCER
The seat reducer is designed for use with children, to ensure greater comfort and stability and provide a more reclined position, preventing their head from falling forwards.
The reducer must be used until the child reaches 75 cm (fig. 11).
ADJUSTING THE HEIGHT OF THE HEADREST AND STRAPS
Adjusting the headrest correctly ensures maximum protection for your child when inside the car seat.
From 40 to 105 cm: When using the 5-point harness, the headrest must be adjusted so that there is a 1-finger (1 cm) space between the shoulder straps and the top of the shoulders.
IMPORTANT: Loosen the shoulder straps before adjusting the headrest. Adjusting the straps to a position lower or higher than the child's shoulders can compromise your child's safety.
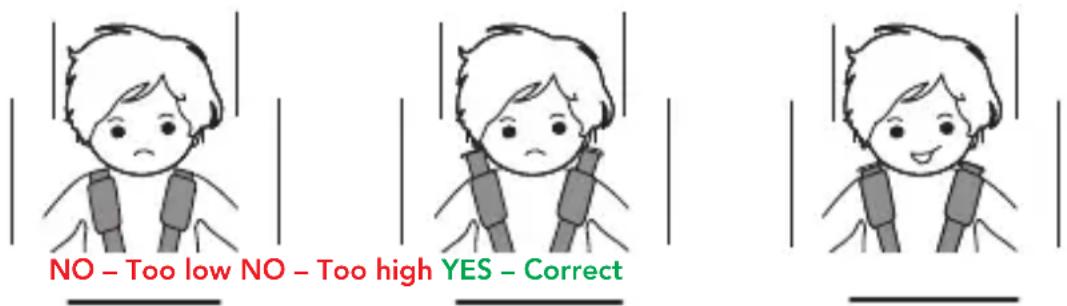
text_image
NO - Too low NO - Too high YES - CorrectFrom 100 to 150 cm: When using the 3-point vehicle seat belt, the headrest must be adjusted so that there is a two-finger space between the headrest and the child's shoulders. Make sure that the diagonal belt, when passing through the "diagonal belt guide loop" on the side of the headrest, is positioned at the shoulders and not at the child's neck.
USE IN THE VEHICLE
text_image
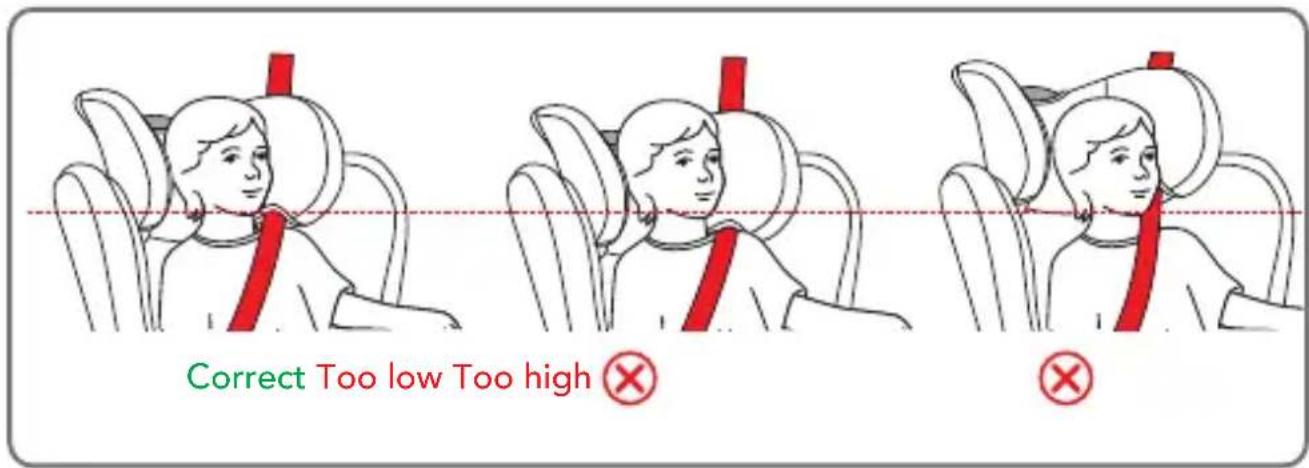
Correct Too low Too high ✗ ✕ADJUSTING THE SEAT BELT (HARNESS) (From 76 cm to 105 cm)
To loosen the harness: Press the adjustment button and at the same time grip the straps (chest belts "b") at the bottom, under the pads of the chest protectors, and pull them forwards to loosen them (fig. 12).
IMPORTANT: Do not pull on the shoulder pads.
Tightening the harness: Pull the harness adjustment strap so as to tighten it properly against the body of the child (fig. 13). The harness is correctly tightened when the gap between the harness and the child is no greater than the thickness of your finger (1 cm). NOTE: check that the buckle is secured by tugging the shoulder and waist straps.
ATTENTION: Do not twist or overlap the harness straps.
USING THE BUCKLE - (From 40 cm to 105 cm / From 76 cm to 105 cm)
To attach the buckle: Hold together the central buckle tabs (fig. 14A, 14B) and insert them in the special slot inside the harness buckle. A "click" will indicate that it has attached correctly (fig. 14C).
To release the buckle: Press the red button to remove the tabs from the central buckle (fig. 14D, 14E).
HEADREST ADJUSTMENT
The headrest can be adjusted to different heights. Pull the handle of the adjustment (a) and raise or lower the headrest to the correct position (fig. 15).
For children from 40 cm to 105 cm the headrest adjustment also adjusts the height of the shoulder straps and the headrest must be adjusted so that there is a 1 finger (1 cm) gap between the shoulder straps and the top of the shoulders.
REMOVING THE HARNESS (Storing the safety harness away)
When the child reaches a height of 100 cm, the 5-point seat belt must be put away and the child secured with the 3-point adult seat belt supplied with the vehicle.
- Completely loosen the shoulder straps, see paragraph "ADJUSTING THE SEAT BELT (HARNESS) (Children from 40 cm to 105 cm / from 76 cm to 105 cm)".
USE IN THE VEHICLE
- Press the red button on the central buckle to release the shoulder straps;
- Remove the buckle protection padding (a) and store it in a safe place or place it behind the back fabric with the chest straps. If present, remove the reducer (b);
- Unhook the elastic flaps on the upper side of the back fabric from the plastic frame (c);
- Pull the pectoral belts (d) out of the plastic hook;
- Position the shoulder straps behind the back fabric;
- Pull the buckle (e) inwards out of the fabric and upholstery loop, lift the seat cover and place the buckle in the storage compartment (f);
- Hook the tips into the buckle (g);
- Close the container compartment, correctly replace the inner upholstery on the seat, replace the fabric on the seat;
- Position the back fabric correctly and hook the elastic flaps on the upper side of the back fabric onto the plastic frame.
PLACING THE CAR SEAT IN THE REAR-FACING POSITION (Children between 40 and 105 cm in height, ISOFIX + support leg + harness)
WARNING! The child car seat must be installed in the rear facing position until the child is older than 15 months. The rear-facing position remains the safest, even after exceeding this limit, and it is therefore advisable to use the car seat facing backwards for as long as possible.
Use the reducer (a) with children up to a height of 75 cm.

DO NOT install the car seat on the passenger seat with an active airbag: this cause SERIOUS, OR EVEN FATAL, INJURY.
- Ensure that the support leg is positioned correctly, see Disk i-Size turntable instructions.
- Ensure that the ISOFIX connectors on the Disk i-Size base are correctly engaged, and that the base is correctly positioned on the vehicle seat, see Disk i-Size rotating base instructions.
- Make sure the seat is correctly attached to the rotating base, see paragraph 'ATTACHING THE CAR SEAT "Disk grow i-Size (type C010) for children 40-150 cm" to the BASE'.
Pull the rotation lever and place the car seat in the rear-facing position. Make sure that it is locked (fig. 17A, 17B).
USE IN THE VEHICLE
NOTE: before use, check that the ISOFIX connectors are correctly attached on both sides, when pulling the car seat, they must not detach.
WARNING: Do not place the front support leg on a storage compartment located on the floor of the vehicle. The support leg must rest on a stable and secure surface on the floor of the vehicle.
WARNING: Make sure that the support leg does not lift the car seat up from the vehicle seat.
Use
Pull the rotation lever and rotate the seat towards the door, to place your child in the car seat easily (fig. 17A).
Place the child in the seat and secure him/her correctly with the 5-point-belt, see section 'ADJUSTING THE SECURITY BELTS, SEAT (Children between 40 and 105cm / 76-105cm) ", and section "ADJUSTING THE HEADREST".
Pull the swivel lever and turn the seat of the seat in the opposite direction to the driving direction. Make sure it is locked (Fig. 17A, 17B).
ATTENTION: Before travelling, ensure that the seat is locked in the rear-facing direction by trying to rotate the seat without pulling the rotation release lever. Do not use other seat positions.
INSTALLATION IN THE FORWARD-FACING POSITION
(Children between 76 and 105 cm in height, ISOFIX + support leg + harness)
WARNING! Using the car seat in the rear-facing position is mandatory for a child up to 15 months of age and 76 cm in height. The rear-facing position remains the safest, even after exceeding this limit, and it is therefore advisable to use the car seat facing backwards for as long as possible.
- Ensure that the support leg is positioned correctly, see Disk i-Size turntable instructions.
- Ensure that the ISOFIX connectors on the Disk i-Size base are correctly engaged, and that the base is correctly positioned on the vehicle seat, see Disk i-Size rotating base instructions.
- Make sure the seat is correctly attached to the rotating base, see paragraph 'ATTACHING THE CAR SEAT "Disk grow i-Size (type C010) for children 40-150 cm" to the BASE'.
Pull the rotation lever and place the car seat in the forward-facing position. Make sure that it is locked (fig. 18A, 18B).
USE IN THE VEHICLE
NOTE: before use, check that the ISOFIX connectors are correctly attached on both sides, when pulling the car seat, they must not detach.
WARNING: Do not place the front support leg on a storage compartment located on the floor of the vehicle. The support leg must rest on a stable and secure surface on the floor of the vehicle.
WARNING: Make sure that the support leg does not lift the car seat up from the vehicle seat.
Use
Pull the rotation lever and rotate the seat towards the door, to place your child in the car seat easily (fig. 18A).
Place the child in the seat and secure him/her correctly with the 5-point-belt, see paragraph 'ADJUSTING THE SAFETY BELTS, BELTING (Children between 40 and 105cm / 76-105cm) ", and paragraph "ADJUSTING THE'.
Pull the swivel lever and turn the seat of the seat in the forward direction. Make sure it is locked (Fig. 18A, 18B).
ATTENTION: Before travelling, ensure that the seat is locked in the forward direction by trying to rotate the seat without pulling the rotation release lever. Do not use other seat positions.
INSTALLATION IN FORWARD DIRECTION
(Children between 100 and 150 cm, ISOFIX + Support leg + 3-point belt in vehicle)
When the child reaches a height of 100 cm, the 5-point seat belt must be put away and the child secured with the 3-point adult seat belt supplied with the vehicle.
- Ensure that the support leg is positioned correctly, see Disk i-Size turntable instructions.
- Ensure that the ISOFIX connectors on the Disk i-Size base are correctly engaged, and that the base is correctly positioned on the vehicle seat, see Disk i-Size rotating base instructions.
- Make sure the seat is correctly attached to the rotating base, see paragraph 'ATTACHING THE CAR SEAT "Disk grow i-Size (type C010) for children 40-150 cm" to the BASE'.
- Remove the 5-point seat belt, see section 'REMOVING THE SEAT BELT (Storing seat belts)'.
Pull the rotation lever and place the car seat in the forward-facing position. Make sure that it is locked (fig. 19A, 19B).
USE IN THE VEHICLE
NOTE: before use, check that the ISOFIX connectors are correctly attached on both sides, when pulling the car seat, they must not detach.
WARNING: Do not place the front support leg on a storage compartment located on the floor of the vehicle. The support leg must rest on a stable and secure surface on the floor of the vehicle.
WARNING: Make sure that the support leg does not lift the car seat up from the vehicle seat.
Use
Adjust the seat to the upright position, see section 'ADJUSTING THE SEAT'.
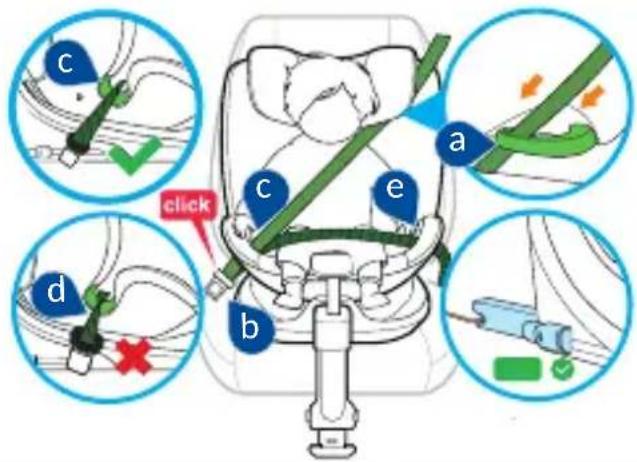
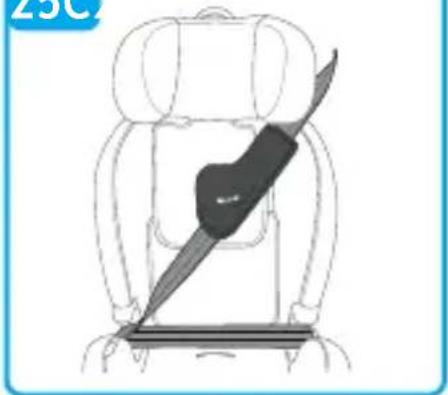
Pass the pectoral part of the 3-point-belt behind the headrest of the car seat and through the green pectoral belt loop guide (a) on the lower part of the headrest, on the retractor side (fig. 20).
Place the child in the car seat. Adjust the headrest to the child's height, make sure that the headrest is locked correctly in the chosen position, see paragraph 'ADJUSTING HEIGHT OF HEADREST AND BRACKETS' and paragraph 'ADJUSTING THE HEADREST'.
Pull out the 3-point seat belt of the vehicle and, passing it over the front of your child, attach the vehicle's seat belt by inserting the tip into the buckle (b). A "click" will indicate that it is attached correctly (fig. 20).
Insert the diagonal belt and the lap belt into the lower loop from the side near the fastening buckle of the vehicle's seat belt (c) (fig. 20). Making sure it is not twisted. (d) (fig. 20).
Insert the lap belt on the opposite side of the car seat into the lap belt loop (e) (fig. 20).
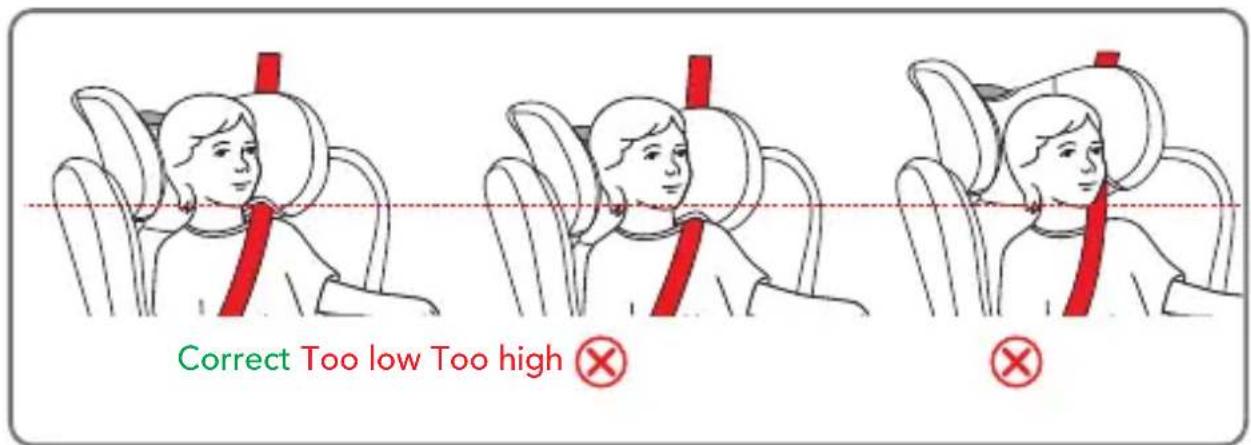
WARNING! The lap belt must run as low as possible over your baby's pelvis. Insert the diagonal belt into the belt guide loop (a), making sure it is not twisted.
text_image
Correct Too low Too high ✗ ✕USE IN THE VEHICLE
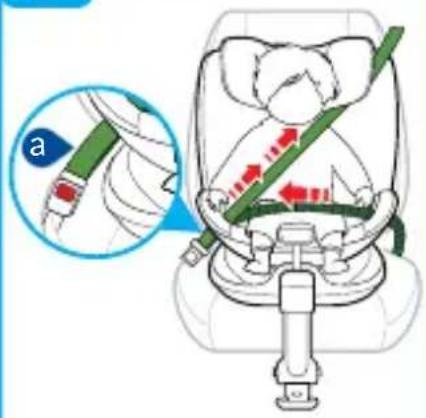
NOTE: When using the 3-point vehicle seat belt, the headrest must be adjusted so that there is a two-finger space between the headrest and the child's shoulders. Make sure that the diagonal belt, when passing through the "diagonal belt guide loop" on the side of the headrest, is positioned at the shoulders and not at the child's neck.
Tighten the belt as shown in the figure 53. Make sure that you have positioned the lap belt as low as possible on the child's pelvis, and that it has been inserted in the belt guides of the lap seat belt and that you have correctly attached the buckle. The diagonal belt must pass through the diagonal belt guide. Ensure that the vehicle's 3-point belt is not twisted (a).
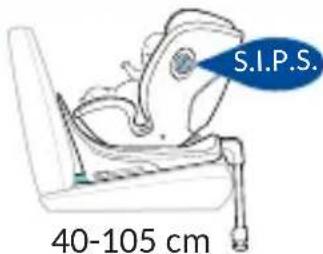
USE of additional side impact protection S.I.P.S.
It is possible to have more protection against side impacts by applying the S.I.P.S. protection on the side of the car seat on the door side.
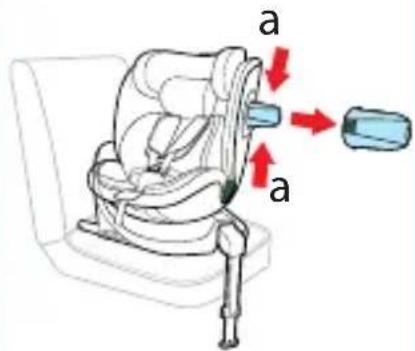
Engagement: Press to insert the S.I.P.S. protection into the 'SAFE BODY PROTECTION' slot facing the door side of the vehicle (fig. 22)
Unlocking: Press buttons 'a' simultaneously and pull outwards to remove the S.I.P.S. protection (fig.23).
KID-PAD INSTALLATION
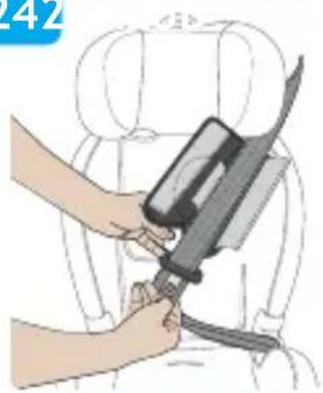
The KID-PAD is a device that must ALWAYS be installed on the diagonal vehicle seat belt to ensure proper protection in the event of an impact.
Position the diagonal belt under the two Velcro straps of the KID-PAD (fig. 24), close the KID-PAD on itself (fig. 25) making sure that the shaped part is positioned between the chin and the chest of the child (fig. 26).
WARNING! The KID-PAD must ALWAYS be used.
REMOVING THE LINING (fig. 27)
Loosen the harness and remove the reducer if it is being used.
Lift up the headrest to the highest position.
Remove it, carefully pulling the fabric off from the headrest.
Remove it, carefully pulling the fabric off from the frame, starting from one side, being careful while removing the fabric from the lap belt guide.
Remove the leg separator harness from the lining and take off the fabric.
To put the lining back on, follow the reverse procedure.
MAINTENANCE AND CLEANING
MAINTENANCE AND CLEANING
Only use original linings, as these components are of fundamental importance for the device to function correctly. Do not use the car seat without the lining.
Cleaning
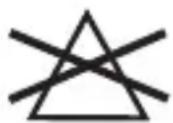
The lining can be removed and washed in a washing machine with a mild detergent, using the delicate fabric cycle (30°C). Follow the washing instructions shown on the label. The colours may fade if washed at temperatures above 30°C. Never spin dry or tumble dry (as the fabric could become detached from the padding).
The plastic parts may be cleaned with water and soap. Do not use harsh detergents (such as solvents).
MAINTENANCE AND CLEANING
IMPORTANT: The lining is a fundamental component for your child's safety. Never use the car seat without the lining, nor replace it with other products which have not been approved, so as to avoid endangering the child's safety or compromising the proper functioning of the device.
Washing instruction:
The lining can be removed, washed at 30^ C and hung out to dry.
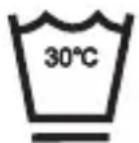
Washing machine
cold water
Do not
bleach

No dry
cleaning

tumble dry
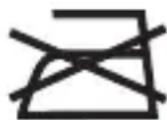
Do not ironDo not
The contents of this document as stated below will come into effect as from 01.01.2005 and replace, on every account and in full, any previous message referring to the guarantee provided by Foppa Pedretti S.p.A.
FORMAL GUARANTEE
Foppa Pedretti S.p.A. the head office of which is located at n. 11 Via Volta, Grumello del Monte (Italy), guarantees directly to the Consumer that this brand new product is free of faults with regard to the materials, design and manufacture and that it complies with the characteristics as declared by the manufacturer. This formal guarantee is valid in all Member Countries of the European Union and it neither excludes nor limits the Consumer's rights in accordance with mandatory measures provided for by the law with regard to the Retailer of the Product.
To take advantage of this formal guarantee, the Consumer must return the faulty product to the Retailer, presenting to the same the proof of purchase of the Product which must clearly show the Retailer's address, the date of purchase of the Product with the Retailer's stamp and signature and an indication of the Product itself or, alternatively, the receipt which must not have been altered and which must clearly show the same information as that referred to above.
The formal guarantee is valid for twelve (12) months from the date of purchase of the Product. During this period, Foppa Pedretti S.p.A. will repair or replace the faulty product, at its own discretion. The formal guarantee is granted to the end buyer of the Product (Consumer) and it neither excludes nor limits the mandatory rights of the Consumer as provided for by the law and/or the rights that the Consumer may have with regard to the Dealer/Retailer of the Product.
EXCLUSIONS TO THE FORMAL GUARANTEE.
The formal guarantee is excluded in the case of damage caused to the Product for the following reasons: if the product is used in a way that does not comply with the information contained in the use and assembly instruction sheet, if the product is knocked or dropped, if the Product is exposed to humidity or extreme heat or environmental conditions, or to sudden changes in the same, corrosion, oxidization, unauthorized alterations or repairs to the Product, repairs using unauthorised spare parts, improper use, improper maintenance or failure to carry out the same, improper maintenance compared to the information given on the use and assembly instruction sheet, incorrect assembly, accidents, damage caused by food or drink, damage caused by chemical products, cases of force majeure.
In any case, Foppa Pedretti S.p.A. declines all responsibility for damage caused to persons or to property, other than the Product, when such damage is caused by a failure to comply with the instructions/advice/warnings cont a ined in the manua I or, alternatively, in the use and assembly instruction sheet provided with each Product for the owner/user. (Purely as an example, in the case of a cot: "Check your baby constantly. Make sure that the sheets and blankets do not cover the baby's head...").
Furthermore, Foppa Pedretti S.p.A. declines all responsibility for damage to persons and to property when the breakage of its products is due to a deterioration in the components of the Product that are subject to wear. All the components of the Product made of plastic are considered to be components subject to wear.
INDICE
natural_image
Line drawing of a car seat assembly with labeled part 13 (no text or symbols on the diagram itself)

natural_image
Simple line drawing of a mechanical component or bracket (no text or symbols)9

natural_image
Simple line drawing of a green abstract shape with curved lines, no text or symbols present10

natural_image
Simple illustration of a stylized human figure in brown outline, no text or symbols present11

natural_image
Anatomical illustration of human upper body and lower back, showing internal organs (no text or labels)5A
5B
text_image
Diagram showing a green checkmark and a blue checkmark on a mechanical component with labeled parts and arrows indicating motion or force.
text_image
Safety warning symbol with red X mark and crossed lines indicating blocked safetytext_image
Correct Trop basses Trop hautesRÉGLAGE DES CEINTURES DE SÉCURITÉ, HARNAIS (De 40 cm a 105 cm / 76-105cm)
text_image
Correct Trop basses Trop hautesEXCLUSIONS DE LA GARANTIE CONVENTIONNELLE.
natural_image
Line drawing of a car seat assembly with labeled parts (no text or symbols present)

natural_image
Simple line drawing of a mechanical component or bracket (no text or symbols)9

natural_image
Simple line drawing of a green abstract shape with curved lines, no text or symbols present10

natural_image
Simple illustration of a stylized human figure in brown outline, no text or symbols present11

natural_image
Anatomical illustration of human upper body and lower back, showing internal organs (no text or labels)5A
5B
text_image
Diagram showing a green checkmark and a blue checkmark on a mechanical component with labeled parts and arrows indicating motion or force.
text_image
Diagram showing a crosshair symbol with red X and diagonal lines, possibly indicating a warning or error.natural_image
Line drawing of a car seat assembly with labeled parts (no text or symbols present)
natural_image
Illustration of a hand holding a small object, possibly a tool or device, with no visible text or symbols.
natural_image
Simple green oval shape with a curved line inside, labeled '10' (no text or symbols on the shape itself)
natural_image
Simple illustration of a stylized human figure with no text or symbols
text_image
5A 5Bnatural_image
Diagram showing a green checkmark on a curved surface with no text or symbols
text_image
Diagram showing a cross symbol with red X and diagonal lines intersecting, likely indicating a medical or safety hazard.Dos 100 cm ate os 150 cm (i-Size booster seat)
natural_image
Line drawing of a car seat assembly with labeled parts (no text or symbols present)
natural_image
Simple line drawing of a hand holding a rectangular object, no text or symbols present9
natural_image
Simple line drawing of a green abstract shape with curved lines, no text or symbols present10

natural_image
Simple illustration of a brown anatomical structure resembling a seated human figure (no text or symbols)11

natural_image
Anatomical illustration of human upper body and lower body with visible bones (no text or labels)5A
5B
text_image
Diagram showing a green checkmark and a blue checkmark on a mechanical component with arrows indicating motion or force.
text_image
Diagram showing a crosshair with red X marks and a diagonal line crossing, likely indicating a threshold or selection of an object.text_image
Diagram showing three car safety zones with no-dominant traffic signs and warning symbols, likely for vehicle safety or hazard detection.
natural_image
Line drawing of a car seat assembly with labeled parts (no text or symbols present)

natural_image
Simple line drawing of a mechanical component or bracket (no text or symbols)9

natural_image
Simple line drawing of a green abstract shape with curved lines, no text or symbols present10
natural_image
Simple illustration of a brown baby or infant with no text or symbols11

natural_image
Anatomical illustration of human upper body and lower body with internal organs (no text or labels)5A
5B
text_image
Diagram showing a green checkmark on a mechanical component with arrows indicating motion or force direction.
text_image
Diagram showing a crosshair symbol with red X and diagonal lines, likely indicating a medical or safety hazard.text_image
Diagram showing three car safety zones with no-dominant symbols and warning signs, likely for vehicle safety or hazard detection.
natural_image
Line drawing of a car seat assembly with labeled parts (no text or symbols present)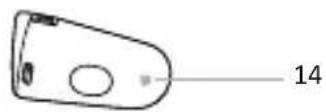

natural_image
Illustration of a hand holding a small object, possibly a tool or device, with no visible text or symbols.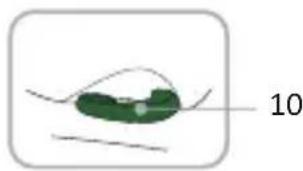
text_image
10
natural_image
Illustration of a stylized human figure with no text or symbols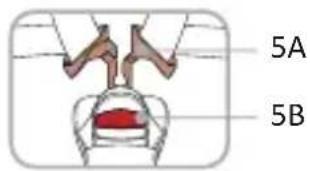
text_image
5A 5Btext_image
Diagram showing a green checkmark and a green ribbon on a mechanical component with labeled parts and arrows
text_image
Safety warning symbol with red X mark and crossed lines indicating blocked safetynatural_image
Line drawing of a car seat assembly with labeled parts (no text or symbols present)
natural_image
Simple line drawing of a rectangular object inside a container (no text or symbols)9

natural_image
Simple line drawing of a green abstract shape with curved lines, no text or symbols present10

natural_image
Simple illustration of a brown baby or infant with no text or symbols11

natural_image
Anatomical illustration of human upper body and lower body with visible internal structures (no text or labels)5A
5B
text_image
Diagram showing a green checkmark and a blue checkmark on a mechanical component with arrows indicating motion or force.