
HB35C - Food Processor Duronic - Free user manual and instructions
Find the device manual for free HB35C Duronic in PDF.
| Brand | Duronic |
| Model | HB35C |
| Product type | Food processor (multifunction immersion blender) |
| Power supply | 220-240 V, 50-60 Hz |
| Power | 350 W |
| Rotation speed | 13 500 rpm |
| Measuring cup capacity | 600 ml |
| Chopper bowl capacity | 500 ml |
| Spiralizer container capacity | 1.4 L |
| Cable length | 150 cm |
| Main functions | Blend, chop, whisk, puree, spiralize |
| Included accessories | Immersion blender, chopper, whisk, potato masher, spiralizer with 3 cones, 2 measuring cups with lids |
| Blade material | Stainless steel |
| Container material | BPA-free plastic |
| Maximum ingredient temperature | 70 °C |
| Maximum continuous use time | 3 minutes |
| Required cooling time | 15 minutes |
| Safety | Automatic shutdown in case of overheating, accessory locking |
| Maintenance | Clean after each use; wipe motor unit with a damp cloth, accessories washable with water |
| Warranty | 2-year manufacturer warranty |
Frequently Asked Questions - HB35C Duronic
User questions about HB35C Duronic
0 question about this device. Answer the ones you know or ask your own.
Ask a new question about this device
Download the instructions for your Food Processor in PDF format for free! Find your manual HB35C - Duronic and take your electronic device back in hand. On this page are published all the documents necessary for the use of your device. HB35C by Duronic.
USER MANUAL HB35C Duronic
HB35B, HB35C, HBA35, HBS35 Hand Blender
PLEASE READ ALL THE INSTRUCTIONS BEFORE USE

duronic.com

duronic

@duronicmedia

Duronic

@duronicmedia
Contents
English Manual 3
Features and Specifications
| Cable Length | RPM Capacity | Power Voltage | ||
| 150cm 59in | 13500 RPM | Jug: 600ml Chopper: 500ml Spiralizer: 1.4L | 350W | 220-240V 50-60Hz |
Components
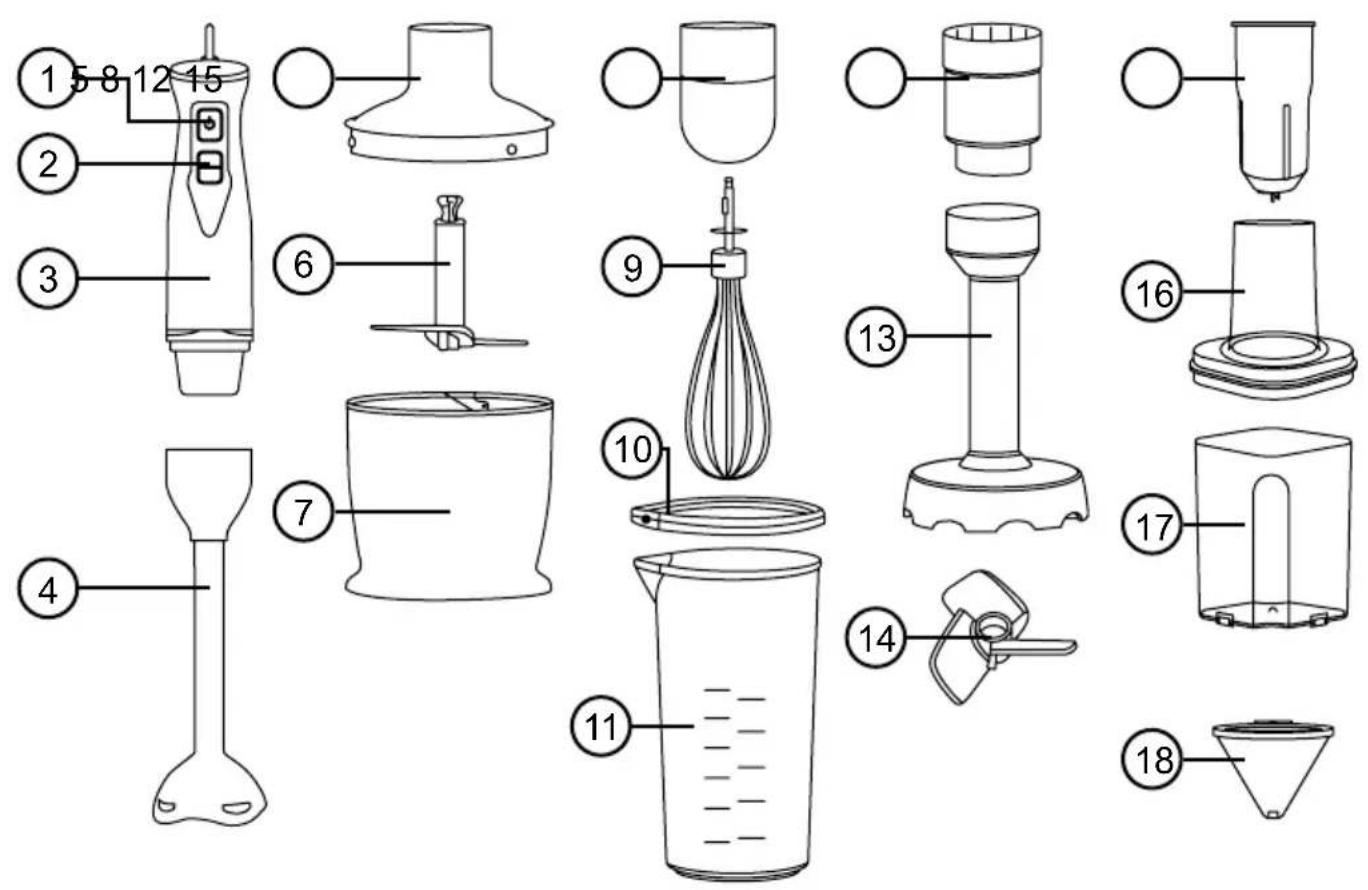
- On/off button
- Turbo button
- Motor unit
- Immersion blender shaft
- Chopper bowl lid
- Chopper blade
- Chopper bowl
- Whisk coupling
-
Whisk
-
Measuring jug lid
- Measuring jug
- Masher coupling
- Masher
- Masher blade
- Spiralizer coupling/pusher
- Spiralizer chute and locking lid
- Spiralizer container
- Spiralizer cones x 3
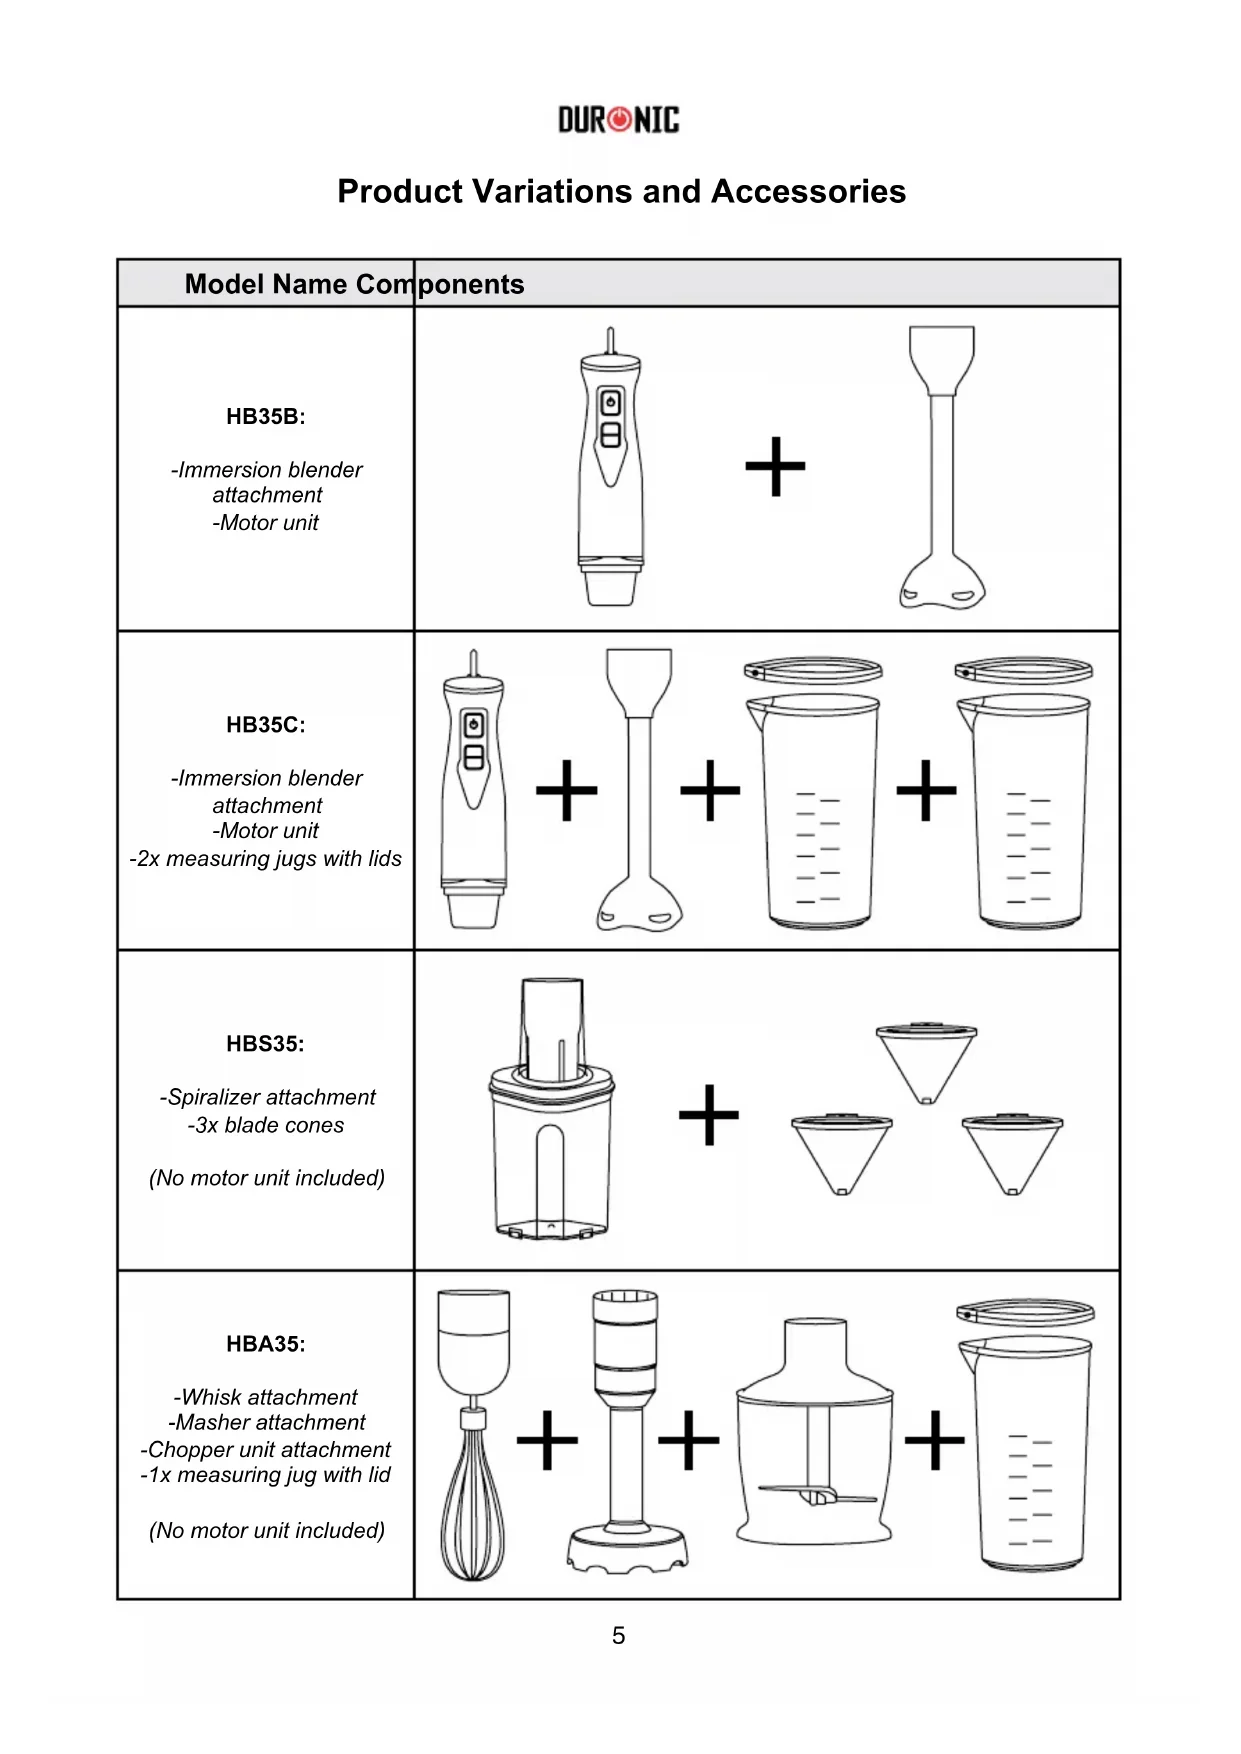
Product Variations and Accessories
| Model Name Com ponents | |
| HB35B: -Immersion blender attachment -Motor unit | + |
| HB35C: -Immersion blender attachment -Motor unit -2x measuring jugs with lids | + + + + + |
| HBS35: -Spiralizer attachment -3x blade cones (No motor unit included) | + + + + |
| HBA35: -Whisk attachment -Masher attachment -Chopper unit attachment -1x measuring jug with lid (No motor unit included) | + + + + + |
DURONIC
Safety Information
PLEASE READ THIS MANUAL CAREFULLY AND RETAIN FOR FUTURE REFERENCE
- Use the appliance solely for its intended purpose and adhere to all procedures outlined within this manual.
- Avoid contact with water during use and never immerse appliances, mains cable, or plug in water or any liquid to prevent electric shock.
- Don't touch the appliance with wet hands.
- Intended for indoor use only.
- Ensure appliances are used on a flat and level surface.
- Always unplug the appliance before moving, filling, cleaning, or when not in use and never pull the mains cable; always pull directly on the plug itself.
- Avoid kinking or crushing the mains cable.
- Do not use the appliance if the appliance itself, the mains cable, or the plug is damaged.
- Keep the appliance and its components away from open flames and hot surfaces.
- Never leave the appliance unattended during operation.
- Never open the casing; there are no user-serviceable parts inside.
- The appliance may be used by children aged 8 years or older and by individuals with reduced capabilities if supervised and instructed in safe use; Children under 8 years old should not use or be near the appliance without supervision.
- Ensure the appliance and accessories have cooled completely before cleaning or storing.
- Do not use abrasive or caustic cleaning agents on the appliance's outer surfaces.
DURONIC
Safety Information (Continued)
Caution
- Do not use the appliance with any of the accessories for longer than 3 minutes constantly. Let the appliance cool down for 15 minutes before you continue processing.
- None of the accessories are suitable for use in the microwave.
- Never use any accessories or parts from other manufacturers. Using such accessories or parts will void your warranty with the manufacturer.
- Keep the motor unit away from heat, fire, moisture, and dirt.
- Never fill the beaker or chopper bowl with ingredients that are hotter than 70^ C / 158^ F .
- Do not exceed the quantities and processing times indicated in the table.
- Clean the blade unit of the blender bar under the tap. Never immerse the power unit in water.
- After cleaning, let the blender shaft dry. Store it either horizontally or with the blade pointing upwards.
DURONIC
Introduction
Welcome to the world of versatile and powerful blending with our Immersion Blender! This product manual is your comprehensive guide to unlocking the full potential of your blender and its range of convenient attachments.
Whether you're looking to create smooth purees, finely chop ingredients, whip up fluffy batters, or even explore the world of creative spiralized dishes, our immersion blender and its optional masher, chopper, whisk, and spiralizer attachments have you covered.
In this manual, we'll walk you through the setup, usage, and care of your immersion blender, ensuring that you can effortlessly prepare a wide variety of delicious recipes. Get ready to blend, mash, chop, whisk, and spiralize your way to culinary perfection!
*Immersion blender and accessories are sold separately as listed on the 'Product Variations and Accessories' page.
How to Use
Before First Use:
Thoroughly clean all parts that will come into contact with food before using the appliance.
Preparing for Use:
- Let hot ingredients cool down before you process them or put them in any of the containers (maximum temperature 70^ ).
- Cut large ingredients into pieces of around 2 × 2 × 2 cm before you process them.
- Assemble the appliance correctly before you put the plug in the wall outlet.
DURONIC
Using the Immersion Hand Blender
The hand blender is intended for:
- Blending fluids, e.g. dairy products, sauces, fruit juices, soups, mixed drinks, and shakes.
- Mixing soft ingredients, e.g. pancake batter or mayonnaise.
Pureeing cooked ingredients, e.g. making baby food. - Chopping nuts, fruits, and vegetables.

CAUTION: Do not blend ingredients such as ice cubes, frozen ingredients, or fruits with stones.
Blending Quantities and Processing Times:
| Ingredients Blending Quantity Time | |
| Fruits and vegetables 50 - 100 g 15 sec | |
| Baby food, soups, and sauces | 50 - 200 ml 30 sec |
| Batters 50 - 250 ml 30 sec | |
| Shakes and mixed drinks | 50 - 250 ml 30 sec |
- Put the ingredients into a suitable container for blending.
- Attach the blender shaft to the motor unit and click into place.
- Put the plug into the wall power outlet.
- Immerse the blade guard completely in the ingredients to avoid splashing.
- Switch on the appliance by pressing the ON/OFF button or the TURBO button.
DURONIC
Using the Immersion Hand Blender (continued)
- Move the blender slowly up and down and in circles to blend the ingredients.
- After you have finished blending, release the button and unplug the appliance.
- For easy cleaning, rinse the blender shaft immediately after use. Do not immerse the shaft completely in water.
- Place the blending shaft in an upright position with the blade guard on top and let it dry for at least 10 minutes before storing.

CAUTION:
Do not immerse the motor handle unit in water or other liquid.
Do not use for more than 3 minutes at a time. This may overheat the appliance.
DURONIC
Using the Chopper
The chopper is intended for chopping ingredients such as nuts, raw meat, onions, hard cheese, boiled eggs, garlic, herbs, dry bread, etc.
Please be very careful when handling the blade unit as these blades are very sharp. Be especially careful when removing the blade from the chopper bowl when you empty the chopper bowl and during cleaning.

CAUTION: Do not attempt to chop ingredients such as ice cubes, frozen ingredients, or fruits with stones.
Chopping Quantities and Processing Times:
| Ingredients Chopping Quantity Time | |
| Garlic, Onions, Eggs 100 g Pulse (5 x 1 sec) | |
| Fish 120 ml 5 sec | |
| Herbs 20 ml Pulse (5 x 1 sec) | |
| Nuts 100 ml 20 sec |
- Put the chopper blade unit in the chopper bowl.
- Put the ingredients in the chopper bowl.
- Put the chopper lid onto the chopper bowl.
- Fasten the motor unit onto the chopper bowl.
- Put the plug into the wall outlet.
- Press the ON/OFF or TURBO button and let it operate until all ingredients are chopped.
- After you have finished chopping, unplug the appliance.
If the ingredients stick to the wall of the chopper bowl, loosen them by adding liquid or by using a spatula. Always let the appliance cool down after chopping meat.
DURONIC
Using the Masher
The masher can be used to mash cooked vegetables such as potatoes, swede, and carrot. Do not mash hard or uncooked foods as you may damage the masher and machine.

CAUTION: Do not mash hard or uncooked foods as you may damage the masher and machine.
- Cook the vegetables first and drain them.
- Connect the masher coupling unit to the masher attachment by turning and clicking into place.
- Turn the masher upside down and fit the masher blade over the central fastener. Turn anti-clockwise to lock into place.
- Fit the blender handle to the masher assembly and plug in to a power outlet.
- Place the masher in the saucepan or bowl, etc., and select the lower speed to switch on the appliance. Move the masher in an up and down movement throughout the mix until the desired result is achieved.
- When finished, release the speed button and unplug.
- Detach the masher, remove the paddle from the masher?
- Unscrew the coupling unit from the masher attachment.

IMPORTANT:
- Never use the masher in a saucepan on direct heat. Always remove the saucepan from the heat and allow it to cool slightly.
- Do not tap the masher on the side of the cooking pan/pot during or after mashing. Use a spatula to scrape excess food away.
- For best results when mashing, do not overfill the saucepan, etc. Only fill the pot/pan or bowl halfway.
Using the Spiralizer
| 1. Large ribbons (9mm) (Pappardelle) | 2. Small ribbons (5mm) (Tagliatelle) | 3. Rounded strips (4mm) (Spaghetti) |
- Choose which cone you'd first like to use. Then place this cone into the black lid that will then sit on top of the jug.
- Once the cone is securely in the lid, place the lid on top of the jug.
- Attach the chute to the lid by lining it up correctly and twist it in until you hear it click into place.
- Attach the spiralizer coupling to the blender handle in a twisting motion until you hear a click.
- Take the vegetable you want to spiralize and place it on the end of the coupling. You will see some prongs on the end. Push the vegetable onto the prongs so it is more secure.

Please note: After spiralizing for 30 seconds, please allow the blender to rest for 30 seconds before continuing.
- Plug the blender handle into the outlet and turn it on using the ON/OFF button. Make sure the coupling is lined up in the chute and can move the full length down the chute.
- Slowly push the vegetable down into the cone for spiralizing.
- When you are finished or when the jug is full, release the ON/OFF button and unplug the blender.
DURONIC
Using the Spiralizer (continued)
- Take the blender out of the chute and remove the spiralizer coupling.
- Disassemble chute and lid in the opposite motion. Please take care when removing the cones for cleaning as they are very sharp.
- For easy cleaning, rinse the cones and the end of the spiralizer coupling immediately when finished and unplugged. We recommend wiping the end of the coupling and not fully submerging it in water.

CAUTION: Please be very careful when handling the cones as they are very sharp. Do not try and twist them into place whilst holding the bottom of the cone. Only touch the plastic side and drop it into the space for it in the lid.
Cleaning and Maintenance
Cleaning:
- Do not immerse the motor unit, the chopper lid, and the whisk coupling unit in water or any other liquids, nor rinse them under the tap. Use a damp and soft cloth to clean these parts. The bottom of the blender shaft blade and guard can be rinsed under the tap.
- Never use scouring pads, abrasive cleaning agents, or aggressive liquids such as alcohol, gasoline, or acetone to clean the appliance.
- Cleaning of the appliance, its parts, and accessories is easiest immediately after use.
Maintenance:
- Wind the power cord loosely around the motor unit.
- Store the appliance in a cool, dry place away from direct sunlight or other heat sources.
Please follow the safety instructions, specifications, and guidelines in this manual for proper usage and care of your hand blender. If you have any questions or concerns, please contact the manufacturer for assistance. Enjoy using your hand blender!
Troubleshooting
| Problem Pro | bable Cause Solution | |
| The blender handle does not turn on. | The appliance is not plugged into the mains. | Put the mains plug in an earthed wall socket. |
| The appliance is overheated. | Leave the appliance to cool down for at least 15 minutes. Make sure not to have the appliance running for more than 3 minutes at a time. | |
| Food is not fully blended. | The amount of the ingredients is too much. | Either keep blending or reduce the amount of ingredients. |
| The amount of the ingredients is too little. | Increase the amount of ingredients or liquid so the blade can be submerged enough to blend. | |
| The ingredients are too hard. | Make sure the ingredients are suitable for the attachment. When using hard vegetables, cook through to soften or chop into smaller chunks. | |
| The ingredients are blended / mashed unevenly. | Not blended / mashed for long enough. | Keep blending / mashng until the desired consistency is reached. Be careful to not overheat the appliance. |
| The attachment won't connect to the blender handle. | The correct coupling has not been attached between the blender handle and the attachment. | Attach the correct coupling to the handle and the attachment. The parts should click into place. |
Troubleshooting
| Problem Prob | bable Cause Solution | |
| The container / jug is melting or warped. | The ingredients are too hot. | Make sure that any ingredients do not exceed the maximum temperature of 70°C. |
| Food will not spiralize | Ingredient is too soft. | Check vegetables are firm and fresh. Hollow and soft ingredients will not work in the spiralizer. |
| Ingredient is too hard. | Use a softer or riper ingredient. | |
| Ingredient is too small. | Use a larger ingredient. | |
| The spiralizer cone is clogged. | Switch off the machine and carefully remove and clean the cone. | |
| The ingredient is not fully seated onto the pusher. | Push a flat end of the ingredient firmly onto the prongs of the spiralizer coupling. You may need to chop the end of the ingredient to make a suitable surface. |
If you have any further issues, please contact Duronic.
Using the Immersion Hand Blender (continued)
la touche TURBO.
Safety Information (Continued)
Information for consumers on the disposal of Waste Electrical & Electronic Equipment (WEEE).
This mark on a product and/or accompanying documents indicates that when it is to be disposed of, it must be treated as Waste Electrical & Electronic Equipment, (WEEE).
Any WEEE marked products must not be mixed with general household waste, but kept separate for the treatment, recovery and recycling of the materials used. For proper treatment, recovery and recycling; please take all WEEE marked waste to your Local Authority Civic waste site, where it will be accepted free of charge.
If customers dispose of Waste Electrical & Electronic Equipment correctly, they will be helping to save valuable resources and preventing any potential negative effects upon human health and the environment, of any hazardous materials that the waste may contain.

Information for consumers on the disposal of Waste Electrical & Electronic Equipment (WEEE).


- HB35B, HB35C, HBA35, HBS35 Hand Blender
- Contents
- Features and Specifications
- Components
- Product Variations and Accessories
- DURONIC
- Safety Information
- PLEASE READ THIS MANUAL CAREFULLY AND RETAIN FOR FUTURE REFERENCE
- Safety Information (Continued)
- Caution
- Introduction
- How to Use
- Before First Use:
- Preparing for Use:
- Using the Immersion Hand Blender
- The hand blender is intended for:
- Blending Quantities and Processing Times:
- Using the Immersion Hand Blender (continued)
- CAUTION:
- Using the Chopper
- Using the Masher
- IMPORTANT:
- Using the Spiralizer
- Using the Spiralizer (continued)
- Cleaning and Maintenance
- Cleaning:
- Maintenance:
- Troubleshooting
- Information for consumers on the disposal of Waste Electrical & Electronic Equipment (WEEE).
Brand : Duronic
Model : HB35C
Category : Food Processor