
MG1600 - Food Processor Duronic - Free user manual and instructions
Find the device manual for free MG1600 Duronic in PDF.
| Brand | Duronic |
| Model | MG1600 |
| Product type | Food processor / Meat grinder |
| Use | Domestic |
| Power supply | 220-240 V, 50/60 Hz |
| Main functions | Meat grinding, preparation of kibbeh and sausages |
| Grinding technology | Auger and rotating blade |
| Included accessories | Meat pusher, meat tray, blade, grinding discs (fine, standard, thick), fixing ring, sausage attachment, kibbeh attachment |
| Material of food contact parts | Stainless steel (blade, discs) and aluminium (head, tray) |
| Control type | ON/OFF/R switch (forward, stop, reverse) |
| Safety | Anti-jam reverse function, protection circuit breaker, mandatory stop before reversing |
| Maximum operating time | 10 minutes continuous, followed by 10 minutes cooling |
| Cleaning | Hand wash with warm soapy water (max 50°C). Do not immerse motor. Do not use dishwasher. |
| Maintenance of metal parts | Wipe with a cloth soaked in vegetable oil after each use and before prolonged storage |
| Warranty | 1 year (by Shine-Mart Ltd) |
| Repairability | Spare parts available (blade, discs, screw, etc.). Do not attempt self-repair. |
| Regulatory information | Compliant with CE, WEEE (electronic waste) standards |
Frequently Asked Questions - MG1600 Duronic
User questions about MG1600 Duronic
0 question about this device. Answer the ones you know or ask your own.
Ask a new question about this device
Download the instructions for your Food Processor in PDF format for free! Find your manual MG1600 - Duronic and take your electronic device back in hand. On this page are published all the documents necessary for the use of your device. MG1600 by Duronic.
USER MANUAL MG1600 Duronic
Meat Grinding - MG1600
PLEASE READ ALL THE INSTRUCTIONS BEFORE USE
DURONIC
Contents
English Manual 5
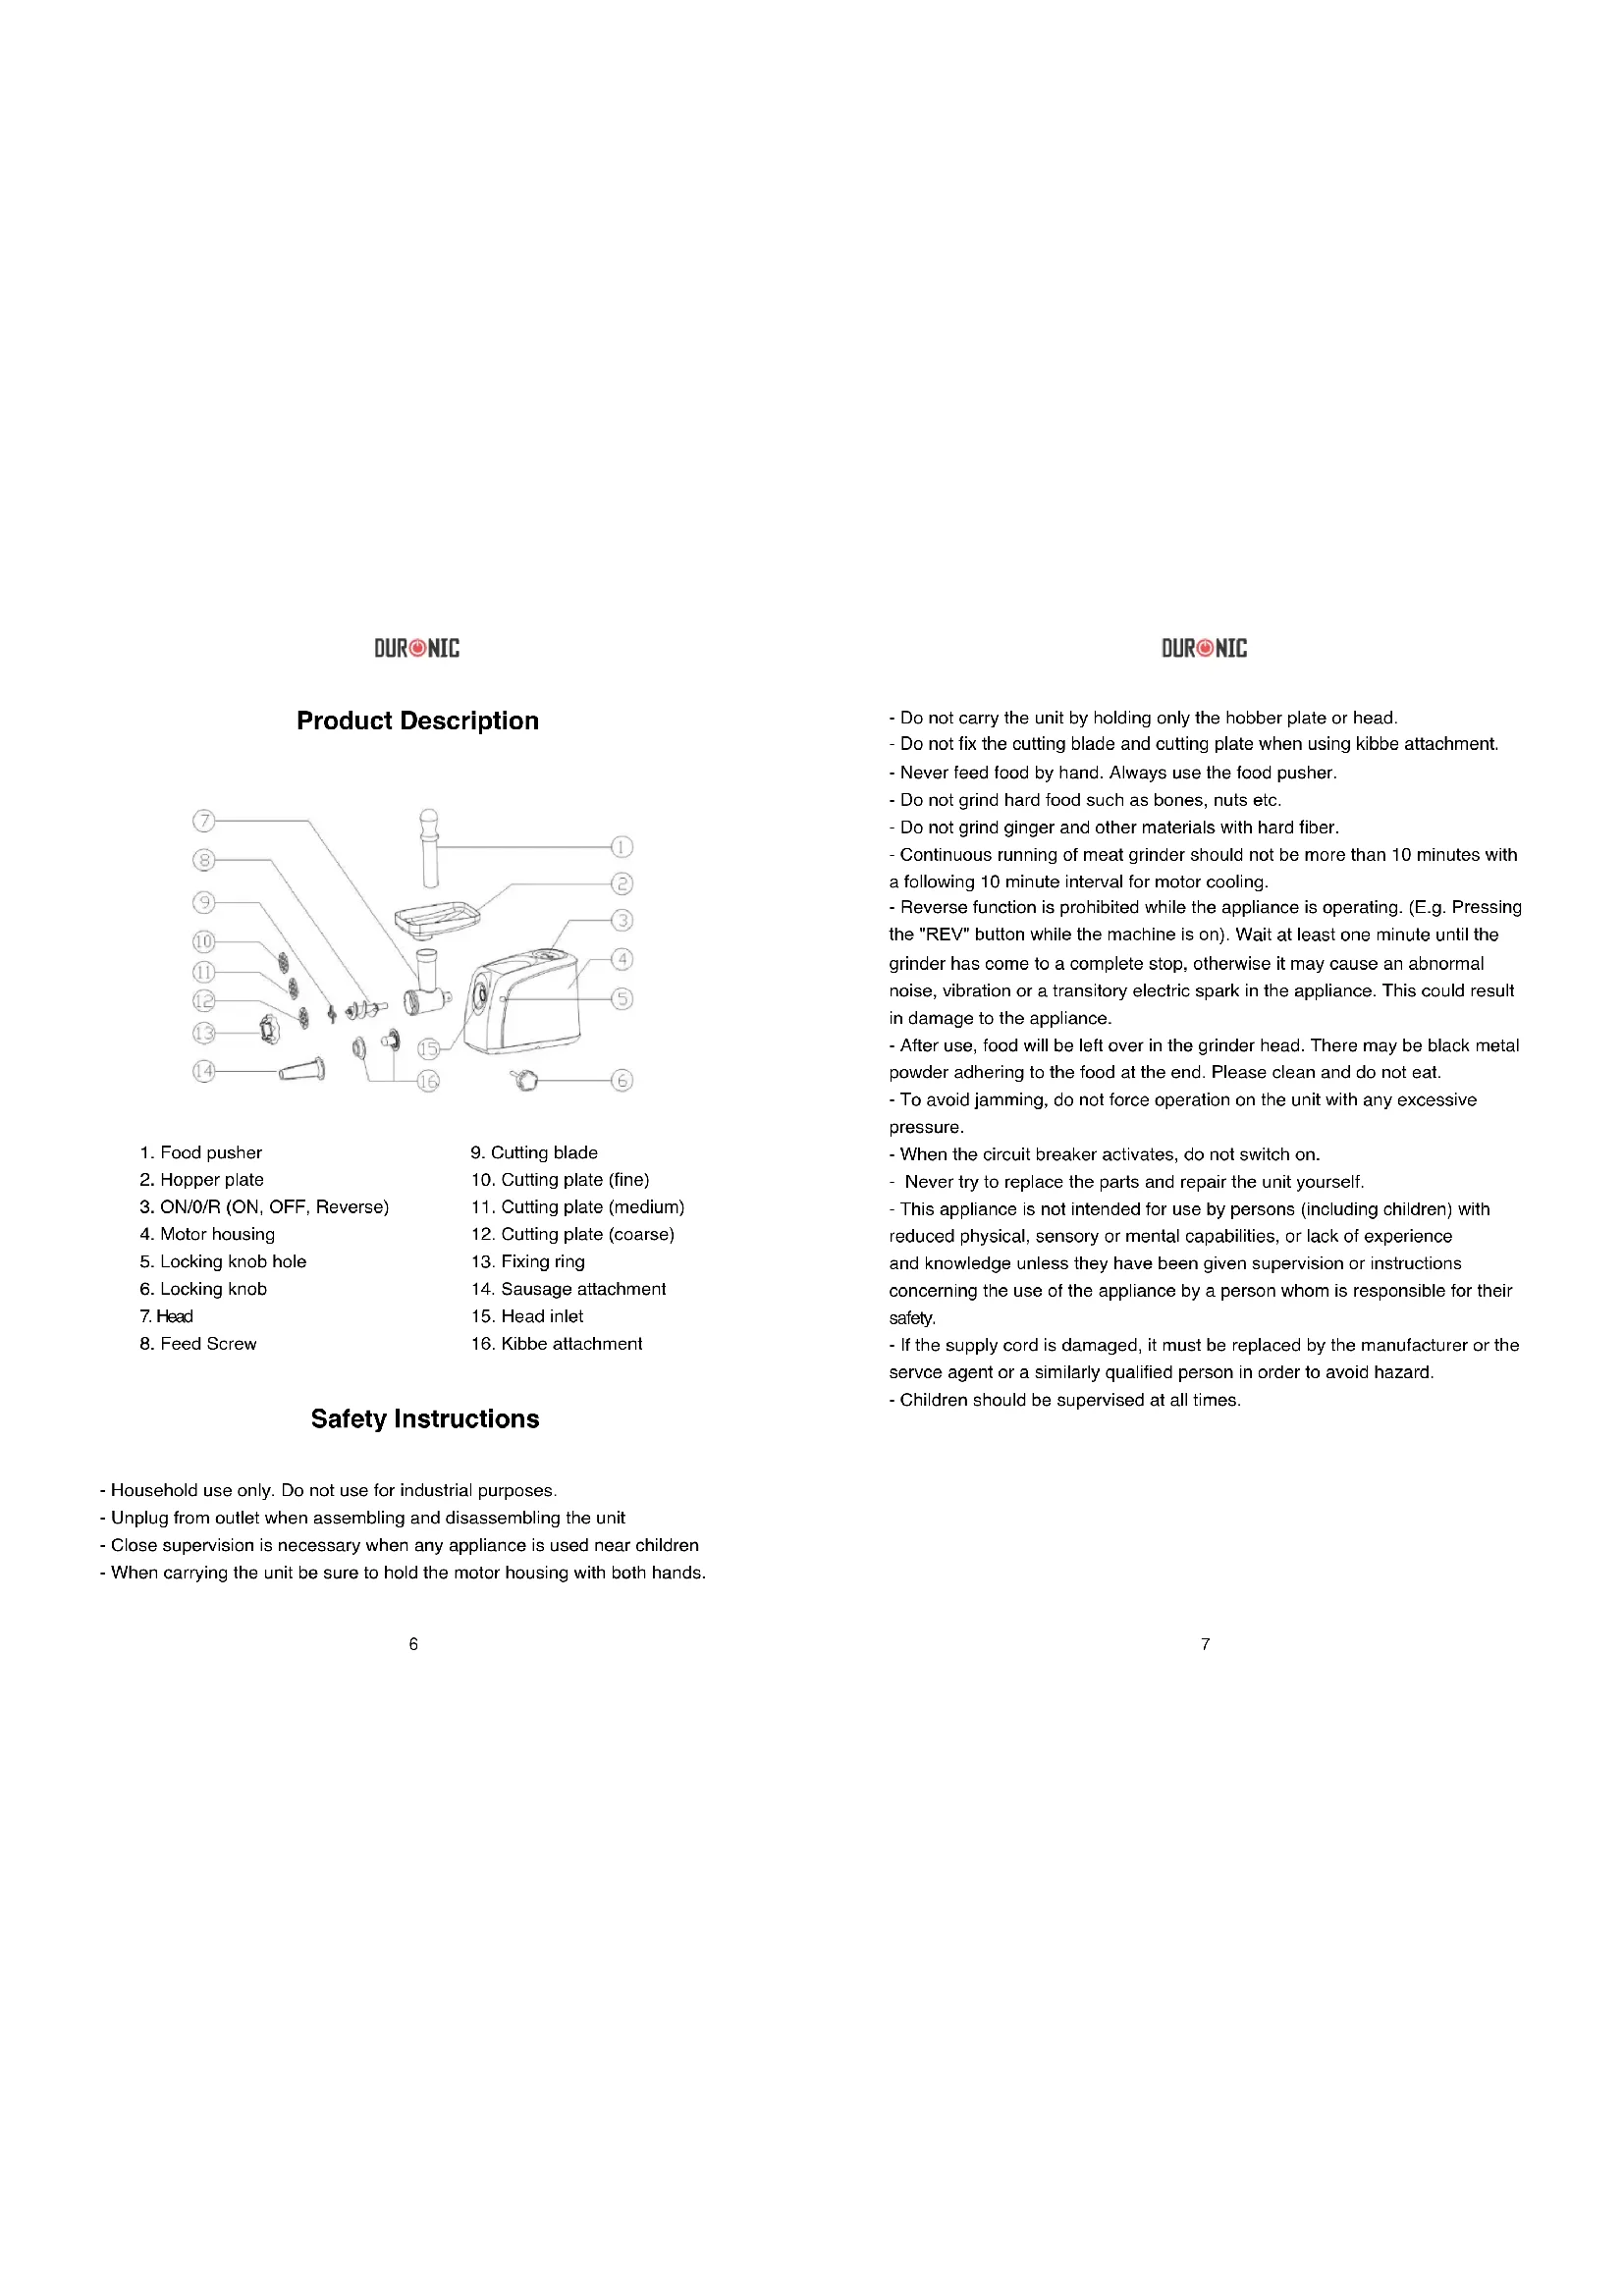
- Food pusher
- Hopper plate
- ON/0/R (ON, OFF, Reverse)
- Motor housing
- Locking knob hole
- Locking knob
- Head
-
Feed Screw
-
Cutting blade
- Cutting plate (fine)
- Cutting plate (medium)
- Cutting plate (coarse)
- Fixing ring
- Sausage attachment
- Head inlet
- Kibbe attachment
Safety Instructions
Household use only. Do not use for industrial purposes.
- Unplug from outlet when assembling and disassembling the unit
- Close supervision is necessary when any appliance is used near children
- When carrying the unit be sure to hold the motor housing with both hands.
DURNIC
- Do not carry the unit by holding only the hobber plate or head.
- Do not fix the cutting blade and cutting plate when using kibbe attachment.
- Never feed food by hand. Always use the food pusher.
- Do not grind hard food such as bones, nuts etc.
- Do not grind ginger and other materials with hard fiber.
- Continuous running of meat grinder should not be more than 10 minutes with a following 10 minute interval for motor cooling.
- Reverse function is prohibited while the appliance is operating. (E.g. Pressing the "REV" button while the machine is on). Wait at least one minute until the grinder has come to a complete stop, otherwise it may cause an abnormal noise, vibration or a transitory electric spark in the appliance. This could result in damage to the appliance.
- After use, food will be left over in the grinder head. There may be black metal powder adhering to the food at the end. Please clean and do not eat.
- To avoid jamming, do not force operation on the unit with any excessive pressure.
- When the circuit breaker activates, do not switch on.
- Never try to replace the parts and repair the unit yourself.
- This appliance is not intended for use by persons (including children) with reduced physical, sensory or mental capabilities, or lack of experience and knowledge unless they have been given supervision or instructions concerning the use of the appliance by a person whom is responsible for their safety.
- If the supply cord is damaged, it must be replaced by the manufacturer or the service agent or a similarly qualified person in order to avoid hazard.
- Children should be supervised at all times.
DURNIC
First Time Use
- Check that voltage indicated on the rating label corresponds to the mains voltage in your home.
- Wash all parts (except body) with warm soapy water.
Instructions for Use
Assembling
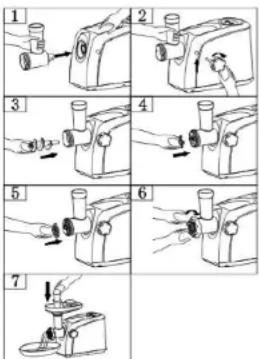
- While holding the head, inset it into the inlet (fig.1). Rotate the head in the same direction as fig.2 until a click can be heard. Move the head slightly to ensure it is placed in securely.
- Place the feed screw into the head (long end first) by turning the feed screw until it is set into the motor housing (fig.3).
- Place the cutting blade onto the feed screw shaft with the blade facing the front as illustrated (fig.4). If it is not fitted properly, meat will not be ground.
-
Place the desired cutting plate next to the cutting blade, fitting protrusions in the slots (fig.5).
-
Support or press the centre of the cutting plate with one finger then screw the fixing ring until tight with the other hand (fig.6). Do not over tighten.
- Place the hopper plate on the head and fix into position.
- Place the unit on a flat, non slip surface.
- The air passage at the bottom and the side of the motor housing should be kept free and not blocked.
DURNIC
Mincing Meat
- Cut all food into pieces (boneless and fatless meat is recommended, approx 20mm × 20mm × 60mm ) so that they fit easily into the hopper opening.
- Plug in and press the ON/OFF button to turn on the machine.
- Feed food into the hopper plate. Only use the food pusher (fig.7)
- After use, switch the unit off and unplug it from the power supply.
Reverse Function
- In case of jamming, switch the appliance off by pressing the 'ON/OFF' button and press the "REV" button.
- Feed screw will rotate in the opposite direction and the head will become empty.
- If it doesn't work, switch the unit off and clean it.
Cleaning and Maintenance
Disassembling
- Make sure that the motor has stopped completely.
- Disconnect the plug from the power outlet.
- Disassemble by reversing the steps from images 6-1.
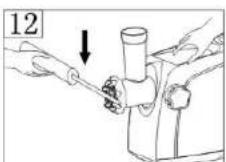
- If the fixing ring is not easily removed by hand, please use tools in fig 12.
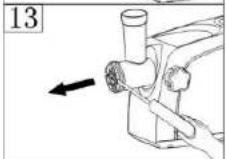
- To remove the cutting plate easily, place a screwdriver between the cutting plate and the head as illustrated and lift it up (fig.13).
- Press the unlock button before removing the head. Holding the head, rotate it in the same direction as fig. 14. The head can then be removed easily.
DURNIC
Cleaning
- Never clean the unit in the dishwasher with a strong alkaline cleaner or a bleaching solution containing chlorine. This will discolour the surfaces.
- Remove meat, etc. Wash each part separately in warm soapy water.
- Do not immerse the motor housing in water. Only wipe it with a damp cloth.
- Thinners and petrol will crack or change the colour of the unit.
- Wash all the metal parts in water below 50^ C and dry.
- Wipe all the cutting parts with oil and a wet cloth.
- In case the unit is unused for a long time, wipe all metal parts before use.
Making Kibble
Stuffing Recipe
Ingredients:
Mutton 100g (mince once or twice)
Olive oil 1 1/2 tablespoons
Onion 1/2 cup
Spices to your taste
Salt to your taste
Flour 1 1/12 tablespoons
- Fry onion in oil until brown and add minced mutton, spices, salt and flour.
DURNIC
Case
Ingredients:
Lean meat 450g
Flour 150-200g
Spices to your taste
1 Grated nutmeg
Pepper to your taste
- Mince meat 3 times and mix all ingredients together in a bowl. More meat and less flour will create a better consistency and taste.
- Grinde the mixture 3 times.
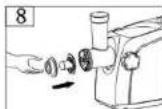
- Disassemble by reversing the steps from 5-3 to remove the cutting plate and cutting blade.
- Place kibbe attachments onto the feed screw shaft together, fitting protrusions in the slots (fig.8).
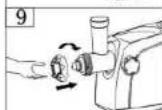
- Screw fixing ring into place until tight. Do not over tighten (fig.9)
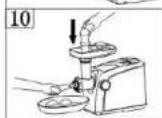
- Make the cylindrical case (fig.10).
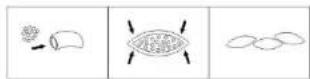
- Form kibbe as illustrated above and deep fry.
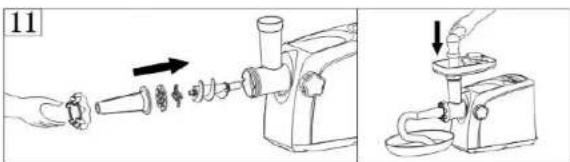
Making Sausage
Before starting, please assemble sausage attachment as follows (fig.11)
DURNIC
DURONIC
Warranty
1 Year Guarantee from Shine-Mart Ltd, Trademark owners of Duronic Products.
NOTE: THESE STATEMENTS DO NOT AFFECT YOUR STATUTORY RIGHTS AS A CONSUMER
This product has been manufactured under the strictest or quality control procedures, and using the highest quality of materials, to ensure excellent performance and reliability. It will give very good and long lasting service, provided it is properly used and maintained.
The product is guaranteed for 1 years from the date of original purchase. If any defect arises due to a faulty materials or poor workmanship, the faulty product must be returned to the original place of purchase. Refund or replacement is at the discretion of that company. Duronic Products are offered with a 1 year guarantee under the following conditions:
- The product must be returned to the retailer with original proof of purchase.
- The product must be installed and used in accordance with the instructions contained in this operating manual.
- It must be used only for domestic purposes.
- It does not cover wear and tear, malicious damage, misuse, neglect, inexpert repairs or consumable parts.
- Shine-Mart Ltd has no responsibilities for accidental or consequential loss or damage.
- Shine-Mart Ltd are not liable to carry out any type of servicing work, under the guarantee
- Valid in the UK only

This product is fitted with BS:1363 plug and fuse. Imported by Shine-Mart Ltd, RM3 8SB

Information on waste Disposal for Consumers of
Electrical & Electronic Equipment.
This mark on a product and/or accompanying documents indicates that when it
is to be disposed of, it must be treated as Waste
Electrical & Electronic Equipment, (WEEE).
Any WEEE marked products must not be mixed with general household waste.
but kept separate for the treatment, recovery and recycling of the materials used.
For proper treatment, recovery and recycling; please take all WEEE marked
Easte to your Local Authority Civic waste site,
where it will be accepted free of charge.
If customers dispose of Waste Electrical & Electronic Equipment correctly, they
will be helping to save valuable resources and preventing any potential negative
effects upon human health and the environment, of any hazardous materials that
the waste may contain.
DURONIC
DURONIC

Brand : Duronic
Model : MG1600
Category : Food Processor