
Conga GrassHopper 800 Connected - Robot mower CECOTEC - Free user manual and instructions
Find the device manual for free Conga GrassHopper 800 Connected CECOTEC in PDF.

| Product type | Robotic lawn mower |
| Brand | Cecotec |
| Model | Conga GrassHopper 800 Connected |
| Reference | 04479 |
| Cutting diameter | 180 mm |
| Cutting height | 20 - 60 mm (9 positions) |
| Weight | Approximately 8.0 kg |
| Battery type | Lithium-ion LBF204 |
| Charging time | 3 hours |
| Power supply | 100-240 V AC 50/60 Hz (adapter CGF251) |
| Connectivity | Wi-Fi 2.4 GHz, Bluetooth 4.0 |
| App | Conga GrassHopper (Android 4.4.2+ / iOS 11+) |
| Rain sensor | Yes (automatic return to station) |
| Maximum slope | 15° (27%) |
| Cutting blades | 3 pivoting blades, replacement provided |
| Charging station | Model CB03A, LED indicator |
| Safety | PIN code, STOP button, collision, tilt and lift sensors |
| Noise level | <55 dB |
| Cleaning | With low-pressure water (<1 MPa) after turning off |
| Box contents | Robot, charging station, boundary wire, pegs, adapter, replacement blades, measuring tape, manual |
Frequently Asked Questions - Conga GrassHopper 800 Connected CECOTEC
User questions about Conga GrassHopper 800 Connected CECOTEC
0 question about this device. Answer the ones you know or ask your own.
Ask a new question about this device
Download the instructions for your Robot mower in PDF format for free! Find your manual Conga GrassHopper 800 Connected - CECOTEC and take your electronic device back in hand. On this page are published all the documents necessary for the use of your device. Conga GrassHopper 800 Connected by CECOTEC.
USER MANUAL Conga GrassHopper 800 Connected CECOTEC
natural_image
3D rendering of a robotic lawn mower with visible control buttons and mesh head (no text or symbols)cecòtec
Safety instructions 15
-
Parts and components 122
-
Before use 122
-
Installation 123
-
Operation 125
-
Cleaning and maintenance 129
-
Troubleshooting 130
-
Technical specifications 137
-
Disposal of old electrical and electronic appliances 138
-
Technical support and warranty 138
-
Copyright 138
-
Declaration of conformity 138
SOMMAIRE
These symbols can be found on the appliance. Pay close attention to them.
| Symbol Meaning | |
 | WARNING: read the instruction manual before using the appliance. |
 | WARNING: disconnect the appliance before carrying out any maintenance or lifting operations. |
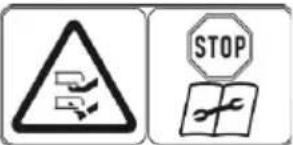
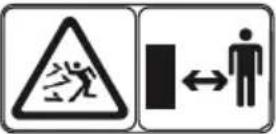 | WARNING: keep a safe distance from the appliance when in use. Keep hands and feet away from rotating blades. |
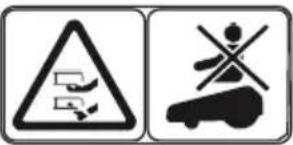 | WARNING: do not ride or sit on the appliance. Never put your hands or feet near or under the appliance. |
 | Read the instruction manual. |
 | CE marking |
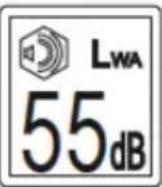 | Ambient noise emission. The emissions of the appliance are indicated in the technical data, specified in this manual and on the nameplate. |
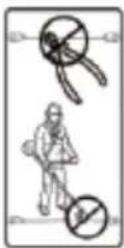 | The low voltage cable must not be shortened, extended or spliced. Do not use a weeding machine near the low voltage cable. Be careful when cutting the edges where the cables are laid. |
 | Class 3 |
| DC current |
Battery symbols
 | Read the instruction manual. |
 | Do not burn the battery or expose it to heat sources. |
 | Do not immerse the battery in water. |
 | Recycling symbol |
 | The battery must not be disposed of as normal household waste. Ensure that the battery is recycled according to local legal procedures. |
Symbols on the charger
 | Read the instruction manual |
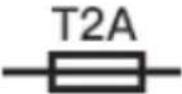 | Fuse |
 | Double insulation |
 | The battery must not be disposed of as normal household waste. Ensure that the battery is recycled according to local legal procedures. |
 | Only use the charger provided (model CGF251). |
Read these instructions thoroughly before using the device. Keep this instruction manual for future reference or new users.
- WARNING: read the instruction manual before operating the appliance.
- WARNING: keep a safe distance from the appliance during operation.
- WARNING: do not get on the appliance.
- WARNING: stop the appliance before lifting it.
- CAUTION: do not touch the rotating blade.
- Never allow children, people with reduced physical, sensory, or mental capabilities or lack of experience and knowledge and/or people unfamiliar with these instructions to use the appliance. Local regulations may be a reason to restrict the age of the user.
- WARNING: supervise children to ensure that they are not
near or playing with the machine when it is in operation.
- This gardening appliance is only designed for mowing lawns. Any use other than the intended use may be dangerous and may cause personal injury or damage to property. Improper use of this appliance includes, but is not limited to, transporting people, children or animals; riding on it; using it to pull or push loads; and using it to cut vegetation other than grass. Strict adherence to the specified guidelines is essential to ensure safety and avoid accidents.
- Caution: risk of accidents. The mower is designed for lawn maintenance. Its use for other purposes is not allowed and may be dangerous.
- To reduce the risk of injury, the appliance must not be used for the following tasks (non-exhaustive list): trimming shrubs, hedges, and bushes; cutting vines; tending green roofs or balcony planters; shredding or chipping tree or hedge debris; clearing paths; or levelling earth mounds (e.g. molehills).
- Only people who are rested and in good physical and mental condition should operate the appliance.
- If you have any health problems, you should ask your doctor if you can use this appliance. Do not use the appliance if you have consumed alcohol, drugs or medication that impairs your ability to react.
- If an accident or malfunction occurs while the mower is in operation, press the STOP button immediately.
- When lifting the appliance, keep your balance at all times. Support yourself well with your feet when moving the mower on slopes. Always wear long trousers and work shoes.
- Do not run while using the mower or its accessories.
- Do not touch moving parts unless they have come to a complete stop and have been switched off. Individual hazards: to avoid injury, wear protective gloves and goggles when servicing or replacing blades.
- Do not touch moving parts, such as the blade disc, before it has come to a complete stop.
- WARNING: to recharge the battery, only use the power supply unit supplied with the appliance, reference CGF251 and the charging station CB03A.
- Do not place the charging station in a location where there is a risk of standing water or where flooding is likely to occur.
- Do not place the charging station (or any of its accessories) within 60 cm of any combustible material. In the event of a malfunction, the charging station and the power supply may overheat, which could cause a fire.
- Do not place the power supply on the floor. Place it at a minimum height of 30 cm, so that there is no risk of it coming into contact with water.
- When connecting the power supply to the mains socket, use a residual current device (RCD) with a tripping current of max. 30 mA.
- If the cable (or plug) is damaged, do not connect it. If the cable is damaged and connected to the mains, do not touch it until it is disconnected. Disconnect the plug from the socket if the cable is damaged during operation of the appliance. If the cable is worn or damaged, the risk of electric shock increases. If the cable is damaged, it must be replaced by qualified personnel.
- Charge the appliance only in the charging station provided.
- Only use original batteries. The safety of the product cannot be guaranteed if non-original batteries are used. Do not use non-rechargeable batteries.
- Incorrect use of the appliance may result in electric shock, overheating or leakage of corrosive battery fluid.
- The battery may leak under extreme conditions. If electrolyte leakage occurs, do not touch the liquid. If the liquid gets into contact with skin, wash immediately with soap and water. If the liquid gets into the eyes, wash them immediately with clean water for a minimum of 10 minutes and seek medical attention. Wear gloves to handle the battery and dispose of it immediately in accordance with local regulations.
- Disconnect the appliance if it has run over foreign objects and examine it for damage. Do not restart without carrying out this check.
- Also disconnect it if you notice that it starts to vibrate abnormally.
- Do not connect the power supply to a power outlet if the plug or cord is damaged. If the cable (or plug) is damaged, do not connect it. If the cable is damaged and connected to the mains, do not touch it until it is disconnected. If the cable is damaged, it could come into contact with low voltage parts.
- Connect the machine and/or its peripheral devices only to a power supply circuit protected by a residual current device (RCD) with a tripping current not exceeding 30 mA.
- Disconnect the boundary wire from the charging station and store this appliance in case of adverse weather conditions (especially when there is a risk of lightning).
- The user is responsible for accidents or damage to other people or their property. Do not use the appliance when people, especially children, or animals are nearby.
- Do not use the machine if you are barefoot or if you are wearing sandals. Always wear sturdy shoes and long trousers.
- Disconnect the appliance:
a. before lifting or holding it;
b. before transporting it;
c. before removing any obstructions;
d. before performing any maintenance on the blades;
e. before checking for damage and before cleaning;
f. if it has run over a foreign object or if it starts to vibrate excessively. If this happens, check that the appliance has not been damaged. Pay particular attention to the parts of the cutting area (blade, blade shaft and blade fixing parts). Carry out the necessary repairs before restarting the appliance.
- Switch off the appliance before clearing a blockage, performing any maintenance work or examining it. Also disconnect it if you notice that it starts to vibrate abnormally.
- Check that the appliance is not damaged before restarting it. Do not use if damaged.
- Do not lay the cables in the working area. Doing so could damage them.
- Make sure that there are no objects such as stones, branches, tools, or toys on the lawn. The blades can be damaged if they run over objects.
- WARNING: do not use the appliance if the guards are defective or if the safety devices are not in place, or if the cable is damaged or worn.
- It is recommended to keep extension leads away from dangerous moving parts to avoid damage to the cables which can lead to contact with live parts.
- If the mower is to be used in public areas, warning signs must be placed around the working area. The following text must appear on the signs: Warning! Automatic lawn mower! Stay away from the appliance! Keep an eye on children!
- The cable between the power supply and the charging station must not be extended.
- Modifications to the appliance that could lead to increased noise emissions are not permitted. For safety reasons, the machine software must not be modified.
- Exercise particular caution when using the mower in public gardens, parks, sports fields, green spaces near roads, agricultural and forestry areas. It is not permitted to transport objects, animals or people (especially children) on the machine. Do not allow anyone to climb or sit on the mower.
- The appliance should only be used with appropriate equipment. Any other use is not recommended.
- Do not use the appliance if the STOP button does not work.
- Always switch off the appliance when not in use.
- For the appliance to charge and respond to any command, you will have to enter the correct PIN.
- Prevent the appliance from colliding with people or animals. If this occurs, stop use immediately. It is recommended to use the appliance in areas where nobody is present.
- Keep hands and feet away from rotating blades. Never put your hands or feet near or under the appliance when it is switched on.
- Do not lift or move the appliance when it is switched on.
- Do not use the appliance in areas where there is standing water (e.g. puddles).
- Do not use the appliance if any automatic watering system is activated.
- Do not place hands or feet near or under rotating parts. Keep away from the discharge opening at all times.
-
Do not pick up or transport the appliance while it is in operation.
-
When the appliance is operating automatically, do not leave it running unattended if you know that pets, children, or people are nearby.
- When using the appliance's buttons:
a. Only use the appliance when there is enough light (natural or artificial).
b. Do not use the appliance on wet grass.
c. Be careful when using the appliance on slopes.
d. Exercise extreme caution when the appliance is operating in your direction.
e. Keep your feet away from the blades.
- To use the appliance (after pressing the STOP button), you will have to press the ⏚ + ⏚ buttons for the appliance to go back to the charging station or, otherwise, ⏚+ ⏚ so that it starts cutting.
Battery and charger
- Before charging the appliance, read the instructions carefully. Make sure that the charger is adapted to the local power supply.
- Ensure that the connection between the charger and the battery is correct, and that the correct models are being used.
- The battery will last longer and perform better if you charge the battery when the temperature is between 18 °C and 25 °C. Do not charge the battery when the temperature is below 5 °C or above 40 °C. This is important, as failure to follow these instructions may result in damage to the battery.
- Safety recommendations on the battery
- Do not disassemble, open, or break the battery.
- Do not tamper with the battery. Do not store the battery in
an untidy manner in a box or drawer where they can short-circuit each other or be short-circuited by conductive materials. When the battery is not in use, keep it away from paper clips, coins, keys, nails, screws or other small metal objects that could create interference between terminals. Connecting the battery terminals may cause burns or fire.
- Do not expose the battery to heat or fire. Do not expose the battery to direct sunlight.
- Do not subject the battery to mechanical shock.
- In the event of a battery leak, keep your skin and eyes away from the liquid. In case of contact, wash the affected area with plenty of water and seek medical advice.
- In case of battery ingestion, please seek medical attention immediately.
- The battery will give optimum performance if used when the room temperature is between 18 °C and 25 °C.
- Only recharge the battery with the supplied charger. Do not use any charger other than the one provided. A charger is only suitable for a type of battery and could cause risk of fire if you use it with another battery.
- Do not use any battery that is not designed for use in this appliance.
- Keep the batteries out of the reach of children.
- Keep this instruction manual for future reference.
- Dispose of the battery correctly.
- If you are not going to use the appliance for a long period of time, remove the battery.
- Do not use a damaged or modified battery.
- WARNING: failure to follow these instructions may result in electric shock, fire and/or serious injury.
INSTRUCTIONS DE SÉCURITÉ
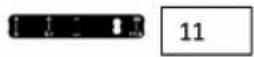
- Display
- Cutting knob
- STOP button (emergency stop)
- Charging station
- Base fitting screws
- Blades
- Boundary wire
- Boundary wire pegs
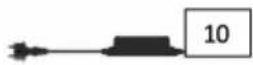
- Power adapter
- Distance guide
Figure 2:
- Time setting indicator light
- PIN indicator light
- Power button
- Start button
- Bluetooth indicator light
- Wi-Fi indicator light
- Battery indicator light
- Confirmation button
- Home button
NOTE:
The graphics in this manual are schematic representations and may not exactly match the device.
2. BEFORE USE
- This appliance is packaged in a way as to protect it during transport. Take the appliance out of its box and remove all packaging materials. You can keep the original box and other packaging elements in a safe place. This will help you prevent damage to the appliance when transporting it in the future. In case the original packaging is disposed of, make sure all packaging materials are recycled accordingly.
- Make sure all parts and components are included and in good conditions. If there is any piece missing or in bad conditions, contact the official Cecotec Technical Support Service immediately.
Box content
- Robot lawn mower
- Charging station
- Base fitting screws
- Blades for replacement
- Boundary wire
- Boundary wire pegs
- Power adapter
- Distance guide
- Instruction manual
Not included
- Scissors and wire strippers
- Hammer
- Measuring tape
3. INSTALLATION
Initial check
- Preparing the mower for proper use is simple. The process does not take long, though this will depend on the size of your garden.
- This mower is designed to mow on a regular basis, allowing you to keep your garden neat and tidy. In addition, you can programme the operating time to operate at any time and without any limitation.
- When using the mower in public places, the following notice must be displayed: Warning! Automatic lawn mower! Stay away from the appliance! Keep an eye on children!
- First, read this instruction manual carefully. Make a plan of the working area and include all obstacles, so it will be easier to see where the charging station should be placed and where the cables should be routed.
- To mow the lawn for the first time, set the cutting height to the maximum level (50 mm). Place the mower in the working area and run it for a while. Check that the boundary wire is correctly positioned. Also check that the mower returns to the charging station by following the boundary wire. If the mower returns to the charging station without difficulties, this means you can use it normally.
Charging station installation. Figure 3
- The charging station can be placed next to a tool shed or a house. When laying the boundary wire, leave at least one metre of wire straight and unobstructed in front of the charging station.
ENGLISH
- The charging station should be placed on a relatively flat surface. Do not place it on an inclined surface and avoid bending the robot's support surface.
- We recommend that the power supply unit is placed on a wall at a minimum height of 30 cm. The power cable must be outside the working area of the mower.
- Position the charging station as shown in figure 3, following the indications on the support surface of the charging station, leaving the "IN" area as the area to be cut and "OUT" as the outer area which will be outside the boundary wire and therefore excluded from the cut.
- Once the charging station is in place, pass the beginning of the boundary wire through the housing in the middle of the charging station to the red terminal at the rear of the charging base.
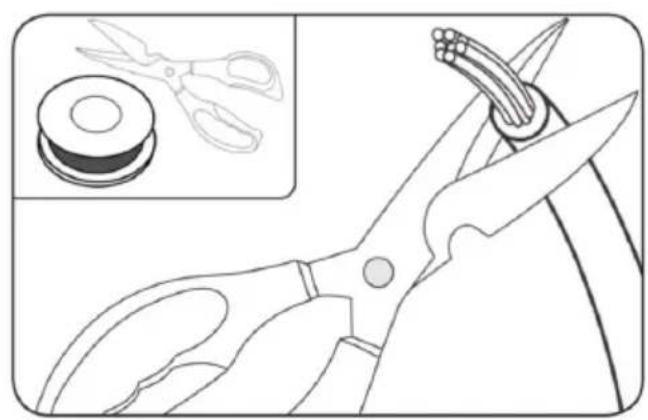
- Strip the end of the boundary wire about 10 mm to connect it so that it makes good contact with the red terminal of the charging station. Fig. 4
- Once the first end is connected, you should continue with the installation of the boundary wire.
Boundary wire installation
If you do not want the mower to pass through certain areas (because there are flowers, bushes, or trees, for example), mark them off with the boundary wire. As shown in Fig. 5, the mower can pass through areas with a minimum width of 0.8 m.
- When laying the boundary wire, use the distance guide to leave a minimum distance of 35 mm between the wire and obstacles. Each peg should be placed at a distance of about 80 cm. Use the provided distance guide. If the ground is uneven, additional pegs must be fitted to ensure that the wire is fully submerged in the ground. Fig. 6.
Note: if there are any obstacles within the cutting area such as sprinklers, make sure that they do not exceed 1.5 cm in height so that they do not come into contact with the blades. In case the obstacle has a longer length, please make sure to cover these areas with a height higher than the height of the robot or delimit the area with the boundary wire.
- Ensure that the boundary wire is completely straight, dipped into the ground and that all angles are at least 90^ . Fig. 7
Note: the mower can climb slopes of up to 27% gradient (15°). Avoid letting the mower pass through areas with a higher percentage of slope. Fig. 8
-
To see how to lay the boundary wire according to the slope of your terrain, see figure 8.
-
To close the cutting perimeter, cut off the excess wire and strip the end 10 mm to connect it to the black terminal.
Connecting the charging station to the mains
Connect the boundary wire correctly and then, plug the power supply into the mains socket. The green LED indicator light on the charging station will light up, indicating that the connection has been made correctly and that the circuit with the boundary wire is properly connected.
| LED indicator lights | Meaning Action required | |
| No indicator light is on | The charging station is not connected to the mains. | Check that the power cable is properly connected to the charging station, and that the charging station is connected to a suitable power supply. |
| Steady green The | boundary wire is correctly connected. | This is normal, no action is required. |
| The battery is fully charged. | ||
| Flashing green The | mower is charging. This is normal, no action is required. | |
| Flashing red The | boundary wire is not connected or is damaged. | Check that both ends of the boundary wire are securely connected.Check the boundary wire for damage. |
4. OPERATION
- Once the installation process is completed, the mower will be ready for use.
- Press the ⏻ button until the mower switches on. The first time you do this, enter the default PIN code (0000). To do so, press four times ⏻ until number 0 flashes, as shown in Fig. 9. (See section "Changing the PIN code" if you wish to change it).
Note:
- The mower will switch off after 30 seconds if no operation is performed.
- If an incorrect PIN is entered ten times, the mower will beep and then switch off. You can try to enter the PIN again after 50 minutes.
- The robot needs the correct PIN to charge.
-
While the robot is charging, it will stop emitting an electrical signal through the cable.
-
Press and then so that the mower starts operating.
-
Press ☐ and then ☐ for the mower to return to its charging station. Before starting the mower, remember to use the cutting knob to adjust the cutting height (the cutting distance is in relation to the ground).
- The mower will mow the lawn without interruption until its battery level is low. It will then return to the charging station. When fully charged, if it is within the operating time range, it will automatically restart, or remain on the charging station if it is outside the operation time range.
ENGLISH
- The mower will perform cutting cycles when fully charged until it detects a lack of battery power.
- The mower can begin in a second starting area, other than the charging station. If the mower has the second starting area activated (ON), it will proceed to a second area from which it will start after the first full discharge of the battery.
- The mower changes the cutting direction when it detects an obstacle thanks to its shock sensor located on the bumper, so this is common and normal in the mower's operation.
- A number may appear momentarily on the display during the cutting task, this is due to the remaining battery percentage of the mower.
Changing the PIN code
- To change the PIN code, press and hold the START and HOME buttons at the same time for 3 seconds. "PIN 1" will start flashing on the display, which means that you must enter the old PIN. When "PIN 1" is displayed, the first number of the PIN will flash. Use the START or HOME buttons to select the number you wish, and press to confirm the setting. Then, the next number of your old PIN will flash. Repeat the process with the remaining numbers of your old PIN. After that, you can enter a new PIN. In this example, the PIN we want to set is 1234. When you have entered your old PIN, "PIN 2" will start flashing on the display and so will the first number. Do the same to enter the new PIN code of your choice (in this example it is 1234). Will then appear on the display, which means that you have successfully changed the PIN code.
- You can change the PIN code from the App by pairing the mower and following the instructions in the settings menu. If you do not remember the PIN code, try to access the mower by following the pairing process and then change the PIN code. If after these attempts you are unable to do so, please contact the official Cecotec Technical Support Service.
Setting the mower's date
- The year, month, day and time must be set, these are mandatory configuration items. If you do not set these elements correctly, it will influence the programming schedule. These elements must be set in the order: year, month, day, and time.
- To start the configuration, press and hold HOME for 3 seconds. For example, 2020. Use and/or HOME to select the year. Then press OK to confirm and finish the configuration. Next, continue with setting the month and day in the same way, e.g. 08.25 would be 25 August.
- In the meantime, the year will be displayed and then a number to indicate the date, e.g. 08.25 (25 August), Fig. 11
- The time will then be shown on the display, e.g. 13:25. When it flashes, use START or HOME to select the desired number and press to confirm the setting. When the time setting is complete, will appear on the display. Fig. 11
Changing the mower's time and programming the operating range
- The mower's time must be set by pressing and holding the START button for 5 seconds for the mower to follow the programming correctly.
- The default operating range is from 9:00 to 15:00, but you can change it. To do so, press and hold the and buttons at the same time for 3 seconds. For instance, if you want the mower to start operating at 13:25, when 0-:- flashes, use the START or HOME buttons to select the desired time, press the button to confirm the setting. I'd LE will appear on the display, and the mower will automatically start operating at 13:25. You will hear a beep when you do so. Fig. 12
Changing the mower's operating time per day
- The default daily operating time is 3 hours, but you can change it (the minimum time is 1 hour, and the maximum is 24 hours).
- To do this, hold down the OK button for 3 seconds. For example, if you want the operating time to be 06 hours, press the START or HOME buttons to select the number (06) and, when OS R flashes, press OK to confirm the setting. I will appear on the display. The mower will run for 6 hours a day from the start time you have set. You will hear a beep when it starts up. Fig. 13
Changing the days of operation per week
- By default, the mower will operate 5 days a week. You can change this setting to 3, 5 or 7 days. For example, imagine you want to select 3 days per week.
- The number "05" will flash. Press the START or HDME button to select the desired number (03) and then press to confirm the setting. The following will appear on the display:
3 = Monday, Wednesday, and Friday.
5 = Monday, Tuesday, Wednesday, Thursday, and Friday.
7 = Monday, Tuesday, Wednesday, Thursday, Friday, Saturday, and Sunday.
By default, the mower will cut the edges skirting the boundary wire on Tuesdays and Fridays. Remember that if you have the mower configured with 3 cutting days, Tuesday will not perform edge cutting because it has not programmed that day in its operating range.
Rain sensor configuration
- The mower has a built-in rain detection sensor. It will stop operation by default and return to its charging station until it stops raining and a preset stipulated time has elapsed.
- To access this menu and activate/deactivate this function, press, and hold the ▼ button for 3 seconds. will appear on the display. Press to access the settings and select the option ON or OFF on the display by pressing △ and ▽, and then press □ to confirm your selection.
ENGLISH
Zone configuration
- The mower has built-in intelligent navigation technology that enables it to start the cutting task from a different point than the charging station. This function is highly recommended to obtain a better result in the total coverage of the cutting area.
- This option is by default on but can be changed by pressing the button for 3 seconds and then pressing START or HOME to switch from the menu to the ZONE menu, and then press to enter to select ON or OFF depending on whether you want to keep the function on or off. To confirm the selection, press
- The mower shall start from the second starting point after completing the total discharge of the battery.
Software update
The mower software can be updated when new versions are available. You can download the latest version of the software from the app.
Connecting the mower
- In order to enjoy the full functionality of the mower, you should always keep it up to date with the latest software version available. To do so, the mower must be connected to the Internet via a 2.4 GHz Wi-Fi network or Bluetooth 4.0.
- Download the app:
- Download the free Conga GrassHopper mower app. It is available for Android (4.4.2 or higher) and iOS (11 or higher).
- By scanning the following QR code you will be able to access the app download option and an instruction manual explaining how to pair your appliance:

- Make sure you have:
- The password of your Wi-Fi network.
- The serial number of the mower. It is located on a label under the back cover of the mower. If you do not wish to enter the serial number, scan the QR code with your phone's camera.
- Check the Wi-Fi network settings.
- The mower only connects to a 2.4 GHz Wi-Fi network.
- Make sure that both the mower and your phone are connected to the same network.
- During connection, make sure that the mower, telephone, and router are as close as possible.
Note
- When the mower passes through an area where there is no or too low Wi-Fi signal, the instructions sent from the app will only be executed when the mower returns to an area with a good signal.
ENGLISH
- If you do not have a Wi-Fi network or signal near the mower's location, you can pair the device via Bluetooth, so that the mower can receive directions directly from the app without the need to link it to the Wi-Fi network.
Connecting the mower to the Internet
Open the app and follow these instructions:
The app is part of the mower system and allows you to download the latest software to optimise your mower's performance.
- Sign up.
- Pair the mower by scanning the QR code. If your phone does not identify the QR code, press "Connect via Bluetooth", after which a pop-up window will open where you must select the Bluetooth device named Mower_XXXXXXXXXXXXXX
- Enter the mower's password (by default, 0000).
- Specify the Wi-Fi network to which you want to connect the mower and enter the password.
- Wait for the pairing process to finish.
5. CLEANING AND MAINTENANCE
WARNING: before cleaning the mower, switch it off. Wear protective gloves before cleaning the blade disc. It can be cleaned with water, but at low pressure (<1 Mpa).
Maintenance
- Clean and check the mower from time to time, some parts should be replaced when they are worn. Turn off the mower before performing any maintenance.
- Keep blades sharp
WARNING: before cleaning, adjusting, or changing blades, turn off the mower and put on protective gloves.
WARNING: when fitting new blades, replace all of them (do not leave any of the old ones). It is not necessary to replace all screws if they are in good condition. You will only have to do this when the screws are damaged. This is important to ensure that the blades do not fall off and to balance the blade disc. Failure to replace damaged screws with new ones could result in serious injury.
- Blades should be changed regularly (especially if the mower is programmed to run every day). Always check the blades for chips or damage and, if so, replace them with new ones. When the blades are not sharp or are worn, replace them. Use the replacement blades provided.
- Before changing the blades, turn off the mower and put on protective gloves.
NOTE: after screwing the blades to the disc, make sure that they can rotate properly.
ENGLISH
Mower storage in winter
The lifespan of the mower will be longer if you store it during the winter. For this reason, we recommend that you store it in a shed or garage during the winter season.
But, before doing so, we recommend the following:
- Clean the mower thoroughly.
- Fully charge the battery and remove it from the mower.
- Disconnect it.
- To maximise the life of the battery, fully charge the battery and remove it from the mower. WARNING: prevent the bottom of the mower from coming into contact with water. If the mower is to be stored outdoors, do not turn it upside down.
6. TROUBLESHOOTING
| Information shown on the display | Meaning Action required | |
| E1 The mower is outside the working area | 1. Place it within the area enclosed by the boundary wire.2. Check that the red and black terminals are not connected backwards.3. If the error still appears, contact the official Cecotec Technical Support Service. | |
| E2 The wheels of themower are blocked | 1. Turn the mower off and place it in an area where there are no obstacles.4. Switch on the mower. Press the button and then .5. If the error code still appears on the display, disconnect the mower. Then, turn it over and check if anything is obstructing the wheels.6. If there is, remove it. Next, turn the mower over again and switch it on. Press the button and then . | |
| E3 The blade disc is blocked | 1. Disconnect the mower.2. Turn it over and check if anything is preventing the blade disc from rotating properly. If the disc or motor is damaged, contact the official Cecotec Technical Support Service.3. Remove any obstructions you find.4. Turn the mower upside down and place it in an area where the grass height is lower or adjust the cutting height to a higher level.6. Switch on the mower. Press the button and then . | |
| E4 Bumper blocked 1. | Switch off the mower.2. Move the mower to an unobstructed area.3. Try to unblock the upper housing.4. If the above step does not solve the problem, remove the cover, and check the magnet on the back. If the magnet is missing, contact the official Cecotec Technical Support Service to have it replaced.5. If magnets are in place, check that the rubber between the cover and the mower is correctly installed.6. Switch on the mower again. | |
ENGLISH
| E5 The mower is not in contact with the ground | 1. Disconnect the mower.2. Position the mower in an area where there are no obstacles.3. Switch on the mower. Press Switch on the mower. Press the button and then.5. If the error code still appears on the display, switch off the mower.6. Turn it over. Check if there is anything preventing the wheels from turning.7. If there is, remove it. Next, turn the mower over again and switch it on. Press the button and then. | |
| E6 The mower is upside down | 1. Turn it over.1. Turn it over.2. Press the button and then.3. If the error still appears, contact the official Cecotec Technical Support Service. | |
| E7 The slope sensor is always activated | 1. Disconnect the mower.2. Check that the slope of the ground does not exceed 15°.3. Place the mower on a flat surface.4. Switch on the mower. Press the button and then.5. If the error still appears, contact the official Cecotec Technical Support Service. |
| E8 The mower has problems connecting to the charging station | 1. Check whether one metre of straight (unobstructed) boundary wire is laid in front of the charging station.2. Check if the charging station has been placed on a flat surface.3. Check that the charging station is not bent.4. If the error still appears, contact the official Cecotec Technical Support Service. |
| E9 The mower is stuck | 1. Position the mower in an area where there are no obstacles.2. If the error still appears, contact the official Cecotec Technical Support Service. |
| BP The battery protection system has been activated | 1. Check the battery temperature. If it is too high, wait until it cools down. If it is too low, wait until the temperature rises above 5 °C.2. If the error still appears on the display, contact the official Cecotec Technical Support Service. |
| E11 The mower does | not receive a signal from the boundary wire | When the mower is inside the working area, check the colour of the indicator light on the charging station. If it is red, it means that the boundary wire is not properly connected to the charging station.If the cable is properly connected, but the indicator light is still red, check that the cable is not broken.If the error still appears on the display, contact the official Cecotec Technical Support Service. |
| E12 Battery problem | Contact the official Cecotec Technical Support Service to change the battery. | |
| E13 Charging problem | Check that the charging head is clean.If the error still appears on the display, contact the official Cecotec Technical Support Service. | |
| E14 | The working area is too large 1. | Reduce the size of the working area. Follow the instructions on this manual.If the error still appears on the display, contact the official Cecotec Technical Support Service. |
| EE | Unknown error | Restart the mower.If the error still appears on the display, contact the official Cecotec Technical Support Service. |
| The mower is blocked | You have entered an incorrect PIN code too many times | 1. You will have to wait for 50 minutes before trying to enter the PIN again.2. If you do not remember which one it is, please contact the official Cecotec Technical Support Service. |
Some cable is tangled or damaged
Put on dielectric gloves and unplug the power cable.
- Unscrew the knob between the extension lead and the adapter.
- Get a new adapter of the same model and replace it.
- Restart the mower.
If you notice abnormal vibrations:
- Switch off the mower.
- Turn it over.
- Check the blades for damage. We recommend that you replace all three blades.
- Turn the mower over and start it up again.
Settings
Does my garden need to be Wi-Fi connected?
- Try to ensure that the Wi-Fi connection covers your entire garden.
- If this is not possible, at least make sure that there is a Wi-Fi connection in the area where the charging station is placed. Thus, the information from the mower will be transmitted from the charging station to the app and vice versa.
*Please note that when pairing the charging station, the mower will need to be connected to the internet.
What do I do if the QR code is not recognised?
If you cannot scan the QR code, connect the mower via Bluetooth.
Operation
Why does the mower sometimes hit some obstacles?
- The mower uses a reactive navigation system, whereby it modifies its trajectory according to the obstacles it hits.
How can I restart the mower if I have pressed the STOP button?
- For safety reasons, press + or + on the display.
ENGLISH
Why does the mower sometimes stop mowing in certain areas?
- The mower does not detect obstacles, and after knocking several times it will stop cutting until it detects one area to another in order to continue the task safely.
What is the function of the rain sensor?
- Although the mower can mow when it rains, it is not recommended. If the mower wheels get muddy, the mowing will be less effective, as wet grass is difficult to cut and also tends to stick to the blade disc. So, by default, the sensor sends the command to the robot to charge.
Connectivity
Why can't the mower connect to the Wi-Fi network?
- Make sure that the Wi-Fi frequency is 2.4 GHz.
- The mobile phone and the mower must be connected to the same network. Ensure that Bluetooth and location permissions and features are enabled on the phone. Check if the Wi-Fi indicator light on the mower's display is light up.
- Check if the Wi-Fi icon in the app is activated.
- Check if the Wi-Fi icon on the mower is activated.
Why can't I find the device when I search for it in Bluetooth?
- Search for the device in the app, not in the phone's Bluetooth device list. Be sure to enable location permissions when establishing the Bluetooth connection.
Why does the location permission have to be enabled?
- This is a requirement of the phone's system configuration. Cecotec does not use this information.
Can I connect the mower to a hotspot network?
- Yes
Software updates
How do I know if the mower needs to be updated?
- If there are new software updates, you will receive notifications in the app.
Why do I need to update the mower?
- We are constantly updating features and user experience improvements to optimise the mower's efficiency. We recommend updating the firmware whenever possible to ensure you enjoy the latest enhancements and the best possible user experience.
Maintenance
How do I store the mower in winter?
- It is recommended to store the mower indoors during the winter. Before storing, make sure that the mower is fully charged and switched off.
Can I clean the mower with water?
- Make sure that all screws are secure before cleaning the mower.
- Use a normal water hose to clean the mower. Do not use a high-pressure water gun.
How often should I change the blades?
- If the grass height is high, change the mower blades every 1-2 months.
- If the robot is to be used in areas where the height of the lawn is kept under control, the blades will stay sharp for a longer period of time.
7. TECHNICAL SPECIFICATIONS
Product reference: 04479
Product: Conga GrassHopper 800 Connected
Cutting diameter: 180 mm
Cutting height: 20-60 mm
Cutting positions: 9
Battery type: Lithium-ion LBF204
Charging time: 3 hours
Power input: 100-240 V AC 50/60 Hz
Power output: 20 V DC 3.0 A
Noise: <55 dB
Weight: approximately 8.0 kg
| Radio technologies | ||
| Compatible radiotechnologies | Frequency band Declared maximum power output (EIRP) | |
| SRD 0.9 kHz - 9 kHz ≤62.45 dBuA/m a 10 m | ||
| Wi-Fi 2400-2483.5 MHz ≤20 dBm | ||
| Bluetooth 2400-2483.5 MHz ≤20 dBm | ||
ENGLISH
Technical specifications may change without prior notification to improve product quality. Made in China | Designed in Spain
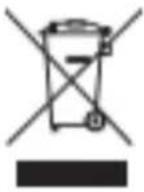
8. DISPOSAL OF OLD ELECTRICAL AND ELECTRONIC APPLIANCES
This symbol indicates that, according to the applicable regulations, the product and/or batteries must be disposed of separately from household waste. When this product reaches the end of its shelf life, you should dispose of the cells/batteries/accumulators and take them to a collection point designated by the local authorities.
Consumers must contact their local authorities or retailer for information concerning the correct disposal of old appliances and/or their batteries.
Compliance with the above guidelines will help protecting the environment.
9. TECHNICAL SUPPORT AND WARRANTY
Cecotec shall be liable to the end user or consumer for any lack of conformity that exists at the time of delivery of the product under the terms, conditions, and deadlines established by the applicable regulations.
It is recommended that repairs be carried out by qualified personnel.
If at any moment you detect any problem with your product or have any doubt, do not hesitate to contact the official Cecotec Technical Support Service at +34 96 321 07 28.
10. COPYRIGHT
The intellectual property rights over the texts in this manual belong to CECOTEC INNOVACIONES, S.L. All rights reserved. The contents of this publication may not, in whole or in part, be reproduced, stored in a retrieval system, transmitted, or distributed by any means (electronic, mechanical, photocopying, recording or similar) without the prior authorization of CECOTEC INNOVACIONES, S.L.
11. DECLARATION OF CONFORMITY
MANUFACTURER: CECOTEC INNOVACIONES S.L
ADDRESS: Av. Reyes Católicos, 60, 46910, Alfafar, Valencia (Spain)
DESCRIPTION: Robot lawn mower
PRODUCT IDENTIFICATION: Conga GrassHopper 800 Connected
FUNCTION: Automated battery-powered lawn mower.
MODEL: 04479
It certifies the product described has been designed, manufactured, and tested and complies with all applicable provisions.
EU DIRECTIVES IMPLEMENTED:
Directive 2006/42/CE on machinery.
Directive 2014/53/EU on the harmonisation of the laws of the Member States relating to the placing on the market of radio equipment.
Directive 2011/65/EU and delegated directive (EU) 2015/863 on the restriction of the use of certain hazardous substances in electrical and electronic equipment.
APPLICABLE HARMONISED NORMS:
EN 60335-1:2012+A11:2014+A13:2017+A1:2019+A14:2019+A2:2019+A15:2021
EN 50636-2-107: 2015+A1:2018+A2: 2020+A3: 2021
EN IEC 55014-1: 2021
EN IEC 55014-2: 2021
EN 301 489-1 V2.2.3
EN 301 489-3 V2.3.2
EN 301 489-17 V3.2.4
EN IEC 61000-3-2: 2019+A1: 2021
EN 61000-3-3: 2013+A1: 2019+A2:2021
EN 303 447 V1.1.1
EN 300 328 V2.2.2
FRANÇAIS
1. PIÈCES ET COMPOSANTS
Image 1:
6. PROBLEEMOPLOSSING
Product: Conga GrassHopper 800 Connected
Maaidiameter: 180 mm
natural_image
Top-down view of a mechanical component with mounting holes and a central shaft (no text or symbols visible)Charging Station
Base fitting nails

Spare blades

Boundary wire reel

Wire pegs
Power adapter
Distance guide
Fig./Img./Abb./Afb./Rys./Obr.1
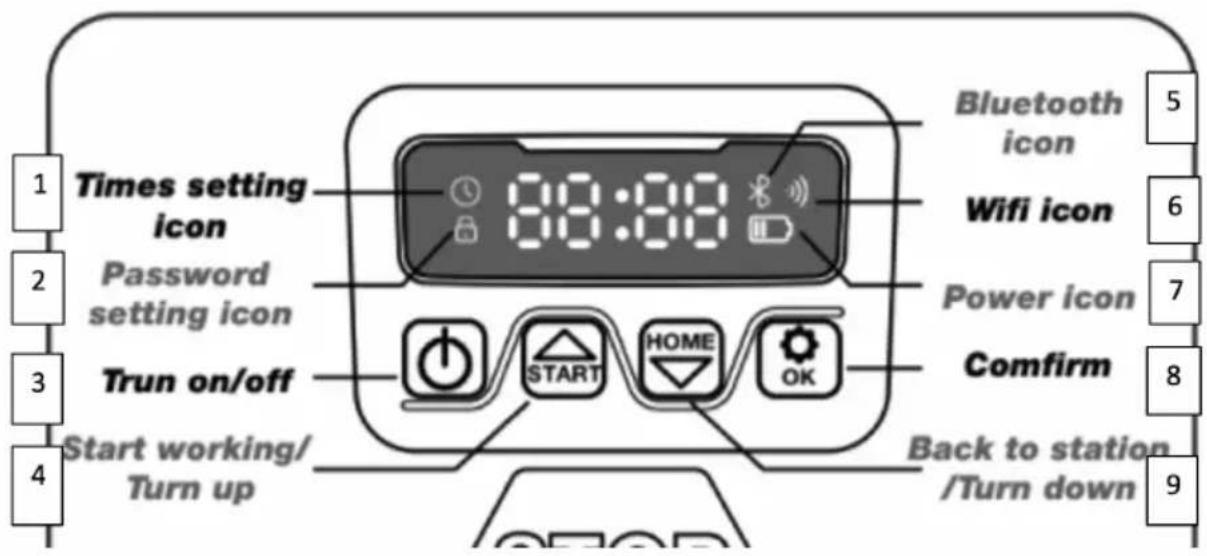
Fig./Img./Abb./Afb./Rys./Obr.2
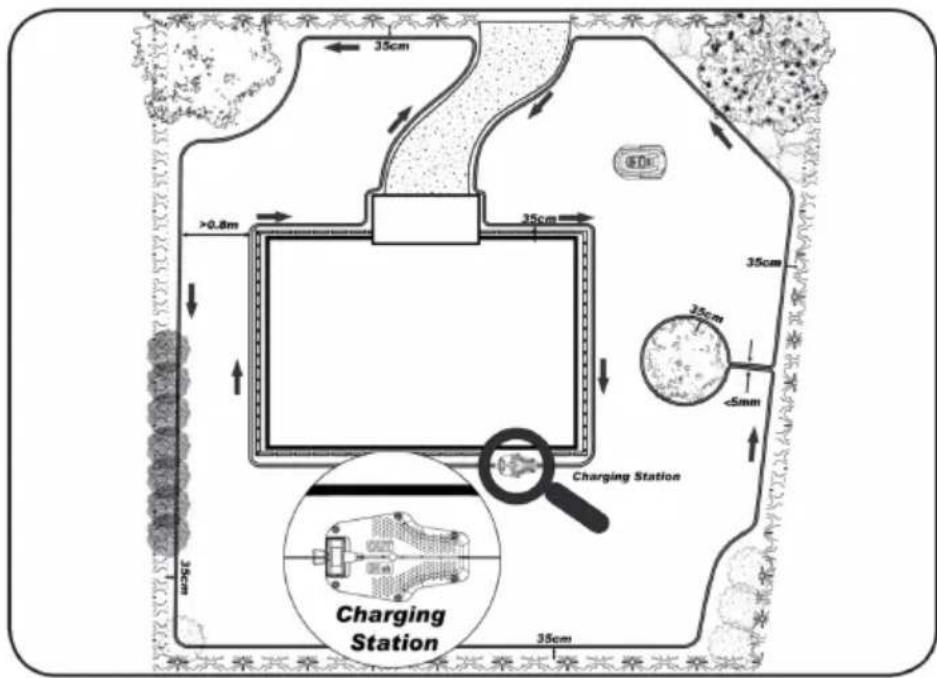
Fig./Img./Abb./Afb./Rys./Obr.3
natural_image
Line drawing of a pair of scissors with a spool inset showing the same tool (no text or symbols)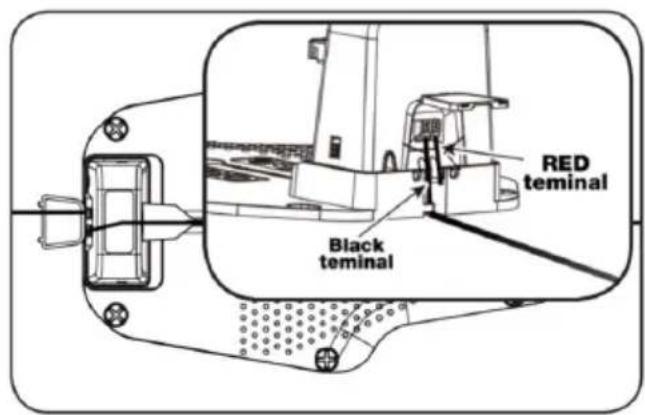
Fig./Img./Abb./Afb./Rys./Obr. 4
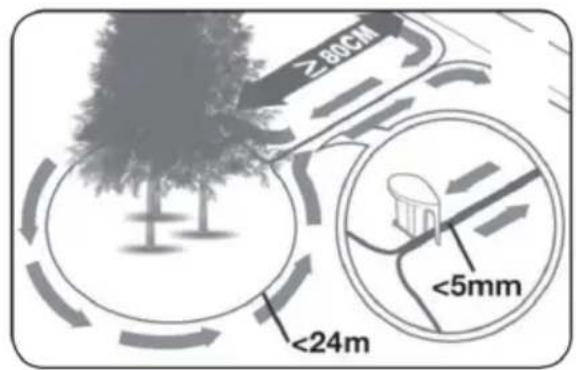
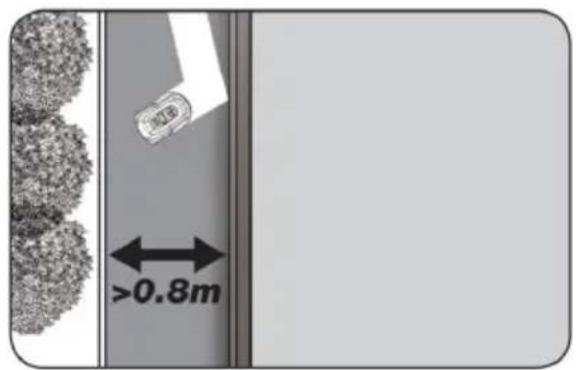
Fig./Img./Abb./Afb./Rys./Obr.5
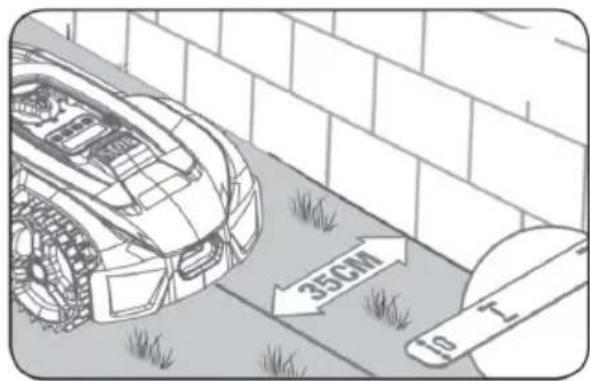
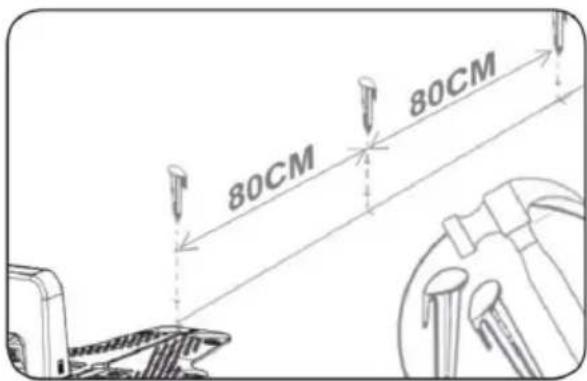
Fig./Img./Abb./Afb./Rys./Obr.6
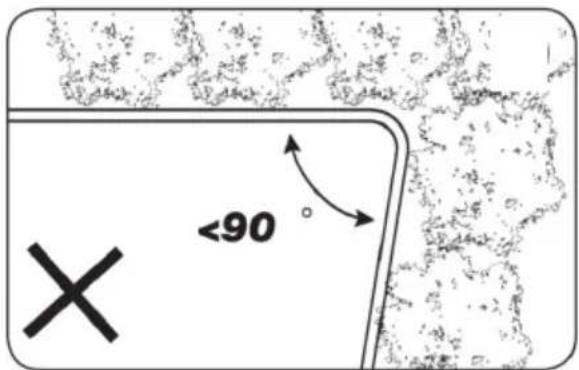
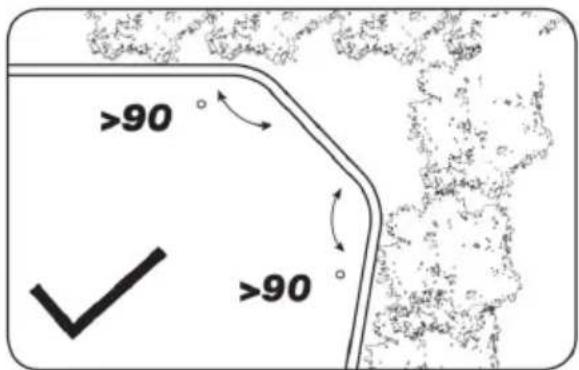
Fig./Img./Abb./Afb./Rys./Obr.7
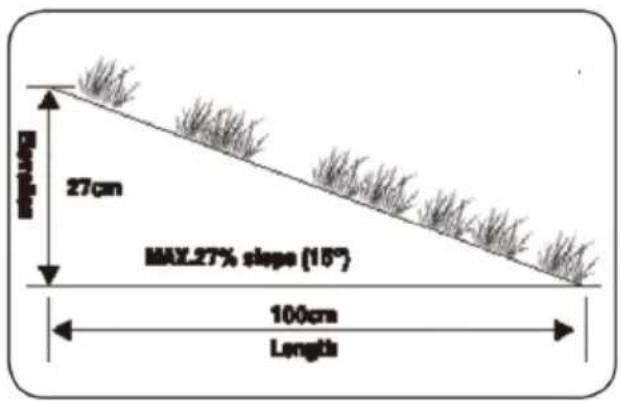
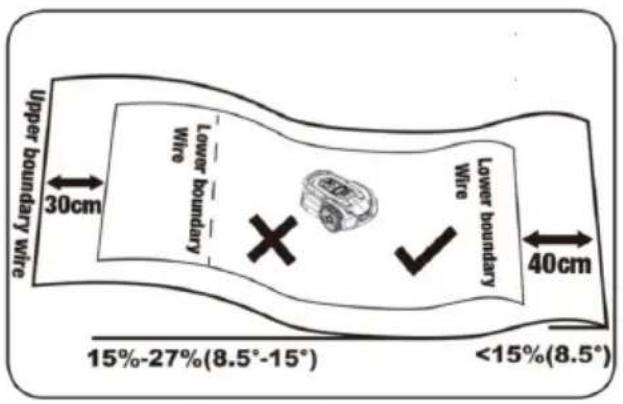
Fig./Img./Abb./Afb./Rys./Obr. 8
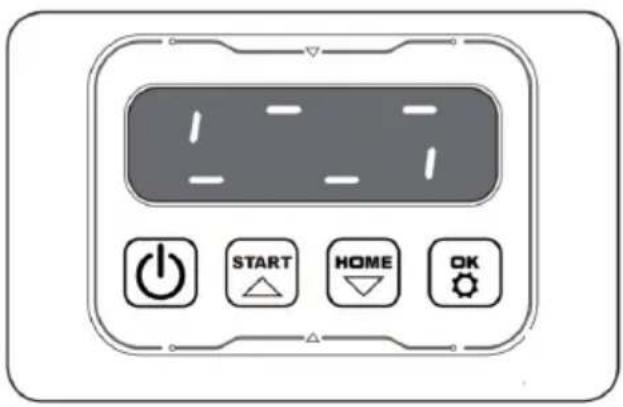
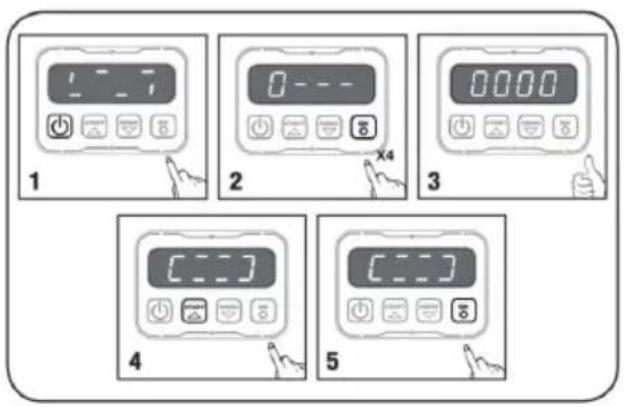
Fig./Img./Abb./Afb./Rys./Obr. 9
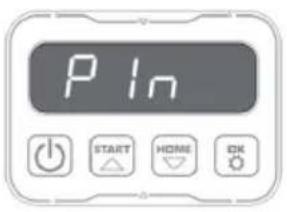
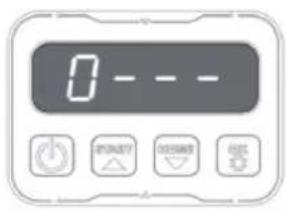
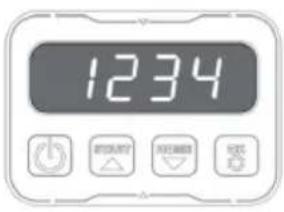
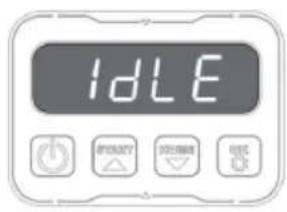
Fig./Img./Abb./Afb./Rys./Obr.10
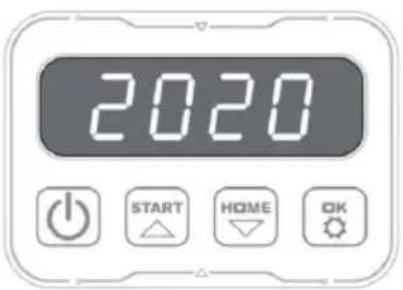
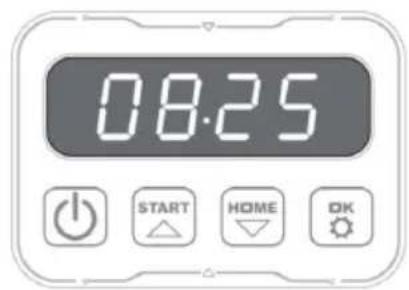
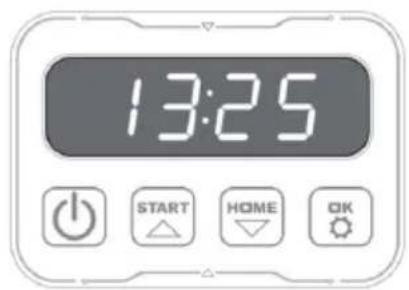
Fig./Img./Abb./Afb./Rys./Obr.11
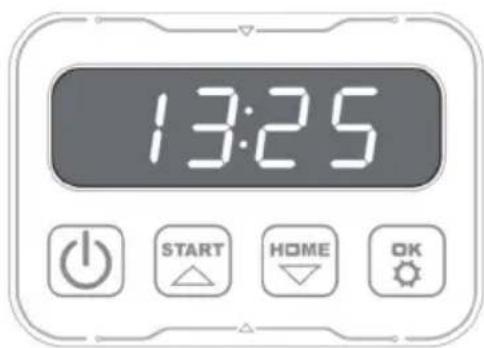
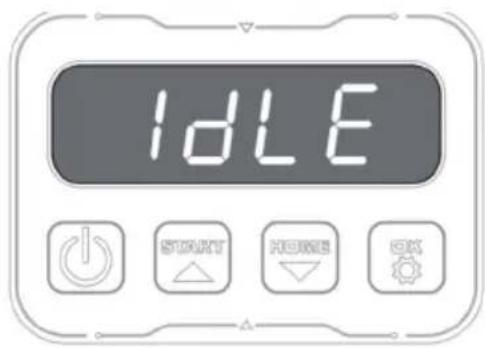
Fig./Img./Abb./Afb./Rys./Obr.11
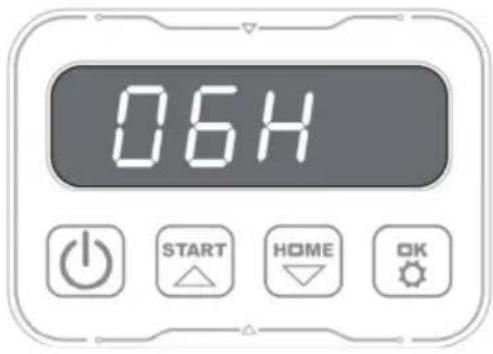

Fig./Img./Abb./Afb./Rys./Obr.13
www.cecotec.es
- SOMMAIRE
- Symbols on the charger
- Battery and charger
- INSTRUCTIONS DE SÉCURITÉ
- Figure 2:
- NOTE:
- BEFORE USE
- Box content
- Not included
- INSTALLATION
- Initial check
- Charging station installation. Figure 3
- ENGLISH
- Boundary wire installation
- Connecting the charging station to the mains
- OPERATION
- Changing the PIN code
- Setting the mower's date
- Changing the mower's time and programming the operating range
- Changing the mower's operating time per day
- Changing the days of operation per week
- Rain sensor configuration
- Zone configuration
- Software update
- Connecting the mower
- Note
- Connecting the mower to the Internet
- CLEANING AND MAINTENANCE
- Maintenance
- Mower storage in winter
- TROUBLESHOOTING
- Some cable is tangled or damaged
- If you notice abnormal vibrations:
- Settings
- Operation
- Connectivity
- Software updates
- TECHNICAL SPECIFICATIONS
- DISPOSAL OF OLD ELECTRICAL AND ELECTRONIC APPLIANCES
- TECHNICAL SUPPORT AND WARRANTY
- COPYRIGHT
- DECLARATION OF CONFORMITY
- FRANÇAIS
- PIÈCES ET COMPOSANTS
- Image 1:
- PROBLEEMOPLOSSING
Brand : CECOTEC
Model : Conga GrassHopper 800 Connected
Category : Robot mower