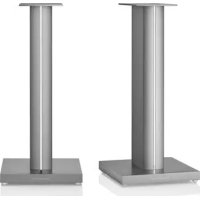
FS600 S3 - Speaker stands BOWERS & WILKINS - Free user manual and instructions
Find the device manual for free FS600 S3 BOWERS & WILKINS in PDF.

| Product type | Floor speaker stand |
| Brand | Bowers & Wilkins |
| Model | FS600 S3 |
| Compatibility | Speakers 606 S3 and 607 S3 |
| Material | Steel (estimate) |
| Height | Approximately 600 mm (estimate) |
| Weight | Approximately 5 kg (estimate) |
| Load capacity | Up to 20 kg (estimate) |
| Adjustable feet | Yes, spikes and rubber feet |
| Spirit level | No |
| Color | Black (likely) |
| Included accessories | Base plate, spikes (4), locking nuts (4), rubber feet (4), protective washers |
| Maintenance | Dust with a soft microfiber cloth. Avoid abrasive, acidic, or ammonia-based products. |
| Safety | Very sharp spikes: keep out of reach of children. Do not touch. |
| Warranty | 2 years (standard, not specified) |
| Compliance | RoHS, REACH, WEEE |
| Height adjustment | No, fixed height |
| Installation | Attach the base plate, screw in the spikes or rubber feet, adjust stability |
Frequently Asked Questions - FS600 S3 BOWERS & WILKINS
User questions about FS600 S3 BOWERS & WILKINS
0 question about this device. Answer the ones you know or ask your own.
Ask a new question about this device
Download the instructions for your Speaker stands in PDF format for free! Find your manual FS600 S3 - BOWERS & WILKINS and take your electronic device back in hand. On this page are published all the documents necessary for the use of your device. FS600 S3 by BOWERS & WILKINS.
USER MANUAL FS600 S3 BOWERS & WILKINS
Welcome and thank you for choosing Bowers & Wilkins.
Our founder, John Bowers, believed that imaginative design, innovative engineering and advanced technology were keys that could unlock the enjoyment of audio in the home. His belief is one that we continue to share and inspires every product we design.
This is a high performance product that rewards thoughtful installation, so we suggest that you take some time to read this manual before you begin. Continue on page 3
| Grille | Foam Plug | Rubber Foot (self-adhesive) | Rubber Foot (screw-on) | Spike Foot | Plinth Allen Key | 45mm Screw | Plain Washer | Shakeproof Washer | |
| 603 S3 | 1 | 4 | |||||||
| 606 S3 | 2 | ||||||||
| 607 S3 | |||||||||
| HTM6 S3 | 1 |
Carton Contents
The table above illustrates the component parts that are packed with the product. In the unlikely event that anything is missing please contact the retailer from whom you purchased the speakers.
Environmental Information
This product complies with international directives, including but not limited to:
i. the Restriction of Hazardous Substances (RoHS) in electrical and electronic equipment,
ii. the Registration, Evaluation, Authorisation and restriction of CHEmicals (REACH)
iii. the disposal of Waste Electrical and Electronic Equipment (WEEE).
Consult your local waste disposal authority for guidance on how properly to recycle or dispose of this product.
2. Positioning 603 S3
Speaker Installation
603 S3
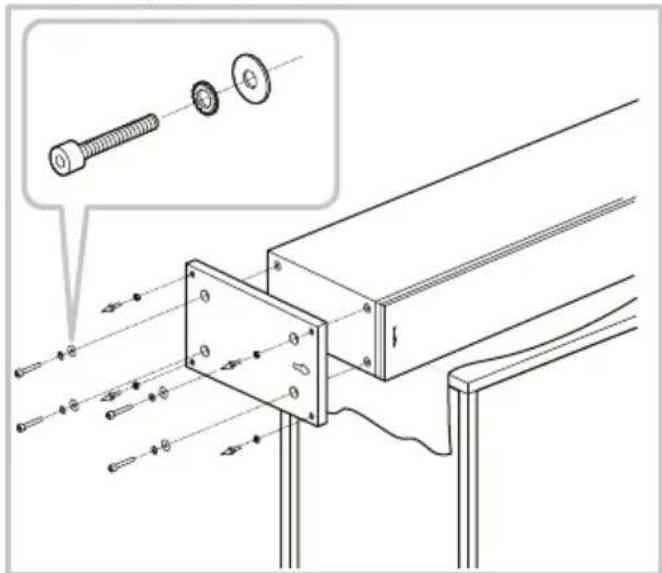
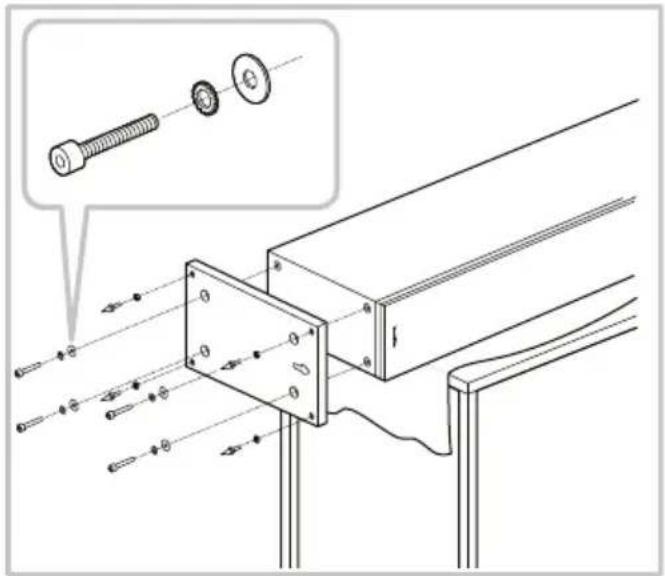
603 S3 is intended to be floor mounted only. For proper stability, always install the provided plinth, then ensure that the speakers stand firmly on the floor using the spike or rubber feet supplied.
You may attach the plinth during the unpacking process, following the illustrations above or the diagrams on the top flap of the carton.
Warning
The plinth MUST always be used, with the rubber or spike feet inserted into the plinth. DO NOT insert rubber or spike feet directly into the cabinet.
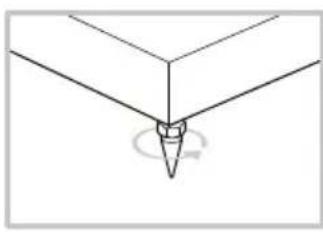

Important Safety Notice
Sharp spikes, do not touch.
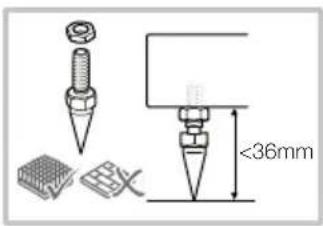
The spike feet are designed to pierce carpet and rest on the floor surface. Initially, screw the lock nuts onto the spikes just far enough to leave the nuts floating just above the carpet when the spikes are resting on the floor beneath. Then, screw the spikes fully into the threaded inserts in the plinth. If the cabinet rocks when placed on the floor, unscrew the two spikes that do not touch the floor until the cabinet rests firmly without rocking. Finally, lock the nuts against the base and gently tighten the nut to stop the spike foot rotating. It may be more convenient to fit and adjust the spike feet after speaker positioning has been optimised.
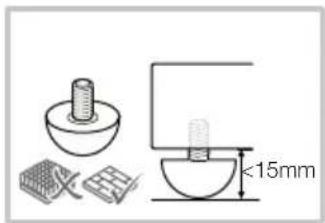
If there is no carpet and you wish to avoid scratching the floor surface, use either a protective metal disc (a coin perhaps) between the spike and the floor, or use the supplied rubber feet. Fit the rubber feet and level the cabinet in the same manner as with the spike feet.
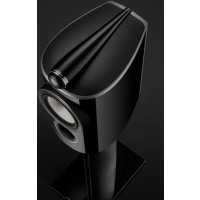
606 S3/607 S3
The 606 S3 and 607 S3 are primarily designed to be mounted on a dedicated floor stand (FS-600 S3), but may be placed on a shelf if preferred. However, it should be noted that this offers less flexibility to optimise the speaker's performance. If shelf placement must be used, we recommend using the foam plugs (supplied) to optimise port performance (see Section 4: Fine-Tuning).
In both installation cases, the speakers' tweeters should be approximately at ear height at your usual listening position.
Note: If using a shelf, ensure that it is strong enough to properly support the weight and fit the four self-adhesive rubber feet to the underside of the speaker.
HTM6 S3
If using a projection television with an acoustically transparent screen, position the speaker behind the centre of the screen. Otherwise, position it either directly below or above the screen using either a floor stand, furniture unit or wall shelf, ensuring the speaker is as close to ear height as possible. If the speaker is to be placed either on a shelf or in a rack shared with other AV equipment, fix the four self-adhesive rubber feet to the base of the speaker. They provide a degree of vibration isolation.
Speaker Positioning
In either stereo or home theatre installations, try to ensure that the immediate surroundings of each speaker are similar in acoustic character. For example, if one speaker is adjacent to bare walls while the other is adjacent to soft furnishings and curtains, both the overall sound quality and the stereo image are likely to be compromised.
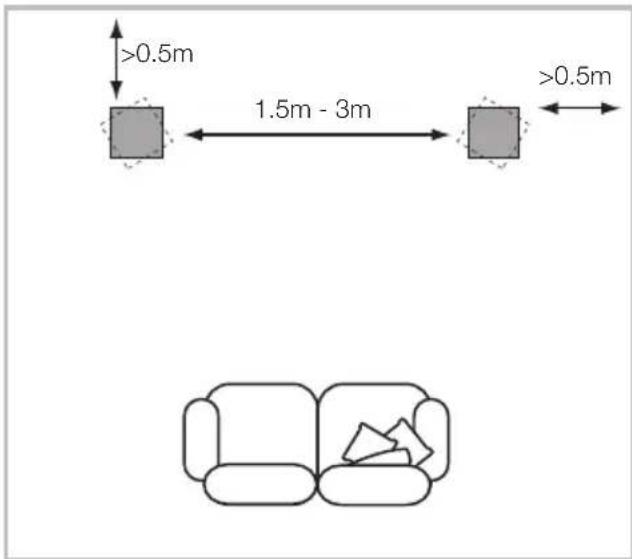
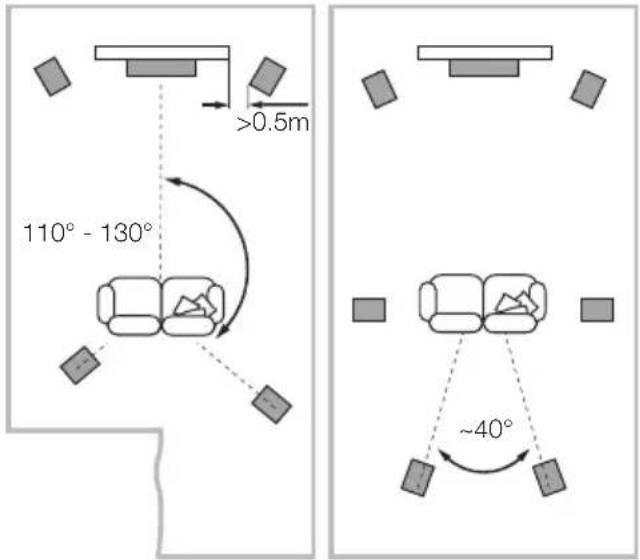
Conventional Stereo Systems
To begin with, the speakers should be positioned between 1.5m and 3m apart at two corners of an equilateral triangle completed by the listening area at the third corner. The speakers should be placed at least 0.5m away from the back and any side walls (as per the illustration above).
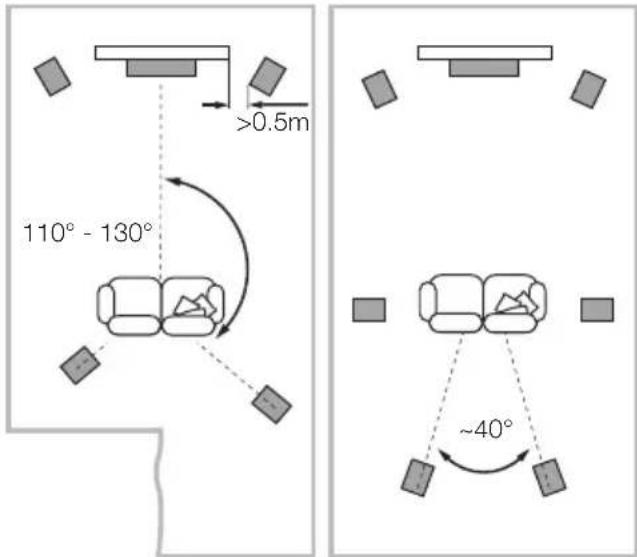
5 Channels 7 Channels
Home Theatre Systems
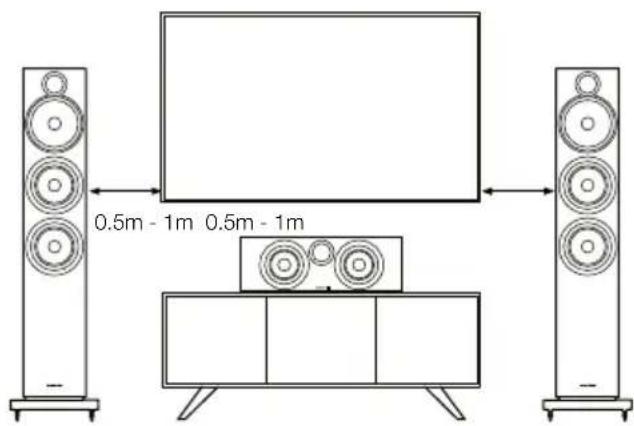
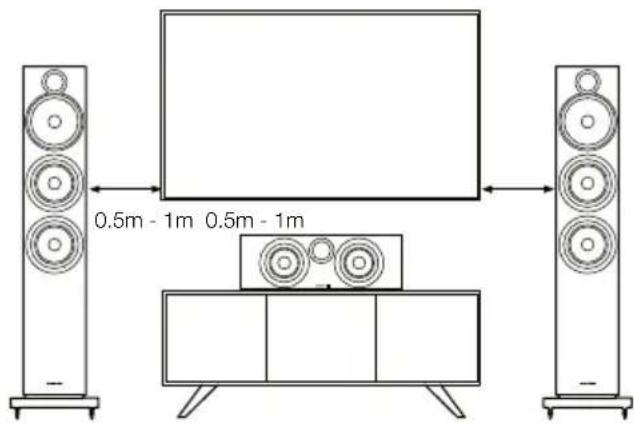
If the speakers are to be used for the front channels in a home theatre system, they should be placed closer together than for 2-channel audio, because the surround channels tend to widen the image. Positioning the speakers within approximately 0.5m of the sides of the screen will also help keep the sound image in scale with the visual image. As with conventional stereo positioning, the speakers should ideally be at least 0.5m away from any side walls.
Stray Magnetic Fields
The speaker drive units create stray magnetic fields that extend beyond the boundaries of the cabinet. We recommend you keep magnetically sensitive articles (CRT television and computer screens, computer discs, audio and video tapes, swipe cards and the like) at least 0.5m from the speaker. LCD, OLED and plasma screens are not affected by magnetic fields.
3. Connections
Conventional Connection Bi-Wired Connection

Important Safety Notice
All connections should be made with the audio equipment switched off. When using audio equipment in normal operation, touching uninsulated speaker
terminals or wiring may result in an unpleasant sensation. The 600 S3 speaker terminals accept a variety of cable terminations: 4mm banana plugs, 6mm and 8mm (1/4 in and 5/16 in) spades, or bare wires up to 4mm (5/32 in) diameter.

Important Safety Notice
In certain countries, notably those in Europe, the use of 4mm banana plugs is considered a potential safety hazard, because they may be inserted into the holes
of unshuttered mains supply sockets. In order to comply with European CENELEC safety regulations, the 4mm holes in the ends of the terminals are blocked by plastic pins. If you are using the products in any country where these conditions apply, you should ensure that any banana plugs cannot be used in an unsafe manner by children or other uninformed persons. The plastic pins can be removed if you wish to use banana plugs.
Ask your dealer for advice when selecting speaker cable. Keep its total impedance below the maximum recommended in the speaker specification and use a low inductance cable to avoid attenuation of high frequencies.
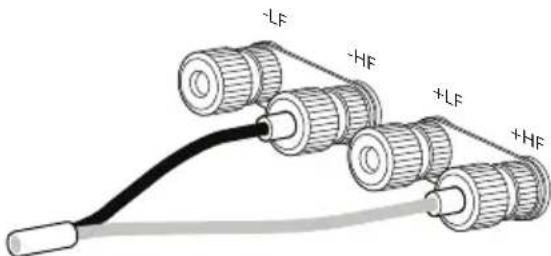
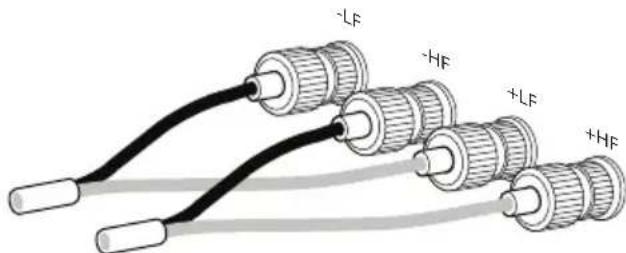
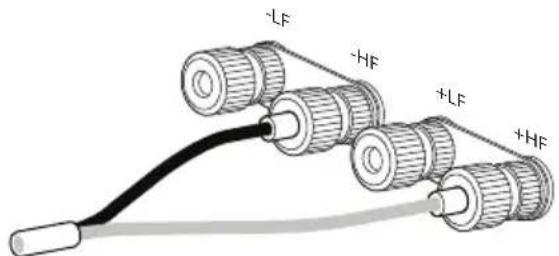
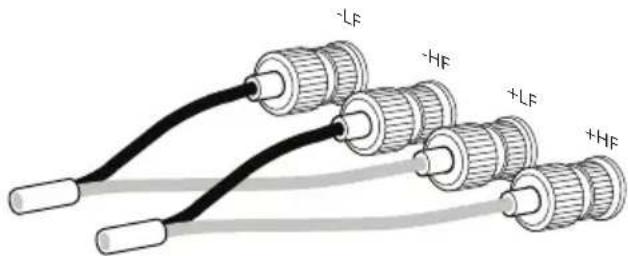
There are two linked pairs of terminals on the back of the speaker. For conventional connection (above left), the terminal links should remain in place (as delivered) and just one pair of terminals connected to the amplifier. For bi-wire connections or bi-amplification (above right), the terminal links should be removed and each pair of terminals connected to the amplifier or amplifiers independently. Bi-wiring can improve the resolution of low-level detail.
Ensure that the positive terminals on the speaker (with red ring) are connected to the positive output terminal on the amplifier and the negative terminals on the speaker (with black ring) are always connected to the negative output terminal on the amplifier. Incorrect connection will not result in damage but will cause poor stereo imaging and loss of bass. Always screw the terminal caps down fully to prevent rattles.
4. Fine-Tuning

Before fine-tuning, make sure that all the connections in the installation are correct and secure.
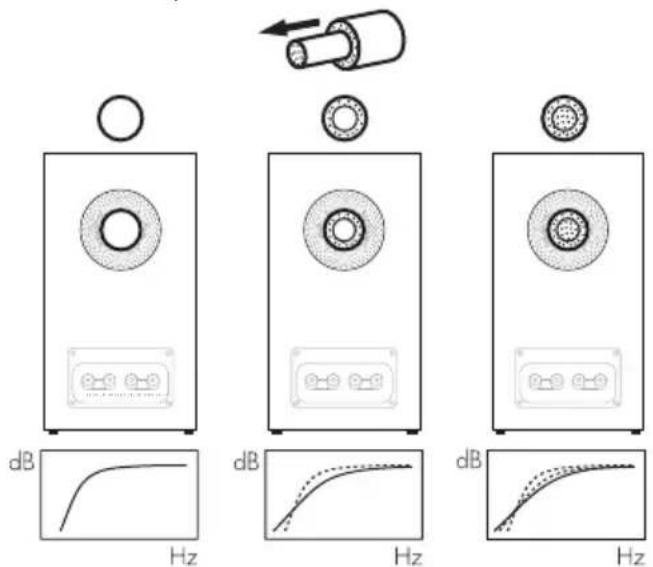
Moving the speakers further from the walls will generally reduce the volume of bass. Space behind the speakers will also help to create an aural impression of depth. Conversely, moving the speakers closer to the walls will increase the volume of bass. If you want to reduce the volume of bass without moving the speakers further from the wall, fit the foam plugs or, for less severe bass reduction, the foam rings in the port tubes (above).
If the bass seems uneven with frequency this will most probably be due to resonance modes in the listening room. Even small changes in the position of the speakers or the listening position can have a profound effect on how these resonances affect the sound. Try moving the listening position or locating the speakers along a different wall. The presence and position of large pieces of furniture can also influence resonance modes.
If no alternatives exist, you can adjust your loudspeakers' low-frequency performance using the supplied foam plugs. The plugs are a two-piece part, allowing for a degree of fine-tuning using either the outer, larger-diameter piece in isolation or the two parts together. Using solely the outer, larger-diameter foam piece will deliver less bass attenuation than the complete plug assembly.
If the central image lacks focus, try moving the speakers closer together or angle them inward so that they point at a location just in front of the listening position. If the sound is too bright, increasing the amount of soft furnishing in the room (heavier curtains for example) may help balance the sound. Conversely, reducing the amount of soft furnishing may help brighten a dull sound.
For the most discerning listening, remove the grilles by gripping around their edges and gently pulling them away from the cabinet.
- Running In 6. Aftercare
The performance of the speaker will change subtly during the initial listening period. If the speaker has been stored in a cold environment, the damping compounds and suspension materials of the drive units will take some time to recover their correct mechanical properties. The drive unit suspensions will also loosen up during the first hours of use. The time taken for the speaker to achieve its intended performance will vary depending on previous storage conditions and how it is used. As a guide, allow up to a week for the temperature effects to stabilise and 15 hours of average use for the mechanical parts to attain their intended design characteristics.
The cabinet surfaces will usually only require dusting. We recommend you use a soft microfibre cloth. If you wish to use an aerosol or other cleaner, apply the cleaner onto the cloth, not directly onto the product, and test a small area first, as some cleaning products may damage some of the surfaces. Avoid products that are abrasive, or contain acid, alkali or anti-bacterial agents. Do not use cleaning agents on the drive units. Avoid touching the drive units as damage may result.
1. Déballage
| Grille Bouchon en mousse | Pied en caoutchoc (auto-adhésif) | Pied en caoutchoc (a visser) | Pointes Plinthe Clé | Allen | Vis de 45mm | Rondelles Rondelle de sécurity | |||
| 603 S3 | 1 | 4 | |||||||
| 606 S3 607 S3 | 2 | ||||||||
| HTM6 S3 | 1 | ||||||||

5 Channels 7 Channels

5 Channels 7 Channels
5 Channels 7 Channels
Sistemi Home Theatre
Bb6op MeCTa JnKoHOHOK
B CNTeMax DOMAUHrO TeaTpa WnC TpeocNCTeMax CTapaNTecb cdaTb Tak,TOb6bl 6nKHeE OKpyXeHne KaxJoN 3K ONoHOK 6blno IOXoXIM NO acyIcYueckm CBOJCTBaM. HanpImep,ecm OHa AC pnnmbKaTe K fONbCTeHemA, aDpyra - K MArKoM MeBemu UToPam, TO 3TO MOKeT OTPiUaTeJIbHO NIOBIMrTa Hs 3ByaHHe.
06bHbIeCTepeocnTeMbI
Ira hauana pacnooxnTe AC ha paccToHnn OT 1,do3M npyOr OTpyaB DByx yTnX paBHOCTOPOHBO TpeYTOhHNA, TpeYrTOYKOTOPOR-ETOHTP 30bI npocnyuHBA. KOLOHK CNEpyePa3MeUaTa HpaCtOHHM He MeHee O5 M OT cTeH C3aHm n C6Oky (CM.PNCYHOK Bblue)

5 kaHaNoB 7 KaHaNoB
CnCTembl DomawHero TeaTpa
Ecn AC nCnOJb3yOTcKa KpOHTaIbHbIe KaHaJIb B DOMaUHem TEaTpE, OHn DOJXHb CTOrTb 6bnKe dpYr KdpY, cEM B 2-KaHaJIbHOM BApHaNTe, T.K. TblIOBBe KaHaJIb paCUnPHToOBpa. PaMeUeHNCe AH paCToAHn npi6nIteHo No 0.5 M oCTopoH eKpaHa TaXe NOMaTe corIACoBaTb MacuTalab 3ByKObORo n 3pnteHoro Oobpa. Ka n B Cnyae ObHyHO CTpeo, AC DoJXHb B IneJe pacnonaratcb Ha paCctoHHn He MeHee 0.5 M OT 3aDHeN b 6kOBbIX CTHe.
PaccceHHoe MarHmTHOH noJe
HAMKNOLOHOOKO3aOTMaHHTHOE NOE, BbXOJAAEE 3a IN npenBb. Mbl peKOMeHyem DEpXaTB MaHHTOuyBCTBNbHe npedMeTb (KHeCKoONbIe CRTTeBn3OpbI, DCNJIEN, NICKETb, MaHHTMbI ayIOu BNdeokaccTe, KAPTOKN T.N.) Ha pacCToAHMmHMMy0.5 OT KO10HOK.LCD, OLED nIIa3MeHHBe NaHEn He NOBepxHeDeCTBnO MaHHTbIX none.
3.Полсоевненя
06bHoe coeHNHeHne CoeHNHeHne 6n-BaepnHrom

BaxHoe yBeDomMHeHne no texHnke 6e3onacHOCTN
Bce NOKIOUHNE BbIIOHIOHTOPI BbIKIOUHHO ayINOCNTMe. PpN UcPONb3OBAHn ayINOCNTMebl BCTaHApTHOM pEXMME KAcHHe HEn3OIPOBaHbIX
BbBOOBKOHOHNINPBOOKNMOXETBb3BaTbHnPNaTHbIe OuyueHH. KJIEMMb600S3 npHnMaKOT WnPOKoe pa3HoOpBa3ne KaBeIbHbX pa3bEmOB:4-MM pa3bEmbl《bHaHb》,nonATKNuPinHO 6MMn8MM(1/4in n5/16in)nnxKe3aunHe HbIE KOHcJI KaBEnJdAmETpOMdo4MM(5/32in).

BaxkHoe 3ameuahne no 6e3onachoctn
B HeKOTOpbIX CTpaHax, B YactHOCTn B Ebpone,
INCNOJb30BAHHe 4-MM pa3bEMOB 《BaHaHOB》CHNTAETCRIOTEHnJIbHO ONaChbIM, T.K. IN NO OUN6Ke MOXHO
BCTABINB 3NEKTPnueckyO PO3Eky.DIa corlacobHnC eBPOeNCKMn HOpMaMn 6eONAnocHcTn (European CENELEC),4-MM OTBepCTNa HA KOHCLAX KEMM 3abNOknpoBaHbI PnaCTMaCCOBblm NpObKaMn. EcnB BnCnOJb3yeTe npOyKT BCTPae, Ige 3TN HOpMbI DeNCTByOT, Bbl DIOJIbHb6bITbYBepeHb, YTO pa3bEmbI b6aHaHbHe CMORYb6bITnpIMeHEbI dETbMn HnNEOCBeDOMHeHHBMNIIODbMn C ONaHOCTbIyI 3dOpOBbI. IIaTcIKOBbIE WHTnTb MOrY b6bITb ydaJeHbI, ECIN Heo6xOIMo NCNoJIb30BaTaPa3bEmbTItna 6aHaH.
PnonpOteBaWeroIepeaNopeKoMeHDoBAtbKa6eJIb.CTapaITecb, T06bleroHMnEdaHc6blHnxKeMaKcMmAbHoDOnyCTUMOROB CInueNfKnacu, a HNyKTMBHOCTb ToXe 6blNa H3KOJ, T06bl He OCLaBtB BlicOKne HaCTOTbl.
Ha 3aJHe nAHe nn KOLOHOK IMeOTcra DBe napb coeINHeHHbIX KOIOHOHyBx KIeMM. PnO obHOM coeINHeHN (KaK BBepy CneBa), COeINHTBHe pAACTINHbI DOXKH aOCTaBAbTcRa H MaCeTe (KaK B MOMENT NOCTABKN AC) u TOnkO Oy npy KJIeMM Heo6XODIMO NOCoEINHbY K cYNInTeIIO. Ia NPOKIIIOUeHnK KOLOHOK 6N-BaepnHROM INN bAMnHROM (KAK BBepy Cnpaba), CoeINHTBHe pAACTINHbI CLeJeET ydaIaNt, n KaXdyNO npy KJIeMM NoCOeINHbT K YcUNInTeIIO (INN yCUnInTeIeM) He3aBnCMo. PNOKIIIOueHne 6N-BaepnHROM MOKeT ynyuHTb pa3peWeHne DeTaIe MAnTO rypOBH.
IIOcOeHNHtE NIOOCOBOn pa3bEm KOIOHKn (C KpaCHbIM 06oKOM) K NIOOCOBOMy BbIXOy ycHInTeR, a MNHyCOBn (C CepHbIM 06oKOM)
-KMNHycOMyHa ycnnteJe. HeBepHoe nokKIOueHeI npBedeT KnckaeHHIO 3BykoBOrO o6pa3a Nytepe bacOB. O6a3aTebHO 3aBNHTTE Kpblky pa3bema do ynpopBaIeped, YTO6bI npOHO 3akpenNTb KaBEnb.
4. Tohka NaCTpoKa
PepenOKOHateJIbHOI TOHNO HAcTpoKoY6eNTecB,TO BCE NOKNIO pABINbHO I HaDexHO.
OTOBINAR KOIOHNOTCTEH, Bbl, KaK IpaBnIO, yMeHbwaete ypOBeHb
6acOB. OocTaOnHoe paccToHne No3aDN KonoHOK No3BOJareT TAKXe
C03dAb 0ouyueHne TjybnHb. COoTBcETCTBEHHO, PnDyBNYB K OIOHNK K
CTeHAM, Bbl yBENuHTe NOIIO bACOB. ECNI Bbl XOTNE CHN3NTb yPOBEHb
6acOB, He OTOBINAR KOIOHNOT CTeh, BCTABTe NopOLOHOBYk 3aJIyUkY
B nOPT faoOHBeptopa, INJxKe -JnHe TaKORo pe3KO rCHNXeHnR - IopOLOHOBOE KOJIbCu (CM.PNC.BblSe).
ECIN INTEHCNBHOCTb CACOB CINbHO 3aBNCNT OACTOTb, 3TO MOKET
6bTB Bb3BaHO akyCTNueCKMN CBOCTBaMn BAeTo NOMEuHnI InpocnyuBaHnA. DaKe He6oBnUme N3MeHeHn B paCNOLOXeHn
KOHOK NIN CNyUATENe MOrTy CUYeCTBeHNo NOBIMrTa H KaYeCTBO
3ByAHnA,OC6eHHO HA Hn3KnX qACTotax. NonpoByTe CmEHnTb
MEcTO pOCyUWBnAHn NIN pa3MeUeHne BAuxN KOIOHok, HApPIMep,
ycTHAOBt bX bDO npG rOteH, cCN 3TO BO3MOxHO.HaHnHne
NIN OTCYCTBnE KpyTHOra6apuTHo Me6eN TaKke MOKET NOBInrTa H B03HNKHOBEHnpe3OHaHCOB B KOMHaTe.
Ecnn BbOpa Het, MoKHO HAcTPOuTH XapAKTeP 3ByaHnBaUHX
aKyCTNueCKNX CNTcEM Ha HN3KNX cactOTax C NOMOULIO PnINaIaeMbIX
npoONHOBbX 3arNyIeK.3arNyIeK COCTOTn3 DByx qactE, YTO
06ecneuBAET ONpeDeneHHyO CTeneHb TOHKOI HAcTPOKnC
NCNoJIb3OBAHNEM NIO OHO NOrHO KOnBuJa 6oNBJeO DNAmETpa, NIOo
DbX qACTeB BMecte, NcNOJIb3OBAHMe TOnBO HApXHO R KOJIbua N3
NEHONPiACTa 6oNBJeO DNAmETpa ObecneuBAeT MehJee OocNa6IeHne
HN3KNX qACTOT, Yem NIOHAR 3aIpyUka IopTa.
Ecnn 3BkyobO B6pa3 B cHtpre Cna6oBAt, nonpo6yTe nOdoBHyTb KOHOK 6nIKe Dpyr K dpyr nnXe HapabNTB B TOcKy nepeD cnWATEmN. Ecm 3Bcy CnHkOM pe3Kn, doBaBte MArKO Me6enn B KOMHate (HaPIMeP, NoOBeCTe TAnKEnle IToTpbi), nn HAO60pOT - y6epnte nx, ecnn 3Bky rnyxOn n63xN3HeHhNb.
Hn60eBbckatehBxCnywateenCHMNTe3uHTHepeWETKNC6aCOB0NcpeHNeHAcTOTHOceKm,B3HBnx3aKpaNocTopoXHONotyHBKc6e.
i. 目前已实现的RoHS(Restriction of Hazardous Substances (易燃易爆)的可燃性)
ii. REACH(Registration, Evaluation, Authorisation and restriction of CH), 1998
iii.WEEE(disposal of Waste Electrical and Electronic Equipment 电能表的安装及使用
iJ 1
2. 603 S3
串形列
603 S3
忘日,贝德卡尼,6mm 8mm(1/4 in 5/16 in)
S300 S30000000000000000000000000000000000000000000000000000000000000000000000000000

中
国(4mm)
SπFJHJHJHJHJHJHJHJHJHJHJHJHJHJHJHJHJHJHJHJHJHJHJHJHJHJHJHJHJHJHJHJHJHJHJHJHJHJHJHJHJHJHJHJHJHJHJHJHJHJHJ HJH J H J H J H J H J H J H J H J H J H J H J H J H J H J H J H J H J H J H J H J H J H J H J H J H J H J H J H J H J H J H J H J H J H J H J H J H J H J H J H J H J H J H J H J H J H J H J H J H J H J H J J H J H J H J H J H J H J H J H J H J H J H J H J H J H J H J H J H J H J H J H J H J H J H J H J H J H J H J H J H J H J H J H J H J H J H J H J H J H J H J H J H J H J H J H J H J H J H J H
賊贝贝印表是日月,如:
Bowers & Wilkins
B&W Group Ltd
Dale Road
Worthing West Sussex
BN11 2BH England
EU Importer:
Bowers & Wilkins
Beemdstraat 11
5653 MA Eindhoven
The Netherlands
Copyright © B&W Group Ltd. E&OE