Lynx 260401 - Binoculars BUSHNELL - Free user manual and instructions
Find the device manual for free Lynx 260401 BUSHNELL in PDF.
User questions about Lynx 260401 BUSHNELL
0 question about this device. Answer the ones you know or ask your own.
Ask a new question about this device
Download the instructions for your Binoculars in PDF format for free! Find your manual Lynx 260401 - BUSHNELL and take your electronic device back in hand. On this page are published all the documents necessary for the use of your device. Lynx 260401 by BUSHNELL.
USER MANUAL Lynx 260401 BUSHNELL
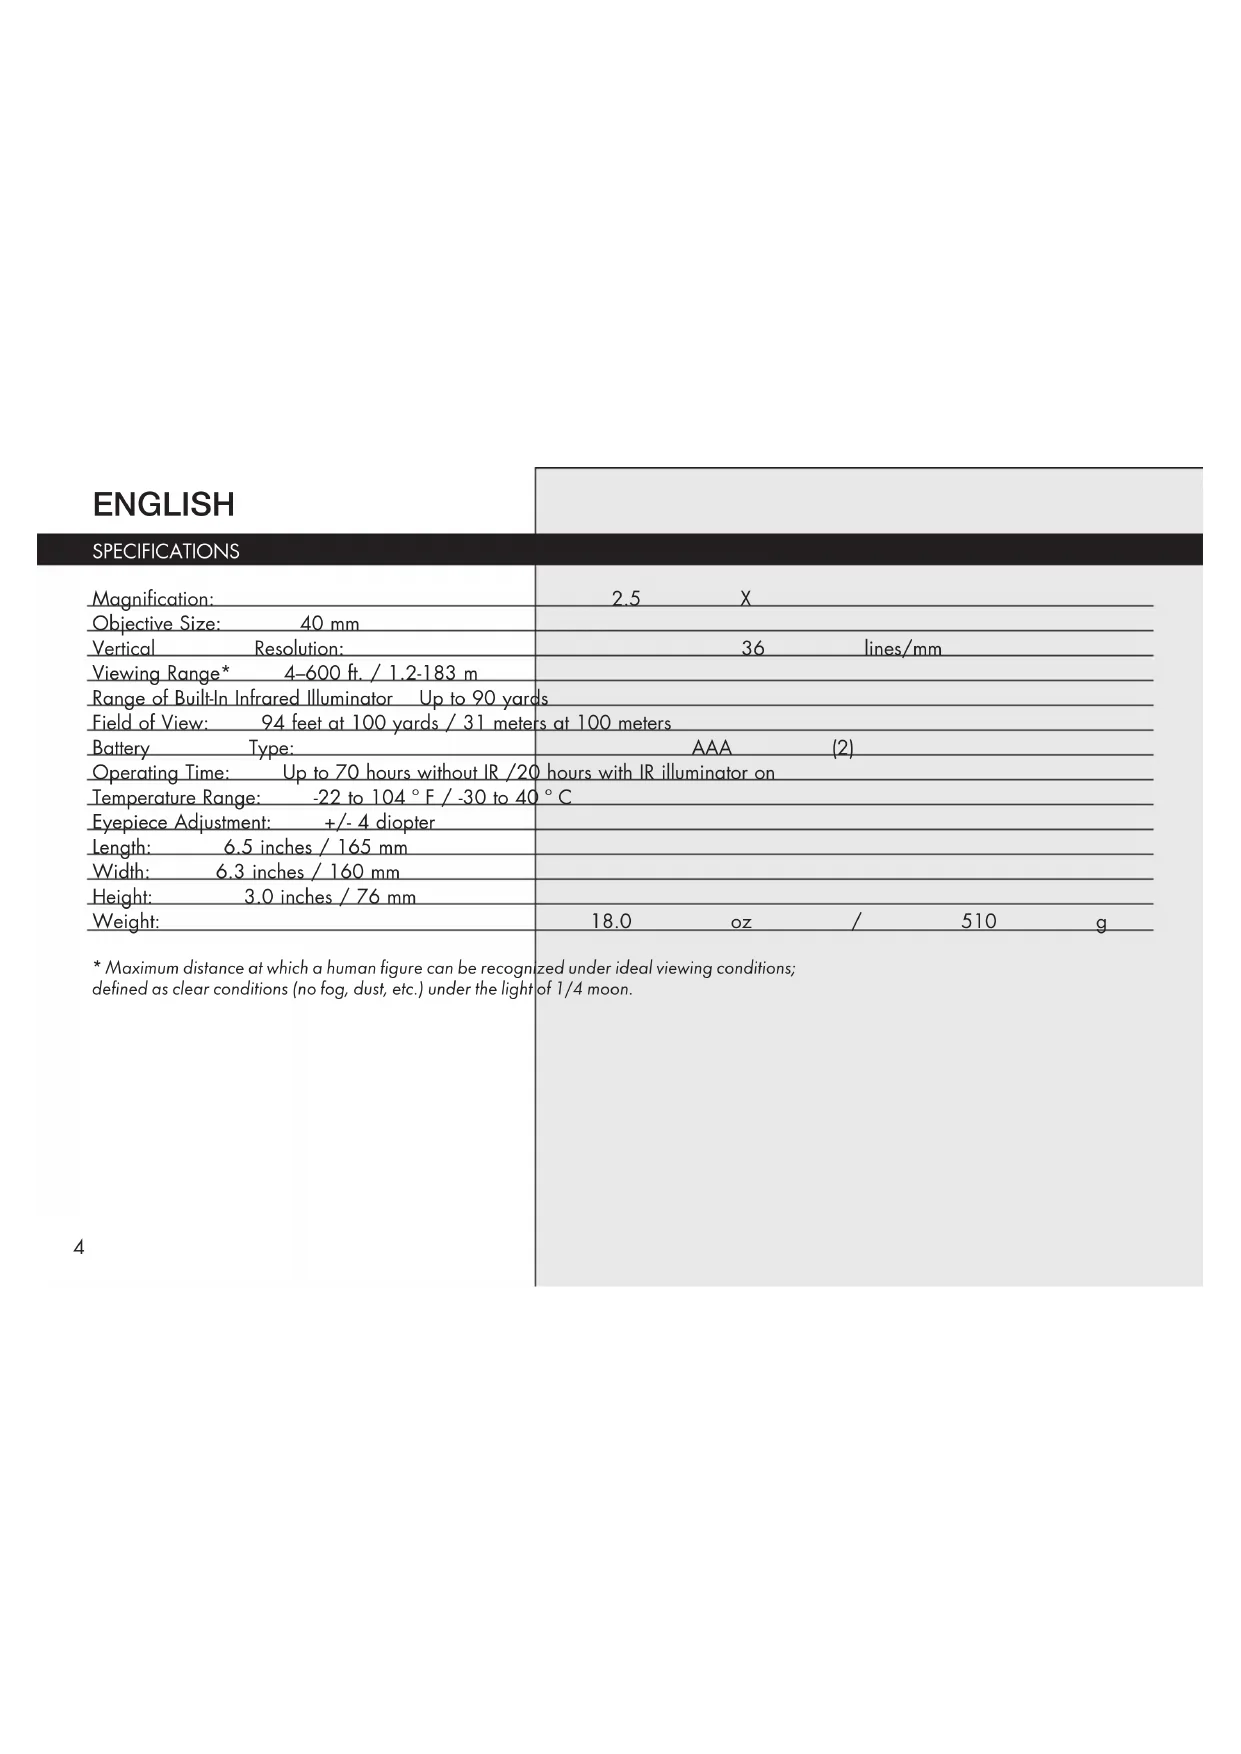
| Magnification: | 2.5 | X | |
| Objective Size: 40 mm | |||
| Vertical Resolution: | 36 | lines/mm | |
| Viewing Range* 4-600 ft. / 1.2-183 m | |||
| Range of Built-In Infrared Illuminator Up to 90 yards | |||
| Field of View: 94 feet at 100 yards / 31 meters at 100 meters | |||
| Battery Type: | AAA | (2) | |
| Operating Time: Up to 70 hours without IR /20 hours with IR illuminator on | |||
| Temperature Range: -22 to 104°F / -30 to 40°C | |||
| Eyepiece Adjustment: +/- 4 diopter | |||
| Length: 6.5 inches / 165 mm | |||
| Width: 6.3 inches / 160 mm | |||
| Height: 3.0 inches / 76 mm | |||
| Weight: | 18.0 oz | / | 510 g |
- Maximum distance at which a human figure can be recognized under ideal viewing conditions; defined as clear conditions (no fog, dust, etc.) under the light of 1/4 moon.
Congratulations on the purchase of your Bushnell Night Vision Product. Bushnell Night Vision products are comprised of high quality image intensifier tubes and optics. Bushnell Night Vision products amplify existing light, allowing you to see in dark conditions too dark for the naked eye.
Bushnell Night Vision products collect and amplify existing light through the objective lens, which is then focused on the image intensifier. Inside the intensifier, a photocathode is "excited" by the light and converts the photon energy into electrons. These electrons accelerate across an electrostatic field inside the intensifier and strike a phosphor screen (like a green monochrome TV screen) which emits an image that you can see. It is the acceleration of electrons, which provides gain and enhances the image. This is a Generation I (analog) night vision device.
Your Night Vision device is ideal for a variety of professional and recreational uses including the following:
Wildlife Observation
Astronomy
Boating / Marine Use
Police / Law Enforcement
Search and Rescue
Security
Property Management
CAUTION: As with any analog night vision device based on light intensifier tube technology, DO NOT REMOVE THE LENS CAPS AND OPERATE THE DEVICE IN BRIGHT LIGHT (DAYLIGHT). Turning on the device's power with the lens covers removed in brightly lit environments (outdoors or indoors) can potentially damage your night vision unit, beyond repair if the light level is very high and/or exposure time is extended. The objective lens caps have a pinhole opening to admit a small amount of light for testing purposes.
GETTING STARTED
Installing Batteries
This device operates on two AAA batteries (alkaline or lithium). To install, rotate the battery cover in a clockwise direction, to the "open" position as shown in the lower right photo. Insert the batteries into the battery compartment so that the positive (+) and negative (-) terminals of the batteries facing you match the markings above the OPEN arrow ("-" on left side, "+" on right side). Replace the battery cover carefully, rotating it counterclockwise back to the closed position.
Use and Testing
Make sure the batteries have been installed according to the instructions above.
If you wish to test your night vision device in a lighted area, be sure the objective lens caps are covering both objective lenses prior to pressing the "ON" button. The objective lens caps have a pinhole opening to admit a small amount of light for testing purposes.
If testing or using the device in the dark, remove the objective lens caps and activate the device by pushing the "ON" button. The power indicator LED above the battery cover will light.
To focus, select an object at the approximate distance for the area that you intend to view. Adjust each eyepiece diopter setting until the image appears the sharpest for your eyesight. After your initial diopter setting, the front (objective) lenses are now utilized for focusing: adjust the front lenses clockwise when you need to focus on closer objects, counter clockwise for more distant objects. If you are unable to focus on very close objects, the eyepieces may then be used as well for fine adjustments only.
Power Indicator

Battery Cover Closed Position

Battery Cover Open Position

Using the Infrared Illuminator
Your Night Vision device offers a Built-In Infrared Illuminator. This allows you to see in complete darkness where no ambient light source, such as moonlight, is available. If the subject is to be viewed in a completely dark area, activate the infrared illuminator by pressing the IR button. In brighter areas turn off the IR illuminator by pressing it again to maximise battery life.
CAUTION: This device can be used in extreme cold weather. However, when the unit is brought back into a warm environment, you must wait approximately 5 hours to allow it to adjust to the change in temperature before using the unit again. If this is not done, damage could occur due to condensation that may have accumulated on the internal circuitry of the unit.
Spots In The Image
You may see spots in the image. These vary from device to device and are very small cosmetic blemishes inside the intensifier tubes. These are normal for "Gen 1" analog technology Night Vision devices and are NOT a defect.
TROUBLESHOOTING
Device will not turn on.
Check that the batteries are installed properly. Replace the batteries with new ones. Check the battery contacts to ensure they are clean and free of corrosion. If the power indicator LED is lit, make sure the objective covers are removed before viewing in dark conditions.
Image is not focused.
Adjust the Eyepiece diopter rings for your vision. Use the Objective Lens focusing controls to adjust for subjects at different distances. If still no improvement, clean the lenses; they may be foggy or dusty.
Visibility decreases or disappears.
Bright light sources such as headlights may cause visibility to degrade or disappear completely. Turn the Power OFF and turn the binocular away from the light source. The unit will restore itself in 1 or 2 minutes. Conditions such as fog or extremely dark environments will decrease visibility.
Image flashes.
The image may flash when used in a bright environment. It may also flash during the first few seconds of use in dark environments.
CARE AND MAINTENANCE
Your Bushnell Night Vision device was designed to provide many years of reliable service.
To ensure that you get the most enjoyment out of your Night Vision device, always obey the following warning and precautions:
Do not point this device toward any light source greater than 1 lux such as car headlights, for an extended period of time.
This device utilizes an internal flash protection system which minimizes potential damage, but long-term exposure to bright lights can damage the unit. Any such damage may void your warranty.
This device was designed to be self-contained. Do not open the body of the device or otherwise attempt to service this device.
Always store the device in a dry, well-ventilated room.
- Remove the batteries if the device is to be stored for longer than 2 months.
- Keep the device away from any heating and air conditioning vents or other heating devices, direct sunlight, and moisture.
- Avoid dropping or otherwise shocking the unit. Although designed for rugged outdoor use, this device incorporates a sophisticated optical system, which could be damaged in extreme cases of misuse.
The device is weather-resistant, not waterproof, and should never be submerged or subjected to a direct stream of water.
- Clean the optical lenses with professional lens cleaning supplies.
- Clean the exterior of the device with a soft clean cloth.
ONE YEAR LIMITED WARRANTY
Your Bushnell® product is warranted to be free of defects in materials and workmanship for one year after the date of purchase. In the event of a defect under this warranty, we will, at our option, repair or replace the product, provided that you return the product postage prepaid. This warranty does not cover damages caused by misuse, improper handling, installation, or maintenance provided by someone other than a Bushnell Authorized Service Department.
Any return made under this warranty must be accompanied by the items listed below:
1) A check/money order in the amount of $10.00 to cover the cost of postage and handling
2) Name and address for product return
3) An explanation of the defect
4) Proof of Date Purchased
5) Product should be well packed in a sturdy outside shipping carton, to prevent damage in transit, with return postage prepaid to the address listed below:
IN U.S.A. Send To:
Bushnell Outdoor Products
Attn.: Repairs Attn.: Repairs
9200 Cody 140 Great Gulf Drive, Unit # B
Overland Park, Kansas 66214 Vaughan, Ontario L4K 5W5
IN CANADA Send To:
Bushnell Outdoor Products
For products purchased outside the United States or Canada please contact your local dealer for applicable warranty information. In Europe you may also contact Bushnell at: Bushnell Germany GmbH
European Service Centre
Mathias-Bruggen-Str. 80
D-50827 Köln
GERMANY
This warranty gives you specific legal rights.
You may have other rights which vary from country to country.
©2014 Bushnell Outdoor Products
FCC NOTE
This equipment has been tested and found to comply with the limits for a Class B digital device, pursuant to Part 15 of the FCC Rules. These limits are designed to provide reasonable protection against harmful interference in a residential installation. This equipment generates, uses and can radiate radio frequency energy and, if not installed and used in accordance with the instructions, may cause harmful interference to radio communications. However, there is no guarantee that interference will not occur in a particular installation. If this equipment does cause harmful interference to radio or television reception, which can be determined by turning the equipment off and on, the user is encouraged to try to correct the interference by one or more of the following measures:
- Reorient or relocate the receiving antenna.
- Increase the separation between the equipment and receiver.
- Connect the equipment into an outlet on a circuit different from that to which the receiver is connected.
- Consult the dealer or an experienced radio/TV technician for help.
Shielded interface cable must be used with the equipment in order to comply with the limits for a digital device pursuant to Subpart B of Part 15 of FCC Rules.
Specifications and designs are subject to change without any notice or obligation on the part of the manufacturer.
FCC
Disposal of Electric and Electronic Equipment
(Applicable in the EU and other European countries with separate collection systems)
This equipment contains electric and/or electronic parts and must therefore not be disposed of as normal household waste. Instead, it should be disposed at the respective collection points for recycling provided by the communities. For you, this is free of charge.
If the equipment contains exchangeable (rechargeable) batteries, these too must be removed before and, if necessary, in turn be disposed of according to the relevant regulations (see also the respective comments in this unit's instructions).
Further information about the subject is available at your community administration, your local waste collection company, or in the store where you purchased this equipment.

Bushnell Outdoor Products
Repairs
9200 Cody 140 Great Gulf Drive, Unit # B
Overland Park, Kansas 66214 Vaughan, Ontario L4K 5W5
Attn.: Repairs
Bushnell Germany European Service
Mathias-Bruggen-Str. 80 D-50827 Köln
GERMANY
Tél: +49 Fax: +49

m = 311 ;

ESPÁNOL
ESPECIFICACIONES
CÓMOFUÑNCLAL VISIONNOCTURNA
Bushnell Outdoor Products
Attn.: Repairs Attn.: Rep.
9200 Cody 140 Great Gulf Drive, Unit # B
Overland Park, Kansas 66214 Vaughan, Ontario L4K 5W5
En CANADÁ enviar a:
Bushnell Outdoor Products
©2014 Bushnell Outdoor Products

m = 311 ;

DEUTSCH
TECHNISCHE DATEN
| Bushnell Outdoor Products | Bushnell Outdoor Products | ||
| Attn.: Repairs | Attn.: Repairs | ||
| 9200 | Cody | 140 Great Gulf Drive, Unit # B | |
| Overland Park, Kansas 66214 | Vaughan, Ontario L4K 5W5 | ||
©2014 Bushnell Outdoor Products

m = 311 ;

ITALIANO
SPECIFICHE
Ingrandimento: 2,5 X
Peso: 18,0 once/510 g
Bushnell Outdoor Products
Attn.: Repairs Attn.: Repairs
9200 Cody 140 Great Gulf Drive, Unit # B
Overland Park, Kansas 66214 Vaughan, Ontario L4K 5W5
IN CANADA Send To:
Bushnell Outdoor Products
©2014 Bushnell Outdoor Products

m = 311 ;

Bushnell
©2014 Bushnell Outdoor Products
www.bushnell.com