
SUP50T2 - Electronic device accessory SONY - Free user manual and instructions
Find the device manual for free SUP50T2 SONY in PDF.

| Product type | TV stand (floor stand) |
| Brand | Sony |
| Model | SU-P50T2 |
| Compatibility | Sony flat-screen TVs KDE-P42MRX1, KDE-P50MRX1, KDE-P61MRX1, KE-P42MRX1, KE-P50MRX1, KE-P61MRX1; LCD TVs KDL-L42MRX1, KLV-L42MRX1 |
| Dimensions (W × D × H) | 600 × 321 × 602 mm |
| Weight | 19.0 kg |
| Material | Steel |
| Color | Black |
| Installation | On floor, on a flat and stable surface, by at least two people |
| Fastening | 10 countersunk screws (M? ) and 2 fixing screws (supplied) |
| Tightening torque | Approximately 2.45 N·m (for electric screwdriver) |
| Wall anchoring | Recommended to prevent falling (rope or chain not supplied) |
| Cleaning | Soft dry cloth; mild detergent for stubborn stains; avoid thinner/gasoline |
| Included parts | Main console, support, 10 countersunk screws, 2 fixing screws, 1 collar |
| Required tools | Phillips screwdriver |
| Number of pages of the manual | 132 |
| Available languages | French, English, German, Spanish, Italian, Portuguese, etc. |
Frequently Asked Questions - SUP50T2 SONY
User questions about SUP50T2 SONY
0 question about this device. Answer the ones you know or ask your own.
Ask a new question about this device
Download the instructions for your Electronic device accessory in PDF format for free! Find your manual SUP50T2 - SONY and take your electronic device back in hand. On this page are published all the documents necessary for the use of your device. SUP50T2 by SONY.
USER MANUAL SUP50T2 SONY
For Customers and Sony Dealers in Europe
Tabletop Stand
Instructions GB
Mode d'emploi FR
Instrucciones ES
Instruções PT
Vejledning DK
Instruksjoner NO
Bruksanvising
Käyttoohje FI
Instructies NL
Thank you for purchasing this product.
To Customers
Sufficient expertise is required for installing this product. Be sure to subcontract the installation to Sony dealers or contractors and pay special attention to safety during the installation. Sony is not liable for any damages or injury caused by mishandling or improper installation. Your Statutory Rights (if any) are not affected.
WARNING
If the safety precautions are not observed or the product is used incorrectly, it may result in serious injury or fire.
This instruction manual shows the correct handling of the product and important precautions necessary to prevent accidents. Be sure to read this manual thoroughly and use the product correctly. Keep this manual available for future reference.
For Sony dealers
Sufficient expertise is required for installing this product. Be sure to read this instruction manual thoroughly to do the installation work safely. Sony is not liable for any damages or injury caused by mishandling or improper installation. Your Statutory Rights (if any) are not affected. Please give this manual to the customer after installation.
On Safety
Products by Sony are designed with safety in mind.
If the products are used incorrectly, however, it may result in a serious injury through fire, electric shock, the product toppling over, or the product dropping. Be sure to observe the precautions for safety to prevent such accidents.
CAUTION
This Tabletop Stand is intended for use only with the following products. Use with other apparatus is capable of resulting in instability causing possible injury.
Specified product (As of March 2004)
| Tabletop Stand SU-P42T2 SU-P50T2 | ||
| Flat Panel Colour Television KDE-P42M (Display Model) (PDM-4210) (PDM-5010) | MRX1 KDE-P50MRX1 KDE-P61MRX1 (PDM-6110) (PDM-6110) | KE-P42MRX1 KE-P50MRX1 KE-P61MRX1 (PDM-4210) (PDM-5010) (PDM-6110) |
| LCD Colour Television KDL-L42MRX1 (Display Model) (LDM-4210) | — KLV-L42MRX1 (LDM-4210) |
For Customers
WARNING
If the following precautions are not observed, serious injury or death through fire, electric shock, the product toppling over, or the product dropping can result.
Be sure to subcontract the installation to Sony dealers.
If persons other than Sony dealers do the installation work, this may result in serious injury, as the Display Unit is very heavy.
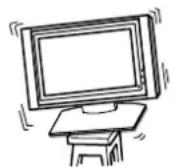
Be sure to take measures to prevent the stand from toppling over.
If you fail to do so, the Tabletop Stand may topple over during an earthquake and cause injury or property damage. Draw a rope, chain, etc. through the holes of the Security Attachments located on the upper part of the main bracket and fix the other ends of the rope, chain, etc. to the wall, pillar, etc. to anchor the Tabletop Stand and prevent it from toppling over.
Be sure to install the Tabletop Stand on a solid and flat surface.
Do not install the Tabletop Stand so that it leans in one direction. If you do so, the Tabletop Stand may topple over or the Display Unit may fall. This may cause injury or property damage.
Be sure to install the Tabletop Stand on a stable surface.
If you install the Tabletop Stand on an unstable surface, it may lose its balance and topple over or fall off. This may cause injury or property damage.

Do not lean on or hang from the Display Unit with the Display Unit installed on the Tabletop Stand.
The Tabletop Stand may topple over, or the Display Unit may fall and cause serious injury or death.

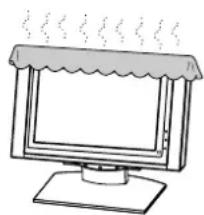
Do not cover the ventilation hole of the Display Unit.
If you cover the ventilation hole (with a cloth, etc.), heat may build up inside and cause fire.

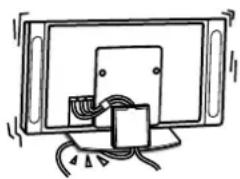
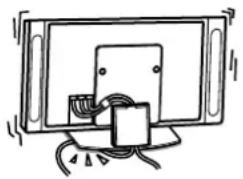
Do not allow the mains lead or the Display Interface Cable to be pinched.
- Do not allow the mains lead or the Display Interface Cable to be pinched when you install the Display Unit on the Tabletop Stand. If the mains lead or the Display Interface Cable is damaged, this may result in a fire or an electric shock.
- Do not step on the mains lead or the Display Interface Cable when you carry the Tabletop Stand. The mains lead or the Display Interface Cable may be damaged, and this may result in a fire or an electric shock.
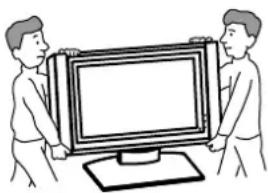
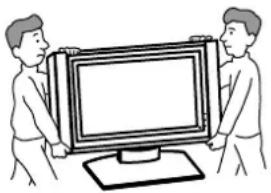
Be sure to carry the stand in the manner shown in this manual.
If the Tabletop Stand is carried incorrectly, it may topple over and cause injury.
Do not stumble over the mains lead or the Display Interface Cable.
If you stumble over the mains lead or the Display Interface Cable, the Tabletop Stand may topple over and cause injury.
Do not carry the Tabletop Stand with Display Unit installed on it.
Be sure to remove the Display Unit before attempting to carry the Tabletop Stand.
If you fail to do so, the Display Unit may fall and cause bodily injury.
CAUTION
If the following precautions are not observed, injury or property damage may occur.
Do not install any equipment other than the specified product.
This stand is designed for use with the specified product only. If you install equipment other than specified, it may fall and cause injury or property damage.
Be sure to use the securing screws.
If the securing screws are not used, the Display Unit may fall and cause injury.
Notes on installation
- W hen assembling, lay the packing materials on the floor to avoid damage to the floor.
-
Install the stand on a solid and flat surface. Do not allow the stand to be installed at an angle or incline. To avoid this, observe the following precautions.
-
If you install the stand on a soft surface such as a mat or a carpet, lay a board over the designated location beforehand.
- Do not install the stand in a place subject to direct sunlight or near a heater.
- Do not install the stand in a hot or humid place, or outdoors.
Note on use
To keep the stand clean, occasionally wipe the stand with a dry soft cloth. Stubborn stains may be removed with a cloth slightly dampened with diluted detergent. Then wipe the area with a dry soft cloth. Do not use chemicals, such as thinner or benzine, as they damage the finish of the stand.
Assemble the Tabletop Stand
For Sony Dealers
To Sony Dealers
The following instructions are for Sony Dealers only. Be sure to read safety precautions described above thoroughly and pay special attention to safety during the installation, maintenance, checking and repair of this product.
Be sure that two or more persons do the installation work.
Be sure that two or more persons install the Display Unit on the Tabletop Stand. If one person does the installation work alone, this may result in an accident or an injury.
Be sure to assemble the Tabletop Stand securely following the instructions in this manual.
If any of the screws are loose or fall out, the Tabletop Stand may lean and topple over, or the Display Unit may fall. This may cause injury or property damage.
Be careful not to hurt your hands or fingers when assembling the Tabletop Stand.
Be careful not to hurt your hands or fingers when assembling the Tabletop Stand or when installing the Display Unit.
Be sure to install the Display Unit securely, following the proper procedure.
Be sure to tighten the screws firmly.
If the Display Unit is not installed securely, it may fall and cause injury.
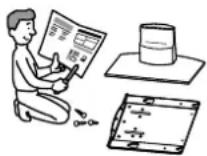
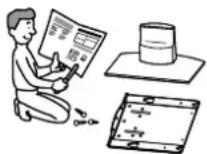
Check the parts
| Name Quantity Name Quantity | |||
| Main bracket Countersink screw | 1 | 10 | |
| Securing screw | |||
| Stand 2 | 1 Cable clamper | 1 | 1 |
Prepare a Phillips screwdriver beforehand.
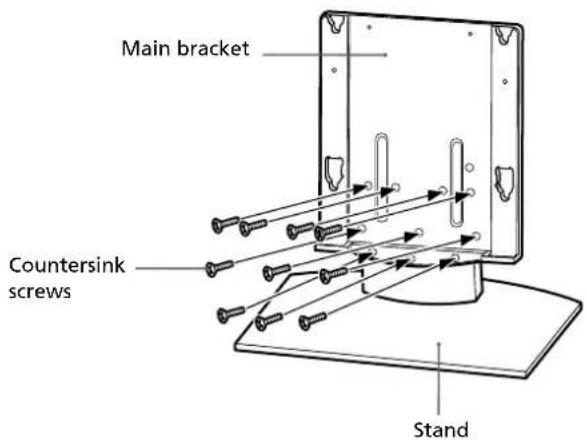
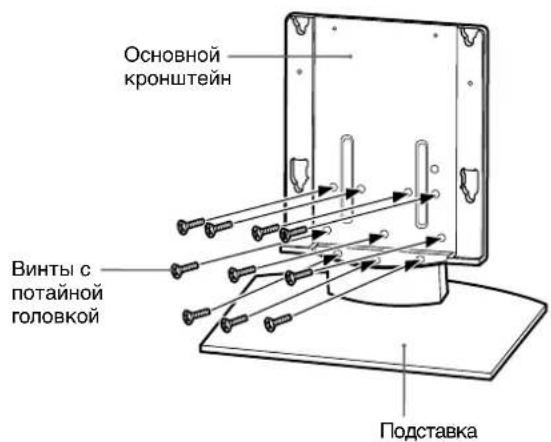
Install the main bracket
Align the main bracket over the screw holes on the stand. Then fasten the main bracket to the stand using 10 countersink screws.
Be sure that two or more persons hold the parts during this procedure.
Tighten the 10 countersink screws once again after screwing them temporarily.
Note
Be sure to hold the stand firmly and keep it stable.
Caution
When using an electric screwdriver, set the torque setting to about 2.45N· m
Do not use an impact driver. If you use an impact driver or an electric screwdriver with the torque setting out of the specified range, screws may be excessively tightened, which may damage the screws or product. The stand may fall and serious injury may result.
Install the Display Unit
WARNING
Be sure to complete the installation before connecting the mains lead to the wall socket. If you allow the mains lead to be pinched under or between pieces of equipment, this may result in a short circuit or an electric shock. If you stumble over the mains lead or the Display Unit, the stand may topple over and cause injury.
1
Install the Display Unit on the Tabletop Stand.
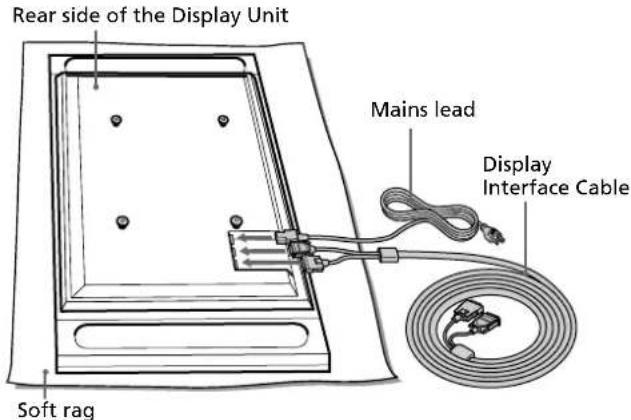
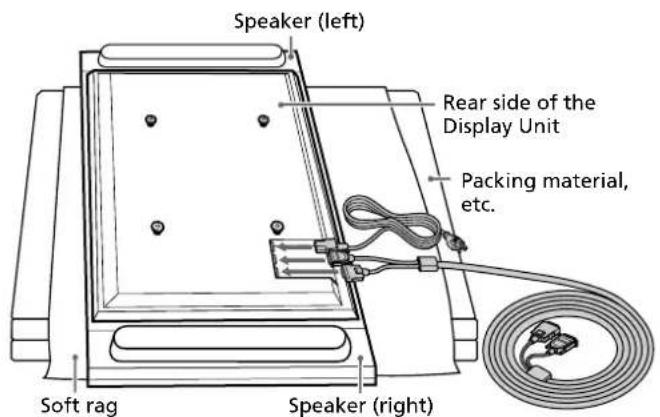
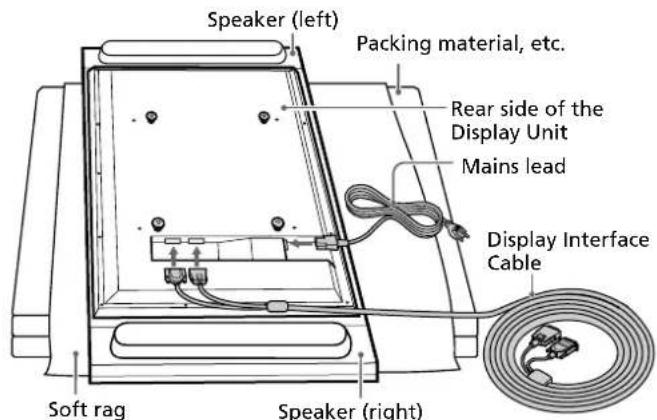
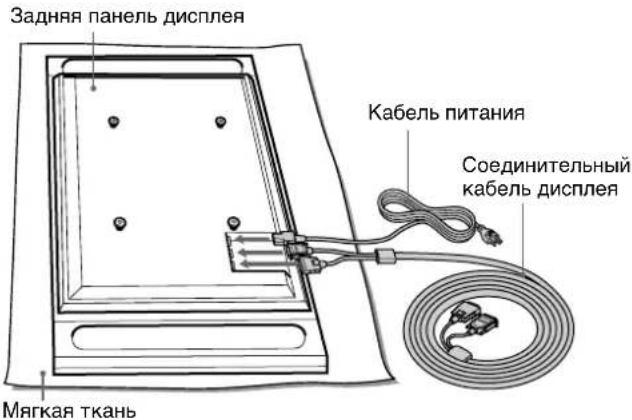
1Connect the mains lead and the Display Interface Cable to the Display Unit.
Tip
See the instruction manual of the Sony Flat Panel Colour Television or LCD Color Television for more details on connecting the mains lead and the Display Interface Cable.
Notes
-
If the weight of the Display Unit is placed on the speakers, deformation or a loose connection of the speakers may result. To avoid this, observe the following. (KDE-P61MRX1, KE-P61MRX1, KDL-L42MRX1, KLV-L42MRX1 only)
-
Do not hold the speakers when carrying the Display Unit.
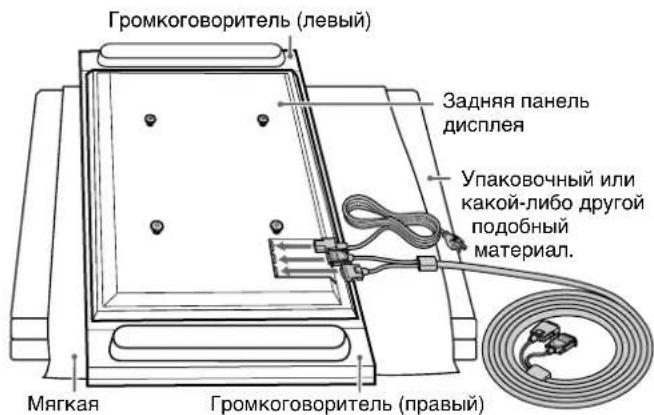
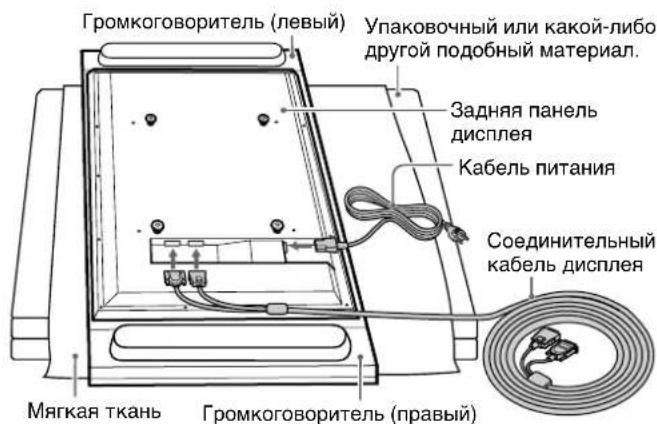
- W hen connecting cables to the Display Unit, place packing material, etc. on the floor and lay the Display Unit face down on it so that the speakers on either side of the Display Unit are clear of the packing material, etc.
- Be sure to place the Display Unit stably.
- Use soft cloth to protect the screen of the Display Unit from damage or dirt.
KDE-P42MRX1/KE-P42MRX1/KDE-P50MRX1/KE-P50MRX1
KDE-P61MRX1/KE-P61MRX1
KDL-L42MRX1/KLV-L42MRX1
Illustrations without model names that appear from now on are based on the Flat Panel colour television KDE-P42MRX1, KE-P42MRX1.
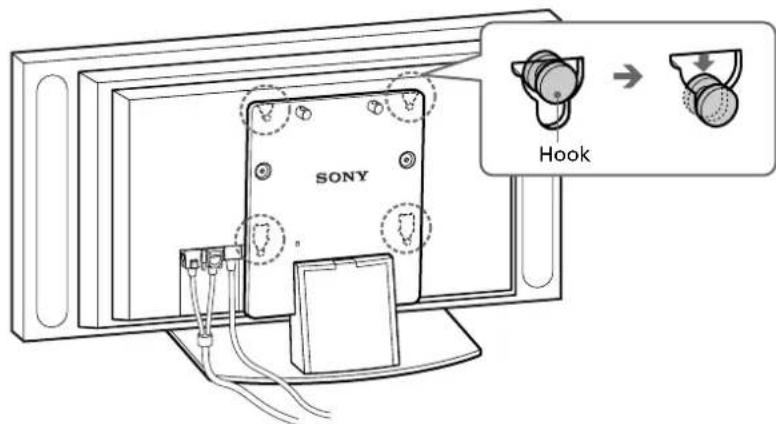
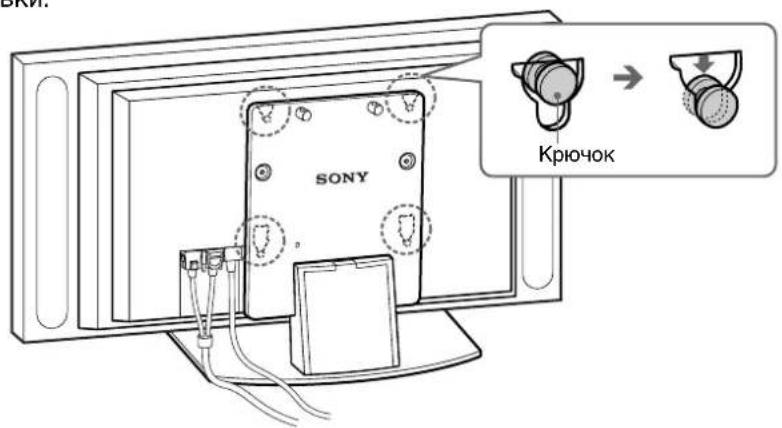
2 Be sure that two or more persons hold the right and left edges of the top and the under sides of the Display Unit while fitting the hooks on the rear of the Display Unit into the holes on the fixtures of the stand. Then confirm that the hooks on the rear of the Display Unit are completely inserted into the four holes of the fixtures.
Note
Do not stumble over the mains lead or the Display Interface Cable.
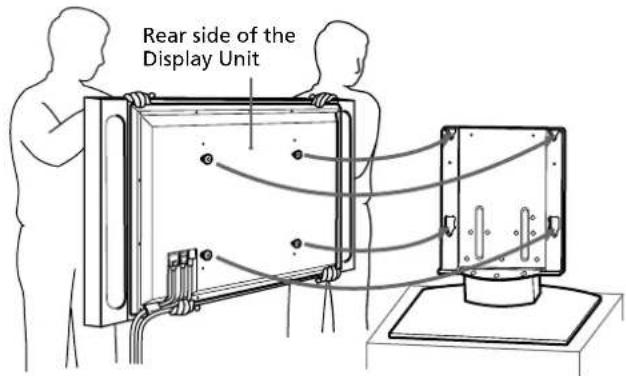
Slide the Display Unit straight downward until it snaps on.
Notes
- Slide the Display Unit completely down to the bottom. Confirm that the Display Unit is installed on the stand horizontally.
- Be sure to keep the Tabletop Stand stable while installing the Display Unit.
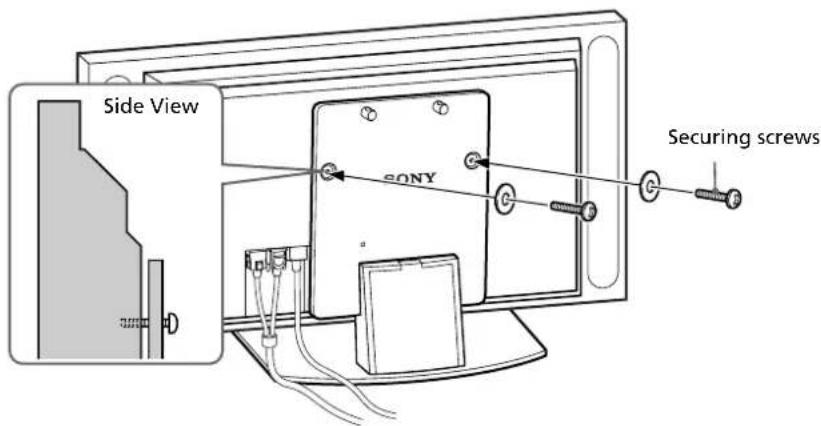
2
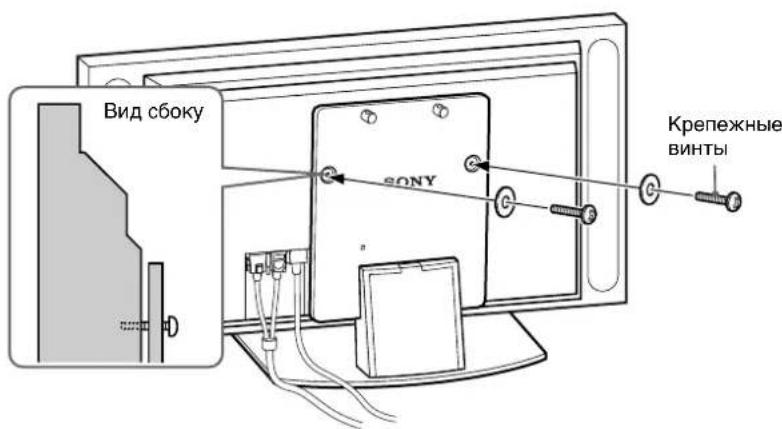
Attach the Display Unit to the stand with the two securing screws.
3
Route the mains lead and the Display Interface Cable through the stand.
Attach the cable clampers to the main bracket.
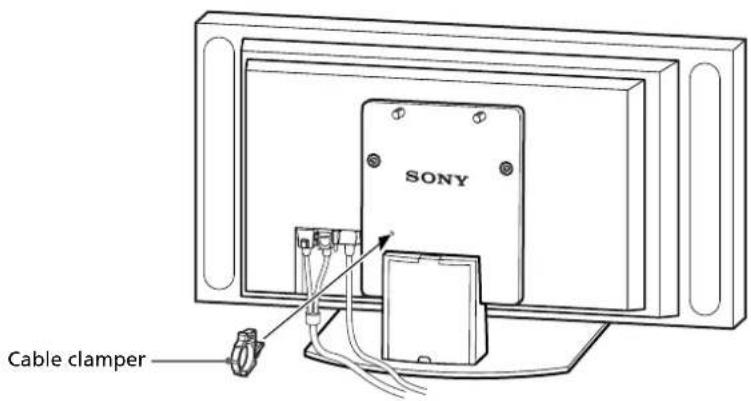
2 Draw the mains lead and the Display Interface Cable through the cable clampers and fix them.
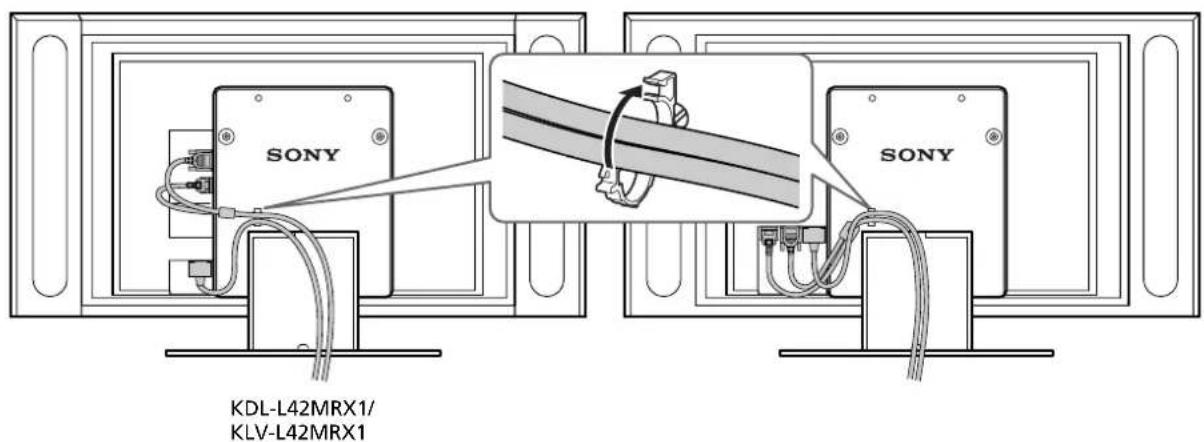
Remove the cable cover from the stand and route the mains lead and the Display Interface Cable inside the stand.
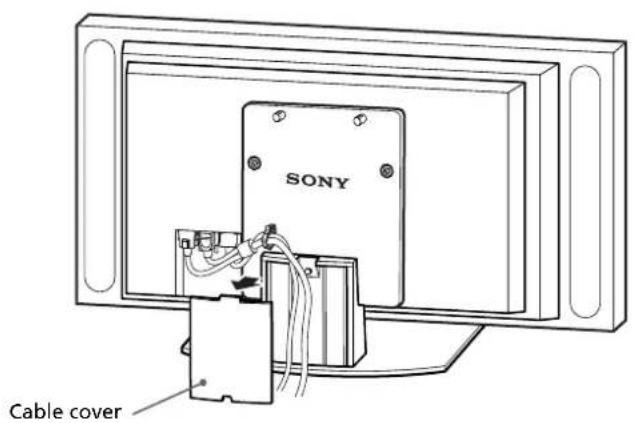
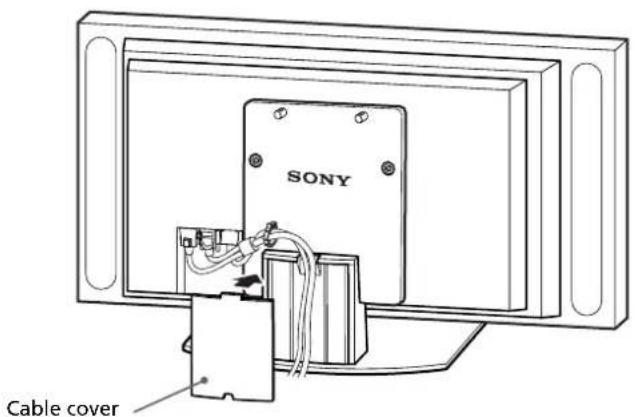
4Reattach the cable cover to the stand.
Safety measures to prevent toppling over
WARNING
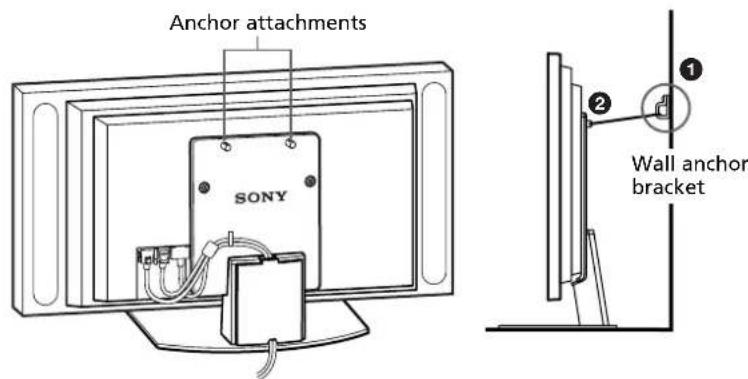
Be sure to take measures to prevent the stand from toppling over. If you fail to do so, the Tabletop Stand may topple over during an earthquake and cause injury or property damage. Anchor the Tabletop Stand to a wall, pillar, etc. to prevent it from toppling over.
Prepare a commercially available rope or chain and wall anchor bracket beforehand.
Secure the wall anchor bracket to a solid wall or pillar.
Pass the rope or chain through both holes of the anchor attachments and then tighten the other end of the rope or chain to the wall anchor bracket.
Specifications
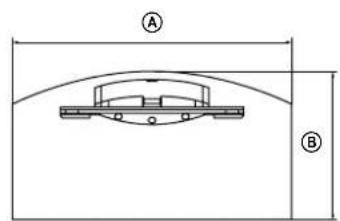
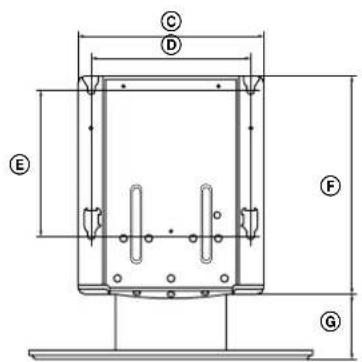

| SU-P42T2 SU-P50T2 | |||
| Dimensions: A 500 (19(mm/inches) B 295 (19) | 11/16) 60 | (23 %) 5% | |
| 5/8) 32 | (12 %) 5% | ||
| C 392 (15 7/16) | |||
| D 340 (13 3/8) | |||
| E 310 (12 7/32) | |||
| F 461 (18 5/32) | |||
| G 41 (5 9/16) | |||
| H 602 (23 11/16) | |||
| Weight: (kg/lb) | 16.0 (35 lb 4 oz) | 19.0 (41 lb 14 oz) | |
Design and specifications are subject to change without notice.
Sorg for at tage passende forholsregler for at forhindre, at starden vaelter.
'EAeyxoc Twv EapntnmuTowv
He onnpaTecb Ha yCTaHOBJIeHHbI Ha NOdCTaBky DnCpJIeN He DePxNTecb 3a Hero.
HactoIbHaNoCTabKa MoXeT onpOKHyTbcA, B pe3yIbTaTe Yero dncnne MoXeT yNaCTb N CTaT npuHHoT TaBm nIN Cmeptn.

He nepekepbBaIte BeHTnlaUcNOHoe OTBepCTne DInCIIpeJ.
Pn nepeKpbIttn BeHTnIauHOnHO OTBepCTn (TKaHbIO T.D.) BHyTpN yCTpoICTBa MOKeT NOBicITbcr TemnepaTypa, YTO MOKeT PpNBecTe K BO3ropaHIO.
He donyckaite 3aemleHnKa6eI nHTaHn u coedHntbHoro Ka6eI y dncnJe.
- Pn yctaHOBKe DnCnIe Ha NoCTaBky He DOnyCKaIte 3aUeMJIeHN Ka6eNn HNTaHn I CoEINHITeNbHorO Ka6eNn DnCnIe. Pn NOBpeKdEHN Ka6eNn NHTaHn IIN CoEINHITeNbHorO Ka6eNn DnCnIe MoXeT pON3oITu BO3rOpAHne IIN NopaxKeHne 3NeKTPnuCeKIM TOKOM.
-Пипелемшнн HabToIbHNo NOdctaBKn 6yDbTe OCTOpOKHbI,чTObI He HAcTyNtB Ha Ka6eNb NITAHn IIN COeDInHTeJIbHbI Ka6eNb DnCnIeR. Ka6eNb NITAHN IIN COeDInHTeJIbHbI Ka6eNb DnCnIeR MOKeT NOJYuHTb NOBpeXdEHHr, YTO npUBeDet K BO3rOpaHnIO IIN NopaxHeHIO 3JIeKTPnuCeCKm TOKOM.
IepemeueHne NOCTaBKn Heo6xOuMo BbINOJHrTb, KaK noka3aHO B daHHOM pyKOBOdCTBe.
Pn HnnpaBnBHom nepemeHn HaCToBna NoCTaBka MoKeT OnpOKnHyTbC, TTO npBeTeK BO3HNKHOBEHIO TpaBM.
Будъ Te octopoKhbI,ЧTOбI He cNOTKHyTbCЯ O Ka6eIb nHTaHnЯ nII coeINHnteIbHbI Ka6eIb dIscPJIeJ.
B npoTHBOM cnUyae HAcToIbHaN IOCTabKa MoKeT OnpOKHyTBcA I CTaTB npuHHO B03HKnHOBeHHa TpaBM.
He nepehocnte HaCTOJIbHyIO NOcTaBky, ecn OHa npNKpeIeHa K DInCIIeIo.
Ppejke yem nepeHocntb nOCTaBky,OTcoeHNHTe ee ot dncnne.B npotNBHom cnuyae dncnne MoKet yNaCTb N CTaTb npuHHO TpaBM.
BHIMAHNE
Pn HecobJIOeHnn CneIyIOux Mep IpeOcTOPOXHOCTN CyueCTByET BepoAHTHOCTb NOLyehn TpaBM nII NOBpeKDeHn IMUeCTBa.
YCTaHaBJIbBaIte TOJbKO NOCTaBJIeHHoe Bam O6OpyIDoBaHne.
3Ta NOCTaBka IpeHa3HaueHa IINcNoB3OBAHn TOJbKO C yKa3aHHbIMN 3DeJIIMM. Ecn Ha daHHo HAcToJbHOI NOCTaBKe KpeNTc8 O6OpYIOBaHne, He IpeHa3HaueHHe OIA TaKo YCTaHOBKn, OHO MOxET yNaCTb N CTaTb PnUHHoT TpaBM INI IOBpeXdeHn IMyUeCTBa.
O6a3aTeIbHO BOCNoJIb3yIteCb KpeNExHbIMN BNHTaMn.
Ecn KpenexKbIe BnHTbI He nCnObl3yOTc, DnCnJIe MoKeT yNaCTb I CTaTB npuHOn NOJyHeHr TpaBM.
B yctaHOBKe IOnJXhbl YuaCTBOBaTb He MeHee DByx YeJIOBeK.
B yctaHOBe nncnne Ha hAcToIbHyIOndTaBky DoJXhbl yAcTBoBaTb He MeHee DByx YenOBek. Ecnn ycTaHOBky BbINOJIHnEe ToIbKO OIN HcNoBek, BO3MOKeH HecCaCTHbI CnyaH IN NOlyeHne TpaBM.
YCTAHOBKY HACTOJIbHOI NOCTaBKn Heo6XoIMO BbINOJHATb B CTPOROM COOTBETCTBnC DaHHbIM PYKOBOIDCTBOM.
Ecn KaKoJ-Nb60 n3 BnHTOB Ocna6JeHnn BBinaJI, HAcToJIbHaN NOCTaBka MOKeT HaKpeHHTbcra NOpOKnHyTbca, a TaKKe BO3MOxHO naDeHne DnCnIe. 3TO MOKe TcTaB npuHNOI ONyueHn TpaBM nn NobpeXdHn IMyEcTba.
Cneinte 3a TeM, YTO6bI npn c6opKe HAcToJbHOJ NOcTaBKn He nobpeDntb pyKN nn NaIbci.
CneIte 3a Tem, YTO6bI npn C6opKe HAcToJIbHoi NOcTAbKu IIN BO BpeMa yCTaHOBKn DInCpIeH He NOBpeDITb pyKN nn NaIbCuI.
O6a3aTeIbHo HaedKHO npKpeNte dncnle, cJeDy HNCTpyKcIaM B HactoIeM pyKOBoDCTBe.
Y6eIntecb, YTO BnHTbl HaJExKHO 3aTAYtbl.
Ecnn dncnny yCTaHOBJIeH HeHaJExKHO, OH MOKeT yNactb n CTaTB npuHHoT pabM.
YcTaHOBNTe OCHOBHOJ KPOHSTeH
COBmectnte OTBepCTnO OCHOHOro KPOHHTeHa C COOTBetCTBYIOUIMN OTBepCTnAMn dIy BnHTOB B NOCTaBKe. 3aTeM, NcNoJIb3yA 10 BnHTOB C NOTaHOI ROJOBKO, npNKpeNTe OCHOHOro KPOHHTeH K NOCTaBKe.
Bo BpMa BbInonHeHn 3To npOeDpybI DePkaTb DeTaJIOnKhbI He MeHee DByx YenOBek.
Chayana HaxNBITE 10 BnHTOB c NotaHOn fONOBKO, a 3aTeM OKOHaTeNbHO 3aTAHNTe.
PpIMeuaHne
ДерхиTe NOДТаВКУ TAK, YTOБь OHa He CMeUaJacb, Nбыla yCTOuHBOI.
BHMAHne
Ecnn nCnoJb3yETc 3neKtpnueckn WpynpoeT,ero Bpaauoui MOMeHT dONKeH COCTaBnTb np6n3ntelHo 2,45 H-M.
He nCNoB3yIte dpeIb c nepΦopatopom. PnncnoB3OBAHnn dpen C nepΦopatopom nIIN 3neKtpnueckoro WypynOBepTa, Bpaauoun Momet KOTOpbIX pReBblaaet yKa3aHHoe 3HaueHne, BNHTbMOrTy 6bTb 3aTHyTb CJNlUKOM CNlbHO, YTO npNBEdET K NOBPexKDeHNO BNHTOB nIIN 3dEInr. PoDCTabKa MoXeT yNaCTb NCTaTb pNpHuHO TpaBMbl.
YcTaHOBka DnCpJIeA
PPEyPExEHEHNE
Ipejde yem noDcoeHnTb Kaebnb nHTaHnK 3JeKtpueecko po3eTke, o8raTeJbHO BbINOHNTE BcIO ycTaHOBky do KOHca. 3aueMneHne Kaebna nHTaHnMeKdy qactmN O6opyoBaHn MOKe TpNBecTN K KopOTKOMy 3ambKaHnIO nn nopaxHeHIO 3JeKtpueeCKm TOKOM.
PnCnOtBkAHN O Ka6JIb NITaHNA IIN DnCnIe HAcTOnbHa NoCTaBKa MOKeT ONpOKnHyTbcR n CTaTB npuHHo BO3NHKHOBEHn TpaBM.
1
YcTaHOBInTe DmCnIeH a HactOJIbHyIO NOCTaBky.
1NoCoeHNHTe K DnCnneTo Ka6enb NtTaHnN I CoeHNHTeBnHbN KabeN BnCnJIeJ.
Cobet
Ioppo6hee o noCoeDInHeHn KaBJI nHTAHn H coeHNITbHOrO KaBJI dNcPnEa CM. B pyKOBODCTBE NO yCTaHOBKe UBeTHORo TEJEBN3Opa C NIOCKo NaHEbIO Sony nn CBETHOrTO TeJEbn3Opa C KK-3kpaHOM.
PpimueaHn
B cnyuae yctaHObKn dncnneHa rpOMKOrOBOpNTeH NOn MOryT DeΦopMnPoBaTbcN IOd BO3DeIcTBnEM Beca nCnpe. Bo3MoXHo TaKxe HapyuHeHne CoedHHeHr rpOMKOrOBOpNTeH.Bo n36ExKaHne 3TOrO co6IoudaTe npUBeDeHHbIe HNXe MepbI npEIOCTOpOXHocTN. (ToJbKO IJIa MoJeNei KDE-P61MRX1, KE-P61MRX1, KDL-L42MRX1, KLV-L42MRX1)
-
Pn npehocke dncnnre He cneyet depkaTc3a rPOMKOROBOpnteH.
-
Pn noDcoeHHeHH KaBeNe K DnCnpeIpa3MeCTnte yNaKOBOHyB Nn KaKoJIb6O npyRoN pO6bMy MaTePnaJHaNoIy nnoXHTe Ha Hero dncnne 3KpaHOM BnI3 TaKm Oba3OM, YTO6blrPoMKoROBOpNTeN NO o6Em CTOpOHAMdncnner BbICTynnn 3a KpaYnakoBOuHOrO nn dpyroro NCNOJb3yEMORo MaTePnaJana.
-
Y6eIntecb, yTO Iucnne HaxoITcB ByCTOHNBOM NOLOXKeHIN.
-IIppeOxpaHeHHIINCNPIeOT BO3MOXHbIX NOBpeKJDeHNI 3aRpa3HeHHI INCNoJIb3yIte MArKyIO TKaHb.
KDE-P42MRX1/KE-P42MRX1/KDE-P50MRX1/KE-P50MRX1
KDE-P61MRX1/KE-P61MRX1
KDL-L42MRX1/KLV-L42MRX1
2Pn COBMeueHn KpOuKOB Ha 3aDHe nAHe nn DnCnpe C OTBepCTnMn Ha KpeNexax NOCTABKn DOJXHbI 6bITb 3aDnCTBOBaHbI DBA yeNoBeka nn 6oJe. OHI DoJXHbI DEpaKaTb DnCnpe 3a erO BepXHIO HNXHIOU qACTn Cnpaba N CneBa. Y6eINTeCb, YTO KpOuKN Ha 3aDHe nAHe nn DnCnpe IONHOCTbIO BCTaBnEhBI B YeTbIpe OTBepCTnR KpeNexeN.
PpmeaHne
Eydte octopoxhbl, yTo6bI He cNOTKHyTbcra O kaebIb NITAHIN NNI COeDINHTeJIbHbI KaebIb DnCnIe.

3CdBnHbTe DnCnIeN OTe6N BHN3 Do IeJka fNKcaTopa.
PpimueaHn
CdbnHbTe DnCnneI Do camoro HxKHeo nOIOXKeHna. Y6eDntecb, yTO dncnney cTaHOBJeH Ha NOCTaBKe TOpN30HTaBHO.
- Pnp yctaHOBKe dncnne oecneyte yCTOuHBOCTb HAcTOJIbHOI NOCTaBKn.
2
PpKpeHnTe dncnne K nOcTbKe, nCNoJb3yA DBa KpeNExHbIX BnHTa.
3
Printed on 100% recycled paper using VOC (Volatile Organic Compound)-free vegetable oil based ink.
- For Customers and Sony Dealers in Europe
- Tabletop Stand
- Thank you for purchasing this product.
- To Customers
- WARNING
- For Sony dealers
- On Safety
- CAUTION
- For Customers
- Notes on installation
- Note on use
- Assemble the Tabletop Stand
- To Sony Dealers
- Be sure that two or more persons do the installation work.
- Be sure to assemble the Tabletop Stand securely following the instructions in this manual.
- Be careful not to hurt your hands or fingers when assembling the Tabletop Stand.
- Be sure to install the Display Unit securely, following the proper procedure.
- Check the parts
- Install the main bracket
- Note
- Install the Display Unit
- 1
- Install the Display Unit on the Tabletop Stand.
- Tip
- Notes
- 3
- Route the mains lead and the Display Interface Cable through the stand.
- Safety measures to prevent toppling over
- Specifications
- 'EAeyxoc Twv EapntnmuTowv
- He onnpaTecb Ha yCTaHOBJIeHHbI Ha NOdCTaBky DnCpJIeN He DePxNTecb 3a Hero.
- He nepekepbBaIte BeHTnlaUcNOHoe OTBepCTne DInCIIpeJ.
- He donyckaite 3aemleHnKa6eI nHTaHn u coedHntbHoro Ka6eI y dncnJe.
- IepemeueHne NOCTaBKn Heo6xOuMo BbINOJHrTb, KaK noka3aHO B daHHOM pyKOBOdCTBe.
- Будъ Te octopoKhbI,ЧTOбI He cNOTKHyTbCЯ O Ka6eIb nHTaHnЯ nII coeINHnteIbHbI Ka6eIb dIscPJIeJ.
- He nepehocnte HaCTOJIbHyIO NOcTaBky, ecn OHa npNKpeIeHa K DInCIIeIo.
- BHIMAHNE
- YCTaHaBJIbBaIte TOJbKO NOCTaBJIeHHoe Bam O6OpyIDoBaHne.
- O6a3aTeIbHO BOCNoJIb3yIteCb KpeNExHbIMN BNHTaMn.
- B yctaHOBKe IOnJXhbl YuaCTBOBaTb He MeHee DByx YeJIOBeK.
- YCTAHOBKY HACTOJIbHOI NOCTaBKn Heo6XoIMO BbINOJHATb B CTPOROM COOTBETCTBnC DaHHbIM PYKOBOIDCTBOM.
- Cneinte 3a TeM, YTO6bI npn c6opKe HAcToJbHOJ NOcTaBKn He nobpeDntb pyKN nn NaIbci.
- O6a3aTeIbHo HaedKHO npKpeNte dncnle, cJeDy HNCTpyKcIaM B HactoIeM pyKOBoDCTBe.
- YcTaHOBNTe OCHOBHOJ KPOHSTeH
- PpIMeuaHne
- BHMAHne
- YcTaHOBka DnCpJIeA
- PPEyPExEHEHNE
- YcTaHOBInTe DmCnIeH a HactOJIbHyIO NOCTaBky.
- Cobet
- PpimueaHn
- PpmeaHne
Brand : SONY
Model : SUP50T2
Category : Electronic device accessory