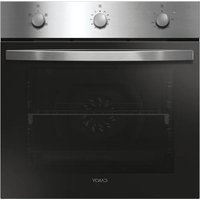
WATCHTOUCHE - Built-in oven CANDY - Free user manual and instructions
Find the device manual for free WATCHTOUCHE CANDY in PDF.
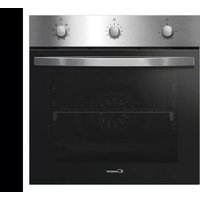
| Product type | Built-in oven |
| Brand | Candy |
| Model | WATCHTOUCHE |
| Energy class | A+ (according to EN 60350-1) |
| Cavity volume | Approximately 70 liters |
| Dimensions (H x W x D) | 595 x 595 x 568 mm (estimate) |
| Net weight | Approximately 35 kg (estimate) |
| Power supply voltage | 220-240 V ~ 50/60 Hz |
| Recommended fuse | 16 A |
| Maximum power | 3200 W (estimate) |
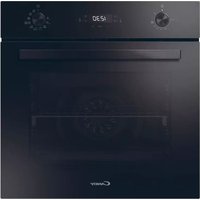
| Screen type | LCD touch screen on the door |
| Connectivity | Wi-Fi IEEE 802.11b/g/n and Bluetooth 2.1/3.0/4.0 |
| Cooking functions | Fan-assisted, natural convection, grill, pizza, Cook Light, defrosting, keep warm, bottom heating element + fan |
| Smart cooking mode | Manual mode, personal programs, suggested cooking, video recipes |
| Built-in camera | Yes, webcam to monitor cooking via screen or app |
| Number of shelf positions | 5 positions |
| Included accessories | Wire rack, drip tray, side grids |
| Internal lighting | Halogen bulb (replaceable) |
| Cleaning | Manual with soapy water, non-abrasive detergents; removable door hinges |
| Safety | Automatic shutdown (not specified), child lock (not specified), hot surfaces indicated |
| Country of origin | European Union (manufacturer Candy Hoover Group Srl) |
| Repairability index | Not communicated, spare parts available via after-sales service |
| Warranty | 2 years (according to applicable legislation) |
Frequently Asked Questions - WATCHTOUCHE CANDY
User questions about WATCHTOUCHE CANDY
0 question about this device. Answer the ones you know or ask your own.
Ask a new question about this device
Download the instructions for your Built-in oven in PDF format for free! Find your manual WATCHTOUCHE - CANDY and take your electronic device back in hand. On this page are published all the documents necessary for the use of your device. WATCHTOUCHE by CANDY.
USER MANUAL WATCHTOUCHE CANDY
- During cooking, moisture may condense inside the oven cavity or on the glass of the door. This is a normal condition. To reduce this effect, wait 10-15 minutes after turning on the power before putting food inside the oven. In any case, the condensation disappears when the oven reaches the cooking temperature.
Cook the vegetables in a container with a lid instead of an open tray. - Avoid leaving food inside the oven after cooking for more than 15/20 minutes.
- WARNING: the appliance and accessible parts become hot during use. Be careful not to touch any hot parts.
- WARNING: the accessible parts can become hot when the grill is in use. Children should be kept at a safe distance.
- WARNING: ensure that the appliance is switched off before replacing the bulb, to avoid the possibility of electric shocks.
- WARNING: in order to avoid any danger caused by the accidental resetting of the thermal interruption device, the appliance should not be powered by an external switching device, such as a timer, or be connected to a circuit that is regularly switched on and off.
Children under 8 should be kept at a safe distance from the appliance if not continuously supervised.
Children should not play with the appliance. - The appliance can be used by those aged 8 or over and by those with limited physical, sensorial or mental capacities, without experience or knowledge of the product, only if supervised or provided with instruction as to the operation of the appliance, in a safe way with awareness of the possible risks.
- Cleaning and maintenance should not be carried out by unsupervised children.
- Do not use rough or abrasive materials or sharp metal scrapers to clean the oven door glasses, as they can scratch the surface and cause the glass to shatter.
- The oven must be switched off before removing the removable parts. After cleaning, reassemble them according to the instructions.
- Only use the meat probe recommended for this oven.
- Do not use a steam cleaner for cleaning operations.
- Connect a plug to the supply cable that is able to bear the voltage, current and load indicated on the tag and having the earth contact. The socket must be suitable for the load indicated on the tag and must have ground contact connected and in operation. The earth conductor is yellow-green in colour. This operation should be carried out by a suitably qualified professional. In case of incompatibility between the socket and the appliance plug, ask a qualified electrician to substitute the socket with another suitable type. The plug and the socket must be conformed to the current norms of the installation country. Connection to the power source can also be made by placing an omnipolar breaker between the appliance and the power source that can bear the maximum connected load and that is in line with current legislation. The yellow-green earth cable should not be interrupted by the breaker. The socket or omnipolar breaker used for the connection should be easily accessible when the appliance is installed.
- The disconnection may be achieved by having the plug accessible or by incorporating a switch in the fixed wiring in accordance with the wiring rules.
- If the power cable is damaged, it should be substituted with a cable or special bundle available from the manufacturer or by contacting the customer service department. The type of power cable must be H05V2V2-F. This operation should be carried out by a suitably qualified professional. The earth conductor (yellow-green) must be approximately 10mm longer than the other conductors. For any repairs, refer only to the Customer Care Department and request the use of original spare parts.
- Failure to comply with the above can compromise the safety of the appliance and invalidate the guarantee.
- Any excess of spilled material should be removed before cleaning.
- A long power supply failure during an occurring cooking phase may cause a malfunction of the monitor. In this case contact customer service.
- The appliance must not be installed behind a decorative door in order to avoid overheating.
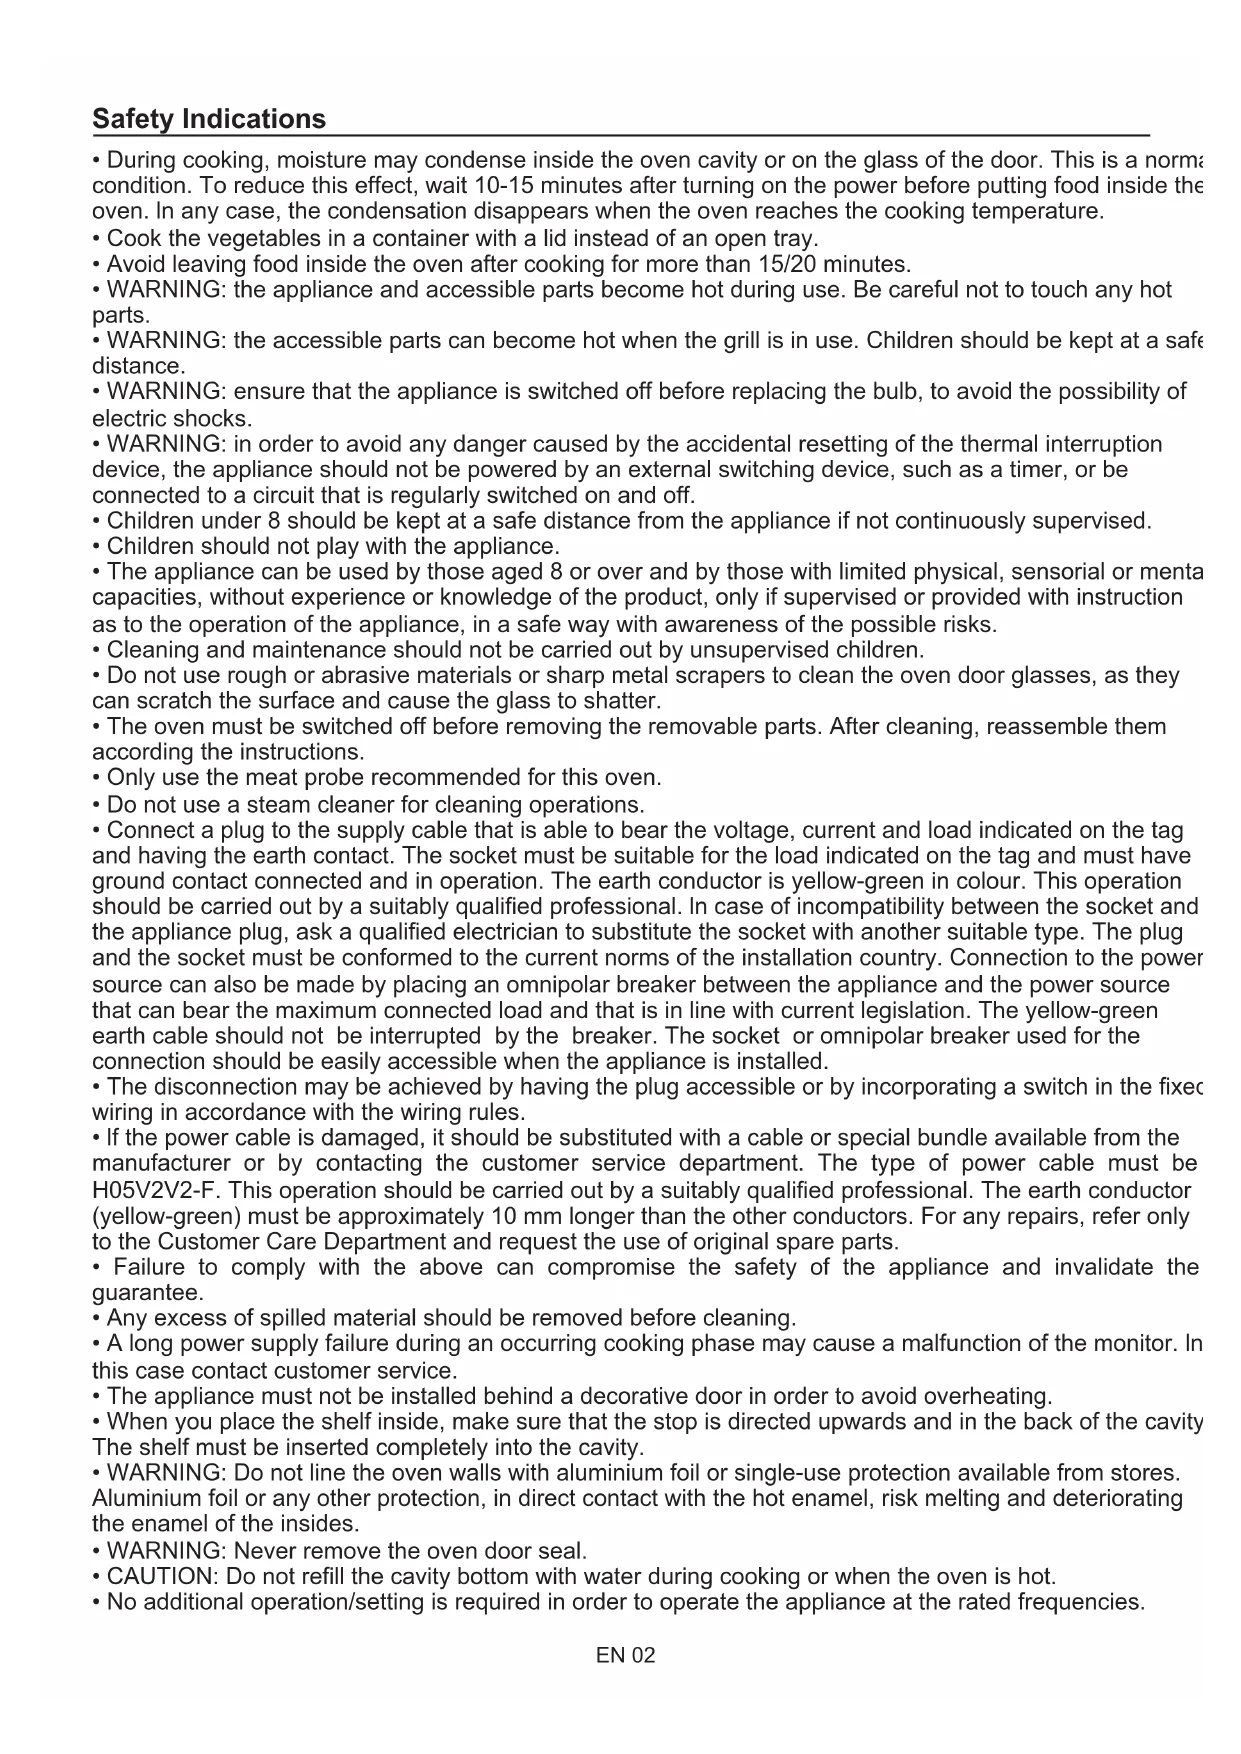
- When you place the shelf inside, make sure that the stop is directed upwards and in the back of the cavity. The shelf must be inserted completely into the cavity.
- WARNING: Do not line the oven walls with aluminium foil or single-use protection available from stores. Aluminium foil or any other protection, in direct contact with the hot enamel, risk melting and deteriorating the enamel of the insides.
- WARNING: Never remove the oven door seal.
- CAUTION: Do not refill the cavity bottom with water during cooking or when the oven is hot.
- No additional operation/setting is required in order to operate the appliance at the rated frequencies.
General Instructions
4
1.1 Safety indications
1.2 Electrical safety
1.3 Recommendations
1.4 Installation
1.5 Waste management and environmental protection
1.6 Declaration of compliance
Product Description
5
2.1 Overview
2.2 Accessories
Use of the Oven
5
3.1 User interface description
3.2 Product setting
3.3 First use
3.4 Operating in manual mode
3.5 Home page - Main functions
3.6 Cooking modes
Simply-Fi
9
- Simply-Fi
Oven Cleaning and Maintenance
10
5.1 General notes on cleaning
5.2 Maintenance
- Removal and cleaning of the side racks
- Cleaning of the interior glass door only
- Changing the lamp bulb
1. General Instructions
We thank you for choosing one of our products. For the best results with your oven, you should read this manual carefully and retain it for future reference. Before installing the oven, take note of the serial number so that you can give it to customer service staff if any repairs are
required. Having removed the oven from its packaging, check that it has not been damaged during transportation. If you have doubts, do not use the oven and refer to a qualified technician for advice. Keep all of the packaging material (plastic bags, polystyrene, nails) out of the reach of children. When the oven is switched on for the first time, strong smelling smoke can develop, which is caused by the glue on the insulation panels surrounding the oven heating for the first time. This is absolutely normal and, if it occurs, you should wait for the smoke to dissipate before putting food in the oven. The manufacturer accepts no responsibility in cases where the instructions contained in this document are not observed.
NOTE: the oven functions, properties and accessories cited in this manual will vary, depending on the model you have purchased.
1.1 Safety Indications
Only use the oven for its intended purpose, that is only for the cooking of foods; any other use, for example as a heat source, is considered improper and therefore dangerous. The manufacturer cannot be held responsible for any damage resulting from improper, incorrect or unreasonable usage.
The use of any electrical appliance implies the observance of some fundamental rules:
- do not pull on the power cable to disconnect the plug from the socket;
- do not touch the appliance with wet or damp hands or feet;
- in general the use of adaptors, multiple sockets and extension cables is not recommended;
- in case of malfunction and/or poor operation, switch off the appliance and do not tamper with it.
1.2 Electrical Safety
ENSURE THAT AN ELECTRICIAN OR QUALIFIED TECHNICIAN MAKES THE ELECTRICAL CONNECTIONS.
The power supply to which the oven is connected must conform with the laws in force in the country of installation. The manufacturer accepts no responsibility for any damage caused by the failure to observe these instructions. The oven must be connected to an electrical supply with an earthed wall outlet or a disconnector with multiple poles, depending on the laws in force in the country of installation. The electrical supply should be protected with suitable fuses and the cables used must have a transverse section that can ensure correct supply to the oven.
CONNECTION
The oven is supplied with a power cable that should only be connected to an electrical supply with 220-240 Vac power between the phases or between the phase and neutral. Before the oven is connected to the electrical supply, it is important to check:
- power voltage indicated on the gauge;
- the setting of the disconnector.
The grounding wire connected to the oven's earth terminal must be connected to the earth terminal of the power supply.
WARNING
Before connecting the oven to the power supply, ask a qualified electrician to check the continuity of the power supply's earth terminal. The manufacturer accepts no responsibility for any accidents or other problems caused by failure to connect the oven to the earth terminal or by an earth connection that has defective continuity.
NOTE: as the oven could require maintenance work, it is advisable to keep another wall socket available so that the oven can be connected to this if it is removed from the space in which it is installed. The power cable must only be substituted by technical service staff or by technicians with equivalent qualifications.
A low light around the central main switch could be present when the oven is off. This is a normal behavior. It can be removed just turning the plug upside down or swapping the supply terminals.
1.3 Recommendations
After each use of the oven, a minimum of cleaning will help keep the oven perfectly clean.
Do not line the oven walls with aluminium foil or single-use protection available from stores. Aluminium foil or any other protection, in direct contact with the hot enamel, risks melting and deteriorating the enamel of the insides. In order to prevent excessive dirtying of your oven and the resulting strong smokey smells, we recommend not using the oven at very high temperature. It is better to extend the cooking time and lower the temperature a little. In addition to the accessories supplied with the oven, we advise you only use dishes and baking moulds resistant to very high temperatures.
1.4 Installation
The manufacturers have no obligation to carry this out. If the assistance of the manufacturer is required to rectify faults arising from incorrect installation, this assistance is not covered by the guarantee.
The installation instructions for professionally qualified personnel must be followed. Incorrect installation may cause harm or injury to people, animals or belongings. The manufacturer cannot be held responsible for such harm or injury.
The oven can only be located high in a column. Before fixing, you must ensure good ventilation in the oven space to allow proper circulation of the fresh air required for cooling and protecting the internal parts. Make the openings specified on last page according to the type of fitting.
1.5 Waste management and environmental protection
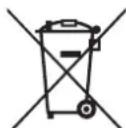
This appliance is labelled in accordance with European Directive 2012/19/EU regarding electric and electronic appliances (WEEE). The WEEE contain both polluting substances (that can have a negative effect on the environment) and base elements (that can be reused). It is important that the WEEE undergo specific treatments to correctly remove and dispose of the pollutants and recover all the materials. Individuals can play an important role in ensuring that the WEEE do not
become an environmental problem; it is essential to follow a few basic rules:
- the WEEE should not be treated as domestic waste;
- the WEEE should be taken to dedicated collection areas managed by the town council or a registered company.
In many countries, domestic collections may be available for large WEEEs. When you buy a new appliance, the old one can be returned to the vendor who must accept it free of charge as a one-off, as long as the appliance is of an equivalent type and has the same functions as the purchased appliance.
SAVING AND RESPECTING THE ENVIRONMENT
Where possible, avoid pre-heating the oven and always try to fill it. Open the oven door as infrequently as possible, because heat from the cavity disperses every time it is opened. For a significant energy saving, switch off the oven between 5 and 10 minutes before the planned end of the cooking time, and use the residual heat that the oven continues to generate. Keep the seals clean and in order, to avoid any heat dispersal outside of the cavity. If you have an electric contract with an hourly tariff, the "delayed cooking" programme makes energy saving more simple, moving the cooking process to start at the reduced tariff time slot.
1.6 Declaration of compliance
- By placing the mark on the appliance, we are confirming compliance to all relevant European safety, health and environmental requirements which are applicable in legislation for this product.
- Hereby, Candy Hoover Group Srl declares that the radio equipment is in compliance with Directive 2014/53/EU. The full text of the EU declaration of conformity is available at the following internet address: www.candy-group.com.
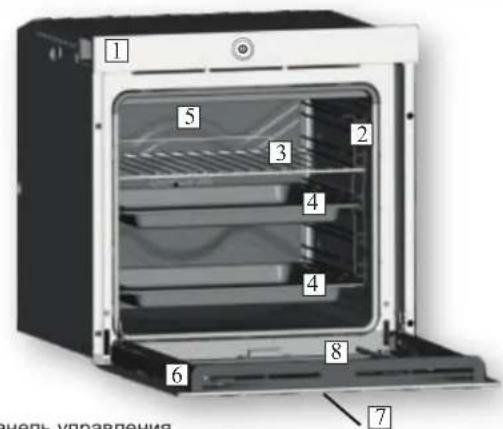
2. Product Description
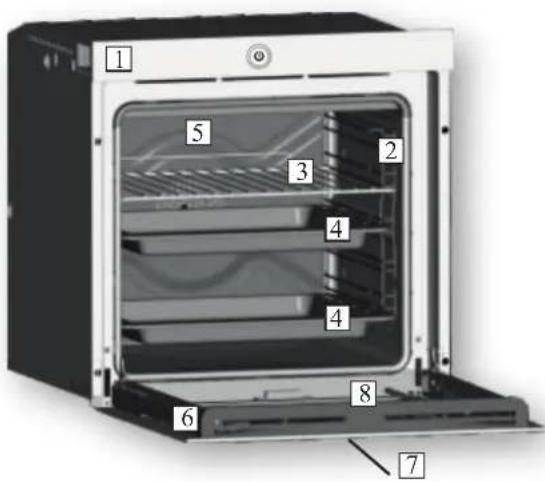
2.1 Overview
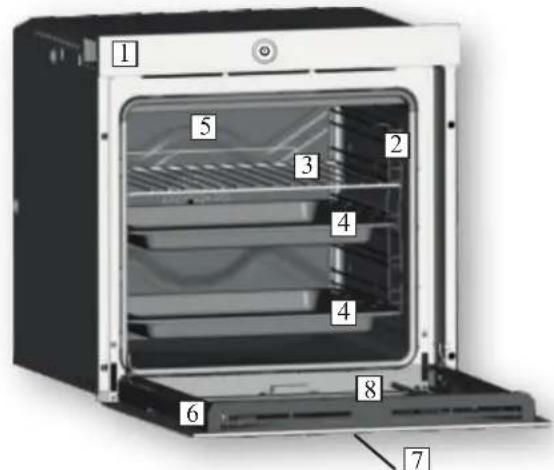
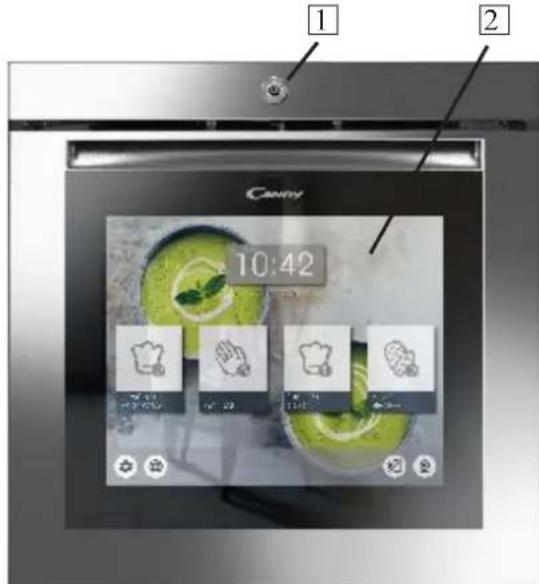
- Control panel
- Shelf positions
(lateral wire grid if included) - Metal grill
- Drip pan
- Fan (behind the steel plate)
- Oven door
- Touch control panel on the door
- Camera
2.2 Accessories (According to model)
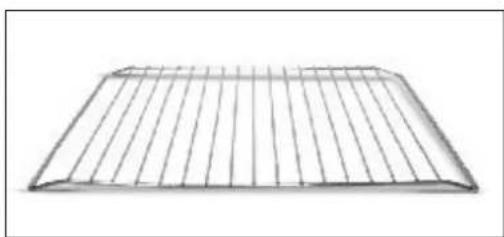
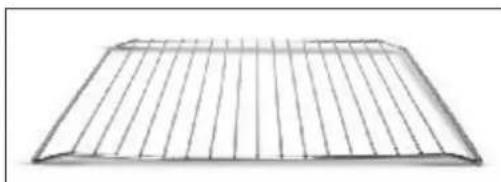
1 Metal grill
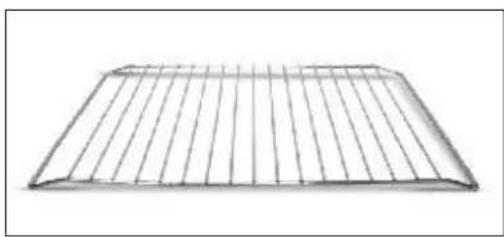
Holds baking trays and plates.
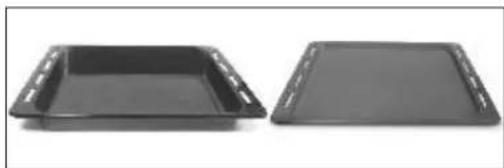
2 Drip pan
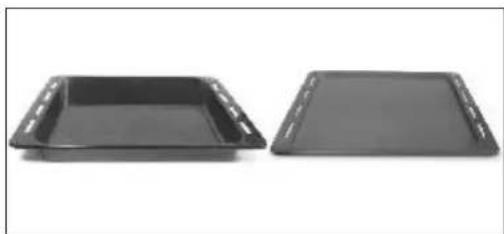
Collects the residues that drip during the cooking of foods on the grills.
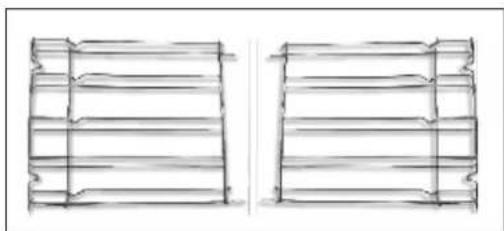
3 Lateral wire grids

It located at both sides of the oven cavity. It holds metal grills and drip pans.
3. Use of the Oven
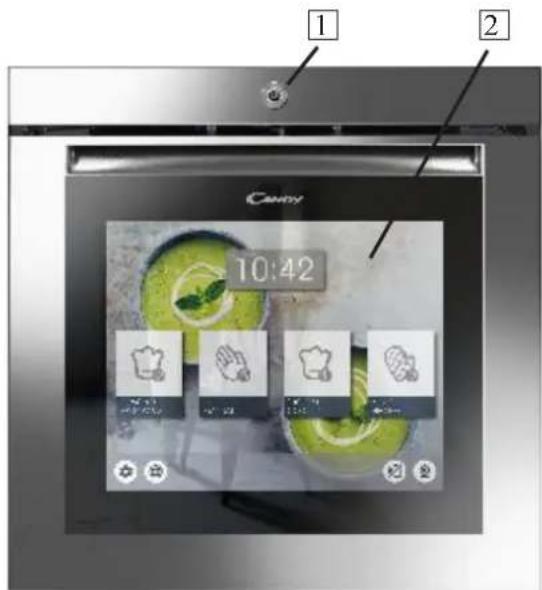
3.1 User interface description
- Main switch on/off
- LCD touch interfac
3.2 Product Setting
- At first launch you need to follow an installation process to be able to use the oven. Press START to go ahead.
- Select the language from the drop down menu. Press NEXT to go ahead.
- Set the date from the calendar. Set the time from the clock. Press NEXT to go ahead.
- Select your home network from the drop down menu. Insert the password related to your home network. Press NEXT to go ahead and wait the loading or connection. NB: The oven works even if not connected to the network. It's possible to enroll the oven to the network at a later time.
- The enrollment has been completed successfully. Press NEXT to go ahead to the last step.
- The installation process is completed. Press GO TO HOME PAGE to start to use the oven.
For more details see quick guide.
WIRELESS PARAMETERS DOOR DEVICE
| Technology | Wi-Fi | BLE |
| Standard | IEEE 802.11b/g/n | Bluetooth v2.1+EDR/BT v3.0/BT V4.0+HS |
| Frequency Band(s) [MHz] | 2400±2497 | 2400±2497 |
| Maximum Power [mW] | 51.7 | 10 |
3.3 First Use
PRELIMINARY CLEANING
Clean the oven before using for the first time. Wipe over external surfaces with a damp soft cloth. Wash all accessories and wipe inside the oven with a solution of hot water and washing up liquid. Set the empty oven to the maximum temperature and leave on for about 1 hour, this will remove any lingering smells of newness.
3.4 Operating In Manual Mode
-
Press the Manual Mode tab to set a cooking in 3 simple steps.
-
Swipe and select the desired cooking function. Press NEXT to go ahead
-
Swipe to select the desired temperature. Press NEXT to go ahead or BACK to return to the cooking functions selection.
-
Swipe to select the cooking time. Press START to begin the cooking or BACK to return to the temperature setting.
In this screen it is possible to:
- exclude pre heating (setted by default)
-
set delayed start
-
When a cooking is running you can:
-
change the temperature
- change the cooking time
- press the webcam icon to watch inside the oven cavity
- press STOP to finish the cooking
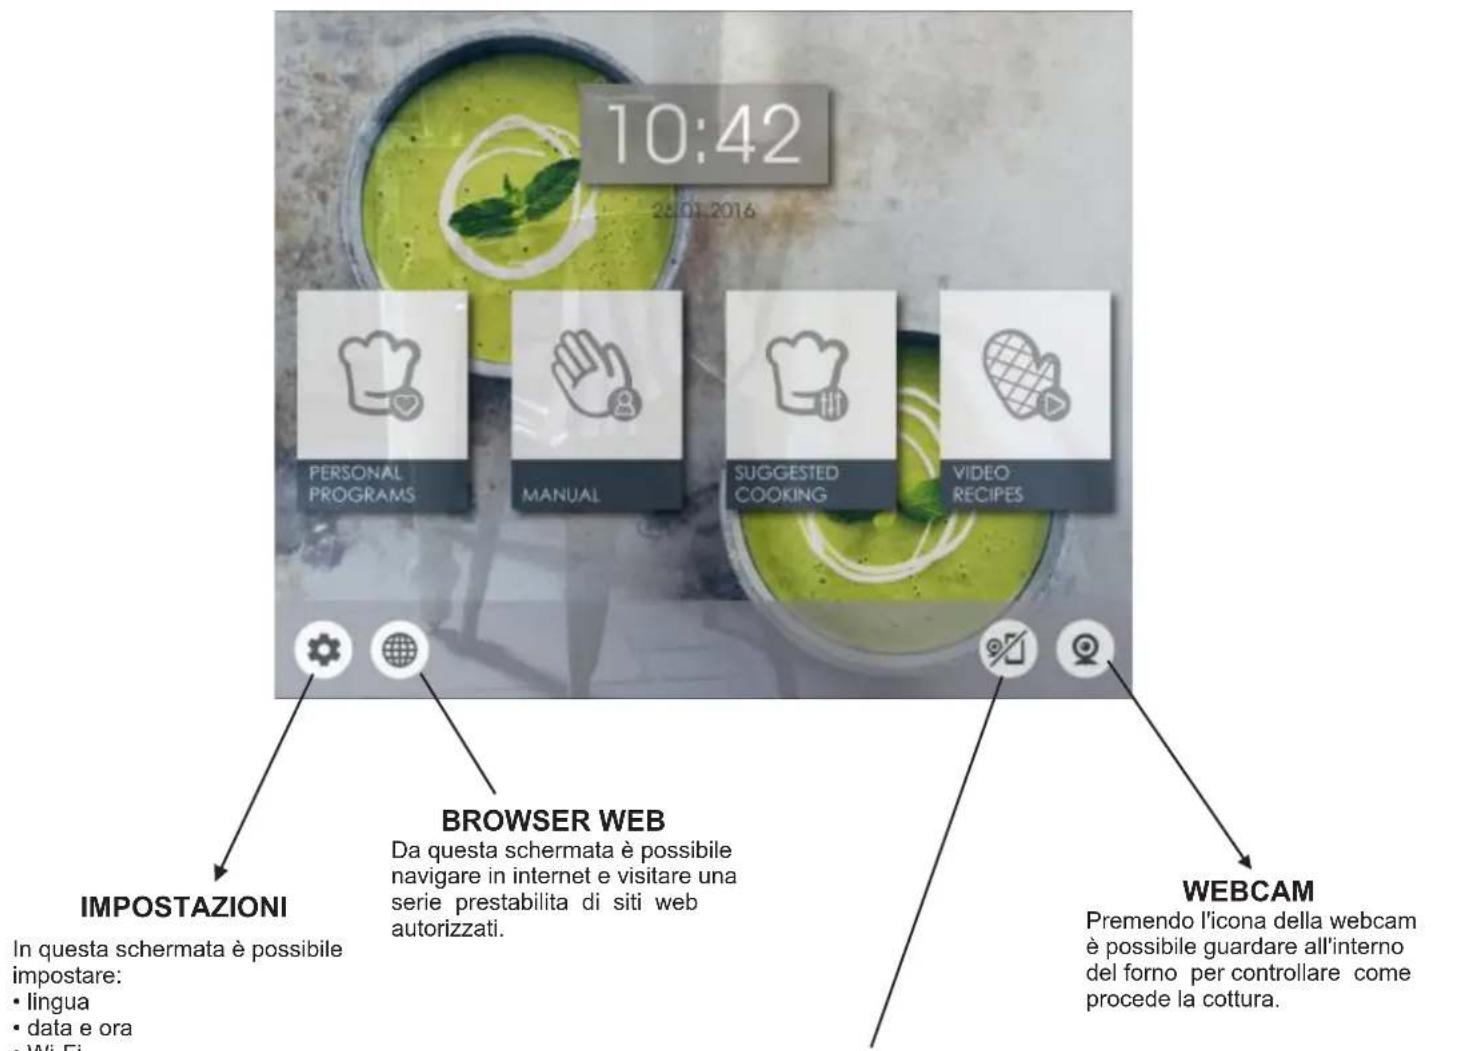
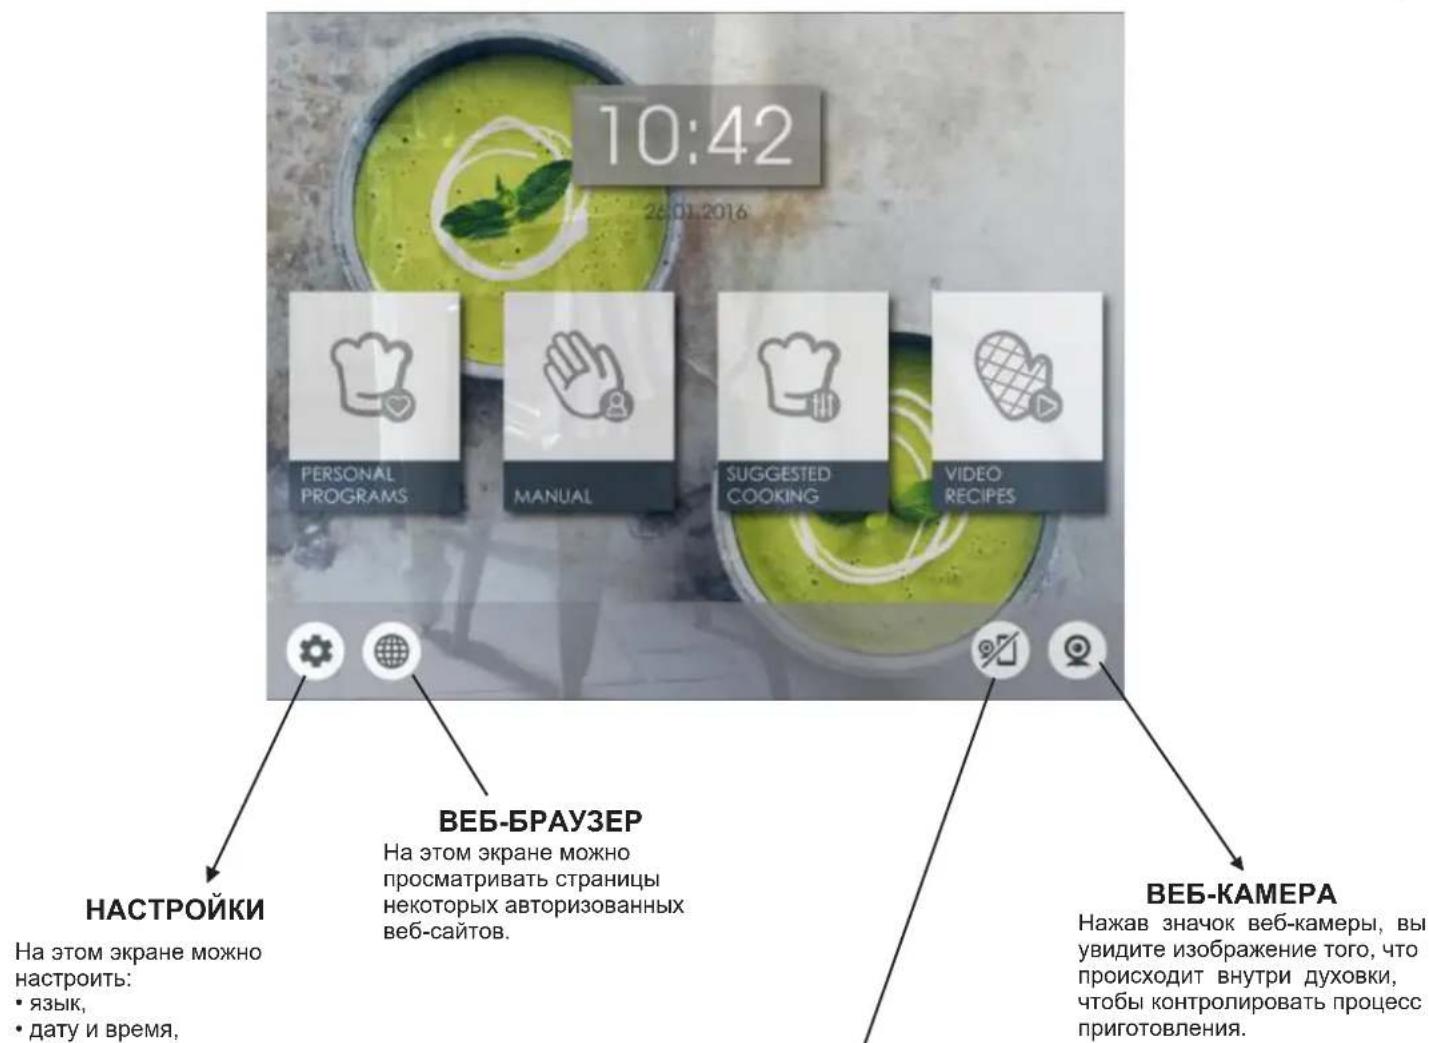
3.5 Home Page - Main Functions
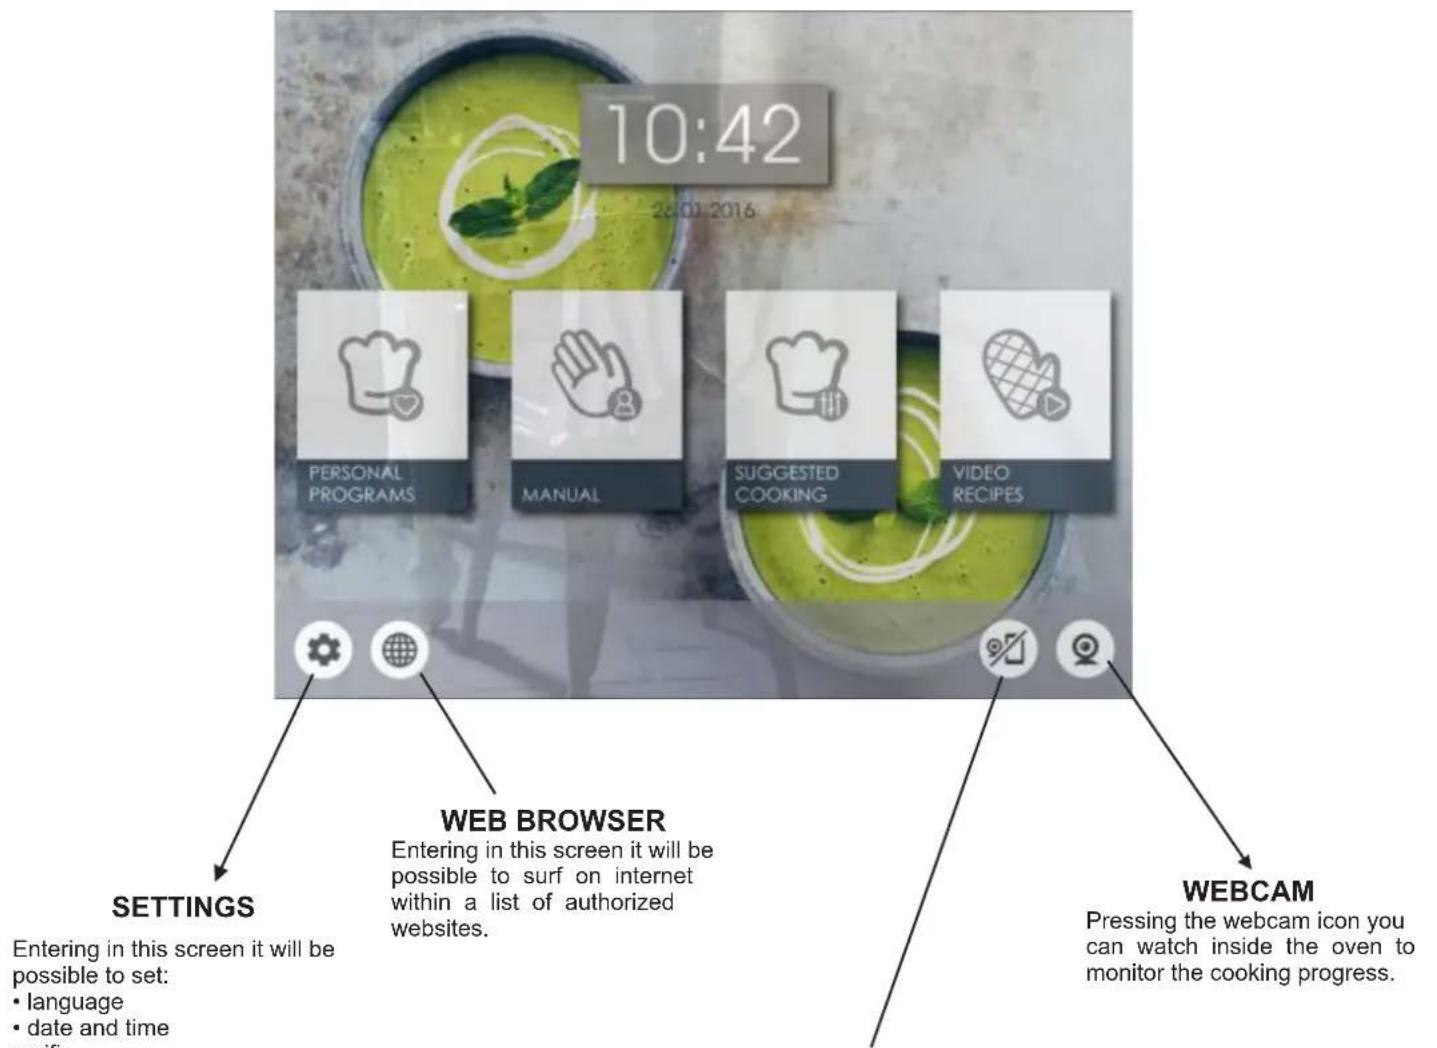
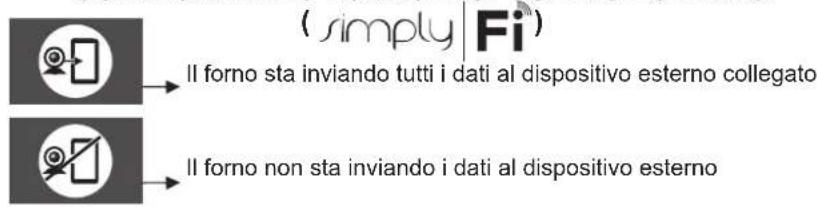
OVEN-DEVICE CONNECTION( simplyFi)

The oven is sending all the data to the connected device

The oven is not sending the data to the device
NB: If this option is activated, the oven is driven only by the connected device.
| FUNCTION WHAT IS DOES | |
| MANUAL MODE: In this mode it is possible to chose cooking functions, temperature and cooking duration, by 3 simple steps. In this mode it is also possible to set a cooking delay. NOTE: By default the preheating option is active: to turn it off click on the symbol | |
| PERSONAL PROGRAMS: In this mode it is possible to save and, in a second time, to select, customized cooking programs. | |
| SUGGESTED COOKING: In this mode it is possible to select a suggested cooking program. During the cooking fase, it is possible to change temperature and cooking duration. | |
| VIDEO RECIPES: In this mode it is possible to select some tutorial about how to prepare several recipes. At the end of the video it is possible to start cooking. It is not possible to change the cooking parametrs. | |
| INTERNET CONNECTION: If the icon is active the oven door is connect to the net. | |
| SETTINGS: Selecting this icon it will be possible to set language, date and time, wi-fi, bluetooth, camera brightness setting. Supported bluetooth devices are audio speakers only. Supported bluetooth standars are: 2.1, 3.0, 4.0 | |
| WEB BROWSER: Selecting this icon it will be possible to surf on the internet within a list of authorized websites. | |
| OVEN DEVICE CONNECTION (SIMPLY-FI): On the first use, with a long press on the icon you enroll the oven on the net. With a short press on the icon, the remote control of the oven it activated. If this option is activated the oven is driven ONLY by the connected device. To control again the oven directly on the door screen click again on the icon. To see webcam streaming on the external device (APP SIMPLY-FI), the door must be connected to the net. (THE INTERNET CONNECTION ICON MUST BE ACTIVATED) | |
| WEBCAM: Pressing the webcam icon you can watch inside the oven to monitor the cooking progress. To protect the camera, the system puts it in stand-by after 1 minute (5 minutes in case of grill function). To restart it, press the button again. Do not keep it switched on for too long. In case of cooking at high temperature, if the camera stays on for a long time, its colours might change. This is a standard phenomenon and disappears when the camera and/or the oven are cooled down. | |
| HOME PAGE: Touching this icon you go back to home page | |
| Function Dial | Function (Depends on the oven model) |
| LAMP: Turns on the oven light. | |
| DEFROST: When the dial is set to this position. The fan circulates air at 40°C around the frozen food so that it defrosts in a few minutes without the protein content of the food being changed or altered. | |
| KEEP WARM: This is recommended to reheat precooked foodstuff, positioning the shelf on the second level from top, or to defrost bread pizza or pastry by positioning the shelf on the lower level. The temperature is preset in 60°C constant, no regulation is possible. | |
| MULTI-LEVEL: We recommend you use this method for poultry, pastries, fish and vegetables. Heat penetrates into the food better and both the cooking and preheating times are reduced. You can cook different foods at the same time with or without the same preparation in one or more positions. This cooking method gives even heat distribution and the smells are not mixed. Allow about ten minutes extra when cooking foods at the same time. | |
| * | CONVENTIONAL: Both top and bottom heating elements are used. Preheat the oven for about ten minutes. This method is ideal for all traditional roasting and baking. For seizing red meats, roast beef, leg of lamb, game, bread, foil wrapped food (papillotes), flaky pastry. Place the food and its dish on a shelf in mid position. |
| BOTTOM HEATING + FAN: The bottom heating element is used with the fan circulating the air inside the oven. This method is ideal for juicy fruit flans, tarts, quiches and pâté. It prevents food from drying and encourages rising in cakes, bread dough and other bottom-cooked food. Place the shelf in the bottom position. | |
| GRILL: Use the grill with the door closed. The top heating element is used alone and you can adjust the temperature. Five minutes preheating is required to get the elements hot. Success is guaranteed for grills, kebabs and gratin dishes. White meats should be put at a distance from the grill; the cooking time is longer, but the meat will be tastier. You can put red meats and fish fillets on the shelf with the drip tray underneath. | |
| PIZZA: With this function hot air circulated in the oven to ensure perfect result for dishes such as pizza or cake. | |
| BOTTOM HEATING: Using the lower element. Ideal for cooking all pastry based dishes. Use this for flans, quiches, tarts, pate and any cooking that needs more heat from below. | |
| * | The "COOK LIGHT" function allows you to cook in a healthier way, by reducing the amount of fat or oil required. Thanks to a special combination of cooking functions and a pulsating cycle of air, it will retain the moisture content of the food, grilling the surface and using a shorter cooking time, without compromising on taste. It is particularly suitable for cooking meat, roasted vegetables and omelettes. The cycle of pulsed air keeps the humidity inside the oven and the moisture content of the food, preserving the nutritional values and ensuring a rapid uniform cooking process. Try all your recipes and reduce the amount of dressing you usually use and experience the lightness of this new function! |
*Tested in accordance with the EN 60350-1 for the purpose of energy consumption declaration and energy class
4. Simply-fi oven enrollment
Installing the appliance
Install the appliance in accordance to the installation guide within this instruction book.
Once this step has been completed, ensure the appliance is working by controlling the appliance directly using the control panel.
Please take the time to read the program guides and functions as this will help you to take full advantage of the features of your new appliance.
Please ensure that the clock time is set before trying to enrol an oven.
Locating your Wi-Fi Password
Locate the Wi-Fi Password (WPA/WEP Key) which is normally found on the back of your Wi-Fi router.
If you are having trouble locating the Wi-Fi Password, please contact your Internet Provider.
Take a note for later use
Once you have your Wi-Fi Password, please take a note of it here below as you will need this later on whilst connecting the appliance to the App.
Router name
Password (WPA/WEP Key)
Connect your device to the same Wi-Fi router ready to install the App
Downloading the App
Download the Candy simply-Fi App from the App store relevant to your device.
Note - The App is suitable for iOS (version 8 and greater) and Android (version 4.4 and greater). App Name - Candy simply-Fi
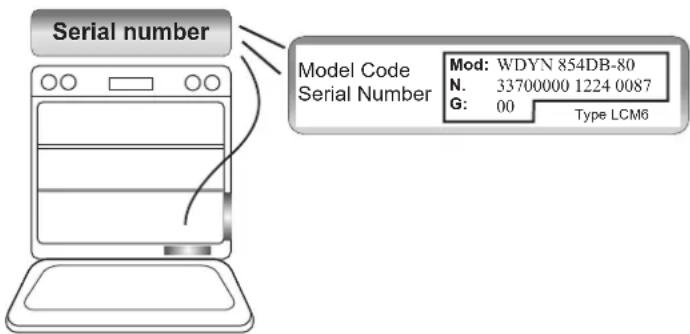
Locating your product code
Locate the product code of your appliance with the help of the image below.
Take note of the serial number
The illustration shows the format of the appliance information. Write your product serial number here below: Serial number (16 digits)
Step 1:
Open the App Candy simply-Fi. Create your account by tapping on "Sign-Up". Accept the privacy policy and complete the fields.
Note - You can explore all the features of the full simply-Fi range by tapping on "Demo".
- Step 2:
In the homepage, tap on the appliance that you want to connect and tap on "Ok".
- Step 3:
Insert the 16 digits serial number that you wrote down above and tap on "Next".
Check that the product details are correct and then tap on "Confirm".
- Step 4:
Once your appliance has been recognized, tap on "Next".
Then, you have 5 minutes to complete the process; otherwise, you will need to start it again.
- Step 5:
Long press the icon

to enroll the appliance.
- Step 6:
Exit the Candy simply-Fi app. Go to your device Wi-Fi settings.
- Step 7:
In the list of available Wi-Fi networks, select "WIFIOVEN-xyzk". If you do not find it, wait few more seconds or do a new scan.
- Step 8:
Exit from the settings of your device. Return to the Candy simply-Fi App and wait for the App to detect the appliance. Once the "Wi-Fi Network is active" screen appears, tap on "Next"
- Step 9:
Your home Wi-Fi Network will be automatically set by the App. (If not, enter the name of your home Wi-Fi network, paying attention to lowercase and uppercase letters). Insert the Wi-Fi Password (WPA/WEP Key), then tap on "Confirm".
- Step 10:
For more advantages, you can Register your product by tapping the dedicated button.
Tap on "Start" to return in the App Homepage.
- Remote control mode
With a short press on the icon controlled.

the oven can be remotely
To control again the oven directly on the door screen do a short press on the icon

To see webcam streaming on the external device (APP SIMPLY-FI), the door must be connected to the net.
- If the set up does not complete
It's important that there is a good Wi-Fi signal strength from the home router to the appliance: low Wi-Fi signal strength would cause the final stage of the set up to fail. To establish if this is the case, start the connection process again from Step 1; once at Step 8, place with your device (smartphone or tablet) next to the router and search for "WIFIOVEN-xyzk" net generated by the machine. If this does not come up as an option, this means the router cannot see the appliance. In this case, we recommend to bring the router near to the machine (if possible) or contact your internet provider and require the assistance to purchase a compatible "Wi-Fi Range Extender" to increase the signal strength.
WIRELESS PARAMETERS MAIN BOARD
| Technology | Wi-Fi |
| Standard | IEEE 802.11b/g/n |
| Frequency Band(s) [MHz] | 2412+2484 |
| Maximum Power [mW] | 41.4 |
5. Oven cleaning and maintenance
5.1 General notes on cleaning
The lifecycle of the appliance can be extended through regular cleaning. Wait for the oven to cool before carrying out manual cleaning operations. Never use abrasive detergents, steel wool or sharp objects for cleaning, so as to not irreparably damage the enamelled parts. Use only water, soap or bleach-based detergents (ammonia).
GLASS PARTS
It is advisable to clean the glass window with absorbent kitchen towel after every use of the oven. To remove more obstinate stains, you can use a detergent-soaked sponge, well wrung out, and then rinse with water.
OVEN WINDOW SEAL
If dirty, the seal can be cleaned with a slightly damp sponge.
ACCESSIONS
Clean accessories with a wet, soapy sponge before rinsing and drying them: avoid using abrasive detergents.
DRIP PAN
After using the grill, remove the pan from the oven. Pour the hot fat into a container and wash the pan in hot water, using a sponge and washing-up liquid.
If greasy residues remain, immerse the pan in water and detergent. Alternatively, you can wash the pan in the dishwasher or use a commercial oven detergent. Never put a dirty pan back into the oven.
5.2 Maintenance
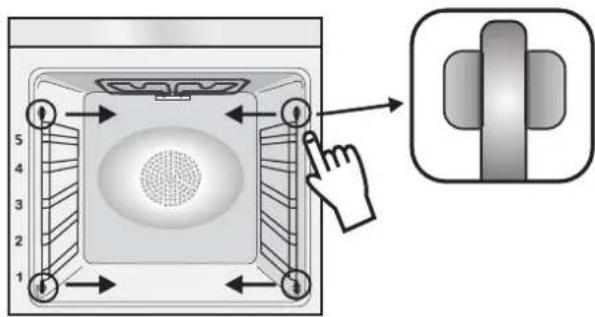
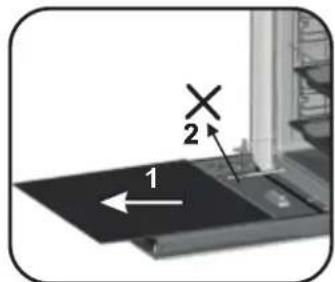
REMOVAL AND CLEANING OF THE SIDE RACKS
1- Remove the wire racks by pulling them in the direction of the arrows (see below)
2- To clean the wire racks either put them in the dishwasher or use a wet sponge, ensuring that they are dried afterwards.
3- After the cleaning process install the wire racks in reverse order.
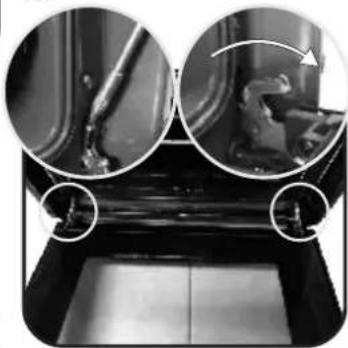
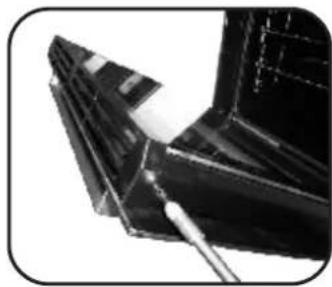
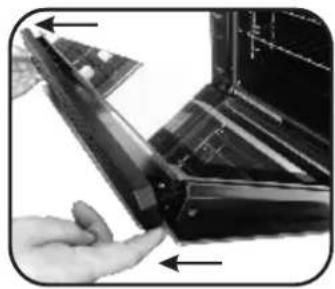
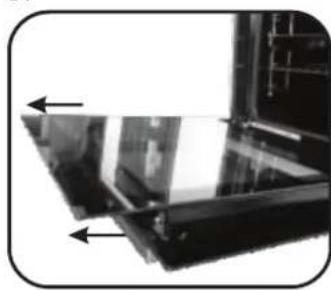
CLEANING OF THE INTERIOR GLASS DOOR ONLY
- Open the oven door.
2.3.4. Lock the hinges, remove the screws and remove the upper metal cover by pulling it upwards.
5.6. Remove the glass, carefully extracting it from the oven door (NB: don't remove any other glass or component). - At the end of cleaning or substitution, reassemble the parts in reverse order.
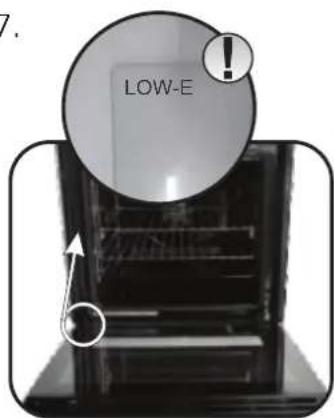
On all glass, the indication "Low-E" must be legible and positioned on the left side of the door, close to the left-hand lateral hinge. In this way, the printed label of the first glass will be inside the door.
1.

2.
3.
4.
5.
6.
7.
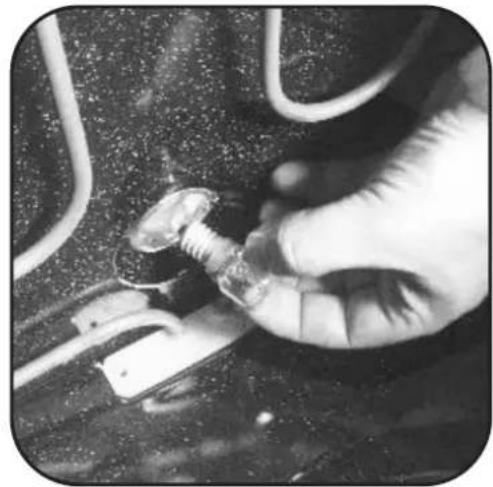
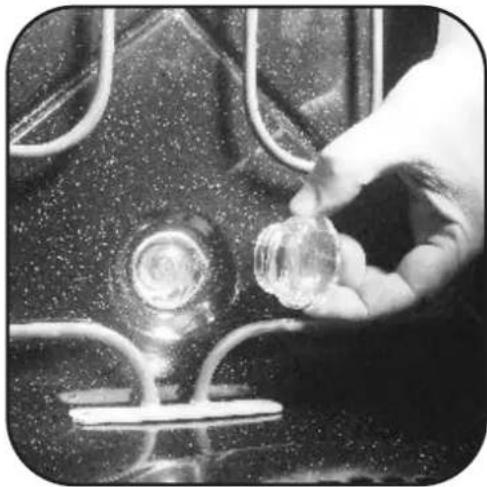
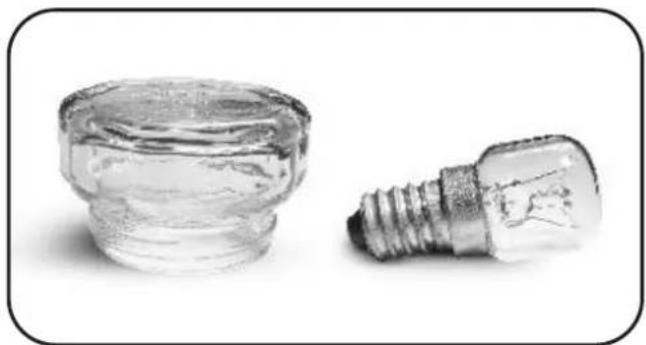
CHANGING THE LAMP BULB
- Disconnect the oven from the mains supply.
- Undo the glass cover, unscrew the bulb and replace it with a new bulb of the same type.
- Once the defective bulb is replaced, replace the glass cover.

NOTE:
For any issue with the led light system present in the door contact costumer service.
3.5 Home Page - Main Functions
COLLEGAMENTO FORNO-DISPOSITIVO ESTERNO
Password (chiave WPA/WEP):
Password (WPA/WEP-Schlüssel)
Tel: 039.2086.1 Fax: 039.2086.403
www.candy-group.com
CANDY
GARANTI BELGESI
ANKASTRE FIRIN
USTEDA ENERGIJE I BRIGA ZA OKOLIS
Ukoliko je moguce, izbjegavaje nepotrebno zagrijavanje prazne pečnice. Vrata otvarajte što je manje moguce, kako biste smanjili gubitak topline iz unutrašnjosti. Za značajnu uštedu energije, isklujčite pečnicu 5 do 10 minuta prije planiranog završetka pečenja i iskoristite preostalu toplin pečnice. Odžavajte brte Čistima i pripazite da su pravlino učvṛscene, kako biste izbjeglī gubitak topline. Ukoliko imate divotaríno brojilo, iskoristite funkćiju odgode počětka pečenja za period jeftinije elektrickne energije.
1.6 Izjava o Sukladnosti
- Postavljanem oznake Cena ovaj proizvod, potvrdujemo da ovaj proizvod udovoljava svim relevantnim europskim sigurnosnilm, zdravstvenim i ekoloskim zahtjevima primjenjivima u propisima za ovaj proizvod.
- Ovim, Candy Hoover Group Srl izjavljue da je radio oprema u skladu sa Direktivom 2014/53/EU. Cijeli tekst EU izjave o sukladnosti dostupan je na sljedecoj internetskoj adresi: www.candy-group.com.
2. Opis proizvoda
2.1 Pregled
- Upravljaca ploča
- Položaju polica (rešetka, ako je prilozena)
- Metalna resetka
- Plitica za prikrupljanje masnoce
- Ventilator (iza celiene ploce)
- Vrata pečnice
- Ploca supravljanjem na dodir na vratima
- Kamera
2.2 Pribor (ovisno o modelu)
1 Metalna rešetka
Drzi pladanj za pecejenje i tanjure.
2 Plitica za priukuplanje masnoce

Zaporka (WPA/WEP kod)
Povežite svoj uredaj na isti ruter za Wi-Fi kako biste instalirali aplikaciju
Locating your product code
Locate the product code of your appliance with the help of the image below.
DAnHHn npH6Op MapKInpOaH corNaCHO Tpe6oBaHnA m n peKT NbB EC 2012/19/EU o6ytnn3au nn 3NeKtpnueckoro n 3NeKTPHOHOOBpyObaHna (WEEE). OToXdbI 3NeKTPeCKoro n 3NeKTPHOHOOBpyObaHna CoepkAT kak 3aqr3HaIOuJe BcEeCTBa (KOtOpBe MOrYT OKa3bIBaTb BpeHoe BO3dEmCTBne Ha OkpyKaIOyO cpeY), TaN oCCHOBHe 3NeMeHTb (KOTOpBe MOrYT 6bITb NCOnJb3OBAHbI NobTOpho). BaXHo, OToBb OTxObl 3NeKTPnueckoro n 3NeKTPHOHOOBpyObaHna PPOXODNNPabINbHyO pOooDpy TYININsauin C
YHNUTOXeHNEM BCEX 3aRpa3HJIOUxBBeIecTB Nnepepa6tKoB CEx MATEpnaIOB. Daxe OTeJIbHbIe IIOIN MORYI rPbT BaKHyO pOB B oEcNEeHm EKoIOnHueCKoB 6eONaCHocTH yTNIN3NpyEmO 3NeKTPuCeCKOrO n 3NeKTPoHnHO 06OpDbaHnBa; BaXHo NIIuB bByINOHrHEKOTOPBX OCHOBHbIe npABNuJa:
- C OTxOaAMN 3JNeKTpUeCKOrI N3JIeKTpOHHoro 06OpyDobAHn HEnb3a O6paatbcKa Kc O6bIHybIMn 6blTObbIMN OTxOaAMN.
-OTXoDb3NeKtpnueckoro 3NEKtpOnHOrO obOpdyobAHn DOJHKbI cdaBaTbc B CneuunbHbIe NyHKbI npEma NO ynpabEnHeM ropDcKO adMNInCTpaunN nn OphiunAIBHO zaprrntpOBAHHo KOMaHN. Bo MHOx ctpaHx kpyhIbe KOMnauN no TYTNMaun 3NEKtpUeCKoro n 3NEKtpOnHORO 6OBOpDABAHN MOYr npOMBODITB BblBO3 6OBpOyOBAHN I Doma. Pn npOpeTeHN HOBO 3NEKtpObTOBO 6OBpyOBAHN, CTApOE 6OBpyOBAHNE, OTOHCUEeC K TOMy xe KNaCCy n PnpDAHaChueHHeOE dJI BblIOHNHEN TEX Xe FyHKmu, YTO n PnO6PepaEMbI np6Op, MoKHO BepHyTB pOpaBuCy, KOtOpBIO63aH BeecnnatHO npnHBy TB erO.
COXPAHEHNE 3AUNTA OKPYKAIOUEN CPEbl
IIO BO3MOXHOCTN, IN36eAaTe npEbnBapntenbHOro nporpeBaHnna neHn BcERda cTapaNTecb 3anONHbTb ee. KaK MOxHO pExe OTkpBbAaTe DBepuy, NocO9OBky KAKNOoe ee ONkPBbAHnnpINBOuNT K paccEBaHIO TennNa n3 BHyTPENHe qACTn Neu. JnAn cyueCTBeHNHO CbepeHnEHn, BbIKNoHaHTe Neb 3a 5 -10 MNHT Do 3annHApOBaHnro BpemeHN OKOHuaHn PnIRTOBNeHnA DnN ACNOJb3OBAHN OCTaTOHORo TennNa, KOtOpoe npOdoNkaet BbipabatbTa NEb. CoxpanHe TepMeTHnCe HpyTOHEHn B YCHCTOTE, 3To NO3BOHTN IN36ExKaTpCaeBHnPAHn BnTAPnDfNEHn HpyTOBHeq TneNn. B CInyae EcnB Bauh TaNPdNtKeHnnpEtnONaeraT NoacobYOnnATy, nporpamma «OTNOKeHHoe npiroTOBHeHnO» ObceNeuBaET Boone npocToi cnoc6 coxpaHHeHn 3HEPRn, NO3BOHnpeHocNt npoucc npiroTOBHeHn Ha Bpem DeNCTBn CHINKeHHbIX TaNPoOB.
1.6ДeКлараци COOTBETCTBnA
HaHeceHEm MapKpOBKn CHa daHHb np6Op n3rOToBnTeNb NOITBePckdaet ero COOTBeTCTBne pNMeHMBm EBponeckM cTahdaptam 6e30NaChOCTn, OxpaHb 3DopOBbry OkpykaHOuec Cpdebl
HactoM Candy Hoover Group Srl 3aBnE, TcPraNooBopyOBAHne OTBeuAeT Tpe6oBaHmIM DInpeKTHBbI 2014/53/EU. POnHbI TeKCT DeKnapaCn COOTBeTCTBnE EC MoXHO HaHTN no CJIeDyUOeMy aDpecy B INHePheTe: www.candy-group.com
3TO H3dEne COOTBETCTBYET TEXHnueckm perIameHTam TaMOKeHHoro Co03a:
TP TC 004/2011 «O COOTBeTCTBUN HN3KOBObTHORO o6opuyoBaHnra TP TC 020/2011 «JNeKtpomarHHTHa CoBMeCTHMOC TEXHmecckx CpeCTB
I3dennne ceptnuipoBaHO b opraHe no ceptnuKaun npOdyKun n ycnyr POCCTECT-MOCKBA》,r.MockBa.
KONHIO cepTINPHKATA COOTBECTCBN BBI MOXETE NOUYHTB MAra3HHe, rIe npNObpeTaC ToBAP HAnICAB 3aNPoc Ha 3NeKTPOHHYIO NOTy candyMow@candy.ru.
2. Onncahne n3dennr
2.1 O6uyn o63op
- NaHene ynpabneHn
- PacnonoKeHne peweTOK - HnpaBnaIOuNX
(nonepeuHa npoBOnouHa peeTeKa,ecnBxOHT B KOMnEKT) - Metanuuecka peuetka Jnra rnilr
4.ПОДДОНДЯСТЕКАнгKANeNB - BeHTnJIaTOp (3a CTaNbHOI JNaCTNHOI)
6.Дерца Neu - CechopHyI nyIbT ynpaBneHnHa DBepe
- Kamepa
2.2 DonoJIHnTeJIbHbIe npHaJNeJxHOCTN
1MetaJIInuecka peweTkaIraIprnla
YdepnBaeT npOTNBHn DnBbINEcK n TapeJIKN.
2 POnDOn DnA CTeKaHnKaKeIb
Cobpaet kann, cTeKaIOUne BO Bpem npiroTOBHeHn Hn Ha rpnne.
3 BoKobIe npOBIoNoHbIe peWeTkn
PacnoonKeHbHa oBeHX cTeHKax dYxOBoro WkaΦa. YdepxBaIO T metaJIInueckne peWetkn n IpOTNBHn.
3. 3Kcnnyatauny DxyOBKn
3.1 Onicahne nHTepceIca noJIb3ObaTeJIa
1.ΓλaBbIy BblKlHoyatEnb
2.CenCOpHbIKKnHTeppeic
3.2 Hac trok npoodyka
-Пипөрьм 3ануcke Heобхдимо Bынлнгть поцеуру yctановк,чTOБыВдальшем NOЛьзOBаТСВСВЕМФункяmaru dYxOBk.нжмITE START (ПУСК),чTOБыHAЧАТБУCTANOBky.
-BbIbepnte 3bIK nHnCnadaiooMeHIO.HaKMnTe NEXT (DAJEE) IINI npOIOxKeHH.
- YctaHOBNTe DaTy B KaIeHdape. YcTaHOBNTe BpEmr Ha Yacax.
HaMMTe NEXTE (DAJEE) nI npOdoJIkeHn.
-6epnte cboIO domaHIO ceTb n3 HnCnadaOJero MeHO. BBeNTe napoB cBoeI domaHHe cTei. HaxMtTe NEXT (DAJIEE) dInr npdoJIKeHn I DOxNITcB 3aBepseHn 3aRpy3kn INy UcTaHOBneHn coeINHHeN.
PpmeaHne. DxyOBka pa6oTaet daxe 6e3 noKIOueHnK cETn. POKIIOUeHne K CETn MOXHO BbIOJNHTb PO3Ke.
- Iocne ycneuHoro noCoeHHeHnHaXmTe NEXT (DAJIEE) npepexoA K noCleHemy 3Tany npoueDpybl.
-ПоЗавершениproцeca установки,HахмITE GO TO HOME PAGE(ПЕРДТК CTAPTOBOI CTPAHUICE),чтоблппсгуньк КЗкл�атуши духовки.
Ioppo6Hee cm. B KpaTkOM cnpaBOHnke.
IAPAMETpbI BECINPOBOHOYCTPOHCTBA DBEPcbl
| Тек halогни | Wi-Fi | BLE |
| Стондэр | IEEE 802.11b/g/n | Bluetooth v2.1+EDR/BT v3.0/BT V4.0+HS |
| Полosa частот [MГц] | 2400÷2497 | 2400÷2497 |
| Марсимальnamя мошноctь [MBT] | 51.7 | 10 |
3.3Первоиспьзованe
PNEBAPNTbHAROCHCTKA
OuHCTnTe DxyOBky Npei nepBbIM IcNoIb3oBaHHeM. IpOtpnte HApyKhIbe NOBepxHOCTN BIAxHOH MmKoI CaJIpEeKoI. IpOMOnTe BCE akceccyapbl I npOTnPte DxyOBky BHyTpIpaTbOpOM Tropye BObl C YnCTaIIM CpeDCTBOM. YcTaHOBnTe HAcTPOkYHa MaKcImMaIbHyIO TempePaTyI npOrpeIte DxyOBky B TeueHne 1 Uaca, YTO6bl YdaJINbXapaKtepHbI 3aIax HOBO rnp6opa.
3.4 Pa6oTa B pyHOM pexKIme
- OTKPOIte BkJaDky puHOrO peXIMa, YTo6bI HAcTpoNTb nporpaMMy npiroTOBnEHHa 3 a3 npocTbIX Waara.
-CmaxHnTe n BbIepHe NHyKHyIO FyHKuIO npiroTOBneHn. HaxmTe NEXT (DAIEE) dny npoDOnKeHn.
-CmaxHNTe, TTo6bI Bb6paTb HxkyHIO TemnepaTypy. Haxmnte NEXTE (DAJIEE) nI npOOnKeHnN INBAC (HA3AD), TTo6bI BepHyTbcK NaCTPOkAM FyHKnnproTOBnEHHN.
-CmaxHnte, YTO6bI Bb6paTb Bpemr npiroTOBneHn. HaxmTe START (NYCK), YTO6bI HauTaB npiroTOBHeHn, INN BACK (HA3AД), YTO6bI Bepybcr K HactpoiKe TempeaTypbl. Ha 3TOM 3KpaHe MoXHO:
OTKNIOHT npEBApnteHbHnHarpeB (yCTaHOBHeH no yMOJUHaHNO), HAcTPOITb OTCPOueHHb 3anyck.
-Bnpoecepe npiroTOBHeHnMoXHO:
- INMehHTb TemnepaTyP,
-IM3MEHHTB BPEM PIPNFOTOBJEHNA
HaxaTb 3HaOK Be6-Kamepbl, YTo6bl CneDnTb 3a TEM, YTO npOxCoNT BHYTPN,
- Haxkab KhoNky STOP (CTON), yTo6bl 3aBepuTb npuroTOBnHeHne.
3.5ΓλaBnaCtpaHua-OchOBhieΦyHKU


PnmeaHne. Ecn daHHb npaMeTp akTNBnPOBaH, ynpabTb dXOBKO MOxHO TOJbKO C NOcOeINHeHHoro yCTpoNCTBa.
| Фуннкция | ЧTO ПОНСХОДТ | |
| РУЧИЙ PЕЖIM В 3兆ом рекиме можно за 3 постыхшара Вьбральь Фунckции пpreciотовлиения, TempepaTyUpи Длеловость пpreciотовлиения. КрOME того, в 3兆ом рекиме можно установпь за对接жу Задусяп рpreciаммь пpreciотовлиения. ПОНМЕЧАЛЕ. Посучесп рpreciаммь пpreciотовлиения. ПROMIMЕЧАЛЕ. Посучесп рpreciамmь пpreciотовлиения. ПROMIMЕЧАЛЕ. Посучесп рpreciамmь пpreciотовлиabella. ПROMIMЕЧАЛЕ. Посучесп рpreciамmь пpreciотовлиabella. ПROMIMЕCHАЛЕ. Посучесп рpreciамmь пpreciотовлиabella. ПROMIMЕCHАЛЕ. Посучесп рpreciамmь пpreciотовлиabella. ПROMIMЕCHАЛЕ. Посучесп рpreciамmь пpreciотовлиabella. ПROMIMЕCHАЛЕ. Посучесп рpreciамmь пpreciот伏; Надусяп рpreciамmь пpreciот伏. ПROMIMЕCHАЛЕ. Посучесп рpreciамmь пpreciот伏. ПROMIMECHАЛЕ. Посучесп рpreciамmь пpreciот伏. ПROMIMECHАЛЕ. Посучесп рpreciамmь пpreciот伏. ПROMIMECHАЛЕ. Посучесп рpreciамmь пpreciот伏. ПROMIMECHАЛЕ. Посучесп рpreciамmь пpreciот伏. ПROMIMECHАЛЕ Посучесп рpreciамmь пpreciот伏. ПROMIMECHАЛЕ Посучесп рpreciамmь пpreciот伏. ПROMIMECHАЛЕ Посучесп рpreciамmь пpreciот伏. ПROMIMECHАЛЕ Посучесп рpreciамmь пpreciот伏. ПROMIMECHАЛЕ Посуwerсп рpreciамmь пpreciот伏. ПROMIMECHАЛЕ Посуwerсп рpreciамmь пpreciот伏. ПROMIMECHАЛЕ Посуwerсп рpreciамmь пpreciот伏. ПROMIMECHАЛЕ Посуwerсп рpreciамmь пpreciот伏. ПROMIMECHАЛЕ Посуwerсп рpreciames ПROMIMECHАЛЕ Посуwerсп рpreciames ПROMIMECHАЛЕ Посуwerсп рpreciames ПROMIMECHАЛЕ Посуwerсп рpreciames ПROMIMECHАЛЕ Посуwerсп рpreciames ПROMIMECHАЛЕ Посуwerсп рpreciames ПROMIMECHАЛЕ П啸ы undet oHopmaJIbHOM raJIbENHIM, effeKet ot KOTOPORO nCHe3Net noCle OxJaXdHIN Телекамрь и/nДухов. К�шушиь 3兆ога 3нчы. Б�ншушиь 3兆ога 3нчы. Б�ншушиь 3兆ога 3нчы. Б�ншушиь 3兆ога 3нчы. Б�ншушиь 3兆ога 3нчы. Б�ншушиь 3兆ога 3нчы. Б�ншушиь 3兆ога Б�ншушиь 3兆ога Б�ншушиь 3兆ога Б�ншушиь 3兆ога Б�ншушиь 3兆ога Б�ншушиь 3兆ога Б�ншушиь 3兆ога Б�ншушиь 3兆ога Б�ншушиь 2兆ога Б�ншушиь 2兆ога Б�ншушиь 2兆ога Б�ншушиь 2兆ога Б�ншушиь 2兆ога Б�ншушиь 2兆ога Б�ншушиь 2兆ога Б�ншушиь 2兆ога Б�нш絵ьььььььььььььььььььььььььььььььььььььььььььььььььььььььььььььььььььььььььььььььььььььььььььььььььььь Б�нш絵ьььььььььььььььььььььььььььььььььььььььььььььььььььььььь Б�нш絵ьььььььььььььььььььььььььььььььььь Б�нш絵ььььььььььььььььььььь Б�нш絵ьььььььььььь Б�нш絵ььььььььь Б�нш絵ьььььь Б�нш絵ььььь Б�нш絵ььььь Б�нш絵ьььь Б�нш絵ьььь Б�нш絵ьььь Б�нш絵ьььь Б�нш絵ьььь Б�нш絵ьььь Б�нш絵ьььь Б�нш絵ьььь Б�нш絵ьььь Б�нш絵вььь Б�нш絵ьььь Б�нш絵ьььь Б�нш絵ьььь Б�нш絵ьььь Б�нш絵ьььь Б�нш絵ьььь Б�нш絵ьььь Б�нш絵ььь Б�нш絵ььь Б�нш絵ььь Б�нш絵ььь Б�нш絵ььь Б�нш絵ььь Б�нш絵ььь Б�нш絵ььь Б�нш絵ььь Б�нш絵ььь Б�нш絷ьь Б�нш絷ьь Б�нш絷ьь Б�нш絷ьь Б�нш絷ьь Б�нш絷ьь Б�нш絷ьь Б�нш絷ьь Б�нш絷ьь Б�нш絷ьь Б�нш絷ьь Б�нш絷ль Б�нш絷ьь Б�нш絷ьь Б�нш絷ьь Б�нш絷ьь Б�нш絷ьь Б�нш絷ьь Б�нш絷ьь Б�нш絷ьь Б�нш絷ьь Б�нш絷ьь Б�нш絷ьь |
| 3начок фуннцли | Фуннкция (В заевсumocm umodelу почу) |
| Лампа: вklючает посвettingу почу. | |
| PA3MOPAXINBAHNE: рни устовке ручки ренилары в дадное пооженке. Вернлары осяспьаот сиркулажи воздуха 40°C Воргт замороженном поши, багограду чему ода разморжinasьетс в точеньеheckлбхи минуbet ecгnotер и пимяменения воставлеси. ПОДЕРЖAHNE TELПА:даная руннкция ренилары в дадное пооженке раимпри�OTВЕнных поставлеси, ecг полaki устовAILBaETС на ВТОМУРBEСBERXY, пимядраимороженке, вддпьшьд; псим полaki устовAILBaETС на Нжнem уровп. Temnéратура устовILA на 60°C, рergировka небоэможна. | |
| MHOROYPOBHEBOE ПИNGOTOBLEHNE: мы ренилары вддпьшьд сандалы метдддддддддддддддддддддддддддддддддддддддддддддддддддддддддддддддддддддддддддддддддддддддддддддддддддд п Tinьс, сdобу, рьбу и овошей. Телл почile понлakот в пишу, садалу лару чему кас в ренилары вддддддддддддддддддддддддддддддддддддддддддддддддддддддддддддддддддддддддддддддддддддддддддддддддддд徳 п Всмя ренилары соррацалу соррацалу сор. Бу Всмя ренилары соррацалу сор. Пишьс c onднаковь поддддддддддддддддддддддддддддддддддддддддддддддддддддддддддддддддддддддддддддддддддддддддддддддддддд德 Даньй метд ренилары вддддддддддддддддддддддддддддддддддддддддддддддддддддддддддддддддддддддддддддддддддддддддддддд Смениhabия захов. Рни OДОВЕМENHOM ренилары вдддддддддддддддддддддддддддддддддддддддддддддддддд ДопОПНТERTНЯ на DecaTы МИHT. | |
| * | TPAДЦNUOHHA: Истльз汞OTСКAK ВERCHI, тak и Нжний ренилары вддддддддддддддддддддддддддд погрөгүпөүв.Tеь в төчөн.Tеьөгүпөүв.Tеьөгүпөүв.Tеьөгүпөүв.Tеьөгүпөүв.Tеьөгүпөүв.Tеьөгүпөүв.Tеьөгүпөүв.Tеьөгүпөүв.Tеьөгүпөүв.Tеьөгүпөүв.Tеьөгүпөүь.Tеьөгүпөүв.Tеьөгүпөүв.Tеьөгүпөүв.Tеьөгүпөүв.Tеьөгүпөүв.Tеьөгүпөүв.Tеьөгүпөүв.Tеьөгүпөүв.Tеьөгүпөүв.Tеьөгүпөү. нжний HAPREB + BEHTNJIATOP: Истльз汞OTСКAK HIXHNIHRANPEBATELBHIIHIIHIIHIIHIIHIIHIIHIIHIIHIIHIIHIIHIIHIIHIIHIIHIIHIIHIIHIIHIIHIIHIIHIIHIIHIIHIIHIIHIIHIIHIIHIIHIIHIIHIIHIIHIIHIIHIIHIIHIIHIIHIIHIIHIIHIIHIIHIIHIIHIIH IIHIIHIIHIIHIIHIIHIIHIIHIIHIIHIIHIIHIIHIIHIIHIIHIIHIIHIIHIIHIIHIIHIIHIIHIIHIIHIIHIIHIIHIIHIIHIIHIIHIIHIIHIIHIIHIIHIIHIIHIIHIIHIIHIIHIIHIIHIIHIIHIIHIIHⅡHIVHIVHIVHIVHIVHIVHIVHIVHIVHIVHIVHIVHIVHIVHIVHIVHIVHIVHIVHIVHIVHIVHIVHIVHIVHIVHIVHIVHIVHIVHIVHIVHIVHIVHIVHIVHIVHIVHIVHIVHIVHIVHIVHIVHIVHIVHIVHIVHIVHIVH IVSTAYIHNITOK. Нжний HAPREB + BEHTNJIATOP: Истльз汞OTСКAK HIXHNIHRANPEBATELBHIIHIIHIIHIIHIIHIIHIIHIIHIIHIIHIIHIIHIIHIIHIIHIIHIIHIIHIIHIIHIIHIIHIIHIIHIIHIIHIIHIIHIIHIIHIIHIIHⅡHIVHIVHIVHIVHIVHIVHIVHIVHIVHIVHIVHIVHIVHIVHIVHIVV Тувьпс ДBackache packanitb HarpeBaTeLbHBe IeMaNTb HeobxOdo mpoedpTaBHeNo ppoRptb TneB Тувьпс ДBackache packanitb HarpeBaTeLbHBe IeMaNTb HeobxOdo mpoedpTaBHeNo ppoRptb TneB Тувьпс ДBackache packanitb HarpeBaTeLbHBe IeMaNTb HeobxOdo mpoedpTaBHeNo ppoRptb TneB Туьпс ДBackache packanitb HarpeBaTeLbHBe IeMaNTb HeobxOdo mpoedpTaBHeNo ppoRptb TneB Туьпс ДBackache packanitb HarpeBaTeLbHBe IeMaNTb HeobxOdo mpoedpTaBHeNo ppoRptb TneB Туьпс ДBackche bckcrtb TseKoHoe pOToPbTb HqOToPbTb HqOToPbTb HqOToPbTb HqOToPbTb HqOToPbTb HqOToPbTb HqOToPbTb HqOToPbTb HqOToPbTb HqOToPbTb HqOToPbTb HqOToPbTb HqOToPp Туьпс ДBackache packanitb HarpeBaTeLbHBe IeMaNTb HeobxOdo mpoedpTaBHeNo ppoRptb TneB Туьпс ДBackache packanitb HarpeBaTeLbHBe IeMaNTb HeobxOdo mpoedpTaBHeNo ppoRptb TneB ТуьпС ДBackache packanitb HarpeBaTeLbHBe IeMaNTb HeobxOdo mpoedpTaBHeNo ppoRptb TneB ТуьпС ДBackache packanitb HarpeBaTeLbHBe IeMaNTb HeobxOdo mpoedpTaBHeNo ppoRptb TneB ТуьпС ДBackache packanirb HqOToPbTb HqOToPbTb HqOToPbTb HqOToPbTb HqOToPbTb HqOToPbTb HqOToPbTb HqOToPbTb HqOToPbTb HqOToPbTb HqOToPbTb HqOToPbTb HqОToPbTb HqOToPbTb HqOToPbTb HqOToPbTb HqOToPbTb HqOToPbTb HqOToPbTb HqOToPbTb HqOToPbTb HqOToPbTb HqOToPbTb HqOToPbTb HqOToPbTTb HqOToPbTTb HqOToPbTTb HqOToPbTTb HqOToPbTTb HqOToPbTTb HqOToPbTTb HqOToPbTTb HqOToPbTTb HqOToPbTTb HqOToPbTTb HqOToPbTTb HqOToPbTTb HqОToPbTTb HqOToPbTTb HqOToPbTTb HqOToPbTTb HqOToPbTTb HqOToPbTTb HqOToPbTTb HqOToPbTTb HqOToPbTTb HqOToPbTTb HqOToPbTTb HqOToPbTTb HqOToPbTb HqOToPbTTb HqOToPbTTb HqOToPbTTb HqOToPbTTb HqOToPbTTb HqOToPbTTb HqOToPbTTb HqOToPbTTb HqOToPbTTb HqOToPbTTb HqOToPbTTb HqОToPbTTb HqОToPbTTb HqOToPbTTb HqOToPbTTb HqOToPbTTb HqOToPbTTb HqOToPbTTb HqOToPbTTb HqOToPbTTb HqOToPbTTb HqOToPbTTb HqOToPbTTb HqOToPbTb HqOToPbTb HqOToPbTTb HqOToPbTTb HqOToPbTTb HqOToPbTTb HqOToPbTTb HqOToPbTTb HqOToPbTTb HqOToPbTTb HqOToPbTTb HqOToPbTTb HqОToPbTTb HqOToPbTTb HqОToPbTTb HqOToPbTTb HqOToPbTTb HqOToPbTTb HqOToPbTTb HqOToPbTTb HqOToPbTTb HqOToPbTTb HqOToPbTTb HqOToPbTTb HqOToPbTb HqOToPbTTb HqOToPbTb HqOToPbTTb HqOToPbTTb HqOToPbTTb HqOToPbTTb HqOToPbTTb HqOToPbTTb HqOToPbTTb HqOToPbTTb HqOToPbTTb HqOToPbTTb HqОToPbTTb HqОToPbTTb HqОToPbTTb HqOToPbTTb HqOToPbTTb HqOToPbTTb HqOToPbTTb HqOToPbTTb HqOToPbTTb HqOToPbTTb HqOToPbTTb HqOToPbTTb HqOToPbTb HqOToPbTb HqOToPbTb HqOToPbTb HqOToPbTb HqOToPbTb HqOToPbTb HqOToPbTb HqOToPbTb HqOToPbTb HqOToPbTb HqOToPbTb HqQToPbTb HqOToPbTb HqOToPbTb HqOToPbTb HqOToPbTb HqOToPbTb HqOToPbTb HqOToPbTb HqOToPbTb HqOToPbTb HqOToPbTb HqOToPbTb HqOToPbTIb HqOToPbTIb HqOToPbTIb HqOToPbTIb HqOToPbTIb HqOToPbTIb HqOToPbTIb HqOToPbTIb HqOToPbTIb HqOToPbTIb HqOToPbTIb HqOToPbTIb HqOToPbTIb HqОToPbTIb HqOToPbTIb HqOToPbTIb HqOToPbTIb HqOToPbTIb HqOToPbTIb HqOToPbTIb HqOToPbTIb HqOToPbTIb HqOToPbTIb HqOToPbTIb HqOToPbTIb HqOToPbTtB HqOToPbTtB HqOToPbTtB HqOToPbTtB HqOToPbTtB HqOToPbTtB HqOToPbTtB HqOToPbTtB HqOToPbTtB HqOToPbTtB HqOToPbTtB HqOToPbTtB Туьпс ДBackache packanitb HarpeBaTeLbHObIuZyCByDEKALNIOI Туьпс ДBackache packanitb HarpeBaTeLbHObIuZyCByDEKALNIOI Туьпс ДBackache packanitb HarpeBaTeLbHObIuZyCByDEKALNIOI Туьпс ДBackache packanitb HarpeBaTeLbHObIuZyCByDEKALNIOI |
| * | Фуннczь "COOK LIGHT" NOЗВОЛТВAM BOTOBIT BODLOEE 3DOPOBIM C1DOSOB MPRINIMAHLON MINGOLZOBAHIN Жирочь масла. Благорading Спебальский Фуннczь Chub�и Бу Валу ренилары в ддддддддддддддддд Бу Валу ренилары в ддддддддддд Бу Валу ренилары в ддддддд Бу Валу ренилары в дддддд Бу Валу ренилары в ддддд Бу Валу ренилары в дддд Бу Валу ренилары в дд Бу Валу ренилары в Бу Валу ренилары в Бу Валу ренилары в Бу Валу ренилары в Бу Валу ренилары в Бу Валу ренилары в Бу Валу ренилары в Бу Валу ренилары в Бу Валу ренилары в Бу Wlalу ренилары в Бу Wlalу ренилары в Бу Wlalу ренилары в Бу Wlalу ренилары в Бу Wlalу ренилары в Бу Wlalу ренилары в Бу Wlalу ренилары в Бу Wlalу ренилары в В�урс "[Фуннczь" NOЗВОЛТВAM BOTOBIT BODLOEE 3DOPOBIM C1DOSOB MPRINIMAHLON MINGOLZOBAHIN Жирочь м�лу ренилары в ддддддддд Бу Валу ренилары в Бу Валу ренилары в Бу Валу ренилары в Бу Валу ренилары в Бу Валу ренилары в Бу Валу ренилары в Бу Валу ренилары в Бу Валу ренилары в Биурс "[Фуннczь" NOЗВОЛТВAM BOTOBIT BODLOEE 3DOPOBIM C1DOSOB MPRINIMAHLON MINGOLZOBAHIN Жирочь м�лу ренилары в Бу Валу ренилары в Бу Валу ренилары в Бу Валу ренилары в Бу Валу ренилары в Бу Валу ренилары в Бу Валу ренилары в Бу Валу ренилары в Бу Валу ренинг Бу Валу ренинг Бу Валу ренинг Бу Валу ренинг Бу Валу ренинг Бу Валу ренинг Бу Валу ренинг Бу Валу ренинг Бу Валу ренинг Бу Валу ренинг Бу Валу ренинrg Бу Валу ренинrg Бу Валу ренинrg Бу Валу ренинrg Бу Валу ренинrg Бу Валу ренинrg Бу Валу ренинrg Бу Валу ренинrg Бу Валу ренинrg Бу Валу ренинrg Бу Валу ренинRG Бу Валу ренинRG Бу Валу ренинRG Бу Валу ренинRG Бу Валу ренинRG Бу Валу ренинRG Бу Валу ренинRG Бу Валу ренинRG Бу Валу ренинRG Бу Валу ренинRG Бу Валу ренинBG Бу Валу ренинBG Бу Валу ренинBG Бу Валу ренинBG Бу Валу ренинBG Бу Валу ренинBG Бу Валу ренинBG Бу Валу ренинBG Бу Валу ренинBG Бу Валу ренинBG Бу Валу ренинRG Бу Валу ренинBG Бу Валу ренинBG Бу Валу ренинBG Бу Валу ренинBG Бу Валу ренинBG Бу Валу ренинBG Бу Валу ренинBG Бу Валу ренинBG Бу Валу ренинRG Бу Валу ренинRG Бу Валу ренинBG Бу Валу ренинBG Бу Валу ренинBG Бу Валу ренинBG Бу Валу ренинBG Бу Валу ренинBG Бу Валу ренинBG Бу Валу ренинRG Бу Валу ренинBG Бу Валу ренинRG Бу Валу ренинBG Бу Валу ренинBG Бу Валу ренинBG Бу Валу ренинBG Бу Валу ренинBG Бу Валу ренинBG Бу Валу ренинBG Бу Валу ренинRG Бу Валу ренинRG Бу Валу ренинRG Бу Валу ренинBG Бу Валу ренинBG Бу Валу ренинBG Бу Валу ренинBG Бу Валу ренинBG Бу Валу ренинBG Бу Валу ренинRG Бу Валу ренинBG Бу Валу ренинBG Бу Валу ренинRG Бу Валу ренинBG Бу Валу ренинBG Бу Валу ренинBG Бу Валу ренинBG Бу Валу ренинBG Бу Валу ренинBG Бу Валу ренинRG Бу Валу ренинBG Бу Валу ренинRG Бу Валу ренинRG Бу Валу ренинBG Бу Валу ренинBG Бу Валу ренинBG Бу Валу ренинBG Бу Валу ренинBG Бу Валу ренинBG Бу Валу ренинRG Бу Валу ренинRG Бу Валу ренинBG Бу Валу ренинRG Бу Валу ренинBG Бу Валу ренинRG Бу Валу ренинBG Бу Валу ренинBG Бу Валу ренинBG Бу Валу ренинBG Бу Валу ренинBG Бу Валу ренинRG Бу Валу ренинBG Бу Валу ренинBG Бу Валу ренинBG Бу Валу ренинRG Бу Валу ренинBG Бу Валу ренинBG Бу Валу ренинBG Бу Валу ренинBG Бу Валу ренинBG Бу Валу ренинRG Бу Валу ренинBG Бу Валу ренинRG Бу Валу ренинBG Бу Валу ренинRG Бу Валу ренинBG Бу Валу ренинBG Бу Валу ренинBG Бу Валу ренинBG Бу Валу ренинRG Бу Валу ренинBG Бу Валу ренинBG Бу Валу ренинBG Бу Валу ренинBG Бу Валу ренинRG Бу Валу ренинBG Бу Валу ренинBG Бу Валу ренинRG Бу Валу ренинBG Бу Валу ренинRG Бу Валу ренинBG Бу Валу ренинBG Бу Валу ренинBG Бу Валу ренинBG Бу Валу ренинRG Бу Валу ренинRG Бу Валу ренинBG Бу Валу ренинBG Бу Валу ренинBG Бу Валу ренинRG Бу Валу ренинBG Бу Валу ренинBG Бу Валу ренинBG Бу Валу ренинBG Бу Валу ренинRG Бу Валу ренинRG Бу Валу ренинBG Бу Валу ренинRG Бу Валу ренинBG Бу Валу ренинBG Бу Валу ренинBG Бу Валу ренинBG Бу Валу ренинBG Бу Валу ренинBG Бу Валу ренинRG Бу Валу ренинRG Бу Валу ренинRG Бу Валу ренинRG Бу Валу ренинRG Бу Валу ренинRG Бу Валу ренинRG Бу Валу ренинRG Бу Валу ренинRG Бу Валу ренинKG Бу Валу ренинKG Бу Валу ренинKG Бу Валу ренинKG Бу Валу ренинKG Бу Валу ренинKG Бу Валу ренинKG Бу Валу ренинKG Бу Валу ренинKG Бу Валу ренинKG Бу Валу ренинBG Бу Валу ренинBG Бу Валу ренинBG Бу Валу ренинBG Бу Валу ренинBG Бу Валу ренинBG Бу Валу ренинBG Бу Валу ренинBG Бу Валу ренинBG Бу Валу ренинKG Бу Валу ренинKG Бу Валу ренинKG Бу Валу ренинKG Бу Валу ренинKG Бу Валу ренинKG Бу Валу ренинKG Бу Валу ренинKG Бу Валу ренинKG Бу Валу ренинRG Бу Валу ренинRG Бу Валу ренинRG Бу Валу ренинRG Бу Валу ренинRG Бу Валу ренинRG Бу Валу ренинRG Бу Валу ренинRG Бу Валу ренинRG Бу Валу ренинLG Бу Валу ренинLG Бу Валу ренинLG Бу Валу ренинLG Бу Валу ренинLG Бу Валу ренинLG Бу Валу р前瞻性 BG Бу Валу р前瞻性 BG Бу Валу р前瞻性 BG Бу Валу р前瞻性 BG Бу Валу р前瞻性 BG Бу Валу р前瞻性 BG Бу Валу р前瞻性 BG Бу Валу р前瞻性 BG Бу Валу р前瞻性 BG Бу Валу р前瞻性 BG Бу Валу р前瞻性 BG Бу Валу р前瞻性 BG |
*3hepronoTope6IeHne I3hepreTnueckn Klacc B coOTBeTCTBUN c EN 60350-1
PapoiB(KIIOU WPA/WEP)
IOnKJIIOUHTe CBOye yCTPOINCTBO K TOMy Ke MapuTyN3aTOpY Wi-Fi npiroTOBbTeCb K 3aRpy3Ke npnIOKeHn.
3arpy3ka npnloxehna
3arpynte npinojKeHne Candy simply-Fi n3 Mara3nHa, B 3abncmocTn OT BaJero yCTpoiCTBa.
- Interruptor principal de ligar/desligar (on/off)
- Interface tátil LCD

Password (tecla WPA/WEP)
The manufacturer will not be responsible for any inaccuracy resulting from printing or transcript errors contained in this brochure. We reserve the right to carry out modifications to products as required, including the interests of consumption, without prejudice to the characteristics relating to safety or function.