IAN 280568 - Fitness Equipment CRIVIT - Free user manual and instructions
Find the device manual for free IAN 280568 CRIVIT in PDF.

User questions about IAN 280568 CRIVIT
0 question about this device. Answer the ones you know or ask your own.
Ask a new question about this device
Download the instructions for your Fitness Equipment in PDF format for free! Find your manual IAN 280568 - CRIVIT and take your electronic device back in hand. On this page are published all the documents necessary for the use of your device. IAN 280568 by CRIVIT.
USER MANUAL IAN 280568 CRIVIT
Before reading, yield out the ilustration pages and go to know all of the functions of your unit.
SOFT-GYMNASTIK-NOPPENBALL
DELTA.SPORTHANDELSKONTORGMEN
Wp
322397urlng
[2018]
On:SpGnne:Ab232
(B)(C)
SOFT-GYMNASTIK-NOPPENBALL
Gebrauchsanweisung
H
PALLA DA MASSAGGIO PER
GINNASTICA DOLCE
Istruzione di'uso
H CH
BALDON DE GYMNASTIQUE A PICOTS
Instructions for use
IAN 280568
口
IAN280568
DF AT CH
F 106
G5 Instructions and Safety Notice Page 26


DE AT CH
Lieferumfang 8
Technische Daten 8
Scope of delivery 26
Technical data 26
Correct use 26
Safety notes 26-27
Risk of injury! 26
Special care - Risk of injury
for children! 26
Risk from wear 26
Avoiding damage to property 26-27
Inflating 27
Deflating 27
General training notes 27
Warming up 27-28
Suggested exercises 28-29
Stretching 29-30
Care, storage 30
Disposal 30
3-year warranty 30
Durchmesser: ca. 65 cm
Ball Leg Curl (Abb. E)
Ausgangsposition
With your purchase you have decided on a high-quality product. Get to know the product before you start to use it.
Carefully read the following instructions for use.
Use the product only as described and only for the given areas of application. Keep these instructions safe. When passing the product on to a third party, always make sure that the documentation is included.
Scope of delivery
1 x Nubbed exercise ball
1 x Vent pipe
2 × Sealing plugs
1 x Air pump adapter
1 x Sealing plug lifter
1 x Instructions for use
Technical data
Maximum load: 120kg
Weight/ball: approx. 1200g
Diameter: approx. 65cm
Correct use
This article is designed as a piece of gymnastics and sports equipment for persons with a maximum weight of 120kg and is not suitable as a seat for continuous sitting. The article was designed for exercises in a private area and is not suitable for medical or commercial purposes.

Safety notes
Risk of injury!
- The article may only be used under adult supervision and not as a toy.
- Consult your doctor before beginning training. Please ensure that your state of health is suited to the training.
- Remember to always warm up before training and to train in accordance with your current level of performance. Severe injury may result if you exert yourself too much or overtrain.
If you experience pain, weakness, or fatigue, discontinue training immediately and contact your doctor.
- Keep the operating instructions and the exercise information at hand at all times.
- Observe the maximum permitted load-bearing capacity of 120kg . Exceeding the weight limit can cause damage to the product and impairment of the function.
- Pregnant women should only carry out this training following consultation with their doctor.
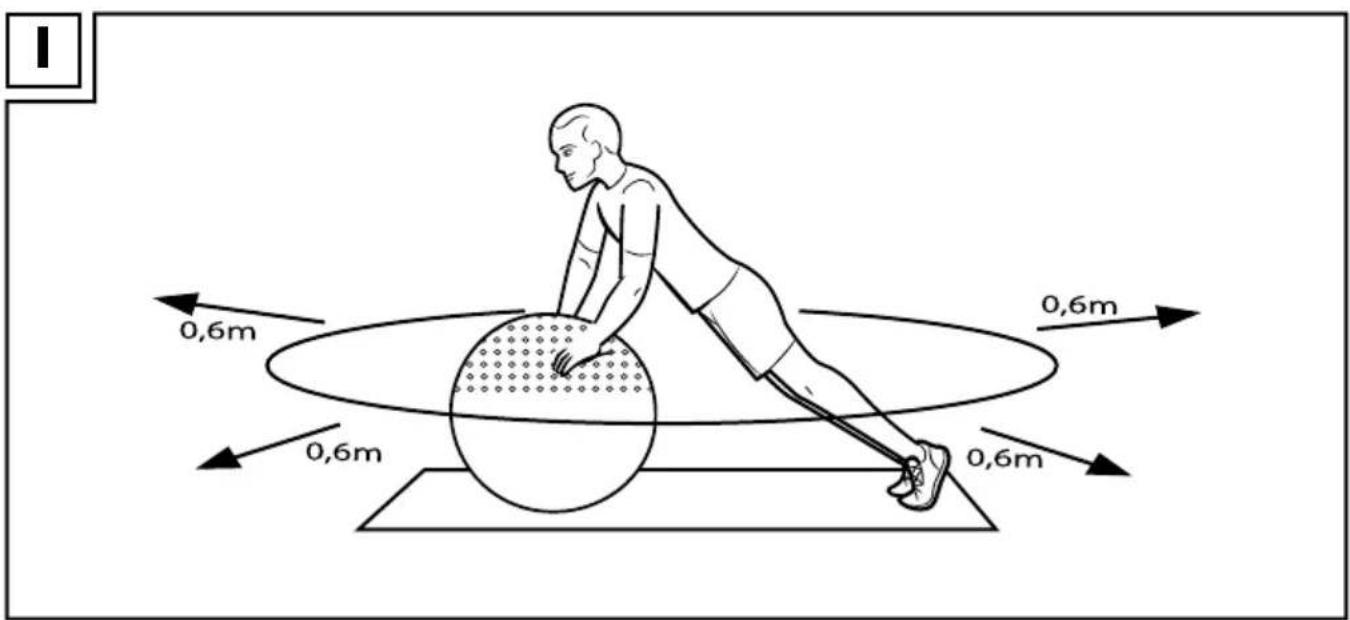
- There must be a free area of approx. 0.6m around the training area (figure 1).
- Only train on a flat and non-slip surface.
- Do not use the article in the vicinity of stairs or steps.
- Never use the article close to open fire or ovens.
- The article may not be used in the water or for swimming. It does not offer stability at the surface and may not be used as a swimming aid. Salt and chlorine in water can damage the surface of the article.

Special care -
Risk of injury for children!
- Do not allow children to use this article without supervision. Point out the correct use of the training instrument and maintain supervision. Only allow use if the mental and physical development of the children allow this. This article is not suitable for use as a toy.

Risk from wear
- The article may only be used in perfect condition. Examine the article for damage or wear before each use. The safety of the article can only be guaranteed if it is examined regularly for damage and wear. Do not use the article if it is damaged.

Avoiding damage to property
- All inflatable articles are sensitive to cold. You should therefore never unfold or inflate the article at temperatures below 15^ .
-
Protect the article from direct sunlight. If the air pressure increases in direct sunlight then this needs to be offset by releasing the air.
-
Avoid contact with sharp, hot, pointed, or hazardous objects. Please ensure that your training area is free of pointed objects.
- Only insert suitable air pump adapters into the valve. Otherwise the valve could be damaged.
- Do not inflate the article too far as there is a risk of the welded seams tearing. Close the valve securely after inflation.
- Do not use a compressor or a compressed air bottle to inflate the article. This can lead to damage to the article.
Inflating
IMPORTANT:
- Only adults may inflate the article.
- Do not pump the ball beyond the given diameter.
- Only fill the article with air.
- Do not inflate the ball with your mouth as this can lead to dizziness.
Use a standard foot pump or double stroke piston pump with corresponding attachments. You may also use the adapter included in the delivery. The adapter has one small and one large thread.
The small thread is for standard ball pumps and the large thread is for e.g. bicycle and car tyre pumps. Then close the article with the correct sealing plug.
Tip! How to test the required diameter of 65cm:
- Mark a height of 65cm on a wall.
- Place the inflated article against the wall.
- Place a spirit level at the highest point of the article and test whether the article is 65cm high using the mark on the wall.
Deflating
Remove the sealing plug with the sealing plug lifter and allow the air to escape slowly.
Or remove the sealing plug and feed the deflating tube into the valve in order to allow the air to escape more quickly.
Note! Do not remove the sealing plug using a sharp or sharp-edged object.
The ball could become severely damaged.
General training notes
Training process
- Wear comfortable sport clothing and trainers.
- Warm up well before each training session and end each training session gradually.
- Take sufficiently long breaks between the exercises and drink enough fluids.
- As a beginner do not train too intensely. Slowly increase your training intensity.
- Carry out all the exercises steadily, not with sudden movements or quickly.
- Be sure to breathe regularly. Breathe out with effort and breathe in on recovery.
- Ensure a correct body position during the exercises.
General training planning
Create a training plan comprising 6-8 exercises that suit your requirements.
Adhere to the following principles:
- One set of exercises should comprise approx. 15 repetitions of one exercise.
Each set of exercises can be repeated 3 times. - Take a break for 30 seconds between each set of exercises.
- Warm your muscle groups up well before each training unit.
- We also recommend stretching after each training unit.
Warming up
Take sufficient time before each training session to warm up. The following includes descriptions of some simple exercises for this purpose. Repeat these exercises 2 to 3 times each.
Neck muscles
- Turn your head slowly to the left and to the right. Repeat this movement 4-5 times.
- Circle your head slowly, first in one direction and then in the other.
Arms and shoulders
-
Clasp your hands behind your back and pull them carefully upwards. If you bend your upper body forwards at the same time all the muscles are warmed up optimally.
-
Circle both your shoulders forwards at the same time and then change direction after one minute.
- Pull your shoulders up to your ears and let your shoulders fall again.
- Circle your right and left arms alternately forwards and then after one minute backwards.
Important: Don't forget to continue breathing steadily throughout!
Suggested exercises
Some of many exercises are described below.
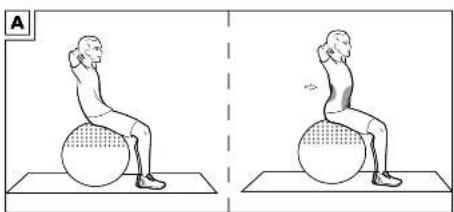
Pelvic tip (figure A)
Starting position
- Sit straight up on the article and place your feet on the floor shoulder-width apart.
- Fold your arms behind your neck. Your elbows are pointing outwards.
End position
- Tense your stomach muscles and pull your shoulder blades into your spine. Your shoulders stay relaxed and down.
- Tip your pelvis slowly backwards and forwards in turn. The article will move with your movements.
- Repeat this exercise 10-15 times and for three sets.
Important: Keep your body tense throughout the exercise and your upper body straight.
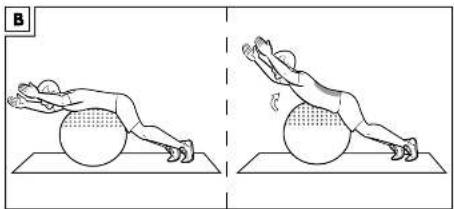
Back stretch (figure B)
Starting position
- Lie on the article on your stomach.
- Stabilise your position on the floor using the balls of your feet.
- Extend your arms forwards and tense your buttock and stomach muscles.
End position
- Lift your arms and your upper body so that your back is straight. Your lower back stays almost straight. Make sure you do not hollow your back.
- Your head is an extension of your spine and your shoulders stay down.
-
Keep your body tensed and then lower your upper body back down.
-
Repeat this exercise 10-15 times and for three sets.
Important: Keep your body tense throughout the exercise your head remains an extension of your spine.
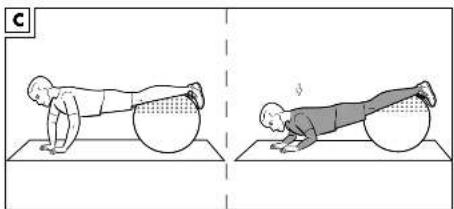
Push up (figure C)
Starting position
- Lie in a push up position with your legs on the article.
- Hold yourself straight and tense your buttock and stomach muscles.
End position
- Lower your upper body to do a push up. Your elbows are pointing slightly outwards and your hands stay under your shoulders.
-
Hold your body tension briefly and then lift your upper body back up. Make sure you stay straight with you upper body and your head as an extension of your spine.
-
Repeat this exercise 10-15 times and for three sets.
Important: Always keep your back straight during this exercise.
Leg lift (figure D)
Starting position
- Lie on your back on a mat and hold the article between your legs.
- Lift your legs up with the article. Your arms are extended close to your body.
End position
- Tense your stomach muscles and lower your legs a little. Your feet do not touch the floor and your lower back stays on the floor throughout.
4 Hold your body tension briefly and then lift your legs up again with the article. - Repeat this exercise 10-15 times and for three sets.
Important: Hold your lower back on the mat throughout the exercise.
Ball leg curl (figure E)
Starting position
-
Lie on your back on a mat with your calves on the article. Your feet and calves are resting the article.
-
Lift your body so that your upper body forms one line with your legs. Your arms are extended close to your body.
- Your head and shoulders are on the mat.
End position
- Tense your buttock and stomach muscles.
- Lift your buttocks upwards and at the same time roll the article towards you using your feet until only your feet are on the article and your trunk forms an angle of approximately 90 degrees to your legs.
- Hold this position briefly.
- Then lower your buttocks and roll the article away from you at the same time using your feet until your calves are resting on the article again.
- Repeat this exercise 10-15 times and for three sets
Important: Keep your back straight during the exercise and keep your body tense throughout the exercise
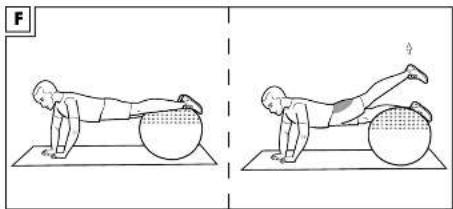
Buttock lift (figure F)
Starting position
- Lie in a push up position with your feet and shins on the article. Your arms are fully extended. Your elbows are pointing outwards and your hands are under your shoulders.
- Hold yourself straight and tense your stomach muscles.
End position
- Lift one extended leg so far up that your back just stays straight. Make sure you do not hollow your back.
- Hold this position briefly and then lower your leg again. Make sure you stay straight with your upper body and keep your head as an extension of your spine.
- Change legs and repeat this exercise 10 - 15 times and for three sets.
Important: Keep your body tense throughout the exercise. Your head remains an extension of your spine and your shoulders stay down.
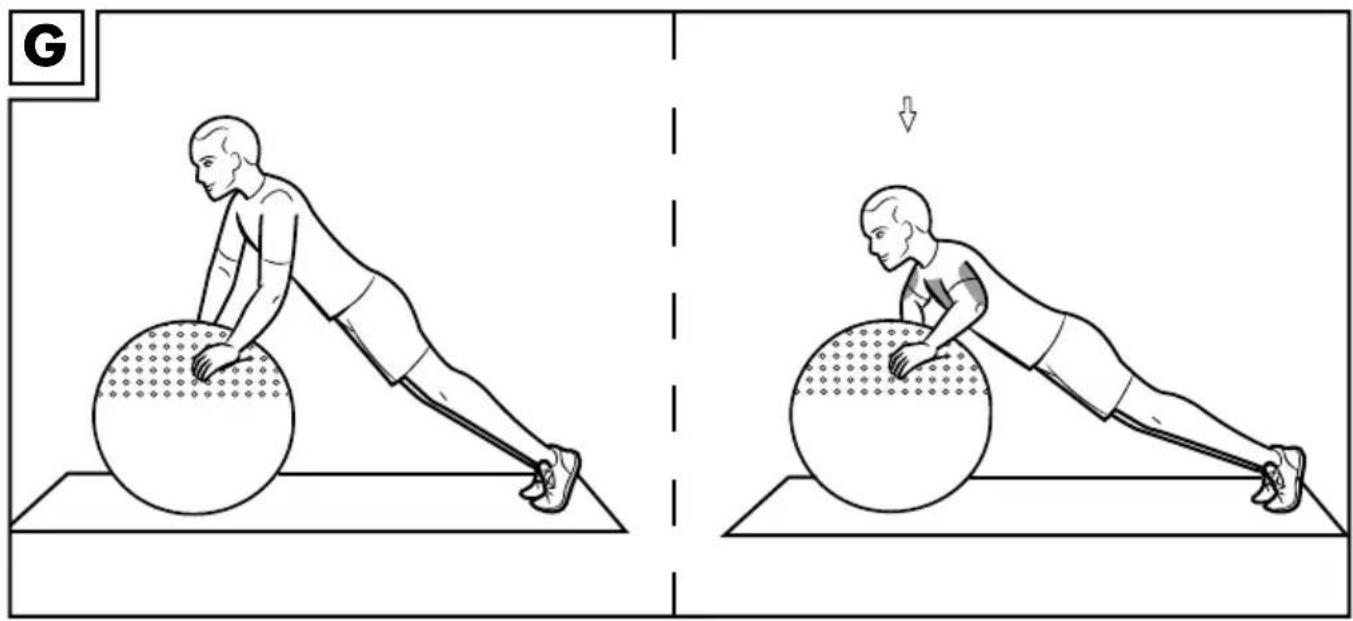
Push up (figure G)
Starting position
- Lie in a push up position with your hands on the article. Your hands are under your
shoulders and your elbows are pointing slightly outwards. Only the balls of your feet touch the floor.
2. Lift your upper body and hold yourself straight.
End position
- Tense your buttock and stomach muscles.
- Lower your upper body to do a push up. Your elbows are pointing outwards and your hands stay under your shoulders.
- Hold your body tension briefly and then lift your upper body again. Make sure you keep your upper body straight and keep your head as an extension of your spine.
- Repeat this exercise 10-15 times and for three sets.
Important: Keep your back straight during the exercise.
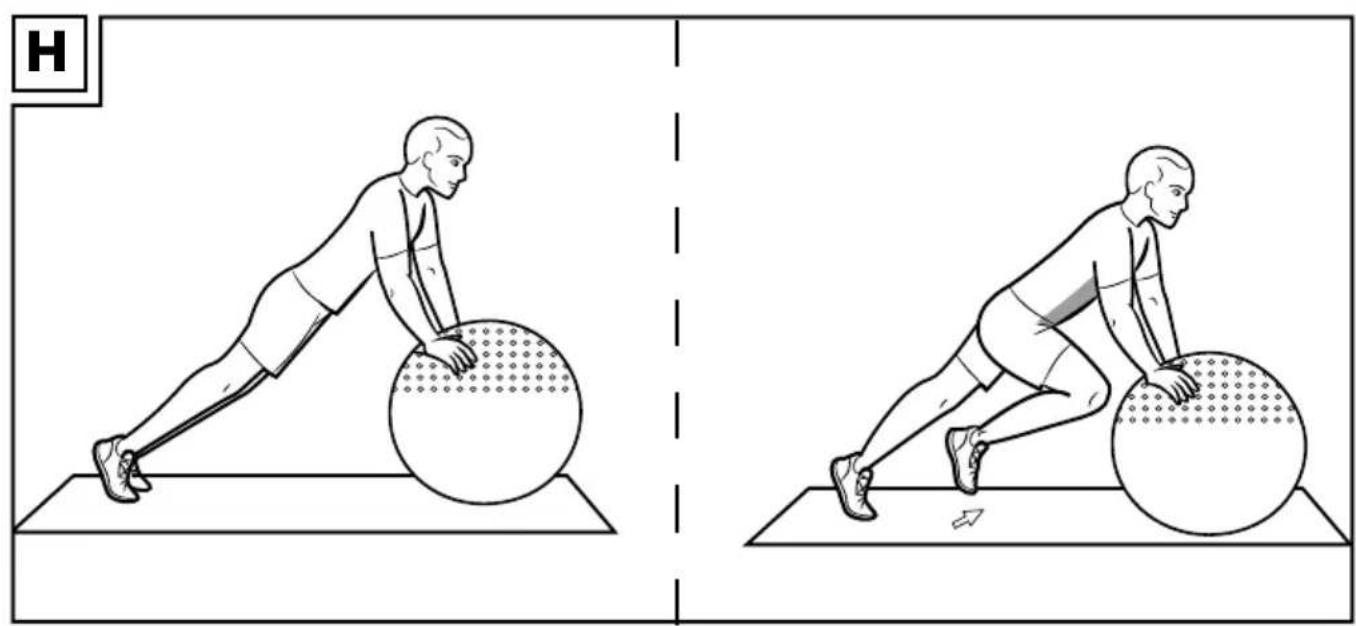
Mountain climber (figure H) Starting position
- Lie in a push up position with your hands on the article. Your hands are under your shoulders and your elbows are pointing slightly outwards. Only the balls of your feet touch the floor.
- Lift your upper body and hold yourself straight.
End position
- Tense your stomach muscles.
- Lift one leg and pull it forwards to your chest. Your elbows are pointing outwards and your hands stay under your shoulders.
- Lower your leg again and pull the other leg in.
Make sure you keep your upper body straight and your head as an extension of your spine. - Change legs and repeat this exercise 10-15 times and for three sets.
Important: Keep your back straight during the exercise.
Stretching
Take sufficient time after each training session to stretch. The following includes descriptions of some simple exercises for this purpose.
Repeat these exercises 3 times each on each side and for 30-40 seconds.
Neck muscles
- Stand in a relaxed position. Pull your head gently to the left and to the right using one, hand. This exercise stretches the sides of your neck.
Arms and shoulders
- Stand up straight with your knees slightly bent.
- Put your right arm behind your head until your right hand is between your shoulder blades.
- Hold your right elbow with your left hand and pull it backwards.
- Change sides and repeat the exercise.
Care, storage
- Always store the article in dry and clean condition at room temperature.
- Never clean it with aggressive cleaning materials but rather wipe it clean with a dry cleaning cloth.
- Protect the article from extreme temperatures, sun, and moisture. Incorrect storage and use of the article can lead to early wear, which can cause injury.
Disposal
Please dispose of the product and packaging in an environmentally friendly manner, separating different materials for recycling as required! Dispose of this item through an authorised disposal company or through your local waste disposal facilities - ask your local authority for information if further guidance is required. Ensure that you comply with all regulations currently in force.
3-year warranty
The product was produced with great care and under constant supervision. You receive a three-year warranty for this product from the date of purchase. Please retain your receipt. The warranty applies only to material and workmanship and does not apply to misuse or improper handling. Your statutory rights, especially the warranty rights, are not affected by this warranty.
With regard to complaints, please contact the following service hotline or contact us by e-mail. Our service employees will advise as to the subsequent procedure as quickly as possible. We will be personally available to discuss the situation with you.
Any repairs under the warranty, statutory guarantees or through goodwill do not extend the warranty period. This also applies to replaced and repaired parts. Repairs after the warranty are subject to a charge.
IAN:280568
GB Service Great Britain
Tel.: 08715000720
(£ 0.10/Min.)
E-Mail: deltasport@lidl.co.uk
You can also find spare parts for your product at: www.delta-sport.com, category Service - Lidl Spare Parts Service