
IAN 497590 - Fitness Equipment CRIVIT - Free user manual and instructions
Find the device manual for free IAN 497590 CRIVIT in PDF.
| Product type | Training kit with resistance bands |
| Brand | Crivit |
| Model | IAN 497590 |
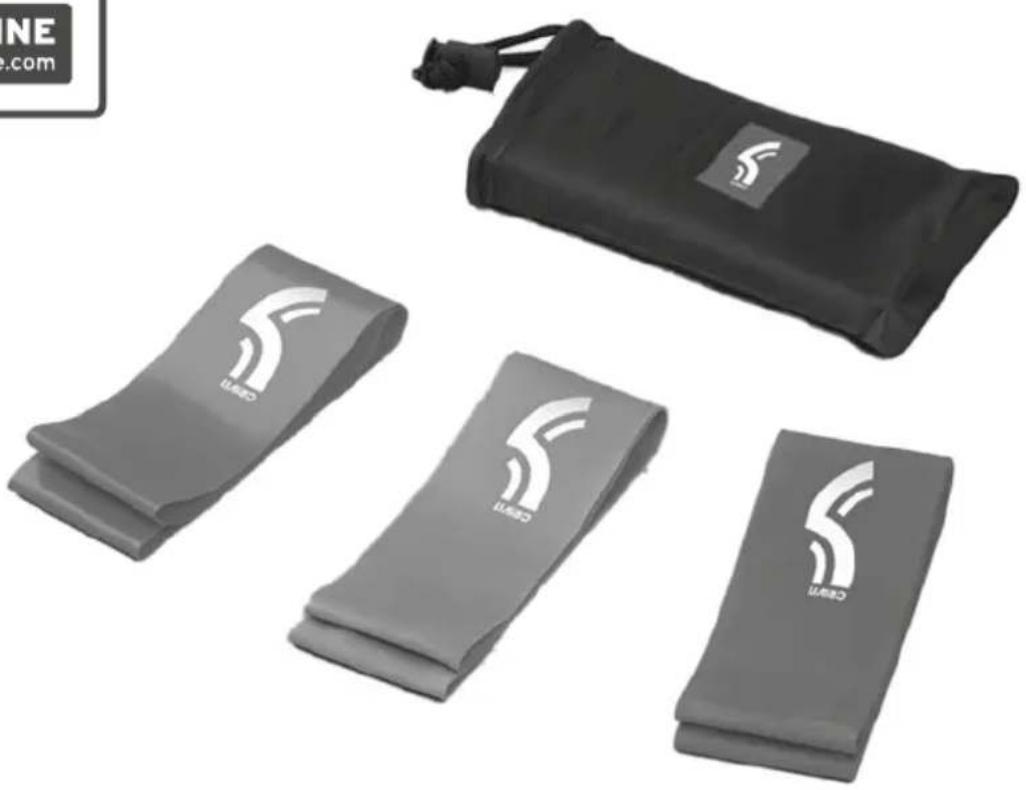
| Number of bands | 3 (turquoise, grey, red) |
| Resistances | Turquoise: 74 N (light); Grey: medium; Red: heavy |
| Maximum stretch length | Turquoise: 125 cm; Grey: 100 cm; Red: 80 cm |
| Force tolerance | ±20% |
| Standard | DIN 32935 |
| Material | Elastomer |
| Use | Private use, not medical/commercial |
| Safety | Consult a doctor before training; warm up; check for damage; do not stretch beyond max lengths; do not use near stairs; avoid extreme temperatures |
| Cleaning | Dry cloth only, no harsh products |
| Storage | Dry and clean place at room temperature, away from sunlight |
| Package contents | 3 mini bands, 1 storage bag, 1 instruction manual, 1 quick start guide |
| Warranty | 3 years for the private end customer (excluding normal wear, abuse) |
| After-sales service (Switzerland) | Tel. 0800 56 44 33, Email: deltasport@lidl.ch |
| Manufacturing date | 09/2022 |
Frequently Asked Questions - IAN 497590 CRIVIT
User questions about IAN 497590 CRIVIT
0 question about this device. Answer the ones you know or ask your own.
Ask a new question about this device
Download the instructions for your Fitness Equipment in PDF format for free! Find your manual IAN 497590 - CRIVIT and take your electronic device back in hand. On this page are published all the documents necessary for the use of your device. IAN 497590 by CRIVIT.
USER MANUAL IAN 497590 CRIVIT
natural_image
Product photo of a black and gray fitness band with white 'S' logo, displayed alongside a matching bag (no text or symbols on the bands themselves)FITNESSBAND-SET
DE AT CH
FITNESSBAND-SET
Gebrauchsanweisung
IT CH
SET FASCE ELASTICHE
Istruzioni d'uso
FR CH
BANDES ÉLASTIQUES DE FITNESS
Instructions for use
natural_image
Illustration of two people performing a leg raise exercise on a mat, showing different postures (no text or symbols present)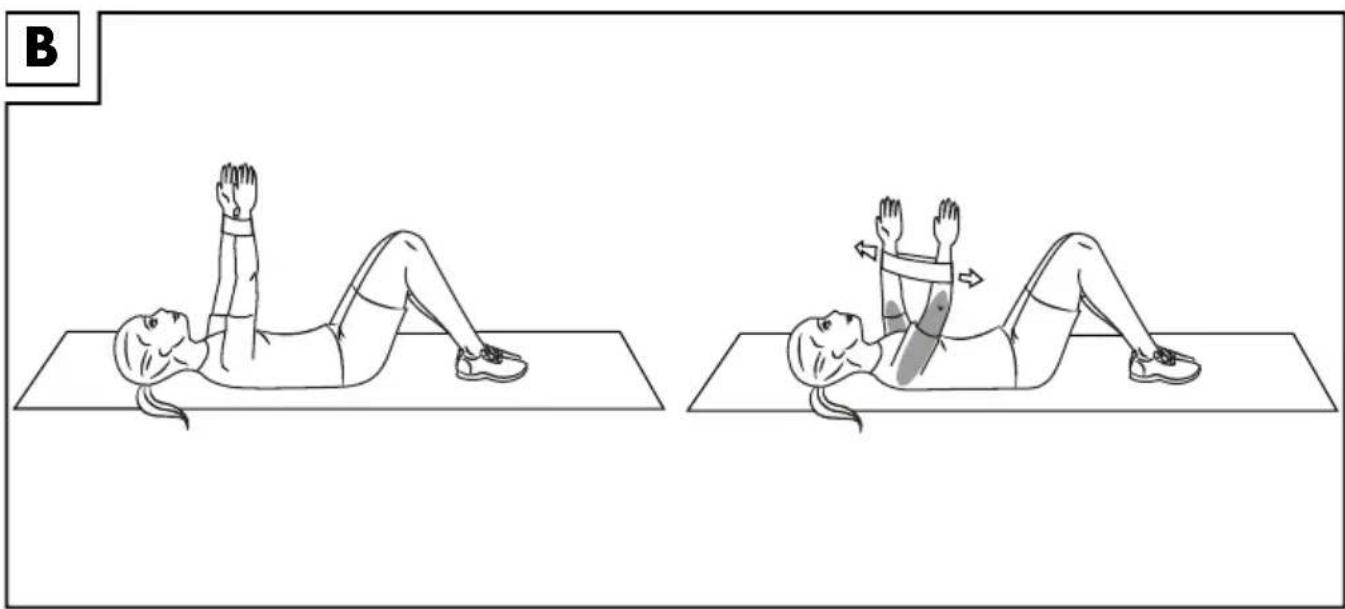
natural_image
Illustration of a person performing two different sit-ups on a mat, showing leg lift and band exercise (no text or symbols)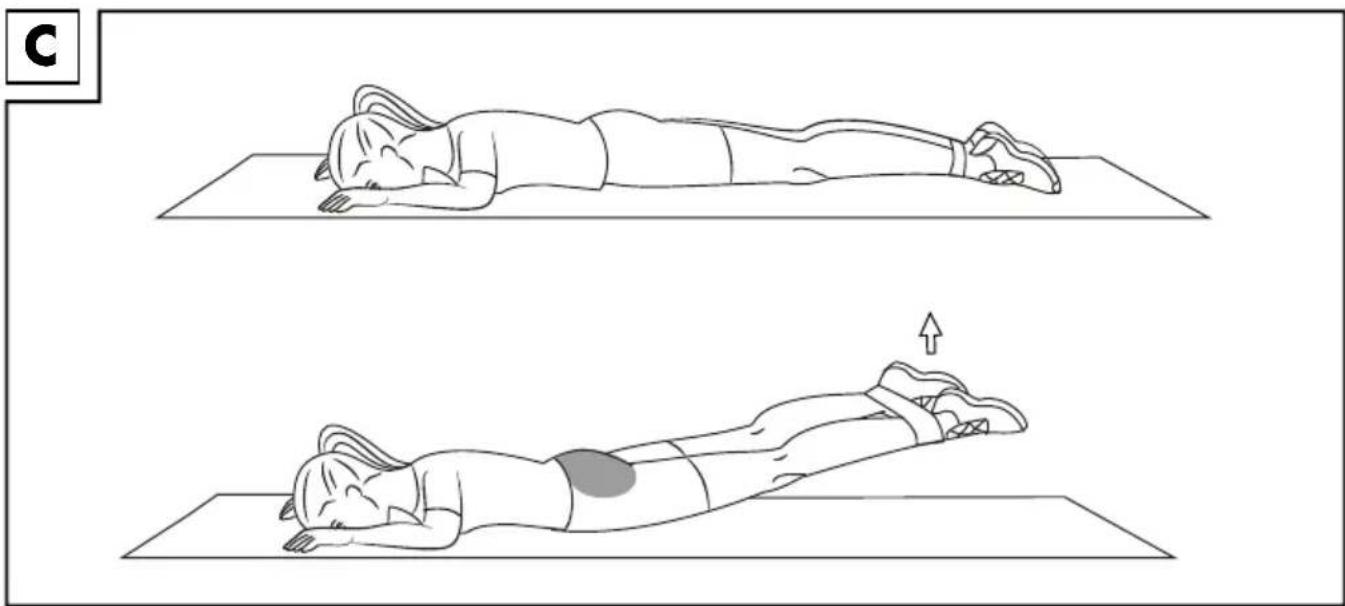
natural_image
Illustration of two people performing a prone exercise on a mat, showing posture changes (no text or symbols)
natural_image
Illustration of a person performing a stretching exercise with dumbbells, showing front and side views (no text or symbols)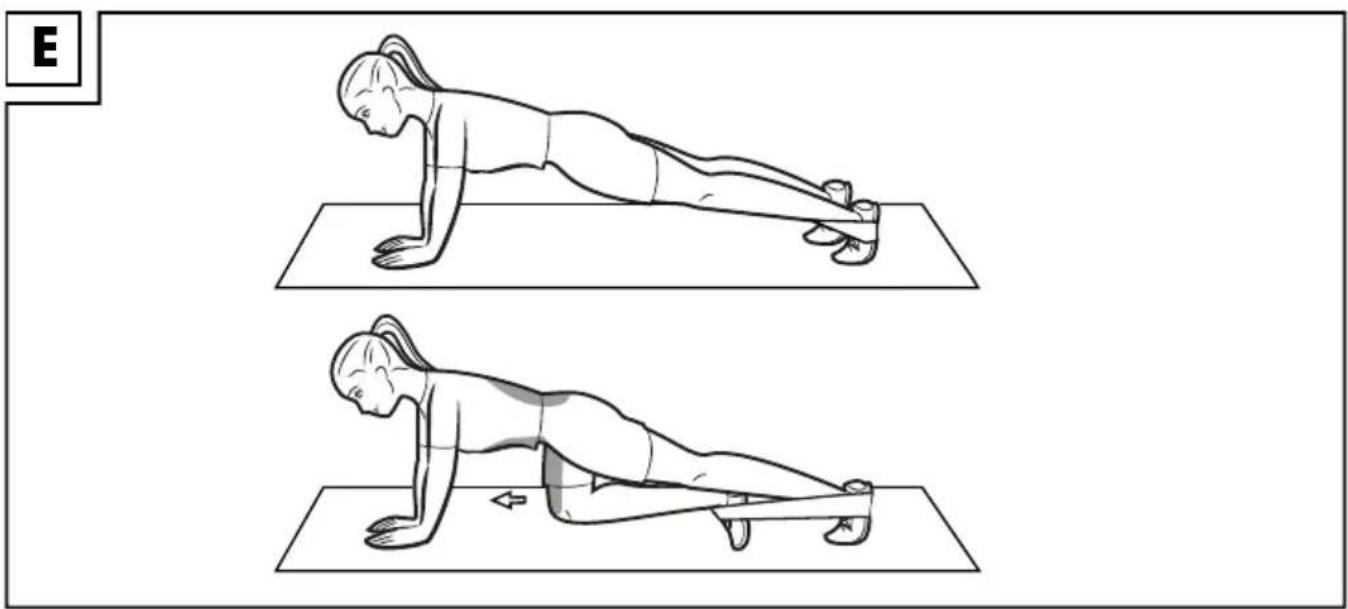
natural_image
Two sequential illustrations of a person performing a plank exercise on a mat, showing posture changes (no text or symbols)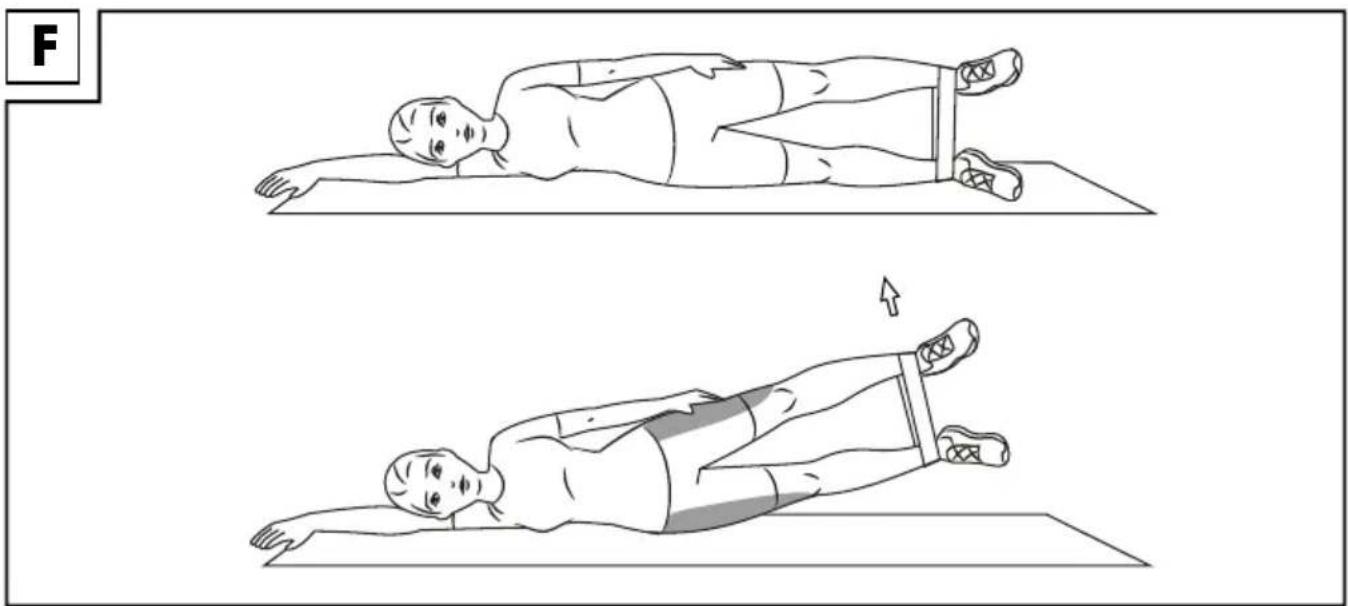
natural_image
Illustration of a person performing two different leg raise exercises on a mat, showing posture changes (no text or symbols)G

natural_image
Line drawing of a person performing a resistance band exercise on a mat (no text or symbols)Lmax (grey) = 100cm at 98N
Lmax(red) = 80cm at 129N
H
natural_image
Line drawing of a person holding a baseball bat, viewed from the side (no text or symbols)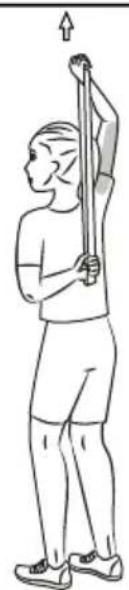
natural_image
Line drawing of a person performing a resistance band exercise (no text or symbols)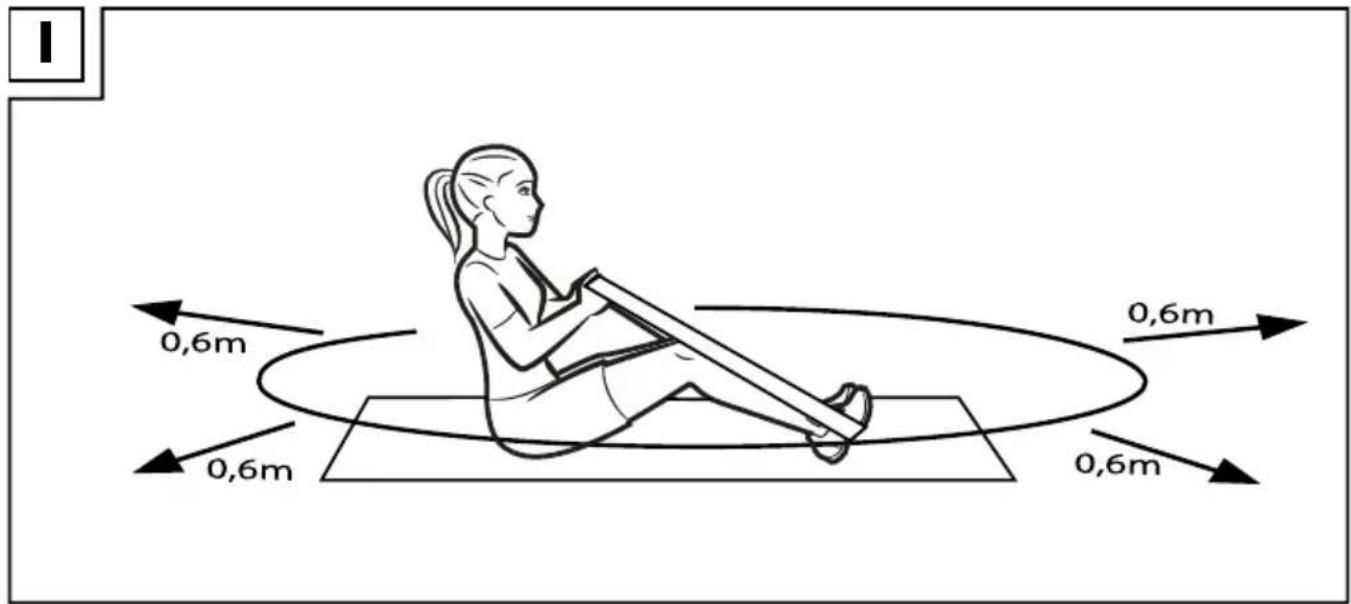
DE AT CH
Lieferumfang 8
Technische Daten 8
Warning! Risk of injury! 26
Extra caution - risk of injury to children! 26
Dangers due to wear and tear 26
Mini band 27
General training instructions 27
Warming up 27
Exercise suggestions 27
Stretching 29
Storage, cleaning 30
Disposal 30
Notes on the guarantee and service handling 30
Mountain climber (fig. E)
You have chosen to purchase a high-quality product. Familiarise yourself with the product before using it for the first time.

Read the following instructions for use carefully.
Use the product only as described and only for the given areas of application. Store these instructions for use carefully. When passing the product on to third parties, please also hand over all accompanying documents.
Package contents
1 x mini band light (turquoise)
1 x mini band medium (grey)
1 x mini band heavy (red)
1 x storage bag
1 x instructions for use
1 x quick guide
Technical data
Maximum possible stretch length:
- Mini band turquoise 125cm at 74N
- Mini band grey 100cm at 98N
- Mini band red 80cm at 129N
The tolerance range for the force is max. 20% (+/-).
Training device form A is compliant with DIN 32935.

Maximum possible stretch length
Date of manufacture (month/year): 09/2022
Intended use
This product was developed as exercise equipment to provide you with a full-body workout. The product is intended for private use and is not suitable for medical or commercial use.

Safety information
Warning! Risk of injury!
- Consult your doctor before you start training. Make sure you are healthy enough to train.
- Always remember to warm up before training and train according to your current performance ability. High exertion and over-training can lead to serious injuries. Stop exercising immediately and contact a doctor if you experience pain, weakness or fatigue.
- The product may only be used under adult supervision and should not be used as a toy.
- Always keep the instructions for use with the exercise instructions readily available.
- You need sufficient space to train safely. Exercise with enough space between you and other people and objects so that no one can be injured.
- Train on a flat, non-slip surface only.
- Do not use the product near steps or landings.
- Never pull the product towards your face, and never wrap it around your head, neck or chest.
- Do not pull the mini bands beyond the maximum stretch length of 125cm (turquoise), 100cm (grey), and 80cm (red)!
- Keep a clear space of approx. 0.6m around the training area (Fig. I).
- The elastomers in the product must be protected from direct sunlight.

Extra caution – risk of injury to children!
- Do not let children use this product unsupervised. Show them the correct use of the training equipment and supervise them. Only allow the use of the product if the child's mental and physical development allows it. This product is not a toy.

Dangers due to wear and tear
- The product may only be used if it is in perfect condition. Check the product for damage or wear before each use. The safety of the product can only be guaranteed if it is regularly inspected for damage and wear and tear. If damaged, it must not be used anymore.
- Do not continue to use the product if you notice cracks.
- Protect the product from extreme temperatures, sun and dampness. Improper storage and use of the product could lead to premature wear and tear, which could result in injury.
Mini band
Select a mini band with one of the following resistance strengths for your training:
- turquoise = light
- grey = medium
- red = heavy
General training instructions
Training procedure
- The following exercises are only a selection. More exercises can be found in relevant literature.
- Wear comfortable sports clothing and athletic shoes.
- Warm up before each training session and end the training session gradually.
- Do not train if you feel sick or unwell.
• Take sufficient breaks between the exercise routines and drink enough. - If you are a beginner, never train with too much intensity. Increase the intensity of the training sessions slowly.
- Stretching can feel uncomfortable, but should never be painful.
- Perform all exercises smoothly, not jerkily or fast.
- Make sure you breathe steadily. Exhale during exertion and inhale upon release.
- Maintain correct body posture while exercising.
General training plan
Create a training plan that suits your needs with sets of 6–8 exercises.
Pay attention to the following fundamentals:
- A set should consist of approx. 15 repetitions of one exercise.
• Each set can be repeated 3 times. - You should take a 30-second break between each set.
- Warm up your different muscle groups well before each training session.
- We also recommend stretching after each training session.
Warming up
Take sufficient time before each training session to warm up. Some simple exercises to do this are shown below.
You should repeat each exercise 2 to 3 times.
Neck muscles
- Turn your head slowly to the left and to the right. Repeat this movement 4 to 5 times.
- Rotate your head slowly, first in one direction, then in the other.
Arms and shoulders
- Clasp your hands behind your back and pull them carefully upwards. If you bend your upper body forwards at the same time, all your muscles will be maximally warmed up.
- Rotate both shoulders forwards at the same time, and after one minute change the direction.
- Pull your shoulders up to your ears and let your shoulders fall again.
- Rotate your right and left arms alternately forwards and then, after one minute, backwards.
Important: don't forget to keep breathing steadily!
Leg muscles
- Stand on one leg and lift the other leg with your knee bent approx. 20cm off the floor.
- First rotate your raised foot in one direction, and then change direction after a few seconds.
- Then switch to your other leg and repeat this exercise.
- Lift your legs one at a time and take a few steps in place. Make sure you only lift your legs to a height where you are still able to maintain your balance well.
Exercise suggestions
Below are some of the many possible exercises.
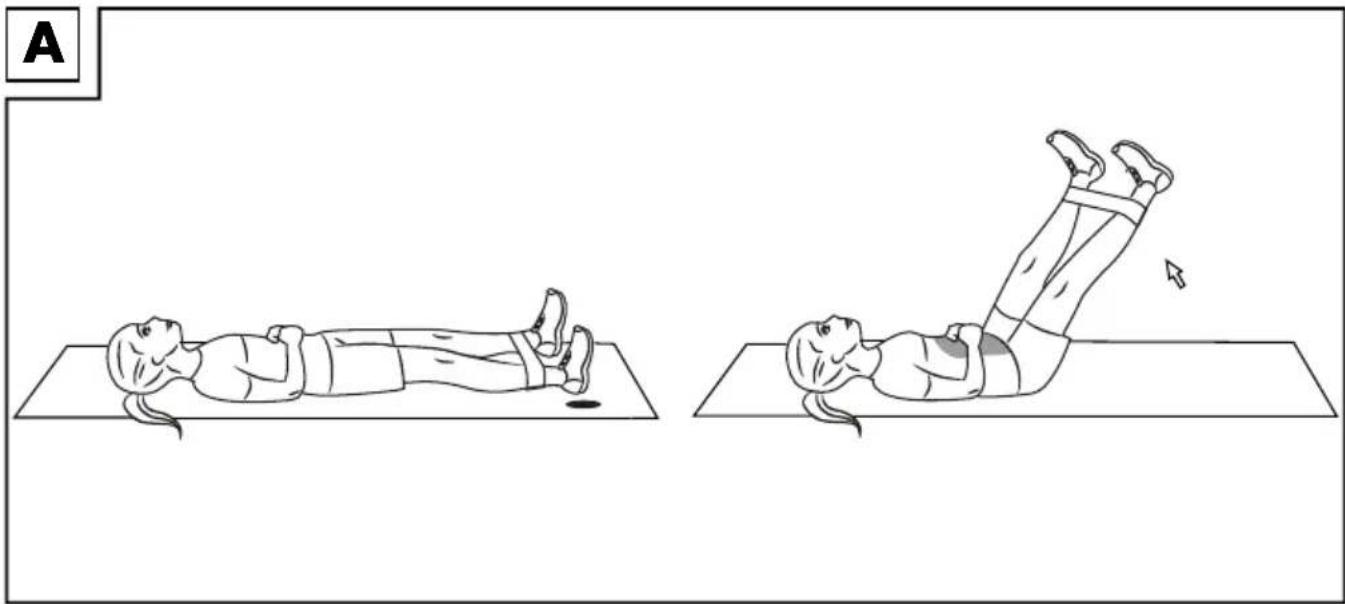
Strengthening the abdominal mus- cles (Fig. A)
Starting position
- Insert your feet through the product so that it is located above your ankles.
- Lie on your back.
- Stretch your legs out on the mat. Both hands are on your belly.
- Spread your legs until you feel resistance.
End position
- Tighten your abdominal muscles.
- Slowly raise your outstretched legs until you feel your abdominal muscles stretching.
- Slowly lower your legs and repeat the exercise 10 to 15 times for three sets.
Important: maintain body tension during the exercise. Your lower back must always be touching the floor.
Keep your head as an extension of your spine and keep your shoulders lowered.
Strengthening the arm muscles (Fig. B)
Starting position
- Lie on your back.
- Insert your arms through the product so that it is located below your wrists.
- Spread your arms until the product is taut and is no longer sliding down.
- Lift your arms vertically upward.
- Bend your legs on the mat.
End position
- Tense your arms and stretch the product outwards.
- Stay in this position for a moment and then go back to the starting position.
- Repeat this exercise 10 to 15 times for three sets.
Important: perform the exercise slowly and keep your shoulders lowered.
Strengthening the buttock muscles (Fig. C)
Starting position
- Insert your feet through the product so that it is located above your ankles.
- Lie on your belly.
- Bend your arms and lay them on the floor at shoulder height, with your face and hands facing the floor.
- Spread your legs until you feel resistance.
End position
- Tighten your buttock and abdominal muscles.
- Lift your legs up and stay in this position for a moment.
- Slowly lower your legs and repeat the exercise 10 to 15 times for three sets.
Important: maintain body tension during the exercise. Keep your head as an extension of your spine.
Chest and biceps stretch with simultaneous shoulder blade mobilisation (Fig. D)
Starting position
- Stand with your feet hip-width apart and place equal weight on both feet.
- Hold the product with both hands behind your back at the height of your buttocks. The backs of your hands are facing away from you.
- Straighten your upper body and slightly bend your knees.
End position
- Tighten your arm and abdominal muscles and raise your arms as high up as possible, away from your body.
- Straighten your elbows and keep your shoulders lowered. Your head is an extension of the spine.
- Stay in this position briefly and then slowly go back to the starting position.
- Repeat this exercise 10 to 15 times for three sets.
Important: make sure that your upper body remains upright to avoid any stray movements.
Mountain climber (Fig. E)
Starting position
- Insert your feet into the product.
- Lie down in the press-up position with your hands on the floor. Your hands are below your shoulders and your elbows are pointing slightly outward. Only the balls of your feet are touching the floor.
End position
- Tighten your buttock and abdominal muscles.
- Lift up one leg and pull it up toward your chest. Your elbows are pointing outward and your hands remain below your shoulders.
- Lower your leg again and pull the other leg up toward chest. Make sure that your upper body remains straight and your head is aligned with your spine.
- Switch legs and repeat the exercise 10 to 15 times for three sets.
Important: always keep your back straight during the exercise.
Strengthening the thigh muscles (Fig. F)
Starting position
- Insert your feet through the product so that it is located above your ankles.
- Lie on your right side. Stretch your right arm upward and place your left arm on your thigh.
- Spread your legs until you feel resistance.
End position
-
Tighten your abdominal muscles.
-
Lift your legs off the mat to hip height and stay in this position for a moment.
-
Slowly lower your legs and repeat the exercise 10 to 15 times for three sets. Then perform the exercise on the other side.
Important: maintain body tension during the exercise.
Torso rotator (Fig. G)
Starting position
- Sit down on the floor and insert your right foot through the product. Hold onto the other end of the product tightly with both hands. Your arms are bent and your upper arms are close to your sides.
- Your upper body is bent slightly backwards, your knee slightly bent, with your heels touching the floor.
End position
- Tense your abdominal and buttock muscles and straighten your upper body.
- Tense your arms, and turn your entire upper body and head to the right. Your hips remain straight.
- Maintain abdominal muscle tension throughout and keep your head aligned with your spine.
- Pull your shoulder blades towards your spine and keep your shoulders lowered.
- Stay in this position for a moment and then slowly go back to the starting position.
- Repeat this exercise 10 to 15 times for three sets. Then perform the exercise with the other leg towards the other side.
Important: perform the exercise slowly and keep your hips straight.
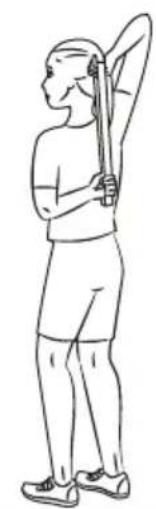
Triceps stretch (Fig. H)
Starting position
- Stand with your feet hip-width apart and place equal weight on both feet.
- Insert both hands into the product behind your back. The palms of your hands are facing outwards.
- Slightly bend your knees and straighten your upper body.
- Keep your left arm in place and pull the product up to shoulder-height with your right hand.
End position
- Pull the product towards the ceiling with your right hand.
- Stay in this position briefly and then go back to the starting position.
- Repeat this exercise 10 to 15 times for three sets. Then perform the exercise with your other arm.
Important: keep the arm that you are stretching up close to your head.
Stretching
Take sufficient time to stretch after each training session. Some simple exercises to do this are shown below.
You should perform each exercise 3 times per side, for 30-40 seconds each time.
Neck muscles
- Position yourself in a relaxed posture. Pull your head gently to one side with one hand, first to the left and then to the right. This exercise stretches the sides of your neck.
Arms and shoulders
- Stand up straight with your knees slightly bent.
- Bend your right arm behind your head until your right hand is between your shoulder blades.
- Grab your right elbow with your left hand and pull it backwards.
- Change sides and repeat the exercise.
Leg muscles
- Stand upright and lift one foot off the floor.
- Rotate it slowly, first in one direction, then in the other.
- Switch feet after a while.
Important: make sure your thighs remain parallel to each other. Push your pelvis forward, keeping your upper body upright.
Storage, cleaning
When not in use, always store the product clean and dry at room temperature.
Wipe clean with a dry cloth only. Protect the product from extreme temperatures, sun and dampness. Improper storage and use of the product could lead to premature wear and tear, which could result in injury.
IMPORTANT! Never clean the product with harsh cleaning agents.
Disposal

Dispose of the product and packaging materials in accordance with current local regulations. Store the packaging materials (foil bags, for example) out of the reach of children. For further information about disposal of the product no longer needed, contact your local council. Dispose of the product and the packaging in an environmentally friendly manner.
The Recycling Code distinguishes different materials to be returned for recycling. The Code consists of the
recycling symbol for the recycling process and a number that identifies the material.
Notes on the guarantee and service handling
The product was produced with great care and under continuous quality control. DELTA-SPORT HANDELSKONTOR GmbH gives private end customers a three-year guarantee on this product from the date of purchase (guarantee period) in accordance with the following provisions.
The guarantee is only valid for material and manufacturing defects. The guarantee does not cover parts subject to normal wear and tear that are thus considered wear parts (e.g. batteries) or fragile parts such as switches, rechargeable batteries, or parts made of glass.
Claims under this guarantee are excluded if the product has been used incorrectly, improperly, or contrary to the intended purpose, or if the provisions in the instructions for use were not observed, unless the end customer proves that a material or manufacturing defect exists that was not caused by one of the aforementioned circumstances.
Claims under the guarantee can only be made within the guarantee period by presenting the original sales receipt. Please therefore keep the original sales receipt. The guarantee period is not extended by any repairs carried out under the guarantee, under statutory guarantees, or as a gesture of goodwill. This also applies to replaced and repaired parts.
If you wish to make a claim please first contact the service hotline mentioned below or contact us by e-mail. If there is a guarantee case, then the product will be repaired or replaced free of charge to you or the purchase price will be refunded, depending on our choice.
Your legal rights, in particular guarantee claims against the respective seller, are not limited by this guarantee.
IAN: 497590_2204

Service Great Britain
Tel.: 0800 404 7657
E-Mail: deltasport@lidl.co.uk
DELTA-SPORT HANDELSKONTOR GMBH
Wragekamp 6 • DE-22397 Hamburg
GERMANY

09/2022


- FITNESSBAND-SET
- DE AT CH
- Mountain climber (fig. E)
- Read the following instructions for use carefully.
- Package contents
- Technical data
- Intended use
- Safety information
- Warning! Risk of injury!
- Extra caution – risk of injury to children!
- Dangers due to wear and tear
- Mini band
- General training instructions
- Training procedure
- General training plan
- Warming up
- Neck muscles
- Arms and shoulders
- Important: don't forget to keep breathing steadily!
- Leg muscles
- Exercise suggestions
- Strengthening the abdominal mus- cles (Fig. A)
- Starting position
- End position
- Strengthening the arm muscles (Fig. B)
- Important: perform the exercise slowly and keep your shoulders lowered.
- Strengthening the buttock muscles (Fig. C)
- Important: maintain body tension during the exercise. Keep your head as an extension of your spine.
- Chest and biceps stretch with simultaneous shoulder blade mobilisation (Fig. D)
- Important: make sure that your upper body remains upright to avoid any stray movements.
- Important: always keep your back straight during the exercise.
- Strengthening the thigh muscles (Fig. F)
- Important: maintain body tension during the exercise.
- Torso rotator (Fig. G)
- Important: perform the exercise slowly and keep your hips straight.
- Triceps stretch (Fig. H)
- Important: keep the arm that you are stretching up close to your head.
- Stretching
- Important: make sure your thighs remain parallel to each other. Push your pelvis forward, keeping your upper body upright.
- Storage, cleaning
- Disposal
- Notes on the guarantee and service handling
Brand : CRIVIT
Model : IAN 497590
Category : Fitness Equipment