SSJ 300 A1 - Centrifuge SILVERCREST - Free user manual and instructions
Find the device manual for free SSJ 300 A1 SILVERCREST in PDF.
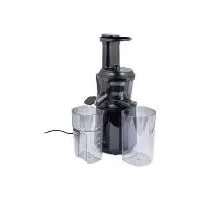
| Product type | Slow juicer with sorbet function |
| Brand | SilverCrest |
| Model | SSJ 300 A1 |
| Power supply | 220 - 240 V ~ 50 Hz, 300 W |
| Protection class | I |
| Max. operating time (juice extraction) | 15 minutes |
| Max. operating time (sorbet) | 5 minutes |
| Container capacity | 300 ml |
| Juice container capacity | 600 ml |
| Pulp collector capacity | 1200 ml |
| Food contact material | BPA-free plastic, silicone seals |
| Anti-drip system | Yes, integrated in the juice outlet |
| Reverse function | Yes, to unclog the auger |
| Child safety | Can only be used when correctly assembled |
| Dishwasher safe parts | Pusher, funnel, lid, auger, filter insert, holder, container, juice container, pulp collector, sorbet insert (except cleaning brush and base unit) |
| Included accessories | Pusher, funnel, lid, auger, filter insert, holder, 300 ml container, 600 ml juice container, 1200 ml pulp collector, sorbet insert, cleaning brush |
| Warranty | 3 years |
| Dimensions (L x W x H) | Not specified in the manual - estimated ~25 x 20 x 40 cm |
| Weight | Not specified in the manual - estimated ~3-5 kg |
Frequently Asked Questions - SSJ 300 A1 SILVERCREST
User questions about SSJ 300 A1 SILVERCREST
0 question about this device. Answer the ones you know or ask your own.
Ask a new question about this device
Download the instructions for your Centrifuge in PDF format for free! Find your manual SSJ 300 A1 - SILVERCREST and take your electronic device back in hand. On this page are published all the documents necessary for the use of your device. SSJ 300 A1 by SILVERCREST.
USER MANUAL SSJ 300 A1 SILVERCREST
natural_image
Product photo of a modern banana juice maker with fruit and kitchen utensils (no visible text or symbols)SLOW JUICER SSJ 300 A1
SLOW JUICER SSJ 300 A1
EXTRACTEUR DE JUS SSJ 300 A1
HOYER Handel GmbH
Tasköprüstraße 3
DE-22761 Hamburg
DEUTSCHLAND
Stand der Informationen - Status of information - Version des informations - Stand van de informatie Stan informacji - Stav informaci - Stav informácil:
02/2019 ID: SSJ 300 A1 19 V1.8
GB IE Operating instructions
SLOW JUICER
Inhalt
- Overview 25
- Intended purpose 26
- Safety information 27
- Items supplied 30
- What is a Slow Juicer? 30
- How to use .... 30
- Assembling the device 30
7.1 Insert the sorbet assembly 33 - Preparing food 34
8.1 Preparing food for sorbet preparation 34 - Juice extraction 35
9.1 Drip stopper.... 35
9.2 Power supply.... 35
9.3 Adding food.... 35
9.4 Switching on/ off and reverse mode 36
9.5 Removing blockages 36 - Preparing a sorbet 36
- Disassembly 36
- Cleaning 37
- Storage 38
- Disposal 38
- Trouble-shooting 38
- Recipes 39
- Technical specifications 42
- Warranty of the HOYER Handel GmbH 42
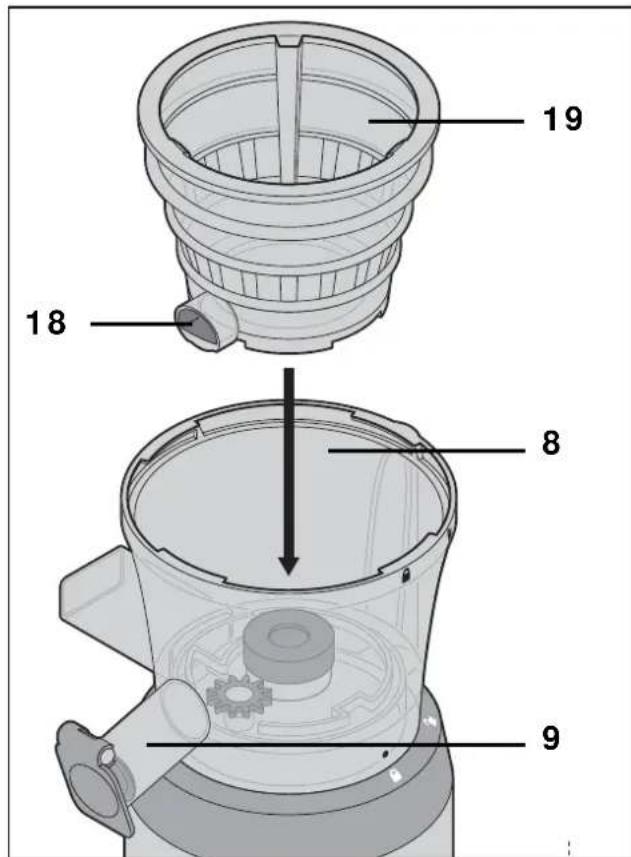
1. Overview
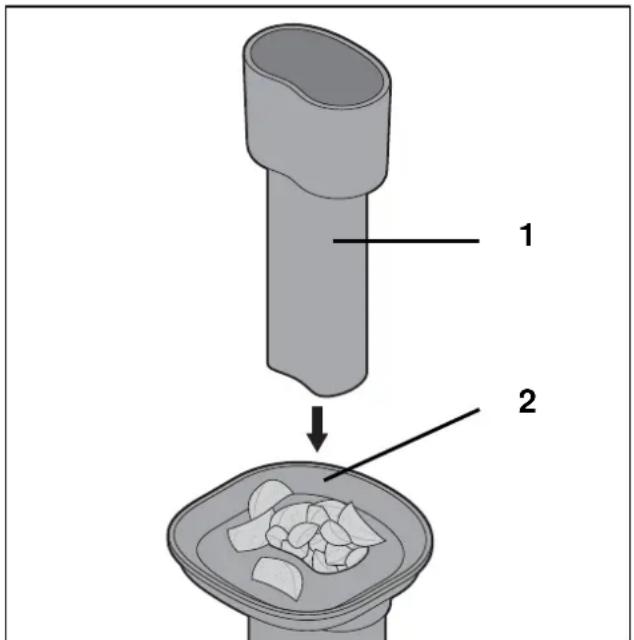
1 Food pusher
2 Filling aid
3 Food chute
4 Lid
5 Auger
6 Screen assembly
7 Holder (for the screen assembly 6)
8 Working container (max. 300 ml)
9 Juice outlet
10 Drip stopper
11 Power cable with mains plug
12 R01 on/off switch
13 Base unit
14 Cleaning brush
15 Juice container (max. 600 ml)
16 Pulp container (max. 1200 ml)
17 Pulp outlet
18 Sorbet outlet
19 Sorbet assembly
$$ \begin{array}{l} \mathbf {R} = \text { Reverse mode } \ \mathbf {0} = \text { Off } \ \mathbf {1} = \text { On (forward mode) } \ \end{array} $$
Seals on the working container 8
20 Seal on the drip stopper 10
21 Seal inside the working container 8
22 Seal on the pulp outlet 17 (on the underside of the working container 8)
Thank you for your trust!
Congratulations on your new Slow Juicer.
For safe handling of the device and in order to get to know the entire scope of features:
- Read these user instructions through thoroughly prior to initial use.
- Above all, observe the safety information!
- The device should only be used as described in these user instructions.
- Keep this copy of the user instructions for reference.
- If you pass the device on to someone else, please include this copy of the user instructions. The user instructions are a part of the product.
We hope you enjoy your new Slow Juicer!
2. Intended purpose
The Slow Juicer is intended for the slow juice extraction of prepared fruits and vegetables. The sorbet assembly can be used to make sorbets from half-frozen pieces of fruit.
The device is designed for private, domestic use. The device must only be used indoors. This device must not be used for commercial purposes.
Foreseeable misuse
WARNING! Risk of material damage!
- The device must not be used for very hard fruit and vegetables (e.g. sugar cane).
- Thick or firm skins (e.g. of citrus fruits, pineapples) and stones of stone fruits (e.g. cherries, peaches, apricots) must be removed before juice extraction.
- Do not use fully frozen ingredients or ice cubes. These may damage the device. The ingredients for sorbets must always be partially thawed.
Symbols on your device

The food-safe material of devices with this symbol will not change the taste or smell of food.
3. Safety information
Warnings
If necessary, the following warnings are used in this copy of the user instructions:

DANGER! High risk: failure to observe this warning may result in injury to life and limb.
WARNING! Moderate risk: failure to observe this warning may result in injury or serious material damage.
CAUTION: low risk: failure to observe this warning may result in minor injury or material damage.
NOTE: circumstances and specifics that must be observed when handling the device.
Instructions for safe operation
- This device must not be used by children.
- The device and the power cable must be kept away from children.
- Cleaning and user maintenance must not be performed by children.
- Children must not play with the device.
- This device can be used by people with restricted physical, sensory or intellectual abilities or people without adequate experience and/ or understanding if they are supervised or instructed on how to use this device safely and if they are aware of the resulting dangers.
- The device must be disconnected from the mains if left unattended and prior to assembly, disassembly or cleaning.
- Prior to the replacement of parts or attachments which move when in operation, the device must be switched off and disconnected from the mains.
- Improper use of the device may result in injuries.
- This device is not intended to be operated using an external timer or a separate remote control system.
- If the mains power cable of this device should become damaged, it must be replaced by the manufacturer, the manufacturer's customer service department or a similarly qualified specialist, in order to avoid any hazards.
- Clean all parts and surfaces that come into contact with food before using the device for the first time (see “Cleaning” on page 37).
- If the screen assembly is damaged, the device may not be operated.
- The device is designed for continuous operation of
... maximum 15 minutes when juicing or ... maximum 5 minutes for sorbet preparation.
After this, the device must remain switched off until it has cooled down to room temperature.

DANGER for children
- Packing materials are not children's toys. Children should not be allowed to play with the plastic bags. There is a risk of suffocation.
- Keep the device out of the reach of children.

DANGER to and from pets and livestock
Electrical devices can represent a danger to pets and livestock. In addition, animals can also cause damage to the device. For this reason you should keep animals away from electrical devices at all times.

DANGER! Risk of electric shock due to moisture
The device must never be operated in the vicinity of a bathtub, a shower, a filled washbasin or similar items.
- The base unit, the power cable and the mains plug must not be immersed in water or any other liquids.
- Protect the base unit, the power cable and the mains plug from moisture and dripping or splashing water.
- Make sure that no liquid gets into the ventilation slots on the underside of the base unit.
- If liquid gets into the base unit, pull out the mains plug immediately. Have the device checked before reusing.
- Never touch the device with wet hands.
- If the device falls into water, disconnect the mains plug immediately. Only then is it safe to retrieve the device.

DANGER! Risk of electric shock
- Only plug the mains plug into the wall socket after the device has been completely assembled.
- Only connect the mains plug to a properly installed and easily accessible earthed wall socket whose voltage corresponds to the specifications on the rating plate. The wall socket must still be easily accessible after the device is plugged in.
- Ensure that the power cable cannot be damaged by sharp edges or hot spots. Do not wrap the power cable around the device.
- Keep the power cable away from hot surfaces (e.g. hot plates).
- Even after it has been switched off, the device is not completely disconnected from the mains. In order to fully disconnect it, pull out the mains plug.
- When using the device, ensure that the power cable cannot be trapped or crushed.
- When removing the mains plug from the wall socket, always pull on the plug and never the cable.
- Disconnect the mains plug from the wall socket ...
...if there is a fault,
... when you are not using the device,
... before you assemble or disassemble the device,
... before you clean the device and
... during thunderstorms.
- Do not use the device if there is visible damage to the device or the power cable.
- In order to avoid any hazards, do not make modifications to the device.
WARNING! Risk of injury by turning parts
- Only plug the mains plug into the wall socket after the device has been completely assembled.
- In order to minimise the risk of injury, the device can only be started if correctly assembled. Never bypass the safety functions!
Due to the heavy, rotating auger there is a risk of injury, for example, by crushing. Therefore: - Never reach into the food chute. Keep long hair out of the way.
- Do not hold anything (e.g. a spoon) in the food chute.
WARNING! Risk of material damage
- Thick or firm peels, (e.g. of citrus fruits, pineapple), stems and pips of stone fruits (e.g. cherries, peaches, apricots) must be removed before blending.
- The device must not be used for very hard fruit and vegetables (e.g. sugar cane).
Do not use fully frozen ingredients or ice cubes. These may damage the device. The ingredients for sorbets must always be partially thawed. - To prevent damage to the device, stop juicing immediately if the auger does not rotate or rotates only with great difficulty.
Pull out the mains plug and check if there is an obstruction in the device. Also check that the device is assembled correctly. - Do not operate the device when it is empty, as this causes the motor to overheat and may result in it becoming damaged.
- Only use the original accessories.
- Place the device on a stable, level surface.
- The vents on the underside of the base unit must not be covered. Never place the device on a towel or anything similar.
- Never place the device on hot surfaces (e.g. hot plates) or near to heat sources or open fire.
- The following parts must never be immersed in water or other liquids, and must not be cleaned in the dishwasher: - the base unit including the power cable with mains plug.
- Do not use any astringent or abrasive cleaning agents.
The device is fitted with non-slip plastic feet. As furniture is coated with a wide array of varnishes and synthetics, and is also treated with different care products, it cannot be fully ruled out that some of these materials contain components that could attack and soften the non-slip plastic feet. If necessary, place a non-slip mat under the device.
NOTES:
- Do not store the fruit juice for more than 24 hours in the juice container or in contact with other parts of the product. This also applies to storage in the refrigerator.
- Some foods (e.g. carrots) can stain the plastic. Apply some cooking oil and place it in the dishwasher. This way, most stains are removed effortlessly. Stains do neither damage the plastic, nor do they affect the taste.
4. Items supplied
1 base unit 13
1 food pusher 1
1 filling aid 2
1 lid 4
1 auger 5
1 screen assembly 6
1 holder 7
1 working container (max. 300 ml) 8
1 juice container (max. 600 ml) 15
1 pulp container (max. 1200 ml) 16
1 sorbet assembly 19
1 cleaning brush 14
1 copy of the user instructions
5. What is a Slow Juicer?
A slow juicer is a juice extractor that works slower than conventional juice extractors. It works using a heavy auger 5, which rotates in the screen assembly 6 and presses the juice through the screen surfaces.
This method helps to maintain vitamins and increases juice yield. This produces high quality juice and less waste.
6. How to use
- Remove all packing materials.
- Check to ensure that all parts are present and undamaged.
- Clean the device prior to its first use! (see “Cleaning” on page 37)

DANGER! Risk of electric shock!
- Only plug the mains plug 11 into the wall socket after the base unit 13 and the accessories have been assembled.
- Place the device on a dry, level, non-slip surface.
7. Assembling the device
NOTE: in order to minimise the risk of injury, the device can only be started if correctly assembled.
Insert the seal 22
- Insert the seal 22 on the underside of the working container 8 into the pulp outlet 17.
NOTE: this is important to prevent the outflow of juice to the base unit 13.
Insert the seal 21
- Place the seal 21 into the working container 8.
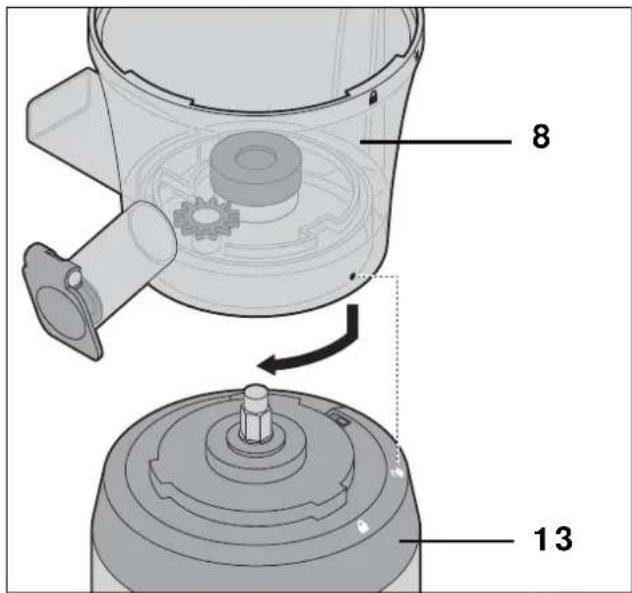
Mount the working container 8
-
Place the working container 8 on the base unit 13 with the ● marking pointing to the open lock symbol?
-
Turn the working container 8 clockwise until the ● marking points to the closed lock symbol 🔒.
NOTE: if you want to make a sorbet, skip the following two assembly steps. Insert the sorbet assembly 19 instead of the holder 7 and the screen assembly 6 (see "Insert the sorbet assembly" on page 33).
Insert the holder 7
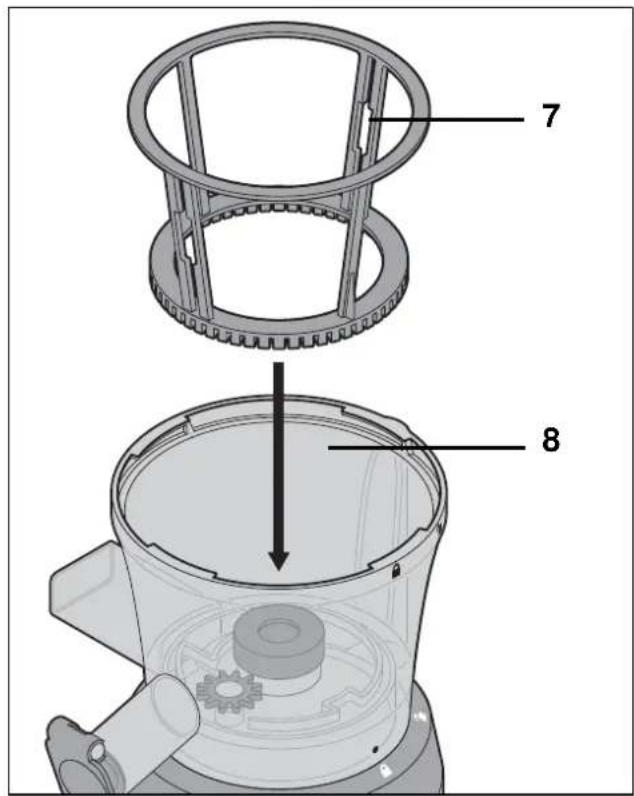
- Place the holder 7 into the working container 8.
Insert the screen assembly 6
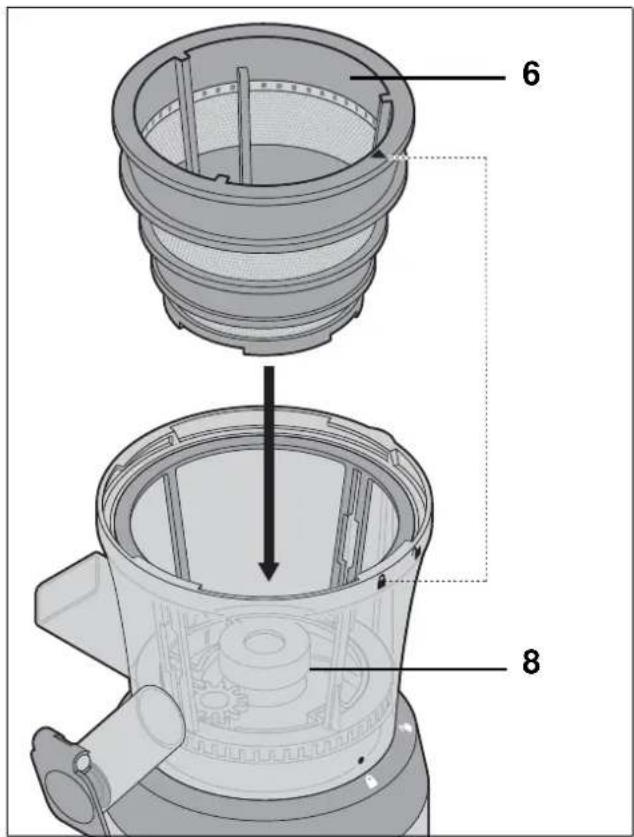
- Place the screen assembly 6 into the working container 8 so that the arrow ▼ points to the closed lock symbol 🔒 Check: the screen assembly sits in its position and can only be moved slightly back and forth.
Insert the auger 5
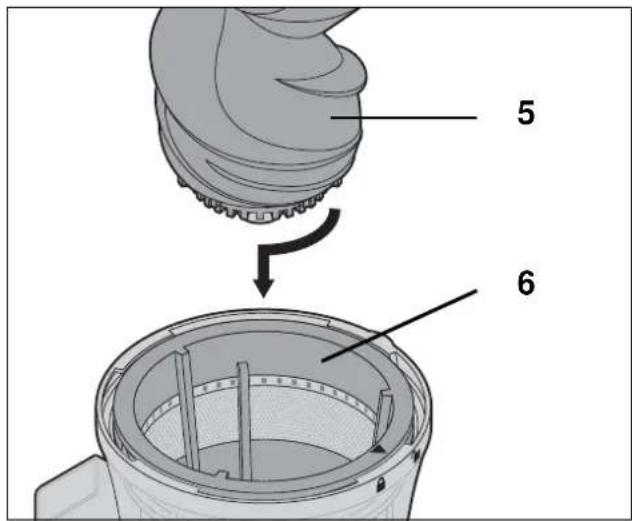
- Slide the auger 5 into the screen assembly 6 while turning it clockwise and at the same time push it down slightly. Finally press the auger 5 down completely.
NOTE: if the auger 5 is not inserted deep enough, the lid 4 will not close properly.
Mount the lid 4
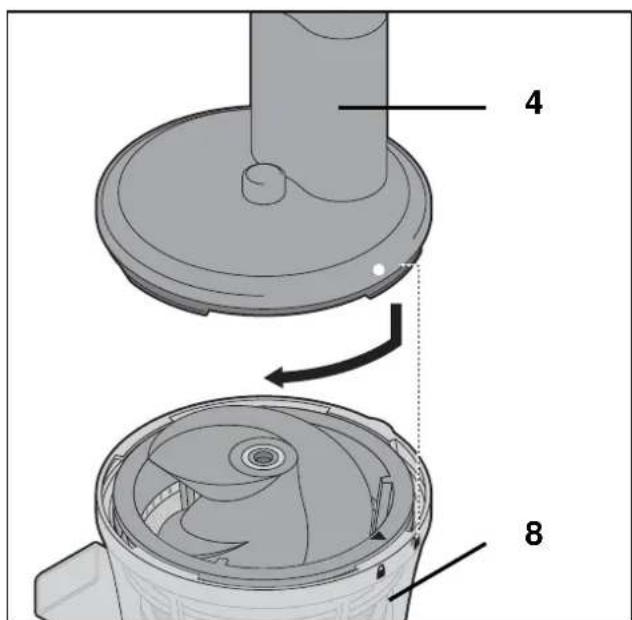
-
Place the lid 4 on the working container 8 so that the point symbol • points to the opened lock symbol ?
-
Press the lid 4 down lightly while turning it clockwise until the point symbol • points to the closed lock symbol 🔒
Mount the filling aid 2
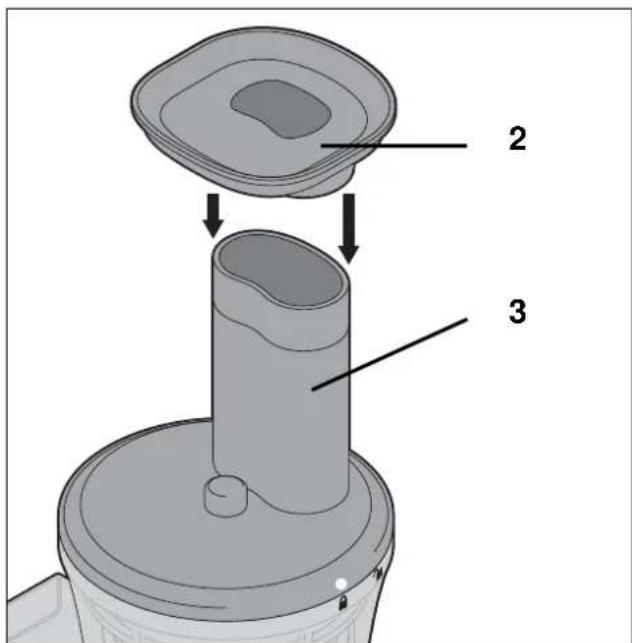
-
Insert the filling aid 2 onto the food chute 3 to facilitate the filling of the prepared food.
-
Place the pulp container 16 under the pulp outlet 17.
-
Place the juice container 15 under the juice outlet 9.
7.1 Insert the sorbet assembly
If you want to make sorbet, assemble the device as described. But use the sorbet assembly 19 instead of the holder 7 and the screen assembly 6.
- Place the sorbet assembly 19 into the working container 8 so that the sorbet outlet 18 opens into the juice outlet 9. Then continue with assembly step 7.
- Place the juice container 15 under the juice outlet 9 to catch the finished sorbet. The pulp container 16 is not needed.
8. Preparing food
WARNING!
- Thick or firm skins (e.g. of citrus fruits, pineapples), stems, and the stones of stone fruits (e.g. cherries, peaches, apricots) must be removed before juice extraction.
- The device must not be used for very hard fruit and vegetables (e.g. sugar cane).
NOTES:
- Dried fruit is not suitable for juice extraction. It contains too little juice.
- To ensure that the juice has the highest possible vitamin content, use freshly harvested, seasonal fruit and vegetables and drink the juice immediately after it has been produced.
- To ensure that apples do not turn brown, add a little lemon juice.
-
Do not store the fruit juice for more than 24 hours in the juice container or in contact with other parts of the product. This also applies to storage in the refrigerator.
-
The fruit used should be as ripe as possible. This will produce lots of juice. It may be necessary to clean the screen assembly 6 more often when using unripe fruit.
- Remove overripe or mouldy fruit. Wash the fruit and vegetables.
- For carrots you can increase the juice yield by placing them in water for 24 hours before juicing.
- Coarse or hard peels (e.g. of citrus fruits, mangoes, pomegranates and pineapples) must be removed.
- Thin peels (e.g. of apples or pears), thin stems (e.g. of blackcurrants) and small pips (e.g. of apples or raspberries) do not need to be removed.
- Cut the fruit and vegetables into small pieces that will fit into the food chute 3 (approx. 2.5 × 2.5 ~cm ).
8.1 Preparing food for sorbet preparation
WARNING! Risk of material damage!
- Do not use fully frozen ingredients or ice cubes. These may damage the device.
• Prepare the fruit as described.
- Cut the fruit into small pieces that will fit into the food chute 3 (approx. 2.5 x 2.5 cm).
- Freeze the pieces of fruit one by one. To do this you can, for example, spread the individual pieces in a shallow bowl. The pieces must not touch each other.
- Shortly before preparing the sorbet, thaw the pieces of fruit until you can pierce them with a fork approx. halfway through.
- Then process the pieces of fruit immediately.
NOTES:
- Frozen fruit pieces should be consumed within one month.
- Thawed ingredients must not be frozen again.
9. Juice extraction
WARNING! Risk of injury by turning parts!
Due to the heavy, rotating auger 5 there is a risk of injury, for example, by crushing. Therefore:
- Never reach into the food chute 3. Keep long hair out of the way.
- Do not hold anything (e.g. a spoon) in the food chute 3.
WARNING! Risk of material damage!
- The device is designed for a maximum operating time of 15 minutes without interruption when juicing. After this, the device must remain switched off until the base unit 13 has completely cooled down.
9.1 Drip stopper
The drip stopper 10 is located in the juice outlet 9. If you want to remove the juice container 15, you can close the drip stopper 10 to prevent juice from dripping out.
NOTE: when juicing, make sure that the drip stopper 10 is open so that the juice will not collect in the working container 8. The working container 8 holds a maximum of 300 ml.
9.2 Power supply

DANGER! Risk of injury!
- Only plug the mains plug 1 1 into the wall socket after the device has been fully assembled.
- Insert the mains plug 11 into a wall socket with earthing contacts which corresponds to the technical data on the rating plate. The wall socket must still be easily accessible after connection.
9.3 Adding food
-
Place the prepared food in small pieces (approx. 2.5 x 2.5 cm) onto the filling aid 2.
-
Use the food pusher 1 to push the prepared food into the food chute 3.
NOTE: do not use too much pressure. The Slow Juicer works slowly. Excessive pressure would strain the motor and reduce the juice yield.
9.4 Switching on/off and reverse mode
- To turn on the device, set the on/off switch 12 to 1.
- To turn off the device, set the on/off switch 12 to 0.
- If you set the on/off switch 12 to R, you will start reverse mode. With this function you can eliminate small blockages.
9.5 Removing blockages
If a piece of fruit or vegetable is blocking the auger 5, it must be removed immediately. You can recognise a blockage...
... if no more juice comes out of the juice outlet 9, even though pieces of food are still in the chute. ... if the pieces of food in the food chute 3 no longer slide down, ... if there are unusual sounds, or ... if the motor becomes audibly slower.
Reverse mode
First, try to fix the blockage by using reverse mode:
- Set the on/off switch 12 in sequence to 0, for approx. 2 seconds to R (reverse mode) and again to 0.
- Turn the on/off switch 12 to 1. Check whether the device is working normally.
- Repeat the process, if necessary.
Cleaning the device
If this does not resolve the blockage, follow these steps:
- Pull out the mains plug 11.
- Take the device apart (see "Disassembly" on page 36).
- Clean the auger 5, the holder 7, the screen assembly 6 and the working container 8 (see "Cleaning" on page 37).
- Reassemble the parts and proceed with juice extraction.
10. Preparing a sorbet
WARNING! Risk of material damage!
- The device is designed to prepare sorbet for up to 5 minutes maximum operating time without interruption. After this, the device must remain switched off until the base unit 13 has completely cooled down.
- Assemble the device for sorbet preparation (see "Insert the sorbet assembly" on page 33).
- Prepare half frozen fruit pieces (see "Preparing food for sorbet preparation" on page 34).
- Proceed in the same way as for juicing. The finished sorbet is ejected through the juice outlet 9.
- Mix the sorbet again with a spoon and serve it immediately.
11. Disassembly

DANGER! Risk of electric shock!
- Pull the mains plug 11 out of the wall socket before you disassemble and clean the device.
- Pull the food pusher 1 off upwards from the food chute 3.
- Remove the filling aid 2.
- Turn the lid 4 anticlockwise until the point symbol • points to the opened lock symbol ☐ remove the lid 4.
- Close the drip stopper 10.
-
Pull out upwards the screen assembly 6 / sorbet assembly 19 complete with the auger 5. While doing this, move these parts somewhat back and forth to make them easier to release.
-
Remove the auger 5 from the screen assembly 6 / sorbet assembly 19.
- If necessary, remove the holder 7 from the working container 8.
- Turn the working container 8 anticlockwise until the ● mark points to the opened lock symbol ?Remove the working container 8.
12. Cleaning
Clean the device prior to its first use!

DANGER! Risk of electric shock!
- Pull the mains plug 11 out of the wall socket before you disassemble and clean the device.
WARNING! Risk of material damage!
- Do not use any astringent or abrasive cleaning agents.
After every use
- Clean the device and all accessories used after each use and remove all food residues.
- All accessories must be disassembled and individually cleaned.
Seals
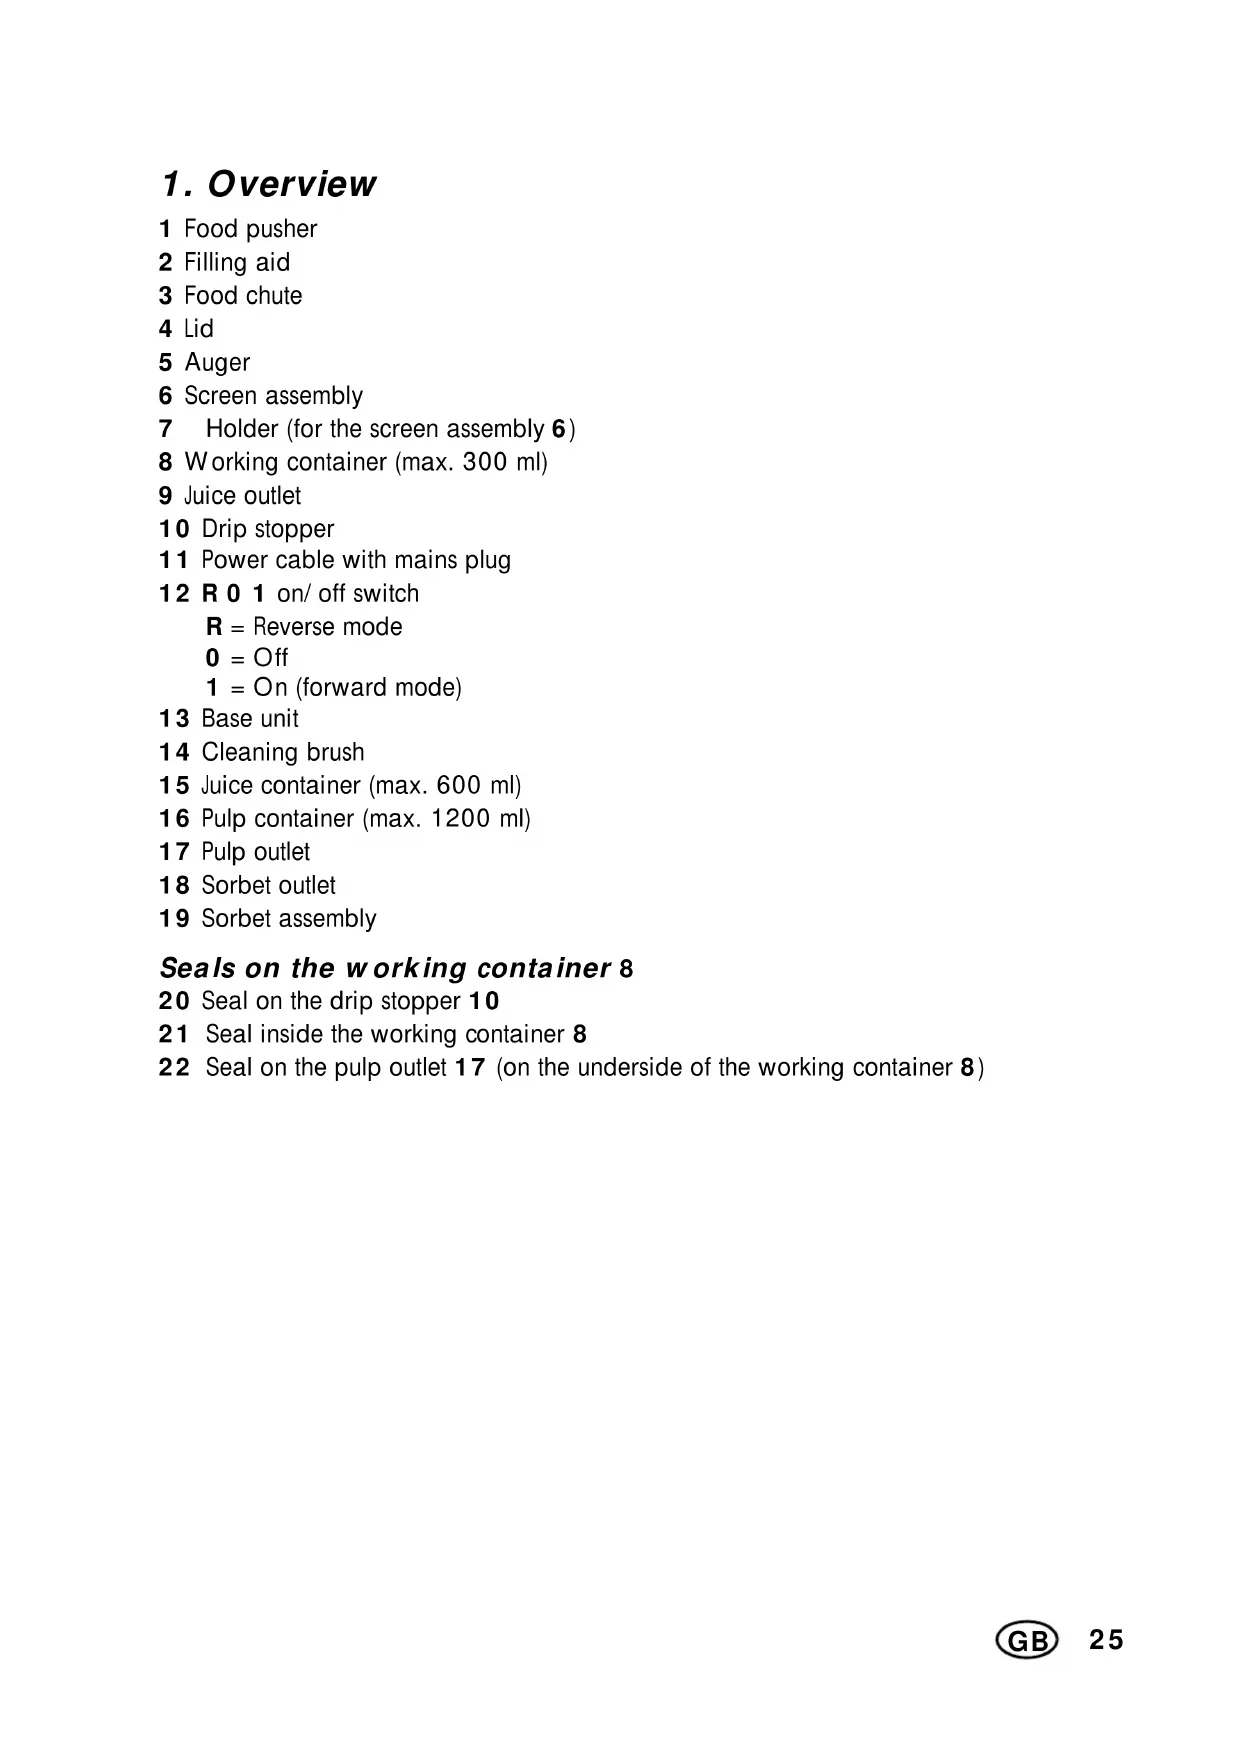
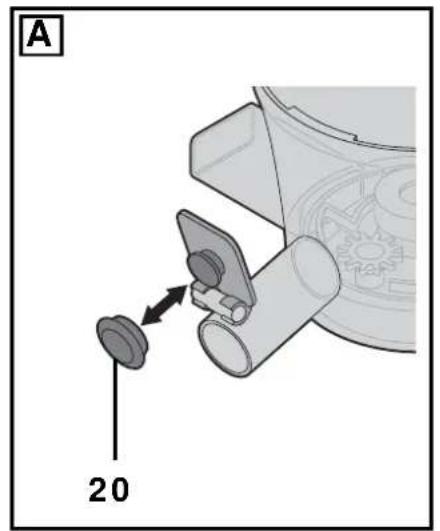
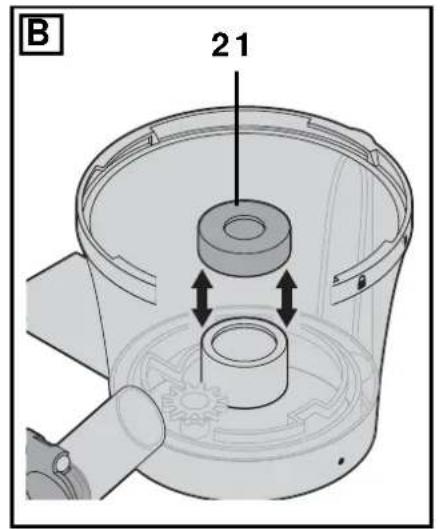
Proceed as follows for the hygienic cleaning of the seals 20, 21 and 22:
• Figure A: remove the seal 20 from the drip stopper 10.
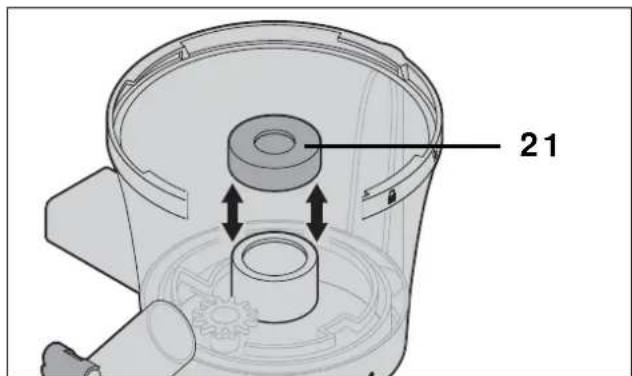
• Figure B: take the seal 21 out of the working container 8.
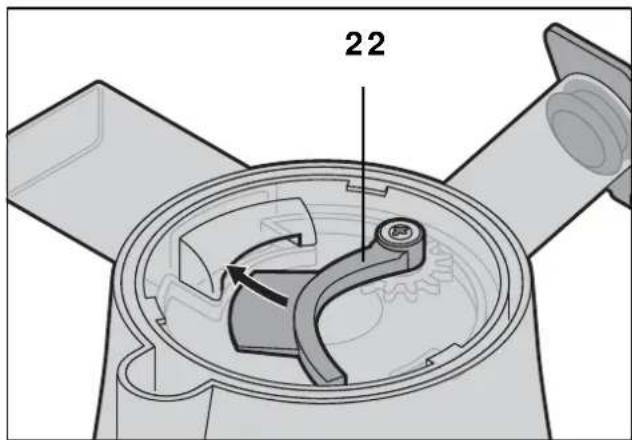
• Figure C: pull the seal 22 on the underside of the working container 8 out of the pulp outlet 17.
- The seal 22 remains firmly attached to the working container 8 and can be cleaned in the dishwasher or by hand.
- The seals 20 and 21 can be cleaned either in the dishwasher cutlery basket or manually.
- Allow the seals to dry completely before reinstalling.
Base unit

DANGER! Risk of electric shock!
- The following parts must never be immersed in water or other liquids, and must not be cleaned in the dishwasher:
- the base unit 13 including the power cable with mains plug 11.
- The cleaning brush 14 must not be cleaned in the dishwasher.
Wipe off the base unit 13 and the power cable 11, using a lightly moistened cloth. Dry with a dry cloth.
Accessories
The following accessories can be cleaned both by hand and in the dishwasher:
- Food pusher 1
- Filling aid 2
- L i d 4
- A u g e r 5
- Screen assembly 6
- H o l d e r 7
- Working container (max. 300 ml) 8
- Juice container (max. 600 ml) 15
- Pulp container (max. 1200 ml) 16
- Sorbet assembly 19
-
Remove food residues with the cleaning brush 14. Do not exert a lot of pressure on the screen surfaces of the screen assembly 6.
-
Clean the accessories with warm water and a little detergent. Afterwards, rinse all parts with clean water.
Or:
Place the accessories in the dishwasher and/ or the small parts in the cutlery basket.
- Allow all parts to dry completely before you put them away or use the device again.
13. Storage

DANGER for children!
- Keep the device out of the reach of children.

DANGER!
- In order to avoid accidents, the mains plug 11 must never be connected to a wall socket while in storage.
- Wind the power cable around the cable spool at the underside of the device.
- Select a location where neither high temperatures nor moisture can affect the device.
14. Disposal
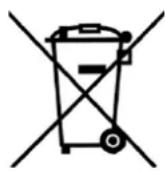
This product is subject to the provisions of European Directive 2012/19/EC. The symbol showing a wheelie bin crossed through indicates that the product requires separate refuse collection in the European Union. This applies to the product and all accessories marked with this symbol. Products identified with this symbol may not be discarded with normal household waste, but must be taken to a collection point for recycling electric and electronic appliances. Recycling helps to reduce the consumption of raw materials and protect the environment.
Packaging
When disposing of the packaging, make sure you comply with the environmental regulations applicable in your country.
15. Trouble-shooting
If your device fails to function as required, please try this checklist first. Perhaps there is only a minor problem, and you can solve it yourself.

DANGER! Risk of electric shock!
- Do not attempt to repair the device yourself under any circumstances.
| Fault | Possible causes / Action |
| No function | Has the device been connected to the power supply?Check the connection.Is the device assembled correctly? |
| The device smells strange or is heating up excessively. | Switch the on/ off switch 12 to 0 and unplug the mains plug 11. Allow the device to cool down.Has the device been used continuously for more than 15 minutes while juicing or more than 5 minutes preparing a sorbet?Is the auger 5 is blocked? |
| The device vibrates strongly or makes grinding noises. | Switch the on/ off switch 12 to 0 and unplug the mains plug 11.· Check whether there is a foreign object in the device.· Check to ensure that all parts are correctly assembled.· Slight vibrations and noises during food processing are normal. |
| The auger 5 is blocked. |
16. Recipes
Tips
- Freshness counts: drink your juice freshly pressed. Only press as much as you are likely to drink right away, as the juice does not last long.
- How to make your juices last longer: to make your juice last longer, you should pasteurise it, i.e. heat it. Heat the juice quickly to approx. 72 °C. Do not let the juice boil, as this would destroy the vitamins.
- Jelly: boil the juice with sugar and a gelling agent to produce jelly.
- Seasoning: vegetable juices can be "pepped up" very well with salt, pepper and other spices.
- Carrots: the provitamin A from carrots will be absorbed better by the body if you add a few drops of oil or if you consume it together with food containing fats.
NOTES:
- Prepare all ingredients as described (see “Preparing food” on page 34).
- The following recipes are suggestions. Try your own variations.
Summer drink
Ingredients for 2 persons:
1 large piece of watermelon
1 lemon
4 apples, sweet and sour (e.g. "Jonagold")
1. Juice the watermelon, lemon and apples.
2. Serve the summer drink chilled.
Apple-pear-strawberry drink
Ingredients for 2 persons:
1 apple, green (e.g. "Granny Smith")
3 small, ripe pears
10 medium-sized strawberries
- Juice everything with the Slow Juicer.
- Mix the juices and serve the drink immediately.
Breakfast drink
Ingredients for 2 persons:
4 - 5 carrots
2 apples
1 tsp olive oil
- Juice the carrots first and then the apples.
- Add the olive oil.
- Stir everything well.
Honeydew melon drink
Ingredients for 2 persons:
approx. 13 honeydew melon
1 mango
1 apple, sweet and sour (e.g. "Jonagold")
1 apple, green (e.g. "Granny Smith")
-
First juice the melon, then the mango and the apples.
-
Stir everything.
Pineapple-mango drink
Ingredients for 2 persons:
12 pineapple
12 mango
1 apple
1 orange
2 tsp wheat germ oil
-
Juice the pineapple first, then the mango.
-
Juice the apple and the orange.
-
Mix the juices.
-
Add 2 tsp of wheat germ oil and stir everything.
Beetroot drink
Ingredients for 2 persons:
1 beetroot
3 oranges
2 tbs of red currants
-
Juice the beetroot, oranges and currants.
-
Mix the juices.
Peach-pear-pineapple drink
Ingredients for 2 persons:
2 peaches
2 small pears
12 pineapple
-
Juice everything one after the other.
-
Serve the juice immediately.
Tomato juice
Ingredients:
approx. 6 medium-sized tomatoes per person
maybe some honey or salt and pepper
- Prepare the tomatoes by removing the green parts and cutting them into small slices.
- Gradually add the tomatoes to the device.
- To naturally sweeten the juice, add some honey. If you like it hearty, season it with salt and pepper.
- Serve the juice immediately.
Pepper juice
Ingredients:
approx. 2 - 3 large peppers per person maybe 1 apple
- Prepare the peppers by removing the stalk and pips and cutting the peppers into strips.
- Gradually add the pepper strips to the device.
- If you want to achieve a sweeter taste, you can also juice the apple.
- Serve the juice immediately.
Broccoli juice
Ingredients:
Broccoli
maybe a pear
NOTES:
- Since broccoli has a low liquid content, the device may make unusual squeaking noises during processing. This is normal and not a defect of the device!
-
By adding the pear, the harsh flavour of the broccoli is mitigated while balancing the low liquid content of the broccoli.
-
Prepare the broccoli by dividing it into small florets.
- Gradually add the broccoli to the device.
- If desired, put the prepared pear into the device.
Straw berry-pineapple sorbet
Ingredients:
7 strawberries
approx. 160 g pineapple
1 tsp grated coconut
- Prepare the strawberries and pineapple for sorbet preparation (see “Preparing food for sorbet preparation” on page 34).
- Put the half-frozen strawberries and pineapple pieces alternately into the food chute 3.
- Add the grated coconut to the sorbet mixture and mix everything with a spoon.
- Serve the sorbet immediately.
Blueberry-banana sorbet
Ingredients:
approx. 100 g blueberries
1½ bananas
- Prepare the blueberries and banana for sorbet preparation (see “Preparing food for sorbet preparation” on page 34).
- Put the half-frozen blueberries and banana pieces alternately into the food chute 3.
- Mix the resulting sorbet again with a spoon and serve it immediately.
Tropicana Sorbet
Ingredients:
approx. 160 g pineapple
1 orange
12 mango (approx. 100 - 150 g)
- Prepare the pineapple, orange and mango for sorbet preparation (see “Preparing food for sorbet preparation” on page 34).
- Put the half-frozen pieces of pineapple, orange and mango alternately into the food chute 3.
- Mix the resulting sorbet again with a spoon and serve it immediately.
Raspberry-pear sorbet
Ingredients:
approx. 100 g raspberries
2 pears
- Prepare the raspberries and pears for sorbet preparation (see “Preparing food for sorbet preparation” on page 34).
- Put the half frozen raspberries and pear pieces alternately into the food chute 3.
- Mix the resulting sorbet again with a spoon and serve it immediately.
17. Technical specifications
| Model: SSJ 300 A1 | |
| Mains voltage: 220 | -240 V ~50 Hz |
| Protection class: I | |
| Power rating: 300 W | |
| SC(Short cycle): | -up to 15 min when juicing-up to 5 min when preparing sorbet |
Symbols used
 | Certified Safety. Devices must comply with the generally acknowledged rules of technology and the German Product Safety Act (Produktsicherheitsgesetz - ProdSG). |
 | With the CE marking, HOYER Handel GmbH declares the conformity with EU guidelines. |
 | This symbol reminds you to dispose of the packaging in an environmentally friendly manner. |
 | Recyclable materials: cardboard (except corrugated cardboard) |
 | The symbol identifies parts that can be cleaned in the dishwasher. |
Subject to technical modifications.
18. Warranty of the HOYER Handel GmbH
Dear Customer,
your device is provided with a 3 year warranty starting with the purchase date. In the event of product defects, you are entitled to statutory rights against the vendor. These statutory rights are not restricted by our warranty presented in the following.
Warranty conditions
The warranty period starts with the purchase date. Please keep the original purchase receipt in a safe place. This document is required to verify the purchase.
If within three years from the purchase date of this product a material or factory defect occurs, the product will be repaired or replaced by us – at our discretion – free of charge to you. This warranty implies that within the period of three years the defective device and the purchase receipt are presented, including a brief written description of the defect and the time it occurred.
If the defect is covered by our warranty, the repaired or a new product will be returned to you. No new warranty period starts with a repair or replacement of the product.
Warranty period and statutory claims for defects
The warranty period is not extended when the warranty has been claimed. This also applies to replaced and repaired parts. Any damages and defects already existing at the time of purchase must be reported immediately upon unpacking. Repairs arising after the expiration of the warranty period are subject to a charge.
Warranty coverage
The device was produced carefully according to strict quality guidelines and tested diligently prior to delivery.
The warranty applies to material or factory defects.
Excluded from the warranty are wear parts subject to normal wear and damages to fragile parts, e.g. switches, batteries, lamps or other parts manufactured from glass.
This warranty expires if the product is damaged, not used as intended or not serviced. For the proper operation of the product, all instructions listed in the operating instructions must be observed carefully. Any form of use and handling that is advised against in the operating instructions or warned against must always be avoided.
The product is only intended for private and not for commercial use. In the case of incorrect and improper treatment, use of force and interventions not performed by our authorised Service Centre, the warranty shall cease.
Handling in case of a warranty claim
In order to ensure prompt processing of your matter, please observe the following notes:
- Please keep the article number IAN: 311807 and the purchase receipt as a purchase verification for all inquiries.
- The article number can be found on the rating plate, an engraving, the title page of your instructions (in the bottom left), or as a label on the rear or underside of the device.
- If faulty operation or other defects occur, first contact the Service Centre listed in the following by telephone or email.
- Then, you are able to send a product reported as defective free of charge to the service address specified to you, including the purchase receipt and the information on the defect and when it occurred.

Please visit www.lidl-service.com to download this and many other manuals, product videos and software.

Service Centre
GB Service Great Britain
Tel.: 0800 404 7657
E-Mail: hoyer@lidl.co.uk
IE Service Ireland
Tel.: 1890 930 034
(0,08 EUR/ Min., (peak))
(0,06 EUR/ Min., (off peak))
E-Mail: hoyer@lidl.ie
MT Service Malta
Tel.: 80062230
E-Mail: hoyer@lidl.com.mt
CY Service Cyprus
Tel.: 8009 4409
E-Mail: hoyer@lidl.com.cy
IAN: 311807

Supplier
Please note that the following address is no service address. First contact the aforementioned Service Centre.
HOYER Handel GmbH
Tasköprüstraße 3
DE-22761 Hamburg
GERMANY
Sommaire
Sorbet framboise-poire
Ingrédients :