SZP 25 B1 - Centrifuge SILVERCREST - Free user manual and instructions
Find the device manual for free SZP 25 B1 SILVERCREST in PDF.
| Product type | Citrus juicer (centrifugal juicer for citrus fruits) |
| Brand | SilverCrest |
| Model | SZP 25 B1 |
| Mains voltage | 220-240 V ~ 50/60 Hz |
| Power | 25 W |
| Protection class | II |
| Juice container capacity | 600 ml (max mark) |
| Base material | Plastic with non-slip silicone feet |
| Supplied accessories | Lid, large and small pressing cones, upper and lower filters, juice container, base with cable winder |
| Pulp adjustment function | Adjustable filter opener (high or low pulp content) |
| Rotation direction | Changes automatically to optimize extraction |
| Automatic stop | Yes, as soon as pressure on the cone is released |
| Cleaning | Manual, do not put in dishwasher; wipe base with a damp cloth |
| Important safety instructions | Do not immerse base in water; unplug before cleaning; do not use if cable is damaged |
| Warranty | 3 years (conditions as per manual) |
| Repairability | Repairs by manufacturer or authorized service only; do not open yourself |
| Country of origin | Germany (brand) |
| Usage | Domestic only, indoors |
| Compatible citrus types | Oranges, grapefruits, lemons, etc. |
| Cable winder | Integrated into base |
Frequently Asked Questions - SZP 25 B1 SILVERCREST
User questions about SZP 25 B1 SILVERCREST
0 question about this device. Answer the ones you know or ask your own.
Ask a new question about this device
Download the instructions for your Centrifuge in PDF format for free! Find your manual SZP 25 B1 - SILVERCREST and take your electronic device back in hand. On this page are published all the documents necessary for the use of your device. SZP 25 B1 by SILVERCREST.
USER MANUAL SZP 25 B1 SILVERCREST
Operating instructions
SE
CITRUSPRESS
Bruksanvising
FR BE
PRESSE-AGRUMES
Mode d'emploi
DE AT CH
ZITRUSPRESE
Bedienungsanleitung
F
SITRUSPUSERRIN
Käytööhje
DK
CITRUSPRESSER
-
Overview 2
-
Intended purpose 3
-
Safety information 3
-
Items supplied 5
5.How to use 5
- Operation 5
6.1Assembling the citrus press.. 5
6.2 Extracting the juice from citrus fruits.. 5
6.3 Removing the juice 6
- Cleaning 6
- Storage 6
- Disposal 6
- Troubleshooting 7
- Technical specifications 7
- Warranty of the HOYER Handel GmbH 7

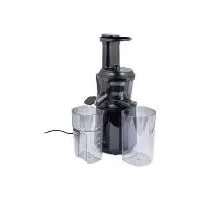
1. Overview
1 Lid
2 Large juicer cone (is placed on top of the small juicer cone)
3 Small juicer cone
4 Upper screen
5 Bottom screen
6 Screen opener (open/close openings within the screen)
7 Juice container
8 Drive axle
9 Power cable with mains plug
10 Base
11 Cable wrap


DANGER! Risk of electric shock due to moisture
- Protect the base of the device against moisture, drips and splashes.
The base, the power cable and the mains plug must not be immersed in water or any other liquids.
If liquid gets into the base, immediately pull out the mains plug. Have the device checked before reusing.

DANGER! Risk of electric shock
- Do not use the device if the device or the power cable has any visible damage, or if the base has previously been dropped.
- Only connect the mains plug to a properly installed and easily accessible wall socket whose voltage corresponds to the specifications on the rating plate. The wall socket must continue to be easily accessible after the device is plugged in.
- Ensure that the power cable cannot be damaged by sharp edges or hot points.
The device is not fully disconnected from the power supply, even after it is switched off. In order to fully disconnect it, pull out the mains plug. - When using the device, ensure that the power cable cannot be trapped or crushed.
To pull the mains plug out of the wall socket, always pull on the mains plug, and never on the power cable. - Disconnect the mains plug from the wall socket...
...if there is a fault,
... if you are not using the citrus press,
... before you assemble or disassemble the citrus press,
... before you clean the citrus press and during thunderstorms.
- To avoid any risk, do not make modifications to the device. You also must not replace the power cable yourself. Re
pairs must be carried out by a specialist workshop or the Service Centre.
WARNING! Risk of injury by turning parts
- Do not touch the rotating juicer cone directly. Do not touch rotating parts with small spoons or similar utensils. Keep long hair or loose clothing away from rotating parts as well.
- Only plug the mains plug into the wall socket after the device has been completely assembled.
WARNING! Risk of material damage
- Do not block and overload the motor.
Do not put excessive pressure on the juicer cone. - Ensure that no foreign body is on the screen or in the device when operating it.
- In order to avoid damage to the device, interrupt pressing immediately, if the juicer cone is not turning or having difficulty turning. Pull out the mains plug and check if there is a foreign body in the device.
- The device is fitted with non-slip silicon feet. Because furniture can be coated with a wide variety of varnishes and plastics, and treated with various care products, the possibility cannot be excluded that some of these substances have ingredients that may attack and soften the silicon feet. If necessary, place a non-slip mat under the device.
- Place the device on a stable, flat surface.
- Never place the device on hot surfaces (e.g. hot plates) or near heat sources or open fire.
- Only use the original accessories.
- Do not clean the citrus press or any of its accessories in the dishwasher or with boiling hot water.
- Do not use any astringent or abrasive cleaning agents.
4. Items supplied
1Lid 1
1 Large juicer cone 2
1 Small juicer cone 3
1 Upper screen 4 and 1 bottom screen 5 (assembled)
1 Juice container 7
1 Base 10
1 Set of operating instructions
5. How to use
- Remove all packing material.
- Check to ensure that all parts are present and undamaged.
Clean the device prior to its first use (see "Cleaning" on page 6)!
6. Operation
6.1 Assembling the citrus press

DANGER!
Only plug the mains plug 9 into the wall socket after the device has been completely assembled.
- Uncoil the power cable 9 from the cable wrap 11 to the desired length.
- Place the base 10 on a dry, solid and level surface.
- Figure C: place the juice container 7 on the base 10 with the handle above the arrow and turn it clockwise until it locks into place.
- Figure D: place the upper screen 4 on the bottom screen 5 so that the screen opener 6 sticks through the opening, and the screens lock into place.
-
Place the assembled screen 4/5 on the juice container 7 so that the handles fit perfectly one on top of the other.
-
Place the small juicer cone 3 on the drive axle 8. In the process, the small juicer cone 3 must lock into the screen 4/5. For large citrus fruits (e.g. oranges, grapefruit) place the large juicer cone 2 on the small juicer cone 3 so that the wings of the small juicer cone 3 fit into the recesses of the large juicer cone 2.
- Insert the mains plug 9 into a wall socket corresponding to the technical data.
6.2 Extracting the juice from citrus fruits
WARNING!
- Ensure that no foreign body is on the screen 4/5 or in the device when operating it.
- Do not put excessive pressure on the juicer cone 2/3.
NOTE:
- Empty the juice container 7 no later than when filled to the 600 ml mark.
In order to achieve the largest juice yield possible, the juicer cone changes the direction of rotation after several starts and stops.
Setting the pulp content
Figure E: using the screen opener 6, you can influence the pulp content of the juice:
- High pulp content: Set the screen opener 6 to the large dot marks so that the openings in the screen 4/5 are open wide.
-
Low pulp content: Set the screen opener 6 to the small dot marks so that the openings in the screen 4/5 are closed.
-
Cut the citrus fruits in half.
- Exert slight pressure on the halves of the citrus fruit when pushing the cut surface down onto the juicer cone 2/3. The juicer cone 2/3 starts turning, and the juice flows into the juice container 7.

- As soon as you stop pressing on the juicer cone 2/3, the device stops.
- If the juicer cone 2/3 is not turning, check if there are pips between the juicer cone and the screen 4/5 and remove them, if necessary.
6.3 Removing the juice
CAUTION: pull out the mains plug 9 before removing the juice container 7 from the base 10.
- Figure B: turn the juice container 7 counterclockwise and lift it from the base 10.
- Pour the juice out of the juice container 7.
- In order to remove pulp and pips, you can remove the screens 4/5 and the juicer cone 2/3 together with the juice container 7.
- Clean the device after each use as soon as possible so the pulp does not start drying to the surface.
7. Cleaning
Clean the device prior to its first use!

DANGER! Risk of electric shock!
Pull out the mains plug 9 from the wall socket before cleaning the citrus press.
The base 10, the power cable and the mains plug 9 must not be immersed in water or any other liquids.
WARNING!
- Do not clean the citrus press or any of its accessories in the dishwasher or with boiling hot water.
- Do not use any astringent or abrasive cleaning agents.
NOTE: clean the device after each use as soon as possible so the pulp does not start drying to the surface.
- Remove the lid 1, if necessary.
- Remove the juicer cones 2/3 and disassemble them.
- Remove the screens 4/5
- Figure A: in order to disassemble the screens 4/5, exert slight pressure on the screen opener 6.
- Figure B: turn the juice container 7 counterclockwise and lift it from the base 10.
- Wipe the base 10 with a damp cloth.
- Wash up all removable accessories by hand. Make sure to wash the small cavity in the handle with a sufficient amount of clear water.
- Dry all parts carefully, before reassembling the device and storing it.
8. Storage
- You can wind up the power cable 9 in the cable wrap 11.
- Place the lid 1 on the device as a protection against dust. Ensure that the recess in the edge of the lid is above the handle.
9. Disposal
The symbol showing a wheeie bin crossed through indicates that the product requires separate refuse collection in the European Union. This applies to the product and all accessories marked with this
symbol. Products identified with this symbol may not be discarded with normal household waste, but must be taken to a collection point for recycling electric and electronic appliances. Recycling helps to reduce the consumption of raw materials and protect the environment.

Packaging
When disposing of the packaging, make sure you comply with the environmental regulations applicable in your country.
10. Troubleshooting
If your device fails to function as required, please try this checklist first. Perhaps there is only a minor problem, and you can solve it yourself.

DANGER! Risk of electric shock! Do not attempt to repair the device yourself under any circumstances.
| Fault | Possible causes/ Action |
| No function | • Is the device connect- ed to the mains power supply? |
| The juicer cone 2/3 stops turning | • Have you exerted ex- cessive pressure on the juicer cone 2/3? • Is a foreign body locat- ed in the device? • Have pips been caught between the juicer cones 2/3 and the screen 4/5? |
11. Technical specifications
| Model: SZP 25 B | 1 |
| Mains voltage: | 220-240 V ~ 50/60 Hz |
| Protection class: | ☐ |
| Power rating: 25 | W |
Subject to technical modification

12. Warranty of the HOYER Handel GmbH
Dear Customer, your device is provided with a 3 year warranty starting with the purchase date. In the event of product defects, you are entitled to statutory rights against the vendor. These statutory rights are not restricted by our warranty presented in the following.
Warranty conditions
The warranty period starts with the purchase date. Please keep the original purchase receipt in a safe place. This document is required to verify the purchase.
If within three years from the purchase date of this product a material or factory defect occurs, the product will be repaired or replaced by us - at our discretion - free of charge to you. This warranty implies that within the period of three years the defective device and the purchase receipt are presented, including a brief written description of the defect and the time it occurred.
If the defect is covered by our warranty, the repaired or a new product will be returned to you. No new warranty period starts with a repair or replacement of the product.
Warranty period and statutory claims for defects
The warranty period is not extended when the warranty has been claimed. This also applies to replaced and repaired parts. Any damages and defects already existing at the time of purchase must be reported immediately upon unpacking. Repairs arising after the expiration of the warranty period are subject to a charge.
Warranty coverage
The device was produced carefully according to strict quality guidelines and tested diligently prior to delivery.
The warranty applies to material or factory defects. This warranty does not include prod
uct parts that are subject to standard wear and therefore can be considered wear parts; the same applies to damages at fragile parts, e.g. switches, rechargeable batteries or parts made of glass.
This warranty expires if the product is damaged, not used as intended or not serviced. For the proper operation of the product, all instructions listed in the operating instructions must be observed carefully. Any form of use and handling that is advised against in the operating instructions or warned against must always be avoided.
The product is only intended for private and not for commercial use. In the case of incorrect and improper treatment, use of force and interventions not performed by our authorised Service Centre, the warranty shall cease.
Handling in case of a warranty claim
In order to ensure prompt processing of your matter, please observe the following notes:
Please keep the article number IAN:93143 and the purchase receipt as a purchase verification for all inquiries.
- If faulty operation or other defects occur, first contact the Service Centre listed in the following by telephone or email.
- Then, you are able to send a product reported as defective free of charge to the service address specified to you, including the purchase receipt and the information on the defect and when it occurred.

Please visit www.lidl-service.com to download this and many other manuals, product videos and software.

Service Centre
GB Service Great Britain Tel.:08715000720 (E 0.10/Min.) E-Mail: hoyer@lidl.co.uk
IE Service Ireland Tel.: 1890 930 034 (0,08 EUR/Min., (peak)) (0,06 EUR/Min., (off peak)) E-Mail: hoyer@lidl.ie
IAN:93143

Supplier
Please note that the following address is no service address. First contact the aforementioned Service Centre.
6.1 Samling of citruspressen

FARE!
Chere cliente, cher client,