
SBT 1.5 A1 - Shaver SILVERCREST - Free user manual and instructions
Find the device manual for free SBT 1.5 A1 SILVERCREST in PDF.
| Product type | Bikini razor |
| Brand | SilverCrest |
| Model | SBT 1.5 A1 |
| Power supply | 1 AA 1.5 V battery (LR6, mignon) |
| Rotation speed | 4000 rpm |
| Protection rating | IPX5 (protected against water jets) |
| Protection class | III (very low voltage) |
| Skin illumination | Yes, integrated |
| Usage | Dry shaving of bikini area, private use |
| Recommended hair length | 1 mm to 5 mm |
| Cleaning | Washable head under running water, cleaning brush included |
| Maintenance | Can be disassembled for deep cleaning |
| Spare parts available | Razor heads (mint green or white) |
| Warranty | 3 years |
| Included accessories | Protective cap, cleaning brush, AA battery |
Frequently Asked Questions - SBT 1.5 A1 SILVERCREST
User questions about SBT 1.5 A1 SILVERCREST
0 question about this device. Answer the ones you know or ask your own.
Ask a new question about this device
Download the instructions for your Shaver in PDF format for free! Find your manual SBT 1.5 A1 - SILVERCREST and take your electronic device back in hand. On this page are published all the documents necessary for the use of your device. SBT 1.5 A1 by SILVERCREST.
USER MANUAL SBT 1.5 A1 SILVERCREST
MINI-RASIEREMINI SHAYERMINI-RASOIR SBT 1.5 A1
DE AT CH
MINI-RASIERER
Bedienungsanleitung
FR BE
MINI-RASOIR
Mode d'emploi
a
MINIATURNÍ HOLICÍ STROJEK
Návod k obsluze
PT
MINI-MAQUINA DE BARBEAR
Operating instructions
NL BE
MINI-SCHEERMES
Gebruiksaanwijizing
ES
MINIAFEITADORA
Before reading, unfold the page containing the illustrations and familiarise yourself with all functions of the device.
FR BE
KOMPERNASS HANDELS GMBH
BURGSTRASSE 21
DE-44867 BOCHUM
DEUTSCHLAND
www.kompernass.com
Introduction 20
Intended use 20
Package contents 20
Operating elements 21
Technical data 21
Safety instructions 22
Inserting the battery 26
Tips and tricks 26
Using the appliance 27
Cleaning and care 27
Removing and cleaning the shaving head 28
Dismantling the shaving head 28
Storage 30
Troubleshooting 30
Disposal. 31
Kompernass Handels GmbH warranty . . . . . . . . 3 1
Service 34
Impor ter 34
Ordering spare parts 35
Introduction
Congratulations on the purchase of your new appliance.
You have selected a high-quality product. The operating instructions are part of this product. They contain important information about safety, usage and disposal. Before using the product, please familiarise yourself with all operating and safety instructions. Use the product only as described and for the range of applications specified. Please also pass these operating instructions on to any future owner.
Intended use
This appliance is intended exclusively for use in domestic households and for shaving the bikini zone. It is not suitable for commercial use! The appliance is not intended for any other purpose, nor for use beyond the scope described.
Claims of any kind for damages resulting from misuse, improper repairs, unauthorised modifications or the use of unauthorised spare parts are excluded.
The risk shall be borne solely by the user.
Package contents
Mini Shaver
Protective cap
Cleaning brush
AA battery
Unpack all parts of the appliance from the packaging and remove all packaging material. Check the package for completeness and signs of visible damage.
NOTES
If the delivery is incomplete or damage has occurred as a result of defective packaging or during transport, contact the Service hotline (see section Service).
Operating elements
See fold-out page for illustrations:
1 Protective cap
2 Shaving head
3 Skin light
On/Off switch
5 AA battery
6 Battery compartment cover
7 Cleaning brush
Technical data
| Appliance | |
| Revolutions per minute 4000 | |
| Voltage supply 1 x 1.5 V, type | AA/LR6/Mignon |
| Voltage 1.5 V | = (DC) |
| Protection class | III/III |
| Protection type | IPX5 Protection against water jets from any direction |
Safety instructions
- Check the appliance for visible external damage before use. Do not operate a appliance which has been damaged or dropped.
DANGER! Do not allow children to play with the packaging material! Keep all packaging materials away from children. There is a risk of suffocation!
This appliance may be used by children aged 8 years and older and by persons with limited physical, sensory or mental capabilities or lack of experience and knowledge, provided that they are under supervision or have been told how to use the appliance safely and are aware of the potential risks. Children must not play with the appliance. Cleaning and user maintenance tasks may not be carried out by children unless they are supervised.
- Do not expose the appliance to direct sunlight or high temperatures. Otherwise it may overheat and be irreparably damaged.
DANGER! Do not operate the appliance close to naked flames (e.g. candles) and do not place burning cand les on or next to the appliance. This serves to prevent fires.
-
To avoid personal injury, do not use the appliance with a damaged or faulty attachment.
-
Switch the appliance off immediately if you hear any unusual noises, smell fumes or notice any smoke. Have the appliance checked by a qualified specialist before using it again.
-
All repairs must be carried out by authorised specialist companies or by the customer service department. Improper repairs may put the user at risk. It will also invalidate any warranty claims.
-
Do not make any unauthorised modifications or alterations to the appliance. This appliance may not be opened by the user.
The appliance is not suitable for wet shaving.
Can be cleaned under running water.
DANGER
Mishandling the battery can cause fires, explosions, leakages of dangerous materials or other hazards!
- Do not throw the battery into a fire and do not subject it to high temperatures.
- Never open, deform or short-circuit the battery, as this can lead to chemical leakages.
- Do not attempt to recharge the battery. Do not charge batteries unless they are explicitly labelled as "rechargeable". There is a risk of explosion!
DANGER
- Check the condition of the battery regularly. Leaking chemicals can cause permanent damage to the appliance. Special care should be taken when handling damaged or leaking batteries. Risk of acid burns! Wear protective gloves.
Chemicals that leak from a battery can cause skin irritation. In event of contact with the skin, rinse off with plenty of water. If the chemicals get into your eyes, rinse thoroughly with water, do not rub and consult a doctor immediately.
If you do not intend to use the appliance for a long time, re move the battery. - Keep the battery out of the reach of children. Children can put the battery into their mouth and swallow it. If a battery has been swallowed, seek medical assistance immediately.
Always insert the battery the right way round (observe correct polarity) otherwise there is a danger that it could burst.
Inserting the battery
1) Turn the battery compartment cover 6 in the opposite direction to the arrow until the marking on the battery compartment cover 6 points to the 4-arking on the housing.
2) Pull the battery compartment cover ⑥ off the housing.
3) Insert the AA battery ⑤ into the battery compartment with the positive terminal (+) first.
4) Place the battery compartment cover 6 back on the housing so that the marking on the battery compartment cover 6 points towards the marking on the housing. Turn the battery compartment cover 6 in the direction of the arrow until the marking on the battery compartment cover 6 points towards the marking on the housing.
Tips and tricks
NOTE
Do not use the appliance if...
-You have sunburn on the affected parts of the body.
-You have a skin irritation or redness.
-You have a skin disease such as neurodermatitis.
-You have pimps, moles or warts on the affected parts of the body.
- You have wounds or raised scars on the affected parts of the body.
Test the appliance on a small, unobtrusive spot first in order to establish skin compatibility.
The skin light 3 is used to illuminate the area being shaved and thus ensure an optimal result.
To make optimal use of the appliance, we recommend using it to shave hairs that are between approx. 1mm and 5mm .
Treat the skin with a peeling treatment or a massage glove before shaving. This helps remove dead skin cells, prevents ingrowing hairs and makes fine hair stand up. The appliance can cut the hair better this way.
After shaving, treat the skin with a moisturising lotion or cream. Ideally, use a cream containing aloe vera or camomile extracts to soothe and nourish the skin.
Using the appliance
CAUTION - PROPERTY DAMAGE!
The appliance is not suitable for wet shaving.
1) Remove the protective cap ① from the housing.
2) Push the On/Off switch 4 towards the I marking. The skin light 3 lights up.
3) Pull the skin taut with one hand.
4) Place the appliance perpendicular on the skin and move it over the skin in circular movements without exerting any pressure.
5) When you have finished the treatment, push the On/Off switch 4 in the direction of the O marking to switch off the appliance. The skin light 3 goes out.
6) Replace the protective cap 1 on the housing.
Cleaning and care
CAUTION - PROPERTY DAMAGE!
Never immerse the appliance in water or other liquids!
After each use, clean the shaving head 2 using the supplied cleaning brush 7 to remove loose hairs.
Disinfect the shaving head ② regularly by spraying and cleaning it with disinfectant spray.
■ Wipe the housing with a damp cloth. If required, use some mild detergent on the cloth. Ensure that the appliance is completely dry before the next use.
NOTE
If...
- the shaving result deteriorates noticeably,
- the shave takes much longer than usual,
- there is any visible damage on the shaving head ② , ... the shaving head ② needs to be replaced.
- You can order replacement shaving heads ② from our service department (see section "Ordering replacement parts").
Removing and cleaning the shaving head
To clean the shaving head ② thoroughly, you need to remove the shaving head ② from the housing:
1) Remove the protective cap (if fitted) from the housing.
2) Turn the shaving head ② in the opposite direction to the arrow until the Ⅰ marking on the shaving head ② points to the O marking on the housing.
3) Pull the shaving head 2 off the housing.
Clean the shaving head 2 using the supplied cleaning brush 7 and/or rinse the shaving head 2 under running water.
4) Dry off the shaving head ② thoroughly if necessary.
5) Also remove any remaining hairs using the cleaning brush 7.
6) Replace the shaving head 2 on the housing and turn the shaving head 2 in the direction of the arrow until the marking on the shaving head 2 points to the 0 marking on the housing.
7) Replace the protective cap 1 on the housing.
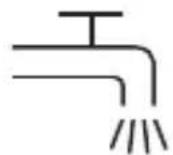
Dismantling the shaving head
You can also dismantle the shaving head ② if you want to clean it particularly thoroughly:
1) Remove the shaving head 2 as described in the section "Removing and cleaning the shaving head".
2) Press the parts of the cutting head out towards the open side of the shaving head housing A.
3) Clean the individual parts carefully under running water.
4) Leave the parts to dry thoroughly.
5) To re-assemble, insert the cutting head cover ⑧ into the shaving head housing ⑨ so that the indentations on the cutting head cover ⑩ slide into the catches on the inside of the cutting head cover ⑪ (see fig. 1).
Fig. 1
6) Place the rotating blades centred into the cutting head cover A so that the rotating blades rest against the cutting head cover B
7) Push the connecting piece D into the cutting head housing A The protruding spacer of the connecting piece must point towards you (see fig. 1). Ensure that the indentations on the cutting head cover slide into the catches on the inside of the cutting head cover A.
8) Push the connecting piece ① firmly downwards so that it clicks into place and sits tightly.
9) Replace the shaving head 2 on the housing and turn the shaving head 2 in the direction of the arrow until the marking on the shaving head 2 points to the marking on the housing.
10) Replace the protective cap ① on the housing.
Storage
Always protect the shaving head 2 with the supplied protective cap 1.
Store the appliance in a dry and dust-free location.
Troubleshooting
The appliance is not working:
Replace the battery.
The appliance is defective. Contact the Customer Service department. Not all hairs are plucked:
■ You are working too fast. Move the appliance over your skin slowly.
Disposal
Never dispose of the applianc mal domestic waste.
This product is subject to the provisions of the European WEEE (Waste Electrical and Electronic Equipment) Directive 2012/19/EU.
Dispose of the appliance via an approved disposal company or your municipal waste facility. Please observe the currently applicable regulations. Please contact your waste disposal facility if you are in any doubt.
The packaging is made of environmentally friendly material and can be disposed of at your local recycling centres.
Disposal of (rechargeable) batteries
Used batteries must not be disposed of in the household waste. Consumers are legally obliged to dispose of batteries at a collection point in their community/city district or at a retail store.
The purpose of this requirement is to ensure that batteries are disposed of in an environmentally friendly manner. Only dispose of batteries or rechargeable batteries when they are fully discharged.
This appliance has a 3-year warranty valid from the date of purchase. If this product has any faults, you, the buyer, have certain statutory rights. Your statutory rights are not restricted in any way by the warranty described below.
Warranty conditions
The validity period of the warranty starts from the date of purchase. Please keep your original receipt in a safe place. This document will be required as proof of purchase.
If any material or production fault occurs within three years of the date of purchase of the product, we will either repair or replace the product for you at our discretion. This warranty service is dependent on you presenting the defective appliance and the proof of purchase (receipt) and a short written description of the fault and its time of occurrence.
If the defect is covered by the warranty, your product will either be repaired or replaced by us. The repair or replacement of a product does not signify the beginning of a new warranty period.
Warranty period and statutory claims for defects
The warranty period is not prolonged by repairs effected under the warranty. This also applies to replaced and repaired components. Any damage and defects present at the time of purchase must be reported immediately after unpacking. Repairs carried out after expiry of the warranty period shall be subject to a fee.
Scope of the warranty
This appliance has been manufactured in accordance with strict quality guidelines and inspected meticulously prior to delivery.
The warranty covers material faults or production faults. The warranty does not extend to product parts subject to normal wear and tear or fragile parts such as switches, batteries, baking moulds or parts made of glass.
The warranty does not apply if the product has been damaged, improperly used or improperly maintained. The directions in the operating instructions for the product regarding proper use of the product are to be strictly followed. Uses and actions that are discouraged in the operating instructions or which are warned against must be avoided.
This product is intended solely for private use and not for commercial purposes. The warranty shall be deemed void in cases of misuse or improper handling, use of force and modifications / repairs which have not been carried out by one of our authorised Service centres.
Warranty claim procedure
To ensure quick processing of your case, please observe the following instructions:
Please have the till receipt and the item number (e.g. IAN 12345) available as proof of purchase.
- You will find the item number on the type plate, an engraving on the front page of the instructions (bottom left), or as a sticker on the rear or bottom of the appliance.
If functional or other defects occur, please contact the service department listed either by telephone or by e-mail.
You can return a defective product to us free of charge to the service address that will be provided to you. Ensure that you enclose the proof of purchase (till receipt) and information about what the defect is and when it occurred.
You can download these instructions along with many other manuals, product videos and software on www.lidl-service.com.
Service

Service Great Britain
Tel.: 0871 5000 720 (£ 0.10/Min.)
E-Mail:
kompernass@lidl.co.uk

Service Ireland
Tel.: 1890 930 034
(0,08 EUR/Min., (peak))
(0,06 EUR/Min., (off peak))
E-Mail: kompernass@lidl.ie
IAN 282641
Importer
Please note that the following address is not the service address. Please use the service address provided in the operating instructions.
KOMPERNASS HANDELS GMBH
BURGSTRASSE 21
DE-44867 BOCHUM
GERMANY
www.kompernass.com
Ordering spare parts
You can order the following replacement parts for the product SBT 1.5 A1:
1 x shaving head (mint green)
1 x shaving head 2 (white)
Order the replacement parts via the service hotline (see section "Service") or simply visit our website at www.kompernass.com.

NOTE
- Have the IAN number of the appliance ready (can be found on the cover of these operating instructions) when you place your order.
Table des matieres
Introduction 38
Chere cliente, cher client,
KOMPERNASS HANDELS GMBH
BURGSTRASSE 21
DE-44867 BOCHUM
ALLEMAGNE
www.kompernass.com
Commander des pieces de rechange
KOMPERNASS HANDELS GMBH
BURGSTRASSE 21
DE-44867 BOCHUM
DUITSLAND
www.kompernass.com
POZOR - HMOTNÉŠKODY!
POZOR - HMOTNÉ SKODY!
KOMPERNASS HANDELS GMBH
BURGSTRASSE 21
DE-44867 BOCHUM
NÉMECKO
www.kompernass.com
- Nunca tire la pila al fuego ni la exponga a altas temperatas.
No abra la pila, ni la deformme ni cortocircuite, ya que podria producirse una fuga de sustancias químicas.
No intente volver a pagar la pila. SoloSEOSEOSEOSEOSEOSEOSEOSEOSEOSEOSEOSEOSEOSEOSEOSEOSEOSEOSEOSEOSEOSEOSEOSEOSEOSEOSEOSEOSEOSEOSEOSEOSEOSEOSEOSEOSEOSEOSEOSEOSEOSEOSEOSEOSEOSEOSEOSEOSEOSEOSEOSEOSEOSEOSEOSEOSEOSEOSEOSEOSEOSEOSEOSEOSEOSEOSEOSEOSEOSEOSEOSEOSEOSEOSEOSEOSEOSEOSEOSEOSEOSEOSEOSEOSEOSEOSEOSEOSEOSEOSEOSEOSEOSEOSEOSEOSEOSEOSEOSEO SEOEO SEOEO SEOEO SEOEO SEOEO SEOEO SEOEO SEOEO SEOEO SEOEO SEOEO SEOEO SEOEO SEOEO SEOEO SEOEO SEOEO SEOEO SEOEO SEOEO SEOEO SEOEO SEOEO SEOEO SEOEO SEOEO SEOEO SEOEO SEOEO SEOEO SEOEO SEOEO SEOEO SEOEO SEOEO SEOEO SEOEO SEOEO SEOEO SEOEO SEOEO SEOEO SEOEO SEOEO SEOEO SEOEO SEOEO SEOEO SEOEO SEOEO SEOEQ SEOEO SEOEQ SEOEQ
PELIGRO
KOMPERNASS HANDELS GMBH
BURGSTRASSE 21
DE-44867 BOCHUM
ALEMANIA
www.kompernass.com
Pedido de recambios
KOMPERNASS HANDELS GMBH
BURGSTRASSE 21
DE-44867 BOCHUM
ALEMANHA
www.kompernass.com
KOMPERNASS HANDELS GMBH
BURGSTRASSE 21
DE-44867 BOCHUM
GERMANY
www.kompernass.com