
Nespresso Atelier XN8908 - Coffee machine KRUPS - Free user manual and instructions
Find the device manual for free Nespresso Atelier XN8908 KRUPS in PDF.

| Product type | Automatic coffee machine with integrated milk frother |
| Brand | Krups |
| Model | Nespresso Atelier XN8908 |
| Pump pressure | 19 bars |
| Dimensions (L x H x D) | 11.9 x 27.9 x 43.4 cm |
| Power supply | 220-240 V, 50-60 Hz |
| Power | 1260 W (estimated) |
| Water tank | Capacity not specified, approximately 1 L (estimated) |
| Capsule container | Capacity not specified |
| Preset functions | Ristretto, Espresso, Lungo, Hot Milk Foam, Cold Milk Foam, Cappuccino, Latte Macchiato, Mocha, Iced Frappé |
| Customization | Programmable coffee volume (Ristretto 15-35 ml, Espresso 35-70 ml, Lungo 70-150 ml) |
| Milk frother | Removable whisk frother, dishwasher safe |
| Water hardness adjustment | 4 levels (0 to 4) via test strip |
| Automatic shut-off | Adjustable: 3 min, 9 min (factory) or 3 h |
| Alarms | Descaling alert (flashing then steady with lock) and frother cleaning alert |
| Daily maintenance | Cleaning the drip tray, capsule container, water tank; cleaning the frother after each use |
| Descaling | Required with Nespresso product approximately every 300 coffees or upon alert |
| Included accessories | VIEW Nespresso mug 270 ml, frother whisk, water hardness test strip, recipe booklet |
| Safety | Automatic shut-off, anti-scale protection, hot surface indicator, shut-off in case of failure |
| Warranty | 2 years (parts and labor) |
Frequently Asked Questions - Nespresso Atelier XN8908 KRUPS
User questions about Nespresso Atelier XN8908 KRUPS
0 question about this device. Answer the ones you know or ask your own.
Ask a new question about this device
Download the instructions for your Coffee machine in PDF format for free! Find your manual Nespresso Atelier XN8908 - KRUPS and take your electronic device back in hand. On this page are published all the documents necessary for the use of your device. Nespresso Atelier XN8908 by KRUPS.
USER MANUAL Nespresso Atelier XN8908 KRUPS
natural_image
Line drawing of a portable electronic device with a base, top, and side ports (no text or symbols)
. Ma machine
ATELIER
MY MACHINE\*
KRUPS
NESPRESSO®
| EN Instruction manual | FR Guide de l'utilisateur | 2 |
| DE Bedienungsanleitung | IT Istruzioni per l'uso | 36 |
| ES Manual de instrucciones | PT Manual de Instruções | 70 |
| NL Gebruikershandleiding | GR Еүхειρίδιο Оδηγιών | 104 |
| RU Руководство по эксплуатации | 139 | |
Specifications/Specification
| ~ | 220-240V~1250-1500 W | Frequency (Hz): 50-60 HzProtection class: Class I | |
| Pmax | Max 19 bar | ||
| ~ 4.5 kg | |||
| 1.0 L | |||
| 11.9 cm | 27.9 cm | 48.4 cm | |
Table of Contents / Table des matières
Unplug the damaged power cord

Caution: hot surface

CAUTION: when this symbol appears, please consult the safety instructions to prevent any hazard and potential damage.

INFORMATION: when this symbol appears, please acquaint yourself with the advice for using your machine in an appropriate, safe manner.

CAUTION: these safety instructions are an integral part of the machine. Read them carefully before using your new machine for the first time. Keep them in an easy-to-find place where you can refer to them at a later stage.
- This machine is designed to prepare drinks according to these instructions. Only use the machine for its intended purposes.
- This machine was only designed for indoor use, under non-extreme temperature conditions.
- Protect your machine from direct sunlight, water splashes and humidity.
-
This machine is only intended for household use. It is not designed to be used in staff kitchens in shops, offices and other work environments, farms; for use by patrons of hotels, motels and other bed and breakfast-type residential environments.
-
This machine may be used by children 8 years and up under adult supervision, provided that they have received instructions for the safe use of the machine and they have been made fully aware of the risks involved. Cleaning and maintenance of the machine must not be performed by children, unless they are under adult supervision.
- Ensure that children under 8 years of age do not have access to the machine or to its power cord.
- This machine can be used by persons with reduced physical, sensory or mental abilities or lack of experience and knowledge,
provided that they are supervised or have been instructed on the safe use of the machine and that they fully understand the hazards involved.
- This device is not intended for use by persons (including children) with reduced physical, sensory or mental capabilities, or lack of experience and knowledge, unless they have been given supervision or prior instruction concerning use of the machine by a person responsible for their safety.
- Ensure that children do not play with the machine.
• Children should be supervised to ensure that they do not play with the
machine.
- In the event of commercial use or inappropriate usage or handling, the manufacturer disclaims all liability and the warranty will not apply, as well as for damage resulting from unsuitable use, improper use, repairs performed by individuals who have not been trained to do so or failure to observe the instructions.
Avoid risks of fatal electric shock and fire
- In the event of an emergency: immediately unplug the machine from the electrical outlet.
- Only plug the machine into suitable outlets that
are easily accessible and earthed. When using an adaptor, ensure that it provides a connection that is properly earthed. Ensure that the voltage of the power supply is identical to the one indicated on the rating plate. Any use of an unsuitable electrical connection will lead to the cancellation of the warranty.
The machine must only be plugged in once it is set up.
- Do not pull the power cord over sharp edges, and be sure to attach it or to let it hang freely.
- Keep the power cord away from all sources of heat and humidity.
- If the power cord or outlet are damaged, they must be replaced by the manufacturer, the service agent or individuals who have identical qualifications, in order to prevent any risk.
- Do not operate the machine if the cord or outlet are damaged. Return the
machine to Nespresso or to an authorised Nespresso retailer.
- Where the use of an extension cord is required, only use an earthed power cord, whose conductor has a cross-section of at least 1.5 mm ^2 or matching input power.
- To prevent all hazards, never place the machine on or near hot surfaces such as radiators, cooking plates, ovens, gas burners, open flame or all other similar heat sources.
- Always place the machine on a stable, level and flat surface. The surface must be resistant to heat and liquids such as water, coffee, descaling product or any other similar liquid.
- During use, never place the machine in a piece of furniture.
- In the event of a prolonged period of non-use, unplug the machine from the electrical outlet.
-
Unplug the machine by pulling on the plug rather than the power cord to prevent damage to the cord.
-
Prior to cleaning and maintaining your machine, unplug it from the electrical outlet and let it cool.
- To unplug the machine, cancel the preparation, then remove the plug from the electrical outlet.
- Never touch the power cord with wet hands.
- Never immerse the machine, in whole or in part, in water or in any other liquids.
- Never wash the machine or its components in a dishwasher, except for the milk frother and the capsule container.
- The simultaneous presence of electricity and water is dangerous and may cause fatal electrical shocks.
- Do not open the machine. Dangerous voltage contained inside the machine!
- Never place anything other than a coffee capsule in the opening intended for this purpose. To do so would risk causing a fire or fatal electrical shocks!
- The use of accessories not recommended by the
manufacturer may cause a fire, electrical shock or injury.
Prevent damage that may be caused by the machine's use.
- Never leave your machine unsupervised while it is in operation.
- Do not use the machine if it is damaged, if it has fallen or if it does not work perfectly. Immediately unplug it from the electrical outlet. Contact Nespresso or an authorised Nespresso retailer to repair or adjust your machine.
- Damaged machine may cause electrical shocks, burns and fires.
- Always fully close the lever and never lift it while the machine is in operation. Burns may occur.
- Do not put your fingers under the coffee outlet or the milk frother connection; this can pose a burn hazard.
-
Do not put your fingers in the capsule compartment or in the capsule container. This poses an injury hazard.
-
Do not touch the surfaces that become hot during or after a preparation or descaling: the coffee outlet, the milk frother and the milk frother connection.
- To prevent injury, do not use the milk frother without a glass.
• To prevent injury, do not touch the milk frother while it is spinning. - When a capsule has not been perforated by the blades, water may flow around a capsule and damage the machine.
- Never use a used, damaged or misshapen capsule.
- If a capsule is blocked in the capsule compartment, turn off the machine and unplug it prior to performing any operation. Call Nespresso or an authorised Nespresso retailer.
• Always fill the water tank with cold, drinking water. -
Empty the water tank if the machine is not used for an extended period (holidays, etc.).
-
Replace the water in the water tank when the machine is not used for a week-end or a similar length of time.
- Do not use the machine without the drip tray and drip grid to prevent liquid from spilling onto surrounding surfaces.
- Never clean your machine using a cleaning product or solvent. Use a soft, non-abrasive, damp cloth and a gentle detergent to clean the surface of your machine.
- To clean the machine, only use clean material.
- This machine is designed for Nespresso coffee capsules exclusively available via Nespresso or your authorised Nespresso retailer.
- All Nespresso machines are subject to strict controls. Reliability tests, performed under real usage conditions, are conducted at random on selected units. Some machines may therefore present signs of prior use.
- Nespresso reserves the right to modify this user manual without prior notice.
Descaling
- When used correctly, the Nespresso descaling product will ensure the proper operation of your machine throughout its service life and an optimal tasting experience, cup after cup.
- The Nespresso descaling product is specially designed for Nespresso machines; the use of any other unsuitable product would risk damaging the machine's components or provide insufficient descaling.
- Your Nespresso machine determines the moment when descaling is required, based on the quantity of water used and your water's hardness level. This level is defined during the first use by means of the water hardness test stick. Consider performing a new water hardness test if you are using your machine in another region or country.
- Descale your machine as soon as it indicates that this is required. If you perform the operation too late, descaling may not be completely effective.
- Descaling is mandatory when the machine indicates that this is required (blinking "Descaling" alert indicator light). To protect your machine's internal components, if descaling is not performed, after a few cycles, the "Descaling" alert indicator light lights up steadily and the machine locks itself until the descaling is performed.
• Perform descaling according to the instructions
Send them to any new user of the machine.
This user manual is available in PDF format on nespresso.com
KEEP THESE
INSTRUCTIONS
Tasting Box of Nespresso Capsules
Water Hardness Test Stick, in the User Manual
Milk frother and descaling information
With the Nespresso Original system, you're invited to enjoy the essence of an espresso, with or without milk. Inspired by the Italian coffee tradition, it's a timeless experience at the touch of a button. The Nespresso Original machines and capsules offer an array of aromas to fit all coffee tastes. Espresso or lungo, black or in a recipe, always layered with a soft crema or an indulgent foam. This is only made possible thanks to the 19-bar pressure in every machine. It extracts the optimal flavours from each capsule, to reveal them in your cup.
Nespresso Original, classic in its own way.
L'EXPÉRIENCE D'UN ESPRESSO CLASSIQUE
CAUTION: when this symbol appears, please consult the safety instructions to prevent any potential hazard and damage.

INFORMATION: when this symbol appears, please acquaint yourself with the advice provided to ensure safe, compliant use of your machine.

First, read the safety instructions to prevent hazards of fatal electrical shock and fire.
- Only plug the machine into suitable outlets that are easily accessible and earthed. When using an adaptor, ensure that it provides a connection that is properly earthed. Ensure that the voltage of the power supply is the same as the one indicated on the rating plate. The use of an unsuitable electrical connection voids the warranty.
- Where the use of an extension cord is required, only use an earthed power cord, whose conductor has a cross-section of at least 1.5 ~mm^2 .

As long as the machine has not completed the priming, it will not produce any coffee.
Descaling is mandatory when the machine indicates that this is required (blinking "Descaling" alert indicator light). If descaling is not performed, after 30 cycles, the "Descaling" alert indicator light lights up steadily and the machine locks itself until the descaling is performed.

natural_image
Exploded view diagram of a mechanical device with numbered components (no text or symbols)When unpacking the machine, place it on a horizontal, stable, uncluttered work surface. Remove the water tank, drip tray, drip base and capsule container. Remove the milk frother from its storage.
natural_image
Technical line drawing of a mechanical component with no visible text or symbols② Position the cord to the right or left of the machine (according to your preference) by using the housing intended for this purpose under the machine.
3 Plug the machine into the mains.
First use or after a long period of non-use /
text_image
Technical diagram of a mechanical device with numbered components, likely a pump or motor assembly.5 Place the water tank on its base, then insert the capsule container and the drip tray. Place the milk frother.
Refer to the "Assembly/Disassembly of the milk frother" paragraph.
6 Tum on the machine by pressing one of the 9 keys for 1 second.
7 The 9 recipes keys blink. The machine is in startup mode. If only 3 keys are blinking, check that the milk frother is properly inserted.
natural_image
Line drawing of a hand mixer with a container, no text or symbols present8 Place a container (600 ml) under the head. Placez un récipient (600ml) sous la tête.
9 Lift the lever and leave it in an open position.
⑪ Priming is completed. Lower the lever.
Light will blink while the machine is heating up. Steady light indicates the machine is ready for rinsing.
text_image
Diagram of a coffee maker with control panel and labeled ports, showing a container and base unit.This step consists of defining the water hardness (i.e. the limestone level) so that the machine personalises how frequently descaling is performed. The water hardness level can be tested with the water hardness stick available on the first page of the user manual. The water hardness is set at 4 by factory default.
Wet it in the water that you will be using. Analyse the water hardness level using the water hardness table.
① Turn on the machine by pressing one of the 9 keys for 1 second.
text_image
3 sec. + - cold team + - large + - hot team + - cold team + - large module + - cold team + - cold team + - cold team + - cold team + - cold team + - cold team + - cold team + - cold team + - cold team + - cold team + -② Simultaneously press the Cold Foam + Mocha keys for 3 seconds: the "Descaling" and "Clean" alert indicator lights light up and the Lungo, Hot Foam, Cold Foam, Espresso and Latte Macchiato keys blink.
3 Press the key that matches the hardness measured. The key blinks 3 times to confirm the new selected value.
④ The machine automatically exits from the Water Hardness Setting Menu mode.
NOTE: the Water Hardness Setting Menu mode deactivates after 15 seconds of inactivity.
Never lift the lever during operation and refer to the important safeguards to avoid possible harm when operating the appliance.

① Turn on the machine by pressing one of the coffee keys (Ristretto, Espresso, Lungo)
2 Lift the lever completely and insert a capsule.
natural_image
Three-panel line drawing of a coffee maker with cups and a cup, showing different mechanical setups (no text or symbols)4 Adjust the position of the drip tray according to your cup. Make sure the drip tray is properly placed.
5 Press the Ristretto, Espresso or Lungo key. The selected key blinks while the coffee is flowing and lights up steadily once the recipe is done. The preparation will stop automatically. To stop the coffee flow at any time, press the selected recipe key again.
To top up your coffee, press the selected recipe again.
6 Once preparation done, take the cup. Lift and close the lever to eject the capsule.
NOTE: while the machine turns on, you may press any coffee key. The coffee will automatically flow as soon as the machine is ready.
natural_image
Illustration of a modern coffee maker with control panel and side arm (no text or symbols)natural_image
Side-by-side line drawing showing a hand using a blender to press food into a bowl, next to a separate device labeled 'MAYA' (no text or symbols on the device itself)text_image
Diagram illustrating a hand holding a small object, interacting with a device and its control panel, alongside a close-up of the device's internal structure.For perfect foam, use refrigerated UHT or pasteurized milk skimmed or semi-skimmed (approximately 4°C).
You can use soy, almond or oat drink for your milk preparations.
The volume of milk foam depends on the nature of the milk used, its temperature, the cup and the position of the milk frother in the mug.
It is required to clean the milk frother after each recipe. Refer to the "Daily Maintenance" paragraph.
For the recipes using ice cubes, pieces of chocolates, ensure that they do not impede the milk frother's motion during the preparation of the recipe.
When positioning the milk frother in your mug, ensure that it is not in contact with the sides or bottom of your mug.
To prevent any overflow, it is strongly recommended to respect the following instructions.
For perfect results when making your milk-based recipe, it is recommended to use the Nespresso View Mug (270 ml) found in the box and available in your Nespresso boutique.
natural_image
Line drawing of a espresso machine with a lid and control panel (no text or symbols)① Lift up the head using the handle and place the milk frother.
Refer to the "Assembly/Disassembly of the milk frother" paragraph.
text_image
Diagram showing a hand using a device to press or<|rotate_right|> a coffee cup, with Chinese labels indicating 'small' and 'large'.2 Put the ingredients and the milk according to the recipe you want to prepare in your VIEW mug (see the recipes page). Place it under the head and lower the head until the milk frother is immersed.
3 Only when preparing a milk recipe with coffee, completely lift the lever and insert a capsules. Close the lever.
4 Press the recipe key. The milk frothing starts automatically. The selected recipe key blinks slowly while it is being prepared.
5 Only when preparing a recipe with coffee: once the milk frothing is done, the coffee will automatically flow.
The Espresso key lights up at the end of the preparation for top up your coffee.
6 Once the preparation is completed, the "Clean" indicator light lights up orange. Lift up the head, remove the milk frother by means of its grip area. The "Clean" indicator light turns off. Clean the milk frother by diswashing or hand washing. Put the milk frother back in its housing.
i Be sure to wait for the end of the preparation and the "Clean" indicator light to light up before handling the milk frother. It is important to take the milk frother by its grip area intended for this purpose because the milk frother may be hot after completion of preparation.
⑦ Take the cup. Lift and close the lever to eject the capsule when preparing a recipe with coffee.
flowchart
graph LR
    A["Beaker with lid"] --> B["Printer"]
    B --> C["Two coffee cups serving out"]
    B --> D["Two coffee cups serving out"]

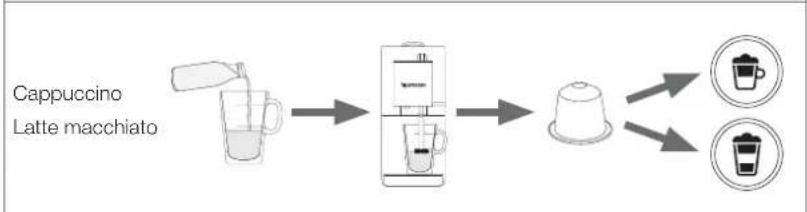
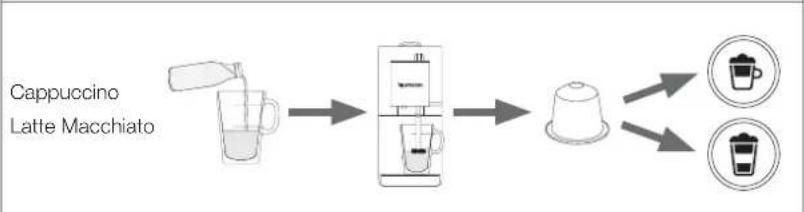
flowchart
graph LR
    A["Cappuccino Latte macchiato"] --> B["Blends with liquid"]
    B --> C["Printer"]
    C --> D["Donut with coffee cup icon"]
    C --> E["Donut with coffee cup icon"]

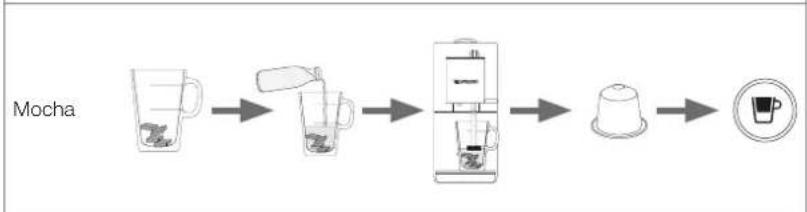
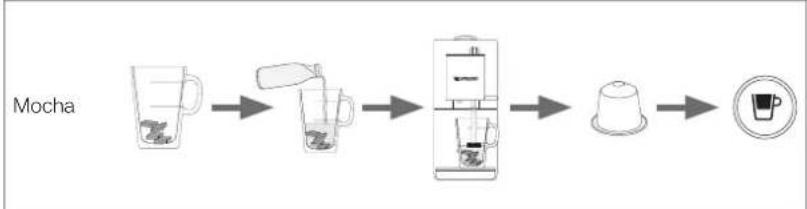
flowchart
graph LR
    A["Mocha"] --> B["Step 1: Round-over cup with coffee cup"]
    B --> C["Step 2: Round-over cup with coffee cup"]
    C --> D["Step 3: Round-over cup with coffee cup"]
    D --> E["Final Product: Round-over cup with coffee cup"]
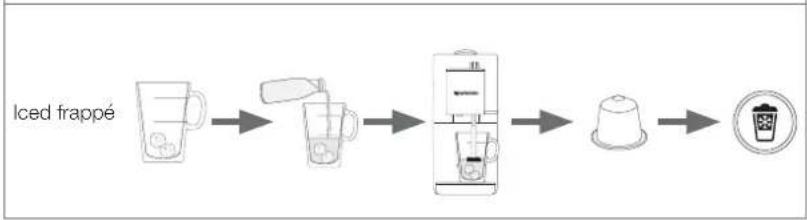
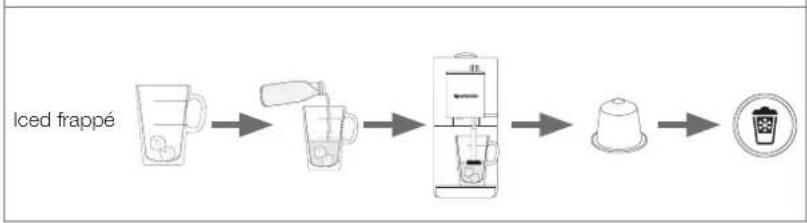
flowchart
graph LR
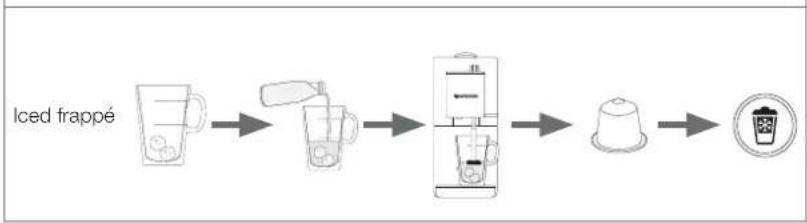
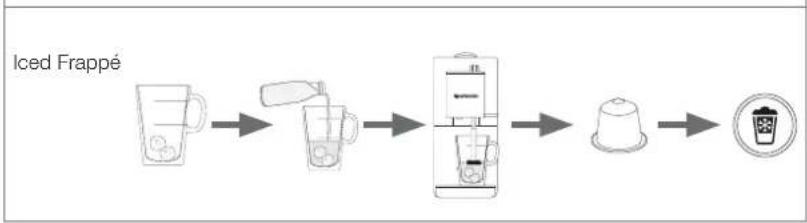
A["Iced frappé"] --> B["Drain"]
B --> C["Recovery into machine"]
C --> D["Ordering"]
D --> E["Product with coffee cup icon"]
For perfect foam, use refrigerated UHT or pasteurized milk skimmed or semi-skimmed (approximately 4°C).
You can use soy, almond or oat drink for your milk preparations.
The volume of milk foam depends on the nature of the milk used, its temperature, the cup and the position of the milk frother in the cup.
It is required to clean the milk frother after each recipe. Refer to the "Daily Maintenance" paragraph.
For the recipes using ice cubes, pieces of chocolates, ensure that they do not impede the milk frother's motion during the preparation of the recipe.
When positioning the milk frother in your cup, ensure that it is not in contact with the sides or bottom of your cup.
To prevent any overflow, it is strongly recommended to respect the following instructions.
text_image
Image showing a ruler with measurement markings and tick marks for measurement reference.① Lift the head of the machine and place the milk frother.
Refer to the "Assembly/Disassembly of the milk frother" paragraph.
3 Put in your cup the ingredients and the milk according to the recipe that you want to prepare, place it under the head of the machine and lower it.
natural_image
Three-panel line drawing showing a mechanical component with bolts and a base, no text or symbols present.② Put the drip tray on the high position. If your mug is too tall to fit under the head of the machine, place the drip tray in the low position or remove the drip tray.
5 Only when preparing a milk recipe with coffee, completely lift the lever and insert a capsules. Close the lever.
6 Press the recipe key. The milk frothing starts automatically. The selected recipe key blinks slowly while it is being prepared.
8 Once the preparation is complete, the "Clean" indicator light lights up orange. Lift up the head, remove the milk frother by means of its grip area. The "Clean" indicator light turns off. Clean the milk frother.
Be sure to wait for the end of the preparation and the "Clean" indicator light to light up before handling the milk frother. It is important to take the milk frother by its grip area intended for this purpose because the milk frother may be hot after completion of a preparation.
text_image
descalling lung hot foam① Turn on the machine by pressing one of the coffee keys (Ristretto, Espresso, Lungo)
natural_image
Illustration of a mechanical device with multiple ports and a central component (no visible text or symbols)② Lift the lever completely and insert a capsule.
③ Close the lever and place a cup under the coffee outlet.
natural_image
Line drawing of a hand using a portable device to press or install a cup (no text or symbols visible)4 Press and hold the Ristretto, Espresso or Lungo key. Release the key as soon as the desired volume is reached.
5 The programmed key blinks rapidly 3 times to confirm the new setting. The coffee volume level is now stored.
NOTE: We recommend that you maintain the factory settings for Ristretto, Espresso and Lungo to ensure the best results in your cup for all our black coffees.
① Turn on the machine by pressing one of the coffee keys (Ristretto, Espresso, Lungo).
② Simultaneously press the Lungo and Mocha keys for 3 seconds to activate the Factory Settings Menu. The Lungo and Mocha keys blink 3 times.
3 The factory settings are restored. The machine automatically exits from the Factory Settings Menu mode.
① Turn on the machine by pressing one of the coffee keys (Ristretto, Espresso, Lungo)
text_image
3 sec. Hand Clean Clean Hand Clean Clean Hand Clean Clean Hand Clean Clean Hand Clean Clean Hand Clean Clean Hand Clean Clean Hand Clean Clean Hand Clean Clean Hand Clean Clean Hand Clean Clean Hand Clean Clean Hand Clean Clean Hand Clean Clean Hand Clean Clean Hand Clean Clean Hand Clean Clean Hand Clean4 The programmed key blinks 3 times to confirm the new selected value.
3 Press one of the Hot Foam, Latte Macchiato and Cappuccino keys to select the desired automatic power off time. You have 15 seconds to program the desired value by pressing the corresponding key.
5 The machine automatically exits from the Automatic Power Saving Setting Menu mode. NOTE: the Automatic Power Saving Setting Menu mode deactivates after 15 seconds of inactivity.
natural_image
Technical line drawing of a mechanical device with ports and components (no text or symbols)① Lift and close the lever to eject the capsule. Remove the milk frother.
natural_image
Illustration of a hand using a blender to generate granular material (no text or symbols visible)② Gently pull on the drip tray to remove the drip base and the capsule container at the same time. Empty them, rinse them using drinking water, dry them using a clean, damp cloth, then put them back in place.
text_image
Technical diagram of a portable coffee maker with labeled components and a magnified inset showing a cup and tray.3 Remove the water tank, fill it with fresh drinking water. Place a container under the coffee outlet (600 ml), press the Lungo key to rinse the machine.
natural_image
Line drawing of a hand using a digital water heater to press or install a product (no text or symbols visible)Descaling is mandatory when the machine indicates that this is required (steady "Descaling" alert indicator light). The machine locks itself until the descaling is performed.
Refer to the safety instructions

- To ensure the proper operation of your machine throughout its service life and to maintain a coffee experience as perfect as on its first day, we recommend the following instructions. Descaling is mandatory when the machine indicates that this is required (blinking "Descaling" alert indicator light). To protect your machine's internal components, if descaling is not performed, after 30 cycles, the "Descaling" alert indicator light lights up steadily and the machine locks itself until the descaling is performed.
- Your Nespresso machine determines the moment when descaling is required, based on the quantity of water used and your water's hardness level. This level is defined during the first use by means of the water hardness test stick. (Refer to "Water Hardness Setting").

The descaling process lasts approximately 25 minutes, including a 20-minute descaling cycle and a 5-minute rinse cycle.
During the descaling cycle, your presence is required, as you will be asked to perform several operations.

natural_image
Line drawing of a portable coffee machine with a coffee cup and stand (no text or symbols)② Lift and close the lever to eject the capsule.
③ Empty the drip tray, drip base and capsule container. Fill the water tank with 500 ml of fresh drinking water. Pour 1 pouch of Nespresso liquid descaling agent into the water tank.
text_image
Diagram showing a hand using a vacuum cleaner to press or install a component, with Chinese labels indicating components.6 To enter the descaling mode, simultaneously press the Lungo + Ristretto keys for 3 seconds. Both keys blink. To start the descaling program press the same keys again.
The "Descaling" alert indicator light stays lit orange during the entire descaling process.
Once in descaling mode, the procedure below must be fully performed so that the machine may return to the normal mode. Any interruption (stoppage of the machine, power outage, etc.) will return the machine to the start of the descaling phase.
natural_image
Line drawing of a mechanical device with a cylindrical component and a small container, no text or symbols present.text_image
descaping tunga water foam wood foam agreen time macrolates read frapped mushells appuccinate macha⑨ Rinse the water tank and completely fill it with fresh drinking water.
text_image
Decomuting Lunch Clean Lunch Lunch Lunch Lunch Lunch Lunch Lunch Lunch Lunch Lunch Lunch Lunch Lunch Lunch Lunch Lunch Lunch Lunch Lunch Lunch Lunch Lunch Lunch Lunch Lunch Lunch Lunch Lunch Lunch Lunch Lunch Lunch Lunch Lunch10 Press the Lungo + Ristretto keys again. Rinsing continues via the coffee outlet and the milk frother. The Lungo + Ristretto keys blink.
Once rinsing is done, the machine goes back to ready mode and the "Descaling" alert indicator light shuts off. Remove and store the milk frother in its housing. Fill the water tank with fresh drinking water.
natural_image
Line drawing of a hand operating a small industrial machine with a lid (no text or symbols visible)② Clean the machine using a damp cloth. You have completed the machine's descaling.
Priming, after emptying or unpriming /
natural_image
Line drawing of a hand using a digital device to press or install a small circular component (no text or symbols present)natural_image
Line drawing of a mechanical device with no visible text or symbolsnatural_image
Diagram of a mechanical device with a cylindrical component inserted into a container, showing internal structure (no text or symbols)3 Place a container (600 ml) under the head of the machine. Placez un récipient (600ml) sous la tête de la machine.
text_image
Meat lunch Hot foam cold foam expans margarote ced tea nutritus cappuccini mochanatural_image
Line drawing of a hand using a digital device to press or install a small component (no text or symbols visible)① Insert the milk frother. Turn on the machine by pressing one of the 9 keys for 1 second.
The milk frother must be inserted before starting the procedure.
natural_image
Technical line drawing of a mechanical device with cylindrical components and a base (no text or symbols)2 Remove the water tank. Lift the lever to eject the capsule. Leave the lever open. Place a container (600 ml) under the head.
text_image
3 sec. Clear Cold Pump Soil Pump Soil Pump Soil Pump Soil Pump Soil Pump Soil Pump Soil Pump Soil Pump Soil Pump Soil Pump Soil Pump Soil Pump Soil Pump Soil Pump Soil Pump Soil Pump Soil Pump③ Simultaneously press the Cold Foam + Ristretto keys for 3 seconds: both keys blink.
4 Simultaneously press the Cold Foam + Ristretto keys again.
Some steam may come out of the coffee outlet and milk frother during emptying.
6 Once emptying is done, both keys blink 3 times and the machine turns off automatically.
5 The keys blink softly and emptying is underway.
natural_image
Illustration of a hand using a small container to clean or wash material, with no visible text or symbols.⑦ Close the lever. Remove the container, milk frother, drip tray, capsule container and drip base. Clean them.
Videos are available via the Nespresso Mobile Application and on www.nespresso.com – Consult the "Services" section.
| No light on the keys and indicator lights. - Check the outlet, plug, voltage and fuse. | |
| - Turn on the machine by pressing one of the 9 keys for 1 second.- If the problem persists, call Nespresso. | |
| The "Descaling" alert blinks orange and the milk-based drinks keys work. | - Descaling is required: a few cycles remain before your machine locks itself. Descale the machine. |
| When you press the recipe key, it does not start and the "Descaling" alert, Lungo and Ristretto keys blink. | - The machine is in safety mode against scale; use is blocked. Descale the machine; refer to the "Descaling" paragraph. |
| During descaling, the Lungo + Ristretto keys blink and the "Descaling" indicator light remains lit. | - Your water tank is empty, but the descaling cycle is not completed. Rinse the water tank and completely fill it with fresh drinking water. Press the Lungo + Ristretto keys to resume the cycle. |
| The 9 keys blink quickly non-stop. | - The water tank is empty. Several recipes in a row were launched with no water in the water tank; the priming mode will be launched after pressing any key. Pour water in the water tank. Place the milk frother and a container under the head. Some water may come out of it after pressing a key. |
| The recipe key blinks rapidly during preparation. - The water tank is empty. Fill the water tank. | |
| The milk foam is insufficient. - | Use refrigerated skimmed or semi-skimmed milk (approximately 4°C).- Rinse the milk frother after each preparation.- Descale the machine (see the "Descaling" paragraph).- Refer to the paragraph "Milk recipe preparations".- Correctly center the cup relative to the machine.- Clean the milk frother connection. |
Milk-based recipes keys do not light up. - Set up the milk frother so that all keys light up.
| Milk overflows from the mug during preparation. - Refer to "Milk recipe preparations" paragraph prior to making milk-based preparations to adjust the quantity of milk or to choose a more suitable mug. | |
| The "Clean" alert is a steady orange light. - Remove the milk frother. Rinse it. | |
| The lever does not fully close. | - Empty the capsule container. Ensure that there are no capsules blocked in the capsule container. |
| Leakage around the capsule (water present in the capsule container). | - Properly insert the capsules. In the event of a leak, call Nespresso. |
| No coffee, no water. - The water tank is empty: fill it. | - Descale if necessary, see the "Descaling" paragraph. |
| The coffee flows very slowly. - The flow rate depends on the capsule type. | - Descale if necessary, see the "Descaling" paragraph. |
| No coffee, only water is flowing (despite having inserted a capsule). | - Call Nespresso. |
| The coffee is not hot enough. - Preheat the cup. | - Perform a rinse of the machine.- Descale if necessary, see the "Descaling" paragraph. |
| Cannot go to the Menu Mode (e.g. "Descaling" "Automatic Power Saving Setting"). | - Tum on the machine.- Ensure that you simultaneously press the keys for 3 seconds.- Plug/unplug the machine.- If the problem persists, call Nespresso. |
| Irregular blinking. | - Send the machine to the repair center or call Nespresso. |
| The 9 keys blink simultaneously for 10 seconds and the machine turns off. | - Breakdown Alarm: Arrange to have the machine repaired or call Nespresso. |
Dépannage


Your machine contains precious materials that may be recovered or recycled. The separation of the remaining waste into various categories, makes it easier to recycle the precious raw materials. For more information on waste disposal, contact local authorities.

For more information, in the event of a problem or to simply ask for advice, call the Nespresso Club. Nespresso Club contact information is presented in the "Welcome to Nespresso" holder in your machine's box or via www.nespresso.com
Krups guarantees this product against all material and manufacturing defects over a period of two years starting from the purchase date or delivery date. A proof or purchase is required to validate this guarantee. During this period, Krups will, at its discretion, repair or replace any defective product at no additional cost to its owner. The replacement products or repaired parts will be exclusively guaranteed for the non-expired portion of the initial guarantee or for six months, the actual duration being the longer of the two. This limited guarantee shall not apply to any defect resulting from an accident, inappropriate use of the machine, improper maintenance or normal wear and tear nor commercial use. Unless set out in current legislation, the conditions of this limited guarantee shall not exclude, restrict or modify the statutory legal rights pertaining to your purchase. For full details of the terms and conditions of this guarantee please visit: www.krups.com
If you consider your product to be defective, contact Nespresso for details regarding the address where it should be sent or brought for repairs. Please consult our website, www.nespresso.com, to learn more about Nespresso.
text_image
Technical diagram of a mechanical device with numbered components, likely a valve or pump assembly.natural_image
Technical line drawing of a mechanical component with no visible text or symbolstext_image
Technical diagram of a mechanical device with labeled components in Chinesenatural_image
Line drawing of a hand mixer with a container, no text or symbols presenttext_image
Diagram of a digital device with labeled ports and control panel, showing a 3D cube base and a zoomed-in view of the screen.natural_image
Three-panel line drawing of a coffee maker with cups and a cup, showing different mechanical setups (no text or symbols)natural_image
Line drawing of a hand washing machine with a side panel and a circular button (no text or symbols)natural_image
Illustration of a kitchen mixer and a digital stand mixer (no text or symbols visible)text_image
Diagram illustrating a hand holding a tool with an arrow indicating direction, alongside a device and a close-up of the device's internal structure.natural_image
Line drawing of a coffee maker with a stand mixer and tray (no text or symbols)text_image
Diagram showing a hand using a device to press or<|rotate_right|> a coffee cup, with Chinese labels indicating 'small' and 'large'.flowchart
graph LR
    A["Beaker with lid"] --> B["Filter"]
    B --> C["Coffee cup with teapot icon"]
    B --> D["Coffee cup with coffee cup icon"]
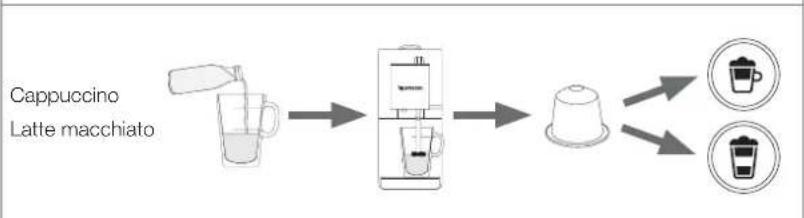
flowchart
graph LR
    A["Cappuccino Latte macchiato"] --> B["Chassis with liquid"]
    B --> C["Blender with teapot icon"]
    C --> D["White coffee bean with coffee cup icon"]
    C --> E["White coffee bean with coffee cup icon"]
flowchart
graph LR
    A["Mocha"] --> B["Teapot with teapot and cup"]
    B --> C["Boiler with steamer and cup"]
    C --> D["Coffee cup with coffee cup icon"]
flowchart
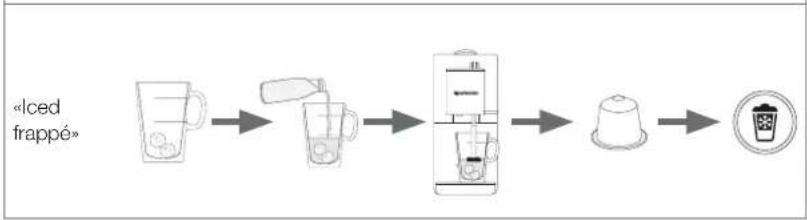
graph LR
    A["Iced frappé"] --> B["Drain"]
    B --> C["Recovery into machine"]
    C --> D["Ordering"]
    D --> E["Product with coffee cup icon"]
text_image
Ruler or scale image showing measurement markings with tick marks and numerical markings along both sides.natural_image
Three-panel line drawing showing a mechanical component with bolts and housing (no text or symbols)text_image
descaling lung hot foamnatural_image
Technical line drawing of a mechanical device with multiple ports and a central component (no text or symbols)natural_image
Line drawing of a hand using a digital device to press or install a coffee machine (no text or symbols visible)text_image
x3 descating lunganatural_image
Technical line drawing of a mechanical device with ports and components (no text or symbols)natural_image
Illustration of a hand using a blender to press a small container (no text or symbols visible)text_image
Technical diagram of a portable coffee maker with labeled components and a magnified inset showing a cup and a glass.natural_image
Line drawing of a hand using a digital water heater to press or install a product (no text or symbols visible)natural_image
Line drawing of a mechanical device with a base and sensor, no visible text or symbolstext_image
Diagram showing a hand using a machine to press or install a component, with Chinese labels indicating parts of the device.natural_image
Diagram of a mechanical device with a cylindrical component and a small container, no visible text or symbolsnatural_image
Line drawing of a hand operating a portable radio machine with a sensor array (no text or symbols)natural_image
Line drawing of a hand using a digital device to press or install a small circular component (no text or symbols present)natural_image
Diagram of a mechanical device with a cylindrical component inserted into a transparent container, showing internal structure (no text or symbols)natural_image
Line drawing of a mechanical device with no visible text or symbolstext_image
Bezzanine Lung Hot Foam Cold Foam Express late macarote Cond Pack Ferritate cappuccinol mochanatural_image
Line drawing of a hand using a digital device to press a small component (no text or symbols visible)natural_image
Technical line drawing of a mechanical device with ports and a base (no text or symbols)text_image
3 sec. Clean red green blue yellow white red green green green green green green green green green green green green green green green green green green green green green green green green green green green green green green green green green green green green green green green green green green green green green green green green green green Greennatural_image
Illustration of a hand using a griddle to press or clean a machine (no text or symbols visible)text_image
Technical diagram of a mechanical device with numbered components, likely a machine or pump assembly.natural_image
Technical line drawing of a mechanical component with no visible text or symbolstext_image
Technical diagram of a mechanical device with numbered components, likely for assembly or manufacturing documentation.natural_image
Line drawing of a hand mixer with a container, no text or symbols present⑧ Coloque un recipiente (600 ml) debajo del cabezal.
text_image
Diagram of a coffee maker with labeled components and a magnified view showing its internal components.text_image
3 sec. + - cold team + - large + - hot team + - cold team + - large module + - cold team + - cold team + - cold team + - cold team + - cold team + - cold team + - cold team + - cold team + - cold team + - cold team + -natural_image
Three-panel line drawing of a coffee maker with cups and a side view showing the same setup (no text or symbols)natural_image
Illustration of a modern coffee maker with control panel and side arm (no text or symbols)① Quite el depósito de agua. Retire o depósito da água.

② Saque el espumador de leche de su compartimento en la parte trasera de la cafetera. Retire o acessório cappuccino do compartimento situado na parte de trás da máquina.
natural_image
Side-by-side line drawing showing a hand using a blender to press food into a bowl, next to a separate device labeled 'MAYA' (no text or symbols on the device itself)text_image
Diagram illustrating a hand holding a small object, interacting with a device and its control panel, alongside a close-up of the device's internal structure.5 Levante el cabezal, quite el espumador de leche sujetándolo por el área de agarre, y el indicador «Clean» se apagará. Limpie el espumador de leche en el lavavajillas o a mano con detergente no agresivo/suave. Vuelva a colocar el espumador de leche en su compartimento. Levante o a cabeça de extração, retire o acessório cappuccino através da pega e a luz indicadora «Limpeza» apaga-se. Limpe o acessório cappuccino na máquina de lavar loiça ou à mão com detergente suave/delicado Volte a colocar o acessório cappuccino no seu compartimento.
natural_image
Line drawing of a espresso machine with a stand mixer and control panel (no text or symbols)text_image
Diagram showing a hand using a water dispenser to lift a cup, with Chinese labels indicating steps and directional arrows.flowchart
graph LR
    A["«Mocha»"] --> B["Add 2 cups into a cup"]
    B --> C["Add 1 cup into a blender"]
    C --> D["Add 1 cup with a coffee cup"]
    D --> E["Packaging with coffee cup icon"]
flowchart
graph LR
    A["«Iced frappé»"] --> B["Drain"]
    B --> C["Recovery into machine"]
    C --> D["Ordering"]
    D --> E["Product with coffee cup icon"]
text_image
Image showing a ruler with measurement markings and tick marks for length comparison.natural_image
Three-panel line drawing showing mechanical components with no visible text or symbolstext_image
descalling lung hot foamnatural_image
Illustration of a laboratory apparatus with labeled components (no text or symbols visible)natural_image
Line drawing of a hand using a digital device to press or install a coffee machine (no text or symbols visible)text_image
x3 descating lungatext_image
3 sec. Read Learn View View View View View View View View View View View View View View View View View View View View View View View View View View View View View View View View View View View View View View View View View View View View View View View View View View Currentnatural_image
Technical line drawing of a mechanical device with ports and components (no text or symbols)natural_image
Illustration of a hand using a blender to generate granular material (no text or symbols visible)text_image
Technical diagram of a portable coffee maker with labeled components and a magnified inset showing a cup and tray.natural_image
Line drawing of a hand using a self-service blender machine (no text or symbols visible)text_image
Diagram showing a hand using a vacuum cleaner to press or install a component, with Chinese labels indicating components.natural_image
Line drawing of a mechanical device with a cylindrical component and a small container, no text or symbols present.text_image
Densitling Loughs Red Tea Red Tea Agreen Tota macrolens Red frappled Rubella Supporting Mochatext_image
decontrolling lunge + clean hold foam expensive load Prapped nutratic tapplesing woodednatural_image
Line drawing of a hand using a portable coffee machine (no text or symbols visible)natural_image
Line drawing of a hand using a digital device to press or install a small circular component (no text or symbols present)natural_image
Line drawing of a mechanical device with no visible text or symbolsnatural_image
Diagram of a coffee machine with a cup and lid, showing mechanical components (no text or symbols)text_image
Hot Pot Lung Hot Foam Cold Pot Cotton Lemonia Margarine Red Juice Nutriture Cappuccinol Mochanatural_image
Line drawing of a hand using a digital device to press or install a small component (no text or symbols visible)natural_image
Technical line drawing of a mechanical device with cylindrical components and a base mount (no text or symbols)text_image
3 sec. Clear Airlock Water Free Roam Safe Mushroom Feed Piping Soda Cupplifier Cupplifier Balancenatural_image
Illustration of a hand using a griddle to press a cup with a container (no text or symbols visible)text_image
Technical diagram of a mechanical device with numbered components and Chinese labelsnatural_image
Technical line drawing of a mechanical component with no visible text or symbolstext_image
Technical diagram of a mechanical device with numbered components, likely for assembly or maintenance instructions.natural_image
Line drawing of a hand mixer with a glass container (no text or symbols)text_image
Technical diagram of a mechanical device with labeled components and an inset showing circular gauges and a 3D cube base.natural_image
Three-panel line drawing showing a hand washing a small cup, with no text or symbols present.natural_image
Illustration of a hand washing machine with a circular base and two side panels (no text or symbols)natural_image
Illustration of a hand using a blender to press food into a container, next to a separate view of a coffee maker (no text or symbols visible)text_image
Diagram illustrating a procedure for using a device to interact with a battery, showing steps from heating to cooling.text_image
Technical diagram of a coffee maker with labeled components and parts, including a coffee machine and a drain cover.text_image
Diagram showing a hand using a coffee machine to press coffee into a cup, with directional arrows indicating movement.flowchart
graph LR
    A["Water Tap"] --> B["Washing Machine"]
    B --> C["Two Coffee Cup"]
    B --> D["Two Coffee Cup"]
flowchart
graph LR
    A["Cappuccino Latte macchiato"] --> B["Preparation Machine"]
    B --> C["Coffee Maker"]
    C --> D["Two coffee bean icons"]
flowchart
graph LR
    A["Mocha"] --> B["Adder"]
    B --> C["Adder with lid"]
    C --> D["Adder with coffee cup"]
    D --> E["Adder with coffee cup and coffee maker"]
flowchart
graph LR
    A["Iced frappé"] --> B["Topiram"]
    B --> C["Reactor with lid"]
    C --> D["Shaker with lid"]
    D --> E["Product with coffee cup icon"]
text_image
Image showing a ruler with measurement markings and tick marks for measurement reference.natural_image
Three-panel line drawing showing a mechanical component with bolts and a base, no text or symbols present.text_image
descaling lung hot foamnatural_image
Technical line drawing of a mechanical device with multiple ports and a central component (no text or symbols)natural_image
Line drawing of a hand using a portable water heater with cups and a digital display (no text or symbols)text_image
3 sec. An Bunch Bunch Battery Battery Battery Battery Battery Battery Batterynatural_image
Technical line drawing of a mechanical device with no visible text or symbolsnatural_image
Illustration of a hand using a blender to press or feed into a container (no text or symbols visible)2 Trek voorzichtig aan de lekbak om de lekbasis en het capsulebakje tegelijkertijd te verwijderen. Leeg en spoel deze met leidingwater, veeg ze dan droog met een schone, vochtige doen en plaats ze terug in het apparaat. Tpaβήτε απαλά τα διοκο στάλαξης για να αφαιρέσετε ταυτάχρονα τη βάση στάλαξης και το δοχείο καψουλών. Αδειάστε τα, επλύνετε τα με πόσιμο νερό, στεγνώστε με ένα καθαρό, νυπό πανί, μετά βάλτε τα πίων στη θέση τους.
text_image
Technical diagram of a coffee maker with labeled components and a magnified inset showing a cup and cupping.natural_image
Line drawing of a hand using a digital kitchen machine to press or install a product (no text or symbols visible)text_image
Technical diagram of a coffee maker with labeled components and a base mount, showing brand name and product details.text_image
File Name Order Name Order Namenatural_image
Diagram of a mechanical device with a cylindrical component and a small container, no visible text or symbolsnatural_image
Line drawing of a hand using a self-service water dispenser machine (no text or symbols visible)natural_image
Line drawing of a hand using a digital pressure checker machine to press or install a small object (no text or symbols present)text_image
danselling large hot foam clean expiries large macarons used frappes rutinette cappuccino mocha② De 9 recepten-toetsen knipperen ononderbroken.
natural_image
Diagram of a mechanical device with a cylindrical component inserted into a container, showing internal structure (no text or symbols)natural_image
Diagram of a mechanical device with a handle and internal components (no text or symbols)text_image
Greening Lange Hot Foam Cold Foam Express Lives Margarine Sandfire Fisture Lappuccino Mambanatural_image
Line drawing of a hand using a digital device to press or install a small component (no text or symbols visible)natural_image
Line drawing of a hand pump device with control panel and base (no text or symbols)text_image
3 sec. Clear Red Clean Green Red Clean Red Clean Green Red Clean Green Clean Red Clean Green Clean Green Clean Green Clean Green Clean Green Clean Green Clean Green Clean Green Clean Green Clean Green Clean Green Clean Green Clean Green Clean Green Clean Green Clean Green Clean Green Clean Green Clean Green Clean Green Clean Green Clean Green Clean Green Clean Green Clean Green Clean Guan Guan Guan Guan Guan Guan Guan Guan Guan Guan Guan Guan Guan Guan Guan Guan Guan Guan Guan Guantext_image
x3 hot foam cold foam squares catte make charts cloud frapp-lnatural_image
Illustration of a hand using a blender to press or feed into a container (no text or symbols visible)natural_image
Exploded view diagram of a mechanical device with numbered components (no text or symbols)natural_image
Technical line drawing of a mechanical component with no visible text or symbolstext_image
Technical diagram of a mechanical device with numbered components, likely for assembly or manufacturing documentation.natural_image
Line drawing of a hand mixer with a container, no text or symbols presenttext_image
Technical diagram of a device with labeled components and an inset showing a circular dial indicator.text_image
3 sec. + - Red Green Cold Free Hot Free Cold Free Express Hot Free Cold Free Red Green Red Green Red Greennatural_image
Three-panel line drawing of a coffee maker with cups and a cup, showing different mechanical setups (no text or symbols)natural_image
Illustration of a hand washing machine with a circular vent and control panel (no text or symbols)① Извлеките резервуар для воды.
natural_image
Illustration of a hand using a coffee maker machine with a separate view of the same device (no text or symbols present)text_image
Diagram illustrating a hand holding a small object, interacting with a device and its control panel, alongside a close-up of the device's internal structure.natural_image
Line drawing of a coffee maker with a stand mixer and small tank (no text or symbols)natural_image
Illustration of a hand using a self-service coffee machine to add beverages into a cup (no text or symbols visible)flowchart
graph LR
    A["Water being mixed with a cup"] --> B["Heating into a blender"]
    B --> C["Discharge to a coffee cup"]
    B --> D["Discharge to a trash can with a coffee cup icon"]
flowchart
graph LR
    A["Cappuccino Latte Macchiato"] --> B["Chassis with liquid"]
    B --> C["Blende with lid"]
    C --> D["White cup with teapot icon"]
    C --> E["White cup with teapot icon"]

flowchart
graph LR
    A["Mocha"] --> B["Adder"]
    B --> C["Boiler"]
    C --> D["Coffee Maker"]
    D --> E["Product"]
flowchart
graph LR
    A["Iced Frappé"] --> B["Teapot with cups"]
    B --> C["Add liquid into cup"]
    C --> D["Add steamer with lid"]
    D --> E["Coffee maker with coffee cup"]
    E --> F["Product with coffee cup icon"]
text_image
Image showing a ruler with measurement markings and tick marks for measurement reference.