
DCS7517 - Surveillance Camera D-LINK - Free user manual and instructions
Find the device manual for free DCS7517 D-LINK in PDF.
| Product Type | Outdoor Surveillance Camera |
| Brand | D-Link |
| Model | DCS-7517 |
| Resolution | 5 Megapixels (2592x1944) |
| Video Compression | H.265 |
| Power Supply | PoE (802.3af) or 12V DC adapter (not included) |
| Lens | Varifocal lens, adjustable sun shield |
| Night Vision | Built-in IR LEDs, automatic day/night light sensor |
| Local Storage | microSD card slot (not included) |
| Audio | Microphone input, speaker output |
| Connectivity | Ethernet RJ45 10/100 |
| Inputs/Outputs | 1 alarm input (DI), 1 alarm output (DO), reserved (12V OUT connector) |
| Viewing Angle | Wide angle with tilt and pan adjustment |
| Mounting | Adjustable mounting bracket, bracket and screws included |
| Protection Rating | Outdoor (waterproof seals, protective covers) |
| Weight | Approximately 600 g |
| Dimensions (LxHxP) | Approximately 200 x 80 x 80 mm |
| Operating Temperature | -20°C to 50°C |
| Reset | Reset button, press and hold for 10 seconds |
| Warranty | Visit warranty.dlink.com |
Frequently Asked Questions - DCS7517 D-LINK
User questions about DCS7517 D-LINK
0 question about this device. Answer the ones you know or ask your own.
Ask a new question about this device
Download the instructions for your Surveillance Camera in PDF format for free! Find your manual DCS7517 - D-LINK and take your electronic device back in hand. On this page are published all the documents necessary for the use of your device. DCS7517 by D-LINK.
USER MANUAL DCS7517 D-LINK
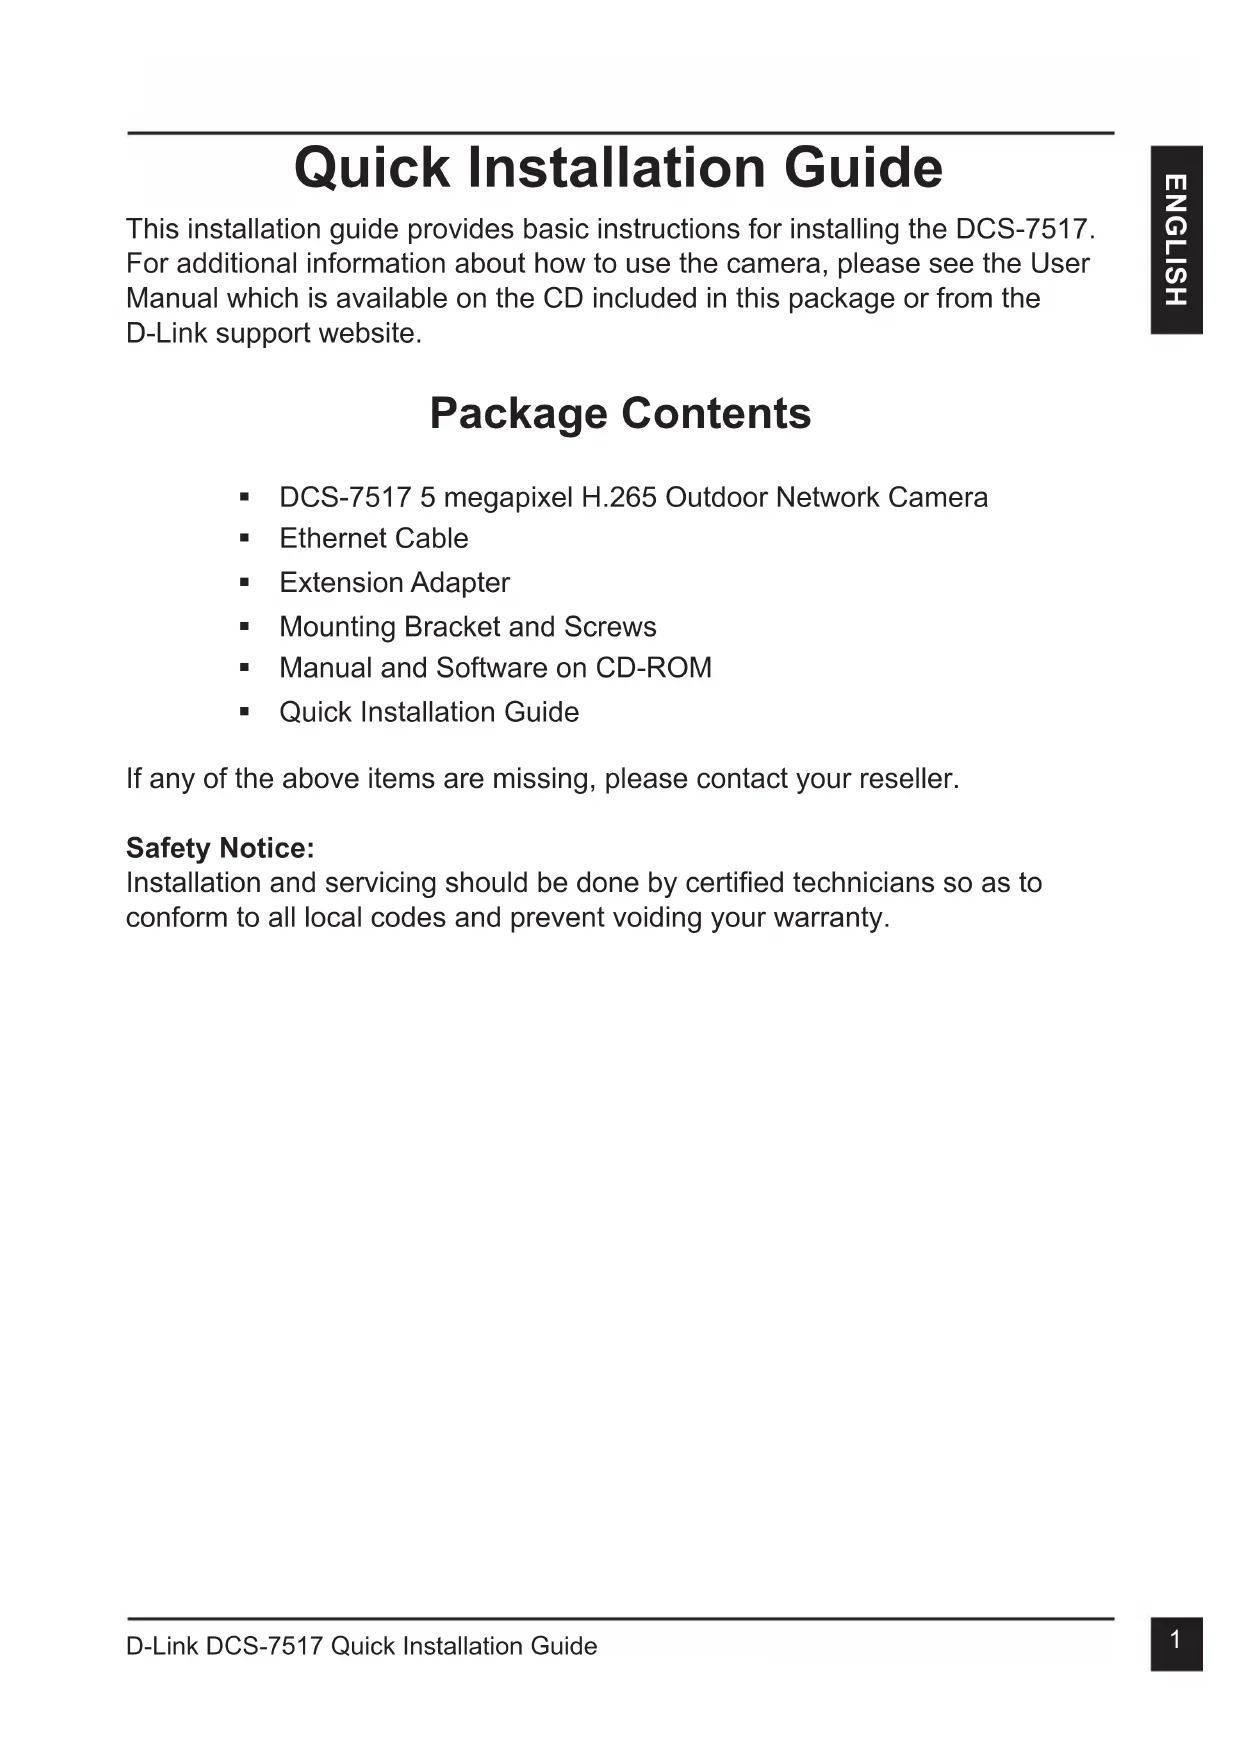
Quick Installation Guide
5 megapixel H.265 Outdoor Network Camera
This document will guide you through the basic installation process for your new D-Link Network Camera.
DCS-7517
Quick Installation Guide
KpaTKoe pyKOBOCTBO NO yCTaHOBKe
This installation guide provides basic instructions for installing the DCS-7517. For additional information about how to use the camera, please see the User Manual which is available on the CD included in this package or from the D-Link support website.
Package Contents
DCS-7517 5 megapixel H.265 Outdoor Network Camera
- Ethernet Cable
- Extension Adapter
- Mounting Bracket and Screws
- Manual and Software on CD-ROM
Quick Installation Guide
If any of the above items are missing, please contact your reseller.
Safety Notice:
Installation and servicing should be done by certified technicians so as to conform to all local codes and prevent voiding your warranty.
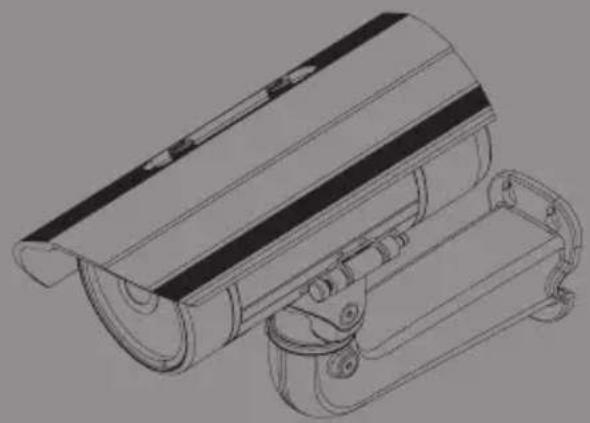
Hardware Overview
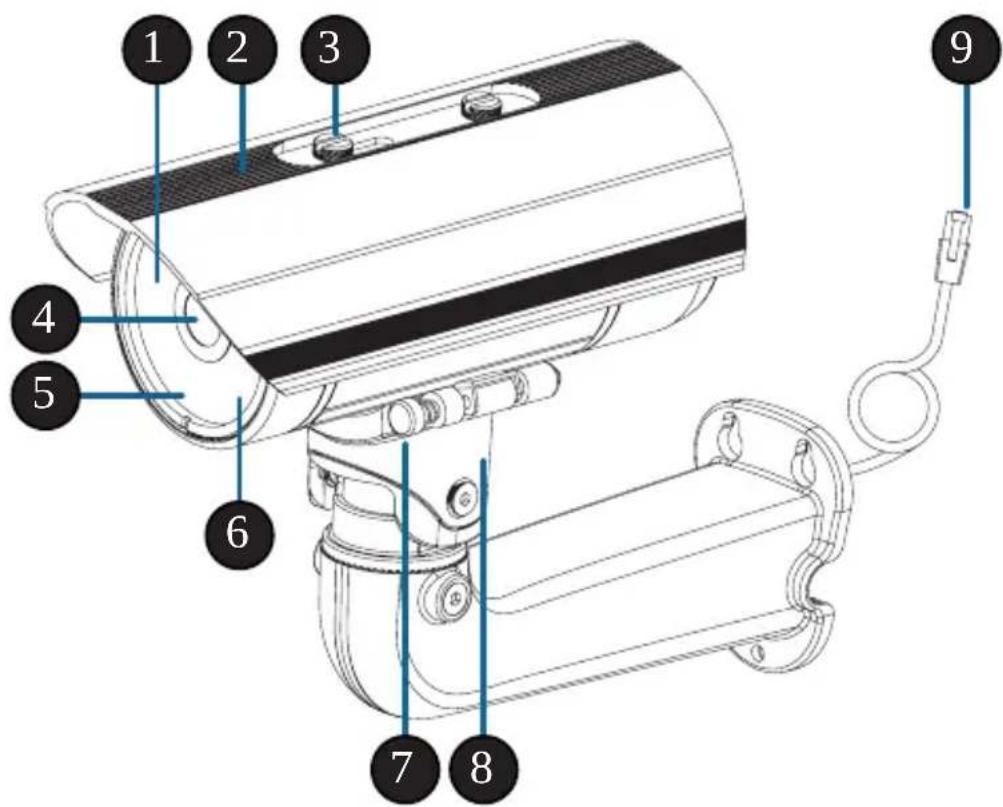
| 1 IR | LEDs | Provide illumination for low-light environments. |
| 2 | Adjustable Top Shield | Shields the camera lens from direct sunlight. |
| 3 | Adjustment Screw | Allows for positioning of the top shield. |
| 4 | Camera Lens | Varifocal lens to record video of the surrounding area. |
| 5 | Power/Status LED | Indicates the camera's current status. |
| 6 | Light Sensor | Measures lighting conditions and switches between day and night mode accordingly. |
| 7 | Quick Release Pin | Allows the camera to be swiveled into position for easy maintenance. |
| 8 | Camera Shoe | Adjustable mounting seat for the camera. |
| 9 | Ethernet Jack | Connects to an RJ45 Ethernet port. Can be used with PoE to provide power to the camera. |
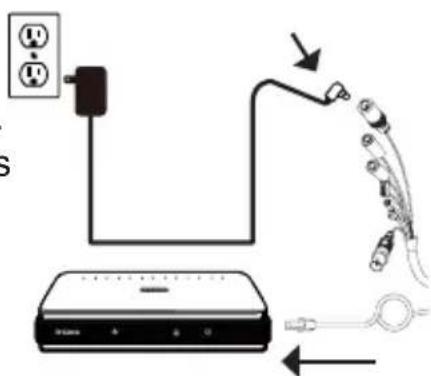
Optional Cable Harness (not included)
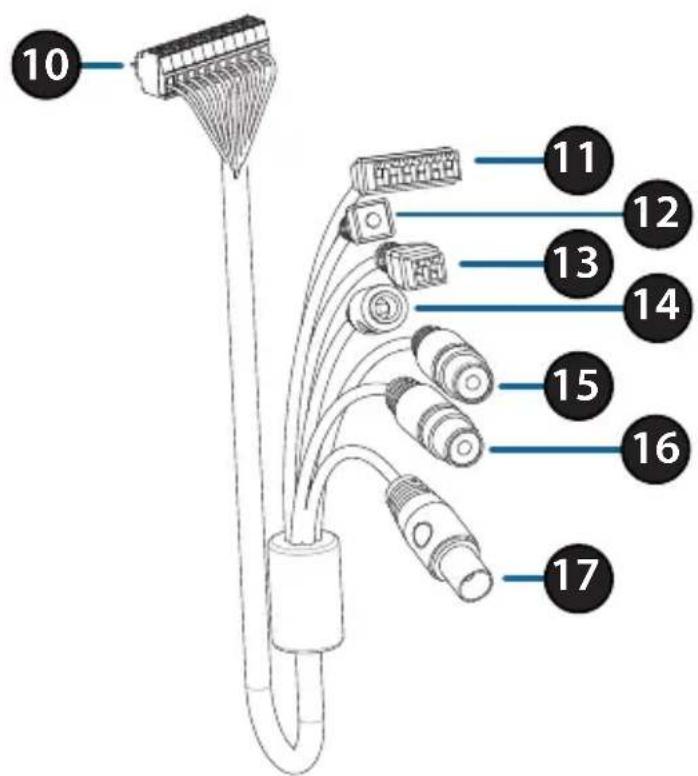
| 10 | Camera Connector | Connects to the DCS-7517. For more details on connecting the A/V cable, refer to the User Manual. |
| 11 | DI/DO Connector | I/O connectors for external devices. |
| 12 | Reset Button | Press and hold the button for 10 seconds to reset the camera back to the factory default settings. |
| 13 | 24 V Power Connector | Not supported for the DCS-7517. |
| 14 | Power Connector | Power connector for a 12 V DC power adapter (not included). |
| 15 | Audio Out (Green) | Connects to a speaker. |
| 16 | Audio In (Red) | Connects to a microphone. |
| 17 | BNC Connector | Not supported for the DCS-7517. |
Internal
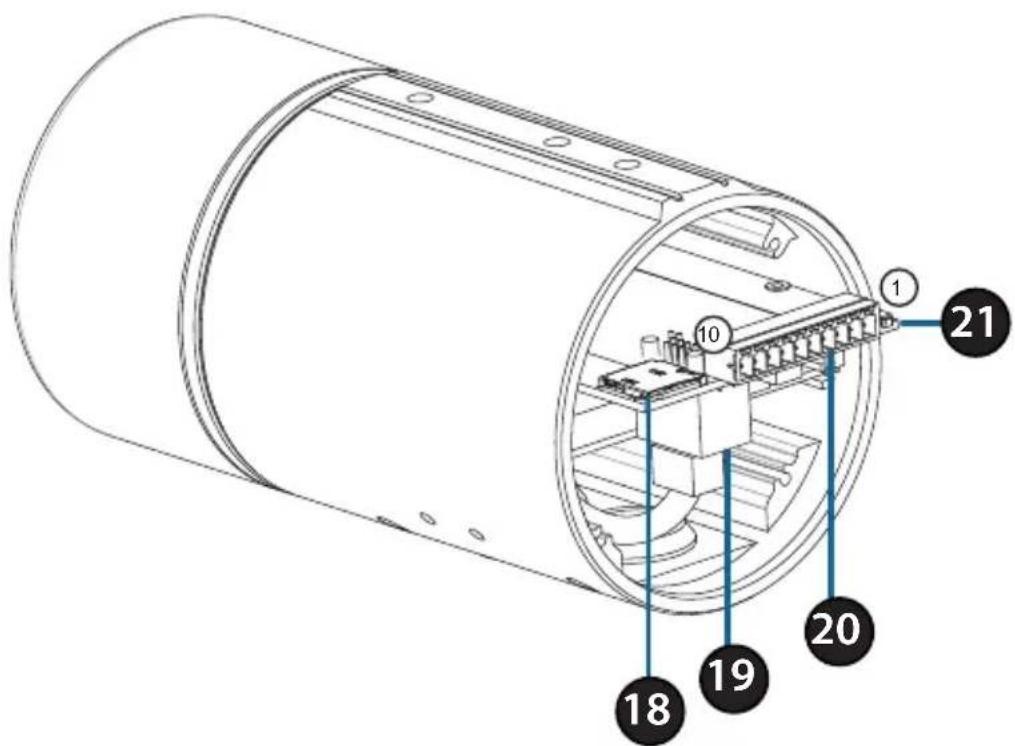
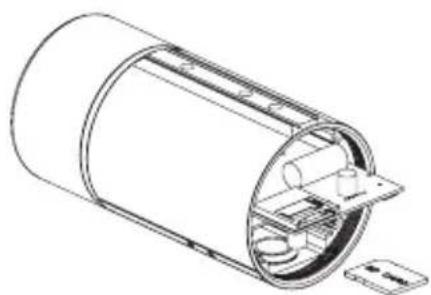
| 18 SD Card Slot | Insert a microSD card for local storage for storing recorded images and video. | |
| 19 Ethernet Port | Connects to Ethernet cable. | |
| 20 | Harness Connector | Connects to the optional cable harness (not included). |
| 1. 12V IN 2. GND 3. AUD IN 4. AUD GND 5. AUD OUT | ||
| 6. 12V OUT 7. GND 8. RESET 9. DI 10. DO | ||
| 21 Reset Button | Press and hold the button for 10 seconds to reset the camera back to the factory default settings. | |
Connecting the Optional Cable Harness
Remove the back camera cover by turning it counter-clockwise.
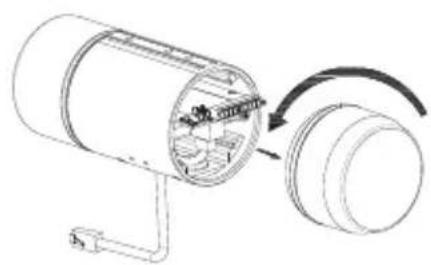
Remove the back waterproofing plug from the camera.
Push the camera connector and cable through the hole, and insert the cable's waterproofing plug.
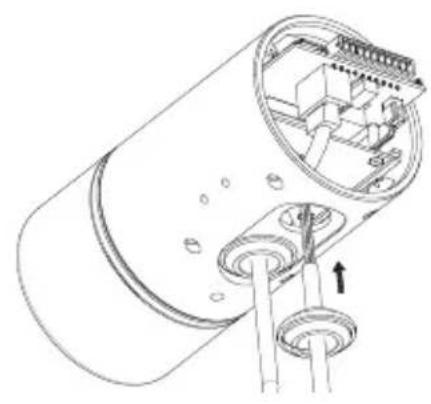
Make sure the plug is inserted properly to ensure a good seal.
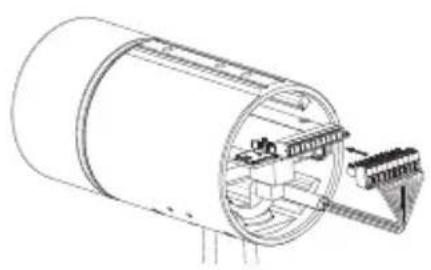
Connect the camera connector to the camera.
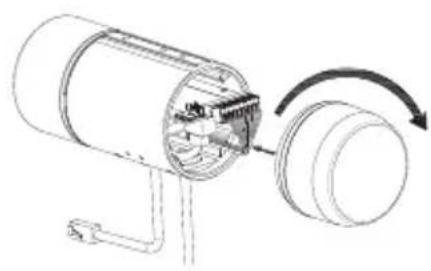
Reattach the back camera cover by turning it clockwise.
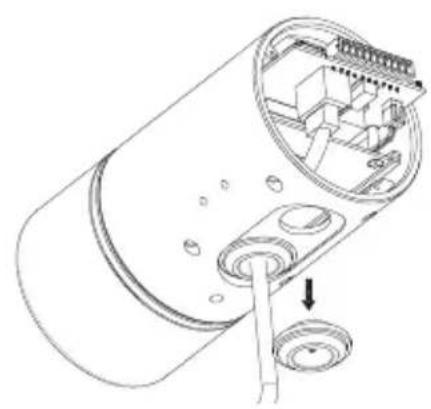
SD Card Installation
Remove the back camera cover by turning it counter-clockwise.

Insert the microSD card with the contacts facing down, then reattach the back cover. Make sure that the weatherproof seals are secured firmly in place.
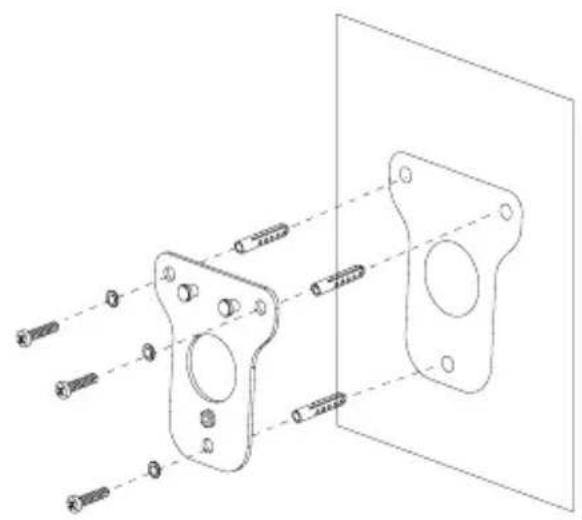
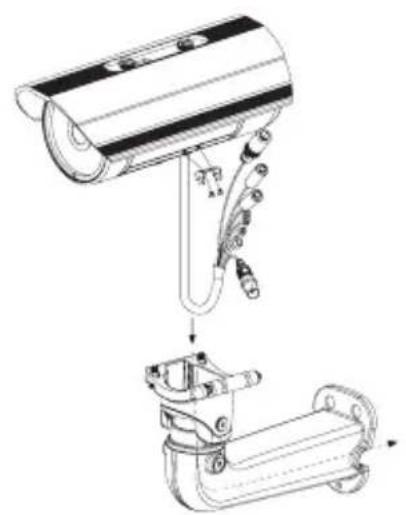
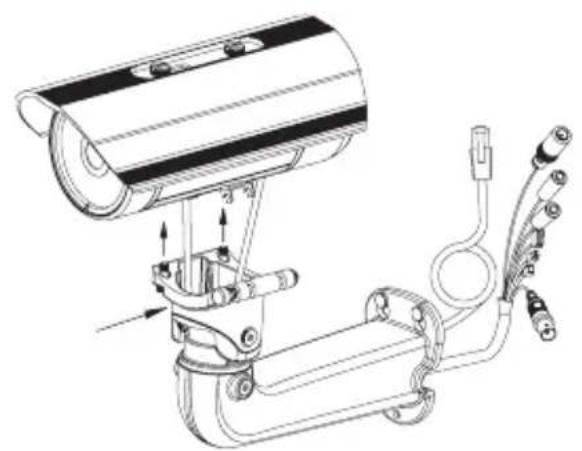
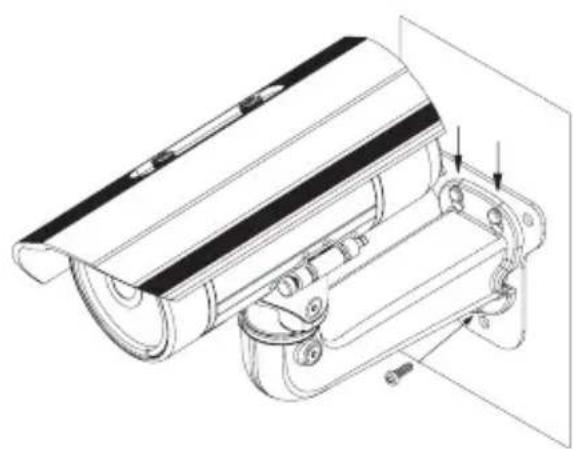
Mounting Instructions
Please refer to the User Manual for detailed instructions on how to install and mount the camera.
Connecting the Camera
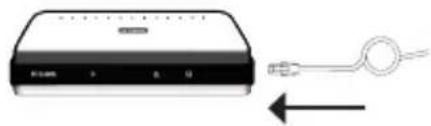
Connection with a PoE Switch
- Connect the Ethernet cable to your PoE switch or injector. The Ethernet cable will provide the camera with both power and a network connection.
If you have the optional cable harness, you can also use the following connection method:
General Connection Using 12 V DC Power Adapter (not included)
- Connect the Ethernet cable to your network.
- Connect your power adapter to the camera's power connector, then plug in the power adapter.
Configuring the Camera
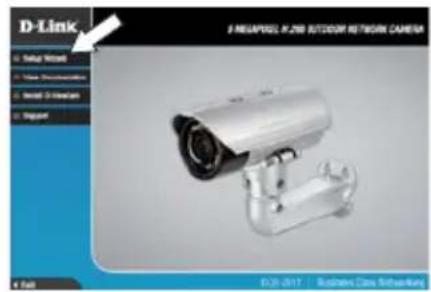
Insert the DCS-7517 CD into your computer's CD-ROM drive to begin the installation. If Autorun is disabled, or if the D-Link Launcher fails to start automatically, click the Start button and type D:\autorun.exe (where D: represents the drive letter of your CD-ROM drive) and press Enter.
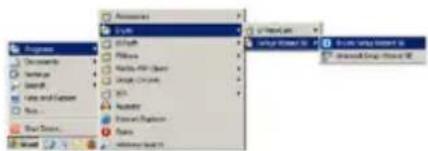
Click Setup Wizard and follow the instructions to install the Setup Wizard.
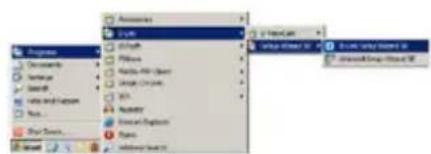
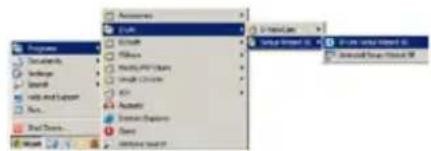
Click on the D-Link Setup Wizard SE icon that was created in your Windows Start menu (Start > D-Link > Setup Wizard SE).
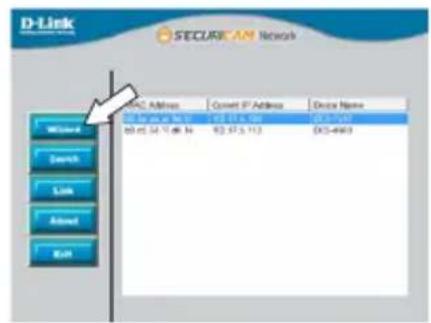
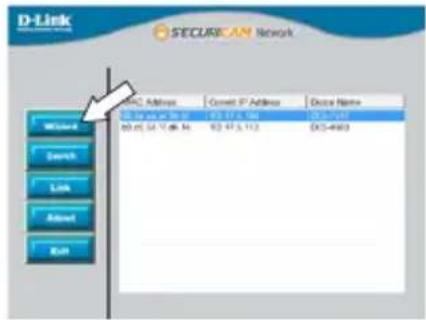
The Setup Wizard will appear and display the MAC address and IP address of your camera(s). If you have a DHCP server on your network, a valid IP Address will be displayed. Otherwise, the network camera's default static IP 192.168.0.20 will be displayed. Select your camera, then click the Wizard button to continue.
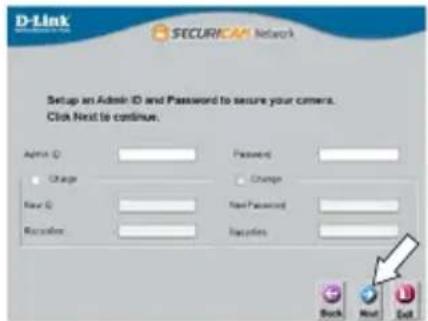
Enter the Admin ID and password. When logging in for the first time, the default Admin ID is admin with the password left blank.
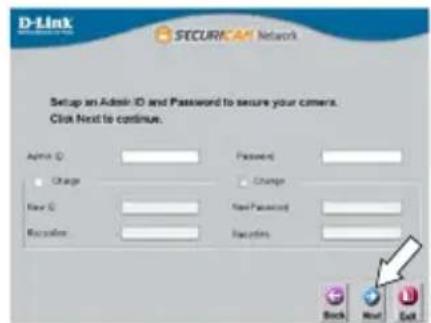
Click the checkboxes if you wish to change the admin ID and password for the camera, and enter the new ID and password you wish to use.
Click Next to continue.
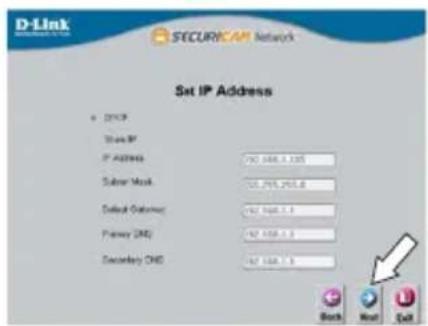
Select DHCP if your camera obtains an IP address automatically from a DHCP server such as a router. Select Static IP if you want to manually enter the IP settings for the camera.
Click Next to continue.

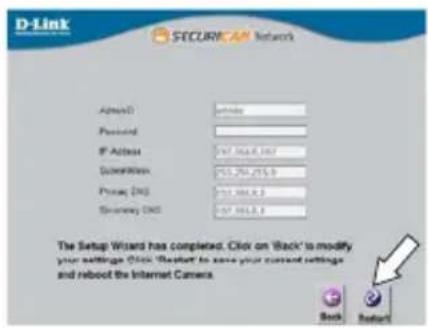
Take a moment to confirm your settings and click Restart.
Viewing Your Camera via Web Browser
Click on the D-Link Setup Wizard SE icon that was created in your Windows Start menu (Start > D-Link > Setup Wizard SE).
Select the camera and click Link to access the web configuration.
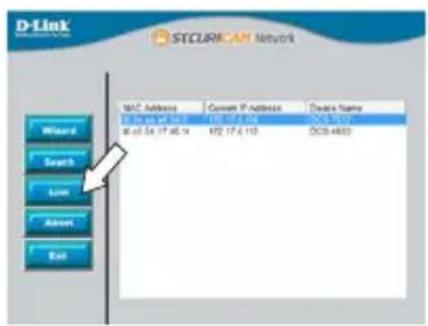
The Setup Wizard will automatically open your web browser to the IP address of the camera.
The first time you connect to the camera, you will be asked to set a password for the administrator account. After entering a password, click Save.

The camera's live video page will open, and you can now control and configure your camera. For additional information about web configuration, please refer to the user manual, which is available on the D-Link website.

Additional Information
Additional help and product information is available online at http://www.dlink.com.
Warranty Information
Please visit http://warranty.dlink.com/ for warranty information for your region.
KpaTkoe pyKOBoIDCTBO NO yCTaHOBKe
KpaTKoe pyKOBOCTBO NO yCTaHOBKe
EcnIyTO-Jn6o n3 nepeuNCJIeHHoro OTCyTCTByeT, NOXaIyIcTa, o6paTntecb K NOCTaBUnKy.
Mepbl 6e3onacHOCTN:
Bo n36exhaHne npekpaueHnra paHTn, yCTaHOBky n 06cnyKbAHne DOJXHbI npOBoDntb cepTnΦuNpOBAHHbIe CNeUaJIncTbI B COOTBETCTBnC peRHOHaJIbHbIMn HopMaMn n PpaBnAmn.
HaxmTe Setup Wizard (MacTep YcTaHOBKn) n CJeDyIe HnCTpyKuIaM dJa yCTaHOBKn.

Выберп Teярлб D-Link Setup Wizard SE B CTapTOBOM MeHIO Windows (Пуск > D-Link > Setup Wizard SE).
OTKPOETcO KHO MacTepa YCTaHOBKn, rDe 6yJeT oTo6paKeH MAC-aDpec n IP-aDpec BaWei kamepbI. EcIn B cEtN iCNoB3yeTcR DHCP-cepBep, To 6yJeT oTo6paKeH IP-aDpec, Na3NaueHHbI N TtM cepBepOM. EcIn B cEtN He iCNoB3yeTcR DHCP-cepBep, To oTo6pa3NTcR CTaTnueckn IP-aDpec kamepbI no yMOJuaHIO: 192.168.0.20. Bbl6epIte kamepy n Haxmnte KHONky Wizard dIra InpoJOnKeHnA.
BVeIte nMa noIb3OBaTeTn (Admin ID) n napoiB (Password). IMa noIb3OBaTeTn no yMoJIyAHnIO - admin, nOJIe dIra napOJIa OCTaBbTe nYcTbIM.
YcTaHOBInTe rAnOuyk,ecn BbIXOTIne NOMEHrTb IMr IOnb3OBaTeIg NapoNb KaMepbl,IN BBeDInTe HOBOE IMr IOnb3OBaTeIg NapoNb.
HaKmTe Next (Danee), YTO6bI nepeHTn Ha cneyIOuO CTpaHnU.
BbI6epnTe DHCP, ecnXOTnTe, YTO6bl kamepa aBTOMaTnueckn noIyana IP-aDpec, Ha3HaueHHbH DHCP-cepBepom.
BbIbepe Static IP (Ctatnueckn IP-aDpec),ecnXOTTE,HTO6bI Kamepa NcnoJIb3OBaJa nocToHHbIIP-aDpec.
HaKmTe Next (Danee), TTo6bI nepeTn Ha cNeyUOuO CTpaHnCu.
AnMaTbI, KypMaHaFa3bl K-ci,143 y
Ten.: +7 (727) 378-55-90
E-mail: almaty@dlink.ru
zujunnu
Uphill Towers Residence A/99
Atasehir /ISTANBUL
Tel: +90 (216) 492-99-99
Email: info.tr@dlink.com.tr
IpaBnla n ycNoBna 6e3oNaCHOkCnPyatau
Ipeed yctaHOBko I NOdkHIOueHnEM yCTpoiCTBa O3HaKOMbTEcB C KpaTKIM pkyoBOIDCTBOM IO yCTaHOBKe. Y6eINTEcb, YTO yCTpoiCTBO, aAnTep NITaHnY I Ka6JIH He IMeIoT MExAHUeCKNX NOBpeXdEHN. YCTPOICTBO DOJXHO 6bITb NCNoJIb3OBAHO TOnbKO IIO
Ha3HaueHIO, B COOTBETCTBnC KpaTknM pyKOBOIDTBOM NO yCTaHOBKe.
He yctaHabJIbIaIte yCTPOcTBO B 3OHaX C BJIaJHXOCtBIO u ypOBHeM 3aIrp3HeHnBaO3dyxa CBblSe 80%; a TaKke B o6JaCTN NOBblSeHHOrO nCnapeHnI npoo6pa3OBAHnI nn ycJIeHHo BV6paZnn.
He nCNoIb3yIte yCTpOInCTBO C NOBpeXdEHHbIM KOpNycOM. TemnepaTypa OkpykaIOUeI cpeIb H HeNOCpeIcTBeHHOJ 6JIIN3OCTN OT yCTpOInCTBa I BHyTpN erO KOpNyca DOJIXHa COOTBeTCTBOBaTb Yka3aHHoJ B TexHnuecknx XapaKTePnCTNKax yCTpOInCTBa.
Bo n36exahanne noBpeXdEHHa MaTpNcbl He HnpaBnaTe oBeKtNB BndeOKaMepbHa OueHb JpKHe oBeKtbl N CoHNCe.
He BkIIOuAaTe aAnTep NITAHnra*, ecnn erO Kopnyc nII KabeNb NOBpeKdHbI.
IodKIOUaTe aAnTepe NITAHN* TOnbKO K IcnpaBbIM po3eTKam CnapaMeTpAMN, Yka3aHHbIMn Ha aAnTepe NITAHN*.
He BCKpbIbAaTe KOpnyc ycTpoiCTBa! Ppeed OChtKo KamepbI OT 3aqr3HeHIn I nbIIN OTKnIOUHTe NITaHne yCtpoiCTBa. YdaJIte nbIb C NOMOuB VbaXHOI caIΦeTKn. He nCNoJIb3yIte JxIDKne/a3pO3OJbHbIe OChTlTeJI NII MaHHTbIe/ CTaTIueckne yCtpoiCTBa dIra OChTkn. I36eaiTe IonoJaHn BlaI IN B yCtpoiCTBO I aDaIaTEP NITaHn*.
Cpok cnjx6bI yctpoiCTBa - 2 roda.
TapaHTnHbI nepNOI NCHCJAEcC MOMeHTa npNo6peTeHna yCTpoiCTBa y oOuIuaJIbHO rIepa Ha TeppntOpN PoCCn n cTpaH CHr n coCTabJIeT ODN HOr.
BHe 3aBnCIMOCtN OT DaTbI npOdaXn rapaHTnHbI CpOK He MoKet npeBbIaTb 2
rOda C DaTbI npON3BOcTBA n3DeJIy, KOTOPa ONpeJelJeTcR no 6 (roD) n 7 (MecaU)
ZnΦpaM cepiHOrO HOMepa, yka3aHHOrO Ha NaKJIeIke C TexHnueCKIMn DaHHbIMn.
ToD: 9 - 2009, A - 2010, B - 2011, C - 2012, D - 2013, E - 2014, F - 2015, G - 2016, H - 2017.
Mecu: 1 - YHbapb, 2 - fpeBpaIb, ..., 9 - cHTa6pb, A - OKTa6pb, B - HoA6pb, C - DeKa6pb.
- Komnnekt noctabkn MOXET OTJIHATbCBy 3aBNCIMOCTN OT pernoHa.
Regulatory Statements (Only for Class A product)
Federal Communication Commission Interference Statement
This equipment has been tested and found to comply with the limits for a Class A digital device, pursuant to part 15 of the FCC Rules. These limits are designed to provide reasonable protection against harmful interference when the equipment is operated in a commercial environment. This equipment generates, uses, and can radiate radio frequency energy and, if not installed and used in accordance with the instruction manual, may cause harmful interference to radio communications. Operation of this equipment in a residential area is likely to cause harmful interference in which case the user will be required to correct the interference at his own expense.
Non-modification Statement
Any changes or modifications not expressly approved by the party responsible for compliance could void the user's authority to operate the equipment.
Caution
This device complies with Part 15 of the FCC Rules. Operation is subject to the following two conditions:
(1) This device may not cause harmful interference, and (2) this device must accept any interference received, including interference that may cause undesired operation.
Innovation, Science and Economic Development Canada (ISED) Statement:
This Class A digital apparatus complies with Canadian ICES-003.
CE EMI Class A Warning
This equipment is compliant with Class A of CISPR 32. In a residential environment this equipment may cause radio interference.
Regulatory Statements (Only for Class B product)
Federal Communication Commission Interference Statement
This equipment has been tested and found to comply with the limits for a Class B digital device, pursuant to Part 15 of the FCC Rules. These limits are designed to provide reasonable protection against harmful interference in a residential installation. This equipment generates, uses and can radiate radio frequency energy and, if not installed and used in accordance with the instructions, may cause harmful interference to radio communications. However, there is no guarantee that interference will not occur in a particular installation. If this equipment does cause harmful interference to radio or television reception, which can be determined by turning the equipment off and on, the user is encouraged to try to correct the interference by one of the following measures:
- Reorient or relocate the receiving antenna.
- Increase the separation between the equipment and receiver.
- Connect the equipment into an outlet on a circuit different from that to which the receiver is connected.
- Consult the dealer or an experienced radio/TV technician for help.
Non-modification Statement
Any changes or modifications not expressly approved by the party responsible for compliance could void the user's authority to operate the equipment.
Caution
This device complies with Part 15 of the FCC Rules. Operation is subject to the following two conditions: (1) This device may not cause harmful interference, and (2) this device must accept any interference received, including interference that may cause undesired operation.
Innovation, Science and Economic Development Canada (ISED) Statement:
This Class B digital apparatus complies with Canadian ICES-003.
This equipment is compliant with Class A of CISPR 32. In a residential environment this equipment may cause radio interference.
SAFETY INSTRUCTIONS
The following general safety guidelines are provided to help ensure your own personal safety and protect your product from potential damage. Remember to consult the product user instructions for more details.
- Static electricity can be harmful to electronic components. Discharge static electricity from your body (i.e. touching grounded bare metal) before touching the product.
- Do not attempt to service the product and never disassemble the product. For some products with a user replaceable battery, please read and follow the instructions in the user manual.
- Do not spill food or liquid on your product and never push any objects into the openings of your product.
- Do not use this product near water, areas with high humidity, or condensation unless the product is specifically rated for outdoor application.
- Keep the product away from radiators and other heat sources.
- Always unplug the product from mains power before cleaning and use a dry lint free cloth only.
DISPOSING AND RECYCLING YOUR PRODUCT

This symbol on the product or packaging means that according to local laws and regulations this product should be not be disposed of in the household waste but sent for recycling. Please take it to a collection point designated by your local authorities once it has reached the end of its life, some will accept products for free. By recycling the product and its packaging in this manner you help to conserve the environment and protect human health.
CE EMI KLASSE A-WAARSCHUWING
AFVALVERWERKING EN RECYCLING VAN UW PRODUCT

MISE AU REBUT ET RECYCLAGE DE VOTRE PRODUIT

IPOEIANOIHCEEMKAAHSA
VIDVÖRUN FYRIR CE EMI FLOKK A
UTYLIZACJA I RECYKLING PRODUKTU

Slovenian [Slovenski]
OPOZORILO CE EMI ZA RAZRED A
DESECHAR Y RECICLAR EL PRODUCTO

CE EMI KLASS A-VARNING
This D-Link product includes software code developed by third parties, including software code subject to the GNU General Public License ("GPL") or GNU Lesser General Public License ("LGPL"). As applicable, the terms of the GPL and LGPL, and information on obtaining access to the GPL code and LGPL code used in this product, are available to view the full GPL Code Statement at:
The GPL code and LGPL code used in this product is distributed WITHOUT ANY WARRANTY and is subject to the copyrights of one or more authors. For details, see the GPL code and the LGPL code for this product and the terms of the GPL and LGPL.
Written Offer for GPL and LGPL Source Code
Where such specific license terms entitle you to the source code of such software, D-Link will provide upon written request via email and/or traditional paper mail the applicable GPL and LGPLsource code files via CD-ROM for a nominal cost to cover shipping and media charges as allowed under the GPL and LGPL.
Please direct all inquiries to:
Email:
GPLCODE@dlink.com
Snail Mail:
Attn:GPLSOURCEREQUEST
D-Link Systems, Inc.
Fountain Valley, CA 92708
Notes
Notes
Notes
Notes
Notes
Notes
D-Link

Ver. 2.01(WW)_130x183
2018/10/05
0420122/1-DL