PCKA 1120 - Coffee machine PROFICOOK - Free user manual and instructions
Find the device manual for free PCKA 1120 PROFICOOK in PDF.
| Product Type | Drip Coffee Maker |
| Brand | ProfiCook |
| Model | PCKA 1120 |
| Power Supply | 220-240 V~, 50/60 Hz |
| Power | 1000 W |
| Water Tank Capacity | 1.7 liters |
| Net Weight | 2.2 kg |
| Coffee Type | Ground Coffee |
| Paper Filter Size | 1 × 4 |
| Functions | Programmable timer (Timer), automatic shut-off after 40 min, keep warm, anti-drip system |
| Display | 24-hour digital clock |
| Carafe Material | Glass |
| Heating Plate | Yes |
| Water Level Indicator | Yes |
| Removable Filter Holder | Yes |
| Safety | Automatic shut-off, hot surface warning, anti-drip system |
| Cleaning | Do not immerse; clean with a damp cloth; descaling with citric acid |
| Maintenance | Regular descaling required |
| Energy Consumption | Compliant with Ecodesign Directive 2009/125/EC |
| Protection Class | I |
Frequently Asked Questions - PCKA 1120 PROFICOOK
User questions about PCKA 1120 PROFICOOK
0 question about this device. Answer the ones you know or ask your own.
Ask a new question about this device
Download the instructions for your Coffee machine in PDF format for free! Find your manual PCKA 1120 - PROFICOOK and take your electronic device back in hand. On this page are published all the documents necessary for the use of your device. PCKA 1120 by PROFICOOK.
USER MANUAL PCKA 1120 PROFICOOK
ATTENTION: Anti-goutte
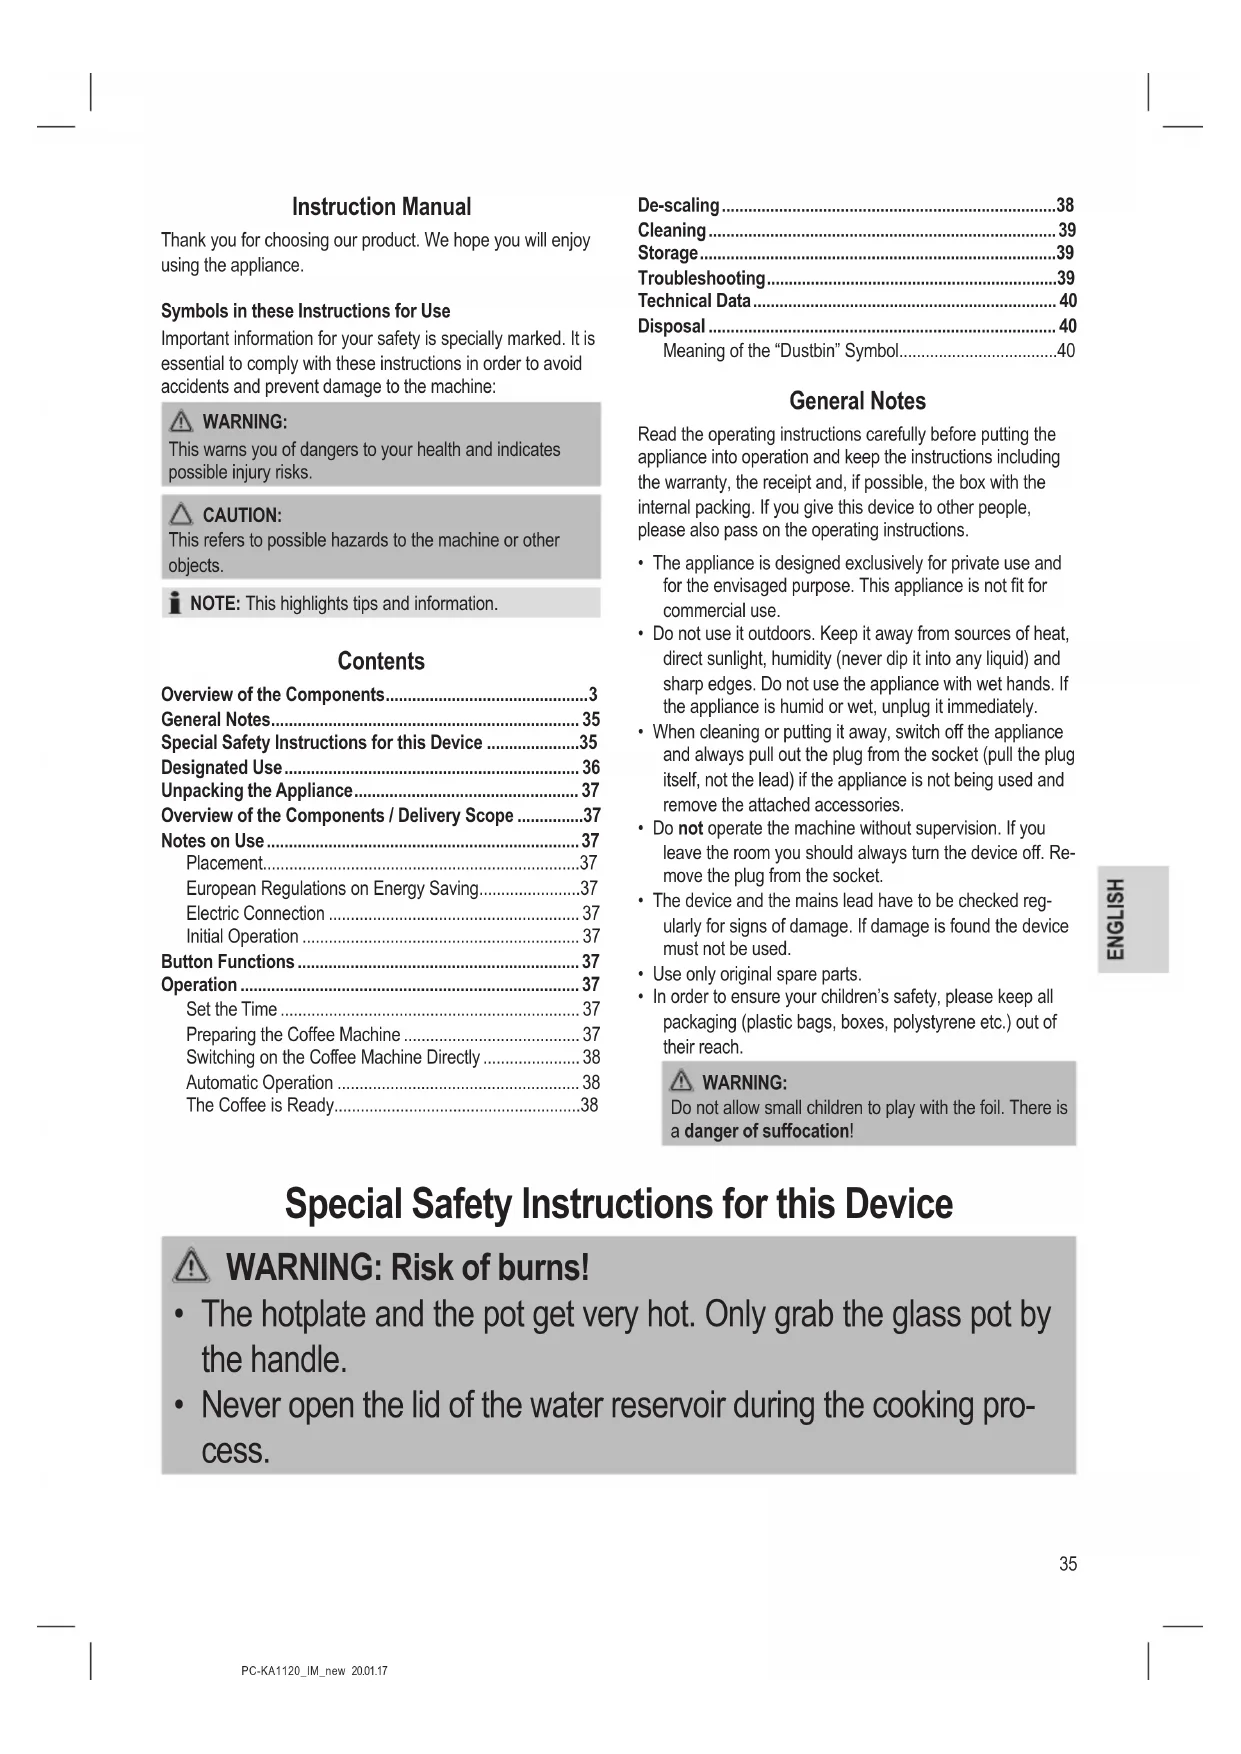
Thank you for choosing our product. We hope you will enjoy using the appliance.
Symbols in these Instructions for Use
Important information for your safety is specially marked. It is essential to comply with these instructions in order to avoid accidents and prevent damage to the machine:

WARNING:
This warns you of dangers to your health and indicates possible injury risks.

CAUTION:
This refers to possible hazards to the machine or other objects.

NOTE: This highlights tips and information.
Contents
Overview of the Components. 3
General Notes. 35
Special Safety Instructions for this Device 35
Designated Use 36
Unpacking the Appliance 37
Overview of the Components / Delivery Scope 37
Notes on Use 37
Placement 37
European Regulations on Energy Saving. 37
Electric Connection 37
Initial Operation 37
Button Functions 37
Operation 37
Set the Time 37
Preparing the Coffee Machine 37
Switching on the Coffee Machine Directly 38
Automatic Operation 38
The Coffee is Ready. 38
De-scaling. 38
Cleaning 39
Storage 39
Troubleshooting 39
Technical Data 40
Disposal 40
Meaning of the "Dustbin" Symbol. 40
General Notes
Read the operating instructions carefully before putting the appliance into operation and keep the instructions including the warranty, the receipt and, if possible, the box with the internal packing. If you give this device to other people, please also pass on the operating instructions.
- The appliance is designed exclusively for private use and for the envisaged purpose. This appliance is not fit for commercial use.
- Do not use it outdoors. Keep it away from sources of heat, direct sunlight, humidity (never dip it into any liquid) and sharp edges. Do not use the appliance with wet hands. If the appliance is humid or wet, unplug it immediately.
- When cleaning or putting it away, switch off the appliance and always pull out the plug from the socket (pull the plug itself, not the lead) if the appliance is not being used and remove the attached accessories.
- Do not operate the machine without supervision. If you leave the room you should always turn the device off. Remove the plug from the socket.
- The device and the mains lead have to be checked regularly for signs of damage. If damage is found the device must not be used.
- Use only original spare parts.
- In order to ensure your children's safety, please keep all packaging (plastic bags, boxes, polystyrene etc.) out of their reach.

WARNING:
Do not allow small children to play with the foil. There is a danger of suffocation!
Special Safety Instructions for this Device

WARNING: Risk of burns!
- The hotplate and the pot get very hot. Only grab the glass pot by the handle.
- Never open the lid of the water reservoir during the cooking process.

CAUTION:
The appliance must not be immersed in water for cleaning. Refer to the instructions provided in the chapter "Cleaning".
- Use the appliance only on a level work surface.
- Only use the appliance when water is filled into the water container.
- Do not move the appliance when it is in operation.
- This appliance can be used by children aged from 8 years and above if they have been given supervision or instruction concerning the safe use of the appliance understand the hazards involved.
- Cleaning and maintenance by the user shall not be made by children unless they are older 8 years and supervised.
- Keep the appliance and its cord out of reach of children less than 8 years.
Children shall not play with the appliance. - Appliances can be used by persons with reduced physical, sensory or mental capabilities or lack of experience and knowledge if they have been given supervision or instruction concerning use of the appliance in a safe way and if they understand the hazards involved.
- Do not try to repair the appliance on your own. Always contact an authorized technician. If the supply cord is damaged, it must be replaced by the manufacturer, its service agent or similarly qualified persons in order to avoid a hazard.
Designated Use
- This appliance serves for brewing of ground coffee.
- Only use the appliance in a dry, indoor area.
- It is intended for domestic use and similar areas of use such as e. g.
- In staff kitchens in shops, offices and other commercial areas;
- By guests in hotels, motels and other accommodation facilities.
It is not intended for use in farm accommodation or Bed & Breakfast establishments.
Unpacking the Appliance
- Remove the appliance from its packaging.
- Remove all packaging materials such as films, filler material, cable clips and carton.
- Check the contents for completeness.
- In the event that the packaging content should be incomplete or if damages are noticeable, do not operate the appliance. Return it to the dealer immediately.
NOTE:
Production residue or dust may have collected on the appliance. We recommend cleaning the appliance according to chapter "Cleaning".
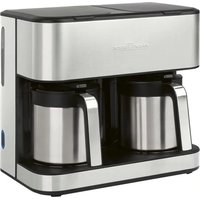
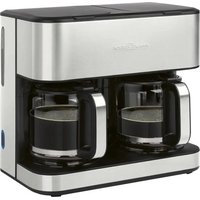
Overview of the Components / Delivery Scope
1 Filter holder
2 Water tank lid
3 Tab to open the water tank lid
4 Water tank
5 Water level indicator
6 Warming plate
7 Glass jug with lid
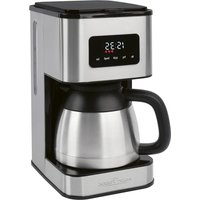
8 Function buttons
ON/OFF Turn appliance on and off
HOUR Hour
MIN Minute
MODE Set current time
Program TIMER operation
9 Display
Notes on Use
Placement
- Place the automatic coffee maker on a stable and level surface. Place the appliance in such way that it cannot tip over.
- Do not place the appliance in close proximity to a gas or electric stove or any other heat source.
European Regulations on Energy Saving
NOTE:
The European Directive 2009/125/EC (Ecodesign Directive) incorporates measurements for energy saving.
The following applies to coffee makers: The keep-warm period is limited to max. 40 minutes after which the appliance turns off automatically.
You benefit from better safety and lower energy consumption.
Electric Connection
- Ensure that your mains power corresponds with the specifications of the appliance. The specifications are printed on the type label.
- Connect the mains cable to a properly installed and earthed wall outlet.
Initial Operation
Before making coffee for the first time operate the appliance twice with clean water only and without paper filter. This removes dust, which may have collected during transport.
Follow the instructions given under "Switching on the Coffee Machine Directly".
Button Functions
ON/OFF
Pressing once: Turn on the device, immediate brewing process (The button lights up blue.)
Pressing twice: TIMER mode, brewing process will start at the programmed time (The button lights up green.)
Pressing 3 times: Turning off device. (The button indicator lamp turns off.)
MODE
Pressing once: Setting of the current time;
Pressing twice: Adjustment of the start time; query of the adjusted start time.
HOUR Hour
MIN
Minute
Operation
Set the time
The device works in the 24-hour mode. The time "12:00" is preset.
Press the MODE button one time. "CLOCK" will appear above the time in the display.
- Set hours:
Press the HOUR button.
- Set minutes:
Press the MIN button.
- Leaving the setting mode:
Wait ca. 15 seconds after the last push of a button. "CLOCK" in the display goes out.
Preparing the Coffee Machine
- Open the lid of the water tank.
- Fill cold water according to the desired amount of cups of coffee into the rear water tank. The water level is displayed on the indicator.

NOTE:
You can use the pot to fill the water tank.

CAUTION:
Do not overfill the tank! Do not fill it above the MAX mark.
- Ensure that the filter holder is properly attached.
- Turn over the lower fold of the paper filter (size 1 × 4 ) and place it in the filter funnel. Then fill it with coffee powder.

NOTE:
Do not put too much coffee powder into the filter to avoid spillage.
- Now close the lid of the water tank.
- Place the jug onto the warming plate.

CAUTION: Drip stop
Your appliance comes with a drip stop. It closes when removing the coffee pot. This prevents the coffee from dripping onto the warming plate if there is still water in the filter.
- Ensure that the lid is attached to the coffee pot. It opens the drip stop.
- If there is still water in the tank, place the pot underneath as soon as possible. Otherwise the filter might overflow.
Switching on the Coffee Machine Directly
Please follow the instructions under points "Preparing the Coffee Machine".
- Press the ON/OFF button once. The appliance is operational. The button lights up blue.

NOTE:
- The unit switches off automatically about 40 minutes after the brewing. The ON/OFF button indicator lamp turns off.
- If you yourself would like to shut off the device beforehand, press the ON/OFF button twice. The button indicator lamp turns off.
- The unit switches off automatically about 40 minutes after the brewing. The ON/OFF button indicator lamp turns off.
- If you yourself would like to shut off the device beforehand, press the ON/OFF button twice. The button indicator lamp turns off.
Automatic Operation
Please follow the instructions under points "Preparing the Coffee Machine".
- Press the MODE button twice. "TIMER" will appear above the time in the display.
- Set start time:
- Press the MODE button twice. "TIMER" will appear above the time in the display.
-
Set start time:
-
Leaving the setting mode:
Wait ca. 15 seconds after the last push of a button.
"TIMER" in the display goes out.
- Press the ON/OFF button twice to start the TIMER operation. The button lights up green.

NOTE:
- The appliance switches on automatically at the preset time. The button lights up blue.
- Press the ON/OFF button once to deactivate TIMER operation.
- If you would like to start the brewing process sooner, press the ON/OFF button twice. The button lights up blue.
The Coffee is Ready
- When no more coffee is flowing through the filter you can remove the pot.
- Turn the device off.
- Would you like to keep the remaining coffee warm? Leave the appliance turned on until the end of the keep-warm period. If you wish to keep the coffee warm even after the keep-warm period has finished, pour the remaining coffee into a thermal flask.

NOTE:
The filter holder can be removed from the machine by its handle.
This makes it easier to dispose of the old coffee filter, for example.

WARNING:
If you want to make another pot of coffee immediately, switch off the device first. Let it cool down with the water tank open in order to avoid hot water splashing when refilling with water.
De-scaling
De-scaling is necessary when the brewing time increases substantially.
- Use only commercially available citrus acidbased de-scaler.
- Follow the recommended instructions for use.

WARNING:
- Afterwards you should boil fresh water in the pot three or four times in order to rinse out residues of the descaling agent.
- Do not use any coffee powder!
- Do not use this water for consumption.

NOTE:
Automatic Operation
- Set hours:
Press the HOUR button. - Set minutes:
Press the MIN button. - Set hours:
Press the HOUR button. -
Set minutes:
Press the MIN button. -
Leaving the setting mode:
Wait ca. 15 seconds after the last push of a button.
"TIMER" in the display goes out.
Cleaning

WARNING:
- Before cleaning, always remove the mains plug and wait until the device has cooled down.
- Do not immerse the device in water. Otherwise this might result in an electric shock or fire.

CAUTION:
- Do not use a wire brush or any abrasive items.
-
Do not use any acidic or abrasive detergents.
-
The exterior of the device should be cleaned as necessary with a slightly damp cloth - without any additives.
- Remove spilled coffee grounds with a paper towel from the inner casing. Afterwards wipe with a damp cloth.
- The coffee pot and the filter pad should be cleaned by rinsing in warm water. Use a soft brush if necessary.
Storage
- Clean the appliance as described and let it dry completely.
- For longer periods of non-use we recommend storing the appliance in its original packaging.
Always store the appliance in a well-ventilated and dry place out of reach of children.
Troubleshooting
| Problem Possible cause Solution | ||
| The appliance does not work. | The appliance is not connected to mains power. | Check the wall outlet with a different appliance. |
| Insert the plug properly in the wall outlet. | ||
| Check the fuse. | ||
| The appliance is defective. | Contact our service or a repair center. | |
| Problem Possible | le cause Solution | |
| Filter blockage:coffee grounds spill over the edge of the filter. | The drip stop is closed: The coffee pot is not on the warming plate or the lid is not on the coffee pot. | 1. Switch the appliance off.Disconnect from mains power supply.2. Put the coffee pot with lid on the warming plate so that the filter is emptied.3. Dispose of the paper filter.4. Clean the appliance as described. |
| Too much coffee powder in the filter. | ||
| Coffee grounds in the coffee. | The paper filter is too small. | Use a paper filter size "1 x 4". |
| Too much coffee powder in the filter. | Use less coffee powder. | |
| The brewing process takes too long. | Limescale deposits in the appliance. | Decalcify the appliance as described. |
| The appliance turns off automatically. | This is not a malfunction of the appliance.In order to comply with the Ecode-sign Directive (2009/125/EC), the appliance turns off automatically after max. 40 minutes after the brewing process has finished. |
Technical Data
Model: PC-KA 1120
Power supply: 220 - 240 V~, 50 / 60 Hz
Power consumption: 1000W max.
Net weight: approx. 2,2kg
The right to make technical and design modifications in the course of continuous product development remains reserved.
This device has been tested according to all relevant current CE guidelines, such as electromagnetic compatibility and low voltage directives, and has been constructed in accordance with the latest safety regulations.
Disposal
Meaning of the "Dustbin" Symbol
Protect our environment: do not dispose of electrical equipment in the domestic waste.
Please return any electrical equipment that you will no longer use to the collection points provided for their disposal.
This helps avoid the potential effects of incorrect disposal on the environment and human health.
This will contribute to the recycling and other forms of re-utilisation of electrical and electronic equipment.
Information concerning where the equipment can be disposed of can be obtained from your local authority.
Instrukcja obslugi
CTC Clatronic Sp. zo.o.
Ul. Brzeska 1
45-960 Opole
Usuwanie
Yka3bIbaeT Ha BO3MOxHyO ONaCHOCT bIgN3dEINnI dpynx OKpyXaIOxN ppeMeTOB.

INPIMEUYAHNA:JaetcoBebiNHHOpMaHIO.
Copepkanne
O63op detanei npnbopa. 3
OmbaHOpMaun 53
CneunbHbe yka3aHnno
6e3oNaChocnI dIy 3TOr np6opa... 53
Ha3nayeHne 55
PacnaKOBka yctpoNCTBa. 55
063op deTane npnbopa/KomnneKT noCTaBKn 55
PpmeaHn no nCnoB3ObaHn 55
PacnoJoxeHne. 55
Ebponeckne HopMbI 3heproc6epexheny .55
PoiKIOUeHne 56
Bvod B cTpoi. 56
Функции KhoHOK.. 56
Pa6ota. 56
IpebeoD yacob 56
IIOIROTOBka KoopeHoro aTOMaTa KaaboTe 56
HenocpeDCTBENHOe BKNIOHHe KOeBapKn 56
PeximabTomatik. 56
Kofo npurotoBneH 57
YdaJIeHHe HAKINN 57
Ynctka 57
Xpanenie 57
YctpaHHe HEnCpBaBHOcte 58
TexHHueckne daHHbIe 58
067aHΦopMaζη
Ipeed hauanom 3KcNpyataun np6opba BnHmateIbHO npouHTaTe npuaaraemyu INCTpykunIO NO 3KcNpyataun I coxpaHNTe ee B HadeXHom MceTe, BMeCTe C rapaHTnHBIM TaHOOM, KaccOBbIM YekOM N, NO BO3MOXHOCTN, KAPTOHHO Kopo6KOc yynakOBoYbIM MaTePnAnOM. Ecn daTe KOMy IIn60 nOnNoB3OBAtbc np6bOpom, O6ra3eTbHo daTe B npndaHy dAnHyIO INCTpykUnIO NO 3KcNpyataun.
ПользуITEcblпиборmonToIbkoЧаТьIMобразOMиnoHa3haueHIO.IngбopHeпрднЗанeнДЯКOMMepueCKOTOИСПЛБ3OBAHIN.
He nolb3yIeTcB npnbopm NOtOKpbItbIM He60m. PpeOxAraHnTe np6bpOT Xapbl, npMbx COJIHeuHbIX IyuE, BnaXnOCTn (N H B KOEM Cnyae He NOrpyKaIte erO B BodY) n yApOB 06 octpIe yrbl. He npKacaiTeCb K np6bopy BnaXhBMn pykam. Ecnn np6bp yBaJaxHNlncn INnHAMOK, TyT Je BbIbTe BNkNy 13 po3ETKn.
- Pocne 3KcnpyaatauM, MoTatake npHaIeJxHocte, uNCTKe INI NOLOMKe np6opa Bcerda BbIHMaTe BnIKy n3 po3eKn (TAHTE 3a BNJIky, a He 3a Ka6ejb).
He octabJrTe BkIIOUeHHbIe 3JIeKTPoPnp6Opbl 6e3 npICMOTpa. BbIXOJa n3 NOMEuEHHa BCErDa BbIKNIOuAHTe np6Op. BbIHbTe uTEkep n3 po3eTKn.
- Pnp6op n Ka6eBcTeBOro nntaHnHeo6xmopeyI npHO o6CneIOBaTb Ha NaHnue CneIOB NOpeKdEHH. PpO6hApUKeHHN NOpeKdEHH NOnb30BaTbCpnp6Opom 3anpeucaTc.
IcnoJb3yTeToJIbKOOpnHaHaNbHbIe3aIuaCTN.
- Ⅰ3 coobpaekhen 6e3oNaChocnДЯ DeTeH He octabnIy Te JexKaTb ynaKOBky (PnactIKOBbIe MeJIK, KapTOH, neHO-npactN T.D.) 6e3 npncmToPa.

PENEYNPEXKDEHNE:
He no3BOJnIe TeTm IrpTaB c nOIN3TNHeHOBo nnEKnO. Onachocb ydysb!
CneuNbHbIe yka3aHnI IO 6e3OpaCHocTn DnI 3TOrO np6opa

Iotpe6JIeMaMA MOUHOCTb: 1000 BAATT MAcC.
Bmectnmoctb. 1,7 mTPOB
Klacc 3aunrbl:
Bec HETTO: npu6n.2,2K
CoxpaheNo npabo Ha texnueckne I KOHcTpyKUHOHHbIe N3MeHeHnB pamkax npoDOnKaHOUsceIpa3pa60TKn npodykTa.
3To n3dJIne npoJIO BCE Heo6xOaMlbIe n aKtyaJIbHbIE npOBepKn, npEaNcaHHbIe dIpeKTINBOI CE, K npIM. Ha 3JIeKTPOMaHTHyO COBMeCTmOCb I COOTBeTCTBHe Tpe6oBaHnM K H3KOBOLTHOH TEXHKe, OHO bIIO TaKKe CCKHOCTpyuPObAHO INoCTPOeHO C yYeTOM NocJeDHNX Tpe6oBAHNI NO TEXHKe 6e3OnacHOCTn.
yoo
"0gall aolao "blal cossylll lalal
jll jai jai jai jai jai jai jai jai jai jai jai jai jai jai jai jai jai jai jai jai jai jai jai jai jai jai jai jai jai jai jai jai jai jai jai jai jai jai jai jai jai jai jai jai jai jai jai jai jai jai jali jali jali jali jali jali jali jali jali jali jali jali jali jali
.
:ab
jao jao jao jao aao 40 ao slal jao lao lao
.ON/OFF jj jao chao jabi
jnoON/OFFjjde bdo1aao jqolllc0j
jjgao gao jbiu
J
"8gall dslal 1jglcc 8yjll cagll
TAALIgTIP "TIMER"J0jMODEJJL
100 8
:lwlbu
.HOURJJG
:
MIN
:baalgogjooegzgl
jbj jil de abdo j1 15 lgljzil
ALI"TIMER
10 10 10 10 10 10 10 10 10 10 10 10 10 10 10 10 10 10 10 10 10 10 10 10 10 10 10 10
:
jgljjglaagbgaalgljlaalglj
+ = 2
10
ON/OFF j#d a#,a#
3jJJJUuUg 0
aJb0d
youuill 2g yds 10g 26
.
jJy jy Jy
jll puiu wla aalil lcll g 1 ryl jgld. 2rblg
.1000000000000000000000000000000000000000000
. 1
jodol
.
- .ddIj5g
·:Joo aololb1
a
aLl l 100g gJyjdo
Jgglgglgglaaaabblgglgjglslw
Jzai 8
aJgjQON/OFF
dUHOUR
MIN
MODE
TIMER
9
#
j( x,y) = ( x^ ( x) ,y^ ( y) )
aas yaa jao gao aagg aabg aagaaagaae
.4b
y
ailll aagaa aolal aagg 1
ab = 10
gjgl jyj gai (gai gai) EC/2009/125 ggi 4gii
.
40 1j jy 1j j j j j j j j j j j j j j j j j j j j j j j j j j j j j
Lalal jall gabla loa
ailll 154wai jao g Jao 10 aolll ao
jgljU Ugzo 1
.0gall joljolUj1
.1j51g dlll lcllog 111011011011010101010101010101010101010101010101010101010
C. | x - 2| = | x + 3| .
jLdJyIyIyIyIyIyIyIyIyIyIyIyIyIy
jgl 100gol o0gol
:
Jall lss jgoll aaiy caii li. jgalld aay gylaiy yj
· = | | · | |
paalil gblj/ulgblgldealeyjbi
1
ab 264 ab 2
341 jj 3
4
5
6
7
60
59
59
59.
59
S_ OBC = S_ COD + S_ BOC
Jusyll dusg clasly laoj g jalgl Jauu Jauucl a 13
J 1
S ACD = S COD + S_ DCA
Jzj 1sll jgl 1000
jglgaggul
plucuie uic uis g(jS1j no jug,jai jno wll (wai) jaii iia 1a
jai jai jai jai jai
2390 1581g jglq
-
156 j5 15j jglzll plz
-
JIJIb3JI aJIoJI JIoJIa
JlalbI Jglua jc Jg (Lxg (jyJgJg) Jgall g
ab = 12
gulssy
Cld
jolil pliauily gaoiui j 3 Jolub sJyulid de S
pulawy11 cllw20 60,1g11 g90,1
0iJ 1111 5jg jai jauai daxu aolal aagbl doaull cloglo
jololl abg gololl gololl gololl
aiaai 1 aay bao yg ddo yd jao 10
a1 = 23,b1 = - 23
1ie.4j jaoaaal jyralg yolal piaaai
Clogstg 10aill Jcogll y
a0j0j0j0j0j0j0j0
Ug
- wouw g hooijooj 03.
62 1
61
61
61
61. A B C D E F G H I J A K L
61
81.23 y 1.23 y
a1 = 12,b2 = 35,c3 = 48,d4 = 79
60
60
60
60.
- 398 a15o sl25
- 60
- 82
jll ljj 100
!:

.
121 121 121 121
:

"ablll" J 3 0s 0gll clalll lglj. a bii iic sbl jglj g puc
.
.16b1j
A
g 8 8 8 8 8 8 8 8 8 8 8 8 8 8 8 8 8 8 8
aaiiabblbbln jybiyddaae bja jlae aol 4
1
1
一
一
1
1
一
一
1
1
一
一
GARANTIEKARTE
warranty card · garantiekaart · carte de garantie · scheda di garanzia · tarjeta de garantia · cartao de garantia · garantikort · karta gwarancyjna · zaručni list · karta jamstva · carte de garantie · fapaunuzhna Kapta · zaručný list · garancijski list · garanciajegy · rapahtiHmΦopMynap · fapaHTiHbTanoh
jiao 28,43
PC-KA 1120
24 Monate Garantie gemäß Garantieerklarung - 24 months warranty according to warranty declaration - 24 maanden garantie volgens garantieverklaring - 24 mois de garantie selon la déclaration de garantie - 24 mesi de garania seconda la dichiarazione di garania - 24 meses de garantia de acordo con la déclaration de garantia - 24 manedors garanti
1 henhold til garantibetingensene - 24 misescagwarancjna podstawtie owsiadcnziona gwarancjnego - zaruka 24 mescu podle prohlaseni o zaruke - 24 meseeno jamstvo u skladu s jamstvenom déclaracijon - 24 luni garantie conform déclaratiei de garantie - 24 mecua rapanunb c bocetctbnce c rapanohnata deknapau n - 24-mesca nara koda podla vyhlasenia o zaruke - 24-mesecnac garancija, skladno z garancjsko izavo - 24 honap garancia a garancifeltetelekben leirtak szerint - rapanrha na 24 micuji biodoi npo rapanio - rapanrna 24 mecua cornacho sarnneHHBM rapanTHHMM npaaanm - 24 10
Kaufdatum, Handelstermelt, Unterschied - date of purchase, dealer stamp, signature - aankoepdatum, dealersteml, handelteking - date d'achat, tampon du concessionaire, signature - data de acquisto, timbre del rivenditure, fimia - fecha de compa, sella del distribuidor, fimia - data de compa, carinbo do distribuidor, assinatura - kopsdata, forhandelderment, signatur - data zakupi, piecnic spredawcy, podis - datum zakupei, nathiko projecej, podis - datum kapovine, zig trovica, potis - data de achizyie, stampila furnuzuluri, semnatura - da na noekymara, lvear na Ibogaava, Ilognac - datum nakupi, pebstika obchodnikla/ predajcu, podis - datum napka, zig trovica, podis - vassanas datuma, kereskeio belyegzja, alaisra - daera npndaanen, ne-ataknpndaanu, pncic - daa npnoepetenikn, ulamn npnoabua, npnoacn.
PROFI COOK
www.proficook.de
PROFI COOK.
Internet: www.proficook.de
Made in P.R.C.