LIFE X44000 - Camera MEDION - Free user manual and instructions
Find the device manual for free LIFE X44000 MEDION in PDF.

| Product type | Compact digital camera |
| Brand | MEDION |
| Model | LIFE X44000 |
| Dimensions (L × H × D) | Approx. 112.5 × 75.9 × 78.7 mm |
| Weight | Approx. 455 g (with batteries) |
| Power supply | 4 AA 1.5 V batteries (LR6) |
| Maximum resolution (photo) | 4608 × 3456 pixels (16 MP) |
| Maximum video resolution | 1280 × 720 pixels (HD) with SDHC Class 6 card |
| Optical zoom | 21x |
| Digital zoom | 5x |
| Screen | Color LCD 7.62 cm (3 inches) |
| Internal memory | 128 MB (usable portion) |
| External storage | SD/SDHC card up to 32 GB |
| Built-in flash | Yes, modes: auto, red-eye reduction, forced, slow sync, off |
| Image stabilizer | Yes, switchable |
| File formats | JPEG (photo), AVI (video), WAV (audio) |
| Connectivity | Micro USB 2.0, AV output (cable included) |
| Package contents | Camera, 4 AA batteries, 4 GB SD card, USB cable, AV cable, wrist strap, lens cap, case, software CD, documentation |
| Maintenance and cleaning | Clean the body with a soft dry cloth. Lens and screen: dust with a blower brush, then soft cloth. Do not use thinners. |
| Safety | Do not open the case (risk of electric shock). Keep out of reach of children. Follow battery instructions (do not throw into fire, do not short-circuit). |
| Repairability | Not user repairable. Contact Medion customer service. |
| Warranty | Refer to the included warranty certificate |
Frequently Asked Questions - LIFE X44000 MEDION
User questions about LIFE X44000 MEDION
0 question about this device. Answer the ones you know or ask your own.
Ask a new question about this device
Download the instructions for your Camera in PDF format for free! Find your manual LIFE X44000 - MEDION and take your electronic device back in hand. On this page are published all the documents necessary for the use of your device. LIFE X44000 by MEDION.
USER MANUAL LIFE X44000 MEDION
LCD Monitor: 7,62 cm / 3" LC - Display
Dateifformat:JPEG (EXIF 2.2),DPOF,AVI,WAV
Max. Auflösungen:
Kamera Modus: 4608 x 3456 Pixel
About these instructions. 5
Symbols and key words used in these instructions 5
Proper use 6
Notes on conformity 6
Safety instructions 7
Dangers for children and people with reduced ability to operate machinery .7
Warnings 7
Notes on the batteries. 8
Safety precautions. 9
Never carry out repairs yourself. 10
Package contents 11
Overview of the device 12
Front 12
Back 13
Top 14
Bottom. 15
Side. 16
Navigation button 17
Initial operation 19
Attaching the carrying strap 19
Attaching the lens cap. 19
Inserting batteries 20
Inserting and removing the SD card 21
First steps. 23
Switching on the camera 23
Switching off the camera 23
Setting the language, date and time 23
Power-saving function 24
Shooting and playback mode 24
Displays. 25
Display options for shooting 25
Displays for photo playback 27
Displays for video playback 28
Displays for sound playback 29
Switching the displays on and off 30
Taking your first shots 32
Setting shooting mode 32
Tips for taking good shots 32
Taking a photo 33
Recording video clips 37
Recording audio clips 38
Using the Functions menu 39
Favourites display 39
Resolution - photos 40
Quality (compression) 40
Video size (resolution - videos) 41
Exposure compensation (EV) 41
White balance 42
ISO (light sensitivity) 43
Colour effect. 44
Using the Recording menu. 44
Viewing/listening to recordings 45
Playing back single recordings 45
Playing back images as thumbnails 46
Calendar mode 47
Playing back video/audio recordings/voice memos 49
Deleting shots 50
The menus 51
Navigating in the menus 51
The Recording menu. 52
The settings menu 55
The playback menu 58
The mode wheel 61
Using the intelligent scene mode 62
Using the aperture priority mode 63
Using the shutter priority mode 63
Using the manual exposure mode 64
Using the panorama mode. 64
Using the burst mode 66
Using the shooting mode 67
Using the different shooting modes 70
Using the kids mode 70
Using the sports mode 70
Using the party mode 70
Using the soft skin mode. 71
Using the food mode 71
Using the foliage mode 71
Using the auction mode 72
Using the smile capture mode. 74
Using the blink detection mode 74
Using the design mode 75
Using the voice recording 76
Playback functions. 77
Showing pictures in a slide show 77
The protect/unlock or delete functions 77
79
Recording voice memos 79
Colour mode 80
Trimming photos 81
Changing the size 82
Connecting to a TV or PC 83
Displaying shots on a television set 83
Printing shots on a photo printer 83
Transferring data to a computer 86
Connecting a USB cable 86
DCF memory standard. 87
Card drive 87
Memory folder structure 87
Resetting the file number 87
Storage capacity 88
Troubleshooting 89
Maintenance and care 91
Disposal 92
Technical data 93
Installing ArcSoft Medialmpression 94
Index 97
About these instructions

Read these operating instructions carefully before using the device for the first time. Note the warnings on the device and in the operating instructions.
Always keep the operating instructions close to hand. If you sell the device or give it away, make sure you also hand over these instructions and the warranty card.
Symbols and key words used in these instructions
| ! | DANGER! Warning: immediate mortal danger! WARNING! Warning: possible mortal danger and/or serious irreversible injuries! |
| ! | CAUTION! Please follow the guidelines to avoid injuries and/or property damage! PLEASE NOTE! Please follow the guidelines to avoid property damage! |
| i | PLEASE NOTE! Additional information on using the device |
| PLEASE NOTE! Please follow the guidelines in the operating instructions! | |
| WARNING! Warning: danger of electric shock! | |
| ·Bullet | point/information on occurrences during operation |
Tasks to be performed
Proper use
The device is suitable for recording and playing back digital images and videos. The device also has an audio recording function.
Do not operate the device either in extreme heat or extreme cold.
The device is not suitable for operation under extreme conditions.
The device is intended only for private use and is not suitable for commercial purposes.
Notes on conformity
The camera fulfils the requirements for electromagnetic compatibility and electrical safety. Your device complies with the fundamental requirements and the relevant regulations of EMC Directive 2004/108/EC.
Safety instructions
Dangers for children and people with reduced ability to operate machinery
- This device is not intended for use by people (including children) with reduced physical, sensory or mental abilities or for those without experience and/or knowledge, unless they are supervised by a person responsible for their safety or they have been instructed in its use.
- Children should be supervised to ensure that they do not play with the device. Children should not be allowed to use this device without supervision.
- Keep the device and its accessories out of reach of children.

DANGER!
Keep plastic packaging out of the reach of children. There is a risk of suffocation.
Warnings
To avoid injuries, please heed the following warnings when using the product:
- Do not trigger the flash too close to people's eyes. This can damage the eyes of the person being photographed.
- Keep at least 1 metre away from children when you are working with the flash.
- Do not open or dismantle the device.
- Dismantling the camera could lead to a risk of high-voltage electric shock. Tests on internal components, modifications and repairs should be carried out by specialists only. Take the product to an authorised Service Centre for testing.
-
If you are not going to use the camera for some time, remove the batteries to prevent leakage.
-
The camera must not be exposed to water droplets or spray. Do not place any objects filled with liquids (e.g., vases) on or next to the device.
- Unplug the charger from the power outlet during thunderstorms or whenever it is not in use.
Notes on the batteries
You can operate your camera with the supplied batteries.
Please note the following general instructions for handling batteries:
- Keep batteries away from children. Seek medical attention immediately if a battery is swallowed.

WARNING!
Risk of explosion if batteries are replaced incorrectly.
Replace batteries only with the same or equivalent types.
- Before inserting the batteries, check that the contacts in the device and on the batteries are clean and, if necessary, clean them.
Always use AA type batteries. - Please note the polarity (+/-) when inserting the batteries.
- Store batteries in a cool, dry place. Strong direct heat can damage batteries. Therefore, keep the device away from strong heat sources.
- Avoid contact with skin, eyes and mucous membranes. If any of these areas come into contact with battery acid, rinse them immediately with plenty of clean water and consult a doctor as soon as possible.
- Do not throw batteries into a fire; do not short-circuit them and do not dismantle them.
- Never expose the batteries to excessive heat such as direct sunlight, fire or similar!
- If the device is not going to be used for long periods, remove the batteries.
- Remove leaking batteries from the device immediately. Clean the contacts before inserting a new battery. There is a risk of skin irritations from battery acid!
- Also remove dead batteries from the device.
- At low temperatures the capacity of the batteries can be drastically reduced due the slowing down of the chemical reactions. When shooting in cold weather, keep a second set of batteries in a warm place (e.g. trouser pocket).
Safety precautions
Take the following safety precautions to avoid damage to your camera and to keep it in good condition.
- Store in a dry place
This camera is not watertight and will not function properly if it is immersed in water or if liquids penetrate to the inner workings. - Keep away from damp, salt and dust
Wipe off salt and dust with a light, damp cloth if you have been using the camera on the beach or at the seaside. Carefully dry the camera afterwards. - Keep away from strong magnetic fields Never place the camera too close to devices that have strong electromagnetic fields, e.g. electric motors. Strong electromagnetic fields may result in camera malfunctions or corrupt data recordings.
- Avoid excessive heat
Do not use or store the camera in sunlight or at high temperatures. This can cause the battery to leak or may deform the case.
- Avoid extreme fluctuations in temperature
If you take the camera from a cold environment into a warm one or vice versa, water can condense on the outside and inside of the camera and cause malfunctions and damage to the camera. Wait until the camera temperature has adjusted to the ambient temperature before starting to use the camera. Use of a carrying case or plastic case offers a certain amount of protection against fluctuations in temperature.
- Do not drop the device
Strong jarring or vibrations resulting from a fall can cause malfunctions. Loop the carrying strap around your wrist when you carry the camera.
- Do not remove the batteries while data are being processed
When image data are being recorded to or deleted from memory cards, switching off the power supply can result in data loss or damage the internal circuit or the memory.
- Treat the lens and all moving parts carefully
Do not touch the lens or the lens barrel. Take care when handling the memory card and the batteries. These parts are not designed for high levels of stress.
Batteries
If the contacts on the battery are dirty, clean them with a dry, clean cloth or use an eraser to remove residues.
Memory cards
Turn off the power supply before you insert or remove the memory card. Otherwise the memory card may become unstable. Memory cards may warm up during use. Always take care when removing the memory cards from the camera.
Never carry out repairs yourself

WARNING!
Never try to open or repair the device yourself. Risk of electric shock!
- If there is a fault, contact the MEDION Service Centre or other suitable specialist workshop.
Package contents
Please check your purchase to ensure all items are included. Contact us within 14 days of purchase if the delivery is incomplete.
The following items are supplied with your product:
Camera MD 87021
- 4 × 1.5 ~V batteries type AA (LR6)
4 GB SD memory card
USB cable
AV cable
- Wrist strap
- Lens cap cord
- Lens cap
Storage bag
- Software CD-ROM
- Documentation

DANGER!
Keep plastic packaging out of the reach of children. There is a risk of suffocation.
Overview of the device Front
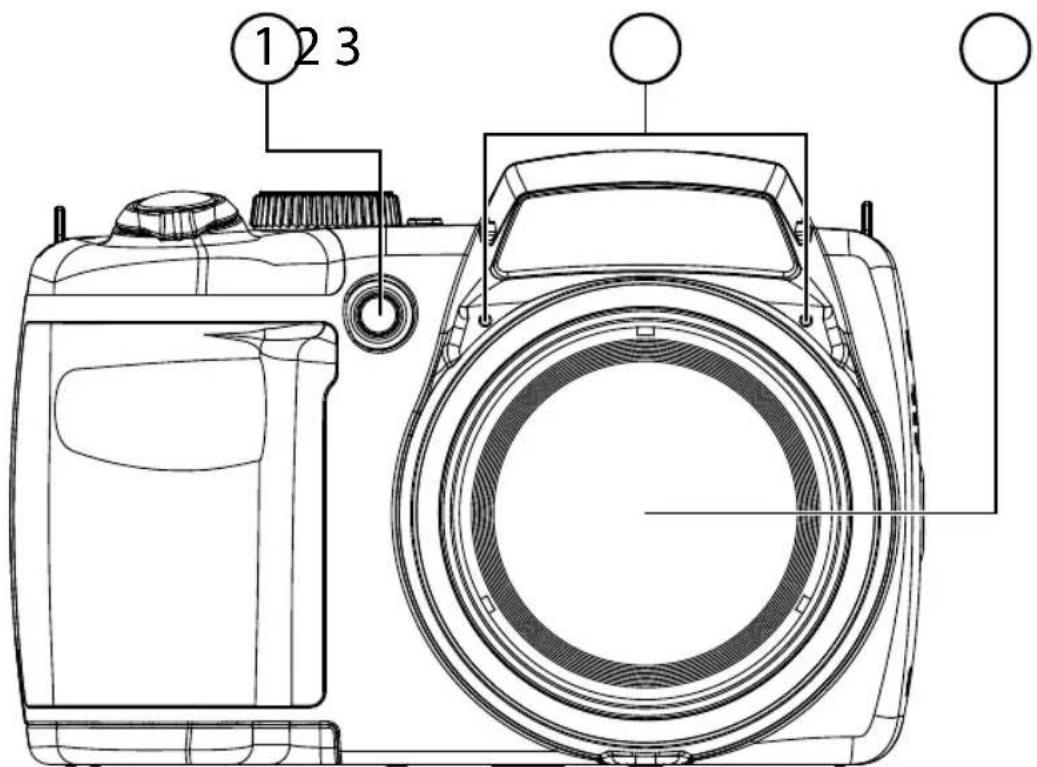
1) Self-timer LED/AF light
2) Microphone
3) Camera lens with lens barrel
Back
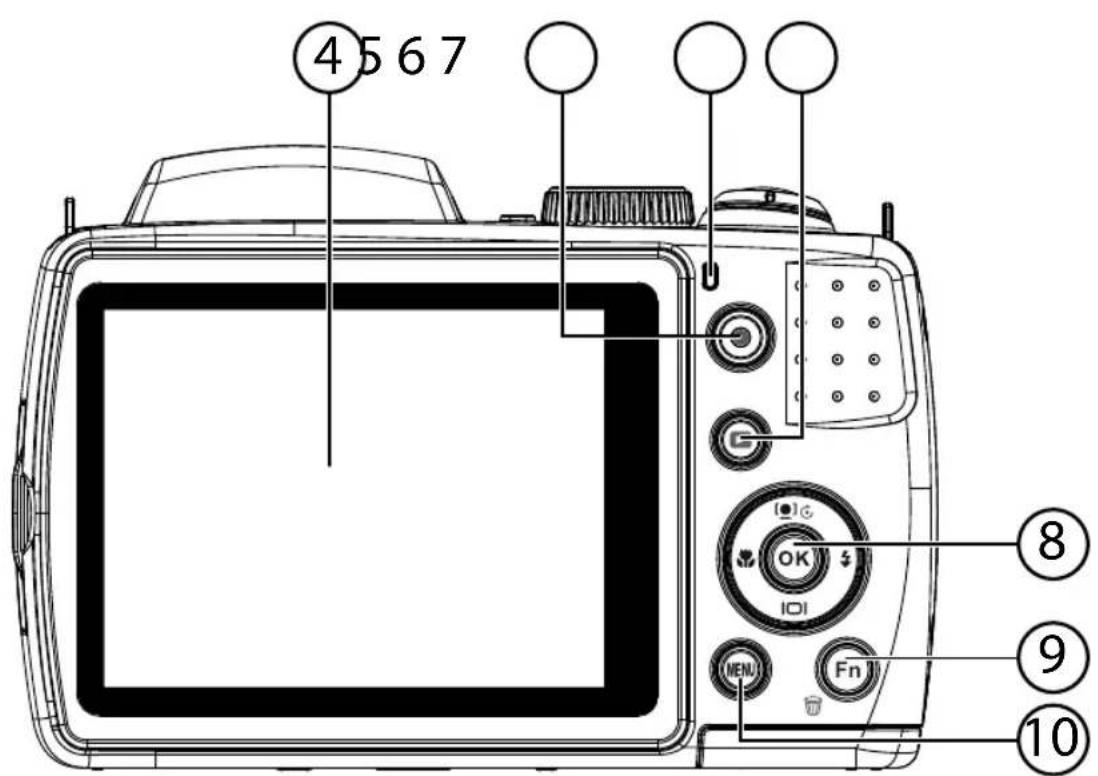
4) LC display
5) Record button for videos
6) Operating LED
7) Playback button
8) OK - button/observation buttons
9) FN /: Function/waste basket
10) MENU: Open menu
Top
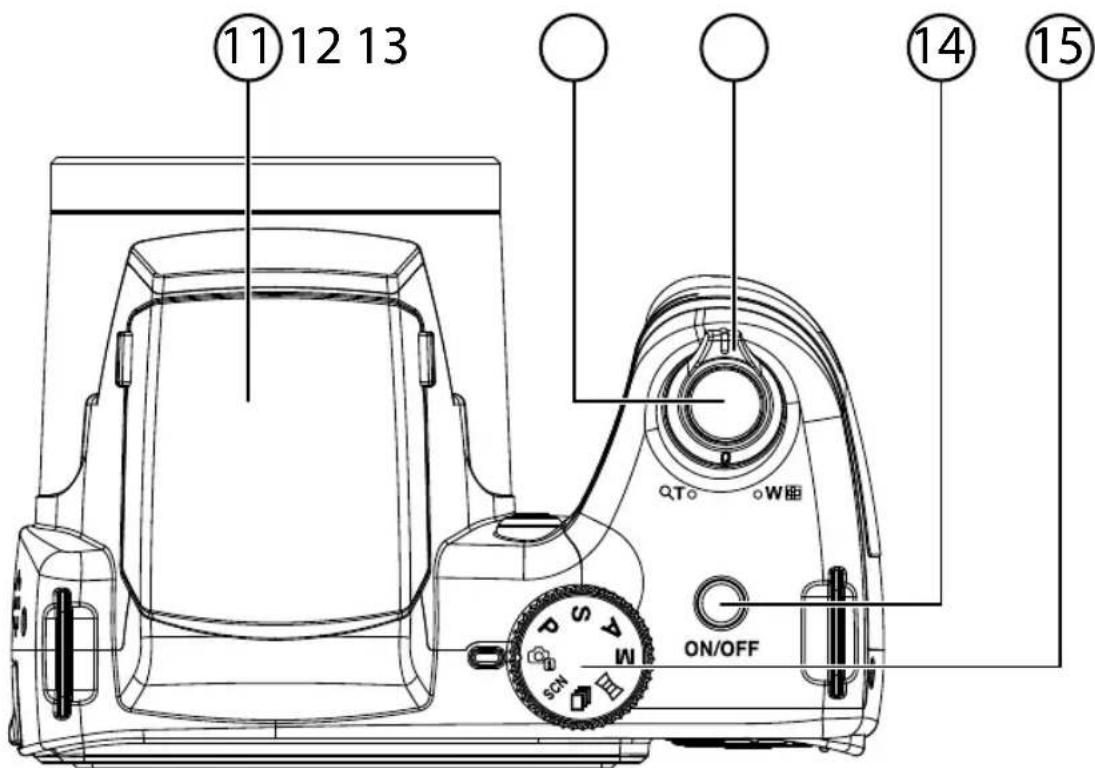
11) Flash (pop-up)
12) Shutter release (press halfway: activate autofocus)
13) TQ/W Zoom wheel):Zoom in and out from your subject
14) ON/OFF: Switch camera on or off
15) Mode wheel: Set different photo/video modes
Bottom
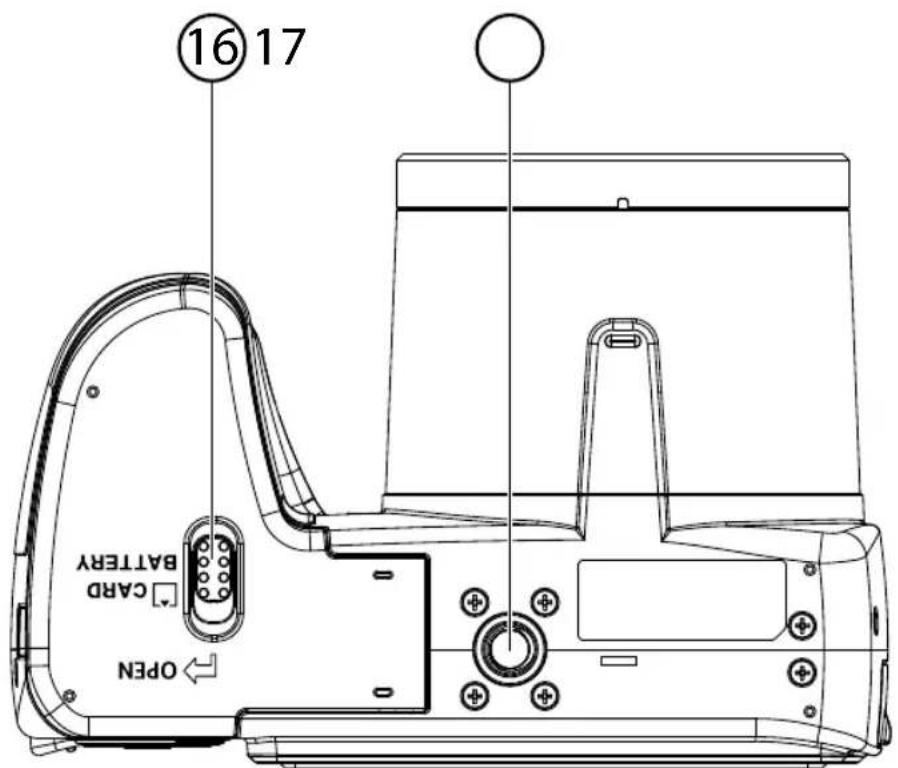
16) Battery/SD card slot cover
17) Tripod mount
Side
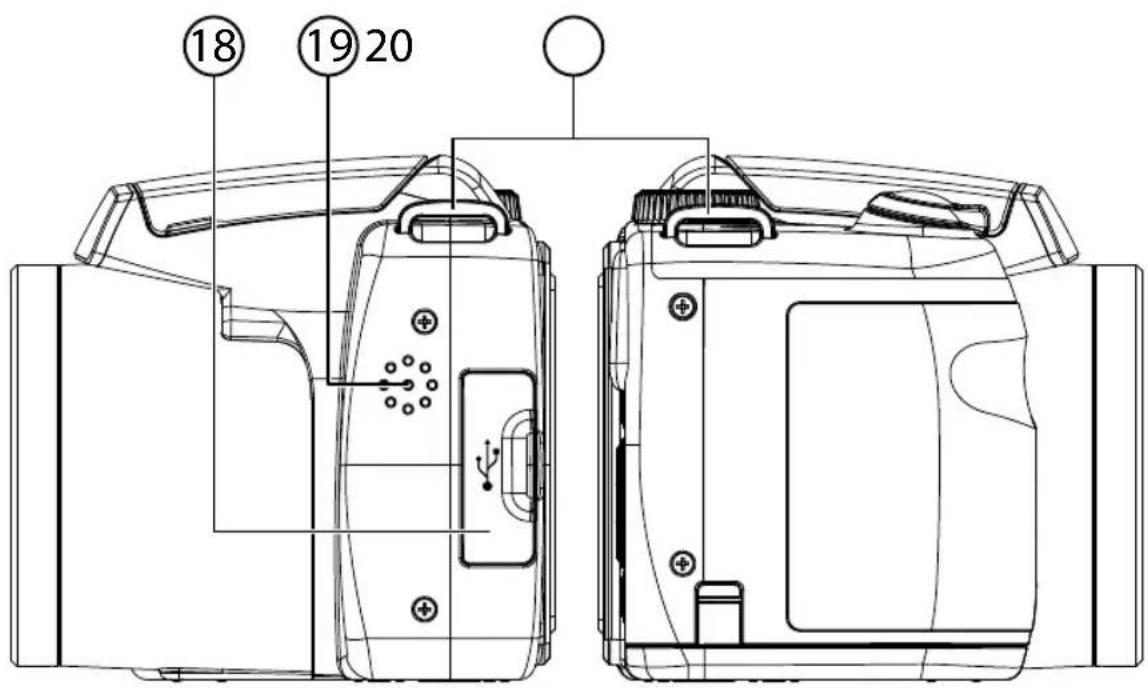
18) Micro-USB connection
19) Speaker
20) Eye for carrying strap
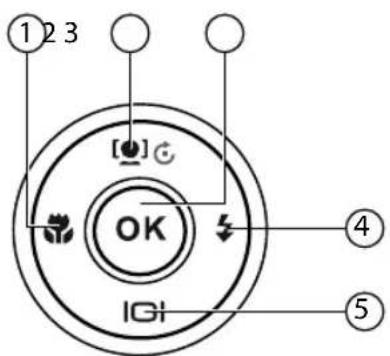
Navigation button
| Button Mode Description | ||
| 1) | In shooting mode: | Turn on macro for close-ups |
| In playback mode: | Show previous shot | |
| Video playback: | Activate rewind or deactivate fast forward | |
| In the menu Exit menu/submenu, scroll left within the menus/submenus | ||
| 2) | In shooting mode: | Face tracking on/off |
| In video play-back mode: | Start/pause playback | |
| In photo play-back mode | Rotate picture by 90° | |
| In the menu Scroll up in menus/submenus | ||
| 3) OK | In video.audio playback mode: | To start playback |
| In the menu Confirm a selection in the menus/submenus | ||
| 4) ¼ | In shooting mode: | Choose flash type |
| In playback mode: | Show next shot | |
| Video playback: Activate fast forward or deactivate rewind | ||
| In the menu | Open menu/submenu, scroll right within the menus/sub- menus | |
| 5) Ⅰ〇Ⅰ | In shooting and playback mode: | Show/hide OSD information |
| Play back videos/audios: | Stop playback | |
| In the menu Scroll down in menus/submenus | ||
Initial operation
Attaching the carrying strap
For ease of handling and increased security, attach the supplied carrying strap to the camera.
Guide the end of the strap through the eye of the strap holder and then into the strap buckle.
Then pull the strap through the strap eye, as shown in the diagram.
Pull the strap tight so that it doesn't slip out of the eye.

CAUTION!
When carrying the camera by the wrist strap, make sure that the camera does not bang into anything. While attaching the wrist strap, place the camera on a stable surface so that it cannot fall down and break.
Attaching the lens cap
Guide the smaller loop through the eye of the lens cap.
Pull the other end of the loop through the smaller loop of the strap and pull the loop tight.
- Fasten the other end of the loop to one of the strap holders of the camera.
Inserting batteries
The supplied batteries are required to operate the camera.
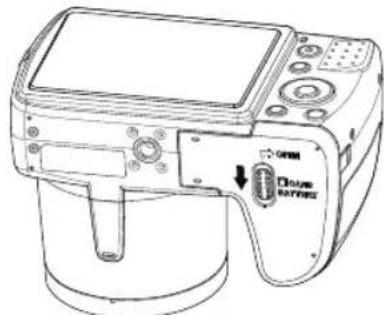
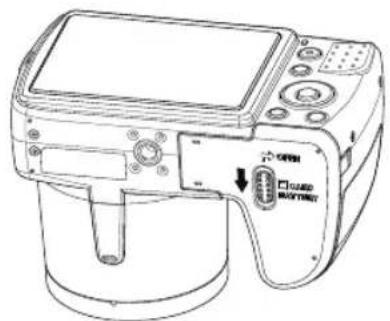
Ensure the camera is switched off.
Move the locking latch of the battery compartment in the direction shown by the arrow.
- Hold the locking latch in position and push the cover of the battery compartment in the direction of the arrow. The battery compartment opens.
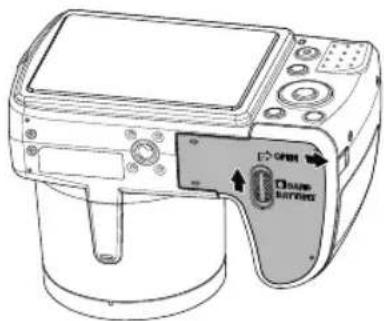
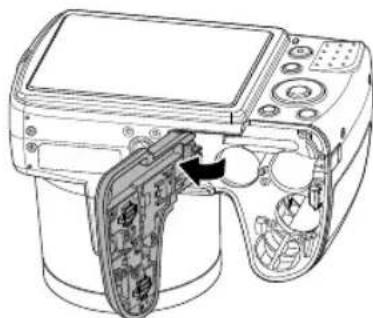
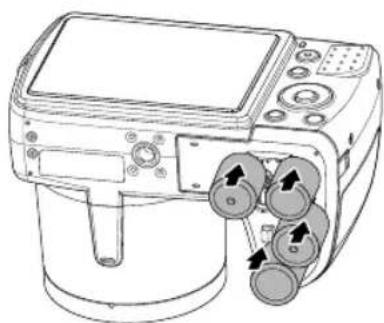
Insert the battery, as shown, into the battery compartment.
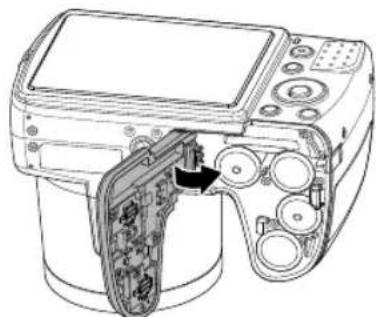
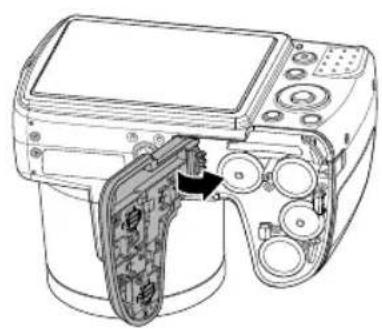
Close the battery compartment and close the locking latch.
Inserting and removing the SD card
If no memory card is inserted, photos will be stored in the internal memory. Please note that the internal memory has a limited capacity.
Use an SD memory card to increase the memory capacity. If a memory card is inserted, your photos will be stored on the card.
Inserting the card
Ensure the camera is switched off.
Move the locking latch of the battery compartment in the direction shown by the arrow.
Hold the locking latch in position and push the cover of the battery compartment in the direction of the arrow. The battery compartment opens.


Insert the card, as shown, into the card slot and make sure that it audibly clicks into place.
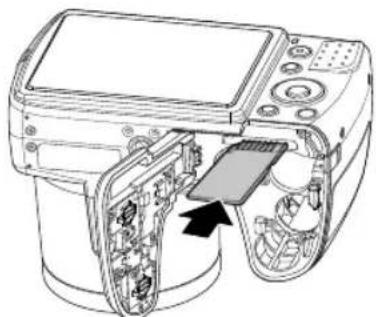
- Close the battery compartment and close the locking latch.
Removing the card
To remove the card, first open the battery compartment as previously described.
Press the card into its slot a short way to unlock it. The card will be pushed out a little and can then be removed.
Close the battery compartment again as described previously.
First steps
Switching on the camera
Press the ON/OFF button to switch on the camera.
The lens comes out, the green light appears on the operating display and the display switches on. The camera is now in shooting mode.

NOTE!
If the camera does not switch on, check whether the battery has been inserted properly and whether it is charged.
Switching off the camera
Press the ON/OFF button to switch off the camera.
Setting the language, date and time
You will be prompted to set the language and time when you switch on the camera for the first time.
Setting the language
Select the required language with the and buttons.
Confirm your choice by pressing the OK button.
After the language has been set, the camera switches automatically to the menu for setting the date and time.
Setting the date and time
Use the and buttons to choose the appropriate value for the date or time.
Use the and buttons to switch to the next entry
Confirm your settings by pressing the OK button.
As well as the date and time, you can also set the date format. The following options are available:
- YY/MM/DD
Year/Month/Day);
MM/DD/YY
(Month/Day/Year);
DD/MM/YY
(Day/Month/Year)

NOTE!
The camera can only display the date and time in playback mode. This information can also be added to the bottom right of the photo if you previously activated the date stamp function (see page 52 "Recording menu").
The internal battery ensures that the time settings are saved. They will be lost, however, if the rechargeable battery is removed from the camera for more than 48 hours.
Power-saving function
The camera switches off if not used for 60 seconds. You can set the automatic switch-off time to 3 or 5 minutes.
The power-saving function is not enabled:
- while recording audio and video clips;
- while playing back images, video or audio clips;
- when the camera is connected to another device via USB.
Shooting and playback mode
Shooting mode is enabled as soon as the camera is switched on. You may take photos directly. You can also record audio and video clips.
In playback mode, you can play back, edit and delete photos, audio clips and video clips.
To access the playback mode, pres button. The playback icon appears at the top left of the display. The most recently taken picture will be shown.
To return to the shooting mode, press th button again.
Displays
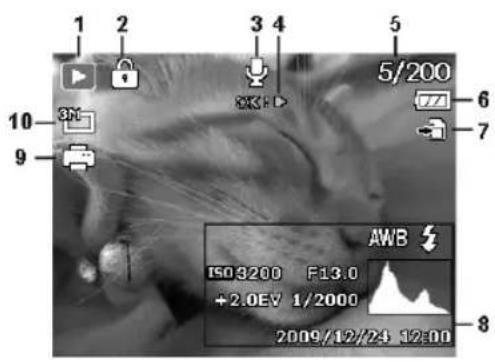
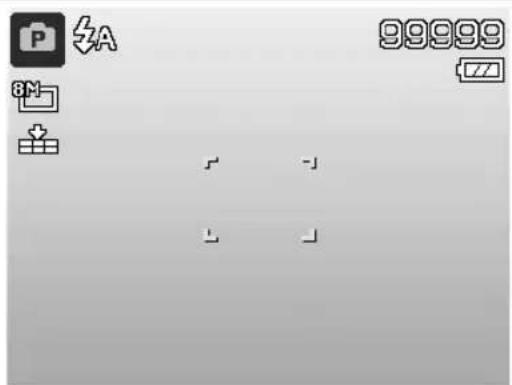
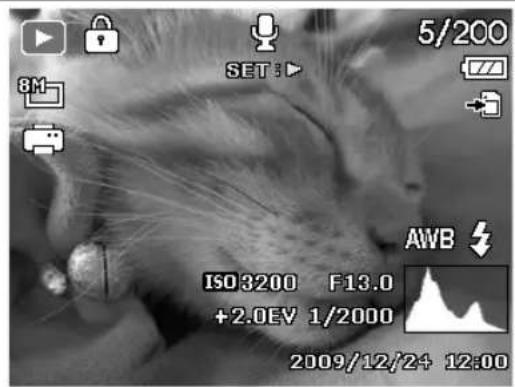
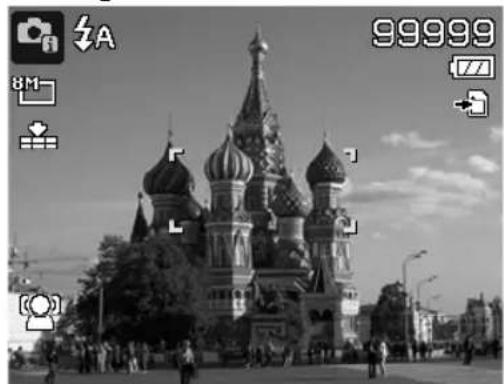
Display options for shooting
The following displays are possible in shooting mode:
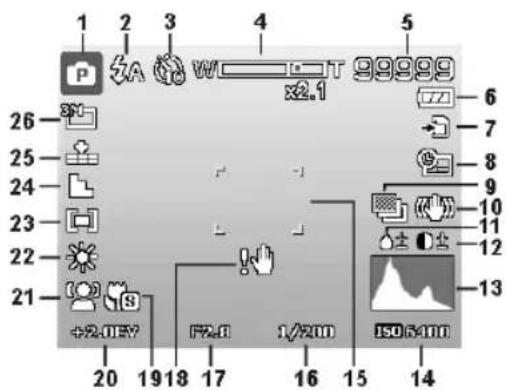
1) Displays the current shooting mode
2) Flash setting
3) Self-timer
4) Zoom setting
5) Remaining shots/recording time (at current resolution)
6) Battery charge status
7) Memory location (internal memory or card)
8) Date stamp
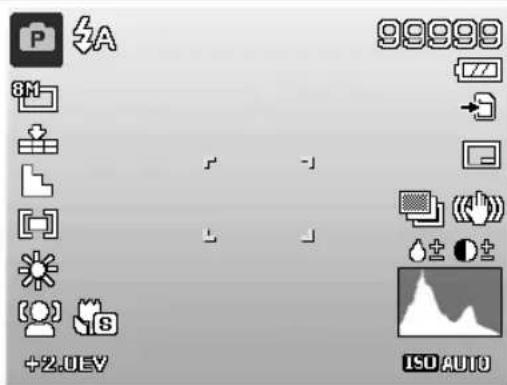
9) Automatic exposure enabled
10) Image stabiliser enabled
11) Saturation display
12) Contrast display
13) Histogram
14) ISO setting
15) Focus range
16) Shutter speed display
17) Aperture setting
18) Warning: Risk of blurring!
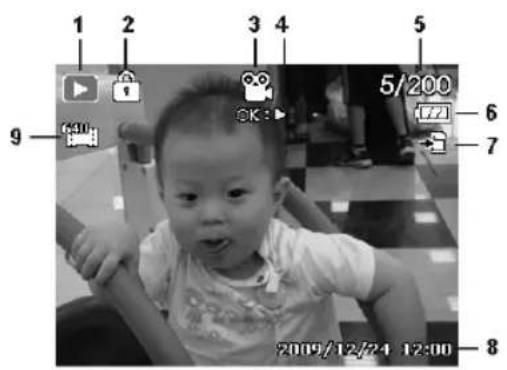
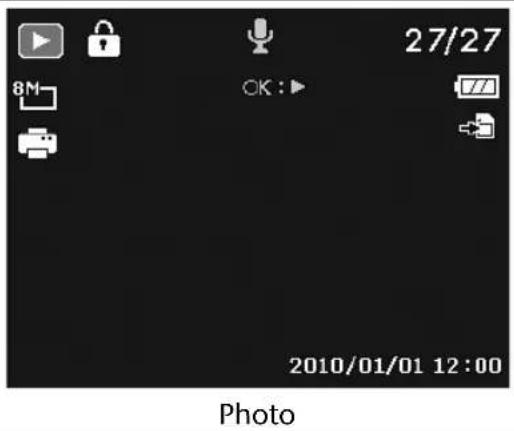
Displays for photo playback
The following displays are possible in playback mode:
1) Mode display (shooting or playback)
2) Picture is protected
3) Sound recording
4) Reference to button function
5) Current shot/total number of shots
6) Battery charge status
7) Memory location (internal memory or card)
8) Shot information
9) DPOF enabled
10) Resolution of currently displayed image
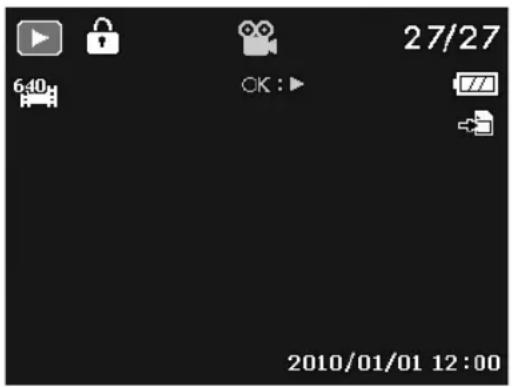
Displays for video playback
The following displays for video clips are possible in playback mode:
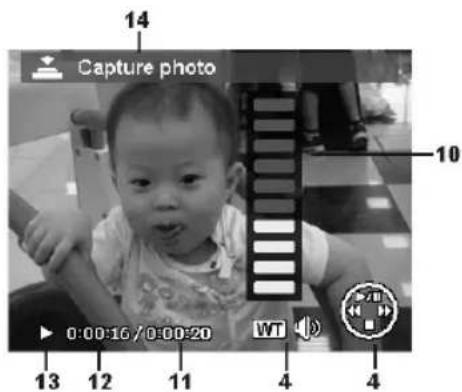
1) Mode display (playback)
2) Video is protected
3) Recording videos
4) Reference to button function
5) Current shot/total number of shots
6) Battery charge status
7) Memory location (internal memory or card)
8) Shot information
9) Resolution
10) Volume setting
11) Video length
12) Playback time
13) Indicates the playback status (playback/pause)
14) Create screen shots
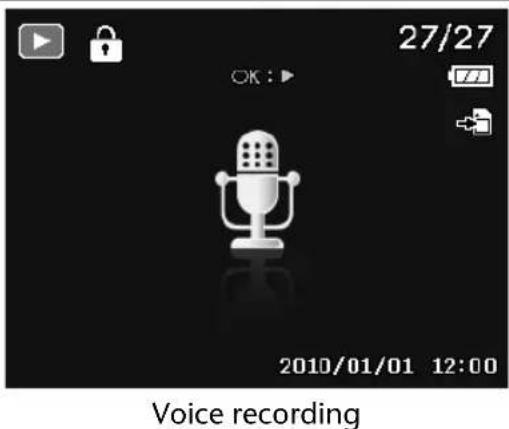
Displays for sound playback
The following displays for sound recordings are possible in playback mode:
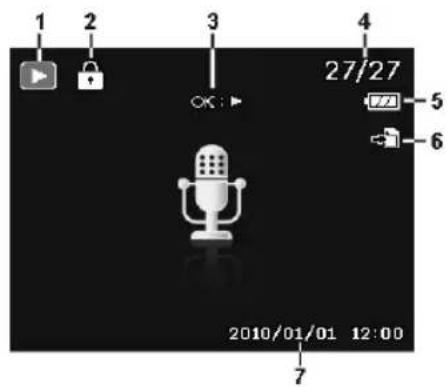
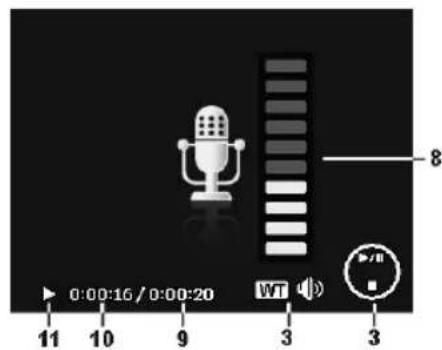
1) Mode display (playback)
2) The recording is protected
3) Reference to button function
4) Current shot/total number of shots
5) Battery charge status
6) Memory location (internal memory or card)
7) Recording information (date and time)
8) Volume setting
9) Audio length
10) Playback time
11) Indicates the playback status (playback/pause)
Switching the displays on and off
Press the 01 button repeatedly to switch the displays on and off and to change them.
In shooting mode
With the most important displays With a
displays

No displays
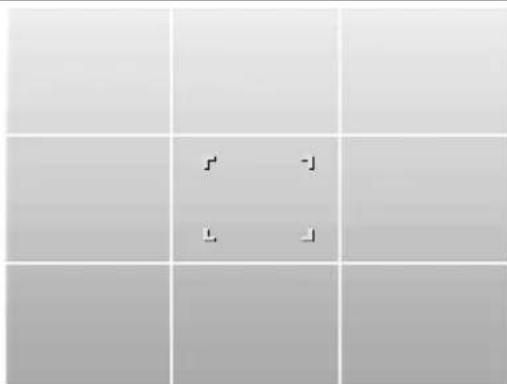
With picture grid lines to make picture layout simpler

NOTE!
The screen displays can vary depending on shooting mode.
In playback mode

With the most important displays
With all displays

No displays
The displays cannot be changed:
While recording and playing back audio and video clips;
- During a slide show or thumbnail display;
- While a photo is being cropped (in editing mode).
Taking your first shots
Setting shooting mode
When the camera is switched on, shooting mode is enabled automatically. The icon for the selected shooting mode appears at the top left in the display. You can find out more about shooting modes and icons on page 67.
Tips for taking good shots
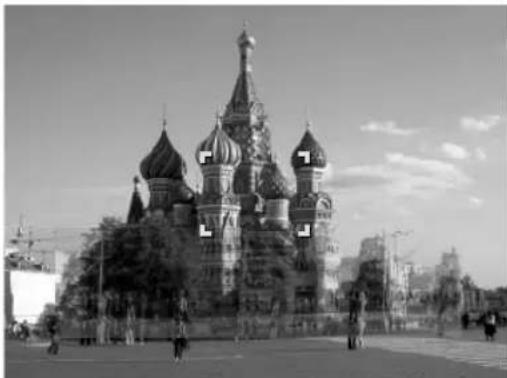
- The camera should not move when you press the shutter release. Do not move the camera directly after pressing the shutter release. Wait for the shutter release signal. If necessary, use a tripod or the image stabiliser (see page 34) to securely support the camera and prevent blurring.
View the subject on the display before pressing the shutter release. - The main subject should take up the largest part of the picture and dominate it. Always move up close enough to the subject.
- When taking shots of landscapes and buildings, ensure you do not include too much of the surroundings in the photo. Such photos are also appealing, but use the panorama function for this instead.
- When taking portrait shots, remember that the face is the decisive subject, and the body or shoes are not relevant here and should not be included in the picture.
- Pictures are more interesting to the viewer when the subject is not exactly in the centre of the picture but rather slightly to one side.
- Many attractive subjects do not come out as well as they could because the background is too distracting. Change the camera angle to get as neutral a background as possible.
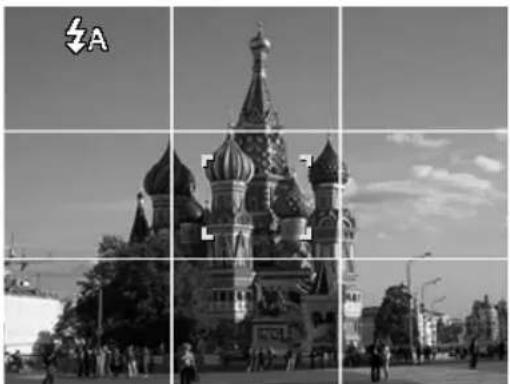
- For landscape shots, use the rule of thirds as orientation; i.e., the picture is divided into three horizontal areas and the photographer uses this division to influence the effect of the picture. Shots with a division of 1/3 sky and 2/3 ground have a quiet and idyllic effect on the viewer, but pictures with a division of 2/3 sky and 1/3 ground have a more dynamic and lively effect on the viewer.
The picture grid lines (see page 30) are very helpful for these types of landscape shots because important picture objects can be aligned to these intersections.
- Give your pictures depth by including several levels in the picture, e.g. by selecting a suitable foreground and/or background.
-
Choose a picture format that matches the subject, e.g. towers and high buildings have an even more impressive effect when taken in portrait format.
-
Try to tell a story with your pictures; 4 or 5 pictures are often enough to turn snapshots into a small story.
- Check the angle if the subject is lit from behind. Change your position to reduce the background lighting.
- Experiment with different perspectives to create more interesting pictures for the viewer.
- If you want to save memory space on the memory card, then do not reduce the resolution of the images but increase the image compression instead (see page 40).
- The tips about good photographs can also be applied to video recordings; but, in addition, you also need to make sure that you pan the camera slowly and keep it steady. If you pan too quickly, the video recordings will be fuzzy and blurred. A tripod can be also very helpful for video recordings.
Taking a photo
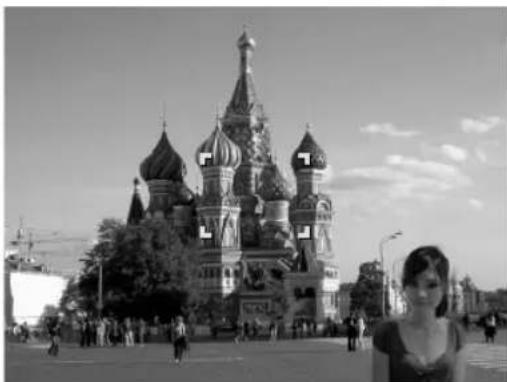
Choose the required subject on the display.
Press the shutter release down slightly to activate the autofocus.
As soon as the autofocus has focused, the yellow image section markers will appear green. The image section markers appear red and the power light flashes if the autofocus cannot focus.
The values for shutter speed, aperture and the ISO value appear.
Press the shutter release all the way down to take the picture. A tone indicates that the photo has been taken (if this function was previously set in the Settings menu under SOUNDs (see page 55).
The photos are saved as JPEG files.

NOTE!
If there is a risk that the shot will blur, this icon also appears in this case you should should hold the camera steady, activate the image stabiliser or use a tripod.
The Functions menu can be used to vary the shooting settings (see page 39). To do this, press the button.

NOTE!
Activate the macro mode by pressing the button if you want to take close-up shots.
Using the stabiliser
The image stabiliser compensates slight camera movements, such as shaking, and prevents the picture from becoming blurred.
From the camera menu, select "STABILIZER" and activate or deactivate the function here.

PLEASE NOTE!
When using a tripod, or if there is sufficient light, you will probably not need to use the image stabiliser.
Using the flash
If there is insufficient light for the photo, the on-board flash can provide the additional light required.
Press the flash button repeatedly to select the following flash settings:
| Symbol Description | |
| A | AUTO: The flash is activated automatically when the shooting conditions require additional lighting. |
| ∅ | Flash is triggered before the actual flash; used to prevent “red-eye” effect. The camera detects the brightness and only flashes if necessary. |
| ↓ | Flash always on |
| SL | “Slow Sync”: The flash is synchronised with slow shutter speed. |
| ◎ | Flash always off |
The flash only works in single shot and self-timer mode. It cannot be used for photo sequences or video recordings.
Using the flash increases battery usage. If the battery is almost flat, the flash takes longer to charge.

WARNING!
Do not use the flash to take close-ups of people and animals. Maintain a distance of at least one metre from your subject.
Zoom function - enlarging or reducing
The camera has an optical and a digital zoom. The lens is used to set the optical zoom; use the Settings menu to enable the digital zoom.
Press the zoom control towards W or T The bar that appears represents the zoom setting
W: The image is zoomed out ("wide angle"); you can capture a larger section.
T Q: The image is zoomed in ("telephoto"); you can capture a smaller section.
| Symbol Description | |
| WOO | If the marking is on the left side of the bar, the optical zoom is in use. |
| WOO | If you press T Q again, the digital zoom is switched on automatically. You can continue to zoom by a factor of 5. Digital zoom must be enabled in the Settings menu for this! |

NOTE!
The digital zoom is not available for video recordings.
With the digital zoom, the image section is enlarged by interpolation; the image quality may suffer somewhat as a result.
Setting the focus mode
This function allows you to define the focus type if you wish to take a photo or record a video clip.
Press the macro button repeatedly until the icon for the required focus mode is displayed at the bottom left of the LCD.
Your camera has the following four different focus modes:
Normal
For normal focus, the focus range begins at 40~cm . When the camera is in normal mode, no icon is displayed.
PF-Multi
- INF - Infinity
If multifocus is enabled, the camera focuses on every subject.
With the infinity setting, the camera focuses on subjects that are very far away.
Recording video clips
In addition to the photo functions, the camera can also record video clips so that you can also save moving pictures as well as stills.

Press the record button to start recording.
The recording time appears in the display.
Press the zoom control towards W or T to zoom in or out and to change the picture selection.
Press the button to stop the recording.
Press the button again to resume recording.
To end the recording, press the record button again.

NOTE!
The digital zoom and the flash are not available when recording video clips.
The microphone is active during the video recording and records the sounds as well.
While the zoom button is held down, no sound is recorded.
The video clips are saved with sound as AVI files.
Recording audio clips
The camera can also store voice recordings; the microphone is located on the right above the lens on the front of the camera. Take care not to touch the microphone during the recording.

Set the mode wheel to the SCN position.
Press the MENU button to access the menu selection.
The button lets you access the selection of the recording mode. Use the buttons to select the voice recording entry
Press the shutter release to start the recording. The recording time appears in the display.
Press the shutter release again to stop recording.

NOTE!
The voice recordings are saved as WAV files.
Using the Functions menu
The Functions menu allows you to perform the essential settings for recording. The individual menu items within the Functions menu can vary depending on the selected shooting mode. The functions available for setting the camera are displayed in the left menu bar. The right bar displays the possible settings for the particular function.
Press the button to open the menu.
Use the direction buttons or to select the function you would like to change.
Use the or buttons to select the required setting, such as the resolution 14M.
Press the OK button to save the setting.
Favourites display
The Favourites display is only available if you have set the shooting mode SCN with the mode wheel. The Favourites display lists the five last used shooting modes as well as the PORTAIT mode.

Each shooting mode has other setting options. If you use the or buttons to change the shooting mode, the setting options will change accordingly.
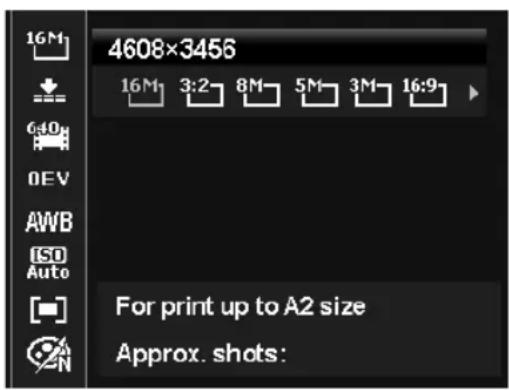
Resolution - photos
Basically, the resolution determines the image quality. The higher the resolution, the more memory an image requires. The highest resolutions are generally recommended for large prints (larger than A4).1.
| Settings Size in pixels | |
| 16 M 4608 x 3456 | |
| 3:2 4608 x 3072 | |
| 8 M 3264 x 2448 | |
| 5 M 2592 x 1944 | |
| 3 M 2048 x 1536 | |
| 16:9 1920 x 1080 | |
| VGA¹ | 640 x 480 |
Quality (compression)
The quality determines how the recorded data is compressed. The higher the quality, the more storage space the images require.
| Settings Meaning | ||
| SUPERFINE | Highest quality | |
| FINE | Medium quality | |
| NORMAL | Normal quality | |
Video size (resolution - videos)
The video size setting is only available for recording video clips.
| Settings Size in pixels Picture quality | ||
| 16:9 | 1280 x 720 | HDTV (only possible with SDHC cards of at least class 6 or with the supplied SD Card) |
| 6:10 | 640 x 480 High quality | |
| 320 | 320 x 240 Normal | |
| 640 x 480 | Web quality Quality for displaying on Internet platforms | |
In the Web Quality setting, the video clip recording is optimised for Internet display. Since file size on Internet platforms is restricted, the camera switches off automatically when the file reaches 100 MB.
If the resolution is set to "Web Quality", the files are saved in the DCF standard (see page 87) in the folder "101UTUBE".
Exposure compensation (EV)
Exposure compensation allows you to deliberately deviate from the exposure values of the exposure meter. By compensating the exposure value (OEV = Over Exposure Value) you can adjust pictures that would otherwise be too dark or too light.
You can set the value using the buttons in twelve stages between +2.0EV and -2.0 EV.
Use a positive value when light conditions are poor and a negative value in strong light.
- Do not use the exposure correction when the subject is in a very bright or very dark area or if you are using the flash. In that case, use the OEV setting.
White balance
The white balance can correct certain light conditions.
| Settings Meaning | ||
| AWB AUTO WHITE BALANCE | White balance is adjusted automatically. | |
| DAYLIGHT | Suitable for shots in bright daylight. | |
| CLOUDY | Suitable for shots under cloudy skies, at dusk or in the shade. | |
| LIGHT BULB | Suitable for shots in electric (tungsten) light. | |
| 1 | NEON_H. | Suitable for shots in fluorescent, red-tinged light. |
| 2 | NEON_L. | Suitable for shots in fluorescent, blue-tinged light. |
| USER | For more precise adjustment or if the light source cannot be categorised. NOTE! To find the right setting, point the camera at a piece of white paper or similar object (in the light conditions under which you want to make the white balance adjust-ment) and use a reference picture to take the white balance. | |
ISO (light sensitivity)
This setting changes the sensor's sensitivity to light. A higher value increases light sensitivity but generates more noise which can have a negative impact on the image quality. It is therefore important to select the lowest possible ISO value for the conditions.
| Settings Meaning | |
| ISO AUTO | Automatic ISO value. |
| ISO 100 | Sets the sensitivity to ISO 100. |
| ISO 200 | Sets the sensitivity to ISO 200. |
| ISO 400 | Sets the sensitivity to ISO 400. |
| ISO 800 | Sets the sensitivity to ISO 800. |
| ISO 1600 | Sets the sensitivity to ISO 1600. |
| ISO 3200 | Sets the sensitivity to ISO 3200. |
| ISO 6400 | Sets the sensitivity to ISO 6400. |

NOTE!
If you set the ISO value to ISO 3200 or ISO 6400, the camera will automatically switch to the resolution 3M.
Measurement - light measurement procedure
This function allows you to determine the area in which light levels are to be measured when taking photos or making video recordings.
| Settings Meaning | ||
| [ ] | Multiple | Selects an exposure based on the measurement results at several points in the shooting range. |
| [ ] | Centre | The light of the entire shooting range is measured, but the values close to the centre are given more significance. |
| [ ] | Point | Chooses an exposure based on one single measurement result in the centre of the image. |
Colour effect
Photo effects can be used in shooting and playback mode to provide different tinges or artistic effects.
| Settings Meaning | |
| NORMAL | No photo effect set. |
| LOMO | LOMO camera colour scheme |
| LIVELY | The image is produced with higher contrast and higher saturation to emphasize the bright colours. |
| SEPIA | The image is produced in nostalgic sepia tones. |
| HUE (RED) | The image is produced in black & white, red colours are retained. |
| HUE (GREEN) | The image is produced in black & white, green colours are retained. |
| HUE (BLUE) | The image is produced in black & white, blue colours are retained. |
| B/W (BLACK/WHITE) | The image is produced in black & white. |
| RED | The image takes on a red hue. |
| GREEN | The image takes on a green hue. |
| BLUE | The image takes on a blue hue. |
Using the Recording menu
You can also select the settings for the recordings via the Recording menu.
You will find more information on navigating through the menus and the various settings in the chapter „The menus" from page 51 onwards.
Viewing/listening to recordings
Playing back single recordings
You can play back your most recent recordings in sequence in display mode.
Press the playback button to switch to the playback mode.
The most recent recording appears on the display and the following display modes are possible, depending on the type:

Press the or buttons to view the previous or next recording.
Playing back images as thumbnails
In playback mode, press the zoom wheel towards W to display up to nine small preview images.
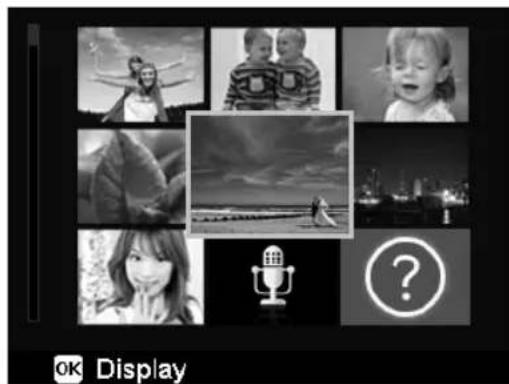
Use the direction buttons or ,or to select a file.
Press the OK button to display the shot at full size.
Press the zoom wheel toward T to return to the full screen view.
Some thumbnails contain icons which specify the file type.
| Icon File type Meaning | |
| Voice recording Indicates a voice recording. | |
| Defective file Indicates a defective file. |
Calendar mode
In playback mode, press the zoom button twice toward W to activate the calendar mode.
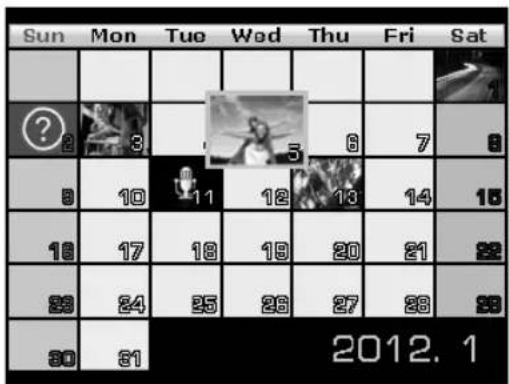
The first file (picture, video or audio) that was recorded on the respective date will be displayed on the screen.
Use the direction buttons or or to select a date.
Press the OK button to display the first recording with this date in full size.
Press the zoom wheel toward T to exit the calendar mode.
Zooming photos
You can zoom in to view individual sections of your photo images.
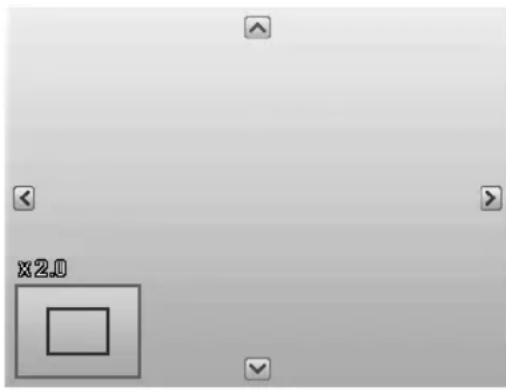
- By repeatedly pressing the zoom wheel toward T Q in full screen view, you can enlarge the image section up to 12 times. By repeatedly pressing the zoom wheel toward W 📁 you can reduce the view.
The four arrows at the edge indicate that the picture detail is enlarged.
Use the direction buttons or to change the image section within the picture.
Press the MENU button to return to the full size image.
Playing back video/album recordings/voice memos
Select the required recording.
Press the OK button to start playback.
During video clip playback, press the or buttons to start fast forward or rewind.
Press the zoom button toward T to increase the volume.
Press the zoom button toward W to reduce the volume.
If you wish to pause playback, press the button.
Press the button again to resume playback.
If you would like to end playback, press the button.
Creating a screen shot of a video recording
While playing back a video recording, press the button to pause the playback.
Press the shutter release to save the shown image as a screen shot. A circle symbol indicating that data is being processed appears on the display.
Press the button to resume playback.
If you would like to end playback, press the button.

NOTE!
This function is only available if there is sufficient storage space. Otherwise the shutter release icon does not appear.
Deleting shots
You can delete shots in the playback mode or via the Playback menu (see page 58).
The quickest way to delete an individual shot is by using the FN button in playback mode.
Select the shot in playback mode and press the FN button.
The "DELETE" query appears in the display. Use the or buttons to select the "DELETE" entry and press the OK button to confirm.
After the shot has been deleted, the next shot is shown on the display.
To cancel the function, select the "CANCEL" entry and press OK to confirm.

NOTE!
Protected files cannot be deleted. In this case, the message "FILE LOCKED" appears on the display.
If a memory card is inserted, you can only delete the files on the memory card.
If the memory card is locked, you will not be able to delete the files on the memory card.
You cannot restore a file that has been deleted. Therefore, exercise caution when deleting files.
The menus
Navigating in the menus
Press the MENU button to open the menus.
Use the direction buttons or to select the setting you would like to change.
Press the OK button or the button. The appropriate submenu opens.
Use the direction buttons or to select the required option and press the OK button to confirm.
The MENU button returns you to the previous level at any time.
The Recording menu
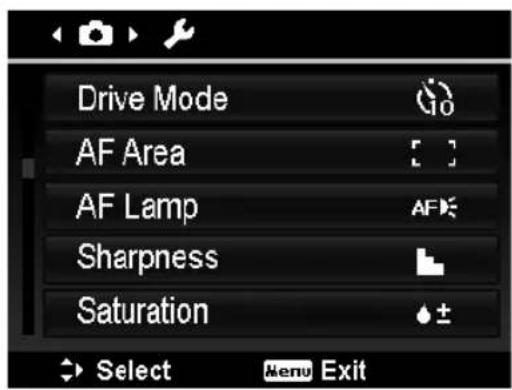
| Settings Symbol Meaning | ||
| DRIVE MODE | You can set the self-timer here. | |
| OFF OFF | The self-timer is deactivated. | |
| 10 SEC. | The picture is taken 10 seconds after pressing the shutter release | |
| 2 SEC. | The picture is taken 2 seconds after pressing the shutter release | |
| DOUBLE | 2 pictures are taken. The first is taken 10 seconds after pressing the shutter release and the second 2 seconds later. | |
| AF AREA | Here you can select the autofocus range (AF). | |
| WIDE | The camera focuses on a wide area. | |
| CENTER | The camera focuses on the image centre. | |
| AF LAMP | Here you can set the AF light to automatic mode or switch off the AF light (OFF). | |
| SHARPNESS | Here you can make the details of an image appear sharper or softer. | |
| HIGH | Sharpens the image. | |
| NORMAL | Normal image sharpness | |
| LOW | Softens the image. | |
| SATURATION | Here you can select the colour saturation. Select a high saturation level for strong colours and a low level for more natural tones. | |
| + HIGH | Strong colours | |
| ± NORMAL | ||
| - LOW | Natural colour tones | |
| CONTRAST | Here you can select the contrast. | |
| ① + HIGH | Increases the contrast | |
| ① ± NORMAL | Normal contrast | |
| ① - LOW | Reduces the contrast | |
| DIGITAL ZOOM | Here you can select the digital zoom for some operating modes. | |
| INTELLIGENT ZOOM | Enlarges the image digitally and optimises the image quality | |
| STANDARD ZOOM | Enlarges the picture detail up to 5 times but produces poorer image quality. | |
| OFF | Uses only the optical zoom. | |
| DATESTAMP | Here you can choose to print the date and time on the pictures. | |
| DATE | Only the date is saved. | |
| DATE & TIME | The date and time are saved together with the picture. | |
| OFF | No date is saved. | |
| Settings Symbol Meaning | ||
| AUTO RE- VIEW | After the shot, the photo is displayed for a few seconds. You can switch this function on or off. | |
| STABILIZER | Here you can switch the automatic image stabiliser on or off. | |
The settings menu
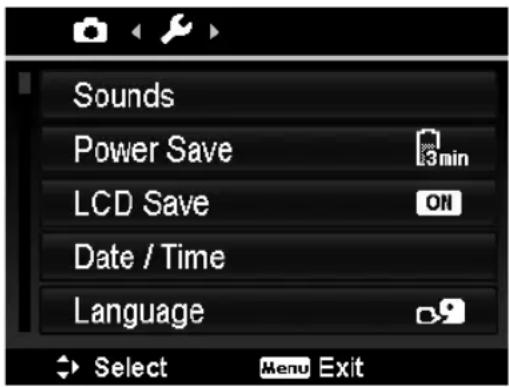
| Settings Symbol Meaning | ||
| SOUNDS | STARTUP | Here you can choose a start tone from 3 availa-ble tones or deactivate the start tone. |
| SHUTTER | Here you can set the tone for when the shutter button is pressed | |
| BEEP VOLUME | Set the volume | |
| POWER SAVE | To save the battery charge, the camera switches off automatically after the selected period. Choose: 1 MIN., 3 MIN. or 5 MIN. The power-saving function is not enabled: • while recording audio and video clips; • while playing back images, video or audio clips; • when the camera is connected to another device via USB. | |
| LCD SAVE | When you set this function to ON, the display is dimmed after a short time if it is not used. | |
| DATE & TIME | Here you can select the date and the time and the format for displaying the date. (see page 23) | |
| LANGUAGE | Here you can select the language for the menu (see page 23) | |
| FILE NUM-BERING | Here you can set the numbering for the files. | |
| SERIES | The files are numbered consecutively from 0001 onwards. | |
| RESET | Reset the numbering to 0001. This function is advisable, for example, after the memory card has been changed. | |
| TV OUT | Using the supplied AV cable, you can transfer the images to your television set. Choose the TV system of your region. | |
| NTSC | For America, Japan, Taiwan, etc. | |
| PAL | For Europe, Australia, etc. | |
| LCD BRIGHT-NESS | Here you can set the display brightness. | |
| AUTO | Automatic adjustment of LCD brightness | |
| BRIGHT | Display is brightened | |
| NORMAL | Standard brightness | |
| BATTERY TYP | Here you can set the battery type of the inserted batteries. | |
| ALKALINE | Alkaline batteries | |
| NI-MH | Nickel metal hydride batteries | |
| LITHIUM | Lithium batteries | |
| MEMEORY KIT | Here you can organise the data in the internal memory. | |
| FORMAT | Formats the memory card or the internal memory. This deletes all the shots. NOTE! If you format the memory, all the data saved in it is deleted. Make sure that there is no important data left in the memory or on the SD card. | |
| COPY TO CARD | Copies shots from the internal memory to the memory card. Use ▲ or ▼ to select “YES” and press the OK button to carry out the selected function. | |
| Settings Symbol Meaning | ||
| RESET ALL | Here you can reset all the individual settings to the factory settings. In this case, confirm the query with “YES”. The following settings will not be reset: • Date & time • Language • TV system | |
DE
EN
FR
NL
DK
ES
IT
The playback menu
If you would like to open the playback menu, first switch to playback mode by pressing the button.
| Settings Symbol Meaning | ||
| DELETE | This function is used to delete files on the internal memory or the memory card (see page 50) that are no longer required.The following options are available: | |
| SINGLE | Delete one shot | |
| VOICE ONLY | Delete the voice recording of an image (if avail-able) | |
| MULTI | Delete several shots (select in the thumbnail view) | |
| ALL | Delete all the shots | |
| SLIDE SHOW | You can run through the shots (photos only) as a slide show. (see page 77) | |
| PROTECT | This function can be used to protect shots from accidental deletionThe following options are available: | |
| SINGLE | Protect one shot | |
| MULTI | Protect multiple shots (select in the thumbnail view). | |
| LOCK ALL | Protect all shots | |
| UNLOCK ALL | Remove protection for all shots. | |
| RED-EYE CORRECTION | Here you can correct shots which were not taken with the pre-flash func-tion (see page 34).You can either save the corrected file under a new name or you can over-write the original file. | |
| VOICE MEMO | You can save a voice memo for each photo taken (see page 76).Start recording the voice memory by pressing the OK button.The maximum length of a voice memo is 30 seconds. The time remaining is shown on the display.If there is already a voice memo for the selected photo, it is overwritten. | |
| COLOR MODE | You can add colour effects to existing shots (see page 80). | |
| TRIM | This function can be used to choose an image section and crop the image to this size. The new picture only contains the area visible in the picture detail. i NOTE! The crop function cannot be applied to shots with a VGA resolution. You have the following options to save the picture: | |
| SAVE AS | Save the picture with a new name. The original file is retained. | |
| OVERWRITE | The original file will be overwritten. | |
| CANCEL | Closes the function and discards the changes. | |
| RESIZE | You can reduce the resolution of photos and thus reduce the file size. i NOTE! The resolution of photos in VGA cannot be changed. You have the following options to save the picture: | |
| SAVE AS | Save the picture with a new name. The original file is retained. | |
| OVERWRITE | The original file will be overwritten. | |
| CANCEL | Closes the function and discards the changes. | |
| STARTUP IMAGE | You can select an image that appears on the screen after the camera has been switched on. You can choose between the following: | |
| SYSTEM | The standard system screen is displayed. | |
| MY PHOTO | The selected photo is displayed. Use ▲ or ▼ to select the My Picture entry. Use ▲ or ▲ to select the photo and press OK to confirm. | |
| OFF | No photo is displayed. | |
| DPOF | DPOF stands for “Digital Print Order Format”. If you would like to have your pictures developed by a photo studio or printed on a DPOF-compatible printer, you can specify the print settings for pictures here. With a DPOF-compatible printer you can print the pictures directly without transferring them to the computer beforehand. You can print all the photos, a single photo, or reset the DPOF settings. ► Connect the camera to the printer by USB cable. ► Now confirm the connection ► Use the ▲ or ▼ buttons to set the number of prints for each picture. ► Use the button to activate or deactivate the date stamp. NOTE! With DPOF you can define up to 99 copies. If you set 0 copies for an image, the DPOF setting of this picture deactivates automatically. | |
| RADIAL BLUR | Radial blur is an effect that softens the edges around the image centre. ► Use the ▲ or ▼ buttons to set the amount of blur. Choose between HIGH, NORMAL and LOW. ► The CANCEL option lets you exit the function. ► Press OK to save the image. | |
The mode wheel
Turning the mode wheel lets you set 8 different shooting modes; the modes Adjusted scene Q_b Program P,Shutter setting S,Aperture setting A,Manual exposure M,Panorama function and Continuous shooting can be used directly.
In the scene mode SCN you can choose between diverse shooting types to achieve a better result for the desired scene.
The following functions are available:
| Symbol Mode Description | ||
| i | INTELLIGENT SCENE | The camera analyses the shooting conditions and automatically changes to the right scene mode (see page 62). |
| P | PROGRAM | The camera automatically selects the appropriate settings, e.g. exposure time and f-stop values |
| A | APERTURE PRIORITY | This function enables you to set the f-stop value (see page 63). |
| S | SHUTTER PRIORITY | This function enables you to set the shutter speed (see page 63). |
| M | MANUAL EXPOSER | With this function you can set the shutter speed and the f-stop value (see page 64). |
| PHOTO STITCH | With this function you can shoot a panorama picture composed of up to 3 composite pictures (see page 64). | |
| BURST MODE | With this function you can shoot a series of pictures (see page 66). | |
| SCN | SCENE MODE | For particular shooting situations or subjects, you can select default shooting modes that use a preprogrammed auto setting (see page 67). |
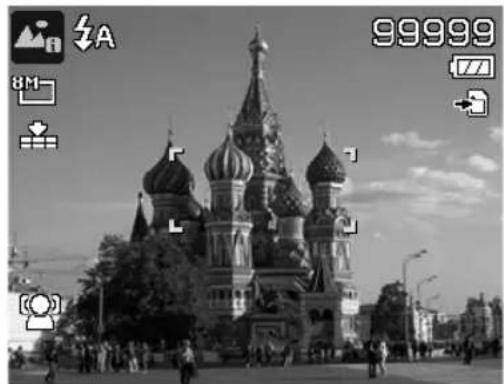
Using the intelligent scene mode
This function is particularly helpful for beginners. You achieve respectable results without any profound knowledge of photography and photographic technology.
If you set the camera to this mode, it automatically detects 11 different shooting types and selects the optimal shooting type from these.
The camera automatically detects the Portrait, Landscape, Sunset, Macro, Snow, Backlight, Backlit Portrait, Night scene, Night shot, Text and Foliage shooting modes.
- Turn the mode wheel to the b position. The icon for the adjusted scene mode appears in the left top corner of the display.
Focus the camera to shoot the selected subject by pressing the shutter release halfway down.
The camera analyses the subject and chooses the most suitable shooting mode. The icon for the detected mode appears in the left top corner of the display.
Press the shutter release all the way down to take the picture.
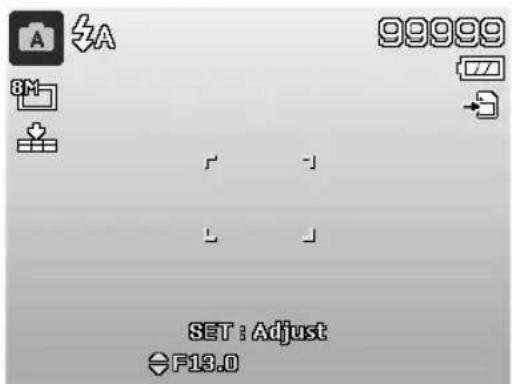
Using the aperture priority mode
This mode lets you manually control the f-stop value, and the camera automatically selects a suitable shutter speed.
The aperture setting influences the depth of field of a picture; when a larger aperture (= smallest f-number) is chosen, only one object is in focus and the background appears blurred.
Choose a small aperture for a picture where all objects should be in focus.
Turn the mode wheel to the A position. The icon for the aperture setting mode appears in the left top corner of the display A.
Press the OK button to call up the setting mode.
Use the buttons to choose the required f-stop value.
Press the shutter release all the way down to take the picture.
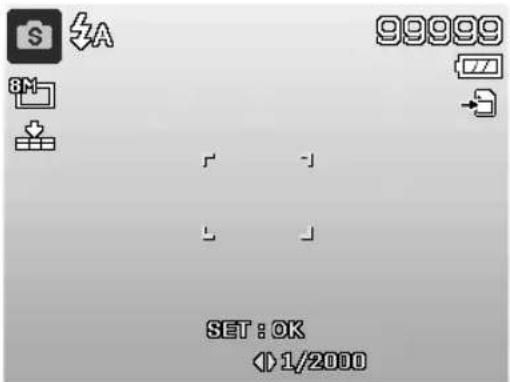
Using the shutter priority mode
This mode is appropriate for taking pictures of moving subjects.
A fast shutter speed freezes movement (such as running children), whereas a slower shutter speed generates movement (e.g. flowing water).
- Turn the mode wheel to the S position. The icon for the shutter setting mode appears in
the left top corner of the display s.
Press the OK button to call up the setting mode.
Use the buttons to choose the required shutter value.
Press the shutter release all the way down to take the picture.
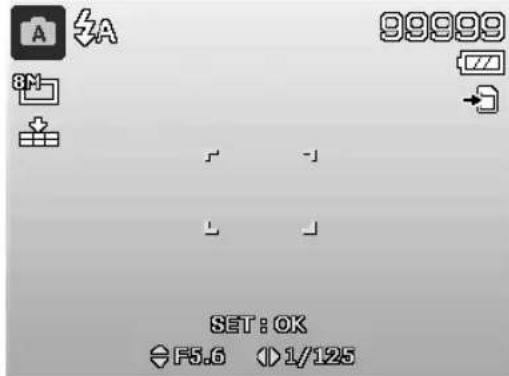
Using the manual exposure mode
This mode makes it possible to manually control the f-stop values and/or shutter settings.
Turn the mode wheel to the M position. The icon for the manual exposure mode appears in
the left top corner of the display M.
Press the OK button to call up the setting mode.
Use the buttons to choose the required shutter value.
Use the buttons to choose the required f-stop value.
Press the OK button to switch between the two setting options.
Press the shutter release all the way down to take the picture.
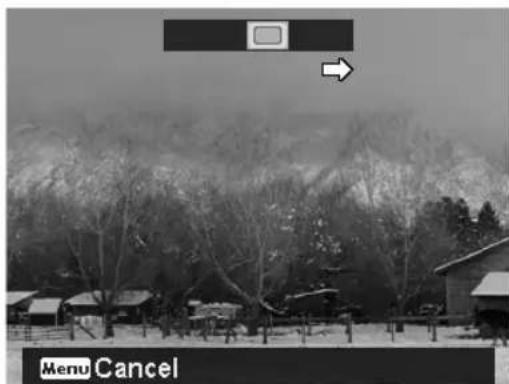
Using the panorama mode
This function lets you create a panorama picture made up of 2 or 3 shots. To assist you, the camera provides guide graphics and an automatically controlled shutter release.
Turn the mode wheel to the position. The icon for the panorama mode appears in the left top corner of the display.
Use the button to choose the direction in which the shots are to be combined.
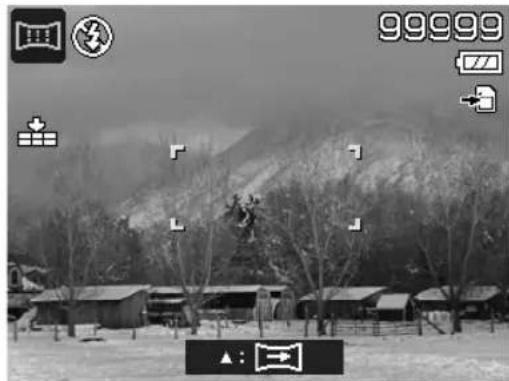
Press the shutter release all the way down to take the first picture.
After you have taken the first shot, a guide line and a direction arrow appear at the top picture edge, indicating in which direction the camera is to be panned.
The yellow box within the guide lines indicates the position of the second picture. Now pan the camera in the indicated direction and try to overlap the camera icon with the yellow bar.

When the camera icon reaches the correct position, the camera takes another shot and
generates the second picture of the panorama picture.
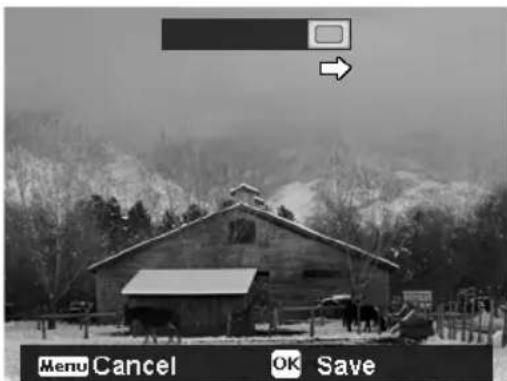
After the second picture has been taken, you can press the OK button and end the panorama shot at this point.
The yellow bar in the guide line now moves to the end of the line; now try again to overlap the camera icon and the yellow bar. The camera automatically takes the shot again to generate the third and last picture of the panorama picture.
The pictures are now joined and the panorama picture is stored.
After every picture of the panorama picture you can use the MENU button to cancel the entire shot and start shooting from the beginning.

PLEASE NOTE!
The following settings are predefined for the panorama function and cannot be changed:
The flash is always off.
- The self-timer is switched off.
The autofocus is active.
- The autofocus range is set to WIDE.
Depending on the chosen subject, the connecting edges of the panorama shots may be visible.
Using the burst mode
- Turn the mode wheel to the position. The icon for the continuous shooting mode appears in the left top corner of the display
Use the buttons to select the required continuous shooting.
The following options are available:
| Symbol | Mode Description | |
| BURST (sequence of shots) | With this setting, the camera continues to take shots in sequence for as long as the shutter release is held down. | |
| SPEEDY BURST | With this setting, the camera captures a series of 30 pictures. | |
| AEB | Here you can switch the automatic exposure function on or off. |
In the AEB mode the camera shoots a small series of three pictures with different stages of exposure:
- one picture with normal exposure
- one picture with underexposure
- one picture with overexposure
Using appropriate software, the three pictures can then be combined into a single high-contrast picture
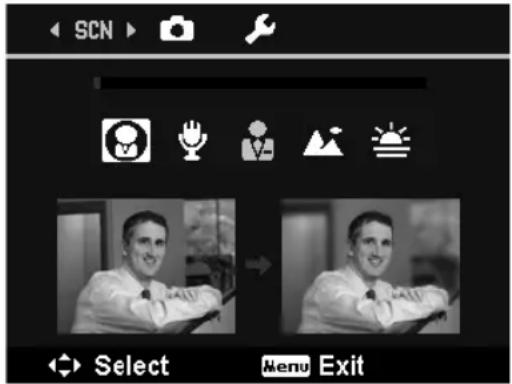
Using the shooting mode
The camera offers 27 modes to take pictures with the most appropriate settings.
- Turn the mode wheel to the SCN position. The corresponding icon for the selected mode
appears in the left top corner of the display.
Press the MENU button to call up the selection menu.
Use the button to switch to the selection list of the shooting modes.
Use the buttons to select the required shooting mode.
Press the OK button to confirm the selection.
After you have made your selection, the selected mode (with the exception of voice recording mode) is added to "Favourites" in the Functions menu (see page 39).
The following shooting modes are available:
For the following special types of shot, certain settings cannot be changed (e.g. flash and macro) as they are preset for the type of shot.
| Symbol Settings Meaning | ||
| PORTRAIT | Reduces background focus and focuses on the centre. | |
| LANDSCAPE | Suitable for wide landscape views. | |
| SUNSET | Emphasises the colour red when taking photos of sunsets. | |
| BACKLIGHT | Adjusts the “Metering” setting to account for the backlighting. | |
| KIDS | Suitable for capturing people in motion. | |
| NIGHT SCENE | Optimises the settings for shooting night scenes | |
| FIREWORKS | Reduces the shutter speed for capturing fireworks. | |
| SNOW | Suitable for beach and snow shots. | |
| SPORTS | Suitable for shooting pictures with fast movements. | |
| PARTY | Suitable for indoor shots and parties. | |
| CANDLELIGHT | Creates shots in warm light. | |
| NIGHT POR-TRAIT | Suitable for portrait pictures with a dark background. | |
| SOFT SKIN | Creates pictures with soft transitions and soft colours. | |
| FLOWING WA-TER | Creates a soft effect for fast movements. | |
| FOOD | Increases the colour saturation. | |
| BUILDING | Emphasises the border (outline) of the photographed sub-ject more. | |
| TEXT | Emphasises the black & white contrast. | |
| FOLIAGE | This function increases the colour saturation of green hues. | |
| Auction | Optimises the images for the Internet (auctions), e.g. VGA resolution You have a choice of 4 different designs. | |
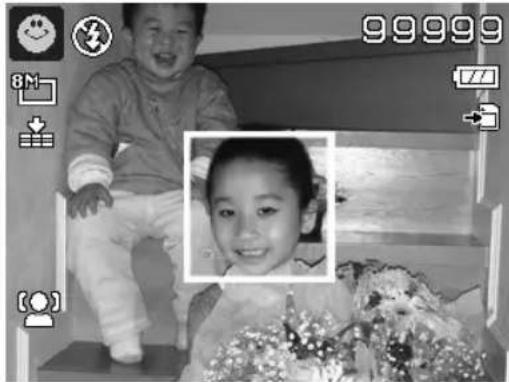
| SMILE CAPTURE | Uses face recognition to automatically capture a smiling face. | |
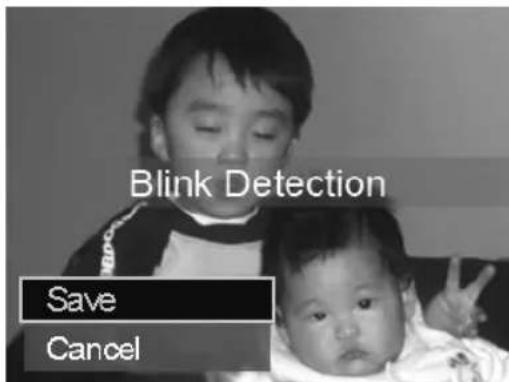
| BLINK DETEC-TION | The camera detects whether the subject's eyes were closed and asks if you wish to save the picture. | |
| PRE-COMPOSITION | The design template helps you to retain a previously determined picture background, for instance, if you hand over the camera to another person to create the final photo. | |
| LOVE PORTRAIT | This function uses face recognition to automatically produce portrait pictures without any need for assistance from third parties. If more than one face is detected, the autofocus is activated automatically. The camera begins to count down and takes the photo after two seconds have elapsed. | |
| SELF PORTRAIT | This function sets the zoom to wide angle. When a face is detected, the AF is activated automatically and an acoustic signal is issued. The camera starts a 2-second countdown and takes the picture. | |
| D-LIGHTING | This function increases the dynamic scope of a picture by increasing the brightness and contrast values. | |
| FISHEYE LENS | This function produces a hemispherical image | |
| VOICE REC | Record an audio clip. | |
Using the different shooting modes
Using the kids mode
Children are especially difficult to photograph as they are almost always moving and thus present quite a challenge. Use the children mode to take pictures of children. This modes uses a faster shutter speed and always focuses on the moving subject.
In the shooting mode, select th option.
- Confirm your selection by pressing the OK button.
Focus the camera on the subject and press the shutter release.
Using the sports mode
Sports action can often only be captured in a picture by using a high shutter speed; the sports mode is particularly well suited for this. In this mode, the camera shoots a photo with an extremely high shutter speed.
In the shooting mode, select the option.
- Confirm your selection by pressing the OK button.
Focus the camera on the subject and press the shutter release.
Using the party mode
If you want to take photos of groups of people, then the party mode is appropriate for this.
In the shooting mode, select the option.
- Confirm your selection by pressing the OK button.
Focus the camera on the subject and press the shutter release.
Have fun at your party.
Using the soft skin mode
If you use this mode, the camera detects skin-coloured areas of a subject, e.g. a face, and processes the picture so that the skin appears soft.
In the shooting mode, select the option.
- Confirm your selection by pressing the OK button.
Focus the camera on the subject and press the shutter release.
Using the food mode
Pictures of food can be created easily and quickly with the help of this mode. This mode uses the macro focus and correspondingly adapts the flash for the close-up.
In the shooting mode, select the option.
- Confirm your selection by pressing the OK button.
Focus the camera on the subject and press the shutter release.
Using the foliage mode
If you would like to take photos of gardens or a forest, this mode will help you create an even more impressive result. The mode reinforces the green and blue shades of the picture and thus creates a picture with strong colours.
In the shooting mode, select the option.
Confirm your selection by pressing the OK button.
Focus the camera on the subject and press the shutter release.
Using the auction mode
In "auction" mode you can shoot a picture or a series of pictures in Web quality for use in Internet auctions. This mode lets you take one to four pictures from various angles and then combine them accordingly with the help of pre-defined templates.

NOTE!
The single pictures and the overall picture are only taken at low quality and in the VGA resolution; this optimises the pictures for use on the Web.
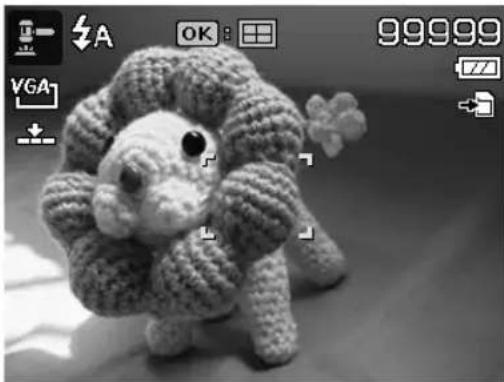
In the shooting mode, select the ^- option.
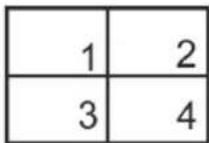
- Use the or buttons to choose a composition. If you have already taken a picture in auction mode, then call up the selected composition type with the OK button. The following divisions are available:


Confirm your selection with OK button.
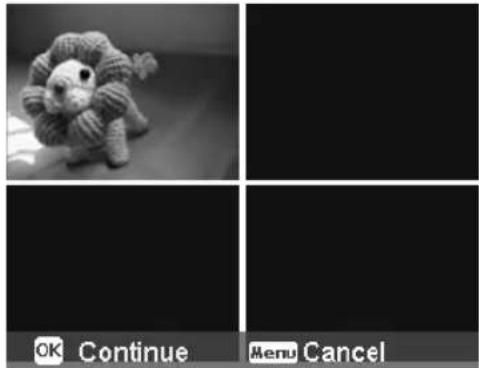
Now select the appropriate subject and press the shutter release to take a picture.
If you chose the setting for 2, 3 or 4 pictures, you can now take further picture that will be compiled to an overall picture.
Press the OK button to take the next picture.
Press the MENU button to shoot the previous picture again.
DE
EN
FR
NL
DK
ES
IT
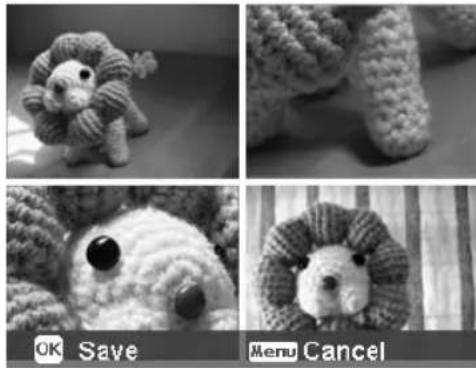
Once you have taken all the individual pictures for your overall image, press the OK button to save the picture, or press the MENU button to shoot the pictures series again.
The camera now stores this overall image to memory.
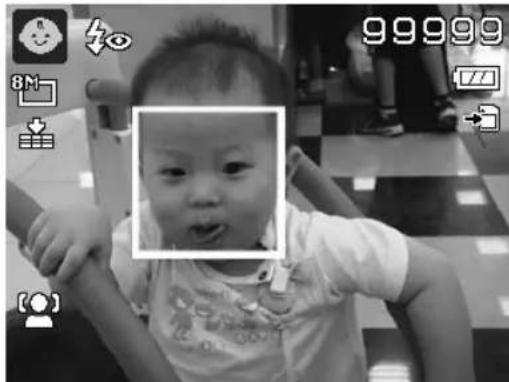
Using the smile capture mode
The smile capture mode automatically takes photos as soon as it detects a smile. This can be especially helpful when taking shots with children.
In the shooting mode, select th option.
Focus the camera on the subject.
As soon as a smile is recognised, the camera takes the photo.
Using the blink detection mode
When you take pictures with this mode, the camera analyses the captured subject and if a blink is detected, you can discard the picture and immediately take a new photo.
In the shooting mode, select th! option.
Focus the camera on the subject and press the shutter release halfway down.
The camera focuses accordingly.
Now press the shutter release all the way down to save the shot.
The camera analyses the shot.
As soon as a smile is recognised, the camera takes the photo.
Using the design mode
The design template helps you to retain a previously determined picture background, for instance, if you hand over the camera to another person to create the final photo.
In the shooting mode, select the option.
Now choose your preferred background subject. Then press the shutter release (press down completely).
The camera stores this picture to its internal memory. A semi-transparent image strip of the background appears in the display.
Press the MENU button to discard the semi-transparent image.
If you now, for example, ask another person to take a picture of you in front of this background, then he or she can align the camera to match the image strip so that the exact picture section is recorded that you previously selected.
Press the shutter release again. The camera stores the picture that was taken in the last step. The picture in the internal memory is deleted.
Using the voice recording

In the shooting mode, select the option.
Confirm your selection by pressing the OK button.
Press the shutter release to start voice recording.
Press the shutter release again to stop voice recording.
Playback functions
Showing pictures in a slide show
You can play back the photos in the memory of the camera as a slide show.
In the playback menu, choose the entry SLIDE SHOW. The SLIDE SHOW menu opens. The following settings are available:
- START: Choose this option to start the slide show.
- CANCEL: Choose this option to exit the menu.
- INTERVAL: Use this option to define the duration of the picture display (1, 3, 5 or 10 seconds).
- TRANSITION: Choose the transition effect between the individual pictures here (SHUFFLE, FROM LEFT, DIAGONAL or TRANSFERRED).
- WIEDERHOLEN: Choose whether the picture sequence should be continuously repeated ( ), or whether it should end after the last picture ( )
After all settings have been made, choose the START entry and press the OK button to start the slide show.
During playback, you can pause and resume the show by pressing OK.
The protect/unlock or delete functions

NOTE!
If a memory card is inserted, you can only delete the files on the memory card. If the memory card is write-protected, then you will not be able to delete the files on the memory card. (The message "card protected" appears.)
You cannot restore a file that has been deleted. Therefore, exercise caution when deleting files.
Individual files
In the submenu "DELETE" or "PROTECT", choose the entry "SINGLE"; the pictures are shown individually on the display.
Select a picture with the or buttons.
- Choose "LOCK"/"UNLOCK" or "DELETE" as soon as the required file is displayed on the screen.
Pressing the OK buttons lets you protect/unlock or delete the file.
- Choose "CANCEL" and confirm with the OK button to return to the playback mode.
Multiple files
In the submenu "DELETE" or "PROTECT", select the entry "MULTI"; the pictures are shown as thumbnails on the display.
Select a picture with the or buttons.
Press the OK button as soon as the required file is highlighted. This marks the file or removes the marking.
Repeat the previous step until all the pictures you would like to protect or delete are marked.
Press the MENU button. A confirmation prompt appears.
- Choose YES and press the OK button to protect or delete the files. The camera returns to playback mode.
- Choose "CANCEL" and confirm with the OK button to return to the playback mode.
All files
In the submenu "DELETE" or "PROTECT" select the entry "LOCK ALL?/UNLOCK ALL" or "DELETE ALL". A confirmation prompt appears.
Choose YES. Press the OK button to protect, unlock or delete all files.
- Choose "CANCEL" and confirm with the OK button to return to the playback mode.

PLEASE NOTE!
If a memory card is inserted, you can only delete the files on the memory card. If the memory card is write-protected, then you will not be able to delete the files on the memory card. (The message "card protected" appears.)
You cannot restore a file that has been deleted. Therefore, exercise caution when deleting files.
Correcting red-eye effect
This function is used for reducing red-eye effect on photos. This function is only available for photos. The red-eye correction can be applied several times to one picture, but the picture quality may also gradually deteriorate as a result.
How to enable red-eye correction:
Select the image in playback mode.
Open the submenu "RED-EYE CORRECTION" in the playback menu.
The image preview and the red-eye menu appear on the display.
Select the START entry and press the OK button to start the correction process.
A menu selection appears after termination of the function.
- OVERWRITE: The new file is saved by overwriting the old one.
SAVE AS: The new file is saved as a new file. - CANCEL: The function is cancelled.
Press the OK button to save or cancel the changes.
Recording voice memos
- Select the required photo in playback mode.

NOTE!
If the photo already contains a voice memo, the voice memo icon appears
- Open the playback menu with the MENU button and choose the VOICE REC option. The image preview and a selection menu will appear on the display.
- Choose START and press the OK button to start the recording. The microphone is located underneath the lens.
The recording ends automatically after 30 seconds. If you would like to end the recording before then, choose STOP and press the OK button again.

NOTE!
You can only add voice memos to photos, not to video clips. You cannot add voice memos to protected images.
Colour mode
The following effects are available:
| Symbol Settings Meaning | ||
| ON | NORMAL | No photo effects are added. |
| SEIA | The image is produced in nostalgic sepia tones. | |
| BW | B&W | The image is produced in black & white. |
| NEGATIVE | NEGATIVE | The image is produced as a negative. |
| MOSAIC | MOSAIC | The image is produced as a mosaic. |
| RED | RED | The image takes on a red hue. |
| GREEN | GREEN | The image takes on a green hue. |
| BLUE | BLUE | The image takes on a blue hue. |
Select the required photo in playback mode.
- Open the playback menu with the menu button and choose the COLOR MODE option; the menu opens.
Use the or buttons to select the desired effect.
The appropriate effect is applied to the picture preview and displayed accordingly.
Press the OK button to save the new file. A new image file is created.
Trimming photos
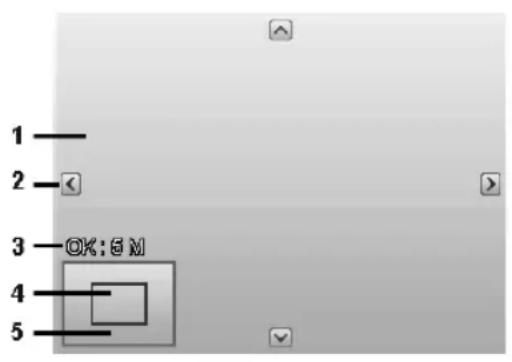
| 1 Enlarged picture |
| 2 Orientation arrows |
| 3 Cropped file size |
| 4 Picture detail |
| 5 Entire picture area |
Choose the required photo in playback mode.
- Open the playback menu with the menu button and choose the TRIM option. The editing window appears on the display.
Press the zoom button towards T Q to enlarge the image, or press towards W to reduce the image. You can see the position of the image section in the grey rectangle on the left.
During the enlargement, you can use the , , or buttons to change the image section. - Once you have set the desired section, confirm your selection with OK. A menu selection appears. Choose between:
OVERWRITE: The new file is saved by overwriting the old one.
SAVE AS: The new file is saved under another name without replacing the old file.
-
CANCEL: The function is cancelled.
-
Confirm your selection by pressing the OK button.
Changing the size
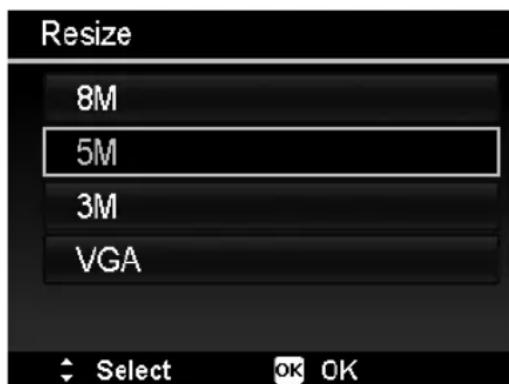
Choose the required photo in playback mode.
- Open the playback menu with the menu button and choose the RESIZE option. The selection menu appears on the display.
Choose one of the following resolutions 8 M, 5 M, 3 M or VGA and confirm your selection with the OK button..

NOTE!
The available resolutions may vary according to the original size of the picture. Settings which are not available are greyed out.
A menu selection appears after termination of the function. Choose between:
- OVERWRITE: The new file is saved by overwriting the old one.
SAVE AS: The new file is saved under another name without replacing the old file.
- CANCEL: The function is cancelled.
Confirm your selection by pressing the OK button.
Connecting to a TV or PC
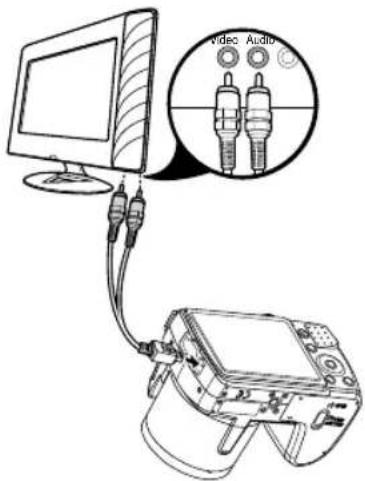
Displaying shots on a television set
You can play back the shots from your camera on a television set.
Switch off the camera and television set.
Connect the TV cable supplied to the USB port on the camera and the yellow video socket and white audio socket on the television set.
Switch the camera and television set on.
- Switch the camera to playback mode and start the playback.
If the television set does not detect the camera signal automatically, switch to the appropriate video input on the television set (usually by means of the AV button).
In the camera menu " SETTINGS", submenu "TV OUT", you may have to choose between PAL and NTSC.
Printing shots on a photo printer
You can print your shots via PictBridge directly to a PictBridge-compatible photo printer.
Connect the printer to the camera with the USB cable supplied.
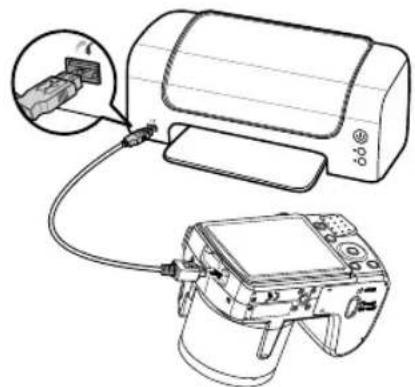
Switch the camera and the photo printer on.
The camera recognises that a USB device has been connected.
In USB mode, select the "PRINTER" option and confirm with OK.

NOTE!
The functions described in the following must be supported by PictBridge compatible printers so that they can be used.
After the connection between printer and camera has been established, the selection menu of the print mode appears.
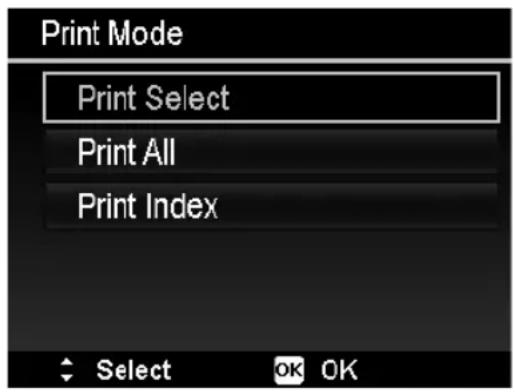
The print mode contains three selection options:
- PRINT SELECT: Select the pictures you would like to print from those stored on the device.
- PRINT ALL: All stored pictures are printed.
- PRINT INDEX: Prints all pictures as a thumbnail overview.
Setting the "Print select" option
Use the or direction buttons to choose the required picture.
Define the number of print copies with the or buttons.
Press the button to activate or deactivate the date stamp.
OK takes you to the printer settings.
Setting the "Print all" and "Print index" option
Define the number of print copies with the or buttons.
Press the button to activate or deactivate the date stamp.
OK takes you to the printer settings.
Defining the print settings
Use the or direction buttons to select the required setting.
Define the paper size (STANDARD; A4; 4"X6") and quality (STANDARD; FINE; NORMAL) with the or buttons.
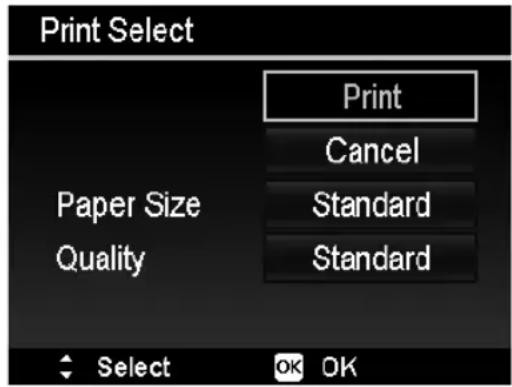
Choose PRINT to start the print, or exit the print settings with CANCEL.
Start print
The message "PRINT..." appears on the display.
You can cancel the process at any time with the MENU button.
Transferring data to a computer
You can copy your pictures and videos to a computer. Supported operating systems:
- Windows XP SP3
Windows Vista SP1 - Windows 7
Connecting a USB cable
Switch the camera off.
- With the computer switched on, connect the supplied USB cable to the USB port on the camera and a USB port on the PC.
Switch the camera on.
Select "COMPUTER" and press the OK button to confirm the selection.
"CONNECT" appears in the camera display.
The computer recognises the camera as a mass storage device (removable storage medium).
In Windows XP, Windows Vista and Windows 7 you can immediately access the content of the camera memory or of the memory card.
In other Windows versions, open Windows Explorer or double-click on "My Computer" (in Vista/Windows 7: "Computer").
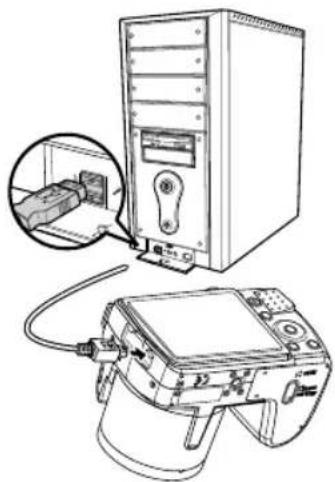
Double-click the media icon for the camera.
Navigate to the "DCIM" directory and, where applicable, to the relevant subdirectories in order to display the files (.jpg = photos; .avi = video recordings; *.wav = sound recordings). See also the directory structure in the memory.
Press down the left mouse button and drag the relevant files to the directory provided on the computer, e.g. in the folder "My Documents". You can also highlight the files and use the Windows commands "Copy" and "Paste".
The files are transferred to the computer and stored there. You can display and process the files with a suitable software application.
DCF memory standard
The recordings on your camera are managed (saved, named, etc.) in accordance with the DCF standard (DCF = Design rule for Camera File system). Photos or recordings on memory cards from other DCF cameras can also be played back on your camera.
Card drive
If your PC has a card drive or is connected to a card reader, you can use this to copy the shots on the memory card to the PC.
The card reader is also detected as a removable data medium on the Windows desktop (or in "Computer" if using Vista/Windows 7).
Memory folder structure
The camera saves the pictures, videos and audio files in two different directories in the internal memory or on the memory card.
The following folders are created automatically:
- Folder DCIM: This folder contains the two following sub folders:
100DICAM.: All pictures, videos and audio files are saved to this folder, except for videos which were recorded in Internet quality mode. - 101UTUBE: Pictures taken in Internet quality mode are saved to this folder.
Normal shots are located in the "100DICAM" folder and are automatically given the name prefix "DSCI" followed by a four-digit number.
When the highest number has been reached – “DSCI9999” – the next folder “101DICAM” is created for the following shots.
Resetting the file number
A maximum of 999 folders can be created. If another capture/recording is made after this, an error message will appear ("Directory cannot be created"). If this happens, proceed as follows:
Insert a new memory card.
Reset the file numbers in the " SETTINGS" menu using the menu item "FILE NO." The file count restarts at 0001 in the folder 100DICAM.
Do not try to change the folders and files in the camera's own directory structure (by renaming, etc.). This can result in the loss of data.
Storage capacity
| Resolution | Size of memory card | ||||||
| 64 MB 12 | 8 MB 256 M | MB 512 MB 1 | GB 2 GB | ||||
| 14M 13 | 27 54 109 2 | 14 429 | |||||
| 3:2 21 | 43 86 173 3 | 38 677 | |||||
| 8M 25 | 50 100 200 | 390 781 | |||||
| 5M 40 | 80 160 320 | 625 1250 | |||||
| 3M 66 | 133 266 533 | 1041 | 2083 | ||||
| VGA | 305 | 611 | 1223 | 2466 | 4778 | 9557 | |
The table specifies the number of images that you can save at a chosen resolution (e.g. 5 M) on a memory card with a specified size (e.g. 128 MB).

NOTE!
The actual number of photos that can be saved may vary (by up to 30% ) depending on the resolution and the number of colours.
Troubleshooting
Use the following checklist if the camera does not function correctly. If the problem persists, consult MEDION Service.
The camera will not switch on.
- The batteries were not inserted correctly.
- The batteries are dead.
The camera will not take any photos.
- The flash is still charging.
The memory is full. - The SD card is not correctly formatted or is defective.
The flash does not go off.
The flash is not opened.
The flash is not completely charged.
The automatic mode is deactivated.
The image is blurred.
The camera was moved during the shot.
- The subject was outside the camera's focal range. Try using the macro mode if you are taking close-up pictures.
- Improve the light conditions.
The image is not shown on the display.
- An SD card has been inserted which took pictures in non-DCF mode on another camera. The camera cannot display that type of image.
The period of time between shots is longer when taking pictures in the dark
- The shutter usually works more slowly under weak light conditions. Change the angle of the camera, or improve the light conditions.
The camera switches itself off.
- The batteries are dead.
- The wrong battery type is set.
- After a preset period, the camera switches itself off to save the battery charge. Switch the camera back on.
The shot has not been saved.
- The camera was switched off before the shot could be saved.
The memory card is full.
The shots cannot be transferred to the PC via the USB cable.
The camera is not switched on.
When the camera is connected to the computer for the first time, no new hardware is found
- The USB connection of the computer is deactivated.
- The operating system is not compatible.
Maintenance and care
Clean the housing, lens and display as follows:
Clean the camera housing using a soft, dry cloth.
Do not use thinners or detergents that contain oil. This could damage the camera.
To clean the lens and the display, first use a lens brush to remove any dust. Then wipe the lens and display with a soft cloth. Do not apply any pressure to the display and do not use hard objects to clean it.
Do not use strong cleaning agents for the housing and lens (contact Medion Service or a specialist shop if there is dirt that cannot be removed).
Disposal
Packaging

Your camera is packaged to protect it from damage during transit. Packaging is raw material and can be reused or added to the recycling system.
Device

At the end of its service life, the device should not be disposed of with the household rubbish. Dispos of it in an environmentally friendly manner via a local collection point for old devices. Contact your local authority to find out where your nearest collection point is located.
Batteries

Do not put used batteries in the household rubbish. Batteries should be taken to a collection point for used batteries.
Technical data
Camera
Pixels: 16 megapixel CCD
Aperture: F = 1:3.1 5.8
Shutter speed: 1 / 2000 15 s
Focal length: f = 4.5 mm 94.5 mm
Optical zoom: 21 times
Digital zoom: 5 times
LCD monitor: 7.62cm / 3'' LC display
File formats: JPEG (EXIF 2.2), DPOF, AVI, WAV
Max. resolutions:
Camera mode: 4608 × 3456 pixels
Video mode: 640 x480/1280 x 720 pixels (with a Class 6 SDHC mem
ory card)
Memory:
Internal: 128 MB internal memory (usable memory may vary)
External: SD/SDHC card (up to 32 GB)
Port: Micro USB 2.0
Dimensions: approx. 112.5 × 75.9 × 78.7 ~mm (W × H × D)
Weight: approx. 455 g (including batteries)
Ambient temperature: 0^ - 40^ at 0% -90% rel. humidity

Subject to technical and optical changes as well as printing errors.
Installing ArcSoft Medialmpression
On the supplied CD you will find "ArcSoft Medialmpression", a program for editing your pictures.
Install Media Impression as follows:
Insert the installation CD in the DVD/CD drive.
The CD will be executed automatically.
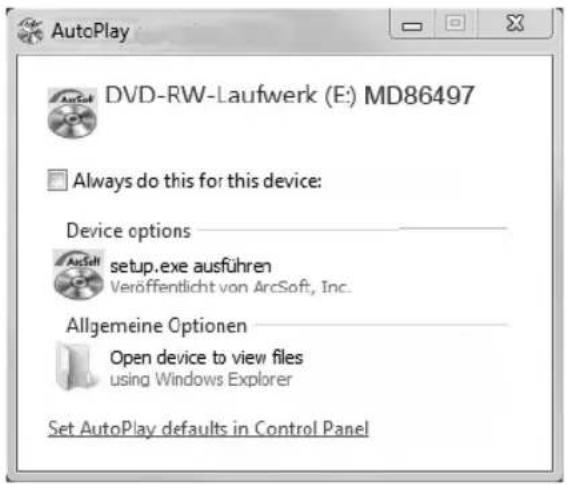
Follow the instructions to complete the installation.
If the CD does not execute automatically, follow the steps shown below to install the software:
Double-click on "DESKTOP".
- Move the mouse pointer to the DVD/CD drive.
Right-click, then click on OPEN.
Double-click on "SETUP.EXE".
A wizard appears and guides you through the installation.
Follow the instructions to complete the installation.
After successful installation, start the program using the shortcut on the desktop.

A start screen appears.
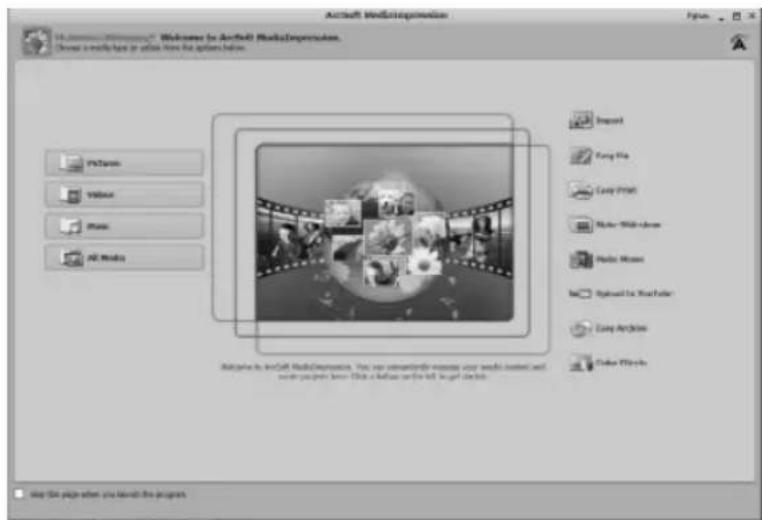
To transfer pictures from the camera to your desktop computer or laptop, click on the button "IMPORT"
The import preview screen will open and you can then select the photos to be imported.
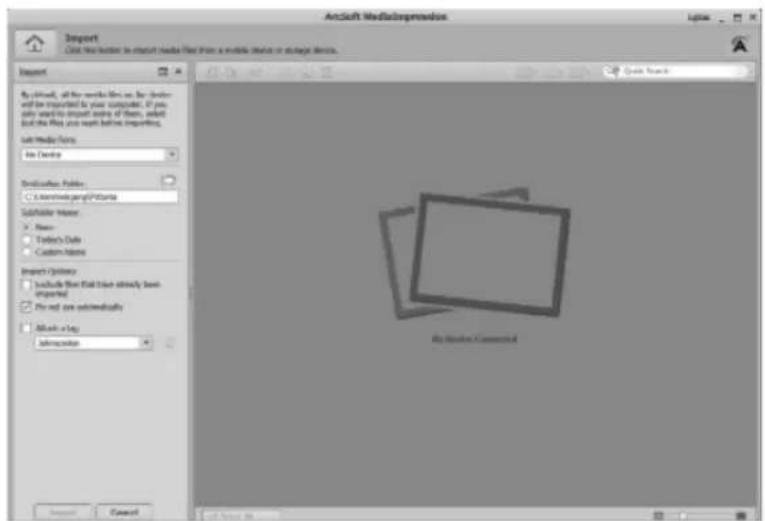
You can define the import options using the side menu bar on the left. The camera will be automatically recognised as a removable storage medium and displayed in the drop-down menu "GET MEDIA FROM:".
Select a target folder where you would like to save the data.
You can define other import options using the side menu bar.
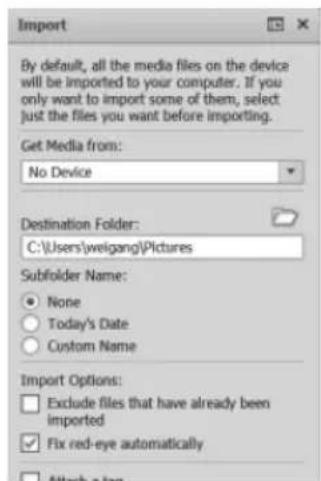

NOTE!
You can call up the entire help function for ArcSoft Media Impression by pressing F1.
There you will find further information regarding the import, editing and saving of pictures.
Index
A
AF lamp 52
Aperture setting 63
Auction 68,72
Auto mode 62
Auto preview 54
B
Backlight 67
Batteries
Information on using batteries 8
Inserting batteries 20
Battery type 56
Blink detection 68, 74
Buildings 68
C
Candlelight 68
Card drive 87
Changing the size 82
Children 67
Colours
Colour effect 44
Colour mode 80
Composition mode 69
Connection to a TV or PC 83
Contrast 53
Copying to card 56
Cropping 81
D
Date stamp 53
DCF memory standard 87
Delete
Deleting all fi les 78
Deleting individual fi les 77
Deleting photos 50
Multiple fi les 78
Digital zoom 53
Display options
Photo playback 27
Shooting mode 25
Sound playback 29
Switching on/off 30
Video playback 28
D-lighting 69
DPOF 60
E
Exposure correction 41
F
Factory settings 57
File numbering 56
Fireworks 68
Fisheye effect 69
Flash 34
Flowing water 68
Focus
AF range 52
Setting the focus mode 36
Foliage 68
Food 68
Formatting 56
1
ISO (light sensitivity) 43
L
Landscape 67
LCD brightness 56
LCD dimming 55
M
Macro 17,33
Manual exposure 64
Measurement - light measurement procedure 43
Medialmpression 94
Memory folder structure 87
Menu
Function menu 39
Playback menu 58
Recording menu 52
Settings menu 55
N
Navigation button 17
Night scene 67
Night shots 68
P
Package contents 11
Panorama function 61, 64
Party 68
PictBridge 83
Playback mode
Calendar mode 47
Playing back individual photos/videos 45
Playing back shots as thumbnails 46
Playing back video/audio recordings/voice memos 49
Portrait 67
Power-saving function 24
Preview images 46
Printing shots on a photo printer 83
Print settings 85
Programme 61
Protect function
All files 78
Individual fi les 77
Multiple files 78
Q
Quality (compression) 40
R
Radialblur 60
Recording video clips 37
Red-eye correction 58, 79
Resetting the file number 87
Resolution
Photos 40
Videos 41
Romantic portrait 69
s
Saturation 53
SD card 21
Self-portrait 69
Setting clock time 23
Setting the date 23, 55
Sharpness 53
Shooting mode 24, 30, 67
Show slide show 77
Slide show 58
Smile capture 68, 74
Snow 68
Soft skin tone 68
Sound recording 38
Sounds 55
Sports 68
Stabiliser 54
Start screen 60
Sunset 67
T
Taking a photo 33
Technical data 93
Text 68
Transferring data to a computer 86
Troubleshooting 89
TV output 56
U
UnlockING
All fles 78
Individual fi les 77
Multiple files 78
V
Voice memo 58, 79
Voice recording 69, 76
W
White balance 42
Z
Zoom 35
Sommaire

m = 311


m = 311
6

m = 311 ;


ISO/ AIO

ok Continuer
Menu Annuler
Pixels: 16 megapixels CCD
Diaphragme: F = 1:3,1 5,8
Vitesse d'obturation: 1/2000 ~ 15 s
Informations affi chees
Installation of ArcSoft MedialImpression 94
Index 97
0mdennevejledning

Filformat: JPEG (EXIF 2.2), DPOF, AVI, WAV
Maks. oplosninger:
Kameratilstand: 4608 × 3456 pixel
Videotilstand: 640 × 480 / 1280 × 720 pixel (med et Klasse 6 SDHC-hukommelseskort)
Billedlager:
Internt: 128 MB interntlager (det anvendelige lager kan variere)
Eksternt: SD/SDHC-kort (op til 32 GB)
Tilslutting: Micro-USB 2.0
MaI: ca. 112,5× 75,9× 78,7mm (B× H× D)
Resolution: photos. 40
ISO (fotosensibilities) 43
Efecto cromático 44
ISO (fotosensibilities)
ISO (fotosensibilities) 43
L
Formato file: JPEG (EXIF 2.2), DPOF, AVI, WAV
120 Faraday Park, Faraday Road, Dorcan
Swindon SN3 5JF, Wiltshire
United Kingdom
Hotline: 0871 37 61 020
(Costs 7p/min from a BT Iadline,
mobiles costs maybe higher)
Fax:01793 715716
To contact us by email please visit the ,Service and
Support" section of our website at www.medion.co.uk.
www.medion.co.uk
BE
T
Medion B.V.
John F. Kennedylaan 16a
5981 XC Panningen
Nederland

Hotline: 022006198
Fax:022006199

Holline: 34-20 808 664
Fax: 34-20 808 665
c/ Miguel Faraday, 6
Parque Empresarial "La Carpetania", N-IV Km. 13
28906 Getafe, Madrid
Espana
Hotline: 902151448
Fax:914604772
E-Mail: service-spain@medion.com
www.medion.es