
LIFE S41002 (MD 86459) - Camera MEDION - Free user manual and instructions
Find the device manual for free LIFE S41002 (MD 86459) MEDION in PDF.


| Product Type | Waterproof Digital Camera |
| Model | LIFE S41002 (MD 86459) |
| Brand | MEDION |
| Sensor | 5.0 Megapixels CMOS |
| Aperture | F2.8 |
| Focal Length | 8.5 mm |
| Shutter Speed | 1/4000 – 1/8 sec |
| Digital Zoom | 8x |
| Display | 6.1 cm (2.5") LC Display |
| Max Photo Resolution | 2560 x 1920 pixels |
| Max Video Resolution | 640 x 480 pixels (VGA) |
| File Formats | JPEG, AVI |
| Storage | 16 MB internal, microSD/microSDHC external |
| Connectivity | Mini USB 2.0 |
| Power | 2 x 1.5V AAA batteries |
| Dimensions (WxHxD) | 90 x 61 x 20.5 mm |
| Weight | Approx. 120 g (including batteries) |
| Water Resistance | Up to 3 m for 30 minutes |
| Flash | Auto, On, Off |
| Scene Modes | Auto, Landscape, Backlight, Night Scene, Portrait, Sports |
| ISO | Auto, 50, 100, 200 |
| White Balance | Auto, Daylight, Cloudy, Tungsten, Fluorescent |
| Self-Timer | 10 seconds |
| Special Features | Smile capture, Image stabilizer, Macro mode |
| Package Contents | Camera, 2x AAA batteries, USB cable, Carrying strap, CD-ROM, Manual |
Frequently Asked Questions - LIFE S41002 (MD 86459) MEDION
User questions about LIFE S41002 (MD 86459) MEDION
0 question about this device. Answer the ones you know or ask your own.
Ask a new question about this device
Download the instructions for your Camera in PDF format for free! Find your manual LIFE S41002 (MD 86459) - MEDION and take your electronic device back in hand. On this page are published all the documents necessary for the use of your device. LIFE S41002 (MD 86459) by MEDION.
USER MANUAL LIFE S41002 (MD 86459) MEDION
Waterproof digital camera
MEDION® LIFE® S41002 (MD 86459)

natural_image
Black-and-white photo of a MEDION digital camera with a turtle on screen, showing its lens and control panel (no text or symbols on the device itself)Instruction manual
Table of content
About these instructions ....4
Symbols and key words used in these instructions ....4
Safety instructions ....6
Dangers for children and people with reduced ability to operate machinery....6
Never carry out repairs yourself 11
Water resistance 11
Overview of the device ....13
Start-up 15
Package contents 15
Inserting batteries 16
Inserting and removing SD cards 17
Fitting the carrying strap 19
First steps 20
Switching on the camera 20
Switching off the camera 20
Setting the language, date and time 22
Display options 23
Taking your fi rst shots 25
Setting shooting mode 25
Tips for taking good shots 25
Taking a photo 26
Recording videos....29
The Photo menu 30
The Video menu 36
The settings menu ....37
Shooting and playback mode 42
Video playback 42
Zooming photos 43
Deleting photos ....43
PC Connection 45
Transferring data to a computer ....45
DCF memory standard ....46
Card drive 46
Memory folder structure ....47
Storage capacity 48
Installing the software.... 49
Troubleshooting 50
Maintenance and care 53
Disposal 54
Technical data 55
About these instructions

Read the safety instructions carefully before use. Note the warnings on the unit and in the operating instructions.
Always keep the operating instructions close to hand. If you sell the unit or give it away, make sure you also hand over these instructions and the guarantee card.
Symbols and key words used in these instructions
 | DANGER!Warning: immediate mortal danger!WARNING!Warning: possible mortal danger and/or serious irreversible injuries |
 | CAUTION!Please follow the guidelines to avoid injuries and/or property damage!CAUTION!Please follow the guidelines to avoid property damage! |
 | PLEASE NOTE!Additional information on using the device |
 | PLEASE NOTE!Observe the notes in the operating instructions! |
 | WARNING!Warning: danger of electric shock! |
| • | Bulleted item / information on operating steps and results |
| ► | Tasks to be performed |
Proper use
The unit is suitable for recording images in digital format.
Do not operate the camera either in extreme heat or extreme cold.
The unit is not suitable for operation under extreme conditions.
Safety instructions
Dangers for children and people with reduced ability to operate machinery
- This product is not intended for use by people (including children) with reduced physical, sensory or mental abilities or for those without experience and/or knowledge, unless they are supervised by a person responsible for their safety or they have been instructed on its use.
- Children should be supervised to ensure that they do not play with the device. Children should not be allowed to use this device without supervision.
- Keep the appliance and its accessories out of reach of children.

DANGER!
Keep plastic packaging out of reach of children.
There is a risk of suffocation.
Warnings
In order to avoid injury, please heed the following warnings while using the product:
- Do not trigger the flash too close to the eyes. This can cause damage to the eyes of the person being photographed.
- Keep at least 1 m away from children when you are working with the flash.
- Do not open or dismantle the camera.
- If you are not going to use the camera for a period of time, remove the batteries to prevent leakage
Battery information
Batteries may contain combustible materials. If not handled properly, batteries may leak, heat up excessively, ignite or even explode, which could result in damage to the camera and your health.

WARNING!
Risk of explosion if batteries are replaced incorrectly.
Replace batteries only with the same or equivalent type.
Please note the following general instructions for handling batteries:
- Keep batteries out of the reach of children. Seek medical attention immediately if a battery is swallowed.
- Before inserting the batteries, check that the contacts in the device and on the batteries are clean and, if necessary, clean them.
- Pay attention to the polarity (+/−) when inserting the battery.
- Store batteries in a cool, dry place. Strong, direct heat can damage the battery. Therefore, keep the unit away from strong heat sources.
- Avoid contact with skin, eyes and mucous membranes. If any of these areas come into contact with battery acid, rinse them immediately with plenty of clean water and consult a doctor as soon as possible.
- Never throw batteries into a fire, short-circuit them or dismantle them.
- Never expose the batteries to excessive heat, such as sunlight, fire or similar.
- Only replace batteries in dry conditions.
- Remove a leaking battery from the device immediately. Clean the contacts before inserting a new battery. There is a risk of skin irritations from battery acid!
Safety precautions
Take the following safety precautions, in order to avoid damage to your camera and to always keep it in perfect condition.
- Keep away from salt and dust
If you have been using the camera on the beach or at the seaside, wipe off salt and dust with a light, damp cloth. Carefully dry the camera afterwards. - Keep the device away from strong magnetic fi elds.
Never place the camera too close to appliances which generate strong electromagnetic fi elds, such as electric motors. Strong electromagnetic fi elds may result in camera malfunctions or corrupt data recordings. - Avoid excessive heat
Do not use or store the camera in sunlight or at high temperatures. Stress of this kind can result in battery leakage or cause the case to warp. -
Avoid extreme fluctuations in temperature
If you take the camera from a cold environment into a warm one, or vice versa, drops of water can form outside and inside the camera, which can cause malfunctions and can damage the camera. Wait until the device has reached room temperature before switching it on. Use of a carrying case or plastic case offers a certain amount of protection against fluctuations in temperature. -
Do not drop the camera Jarring or vibrations resulting from a fall can cause malfunctions. Loop the carrying strap around your wrist when you carry the camera.
- Do not remove batteries while data is being processed. Switching off the power supply while image data is being saved to or deleted from memory cards can result in data loss or damage to the internal circuit or the memory.
- Treat the lens and all moving parts carefully. Do not touch the lens or the lens barrel. Take care when handling the memory card and the batteries. These parts are not designed for high levels of stress.
- Batteries At low temperatures there can be a sharp drop in battery capacity.
- Memory cards Switch off the power supply before you insert or remove the memory card otherwise data could be lost. Memory cards may warm up during use. Always take care when removing the memory cards from the camera.
- Underwater operation The camera is suitable for underwater operation up to a maximum depth of 3 metres/30 minutes of diving. Please ensure that you do not dive deeper than 3 metres or for longer than 30 minutes.
Never carry out repairs yourself

WARNING!
Never try to open or repair the appliance yourself. There is a risk of electric shock.
- If there is a fault, contact the MEDION Service Centre or other suitable specialist workshop.
Water resistance
- The camera is water resistant to a depth of 3 metres.
- The camera should only be used for a maximum of 30 minutes under water.
- The accessories included are not water resistant.
Important notes before diving:
- Check the area around the battery compartment. Remove any dirt, sand or other particles with a dry cloth.
- Ensure that the battery compartment is not scratched or cracked.
- Ensure there are no cracks in the camera.
- Check that the battery compartment cover is firmly closed.
- Do not throw the camera into the water or jump into the water with the camera as such dynamic forces may result in water penetrating the camera's interior.
Overview of the device

- Shutter release
- On/off button
- Loop for carry strap
- Flash
- Lens
- Operating LED
- Macro controller
- LC display
-
▲ -/T button: Zoom in/Menu selection up
-
▼ -/W button: Zoom out/Menu selection down
- ◀ -/Flash button: Set flash mode/Menu selection left
- ▶ -/Play button: Set play mode/Menu selection right
- Mode button
- Menu button
- Tripod socket under compartment cover
- Micro SD card slot
- USB connection
- Battery compartment
Start-up
Package contents
Please check your purchase to ensure all items are included.
Contact us within 14 days of purchase if the delivery is incomplete.
The following items are supplied with your product:
- Camera
- 2 x 1.5 V, AAA type batteries
- USB cable
- Carrying strap
- Software CD-ROM
- Operating instructions and warranty documents
Inserting batteries
2 x 1.5 V AAA type batteries are required to operate the camera.
▶ Move the battery compartment catch in the direction shown by the arrow.
▶ Slide the battery compartment in the direction of the arrow, the cover pops open.
▶ Insert the batteries as shown. Note the polarity (as shown).

natural_image
Line drawing of a handheld electronic device with ports and a screen (no text or symbols)▶ Close the battery compartment and slide the battery compartment cover back into the starting position until it clicks into place.
Inserting and removing SD cards
If no memory card is inserted, photos will be stored in the internal memory.

PLEASE NOTE!
Please note that the capacity of the internal memory is limited. Use a micro-SD memory card to increase the memory capacity.
If a memory card is inserted, your photos will be stored on the card.
Insert card
▶ Switch the camera off.
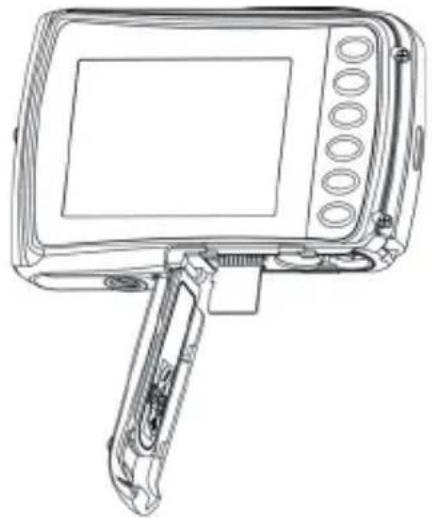
▶ Open the battery compartment cover.
▶ Insert the card, as shown, into the card slot.
natural_image
Line drawing of a handheld electronic device with control panel and display screen (no text or symbols)▶ Close the cover of the battery compartment.
To remove the card, press it down briefly to release it. The card will then protrude slightly and can be removed.
Fitting the carrying strap
For ease of handling and increased security attach the carrying strap to the camera.
▶ Feed the strap through the eye.
▶ Pull the other end of the carrying strap through the thin loop of the strap and pull tight.

CAUTION!
If you carry the camera by the carrying strap ensure that the camera does not bang into anything.
While you are attaching the carrying strap place the camera on a stable surface so it cannot fall down and get broken.
First steps
Switching on the camera
▶ Press the ON/OFF button for 1 to 2 seconds to turn the camera on. The ON indicator lights up red and the display switches on. The camera is in recording mode.

PLEASE NOTE!
If the camera does not switch on, check whether the batteries are inserted properly and whether or not they are charged.
Switching off the camera
▶ Press the ON/OFF button down for a little longer to switch the camera off.
Energy-saving function
If the camera is not used for 60 seconds, it switches off. You can also set the automatic switch-off period to 3 minutes or to switch off completely.
The energy-saving function is not enabled:
• while recording video clips;
• while viewing images or video clips;
- when the camera is c onnected to another device via the USB connection.
Setting the language, date and time
Before using the camera for the first time, select your preferred language from the menu and set the current date and time. Both settings are performed in the “SETUP” menu:
▶ With the camera switched on, press the button to open the menus.
▶ Use theor buttons to select the “SETUP” menu.
In the “SETUP” menu, use the T or W buttons to select the “LANGUAGE” (Engl. Language) entry and press the shutter release. The language selection menu opens.
▶ Select the desired language using their W buttons and save the setting by pressing the shutter release.
Now in the “SETUP” menu, use the T or W buttons to select the “DATE/TIME” entry and press the shutter release. The Settings menu opens.
▶ Using theor buttons, select the entry you wish to change.
▶ Use the or W buttons to set the desired value.
▶ Once the desired value has been set, press to navigate to the next entry and ↓ for the previous entry.
▶ Press the shutter release to save the specified values.
Display options
The following displays are possible in shooting mode:

| Number Symbol Explanation | ||
| 1 |  | Photo mode |
| 2 |  | Flash mode |
| 3 Self-timer | ||
| 4 ISO Displays the current ISO value set | ||
| 5 Shows the number of shots taken and remaining. | ||
| 6 5M Resolution | ||
| 7 |  | Quality |
8 Indicates that a  card is being used card is being used | ||
| 9 |  | Image stabilisation |
| 10 |  | Macro mode |
| 11 |  | Battery status |
| 12 Indicates the current exposure compensation. | ||
| 13 AWB White balance | ||
| 14 Shooting mode | ||
| 15 |  | Smile capture |
| 16 x 2.3 Zoom factor | ||
Taking your first shots
Setting shooting mode
When the camera is switched on, shooting mode is enabled automatically. If playback mode is enabled instead of shooting mode, press the mode button M.
Tips for taking good shots
- The camera should not move when pressing the shutter release. Do not move the camera directly after pressing the shutter release. Wait for the shutter release signal.
- View the subject on the display before pressing the shutter release.
- Check the angle if the subject is lit from behind. Change your position to reduce the background lighting.
- In order to create good video clips, move the camera round slowly. If you pan too quickly, the video pictures will be fuzzy and blurred.
Taking a photo
▶ Press the shutter release all the way down to take the picture. A tone indicates that the photo has been taken.
The photos are saved as JPEG files.
Using the fl ash
If there is insufficient light for the photo the on-board flash can provide the additional light required.
▶ Press the flash button repeatedly to select the following flash settings:
 | AUTO: The flash is activated automatically when the shooting conditions require additional lighting. |
 | Flash always on |
 | Flash always off |
The flash only works in single shot and self-timer mode. It cannot be used for photo sequences, macro shots and video recordings.
Using the flash increases battery usage. If the battery is almost flat, the flash requires longer to charge.

CAUTION!
Do not use the flash to take close-ups of people and animals. Maintain a distance of at least one metre from your subject.
Zoom function – enlarging or reducing
The camera has an 8x digital zoom.
▶ Press the and W buttons. The zoom factor appears in the bottom left-hand corner of the display.
W: The image is zoomed out (wide angle); you can capture a larger section
T: The image is zoomed in (telephoto); you can capture a smaller section.

PLEASE NOTE!
With the digital zoom, the image section is enlarged by interpolation; the image quality can suffer as a result.
Setting the focus mode
This function allows you to define the focus type if you wish to take a photo or record a video clip.
▶ Slide the macro controller to the desired setting.
Your camera offers various focus modes:

Normal
With normal focus, the focus range starts at 40 cm. When the camera is in Normal mode, no icon is displayed.

Macro
This mode is particularly suitable for close-ups. With fixed focus, this mode allows you to capture detail and also to get the subject in focus at much smaller distances.
Recording videos
▶ Press the Mode button until the 📄 symbol appears at the top left of the display.
▶ Press the shutter release to start the recording. The display will show the recording time.
▶ You can change the image section by zooming in and out using the T and W buttons.
▶ Press the shutter release again to stop recording.

PLEASE NOTE!
During video recording, the microphone is enabled and the sound also recorded.
The video clips are saved with sound as AVI fi les.
The Photo menu
The Photo menu allows you to change key settings for shooting quickly.
There is a separate menu for each shooting mode (video, photo shooting mode). This menu allows you to adjust shot-specific settings for taking photos.
▶ Select the submenu you would like to open using their W buttons.
▶ Press the shutter release to open the desired menu.
▶ Change the desired setting using the T or W buttons.
▶ Press the shutter release to save the setting.
Shooting mode
The shooting mode allows you to take individual shots or a shot using the self-timer.
| Setting Explanation | |
| Single Single | e images are taken |
| 10s timer | A single image is taken using a 10 second self-timer. |
Resolution
The resolution basically determines the quality of the photos taken. The higher the resolution, the more memory an image requires. The highest resolutions are generally recommended for large prints (larger than A4).
| Setting Size in pixels | |
| VGA 640 x 480 | |
| 1.3M 1280 x 960 | |
| 3M 2048 x 1536 | |
| 5M 2560 x 1920 |
Quality (compression)
The quality determines how the data recorded is compressed. The higher the quality, the more storage space the images require.
| Setting Explanation | ||
 | Superfi ne Highest quality | |
 | Fine Medium quality | |
 | Normal Standard quality | |
Sharpness
The sharpness settings allow photos/fi lms to be softened or sharpened
| Setting Explanation | |
| Strong | The outlines are emphasised in the image. Blurring may occur in the image. |
| Normal | The outlines are sharp. This setting is particularly suitable for subsequent printing. |
| Soft | The outlines are softer. This setting is particularly suitable for displaying on-screen. |
Exposure compensation (EV)
By correcting the exposure value (EV) you can adjust pictures that would otherwise be too dark or too light.
You can set the value in 13 stages between +2.0 EV and -2.0 EV.
Use a positive value when light conditions are poor and a negative value in strong light.
Do not use the exposure correction when the subject is in a very bright or very dark area or if you are using the flash. In that case, use the automatic setting ("0").
White balance
The white balance can correct certain light conditions.
| Setting Explanation | |
| Auto White balance is adjusted automatically. | |
| Daylight Suitable for shots in bright daylight. | |
| Cloudy | Suitable for shots under cloudy skies, at dusk or in the shade. |
| Tungsten For shots taken in electric (tungsten) light.Flourescent | Suitable for shots in fl uorescent light.Corrects the green cast from fl uorescent lamp light and can save the fl ash. |
Scene mode
Photo effects can be used in shooting and playback mode to provide different tinges or artistic effects.
| Setting Explanation | |
| Auto | The settings for shooting an image are confi gured automatically. |
| Landscape Suitable for wide landscape views. | |
| Backlight Adjusts the “Metering” setting to the backlight. | |
| Night scene | Optimises the settings for shooting night scenes. |
| Portrait | Reduces background focus and focuses on the centre. |
| Sports | Suitable for creating images with fast movements. |
ISO (light sensitivity)
This setting changes the sensor's sensitivity to light. A higher value increases light sensitivity but generates more noise which can have a negative impact on the image quality. It is therefore important to select the lowest possible ISO value for the conditions.
| Setting Explanation | |
| Auto Automatic ISO value | |
| 50 Sets the sensitivity to ISO 50. | |
| 100 Sets the sensitivity to ISO 100. | |
| 200 Sets the sensitivity to ISO 200. |
Smile capture
This function uses face recognition to automatically capture a smiling face.
▶ Select the ON or OFF option depending on whether you wish to use the function or not.
Stabilisation
Greater sensitivity and faster shutter speeds enable you to obtain better and sharper images with very little effort even in handheld shots or with fast-moving subjects.
▶ Select the ON or OFF option depending on whether you wish to use the function or not.
The Video menu
The Video menu enables you to quickly change the basic settings for a clip.
There is a separate menu for each shooting mode (video, photo, audio shooting mode). This menu allows you to adjust shot-specific settings for shooting videos.
▶ Select the submenu you would like to open using their W buttons.
▶ Press the shutter release to open the desired menu.
▶ Change the desired setting using the T or W buttons.
▶ Press the shutter release to save the setting.
Resolution
The resolution determines the image quality. The higher the resolution, the more memory an image requires.
| Setting Size in pixels | |
| QVGA 320 x 240 | |
| VGA 640 x 480 |
The VGA setting is ideal for sending recordings by e-mail, for example.
The settings menu
The Settings menu enables you to rapidly change the settings for a camera.
Date/time
In the “SETUP” menu, use the T or W buttons to select the “DATE/TIME” entry and press the shutter release. The Settings menu opens.
▶ Using theor Buttons, select the entry you wish to change.
▶ Use the W buttons to set the desired value.
▶ Once the desired value has been set, press to navigate to the next entry and ↓ for the previous entry.
▶ Press the shutter release to save the specified values.
The time settings remain stored thanks to the internal battery. They are lost, however, if the battery is removed from the camera for more than 48 hours.
Auto off
In the “SETUP” menu, use the T or W buttons to select the “AUTO POWER OFF” entry and press the shutter release. The power-saving menu opens.
▶ Use the or W buttons to select the period of 3 minutes or 1 minute after which the camera should automatically switch off and confirm your selection by pressing the shutter release.
▶ Set the value to “OFF” to disable the power-saving function.
Beep Sound
In the “SETUP” menu, use the T or W buttons to select the “BEEP SOUND” entry and press the shutter release. The Sound menu opens.
▶ Using their W buttons, select the ON or OFF option depending on whether you wish to use the function or not.
Language
In the “SETUP” menu, use the T or W buttons to select the “LANGUAGE” entry and press the shutter release. The language selection menu opens.
▶ Select the desired language using their W buttons and confirm the selection by pressing the shutter release.
Date display
In the “SETUP” menu, use the T or W buttons to select the “DATE STAMP” entry and press the shutter release. The Settings menu opens.
▶ Select the desired setting using their W buttons and confirm the selection by pressing the shutter release.
Frequency
In the “SETUP” menu, use the T or W buttons to select the “FREQUENCY” entry and press the shutter release. The Frequency menu opens.
▶ Using the W buttons, select the frequency of 60 Hz or 50 Hz (depending on your television) and confirm your selection with the shutter release.
Format
In the “SETUP” menu, use the T or W buttons to select the “FORMAT” entry and press the shutter release. The Formatting menu opens.
▶ Using theor W buttons, select whether you wish to format the internal memory or the micro SD card and confirm your selection with the shutter release.

ATTENTION!
If you format the memory, all the data saved in it is deleted.
Make sure that there is no important data left in the memory or on the SD card.
Default Settings
In the “SETUP” menu, use the T or W buttons to select the “DEFAULT SETTINGS” entry and press the shutter release. You are prompted to confirm the command.
Using their W buttons, select the "OK" menu item to restore the camera's default settings from the factory. Confirm your selection with the shutter release.
Version
In the “SETUP” menu, use the T or W buttons to select the “VERSION” entry and press the shutter release. An information table appears showing the version information for the camera software.
Shooting and playback mode
Shooting mode is enabled as soon as the camera is switched on. You can begin taking photos straight away. You can also record video clips.
In playback mode, you can play and delete photos and video clips.
▶ To activate playback mode, press the play button ▶. The play icon appears at the top left of the display. The most recently taken image will be displayed.
▶ To return to shooting mode, press the mode button
Video playback
▶ Select the desired clip in the relevant playback mode.
The active playback mode can be determined by the corresponding icon (photo) or (video).
▶ You may also switch between the modes by repeatedly pressing the play button ▶.
▶ Press the shutter release to start playback.
When playing back video clips, hold down the ▶ or ↓ buttons to fast forward or rewind.
▶ If you wish to pause playback, press the shutter release.
▶ Press the shutter release again to resume playback.
Zooming photos
With photo images, you can view individual sections of the image.
▶ Press the button repeatedly in full size view to enlarge the image section up to 4 times.
▶ Use the W; ▶ and ↕ buttons to change the image section within the image.
▶ Press the shutter release to return to full screen.
Deleting photos
You can delete photos in playback mode. The quickest way to delete an individual shot is with the 📋 button.
▶ Select the shot in playback mode and press the button.
▶ Using the and W buttons, select whether or not the current image/video clip or all images/video clips should be deleted.
▶ To cancel the function, press the button again.
The next image is shown on the display.

PLEASE NOTE!
If a memory card is inserted, you can only delete the files on the memory card.
You cannot restore a fi le that has been deleted. Exercise caution therefore when deleting fi les.
PC Connection
Transferring data to a computer
You can copy your pictures and videos to a computer.
Supported operating systems:
Windows XP SP3
Windows Vista SP1
Windows 7
Using a USB cable
- Connect the supplied USB cable to the USB output on the camera and to the USB port on the computer.
▶ Navigate to the “DCIM” directory and, where applicable, to the relevant subdirectories in order to display the fi les (*.jpg = photos; *.avi = sound recordings). See also the directory structure in the memory.
- Press down the left mouse button and drag the relevant files to the directory provided on the computer, e.g. in the folder “My Documents”. You can also highlight the fi les and use the Windows commands “Copy” and “Paste”.
The fi les are transferred to the computer and stored there. You can display and process the fi les with a suitable software application.
DCF memory standard
The recordings on your camera are managed (saved, named, etc.) as specified by the DCF standard (DCF = Design Rule for Camera File System). Captures on memory cards from other DCF cameras can also be played back on your camera.
Card drive
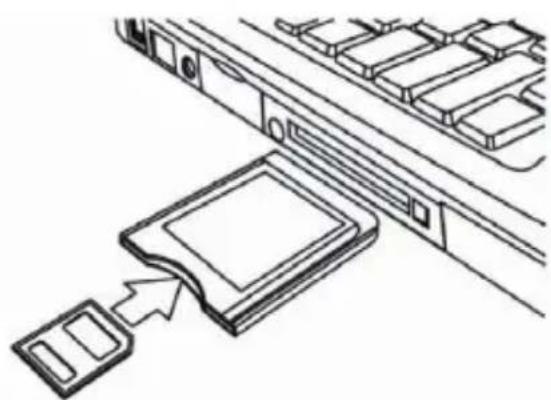
If your PC has a card drive or is connected to a card reader and you have saved the shots on the memory card, you can use this to copy the shots onto the PC.
The card reader is also detected as a removable data medium on the Windows desktop (or in "Computer" if using Vista).
natural_image
Technical line drawing of a mechanical component with a bracket and housing, showing no text or symbolsMemory folder structure
The camera saves the pictures and videos fi les in different directories in the internal memory or on the memory card. The following folders are automatically created upon saving:
DCIM: All pictures, videos and audio files are saved to this folder, Normal shots are located in the “100MEDIA” folder and automatically named with “PTDC” and a four-digit number. When the highest number has been reached – “PTDC9999”, the next folder “101DICAM” is created for the following shots, and so on.
A maximum of 999 folders can be created. If another capture/ recording is made after this, an error message will appear (“Directory cannot be created”).
▶ Insert a new memory card.
Do not try to change the folders and fi les in the camera's own directory structure (by renaming, etc.). You might destroy the fi les by doing so.
Storage capacity
| Size of memory card | ||||||
| Resolution | 128 MB 256 MB 51 | 2 MB 1 GB 2 GB | ||||
| 5 M 80 1 | 60 320 62 | 5 1250 | ||||
| 3 M 133 | 266 533 1 | 041 2083 | ||||
| VGA 611 | 1223 246 | 6 4778 95 | 57 | |||
The table specifies the number of images that you can save at a chosen resolution (e.g. 5 M) on a memory card with a specified size (e.g. 128 MB).
The actual number of photos that can be saved may vary (by up to 30%) depending on the resolution and the number of colours.
Installing the software
On the CD supplied, you will find Arcsoft Media Impression, a program for editing your pictures.
▶ Insert the CD in the CD-ROM drive of your computer.
▶ Normally, the CD is recognised automatically and its contents are displayed on the screen. If not, select the CD drive in Windows Explorer > My Computer and double-click on the drive name to start the CD.
The start page shows an overview of the contents of the CD.
▶ To install the software, select it and click the INSTALL button.
▶ Follow the on-screen instructions.
Troubleshooting
Use the following checklist if the camera does not function correctly. If the problem persists, consult MEDION Service.
The camera will not switch on.
- The batteries were not inserted correctly.
• The batteries are dead. - The battery compartment door is not closed properly.
The camera is not taking any photos.
• The flash is still charging.
- The memory is full.
- The SD card is not correctly formatted or is defective.
- The maximum number of fi les has been exceeded. Reset the fi le numbering function.
- Not enough light. Change the angle of the camera to pick up more light or use the flash.
The fl ash does not go off.
- The camera was moved during the shot.
• The flash is switched off. - The camera is in burst, macro or video mode.
The image is blurred.
- The camera was moved during the shot.
- The subject was outside the camera's focal range. Use the Macro mode for close-up pictures if necessary.
The image is not shown on the display.
- An SD card has been inserted which took pictures in non-DCF mode on another camera. The camera cannot display that type of image.
The period of time between shots is longer when taking pictures in the dark
- The shutter usually works slower under weak light conditions. Change the angle of the camera, or improve the light conditions.
The camera switches itself off.
- After a preset period, the camera switches itself off to save energy. Restart the camera.
The shot has not been saved.
- The camera was switched off before the shot could be saved.
Shots on other memory cards are not displayed.
- The shots on memory cards of other cameras are only displayed if the other camera also uses the DCF memory system.
The shots cannot be transferred to the PC via the USB cable.
- The camera is not switched on.
When the camera is connected to the computer for the first time, no new hardware is found
- The USB connection of the computer is deactivated in the BIOS.
- Enable the port in the computer's BIOS. Refer to the PC manual if necessary.
Maintenance and care
Clean the housing, lens and display as follows:
▶ Clean the camera housing using a soft, dry cloth.
- Do not use thinners or detergents that contain oil, This could damage the camera.
To cleaning the lens and the display, first use a lens brush to remove any dust. Then wipe the lens and display with a soft cloth. Do not apply any pressure to the display and do not use hard objects to clean it.
▶ Do not use strong cleaning agents for the housing and lens (if there is dirt that cannot be removed, contact your dealer).
Disposal
Packaging

Your camera is packaged to protect it from transportation damage. Packaging is raw material and can be reused or added to the recycling system.
Device

natural_image
Symbol of a trash bin crossed with a diagonal line, no text or numbers presentAt the end of its service life, the device should not be disposed of with the household rubbish. Dispose of it in an environmentally friendly manner at a local collection point for old appliances. Contact your local authority to find out where your nearest collection point is located.
Batteries

Do not dispose of used batteries in the normal household rubbish. Batteries should be taken to a collection point for used batteries.
Technical data
Pixels: 5.0 megapixels CMOS
Aperture: F2.8
Focal length: f = 8.5 mm
Shutter speed: 1/4000–1/8 sec.
Digital zoom: 8 times
LCD monitor: 6.1 cm/2.5" LC display
File formats: JPEG (EXIF 2.2), AVI
Max. resolution:
Camera mode: 2560 x 1920 pixels
Video mode: 640 x 480 pixels
Memory:
Internal: 16 MB internal memory (usable memory may vary)
External: microSD/microSDHC card
Port: Mini USB 2.0
Dimensions: 90 x 61 x 20.5 mm (W x H x D)
Weight: approx. 120 g (including batteries)
Subject to technical and optical changes as well as printing errors.

- Waterproof digital camera
- Table of content
- About these instructions ....4
- Safety instructions ....6
- Overview of the device ....13
- Start-up 15
- First steps 20
- Taking your fi rst shots 25
- The Photo menu 30
- The Video menu 36
- The settings menu ....37
- Shooting and playback mode 42
- PC Connection 45
- Memory folder structure ....47
- Storage capacity 48
- Installing the software.... 49
- About these instructions
- Symbols and key words used in these instructions
- Proper use
- Safety instructions
- Dangers for children and people with reduced ability to operate machinery
- DANGER!
- Warnings
- Battery information
- WARNING!
- Safety precautions
- Never carry out repairs yourself
- Water resistance
- Important notes before diving:
- Overview of the device
- Start-up
- Package contents
- Inserting batteries
- Inserting and removing SD cards
- PLEASE NOTE!
- Insert card
- Fitting the carrying strap
- CAUTION!
- First steps
- Switching on the camera
- Switching off the camera
- Energy-saving function
- Setting the language, date and time
- Display options
- Taking your first shots
- Setting shooting mode
- Tips for taking good shots
- Taking a photo
- Using the fl ash
- Zoom function – enlarging or reducing
- Setting the focus mode
- Normal
- Macro
- Recording videos
- The Photo menu
- Shooting mode
- Resolution
- Quality (compression)
- Sharpness
- Exposure compensation (EV)
- White balance
- Scene mode
- ISO (light sensitivity)
- Smile capture
- Stabilisation
- The Video menu
- The settings menu
- Date/time
- Auto off
- Beep Sound
- Language
- Date display
- Frequency
- Format
- ATTENTION!
- Default Settings
- Version
- Shooting and playback mode
- Video playback
- Zooming photos
- Deleting photos
- PC Connection
- Transferring data to a computer
- Using a USB cable
- DCF memory standard
- Card drive
- Memory folder structure
- Installing the software
- Troubleshooting
- The camera will not switch on.
- The camera is not taking any photos.
- The fl ash does not go off.
- The image is blurred.
- The image is not shown on the display.
- The period of time between shots is longer when taking pictures in the dark
- The camera switches itself off.
- The shot has not been saved.
- Shots on other memory cards are not displayed.
- The shots cannot be transferred to the PC via the USB cable.
- When the camera is connected to the computer for the first time, no new hardware is found
- Maintenance and care
- Disposal
- Packaging
- Device
- Batteries
- Technical data
- Max. resolution:
- Memory:
- Subject to technical and optical changes as well as printing errors.
Brand : MEDION
Model : LIFE S41002 (MD 86459)
Category : Camera