
MD 85173 - Camera MEDION - Free user manual and instructions
Find the device manual for free MD 85173 MEDION in PDF.


| Product Type | Digital Camera |
| Brand | MEDION |
| Model | MD 85173 |
| Dimensions (approx.) | 90 x 60 x 30 mm |
| Weight (approx.) | 150 g |
| Power Supply | Rechargeable Lithium-Ion battery |
| Image Sensor | CMOS, up to 16 MP |
| Zoom | Optical 5x and Digital 4x |
| Display | 2.7-inch LCD screen |
| Storage Media | SD/SDHC memory card (not included) |
| Photo Modes | Auto, Program, Portrait, Landscape, Night, Sport |
| Video Recording | HD 720p video |
| Connectivity | USB 2.0, AV output |
| Maintenance | Clean the lens with a soft, dry cloth; avoid moisture |
| Safety Precautions | Do not expose to water or extreme temperatures; keep away from children |
| Spare Parts | Available from MEDION customer service or authorized dealers |
| Repairability | Check user manual for troubleshooting; contact support for repairs |
Frequently Asked Questions - MD 85173 MEDION
User questions about MD 85173 MEDION
0 question about this device. Answer the ones you know or ask your own.
Ask a new question about this device
Download the instructions for your Camera in PDF format for free! Find your manual MD 85173 - MEDION and take your electronic device back in hand. On this page are published all the documents necessary for the use of your device. MD 85173 by MEDION.
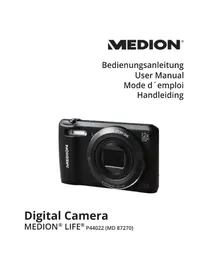
USER MANUAL MD 85173 MEDION
natural_image
Exterior view of a white MEDION digital camera with ports and buttons (no readable text or symbols beyond branding)MEDION®
Medion Electronics Ltd.
120 Faraday Park • Faraday Road
Dorcan • Swindon SN3 5JF • Wilts.
Phone: 0870 7270 370
Fax: 01793 715716
E-Mail: hotline@medion.co.uk
www.medion.com
INSTRUCTION MANUAL
C€
Table of contents
2 Safety Instructions.... 4
2.1 WARNINGS....4
2.2 Batteries 5
2.3 PRECAUTIONS....5
3 Getting started....7
3.1 Parts of your camera 7
3.2 Inserting the batteries....8
3.3 Inserting and removing the SD/MMC card 9
3.4 Attaching the carrying strap.... 10
4 Basic operation ...... 11
4.1 Switching the camera on and off 11
4.2 Using the mode buttons.... 12
4.3 Taking photographs.... 13
4.4 Recording audio 16
4.5 Making video clips 17
4.6 Playing images, audio and videos.... 18
4.7 Deleting recordings.... 19
5 Advanced operation.... 21
5.1 Using the flash.... 21
5.2 Using direct access buttons 21
5.3 Changing menu options.... 22
5.4 List of menu options 23
5.5 Exposure compensation.... 25
5.6 Selecting a language 25
5.7 Setting the image resolution.... 26
5.8 Setting image quality 26
5.9 Setting image effects.... 27
5.10 Setting the driver 28
5.11 Protecting photos against accidental deletion 28
5.12 Viewing images on a television set.... 29
5.13 Setting the date and time.... 29
5.14 Setting the LOGO 30
6 Installing the software 31
6.1 Supported operating systems....31
6.2 Installing the driver 31
7 Transferring files to your PC.... 35
8 Specifications 36
9 Memory requirement.... 37
10 Troubleshooting.... 38
11 Further information.... 39
11.1 Safety instructions 39
11.2 Maintenance and care 39
11.3 Photo tips....40
11.4 Battery tips.... 40
1 Contents of package
Please ensure that the following items are included in the box:
1x Digital camera MD 85173
1x user manual
2x AAA batteries
1x USB cable
1x TV cable
1x audio cable
1x CD-ROM (driver and application software)
1x carrying pouch
1x wrist strap
Intended Use
This product is a digital imaging device with an integrated digital camera, digital video recorder, digital audio recorder and PC camera. It allows you to take digital photographs and videos, make voice recordings or use it as a webcam.
2 Safety Instructions
2.1 WARNINGS
To prevent possible injury, please observe the following warnings when using this product.
- Do not aim the viewfinder at the sun or other intense light.
Aiming at the sun through the viewfinder could injure your eyesight.
- Do not use the flash too close to eyes.
Using the flash too close to your subject's eyes can injure the eyesight.
Please, remain at least one meter (39 inches) away from infants when you use the flash.
- Do not place camera strap around neck.
The strap could result in suffocation when accidentally wound around neck.
- Do not open or disassemble.
Disassembling the equipment may cause high-voltage electrical shock. Interior inspections, modifications and repairs should be conducted by qualified service staff. Please take the product to an authorized service center for inspection.
- Turn off immediately when malfunction.
If you notice unusual smell or smoke coming from the equipment, please unplug the AC adaptor and remove the battery immediately. Proceed swiftly with caution to avoid burns. Take the equipment to an authorized service center for inspection.
- Unplug the adaptor when the camera is not in use.
If you use the adaptor as the power source, unplug the adaptor when the camera is not in use to prevent fire and other dangers.
- Continuous use over a long time may lead to overheating, deformation and fire.
2.2 Batteries
Observe the following instruction when handling battery used in this product.
- Improper use of battery may lead to leakage or explosion.
- Check battery polarity before inserting. Do not attempt to insert the battery upside down or backward.
- Do not disassemble or short circuit the battery.
- Do not expose battery to fire or excessive heat.
- Do not immerse or contact with water or other liquids.
- Stop using the battery immediately when noticing any deformation or changes in color.
- Do not put the battery along with metal objects such as coins, keys or hairpins in your pocket.
- Keep battery out of the children's reach. Seek medical attention right away if the child swallowed a battery.
2.3 PRECAUTIONS
Observe and exercise the following cautions to avoid damage and keep your camera in an optimum working status.
- Keep dry.
This camera is not waterproof, and may malfunction when immersed in water, or any liquids enter the interior of the camera - Keep away from moisture, salt or dust.
Wipe off salt or dust with a slightly dampened soft cloth after using your camera at the beach or seaside, then, dry your camera thoroughly. - Keep away from strong magnetic fields.
Never put the camera too close to any equipment producing strong electromagnetic fields, such as electric motor. Strong electromagnetic fields could lead camera malfunctions or interfere the data recording. - Avoid intense heat.
Do not use or store the camera under sunlight or high temperatures. Such exposure could lead to the leakage of the battery or deformation of the casing.
- Avoid rapid temperature change.
Rapidly moving the equipment between hot and cold temperatures may form water droplets on its exterior and interior. To prevent the condensation, place the equipment in its carry case or a plastic bag before exposing it in a rapid temperature change.
- Do not drop.
Strong shock or vibration of dropping could cause malfunction. Keep the strap around your wrist when carrying the camera.
- Do not unplug or remove the battery when the processing data.
When images data are being recorded or deleted from memory cards, cutting off power could result in data loss or damage the internal circuitry or memory.
- Handle the lens and all moving parts with care.
Do not touch the lens and lens barrel. Be careful in handling the memory card and battery. These parts are not design to take extra force than regular use.
- Batteries
In low temperature circumstances, the batteries' capacity may decrease significantly due to the inactive chemical reaction. When taking pictures in cold weather, keep a warm backup battery on hand.
- If the battery terminals get dirt or contamination, wipe them off with a dry, clean cloth or use an eraser to remove the stain.
- Memory cards.
Turn off the power before inserting or removing the memory card. Otherwise, the memory card could become unstable.
Memory cards may getting hot during use, remove memory card from the camera with care.
3 Getting started
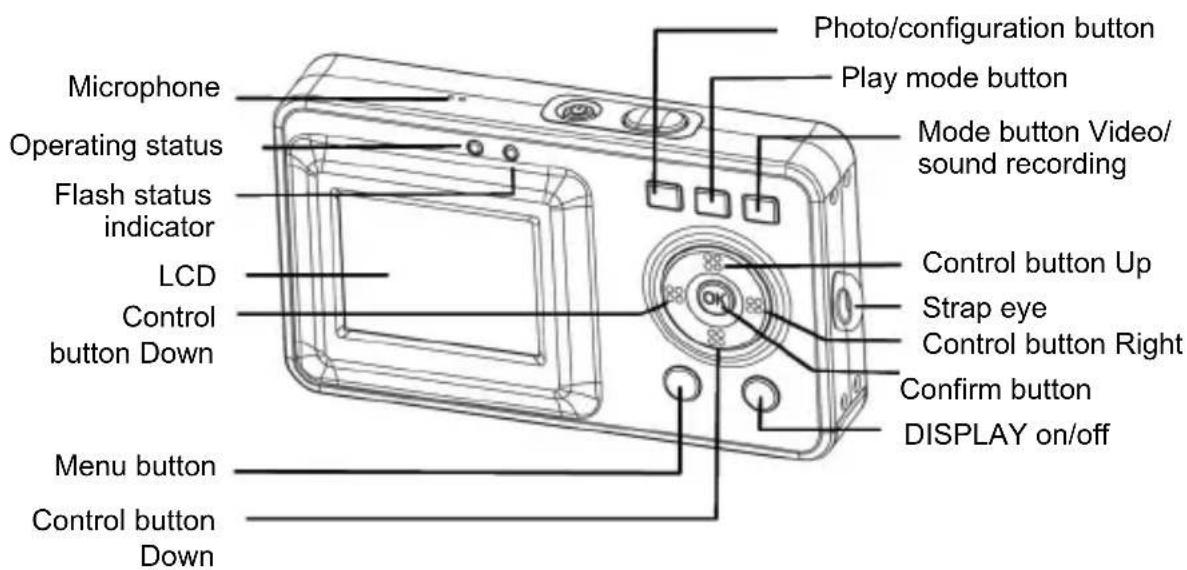
3.1 Parts of your camera
Familiarise yourself with the parts of your camera before use. That makes it easier to operate the camera.

3.2 Inserting the batteries
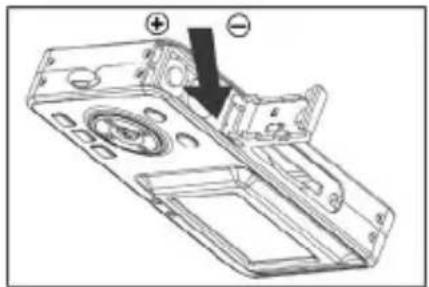
Use two AAA (micro) batteries.
1 Push the cover of the battery compartment in the direction indicated to open the compartment.

natural_image
Line drawing of a device casing with control panel and buttons, showing an arrow indicating rotation (no text or symbols)2 Open the cover of the battery compartment.

natural_image
Technical line drawing of a mechanical housing component with an arrow indicating rotation (no text or symbols present)3 Insert the batteries into the battery compartment and ensure that the polarity is correct. Close the cover of the battery compartment by closing it over and pushing it back into place.
natural_image
Technical line drawing of a mechanical housing component with mounting holes and a positive/negative symbol (no text or labels)
-
We recommend that you use rechargeable 1.2V NiMH batteries as they have a longer battery life.
-
You can also use 1.5V alkaline batteries.
√ See the "Battery tips" section on page 40 for details on the battery life.
3.3 Inserting and removing the SD/MMC card
You can use SD or MMC cards to increase the memory capacity. Switch off the camera before inserting the card. Insert the card as follows (photographs, sound and video recordings are no longer stored in the internal memory, but stored on the card).
Inserting the card
1 Open the cover of the card slot.

natural_image
Line drawing of a device with an arrow indicating rotation or movement (no text or symbols)2 Insert the card in the card slot until it locks into place.

natural_image
Line drawing of a device casing with an arrow pointing to a component (no text or symbols)3 Close the cover of the card slot.

natural_image
Line drawing of a device with an arrow indicating rotation or change (no text or symbols)Removing the card
Open the cover of the card slot. Press the card downwards briefly to unlock it. Remove or change the card and close the card slot cover again.
3.4 Attaching the carrying strap
Attach the carrying strap for your convenience and for safety reasons.
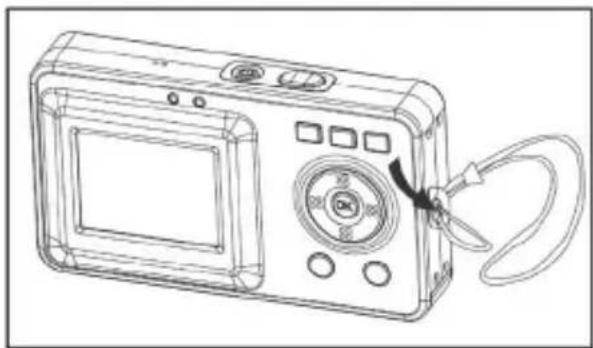
1 Pass the loop of the carrying strap through the eye as shown in the illustration.
2 Pull the other end of the carrying strap through the loop of the thin cord and pull the carrying strap tight.
natural_image
Line drawing of a digital camera with control panel and cable (no text or symbols)
Caution
- Do not hang the camera around your neck using the carrying strap to avoid danger. This applies to children in particular.
- When carrying the camera on the strap, ensure that you do not hit the camera against anything.
- When attaching the carrying strap, place the camera on a solid surface to ensure that it cannot fall down and be damaged.
4 Basic operation
4.1 Switching the camera on and off
Switching the camera on
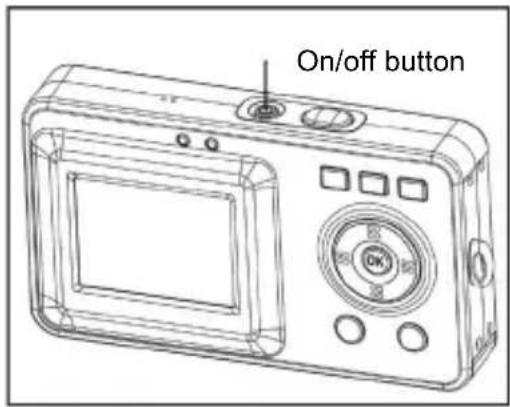
Press the On/Off button for 1-2 seconds to switch the camera on. If the camera is not switched on, check the polarity of the batteries and ensure that they are charged.
Switching the camera off
Press and hold the main switch for several seconds to switch the cameral off. The LCD goes blank.

If the camera is idle for more than three minutes, it is switched off automatically to save battery power. Press the On/Off button for 1-2 seconds to switch the camera on again.
Automatic deactivation is not active in USB or record mode.
4.2 Using the mode buttons
The camera features five operating modes.
- Still image mode – for taking digital images/photographs
• Video mode – for taking high-quality videos with sound - Recording mode – for crystal clear sound recordings
- Play mode – for watching/listening to all recordings
- Configuration mode – for setting the operating parameters
When the camera is switched on, it is automatically in still photograph mode. Press the following mode buttons to select the required mode.

Selects the photography mode and setting mode

Play mode

Video/sound recording mode
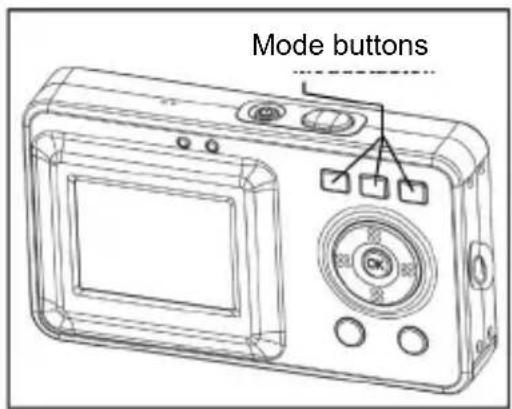
When the camera is in photography mode, press the 📋/SET button to access the setting mode.
When the camera is in the setting mode or one of the other modes, press the 📋/SET button to return to the photography mode.
Press the button again for the video/sound recording mode to switch between both operating modes.
4.3 Taking photographs
4.3.1 LCD descriptions display
Status symbols in the photography mode
| 0/7 | Number of photographs taken, number of photographs available | 0.5M | 0.5 megapixel image mode |
| Battery status | 0.8M | 0.8 megapixel image mode | |
| Single shot mode 2.0 megapixel image mode | |||
| Burst mode 3.0 megapixel image mode | |||
| Self-timer mode 4.0 megapixel image mode | |||
| Automatic flash 5.0 megapixel image mode | |||
| Flash always on Automatic white balance | |||
| Flash off Daylight white balance | |||
| ★★★ | Best image quality Tungsten white balance | ||
| ★★ | Medium image quality Fluorescent white balance | ||
| ★ | Standard image quality Using external memory card | ||
| The external SD card is | X | write-protected (locked) | |
4.3.2 Snapshot
Press the On/Off button to switch the camera on.
1 Select single shot mode
When the camera is switched on, it is automatically in still photograph mode. If this is not the case, press the 📄/SET mode button to select the photography mode. Photography mode is active when the 🔔 symbol appears in the upper corner of the LCD display.

2 Zooming in or out digitally
Use the LCD to frame the image and press the up button to zoom in or the down button to zoom out.
3 LCD
You can now view the image on the LCD. The meaning of the status symbols shown on the LCD is explained in the table on page 12.

natural_image
Two smiling girls sitting on a table, each with hands behind them, surrounded by camera and star ratings (no text or symbols in the image)4 Taking a photograph
Press the shutter release down fully to take a photograph. A sound signals that the photograph has been taken.

Photographs taken with the camera are saved as JPEG files.
When you press the menu button in photography mode, the following menu functions are available for selection:
- Capture Mode
- Strobe
- Resolution
- Photo Quality
- Photo Effect
• WB
• EV
You can choose between three different image modes in the "Capture Mode" menu function:
| Single | When the shutter release is pressed, a single photograph is taken. | |
| SelfTimer | The photograph is taken 10 seconds after the release is pressed. | |
| Sequence | When the shutter release is pressed, a series of three photographs is taken. |

The photography mode is preset to single-shot.
The LCD can be switched off using the sleep button (LCD on/off) to save power.
4.4 Recording audio
1 Press the button twice to activate the digital recording function. The symbol is shown on the LCD. Before recording, the information shown at right is displayed. Press the shutter release once to start sound recording.

2 The information shown here is displayed when recording was started using the shutter release. Press the shutter release again to stop sound recording.
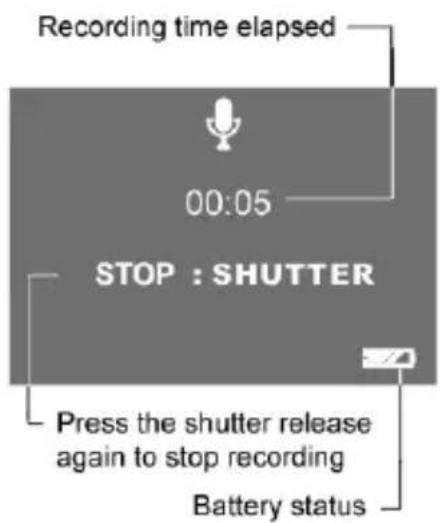

The sound is recorded as a WAV file. The length available depends on the size of the memory.
The LCD display can be switched off using the sleep button (DISP on/off) to save power.
4.5 Making video clips
4.5.1 LCD descriptions
The elapsed time is shown at the top right. The remaining time is shown at the bottom left.

The display is not changed during recording and is not updated until recording is complete.
4.5.2 Making a video clip
Switch the camera on.
1 Press the button for the video mode 🎨. Video mode is active when the 🔊 symbol appears in the upper corner of the LCD display.
2 Press the shutter release to start recording a video. Press the shutter release again to stop recording. The information shown at right is displayed on the LCD during video recording.

3 Press the up button (▲to zoom in digitally and the down bottom (▼) to zoom out.

The video is recorded as an AVI file (with sound).
4.6 Playing images, audio and videos
4.6.1 LCD descriptions
Status symbols in play mode
2004:02:11 Current system time: 11.02.2004, 12:02:47 12:02:47
01/10 Number of photographs taken / total photographs

Photo is protected

Photo is not protected

Current file is a photograph (jpg)

Current file is a video (avi)

Current file is a sound recording (wav)
4.6.2 Viewing photos, videos and listening to sound recordings
1 Press the button to activate play mode. You can now play photographs, videos and sound recordings. The ▶ symbol is shown on the LCD.
2 The following buttons are used to browse the photos/videos/sound recordings in play mode:
OK Start/close thumbnail view.
Goes to the previous photo, video or sound recording (highlighted by frame).
▶ Goes to the next photo, video or sound recording
Press OK and then the shutter release to start videos or sound recordings from the thumbnail view. Press the shutter release again to stop playing.

Thumbnail view
While playing photos, videos and sound recordings, you can open the thumbnail view by pressing the confirm button (OK button). This mode allows you to view several photos, videos or sound recordings at once.
Use the control buttons ◀, ▲, ▼ and ▶ to select a file and press OK to play the file.

natural_image
Three grayscale images showing different scenes: strawberries, beach, and landscape, each labeled with a 2x2, 3x3, and 4X4 coordinate axes (no text or symbols in the images themselves)There are three thumbnail modes: 2x2, 3x3 and 4x4, so that four, nine or sixteen thumbnails can be shown on the LCD. (Select Play Mode > Press MENU > Select "Thumbnail").
4.7 Deleting recordings
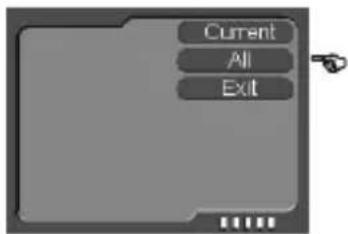
You can delete unrequired photos, videos and sound recordings. Either single recordings or all recordings can be deleted. To do so, you must be in playback mode.
Deleting a single recording
Select the recording to be deleted in playback mode. Then press the menu button and select "Delete" and "Current". Press OK to erase the recording.

Deleting all recordings
To delete all recordings, press the menu button and select "Delete" and "All". Press OK. All photos are now deleted.
Formatting the memory
You may wish to format the memory in order to re-set the original data structure of the internal memory or the external card, resp. Please note that all the recordings will be lost during formatting.
Press the 📄/SET button to open the configuration mode. Select "Format", press the OK button and select "YES" to start formatting. The menu is displayed again after formatting.
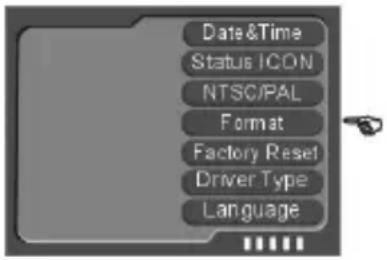
The method described above can also be used to delete video clips and sound recordings.

Caution
Protected data is not deleted but can be formatted. See page 28 for instructions on protecting and unprotecting data.
SD cards can be write-protected using an integrated lock. The current status of the SD card is also shown via a symbol in the LCD. If the SD card in the camera is write-protected, you cannot save images, videos or sound recordings to it, delete existing data or format the card. The data can only be played back.
5 Advanced operation
5.1 Using the flash
If there is not enough available light for your photo, the built-in flash can provide the additional light required.
1 Switch the camera on and select the photo mode (single shot or self-timer mode).
2 You can set the flash to "Auto", "Always on" or "Off" by pressing the right button ▶ in single shot and self-timer modes. The corresponding symbol is displayed on the LCD.
The flash is activated automatically when the light level is too low if the flash is set to "Auto". When "Always on" is set the flash is used for every shot. When "Off" is selected, the flash is deactivated. The flash only works in single shot mode and self-timer mode. It does not work in burst and video mode. Please note that using the flash increases battery consumption.
5.2 Using direct access buttons
Selecting photography mode directly
In photography mode, you can access the "Single", "SelfTimer" and "Sequence" modes by pressing the left button repeatedly. The corresponding symbol is displayed at the top left of the LCD.
Selecting the resolution directly
In photography mode, the OK button can be used to select the resolution progressively. The current resolution is displayed at the bottom left of the LCD. In the top right you see the number of photos you can take in the selected resolution.
Please also refer to the table in the Appendix: "Picture Quantity for Selected Resolutions".
5.3 Changing menu options
The camera features image, playback and configuration menus.
1 Press the menu button to select these menus from the photography or playback mode.
For the configuration mode menu, press /SET twice.
2 Press the ▲(up) and (down) buttons to select the corresponding option and press the OK button to confirm.
The respective option selected is highlighted in colour.
Photography mode menu Playback mode menu Configuration mode menu


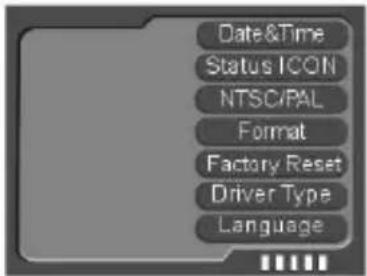
5.4 List of menu options
The menu contents vary in accordance with the operating mode.
The menu contents may vary in accordance with the camera model.
See "Specifications" on page 36 for further details.
Photography mode
| Menu Setting Description | ||
| Capture Mode | Single Take a single photograph | |
| Sequence Takes a series of three photos | ||
| SelfTimer 10 seconds self-timer | ||
| Strobe | AUTO | See page 21 for further details on the setting. |
| Force | ||
| Forbidden | ||
| Resolution | 5 mega 5 million pixels | |
| 4 mega 4 million pixels | ||
| 3 mega 3 million pixels | [standard setting for this camera] | |
| 2 mega 2 million pixels | ||
| 0.8 mega 0.8 million pixels | ||
| 0.5 mega 0.5 million pixels | ||
| Photo Quality | Superfine Best image quality | |
| Fine Medium image quality | ||
| Economy Normal image quality | ||
| Photo Effect Normal Normal photo mode | ||
| B/W Black and white | ||
| Sepia Photos with a nostalgic brown tone | ||
| WB Auto Automatic white balance | ||
| Daylight | White balance for daylight mode | |
| Tungsten White balance for tungsten mode | ||
| Fluorescent | White balance for fluorescent mode | |
| Cloudy | White balance for cloudy mode | |
| EV | -2.0 EV to +2.0 EV | Six-step exposure compensation |
Playback mode
| Menu Setting Description | ||
| Protect | Lock Current Protect current photo to prevent accidental deletion | |
| Unlock Current Cancel protection for current photo | ||
| Lock All Protect all photos to prevent accidental deletion | ||
| Unlock All Cancel protection for all photos | ||
| Delete | Current Delete current photo | |
| All Delete all photos | ||
| Thumbnail | 2 x 2 Show 4 thumbnails simultaneously | |
| 3 x 3 Show 9 thumbnails simultaneously | ||
| 4 x 4 Show 16 thumbnails simultaneously | ||
| Set Logo Use the current photo as the start-up image | ||
| Play Logo | Enable Select current photo as the start-up image | |
| Disable Use the preset image as the start-up image | ||
Configuration mode
| Menu Setting | Description | |
| Date&Time Set date and time for current photo | ||
| Status ICON | On Display symbol for current status | |
| Off Hide symbol for current status | ||
| NTSC/PAL | NTSC | Set TV output to NTSC |
| PAL | Set TV output to PAL | |
| Format | Yes | Format internal/external memory |
| No | Cancel format | |
| Factory Reset | Yes | Reset values to factory settings |
| No | Cancel factory reset | |
| Driver Type | TWAIN | Set camera to TWAIN mode, use as webcam |
| MASS | Set camera to MASS mode. In this mode, functions such as downloading, copying and cutting can be used. | |
| Language | Select the menu language (menu contents may vary in various models). | |
5.5 Exposure compensation
By correcting the exposure value (EV), you can adjust images which appear too light or too dark.
1 Selecting the image mode
Press the menu button in photography mode.
2 Selecting EV
Select the EV item in the menu and press OK to open the exposure option.
3 Selecting an EV value
Press ▲ or ▼ to select a suitable exposure compensation and press OK to confirm. The value can be set in six steps between -2.0 EV and +2.0 EV.
i Exposure compensation can be very useful. In dark conditions set the value to a positive number and in bright conditions to a negative value.
Do not use exposure compensation if the subject is in a very bright or very dark area, or if the flash is used.
5.6 Selecting a language
When you use the camera for the first time, the texts on the LCD may not be displayed in your language. However, the LCD language can be changed easily.
1 Press the button to open the configuration menu.
2 Select the "Language" menu item and press OK to confirm.
3 Select the required language.
5.7 Setting the image resolution
The basic setting for the image resolution is 3.0 megapixels.
1 Press the menu button in photography mode.
2 Press ▲ or ▼ to select the "Resolution" option and press OK to confirm.
3 You can select one of six resolution settings: 5.0 megapixels, 4.0 megapixels, 3.0 megapixels, 2.0 megapixels, 0.8 megapixels and 0.5 megapixels. At the 4.0 and 5.0 megapixel settings, pixels are interpolated – no image bursts can be captured in these resolutions.
5.8 Setting image quality
The default image quality setting when the camera is switched on is "Fine".
1 Press the menu button in photography mode.
2 Select the "Photo quality" item in the menu and press OK to confirm.
3 Press "up" or "down" to select the "Exposure" option and press OK to confirm.
- “Super fine” is the best quality which requires most memory,
- “Fine” is medium quality with a medium memory requirement and
- “Economy” is normal quality with a low memory requirement.
5.9 Setting image effects
The standard image effect setting when the camera is switched on is "Normal".
1 Press the button to activate photography mode and press the menu button.
2 Select the "Photo Effect" item in the menu and press OK to confirm.
3 Press "up" or "down" to select the photo effect option and press OK to confirm.
- "Normal": No special photo effect.
- “Black and white”: Images are recorded in black and white.
- “Sepia”: Images are recorded in a nostalgic brown tone.
Sepia: Brown/amber simulates the brown tone of old photos caused by oxidation of the chemical components of the photograph. Sepia shifts the brown tones of the digital image to the dark brown range to give the impression of an old photo.
5.10 Setting the driver
The default driver setting is MASS (see also the tabel “Configuration mode” on page 24).
1 Press the button to activate the configuration menu.
2 Select the "Drive Type" item in the menu and press OK to confirm.
3 Press ▲ or to select the required driver type and press OK to confirm.
5.11 Protecting photos against accidental deletion
This camera offers a protect function to prevent selected images being accidentally deleted.
1 Press the button to start the playback mode. Open the photo to be protected. Press the menu button and select the "Protect" item.
2 Select the required option from the list displayed.
The list contains four options: "Lock Current", "Unlock Current", "Lock All", "Unlock All" (see also list of menu options on page 23).
The 🔒 symbol appears on the image in the LCD if the image is protected against accidental deletion. The 🔒 symbol appears when the protection option is cancelled for the photo.

Note
Protected photos cannot be deleted but can be formatted.
5.12 Viewing images on a television set
1 Connect the TV output of the camera to the video input of the television set using the cable supplied.
2 Connect the audio input of the TV to the headphone jack of the camera. The camera automatically recognises the television set and switches to TV.
When still images are played on a TV, black pixels may appear around the image.
5.13 Setting the date and time
Your digital camera can save the date and time each photo was taken and display this information in playback mode.
However, you must first set the date and the time for the camera.
1 Press the button to activate the configuration menu.
2 Select the "Date&Time" item in the menu and press OK to confirm.
3 Now change the time setting. Select the setting required using the control buttons ◀ and ▶ and then change the value using the ▲ and ▼ control buttons.
Press OK to confirm the values after you have finished making the settings.


The date and time can only be displayed by the camera in playback mode. They cannot be printed.
The time settings are saved by an internal backup battery. Therefore, the time settings are not lost when the two replaceable AAA batteries are removed. The settings are not lost until the internal backup battery is flat.
5.14 Setting the LOGO
The LOGO is the startup image which is shown on the display when the camera is activated. This allows the user to define individual images. To do so, proceed as follows:
1 Press the button to start playback mode. Open the required photo. Press the menu button and select the "Set Logo" item.
2 After setting the logo, select the option "Play Logo" in the playback mode menu. There are two options:
- Activate: The image selected by the user is used as the startup image.
- Deactivate: The preset image is the startup image.

The startup image is not deleted when images are deleted or the memory is formatted. To set another startup image, you must repeat the procedure described above.
6 Installing the software
6.1 Supported operating systems
- Windows 98 SE
- Windows Me
- Windows 2000
- Windows XP
Microsoft Windows 98, Windows 98 SW, Windows 2000 Professional, Windows ME or Windows XP systems are pre-installed.
6.2 Installing the driver
Driver installation is similar for the various Windows systems. When specifying the path, you must simply select the driver in the CD-ROM drive.
The camera has two USB driver modes: TWAIN and MASS. MASS is the default setting. The procedure for installing the drivers for each of the two modes is described below.
6.2.1 Installing the driver in MASS mode

When the camera is in MASS mode, Windows ME, 2000 and XP automatically recognise the camera and no driver must be installed. The description of the driver installation procedure refers to Windows 98 SE.
1.
When the camera is connected to the computer in MASS mode, the Found New Hardware Wizard appears on your PC monitor.
Click "Next" to open the next window

2.
Select "Search for the best driver for your device" and click "Next".

3.
Select "Specify a location" and click "Browse". Specify the driver CD in your drive.

4.
Now click "Next". The system installs the driver and the following window appears:
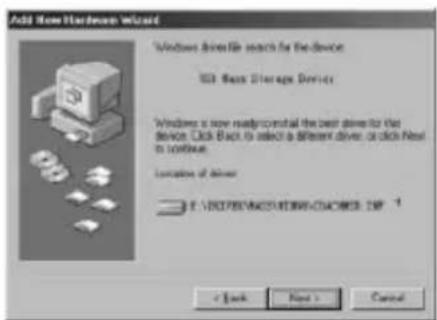
5.
Click "Finish" to complete installation.

6.
You may be prompted to insert the Windows 98 CD during the installation process:

6.2.2 Installing the driver in TWAIN mode
1.
Connect the camera to the computer. The system should automatically recognise that a new device has been connected.
2.
In TWAIN mode, the driver must be installed for all systems. The procedure is similar to that described for Mass mode.
3.
Under Windows 2000, you may be asked about the digital signature of the driver. Click "Yes" to install the driver.
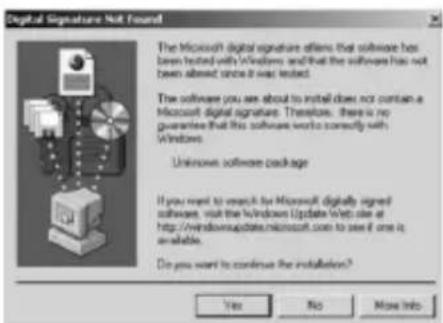
4.
When installing the driver on Windows XP the Found New Hardware Wizard appears. Select "Install the software automatically" (recommended).
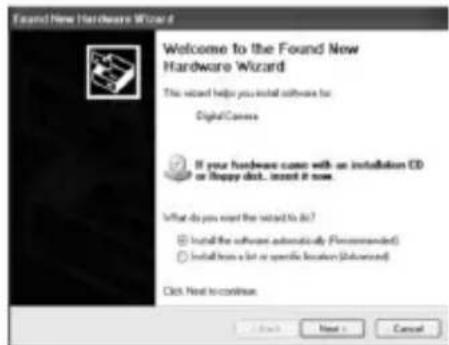
The following window may appear. Click "Continue" and wait until the installation is complete.

- The installation procedure under Windows ME is similar.

Either of two driver modes can be selected for the camera.
TWAIN mode uses the video components for the PC (WebCam).
In MASS mode, the internal memory is used as mobile memory. It can be treated like a hard drive. You can copy, delete, cut and download photos and videos from the camera.
Location of the drivers on the CD:
(Example: "F:\ " as the CD-ROM drive)
F:\Driver\mass-storage\Win98: MASS driver for Win 98
F:\Driver\Twain\win98 2k: TWAIN driver for Win 98 / 2000
F:\Driver\Twain\WinMe_XP: TWAIN driver for Win ME / XP
Photos should be downloaded directly in MASS mode. To select the correct driver mode before installing the driver, press the ☐/SET button to open the menu and select the corresponding mode via the "Driver type" option.
7 Transferring files to your PC
After you install the drivers, you can transfer your photos, videos and sound recordings to the PC using the USB cable, and view, play and edit them on your PC. The camera switches to USB mode.
1 Switch your PC on. If necessary, set your camera's driver mode to MASS (see page 31).
2 Connect the digital camera to your PC by inserting the end of the supplied USB cable into the USB port of your PC and connecting the other end of the USB cable to the USB terminal of your camera.
3 If the driver was installed correctly, the camera is identified by the computer as a mass storage device (removable media). If you use Windows XP, you can access the contents of the camera memory immediately. In other Windows versions, open the Windows Explorer or double-click My Computer. Double-click the media symbol for the camera and, where applicable, the folders within it to view the files.
4 Now press and hold the left mouse button to drag the required files (images, sound or video) to a suitable folder on your PC, e.g. the "My Files" folder. You can also select the files and use the "Copy" and "Paste" Windows commands.
The files have now been transferred and saved to your PC. You can now view, play and edit the files using the application software.
USB power supply and webcam function
The camera is supplied with power via the USB port. This allows you to transfer data from the camera to the PC using the USB cable even when there are no batteries in the camera. You can use the camera as a webcam if you set the driver type of the camera to TWAIN. This allows you to use functions such as video capture, video monitoring or internet video conferences (netmeeting.
8 Specifications
| Sensor 1/2" CMOS | |
| Pixels 3.1 million | |
| Effective resolution 2048x1536, 1600x1200, 1024x768, 800x600 | |
| Interpolated resolution | 2560x1920, 2304x1728 |
| File formats | Photo: JPEG (EXIF 2.1 Version) |
| Video: AVI/Motion JPEG 640*480 | |
| Sound: WAV format | |
| Special effects Standard, black and white, sepia modes | |
| Zoom factor 8x digital zoomLCD monitor 2 inch TFT monitor | |
| Compatible systems Windows 98/2000/ME /XP | |
| Focal length F = 8.7 mm | |
| Aperture F2.8 | |
| Focus range 1m ~ infinity | |
| Exposure Auto and manualExposure compensation | -2.0 EV to +2.0 EV in six steps |
| Date terminal | Mini USB terminal, two driver modes: MASS and TWAIN |
| Flash | Integrated wide angle flash with three modes:Auto, always on and off |
| Flash range 2 m | |
| White balance | Automatic white balance and four manual modes:Daylight, tungsten, fluorescent, cloudy |
| Burst Series of three photos | |
| Self-timer 10 seconds | |
| Video output | NTSC and PAL system available |
| TV output signal | |
| Other functions | Crystal clear sound recordings |
| Memory can be expanded | |
| Webcam for internet chat and conference | |
| Customisable startup image | |
| Power supply via USB port | |
| Memory medium | 32MB internal (including system memory), SD or MMC card |
9 Memory requirement
| Resolution/ PIXELS | Quality | Image size in kB | 8 MB | 16 MB | 32 MB | 64 MB | 128 MB | 256 MB | 512 MB | 1 G |
| 2560x1920/ 5 MP | Superfine | appr. 830 4 | 8 16 | 32 64 | 128 | 256 512 | ||||
| Fine | appr. | 600 | 5 | 10 | 20 | 40 | 80 | 160 | ||
| Economy | appr. | 510 | 6 | 12 | 24 | 48 | 96 | 192 | ||
| 2304x1728/ 4 MP | Superfine | appr. | 620 | 5 | 10 | 20 | 40 | 80 | 160 | |
| Fine | appr. | 480 | 7 | 14 | 28 | 56 | 112 | 22 | ||
| Economy | appr. | 400 | 8 | 16 | 32 | 64 | 128 | 25 | ||
| 2048x1536/ 3 MP | Superfine | appr. | 530 | 6 | 12 | 24 | 48 | 96 | 192 | |
| Fine | appr. | 400 | 8 | 16 | 32 | 64 | 128 | 25 | ||
| Economy | appr. | 310 | 10 | 20 | 40 | 80 | 160 | 320 | ||
| 1600x1200/ 2 MP | Superfine | appr. | 310 | 10 | 20 | 40 | 80 | 160 | 320 | |
| Fine | appr. 250 | 14 | 28 | 56 | 112 | 224 | 448 | 896 | 1792 | |
| Economy | appr. 200 | 17 | 34 | 68 | 136 | 272 | 544 | 1088 | 2176 | |
| 1024x768 / 0.8 MP | Superfine | appr. 150 | 26 | 52 | 104 | 208 | 416 | 864 | 1728 | 3456 |
| Fine | appr. 110 | 34 | 68 | 136 | 272 | 544 | 1088 | 2176 | 4352 | |
| Economy | appr. 90 | 43 | 86 | 172 | 344 | 688 | 1376 | 2752 | 5504 | |
| 800x600 / 0.5 MP | Superfine | appr. 85 | 42 | 84 | 168 | 336 | 672 | 1344 | 2686 | 5376 |
| Fine | appr. 70 | 54 | 108 | 216 | 432 | 864 | 1728 | 3456 | 6912 | |
| Economy | appr. 55 | 68 | 136 | 272 | 544 | 1088 | 2176 | 4352 | 8704 | |
| Video | --- | --- | ~10 sec | ~30 sec | ~70 sec | ~150 sec | ~3 min |
The actual number of stored images can vary depending on the resolution and colour richness (up to ± 30% ).
10 Troubleshooting
If your camera does not work properly, please check the following items. If the problem still exists please contact your dealer.
| Symptoms Cause and solution | ||
| Error ACamera does not take photos | Cause: Not enough light | |
| Solution: | Change angle of camera to include more light or use automatic flash. | |
| Error BPhotos disappear from the LCD after a period | Cause: Weak batteries | |
| Solution: Insert two fresh batteries. | ||
| Error CNot all images can be downloaded to the PC | Cause: The PC does not have enough free RAM. | |
| Solution: | Close all other applications before downloading.If the problem persists, download the images one at a time to the PC and save them there before transferring the next image. | |
| Error DCamera switches off after 5 minutes. LCD switches off. | Cause: Camera shuts down automatically.Solution: Restart camera. | |
| Error EWhen the camera is connected to the PC for the first time, no new hardware is found. | Cause: The PC's USB port is deactivated in the BIOS. | |
| Solution: Activate the port in the PC's BIOS. | ||
| Error FThe shot to shot time is longer when taking pictures in dark conditions.Error GThe camera does not start after connection to the PC. The camera display lights up and LCD shows all symbols. | Cause: | It is normal for the shutter speed to be slower in dark conditions. |
| Solution: | Change the camera angle or improve the light conditions.PC or camera is busy and there is no connection between the two. | |
| Solution: | Disconnect the USB cable from the PC, check why the PC is busy and insert the cable again. | |
Note: This table contains possible causes of error. Some of these are normal phenomena.
11 Further information
11.1 Safety instructions
Although this product is safe, please observe the following information and warnings.

Caution
- Do not modify or dismantle the camera.
- Contact your dealer for repairs and inspections.
- Do not shake the camera or subject it to hard knocks. The camera may be damaged if it falls.
- Ensure that no water or moisture enters the camera. This can cause short circuits and accidents.
Note
When using the flash, do not look directly into it, as this can damage the eyes.
11.2 Maintenance and care
Please clean the body, lens and LCD as follows:
- Do not use thinning or cleaning agents which contain petrol. This could damage the camera.
- Clean the camera body with a soft cloth.
- Lens: First remove dust with a lens brush. Then clean with a soft cloth.
- Do not use powerful cleaning agents on the body and lens (contact your dealer if dirt cannot be removed).
- Do not apply pressure to the LCD or use hard objects to clean it.
11.3 Photo tips
For excellent photographs, please observe the following tips:
- Do not move the camera quickly to prevent the photos being out of focus. Hold the camera steady when pressing the shutter release. Do not move the camera immediately after pressing the shutter release. Wait until you hear the sound signal before moving the camera.
- Look at the subject through the viewfinder before pressing the shutter release.
- Check the angle if the subject is backlit. Move to the side to reduce the backlighting.
- In dark conditions, the flash or manual exposure setting should be used.
- Move/pan the camera slowly to make good videos. Pans that are too fast result in out of focus and blurry videos.
11.4 Battery tips
Incorrect handling of the batteries can cause them to leak, become hot or explode.
Observe the following safety instructions:
- Do not heat batteries or dispose of them in fires.
- Do not transport batteries with metallic objects, as they can come into contact with the battery poles and cause damage.
- Do not expose batteries to moisture. Always store them in a dry area.
- Do not dismantle, deform or modify batteries.
- Never remove the cover of the battery.
- Do not subject the battery to hard knocks.
- Never use leaking or damaged batteries.
- Keep batteries out of reach of children.
-
Ensure that the polarity is correct when inserting the batteries into the camera.
-
Battery power is reduced in cold environments ( -10ircC or colder, applies to alkaline batteries in particular).
- Warm up batteries before use in cold environments (e.g. in your pocket).
- When using a heat source, do not allow batteries to come into contact with it.
- MEDION®
- INSTRUCTION MANUAL
- Table of contents
- Safety Instructions.... 4
- Getting started....7
- Basic operation ...... 11
- Advanced operation.... 21
- Installing the software 31
- Transferring files to your PC.... 35
- Contents of package
- Intended Use
- Safety Instructions
- WARNINGS
- Batteries
- PRECAUTIONS
- Getting started
- Parts of your camera
- Inserting the batteries
- Inserting and removing the SD/MMC card
- Inserting the card
- Removing the card
- Attaching the carrying strap
- Caution
- Basic operation
- Switching the camera on and off
- Switching the camera on
- Switching the camera off
- Using the mode buttons
- Taking photographs
- LCD descriptions display
- Snapshot
- Select single shot mode
- Zooming in or out digitally
- LCD
- Taking a photograph
- Recording audio
- Making video clips
- LCD descriptions
- Making a video clip
- Playing images, audio and videos
- LCD descriptions
- Status symbols in play mode
- Viewing photos, videos and listening to sound recordings
- Thumbnail view
- Deleting recordings
- Deleting a single recording
- Deleting all recordings
- Formatting the memory
- Advanced operation
- Using the flash
- Using direct access buttons
- Selecting photography mode directly
- Selecting the resolution directly
- Changing menu options
- List of menu options
- Exposure compensation
- Selecting the image mode
- Selecting EV
- Selecting an EV value
- Selecting a language
- Setting the image resolution
- Setting image quality
- Press "up" or "down" to select the "Exposure" option and press OK to confirm.
- Setting image effects
- Setting the driver
- Protecting photos against accidental deletion
- Note
- Viewing images on a television set
- Setting the date and time
- Setting the LOGO
- Installing the software
- Supported operating systems
- Installing the driver
- Installing the driver in MASS mode
- 1.
- 2.
- 3.
- 4.
- 5.
- 6.
- Installing the driver in TWAIN mode
- Transferring files to your PC
- USB power supply and webcam function
- Memory requirement
- Troubleshooting
- Further information
- Safety instructions
- Maintenance and care
- Photo tips
- Battery tips
Brand : MEDION
Model : MD 85173
Category : Camera