— Camera — Mode d'emploi PDF")
LIFE P44022 (MD 87270) - Camera MEDION - Free user manual and instructions
Find the device manual for free LIFE P44022 (MD 87270) MEDION in PDF.

| Product type | Compact digital camera |
| Brand | MEDION |
| Model | LIFE P44022 (MD 87270) |
| Weight (without battery) | 127 g |
| Power source | Li-ion battery NP-45 (3.7 V / 700 mAh) and USB power adapter (5 V / 1 A) |
| Maximum photo resolution | 5152 x 3864 pixels (20 Megapixels) |
| Optical zoom | 12x |
| Digital zoom | 8x |
| LCD screen | 6.86 cm (2.7 inches) |
| Internal memory | 64 MB (approx. 24 MB available) |
| External storage | microSD/SDHC card (up to unspecified capacity) |
| Connectivity | WiFi 802.11 b/g/n, Mini USB 2.0 |
| File formats | JPEG (EXIF 2.3), AVI, WAV |
| Maximum video resolution | 1280 x 720 pixels (AVI) |
| Shutter speed | 1/2000 to 4 seconds |
| Focal length | 4.3 mm to 51.6 mm |
| Built-in flash | Yes, modes Auto, Red-eye reduction, Always, Slow sync, Off |
| Battery charging | Charging via USB power adapter or computer USB port |
| Maintenance and cleaning | Soft dry cloth for the body; brush and soft cloth for the lens |
| Safety | Do not open the device, do not attempt repairs yourself. Keep the flash more than 1 meter away from eyes |
| Spare parts and reparability | Contact Medion after-sales service. Use only authorized accessories |
Frequently Asked Questions - LIFE P44022 (MD 87270) MEDION
User questions about LIFE P44022 (MD 87270) MEDION
0 question about this device. Answer the ones you know or ask your own.
Ask a new question about this device
Download the instructions for your Camera in PDF format for free! Find your manual LIFE P44022 (MD 87270) - MEDION and take your electronic device back in hand. On this page are published all the documents necessary for the use of your device. LIFE P44022 (MD 87270) by MEDION.
USER MANUAL LIFE P44022 (MD 87270) MEDION
1. About these instructions 93
1.1. Symbols and key words used in these instructions 93
1.2. Proper use 94
1.3. Notes on conformity 95
FR
2. Safety information
2.1. Dangers for children and people with reduced capability 96
2.2. Notice regarding power disconnection 97
2.3.Warnings 98
2.4. Instructions for batteries 99
2.5. Safety precautions
2.6. Never carry out repairs yourself 105
3. Overview of the product 106
3.1. Front 106
3.2. Rear 107
3.3.Top 10
3.4. Underside 109
3.5. Navigation button 110
4. Start of operation 113
4.1. Package contents
4.2. Inserting rechargeable batteries 114
4.3. Charging the battery via USB 115
4.4. Inserting and removing SD cards 116
4.5. Setting the language, date and time 117
DE
EN
NL
5. Display features 118
5.1. Displays for shooting 118
5.2. Displays for photo playback 120
5.3. Displays for video playback 121
6. Flash 122
7. Setting the focus mode 123
7.1. AE/AF - autofocus lock 124
8. Wi-Fi function 125
8.1. Connecting the camera with a smartphone .......125
8.2. Establishing a Wi-Fi connection between camera and smartphone 127
9. Recording video clips 132
10. 133
10.1.Navigating in the menus 133
10.2. Recording menu 134
10.3.Shooting mode 140
10.4. Art effect mode 144
10.5. Settings menu 146
10.6.Playback menu 150
11. Panorama images 156
12. Connecting to a printer or PC 159
12.1. Printing shots on a photo printer 159
12.2. Transferring data to a scomputer 160
12.3. Using a USB cable 160
13. Installing the software 161
14. Troubleshooting 163
15. Maintenance and care 164
- Disposal 165
- Technical data 166
- Legal notice
FR
NL
1. About these instructions

Read the safety instructions carefully before using the product for the first time. Note the warnings on the product and in the operating instructions.
Always keep the operating instructions close to hand. If you sell the product or give it away, make sure you also hand over these instructions and the warranty card.
1.1. Symbols and key words used in these instructions
| ! | DANGER! Warning of immediate risk of fatal injury WARNING! Warning of possible risk of fatal injury and/or serious irreversible injuries CAUTION! Please follow the instructions to prevent injuries and property damage |
| IMPORTANT! Please follow the instructions to avoid property damage | |
| i | PLEASE NOTE!Additional information on using the product |
| B | PLEASE NOTE!Please refer to operating instructions |
| A | WARNING!Warning of risk of electric shock |
| . | Bullet point/information on operating steps and results |
| ►Tasks to be performed | |
1.2. Proper use
This camera is designed to take photographs and record videos in digital format.
The product is intended for private use only and not for industrial/commercial use.
Please note that we shall not be liable in cases of improper use:
- Do not modify the product without our consent and do not use any auxiliary equipment that we have not approved or supplied.
- Use only spare parts and accessories that we have supplied or approved.
- Heed all the information in these operating instructions, especially the safety information. Any other use is deemed improper and can cause personal injury or damage to property.
- Do not use the product in extreme environmental conditions.
1.3. Notes on conformity
The camera fulfils the requirements for electromagnetic compatibility and electrical safety.
Medion AG hereby declares that the product conforms to the following European requirements:
R&TTE Directive 1999/5/EC
EMC Directive 2004/108/EC
Low Voltage Directive 2006/95/EC
- Ecodesign Directive 2009/125/EC
RoHS Directive 2011/65/EU.
2. Safety information
2.1. Dangers for children and people with reduced capability
- This product is not intended for use by people (including children) with reduced physical, sensory or mental abilities or for those without experience and/or knowledge, unless they are supervised by a person responsible for their safety or they have been instructed in its use.
- Children should be supervised to ensure that they do not play with the product. Children should not be allowed to use this product without supervision.
- Keep the product and its accessories out of the reach of children.

DANGER!
Keep plastic packaging out of the reach of children. There is a risk of suffocation!
2.2. Notice regarding power disconnection
- To disconnect the power supply from the product, pull the mains adapter from the socket outlet. Always pull on the mains adapter/mains plug itself when removing it from the socket. To prevent damage, never pull on the cable.
- When not in use, pull the mains adapter from the socket outlet or use a master-slave power strip to prevent power consumption when switched off.
- Any sockets used for charging the battery must be close to the device and easily accessible. Position the cables so that they cannot be stepped on or tripped over.
- Only operate the mains adapter on earthed socket outlets with 230V 50Hz . If you are not sure about the power supply at the set-up location, please ask your power supplier.
-
To prevent the mains adapter from overheating, do not cover it.
-
Stop using the mains adapter if the housing or the supply lead to the product is damaged. Replace the mains adapter with one of the same type.
- Use only the supplied mains adapter model: KSAS0060500100VEU, otherwise damage may occur.
2.3.Warnings
In order to avoid injury, please heed the following warnings while using the product:
- Do not trigger the flash too close to the eyes. This can cause damage to the eyes of the person being photographed.
- Keep at least one metre away from children when you are working with the flash.
- Do not open or dismantle the product.
- Only connect the USB mains adapter to a professionally installed AC 230 ~V 50 / 60 ~Hz mains socket.
-
Only use the USB mains adapter (Ktec KSAS0060500100VEU) and the battery (NP-45) supplied with the camera!
-
Dismantling the product could lead to a risk of high-voltage electric shock. Tests on internal components, modifications and repairs should be carried out by specialists only. Take the product to an authorised Service Centre for testing.
- The socket must be close to the device and within easy reach.
- If you are not going to use the camera for some time, remove the battery to prevent leakage.
- The camera or the USB mains adapter must not be exposed to water in droplet or spray form. Do not place any objects filled with liquids (e.g. vases) near to or on the product.
- Unplug the charger from the power outlet during thunderstorms or whenever it is not in use.
2.4. Instructions for batteries
Your camera may be operated with the battery supplied. Charge the battery with the supplied USB mains adapter only.
Please heed the following general instructions on handling batteries:
- Keep batteries away from children. Seek medical attention immediately if a battery is swallowed.

CAUTION!
There is a risk of explosion if rechargeable batteries are replaced incorrectly.
Replace rechargeable batteries with the same or equivalent type only.
- Before inserting the battery, check that the contacts in the device and on the battery are clean and clean them if necessary.
- Insert only the battery supplied.
- Note the polarity (+/-) when inserting the battery.
-
Store the battery in a cool, dry place. Direct intense heat can damage the battery. Therefore, keep the product away from strong heat sources.
-
Avoid contact with skin, eyes and mucous membranes. If any of these areas come into contact with battery acid, rinse them immediately with plenty of clean water and consult a doctor as soon as possible.
- Do not throw the battery into a fire, short-circuit it or dismantle it.
- Never expose the battery to excessive heat, such as sunlight or fire, etc.
- If the product is not going to be used for some time, remove the battery.
- If the battery is leaking, remove it from the product immediately. Before inserting a new battery, clean the contacts. There is a risk of skin irritations from battery acid!
- Always remove a flat battery from the product.
-
At low temperatures the capacity of the battery might drop significantly as the chemical reactions slow down. When taking photographs or videos in cold weather, keep a second battery pack in reserve in a warm place (e.g. trouser pocket).
-
Avoid any blows or jolts that may affect the battery and do not crush it or drop it.
2.5. Safety precautions
Take the following safety precautions in order to avoid damage to your camera and to keep it in perfect condition.
- Store in a dry place
- This camera is not watertight and will not function properly if it is immersed in water or if liquids get into the inner workings.
- Keep away from damp, salt and dust Wipe off salt and dust with a light, damp cloth if you have been using the camera on the beach or at the seaside. Carefully dry the camera afterwards.
-
Keep away from strong magnetic fields. Never place the camera too close to devices that have strong electromagnetic fields, e.g. electric motors. Strong electromagnetic fields may cause the camera to malfunction or interfere with data recording.
-
Avoid excessive heat
- Do not use or store the camera in direct sunlight or high temperatures. This can cause the battery to leak or the case to deform.
- Avoid extreme fluctuations in temperature If you take the product from a cold environment into a warm one or vice versa, drops of water can form outside and inside the product which can cause malfunctions and can damage the product. Wait until the product has reached ambient temperature before switching it on. Using a carrying case or plastic case offers a certain amount of protection against fluctuations in temperature.
- Do not drop the product
-
Jarring or vibrations resulting from a fall can cause malfunctions. Loop the carrying strap around your wrist when you carry the camera.
-
Do not remove the battery when data are being processed
- When image data are being recorded to memory cards or deleted, switching off the power supply can result in data loss or cause damage to the internal circuit or the memory.
- Treat the lens and all moving parts carefully Do not touch the lens or the lens barrel. Take care when handling the memory card and the battery. These parts are not designed for high levels of stress.
- Batteries
- At low temperatures, there can be a sharp drop in battery capacity. If you take photographs in cold temperatures, keep a warm replacement battery in reserve.
- If the contacts on the battery are dirty, clean them with a dry, clean cloth or use an eraser to remove residues.
- Memory cards
- Switch the power supply off before you insert or remove the memory card. Otherwise the memory card may become unstable. Memory
cards may heat up during use. Always take care when removing the memory cards from the camera.

PLEASE NOTE!
Memory cards are consumable items and need to be replaced after relatively long periods of use.
After a long period of use, the photographs/recordings may become corrupted. Therefore, regularly check the performance of the card and replace it when necessary.
2.6. Never carry out repairs yourself

WARNING!
Never try to open or repair the product yourself. There is a risk of electric shock!
- To prevent hazards, please contact the Medion Service Centre or an approved repair centre if the product develops a fault.
3. Overview of the product
3.1. Front
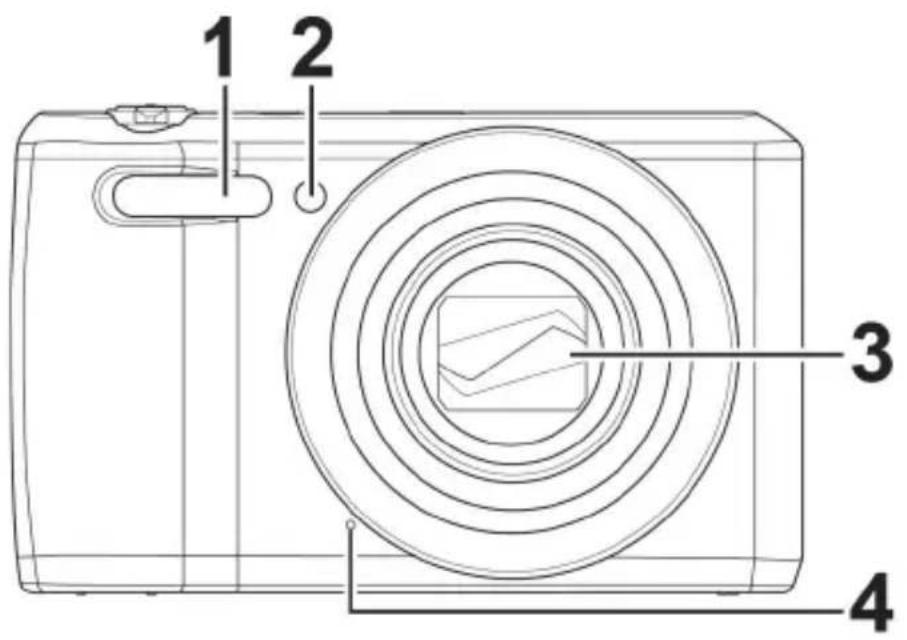
1) Flash
2) Display for self-timer/light flashes: self-timer is switched on
3) Camera lens with lens barrel
4) Microphone
3.2. Rear

5) LC display
6) Operating LED
7) button: start video recording
8) AE/AF LOCKbutton: autofocus lock/trash can
9) OK button/observation keys
10) MENU button: open menu
11) button: enable playback mode
3.3. Top
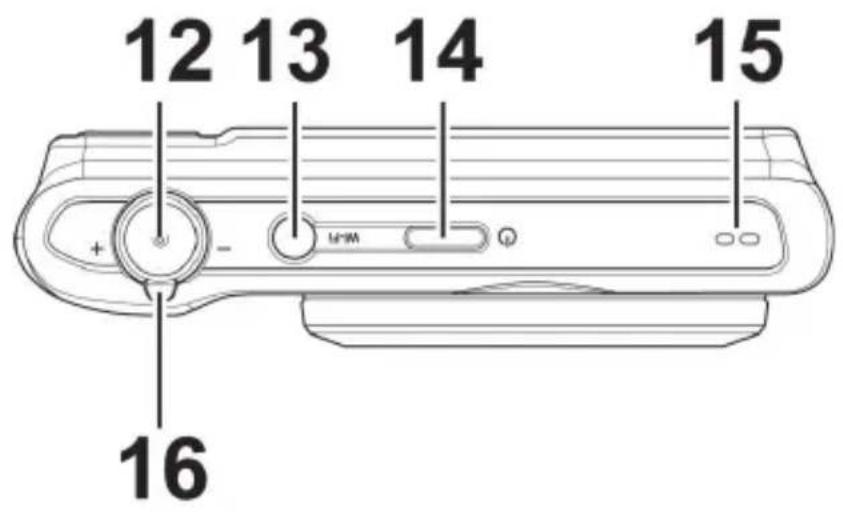
12) Shutter release button Press halfway: set focus range Press fully: take photo
13) WLAN button
14) ON/OFF: switch camera on or off
15) Speaker
16) Zoom ring: - / + ; enlarge or reduce selection.
3.4. Underside
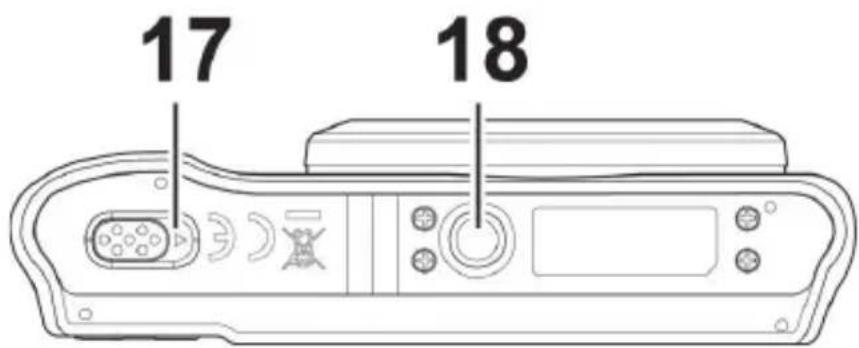
17) Battery/SDHC card compartment cover
18) Tripod mount
3.4.1. Right side
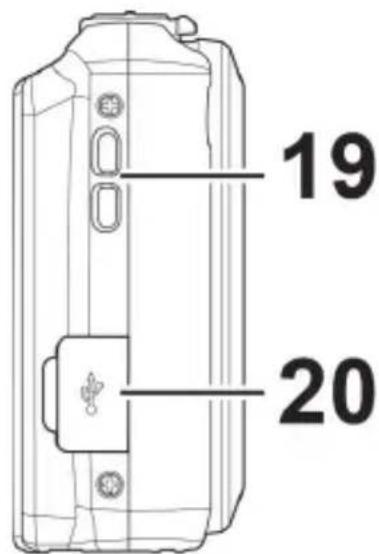
19) Eyelet for strap
20) Micro USB connection
3.5. Navigation button

| Button | Mode Description | |
| 1) | In shooting mode: | Turn on macro for close-ups |
| In playback mode: | Show previous shot | |
| Video playback: | Activate rewind or deactivate fast forward | |
| In the menu | Exit menu/submenu, scroll left within the menus/submenus | |
| 2) | In shooting mode: | Change exposure settings |
| In video play-back mode: | Start/pause playback | |
| In photo play-back mode | Rotate picture by 90° | |
| In the menu Scroll up in menus/submenus | ||
| 3) | In shooting mode: | Choose flash type |
| In playback mode | Show next shot | |
| Video playback: | Activate fast forward or deactivate rewind | |
| In the menu | Open menu/submenu, scroll right within the menus/submenus | |
| 4) OK | In video.audio playback mode: | Start playback |
| In the menu | Confirm a selection in the menus/submenus | |
DE
EN
FR
NL
| Button | Mode Description | |
| 5) | In shooting mode: | Show self-timer options |
| Video.audio playback: | Stop playback | |
| In the menu Scroll down in menus/submenus | ||
4. Start of operation
4.1. Package contents
Please check your purchase to ensure that all the items are included and contact us within 14 days of purchase if any parts are missing.
The following items are supplied with the product:
Camera
1 Li-ion battery
- USB mains adapter
USB cable
- Wrist strap
- Case (art. no. VG0692174470091)
- Software CD-ROM
Documentation

DANGER!
Keep plastic packaging out of the reach of children. There is a risk of suffocation!
4.2. Inserting rechargeable batteries
The Li-ion battery supplied is required for operating the camera.
- Switch the camera off (if it is on).
Slide the battery compartment in the direction of the arrow and open the cover.
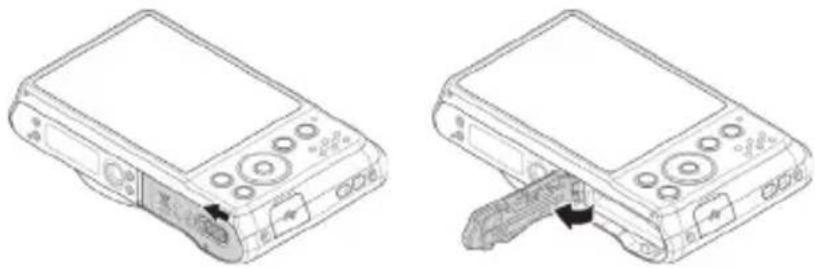
Insert the battery into the compartment as shown.
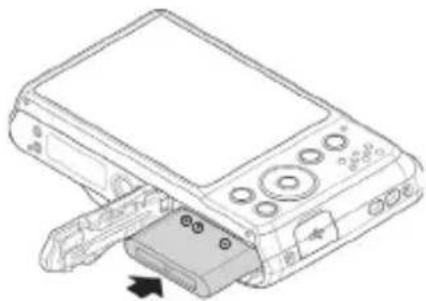
- Close the battery compartment again.
4.3. Charging the battery via USB
You can charge the battery either using the USB mains adapter supplied or via a USB connection on your PC or another device with a USB connection.
Connect the USB cable to the camera.
- Connect the other end of the cable to the USB mains adapter and plug it into the mains socket.
- Alternatively, use the USB cable supplied to connect the camera to the USB port on your PC or to another device with a USB port.
The operating LED on the camera will flash during the charging process. The operating LED will go out once the battery is fully charged. If the operating LED flashes quickly, check the battery and connections and switch the camera on again.
If the operating LED still flashes quickly, please contact our service hotline.

PLEASE NOTE!
The battery is not charged when you purchase the product. You need to charge the battery before you can use the camera.
4.4. Inserting and removing SD cards
If no memory card is inserted, the photographs and recordings will be stored in the internal memory. Please note that the capacity of the internal memory is limited.
Use an SD memory card to increase the memory capacity. If a memory card is inserted, your photographs and recordings will be stored on the card.
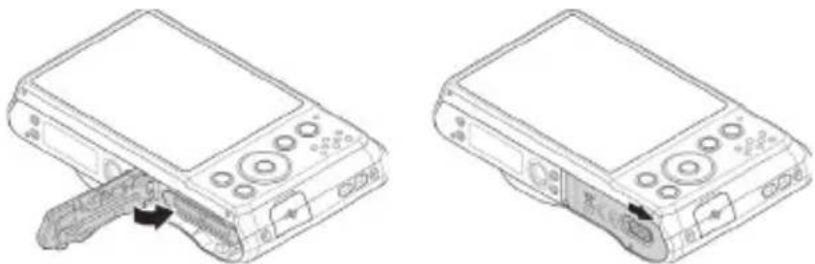
4.4.1. Inserting the card
Slide the battery compartment in the direction of the arrow and open the cover.
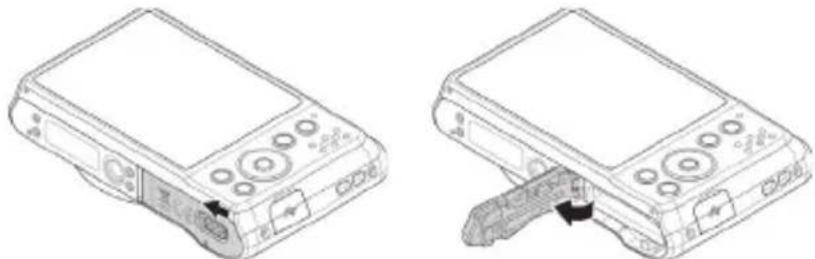
Insert the card in the slot as illustrated.
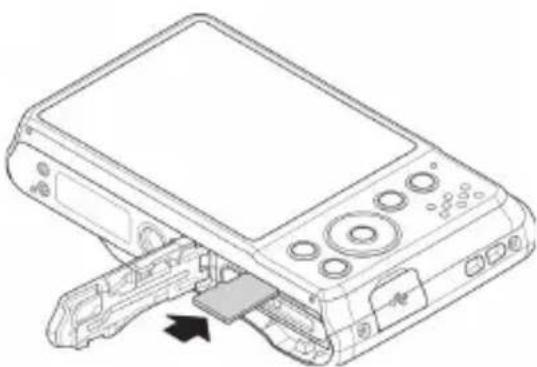
- Close the battery compartment and close the locking latch.
To remove the card, press it down briefly to release it. The card will then protrude slightly and can be removed.

PLEASE NOTE!
Memory cards are consumable items and need to be replaced after relatively long periods of use.
After a long period of use, the photographs/recordings may become corrupted. Therefore, regularly check the performance of the card and replace it when necessary.
4.5. Setting the language, date and time
You will be prompted to set the language and time when you switch on the camera for the first time.
Follow the instructions on the display.
5. Display features
5.1. Displays for shooting
The following displays are possible in shooting mode:
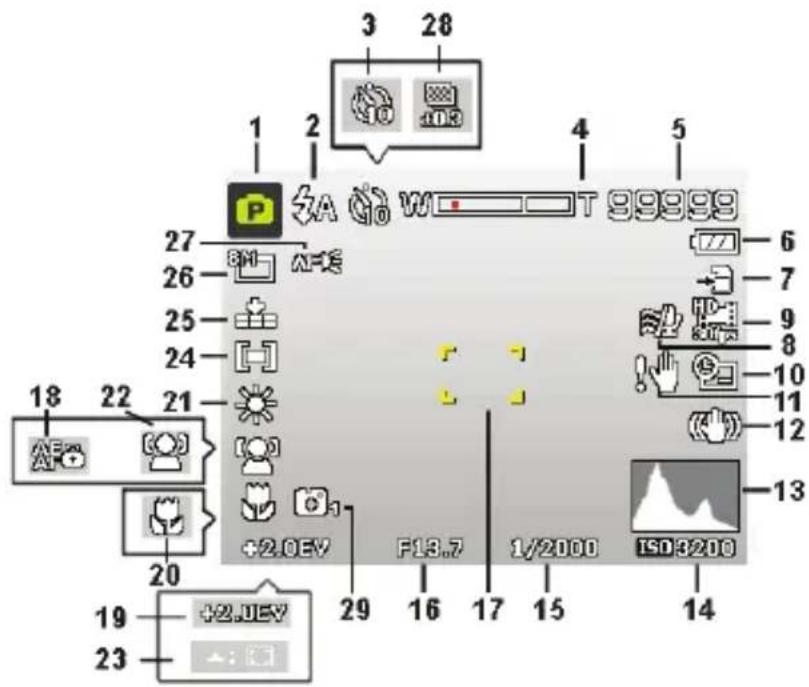
1) You can set various types of recording. The recording mode currently selected will be displayed here
2) Flash setting
3) Self-timer
4) Zoom setting
5) Remaining shots/recording time (at current resolution)
6) Battery charge status
7) Memory location (internal memory or card)
8) Wind noise reduction enabled
9) Video resolution
10) Date stamp
11) Warning: risk of blurring!
12) Image stabiliser switched on
13) Histogram
14) ISO setting
15) Shutter speed
16) Aperture setting
17) Focus range
18) AE/AF lock activated
19) Exposure setting
20) Macro setting
21) White balance
22) Face recognition
23) AF tracking activated
24) Exposure measurement
25) Quality
26) Image size
27) AF lamp
28) Bracketing
29) Style features
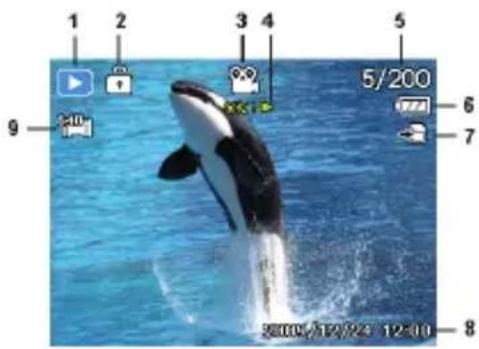
5.2. Displays for photo playback
The following displays are possible in playback mode:
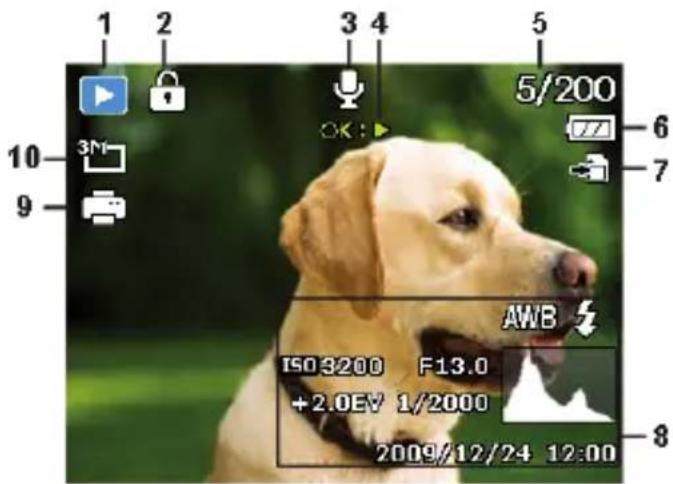
1) Mode display (shooting or playback)
2) Picture is protected
3) Sound recording
4) Key assignments
5) Current shot/total number of shots
6) Battery charge status
7) Memory location (internal memory or card)
8) Recording information
9) DPOF enabled
10) Resolution of image currently displayed
5.3. Displays for video playback
The following displays for video clips are possible in playback mode:
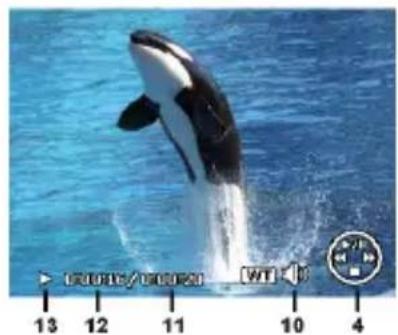
1) Mode display (shooting or playback)
2) Picture is protected
3) Video recording
4) Recording controls
5) Current recording/total number of recordings
6) Battery charge status
7) Memory location (internal memory or card)
8) Recording information
9) Resolution
10) Volume setting
11) Video length
12) Playback time
13) Indicates the playback status (playback/pause/stop)
6. Flash
If there is insufficient light for the photo, the built-in flash can provide the additional light required.
Press the flash button repeatedly to select the following flash settings:
| ZA | AUTO: the flash will be activated automatically when the shooting conditions require additional lighting. |
| ZO | Flash is triggered before the actual flash; used to prevent "red-eye" effect. The camera detects the brightness of subjects and only uses the flash if necessary. |
| S | Flash always on |
| SL | "Slow Sync": the flash is synchronised with slow shutter speed. |
| ∅ | Flash always off |
The flash only works in single shot and self-timer mode. It cannot be used for photo sequences and video recordings.
Using the flash increases battery usage. If the battery is almost flat, the flash will take longer to load.

CAUTION!
Do not use the flash when taking close-ups of people and animals. Maintain a distance of at least one metre from your subject.
7. Setting the focus mode
This function allows you to specify the focus type if you wish to take a photograph or record a video.
Press the macro button repeatedly until the icon for the desired focus mode is displayed.
Confirm your selection by pressing the OK button.
Your camera has five different focus modes:
AF - Auto Focus
In this setting, the camera automatically focuses on subjects.
- Macro
This mode is ideal for close-ups. In this mode you can capture details thanks to the fixed focus and you can get the subject in focus at much closer distances. Approximate focusing range: from about 5 cm to 50 cm.
Super Macro
This mode is ideal for close-ups. In this mode, you can use the fixed focus to capture details and take sharp photos at much closer distances. Approximate focusing range: from about 3 cm to 30 cm. When Super Macro is set, you cannot use the zoom.
- Infinity
In this setting, the camera focuses on subjects that are very far away.
MF - Manual Focus
If you activate the manual focus, a box appears in the centre of the display in which you can then focus in on the image using the navigation buttons or . Once you have found the right setting, press OK to confirm.
7.1. AE/AF - autofocus lock
The autofocus lock fixes the current focus setting.
To activate the autofocus lock, press the AE/AF LOCK button.
When the autofocus lock has been activated, a lock symbol appears next to the AF indicator on the display.
The autofocus lock will be deactivated at the following times:
- The zoom ring is being operated
- The AE/AF lock button is pressed again
- One of the following buttons is pressed: , , MENU or ON/OFF
8. Wi-Fi function
You can use the Wi-Fi function to transfer photos and videos on this camera directly to other devices such as smartphones or tablet PCs when they are connected. You can also use these devices as remote controls. Apart from video recordings, photographs or the downloading of files from the camera can be directly controlled via your smartphone or tablet PC.
You can only access the Wi-Fi menu by pressing the Wi-Fi button in the preview or single view mode.
8.1. Connecting the camera with a smartphone
Before using Wi-Fi mode, please download the Wi-Fi app "ME-DION LifeCam" from Google Play (Android) or the Apple Store (IOS) and install it on your smartphone.

If you have installed a QR code reader on your smartphone, please use the adjacent code to download the app.

Switch on the camera and press the
Wi-Fi button. Then tap on remote control.
| Element Description | |
| Remote Control | With the exception of video record-ings, you can use your smartphone to control the camera for the taking of pictures or the downloading of files from the camera. |
| Geotag Recording | Synchronises the time of the smart- phone with that on the camera. |
| Download GPS Data | Download the GPS data with your smartphone to add geotags to photo- graphs that are stored in the cam- era. |
| Send to App | Download photos or films from the camera onto a smartphone. |
- Switch the Wi-Fi network on. Then connect to the hot spot with the name of the camera (the default is "Wi-Fi Camera") from the list of detected networks.
The first time you do this, enter the default password "12345678" for the hot spot.
Once your smartphone connects with the network of the camera, start the "MEDION LifeCam" app to control the camera remotely with your smartphone or to download and display photos and videos from the camera.
8.2. Establishing a Wi-Fi connection between camera and smartphone
If you want to use the "Remote Control" or "Download GPS Data" functions on the smartphone, you need to establish a Wi-Fi connection between the camera and the smartphone and ensure that the smartphone is within the Wi-Fi range. Then select the camera name from the list of networks on your smartphone. If this is the first time you have made a connection with this camera, you will be asked for a password.
8.2.1. Remote control
Follow the steps below to run the remote control function:
Select "Remote Control" from the Wi-Fi menu on the camera.
The camera will call up the Wi-Fi standby mode:
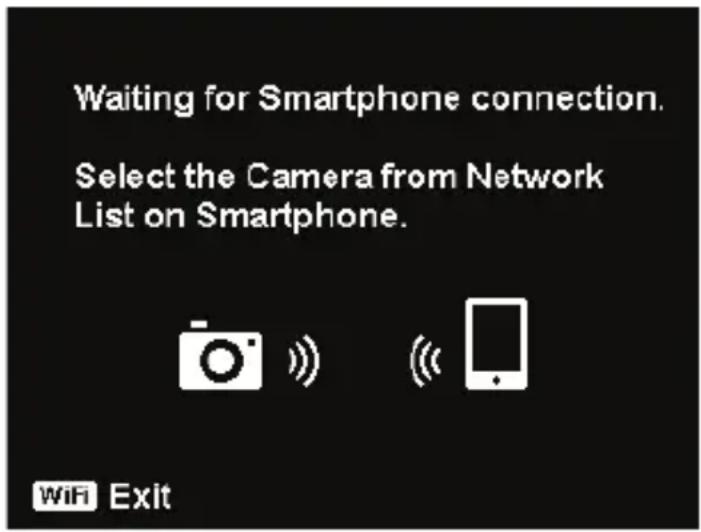
- Select the camera name from the list of networks on your smartphone.
- Start the "MEDION LifeCam" application on your smartphone and then click on "Remote Shutter" or "Camera Link":
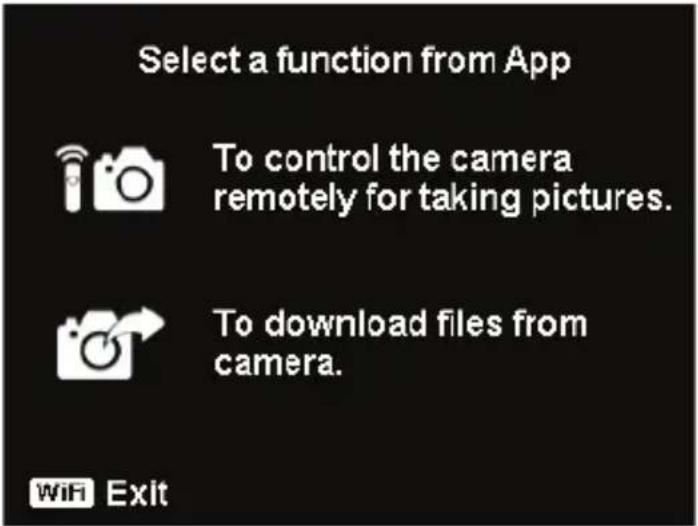
If you tap on "Remote Shutter", the camera will switch to preview mode. If you tap on "Camera Link", the camera display turn black.
8.2.2. Geotag pictures
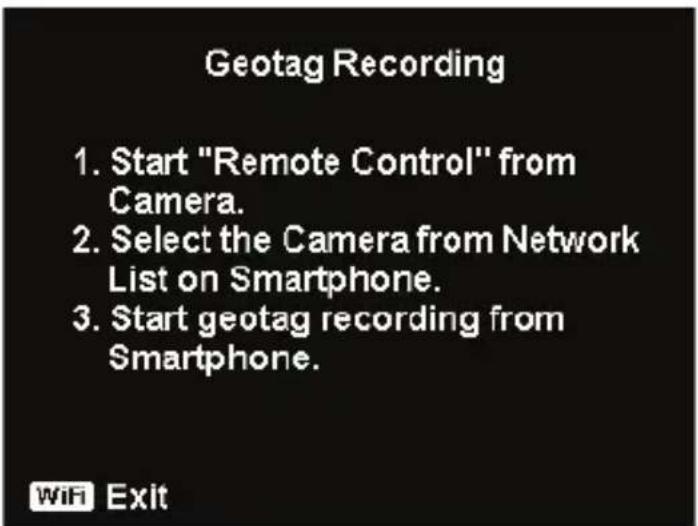
Select "Remote Control" from the Wi-Fi menu on the camera.
- Select "Geotagging" from the app menu on your smartphone.
-
Switch on the GPS function on your smartphone.
-
Start the "MEDION LifeCam" application on your smartphone and click on the "Geotagging" option.
- Click the red button in the "Geotagging" window. The camera will synchronise the date and time with the smartphone and then the smartphone will start recording GPS data. The camera will return to the remote control window. If you want to stop recording GPS data, please press the same button again.
Press the Wi-Fi button to disconnect the camera from the smartphone. During this time, you can take pictures and videos with the camera as normal. The "MEDION LifeCam" application on your smartphone will inform you about the disconnection. Click OK to confirm but do not stop the GPS data recording of the "MEDION LifeCam" application. - Use the "Download GPS Data" function after taking the photo to import location information from the smartphone and to save this information in the photo.

PLEASE NOTE!
Use this together with the "GPS-Daten herunterl." function to show the location information in the properties of the photo.
8.2.3. Downloading GPS data
Follow the steps below to run the "Download GPS Data" function:
Select "Download GPS Data" from the Wi-Fi menu on the camera.
- Select the camera name from the list of networks on your smartphone.
Start the "MEDION LifeCam" application on your smartphone and open the Geotagging menu.
Tap on "Upload to Camera" on your smartphone.
The camera will then display the download window.
An upload progress bar will appear on the smartphone.
A prompt will appear on the smartphone to confirm whether the GPS data are to be retained.
The Wi-Fi connection will be disconnected automatically when the upload is finished. The camera will then return to preview mode or playback mode.
- You can view the location information for the place where the photo was taken by displaying the properties of the photo on your PC.

PLEASE NOTE!
The GPS data are called up once a minute and imported into the photos with the same capture time. Data of other kinds are not imported into any photo.
8.2.4. Sending to app
Follow the steps below to run this function:
Select "Send to APP" from the Wi-Fi menu on the camera.
The camera will call up the 4 × 3 thumbnail view.
- Tap on the or buttons to select the desired images on the camera, mark the selected images with the button and then press the OK button to confirm the selection.
- Select the camera name from the list of networks on your smartphone.
- Start the "MEDION LifeCam" application on your smartphone and tap on Start to receive images on your smartphone.
The camera will call up the Send window to send the images.
The received images will be displayed on your smartphone.
The Wi-Fi connection will be disconnected automatically when the upload is finished. The camera will then return to preview mode or playback mode.
The smartphone will display a message concerning the conclusion of the process.

PLEASE NOTE!
Due to compatibility problems, videos cannot be sent to iOS devices (e.g. iPhone or iPad).
- All of the camera's functions will be disabled while Wi-Fi is connected except the ON/OFF button, the WLAN button and the MENU button.
-
Wi-Fi functions even if no memory card is inserted in the camera.
-
The Wi-Fi function will be stopped automatically in the following situations:
-
When the WLAN button is pressed again to exit Wi-Fi mode.
-
When the MENU button is pressed to stop Wi-Fi mode and to show the photo preview or single photo view.
-When outside the Wi-Fi range.
- When connected to a PC, television or printer.
- When inserting or removing memory card.
- When remaining battery charge is less than 10% ( ± 5% ).
9. Recording video clips

Press the button to start recording a video. The display will show the recording time.
You can change the image section by using the zoom ring / + .
Press the button if you wish to stop the recording.
Press the button again to resume recording.
To stop the recording, press the button again.

PLEASE NOTE!
The digital zoom is not available for recording video clips.
No sound will be recorded while the zoom ring is being operated.
The microphone is active during video recording and the sound is also recorded.
The video clips are saved with the sound as AVI files.
10. Menus
10.1. Navigating in the menus
Press the MENU button to open the menus.
Use the arrow keys or to select the setting you would like to change.
Press the OK button and the relevant submenu will open.
Use the arrow keys or to choose the desired option and press OK to confirm.
The MENU button will take you back to the previous level at any time.

PLEASE NOTE!
You cannot access menus while recording a video.
10.2. Recording menu
| Setting Meaning | |
| Scene Mode | Here you can select from the different shooting modes. |
| Photo Size | The image size function is used to set the resolution before taking a picture. Changing the image size will have an effect on the number of images that can be saved to the memory card. The higher the resolution, the more memory space is required. |
| 20 M 515 x 3864 | |
| 8 M 3264 x 2448 | |
| 5 M 2592 x 1944 | |
| 3 M 2048 x 1536 | |
| VGA 640 x 480 | |
| 3:2 5152 x 3435 | |
| 16:9 (14 M) 5152 x 2898 | |
| 16:9 (2 M) 1920 x 1080 | |
| 1:1 2992 x 2992 | |
| Quality | The quality setting determines how the recorded data is compressed. The higher the quality, the more memory space the images require. Superfine, highest quality Fine, medium quality Normal, normal quality. |
| White Balance | AWB - Auto White Balance - the white balance is automatically set by the camera. Daylight - ideal for bright, sunny conditions. Clousy - ideal for overcast conditions. Tungsten - ideal for indoor shots in artificial light with standard light bulbs or halogen lighting without a flash. fluorescent_1 - ideal for indoor shots with blueish shimmering lighting conditions. Fluorescent_1 - ideal for indoor shots with reddish shimmering lighting conditions. |
| White Balance | Custom - used when the light source cannot be ascertained. Press ➔ so that the camera can automatically select a suitable setting for the white balance based on the relevant conditions. It is advisable here to set up the camera on a white sheet of paper and press the ➔ button. |
| ISO (light sensitivity) | This setting changes the sensor's sensitivity to light. A higher value increases light sensitivity but generates more noise which can have a negative impact on the image quality. It is therefore important to select the lowest possible ISO value for the conditions. Auto - automatic ISO setting. ISO 100 - sets the sensitivity to ISO 100. ISO 200 - sets the sensitivity to ISO 200. ISO 400 - sets the sensitivity to ISO 400. ISO 800 - sets the sensitivity to ISO 800. ISO 1600 - sets the sensitivity to ISO 1600. ISO 3200 - sets the sensitivity to ISO 3200 ISO 6400 - sets the sensitivity to ISO 6400. |
| Maximum ISO Auto | With this feature, the camera can set the ISO value automatically between ISO 100 and the maximum sensitivity value according to the exposure conditions. The available options are 200, 400 and 800 (standard). |
| Metering | The measurement method for the calculation of the exposure is defined here: Multi - selects an exposure based on the measurement results at several points in the shooting range. Center - the light in the entire shooting range is measured but the measurement is weighted towards the values near the centre. Spot - an exposure is selected on the basis of one single measurement in the centre of the picture. |
| Exposure Bracketing | Use this feature to take photos with different exposure compensation levels. When using bracketing, a series of three photos is taken in the following order: standard exposure, under-exposed and over-exposed. The available settings are: Off, ±0.3, ±0.7 and ±1.0. |
| AF Area | Here you can select the autofocus (AF) range. Face Tracking - the camera automatically recognises faces. Wide - a wide area is put in focus. Center - the centre is put in focus. Tracking AF - the camera focuses on the moving subject and the focus is maintained. |
| AF-Lamp | The AF lamp function enables photos to be taken even in poor lighting conditions. If the AF lamp is set to Auto, the AF lamp on the front of the camera will light up red when the shutter release is pressed halfway down so that the camera can easily focus. |
| AE-L / AF-L | This function allows you to lock the exposure or focus or both by clicking on the AE/AF LOCK button. You can set the AE/AF LOCK button to one of the following functions: AE-L - lock/unlock exposure. AF-L - lock/unlock focus. AE-L & AF-L - lock/unlock exposure and focus. |
| Digital Zoom | This function is used to control the digital zoom mode on your camera. |
| Date Stamp | Here you can choose the date and time stamp for the pictures. Date Date & Time Off |
| Auto Review | The photograph is displayed for a few seconds after being taken. You may switch this function on or off. |
| Blink Detection | If the camera detects a blink, the user is given the option of saving or discarding the image. Select "Save" to save the image or "Cancel" to discard it. PLEASE NOTE! The blink detection function will only appear in the shooting menu when the face recognition function is enabled. |
| Grid Line | Set the image grid lines On or Off here to make it easier to divide up the image. |
| Stabilizer | The stabiliser helps to avoid blurred images caused by camera shake. Here you can switch the stabiliser on and off. |
10.3. Shooting mode
For certain situations or subjects, you can use the preset shooting modes. This eliminates the necessity for manual setting.
After you have made your selection, the selected mode (with the exception of voice recording mode) is added in the top position under "My Mode" in the Functions menu.
The following shooting modes are available:
| Symbol Setting Meaning | ||
| Intelligent Scene | The camera analyses the shooting conditions and automatically switches to the right scene mode. | |
| Program | The camera automatically selects the appropriate settings, e.g. exposure time and f-stop values | |
| For the following special types of shot, certain settings cannot be changed (e.g. flash and macro) as they are preset for the type of shot. | ||
| Portrait | Reduces background focus and focuses on the centre. | |
| Landscape Suitable | ble for wide landscape views. | |
| Sunset | Emphasises the colour red when taking sunsets. | |
| Backlight | Adjusts the "Metering" setting to the backlight. | |
| Kids | Suitable for capturing people in motion. | |
| Night Scene | Optimises the settings for shooting night scenes. | |
| Fireworks | Reduces the shutter speed for capturing fireworks. | |
| Snow Suitable for beach and snow shots. | ||
| Sports | Suitable for creating images with fast movements. | |
| Party | Suitable for indoor shots and parties. | |
| Candlelight Creates shots in candlelight. | ||
| Night Portrait | Suitable for portrait shots with a dark background. | |
| Soft Skin | Creates images with soft transition areas and delicate colours. | |
| Flowing Water | Creates a delicate effect with fast movements. | |
| X | Food Increases t | the colour saturation. |
| Love Portrait | This function uses face recognition to automatically produce portrait pictures without any need for assistance from other pictures. If more than two faces are detected, the autofocus is activated automatically. The camera begins to count down and takes the photo after two seconds have elapsed. | |
| Self Portrait | This function sets the zoom to wide angle. When a face is detected, the AF is activated automatically and an acoustic signal is heard. The camera starts a two-second countdown and then takes the picture. | |
| D-Lighting | This function increases the dynamic scope of a picture by increasing the brightness and contrast values. | |
| Time Lapse | This function takes a series of images over a predefined time period. | |
| Panorama | Use this function to create a pano-rama by panning or tilting the cam-era. | |
| ART Art Effect | This feature applies different artis-tic effects to your photos. | |
| Burst | In this setting, the camera will take a series of photos for as long as you keep the shutter release button pressed. | |
| Speedy Burst | In this setting, the camera takes a series of 30 photos. | |
| GIF Capture | Use this feature to shoot a previ-ously defined number of images at a defined time interval. These im-ages will be joined together in a moveable GIF file and are not saved individually. You can amend the settings after you have pressed the OK button in this mode. | |
10.4. Arteffect mode
Press the MENU button and select the Art Effect option in the shooting menu.
The option Kunststoffe will then appear in the Aufnahme-Menu under the shooting mode option.
The following settings are possible:
| Symbol Setting Meaning | ||
| 暗 | Stylish | This function is used to capture images with over-saturated colours, uneven exposure or blurring. |
| Soft Focus | Adds a blur around the photographed object to create a soft focus effect. | |
| Light Tone | Reduces the contrast to create a calm and relaxed atmosphere. | |
| Vivid | The camera adds more contrast and saturation to the image to highlight vivid colours. | |
| Miniature Effect | Blurs parts of the photos to make the scene look like a miniature model. We recommend taking the photo from a high angle for best results. | |
| Fischey Lens | This function produces a hemispherical image. | |
| Astral | Star-like light reflections are added to the image. | |
| Poster | This function gives the picture the effect of an old poster or illustration. | |
| Impressive Art | This function creates pictures with a dramatic contrast. | |
| B & W | Pictures are taken in black and white. | |
| Sepia Pictures | Sepia Pictures are taken in sepia tones. | |
| Color Accent (Red) | Retains the red colour while reducing the rest of the image to black and white. | |
| Color Accent (Orange) | Retains the orange colour while reducing the rest of the image to black and white. | |
| Color Accent (Yellow) | Retains the yellow colour while reducing the rest of the image to black and white. | |
| Color Accent (Green) | Retains the green colour while reducing the rest of the image to black and white. | |
| Color Accent (Blue) | Retains the blue colour while reducing the rest of the image to black and white. | |
| Symbol Setting Meaning | ||
| Color Accent (Purple) | Retains the purple colour while reducing the rest of the image to black and white. | |
10.5.Settings menu
| Setting Meaning | |
| Sounds | Here you can switch the start tone off or choose from three tones, switch on the beep and the shutter-release tone, and you can also set the volume for all the tones. |
| Power Save | To save the battery charge, the camera switches off automatically after the selected period. Select 1 min, 3 min or 5 min. The energy-saving function is not enabled at the following times: • while recording audio and video clips; • while playing back images, video or audio clips; • when the camera is connected to another device via the USB connection. |
| Date & Time | Here you can select the date, time and display format. |
| Language | Here you can select the language for the menu. |
| Display Mode | On: the date and time are displayed in playback mode. In shooting mode, only the most important settings are displayed. Detailed Info: all of the information is displayed in playback and shooting mode. Off: no information is displayed in play-back and shooting mode. |
| LCD Brightness | Here you can set the display brightness. Auto: the brightness is set automatically Bright: the display is brightened Normal: standard brightness |
| Format | Formats the memory card or the internal memory. This deletes all the shots. PLEASE NOTE! If you format the memory, all the data saved in it will be deleted. Make sure that there are no important data in the memory or on the SD card. |
| Reset All | Here you can reset all the individual settings to the factory settings. In this case, answer "Yes" in response to the prompt. The following settings are not reset: Date and time Language TV system |
Setting Meaning
Wi-Fi Settings
The Wi-Fi settings contain the camera name and password. You can use the 4-way control to move the cursor and press the OK button to enter the selected letters or numbers.
The default camera name is "Wi-Fi Camera". You can change it using 1~32 alphanumeric characters (it is case-sensitive). The default password is "12345678". You can change it using 8~16 alphanumeric characters (it is case-sensitive).

NOTICE!
When using the camera for the first time, please change the camera name and also the
password.

NOTICE!
Only one smartphone can be connected to the camera at once. Connecting two diffe- phones at the same time is not
10.6. Playback menu
| Setting Meaning | |
| Slide Show | You can run the shots (photos only) as a slide show. |
| Protect | This function can be used to protect shots from accidental deletion. The following options are available: Single: protect one shot Multi: protect multiple shots selected in the thumbnail view Lock all: protect all shots Unlock all: remove protection for all the shots. |
| Voice Memo | You can save a voice message for each photo taken. The maximum length of a voice message is 30 seconds. The time remaining is shown on the display. If there is already a voice message for the se-lected photo, it will be overwritten. |
| Filter Effects | The filter effects function is only available with other artistic effects on images with an aspect ratio of 4:3. The photos edited with this func-tion are saved as new files. Soft: the image is given a soft focus effect. |
| Filter Effects | Color Emphasis: retains the colour tone while reducing the rest of the image to black and white. Vivid: the image is given more contrast and saturation to highlight vivid colours. Miniature Effect: parts of the photo will be blurred to give the picture a miniature model effect. Astral: light areas are filled with stars. Impressive Art: the image is given a dramatic contrast effect. Painting: the image is converted into a line drawing with colour accents. Negative: the colours of the image are inverted. B&W: black and white Mosaic: the image is displayed in pixelated form. Sepia: the image is converted to sepia tones. |
| Trimming | This function can be used to choose an image section and crop the image to this size. The border not visible on the display is deleted. You can either save the corrected file under a new name or you can overwrite the original file. |
| Resize | You can reduce the resolution of photos and thus reduce the file size. You can either save the corrected file under a new name or you can overwrite the original file. The resolution of photos in VGA cannot be changed. |
| Startup Im-age | You can select a start screen that will appear on the screen when the camera is switched on. You can choose between the following: System: the default system screen is displayed My Photo: your selected photo is displayed Off: no photo is displayed Use ▲ or ▼ to select the entry My PHOTO. Use ← or ➔ to select the photo and press OK to confirm. |
| DPOF | DPOF stands for "Digital Print Order Format".Here you can specify print settings if you wish to have pictures published by a photo studio or printed on a DPOF-compatible printer. With a DPOF-compatible printer you can print the pictures directly without transferring them to the computer beforehand.You can print all the photos or just one, or reset the DPOF settings.Use the ▲ or ▼ buttons to set the number of prints for each picture.Use the button to switch the date stamp on or off.PLEASE NOTE!With DPOF you can specify up to 99 copies. If you set 0 copies for an image, the DPOF setting of this picture will be automatically deactivated. |
| Copy | Use this function to copy images between the internal memory and the memory card. |
Setting Meaning
Movie Paste
Use this function to combine two videos with the same specifications (video size and fps) into one video.
First select a video.
Press the Menu button to call up the playback menu.
- Select Film einfugen. Videos with the same specifications as the original video will be displayed on the LCD monitor.
Use the or buttons to search and the or buttons to select/deselect the second video.
Press the OK button and select Yes to add the second video to the end of the original video and overwrite it.

PLEASE NOTE!
The total length of the combined video to may not exceed 30 minutes.
Once the videos have been combined, the second video will no longer exist as a separate file.
Setting Meaning
Face Retouch
This function can only be used on photos that have been taken using the face recognition function (e.g. with the "Portrait" shooting mode enabled).
When you have opened the menu for retouching faces, move the cursor over the image if it contains two or more faces or move the cursor using a function on the right-hand side of the menu if the image only contains one face.
Only one face can be retouched in each case.
All functions will be reset to 0 if you exit the face menu, irrespective of whether you save the image or discard the settings.
Images in which faces have been retouched are saved as new images and they can then be edited again using this function.
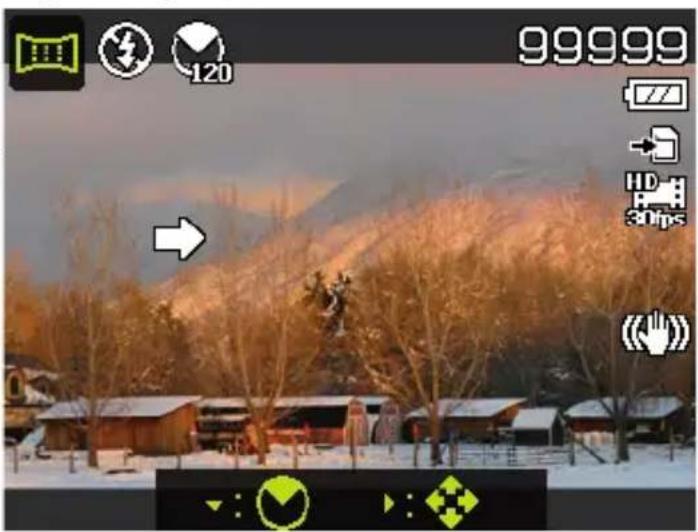
11. Panorama images
This function enables you to capture a panoramic image. To assist you, the camera provides guide graphics and an automati
cally controlled shutter release.
In the shooting mode, select the option. The panorama mode icon appears in the top left corner of the display.
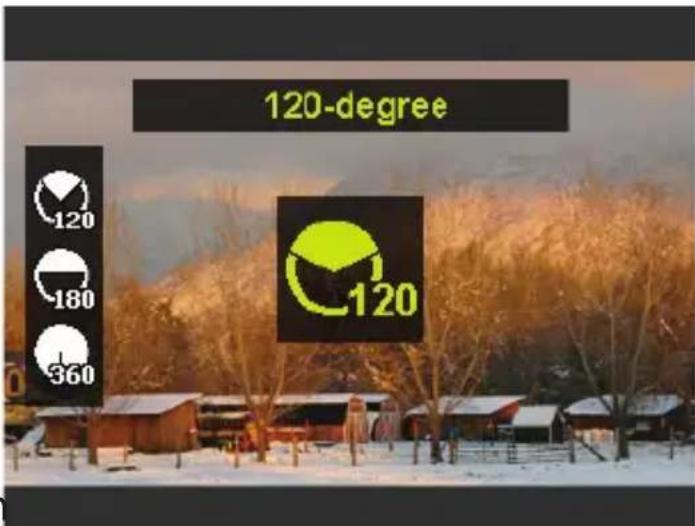
Press the button to open the selection menu for the degrees of the panoramic photo.
Use the or keys to select the desired degree value. You can choose between 120^ , 180^ and 360^ .
- Confirm your selection by pressing the OK button.
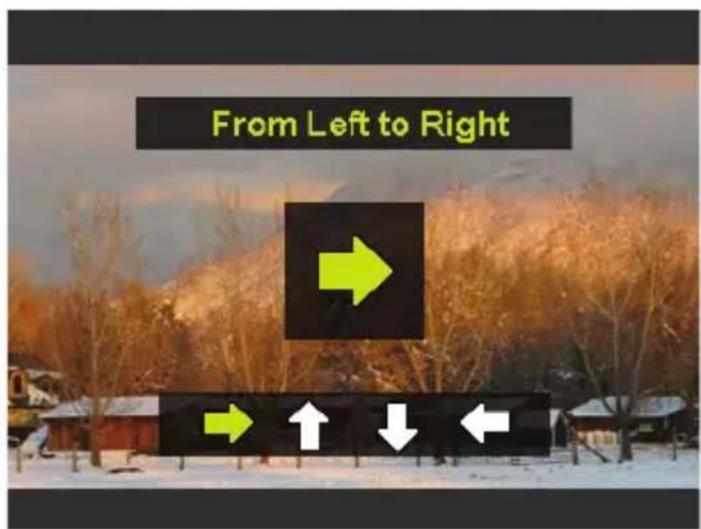
Press the button to open the selection menu for the shot direction of the panoramic photo.
Use the or keys to select the desired direction: From Left to Right From Bottom to Top From Top to Bottom From Right to Left
- Confirm your selection by pressing the OK button.
Press the shutter release all the way down to take the picture.
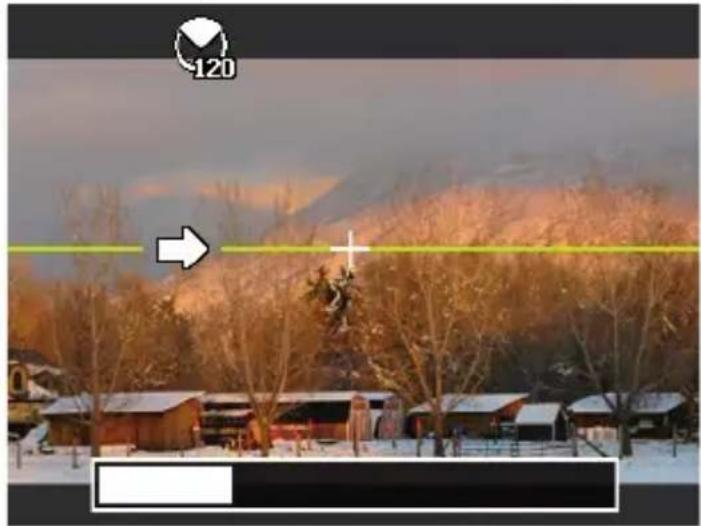
- When you start taking the picture, a white cross will appear in the middle of the display. A yellow horizontal or vertical line (depending on the orientation of the camera) will also appear in the centre of the display to help with the alignment of the camera.
A toolbar will appear at the bottom edge of the screen during the shooting process.
For an ideal panoramic shot, the yellow line must always run horizontally or vertically through the positioning cross.

Once the toolbar reaches the end, the shot is complete and the image is saved.


PLEASE NOTE!
The following settings are predefined for the panorama function and cannot be changed:
The flash is always off.
- The self-timer is switched off.
The autofocus is active.
The autofocus range is set to Wide.
12. Connecting to a printer or PC
12.1. Printing shots on a photo printer
Using PictBridge, you can print your shots directly on a PictBridge-compatible photo printer.
Connect the printer to the camera with the USB cable supplied.
Switch the camera and the photo printer on.
The camera recognises that a USB device has been connected.
- Switch to printer mode by selecting the "PTP" option and pressing OK to confirm.
Use the arrow keys or to select the desired photo and the desired number of copies. You have the following options:
Print selected - select the desired photo and the number of copies
Print all - print all photos
Index - print all photos as thumbnails.
12.2. Transferring data to a scomputer
You can copy your pictures and videos to a computer.
Supported operating systems:
- Windows 7
- Windows 8
- Windows 8.1
- Windows 10
12.3. Using a USB cable
Switch the camera off.
- With the computer switched on, connect the USB cable supplied to the USB socket on the camera and a USB socket on the PC.
As soon as the connection between the camera and computer has been established, "Mass Storage" or "PTP" will appear on the camera screen.
If you select Mass Storage, the camera is shown as a mass storage device and can be used as a separate drive in Windows Explorer. Open Windows Explorer or double-click on "Desktop" (in Vista/Windows 7: "Computer").
Double-click on the media icon for the camera.
Navigate to the "DCIM" directory and, where applicable, to the relevant subdirectories in order to display the files (.jpg = photos; .wav = sound recordings; *.avi = video recordings). See also the directory structure in the memory.
Press down the left mouse button and drag the relevant files to the directory provided on the computer, e.g. to the folder "My Documents". You can also highlight the files and use the Windows commands "Copy" and "Paste".
The files are transferred to the computer and stored there. You can display, view and process the files with a suitable software application.
If you select PTP, the camera will be connected as a PTP (Picture Transfer Protocol) device.
In Windows Vista, Windows 7 and Windows 8 you can immediately access the content of the camera memory or the memory card.
13. Installing the software
There is a picture editing program called "CyberLink PhotoDirector" on the CD supplied with the product.
How to install CyberLink PhotoDirector:
Insert the installation CD in the DVD/CD drive.
The CD is automatically executed and a selection screen appears.
Select the entry "Install CyberLink PhotoDirector" on the screen.
Follow the instructions to complete the installation.
Start the program via the symbol on the desktop, where applicable.
- When you start the program for the first time, it has to be activated. To activate the program, enter the serial number HEZGA-B5DS5-3P3SS-GS648-HLJS6-UNP3E.

PLEASE NOTE!
Help with using the program is available in the help system software, which can be accessed by pressing the F1 button.
If the CD is not automatically executed, follow the steps below to install the software:
Double-click on Desktop.
Move the mouse pointer to the DVD/CD drive.
Right-click, then select Open.
Double-click on Setup.exe.
A wizard will then guide you through the installation process.
Follow the instructions to complete the installation.
Start the program via the symbol on the desktop.
- When you start the program for the first time, it has to be activated. To activate the program, enter the serial number HEZGA-B5DS5-3P3SS-GS648-HLJS6-UNP3E.
14. Troubleshooting
Use the following checklist if the camera does not function correctly. If the problem persists, consult MEDION Service.
The camera will not switch on.
The battery is not inserted correctly.
The battery is flat. Recharge it.
The battery compartment door is not closed properly.
The camera will not take photos.
The flash is still charging.
The memory is full.
The SD card is not correctly formatted or is defective.
The maximum number of files has been exceeded. Reset the file numbering function.
There is not enough light. Change the angle of the camera to pick up more light or use the flash.
The flash does not go off.
The camera was moved during the shot.
The flash is switched off.
The image is blurred.
The camera was moved during the shot.
The subject was outside the camera's focal range. Use the Macro mode for close-up pictures, where applicable.
The image is not shown on the display.
An SD card has been inserted which has been used to take pictures in non-DCF mode on another camera. The camera cannot display this type of image.
The camera switches itself off.
After a preset period, the camera switches itself off to save the battery charge. Restart the camera.
The shot has not been saved.
The camera was switched off before the shot could be saved.
Shots on other memory cards are not displayed.
The shots on memory cards from other cameras will only be displayed if the other camera also uses the DCF memory system.
The zoom function is not available while recording a video.
Ensure the macro function is switched off.
The camera cannot be connected to a smartphone via WLAN.
Only one smartphone can be connected to the camera at once, connecting two smartphones at the same time is not possible. If you have two smartphones, please only activate WLAN on the smartphone that you want to use to connect to the camera.
In order to prevent smartphones from third parties connecting to your camera, please change the camera name and the password in the settings.
15. Maintenance and care
Clean the housing, lens and display as follows:
Clean the camera housing using a soft, dry cloth.
Do not use thinners or detergents which contain oil. This could damage the camera.
When cleaning the lens and the display, start by removing the dust with a lens brush. Then wipe the lens and display with a soft cloth. Do not apply any pressure to the display and do not use hard objects to clean it.
Do not use strong cleaning agents for the housing and lens (if there is dirt that cannot be removed, contact your dealer).
16. Disposal

Packaging
The product has been packaged to protect it from damage in transit. The packaging is made of materials that can be recycled in an environmentally friendly manner.

Product
Old appliances should not be disposed of with the normal household rubbish.
In accordance with Directive 2012/19/EU, the product must be properly disposed of at the end of its service life.
This involves separating the materials in the product for the purpose of recycling and avoiding any impact on the environment.
Take old appliances to a collection point for electrical scrap or a recycling centre.
Contact your local waste disposal company or your local authority for more information on this subject.

Batteries
Rechargeable batteries/batteries must be properly disposed of. Retailers who stock batteries and local authority collection points have appropriate disposal containers for this purpose. You can contact your local waste disposal company or municipal authorities for further information.
17. Technical data
CAMERA
Pixels: 20 megapixel CCD
Aperture: F = 3.1 6.3
Shutter speed: 1/2000 4 s (in firework mode)
Focal distance: f = 4.3 mm 51.6 mm
Optical zoom: 12 ×
Digital zoom: 8 ×
LCD monitor: 6.86~cm / 2.7'' LC display
File formats: JPEG (EXIF 2.3), DPOF, AVI, WAV
Max. resolutions:
Camera mode: 5152 x 3864 pixels
Video mode: 1280 × 720 pixels (with a class 6
SDHC memory card)
Picture memory:
Internal: 64 MB internal memory
(approx. 24 MB available; the usable
memory may vary)
External:
microSD/SDHC card
Connection:
Mini-USB 2.0
Dimensions (W x H x D):
approx. 101 × 61 × 26.7 mm
Weight: approx. 127 g (excluding battery)
Ambient temperature: 0^ - 40^ at 0% -90% rel. humidity
Wi-Fi module: 802.11 b/g/n
USB MAINS ADAPTER
Model number: KSAS0060500100VEU
Manufacturer: Ktec, China
Input voltage: 100 - 240V 50 / 60Hz0.18A
Output voltage: 5.0V 1.0 A
BATTERY
Manufacturer: HYB BATTERY CO., LTD
Model number: NP-45
Technical data: 3.7 V/700 mAh/2.6 Wh
Subject to technical modifications, display changes and printing errors!

18. Legal notice
Copyright © 2015
All rights reserved.
This operating manual is protected by copyright.

Mechanical, electronic and any other form
of reproduction is prohibited without the written permission of the manufacturer.
Copyright is owned by the company:
Medion AG
Am Zehnhof 77
45307 Essen
Germany
The operating manual can be reordered via the service hotline and is available for download via the service portal at www.medion.com/gb/service/start/.
You can also scan the QR code above and download the operating manual onto your mobile device via the service portal.
Sommaire
You've got a good idea.
Pixels: 20 megapixels CCD
Diaphragme: F = 3,1 6,3