— Camera — Mode d'emploi PDF")
LIFE X44038 (MD 86938) - Camera MEDION - Free user manual and instructions
Find the device manual for free LIFE X44038 (MD 86938) MEDION in PDF.

| Product type | Compact digital camera |
| Brand | Medion |
| Model | LIFE X44038 (MD 86938) |
| Dimensions (W × H × D) | Approx. 109 × 64 × 38 mm |
| Weight | Approx. 211 g (with battery) |
| Power supply | Lithium-ion battery 3.7 V / 940 mAh (3.478 Wh); USB power adapter 5 V / 1 A |
| Max photo resolution | 4608 × 3456 pixels (16 MP) |
| Max video resolution | 1280 × 720 (30 fps) |
| Optical zoom | 12x |
| Digital zoom | 8x |
| Display | Flip LCD screen 7.62 cm (3.0 inches) |
| Sensor | Not specified, but max resolution 16 MP |
| Equivalent focal length | 24 – 288 mm (small format) |
| Internal memory | 64 MB (approx. 27 MB usable) |
| External memory | SD card (up to 4 GB), SDHC (up to 32 GB) |
| Connectivity | Wi-Fi 802.11 b/g/n, USB 2.0 (Micro USB), AV output |
| Built-in flash | Yes, modes: auto, red-eye reduction, always on, slow sync, off |
| Image stabilizer | Yes (switchable) |
| File formats | Photo: JPEG (EXIF 2.3); Video: AVI; Audio: WAV |
| Face detection | Yes |
| Maintenance and cleaning | Body: dry soft cloth; Lens and screen: blower brush then soft cloth |
| Safety | Do not open, do not expose to water, do not repair yourself |
| Spare parts and repairability | Removable battery (specific model), power adapter included; repair exclusively by Medion customer service |
| General information | Wi-Fi for transfer and remote control; multiple scene modes (24); CyberLink PhotoDirector software included |
Frequently Asked Questions - LIFE X44038 (MD 86938) MEDION
User questions about LIFE X44038 (MD 86938) MEDION
0 question about this device. Answer the ones you know or ask your own.
Ask a new question about this device
Download the instructions for your Camera in PDF format for free! Find your manual LIFE X44038 (MD 86938) - MEDION and take your electronic device back in hand. On this page are published all the documents necessary for the use of your device. LIFE X44038 (MD 86938) by MEDION.
USER MANUAL LIFE X44038 (MD 86938) MEDION
1. About these instructions 153
1.1. Symbols and key words used in these instructions 153
1.2. Proper use 155
1.3.Notes on conformity 155
2. Safety instructions
2.1. Dangers for children and people with reduced capability 156
2.2. Notice regarding power disconnection 157
2.3.Warnings 1
2.4. Instructions for batteries 159
2.5. Safety precautions
2.6. Never carry out repairs yourself 164
3. Package contents
4. Overview of the device 166
4.1. Front 1
4.2. Rear 1
4.3. Top
4.4. Bottom 1
4.5. Page 1
4.6. Navigation button
5. Start of operation 174
5.1. Attach the wrist strap 174
5.2.Insert the battery 175
5.3. Removing the battery 177
5.4. Charging the battery via USB 177
5.5. Inserting and removing the SD card 178
6. First steps 182
6.1. Switching on the camera 182
6.2. Switching off the camera 182
6.3. Setting the language, date and time 182
6.4. Power-saving function
6.5.Shooting and playback mode 184
6.6. Video mode
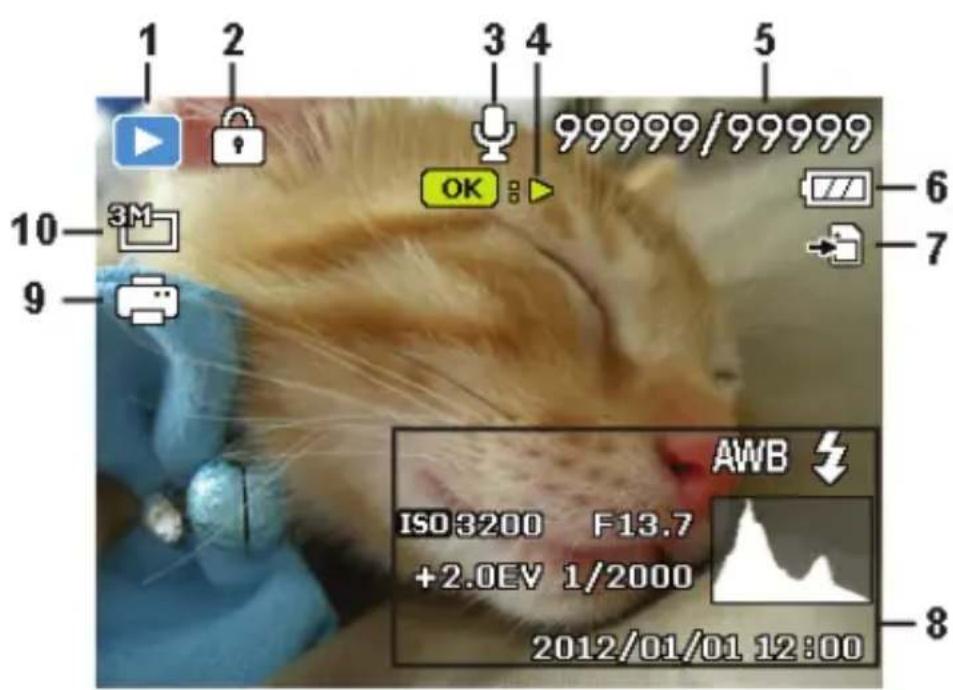
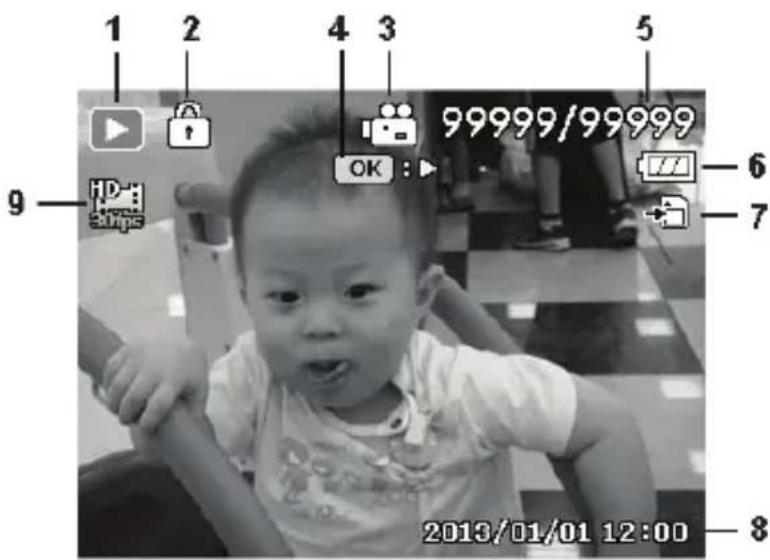
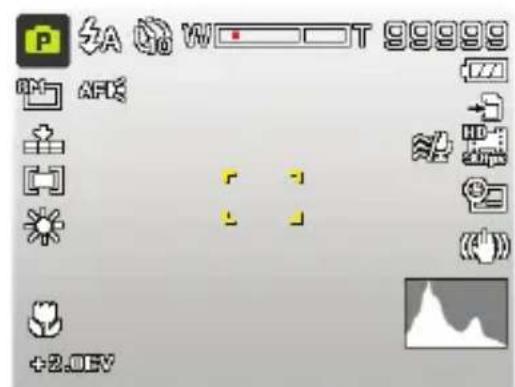
7. Display features 184
7.1. Displays for shooting 185
7.2. Displays for photo playback 187
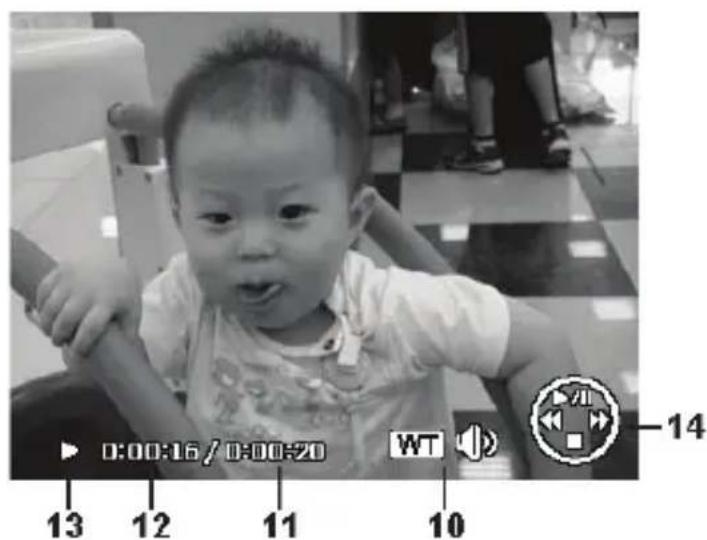
7.3. Displays for video playback 188
7.4. Switching the displays on and off 190
8. Starting to take photographs 193
8.1. Setting shooting mode 193
8.2. Tips for taking good shots 193
8.3. Taking photographs 195
8.4. Using the Wi-Fi function 201
8.5. Recording video clips 211
9. Viewing/listening to recordings 213
9.1. Playing back single recordings 213
9.2. Playing back shots as thumbnails 214
9.3. Playing back video recordings and voice memos ..... 216
9.4. Deleting photos 217
10. The menus 220
10.1. Navigating in the menus 220
10.2. The photo menu 220
10.3. The video recording menu 228
10.4. The settings menu 229
10.5. The playback menu 233
11. The Shooting mode menu item 240
11.1. The following shooting modes are available: .... 241
12. Using the different shooting modes 244
12.1. Using the adjusted scene mode 244
12.2. Using the child mode 245
12.3. Using the sports mode 246
12.4. Using the party mode 246
12.5. Using the panorama mode 247
12.6. Using the art effect mode 252
12.7. The P (Program) shooting mode 254
13. Playback functions 25
13.1.Showing pictures in a slide show 255
13.2. Lock/unlock functions 256
13.3. Recording voice messages 257
13.4.Filter effects 2
13.5. Trimming 258
13.6.Changting the size 260
13.7.Startup image 260
13.8. DPOF 26
13.9. The copy function 261
13.10. "Add film" function 263
14. Connection to TV and PC 264
14.1. Displaying captures on a television set 264
14.2. Printing shots on a photo printer 265
14.3. Transferring data to a computer 268
14.4. Connecting the USB cable 268
14.5. DCF memory standard 270
14.6.Card drive. 270
14.7. Memory folder structure 270
- Installing the software 271
- Troubleshooting 272
- Maintenance and care 274
- Disposal 275
- Technical data 276
- Legal notice 278
1. About these instructions

Read the safety instructions carefully before use.
Note the warnings on the device and in the operating instructions.
Always keep the operating instructions close to hand. If you sell the device or give it away, make sure you also hand over these instructions and the warranty card.
1.1. Symbols and key words used in these instructions
| ! | DANGER! Warning: life-threatening danger! WARNING! Warning: possible mortal danger and/or serious irreversible injuries! CAUTION! Danger of possible minor or moderate injuries! |
| ! | ATTENTION! Please follow the guidelines to avoid property damage! |
| i | NOTE! Additional information on using the device! |
| i | NOTE! Please follow the guidelines in the operating instructions! |
| WARNING! Warning: danger of electric shock! | |
| . | Bullet point/information on operating steps and results |
| ►Tasks to be performed | |
1.2. Proper use
This camera is designed for the recording of digital pictures and video clips.
- The device is intended for private use only and not for industrial/commercial use.
Please note that we shall not be liable in cases of improper use:
- Do not modify the device without our consent and do not use any auxiliary equipment that we have not approved or supplied.
- Use only spare parts and accessories which we have supplied or approved.
- Heed all the information in these operating instructions, especially the safety information. Any other use is deemed improper and can cause personal injury or damage to the device.
Do not use the device in extreme environmental conditions.
1.3. Notes on conformity
Medion AG hereby declares that this product conforms to the following European requirements:
EMC Directive 2004/108/EC
BoHS Directive 2011/65/EU.
Full declarations of conformity are available at www.medion. com/conformity.
2. Safety instructions
2.1. Dangers for children and people with reduced capability
- This product is not intended for use by people (including children) with reduced physical, sensory or mental abilities or for those without experience and/or knowledge, unless they are supervised by a person responsible for their safety or they have been instructed in its use.
- Children should be supervised to ensure that they do not play with the product. Children should not be allowed to use this product without supervision.
- Keep the device and its accessories out of the reach of children.

DANGER!
Keep plastic packaging out of the reach of children. There is a risk of suffocation!
2.2. Notice regarding power disconnection
- To disconnect the power supply from your device, pull the mains adapter from the socket outlet. Always pull on the mains adapter/mains plug itself when removing it from the socket. To prevent damage, never pull on the cable.
- When not in use, pull the mains adapter from the socket outlet, or use a master-slave power strip to prevent power consumption when switched off.
- The sockets used when charging the battery must be close to the product and easily accessible. Position the cables so that they cannot be stepped on or tripped over.
- Only operate the mains adapter on earthed socket outlets with 230 ~V 50 ~Hz . If you are not sure about the power supply at the set-up location, please ask your power supplier.
-
To prevent non-permissible heating up, do not cover the mains adapter.
-
Do not continue to use the mains adapter if the housing or the supply lead to the device is damaged. Replace the mains adapter with one of the same type.
- Use only the supplied AC adapter model: KSAS0060500100VEU, otherwise damage may occur.
2.3.Warnings
In order to avoid injury, please heed the following warnings while using the product:
- Do not trigger the flash too close to the eyes. This can cause damage to the eyes of the person being photographed.
- Keep at least one metre away from children when you are working with the flash.
- Do not open or dismantle the camera.
-
Dismantling the camera constitutes a risk of high-voltage electric shock. Only expert personnel should undertake internal component tests, modifications and repairs. Take the product to an authorised Service Centre for testing.
-
If you are not going to use the camera for some time, remove the batteries to prevent leakage.
- The camera must not be exposed to water droplets or spray. Do not place any objects filled with liquids (e.g. vases) on or next to the device.
- Unplug the charger from the power outlet during thunderstorms or whenever it is not in use.
2.4. Instructions for batteries
Your camera operates using the supplied battery. Charge the battery only with the supplied USB cable and/or the supplied adapter.
Please heed the following general instructions on handling batteries:
- Keep children away from batteries. Seek medical attention immediately if a battery is swallowed.

WARNING!
There is a risk of explosion, if rechargeable batteries are replaced incorrectly.
Replace rechargeable batteries only with the same or equivalent type.
- Before inserting the batteries, check that the contacts in the device and on the batteries are clean, and clean them if necessary.
- You must insert only the battery supplied.
- Note the polarity (+/-) when inserting the battery.
- Store the battery in a cool, dry place. Direct intense heat can damage the battery. Therefore keep the product away from strong heat sources.
- Avoid contact with skin, eyes and mucous membranes. If any of these areas come into contact with battery acid, rinse them immediately with plenty of clean water and consult a doctor as soon as possible.
- Do not throw the battery into a fire, short-circuit it or dismantle it.
- Never expose the battery to excessive heat, such as from sunshine, fire or similar!
-
If the camera is not going to be used for some time, remove the battery.
-
If the battery is leaking, remove it from the camera immediately. Before inserting a new battery, clean the contacts. There is a risk of skin irritations from battery acid!
- Remove a flat battery from the camera.
- At low temperatures the capacity of the battery might drop significantly as the chemical reactions slow down. When recording in cold weather keep a second battery pack in reserve in a warm place (e.g. trouser pocket).
- Avoid knocks or impacts that can affect the battery; do not crush or drop the battery.
2.5. Safety precautions
Take the following safety precautions, in order to avoid damage to your camera and to always keep it in perfect condition.
- Store in a dry place
-
This camera is not watertight and will not function properly if it is immersed in water or if liquids penetrate to the inner workings.
-
Keep away from damp, salt and dust Wipe off salt and dust with a light, damp cloth if you have been using the camera on the beach or at the seaside. Carefully dry the camera afterwards.
- Keep away from strong magnetic fields Never bring the camera too close to devices that have strong electro-magnetic fields, e.g. electric motors. Strong electromagnetic fields may cause the camera to malfunction or interfere with data recording.
- Avoid excessive heat
- Do not use or store the camera in sunlight or at high temperatures. This can cause the battery to leak or the case to become misshapen.
- Avoid extreme fluctuations in temperature If you take the camera from a cold environment into a warm one or vice versa, drops of water can form outside and inside the camera which can cause malfunctions and can damage the camera. Wait until the camera has reached ambient temperature before switching it on. Using a carrying case or plastic case offers a
certain amount of protection against fluctuations in temperature.
- Do not drop the camera
- Yesrring or vibrations resulting from a fall can cause malfunctions. Loop the carrying strap around your wrist when you carry the camera.
- Do not remove the batteries when data are being processed When image data are being recorded to memory cards or deleted, switching off the power supply can result in data loss or damage the internal circuit or the memory.
- Treat the lens and all moving parts carefully
- Do not touch the lens or the lens barrel. Take care when handling the memory card and the batteries. These parts are not designed for high levels of impact.
- Batteries
-
If the contacts on the battery are dirty, clean them with a dry, clean cloth or use an eraser to remove residues.
-
Memory cards
- Switch the power supply off before you insert or remove the memory card. Otherwise the memory card may become unstable. Memory cards may heat up during use. Always take care when removing the memory cards from the camera.
2.6. Never carry out repairs yourself

WARNING! Never try to open or repair the product yourself. There is a risk of electric shock!
- If there is a fault, contact the MEDION Service Centre or another specialist repair shop in the interests of safety.
3. Package contents
Please check your purchase to ensure that all the items are included and contact us within 14 days of purchase if any parts are missing.
The following items are supplied with the product you have purchased:
- Camera MD 86938
- 3.7 V lithium-ion battery
USB cable - USB mains adapter (EU version)
AV cable - Wrist strap
Storage bag VG0692172H80391 - Software CD-ROM
Documentation

DANGER!
Keep plastic packaging out of the reach of children. There is a risk of suffocation!
4. Overview of the device
4.1. Front
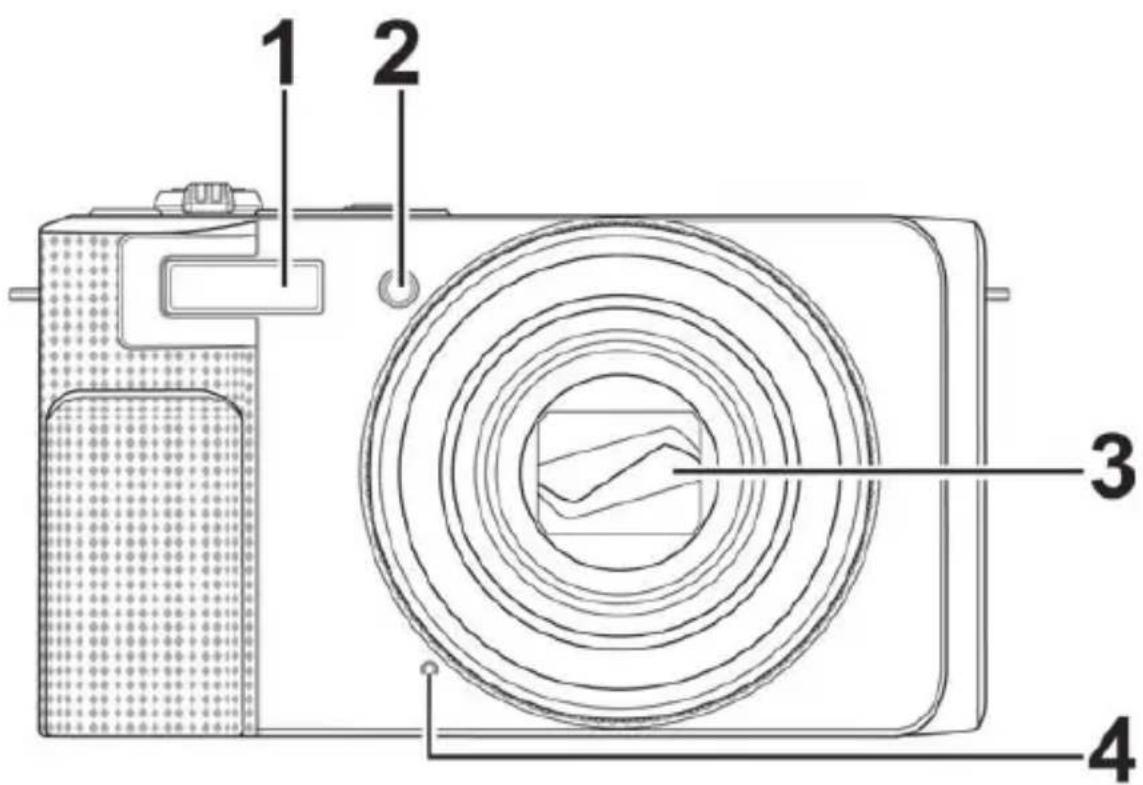
1) Flash
2) Self-timer LED/AF light
3) Camera objective lens
4) Microphone
4.2. Rear
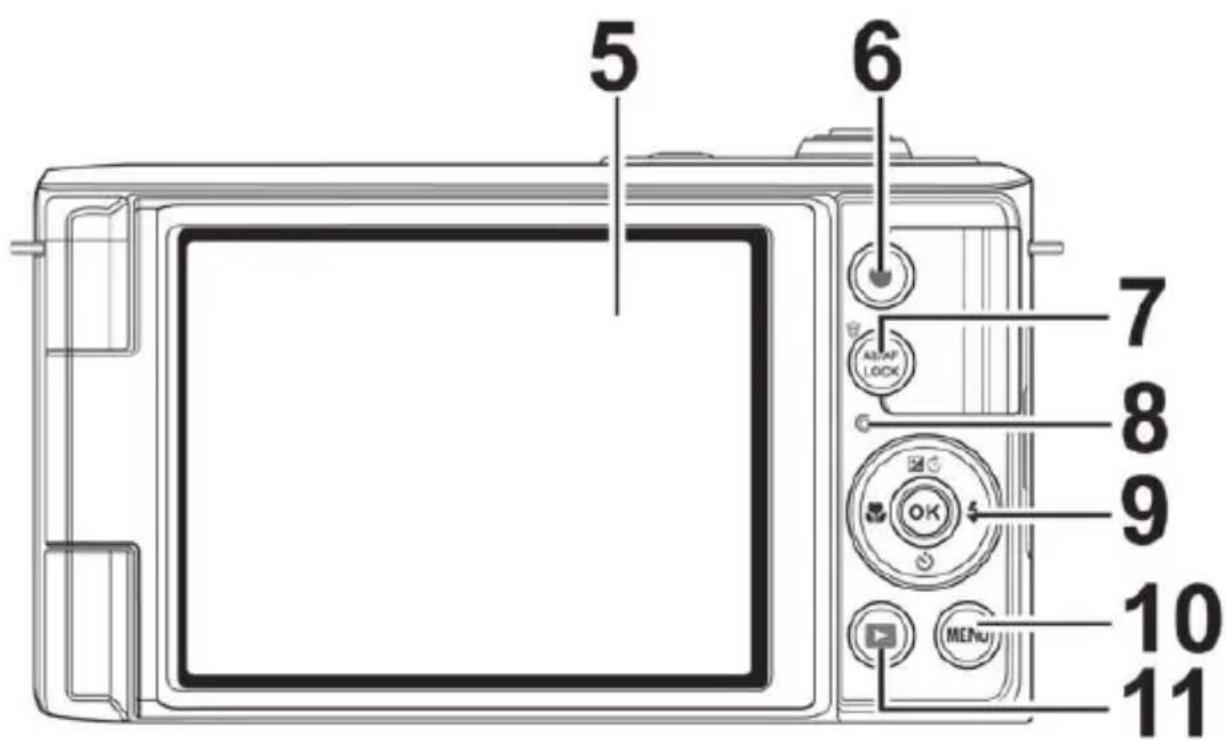
5) LC display
6) Video button
7) AE/AF LOCK button/Löschen
8) LED display light
9) OK button / navigation buttons (4-way navigation)
10) MENU: Open the menu
11) :PI back button
4.3. Top
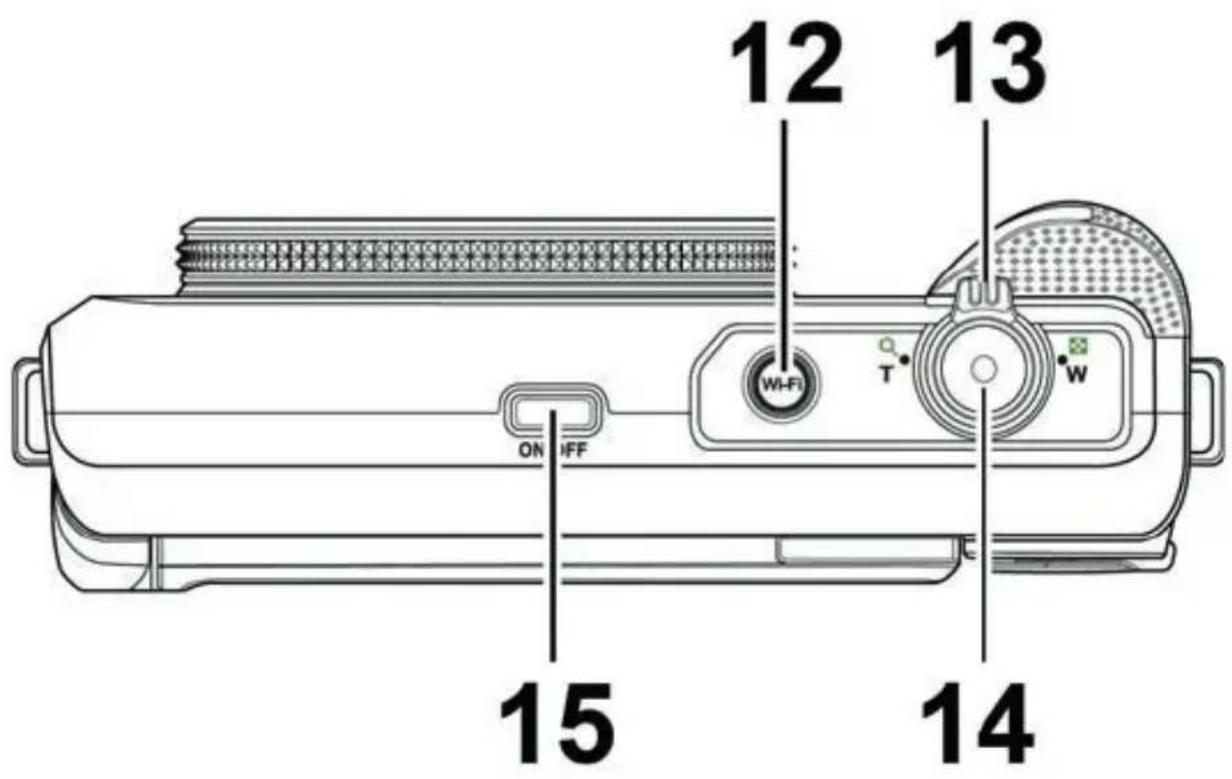
12) WI-FI button
13) TQ / W (zoom wheel): Zoom in and out of the image
14) Shutter release (press half way: activate autofocus)
15) ON/OFF: camera on/off switch
4.4. Bottom
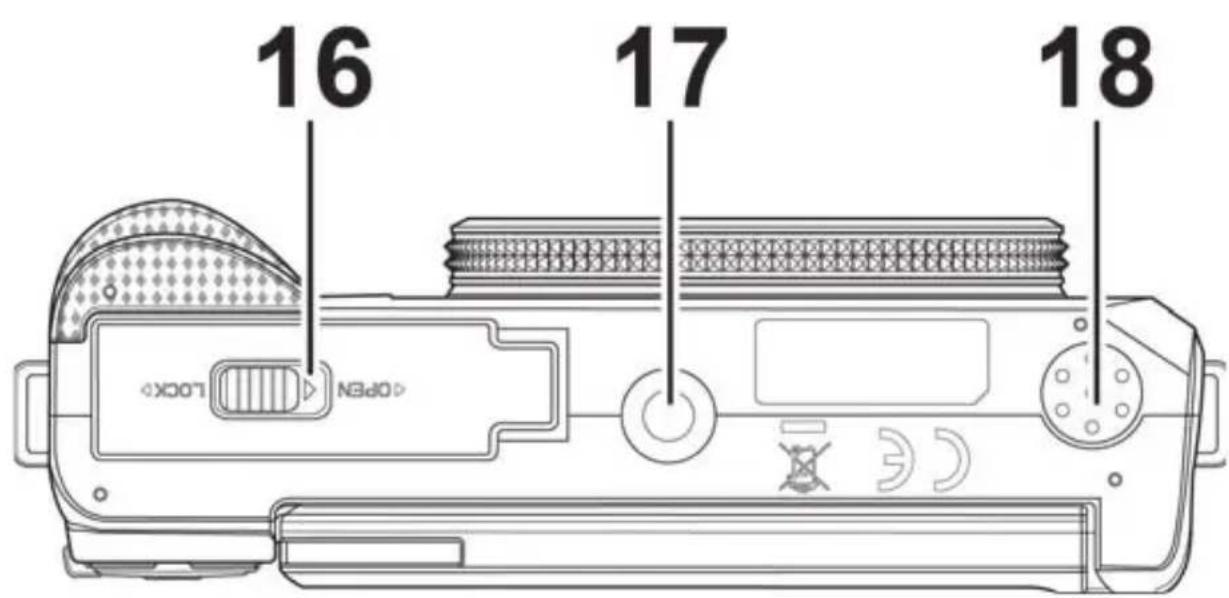
16) Battery/memory card compartment cover
17) Tripod mount
18) Loudspeaker
4.5. Page
| Button Mode Description | ||
| 1) | In shooting mode: | Turn on macro for close-ups |
| In playback mode: | Show previous shot | |
| Video playback: | Activate rewind or deactivate fast forward | |
| In the menu | Exit menu/submenu, scroll left within the menus/submenus | |
| 2) | In shooting mode: | Change exposure settings |
| In video play-back mode: | Start/pause playback | |
| In photo play-back mode | Rotate picture by 90° | |
| In the menu Scroll | up in menus/submenus | |
| 3) | In shooting mode: | Choose flash type |
| In playback mode | Show next shot | |
| Video playback: | Activate fast forward or deacti-vate rewind | |
| In the menu | Open menu/submenu, scroll right within the menus/sub- menus | |
| 4) OK | In video/music playback mode: | Start playback |
| In the menu | Confirm a selection in the menus/submenus | |
| Button Mode Description | ||
| 5) | In shooting mode: | |
| Play back videoskHz/audios: | ||
| In the menu | ||
5. Start of operation
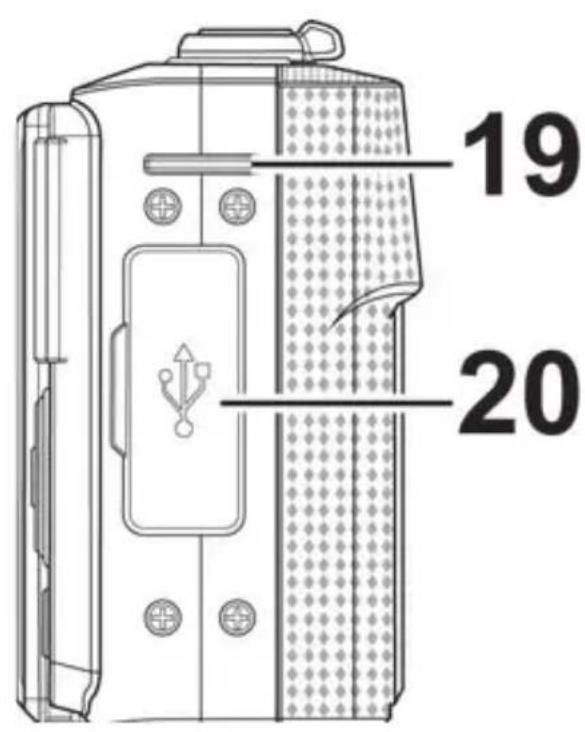
5.1. Attach the wrist strap
For ease of handling and increased security, attach the wrist strap to the camera. Feed the strap through the eye, as shown in the diagram.
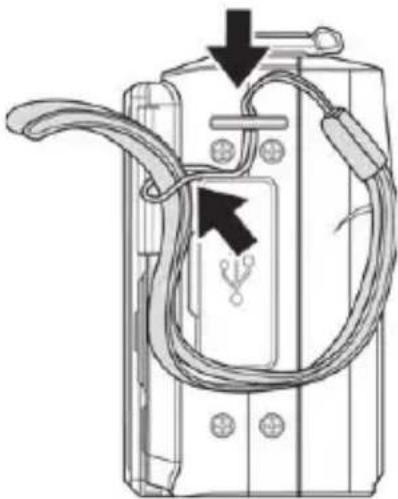
Pull the other end of the wrist strap through the thin loop of the strap and pull the wrist strap tight.

ATTENTION!
If you carry the camera by the wrist strap, make sure that it does not bang into anything. While attaching the wrist strap, place the camera on a stable surface so that it cannot fall down and break.
5.2. Insert the battery
The li-ion battery supplied is required for operating the camera.
Switch the camera off.
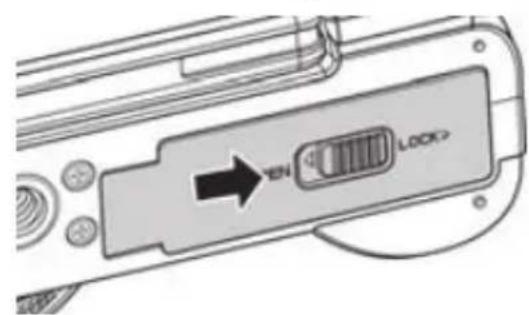
Slide the latch of the battery compartment cover towards OPEN and open it in the direction of the arrow.
Insert the battery with the contacts pointing in the direction of the camera as shown in the illustration.
Push the battery carefully into the camera until it clicks into place.
- Close the battery compartment cover in the direction of the arrow and slide the latch in the direction LOCK.
5.3. Removing the battery
To remove the battery, open the battery compartment as described above.
- Carefully push the battery latch upwards; the battery is ejected a little and can be easily removed.
5.4. Charging the battery via USB

NOTE!
The battery is not charged when you purchase the camera. You must charge the battery before you use
the camera.
You can charge the battery either using a USB mains adapter or via a USB connection on your PC or another device with a USB connection.

NOTE!
Only the EU plug version of the mains adapter is supplied; there is not a separate UK AC adapter variant included. You can also charge the camera via a PC or an adapter (UK to EU) (not supplied).
Connect the USB cable to the camera.
-
Connect the other end of the cable to the USB mains adapter and plug it into the mains socket.
-
Alternatively, use the supplied USB cable to connect the camera to the USB port of your PC or to another device with a USB port.


NOTE!
Charging the battery with the supplied mains adapter is only possible with the camera turned off.
5.5. Inserting and removing the SD card
If no memory card is inserted, photos will be stored in the internal memory. Please note that the capacity of the internal memory is limited.
Use an SD memory card to increase the memory capacity. If a memory card is inserted, your photos will be stored on the card.
5.5.1. Inserting the card
Ensure the camera is switched off.
-
Move the locking latch of the battery compartment in the direction shown by the arrow.
-
Hold the locking latch in position and push the cover of the battery compartment in the direction of the arrow. The battery compartment opens.
Insert the card in the card slot as shown with the contacts facing upwards and ensure that it audibly clicks into place.
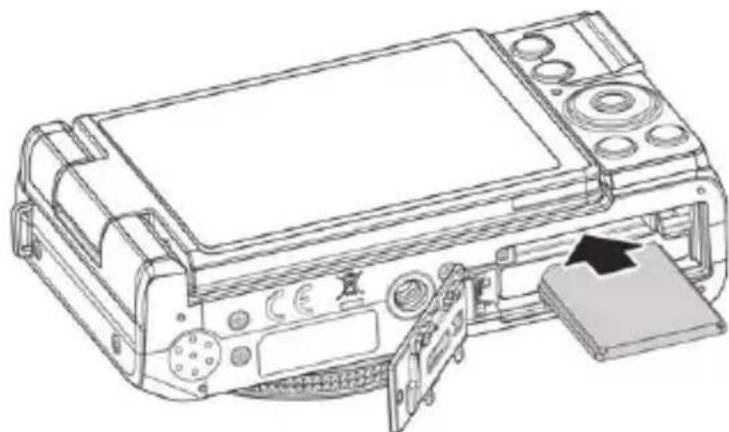
- Close the battery compartment and close the locking latch.
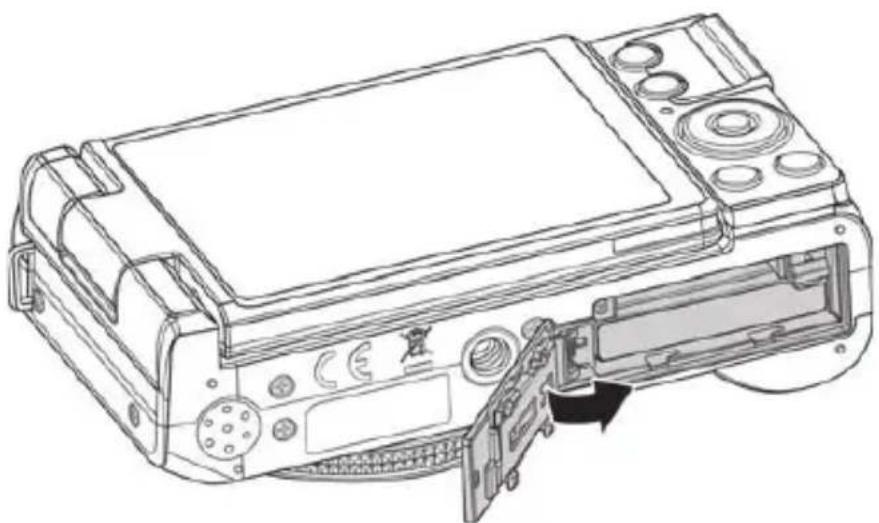
5.5.2. Removing the card
To remove the card, first open the battery compartment as previously described.
Press the card into its slot a short way to unlock it. The card will then protrude slightly and can be removed.
- Close the battery compartment again as described previously.
5.5.3. Camera memory
Internal memory
Your camera is equipped with 64 MB of internal memory. You can save up to 27 MB on this. If no memory card is inserted into the memory card slot, all photos and videos will be automatically stored in the internal memory.
External memory
Your camera supports SD cards with capacities of up to 4 GB. It also supports SDHC cards with a maximum capacity of 32 GB. If a memory card is inserted into the memory card slot, all photos and videos will be automatically stored on the external memory card. The symbol shows that the camera is using an SD card.

NOTE!
It is possible that not all cards are compatible with your camera. Check the technical data of the card when purchasing and take the camera with you.
6. First steps
6.1. Switching on the camera
Press the ON/OFF button to switch on the camera.
The lens comes out, the green light appears on the operating display and the display switches on. The camera is then in operating mode.

NOTE!
If the camera does not switch on, check whether the battery has been inserted properly and whether it is charged.
6.2. Switching off the camera
Press the ON/OFF button to switch off the camera.
6.3. Setting the language, date and time
You will be prompted to set the language and time when you switch on the camera for the first time.
6.3.1. Setting the language
Use the / and / buttons to select the required language.
Confirm your choice by pressing the OK button.
After the language has been set, the camera switches automatically to the menu so you can set the date and time.
6.3.2. Setting date and time
- Use the and buttons to choose the appropriate value for the date or time.
Use the and buttons to switch to the next entry - Confirm your settings by pressing the OK button.
As well as the date and time, you can also set the date format.
The following options are available:
- YY/MM/DD (Year/Month/Day);
MM/DD/YY (Month/Day/Year); - DD/MM/YY (Day/Month/Year)

NOTE!
The camera can only display the date and time in playback mode. These details can also be inserted in the bottom-right corner of the photo if you have previously enabled the date stamp function (see "10.2. The photo menu" on page 220).
The time setting remains stored thanks to the internal battery. It is lost, however, if the battery is removed from the camera for more than 48 hours.
6.4. Power-saving function
If the camera is not used for 60 seconds, it switches off. You can also set the automatic switch-off period to three or five minutes or completely deactivate it.
The power-saving function is not enabled:
- while recording audio and video clips;
- while viewing images, video or audio clips;
- while the camera is connected to another device via the USB connection.
6.5. Shooting and playback mode
Shooting mode is enabled as soon as the camera is switched on: you can start taking photos straight away.
In playback mode, you can play, edit and delete photos, audio clips and video clips.
To access the playback mode, press the button. The playback icon will appear at the top left of the display. The most recently taken picture is displayed.
To return to the shooting mode, press the button again.
6.6. Video mode
You can also record video clips.
Press the button to start video recording.
Press the button again to stop video recording.
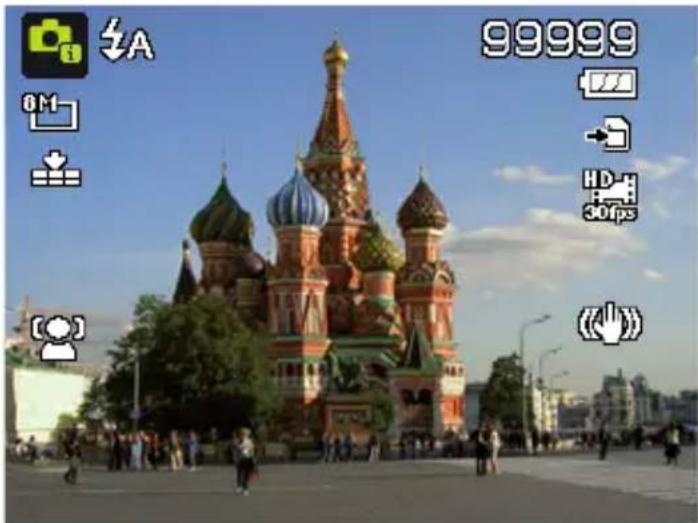
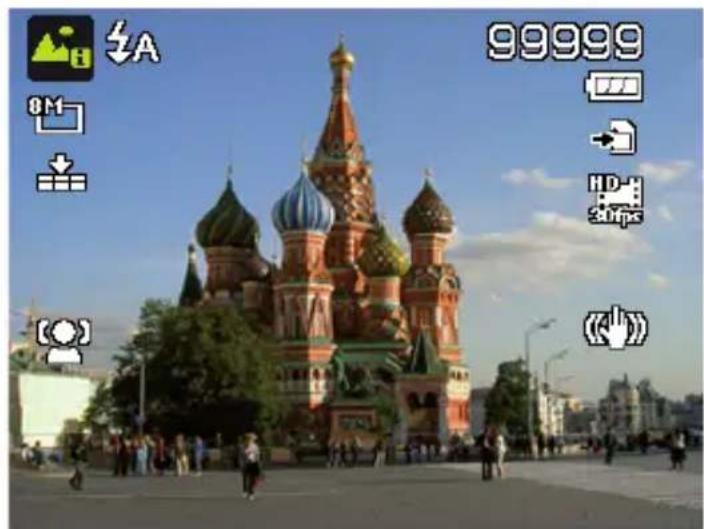
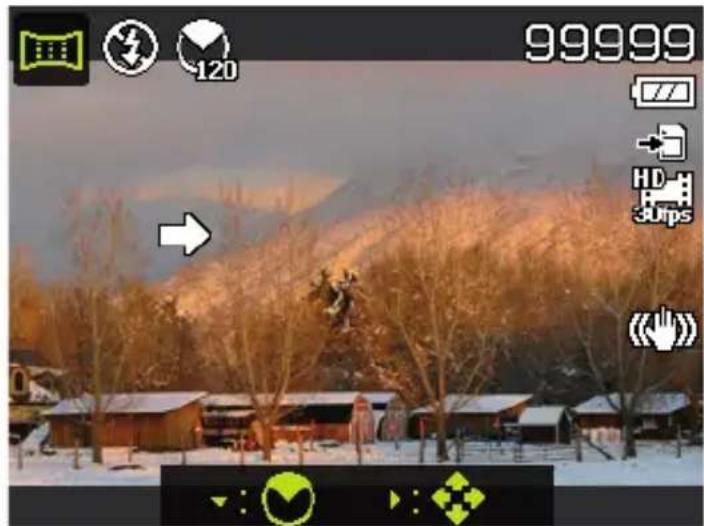
7. Display features
7.1. Displays for shooting
The following displays are possible in shooting mode:
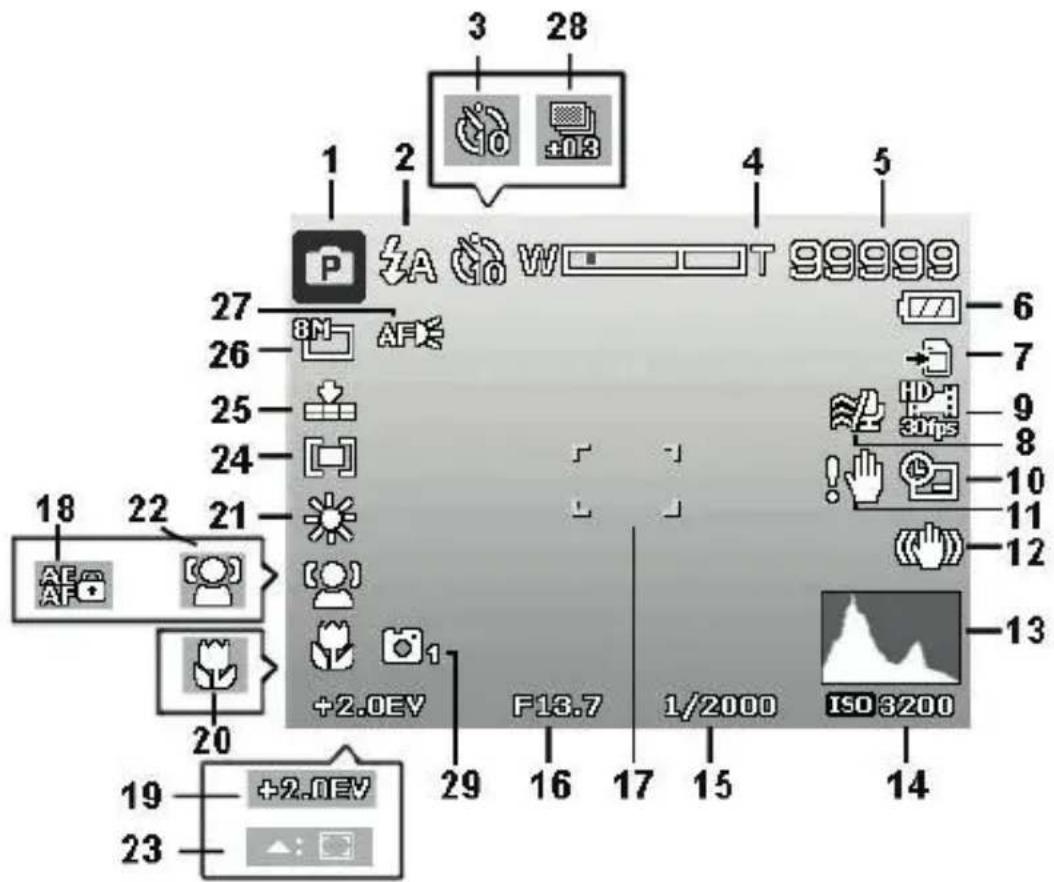
1) Displays the current shooting mode
2) Flash setting
3) Self-timer
4) Zoom setting
5) Remaining shots/recording time (at current resolution)
6) Battery charge status
7) Memory location (internal memory or card)
8) Wind noise reduction
9) Show video resolution
10) Date stamp
11) Warning: Risk of camera shake!
12) Image stabiliser switched on
13) Histogram
14) ISO setting
15) Shutter speed display
16) Aperture setting
17) Focus range
18) AE/AF lock activated
19) Exposure setting
20) Macro setting
21) White balance
22) Face recognition
23) AF tracking activated
24) Exposure measurement
25) Quality setting
26) Picture size/resolution
27) AF light activated
28) Bracketing
29) Stylish function activated
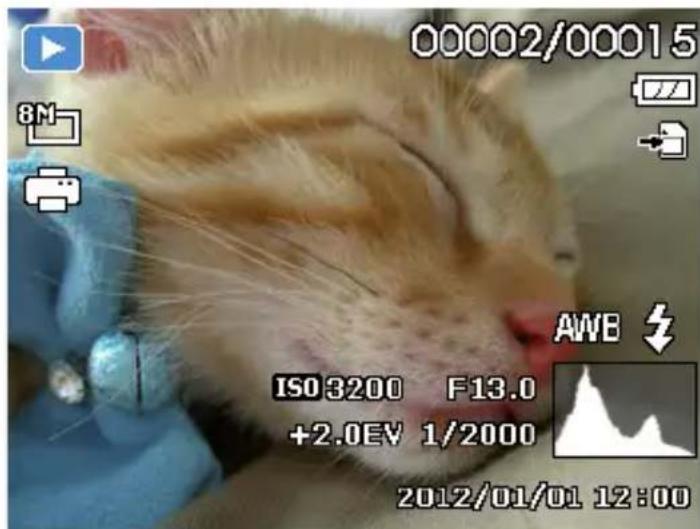
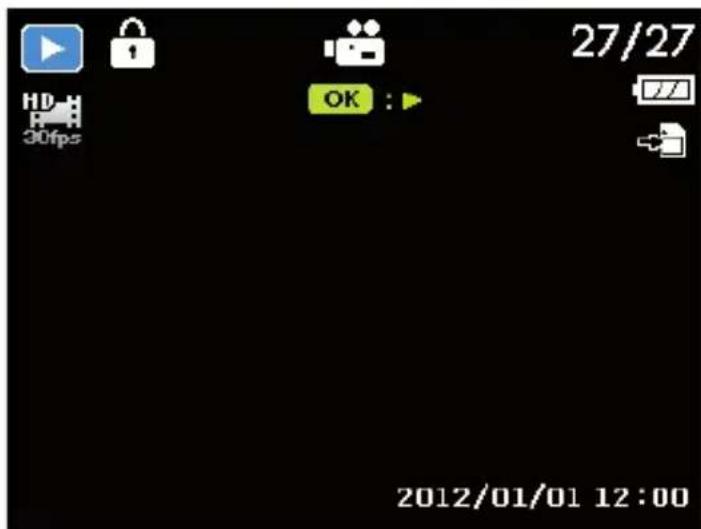
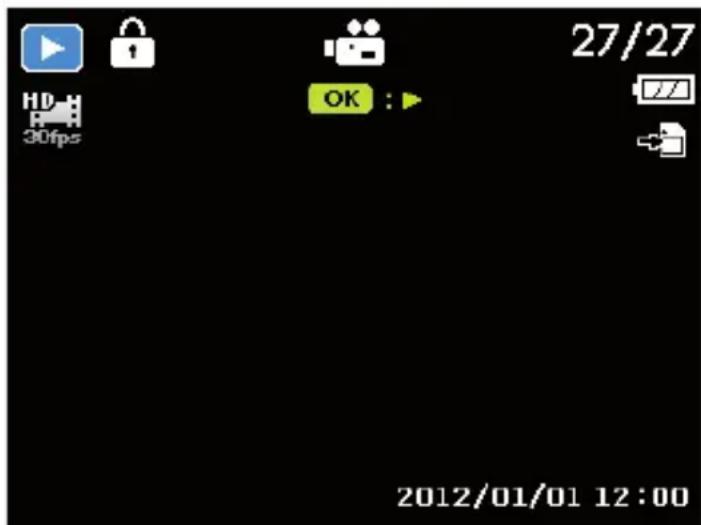
7.2. Displays for photo playback
The following displays are possible in playback mode:
1) Mode display (shooting or playback)
2) Picture is protected
3) Sound recording
4) Reference to button function
5) Current recording/total number of recordings
6) Battery charge status
7) Memory location (internal memory or card)
8) Recording information
9) DPOF enabled
10) Resolution of image currently displayed
7.3. Displays for video playback
The following displays for video clips are possible in playback mode:
1) Mode display (playback)
2) Video is protected
3) Video recording
4) Reference to button function
5) Current recording/total number of recordings
6) Battery charge status
7) Memory location (internal memory or card)
8) Recording information
9) Resolution/file size
10) Reference to button function
11) Video length
12) Playback time
13) Indicates the playback status (playback/pause)
14) Reference to button function
7.4. Switching the displays on and off
In the settings menu, you can select whether to show/hide the display indications or show detailed information under the "Display mode" option.
Use the and buttons to select the setup menu.
- Confirm your choice by pressing the OK button.
Use the and buttons to select the display mode menu.
- Confirm your choice by pressing the OK button.
- Use the and buttons to select the display mode and confirm the selection with the OK button.
7.4.1. In shooting mode

With the most important display options
Detailed information (with all display options)

NOTE!
The screen displays can vary depending on shooting mode.
7.4.2. In playback mode

With the most important display options

With all display options
No display options
The displays cannot be changed:
- While recording and playing back audio and video clips;
- During a slide show or thumbnail display;
While a photo is being cropped (in editing mode).
8. Starting to take photographs
8.1. Setting shooting mode
When the camera is switched on, shooting mode is enabled automatically. The icon for the selected shooting mode appears at the top left in the display. You can find out more about shooting modes and the icons on Page 240.
8.2. Tips for taking good shots
- The camera should not move when pressing the shutter release. Do not move the camera directly after pressing the shutter release. Wait for the shutter release signal. If necessary, use a tripod or the image stabiliser (see Page 196) to securely support the camera and prevent blurring.
- View the subject on the display before pressing the shutter release.
- The main subject should take up the largest part of the picture and dominate it. Always move up close enough to the subject.
- When taking shots of landscapes and buildings, ensure you do not include too much of the surroundings in the photo.
- When taking portrait shots, remember that the face is the decisive subject, and the body or shoes are not relevant here and should not be included in the picture.
-
Pictures are more interesting to the viewer when the subject is not exactly in the centre of the picture but rather slightly to one side.
-
Many attractive subjects do not come out as well as they could because the background is too distracting. Change the camera angle to get as neutral a background as possible.
- For landscape shots, use the rule of thirds as orientation; i.e., the picture is divided into three horizontal areas and the photographer uses this division to influence the effect of the picture. Images with a split of 1/3 sky and 2/3 ground appear calm and idyllic to the viewer; on the other hand, pictures with a split of 2/3 sky and 1/3 ground seem more dynamic and lively.
The on-screen grid lines (see Page 190) are very helpful for these kinds of landscapes as you can align important image objects on the cross points.
- Give your pictures depth by including several levels in the picture, e.g. by selecting a suitable foreground and/or background.
- Choose a picture format that matches the subject, e.g. towers and high buildings have an even more impressive effect when taken in portrait format.
- Try to tell a story with your pictures; 4 or 5 pictures are often enough to turn snapshots into a small story.
- Check the angle if the subject is lit from behind. Change your position to reduce the background lighting.
- Experiment with different perspectives to create more interesting pictures for the viewer.
- The tips about good photographs can also be applied to video recordings; but, in addition, you also need to make sure that you pan the camera slowly and keep it steady. If you pan too quickly, the video footage will be fuzzy and blurred. A tripod can be also very helpful for video recordings.
8.3. Taking photographs
Choose the required subject on the display.
Press the shutter release just a little way down at first to turn on the autofocus.
As soon as the autofocus has focused, the yellow image section symbols turn green.
The image section symbols turn red if the autofocus cannot focus.
The display features the values for the shutter speed, the aperture and the ISO value.
Press the shutter release all the way down to take the photograph. A tone indicates that the photo has been taken (if this setting has been previously set in the Settings menu under SOUNDs (see Page 229)). The photos are saved as JPEG files.

NOTE!
If there is a risk that the shot will be blurred, this icon also appears: In this case you should hold the camera steady, activate the image stabiliser or use a tripod.
Activate the macro mode by pressing the button to take close-ups.
8.3.1. Using the stabilizer
The image stabiliser compensates slight camera movements, such as shaking, and prevents the picture from becoming blurred.
From the camera menu, select "STABILIZER" and activate or deactivate the function here.

NOTE!
When using a tripod, or if there is sufficient light, you will probably not need to use the image stabiliser.
8.3.2. Using the flash
If there is insufficient light for the photo, the built-in flash can provide the additional light required.
Press the flash button repeatedly to select the following flash settings:
| Symbol Description | |
| ↓A | AUTO: The flash is activated automatically when the shooting conditions require additional lighting. |
| ↓○ | Flash is triggered before the actual flash; used to prevent “red-eye” effect. The camera detects the brightness and only flashes if necessary. |
| ↓ | Flash always on |
| ↓SL | “Slow Sync”: The flash is synchronised with slow shutter speed. |
| Symbol | Description |
| # | Flash always off |
The flash only works in single shot and self-timer mode. It cannot be used for photo sequences and video recordings.
Using the flash increases battery usage. If the battery is almost flat, the flash requires a longer time for charging.

CAUTION!
Do not use the flash when taking close-ups of people and animals. Maintain a distance of at least one metre from your subject.
8.3.3. Zooming in and out
The camera has an optical and a digital zoom. The optical zoom level is adjusted via the lens settings; use the Settings menu to enable the digital zoom.
Press the zoom control towards W or T Q. A bar appears that represents the zoom setting w
W The image is zoomed out ("Weitwinkel"); you can capture a larger section
The image is zoomed in ("Telephoto"); you can capture a smaller section.
| Symbol Description | |
| W | If the marking is on the left side of the bar, the optical zoom is in use. |
| W | If you press T again, the digital zoom is switched on automatically. You can continue to zoom by a factor of 8. Digital zoom must be enabled in the Settings menu for this! |

NOTE!
The digital zoom is not available for video recordings. With the digital zoom, the image section is enlarged by interpolation; the image quality may suffer somewhat as a result.
8.3.4. Setting the focus mode
This function allows you to specify the focus type if you wish to take a photo or record a video clip.
Press the macro button repeatedly until the icon for the desired focus mode is displayed.
- Confirm your selection by pressing the OK button.
Your camera has four different focus modes, as follows:
AF - Autofocus
In this setting, the camera automatically focuses on subjects.
Macro
This mode is ideal for close-ups. In this mode you can capture details thanks to the fixed focus and you can get the subject in focus at much closer distances. Rough focusing range: approximately 1 cm to 50 cm.
Super Macro
This mode is ideal for close-ups. In this mode, you can use the fixed focus to capture details and take sharp photos at much closer distances. Rough focusing range: approximately 1 cm to 30 cm. When Super Macro is set, you cannot adjust the focus.
- Infinity
In the Infinity setting, the camera focuses on subjects that are very far away.
MF - Manual Focus
You can use the manual focus to adjust the focus between Macro and Infinity by pressing the up/down button. Press the OK button to fix the focus and exit the settings window.
8.3.5. Using the AE/AF lock button
Use the AE/AF LOCK button on the camera to lock the focus and exposure.
To lock AE/AF, press the AE/AF lock button or press the shutter release button halfway during video recording and then on the AE/AF LOCK button in photo mode. The AE/AF remains locked even after the shutter is released.
You can unlock AE/AF in one of the following ways:
- Press the AE/AF LOCK button
- Press the zoom control
- Press on the MENU/Playback/Video/On/Off button to perform a different function
8.3.6. Using the self-timer
The self-timer allows you to take pictures after a preset delay. In continuous shooting mode, on the other hand, you can take a sequence of shots. This function is only available for taking photos. The setting for the self-timer will automatically deactivate when you turn off the camera.
Activating the self-timer:
Press on the SELF-TIMER/DOWN ARROW button on your camera to call up the self-timer function.
To select the self-timer options, press or . Press the OK button to save and apply the settings.
The camera has three self-timer modes:
| OFF OFF | The self-timer is deactivated. |
| 10 SEC. | The picture is taken 10 seconds after pressing the shutter release |
| 2 SEC. | The picture is taken 2 seconds after pressing the shutter release |
| DOUBLE | 2 pictures are taken. The first and second shots are taken 10 seconds and 12 seconds respectively after the shutter release has been pressed |
8.4. Using the Wi-Fi function
You can use the Wi-Fi function to transfer photos and videos on this camera directly to other devices such as smartphones or tablet PCs and even onto social networks when it is connected. You can also use these devices as remote controls. Apart from video recordings, photo images or the downloading of files from the camera can be directly controlled via your smartphone or tablet PC.
You can only access the Wi-Fi menu by pressing on the Wi-Fi button in the preview or individual view mode.
8.4.1. Connecting the camera with a smartphone
Before using Wi-Fi mode, please download the Wi-Fi app "LifeCam" from Google Play (Android) or the Apple Store (IOS) and install it on your smartphone.

If you have a QR code reader installed on your smartphone, use it to scan the code here and download the app.

- Switch on the camera and press the Wi-Fi button. Then tap on remote control
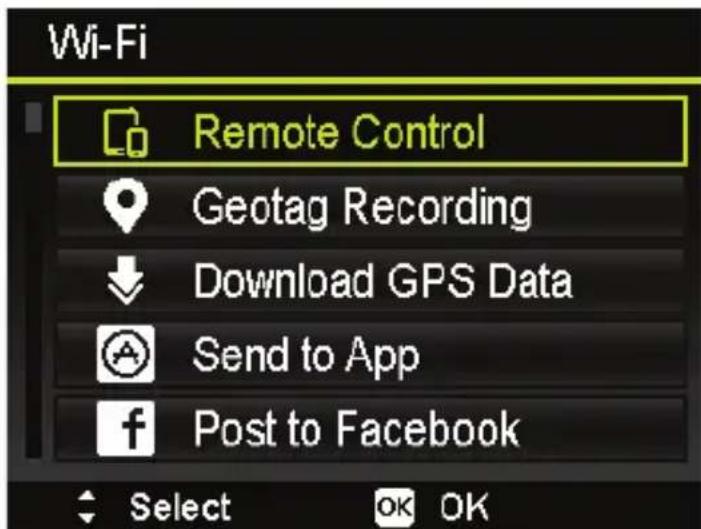
| Element Description | |
| REMOTE CONTROL | With the exception of video recordings, you can use your smartphone to control the taking of pictures or the downloading of files from the camera. For more details please see “Remote control” on page 204. |
| GEOTAG RECORDING | Synchronizes the time of the smart-phone with that on the camera. For more details please see “Geotagged captures” on page 205. |
| DOWNLOAD GPS DATA | Download the GPS data with your smartphone to add geotags to photos that are stored in the camera. For more details please see “Download-ing GPS data” on page 206. |
| SEND TO APP | Download photos or films onto a smartphone. For more details please see “Send to app” on page 207. |
Element Description
POSTING TO SOCIAL NETWORKING SITES
Upload photos onto social networks via the network server. The social networks Facebook and Picasa are supported. For more details please see "Posting to social networking sites" on page 208.
- Switch the Wi-Fi network on. Then connect to the hotspot with the name of the camera (the default is "Wi-Fi Camera") from the list of detected networks.
The first time you do this, enter the default password "12345678" for the hotspot. - Once your smartphone connects with the network of the camera, start the "LifeCam" app to control the camera remotely with your smartphone or to download and display photos and videos from the camera.
8.4.2. Establishing a Wi-Fi connection between camera and smartphone
If you want to use the functions "REMOTE CONTROL" or "GEOTAG RECORDING" on the smartphone, you need to establish a Wi-Fi connection between the camera and the smartphone. Start by switching on the Wi-Fi on the camera and make sure that the smartphone is within Wi-Fi range. Then select the camera name from the list of networks on your smartphone. If this is the first time you have made a connection with this camera, you will be asked for a password.
Remotecontrol
Follow the steps below to run the remote control function:
Select "REMOTE CONTROL" from the Wi-Fi menu on the camera.
The camera will call up the Wi-Fi standby mode:

-
Select the camera name from the list of networks on your smartphone.
The camera will call up the remote control standby mode: -
Start the "LifeCam" application on your smartphone and then click on "Remote Shutter" or "Camera Link":
Select a function from App

To control the camera remotely for taking pictures.

To download files from camera.
WiH Exit
If you tap on "Remote Shutter", the camera will switch to preview mode. If you tap on "Camera Link", the camera display will remain black.
- You smartphone will then select the mode "Remote Shutter" or "Camera Link".
Geotaggedcaptures
Geotag Recording
- Start "Remote Control" from Camera.
- Select the Camera from Network List on Smartphone.
- Start geotag recording from Smartphone.
Win Exit
Select“REMOTE CONTROL"from the Wi-Fi menu on the camera.
Select "Geotagging" from the app menu on your smartphone.
Switch on your GPS on your smartphone.
-
Start the "LifeCam" application on your smartphone and click on the "Geotagging" option.
-
Click the red button in the "Geotagging" window. The camera will synchronise with the smartphone; the smartphone will then begin with the recording of GPS data for each picture you take. The camera will return to the remote control window. Press the same button again to stop the inclusion of GPS data.
Press the Wi-Fi button to disconnect the camera from the smartphone. During this time, you can take pictures and videos with the camera as normal. The "LifeCam" application on your smartphone will inform you about the disconnection. Click OK to confirm but do not stop the GPS data recording of the "LifeCam" application.
Use the "GPS-Daten herunterl." function after taking the photo to import location information from the smartphone and save it in the photo.

NOTE!
Use this together with the "DOWNLOAD
GPS-DATAs function to show the location information in the properties of the photo.
Downloading GPS data
Follow the steps below to run the "DOWNLOAD GPS-DATA" function:
Select "DOWNLOAD GPS-DATA"from the Wi-Fi menu on the camera.
- Select the camera name from the list of networks on your smartphone.
Tap on "Upload to Camera" on your smartphone.
The camera will display the download window.
An upload progress bar will appear on the smartphone.
A dialogue window will be shown on the smartphone to confirm whether the GPS data are to be retained.
The Wi-Fi connection will be disconnected automatically when the upload is finished. The camera then returns to preview mode or playback mode.
You can view the location information for the location of the photos by displaying the properties on your PC.

NOTE!
The GPS data are called up once a minute and imported into the photos with the same capture time. Deviating data are not imported into any photo.
Send to app
Follow the steps below to run the Send to app function:
Select "SEND TO APP" from the Wi-Fi menu on the camera.
The camera calls up the 4 × 3 thumbnail view.
- Tap on the button to select the required images on the camera and then press the OK button.
- Select the camera name from the list of networks on your smartphone.
The camera will call up the standby mode.
Tap Start to receive images on your smartphone.
The camera will call up the Send window to send the images.
The received images are displayed on your smartphone.
The Wi-Fi connection will be disconnected automatically when the upload is finished. The camera then returns to preview mode or playback mode.
The smartphone displays a message concerning the conclusion of the process.

NOTE!
Due to compatibility problems, videos cannot be sent to iOS devices (e.g. iPhone or iPad).
Posting to social networking sites
When using the Wi-Fi function it is not necessary to connect your camera via cable to share photos with social networking sites. The following social networking sites are supported by this product. Please follow the steps below to share your photos.
Element Description
POST TO FACEBOOK
Select“POST TO FACEBOOK" from the Wi-Fi menu on the camera
- Select the file and press the OK button. Only one file can be uploaded at a time.
Add a description to the photo. This step is optional for Facebook.
All available Wi-Fi networks are presented in a list. Select your network and enter your password if required.
Sign in to Facebook to start the transfer.

NOTE!
If you cannot log in to Facebook from your camera, check your Facebook security settings. If necessary deactivate the notifications for the points login notifications and validating logins.
| Element Description | |
| POST TO PICA-SA | Select “POST TO PICA” from the Wi-Fi menu on the camera. The camera calls up the 4 x 3 thumb nail view. Press the up/down button to select or deselect images. A maximum of 200 files can be selected at the same time. All available Wi-Fi networks are presented in a list. Select your network and enter your password if required. Then upload the pictures. |

NOTE!
Due to increased traffic on the social platform servers or slow speed of your network, there may be connection errors or problems with the uploading of photos. We recommend that you check the network environment and wait a moment before you try again.
- All of the camera's functions will be disabled while Wi-Fi is connected except the ON/OFF button, the WI-FI button and the MENU button (only when posting in social networks).
- Wi-Fi functions even if no memory card is inserted in the camera.
-
The Wi-Fi function is stopped automatically in the following situations:
-
Press the WI-Fl button again to end Wi-Fi mode.
-
Press the MENU button to stop the Wi-Fi mode and show the photo preview or single photo view.
-
Outside the Wi-Fi range.
- Connection to a PC, television or printer.
- Inserting or removing memory card.
- Remaining battery charge less than 10% ( ± 5% ).
8.5. Recording video clips
In addition to the photo functions, the camera can also record video clips so that you can also save moving pictures as well as stills.

Press the record button to start recording. The display will show the recording time.
Press the zoom control towards W or T to zoom out or in and to change the picture selection.
To stop the recording, press the record button again.

NOTE!
The digital zoom and the flash are not available when recording video clips.
The microphone is active during video recording and the sound is also recorded.
The video clips are saved with the sound as AVI files.
8.5.1. PIV function (picture in video)
You have the option to take a photo while filming a video:
While recording the video, press the shutter release down all the way. An icon appears on the display during filming.
If you press the shutter release down the whole way, the current display is saved as a photo without stopping the video recording.
After taking a picture, an icon and the number of pictures appears on the display. If the number of shots has reached the maximum, the icon on the display will turn red and no more pictures can be taken.

NOTE!
Please note that the video recording continues even when the camera icon turns red. The PIV function can be used only for the following video resolutions; 720p30 and VGAp30.

NOTE!
If the video resolution is 720p (30fps), the photos will be saved with a resolution of 1280 × 720 .
If the video resolution is VGA (30fps), the photos will be saved with a resolution of 640 × 480 .
9. Viewing/listening to recordings
9.1. Playing back single recordings
You can play back your most recent recordings in sequence in display mode.
Press the playback button to switch to the playback mode.
The most recent recording appears on the display and the following display modes are possible, depending on the type:
Photo
Video
Press the or buttons to view the previous or next recording.
9.2. Playing back shots as thumbnails
In playback mode, press the zoom wheel anticlockwise to display up to nine small preview images.

You can select the desired file using the arrow keys or , or .
Press the OK button to display the full screen image.
- Press the zoom wheel clockwise to return to full screen view. Some thumbnails contain icons which specify the file type.
| Icon File | type Meaning | |
| ? | Defective file Indicates a defective file. | |
9.2.1. Zooming in on photographs
You can zoom in on individual sections of photographs.

By repeatedly pressing the zoom wheel clockwise (to the right) in full screen view, you can enlarge the image section up to 12 times. By repeatedly pressing the zoom wheel toward T you can reduce the view.
The four arrows at the edge indicate that the picture detail is enlarged.
You can use the arrow keys or to change the image section within the image.
Press the MENU button to return to the full size image. A query will be shown asking if you want to save the image crop. After answering, the camera returns to full screen mode.
9.3. Playing back video recordings and voice memos
Select the required recording.
Press the OK button to start playback.
During video clip playback, press the or buttons to fast forward or rewind.
Press the zoom button anti-clockwise (to the left) to lower the volume.
Press the zoom button clockwise (to the right) to increase the volume.
If you wish to pause playback, press the key.
Press the button again to continue the playback.
To cue the video backward or forward one frame at a time, press to stop playback and press or .
If you would like to end playback, press the button.
9.4. Deleting photos

NOTE!
If a memory card is inserted, you can only delete the files on the memory card.
If the memory card is write-protected, then you will not be able to delete the files on the memory card. (The message "card protected" appears.)
You cannot restore a file that has been deleted. You should therefore exercise caution when deleting files.
9.4.1. Individual files
Use the or buttons to select a photo.
Press the button to show the menu options for the delete function on the display.
Select "SINGLE" and then press OK to delete the recording.
- Choose "CANCEL" and confirm with the OK button to return to playback mode.
9.4.2. Multiple files
Press the button to show the menu options for the delete function on the display.
- Select "MULTI" and then press OK to display the thumbnail view of the captures to be deleted.
- Use the or buttons to select an image and then add a delete mark with the buttons or use the button to remove an existing delete mark.
If you want to leave the thumbnail view without deleting any files, simply press the MENU button. All of the delete marks that have been set will be lost.
- Confirm your selection with the OK button and select "YES" and confirm with the OK button to delete all the selected files.
- Choose "CANCEL" and confirm with the OK button to return to playback mode.
9.4.3. All files
In playback mode, use the or button to select a photo.
Press the button to show the menu options for the delete function on the display.
Select "ALL" and press the OK button.
- Choose "YES" and confirm with the OK button to delete all files.
- Choose "CANCEL" and confirm with the OK button to return to playback mode.

NOTE!
Protected files cannot be deleted. In this case, the message "FILE LOCKED" appears on the display. If a memory card is inserted, you can only delete the files on the memory card.
If the memory card is locked, you will not be able to delete the files on the memory card.
You cannot restore a file that has been deleted. You should therefore exercise caution when deleting files.
10. The menus
10.1. Navigating in the menus
Press the MENU button to open the menus.
Use the arrow keys or to select the setting you would like to change.
Press the OK button or the button. The appropriate sub-. menu opens.
- Use the arrow keys or to choose the desired option and confirm with the OK button.
The MENU button returns you to the previous level at any time.
10.2. The photo menu
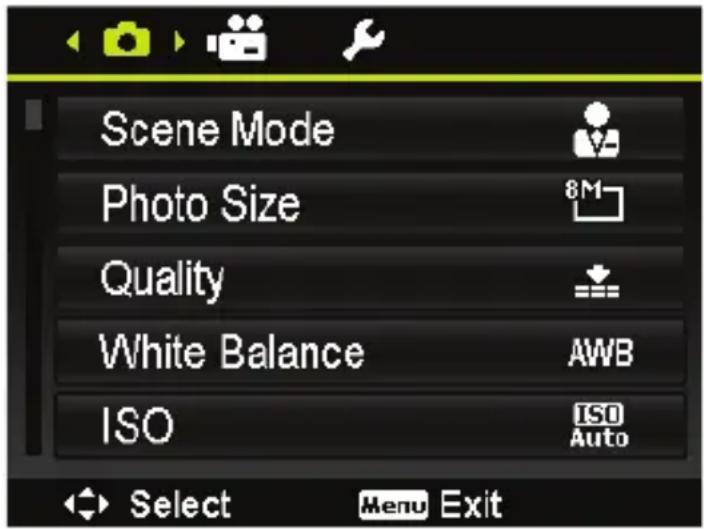
| Setting Symbol Meaning | ||
| SCENE MODE | For certain shooting situations or subjects, you can select preset shooting modes in which a pre-programmed auto setting is used (see “11. The Shooting mode menu item” on page 240). | |
| PHOTO SIZE | The resolution basically determines the image quality. The higher the resolution, the more memory a recording requires. The highest resolutions are generally recommended for large prints (larger than A4) or later crops. | |
| 16 M | 4608 x 3456 | |
| 8 M | 3264 x 2448 | |
| 5 M | 2592 x 1944 | |
| 3 M | 2048 x 1536 | |
| VGA | 640 x 480 | |
| 3:2 | 4608 x 3072 | |
| 16:9 (10 M) | 4608 x 2592 | |
| 16:9 (2 M) | 1920 x 1080 | |
| 1:1 | 2992 x 2992 | |
| QUALITY | Super Fine: 5x compression ratio | |
| Fine: 8x compression ratio | ||
| Normal: 12x compression ratio | ||
| WHITE BALANCE | AWB | White balance is adjusted automatically. You can access the function by pressing the button on the 4-way navigation key (see “WB shift” on page 227). |
| Suitable for shots in bright day-light. | ||
| Suitable for shots in overcast conditions, at dusk or in the shade. | ||
| Suitable for shots in electric (tungsten) light. | ||
| Suitable for shots in fluorescent, red-tinged light. | ||
| Suitable for shots in fluorescent, blue-tinged light. | ||
| WHITE BALANCE | For more precise adjustment or if the light source cannot be categorised. i i i i i i i i i i i i i i i i i i i i i i i i i i i i i i i i i i i i i i i i i i i i i i i i i i e e e e e e e e e e e e e e e e e e e e e e e e e e e e e e e e e e e e e e e e e e e e e e e e e e i e e e e e e e e e e e e e e e e e e e e e e e e e e e e e e e e e e e e e e e e e e e e e e e e i i i i i i i i i i i i i i i i i i i i i i i i i i i i i i i i i i i i i i i i i i i i i i i i i o o o o o o o o o o o o o o o o o o o o o o o o o o o o o o o o o o o o o o o o o o o o o o o o o o e e e e e e e e e e e e e e e e e e e e e e e e e e e e e e e e e e e e e e e e e e e e e e e e e o o o o o o o o o o o o o o o o o o o o o o o o o o o o o o o o o o o o o o o o o o o o o o o o o i i i i i i i i i i i i i i i i i i i i i i i i i i i i i i i i i i i i i i i i i i i i i i i i i f f f f f f f f f f f f f f f f f f f f f f f f f f f f f f f f f f f f f f f f f f f f f f f f f f f f f f f f f f f f f f f f f f f f f f f f f f f f f f f f f f f f f f f f f f f f f f f f f f f f e e e e e e e e e e e e e e e e e e e e e e e e e e e e e e e e e e e e e e e e e e e e e e e e e e f f f f f f f f f f f f f f f f f f f f f f f f f f f f f f f f f f f f f f f f f f f f f f f f f e e e e e e e e e e e e e e e e e e e e e e e e e e e e e e e e e e e e e e e e e e e e e e e e e e e | |
Setting Symbol Meaning
| ISO (LIGHT SENSITIVI- TY) | This setting changes the sensor's sensitivity to light. A higher value increases light sensitivity but generates more noise which can have a negative impact on the image quality. It is therefore important to select the lowest possible ISO value for the conditions. | |
| ISO AUTO | Automatic ISO value. | |
| ISO 100 | Sets the sensitivity to ISO 100. | |
| ISO 200 | Sets the sensitivity to ISO 200. | |
| ISO 400 | Sets the sensitivity to ISO 400. | |
| ISO 800 | Sets the sensitivity to ISO 800. | |
| ISO 1600 | Sets the sensitivity to ISO 1600. | |
| ISO 3200 | Sets the sensitivity to ISO 3200. | |
| ISO 6400 | Sets the sensitivity to ISO 6400. | |
| i NOTE! To set an ISO value of ISO 3200 or ISO 6400, the resolution must have been set to 3M! | ||
| MAXIMUM ISO AUTO | With this feature, the camera can set the ISO value automatically between ISO 100 and the maximum sensitivity for the set value according to the exposure conditions. The available options are 200 (standard), 400, 800. | |
| Setting Symbol Meaning | ||
| METERING | This function allows you to determine the range for measuring light for the photos or video recordings. | |
| [ ] | Selects an exposure based on the measurement results at several points in the shooting range. | |
| [ ] | The light in the entire shooting range is measured but the measurement is weighted towards the values near the centre. | |
| [ ] | An exposure is selected on the basis of one single measurement in the centre of the picture. | |
| EXPOSURE BRACKET-ING | Use this feature to take photos with different exposure compensation levels. When using bracketing, a series of 3 photos are taken in the following order: standard exposure, under-exposed and over-exposed. | |
| Off | ||
| ±0.3 Aperture level | ||
| ±0.7 Aperture level | ||
| ±1.0 Aperture level | ||
| AF AREA | Here you can select the autofocus (AF) range. | |
| [ ] | The camera automatically rec-ognizes faces. | |
| [ ] [ ] | The camera focuses on a wide area. | |
| [ ] [ ] | The camera focuses on the im-age centre. | |
| [ ] | The camera focuses on the moving subject and the focus is automatically maintained. | |
| AF LAMP | Here you can set the AF lamp to automat-ic operation (AUTO) or turn off the AF lamp (OFF). | |
| AE-L/AF-L | This function allows you to lock the exposure or focus or both by clicking on the AE/AF lock button. You can set the AE/AF lock button to one of the following functions: | |
| AE-L | Lock/unlock exposure. | |
| AF-L | Lock/unlock focus. | |
| AE-L & AF-L | Lock/unlock exposure and focus. | |
| DIGITAL ZOOM | Here you can set the digital zoom or disable the function (AUS). | |
| DATE STAMP | Here you can choose the date and time stamp for the pictures. | |
| DATE | ||
| DATE/ TIME | ||
| OFF | ||
| AUTO RE- VIEW | After the shot, the photo is displayed for a few seconds. You may switch this function on or off. | |
| BLINK DE- TECTION | Here you can set the blink detection or disable the function (OFF). If the camera detects a blink after a photo has been taken, the SAFE or CANCEL option is shown on the display. This function can only be activated if face recognition is activated. | |
| GRID LINE | The grid line function provides a grid in the preview when taking pictures. The available settings are: On, Off. | |
| STABILIZ- ER | Here you can switch the automatic image stabiliser on or off. | |
WBshift
You can use the WB shift function to manually adjust the white balance. To do this, use the 4-way navigation key to move the cross hair on the display into the desired colour segment.
10.3. The video recording menu
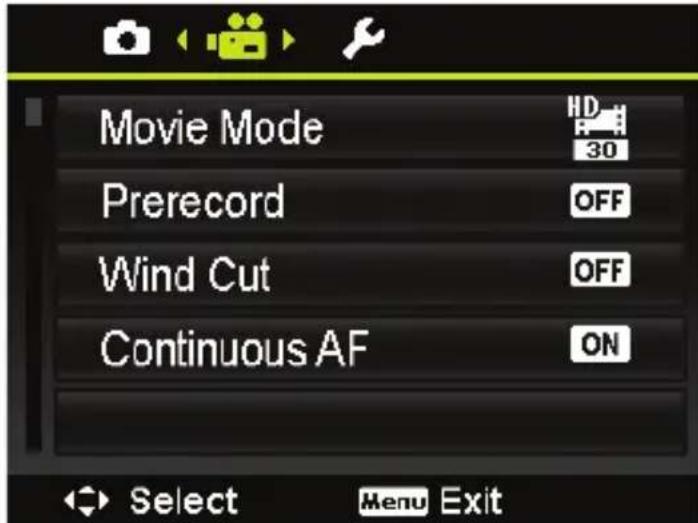
| Setting Symbol Meaning | ||
| MOVIE MODE | The resolution basically determines the image quality. The higher the resolution, the more memory a recording requires. | |
| 720P30 | Video resolution 1280x720 30 frames per second (when using a Class 6 SDHC memory card) | |
| VGAP30 | Video resolution 640x480 30 frames per second | |
| PRERE-CORD | You can record the first three seconds of an action that you otherwise might have missed. When pre-recording is activated, the camera automatically starts recording video before the shutter button is fully pressed. | |
| WIND CUT | This function is used to reduce wind noises during video recording. | |
| Setting Symbol Meaning | |
| CONTINU- OUS AF | You can use this function to record videos us- ing the autofocus method. The available set- tings are ON and OFF. |
10.4. The settings menu
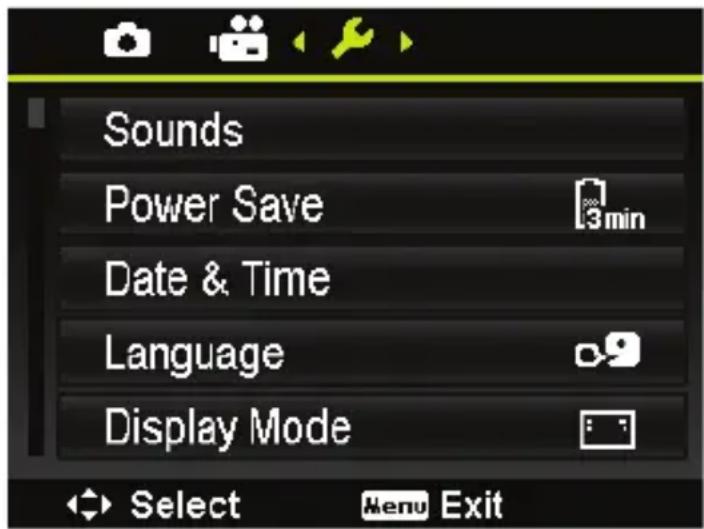
| Setting Symbol Meaning | ||
| SOUNDS | STARTUP | Here you can choose a start tone from 3 available tones or deactivate the start tone. |
| SHUTTER | Here you can turn the sound for the shutter on or off. | |
| BEEP VOL-UME | Set the volume | |
| Setting Symbol Meaning | ||
| POWER SAVE | To save the battery charge, the camera switches off automatically after the selected period. You can select between 1 MIN., 3 MIN., 5 MIN. and OFF. The power-saving function is not enabled: • while recording audio and video clips; • while viewing images, video or audio clips; • when the camera is connected to another device via USB • when AE/AF has been locked • while films are being added • during the interval in time-lapse photogra- phy • in Wi-Fi operation | |
| DATE / TIME | Here you can select the date and the time and the format for displaying the date. (see Page 182) | |
| LAN- GUAGE | Here you can select the language for the menu. (see Page 182) | |
| DISPLAY MODE | Here you can set the icon display on the LC dis- play in recording mode as well as in playback mode. Select: ON, DETAILED INFO or OFF. | |
| Setting Symbol Meaning | ||
| TV OUT | Using the TV settings function you can custom-ise the video output signal to match different re- gional settings. If the TV settings are not set cor-rectly, the image may not be displayed correctly on your television. | |
| The video output signal can be changed accord- ing to the locally applicable standards: NTSC or PAL | ||
| LCD BRIGHT-NESS | Here you can set the display brightness. | |
| AUTO | Automatic adjustment of LCD brightness | |
| BRIGHT | Display is brightened | |
| NORMAL | Standard brightness | |
| FORMAT | Formats the memory card or the internal memo- ry. This deletes all the shots. i NOTE! If you format the memory, all the data saved in it is deleted. Make sure that there is no important data left in the memory or on the SD card. | |
| Setting Symbol Meaning | |
| RESET ALL | Here you can reset all the individual settings to the factory settings. In this case, answer the query with “YES”. The following settings are not reset: • Date and time • Language • TV system |
| WI-FI SET-TINGS | The Wi-Fi settings contain the camera name and password. You can use the 4-way control to move the cursor and press the OK button to enter the selected letters or numbers. The default camera name is “WI-FI CAMERA”. You can change it using 1~32 alphanumeric characters (it is case-sensitive). The default password is “12345678” You can change it using 8~16 alphanumeric characters (it is case-sensitive). |
10.5. The playback menu
If you would like to open the playback menu, first switch to playback mode by pressing the button.
| Setting Symbol Meaning | ||
| SLIDE SHOW | You can run the shots (photos only) as a slide show (see Page 255) | |
| PROTECT FUNC- TION | This function can be used to protect shots from accidental deletion. The following options are available: | |
| SINGLE | Protect one shot | |
| MULTI | Protect multiple shots select-ed in the thumbnail view. | |
| LOCK ALL | Protect all shots | |
| UNLOCK ALL | Remove protection for all the shots. | |
| VOICE MEMO | You can save a voice memo for each photo taken (see Page 257). ► Select a photo to which you want to append a voice memo. ► Select START and then press the OK but-ton to start the recording. ► Press the OK button again to stop the re-cording. The maximum length of voice message is 30 sec-ons. The time remaining is shown on the display. If there is already a voice message for the select-ed photo, it is overwritten. | |
| Setting Symbol Meaning | ||
| FILTER EFFECTS | SOFT | The image is given a soft foci effect. ► Select between WIDE, NORMAL or NAR-ROW |
| COLOUR EM-PHASIS | Use the arrow keys ← or ➔ to select the colour you want to intensify. The rest of the scene will be set to black and white. | |
| VIVID | The image is given more contrast and saturation to highlight more vivid colours. ► Press the OK button and then select SAVE to activate the function. | |
| MINIATURE EFFECT | Parts of the photos are blurred to make the scene look like a miniature model. We recommend taking the photo from a high angle for best results. ► Press the OK button and then select SAVE to activate the function. | |
| Setting Symbol Meaning | ||
| FILTER EFFECTS | ASTRAL | Star-like light reflections are added to the image. Press the OK button and then select SAVE to ac-tivate the function. |
| IMPRESSIVE ART | The image is given a dramatic-ic contrast effect. Press the OK button and then select SAVE to ac-tivate the function. | |
| PAINTING | The image is given a water colour effect. Press the OK button and then select SAVE to ac-tivate the function. | |
| NEGATIVE | The colours are inverted. Press the OK button and then select SAVE to ac-tivate the function. | |
| B&W | The image is black and white. Press the OK button and then select SAVE to ac-tivate the function. | |
| Setting Symbol Meaning | ||
| FILTER EFFECTS | MOSAIC | The image is produced as a mosaic. Press the OK button and then select SAVE to activate the function. |
| SEPIA | The image is produced in se-pia tones. Press the OK button and then select SAVE to ac-tivate the function. | |
| TRIM-MING | You can use the crop function to crop the photo to a different size. Select a photo you want to crop. Call up the Crop menu. Change the crop frame by turning the zoom wheel. You can shift the edges of the crop box with the arrow keys ←, >,▲ and ←. Press the OK button and then select YES to save the changes. NOTE! The crop function is not available for VGA photos. All of the images are in the aspect ra-tio 4:3 regardless of the original pic-ture aspect ratio. | |
| Setting Symbol Meaning | |
| RESIZE | Select between the image sizes 640, 320 or 160. Press OK and then use ▲ or YES to select and press the OK button again to execute the desired function. NOTE! This function is only available for photos with an aspect ratio of 4:3. The size of photos that have already been changed cannot be changed again. |
| STARTUP IMAGE | You can select a start screen that appears on the screen after the camera has been switched on. You can choose between the following: SYSTEM: The default system screen is displayed. MY PHOTO: Your selected photo is displayed. OFF: No photo is displayed. Use ▲ or ▼ to select the entry My Photo. Use ▲ or ▲ to select the photo and press OK to confirm. |
| Setting Symbol Meaning | ||
| DPOF | You can use the DPOF (Digital Print Order Format) to save print information on the memory card. You can specify which images are to be printed and in what quantities in the camera's DPOF menu. This information will be saved in the internal memory or on the memory card. When you start printing, the printer reads the embedded information on the memory card and prints the specified images. ►Use ↓ or ➔ in the SELECT IMAGES menu to select the pictures you want to print on the memory card. ►Use ▲ or ▼ to select the number of copies you want to print of the selected image. ►Press the OK button and then select READY to save the settings. To cancel the DPOF settings, select the menu option RESET and then press OK. | |
| Setting Symbol Meaning | ||
| COPY | COPY TO CARD | Copies images from the internal memory to the memory card. Select the images that you wish to copy. Press OK and then use ▲ or ▼ YES to select and press the OK button again to execute the desired function. |
| COPY TO CAMERA | Copies pictures from the memory card to the internal memory. | |
| MOVIE PASTE | Use this function to combine two videos with the same specifications (video size and resolution) into one. Use ▲ to select the film that you want to add to a different film (ON). Use the ▼ button to delete the selection. Then select the film to which you want to add the film and press the OK button and select with ▲ or ▼ YES. | |
| Setting Symbol Meaning | |
| FACE RE-TOUCH | The retouch face function can be used on faces that have been recognised with the face detection function. You have the following options to change settings in 4 stages: SMOOTHING, BRIGHTEN, ENLARGE EYES. ► Select SAVE to save the settings. |
11. The Shooting mode menu item
The camera offers 24 modes to take pictures with the most appropriate settings.
Press the MENU button to call up the selection menu.
Press the OK button to call up the Shooting mode menu.
Use the buttons to select the required shooting mode.
Press the OK button to confirm the selection.
11.1. The following shooting modes are available:
For the following special types of shot, certain settings cannot be changed (e.g. flash and macro) as they are preset for the type of shot.
| Symbol Setting Meaning | ||
| INTEL- LIGENT SCENE | The camera detects the picture conditions and automatically switches to the appropriate shooting mode. For further details, see “12.1. Using the adjusted scene mode” on page 244. | |
| PROGRAM | The camera automatically selects appropriate picture settings, for example, exposure time and aperture values. | |
| PORTRAIT | Reduces background focus and focuses on the centre. | |
| LAND-SCAPE | Suitable for wide landscape views. | |
| SUNSET | Emphasises the colour red when taking sunsets. | |
| BACK-LIGHT | Adjusts the “Metering” setting to the backlight. | |
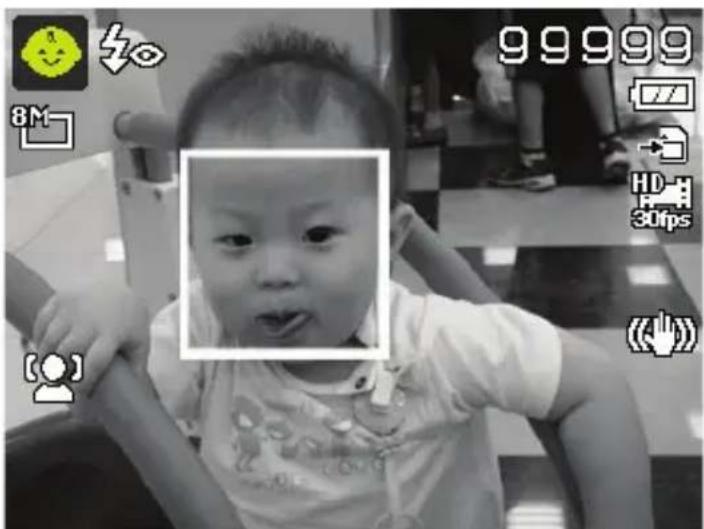
| KIDS | Suitable for capturing people in motion. | |
| NIGHT SCENE | Suitable for portrait shots with a dark background. | |
| FIREWORKS | Reduces the shutter speed for cap-turing fireworks. | |
| SNOW | Suitable for beach and snow shots. | |
| SPORTS | Suitable for shooting pictures with fast movements. | |
| PARTY | Suitable for indoor shots and parties. | |
| CANDLE-LIGHT | Creates shots in warm light. | |
| NIGHT PORTRAIT | This function is used for portrait shots in a night setting or with a dark background. | |
| FLOWING WATER | Creates a delicate effect with fast movements. | |
| FOOD | Increases the colour saturation. | |
| LOVE POR-TRAIT | This function uses face recognition to automatically produce portrait pictures without any need for assistance from third parties. If more than one face is detected, the autofocus is activated automatically. The camera begins to count down and takes the photo after two seconds have elapsed. | |
| SELF-POR-TRAIT | This function sets the zoom to wide angle. When a face is detected, the AF is activated automatically and an acoustic signal is issued. The camera starts a two-second countdown and then takes the picture. | |
| D LIGHT-ING | This function increases the dynamic scope of a picture by increasing the brightness and contrast values. | |
| TIME LAPSE | Use this function to automatically take photos at specified intervals. | |
| PANORA-MA | Use this function to create a panorama by panning or tilting the camera. | |
| ART EF-FECT | This feature applies different artistic effects to your photos. | |
| BURST | Keep the shutter release pressed down to take a series of pictures until you release the shutter button or the memory card is full. | |
| SPEEDY BURST | Takes 30 pictures in a series when the shutter release is pressed The automatically selected picture size is only 4:3 VGA. | |
12. Using the different shooting modes
12.1. Using the adjusted scene mode
This function is particularly helpful for beginners. You achieve respectable results without any profound knowledge of photography and photographic technology.
If you set the camera to this mode, it automatically detects 7 different shooting types and selects the optimal shooting type from these.
The camera automatically detects the capture modes portrait, landscape, sunset, macro, backlight, backlight portrait, night scene and night portrait.
- Select in the SCENE MODE menu item. The icon for the adjusted scene mode appears in the left top corner of the display.
Focus the camera to shoot the selected subject by pressing the shutter release halfway down.
The camera analyses the subject and chooses the most suitable shooting mode. The icon for the detected mode appears in the left top corner of the display.
Press the shutter release all the way down to take the picture.
12.2. Using the child mode
Children are especially difficult to photograph as they are almost always moving and thus present quite a challenge. Use the child mode to take pictures of children.
This mode uses a faster shutter speed and always focuses on the moving subject.
In the shooting mode, select th option.
Confirm your selection by pressing the OK button.
Focus the camera on the subject and press the shutter release.
12.3. Using the sports mode
Sporting action can often only be captured in a photo by using a fast shutter speed; the sports mode is particularly well suited for this. In this mode, the camera shoots a photo using an extremely fast shutter speed.
In the shooting mode, select the option.
Confirm your selection by pressing the OK button.
Focus the camera on the subject and press the shutter release.
12.4. Using the party mode
If you want to take photos of groups of people, then the party mode is appropriate for this.
In the shooting mode, select the option.
Confirm your selection by pressing the OK button.
Focus the camera on the subject and press the shutter release.
Have fun at your party.
12.5. Using the panorama mode
This function enables you to capture a panoramic image. To assist you, the camera provides guide graphics and an automatically controlled shutter release.
In the shooting mode, select the option. The panorama mode icon appears in the top left corner of the display.
Press the button to open the selection menu for the degrees of the panoramic photo.
Use the or keys to select the desired degree value. You can choose between 120^ , 180^ and 360^ .
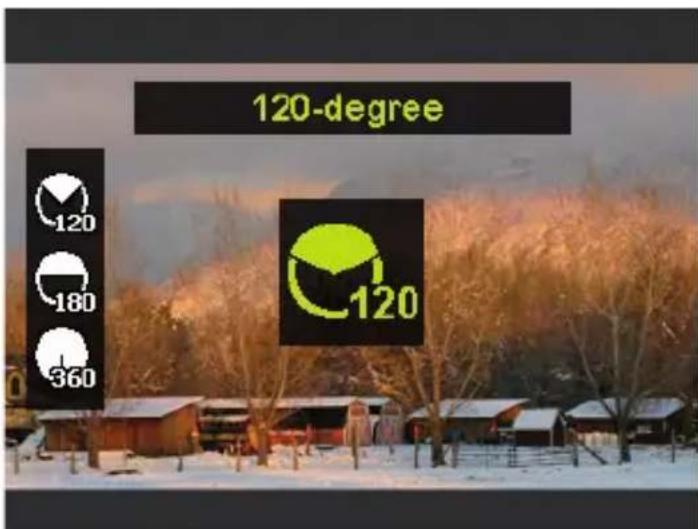
- Confirm your selection by pressing the OK button.
Press the button to open the selection menu for the shot direction of the panoramic photo.
Use the or keys to select the desired direction: FROM LEFT TO RIGHT FROM BOTTOM TO TOP FROM TOP TO BOTTOM FROM RIGHT TO LEFT
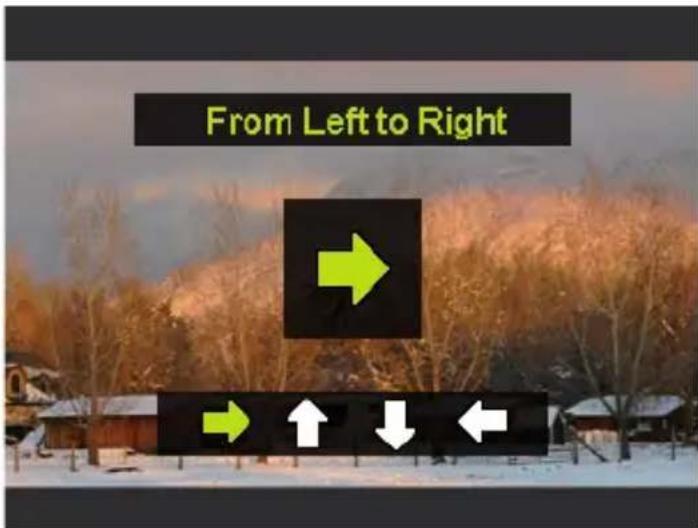
Confirm your selection by pressing the OK button.
Press the shutter release all the way down to start taking the picture.
When you start taking the picture, a white cross appears in the middle of the display. A yellow horizontal or vertical line (depending on the orientation of the camera) also appears in the centre of the display to help with the alignment of the camera.
A recording tool bar appears at the bottom edge of the screen during the capture.
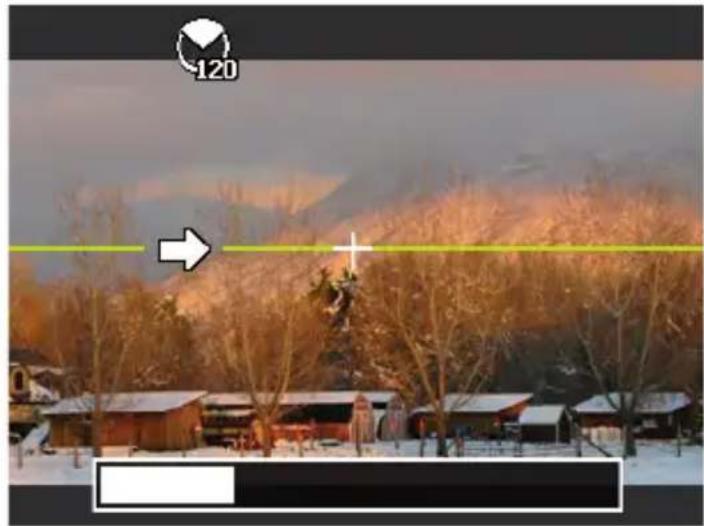
For an ideal panoramic shot, the yellow line must always run horizontally or vertically through the positioning cross.
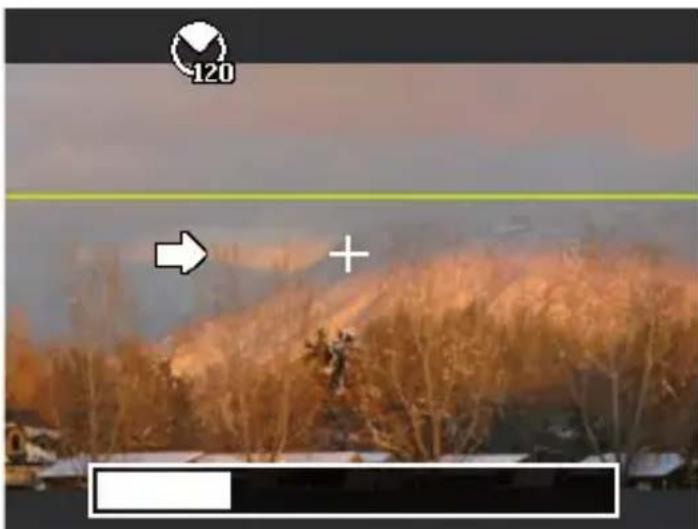
- Once the recording tool bar is completely full, the capture is complete and the image is saved.


NOTE!
The following settings are predefined for the panorama function and cannot be changed:
The flash is always off.
- The self-timer is switched off.
The autofocus is active.
- The autofocus range is set to WIDE.
12.5.1. Notes and tips for the panorama function
- The size of the final image may vary depending on the panorama angle and the result of the combination of the constituent images as well as on the degree of camera shake.
- We recommend using a tripod to stabilise the camera and also to help to move the camera slowly during the capture.
- If you select FROM TOP TO BOTTOM or FROM BOTTOM TO TOP in 360^ panorama mode, we recommend turning the camera by 90^ to ensure stability during the capture.
- Irregular brightness can lead to lighting differences between the capture and the actual subject in panorama mode.
- The longest capture time in panorama mode is approximately 45 seconds.
12.6. Using the art effect mode
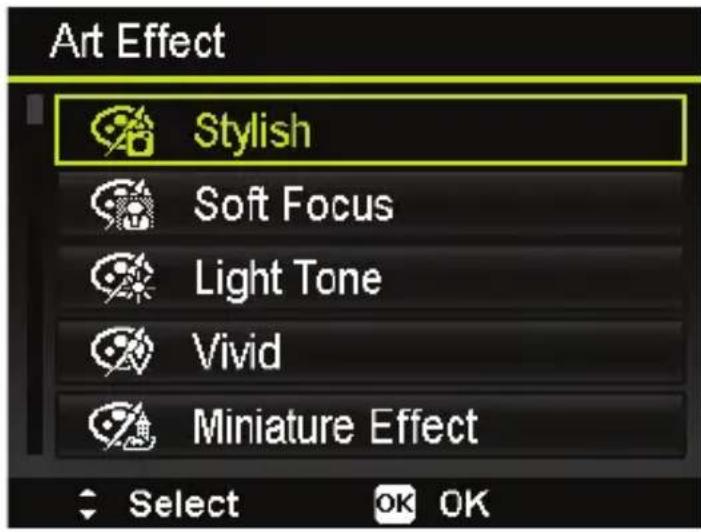
- Set the KUNSTEFFEKT shooting mode by selecting the ART option in the shooting mode.
Press the MENU button and select the KUNSTEFFEKT item in the shooting menu.
The following settings are possible:
| Symbol Setting Meaning | ||
| 暗 | STYLISH | This function is used to capture images with over-saturated colours, uneven exposure or blurring. |
| SOFT FO-CUS | Adds a blur around the photographed object to create a soft focus effect. | |
| LIGHT TONE | Reduces the contrast to create a calm and relaxed atmosphere | |
| VIVID | The camera adds more contrast and saturation to the image to highlight more vivid colours. | |
| MINIA-TURE EF-FECT | Blurs parts of the photo to make the scene look like a miniature mod- el. We recommend taking the photo from a high angle for best results. | |
| FISHEYE LENS | This function produces a hemispher- ical image | |
| ASTRAL | Star-like light reflections are added to the image. | |
| POSTER | This function gives the picture the effect of an old poster or illustration. | |
| IMPRES-SIVE ART | This function creates pictures with a dramatic contrast. | |
| B&W | Pictures are taken in black and white. | |
| SEPIA | Pictures are taken in sepia tones. | |
| COL- OUR AC-CENT(RED) | Retains the red colour while reduc- ing the rest of the image to black and white. | |
| COLOUR ACCENT (ORANGE) | Retains the orange colour while re- ducing the rest of the image to black and white. | |
| COLOUR ACCENT (YELLOW) | Retains the yellow colour while re- ducing the rest of the image to black and white. | |
| Symbol | Setting Meaning | |
| COLOUR ACCENT (GREEN) | Retains the green colour while re- ducing the rest of the image to black and white. | |
| COLOUR ACCENT (BLUE) | Retains the blue colour while reduc- ing the rest of the image to black and white. | |
| COLOUR ACCENT (MAGEN- TA) | Retains the magenta colour while re- ducing the rest of the image to black and white. | |
12.7. The P (Program) shooting mode
Under the SCENE MODE setting in the recording menu, select PROGRAMME.
The camera will now select appropriate picture settings (for example, exposure time and aperture values) automatically.
13. Playback functions
Call up the playback function by pressing the button.
Then press the MENU button to call up the playback menu.
13.1. Showing pictures in a slide show
You can play back the photos in the memory of the camera as a slide show.
In the playback menu, choose the entry SLIDE SHOW. The DIASHOW menu opens.
The following settings are available:
-
START: Choose this option to start the slide show.
-
CANCEL: Choose this option to exit the menu.
-
INTERVAL: Use this option to define the duration of the picture display (1, 3, 5 or 10 seconds).
-
REPEAT: Choose whether the picture sequence should be continuously repeated (or whether it should end after the last picture)
When all the settings are made, select START and press OK to start the slide show.
During playback, you can pause and resume the show by pressing OK.
13.2. Lock/unlock functions
13.2.1. Individual files
- Select the entry "PROTECT" in the playback menu and then the option "SINGLE".
Use the or buttons to select an image.
Select "LOCK" or "UNLOCK" and press the OK button to protect or unlock the selected file. - Choose "EXOT" and confirm with the OK button to return to playback mode.
13.2.2. Multiple files
- Select the entry "PROTECT" in the playback menu and then the option "MULTI".
- Use the or buttons to select an image and then add a protect mark with the buttons or use the button to remove an existing protect mark.
If you want to leave the thumbnail view without saving the protect marks, simply press the MENU button. All of the protect marks that have been set will be lost.
- Confirm your selection by pressing the OK button.
13.2.3. All files
In playback mode, use the or button to select an image.
- Select the entry "PROTECT" in the playback menu and then the option "LOCK ALL" or "UNLOCK ALL".
- Choose "YES" and confirm with the OK button to protect/ unlock all files.
- Choose "CANCEL" and confirm with the OK button to return to playback mode.
13.3. Recording voice messages
Select the required photo in Playback mode.

NOTE!
If the photo already contains a voice memo, the voice memo icon appears.
- Open the playback menu with the MENU button and choose the VOICE MEMO option.
The image preview and a selection menu will appear on the display.
Choose START and press the OK button to start the recording. The microphone is located underneath the lens.
The recording ends automatically after 30 seconds. If you would like to end the recording before then, choose STOP and press the OK button again.

NOTE!
You can only add voice messages to photos, not to video clips. You cannot add voice memos to protected images.
13.4.Filter effects
The filter effect function is only available with other artistic effects on images with an aspect ratio of 4:3. The images edited with this function are saved as new files.
The following effects are possible:
- SOFT: The image is given a soft focus effect.
- COLOR EMPHASIS: Retains the colour tone while reducing the rest of the image to black and white.
VIVID: The image is given more contrast and saturation to highlight more vivid colours.
MINIATURE EFFECT: Parts of the photo will be blurred to give the picture a miniature model effect. - ASTRAL: Light areas are filled with stars
- IMPRESSIVE ART: The image is given a dramatic contrast effect.
- PAINTING: The image is converted into a line drawing with colour accents.
-
NEGATIVE: The image's colours are inverted.
-
B&W: Black and white
-
MOSAIC: The image is displayed in pixelated form.
- SEPIA: The image is converted to sepia tones.
13.5. Trimming
This function can be used to choose an image section and crop the image to this size. The border not visible on the display is deleted.
You can save the corrected file under a new name.
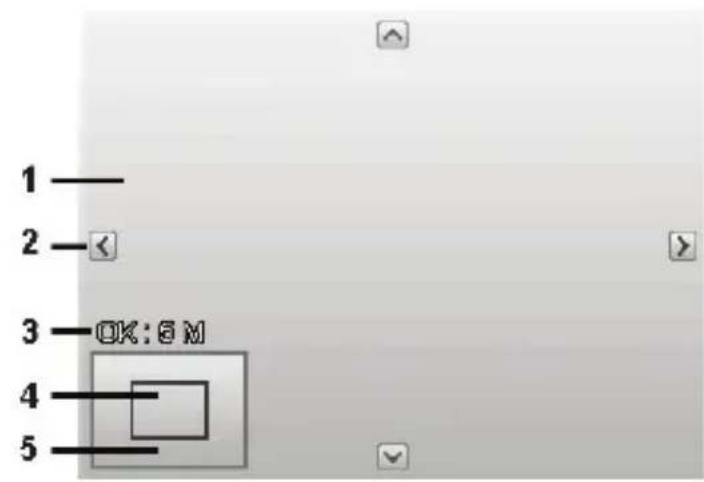
| 1 Enlarged picture |
| 2 4-way display |
| 3 Cropped size |
| 4 The approximate position of the cropping area |
| 5 Image area |
Choose the required photo in Playback mode.
- Open the "TRIMMING" submenu in the playback menu. The editing window appears on the display.
Use the zoom wheel to adjust the crop box in the same way as zooming in and out.
During the enlargement, you can use the , , or keys to modify the image section.
A menu selection appears after termination of the function.
Choose between:
- YES: The new file is saved as a new file.
- CANCEL: The function is cancelled.
Press the OK button to save/cancel the changes.
13.6. Changing the size
Choose the required photo in Playback mode.
- Open the playback menu with the MENU button and choose the RESIZE option. The selection menu appears on the display.
Choose one of the following resolutions 640, 320 or 160 and confirm your selection with the OK button.
Confirm the size with:
- YES: The new file is saved,
or
- CANCEL: The function is cancelled.
Confirm your selection by pressing the OK button.

NOTE!
The available resolutions may vary according to the original size of the image. Settings which are not available are greyed out.
13.7. Startup image
You can select a start screen that appears on the screen after the camera has been switched on.
Use the button to return to playback mode.
- Open the playback menu with the MENU button and choose the "STARTUP IMAGE" option.
You can choose between the following:
- SYSTEM: The default system screen is displayed.
-
MY PHOTO: Your selected photo is displayed. Use or to select the desired photo and press OK to confirm.
-
OFF: No photo is displayed.
13.8. DPOF
DPOF stands for "Digital Print Order Format".
Here you can specify print settings if you wish to have pictures published by a photo studio or printed on a DPOF-compatible printer. With a DPOF-compatible printer you can print the pictures directly without transferring them to the computer beforehand.
You can print all the photos or just one, or reset the DPOF settings.
Use the or buttons to set the number of prints for each picture.

NOTE!
With DPOF you can define up to 99 copies. If you set 0 copies for an image, the DPOF setting of this picture deactivates automatically.
13.9. The copy function
You can use this function to copy photographs from the internal memory to the memory card or from the memory card to the internal memory.
Use the button to return to playback mode.
- Open the playback menu with the MENU button and choose the "COPY" option.
Now select the copy option "COPY TO CARD" or "COPY TO CAMERA" and confirm the selection with OK.
Each copy option provides you with two selection choices:
- SELECT IMAGES: Here you start by selecting the images to be copied in the thumbnail overview.
- ALL IMAGES: With this function, all stored images are copied to the desired medium.
13.9.1. Copy selected images
- Select the option "SELECT IMAGES" in the copy function submenu.
- Use the or buttons to select an image and then add a selection mark with the buttons or use the button to remove an existing selection mark.
- Confirm your selection by pressing the OK button.
- Choose "YES" and confirm with the OK button to protect/ unlock all files.
- Choose "CANCEL" and confirm with the OK button to return to playback mode.
13.9.2. Copy all images
- Select the option "ALL IMAGES" in the copy function submenu.
- Confirm your selection by pressing the OK button.
- Choose "YES" and confirm with the OK button to protect/ unlock all files.
- Choose "CANCEL" and confirm with the OK button to return to playback mode.
13.10. "Add fi lm" function
With this function you can combine two stored films with the same specifications (video size and resolution).
Use the or buttons to select a video in playback mode.
- Open the playback menu with the MENU button and choose the "MOVIE PASTE" menu option.
A thumbnail view of all videos with the same specification as the original video appears on the display.
- Use the or buttons to select the second video and then add a selection mark with the buttons or use the button to remove an existing selection mark.
- Confirm your selection with the OK button and select "YES" to merge the videos.

NOTE!
After the two videos have been combined, only the new, longer version will be stored in the memory. The two original videos will be deleted.
The total length of the combined video must not exceed 30 minutes.
14. Connection to TV and PC
14.1. Displaying captures on a television set
You can play back the shots from your camera on a television set.
- Switch off the camera and television set.
Connect the AV cable to the USB port on the side of the camera.
-
Switch the camera and television set on. The camera switches automatically to playback mode.
-
Connect the other end of the cable to an AV input socket on your television set.
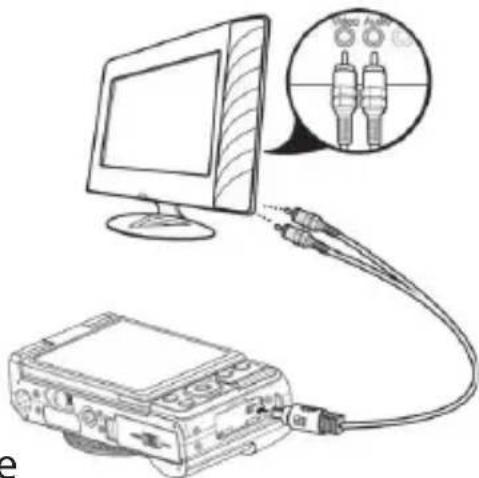
If the television set does not detect the camera signal automatically, switch to the appropriate video input on the television set (usually by means of the AV button).
14.2. Printing shots on a photo printer
Using PictBridge, you can print your shots directly on a PictBridge-compatible photo printer.
Connect the printer to the camera with the USB cable supplied.
- Switch the camera and the photo printer on.
The camera recognises that a USB device has been connected and detects the printer automatically.
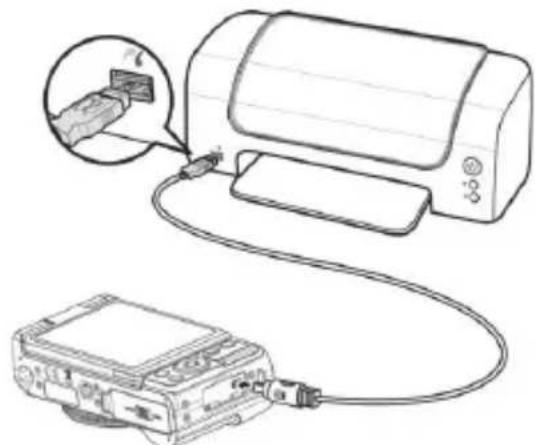

NOTE!
The functions described in the following must be supported by PictBridge-compatible printers so that they can be used.
After the connection between printer and camera has been established, the selection menu of the print mode appears.
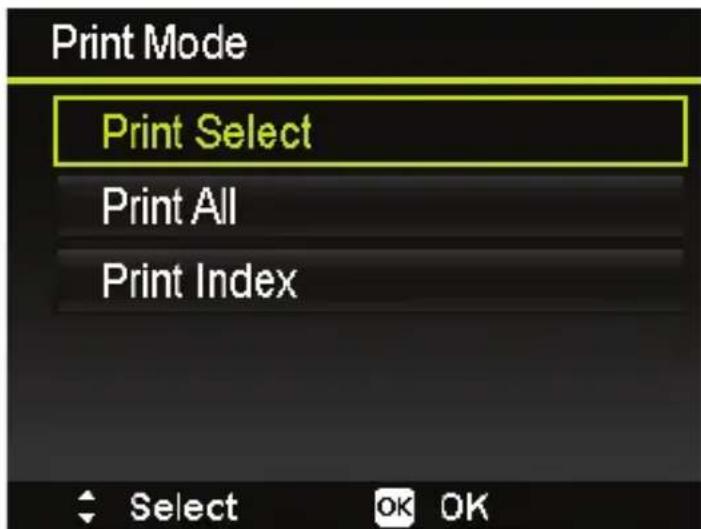
The print mode contains three selection options:
- PRINT SELECT: Select the pictures you would like to print from those stored on the device.
- PRINT ALL: All saved pictures are printed.
- PRINT INDEX:Prints all pictures that have a DPOF setting.
14.2.1. Setting the "Print selection" option
Use the arrow keys or to choose the required picture.
Define the number of print copies with the or buttons.
Press OK to go to the printer settings.
14.2.2. Setting the "Alles Drucken" and "DPOF Drucken" options
Define the number of print copies with the or buttons.
Press OK to go to the printer settings.
14.2.3. Defining the print settings
Use the arrow keys or to select the required setting.
- Define the paper size (STANDARD) and quality (STANDARD) using the or buttons.
- Specify whether the capture date (YES; NO) and the capture information (YES; NO) are also to be printed.
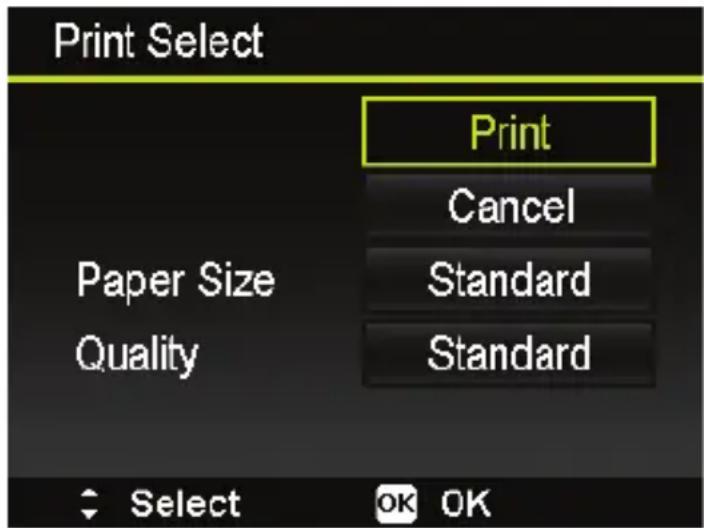
- Choose PRINT to start the print, or exit the print settings with CANCEL.
14.2.4. Start print
The message "PRINTING..." appears on the display.
You can cancel the process at any time with the MENU button.
14.3. Transferring data to a computer
You can copy your pictures and videos to a computer.
Supported operating systems:
Windows Vista SP1
Windows 7
Windows 8
Windows 8.1
14.4. Connecting the USB cable
Switch the camera off.
- With the computer switched on, connect the USB cable supplied to the USB socket on the camera and a USB socket on the PC.
As soon as the connection between the camera and computer has been established, "MASS STORAGE" or "PTP" appears on the camera screen.
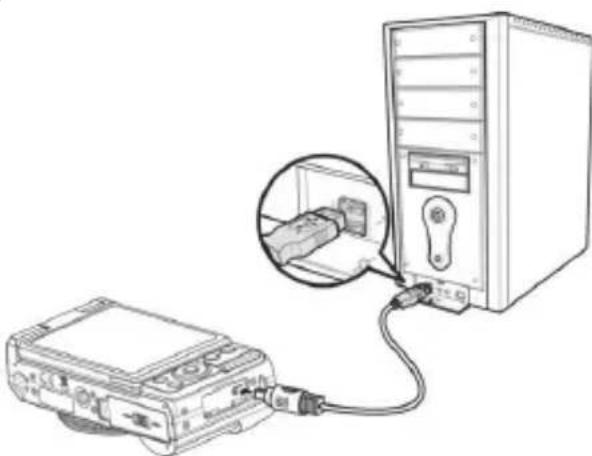
If you select MASS STORAGE, the camera is shown as a mass storage device and can be used as a separate drive in Windows Explorer. Open Windows Explorer or double-click on "My Computer" (in Vista/Windows 7: "Computer").
Double-click on the media icon for the camera.
- Navigate to the "DCIM" directory and, where applicable, to the relevant subdirectories in order to display the files (.jpg = photos; .wav = sound recordings; *.avi = video recordings). See also the directory structure in the memory.
Press down the left mouse button and drag the relevant files to the directory provided on the computer, e.g. in the folder "My Documents". You can also highlight the files and use the Windows commands "Copy" and "Paste".
The files are transferred to the computer and stored there. You can display, view and process the files with a suitable software application.
If you select PTP, the camera will be connected as a PTP (picture transfer protocol) device.
In Windows Vista, Windows 7 and Windows 8 you can immediately access the content of the camera memory or the memory card.
14.5. DCF memory standard
The recordings on your camera are managed (saved, named, etc.) in accordance with the DCF standard (DCF = Design rule for Camera File system). Recordings on memory cards from other DCF cameras can also be played back on your camera.
14.6.Card drive
If your PC has a card drive or is connected to a card reader, you can use this to copy the shots on the memory card to the PC. The card reader is also detected as a removable data medium on the Windows desktop (or in "Computer" if using Vista/Windows 7/Windows 8 and Windows 8.1).
14.7. Memory folder structure
Your camera automatically creates specific folders on the internal memory card in order to organise captured images and video files.
- File names begin with "DSCI" followed by a 4-digit number in ascending order. The file numbering starts from 0001 when a new folder is created.
- The highest file number is 9999. After it reaches 9999, the camera will begin again with the file number 0001.

NOTE!
Do not change the folder or file names on the memory card from your personal computer. This may lead to them being no longer recognised by the camera.
15. Installing the software
There is a picture editing program called "CyberLink PhotoDirector" on the CD supplied with the product.
How to install the CyberLink PhotoDirector:
Insert the installation CD in the DVD/CD drive.
The CD is automatically executed and a selection screen appears.
Select the entry "Install CyberLink PhotoDirector" on the selection screen.
Follow the instructions to complete the installation.
Start the program via the symbol on the desktop, where applicable.
When you start the program for the first time, it has to be activated.
To activate the program, enter the serial number HEVK4-S9JM4-AWZXQ-SXML6-T8EQ9-PVSH7.

NOTE!
Help with using the program is available in the help system software, which can be accessed by pressing the F1 button.
If the CD is not automatically executed, follow the steps below to install the software:
Double-click on Desktop.
Move the cursor to the DVD/CD drive.
Right-click, then click on Open.
Double-click on Setup.exe.
A wizard will then guide you through the installation process.
Follow the instructions to complete the installation.
Start the program via the symbol on the desktop.
- When you start the program for the first time, it has to be activated.
To activate the program, enter the serial number HEVK4-S9JM4-AWZXQ-SXML6-T8EQ9-PVSH7.
16. Troubleshooting
Use the following checklist if the camera does not function correctly. If the problem persists, consult MEDION Service.
16.7.1. The camera will not switch on.
- The batteries are not inserted correctly.
- The batteries are empty.
16.7.2. The camera will not take photos.
The flash is still charging.
The memory is full.
- The SD card is not correctly formatted or is defective.
16.7.3. The flash does not go off.
The flash is not opened.
The flash is not completely charged.
- The automatic mode is deactivated.
16.7.4. The image is blurred.
- The camera was moved during the shot.
- The subject was outside the camera's focal range. Use the Macro mode for close-up pictures, where applicable.
- Improve the light conditions.
16.7.5. The image is not shown on the display.
- An SD card has been inserted which took pictures in non-DCF mode on another camera. The camera cannot display this type of image.
16.7.6. The period of time between shots is longer when taking pictures in the dark
- The shutter usually works more slowly in poor light conditions. Change the angle of the camera, or improve the light conditions.
16.7.7. The camera switches itself off.
- The batteries are empty.
- The wrong battery type is set.
- After a preset period, the camera switches itself off to save the battery charge. Restart the camera.
16.7.8. The shot has not been saved.
- The camera was switched off before the shot could be saved.
The memory card is full.
16.7.9. The shots cannot be transferred to the PC via the USB cable.
The camera is not switched on.
16.7.10. When the camera is connected to the computer for the first time, no new hardware is found.
- The USB connection of the computer is deactivated.
- The operating system is not compatible.
17. Maintenance and care
Clean the housing, lens and display as follows:
Clean the camera housing using a soft, dry cloth.
Do not use thinners or detergents which contain oil. This could damage the camera.
To clean the lens and the display, first use a lens brush to remove any dust. Then wipe the lens and display with a soft cloth. Do not apply any pressure to the display and do not use hard objects to clean it.
- Do not use strong cleaning agents for the housing and lens (contact Medion Service or a specialist shop if there is dirt that cannot be removed).
18. Disposal
PACKAGING

Your camera is packaged to protect it from transportation damage. Packaging is raw material and can be reused or added to the recycling system.
HARDWARE

Do not dispose of the product in the household rubbish at the end of its service life. Take it to a local collection point for used appliances in order to comply with environmental regulations. Contact your local authority to find out where your nearest collection point is located.
BATTERIES

Do not dispose of used batteries in the household rubbish! Batteries should be taken to a collection point for used batteries.
19. Technical data
19.7.1. Camera
Pixels:
16
megapixels
Sensor: 16 MP CMOS 1/2.3"
Aperture: F = 3.1 6.3
Shutter speeds: 1 / 2000 4 s
Focal length: f = 4.3 51.6 mm (equivalent to
compact picture format: 24mm 288 mm)
Optical zoom: 12 x
Digital zoom: 8x
LCD monitor: 7.62cm / 3.0'' flip LC display
File formats: JPEG (EXIF 2.3), DPOF, AVI, WAV
Max. resolutions:
Camera mode: 4608 x 3456 pixels
Video mode: 1280 × 720 (30 frames per second)
Picture memory:
Internal: 64 MB internal memory (usable
storage capacity: approx 86 MB)
External:
SD card (up to 4 GB)
SDHC card (up to 32 GB)
Connection: micro USB 2.0
Dimensions:
approx. 109 × 64 × 38 ~mm (W x H x D)
Weight:
approx. 211 g (incl. battery)
Ambient temperature:
0^ - 40^ at 0% -90% rel. humidity
Wi-Fi module: 802.11 b/g/n
USB MAINS ADAPTER
Model number: KSAS0060500100VEU
Manufacturer:
Ktec,
China
Input voltage: 100 - 240V 50 / 60Hz180mA
Output voltage: 5.0V
1.0A
BATTERY
Manufacturer:
Fuji
Electronics
Model number: NP-50
Technical data: 3.7 V/940 mAh/3.478 Wh
Subject to technical and optical changes as well as printing errors.

20. Legal notice
Copyright © 2014 All rights reserved.
This operating manual is protected by copyright.
Mechanical, electronic and any other form of reproduction is prohibited without the written permission of the manufacturer

Copyright is owned by the company:
Medion AG
Am Zehnhof 77
45307 Essen
Germany
The operating manual can be reordered via the service hotline and is available for download via the service portal at www.medion.com/gb/service/start/.
You can also scan the QR code above and download the operating manual onto your mobile device via the service portal.
Sommaire
- Directive CEM 2004/108/CE
- Directive RoHS 2011/65/UE
Pixels: 16 megapixels
Captive: 16 MP CMOS 1/2,3"
Diaphragme: F = 3,1 6,3
Vitesse d'obturation: 1/2000 4 s
Fabricant: Fuji Electronics
Référence: NP-50
Download in de App Store

15. Installation of software
Filformat: JPEG (EXIF 2.3), DPOF, AVI, WAV
Maks. opløsninger:
Kameratilstand: 4608 x 3456 pixel
Videotilstand: 1280 x 720 (30 billed per. sek.)
Billedlager:
Intert: 64 MB internt lager (anvendeligt
lager: ca. 86 MB)
Producent: Fuji Electronics
Modelnummer: NP-50
Tekniske data: 3,7 V / 940 mAh / 3,478 Wh
www.medion.com/dk/service/start/.