
T600 - Treadmills Vision Fitness - Free user manual and instructions
Find the device manual for free T600 Vision Fitness in PDF.
| Technical Features | Vision Fitness T600 treadmill with 3.0 HP motor, incline up to 15%, running surface of 51 x 140 cm, speed from 0 to 20 km/h. |
|---|---|
| Usage | Designed for home use, ideal for running and walking workouts, suitable for users of all levels. |
| Maintenance and Repair | Regularly check belt tension, lubricate the treadmill every 6 months, clean the surface after each use. |
| Safety | Equipped with an emergency stop system, ergonomic handles, and an easy-to-read control screen to monitor performance. |
| General Information | Maximum user weight of 136 kg, 2-year frame warranty and 1-year parts warranty, product dimensions: 180 x 90 x 140 cm. |
Frequently Asked Questions - T600 Vision Fitness
User questions about T600 Vision Fitness
0 question about this device. Answer the ones you know or ask your own.
Ask a new question about this device
Download the instructions for your Treadmills in PDF format for free! Find your manual T600 - Vision Fitness and take your electronic device back in hand. On this page are published all the documents necessary for the use of your device. T600 by Vision Fitness.
USER MANUAL T600 Vision Fitness
SAVE THESE INSTRUCTIONS
- When using a treadmill, basic precautions should always be followed, including the following: Read all instructions before using this equipment. It is the responsibility of the owner to ensure that all users of this equipment are adequately informed of all warnings and precautions.
This equipment is intended for commercial use. To ensure your safety and protect the equipment, read all instructions before operating.
DANGER!
TO REDUCE THE RISK OF ELECTRICAL SHOCK:
- Always unplig the equipment from the electrical outlet immediately after using, before cleaning, performing maintenance and putting on or taking off parts.
WARNING!
TO REDUCE THE RISK OF BURNS, FIRE, ELECTRICAL SHOCK OR INJURY TO PERSONS:
- Incorrect or excessive exercise may cause injury. If you experience any kind of pain, including but not limited to chest pains, nausea, dizziness, or shortness of breath, stop exercising immediately and consult your physician before continuing.
- When exercising, always maintain a comfortable pace.
- Do not wear clothes that might catch on any part of the treadmill.
- User must wear proper footwear (i.e. athletic shoes) when using this exercise device.
Do not jump on the treadmill. - At no time should more than one person be on treadmill while in operation.
- This treadmill should not be used by persons weighing more than specified in the OWNER'S MANUAL SPECIFICATIONS SECTION. Failure to comply will void the warranty.
- Disconnect all power before servicing or moving the equipment.
- To clean, wipe surfaces down with soap and slightly damp cloth only; never use solvents. (See MAINTENANCE)
- Unplug from outlet when not in use, and before putting on or taking off parts.
- Connect this exercise product to a properly grounded outlet only.
-
Do not remove the protected covers unless instructed by Professional and your local dealer. Service should only be done by an authorized service technician
-
Installation of parts or accessories not originally intended or compatible with the equipment as sold will void warranty and may impact safety.
- Measured at typical head height, the A-weighted sound pressure level when the Treadmill is running at 12Km/ Hour (without load) is no greater than 70 dB.
- Noise emission under load is higher than without load.
- At NO time should pets or children under the age of 14 be closer to the treadmill than 10 feet.
At NO time should children under the age of 14 use the treadmill.
Children over the age of 14 should not use the treadmill without adult supervision.
This equipment is not intended for use by persons with reduced physical, sensory or mental capabilities, or lack of experience and knowledge, unless they have been given supervision or instruction concerning use of the equipment by a person responsible for their safety.
Use the treadmill only for its intended use as described in owner's manual. - Never operate the treadmill if it has a damaged cord or plug, if it is not working properly, if it has been dropped or damaged, or immersed in water. Call Customer Tech Support for examination and repair.
- To avoid the risk of electric shock, this piece of equipment must only be connected to a circuit with non-looped (isolated) ground.
- Keep power cord away from heated surfaces. Do not carry this unit by its supply cord or use the cord as a handle.
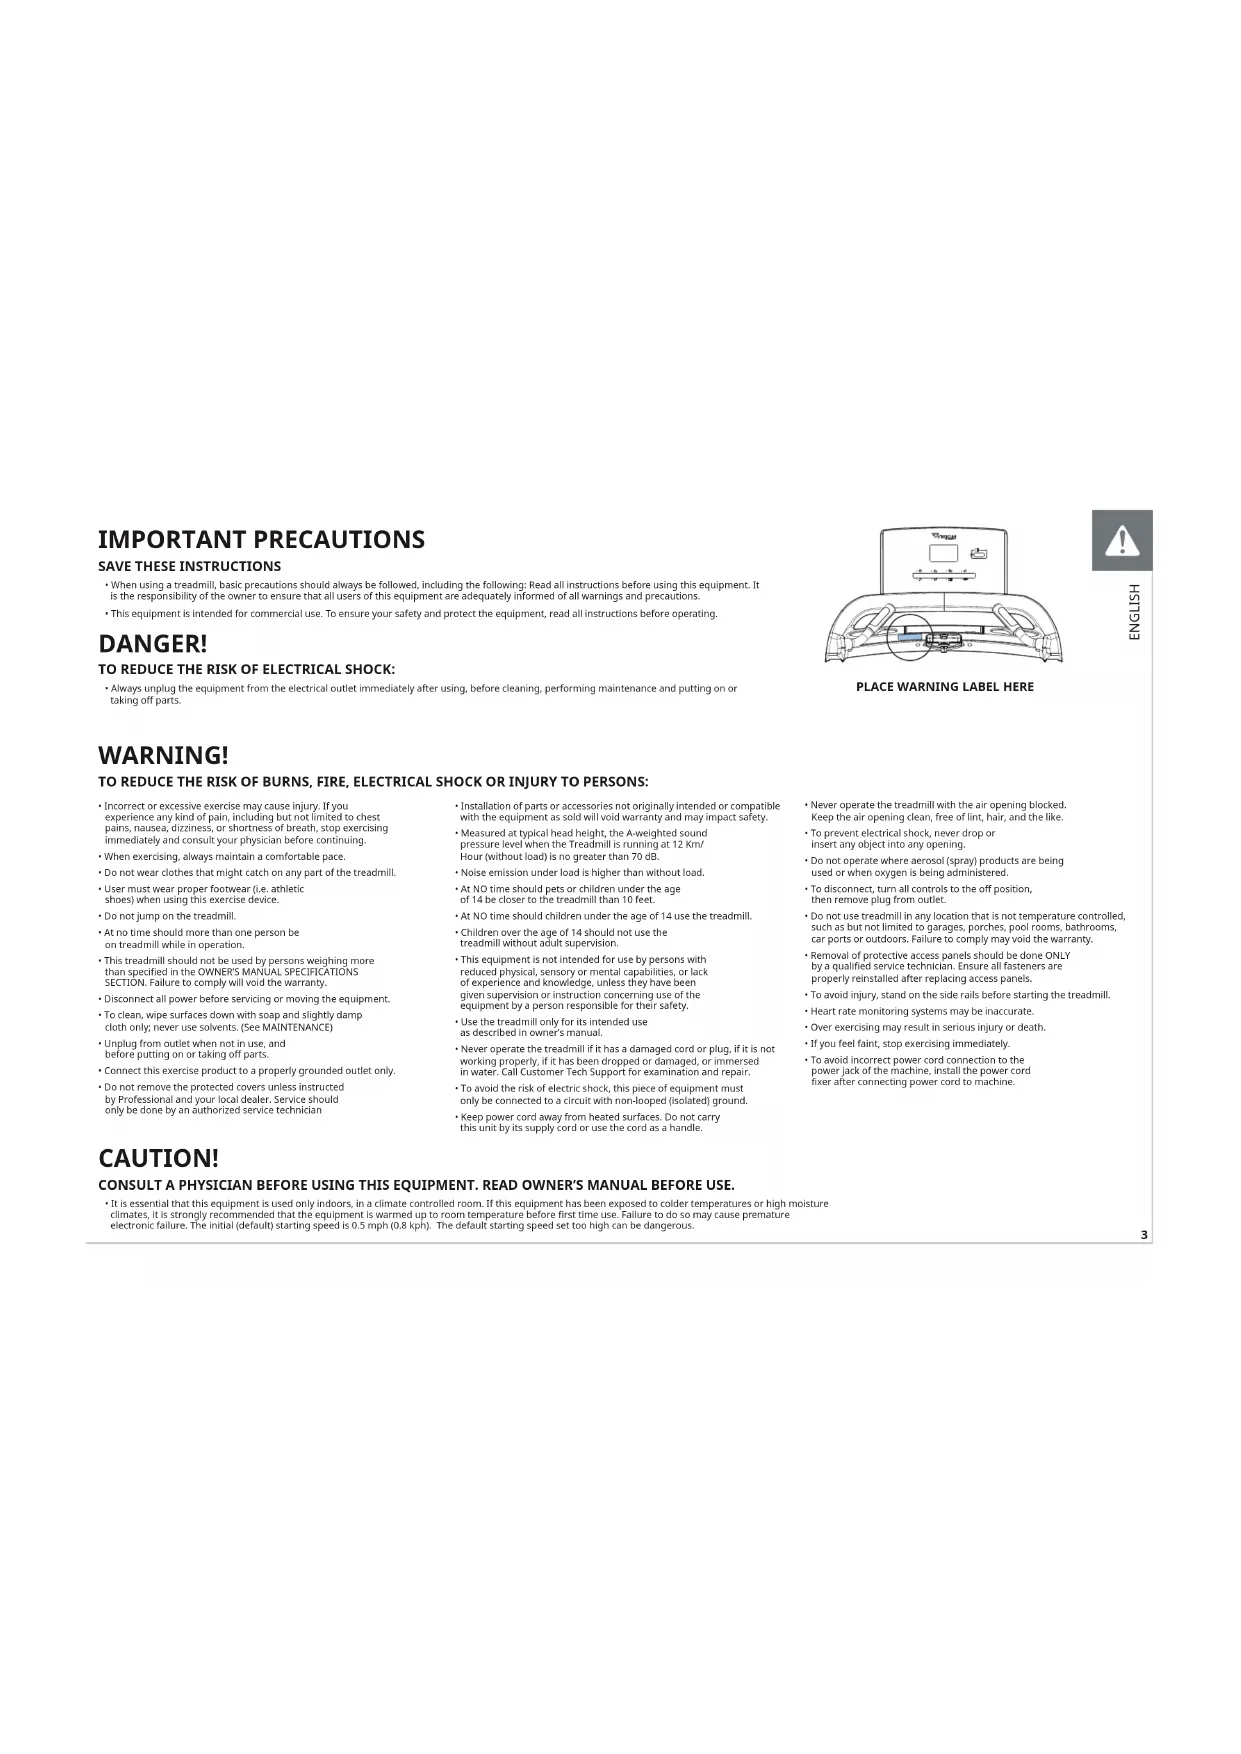
PLACE WARNING LABEL HERE

HS170N3
- Never operate the treadmill with the air opening blocked.
- Keep the air opening clean, free of lint, hair, and the like.
- To prevent electrical shock, never crop or insert any object into any opening.
- Do not operate where aerosol (spray) products are being used or when oxygen is being administered.
- To disconnect, turn all controls to the off position, then remove plug from outlet.
- Do not use treadmill in any location that is not temperature controlled, such as but not limited to garages, porches, pool rooms, bathrooms, car ports or outdoors. Failure to comply may void the warranty.
- Removal of protective access panels should be done ONLY by a qualified service technician. Ensure all fasteners are properly reinstalled after replacing access panels.
- To avoid injury, stand on the side rails before starting the treadmill.
- Heart rate monitoring systems may be inaccurate.
Over exercising may result in serious injury or death.
If you feel faint, stop exercising immediately. - To avoid incorrect power cord connection to the power jack of the machine, install the power cord fixer after connecting power cord to machine.
CAUTION!
CONSULT A PHYSICIAN BEFORE USING THIS EQUIPMENT. READ OWNER'S MANUAL BEFORE USE.
It is essential that this equipment is used only indoors, in a climate controlled room. If this equipment has been exposed to colder temperatures or high moisture climates, it is strongly recommended that the equipment is warmed up to room temperature before first time use. Failure to do so may cause premature electronic failure. The initial (default) starting speed is 0.5 mph (0.8 kph). The default starting speed set too high can be dangerous.

POWER REQUIREMENTS
DEDICATED CIRCUIT AND ELECTRICAL INFO
A "Dedicated Circuit" means that each outlet you plug into should not have anything else running on that same circuit. The easiest way to verify this is to locate the main circuit breaker box, and turn off the breaker(s) one at a time. Once a breaker has been turned off, the only thing that should not have power to it are the units in question. No lamps, vending machines, fans, sound systems, or any other item should lose power when you perform this test. Non-looped (isolated) neutral/grounding means that each circuit must have an individual neutral/ground connection coming from it, and terminating at an approved earth ground. You cannot "jumper" a single neutral/ground from one circuit to the next.
ELECTRICAL REQUIREMENTS
For your safety and to ensure good treadmill performance, the ground on this circuit must be non-looped (isolated). Please refer to NEC article 210-21 and 210-23. Your treadmill is provided with a power cord with a plug listed below and requires the listed outlet. Any alterations of this power cord could void all warranties of this product.
220VUNITS
All Vision 220 V treadmills require the use of a 216-250 V, 50 Hz and a 20 A "Dedicated Circuit", with a non-looped (isolated) neutral/ground for power. This outlet should be a NEMA 6-20R and have the same configuration as the plug. No adapter should be used with this product.
GROUNDING INSTRUCTIONS
The equipment must be grounded. If it should malfunction or breakdown, grounding provides a path of least resistance for electric current to reduce the risk of electric shock. The unit is equipped with a cord having an equipment-grounding conductor and a grounding plug. The plug must be plugged into an appropriate outlet that is properly installed and grounded in accordance with all local codes and ordinances. If the user does not follow these grounding instructions, the user could void the Vision limited warranty.
ADDITIONAL ELECTRICAL INFO
In addition to the dedicated circuit requirement, the proper gauge wire must be used from the circuit breaker box, to each outlet that will have the maximum number of units running off of it. If the distance from the circuit breaker box to each outlet, is 100 ft (30.5m) or less, then 12 gauge wire should be used. For distances greater than 100 ft (30.5m) from the circuit breaker box to the outlet, a 10 gauge wire should be used.
ENERGY SAVING / LOW-POWER MODE
All units are configured with the ability to enter into an energy saving / low-power mode when the unit has not been in use for a specified period of time. Additional time may be required to fully reactivate this unit once it has entered the low-power mode. This energy saving feature may be enabled or disabled from within the 'Manager Mode' or 'Engineering Mode'.
WARNING!
Connect this exercise product to a properly grounded outlet only.
- Never operate product with a damaged cord or plug even if it is working properly.
- Never operate any product if it appears damaged, or has been immersed
in water. Contact Customer Tech Support for replacement or repair. Failure to follow these specifications can cause damage
to your product and can void the warranty:
-
All video and power outlets must be functional the day of delivery / assembly of the product. The client is responsible for any additional installation charges associated with return visits.
-
Electrical supply may fluctuate in your area. To ensure stable performance of the product, use the proper gauge wire.
DANGER!
Improper connection of the equipment-grounding conductor can result in a risk of electric shock. Check with a qualified electrician or serviceman if you are in doubt as to whether the product is properly grounded. Do not modify the plug provided with the product. If it will not fit the outlet, have a proper outlet installed by a qualified electrician.
ASSEMBLY
UNPACKING
Unpack the equipment where you will be using it. Place the carton on a level flat surface. It is recommended that you place a protective covering on your floor. Never open box when it is on its side.
IMPORTANT NOTES
During each assembly step, ensure that ALL nuts and bolts are in place and partially threaded. Several parts have been pre-lubricated to aid in assembly and usage. Please do not wipe this off. If you have difficulty, a light application of lithium grease is recommended.
WARNING!
There are several areas during the assembly process that special attention must be paid. It is very important to follow the assembly instructions correctly and to make sure all parts are firmly tightened. If the assembly instructions are not followed correctly, the equipment could have parts that are not tightened and will seem loose and may cause irritating noises. To prevent damage to the equipment, the assembly instructions must be reviewed and corrective actions should be taken.
NEED HELP?
If you have questions or if there are any missing parts, contact Customer Tech Support. Visit world.visionfitness.com for contact information.
TOOLS REQUIRED:
8mm T-Wrench
□ 8mm Allen Wrench
□ 6mm Allen Wrench
Phillips Screwdriver
PARTS INCLUDED:
1 Base Frame
□ 1 Console base set
□1 Console Assembly
□2ConsoleMasts
2 Handlebars
□1Power Cord
□1HardwareKit

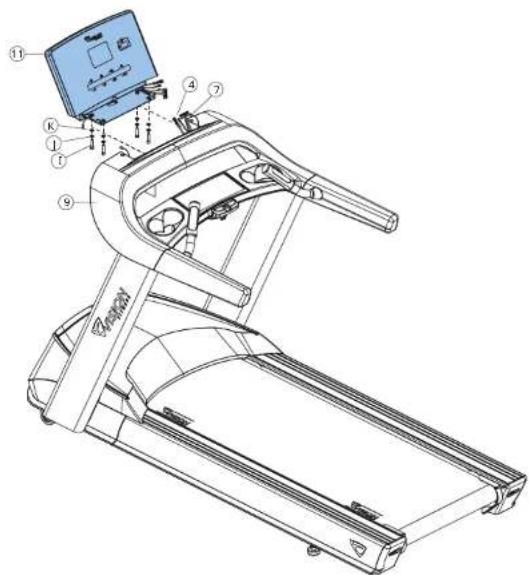
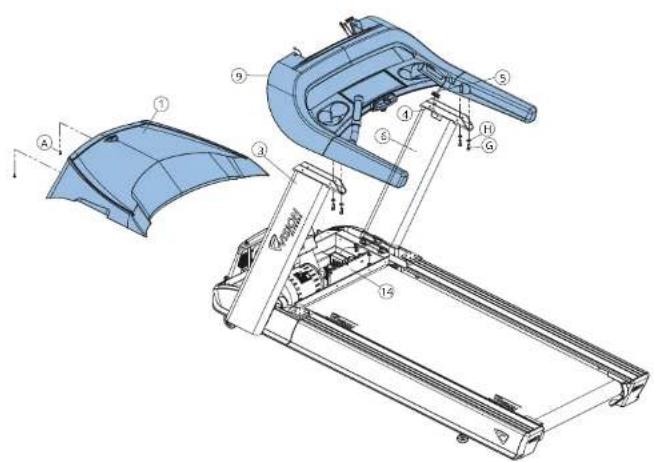
1
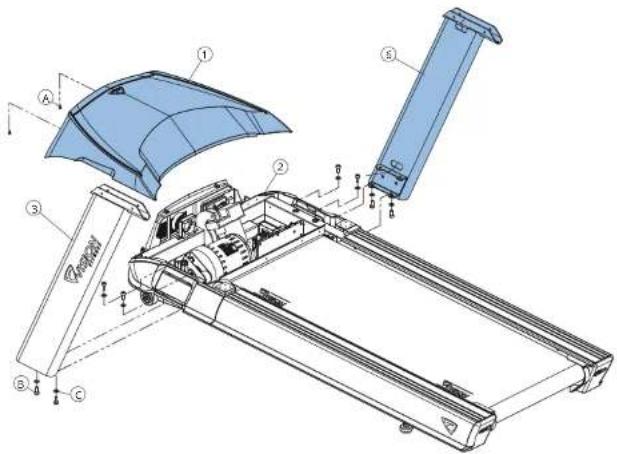
IMPORTANT: Do not tighten bolts until step 3 is complete.
- Remove 2 pre-installed screws (A) and detach MOTOR COVER (1).
- Open HARDWARE FOR STEP 1.
- Attach LEFT CONSOLE MAST (3) to BASE FRAME (2) using 4 BOLTS (B)
and 4 FLAT WASHERS (C) from the top and bottom. - Attach RIGHT CONSOLE MAST (6) to BASE FRAME (2) using 4 BOLTS (B)
NOTE: Be careful not to pinch wires while attaching the handlebar.
Hardware For Step 1
| Description Qty | |
| A | Pre-Installed Screw 2 |
| B | Bolt 8 |
| C | Flat Washer 8 |

2
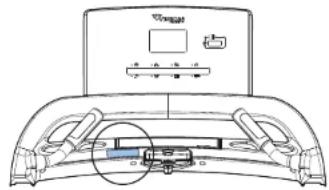
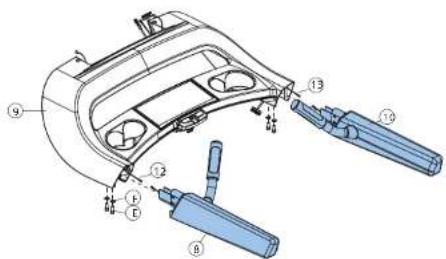
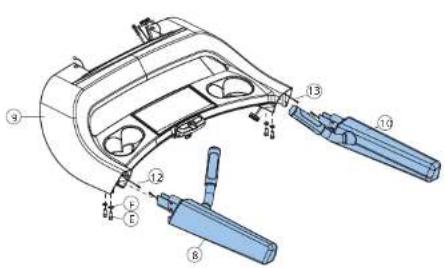
Open HARDWARE FOR STEP 2.
- Connect the HEART RATE GRIP WIRE (12), discard the wire tie, and tuck the cables inside the LEFT HANDLE BASE (8) and slide into the CONSOLE BASE (9).
- Connect the HEART RATE GRIP WIRE (13), discard the wire tie, and tuck the cables inside the RIGHT HANDLE BAR (10) and slide into the CONSOLE BASE (9).
- Attach HANDLEBARS (8 & 10) to CONSOLE BASE (9) using 4 BOLTS (E) and 4 CURVED WASHERS (F).
Hardware For Step 2
| Description Qty | |
| E | Bolt 4 |
| F | Arc Washer 4 |
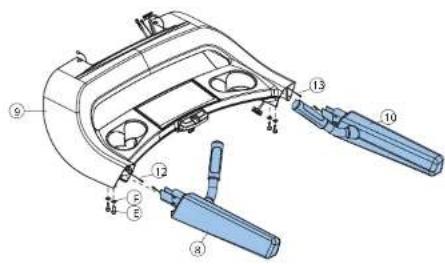
Open HARDWARE FOR STEP 3.
- Attach LEAD WIRE (4) to CONSOLE Cable (5) and pull lead wire through RIGHT CONSOLE MAST (6). After pulling the lead wire through the mast, the top of the console cable should be connected to the MCB (14). Detach and discard lead wire.
- Attach CONSOLE BASE (9) to CONSOLE MASTS (3 & 6) using 4 BOLTS (G), and 4 CURVED WASHERS (H).
- Tighten all bolts from steps 1-3.
Install MOTOR COVER (1) using 2 pre-installed SCREWS (A).
| Description Qty | |
| G | Boil 4 |
| H | Arc Washer 4 |
Open HARDWARE FOR STEP 4
- Connect the CONSOLE CABLES (4) and HEART RATE WIRES (7) to the CONSOLE (11) and carefully tuck the excess cable into the CONSOLE BASE (9).
- Attach the CONSOLE (11) to the CONSOLE BASE (9) using 4 BOLTS (I) and 4 SPRING WASHERS (J) and 4 FLAT WASHERS (K).
| Hardware For Step 4 | |
| I | Description Qty |
| J | Bolt 4 |
| K | Spring Washer 4 |
| Flat Washer 4 | |


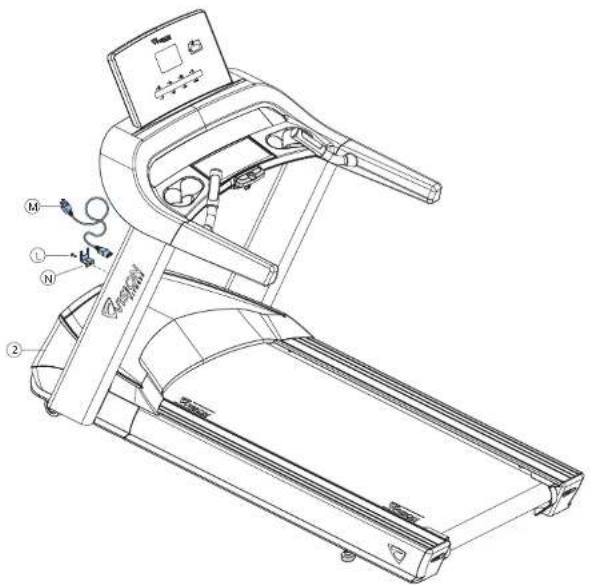
5
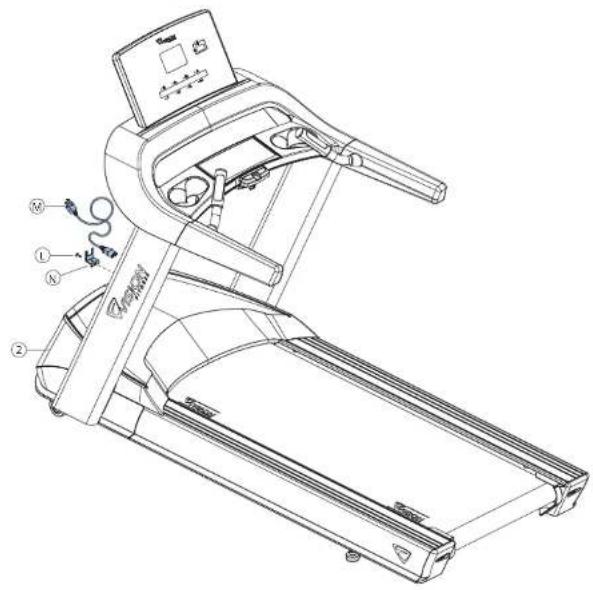
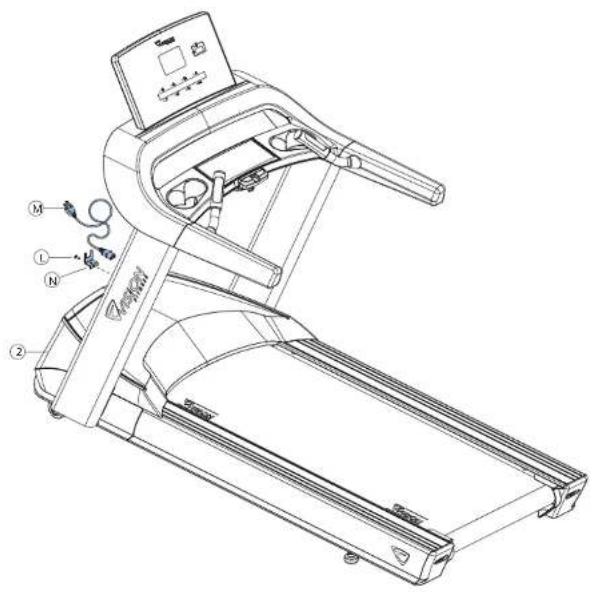
Install the POWER CORD (M) to the BASE FRAME (2).
- Install the POWER CORD RETAINING PLATE (N) to the BASE FREAME (2) using 1 SCREW (L).
| Description Qty | |
| L | Screw 1 |
| M | Power Cord 1 |
| N | Power Cord Retaining Plate 1 |
ASSEMBLY COMPLETE!
CONSOLE OPERATION
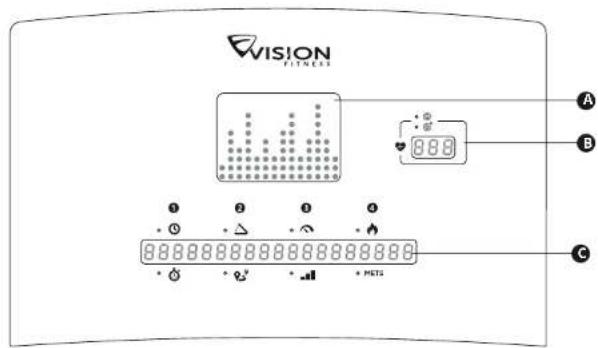
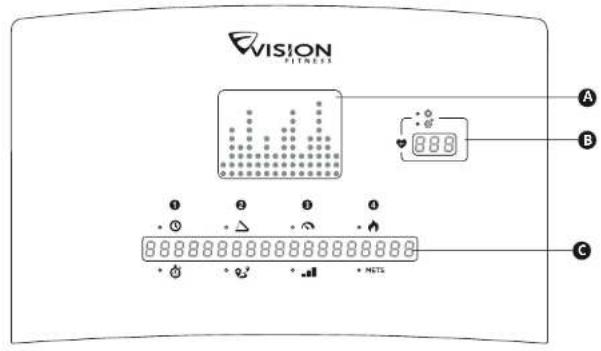
PROGRAM PROFILE WINDOW
Represents the profile of the program being used (speed during speed based programs and incline during incline based programs).
3 HEART RATE CENTER
Displays your Actual and Target heart rate during the workout. The console displays a heart rate within 15 to 20 seconds of contact with the sensors or the use of a heart rate chest strap. In TARGET HEART RATE program, the inputted target heart rate will display in the window every 60 seconds.
INSTRUCTION CENTER
Displays step-by-step instructions for setting up a program. During a workout, it displays Time, Pace, Incline, Distance, Speed, Level, Calories and METS.
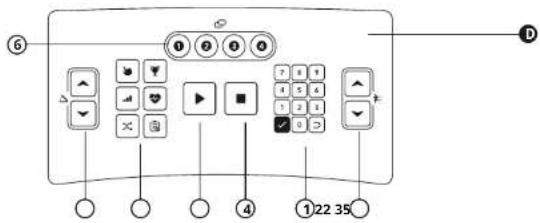
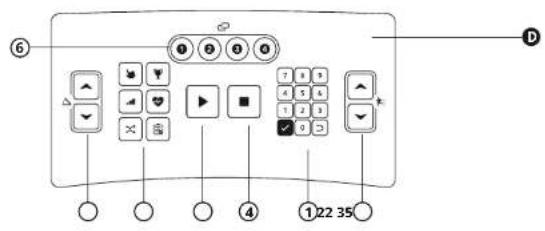
CONTROL KEYPAD
Allows the user to set up programs and control workout.
1 NUMBER KEYPAD
Used to enter program data during program setup. Press confirm settings. Press clear data not yet entered during the workout setup.
② SPEED & INCLINE
Use adjust speed or incline.
3 GO
Press to begin your workout immediately, without having to select a workout program.
4STOP
Press to stop your workout. Press and hold for 3 seconds to reset console.
(5) PROGRAM KEYS
Press to select a program. For Goal+ and Heart Rate+, press the key repeatedly for additional programs.
⑥ CHANGES DISPLAY (1-4)
Press to change display feedback during workout.
NOTE: By default the time window will count down from the total workout time. If no workout time is set, the time woindow will count up from 0:00.
Please visit Vision website for further assembly and console information: world.visionfitness.com

PROGRAM INFORMATION
| PROGRAM DESCRIPTION | DEFAULT TIME | PROMPT INPUT | PROGRAM CONTROL | ||
| QUICK START | Quick Start is the fastest way to begin exercising and bypasses the setup prompts. After pressing▶, a constant-level workout begins, and the speed and incline do not change automatically. | N/A N/A N/A | |||
| MANUAL | Manual is a constant effort workout in which the user can change incline or speed at any time. | 20:00 Time, | Weight N/A | ||
| INTERVAL | Interval is periods of intense aerobic exercise separated by regular periods of lower-intensity exercise. At any point during the workout, the user can change the settings of the current speed. | 20:00 Level, | Time, Weight Elevation | ||
| GOAL+ | TIME | This workout sets duration as the workout goal. Once the duration objective is met, the workout goes into a cool-down phase. | 20:00 | Time, Start Incline, Start Speed, Weight | N/A |
| DISTANCE | This workout is designed to build endurance in a certain distance. Once the objective is met, the workout automatically goes into a cool-down phase, and ends afterward. | N/A | Distance, Start Incline, Start Speed, Weight | N/A | |
| CALORIES | This workout is designed to burn a certain number of calories in the selected time duration. Once the objective is met, the workout automatically goes into a cool-down phase, and ends afterward. | N/A | Calories, Start Incline, Weight | N/A | |
| RANDOM | Random creates a random terrain pattern of hills and valleys that varies with each workout. | 20:00 Time, | Weight Elevation | ||
| HEART RATE+ | TARGET HR | Target HR is a higher intensity workout for more fit users, emphasizing cardiovascular benefits. The user must wear a heart rate chest strip, or keep hands on contact heart rate grips continuously. The program adjusts the intensity level, based on the actual heart rate, to maintain the rate at 80 percent of the theoretical maximum. | 20:00 | Age, Heart Rate, HR Control, Max. Speed or Max. Incline, Time, Weight | Speed or Elevation |
| WEIGHT LOSS | Weight Loss is a low-intensity workout for burning the body's fat reserves. The user must wear a heart rate chest strip, or keep hands on contact heart rate grips continuously. The program adjusts the intensity level, based on the actual heart rate, to maintain the rate at 65 percent of the theoretical maximum. And use Body Mass Index (BMI) to measure your body composition. | 20:00 | Age, Heart Rate, HR Control, Max. Speed or Max. Incline, Time, Weight, Height | Speed or Elevation | |
| FITNESS TEST | Vision treadmill offers fitness tests-the Gerkin firefighter protocol, the Gerkin protocol was developed by Dr. Richard Gerkin of the Phoenix (Arizona) Fire Department. It is a sub-maximal graded treadmill evaluation used by many Fire Departments across the United States to assess the physical condition of the firefighters. The test requires constant monitoring of the user's heart rate so the use of a telemetric chest strap is highly encouraged. | N/A N/A N/A | |||
PROGRAMS CHARTS
FITNESS TEST - GERKIN
| Stage | Total Time | Speed MPH | Incline % | Predicted VO2 max (ml/kg/min) | Predicted VO2 max METS |
| 0 (warm-up) | 1:30 | 3.0 | 0 | 13.3 | 3.3 |
| 2:30 | 3.0 | 0 | 13.3 | 3.3 | |
| 3:30 | 3.0 | 0 | 13.3 | 3.3 | |
| 1 | 3:30 | 4.5 | 0 | 15.3 | 4.4 |
| 4:30 | 4.5 | 0 | 17.4 | 5.0 | |
| 2 | 4:30 | 4.5 | 2 | 13.4 | 5.5 |
| 5:30 | 4.5 | 2 | 21.5 | 6.1 | |
| 3 | 5:30 | 5.0 | 3 | 23.6 | 6.7 |
| 6:30 | 5.0 | 2 | 27.6 | 7.9 | |
| 4 | 6:30 | 5.0 | 4 | 28.7 | 8.2 |
| 7:30 | 5.0 | 4 | 29.8 | 8.5 | |
| 5 | 7:30 | 5.5 | 4 | 31.2 | 8.3 |
| 8:30 | 5.5 | 4 | 32.7 | 9.3 | |
| 6 | 8:30 | 5.5 | 6 | 33.9 | 9.7 |
| 9:30 | 5.5 | 6 | 35.1 | 10.0 | |
| 7 | 9:30 | 6.0 | 6 | 36.6 | 10.5 |
| 10:00 | 6.0 | 6 | 38.2 | 10.9 | |
| 8 | 10:30 | 6.0 | 8 | 39.5 | 11.3 |
| 11:00 | 6.0 | 8 | 42.9 | 11.6 | |
| 9 | 11:30 | 6.5 | 8 | 42.6 | 12.2 |
| 12:00 | 6.5 | 8 | 44.3 | 12.7 | |
| 10 | 12:30 | 6.5 | 10 | 45.7 | 13.1 |
| 13:00 | 6.5 | 10 | 47.2 | 13.5 | |
| 11 | 13:30 | 7.0 | 10 | 43.0 | 14.0 |
| 14:30 | 7.0 | 10 | 50.8 | 14.5 | |
| 12 | 14:30 | 7.0 | 12 | 52.3 | 14.9 |
| 15:00 | 7.0 | 12 | 53.9 | 15.4 | |
| 13 | 15:30 | 7.5 | 12 | 55.8 | 15.9 |
| 16:00 | 7.5 | 12 | 57.8 | 16.5 | |
| 14 | 16:30 | 7.5 | 14 | 58.5 | 17.0 |
| 17:00 | 7.5 | 14 | 61.2 | 17.5 | |
| 15 | 17:30 | 8.0 | 14 | 63.2 | 18.1 |
| 18:00 | 8.0 | 14 | 65.3 | 18.7 |
| VO2 max (ml/kg/min) FEMALES MALES | |||||||||
| TEST RESULT PERCENTILE 20-29 30-49 50-69 20-29 30-39 40-49 50-59 | |||||||||
| SUPERIOR | 99 | >53.0 | >48.7 | >46.8 | >42.0 | >58.8 | >58.9 | >55.4 | >52.5 |
| 35 | 46.8 | 43.9 | 41.0 | 36.8 | 54.0 | 52.5 | 50.4 | 47.1 | |
| EXCELIENT | 90 | 44.2 | 41.0 | 39.5 | 35.2 | 51.4 | 50.3 | 48.2 | 45.3 |
| 80 | 41.0 | 38.6 | 36.3 | 32.3 | 48.2 | 45.8 | 44.1 | 41.0 | |
| GOOD | 70 | 38.1 | 36.7 | 33.8 | 30.9 | 46.4 | 44.6 | 41.8 | 38.5 |
| 60 | 36.7 | 34.6 | 32.3 | 29.4 | 44.2 | 42.4 | 39.0 | 36.7 | |
| FAIR | 50 | 35.2 | 33.8 | 30.9 | 28.2 | 42.5 | 41.0 | 38.1 | 35.2 |
| 40 | 33.8 | 32.3 | 29.5 | 26.9 | 41.0 | 38.9 | 36.7 | 33.8 | |
| POOR | 30 | 32.3 | 30.5 | 28.3 | 25.5 | 39.5 | 37.4 | 35.1 | 32.3 |
| 20 | 30.6 | 28.7 | 26.5 | 24.3 | 37.1 | 35.4 | 33.0 | 30.2 | |
| VERY POOR | 10 | 28.5 | 25.5 | 23.1 | 22.3 | 34.5 | 32.5 | 30.0 | 28.0 |
| 5 | 25.9 | 25.1 | 23.5 | 21.1 | 31.6 | 30.9 | 28.3 | 25.1 | |
- During the test
1.1 If the STOP key is pressed, the instrument will terminate the test and display "TEST TERMINATED."
1.2 When HR(heart rate) > THR(target heart rate) exceeds 15 seconds or completes 18 minute tests, the machine will enter the "COOL DOWN" state to end all test actions and display the test results.
1.3 When WARM UP is finished, if the heart rate is not detected, the instrument will show "HEART RATE LOST GRIP SENSORS". If more than 20 seconds, the heart rate is still not detected. The machine will terminate the test and enter the COOL DOWN state, and then show "TEST TERMINATED". - Test results:
Total Time / Calories / Stage Number / Test Level - THR = ( 220 - AGE) × 0.85
INTERVALS
| SEGMENT | 2345678910112314 | ||||||||
| LEVEL INCLINE | |||||||||
| L111.2 | 12131212111 | ||||||||
| L212.3 | 13131313211 | ||||||||
| L312.3 | 13141513211 | ||||||||
| L413.4 | 14151414311 | ||||||||
| L523.4 | 25252525322 | ||||||||
| L624.4 | 25262526422 | ||||||||
| L724.6 | 26272626422 | ||||||||
| L835.7 | 3738373853 | ||||||||
| L935.8 | 38393838533 | ||||||||
| L1036.9 | 393930394613 | ||||||||
Random program map information is come from interval table.

GETTING STARTED
1) Check to make sure no objects are placed on the belt that will hinder the movement of the treadmill.
2) Plug in the power cord and turn the treadmill ON.
3) Stand on the side rails of the treadmill.
4) Attach the safety key clip to part of your clothing making sure that it is secure and will not become detached during operation.
A) QUICK START
Simply press to begin working out. Time will count up from 0:00. The workout begins at the lowest incline and speed.
B) SELECT A PROGRAM
1) Select a program using the PROGRAM KEYS and press
2) Follow the prompts on the INSTRUCTION CENTER to set workout program information using or the NUMBER KEYPAD. Press after each selection.
3) Press to begin workout.
NOTE: You can adjust the speed and incline levels during your workout.
When your workout is complete, your workout information will be displayed on the console.
TO CLEAR CURRENT SELECTION
To clear the current program selection or screen, press and hold STOP for 3 seconds.
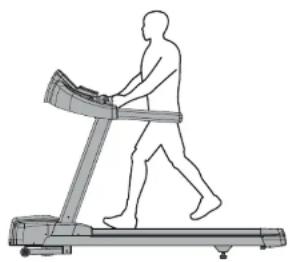
PROPER USAGE
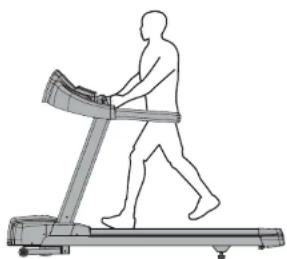
Position your feet on the belt, bend your arms slightly and grasp the heart rate sensors (as shown). While running, your feet should be located in the center of the belt so that your hands can swing naturally and without contacting the front handlebars.
Your treadmill is capable of reaching high speeds. Always start off using a slower speed and adjust the speed in small increments to reach a higher speed level. Never leave the treadmill unattended while it is running. When not in use turn the on/off switch to off
and unplug the power cord. Make sure to follow the MAINTENANCE schedule in this guide to maintain optimal performance and prevent premature electronic failure. Keep your body and head facing forward. Do not attempt to turn around or look backwards while the treadmill is running. Stop your workout immediately if you feel pain, faint, dizzy or are short of breath.
BEFORE YOU BEGIN
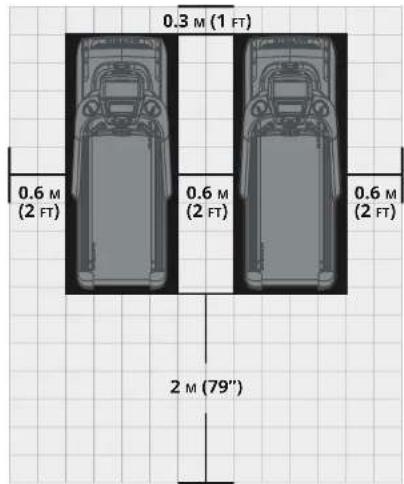
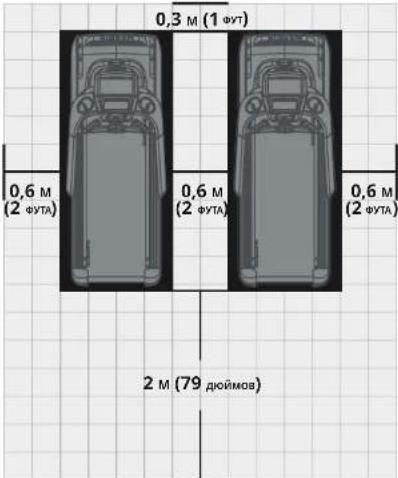
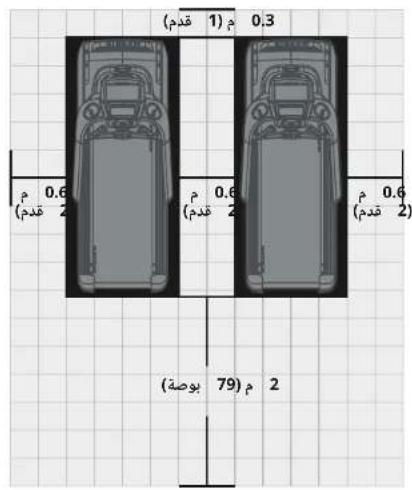
Place the equipment on a level and stable surface away from direct sunlight. The intense UV light can cause discoloration on the plastics. Locate the equipment in an area with cool temperatures and low humidity. Please leave a clear zone behind the treadmill that is at least the width of the treadmill and at least 79^ (2 meters) long. This zone must be clear of any obstruction and provide the user a clear exit path from the machine. For ease of access, there should be an accessible space on both sides of the treadmill of at least 24^ (0.6 meters) to allow a user access to the treadmill from either side. Do not place the treadmill in any area that will block any vent or air openings. The treadmill should not be located in a garage, covered patio, near water or outdoors.
LEVELING THE TREADMILL
It is extremely important that the levelers are correctly adjusted for proper operation. Turn leveling foot clockwise to lower and counter-clockwise to raise treadmill. Adjust each side as needed until the treadmill is level. An unbalanced unit may cause belt misalignment or other issues. Use of a level is recommended.
MOVING THE TREADMILL
To avoid damaging parts when moving the treadmill, only lift from areas or as shown in the image.
WARNING!
Our equipment is heavy, use care and additional help if necessary when moving. Failure to follow these instructions could result in injury. Never operate equipment if it has a damaged cord or plug, if it is not working properly, if it has been damaged, or immersed in water. Contact Customer Tech Support for examination and repair.

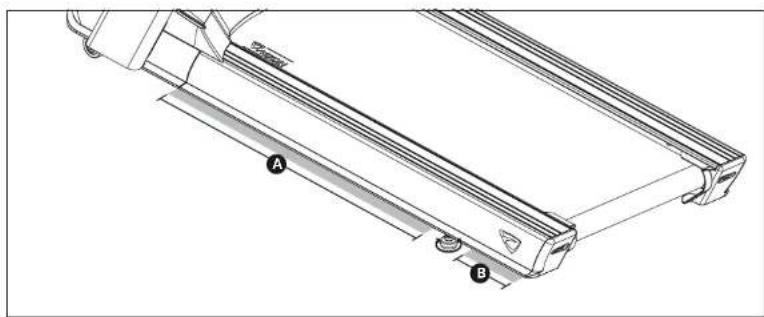
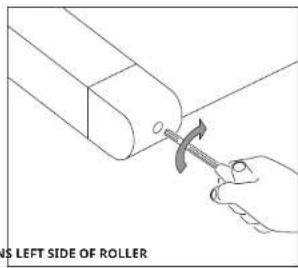
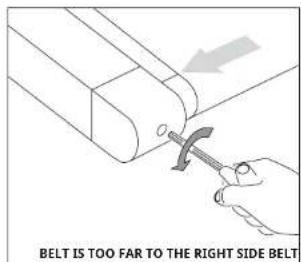
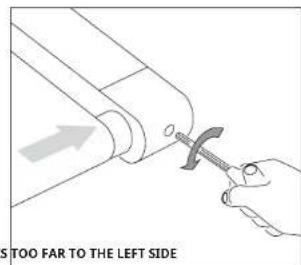
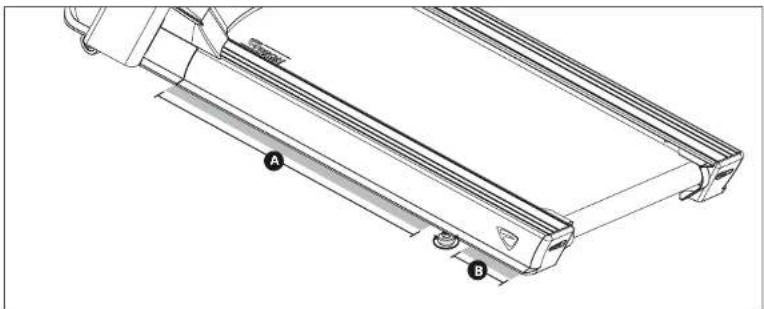
TENSIONING THE RUNNING BELT
After placing the treadmill in the position it will be used, the belt must be checked for proper tension and centering. The belt might need to be adjusted after the first two hours of use. Temperature, humidity, and use cause the belt to stretch at different rates. If the belt starts to slip when a user is on it, be sure to follow the directions below.
1) Locate the two hex head bolts on the rear of the treadmill. The bolts are located at each end of the frame at the back of the treadmill. These bolts adjust the rear belt roller. Do not adjust until the treadmill is on. This will prevent over tightening of one side.
2) The belt should have equal distance on either side between the frame. If the belt is touching one side, do not start the treadmill. Turn the bolts counter clockwise approximately one full turn on each side. Manually center the belt by pushing the belt from side to side until it is parallel with the side rails. Tighten the bolts the same amount as when the user loosened them, approximately one full turn. Inspect the belt for damage.
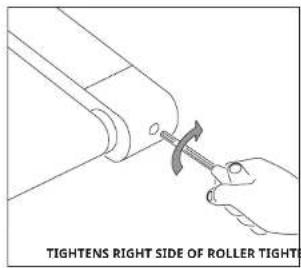
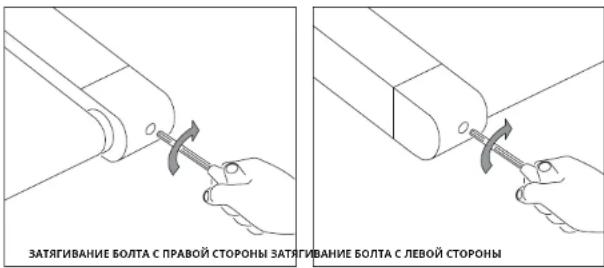
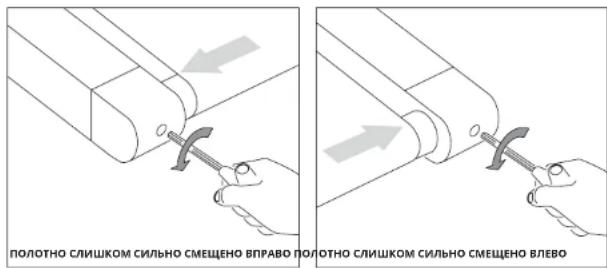
3) Start the treadmill running belt by pressing the GO button. Increase speed to 3 mph (~4.8 kph) and observe the belt position. If it is moving to the right, tighten the right bolt by turning it clockwise 14 turn, and loosen the left bolt 14 turn. If it is moving to the left, tighten the left bolt by turning it clockwise 14 turn and loosen the right 14 turn. Repeat Step 3 until the belt remains centered for several minutes.
4) Check the tension of the belt. The belt should be very snug. When a person walks or runs on the belt, it should not hesitate or slip. If this occurs, tighten the belt by turning both bolts clockwise 1/4 turn. Repeat if necessary.
NOTE: Use the orange strip in the lateral position of the side rails as criteria to confirm the belt is properly centered. It is necessary to adjust the belt until the edge of the belt is parallel to the orange or white strip.
WARNING!
Do not run belt faster than 3 mph (~4.8 kph) while centering. Keep fingers, hair and clothing away from belt at all times.
Treadmills equipped with side handrails and front handlebar for user support and emergency dismount, press emergency button to stop the machine for emergency dismount.
BEFORE USING THE TREADMILL
Perform initial setup and calibrate the treadmill using the auto-calibration feature found in 'Manager Mode' or 'Engineering Mode'.
NOTES:
- DO NOT stand on the belt while the auto-calibration sequence is in progress.
DO NOT adjust incline until the initial setup and auto-calibration are completed.
DO NOT start the treadmill running belt or press any speed buttons until directed to while tensioning the running belt.
CAUTION!
RISK OF INJURY TO PERSONS
While you are preparing to use the treadmill, do not stand on the belt. Place your feet on the side rails before starting the treadmill. Start walking on the belt only after the belt has begun to move. Never start the treadmill at a fast running speed and attempt to jump on! In case of an emergency, place both hands on the side arm rests to hold yourself up and place your feet onto the side rails.
USING THE SAFETY KEY
Your treadmill will not start unless the emergency stop button is reset. Attach the clip end securely to your clothing. This safety key is designed to cut the power to the treadmill if you should fall. Check the operation of the safety key every 2 weeks.
WARNING!
Never use the treadmill without securing the safety key clip to your clothing. Pull on the safety key clip first to make sure it will not come off your clothing.
Only engage reverse belt direction in a supervised environment. The maximum default belt speed is 2 mph and should only be changed by an authorized technician.
Your treadmill is capable of reaching high speeds. Always start off using a slower speed and adjust the speed in small increments to reach a higher speed level. Never leave the treadmill unattended while it is running. When not in use turn the on/off switch to off and unplug the power cord. Make sure to follow the MAINTENANCE schedule in this guide to maintain optimal performance and prevent premature electronic failure. Keep your body and head facing forward. Do not attempt to turn around or look backwards while the treadmill is running. Stop your workout immediately if you feel pain, faint, dizzy or are short of breath.
USING THE HEART RATE FUNCTION
The heart rate function on this product is not a medical device. While heart rate grips can provide a relative estimation of your actual heart rate, they should not be relied on when accurate readings are necessary. Some people, including those in a cardiac rehab program, may benefit from using an alternate heart rate monitoring system like a chest or wrist strap. Various factors, including movement of the user, may affect the accuracy of your heart rate reading. The heart rate reading is intended only as an exercise aid in determining heart rate trends in general. Please consult your physician.
PULSE GRIPS
Place the palm of your hands directly on the pulse grip. Both hands must grip the sensors for your heart rate to register. It takes 5 consecutive heart beats (15-20 seconds) for your heart rate to register. When gripping the pulse grip, do not grip tightly. Holding the grips tightly may elevate your blood pressure. Keep a loose, cupping hold. You may experience an erratic readout if consistently holding the pulse grip. Make sure to clean the pulse sensors to ensure proper contact can be maintained. The pulse grips are designed for pulse sensing purpose only.
WARNING!
Heart rate monitoring systems may be inaccurate. Over exercising may result in serious injury or death. If you feel faint, stop exercising immediately.
PRODUCT SPECIFICATIONS
| Max User Weight | 182 kg / 400 lbs. |
| Product Weight | 178 kg / 392 lbs. |
| Shipping Weight | 210 kg /462 lbs. |
| Overall Dimensions (L x W x H)* | 215 x 91 x 154 cm / 85" x 36" x 61" |
* Ensure a minimum clearance width of 0.6 meters (24^ ) for access to and passage around VISION equipment. Please note, 0.91 meters (36^ ) is the ADA recommended clearance width for individuals in wheelchairs.

MAINTENANCE
Any and all part removal or replacement must be performed by a qualified service technician. 1) DO NOT use any equipment that is damaged and or has worn or broken parts. Use only replacement parts supplied by your country's local VISION dealer.
2) MAINTAIN LABELS AND NAMEPLATES: Do not remove labels for any reason. They contain important information. If unreadable or missing, contact your VISION dealer for a replacement.
3) MAINTAIN ALL EQUIPMENT: Preventative maintenance is the key to smooth operating equipment as well as keeping your liability to a minimum. Equipment needs to be inspected at regular intervals.
4) Ensure that any person(s) making adjustments or performing maintenance or repair of any kind is qualified to do so. VISION dealers will provide service and maintenance training at our corporate facility upon request.
WARNING!
To remove power from the Treadmill, the power cord must be disconnected from the wall outlet.
RECOMMENDED CLEANING TIPS
Preventative maintenance and daily cleaning will prolong the life and look of your equipment.
1) Use a soft, clean cotton cloth. DO NOT use paper towels to clean surfaces on the treadmill. Paper towels are abrasive and can damage surfaces.
2) Use a mild soap and damp cloth. DO NOT use ammonia based cleaner or alcohol. This will cause discoloring of the aluminum and plastics it comes into contact with.
3) Do not pour water or cleaning solutions on any surface. This could cause electrocution.
4) Wipe the console, heart rate grip, handles and side rails after each use.
5) Brush away any wax deposits from the deck and belt area. This is a common occurrence until the wax is worked into the belt material.
6) Be sure to remove any obstructions from the path of the elevation wheels including power cords.
For cleaning touch screen displays, use distilled water in an atomizer spray bottle. Spray distilled water onto soft, clean, dry cloth and wipe display until clean and dry. For very dirty displays, adding vinegar is recommended.
CAUTION!
Be sure to have proper assistance to install and move the unit in order to avoid injury or damage to the treadmill.
MAINTENANCE SCHEDULE
| ACTION FREQUENCY | |
| Unplug the unit. Clean entire machine using water and a mild soap or other approved solution (cleaning agents should be alcohol and ammonia free). | DAILY |
| Inspect the power cord. If the power cord is damaged, contact Customer Tech Support. | DAILY |
| Make sure the power cord is not underneath the unit or in any other area where it can become pinched or cut during storage or use. | DAILY |
| Unplug the treadmill and remove the motor cover. Check for debris and clean with a dry cloth or small vacuum nozzle. WARNING: Do not plug the treadmill in until the motor cover has been reinstalled. | MONTHLY |
| For touch screen consoles, enter service mode and select 'test'. Select 'touch calibration' and then select 'start'. Follow the on-screen prompts and touch the screen where indicated. | QUARTERLY |
| Clean IR sensors (located on console masts) with a cotton swab and rubbing alcohol. | QUARTERLY |
DECK AND BELT REPLACEMENT
One of the most common wear and tear items on a treadmill is the deck and belt combination. If these two items are not properly maintained they can cause damage to other components. This product has been provided with the most advanced maintenance free lubricating system on the market.
WARNING!
Do not run the treadmill while cleaning the belt and deck. This can cause serious injury and can damage the machine. Maintain the belt and deck by wiping the sides of the belt and deck with a clean cloth. The user can also wipe under the belt 2 inches (-51mm) on both sides removing any dust or debris. The deck can be flipped and reinstalled or replaced by an authorized service technician. Please contact Vision Fitness Systems for more information.
DEUTSCH

PROGRAMMINFORMATIONEN
PROGRAMMA-INFORMATIE
SPÉCIFICATIONS DU PRODUIT
WYMIANA BLATU I PASA
Bb, BkJIOAN BcN B rpyD, TOnHOTY, TOnOBKpyKHe N
OdbIky,HeMeJIeHHOpeKoPATEy nPpXHEHnNepdIXx
BO BPEW9 TOHEUMOBK4 SCERA NOVDPXKB3A TATE KOMOPDTHbTEN
He HOCATPAPKAY, KOTIPARN KONSTHCTDHB
Kakoi-Nu6o Hactn GeroBOO DopoxxN.
PnncnoB30aHnn daHHoro TpeHaxepa Hocute
HaHnEaHbO oyB (I.e. chopnHaHy). No any noe fo aoeo
He npnre Hs eon
HAXOHTBCEFOEHOHOHO
Haeepnepnepnepnepnepnepnepnepnepnepnepnepnepnepnepnepnepnepnepnepnepnepnepnepnepnepnepnepnepnepnepnepnepnepnepnepnepnepnepnepnepnepnepnepnepnepnepnepnepnep
Bec KOTopbix npebbwaet yka3aHHb b PA3DENE *TEXHmECKNE
XAPARTEPVICTKYNPYROBZCTBAHOTB3OBATEY
Pepel 6000000000000000000
O6OpDyOBAHNAOTKNIOHTNEITNAHHE
DBBCHNTN POMBaTe NIOBepxHOCTCN MBIOM NCIERKa
BACRONPARKON,MAKENGYDE-MECHINSYBEACTABOTNEA4CMTEXHINHECKOEOCEDYJXBAHAVE
OTKHOHATEOOPVACBAHREOTPO3EKNCCMOHOHSNCNBJYESTCH
aTaKne nepeyctahOBKOu n ChaTHeM dTeanE.
PnoknoaTe 3OT TpeHaeep ToIbKO npabNlBHO 3aseMneHHoH po3eTke.
He CHMMAIte 3aunTHbIe KpUkN,ecn3To He yka3HO CneuHNTAM
MecTHbIMJUnePOMOBOPyOBAHNA,ObCnyuRAHHeOJNKHO
BnHHTBCTTOBIOABTOPII08AHHNCEPVCCHNCTeKAAICOM
100
cHMM He630NaHa MoKeT npReCTH KOTMeHe rapaHTM.
BHIMAHHE!
NEPEH HAHJIOHM NCHOJIb3OBAHINOBOPUYOBAHINIPOINTE MEINIHNCKOE OBCNEOBAHNE. NEPEH NCIOJIb3OBAHNEM TPEHAKEPAPIOOTNTPEYKOBOCTBO NJIb3OBATEJI.
OcbpyoBHeHpeaepaetc HcnoBbAeTb TnBkoB B nomeueHHx, B yCNOBHX KHOPTPmEYMO MHKPOKIMATA. Ecm sto 06pOa3AHNE NOBepraNoc bO3eDyHIO NHKHX TMepaTPN N BVKOKIN BAAHCHNCT, OcbpyoBHeHpe aepaETc nepe, nepebMn cnoBtBnHMe nnporepE rdo KO mohHn TEMpeATpyu. HecoBnEHTHrTe TneBOeBHO MoeK pIeaeCTN K PkEeDEPEMHOMBy BhoQy eekPONHO OcbpyoBHeHpe h CTPOR. HauhNanH (No ymoHuaHn) CTPOBn AcoOpch CoctAahn 0, kMn/0, (0,5 MIn/0). YctahOBKa BbOCXn CTAPoBn CkOPOCT NoYMvHMOH Moxt E BbOy ChAn Dnnl moHs3BaTe.
TPEBOAHNA K NCTOCHKYNIHTAHNIA
BbDEJIENHHAIEINHΦOPMAIURNO 3EKTPOO6OUPOBOAHIMU
[BüIeHENHAAIe] 03HauAeT, TIO K IIOBIO POZTeK, K KOtOpB BIIO NIOKIOAteCb, He OIOJIHO B6bIb NIOIOHIO HNAKO O pTOrO oBOpOBAHnA, KOTOpoe paObaTeA BTO JIe IEN. CamBI PNOCTO CNOcO6 nPOeBPITb 3TO - HAHTI rANbHYO KOPo6Ky BbIKIOATeAEi OTKIOAOBt BbIKIOATeIN NO OMOY 3a paz. KOrDa BbIKIOATeHN OTKIOHEn, To BOPOyOBaHE, O KOtOpOM IET peH, He DIOJIHO IMeT NIIAHNA. PmBIOJONHNI 3TO RTe, HE DOJIKNH IOIOHAtCBNKAKe NAMnbl, TOPOBIE AOTOMBtI, BEHNIATOPI, 38YKBOBIE CICTEMbl INIIOIOBle DPyrme INIeNl. BeckontypHa (BOINIOPOBaHHA) HeITPnA/3aEMeHNe O3HAeT, OTO KaXdAaIeBIOJIOHNa IMeTb INIHINBIVDIAHBoHe EITPAHBo/H 3AEEMIOoae COeIDNEHne, BIXOJDIeOT HEI e 3AKAHNVBAIOoeeCa HA YTBepxEHHOHOM 3aEMeHNe. BbI He MOKeTe IpepeMbKtBt. EJMHCTBEHHyO HeITpAlb/3aEMeHNe OT ODNHI cN KpyroI.
3NEKTPNUECKNE TPEBOAHNA
Дя BAUII BéOaHACHTOи OBeCEeHNeH AhdNEXaXuXx XapakTePnCTNK 6ERoBOI DOPOKKx 3aEMeHne H AToT ΜeUIN He DoJNHO VIMET KOTyPOB (doJNHO 6bITb HIOJIPOBAHnHm). CM, NEC, CTaBn 210-21 n 210-23. DAHNBOGER DOPOKKx NOCTABLRETC C cEBsBM UHPOM C HIXeKYaAHHON BUNKO I Tpe6yET yka3AHHy oCEtBuY po3eTK. JIObMo MDoNfKaVNaM daHORHO tHaPy nTaHAn MOrTy pIneBcT K aHNYIpOBaHNo BCEX rappAhT dA daHORHO npDyKTa.
YCTPOICTBA HANPRAKEHENEM 220B
Bce GeroBBe DpOoKxN VISH AnpRHeHem 220 BpE6yKt NIOIb3OBAHnA
DnTnTHAHnBbEeBnHOrHO KOnThya-216-250, B0 Fu n 20 a C
BeckOHrTpHoH (H3OIMPoBaHnOH) HeINpaIbKOa3eMnEHm. PoTeKa
doJHXa OTHOCsBC K TYNemaE6-20R N IMeTbYKe KOHNpyraQnHO,
OTU INBIA. AdApTeBc t c HINPdOyKToH ePiMeHHOTc.
NHCTPYKUINIIO3A3EMJIENHIO
YCTPOCTBO DOJXHO 6bIb 3a3eMHeO. PnB O3HNIKKOBHEIN HENCPABHOCTN
HIM NOBPEKdEHN YcPToDBA 3a3eMEHNE 06ceJIbNAe TpyHbAMHeBwE
cOPOTBNHEIA 3eKTPNCECKOM TYK,OTb6I CHMNTPBCK NOPAKEN
3eKTPNCECKM TOK. YcPTOCTBO OCAUHEO WHTYPOM, IMEOUHM 3a3eMHOHN
npoBDNHIO 6OpbyDOBAHN 3a3eMHOUYBNU BNYKa DOxHb6bIT
NOJIOHcHKe K COOTBCTBNOJE POSETEK, KOtOPAN pPABNJbHO YCTAOHBENHa
3a3eMENA B COOTBCTBNA CO BECMI MeCTHbIMn PPABNJAMN INOCTAHOBENHM
HeBbIOHEnHE NOn BOBATEEN 3TNX INHCTPyKmN IO 3a3eMENHO MOKET
pNPBeCTK A ANHUPBOAHNIO ORPANHEHNO RAPANTN HA Vision.
DONOHINHEJIbHAR 3NEKTPUeCKA INHOPMALUN
BdoHHeHKepe6oBAHIO BbIeHHeHOI cHIN Heo6xOIMIO NCIOB30BaT npOBd NOxOaIeeroceHHOnOTxoKOBn AToMAtyCeCKBO RTOBIOHATOn Do KAKDo pOeTKN, K KOTOPB 8DyET IOKNIKOHO MAKCNbIOH OJOHNCTBO YcPOrOCTB. ECnnPacctOAHNEOT bNOA AToMAtuYeCKoRTO BbIKNoHTaTeN Do KAKDo POeTKN COCTABHET 100 FOYOB (30,5M) NmIEMbue, CNeDEy IIOLOB30BaT npOBd 12-ro KANbpa. Dn paCtOaHIOT 6NOKa AToMAtuYeCKoRTO BkIOHQTaeTpoOeTKN, npeBbUAnOxHn 100 FOYOB (30,5M), CnDEy IIOLOB30BaT npOBd 10-ro KANIbpa.
3HEPROC6EPEAIOUIN PEKIM
Bce yctpoiTa cKoHpyrnpoBaHb C BoaMOnKohtbpeXeOBA B 3epeoc6epeiaoun pexmE, euny yctpoIcTeBO He HcnoIb3oAnOB b TeueHene onepenEnHoro nepnoD apemEHN. Tocae nepeOxA yctpoIcTBA B pexHM 3hK0r3e hpronotppeBENH MoeK TOpneBbAcb TaonOHInHeHOe BPEMIA Iero nolno HoropTOB KINIOHUEH. 3Ta fHykua 3epeoc6epeKeHMAOT E6bbl BkIOHueHa NtO kIOHueHa B pEXIMME AicinetpeP) VNI INKHeEP
PNEyIpyKdEHNIE!
NoqknoahtetotnpAkeoKn npabHbHO 3aemHeHHpoaete. HNcOgHa de paobotaie C noBpeXeHHM uHypom nnn BnKo, daKe ecn o6pOyBaHae paoTaet npabHIO. He cNOHb3yHe 3aMeNEe n pInHhAKam noBpeXeHHI mNporpyKeHHB BOy, ObpatATecB C nyKx TexNHcckm noDaePcKl KMIeHTOB dA aMeHbI Nn peMOHa. Hec6bIoJeHN 3xu Tpe6oBAHbM KOt PnBECTn NopeXeHHIO hAHHyPiOBAHIO rapaHTMN: B DeHnocTbA/6cOpKn npOdyTKA BCE paaBmbl BuaEO/nITAHIN DOnKHX dyHKIMPOPABoT. KMIeHT EOTBeTCTBeHHOCB3 A NOBbI DoONHHTACXoBbI npU yCTAOBKe, Ca3AHHE C NOBTOBHM NnOCUeHHM. 3NeKtpNueKcneNTAHME B BAeum PeIOHO Moket KOJIeBcB. Ndi o6e CT6MbHbHO paobTo hNcN0yTE IPOBOQHy HAeNXeALERO KAI
ONACHOCTb!
HenpabnHbOeNOJcHHeH3a3eMHOo npOBoA o6OpD0BaHN MoXET npVBECTN K pKNY pApnBbHO 3a3eMeHnI 3a3eMnI 3a3eMnI 3a3eMnI 3a3eMnI 3a3eMnI 3a3eMnI 3a3eMnI 3a3eMnI 3a3eMnI 3a3eMnI 3a3eMnI 3a3eMnI 3a3eMnI 175 cNeJIaJIACNTOM TO EcxHueCKOMY OcNcHvXBAHIO. He MOndHpUpyTe BNIky, NOCTaJIyEMy C nEJIaMEm. EcnO hAo HE NpXdoHT K poKeTae, npRNaLacite KBANIMPPOBaHOrHO 3a3eTKPa JyctAHOBKn HAnkeJaekoe PoTeTk.


C6OPKA
PACNAKOBKA
PacNaKOBuBAIte 06pOyBaOMBE T MO CTeB, C KOTOPM LAnHpyETcER Ero cKnYIOATPObAeT. YCTAOhOBeKOpeKyHa PObHYIO NPOCKy NOPExHOCTb. PekMOHcyETeNOXHTb H aONa3aOpTHoeNIOkpytHe. Hn B KOem Cnyae ToE kOBpaTeKo6pSy, NaexhyoHa NK
BAKHbIE PIMMEAHNIA
B O Bpema KAKdo 3ana Cbopk HcKOTPnpye, TcBoBCE rAHHN 60
H 60
H 60
H 60
H 60
H 60
H 60
PNEyIpyEKeJDEHNE!
HekotopbHM Mometam He6xodmo yednBt Oc6o8e BHNMAHNE Bnpouce Ccbpn. Ovchb Baxho cboaDth HcTpyknnu No cbpke NnaHexdoa3atrrBahts BCte Dantm ECnHa Ce6no4dth HnCTpyknn no cbpke,ToB 6obpydoAHN MoYrOCTaCHe3AHTyBte Tautan, KOTOpBuocnAHTy MoYrT B3bIbaTaB pdaPaxKaUme WMyBa Bo n3EkaHne NobpeckdHnOBpydoAHN Hec6xoDMo NEpeCMOpTeBnHcTpyknn no cbpke npinnarKpokKeTIPkyouMeepi.
HUYKHAIOMOUIb?
Ecm y Bac ectb Bonocbbl OtnctcyTbHOTKaneNnHO Detann,
obpatntecb B Cnycb By TeKnnueckcn noJndepkXkmHeHTOB.
KoHTAKTHMnOgMAuHa na Calite world.visionfitness.com.
HEOXBODIMbIE INHCTPYMEHTbl
T-06pa3HbI HauNIOHn RaeHbI KIIIOU 8 MM
WecTnpranHHbI TopceBOKIOU8MM
WecTnpranHHbTOpceBOKKnOy6MM
KpeToo6pa3HaNAOTBeptKa
DETAJINB KOMNJIEKTE
1OCHOBHpaMa
10okolb naHEn ynpaBHeHn, KOMnneKT
16JIOK naneynynpaBneHn
2 ctoKn naHenn ynpaBHeHH
2pyuKn
1HypnTaHn
1KOMnIeKT KpeIeXhblx 3JemeHToB
BAXHO! He 3aTARnBaIe BoNTb Do 3abepuena Wara 3
CHMNTA 1BnpeyctaHOBNEHbIX BHTA (A) 3aTatem CHMNTA KpblkX MOPTOA (1)
- ⅡOCTaHbTe KPEENKHBIE N3DENN AINB BbINOJIHEHNA WATA1.
3akpenite NEBYIO CTOKNYNAHENYNPABNEHRA(3)HOCHOBHON PAME
(2)cncnonbaonbaHnem 46oTob(B)4NIOCKNX WAnB(C)cebpxy nCH3y.
ZAPKENITE PABYO TO CTOKY NAHENI YPANPALEHIA (6) HA OCHOBHOR PAME (2) C NCMCBOHAHAIEN 4 SoTHB (8) V 4 NPOCKXU WIAIS (C) crepxyu CHNAY.
PIMPEUHAE. OTOPOXHOI He 3aueeMnre npoeo 80 spema 3akpenenmny pynk.
Kpenexhie n3dennr
nBnnonHeHwara1
OncanHe K0n-Bo
A PpeyctAHOBnEHbBvH 2
B
C nockanwai5a
OCTHBTE KPENDKHBIE N3ENNA DNNB BbINONHEHNA WAR2.
PiOc0eHnHTe PPOBOy PYKIN IINMMEPEHINIYNbCA(12). CHNNTE CTHKIN POPOBA, DABATE KUHN BHYB NEOB PYYKIN (8) 9CCTAETU KOKON PAHENY UYNAPANEHIN (9).
IIOOc0eHnWtN PPOBOD PYKU INA N3MEPEHNYINbCA(13), CHMNTTE CTHKXYPNOBcA,CHNNEATN KABN KABENBHTPNPABONPYKOTKN(10) VCTBTA BOKOLNI PAHEYNYPNAEBN(9).
PnOcDOHATREPYKIM(810×LQOKIOIPOHEYNIYPBJIENHIA(9)CNOLOBBOHNEM4BOTOB(8)E1NORHTBNXIAW(F)
Kpenexhblueu
ДЯВБИОПЕНСHA WARTA Z
OnncanHeKoB
E 60/17

3
DocHeBcKPENEXHbIeN3dEINrAINBbINONHEHnWArA3.
IpKaeHnTe NITATAOIOIN PNOBOD (4) KAEJIHO TAHANEY IUPABJHEIN (5) INPPOHNTAITAIIOOIN OOPe3 ZPAPBTO YCOKNAYI NPTABIEHN6.
NcpeTNIPOBHTAIIOOIN NITATAOIOOIOI NPOBOD 0epe3 cTOWIK KAEJIb KOHONI DOKOH Bb8 NPOKJCNH K MCB (14).OTOECHNIU NHMINTAI TIAOIOIN PNOBOD.
HYPABENHIN36CNCNPOBANHE40NTOB(4)G 4NTOHTHYBXWAE(H)
3aTAHNTe Bce 60ntb c wara 1 no 3.
YCTAHOBYTE KPBILIKY MOTOPA (1) CVCN07-306AHKEM 2 PNDVCTAHOBHEHHBX BHTOB (A)
| Опсане Кал-Бо | |
| В Бот | 4 |
| H Истутулшба | 4 |
4
-DocTaHbTe KPNENKHBIE N3DENNIA BnBnONHEHNA 4.
PcEeOaHnT KAELEI PAHEIL YNPABEEY (4) INPOBOA PyKHN DINN H3MEPHEN IYBCA7 (6) INAIEHL YNPABEEY (11) nocropoxoHnDIN NINN H3MEPHEN IYBCA7 (12)
PiueeHnne PAHJIb YNPABHEHn (11)XIOKJIO PAHENYNPABHEHn (9)cNcnoB3oBAHnEM 4BOITOB(1),4PNYKHHBXIaM(B)u4IIOCKHX WAIK(K).
OncaHneKo-Bo L BHT 1 M UHPNNTA H 1 N PnHMAHnHa 1
CBOPKA 3ABEPUIEHA!

PABOTA C PAHEJIbU YNPABJIEHNA
OKHO NPOΦNII PNOPTPAMMbI
OTo6paKaJr IIOpKIN, hNcAeMyoPnPAMM (HsHaHeMe KcOPCTaBnI pPpAMM, OCHOBHbHx KaCOPCTa, N3HaHeMe HkIoHOA rDpPAMM, OChOBHbHa HA KAtHOE).
3 CEHTP YACTOTbI CEPdEHybIX COKPAUeHn
OAnbpaKaetAikTaNyHIOIeBENHYIcAOTCTeCEPdEHNiCkOPaENHNO BpEMR TnEHPOBKM.
OanbnyApNABnEHOnObpaKaEToOBpaKaETAOCTOePcEPdEHNiCkOPaENHNO BvHTpeBA15-20cKeyHAD
NopeCTBOMCBnCceCPoAMNHmMnONLbOaBNHNRHarpdyHOrOyCTPOBCTBAHMepeHCR
HC.BnpopammeIENEBOHJACTOTBIECPEDHHIXCKPALLEEHIVBEeEBehnaCC
OobpaKaETaHaIKpaeKakDJI60cKeyH.
G INHCTPYKTOPCKN UEHTP
P0aIaOo OTObpaKaTeYk3aHnIy IaHcTPOKII NpOgAMMb.Bo BpeM TpeHIOBkN OTObpaKaOTcBpeM,TEM, HAKIOH, PAcCTOnHHe, CKoPoCTb, ypoBeH, KONIECTBO KaOpHm I METAbIoNeckK 3KbHbAEHT.
KOHTPOJIbHAR KHOIOUHAR NAHEJIb
Paaanrnt noh3oateHn HacpnaBbI nporpaMmN KOHTpnpoBaT bpHApOBy.
1UHPOBAKJLABNATYPA
NIOBbEyETD INBBOAaHnHexIPOrpaVMAHbI SO BPEMcEyCTAHOBKn. HAXMMTEyNEoNDTepeXpJedHeHACTpoek.HAXMMTEyNEoYdaneHema eue He NOITBePExDHNHHaNNbHMy BnIOeCEHAcTPOKn TRePNHOOPK
②CKOPOCTb HAKIOH
NcnoBcyETCA DnpeynipobAHNAHCTpoek CKOpOCTn HAKHOHa.
3GO(BITEPEA)
HaKMMTe, 106bHauaTb TpeHpOBy HeaAmeaHnteBHo, 6e3 bH6pa nporpaMmbl.
(4) cron
Haxmite CTOJI IJI 3BaepeHHnE TPHPOBkN. Haxmite VyepKbHaiBeT B TeHneJI TPEck cyeku, ytsb6c0pncIb HactpoKIIa HnepnIe HynpAeHHNRe B XCDHNOE COTOHNIH.
5NPOTPAMMUPYEMBIEKHOIKN
HAKMITEJINBIBb6paIpnpaMMb.JIINGa+I{IeBa-}n HeartRate+UCC+ HAKMITEKHNKOYXTOENop, NOAHENoBACATBcNEbOxObMbIpe npopMaMM.
CBEDEHNO O PPOPTPAMME
B.BbIbOP IPOPTPAMMbI
1)CenaiheBbOp nporpammbcnnooHKOHNOKIPOPGAMN HANMAHTe
2) CnEyIeY3AaAHMIM VHCTPYIKTOPTCKOIOIEHTPAJHnHCTPOKINpOpaMMbTpeHnPOBKN,NCIOJIb3yNnNnΦPOBYOKNJABMATYP.NakHMaiTeNNOgTbePdENHbBbOpa.
3)Haxmnte □nHaana TpeHnpOBKn.
PIMMEUAHHE.BoBpMaTpeHnPOBKNMOXHOperynHPOBaTBCKOPOCTb N ypoBENH HAKIOHa.
C.3ABEPUHEHME TPEHHPOBKIN
IO KOHANHIN TnpHOKKN HINΦOPMAI O ee peyJIbTaTAX 0o6pa3HTA Hn aeHN ynpaBHeNIA.
YDAJIEHNE TEKUYIeTO BbIeOPA
IydyaneHnTeKbHbOpaNpOpaMMbINydyaneHn HOpMaUMcKpaHaHakMnteNydpkBaTKe KHONKY CTOI BTEueHnTePteCkyHd.
NOPRAOK NCHONb3OBAHNA
BCTaHbTe Ha 6eroBoe noToHo, cnerKa
COnHHe NnBn B03bMmTEcBa 3a CenCOpB1
CaTObTc cepDeyHxK CoPakHEni
(Ka KIOka3aHO Ha N3o6paKeHn).
Bo BpMa Ege BaNHO HrO JIoHNb
PaonlAorabno NO ChETpy B6IBOrO
NoToHa,HTo6bH HnHrero He MeIaNO
ectCTBeHHOMy DBeJHKnHO
pykN OHn HE conPknKAcAcmCb
CnepeHIMn pyKamN.
BeroBaJdoPOKKaMOKetpa6oTaB C bCkoKoK CKOPOCTb. BcTea BIOHOaHTe DOPOCKyHaHNIKO KDOPOCTY
n NobbIaTbe CkocOtB NoctenHNo. BKnIOHeHHy BoEByo DopoxKy HeNb3r OCTabNtB 6e3 npCmToPA. Ecn TpeAkapHe p IcNcIbEytcB, BkIOHOTnepeKIOuateB n OTOcOeHNiTe WHP NTAHIN. PnpDePekXBIAeTbc TpaФMkaTEXHVCEKOFO OCBJYXBAHIVN IS dHaHOro pykoBOCTBa Jn oKeppKTHOH paBoTy npeOtepaeHHEN BbXoDa NkETPOHnO BOOpDyABaHn 3 cTPOB. H a SeBOERoDOxKcCNeDyET CTOBn IMoOM BnepeD. H bTaNtAEbTcBepHpycRnnn NOcMOptBe H3a3d BO VpeBmE BnIXeHHN IOHOta BeBOrO DOpOKxK. He3aMeIeNTbHO pPeKpaITe TpeHnPOBky, eCNbl YNOvBCTBOAbN 6bn, cAboCTb, roLOBokpyKxeHne nn OduBkiy.


IPEDAHAYAION
PACNOLOXHEBEROBOI DOPOXKIN
YCTAHANBIAIeO6OpyDAnBEH aPOHOH NcYTOHINOBNEBOEXPKCTN BAAJIOn OT pPMAFO COENHEHO CEBTA. INTHECNHBOE yIbTpApoHIOHe N3UYneMeoK NTPOBAtb K bUbaTeBAHnNtACMaCCs.PacnONARAE 6OByDpAHBe H 30Ne YEmeHHX TEmpeyTu H NkHo BAHCKTt. ObecCteYe aBaBEOJDPoKxO He MeHee 2 M CBODHOrno PooctpHaTBA. B 30Ne 30Ne He DoNHO b6Itb NKAKAX npenATCB.Tb. OaDOHx ObecCteHbNTABAOBIE NIKM Nyt bOtXaOd tTrpehKePA. Dny dOCTBa DOCTy c ObeXn CTpOH G6OBorOdoPOKKHe6OxDMIO O6eCeHTb He MeHee 0.6 M CBODHOrno PooCTPHaTBA. KOtOpoeObecNeHNBOBtIO JOCTY K BoEOBorDOPOKx C NObO ToPOHb. 3aIPeuaeTa PAaMeuAta B6Oby DOPOKxy B30Ne, KOtOPa8 dyet PekepbuBAt KaKeNMo BENTNaMOHcKaHAn NmOTepCHy. BerOyo DOPOKxy He PaapeuETCAYTHANBIAIb B TaRapae, Ha KpBoTo TReppace, PpIMo C BOIDN NnND OTKPbHM HeBOM
BbIPABHINBAHNE BEGOBOI DOPOXKIN
IINI HADNEHAeKCNNTAYAaUpeB3HbHIO BAXHO pOTRyPnOBATy cTPOCTBAI
BUPAHHBAIO. POepHTBE BpAPBBAIOO HOXky NO CACOB CTPEKe,OT60b OYCTbTb
BEROByo IOPOKKY,IPOTAVACOB-OT60b PNOHTBE.EBpABNBAITE KAKDYTOCPOHy nMepe
HEOxBOAMCtO, NOEgBAER DOPOKHe bEydt CTOrb POHO. DcBnAa HCPTyAO MOKETPiBECTN
K CMEUEHNO BEOBORIO NpOTHa NpyrIMTOPbEMAM. PEKOMENyETCRNIOBbOAByTOPBONy
IPEPEMLEHEBEIOBOOIOPOXKIN
BIOH63eKANI HOBPEKENHI BOEBOI DOPOKO BIOBPOE EpepeMeHHAIOHMAITE TOBKO 3a YNACTKO AAI N KAK POKSA3HO HA PHCHyKHe.
PPEyPPEKDEHNEI
O60pyoBAnHe Meey 60yIyMo CACY.Pn Iero epeMeuHn HooXoJMO DEeCTOBAR EOTOPXHO INHoeXoJMOcTIN pnoIEAeT NMOUKNKOB. Hec6IOJeHne 3TNX INCHyPCKL MOKET PnRECTN K TPAJBAM.AANPEIaTeCN 3KNTYATAUHN 6EBOBO DDOxK, cyn Jye NoBpeKEn CHyO INN BUNK, cyn OHa He PaBATOe aONKbMn bAp43m, NpOpeXeHn nn nnpRyKanac B Yo.BogApTeCb CnykXbTexNHueckOn NOpeKpn KIneHToD AOMPTaN nn pemOnTA.
HATXKEHNE BEROBOTO NOJOTHA
Nocye TAYaHOB GEROB DOpOxKHa MeToe e KcNnYATAuHIN Heo6XoMn POpeBtN HATxKHeH NcETPbOy BeGOBO RNOHTA. PeryIIMPOBa BNaONaTHoM KOMeT NOHaDObTaBc Nocpe NepBbX DByx HAcob KcNnYATAuHIN TemNepatypa, BnaXhoCTb NcKcNnYATAuHIN pNBoBDaR T paXkTeHHNo nOtoC aHmHNIO HIneTCHVBOHctbO. Ecn noNtOHO NaHaeH nPoCKaNb3b1BbT, KOrJa NpOBaTeBn HAcOxITn HA en, CneJeDyPeBNHeHn IMHexeH NcHrTpKYMaJn
1)HaHnIe Ta 60nta cIeTirpaHHoI roNbKO HA 3aHeJ qAChn 6eroBoi DopOxKn. 50ntbI paoNIOXeHbI cO6ExN CTOpOH pAmB I 3aHeJ qAChn 6eroBoi DopOxKn. OH nCNOB3yTOcra PaeryIpOBKa 3aHrEro poNkna POONHa. BByOnHRepeYpNIOBky ToLbKO nOcne BKnIOe HBeBOO bOpOxKn. 3to N03BOnl N36EeTa 3uNNHReTo 3ATRINBAH Ha OHOH CTOpOE.
2)NoItoTHo DoJIKHO paCOnonaratbTaTakMI Obpa30M, TcOb6i C KaXdoJ CTOpOHb Do paMbIOCTabAOBc ODAHAKOBoe paoCTOHNHE. Ecnla NoItoTHo KacaTeaRC paMbIO C OIOH CTOpOHBO, HteyCNsAHTe6 BOEoHy DOpOKxq. NobpeHHTe6 BoTbC KaKdoJ CTOpOHb PnIPbNtAEHbHO Ha OdNH NOnHbN noBopOT npOTbYacOBo CTpeKNk. BpyHuOy OTpeYNpUyTE nIoNOXeHne NOIOnTHA, DBeRan ero I3 CTOpOHb B CTOpOHy TAKMI Obpa30M, TcOb6I OBO bIO paCOnonooKe npAnPEnbHO 6OkoBbIM ONopAM. 3aTaNHe6 BoTbNpINbNtAEHbCO TcMe Xe MoneMeTOM - NoepHernt Hx HA Odn HO oOABoT No YACOBo CTpeKN. NobpeBte NToONTOHa H aNNHue NopeKedheni.
3) HAXMMTE KHOKNGY GO (BITEPED) — nonoTHO 6eBOGIO DOPOKKx HAUNHAET BIXKHeH. YBENHbTe CkopocTdo 8,4 KM/h (-3MNHN/), H6NIOaTe 3a nonoXeHem NO nTOHa. Ecnn OHO CMeUaTaBnPABO, 3ATNHIE npabB oNt, NOpHByE roh 3/4 oOpota No hAcOBon CTpeKne, IocNAbSe 3aTARKKy neBOgONa, NOpHByE roh 3/4 oOpota npOTB NACOBon CTpeKN, Ecnn OHO CMeUaTaBnE BOB, 3ATNHIE neBb 60NT, NOpHByE roh 3/4 oOpota No hAcOBon CTpeKne, IocNAbSe 3aTARKKy npabO BOBtA, NOpHByE roh 3/4 oOpota npOTB NACOBon CTpeKN, NOpToprue uar 3 do Tex nop, noka UENTPAHBoe NOXeHHe NOnOTHa He 6yDet COxpaHrtBa B TceHHe MecKoKINMHyT.
4)Ппберьт haTЯжснг noToH. Oho doJxHo nIToH npnneraTb K Deke. KOrda noJb3oBATEbI Wdnt NII6BekHtNo noToTHy, Oho He doJxHo npIOCTaHaBnIBaBcra HnnpocKb3bBaTb. B npOTHBM Chnye hAHTaHNe noToTHo, noBepHyb 6a 60Ta Ha 16obopota noHaCBOB CTpeJIke. PpH Heo6XdoMOnCTN nobTOPIte.
PIMMEYAHNE: T06bI npoBepnTb npaBnHocTb ceHTpOBkN noLoTHA, nOIOB3yIe rop3OHTaNHyO opAnHEye BNOONCK HA 60KobXbX onOpax. PInn Heo6DmoCnO tpyenlpnyTe NOnOKeHne NOONtA K, Tc06bI erO kPOMKa HxOdoNcB npaAanBHe OApHKeBvNN GNoN NOONcE.
PNEyPKeKdEHNIE!
Bo Bpema ceHTpoBKn He 3anyckaiTe nonoTHo co ckopocbTo bblwe 4,8 km/4 (-3 mn/4). He donyckaiTe nonaHaHn naIbueB, Bonoc n odekbs I nooTHO.
A 60000000000000000000000000000000000000000000000000000000
cOHTn cdoPoxKn: HxMnte KONkY aBapuHoro oCTaHOBa dIa OTKnHoeHr TpeHaXepa.
NEPEI NCIOJIb3OBAHnEM BEROBOI DOPOXKIN
PpOu3BvIe npBOHaunbHn 3anyck nOTkAn6pyTe 6eroyIO dopoKky, nCOnb3y4y fHKUHO bTOKaUN6poBKn B pexKMe «DcneTep» mIn «INHexEep.
PIMMEAHHE:
HE BCTABAITE Ha noToHO Bo BpeMa ABToKaJIb6pOBeKn.
HE PERYIINPYTE HAKNOH Do 3aBepueHHnepBOHaauhboro 3anyckn ABToKaN6pOBKn.
- HENB3B KBNHATb DABXHEHNE NOLOTHA HNN HAXNMAb HA KHONK perynupOBAHNA CKOPoCTN DO NOYUeHNA YKa3AHN BO BpMa HATRKeHNA 6ERBOrO nonoTHa.

BHIMAHHE!
PNUCKIIOJUYEHINTPABMBi
He 8ctabaihe Ha 6eBOe BnOHO H npooce NpOIOBKA K nIOHsOBAHn odoPCK. Ctabr hno H ha 6oKoBc OOnpe nped BkIOChEhem Ebero0do pDOxKn. HauHnTe XoJb6y no DOPOXe Tohko Nocte Tno, KaNIOHO HAuHn EtBmXeHne. HeNb3a BkIOHtB 6eBOyHO DOPOXe C bUcOKO K copoCtBu H a3pIbnHbAT Ha He! Pn 603NHOBENH upe3BBvuaHoi Cntayu yBXaTInTe bpyKaMn 3a npObe, paONNOBENH No 6oKAM, pmoDnMOHCTe N a3TbHe T ha 6oKoBc OOnpe.
NCIOJIb3OBAHNE IPEDOXPAHNTIbHOFO KIOUCA
Borobao doxopka He HnHapb oabTy, Noka HnKaTa KHOna
abApHHOrO octoHaHO. HaeKHeO 3akpnpeTae 3aHnBa aoeJ OeKeJ,
3ToT npdoxaHantelhMy KKnu pa3paOtaH anr Tora, UtoBbMknHHTb
nHnAthe BoRoo doxopka B Cnyae BaIero nHaenJa. IpoBePaeI
pabOt npdoxaHantelhBO RKnho KaKaHe 2 HeJaJIa.
PNEyNPEKdHNEI
He nons3yirecB 60beiDpOkoH, npEbpAtenbHO He npKpENBEzAKIM npedoxpaHntenbHoro KIOaKaK OdoKe. PtoHnRE zAKIM npDeoxpaHntenbHoro KIOua, TTOby6eBdCBAHcBcBaWaeOeXbI.
NcnoB3yIe 3MHeHene HapBanMeHNO XoTa TOnko Nod HbIoNeHMeN
NoTobOBHeHO HnCTpyKTopa. MAcMmAbHa NKcOpCTB DaKeHcNEH NoToTHa
2 MMwUe, OAt MOKeT 6bTb 3MHeHema ToBko ABTOPbOABHHbM CneuJIaNTOM.
5eBorAdoPoxka Moxt pabotb C bBCOKO KcPOctbIO. Bcerda BkIOuOaIte
doPoxkhy Hn3KoK cokactn NOBbIaHte cokoptb NOCTENHO. BkUHOeHNO
6eBOyO doPoxkky Hn3Ba octabNt 63 nepNCMPTa. EcnI TpeHaxep
He nCnIb3yETc, BkIOuOHTepeKKnOATeINb NOTcEOHNITe HYP NTaHANr.
PiPdePckBaTBeTc rpaPfKa TEKHNECKOTIO O5CJNYBAHIN 13 dAnHOrTO
pykoBDCTBA JnKOPEKTHoN PAb0fN IN PpeDTBPAeHN BbXoDa 3neKTOPOHHOR
OobpyDABAHn 13 cTPO.HaBeroHO DApOKe XcEET CToRb NtCM OIEpe.
He NtIaTcB PaeEPbYCb INNNOCMTPeB HA3d BO BPEMA BIXeHXO
PnNTaHGERo DOpOxKs. HBeAmeDInbNIO PpeKpTaTIe TPHPOKBy,
ecnBnNooyBCTBOaBN GoN, cnaocbT, rolONBOPxHEnm nnObluKy.
NcIOJIb3OBAHHe ΦYHKUIN YACTOTbI CEPdEHybIX COKPAUeHNI
HnHnHnHnHnHnHnHnHnHnHnHnHnHnHnHnHnHnHnHnHnHnHnHnHnHnHnHnHnHnHnHnHnHnHnHnHnHnHnHnHnHnHnHnHnHnHnHnHnHnH n HbAeBcBcBcBcBcBcBcBcBcBcBcBcBcBcBcBcBcBcBcBcBcBcBcBcBcBcBcBcBcBcBcBcBcBcBcBcBcBcBcBcBcBcBcBcBcBcBcBcBcBcBbC BbC BbC BbC BbC BbC BbC BbC BbC BbC BbC BbC BbC BbC BbC BbC BbC BbC BbC BbC BbC BbC BbC BbC BbC BbC BbC BbC BbC BbC BbC BbC BbC BbC Bbb C Bbb C BB C BB C BB C BB C BB C BB C BB C BB C BB C BB C BB C BB C BB C BB C BB C BB C BB C BB C BB C BB C BB C BB C BB C BB C BB C BB C BB C BB C BB C BB C BB C BB C BB C BB C BB C BB C BB C BB C BB C BB C BB C BB C BB C BB C BB C BB C BB C BB C BB C BB CBB CBB CBB CBB CBB CBB CBB CBB CBB CBB CBB CBB CBB CBB CBB CBB CBB CBB CBB CBB CBB CBB CBB CBB CBB CBB CBB CBB CBB CBB CBB CBB CBB CBB CBB CBB CBB CBB CBB CBB CBB CBB CBB CBB CBB CBB
PYKINIIN3MEPEHNIYJbCA
PacnoLoKxIe IaDnB npmo HyaPyke IaMpeHepHaynbCa. dner paeTpaunl Hactotbl cepdHuXcKaopauHEn Obse pykDaonHbXaaMmaHcbocHp, dner paeHtpaumc CepdeHoro pntMa Tpe6ybet 5 NoCpObeoatahBbXcpeDeHnx CcpAuaen (15-20 cekHy).Piir 3axBaTe pyek dy IaMpeHepHaynbCa He CnpEy Jx CInbO daBnaHT. PtoHoe CkMaHne Pyek KMOEpiPBeCTK N KobuBHeIO KPOBHOBO DApenn. 3axBaTdoKeN BbTy CboOpDHN OXBtaTbBAHOUM.PnPi NOctOBHOM CkMaHmYpyek y Bac Moet HabIoTaBc HeyCToHbBO CHTbBAHNe. O6BaTeBn HOUcTIeNbYbcomETbpy, ToB6yObeCneHTb. HApLaKaasn KOtAKr. PYKAnI DaMpeHepHaynbCa pndHa3aHcyeTO bToKBo dncHTbAByan Npb.
PNEyPENKDEHNE!
BoMxOHHoNpEHOHCTN CHTEM MOHOTAPHRHc YU3HYPPOIOe ynpaxHEHn MORY TNPBEcTN KTAKEBm TPMABMM NtANbHOMy XCOyEcN Bbl CYBCTByTe 6bn3Oct bO6mOPKa, HMeENDEHO NpEKPATYe nypxHEHn.
CNEUINKALUNI3DENN
| Моск. Всес几乎所有 | 182 kr/400城乡居民 |
| Маса Идделя | 178 kr/392城乡居民 |
| Травлий Росточьая Маса | 210 kr/462城乡居民 |
| Габаритные рамеры (Д × Д × В) * | 215 × 91 × 154城乡居民/85" × 36" × 61" |
MNHIMAbHAR CBO6OJAH3 OHO BOKpy 06OpDyOBAHN VISION DOxKHA COCTABNTB 0.6 M (24")
06OBcEeHHN 6oNEPNER TCTBEHNORIOCTNYA K HEMY. ObpATNE BHMAMHE HA To,
TO pAOCTOHME IANBOBATEEN B INHBAHIXO KONKCKA, peKOMEHDOHHO B3KOHe
03aHTpe np8pRaxdH cOrpaHnHBMn BO3MOXOTHMN (ADA) CLUA, coCTABNTB 0.91 M (36").
TEXHnueCKOE O6CJyXKBAHNE
dEMOHTAKI 3aMeyHIO6bIX DetAeBpaapeuEaTc BUNoHnHbTo TLBoX KOaINHnHpOBaHOHMy CneauAIAO NO cepCNCHOW OBCxNBAHUMO.
1) HE nCnOblyIte obOpDObAHme, eCNH OHO NOBPExeHIO, IMcEET NHOUeHNbIe WNI CNOMaHNHe deTANI. VcNcNoBlyIte IpemOnTa ItoKko 3aNaChbIe cAchTI, nppeOCTaBHeHbIe dJInePOM ObOpDyobAOHIAVION B waeB CTpeA.
2) COXPAHAYIET MAPKINPOBKY I NACNOPTHBIE TAE 5JNUKHNpN KAKNX O6CTOATENBCTBX AYdJIaIHTE MAPKIOPOBKY. OH MOKET CODEPKATb BAKHYQ INHOPMAUHO.EcNI MAPKIOBAK ATyCTByET NII TEKT Ha HEBO3MOKHO pOHTaTb, o6paTNTcK C KBOEM dInepy 6obpyoDBAHN VISION I JnZAMHeH.
3) PNOBQIDTE XHEHNECKOE OBCJXUYBAHIE BCEOF OPBOYDAHIER. PINOPAINIAUTCHEE KEXOYCNKBAHIE YARIBTCE KIAOHEBMNI JEMENOTDM HAIJADKEAUJI PA60TIb OPBOYDAHIER INCHIKENHA BAAEI OTBTCTBEHNCTN. IPOBPKA bOPYODAHIER DOHNKA PNOBQIDTNCA UEP3P EPERIABHPb PNOPEKTYKIP ENPEIMIA.
4)BcepaTbNo 6cbnykBaHnIO pemOHryIpyrpoKe o6bpyoBaHnO pKHyblnoHtbc KaBnAeHpOaBaHn HnpcoHaN. DyepbVVISION no 3anpoCy npObeDyTobuyuHne NoTexHHecckMO Bc6yKnBaHnIO HA HauEi PnouJaQke.
PNEyNPEKdEHNEI
TcBb6 TcKbHbUHTaNHtAeTc0Be8OBoDpOoKm, Heo6xoDMBOBuHbTy bHpyTnAHyNt3AcHeTHHO pO3EtKy.
PEKOMEHDAUIN NO YXOY IN OUYCTKE
IpoNnAaTcHcKoeTex6XcybAHe H exEeDHeAaO hCtckp npOaT pCK cNxyBbAeTooOOByDnHnYvUHATr EoBHeunu BnD.
1)NcnoIb3yTe MArkyo HcyTyo XnONKOByTO kTHaB. HE NcIOJIb3yTE GymaxHbIe noNTHeu dAnUeHHaNE BOpEXHOCTeBEROBoD OPOKKn. ByMamKbIe noNTHeu a6pa3INHbIc OHMyrTONoBepOCTb NOBEPXOCTb.
2 CpeOCTBaC oepKHeM AEMMAHnA n cHPTa OHTCAaHbIMn CpeCTBmMOKETI PnABCTN K3MEHEHHIOBETA ANOMHIAH N IAACTNKA
3 He NalnaBte To Bovn HUCTTne CpeCDTa H a NoaepxHcStn bOpdyobanBa 0a36ExAHaeN PnApKHeHNeAeKTODtOKM.
4) PnntyaPte naheJIy npAynIeJIy, pyuHJ dy IaIepeRHH nyIbCa, npOyHm I 6oKOBbe OTOpIbIO neKao KcJgTO nCnOIbOAHIN TpeHaeJa.
5. UOJIaJIe TIOIbIe CIEBc BOKc HApEe I NIOLOTHE. OMOYrTPOJARLTbC, NOCKOBKY BOCXOM 6oBpOaTbN MaTePnAIN POLOTHA.
6) 6bEaHTCbB T BOM,TOYcYCTpaHEHbI LIObIe pENrTCTBnHa H aNITI NIObEMhBX KOncE, B TOM UHCAE HUNbpyiPITAHAn.
An ouhctkn cncnopbHx dncnneBnncnob3yire nubepn3atopc nctnnnpobahno Bdoio. PaBnntte dncnnpobahnyo bdo HA mkiyo,nuCyo H cyxo TkAHa, npotprte eo dncnne D noonoh ouhctkn h 3aTe pnpotrE rO hcyxo.Dn Cmblho zarpaehnhbx dncnnee pekoMeHyeretDIOabNtB B doy yKyc.
BHIMAHHE!
BoI6zBeKaHn TpMaBn I nOBpeKdEHHN 6eBOOi DOpOoKKn O6pATInTeCb 3a NOMOuBIO npYCTAHOBKe nIepemeeHnN 06OpDyBaOHn.
TPAΦUK TEXHnueCKOTO OBCnyXUBAHIA
| ОПЕРAZИЯ | ЧАСТОВ БУПОЛHEНД |
| ОТКLOЧITE yctropoCTBO. OЧИЙМЕ BCE yctropoCTBO С ИСПОЛБОННОМЕ BOДБ, МÁRTКО МÍЛьнÓТо раCTBOPA ИЛ Ильх разрочЕнDHx CpeCTB (чіп'thушіпсіпісі СpeCTB经ДолЖи coDEpXaTH спгота и AmmMak). | EXEДHEBHO |
| ОСМТРΙΥ ΜΥΡ pNTAHΥ. Ріп оБAPУЖЕΝΗ ПОВPEЖЕΝΗ Шypа oбатпесь в СпчБу TeхнUCHESKO ПОДЕХКИ KIMETTOB. | EXEДHEBHO |
| УБЕДСТЕСВ В TOM,ЧТо YHYP pNTAHΥ经 HAXOДTSC пдО YCТРСТВOM ИЛ И ПОПАВ I BDPYTO OБПАСТБ, РIDEО MOXFET ZaSHTMHTBС AII NII NOВPEDITCY BO BPEMA XpHANHΥ ИИЗ KECПЛТAZAUÇA. | EXEДHEBHO |
| ОТКLOCHITE 6BEROуDOROKKу OT POZETKINI CHIMNTE KPBISKU MOTORA. Ріп HAIHIVNIA ZaRPGAHEHΥ UDAJIЯTE IX C NOMOДБЮ CxOYU TKAHI NIIblbncoSа C HeBONSLW HACAJKO. | EXEMECRYHO |
| ПЕДУПЕКДECHЕМ. He pOKLACHAYTE 6BEROуDOROKK catereвО POZETKД ДУТАНБКИ KPBISKU MOTORA на МетTo. | |
| ДДЯ PAHENI UYPaRABNHY CseHCOHIM EKPAHOM BoYdITE B PEXKIM ОБСLEЖАHAHNY ANDI BIBEPUTe test (TeT). BbEBPte touch calibration (CeHCOHAN KALIMOBROBA), a 3ATEM start (Hauchy). Ciedltyte ИИТСТРУМА на ЗКане и Касадтсь крану, РIDEУКAZANO. | EXEKBAPTALHBO |
| ОчиДАЙ ИНФРAKРACSы DTAMKINI (pacnoLoXeHNBHy н STOKE ПALENHу UYPaRANENHΥ) ріп рОмоць BAthOro TAmNoHa и ростючуго спгота. | EXEKBAPTALHBO |
3AMEHA DEKUNI NOJOTHA
Han600ee 6bctpo3haaunBaooMncc DeTalamn GeroBOpDopokknn RnBIOCTe Kda nnoTOHO. Ecm 3nIb2AneMeHTe HnepeKBAOHTB BICNPAOBmCocTHOHNN, OHMOYRT CTb npHvNHNOp9aeXeHApdyHXN NdeMeTOB, DAAHoe YcPOTCTBO OCHaLHeO cAmOy yocobepueHCTBOAHN CttemOe TXe6CnYXhANBaH Na bHKe, He Tpe6youei CmaKn.
NPEAUYPKEKDEHNEI
HnB3a 3anyckb BerOyIO DO pOeKx O BpEIM PooceCA TcKIO N oekn EoKmT npMeCTN KTKeIb TM PAaM N OpeKdEHNIO OOpdyOBAnH. IpotpAte6 BoKoBc STOPOHIO IIOHTA Heky Oeky ToAKnHO. TaKe OEKO hnpOITpAB TIO NOLOTHOM (51 MM; 2doJIaM) C bByx TcTOH D yANeHNu N aRap3EHnH. TOnko ABOTOO3OBAHH cepuHCHNI CIIaIINM CTMOJ IOApAHNBAt, MeHbT N nepeCyTAHANMBAT, eky.
7nD noP60hH nHFOPMauN O6pTaTReB kOMMaHIO Vision Fitness Systems.

日本語
重要な注意事項
本說明書は大切に保管てくさ。
aessll paaeae aee (a) 1000000000000000000000000000000000000000000
y
( x - 1) ( x + 3) = 0
()
| x^ | = 1| x|
Jll 5g jaoa oao oao yogj gai jg
1
20000000000000000000000000000000000000
jannnnnnaa aay 3g jadcll
aal 1000
70(gao)
1gao 000000000000000000000000000000000000

pssssssssssssssssssssssssssssssssssssssssssssssssssssssssssssssssssssssssssssssssssss
aee aee eae aee aee aee aee aee aee aee aee aee aee aee aee aee aee
J
aeggaggg jyj yj yj yj yj yj yj yj yj yj yj yj yj yj yj yj yj yj yj yj yj yj yj yj yj yj yj yj yj yj yj yj yj yj yj yj yj yj yj yj yj yj yj yj yj yj yj yj yj yj yj
aolal ayuS ologao
aagglg aal gaaagaaal yall plaaal gaaal aal alal 100 30.5 p100 aagaae 100
aiaaaaii aaiii / aiilaiy ggi
aal / aalal yag gag gag gag gag gag gag gag gag gag gag gag gag gag gag gag gag gag gag gag gag gag gag gag gag gag gag gag gag gag gag gag gag gag gag gag gag gag gag gag gag gag gag gag gag gag gag gag gag gag gagg
!
a a a a a a a a a a a a a a a a a a a a a a a a a a a a a a a a a a a a a a a a a a a a a a a a a a a a a a a a a a aaa
a_i a a_i 的最小值为 k .
y 10000000000000000000000000000000000000000000000000000000000000000000000
aalil
auiuyuullogalgaaanall yjll
1 1 1 1 1 1 1 1 1 1 1 1 1 1 1 1 1 1 1 1 1 1 1 1 1 1 1 1 1 1 1 1 1 1 1 1 1 1 1 1 1 1 1 1 1 1 1 1 1 1 1
auiuui
a a a a a a a a a a a a a a a a a a a a a a a a a a a a a a a a a a a a a a a a a a a a a a a a a a a a a a a a a
220 1
"200 220 220 220 220 220 220 220 220 220 220 220 220 220 220 220 220 220 220 220 220 220 220 220 220 220 2

100
1
y
1
gaae pae aegaae eae aeae
A 1000000000000000000000000000000000000000000
aogoo
y 1
P 1
p2010 p2020 00000000000000000000000000000000
:
T8 2
□
8:1 Loo
□
106 11 zliao
□
□muoljies
+ = 2
□aol
1
y
1
10835 226 496 496 496 496 496 496 496
SocLud cLiJ J
y
Jalal Cogla Jc world.visionfitness.com gall
2 agalll glll pell 1
gall l 12) aaln lana aal n (9) paaal naaale 8
gall l aal n (13) aalnae aln (9) paaal naaale (10)
4 E 4 P
| ### | |
| 4 | ### |
| 4 | ### |
2
31hail 10
(1)Jall JalA(A)laa jpaaljpa
13gaaal 222000000000000
| Sagittal plane (x,y,z) position | |
| L | L |
| 1 | L |
| 1 | M |
| 1 | N |

109
Joo jolll Jc Jgolll Vision ggo 3jol J .Jolll. world.visionfitness.com
a_i a a_i 的最小值为 k .
gaiyaiyaiyaiyaiyaiyaiyaiyaiyaiyaiyaiyaiyaiyaiyaiyaiyaiyaiyaiyaiyaiyaiyaiyaiyaiyaiyaiyaiyaiyaiyaiyaiyaiyaiyaiyaiyaiyaiyaiyaiyaiyaiyaiyaiyaiyaiyaiyaiyaiyai
aall lal aal alal alal alal alal alal alal alal alal alal alal alal alal alal alal alal alal alal alal alal alal alal alal alal alal alal alal alal alal alal alal alal alal alal alal alal alal alal alal alal alal alal alal alal alal alal alal alal alal alal alal
#
1
2
1 3
aal alalal aag 100 100 100 100 100 100 100 100 100 100 100 100 100 100 100 100 100
.
#
0:00 1
#
1
plaaa aal 2
jssy
yall 1
yass jda jalg aajw gaaa baoa aee
yj
aaii 100g jyaiai clogiao yao pao yao laow
1
y jayawny baaal yall aal gil oolssaal 0o
3 aal

1
2011 题 3
a aaa aaa aaa aaa aaa aaa aaa aaa aaa aaa aaa aaa aaa aaa aaa aaa aaa
y
4.8 3 2
y
y jg 1 y jg jg g p aal paa oag g g g g g g g g g g g
golal 1000
gall j4p plssuul J
aagaa aaiiiaaiyalee aae aie aee
(,g)“Engineering Mode"()"Manager Mode”
1
aalal 1
Jaaal yaaa aal 1yaaa aal yaaa yaaa yaaa

109
Juaa aagp
aal 1 aal 1 aal 1 aal 1 aal 1 aal 1 aal 1 aal 1 aal 1 aal 1 aal 1 aal 1 aal 1 aal 1 aal 1 aal 1 aal 1 aal 1 aal 1 aal 1 aal 1 aal 1 aal 1 aal 1 aal 1 aal 1
y
a aae 1
a a a a a a a a a a a a a a a a a a a a a a a a a a a a a a a a a a a a a
a a a a a a a a a a a a a a a a a a a a a a a a a a a a a a a a a a a a a a a a a a a a a a a a a a a a a a a a a a a a a a a a aaa
g
aie aie pae gagg aegy gaae yagaae gaae gaae gaae gaae gaae gaae gaae gaae gaae gaae gaae gaae gaae gaae gaae gaae gaae gaae gaae gaae gaae gaae gaae gaae gaae gaae gaae gaae gaae gaae gaae gaae gaae gaaa
yoo
U 1000000000000000000000000000000000000000000000000000000000000000000000000000000000000
a
VISION 1
1 + u1 - 1 = ( 1 + u) u1 < 1 = u
2
3
4
VISION
1
aannnne nnnnne nnnnne nnnnne nnnnne nnnnne nnnnne nnnnne nnnnne nnnnne nnnnne nnnnne nnnnne nnnnne nnnnne nnnnne nnnnne nnnnne nnnnne nnnnne nnnnne nnnnne nnnnne nnnnne nnnnne nnnnne nennnne nnnnne nnnnne nnnnne nnnnne nnnnne nnnnne nnnnne nnnnne nnnnne nnnnne nnnnne nnnnne nnnnne nnnnne nnnnne nnnnne nnnnne nnnnne nnnnne nnnnne nnnnne nnnnne
4.1.2008全国春季,2卷,96
aagjJe aalaaag jaoal ae b! Jgssall adzaiy gaoiall aolll
aagaaal aalaaal 1
100
gol 1111111111111111111111111111111
- a5x>1 j=2c0s+1|j≥3g≥g≥k, 2e g≥aall |j≥
y 3
plal 5 100000000000000000000000000000000000000000000
5
#
y
gag gag gag gag gag gag gag gag gag gag gag gag gag gag gag gag gag gag gag gag gag gag gag gag gag gag gag gag gag gag gag gag gag gag gag gag gag gag gag gag gag gag gag gag gag gag gag gag gag gag
aal aal y
!
yall ydi ydi ydi ydi ydi ydi ydi ydi ydi ydi ydi ydi ydi ydi ydi ydi ydi ydi ydi ydi ydi ydi ydi ydi ydi ydi ydi ydi ydi ydi ydi ydi ydi ydi ydi ydi ydi ydi ydi ydi ydi ydi ydi ydi ydi ydi ydi ydi ydi ydi y


T600
© 2019 Johnson Health Tech
220V Rev 2-3