
IAN 297595 - Trampoline CRIVIT - Free user manual and instructions
Find the device manual for free IAN 297595 CRIVIT in PDF.
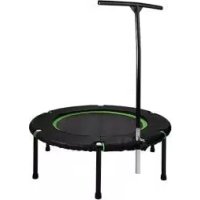
| Product Type | Garden Trampoline |
| Brand | Crivit |
| Model | IAN 297595 |
| Dimensions (assembled) | 300 x 265 cm |
| Product Weight | Approximately 44.5 kg |
| Maximum User Weight | 150 kg |
| Use | Outdoor, domestic |
| Recommended Minimum Age | 6 years |
| Materials | Steel, jumping mat, polyethylene net |
| Safety | Safety net, frame pad, adult supervision required, 2 m clearance |
| Package Contents | Jumping mat, frame pad, safety net, frame bars, poles, springs (60), screws, wrench, spring compressor |
| Assembly | Adult required, tools provided (wrench and spring compressor) |
| Maintenance | Clean with soapy water, regularly check fasteners, replace net every 3 years |
| Warranty | 3 years |
| Standards | CE |
Frequently Asked Questions - IAN 297595 CRIVIT
User questions about IAN 297595 CRIVIT
0 question about this device. Answer the ones you know or ask your own.
Ask a new question about this device
Download the instructions for your Trampoline in PDF format for free! Find your manual IAN 297595 - CRIVIT and take your electronic device back in hand. On this page are published all the documents necessary for the use of your device. IAN 297595 by CRIVIT.
USER MANUAL IAN 297595 CRIVIT
natural_image
Trumbot with visible mesh cover and 'crivit' branding, no text or symbols on bodyGARTENTRAMPOLIN / OUTDOOR TRAMPOLINE / TRAMPOLINE DE JARDIN
DE AT CH
GARTENTRAMPOLIN
Assembly, operating and safety instructions
NL BE
TUINTRAMPOLINE
natural_image
Circular diagram with six curved lines and small protrusions, no text or symbols present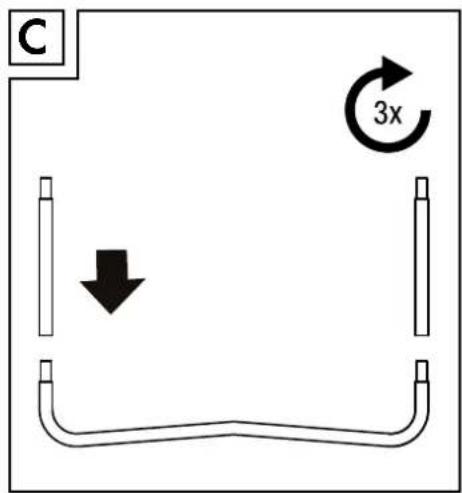

natural_image
Circular diagram with radial lines and a label 'I' in the top-left corner (no text or symbols within the diagram itself)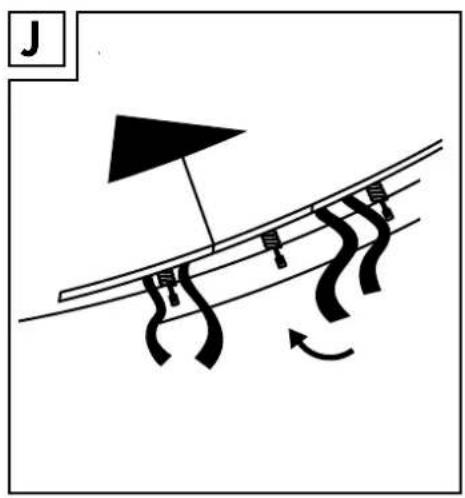
natural_image
Line drawing of a mechanical component with rope ties and a base, labeled 'K' in top-left corner (no text or symbols on the diagram itself)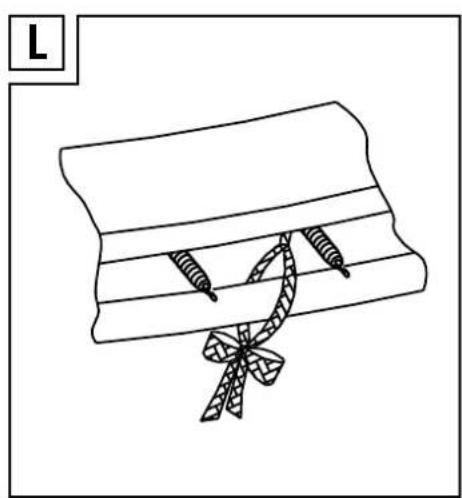
natural_image
Simple line drawing of a ribbon tied with a bow, no text or symbols present
natural_image
Line drawing of a simple round table with six legs and a central oval base (no text or symbols)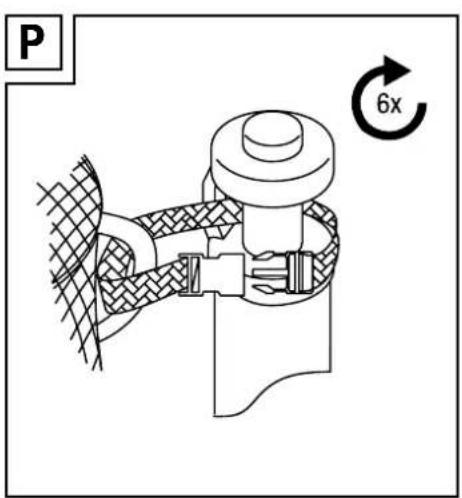
natural_image
Technical line drawing of a mechanical device with a circular base and vertical supports (no text or symbols)1
natural_image
Simple line drawing of a person in motion, possibly running or walking (no text or symbols)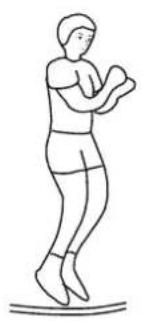
natural_image
Line drawing of a person in a dynamic pose, possibly dancing or performing a martial arts or exercise pose (no text or symbols)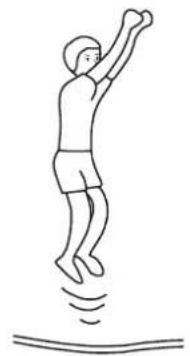
natural_image
Simple line drawing of a person jumping with motion lines indicating movement (no text or symbols)2
natural_image
Simple line drawing of a person jumping with one arm raised (no text or symbols)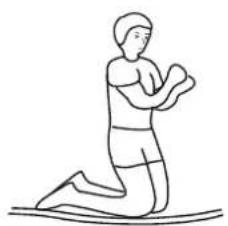
natural_image
Line drawing of a person kneeling and performing a kbow stretch (no text or symbols)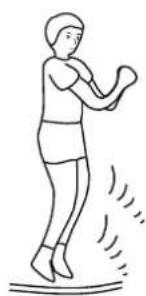
natural_image
Line drawing of a person in motion, possibly dancing or kicking (no text or symbols)3
natural_image
Simple line drawing of a person jumping with one arm raised (no text or symbols)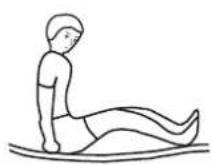
natural_image
Simple line drawing of a person in motion, possibly running or jumping, with motion lines indicating speed (no text or symbols)4
natural_image
Line drawing of two people in swimming poses, one jumping and the other lying on a surface (no text or symbols)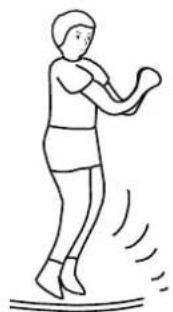
natural_image
Line drawing of a person in motion, possibly dancing or kicking (no text or symbols)5

natural_image
Simple line drawing of a person lying prone on a mat (no text or symbols)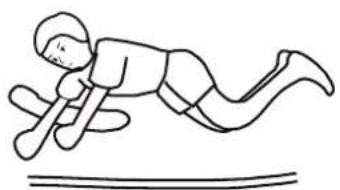
natural_image
Simple line drawing of a diver in mid-swing, no text or symbols present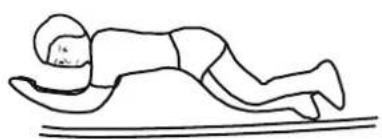
natural_image
Line drawing of a person performing a prone exercise or stretching pose (no text or symbols)Gartentrampolin
- Einleitung

We congratulate you on the purchase of your new product. You have chosen a high quality product. Familiarise yourself with the product before using it for the first time. In addition, please care-
fully refer to the operating instructions and the safety advice below. Only use the product as instructed and only for the indicated field of application. Keep these instructions in a safe place. If you pass the product on to anyone else, please ensure that you also pass on all the documentation with it.
⚠️ Failure to follow the safety instructions could lead to serious injury.
- Instructions for use
Before reading, fold out the illustration page and get to know all of the functions of your product.
- Intended use
This product is designed exclusively for private use.
The product is not suitable for therapeutic or commercial use. The product is neither designed nor suitable to be installed in-ground.


Only for domestic use.
The trampoline is intended for outdoor use.
● Items delivered / Description of parts (fig. A)
1 1 x Jump mat
2 1 x Frame protection
3 1 x Enclosure net
4 3 x Frame rods with leg sleeve
5 3 x Frame rods
6 6 x Enclosure poles upper
7 6 x Enclosure poles lower
8 6 x Enclosure poles support
9 3 x Angled rods
10 6 x Extension rods
11 60 x Springs
12 6 x Screws eyelet
13 6 x Screws
14 1 x Wrench
15 6 x Poles cap top
16 6 x Plastic cap
17 12 x Spacer
18 12 x Nut
19 12 x Washers
20 6 x Rope
21 1 x Tool to tension the springs
- Technical data
Maximum user load: 150 kg
Weight of Product: approx. 44.5 kg
Dimensions: assembled approx.: 300 x 265 cm

Safety notes
WARNING!
■ Warning! Max 150 kg.
Warning! The trampoline shall be assembled by an adult in accordance with the assembly instructions and thereafter checked before the first use.
Warning! Adult assembly only, as there may be constituted a puncture hazard during assembly.
■ Warning! Always close the net opening before jumping.
■ Warning! Jump without shoes.
■ Warning! Do not use the mat when it is wet.
■ Warning! Empty pockets and hands before jumping.
■ Warning! Always jump in the middle of the mat.
■ Warning! Do not eat while jumping.
■ Warning! Do not exit by a jump.
■ Warning! Limit the time of continuous usage (make regular stops).
Warning! Do not use in strong wind conditions and secure the trampoline.
■ Warning! Only one user. Collision hazard.
■ Warning! The net should be replaced every 3 years.
■ Warning! Please keep 2m clear around the trampoline.
■ Warning! Adult supervision required.
■ Warning! No somersaults.
■ Warning! Read the instruction.
Warning! Ensure to drag the end of the strap as more as possible during assembly (figure P).
■ Warning. Not suitable for children under 36 months.
Small parts. Choking hazard.
■ Suitable for children aged 6 and above, as it may be difficult
for younger children to cope with the physical and dynamic characteristics of the trampoline mat, because they do not yet have the required coordination skills.

CAUTION! RISK OF INJURY!
■ The product may only be used under adult supervision
- Consult with your doctor before you begin exercising. Make sure that you are in suitable health for the exercise.
■ Always remember to warm up before exercising and exercise in accordance with your current abilities. Serious injury can occur if you exert yourself too much and over exercise. Cease exercising immediately if you experience discomfort, weakness, or fatigue and consult a doctor.
- Keep the operating instructions with the exercise descriptions to hand at all times.
■ Please note the maximum load bearing capacity of 150 kg. If this weight limit is exceeded it can lead to damage to the product and compromise its function.
■ Pregnant women should only use the product following consultation with their doctor.
A free area of not less than 2m shall remain around the exercising area in the directions from which the equipment is accessed.
■ Only exercise on a flat and non-slip surface.
■ Do not use the product in the vicinity of stairs or steps.
■ Never use the product in the vicinity of open fire or ovens.
This trampoline is not intended to be buried into the ground;
Place the trampoline on a level surface at least 2 m from any structure or obstruction such as a fence, garage, house, overhanging branches, laundry lines or electrical wires;
■ Trampolines shall neither be installed over concrete, asphalt or any other hard surface nor at proximity of other conflicting installations (e.g. paddling pools, swings, slides, climbing frames);
■ Modification of trampoline is not allowed.
The self-locking nuts 18 are for one-time use only and new nuts must be used each time the product is assembled.
⚠️ Particular caution – Risk of injury for children
- Keep the packaging materials away from children. There is a risk of suffocation!
- Parents and other supervisors should be aware of their responsibility as situations and conduct may arise for which the exercising equipment was not designed due to the playfulness and experimentation that is natural in children.
If you allow your children to use the product you should take their mental and physical development into account and, most importantly, their temperament. Supervise the children and always instruct them on how to use the product correctly.
■ Store the product out of the reach of children when not in use.

Risks from wear
The product may only be used when in perfect condition. Examine the product for damage and wear before each use. The safety of the product can only be guaranteed if it is examined regularly for damage and wear. Discontinue use if damage is found.

Avoiding damage to property
- Avoid contact with sharp, hot, pointed, or hazardous objects. Please ensure that your exercising area is free of pointed objects.

Prior to assembling
☐ To assemble this product all you need is the wrench and special spring loading tool provided with this product.
☐ During periods of non-use the product can be easily disassembled and stored.
☐ Please read the assembly instructions before beginning to assemble the product.
☐ Please refer to page for part descriptions and numbers. The assembly steps use these descriptions and numbers as reference for your convenience.
☐ Make sure that you have all parts listed. If you are missing any parts, please contact the producer.
☐ To prevent any injuries to your hands from pinch points during assembly, please use gloves to protect your hands.

Moving the trampoline
In order to move the trampoline you should have as many helpers as the trampoline has feet. Prior to lifting, all used fasteners (pegs, etc.) should be removed. Caution! Due to the spring tension there is a possible risk that the frame can be twisted as a result of uneven lifting. You and your helpers should therefore be respectively positioned between two feet of the trampoline and you should then all lift the trampoline at the same time. Lift the trampoline off the ground slightly and keep it horizontal with the floor. To move the trampoline in a different way, disassemble it completely. To disassemble, follow instructions for assembly backwards.

Assembly
Tools required:
1 x Wrenches 14 (included)
1 x Tool to tension the springs 21 (included)
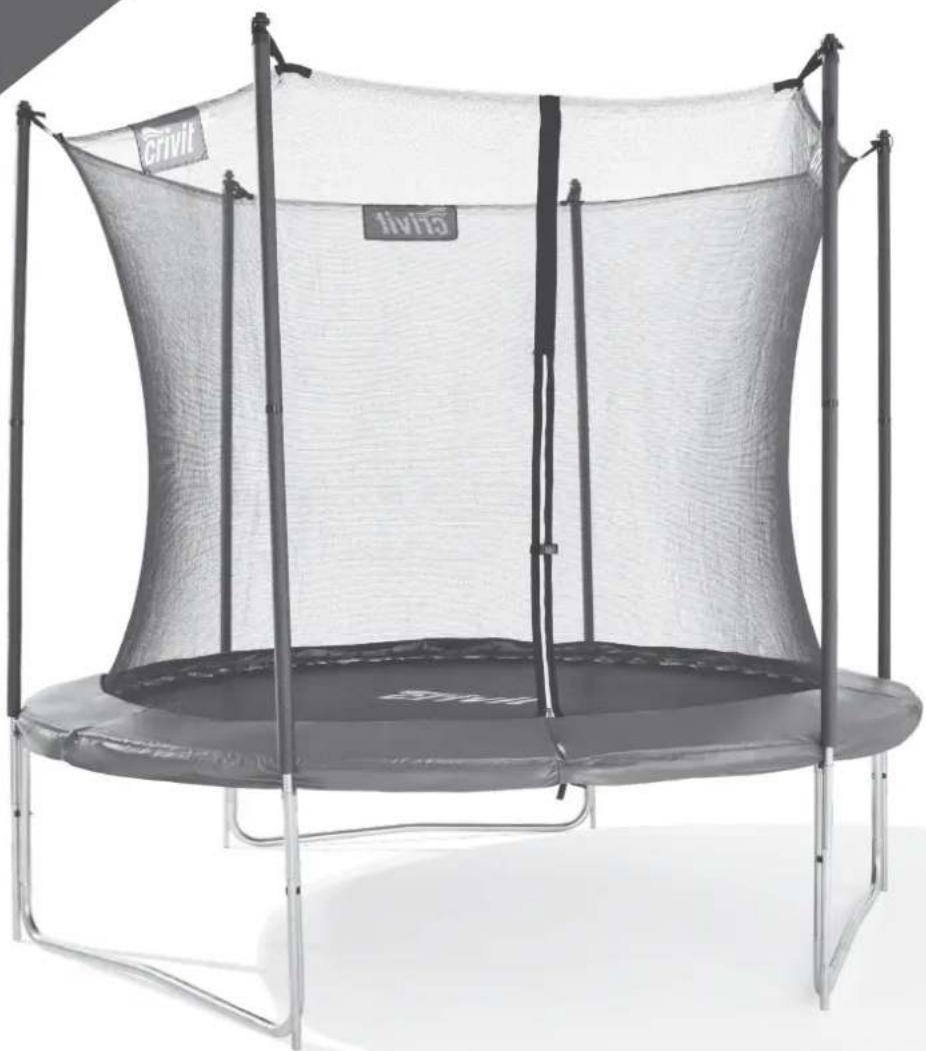
Step 1 (fig. B, C, D, E)
☐ Please select all frame rods with leg sleeve 4, frame rods 5, angled rods 9 and extension rods 10 according to the products from the illustrations. All parts with the same part number are interchangeable and have not "right" or "left" orientation, to connect the parts, simply slide section tubing that is smaller on one end into the adjacent section that has a larger opening.
Note: Rotate the extension rods 10 so that the holes align.
Step 2 (fig. F, G, H, I)
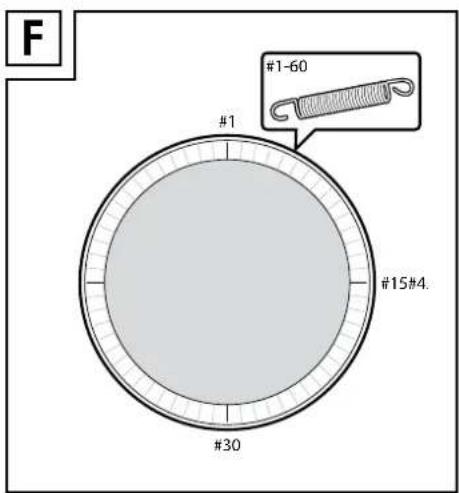
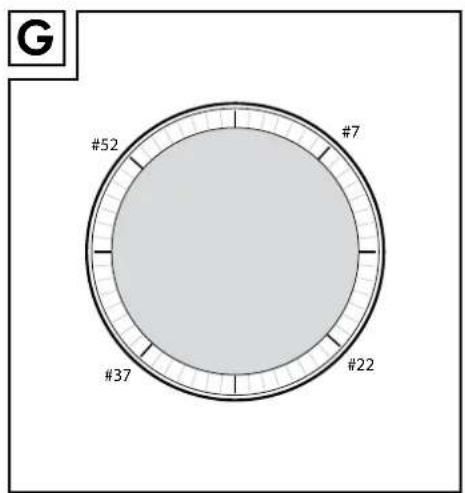
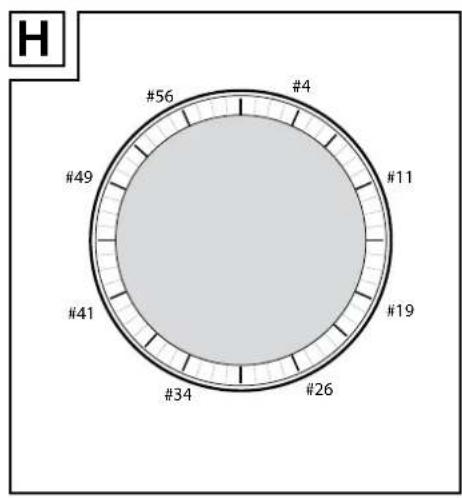
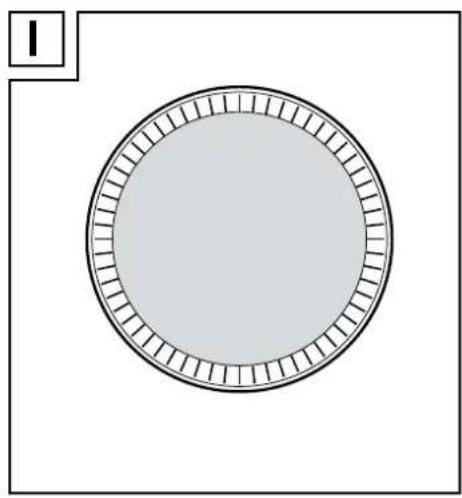
☐ When attaching springs to the jump mat 1, please invite another person to help you with this portion of the assembly. CAUTION! When attaching the springs 11, the tube joints can become pinch points since the product is tightening up.
□ Lay out the jump mat 1 with the printed side facing upwards in the product.
☐ Position the spring 11 on the eyelet of the jump mat 1 use tool to tension the springs 21 and link up the end of the spring hook.
☐ Extend spring tool 21 and link up spring hook to the hole on the rods 4/5.
☐ Select an arbitrary point on the frame rods (designate it as point ZERO). Thereby, attach the first springs 11
☐ Count 15 holes from point ZERO in one direction. Thereby attach the second spring 11 . Attach two further springs at the same interval, so that now four springs are respectively attached in quarter-circle intervals.
☐ Securely attach a further spring in the middle of each quarter. Now you can attach the remaining springs by the middle of each quarter. If you notice that you have skipped a hole and an eyelet, recount and remove or attach any springs required to maintain the rest of springs.
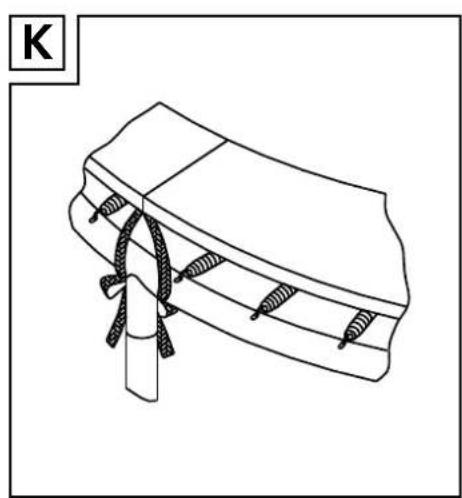
Step 3 (fig. J, K, L)
Place the frame protection 2 towards the product, so that the springs and the frame are covered.
☐ Please ensure that the frame protection covers all metal parts.
☐ Place the elastic drawstrings so that every other string is led over a leg socket.
□ Fasten the drawstrings at the back of the leg socket and frame. Knot the two ends together.
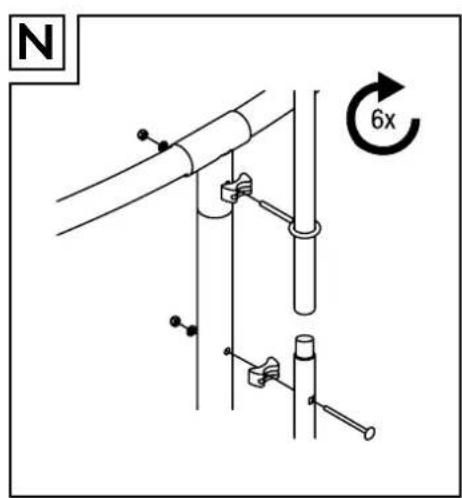
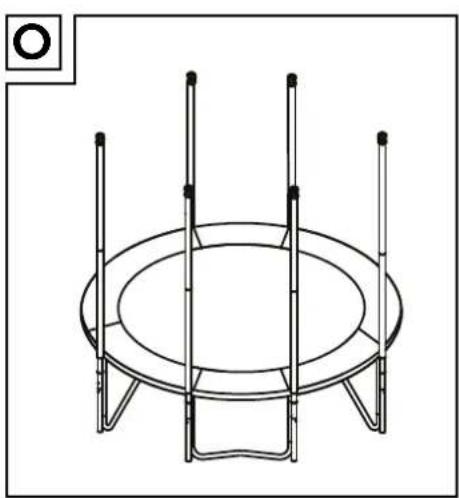
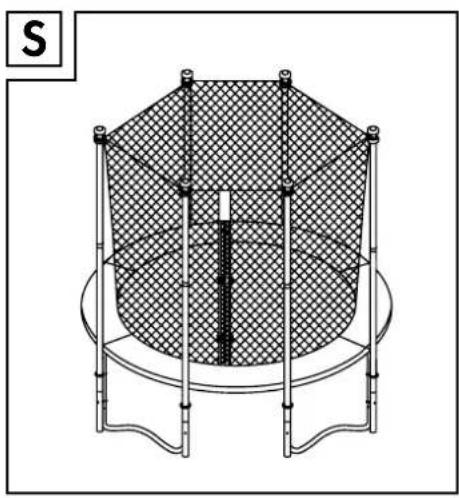
Step 4 (fig. M, N, S)
□ Connect two sections of upper and lower enclosure poles 6/7 together with Pole cap top 15 and plastic cap 16 as illustration.
☐ Mount the enclosure poles support 8 with poles 6/7 onto the trampoline leg using parts of spacer 17 screws 12/13 Nut 18 and washer 19 Firm the bolt using provided wrench 14.
☐ Repeat until all the poles are set up.
☐ Spread Enclosure n out on the trampoline mat. Locate the panel with the doorway and align the net as to where you would like to get in and out of the product. The edge with the network loop on the upper part of the net will be hooked pole cap top 15 at the top of the pole. Ensure that the bracket of the poles cap top 15 is facing outwards.
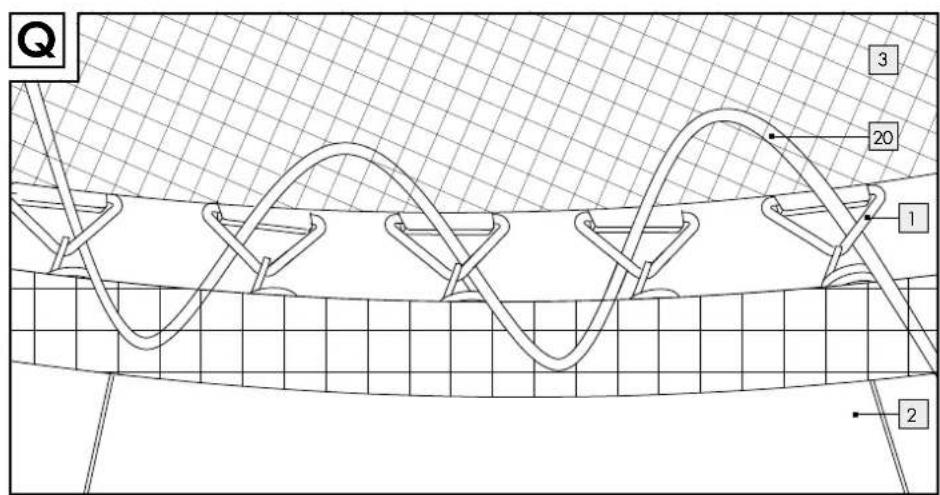
☐ Knot the rope 20 on an triangle-ring of the jump mat 1. Then thread it as shown alternately through the triangle-ring of the jump mat 1, the enclosure net 3 and net of frame protection 2. The tensioning rope 20 is divided into several parts for easy assembly. Pay attention to a complete assembly. When you get back to the starting triangle-ring, knot the end again.
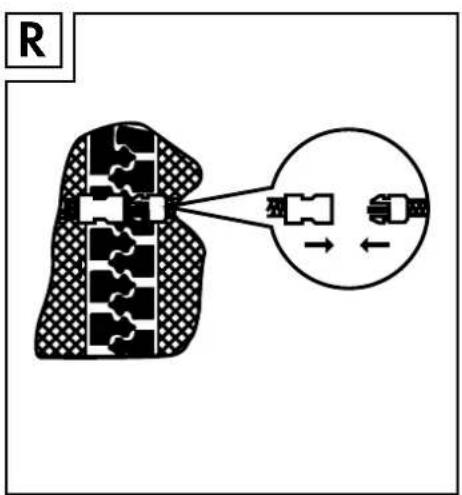
IMPORTANT: All snap closures must be once again clamped securely so that the enclosure net becomes taut. If the enclosure net is not taut, it cannot complete this function as designed.

Exercising notes
The following exercises only represent a selection. You can find further exercises in the relevant literature.
□ Warm up well before each exercising session.
□ Do not exercise if you feel ill or unwell.
☐ Only exercise as long as you feel well and/ or you are able to carry out the exercises correctly.
□ Wear comfortable sports clothing.
☐ Determine the frequency and intensity of the exercises yourself. Start slowly 2 to 3 times a week for 10 minutes at a time, and increase the frequency and the exercise intensity gradually. The more frequently and regularly you carry out the exercises, the fitter and better you will feel.

CAUTION! Avoid exercising too intensely!
☐ When you first begin exercising, 2-3 minutes are sufficient per exercise. If you exercise every day the duration can be increased to 5-10 minutes after approximately one week. The maximum exercising time should, however, not exceed 1 hour.
☐ Take sufficient breaks between exercises and drink sufficient fluids.
CAUTION!
Cease exercising immediately if you experience discomfort or feel unwell and consult your doctor.
- Warming up
Take sufficient time before each exercising session to warm up. The following includes descriptions of some simple exercises for this purpose. Repeat these exercises 2 to 3 times each.
● Suggested exercises
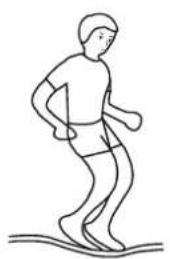
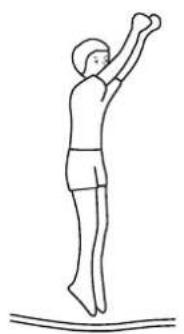
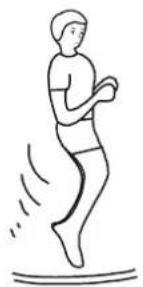
Basic Jump (fig. 1)
- Start out standing with your feet a shoulder's width apart, your head held up high and your eyes focused on the mat.
- Swing your arms to the front and up in a circular shape.
- Put your feet together in mid air and point your toes down.
- When you land on the mat, position your feet a shoulder's width apart.
Knee Drop (fig. 2)
- Start with the basic jump and perform a low jump.
- Land on your knees with a straight back and upright body and keep your balance with your arms.
- Jump back into the basic jumping position by swinging your arms upwards.
Seat Drop (fig. 3)
- Land in a flat seated position
- Place your hands on the mat next to your hips and keep your elbows relaxed.
- Return to the upright position by pushing off with your hands
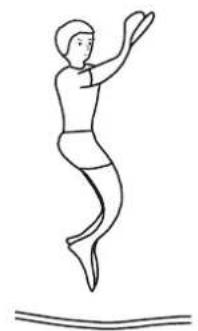
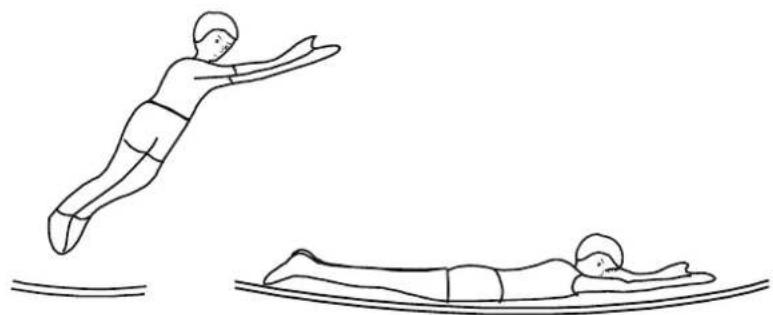
Front Drop (fig. 4)
- Start with a low jump.
- Land on your stomach (face down) and hold your hands and arms stretched out to the front on the mat.
- Push yourself off the mat with your arms to return to a standing position
180- Degree Swivel (fig. 5)
- Start lying on your stomach.
- Push yourself off with your right or left arm(Irrespective of the direction in which you would like to twist)
- Stretch your head and shoulders in the same direction and hold your back parallel to the mat and your head up high.
- Land on your stomach and return to a standing position by pushing off with your arms
- Stretching
Take sufficient time after each exercising session to stretch. The following illustrates a simple exercise for this purpose. You should carry out the stretching exercise 3 times on each side for 30-40 seconds.
Neck muscles
- Stand in a relaxed position. Pull your head gently to the left and to the right using one hand. This exercise stretches the sides of your neck.
Arms and shoulders
- Stand up straight with your knees slightly bent.
- Put your right arm behind your head until your right hand is between your shoulder blades.
- Hold your right elbow with your left hand and pull it backwards.
- Change sides and repeat the exercise.
Leg muscles
- Stand up straight and lift one foot off the ground.
- Slowly circle your foot, first in one direction and then in the other.
- Change feet after a while.
Important: Please ensure that your thighs stay parallel next to one another. Push your hips forward and keep your upper body upright.
● Maintenance, storage
Carry out checks and maintenance of the main parts (frame, suspension system, mat, padding, and enclosure) at the beginning of each season and also at regular intervals. WARNING! If these checks are not carried out, the trampoline could become dangerous.
In strong wind condition, keep the trampoline in a location that is sheltered from the wind to prevent it from being blow away or falling over.
- Check all nuts and bolts for tightness and tighten when required.
Check that all spring-loaded (pit pin) joints are still intact and cannot become dislodged during play.
- Check all coverings and sharp edges and replace when required.
■ Retain the maintenance instruction manual.
Outdoor trampolines should be equipped with a device that in strong wind conditions avoid displacement due to wind (e.g. steel bars in the ground or loads like sand bag or water bags) and/or items catching wind like net and mat should be removed.
In certain countries during winter period, the snow load and the very low temperature can damage the product. It is recommended to remove the snow and store the mat and the enclosure indoor.
- Check that mat, padding and enclosure are without defects.
Note: Sunlight, rain, snow and extreme temperatures reduce the strength of these parts over time.
- Replace the net and /or enclosure after 3 years of use.
■ Make sure that the hook-and-loop fasteners are closed correctly during use of product.
- Replace defective components immediately and / or keep the equipment out of use until repair
- Cleaning and Care
☐ Only use clean or soapy water to clean the product. Never use harsh detergent.
●Disposal
The packaging is made entirely of recyclable materials, which you may dispose of at local recycling facilities.
Contact your local refuse disposal authority for more details of how to dispose of your worn-out product.
- Warranty
The product has been manufactured to strict quality guidelines and meticulously examined before delivery. In the event of product defects you have legal rights against the retailer of this product. Your legal rights are not limited in any way by our warranty detailed below.
The warranty for this product is 3 years from the date of purchase. Should this product show any fault in materials or manufacture within 3 years from the date of purchase, we will repair or replace it - at our choice - free of charge to you.
The warranty period begins on the date of purchase. Please keep the original sales receipt in a safe location. This document is required as your proof of purchase. This warranty becomes void if the product has been damaged, or used or maintained improperly.
The warranty applies to defects in material or manufacture. This warranty does not cover product parts subject to normal wear, thus possibly
considered consumables (e.g. batteries) or for damage to fragile parts, e.g. switches, rechargeable batteries or glass parts.
CE
Trampoline de jardin
- Introduction

Stap 1 (afb. B, C, D, E)
Stap 4 (afb. M, N, S)
Stap 5 (afb. O, P, Q, R)


- GARTENTRAMPOLIN / OUTDOOR TRAMPOLINE / TRAMPOLINE DE JARDIN
- GARTENTRAMPOLIN
- TUINTRAMPOLINE
- - Einleitung
- ⚠️ Failure to follow the safety instructions could lead to serious injury.
- - Instructions for use
- - Intended use
- ● Items delivered / Description of parts (fig. A)
- - Technical data
- Safety notes
- WARNING!
- CAUTION! RISK OF INJURY!
- ⚠️ Particular caution – Risk of injury for children
- Risks from wear
- Avoiding damage to property
- Prior to assembling
- Moving the trampoline
- Assembly
- Tools required:
- Step 1 (fig. B, C, D, E)
- Step 2 (fig. F, G, H, I)
- Step 3 (fig. J, K, L)
- Step 4 (fig. M, N, S)
- Exercising notes
- CAUTION! Avoid exercising too intensely!
- CAUTION!
- - Warming up
- ● Suggested exercises
- Basic Jump (fig. 1)
- Knee Drop (fig. 2)
- Seat Drop (fig. 3)
- Front Drop (fig. 4)
- 180- Degree Swivel (fig. 5)
- - Stretching
- Neck muscles
- Arms and shoulders
- Leg muscles
- ● Maintenance, storage
- - Cleaning and Care
- ●Disposal
- - Warranty
- Trampoline de jardin
- - Introduction
- Stap 1 (afb. B, C, D, E)
- Stap 4 (afb. M, N, S)
- Stap 5 (afb. O, P, Q, R)
Brand : CRIVIT
Model : IAN 297595
Category : Trampoline