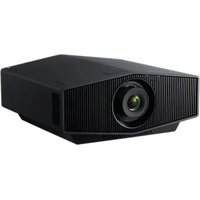
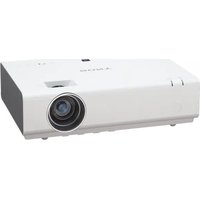
VPLCX276 - Projector SONY - Free user manual and instructions
Find the device manual for free VPLCX276 SONY in PDF.

| Feature | Details |
|---|---|
| Projector Type | LCD Projector |
| Resolution | WXGA (1280 x 800) |
| Brightness | 2700 Lumens |
| Contrast | 3000:1 |
| Lamp Life | Approximately 6000 hours (eco mode) |
| Connectivity | HDMI, VGA, USB, RCA |
| Dimensions | 320 x 230 x 80 mm |
| Weight | 2.5 kg |
| Usage | Ideal for professional presentations and educational projections |
| Maintenance | Regular filter cleaning, lamp replacement depending on usage |
| Safety | Avoid exposure to moisture, do not touch the hot lamp |
| Warranty | 2 years |
Frequently Asked Questions - VPLCX276 SONY
User questions about VPLCX276 SONY
0 question about this device. Answer the ones you know or ask your own.
Ask a new question about this device
Download the instructions for your Projector in PDF format for free! Find your manual VPLCX276 - SONY and take your electronic device back in hand. On this page are published all the documents necessary for the use of your device. VPLCX276 by SONY.
USER MANUAL VPLCX276 SONY
| 画面のフィーナス (フィーナス) | 画面のサイズ (ズム) | 画面の位置 (レンズ节目中) |
| ↓ ↑ ↓ | ||
| フィーナスリング | ← → → → → → → → → → → → → → → → → → → → → → → → → → → → → → → → → → → → → → → → → → → → → → → → → → → ← → ← → ← → ← → ← → ← → ← → ← → ← → ← → ← → ← → ← → ← → ← → ← → ← → ← → ← → ← → ← → ← → ← → ← → ← → → ← → ← → ← → ← → ← → ← → ← → ← → ← → ← → ← → ← → ← → ← → ← → ← → ← → ← → ← → ← → ← → ← → ← → ← ← ← ← ← ← ← ← ← ← ← ← ← ← ← ← ← ← ← ← ← ← ← ← ← ← ← ← ← ← ← ← ← ← ← ← ← ← ← ← ← ← ← ← ← ← ← ← ← ← → → → → → → → → → → → → → → → → → → → → → → → → → → → → → → → → → → → → → → → → → → → → → → → → → |
レンズフトによる微調整
FIILTJFILTLJFILTLJFILTLJFILTLJFILTLJFILTLJFILTLJFILTLJFILTLJFILTLJFILTLJFILTLJFILTLJFILTLJFILTLJFILTLJFILTLJFILTLJFILTLJFILTLJFILTLJFILTLJFILTLJFILTLJFILTLJFIL

工一菲尔夕一は2枚重ねです。
4 工アーフル夕一力八一を元に戸さ。
注意
Before operating the unit, please read this manual thoroughly and retain it for future reference.
WARNING
To reduce the risk of fire or electric shock, do not expose this apparatus to rain or moisture.
To avoid electrical shock, do not open the cabinet. Refer servicing to qualified personnel only.
WARNING
THIS APPARATUS MUST BE EARTHED.
CAUTION
Danger of explosion if battery is incorrectly replaced.
Replace only with the same or equivalent type recommended by the manufacturer. When you dispose of the battery, you must obey the law in the relative area or country.
Installing batteries
One lithium battery (CR2025) is supplied for the RM-PJ8 Remote Commander. To avoid risk of explosion, use a lithium battery (CR2025).
WARNING
When installing the unit, incorporate a readily accessible disconnect device in the fixed wiring, or connect the power plug to an easily accessible socket-outlet near the unit. If a fault should occur during operation of the unit, operate the disconnect device to switch the power supply off, or disconnect the power plug.
CAUTION
About the LAN connector
For safety, do not connect the connector for peripheral device wiring that might have excessive voltage to this port.
WARNING
1 Use the approved Power Cord (3-core mains lead) / Appliance Connector / Plug with earthing-contacts that conforms to the safety regulations of each country if applicable.
2 Use the Power Cord (3-core mains lead) / Appliance Connector / Plug conforming to the proper ratings (Voltage, Ampere).
If you have questions on the use of the above Power Cord / Appliance Connector / Plug, please consult a qualified service personnel.
IMPORTANT
The nameplate is located on the bottom.
For kundene i Norge
For the customers in the U.S.A.
This equipment has been tested and found to comply with the limits for a Class B digital device, pursuant to Part 15 of the FCC Rules. These limits are designed to provide reasonable protection against harmful interference in a residential installation. This equipment generates, uses, and can radiate radio frequency energy and, if not installed and used in accordance with the instructions, may cause harmful interference to radio communications. However, there is no guarantee that interference will not occur in a particular installation. If this equipment does cause harmful interference to radio or television reception, which can be determined by turning the equipment off and on, the user is encouraged to try to correct the interference by one or more of the following measures:
- Reorient or relocate the receiving antenna.
- Increase the separation between the equipment and receiver.
- Connect the equipment into an outlet on a circuit different from that to which the receiver is connected.
- Consult the dealer or an experienced radio/TV technician for help.
If you have any questions about this product, you may call; Sony Customer Information Service Center 1-800-222-7669 or http://www.sony.com/
You are cautioned that any changes or modifications not expressly approved in this manual could void your authority to operate this equipment.
All interface cables used to connect peripherals must be shielded in order to comply with the limits for a digital device pursuant to Subpart B of part 15 of FCC Rules.
This device complies with part 15 of the FCC Rules. Operation is subject to the following two conditions: (1) This device may not cause harmful interference, and (2) this device must accept any interference received, including interference that may cause undesired operation.
Declaration of Conformity
Trade Name : SONY
Model
VPL-CX236/CX276
VPL-CW256/
CW276
Responsible party : Sony Electronics Inc.
Address: 16535 Via Esprillo,
San Diego, CA
92127 U.S.A.
Telephone Number: 858-942-2230
This device complies with part 15 of the FCC Rules. Operation is subject to the following two conditions: (1) This device may not cause harmful interference, and (2) this device must accept any interference received, including interference that may cause undesired operation.
For the customers in Canada
CANICES-3(B)/NMB-3(B)
For the customers in Europe, Australia and New Zealand
WARNING
This equipment is compliant with Class A of CISPR 32. In a residential environment this equipment may cause radio interference.
For the customers in Europe
This apparatus shall not be used in the residential area.
For the customers in Taiwan only

廢電池請回收
For the State of California, USA only
Perchlorate Material - special handling may apply, See www.dtsc.ca.gov/hazardouswaste/perchlorate
For the Customers in Brazil only DESCARTE DE PILHAS E BATERIAS

For the customers in the U.S.A. SONY LIMITED WARRANTY - Please visit http://www.sony.com/psa/warranty for important information and complete terms and conditions of Sony's limited warranty applicable to this product.
For the customers in Canada SONY LIMITED WARRANTY - Please visit http://www.sonybiz.ca/pro/lang/en/ ca/article/resources-warranty-product- registration for important information and complete terms and conditions of Sony's limited warranty applicable to this product.
For the customers in Europe
Sony Professional Solutions Europe - Standard Warranty and Exceptions on Standard Warranty. Please visit http://www.pro.sony.eu/ warranty for important information and complete terms and conditions.
For the customers in Korea
SONY LIMITED WARRANTY - Please visit http://bpeng.sony.co.kr/handler/ BPAS-Start for important information and complete terms and conditions of Sony's limited warranty applicable to this product.
WARNING HAZARDOUS MOVING PARTS KEEP FINGERS AND OTHER BODY PARTS AWAY
Precautions
On safety
- Check that the operating voltage of your unit is identical with the voltage of your local power supply. If voltage adaptation is required, consult with qualified Sony personnel.
- Should any liquid or solid object fall into the cabinet, unplug the unit and have it checked by qualified Sony personnel before operating it further.
- Unplug the unit from the wall outlet if it is not to be used for several days.
- To disconnect the cord, pull it out by the plug. Never pull the cord itself.
- The wall outlet should be near the unit and easily accessible.
- The unit is not disconnected from the AC power source (mains) as long as it is connected to the wall outlet, even if the unit itself has been turned off.
- Do not look into the lens while the lamp is on.
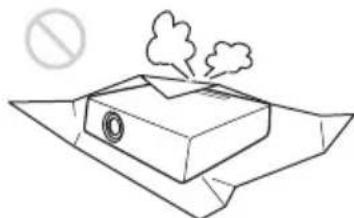
- Do not place your hand or objects near the ventilation holes — the air coming out is hot.
- Be careful not to catch your fingers by the front feet (adjustable) when you adjust the height of the unit. Do not push hard on the top of the unit with the front feet (adjustable) out.
- Avoid using an extension cord with a low voltage limited since it may cause the short-circuit and physical incidents.
- Do not catch your finger between the unit and surface of the floor when moving the projector installed on the floor.
- Do not move the projector when it is turned on and the cabinet cover is open.
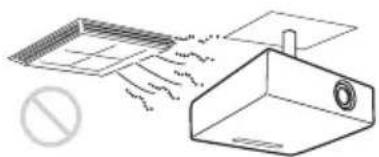
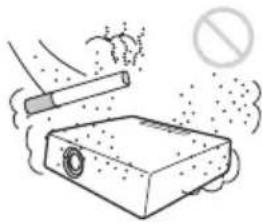
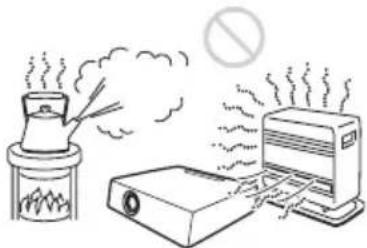
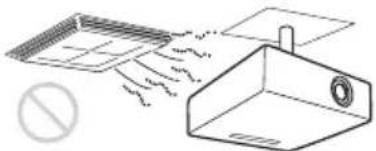
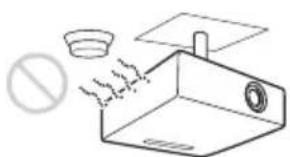
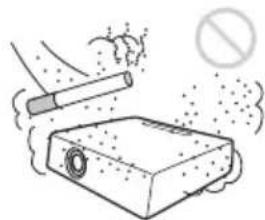
- Do not install the unit in a location near heat sources such as radiators or air ducts, or in a place subject to direct sunlight, excessive dust or humidity, mechanical vibration or shock.
-
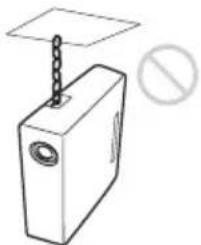
Never mount the projector on the ceiling or move it by yourself. Be sure to consult with qualified Sony personnel (charged).
-
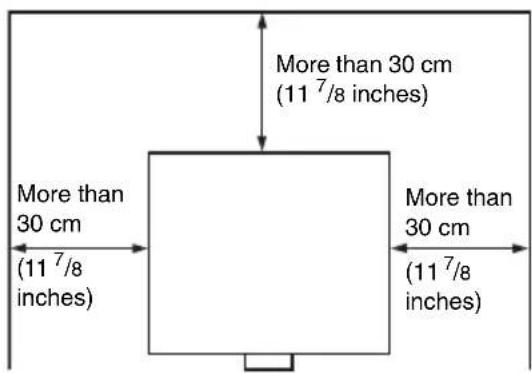
If the ventilation holes are blocked, internal heat builds up, and it may cause a fire or damage the unit. To allow adequate air circulation and prevent internal heat build-up, follow the items below:
- Leave space of more than 30cm (11 ^7/8'' ) around the unit (page 6).
- Avoid using something to cover the ventilation holes (exhaust/intake).
- Do not place the unit on surfaces such as an original packing sheet, soft cloth, papers, rugs, or scraps of paper. The ventilation holes may take in such materials.
- Do not place any object just in front of the lens that may block the light during projection. Heat from the light may damage the object. Use the picture muting function to cut off the picture.
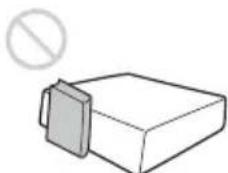
- Do not use the Security bar for the purpose of preventing theft for transporting or installing the unit. If you lift the unit by the Security bar or hang the unit by this bar, it may cause the unit to fall and be damaged, and may result in personal injury.
For dealers
- Be sure to secure the cabinet cover firmly when installing to the ceiling firmly.
Safety precautions for installing the unit on a ceiling
- Never mount the projector on the ceiling or move it by yourself. Be sure to consult with qualified Sony personnel (charged).
- When installing the unit on a ceiling, be sure to use a safety wire, etc., to prevent the unit from falling. Entrust the installation to an experienced contractor or installer.
On Installation
- When installing the unit, leave space between any walls, etc. and the unit as illustrated.
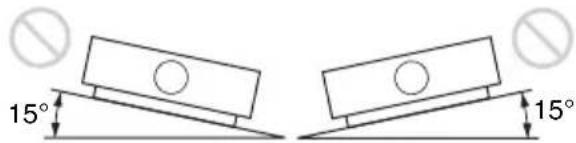
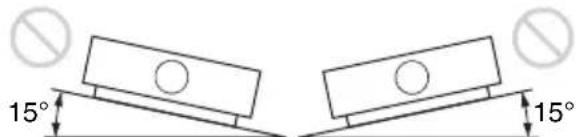
- Avoid using if the unit is tilted more than 15 degrees horizontally.
- Install the projector on the floor or ceiling. Any other installation causes a malfunction such as color irregularity or shortening lamp life.
- Avoid using the unit in a location where the temperature or humidity is very high, or temperature is very low.

- Avoid installing the unit in a location subject to direct cool or warm air from an air-conditioner. Installing in such a location may cause malfunction of the unit due to moisture condensation or rise in temperature.
- Avoid installing the unit in a location near a heat or smoke sensor. Installing in such a location may cause malfunction of the sensor.

- Avoid installing the unit in a very dusty or extremely smoky environment. Otherwise, the air filter will become obstructed, and this may cause a malfunction of the unit or damage it.
- When using the unit at an altitude of 1,500m or higher, set "High Altitude Mode" to "On" in the INSTALL SETTING menu. Failing to set this mode when using the unit at high altitudes could have adverse effects, such as reducing the reliability of certain components.
On cleaning the lens and the cabinet
- Be sure to disconnect the AC power cord from the AC outlet before cleaning.
- If you rub on the unit with a stained cloth, the cabinet may be scratched.
- If the unit is exposed to volatile materials such as insecticide, or the unit is in contact with a rubber or vinyl resin product for a long period of time, the unit may deteriorate or the coating may come off.
- Do not touch the lens with bare hands.
- On cleaning the lens surface: Wipe the lens gently-with a soft cloth, such as a glass cleaning cloth. Stubborn stains may be removed with a soft cloth lightly dampened with water. Never use solvent such as alcohol, benzene or thinner, or acid, alkaline or abrasive detergent, or a chemical cleaning cloth.
- On cleaning the cabinet: Clean the cabinet gently with a soft cloth. Stubborn stains may be removed with a soft cloth lightly dampened with mild detergent solution and wrung, followed by wiping with a soft dry cloth. Never use solvent such as alcohol, benzene or thinner, or acid, alkaline or abrasive detergent, or a chemical cleaning cloth.
On Illumination
To obtain the best picture, the front of the screen should not be exposed to direct lighting or sunlight.
On Heat Dissipation
The temperature of the projector cabinet may increase during or immediately after use; however, this is not a malfunction.
On Screen
When using a screen with an uneven surface, stripes pattern may rarely appear on the screen depending on the distance between the screen and the unit or the zooming magnifications. This is not a malfunction of the unit.
On Fan
Since the projector is equipped with a fan inside to prevent internal temperature from rising, there may be some noise. This is a normal result of the manufacturing process and does not indicate a malfunction. If, however, in a case of abnormal noise, consult with qualified Sony personnel.
On Lamp
The lamp used as a light source contains mercury that has high internal pressure. A high-pressure mercury lamp has the following characteristics:
- Brightness of the lamp will be lowered as the elapse of time used.
- The lamp may break with a loud noise as a result of shock, damage, or deterioration caused by the elapse of time. The lamp may become unlit and may burn out.
- The lamp life varies with individual differences or usage conditions of each lamp. Therefore, it may break or will not light even before the specified replacement time.
- It may possibly break after the replacement time has elapsed. Replace the lamp with a new one as soon as possible if a message displayed on the projected image, even if the lamp normally lights.
For carrying
This unit is precision equipment. When carrying the unit, do not subject the unit to shocks, or fall. It may damage the unit.
On LCD Projector
The LCD projector is manufactured using high-precision technology. You may, however, see tiny black points and/or bright points (red, blue, or green) that continuously appear on the LCD projector. This is a normal result of the manufacturing process and does not indicate a malfunction. Also, when you use multiple LCD projectors to project onto a screen, even if they are of the same model, the color reproduction among projectors may vary, since color balance may be set differently from one projector to the next.
On Condensation
If the room temperature where the projector is installed changes rapidly, or if the projector is moved suddenly from a cold to a warm place, condensation in the projector may occur. As the condensation may cause malfunction, be careful in adjusting temperature settings of the air conditioner. If condensation occurs, leave the projector turned on for about two hours before use.
Notes on security
- SONY WILL NOT BE LIABLE FOR DAMAGES OF ANY KIND RESULTING FROM A FAILURE TO IMPLEMENT PROPER SECURITY MEASURES ON TRANSMISSION DEVICES, UNAVOIDABLE DATA LEAKS RESULTING FROM TRANSMISSION SPECIFICATIONS, OR SECURITY PROBLEMS OF ANY KIND.
- Depending on the operating environment, unauthorized third parties on the network may be able to access the unit. When connecting the unit to the network, be sure
to confirm that the network is protected securely.
- From a safety standpoint, when using the unit connected with the network, it is strongly recommended to access the Control window via a Web browser and change the access limitation settings from the factory preset values.
Changing the password regularly is also recommended. - Do not browse any other website in the Web browser while making settings or after making settings. Since the login status remains in the Web browser, close the Web browser when you complete the settings to prevent unauthorized third parties from using the unit or harmful programs from running.
Notes
- Always verify that the unit is operating properly before use. SONY WILL NOT BE LIABLE FOR DAMAGES OF ANY KIND INCLUDING, BUT NOT LIMITED TO, COMPENSATION OR REIMBURSEMENT ON ACCOUNT OF THE LOSS OF PRESENT OR PROSPECTIVE PROFITS DUE TO FAILURE OF THIS UNIT, EITHER DURING THE WARRANTY PERIOD OR AFTER EXPIRATION OF THE WARRANTY, OR FOR ANY OTHER REASON WHATSOEVER.
- SONY WILL NOT BE LIABLE FOR CLAIMS OF ANY KIND MADE BY USERS OF THIS UNIT OR MADE BY THIRD PARTIES.
- SONY WILL NOT BE LIABLE FOR THE TERMINATION OR DISCONTINUATION OF ANY SERVICES RELATED TO THIS UNIT THAT MAY RESULT DUE TO CIRCUMSTANCES OF ANY KIND.
Checking the Supplied Accessories
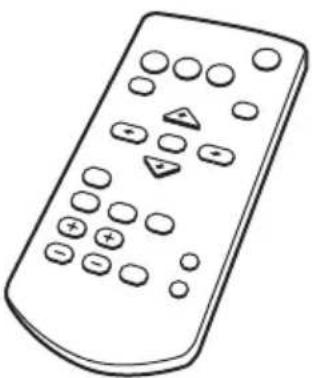
RM-PJ8 Remote Commander (1) Lithium battery (CR2025) (1) The battery is already installed. Before using the remote commander, remove the insulation film.

AC power cord (1)
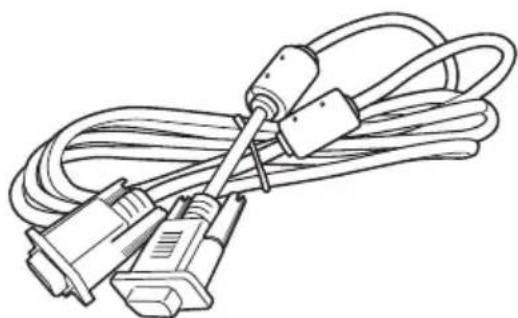
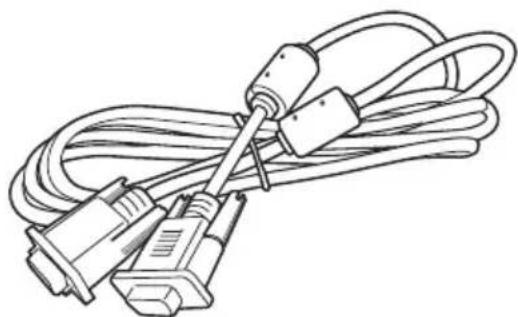
Mini D-sub 15 pin cable (1.8m) (1) (1-970-584-11/Sony)
Lens cap (1)
Quick Reference Manual (this manual) (1)
Operating Instructions (CD-ROM) (1)
Using the CD-ROM manual
The manual can be read on a computer with Adobe Reader installed.
You can download Adobe Reader free from the Adobe website.
1 Open the index.html file in the CD-ROM.
2 Select and click on the manual that you want to read.
Note
If you have lost or damaged the CD-ROM, you can purchase a new one from your Sony dealer or Sony service counter.
Installing Batteries
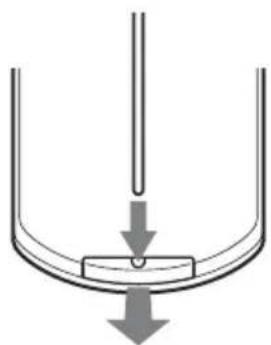
1 Pull out the lithium battery compartment. Pull out the battery compartment with a stick as shown in the illustration.
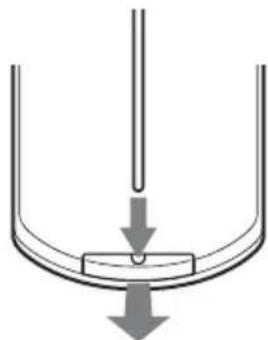
2 Insert a lithium battery.
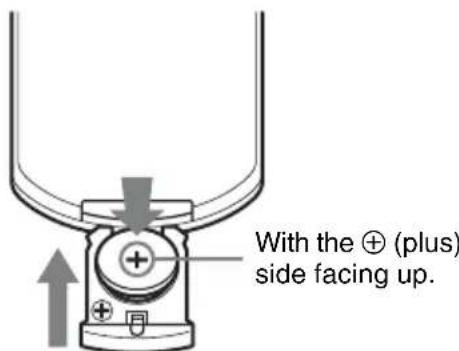
3 Close the lithium battery compartment.
Selecting the Menu Language
The factory setting for the language for displaying menus, messages, etc. is English. To change the on-screen language, proceed as follows:

1 Plug in the AC power cord into a wall outlet.
2 Turn on the projector. Press the / key.
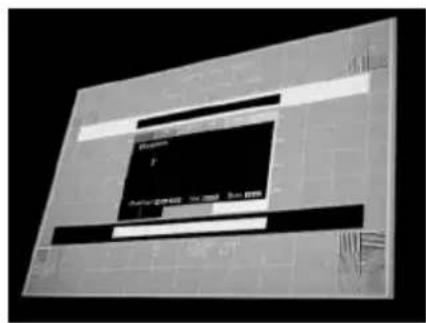
3 Press the MENU key to display the menu. If the display cannot be properly seen, adjust the focus, size, and position of the projected image (page 14).
4 Select the menu language.
① Press the or key to select the MENU SETTING ( menu then press the ENTER key.
② Press the or key to select "Language (A then press the ENTER key.
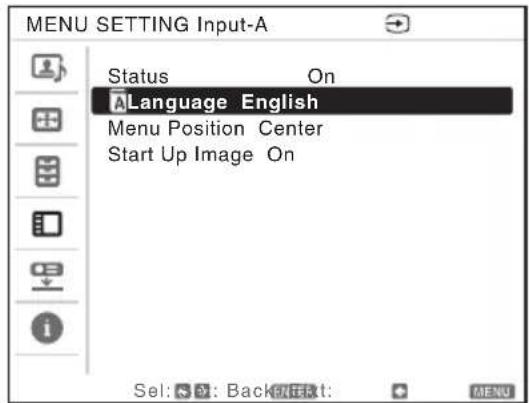
③ Press the / / / key to select a language, then press the ENTER key.
5 Press the MENU key to turn off the menu screen.
Connecting the Projector
Notes
- Make sure all the equipment is powered off when connecting the projector.
- Use the proper cables for each connection.
- Insert the cable plugs firmly; Loose connections may reduce performance of picture signals or cause a malfunction. When pulling out a cable, be sure to grip it by the plug, not the cable itself.
- For more information, refer also to the instruction manuals of the equipment you are connecting.
- Use a no-resistance audio cable.
Connecting a Computer
Connection with a computer is explained for each input signal.
INPUT A/INPUT B
For connecting a computer with an RGB output connector.
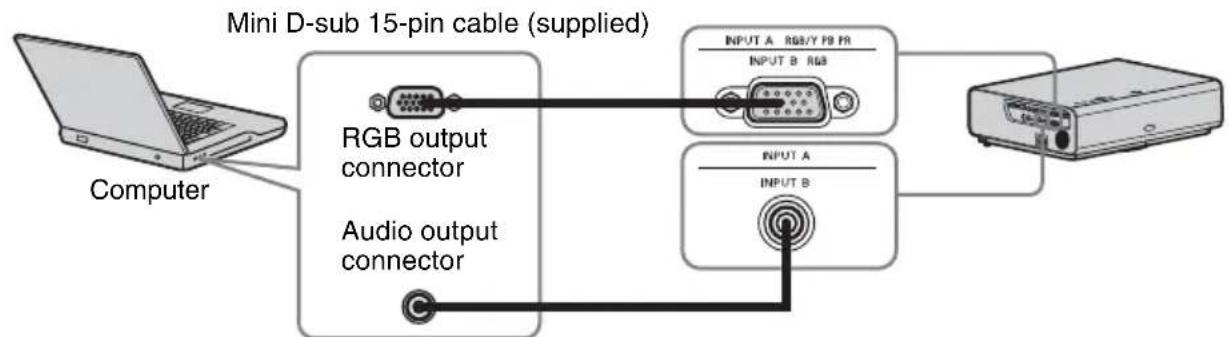
Audio cable (Stereo mini plug) (not supplied)
Note
It is recommended that you set the resolution of your computer to 1024 × 768 pixels (VPL-CX236/ CX276) or 1280 × 800 pixels (VPL-CW256/CW276) for the external monitor.
INPUT C/INPUT D
For connecting video equipment with an HDMI output connector.
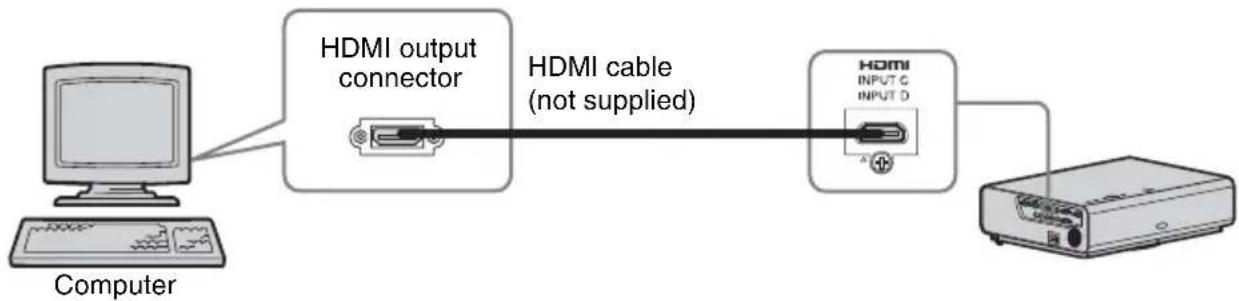
Notes
- Use HDMI-compatible equipment and cable(s) that have an HDMI logo on them.
- Use a high speed HDMI cable(s) on which the cable type logo is specified. (Sony products are recommended.)
-
The HDMI connector of this projector is not compatible with DSD (Direct Stream Digital) Signal or CEC (Consumer Electronics Control) Signal.
-
For a PC with DVI-D output connector, use an HDMI-DVI-D cable (not supplied).
For information on other connecting methods, refer to "Connecting the Projector" in the Operating Instructions contained in the supplied CD-ROM.
Projecting an Image
The size of a projected image depends on the distance between the projector and screen. Install the projector so that the projected image fits the screen size. For details on projection distances and projected image sizes, see "Projection Distance and Lens Shift Range".
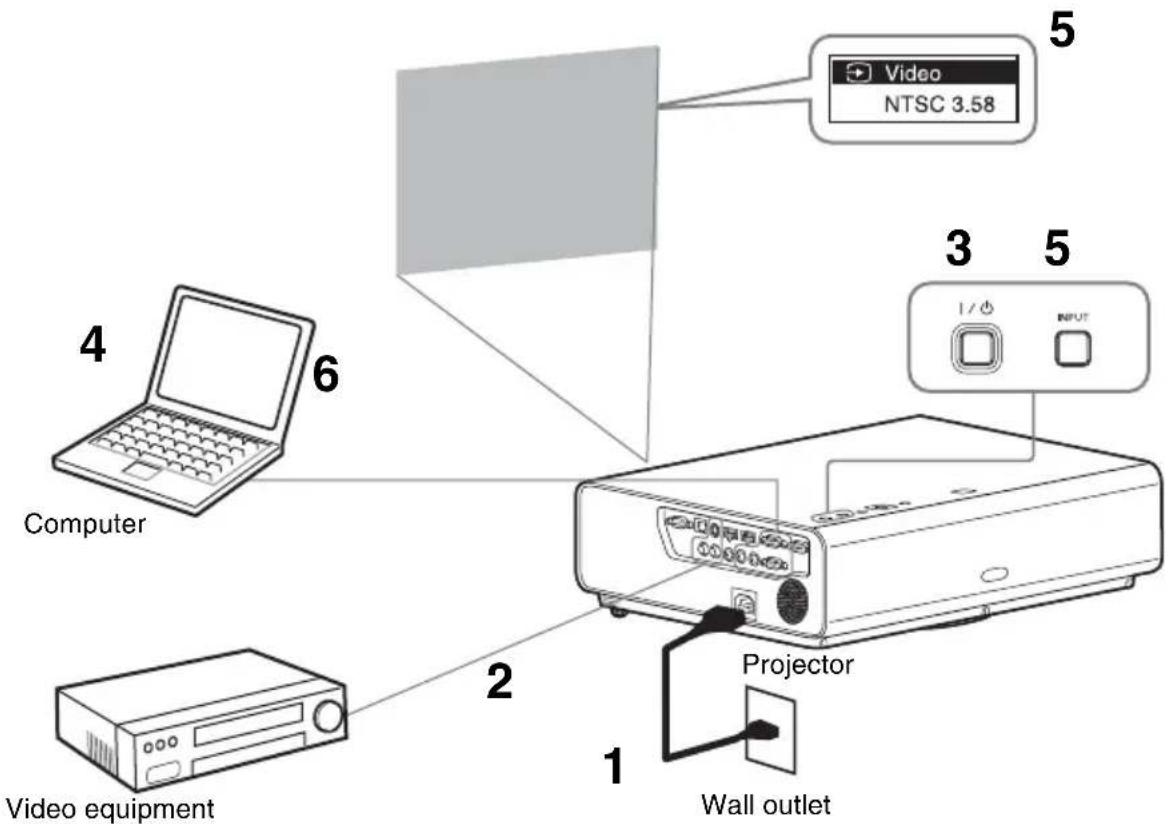
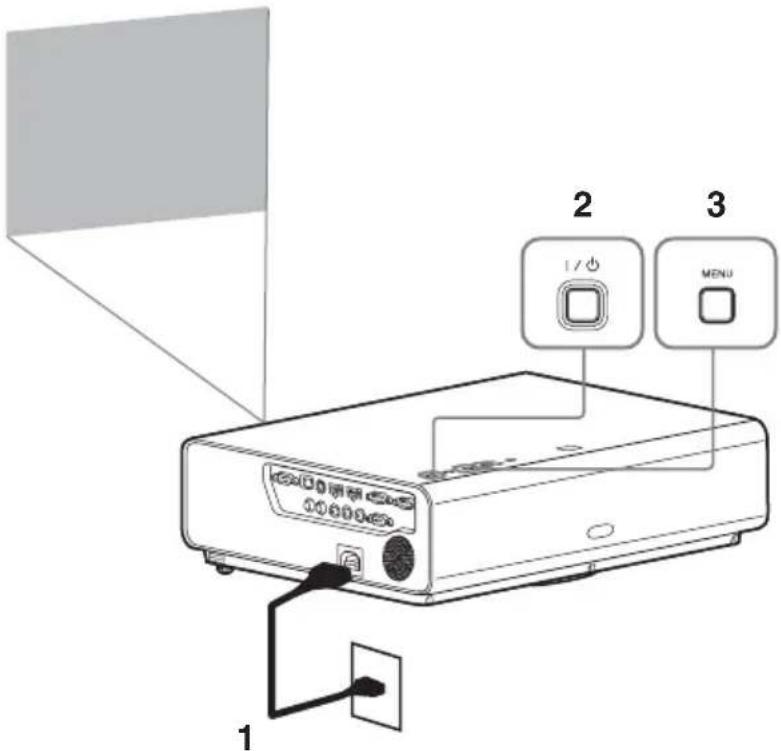
1 Plug the AC power cord into the wall outlet.
2 Connect all equipment to the projector.
3 Press I/O to turn on the unit.
4 Turn on the connected equipment.
5 Select the input source. Each time you press the INPUT key on the projector, the input signal switches. Press the INPUT key repeatedly to select an image to be projected.
6 To project an image from a computer, set your computer to output to external display. How to switch the computer to output to the projector varies, depending on the type of computer.
(Example)

7 Adjust the focus and position of the projected image (page 14).
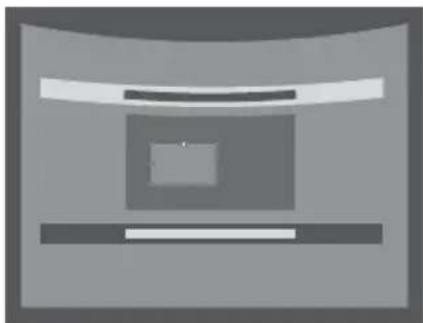
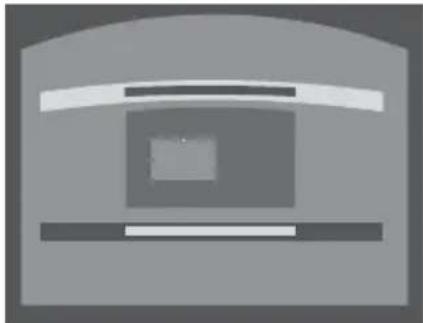
Adjusting the Projected image
| Focus Size (Zoom) | Position (Lens shift) | |
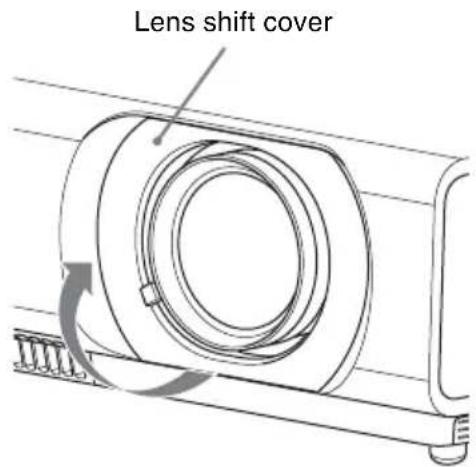
Adjusting the tilt of the projector by lens shift
You can adjust the position of the projected image by turning the screws for lens shift (V shift screw and H shift screw).
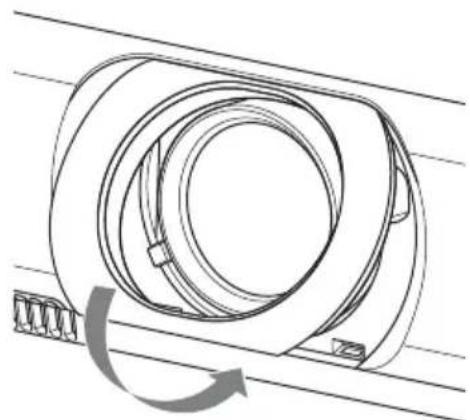
1 Lift up the lower end of the lens shift cover with your finger to remove it.
2 Insert a Philips screwdriver to the ①H shift screw inside the unit and turn it to adjust right or left, and to the ②V shift screw to adjust up or down. Be careful not to look into the lens.
Continued turning of these screws will return the lens shift to its original position. Adjust the screws to set the lens shift to the optimum position. For details on the adjustment range, see the "Lens shift range".
3 Return the lens shift cover to the unit.
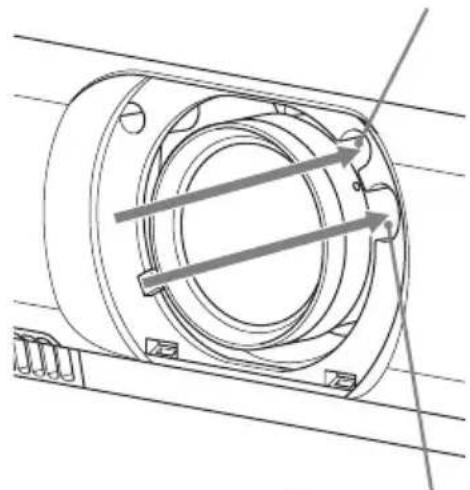
②V shift screw
①H shift screw
Adjusting the tilt of the projector with the front feet (adjustable)
You can adjust the height of the projector pushing the side button on this unit. By changing the slope of the projector with front feet (adjustable), you can adjust the position of the projected image.
How to alter the angle
1 Push in the foot adjust button at the side of the unit.
2 Keeping the button pushed in, raise the main unit to the desired angle.
3 Release the foot adjust button.
4 For fine positioning, turn the right and left front feet (adjustable) beneath the unit.

Notes
- Be careful not to let the projector down on your fingers.
- Do not push hard on the top of the projector with the front feet (adjustable) extended. It may cause malfunction.
Changing the aspect ratio of the projected image
Press ASPECT on the remote commander to change the aspect ratio of the projected image. You can also change the setting in Aspect of the INPUT SETTING menu.
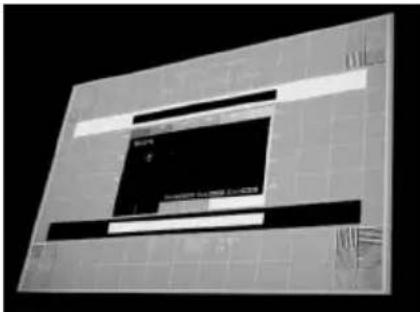
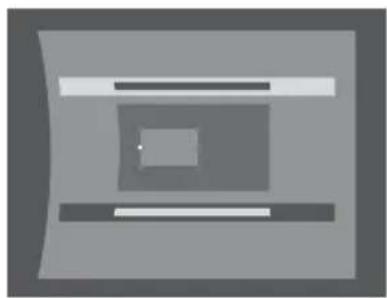
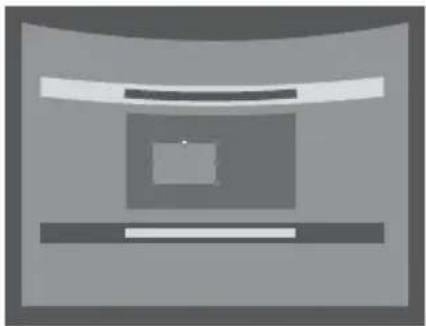
Correcting trapezoidal distortion of the projected image (Keystone feature)
When the projected image is a trapezoid, tapering to the top or bottom
When "V Keystone" is set to "Auto", the keystone feature works automatically to correct the distortion. However, the keystone feature may not work properly when the screen is tilted, etc. In this case, set keystone manually.
1 Press KEYSTONE on the remote commander once or select V Keystone in the INSTALL SETTING menu.
2 Use / / to set the value. The higher the setting, narrower the top of the projected image. The lower the setting, the narrower the bottom.
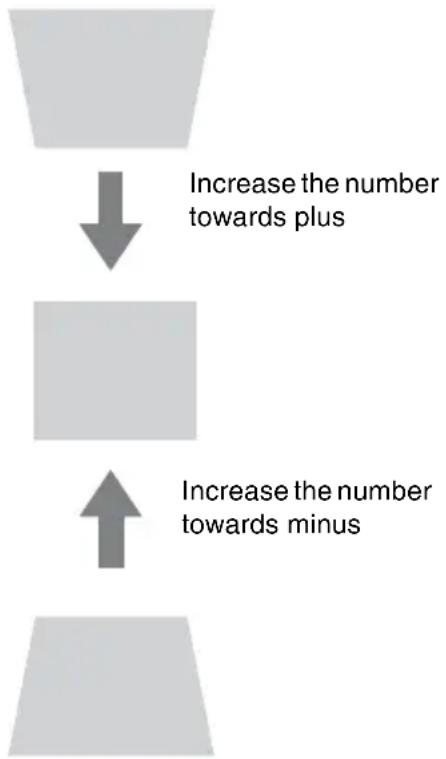
Press the RESET key to restore the projected image before adjustment.
When the projected image a trapezoid, tapering to the right or left
1 Press KEYSTONE on the remote commander twice or select H Keystone in the INSTALL SETTING menu.
2 Use / / / to set the value. The higher the setting, the narrower the right part of the projected image. The lower the setting, the narrower the left part.
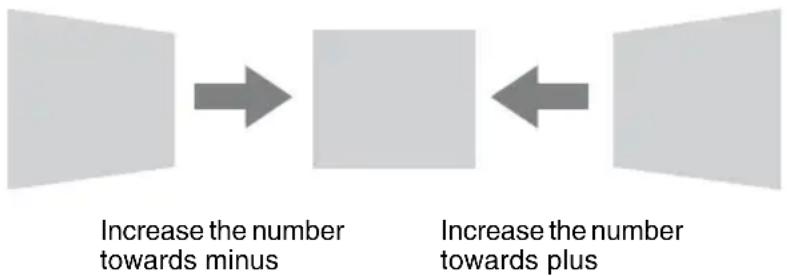
Press the RESET key to restore the projected image before adjustment.
Notes
- Since the Keystone adjustment is an electronic correction, the image may be deteriorated.
- Depending on the position adjusted with the lens shift feature, the aspect ratio of the image may change from the original or projected image may be distorted with Keystone adjustment.
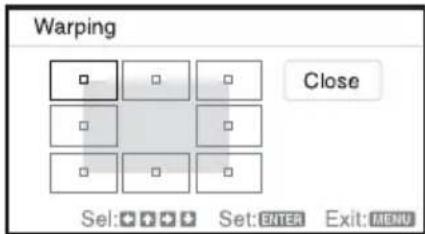
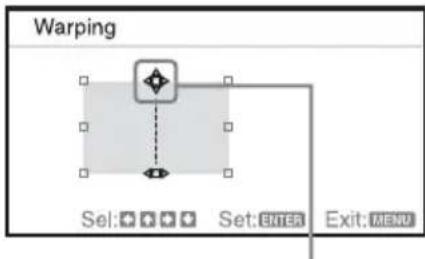
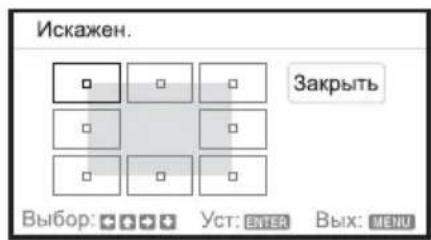
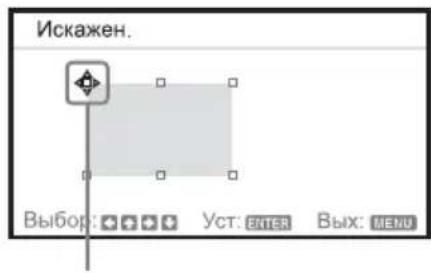
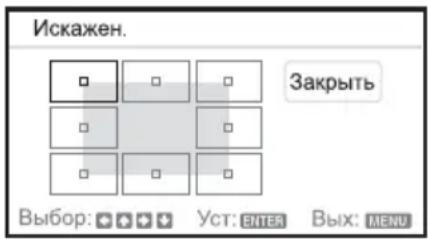
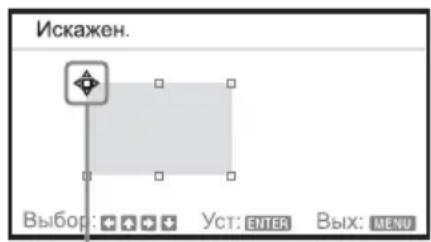
Correcting the image twist (Warp correction feature)
You can correct the image twist by the warp correction feature
1 Press KEYSTONE on the remote commander three times, or select "Warping" in the INSTALL SETTING menu, and select "Adjust."
2 The guide is displayed.
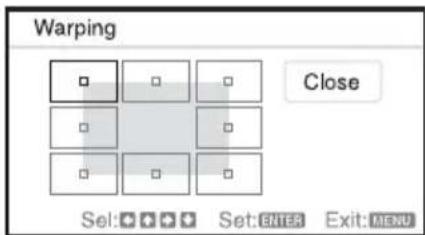
The corners of the image to be corrected
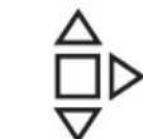
1 Move the by using / / / to select the corner you want to correct. If you press ENTER, you will go back to the cursor display.
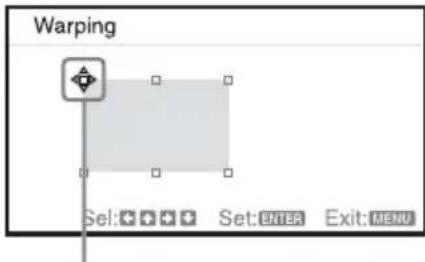
Adjust using this cursor.
2 Adjust the position of the corner you want to correct by using / / / .
3 The cursor will disappear if the adjustment range limit is reached.
Example of cursor display:

You can adjust in all directions.
You can adjust only to the left/ right or downwards.
Press the RESET key to restore the projected image before adjustment.
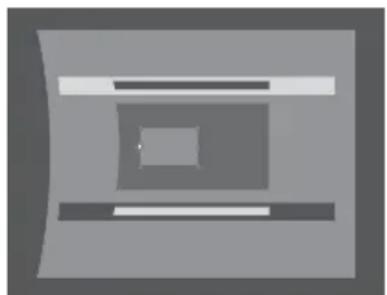
Correcting deflection ①-The right/left edges of the image
1 Move the by using / / / to select the corner you want to correct. If you push ENTER, you can switch to the cursor display.
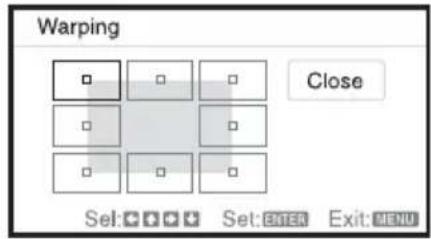

Adjust using this cursor.
2 You can adjust the deflection of the edges by using / / / . You can adjust the central position of the edges by using / . For the range of deflection, use / . You can adjust the right/left edge independently.
Note
When adjusting the central position of the edges, the right and left edges will be set at the same time.

3 The cursor will disappear if the adjustment range limit is reached.
Example of cursor display:

You can adjust in all directions.
You can adjust only upwards/ downwards or to the right.
Press the RESET key to restore the projected image before adjustment.
Correcting deflection ②-The top/bottom edges of the image
1 Move the by using / / / to select the corner you want to correct. If you push ENTER, you can switch to the cursor display.
Adjust using this cursor.
2 You can adjust the deflection of the edges by using / / / .
You can adjust the top position of the edges by using / . For the range of deflection, use / . You can adjust the top/bottom edge independently.
Note
When adjusting the top position of the edges, the top and bottom edges will be set at the same time.
3 The cursor will disappear if the adjustment range limit is reached.
Example of cursor display:

You can adjust in all directions.
You can adjust only to the left/ right or downwards.
Press the RESET key to restore the projected image before adjustment.
Automatically adjusts Phase, Pitch and Shift of projected image while a signal is input from a computer (APA (Auto Pixel Alignment))
Press APA on the remote commander. Press again to cancel during the setting. If Smart APA is set to On, executes APA automatically when a signal is input.
Turning Off the Power
1 Press the I/O key on the main unit or the Remote Commander.
The shutdown message appears.
If you do not press any of the keys for a while, the projector will turn off.
If you press / on the projector or remote commander while the shutdown message is on the screen, the projector will restart.
Note
Do not turn off the projector soon after the lamp lights. It may cause a malfunction of the lamp (does not light, etc.).
2 Unplug the AC power cord from the wall outlet.
After step 1, the fan continues to run for a while to reduce internal heat, however, you may also unplug the AC power cord before the fan stops.
Turning off without displaying the confirmation message
Hold the l / 0 key on the main unit pressed for a few seconds.
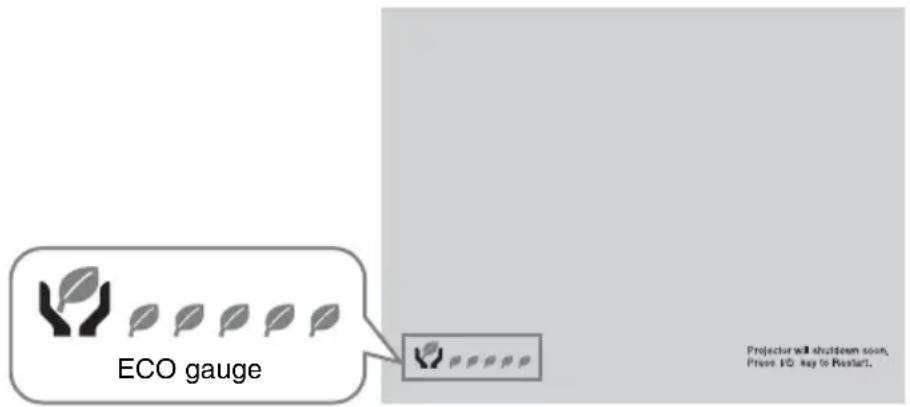
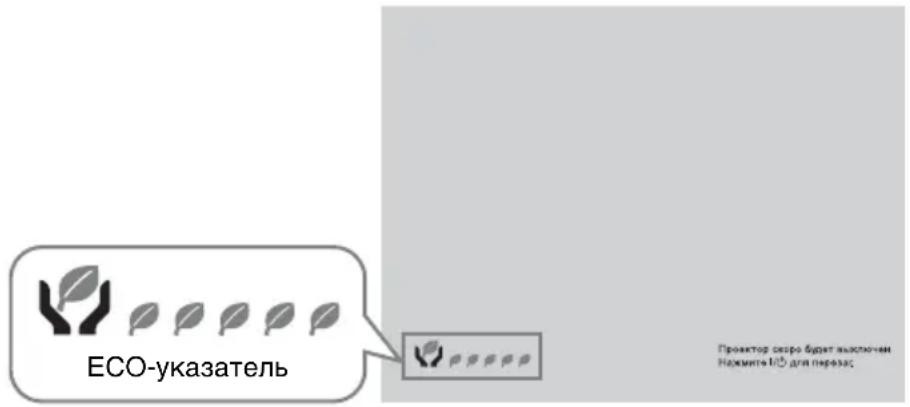
ECO gauge
This gauge indicates the current effectiveness of the projector's ECO function. (For details on the ECO function, see "ECO MODE key", "AUTO POWER SAVING" and "Lamp Mode"). The leaf icons are displayed when the projector is shut down. The number of displayed icons varies according to how much energy is saved as a result of using the ECO function.
Indicators
The indicators allow checking the status and notify you of abnormal operation of the projector. If the projector exhibits abnormal status, address the problem in accordance with the table below.
ON/STANDBY indicator
Status Meaning/Remedies
Lights in red The projector is in Standby mode.
Flashes in green • The projector is ready to operate after having been turned on.
- The lamp cools after the projector is turned off.
Lights in green The projector's power is on.
Lights in orange The projector is in AUTO POWER SAVING (lamp cut off).
Flashes in red The projector is in abnormal status. Symptoms are indicated by number of flashes. Address the problem in accordance with the following. If the symptom is shown again, consult with qualified Sony personnel.
Flashes twice The internal temperature is unusually high. Check the items below.
- Check to see if nothing is blocking the ventilation holes.
- Check to see if the air filter is not clogged. (page 25)
Flashes six times Unplug the AC power cord from a wall outlet. After checking that the ON/STANDBY indicator goes out, plug the power cord to a wall outlet again then turn on the projector. If the problem still persists, consult with qualified Sony personnel.
Other number of Consult with qualified Sony personnel. flashes
LAMP/COVER indicator
Status Meaning/Remedies
Flashes in red Symptoms are indicated by number of flashes. Address the problem in accordance with the following.
Flashes twice The lamp cover or air filter cover is not attached securely. (page 23, 25)
Flashes three times The temperature of the lamp is unusually high. Turn off the projector and turn it on again after the lamp has cooled. If the same symptom occurs, turn off the projector again and remove the lamp (page 23), then check if the lamp is not broken.
If the lamp is not broken, reattach the lamp and turn on the projector again.
If the symptom occurs again, the lamp may be exhausted. In this case, replace the lamp with a new one (page 23).
If the lamp is broken, do not exchange the lamp by yourself. Consult a qualified Sony consultant.
Replacing the Lamp
Replace the lamp with a new one if a message displayed on the projected image or the LAMP/ COVER indicator notifies you to replace the lamp (page 22).
Use an LMP-C280 (VPL-CX276/CW276), LMP-C240 (VPL-CX236/CW256) projector lamp (not supplied) for replacement.
Caution
- The lamp remains hot after the projector is turned off. If you touch the lamp, you may burn your finger. When you replace the lamp, wait for at least an hour after turning off the projector for the lamp to cool sufficiently.
- Do not allow any metallic or inflammable objects into the lamp replacement slot after removing the lamp, otherwise it may cause electrical shock or fire. Do not put your hands into the slot.
Notes
- If the lamp breaks, contact qualified Sony personnel. Do not replace the lamp yourself.
- When removing the lamp, be sure to pull it out straight, by holding the designated location. If you touch a part of the lamp other than the designated location, you may be burned or injured. If you pull out the lamp while the projector is tilted, the pieces may scatter if the lamp breaks any may cause injury.
1 Turn off the projector, and disconnect the AC power cord from a wall outlet.
2 When the lamp has cooled sufficiently, open the lamp cover by loosening 3 screws.
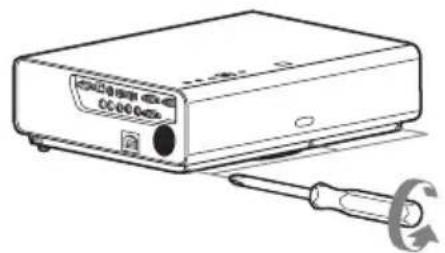
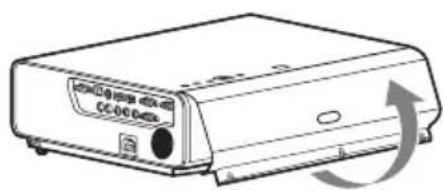
You can remove the lamp cover for a while when installing on the ceiling. Take care to prevent the lamp cover from falling down, as it is not fixed. Do not apply pressure to the lamp cover while it is open.

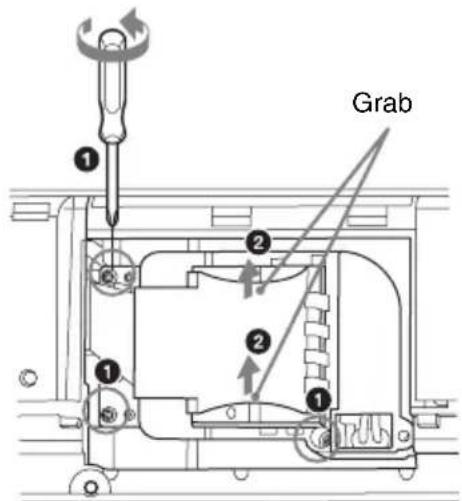
3 Loosen the 3 screws on the lamp (1), then pull out the lamp by its grab (2).
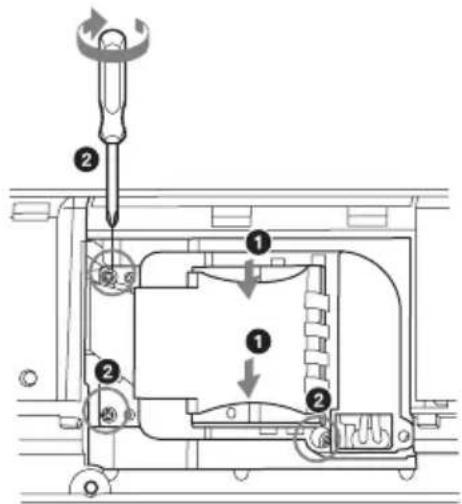
4 Insert the new lamp all the way in until it is securely in place (1). Tighten the 3 screws (2).
Note
Be sure to install the lamp and Lamp cover securely as it was. If not, the projector cannot be turned on.
5 Close the lamp cover and tighten the 3 screws.
6 Connect the AC power cord to a wall outlet and turn on the projector.
7 Reset the lamp timer for notification of the next replacement time.
Select "Lamp Timer Reset" on the SET SETTING menu then press the ENTER key. When a message appears, select "Yes" to reset the lamp timer.
Caution
For the customers in the U.S.A. and Canada
Hg Lamp contains mercury. Dispose according to applicable local, state/ province and federal laws. For additional information, see www.sony.com/mercury
Cleaning the Air Filter
When a message appears on the projected image, clean the air filter.
If the dust cannot be removed from the air filter even after cleaning, replace the air filter with a new one. For details on a new air filter, consult with qualified Sony personnel.
Caution
If you continue to use the projector even after the message is displayed, dust may accumulate, clogging it. As a result, the temperature may rise inside the unit, leading to a possible malfunction or fire.
1 Turn off the projector, and disconnect the AC power cord from the AC outlet.
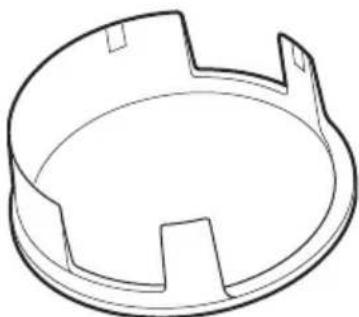
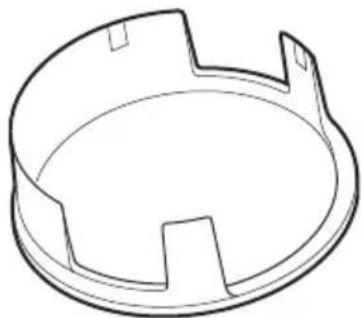
2 Draw out the air filter cover.
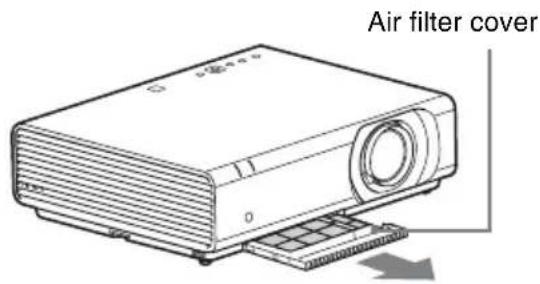
Note
If you remove the air filter cover when power is turned on and the AC power cord is not removed from the AC outlet, avoid touching the fan inside the unit, as it may cause injury.
3 Clean the air filter with a vacuum cleaner.
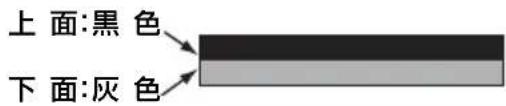
Remove the filter holder to remove the air filter.
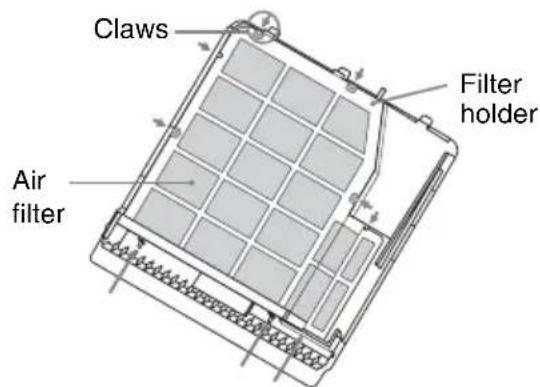
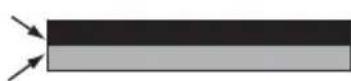
The air filter consists of 2 filters.
Upper filter: Black
Lower filter: Gray
4 Attach the air filter cover to the unit.
Note
Be sure to attach the air filter cover firmly. Incorrect attachment of the cover may cause a malfunction.
- La lampara permanece caliente despues de haber apagado el projector. Si toca la lampara,uede quemarse los dedos.Antes de sustituir la lampara,espere al menos una hora afterwards de haber apagado el projector para que se enfiree lo suficiente.
- No permitted that you can introduce objects into the ranura.
- No permit to use objects introduced in the ranura.
- No permit to use objects introduced in the ranura.
- No permit to use objects introduced in the ranura.
- No permit to use objects introduced in the ranura.
- No permit to use objects introduced in the ranura.
- No permit to use objects introduced in the ranura.
- No permit to use objects introduced in the ranura.
- No permit to use objects introduced in the ranura.
- No permit no objects introduced in the ranura.
- No permit no objects introduced in the ranura.
- No permit no objects introduced in the ranura.
- No permit no objects introduced in the ranura.
- No permit no objects introduced in the ranura.
Notas
- YroJI HaKIOHa IpoeKTopa He IOJIKeH IpeBbIaTb 15 rpaIycob B Ropn3OHTaJIbHOI JIOCKOCTN.
- YcTaHOBHTe IpoeKTop Ha IIOJy NIN HOTOLKe.JIIO6bIe IpyrHe yCTaHOBKn IINBOIDT K TaKIM HeIOJIaIKam, KaK NCKaXeHHe IBeTHOCTN ININ COKpaIeHne cPoKa CJyX6bl JAmIIbI.
He yctaHaBJIbAaTe ycTPOcTBOB HOMeHnX CIOBbIWeHHoT TeMIIepaTyPoN IN BJIaXHOCTbIO, JIN IOHNKeHHoT McIpePaTyOi.
He yctaHaBJIbBaIte ycTPOcTBO B6JIN3KOHIIHIOHEpa,IOI IIPrMbIM IOTOKOM XOJOHORO HJITeIIIORO BO3Iyxa.YCTaHOBka B TaKHX MeCTax MOXCT IIpNBcCTN K HeNCIIpaBHOCTN ycTPOcTBa BCJIeICTBHe KOHNcaIIHN BJIaHI NII IOBbIIHeHH TeMIpePaTypbl.
He yctHaBJIHBAaTe ycTpOncTBO B6JIN3n DaTcIKOB TeMIIepaTypbI INJIN IbIMa. 3TO MOKeT cTaTB IIpHUNHO HeNCIIpaBHOCTN daTcHKa.
He yctaHaBJIHBAIte yctpoIcTBO B ycIOBHX KpaHHe 3aIIbJIeHHOCTH HJN 3aIbIMJIeHHOCTH. Bo3duHbI qNJbTp MOKeT 3acOpHTbcra, YTO IIpNBeTeK HcncPpABHOCTn yCTPOIcTBA HJN erO IOBpeKJeHHIO.
- EcJn ycTPOINCTBO 3KcJIiyaTHpyeTcH a BBICOTe 1500 MeTPOB HJN 6oJIee HaI yPOBHeM MOpR, yCTaHOBInTe IJIy IapAMeTpTa "PeXHM BBIC.IIOJI" 3HaueHne BkJI" B McHIO YCTAHOBKN. EcJn IIpn 3KcIIiyatauHn Ha 3HaHTeJIbHOB BBICOTe He yCTaHOBNTb JaHHbI IN peXHM, MOrY T BO3HNKaTb HeKeJIaTeJIbHbIe 3ΦΦeKTbI, TaKHe KaK CHNXeHHe HaJeXHOCTH HeKOTOPbIX KOMIOHETOB.
OuNcTKa IINH3bI N KOpnyca
- IpeI OUHCTKoI OTKJIIOHTe IIHyp IITaHII IepMeHHOTo TOKaOT 3JIeKTpHueCKoI p03eTKN.
- He BbITnpaIte yCTpoNcTBO rP3HO TKAHbIO - 9TO MOKeT IIpNBecTN K IIOABJIeHHIO IapaIIHH Ha KOpNyce.
- IJIITeJIbHbI KOHTaKT cJIeTuyHMN BeIIeCTBaMn (HaIIpIMcpeCCTBO OT HaceKOMbIX), a TaKKe N3JeJINMMN 3 pe3HHbI IIIN BHNJIa MOKeT IIpNBecTHN K IN3MeHeHIO BHeIIHeRo BNJa yCTPOINCTBa IN IOBpeXJDeHNO IOKpbITNA.
He kacaTecb JHH3bI rOJIbIMn pyKaMn.
OuHCTKa IIOBepxHOCTH JINH3bl: AkKypaTHo IpoTpHTe JINH3y MraTKoI TKAHbIO, HAnpMep TKaHbIO JIA OYnCTKn cTeKJIa. 3aRpy3HeHne, KOTOpoe He yJaCTcY yCTpaHHTb, MOJHO OYnCTNTb, CJERKa CMOYNB TKAHb BOIO. He NcIOJIb3yIte pactBOPHTeJIN, cIIInPT, 6eH3HH JIN KNCJOTy, IIeJOUHbIE n a6pa3HBHbIE MOIOUIne cpeITcBA HJN IPOINTaHHYIO TKAHb JII YOHNCTKN.
OuHCTKa KOpIyca: AkKypaTHo OUnCTHTe KOpIyc MraKoT KaHbIO. 3aRpy3HeHn, KOtOpbIe He ydaetcYcTpaHHTb, MoKHO OUnCTHTb, cJIeTKa CMOuHB TkaHb CJaobIM pactBOPOM MOIOIeRO cpeJCTBa, IpeBapNTeJBHO OTKaB ee, a 3aTeM IPOTepeB KOpIyC cyXoM MaKoT KaHbIO. He HcIOJIb3yIte pactBOPHTeJIN, cInpT, 6eH3HH JIN pa36aBHTeJB, KNCJOTy, IIeJOUHbIe IN a6pa3HNbIe cpeJCTBa JIN IPOINTaHHYIO TkaHb IJIa OUnCTKN.
OcBeueHne
IIЯ NOJIyuYeHnI N3O6paXeHnI XopoIeIro KaueCTBa Heo6xOIMo, YTO6bI 3KpaH 6blI 3aIIINIIeH OT IIpyMOrO OCBeIeHnI HJIn COJIHeYHOrO CBeta.
O paccseHn Tepla
TeMnepaTpa Kopnyca IpoeKTopa MoKeT IOBbIHaTbcr BO BpeMnIOJIb3OBaHn HJn cpa3y IocJIe Hero; OJHaKO 3TO He JBAJIaTcRHeNCIIpaBHOCTbIO.
3KpaH
Ipn HcnoJb3OBAHHn 3KpaHa c HeJIaIKo IIOBepXHocTbIO Ha 3KpaHe MOrYT INHGra IIOBJIaTBcII IOJIOcbI, B 3aBNCIMOCTH OT paCCTOHHM MeKdy 3KpaHOM N yCTPOINCTBOM, a TaKKe 3HaueHn IIpNoJInxKeHH. To He 3BJIeTcHcNIIpaBHOCTbIO yCTPOINCTBa.
BentnlaTop
IpoeKTOP OCHaIeH BHyTpEHHM BeHTJIaTOpOM, KOTOpbIcJyXHT IIJI CHHXeHNA BHYTpEHHe TeMIIepaTypbI. Pa6ota BeHTJIaTOpa MoKeT COIIPOBOXJaTbcra JIERKIM IYUMOM.3TOT aΦΦeKT YBJIaTeCRA HOpMaJIbHBIM pe3yJIbTaTOM IIPOH3BOJCTBeHHOTo IIPOUecca H He CBnIeTeJIbCTByeT O HeNCIIpaBHOCTH.NOHaKO, IIPIN BBICOKOM yPoBHe IYWMA cJIeIyET o6paHTbCRA K KBaJIuΦNIuPObAHHomy IepcoHaJIy KOMIIaHHN Sony.
CbeHnO Jamne
B IIpoeKTope B KaueCTBe HcToUHHKa CBeta HcIOJIb3YeTcra PtTyTHa JIaMIIa BBICOKO rJaBJIeHn. XapaKTepHcTnKn pTyTHoJ IaMIbI BBICOKO rAbJIeHn yKa3aHbI HnKe.
-RpKocTb JAmIbI IocTeHHo CHNXKaETcB TeueHne cPoka 3KcIIJyatauH.
JaAMIIa MOKET JIOHHyTb c rPOMKHM 3BykOM Bpe3yJIbTaTe yIapa, IOBpeXJdeHn IIN I3HOca IIIO HCTeueHHn Cpoka 3KcIIJyaTaIHH. JaAMIIa MOKET NepeCTaTb CBETHTbcn I nepeFOpetb.
CpOK cIyK6bI JAMIIb 3aBnCTOT INHINBBNyajbHbIX XapaKTepnCTNK JAMIIb HJN ycIOBn 3KcIIyatauHN. IToI npHInHe JAMIIa MoKeT IOnHyTB HJN IIpeEROpETb Jo yKa3aHHORO cPOKa 3aMeHbI.
JaAMnTaKKe MoKcT JIOHHTb IocJte HCTeueHHa cPoka 3aMeHbI.3aMeHnte JAmNpy IpOeKTopa cpa3y IocJIe IOBJIeHHa COo6IeHHa IIPOeHpyemOM N3O6paXKeHH, JaXe ecJIN JaAMn IIpoIoJIkaeT HopMaJIbHO pa6OtaTb.
Mepbl npedoctoPOXHOCTN npn TpaHcnpTnpOBKe
JaHHoe ycTpoIcTBO OTHOCHTcK
TOUHOMy o6OpyIOBaHnIO. Ipn
TPaHCIIOPTNPOBKe 6epeIHTe ycTPOIcTBO
OT yIapOB NJIIN IIaIeHnY. YIapbI NJIIN
IIaIeHnE MOrTy IOBpeIITb yCtPoIcTBO.
KndkokpncTaJIInueckn npoekTop
KK-ⅡpoekTop co3daH c
HIOJIb3OBAHNEM BBICOKOTOHbIX
TexHOJIOrn. OHaKApHe KK
IIpoeKTopa MOryT IepNoJUYeCKN
IOABJIaTBcM MeJIKe YepHbIe H/NIH
IrpKne (KpaChbIe, CInHe NJIIN 3eJIeHbIe)
TOckN. 3TOT aQFeKT YBJIaTeCt
HOPMaJIbHbIM Pc3yJIbTaTOM
IPOUN3BOIDCTBeHHORO IIpoUcecca H He
CBuJeTeJIbCTByeT O HeNCIIpaBHOCTN.
KpOME TOrO, IIpn HCIOJIb3OBAHH INIA
IIpoeIIuPoBaHHa OINH 3KpaH
HeCKoJIbKnx KK-IIpoeKTopOB, JaXe
OJHOJ MOJeJIH, IBEToIpeJaY pa3HBIX
IIpoeKTopOB MoXeT OTJNuATbcR, TaK
KaK 6aJIaHC IIBeTa Ha HNX MoXeT 6bITb
HaCTpoEH IO-pa3HOMY.
OKoHdEhcauN
IIpn6bICTpOM H3MeHeHH TeMnepaTpyB IIOmeHnn, B KOTOPOM yCTaHOBJeH IIPOEKTOp, HIN IIpi N6bICTpOM IIpeMeIeHHN IIPOeKTopa H3 XOJIOnHO B TEJIIOe MeCTO BHyTPn HEo MOKeT O6pa3OBaTbcra KOHdEHCat. TaK KaK KOHNecAT MOKeT IIpNBecTHK HeNCIIpaBHOCTH, CO6JIIOJaTe OCTOPOXHOCTb IIpi H3MeHeHH NaCTPOeK TeMIIePaTpybI KOHNIOHepa. IIpi 6pa3OBaHHN KOHNcHcaTa IIpeJN CNOJB3OBaHHem IIPOeKTopa OCTaBBte eTO BKJIIOueHHbIM IIpNoJIN3HTeJIbHO Ha IBa Yaca.
Приимechanical 6e3oNaChocTn
KOMIIAHNIA SONY HE HECET OTBETCTBEHHOCTNI 3A KAKOI bI TO HN bIIO YIIEPB, BO3HNI KJIIECTBNEHECOBJIOJEHNA MEP IPEIOCTOPOXHOCTNI PPINCIOJB3OBAHNU YCTPOICTB IPEDAU IN DAHHbIX, HEN36EJKHbIX YTEUEKNHOPMAIIN, CBIAHHbIX CO CIIINΦHKAIJMN IPEDAUYIADHHbIX, NJIN IPOBJEM BE3OPIACHOCTNI JIOBOTOPODA.
B 3aBnCmOCTN OT OIIepaIIOHOHcpeIbI BO3MOXKeH HeCAHKNIOHNPoBAHHbI IOCTyIIOCTOPOHHX JINK yCTPOIcTBY. PnIOJKNIOyeHNyCTPOIcTBa K ceTHy6eINTecb B TOM, YTO CeTb HAnEJHO3aIIINJIeHa.
-Прин ИСЮЛБ3OBAHи yCtpoIcTBA, IODKJIIOUeHHO K CeTN, B IeJIaX 6e3ОпаСHOCrpeKOMeHДуETcra OTKpbITb OKHO yIpaBJIcHnA C IOMOIIbIO Be6-6pay3epa H N3MeHHTb 3aBOJCKHe NaCTPOIKN II O yMOJIuaHnIO IJIa ORpaHnueHnI DoCTyIIa. KpOME TOrO, peKOMeHДуETcra peTyJIaRPHo MeHrTb IapOJIb.
-BoBpeMa yctaHOBKn HAcTpoeK n IocJIe ee 3aBepHHe He 3axoJnte Ha KaKne-JIbO Be6-caNTbI Yepe3 Be6-6pay3ep. IocKOJIbKy coCToAHnE BXoJa coXpaHЯETcR B 6pay3epe, IIO 3aBepHHeHHHAcTpoEe 3akPoHTe Be6-6pay3ep, YTO6bI IIpeIoTbPaTHTb HecaHKIIHOHPOBaHHbI IOCTyI IIOCTOpOHHHJ JINK YcTPOIcTBBy N BO3JeIcTBHe BpeIOHOCHOrO IIporpAMMHorO oBeCHeHnA.
PpMpeaHnA
BceTgIa npOBeprTe hCpABHocTb yCTPOnCTBa, IpexKJe Yem ero HcNoJIb3ObaTb. KOMIIAHN ASONY HE HECET OTBETCTBEHHOCTn 3A KAKoI Bbl TO Hn BblIO YIePB, BKJIIOUyA, B YACTHOCTn, KOMIEHCALNIIO NJIN BO3MEIeHNE YbblTKOB B CBa3N C UTPATOI INJIN HEIOIOJIYUeHNEM IPIIBJIEN N3-3A HEPA6OTOCIOCO6HOCTn 3TOI0 O6OPUIOBAHNA, KAK HA IIPOTJAKeHN IAPAHTNIHOTo IEPNOJa, TAKIIOCSJE NCTeUeHN IAPAHTNIHOTo CPOKA, A TAKKE BCJIeIcTBHeJIIObblIX INHbIX BO3MOJXHbIX IPIuHN.
KOMIIAHNASONY HE HECET OTBETCTBEHHOCTN 3A IPIPENEH3NI JIOBOFOPODA, IPIPJIbABJEHHbIE IOJIb3OBATEJIAMN 3TOFO IPIPIBOPA INI TPETbIMN JINICAMN.
KOMIIAHNJSONYHE HECET OTBETCTBEHHOCTN3A IIPKEPAIIEHNE INIIN IPIPNOCTAHOBKY IPEIOCTABJIEHNJA KAKNX-JINBO YCJYT,CBIAHHbIX C 3TNIMIPNBOPOM,BHE 3ABNCIMOCTNOT OBCTOJTEJBCTB.
BxoJaIeB KOMJIeKT npHaJleXHocTn
IyIbT InCTaHIOHO ynpaJIeHnRAm-PJ8 (1)
JIITHeBa 6aTapeKa (CR2025) (1) BaTapeKa IIpeBapHTeJIbHo ycTaHOBJIeHa.IpeEINcHOJIb3OBAHNem IyJIbTa IInCTaHIOHO rIpaBJIeHnYJaJIrTe H3OJIaIOHHU O IIJeHky.
Ka6eJIb IITaHHI NcpeMeHHOTo TOKa(1) Ka6eJIb c 15-KoHTaKTHBIM MHHpa3bemOM D-sub (1,8M) (1) (1-970-584-11/Sony)
KpbIIka o6beKTnBa (1)
Kopotkoe cnpaBOuHoe pyKOBoIcTBO (HaHHoe pyKOBoIcTBO) (1) PyKOBoIcTBO IO 3KcIIyatauIN (Ha IIncke CD-ROM) (1)
Исpenьзоване pykoBoDCTBaHaKOMnakT- ДиСke
PyKOBOIDTO BO MOxHO OTKpbIb c IOMOIIbIO KOMIIbIOTepa,Ha KOTOpOM ycTaHOBJIeHa IIporpaMMA Adobe Reader. IIporpaMMy Adobe Reader MOxHO 6ecIIaTHo cKaaTb c Be6-caIta Adobe.
1 OTKpoIte paai index.html Ha KOMIIaKT-INCKe.
2 BbI6epHTe HxHoe pyKOBOCTBO II IeJIKNHTe IIO HeMy.
PpMpeaHne
B cIyae yTeprn HJIN IOBpeKJeHn KOMIIaKT-HNCKa HOBbI JNcK MOXHO IIpNo6pcTn y 6JIHXaJIIErO IJIepa Sony HJIN B cepBnCHOM IeHTpe Sony.
YctaHObKa 6aTapeek
1 IOTaHHTe Ha ce6aTaapeHbIOTceK. IOnJIeHbTe 6aTaapeHbIOTceK OcTpblm IIpeJMeTOM, KaK IOKa3aHO Ha pncyHke.
2 BcTaBbTe JHTHeByIO 6aTapeKy.
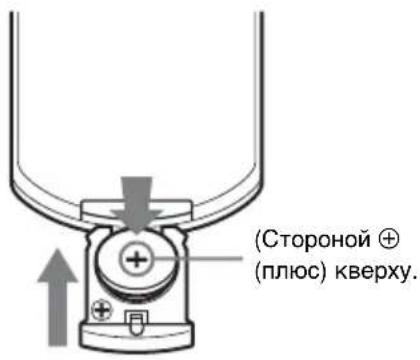
3 3aKpoTe 6aTaapeHbIn OTeK.
Bb6opЯ3bika MeHIO
Iyo yMOJIuaHIO IJIa OTobpaKaembIX MeHIO, COo6uHn H T. I. BbI6paH aHrJInckn J3bIK.
IIH3MeHcHnra3bIka 3KpaHa BbINOJHNTe CJIeNyIOUHe IeNCTBnA:
1 BcTaBbTe HHyp NHTaHnIepeMeHHoro TOKa B po3eTKy.
2 BkJIOUHTe IpoEKTOp. HaxMMTe KJIaBnHuy I/0
3 HaXMTe KJIaBnIy MENU JIЯ OTO6paXeHnMeHIO. EcJIN 3KpaH OTO6paXaTcR HeYeTKO, OTpeRyJInpyTe fOKyc, pa3Mep H IOJIOxKeHHe IIpoEKTnpyeMoRo I3O6paXeHn (cTp.15).
4BbI6epHTe 3bIK MeHIO. ① B IOMOIIbIO KHOIOK H BbI6epHTe MeHIO HACTPOIKN (3aTeM HaKMITE KJIaBNiY ENTER.
② HaKMnTe KJIaBnIy HJH TTO6bI BbI6paTb "Language (A, a 3aTeM HaKMnTe KJIaBnIy ENTER.

HaKHMaIte KJIaBnUy / / / IJIa BbIOpa J3bIka, a 3aTeM HaKMITE ENTER.
5 HaXMTe KJIaBnIy MENU, TTO6bI OTKJIIOHTb 3KpaH MeHIO.
HaJMMTe KJIaBnIy RESET, YTO6bI BocCTaHOBHTb IpoeIpyeMOe N3o6paJxHne Ipei NaCTpO'KoI.
Приимechanicals
- PockoJIbky KoppeKIIra TpaIeHuaJIbHO rNCKaKeHHraBJIaTeTc 3JIeKTPoHHoKoppeKIIue, ee HcIOJIb3OBAHne MoXeT IIpNBecTH K CHUKeHHIO KaueCTBa N3O6paKeHHa.
B 3aBnCHMOCTH OT IOJIOXeHHa,OTpeRyIHPoBAHHORO c IOMOIIbIO yHKINN cIBHra o6BeKTHBa, COOTHOIIeHne CTOpOH H3O6paXeHHaMOKeT OTJIHcA TbCBcAOT COOTHOIIeHHa CTOpOH OPHNHaJIbHOrO H3O6paXeHHaJIH IIPOeIHpyEmoe H3O6paXeHHe MOKeT 6bITb JcΦopMnPoBaHO H3-3a KOPPeKIIH TpaIIeEHaJIbHOrO NCKaXeHHa.
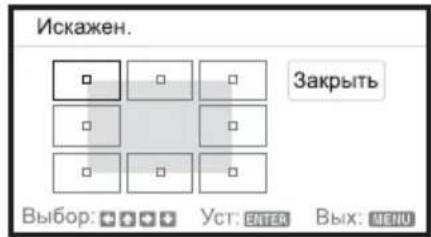
KoppeKTIpOBKa yrIa 3aKpyuBaHnA (ФункцЯ KoppeKTIpOBKn nCKaJxHn)
C IIOMOIbIO 4yHKUHN KOppeKTHIpOBKn HCKaJKeHn MOxHO OTKOppeKTHIpOBaTb 3aKpyuHBaHHN H3O6paJKeHn
1 TpKbHaKMnTe KHOIIKy KEYSTONE Ha IIyIbTe IINCTaHIOHOoro ynpaBJeHHa HJN BbI6epHe "IcKaXeH." B MeH0 MOHTAXHA YCTAHOBKA, a 3aTeM BbI6epHe "HaCtpoKa".
2 OTo6pa3HTcHnCTpyKIIIA.
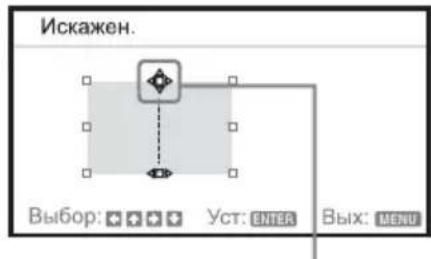
KoppeKtnpOBka yrIIOB n3o6paXeHnA
1 IepemeeaHTe c HOMOIIbIO / / / IJIy BbI6opa yTJa IJIa KOppeKTHpOBKn. EcJIN HaKaTb KHOIIky ENTER, 6yIcTe OcyIIECTBJIeH BO3BpaT B peXHM N3O6paKeHn Kypcopa.
OtperyI npIte c IOMoIbIO 3Toro Kypcopa.
2 KoppeKTHIOBka yrIOB IIPOH3BOJNTcC IOMOIIbIO / / /
3 EcIn IOcTHHyT IpeJeI HnHaNa3OHa HAcTpOKn, KypCop NcYe3HcT.
HaKMTe KJIaBnIiy RESET, YTO6bI BOCCTaHOBHTb IIpoeIIpyEmoe H3O6paJxHne Ipei HaCTpO'KO.
KoppeKunr OTKloHeHn ①-npaBb/JeBbI KpaN3o6paxeHn
1 IepemeeaHTe cIIOMOBHO / / IJIy BbIbopa yTla JIJIa KOppeKTHnpOBKn. EcJIN HaxKaTb KHOIIKy ENTER, 6yJeT oCyIueCTBJIeHO IpeKJIIOUeHHe B peKIM N3O6paXeHnKypcopa.
OtperyIpyTe c IOMoIbIO 3Toro Kypcopa.
2 KoppeKTHIOBka OTKJIOHeHHa BbIOJIHReTcA c IOMOIIbIO / / / . MoXHO OTepyJIINPOBaTb IeHTpaJIbHoe IIIOJKeHne KpaEB, HcIOJIb3y / . PerIyJINPOBKa dHaIIa3OHa OTKJIOHeHHa BbIOJIHReTcA c IOMOIIbIO / . PpaBBn JIeBBn Kpaar MOxHO OTepyJIINPOBaTb He3aBNCIMo.
PpimmeaHne
IpnKoppeKTHPOBKe 电HTpaJIbHOro IIOJIOXeHHa KpaEB IIpaBbI NJIeBbI Kpa peRyINpyIOTcO INHOBpeMeHHO.

3 EcJIN IOCTHHyT IpeJeI IHaIa3OHa HAcTpOJKN, KypCop Hcye3HeT.
HaXMMTe KJIaBnIy RESET, YTO6bI BocCTaHOBHTb IpoeIpyeMOe N3O6paJxHne Ipei NaCTpO'KoI.
KoppeKzra OTKloHeHna ②-BepxHn/HnxHn Kpa n3o6paXeHna
1 IepemeeaHTe c HOMOIIbHO / / / ⅡIy BbIbopa yTla JIJI KOppeKTHnpOBKn. Ecn HaKaTb KHOJky ENTER, 6yJeT ocYIeCTBJIeHO IpeKJIIOueHne B peKIM I3O6paKeHnKypcopa.
OtperyIpyIte c HOMOIIbIO 3TOrO Kypcopa.
2 KoppeKTHPOBka OTKIOHeHHa BBIOJIHReTcI IOMOIIbIO / / . MoXHO OTpeYJINpOBaTB IeHTpaJIbHOe IOJOKeHHe KpaEB, HIOJIb3yra / . PerjNPOBKa JnHaIa3OHa OTKIOHeHHa BBIOJIHReTcI IOMOIIbIO / . BepxHn II HnXKn KpaR MoXHO OTpeYJINpOBaTB He3aBHCNO.
PpMMeaHne
Pn KoppeKTHPOBKe BepxHero IOIOJKeHHa KpaEB BepXHH HIXHH Kpa peYJINpyOTc OJHOBpeMeHHO.

3 EcJIN IOCTNHyT IpeJeI dHaHa3OHa HAcTpOuKN, KypCop NcYe3HeT.
HaJMMTe KJIaBnIy RESET, YTO6bI BocCTaHOBtB IIpoeHpyeMOe H3O6paJxHe IpeJn HaCTpO'KoI.
A B T O M A T N U C E K A p e r y n i n p o B k a h a c t p o e k Φ a 3 a, I s a n C d b n r p p o e u p y e m o r o n 3 0 6 p a x e H N R p n n o l y u e H N n C n r h a n a c K o m n b i o T e p a (A P A (a B T O M A T N U C E K O E B b i p a B H N B a H N e n o n k c e n J M))
HaJMMTe KJIaBNIy APA Ha IIyJIbTe IInCTaHIOHHO yIpaBJIeHH. JJIa OTMeHbI BO BpeM yCTaHOBKn HaJMMTe KJIaBNIy eIe pa3.
EcJINIJA APA BbIC.ueTK.yCTaHOBJeHO 3HaueHHe BKJI, yHKIIJNA PA BbIOJIHReTcA bTOMaTHueCKN IIpN IIOJaYe Ha BXoJ cNrHaJa.
BbIKJIoueHne NITaHnA
1 HaKMITE KJIaBnIy I/Ha OCHOBHOM yCTpOcTBe HJN Ha IIyJIbTe INCTaHIIOHOHHoro yIpaBJIeHN.
IIOBHTcOo6HHeO 3aBepHn pa6ToI.
EcsIHe HaKMaTb KaKHe-JIN6o KJIaBnHn B TeueHne HeKOTOpO BrpeMeHN, IIpoEKTop BBIKJIOHTcra.
Ecn HaKaTb KHOIky I/Ha IIpoeKTope HIN NylbTe INCTaHIOHHORO yIIpaBJIeHN, KOJa Ha 3KpaHe OTO6paKaEcTc coo6IeHHe O 3aBepIIeHn pa6OTbI, IIpoeKTop 6yET Nepe3aanyIeH.
Приимецанne
He BbIKJIOUaHTe IPOeKTop BcKOpE IocJIe BKJIOUeHnIJaMIIb. 3To MoKeT IIpHBecTH K HeHCIIpaBHOCTN JaIMBI (JaAMNa MoKeT He 3aRopatbcn T.II).
2 OToeHHTe Ka6eJIb IITaHnI IepMeHHORo TOKa OT 3JIeKTPnueckOIO p03eTKH.
IocJIe BbIIIOJIHeHn IlaRa 1 BeHTNIJTop IIpoJOJIkaeT pa6oTaTB HeKOToOpoe BpeM IJIa CnIXKeHn TeMIIepaTypbI BHyTpN yCTpOcTBA, OHaKo Ka6eJIb IINTaHn IepMeHHOrO TOKAMoXHO OTCOeINHHTb IO OCTaHOBKn BeHTNJrTopa.
BbIKIIOUeHne 6e3 OTo6paXeHn cOo6uEHNc 3aIpocm Ha NOdTBePxKdEHe
YepKnBaTe HaKaToi KJIaBnIy I/Ha OCHOBHom ycTPOIcTBe B TeYeHne HeCKOJIbKHX cekyH.
ECO-указателb
TOT HINKATOP IOKa3bIbae TKeuyIO fkeKTNBocTb yHKiH N ECO IIpoeKTopa. (IIra IIOJIyueHn CBeJeHn O yHKiH N ECO cm. pa3JeJIbI "KJIaBnHa ECO MODE", "ABTO3HEPFOC6EPEK." n "PeXHM JAMIIbI".) CmBOJIbIB BnDE JInCTbeB OTo6paJxOTc, KOrJa IPOeKTop BBIKJIOUeyH. KoJInyeCTBO OTO6paJxemBX CmBOJOB H3MeHReTcB 3aBNCMOCTH OT KOJInyeCTBa 3HeprHn, cKOHOJMJeHHoB B pe3yJIbTaTe NCIOJIb3OBAHn fYHKiH N HepeCr6epeJHn ECO.
ндкатopy
HnKATOpbI IO3BOJIaOT IPOBepHTb COCTOARHe N O6HaPyKHTb HeIIpaBNIbHyIO pa6OTy IIpoEKTopa.
EcIIIO OTO6paXaeTcH HeOpMaJIbHOe COCTOaHHe IPOeKTopa, BbIIOJIHNTe JeIcTBnA, yKa3aHHbIe B CJIeJyIOIIeN Ta6JIuIe.
Инд�示ОN/STANDBY
Bo3nyHbI HJbTp cOcTOnr H3 2ΦHJbTpOB.

4 YcTaHOBHe KpbIHKy BO3dYIIHOrO ΦJIbTpHa Ha yCTpoIcTBO.
PpMMeaHne
PpOBepbTe HaJeXHoCTb 3aKpbITnKa pBHKN BO3dYHOrO fHJbTpA. HeIpaBnJIbHa aHkCaIIra KpbHKn MOKeT IIpNBecTH K HEnCINpaBHocTH.
Sony Corporation Printed in China