DB2D - Subwoofer BOWERS & WILKINS - Free user manual and instructions
Find the device manual for free DB2D BOWERS & WILKINS in PDF.
| Product type | Active subwoofer |
| Brand and model | Bowers & Wilkins DB2D |
| Power supply | Mains, power cable supplied |
| Audio inputs | Unbalanced stereo (RCA Phono) and balanced stereo (XLR) |
| Connectivity | Bluetooth for configuration via iOS/Android app |
| Remote control | Trigger 12V (2 x 3.5mm jack inputs), RS-232 |
| Equalization | Automatic Room EQ via mobile device microphone; presets: Flat, Music, Movie, Custom (5-band) |
| Low-pass filter | Adjustable, with presets for Bowers & Wilkins speakers or custom |
| Level adjustment | Via the app, with adjustable input balancing |
| Standby mode | Automatic after 20 minutes, red indicator; manual via standby button |
| Included feet | Spikes (for carpet), decoupling feet (for wooden floor), rubber feet (for hard floors) |
| Grilles | Removable, magnetic attachment |
| Cleaning | Soft, clean cloth; avoid abrasive, acidic, or alkaline products |
| Reset | Press the standby button 3 times quickly |
| General information | Dual-driver design; unpacking requires at least two people |
Frequently Asked Questions - DB2D BOWERS & WILKINS
User questions about DB2D BOWERS & WILKINS
0 question about this device. Answer the ones you know or ask your own.
Ask a new question about this device
Download the instructions for your Subwoofer in PDF format for free! Find your manual DB2D - BOWERS & WILKINS and take your electronic device back in hand. On this page are published all the documents necessary for the use of your device. DB2D by BOWERS & WILKINS.
USER MANUAL DB2D BOWERS & WILKINS
DB Series Subwooofers
Welcome to Bowers & Wilkins and the DB Series subwoofoers.
Thank you for choosing Bowers & Wilkins. When John Bowers first established our company he did so in the belief that imaginative design, innovative engineering and advanced technology were keys that could unlock the enjoyment of audio in the home. His belief is one that we continue to share and it inspires every product we design.
Before connecting and operating this mains powered apparatus, please read carefully and observe the Important Safety Instructions in the accompanying leaflet.
This manual covers all DB Series subwoofoers.


bowers-wilkins.com
1. Carton Contents
- DB Series subwoofer
- Power cable(s)
- Speaker grilles
- Spike, decoupling and rubber feet
- Literature pack
2. Introduction
Your DB Series subwoofer is an extremely high performance product that will reward thoughtful installation. We suggest that you take some time to read this manual before you begin.
DB Series subwoofoers can be used for low frequency applications in both conventional stereo and home theatre systems. They incorporate a comprehensive set of features that enhance versatility and enable performance to be finely tuned to the listening room, listening position and programme material. These features are briefly described in the following paragraphs:
Set Up and Control
DB Series subwoofoers can be set up and controlled only via the Bluetooth connected Bowers & Wilkins DB Subwoofoers app for iOS and Android devices.
Before you begin installing your subwoofer, please download and install the DB Subwoofer app on your iOS or Android device. It is not possible to set up or use a DB Series subwoofer without the app.
Note: The DB Subwoofer's app requires iOS version 10 and Android version 5 or later. Bluetooth must be switched on in the iOS or Android settings.
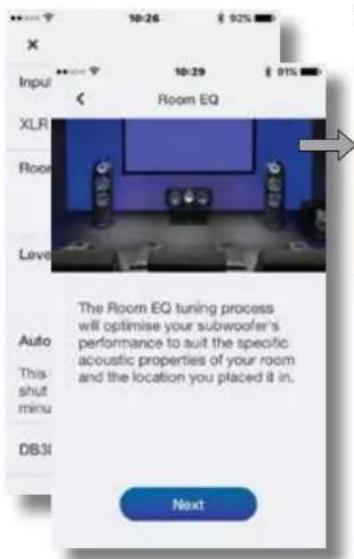
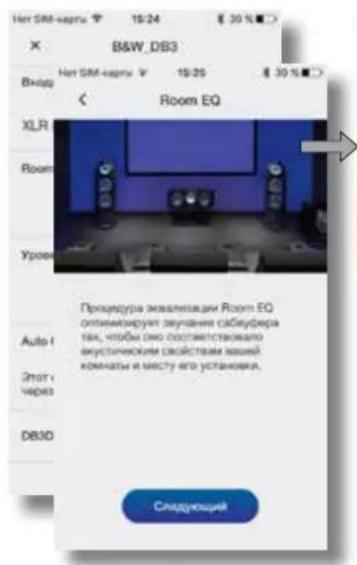
Room Equalisation
DB Series subwoofoers can automatically optimise their performance to match the acoustic characteristics of the listening environment.
Multiple Inputs
DB Series subwoofoers provide RCA Phono and balanced XLR stereo analogue inputs. The inputs can be connected simultaneously and configured independently for different system applications.
Level Adjustment
DB Series subwoofoers incorporate both level adjustment and trim adjustment. The trim adjustment enables optimum matching of different source output levels so that the subwoofer volume level matches that of the main speakers for all inputs.
Low Pass Filter Set up
DB Series subwooers provide low pass filter options for stereo configurations for both RCA and XLR connections. When using mono (LFE) connections the bass management functions of the source equipment should be employed. For stereo installations the low pass filter characteristics can be matched to either specific Bowers & Wilkins main speakers or to alternative manufacturer's main speaker specifications.
Input EQ
DB Series subwoofoers provide optional equalisation presets designed to suit music and movie programme material. Custom equalisation via a five band equaliser is also provided.
3. Installing your Subwoofer
3.1 Before You Begin
Please follow the unpacking instructions printed on the outer carton.
Your DB Series subwoofer is heavy and should be unpacked by two people working together close to its final installed position.
Note: Due to the dual driver design of the DB1D, DB2D, and DB3D subwoofer we do not recommend that they are suitable for installation within custom built furniture. If furniture installation is necessary, multiple DB4S subwoofer are likely to offer a more satisfactory solution. In any case, built-in furniture must be structurally adequate to support the weight of the subwoofer or subwoofer and provide at least 20cm (8 inches) clearance around the subwoofer sides, back, and top.
3.2 Positioning
DB Series subwoofoers are more versatile than most subwoofoers in terms of positioning thanks to their Room EQ optimisation system that can compensate for less than ideal positioning.
Best results however will be obtained if your DB Series subwoofer is placed between the left and right speakers or in the vicinity of one of them. Placing a subwoofer to the side, but still to the front of the listeners is an acceptable compromise
if domestic considerations dictate, however the subwoofer should not be located behind the listening position.
If two subwoofoers are to be used it is best to position one near the left speaker and one near the right speaker. Diagrams 1a and 1b illustrates subwoofer positioning.
Note: DB1D, DB2D and DB3D models should be orientated with their twin drivers facing sideways. The DB4S should be orientated with its single driver facing outwards into the room.
Note: Using two subwoofoers in a single installation can improve performance by maintaining stereo separation to the lowest frequencies, averaging the effects of low frequency room resonances and enabling a higher maximum volume level. In the case of two subwoofoers used in a conventional stereo system, stereo separation will only be improved if each subwoofer is located close to the appropriate main speaker.
Note: Like all speakers, the proximity of room boundaries affects the sound of a subwoofer. Bass volume increases as more boundaries come into proximity. The more boost gained from the room, the lower the volume can be set and the less hard the subwoofer has to work.
Once you have positioned your subwoofer, its performance can be optimised using the Room EQ function. This is described in Section 4.
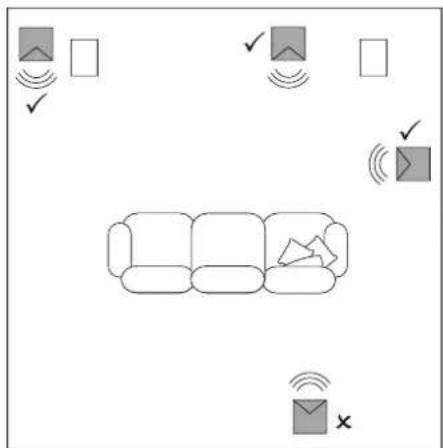
Diagram 1a DB4S positioning in a stereo (2.1) system
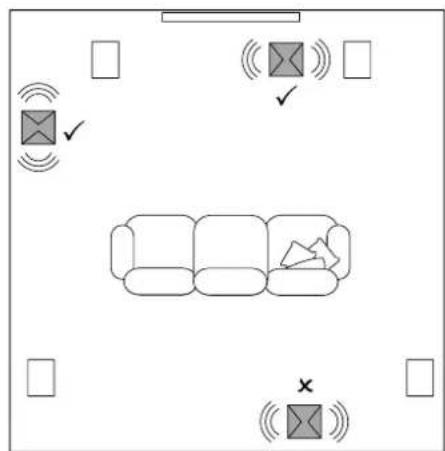
Diagram 1b DB1D, DB2D and DB3D positioning in a home theatre (5.1) system
3.3 Subwoofer Foot Options

DB Series subwoofoers must not be without one of the foot options fitted.
DB Series subwoofoers can be fitted with either decoupling, rubber or spike feet. Use of the different foot types is described in the following paragraphs:
- The spike feet are intended for use on carpeted floors. The spikes pierce the carpet and rest on the floor beneath both to protect the carpet from indentation and to provide the subwoofer with a solid foundation.
- The decoupling feet are intended to be used on suspended wooden floors. The rubber material of the foot provides a degree of de-coupling between the floor and subwoofer.
- The rubber feet are intended for use on noncarpeted solid floors where spike feet might cause damage the surface.

Due to the underside location of a bwoofer heat-sink, rubber or coupling feet should not be used on heated floors.
In order for feet to be fitted to the subwoofer it must first be turned upside-down. Take care not to damage the drive units when handling the subwoofer, and ensure when upside-down that the subwoofer rests on a surface that will not damage its finish.
Fit the feet by screwing one into each of the four screw holes in the subwoofer underside. In the case of spike feet, initially screw the lock nuts fully onto the thread before screwing the feet into the subwoofer. The lock nut should then be used to raise the subwoofer above the carpet pile and to enable adjustment to minimise rocking.
Note: It is particularly important on the DB1D, DB2D and DB3D to raise the subwoofer above the carpet pile to ensure that cooling air can flow around the subwoofer amplifier heat-sink panel.
Diagrams 2a and 2b illustrate the use of each foot type.
Once the feet are fitted, the subwoofer can be turned back on to its feet. Take care not to allow the entire weight of the subwoofer to rest at an angle on one or two feet.

Never slide the subwoofer across the skin on its feet. It must be lifted if it is removed.
If the subwoofer rocks when placed on the floor in its final position on spike feet, or the thickness of carpet means that the spike points do not reach the floor beneath, adjust the feet until the subwoofer is supported firmly without rocking and is well clear of the carpet pile. When adjustment is complete, tighten all the lock nuts against the underside of the subwoofer using a 10mm spanner.
3.4 Subwoofer Grilles
Your DB Series subwoofer is supplied with optional fabric covered grilles (a single grille in the case of the DB4S). The subwoofer can be used with or without grilles fitted. The grilles are attached magnetically.
3.5 Connections
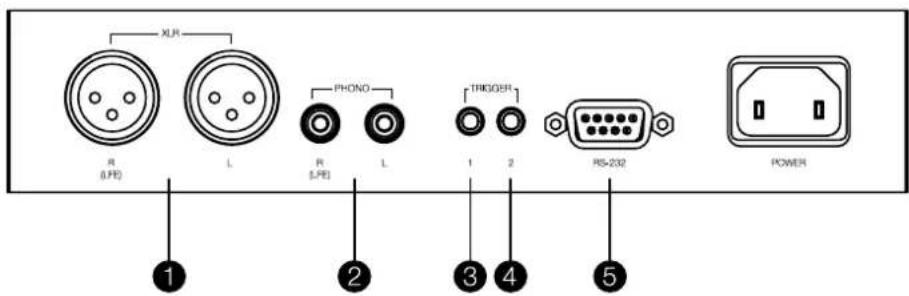
DB Series subwoofores require connection to a mains power supply and an input signal. Connectors for optional 12V trigger and RS232 control are also provided. Diagram 3 illustrates the DB Series subwoofer connection panel.
Mains Power
A variety of different power cables may be packed with your subwoofer. Use the cable appropriate for the mains socket in your territory. The subwoofer will switch on in operational mode, with its standby button indicator illuminated green, as soon as it is connected to mains power.
Note: The standby button is located on the front panel of the DB1D, DB2D and DB3D, and on the rear panel of the DB4S.
If the subwoofer remains unused for more than 20 minutes it will automatically switch to standby mode with the indicator illuminated red.
Signal Connections
DB Series subwoofer provide stereo RCA Phono and stereo balanced XLR inputs. It is possible to use the Phono and XLR sockets as independently selectable Inputs. This enables your subwoofer to be integrated with two different audio systems: a home theatre system and a conventional stereo system for example. Input selection is managed via the DB Subwoofer app.
1-XLR inputs
The balanced XLR inputs are intended for use with proamplifiers or audio-visual processors that provide balanced stereo outputs.
Diagram 2a
Using spike feet
Note: Balanced connection, where negative, positive and ground signals are carried on separate wires, is common in professional and some high-end domestic audio equipment. Balanced connection is inherently more resistant to interference and noise than unbalanced connection.
2 - RCA Phono inputs
The unbalanced RCA Phon inputs are intended for use with preamplifiers or audio-visual processors that provide only unbalanced stereo outputs.
Note: If your preamplifier or audio-visual processor provides only a mono subwoofer output, it can be connected to just one of the subwoofer input sockets.
Control Connections
In addition to mains and signal input sockets the DB Series subwoofer connection panel carries the following optional control interface sockets:
3-12V Trigger 1:3.5mm jack socket
The Trigger 1 socket enables wired remote control of the subwoofer switch on and standby functions.
4-12V Trigger 2:3.5mm Jack socket
The Trigger 2 socket enables wired remote control of subwoofer input selection.
5-RS-232:9-pin D connector
The RS232 interface enables subwoofoers to be incorporated in remote control home automation systems. Your Bowers & Wilkins retailer will be able to provide more information on RS232 based home automation systems.
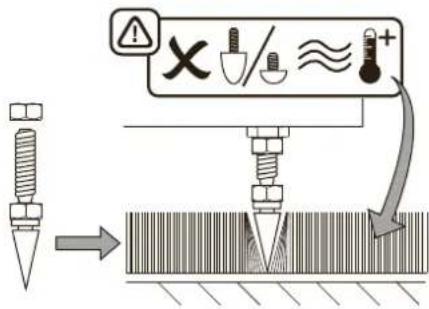
Diagram 2b
Using decoupling and rubber feet

Diagram 3
DB subwoofer connection panel
4. Set Up and Control
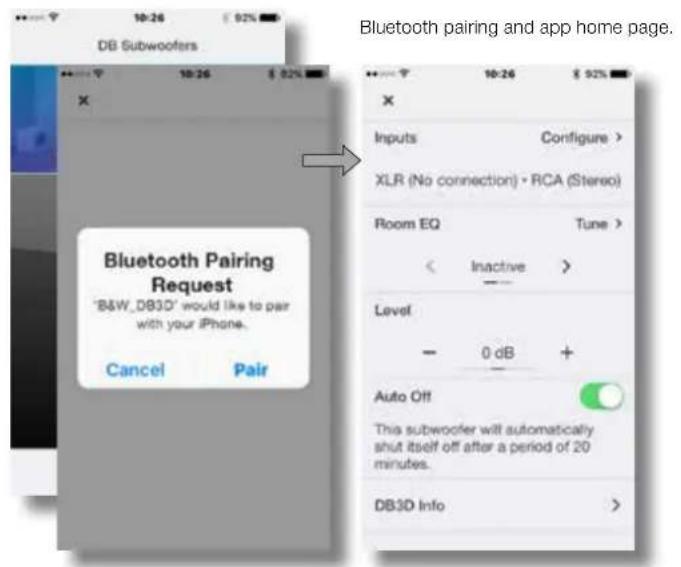
Your DB Series subwoofer can only be set up and controlled using the DB Subwoofer app. If you have not already downloaded and installed the app on your iOS or Android device please do so now. Bluetooth must be enabled on the device in order for it to connect to the subwoofer.
Note: The DB Subwoofer's app requires iOS version 10 and Android version 5 or later. Bluetooth must be switched on in the iOS or Android settings.
When your DB subwoofer is connected to signal cables and mains power it will switch on in operational mode with its standby indicator illuminating green. To begin the set up procedure follow the steps below:
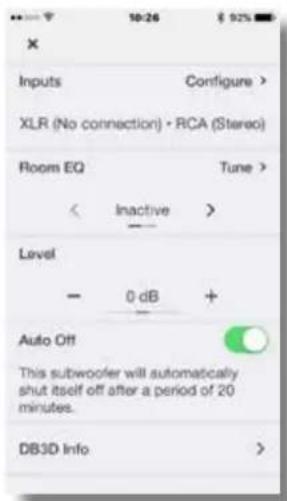
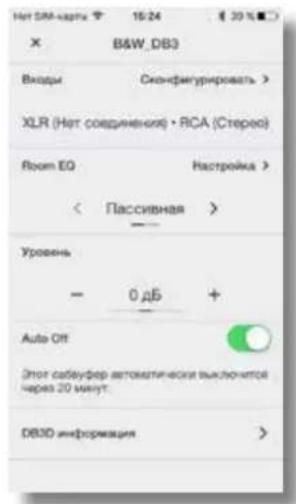
- Launch the DB Subwoofer app and confirm Bluetooth pairing. When pairing is complete the app will display the app home page.
The home page provides subwoofer level adjustment, product information, auto-standby options and access to the Room EQ optimisation procedure. Using Room EQ is not mandatory, however doing so will ensure that your subwoofer performs optimally in your room.
4.1 Input Set up
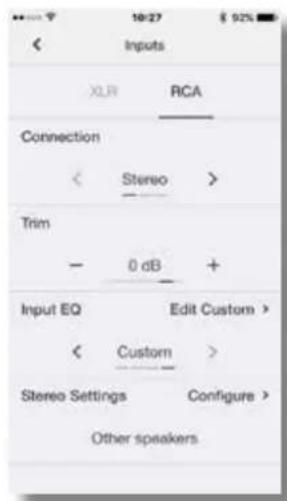
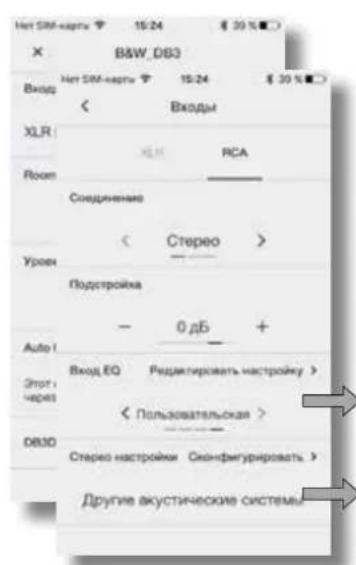
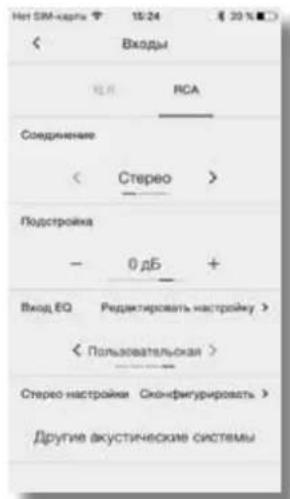
- Selecting the Input option from the app home page will open a configuration page that enables the Phono and XLR inputs to be independently set up. Selecting one of the inputs also makes it active.
Note: The set up options available for the XLR and Phono inputs are the same.
Note: Settings are input specific. Different settings can be selected for each input.
Note: If two subwoofoers are used in one system the input settings should be the same for both.
The input set up options are described in the following paragraphs:
- Connection: None, Stereo, LFE. If your subwoofer is to be used for the low frequency effects channel in a home theatre system select LFE. If your subwoofer is to be used for low frequency enhancement of stereo speakers select Stereo. If the input is not connected select None.
- Trim: Input sensitivity. Begin with the input sensitivity set to 0dB. If, in use, the subwoofer level adjustment on the app home page doesn't provide a suitable range the level trim can be adjusted.
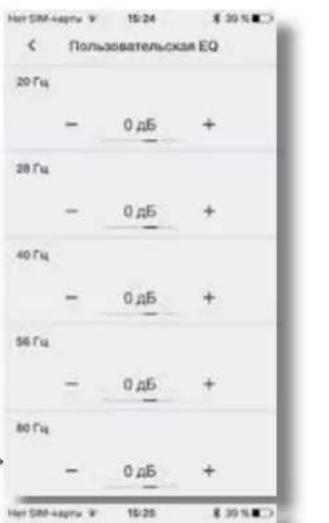
- Input EQ: Flat (no EQ), Music, Movie, Custom. Select Flat to apply no input EQ. Select Music to apply an input EQ character appropriate for music programme. Select Movie to apply an input EQ character appropriate for movie programme. If the Custom Input EQ option is selected the app will display a five band EQ page that enables a custom equalisation curve to be applied to the input signal.
Input Options.Custom input EQ.
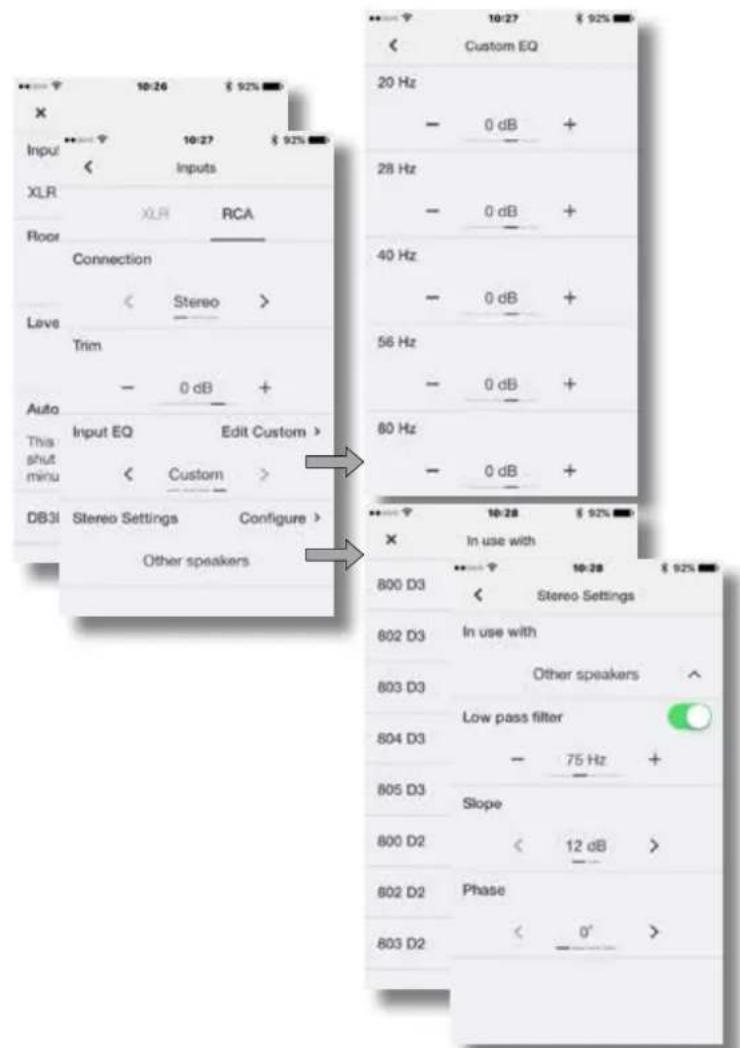
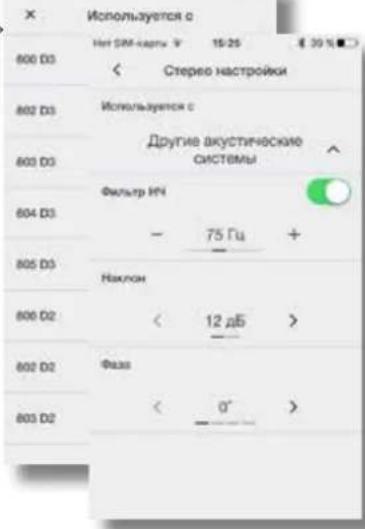
Stereo Settings: low pass filter selection or configuration.
- StereoSettings: Configure.
The Stereo Settings option is available only if the Stereo input connection option is selected. In this case, selecting Configure will open a page that enables either the subwoofer's low pass input filter to be set appropriately for specific Bowers & Wilkins main speaker models, or enables a custom low-pass input filter to be specified. - Use of a custom low pass filter is appropriate when either the main speakers are unlisted Bowers & Wilkins models, or are from an alternative manufacturer. In either case, the low pass filter should be configured to match the main speaker's published low frequency characteristics. Bowers & Wilkins or the alternative speaker manufacturer will be able to assist with the appropriate information if necessary.
4.2 Room Equalisation
Note: If two subwoofoers are to be set up, the Room EQ procedure must be carried out separately for each one.
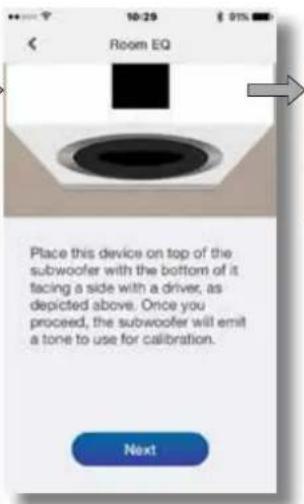
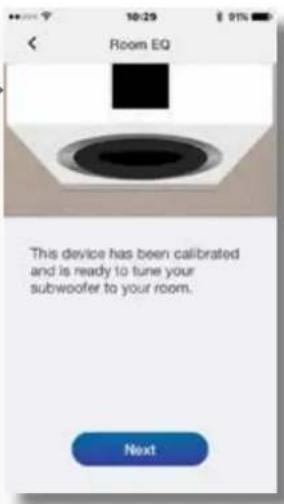
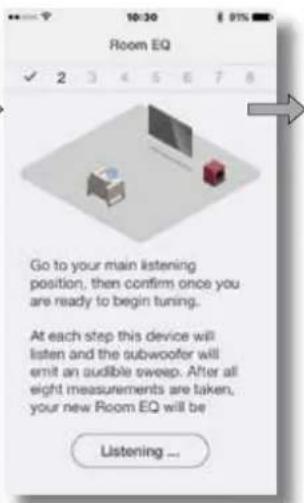
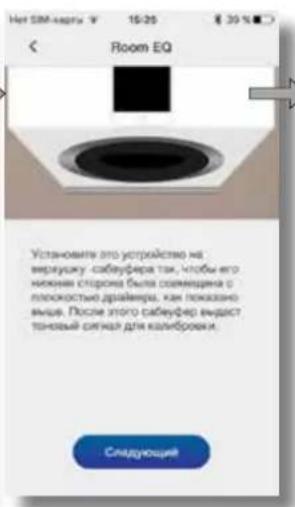
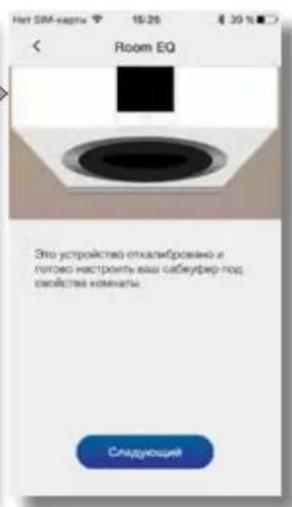
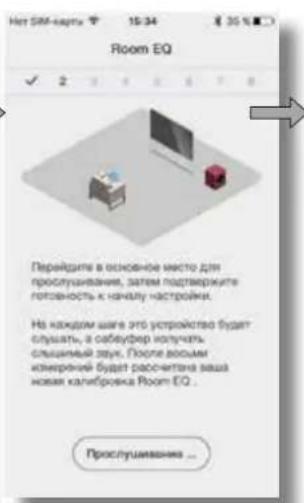
- To begin the Room EQ procedure select Tune on home page. Room EQ employs the microphone in your mobile device to analyse the performance of the subwoofer in your room, and the initial requirement is for the mobile device microphone to be calibrated. This is done by placing the mobile device in close proximity to one of the subwoofer drive units while the subwoofer generates a test signal.
Note: Due to microphone incompatibilities, Room EQ is not available with all Android mobile devices. A list of authorised devices can be found in the support section of the Bowers & Wilkins website.
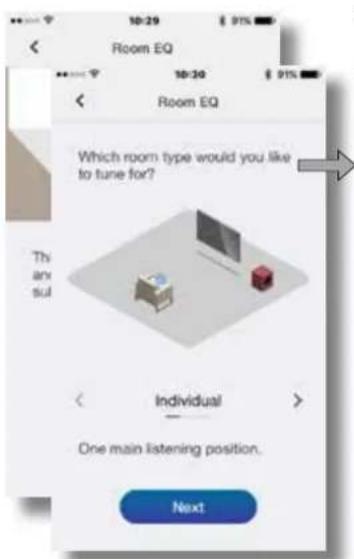
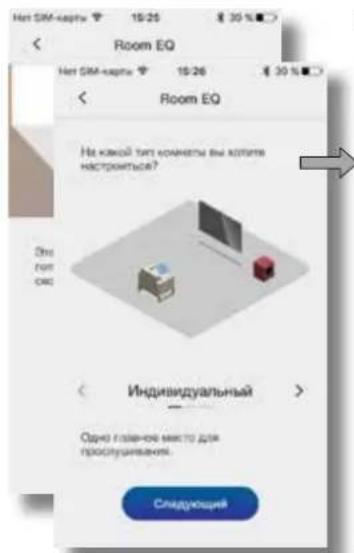
- With the mobile device microphone calibrated, the Room EQ procedure provides options for the subwoofer optimisation to be targeted at a single listening position, a listening area appropriate to two or three listeners, or targeted generally throughout the room. Choose your preferred option and select Next.
- The subwoofer will generate a series of eight separate test signals and use the mobile device microphone to measure the sound in the room and automatically apply an optimal EQ curve. If the Group or Room listening options were selected the app will ask you to move to different positions as the eight measurements are taken.
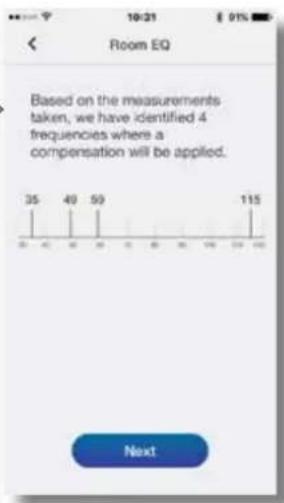
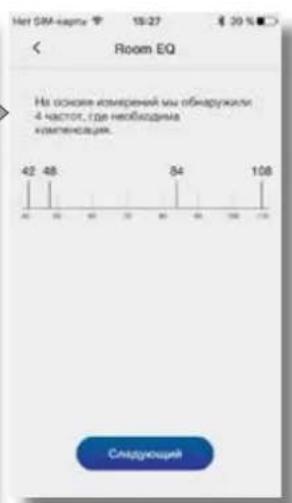
- When the measurements are complete the results will be displayed. Room EQ will then be complete. On selecting Next the app will return to the home page.
If your DB subwoofer is moved within the listening room or if large items of furniture are introduced, the Room EQ procedure should be repeated.
Room EQ; mobile device microphone calibration.
Room EQ: Measurement and analysis.
5. Subwoofer In Use
Once your subwoofer has been set up it is ready for use. In normal daily use little adjustment should be necessary, however you may wish to adjust the subwoofer volume level, use an alternative input EQ or select the other input.
To adjust subwoofer volume use the level control on the app home page.
To select an alternative Input EQ select from the input set up page.
To select the alternative input select the alternative tab on the input set up page.
To switch your subwoofer to standby mode press the standby button. The button indicator will illuminate red.
Please remember that your DB Series subwoofer is capable of volume levels that have the potential to cause nuisance. If in any doubt, reduce the volume.
Note: If a DB subwoofer is overloaded its standby indicator will flash red.
The performance of your subwoofer may change subtly during the initial listening period. If it has been stored in a cold environment, the damping compounds and suspension materials of the drive units will take some time to recover their correct mechanical properties. The drive unit suspension will also loosen up during the first hours of use. The time taken for the speaker to achieve its intended performance will vary depending on previous storage conditions and how it is used. As a guide, allow up to a week for the temperature effects to stabilise and 15 hours of average use for the mechanical parts to attain their intended design characteristics.
6. Default Reset
To return your subwoofer to its default settings, press standby button three times in quick succession. When the default reset is complete the subwoofer will switch off. Press the standby button or launch the app to switch on.
Note: It will be necessary following a default reset operation to instruct previously connected mobile devices to "forget" and re-connect to your DB Series subwoofer.
7. Cleaning
Wipe surfaces with a clean lint-free cloth. If you wish to use a cleaning agent, apply it onto the cleaning cloth, not directly onto the subwoofer. Test a small area first, as some cleaning products may damage some of the surfaces. Avoid products that are abrasive, or contain acid, alkali or antibacterial agents.
8. Support
Should you require further help or advice for DB Series subwoofoers please visit the support site here
Home page
Input set up page
5-RS-232:9-pins D-connector
BHHMaHHe:Ca5yepbCepn DB He pKHe bMycTaHAnEnb6eaOpHrnaBaPnHaTOnOp.
Ca6bpyepb Cepn DB MoXho y13HOBHT Ha MeaHMeckn
paBBBaBauOe OIOp, Hb IINb NIM HA pesHOBHe
HOKc. Nc0IbocBAHae paaHHx Tmog onop Onuca H a
cnedyouin naparpapax:
1IINb npednHaHaeHb nncnbl30aHa HnnaX cKOBpBbM NOKBtMeH. OH npbTuKaT KOBep m oebceNvBAKT npOHy onOpCy cabEypepaon b63 noBpOeKnBCOPaKOBpa
MexAHueckn pa3BraBbIoune OIOp npEpaHaeHeIa IINoNtBcOBAHn HdoOpBxN0nx PocHOBm Matoan TAKNX OOP oecnBaet HeKOpToy BbPovOnuHnCnO CaoyepaOTnla.
P03AHOBH6 HOKXn PCDHa3aHbHnI JnHOJIOJIbOBAHnHA HnTepDnNnONax B6 KOBpBOrO NOKpHTn, Ie IIINIy MOrTI YOBpeDnIb OOBxHOCt.

BHHHMME 3a-3a TOrO,paHuaTOp CICTeMB OxJAAHENCABeDpePAcIOJOKeHNbIMy peNHOBBIE HOKNI PAuBaBbAooHe ChIOPI He cIeYET NcNOIbaOBt Ha NoXc KORPOBbM NKpblnEM
HnnpkpenHmwnnoBnnpeWHObX ONop. CHaHaNA
AkypaTHo nepepeHnre cabyep Baox HoraMn.
He nopepeDn nphiy0 np daepn y6eDntec,HTO
NopeXPHOCTb Ch3yHnepePNT oTEnKyCaByepOa.
3aepHHTe 1nblknnpeaHOBbE onopb a qteIpe
OTBEPCTN Cpe3b0B HBNy, B cnyae IINCB CHAYA
NOHOCTBO HABHHITc KOHTprAkn HA PO3bBY HOKc, 3aTeM
IOIOHO BBHNTHe HOKK b OTBEPCTN B KcpNyce CaBsypepa
Nocne STOrO VNCONbYtE KOHTprAkn, YTO6b NpHHTb
CaBsypehad BOPCOM KOBA IN 3aBcPHITc Hx TaK, HTO6b OH
He UIATAc.
PnmeHcneOcbEHOaXHOaDB1D,DB2D n DB3DnpnoHnBtcbAeFepHADBOPCOMKOBpa 06bIobecnHtpoxoOxnaXdoUoeBOaLyKa padatocaycbfephoYcunnter.
Ha Diagram 2a 2b noKa3aHc, Ka yctaHaanBb HnBn nnpe3Hoube onOp.
NoToTcKAKUHbHnPOaHOBbO npOpbl
pApKePNHeBcBaCypeMoKHO OoTb NOCTaBHT Ha Hm.
He pOnyckaTe, TcObBeBecSec CaByepepaWEnCnD
yNOM hOHNnnpAynPbN0B

BHHMNHHe: HkOJa He Taunite CbEyep No nony HA eHOHXKao. Eo Ho6xOJIMNoNnHrTb NtloKo TaNpeHocHTs.
Ecmcbaydep TaatcH. Hmnnn He Doctantdo Noa ha TocToro KOBpa, OperpyepAte bMoCtDyax npctnbctoanHXoK, noKa cabSyep He dyetnpcho yctahCBn, a Notom 3aHOBO 3aHTHne KOHTPIKc C NMOUcB10-MMKnOa.
3.4 3aunTHa peweTka (rpnlb) ca6byepa
Cabe6yeppe Cepen DB OCHAUAOTc ONUHNOHN aauHHo PEeHTKON, NKpBToN TKAHbO (OIOHO 3aunTHoN eepTeKON B cynae DB4S). Cabe6yeppe MOKHO NcHbOABATKa c aauHHoP eHETKoN, TAK N 663 H66. OHa IMeT MarHHTHOE KpIENHE.
3.5 PtoCoeMHHeHn
Cabbyepc Cepn DB tpebyet noocceHne H cetebomy nataHIO nnoJANB XBOHO rCnHAR. IMeIOCTa TAKKe paBembe yOnOHNHO CINHARN OynpaENHe 12-B TOIIEPbH N RS232 [u]CNTOEW DOWAIHEA BOMTNIK). Ha Diagram 3 nokaaHa naHe b c pabeMaMa Cabbyepa Cepn DB.
KpmeBxOHHbXp3eBEmoDnCnHaiOBn CetEBORI nHAIHn, HnHnEHNIOOcDEHnHnCaBdypeBO Cpnn DBHXaOpTcNEcIyIeepnPaanEMbc
3-12V Trigger 1-3.5-MM pa3bem Tnna MNHn
PaeBm Trigger 1 ObcireWaaer npoogHoe DuctAHIOHOOyupaONe AKNIOHcM C6bEyOpom Capn DB nepaoE rro pexmm stndby.
4-12V Trigger 2-3.5-MM pa3bem Tuna MNHn
PaaBem Triggcr 2 paaBem Daet BoaXoXHOCTb PpOoHOrO DnctaHIOHOHOY npAbaIeHnC BbOpaOM BXoOB CaOaCepe.
5-RS-232-9-pin Dpa3beM
PaaBem RS232 06c0eHnBaET HHTERPAu c5bSypeoB Cepa n DB a cncTbM aOMaHne ABTOAMTN BAI dnp Bowers &Wilkins npctdabm ABn Bocoe noDpObHy nHfOpMaHIO C cNCTeMAx DOMAHN ABOTAMKn HA Bae RS232.
Diagram 2b
IVNcOnsO3BaHneMEXAHINeCKn PAB3BbIAOuIXoONpI pEHOHOBIX HOKEX
Diagram 3 SaHn aenHcBcyepoe Copm DB c paaemnn

4. HactpoKa n ynpaBJeHne
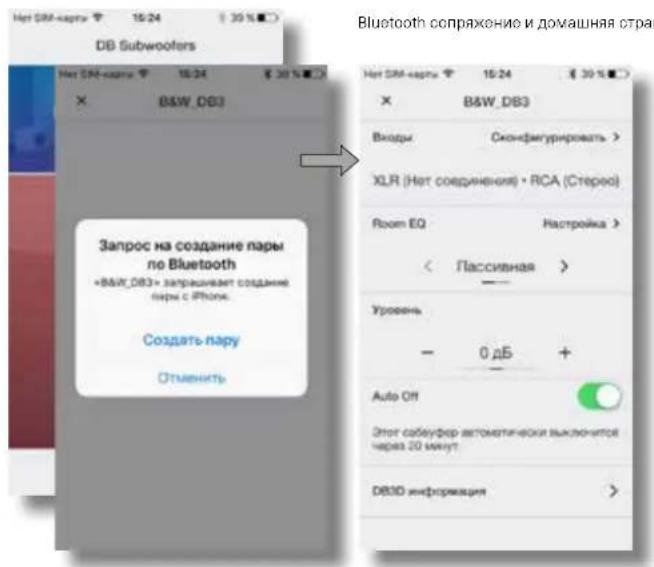
Bau c6aypep Cepn DB moKet 6bIb Hactpoen Tolko c nomoo npinoxehn DB Subwooers. Ecn Bbl Bce ue He ckaanHne tahobOn npnoxohne Ha Baue IOS nn Android yctpojCTAO, noXanycta, cdenaiTe 30c euaac. Ha yctpojCTe doJoxhen 6bItb AKtINbPOBaB Bluetooth, 706b coedNHTbC c c6aypepm.
IppmueHne: PnpoxenHe DB Subwoofers rpeyer iOS seepn 10 u Android seepn 5 mnn Hoee. Fynkuau Bluetooth doknna sbtcknoea yctaohkaX iOS uAndroid ycipocactra.
KaT ToIbKa cABSypeCepu DB npocdHnK CTHaBbHM KaEBIM IN 8eKTPOHTAHNHO, OHcpa3Xe BKNJOKCN T aBaOyH pexMn HA HEM ATRCPCTE ZHeHbAcreTOIOq. TOnbHaHbTa npoQdypHcTePoiK, PPOpena cieDkyoaeU
3anyctne npnnoxehne DB Subwoofoers npnoepbte Hannmhe Bluetooth conpaenHek. KaK tonko ycTPOCTBO coepdntnHcerpe3e Bluetooth, npnnoxehne npoDMOCHTDPyDfTnAHyCtPAHMy MHO.
MENHO rnaHcO cTpaHcUb oecneMaB aepnepdyb HAcTOPOK N yPOBHa RPOMOCTu Ca6yDpeBa, BuaTaC HnOPMAO O npOyTKo, BapNAHb pOKMA autostandby n daet doctyn k npoeDyepe KANlbpOKn axcyTKn Room EQ. HcnlonbCoBAt Roorn EQ He obaatolho, oAnako KaNlbpOBKa rapaHTpyeT, TTo BaU cabBypeHactpoEHOnmAAHBOIraSTO KomhAbe
4.1 HacTpoKa BxOIOB
BbIpaB BpAAHT BxOaH bI HABHO CTPAHINI PnIOKHeHH, BblcTPOEToCTPAnu KoHOFpyauu KOTOPaN03BOeA INHmDyabAoHb HO HcPTpBBtRCA XL BXoBbl. BbIpaB OaHnMxOoo, Mb TaXke DeBaem ETO aTKVHBM.
TIPMUEYHNE: aapAAHTb HACTOOHN NAPAMETPOA, OCTyCNTHN BY XLR RCA xAOOAD, OHNI IN TE K
PnmeaHn:NaCTPOKn 2AeBCTOT KHXHPETbX
ExoDb. TaBHeIraepMeTpbMoiYr BcYbBb6pHan pR
paBHx ExoDb.
PnmeHae:ecnnae caoyepo hcnnohyotc B OHOH CNTAMO, HCTPOKN BXODOS DOXHHb 60
BavayntbNtHCTaPtoXnOJHbE npaMetpoOn OuaCahBa 8 chneDyooynxIyKTx:
CoenHHe: Hc, ctepeo, LFE. EcnBaaCabeOpep dyetncnOaobatcna KAHNAHnKoAOTbHex 300fektos aDMaunHE TeaTpe, Bb6epTe LFE. EcnBaaCabeOpep dyetncnOaobatcna yocnEHHN OTHaH No HnKIM HACTOTAM CTEpeo KOHOx, Bb6epTe ctepeo. EcnBxOd He nDkIOHs, Bb6epTe None.
Trim: y8CTBt6bHOCTb HXBOc. HANHHTC CyCTAANTeHbOCTc,3aADHHK KAc 0Db.EcnpeYIpynIOEBAKYPOSA CA6EybpEs B DOMAHNCHTpAHnE pINNOKEXHE He oecneHnBaET HyKnH DNAnAO3o, MOHO NOkOPKepTeYPOBAt e c NOVCUoTlIM
Bxq EQ Flat (HET kbaan3epa), Mybka, Kn10, nonbocatebnck. Bb6pnte Flat, HTObHe No pnpMeHb tKBAAN3auNk BxaD. Bb6peRte Music 18 aadAraXap3KeP AKBNAaBnE XbOa NDOXoAIOIIO DnMy3bKnBHO nporpaMMu. Bb6peTe Movie nna aadHnXapKePa BkAAaBn3auNt XoNOHoe IIOBnBPOp pAMM. Eclnn BxoHIO CINHbIA Bb6pHo Custom, Ha dncnnee NOBNTC5-10IOcHbIKKaAaN3ep, KOtpb IO3BOHIE TnpmHbI blo3cBATEBCKyO KpMAYO K BxOHNCHrANAL.
BapnHTBxOoB3Ka3HbE EQ BxoOB
HahtpoKnIaIcTepe:BaBOpΦuBtpaHU nnKoHpynpOBAHHe
Ctepeo HactpknK KOHfNpyPBOBHAo.
BapnHT Ctepeo HactpknK DOCTyHnTOIbKO TOrA, KOrda BboPaHO Ctepeo DnBXOHDHO CoeHNHEIN.
3 80mTcYae, NOOE BbOpa OFigurE OTKpoTeR CTpHua, ObeCNENBAUOa PnABnBIHy HOACTPOky BXOHDOR cMbTaPnH3XkN XAcTOT JIOKHPETbIX MOnEOJ AC Bowers &WilKs, NnIO BoBANIOuA aadab TNONsOBATEBSCKe HactpcknH HcMbtpa.
VcnoBbAHnCnHnHnHnO HnHnTPa HnKHXNACTOT CENCOOBpa3AO, KOHOCHOBHKOHOHn - HEykaBHHe B CnncKe MOnJAC BoWers &Wilms NINXe AC INHOIOPOVBOOHTENB. BIO6OM CNYBEΦHbTP HnKHXNCTAO TONKEN BbHCTPOEHN COOTETCTAMCN OyBnIKoAHBBHMn HnKHOACTOTHHMNNXpAEBPNTKMMN IABHBXAC BOwER&Wilms nAn ABtepHaTHNBnI pON20DnENTAE BC Ayet pad nCMOBCb BuDAHE NyKHOHOPMOUm PnR HeoBXODMOCT.
4.2 KaIIb6pOBKa KOHOK NOd aKyCTNkY KOMHaTbI - Room EQ
Pnmoohyae: oon HooochQmmo HacpOHTbBa
caobuyepoe, npocuype Room EQdoJHne bOBy
npoepea otDcBno pnn KAKDOH aHxN.
Hn Hn Hn Hn Hn Hn Hn Hn Hn Hn Hn Hn Hn Hn Hn Hn Hn Hn Hn Hn Hn Hn Hn Hn Hn Hn Hn Hn Hn Hn Hn Hn Hn Hn Hn Hn Hn Hn Hn Hn Hn Hn Hn Hn Hn Hn Hn Hn Hn Hn Hn HH n n n n n n n n n n n n n n n n n n n n n n n n n n n n n n n n n n n n n n n n n n n n n n n n n n n n n n n n n n n n n n n n n n n n n n n n n n n n nn nn nn nn nn nn nn nn nn nn nn nn nn nn nn nn nn nn nn nn nn nn nn nn nn nn nn nn nn nn nn nn nn nn nn nn nn nn nn nn nn nn nn nn nn nn nn nn nn nn nn nn nn nn nn nn nn nn nn nn nn nn nn nn nn nn nn nn nn nn nn nn nn nn nn nn nn nn nn nn nn nn nn nn nn nn nn nn nn nn nn nn nn nn nn nn nn nn nn nn nee e e e e e e e e e e e e e e e e e e e e e e e e e e e e e e e e e e e e e e e e e e e e e e e e e e e ee ee ee ee ee ee ee ee ee ee ee ee ee ee ee ee ee ee ee ee ee ee ee ee ee ee ee ee ee ee ee ee ee ee ee ee ee ee ee ee ee ee ee ee ee ee ee ee ee ee ee ee ee ee ee ee ee ee ee ee ee ee ee ee ee ee ee ee ee ee ee ee ee ee ee ee ee ee ee ee ee ee ee ee ee ee ee ee ee ee ee ee ee ee ee ee ee ee ee ee
ПИМОЧАМ: 33-34 НOCOMOCTMUMOCTM MKNKPOPOHA, Room EQ DOCTMNA H RA BACX MOBUNBx yCTPOCTA noq Android.CNTCOK ATOPTOMMOHBA xTPOCTA MOKHO HAIYI B PAGDIO NODEPKKN 86-CaTTA BOWERS &WICKS.
PocnTOKMKPOOHOMOBHLHOrOyCTBa 6yETOKANBOPOAH,poNpAeroPoRaONEOqnpctaansr BAPINHTbOTNNMBAU3aayHARNAcBAGyPepe-dI ONDHO CNYLIATEB,1JRAEYHX NTPexCNYLIATEB RBOHPOPCNIIWBAHNRUMX -BOOBJIeJPNRBCN KOMHBt. BbEpNIe HxHbBapnHnHAXMIte KHOKY CNeDnyoM
Ca6bpybepyreHepoBaTcpeHnBocmN Tectobix CHTAIOE BdyET MIOHO308aB MIKpOCH MOINbHOrO YCTPOIOTBB INM3MpeHn33yKa 3 NOMeHHEN H AATOMATHECKORPO PACHTONMMALBOH XkAPTEPACTKNACTPEOKAAJIePAE.EcNbbln BbpaHb BapMAHTHOHNIPOCyUIMBAHMR Group nnn RnoPMxKHeNPONCNTBACNEeINB Dpyroec MeTO, T.K. HebOgIMMO CnDNTB OBCemN3MpeHn3
KordaH3MpeHnH 3AeepuTcra,pc3yntbTaBb6dyT BBeHHa HmCnI,PiouEpyoRooEHa3OM bcyTe aepueHna,PocncBbOpa CneDyoU npnloKHeHc BepHTcra Ha DOMauHOO CTpaNvLIy.
EcnBaa cabiep cepn DB nepemaeianc a komate npocnywnbnaHn Jne Hn Bcynyctanohene npynhnc npmoTbMu bannn, npouaepyp Room EQ onayot nortopntb.
Room EQ:kan6p0ka MmKpO0ha Mo5nBHO yCToHCTBa.
Room EQ: m3mepeHHn aHaHn3.
5. McnoIb3ObaHne ca6ByΦepoB
IIOeTOK KAKPPOUdya HAcTOPOHKn CnMOuHn PnIOXeHHAaepueha,BauCAByOepeTOB KpAOBe. PIIb O6HUMcEKAeHbHM NcHbOBAHmBcAByOeN OHHTHe TpeYeiHrACTOPOHKn, OaHKAn BbMooKete AaOXoETb HAcTOPoHb ERO yPOBEhPfOMKoCTh,3aDAtbApTyIO 0kBAHnAHO DAAxBOAHa HbBabPbApTyOHN BxOd.
HnpeynpnK npnnrpnKpOeH pOoKTHcAcbpyepa HNO3L3yIe DOMAnIO OCPaIIuPnHOKeIHnTAM cctl coOTBCTBYIOU KINKN.
JHIN HUNIGA JIpyoT ANKHAHIMH NxOa(E.Q)AABHTNE HA cTAPNNU NACTPOIKH NxOoB.
- DnBkhnpaJyIIOHOxNlaJbAHTBeTgKbHNNB bapnHAnO 1a TpIaIeNbIaTcPOHbXIOAO
HINI HINHUA cABHyepa B PEXHM NIKHANHAN standby HAKMITE KHOHNKY standby HAHEKHOKNHAKATOP 3ARHPOTKPCAHNCBETON.
TOKAHTCTA,ZAMHMTHE TAKAE,TOO CABYFepCepHH DBMOKET coaabaBb tyoBBN POMKOTCN,NOTEHUANHO OAnchEeBnEOIcAYxHcNYxDPyTHNOJed.ECN BbCOHMBAeTeB BPOeJeCTBNX,NyueyeMeHNHTRE POMKOTC
IpnmuaaH: Ecm Cabyep Cep DEB nppeycken eio hnKapatop stady bye Mnnr kpaacb mceom.
38yyaHaeBnro Cepn DB MoKet ChneKa HmEHTNCTB B TeueHHe HaaybHoro nepHOda PocIyHnBaHH. Eclnn ero XaHHH B XOaOHOM IomeeHH, DemHpyHQHM OcTABAM H MATEpHaAM IOpeBaCduHpy3POB DnAHHKOB NtPpeByETC HeKOTOpE BPEM 10BocCTAHHOHH YhMHx MeHHAneeCHHX CBOHCTb. POIEBC DnAHHKOB XoDe nepBbXuacOB paBbTH TAKKe TepET KecKCTb. BPMe, TpeYIOeC DnAHHAMd DmDnCTHEKHeHHNE pIeJCAHHOHR KAcEeTB 38yyaHHo, MOKet BaBHpOBAb TB 3aBHCHMOCTb OT yCLOBNI INPdAUYeero XpAHHH N HcNOI3OaHH. OPHInHPINHOHOHN CNTT, cHJIeHNe HIOHOTIPbFIOH dI CTABHAAHNN TMehpArTyHbX aIpeKToH N OKHO 15uACOB paBbTO pRn CpEnH nHarpy -dOCTKHeHH MEAHXueChkHM HACTAm PAcEHTHX XapAKTePHCTHK.
6. BocctaHOBJIeHne 3aBODCKHX yCTaHOBOK no ymOJUHAnHO
JINIIOI,OTbOBEHPYBcAByBepK3ABDcKHM
HactpoiKaMnOmyaunHIO,HAKMHTe b6bTPOp a03
noPdA KONKNYstandby,PiocE OOKUHNHPOeDyBu
CbPOCAcbyBepOeKnHHTC.HAKMHTe eue pa3 HA KONKNY
standby Hn3AnyCTHe pInloKeHHe,OTbO BkLIOHTB
cbNyBep.
IpHmEHNHe: IocHe Oepeaun CbOpca Heo6xOJNMO, TOpBpaee NoKIOeHNHe yCtPOeTBA 3a5bIMn npo CBARb H aHaBO nOcCepDnHmnc K bawemy cabSyepy cepm DB.
7. OuncTkca ca6byfepa
POTPHTHEHOPHEXHCTB HCTB TKAHbE B3K BOPCA.EcHJ
JEH 3AXOTHTREHCIO60BtB HNTCHTAEH-AP3O3OB,IM
YCHKT,TOPAJIACIIEA3PO3OBN Hn POTHPOHYKTIKAH,
a He HA KOpHc. HIOPOBYTE er O CHaHa Ha Heb5bHOM
yAcTKE HOPHEXHOCTh,TK.HeKoTOpHe bMOIOHe BEUcETBa
MORY TNOPBExdA,OTeADKe. HsEBaTe I PmEHMeHHn
HNKOCTe C abpa3HBMM NACTiuaAM, CodepKaunix
KNCOTy UIN IOIOu, a TaKke AHTNbAKTepeHbIbe
BEUECTBa.
EcnH Bm Tpeyetra Nnmoi Hnn COEB dIa MaedJeueb ca6byepoB Cepn DB, nokayeta, nocertte caitn noeepkck 3ne
Домаш�ястанда
CtpaHnHaHctpOKnRXoON
Bowers & Wilkins've DB Serisi subwoofer'lara hosgeldiniz.
DB 电E E E E E E E E E E E E E E E E E E E E E E E E E E E E E E E E E E E E E E E E E E E E E E E
3. 甲乙甲丙
3.1 机制功能
H
孕:+,一,其云运三,,,,,,,,,,,,,,,,,,,,,,,,,,,,,,,,,,,,,,,,,,,,,,,,,,,,,,,,,,,,,,,,,,,,,,,,,,,,,
责皂藻皂园灶皂藻藻藻藻藻藻藻藻藻藻藻藻藻藻藻藻藻藻藻藻藻藻藻藻藻藻藻藻藻藻藻藻藻藻藻藻藻藻藻藻藻藻藻藻藻藻藻藻藻藻藻藻藻藻藻藻藻藻藻藻藻藻藻藻藻藻藻藻藻藻藻藻藻藻藻藻藻藻藻藻藻藻藻藻藻藻藻藻藻藻藻藻藻藻藻藻藻藻藻藻
2-RCA 五
3-12V Trigger 1-3.5mm
T 1
4-12V Trigger 2-3.5mm
串串串串串串串串串串串串串串串串串串串串串串串串串串串串串串串串串串串串串串串串串串串串串串串串串串串串串串串串串串串串串串串串串串串串串串串串串串串串串串串串串串串串串串串串串串串串串串串串串串串串