
WFC970 - Weather Station HAMA - Free user manual and instructions
Find the device manual for free WFC970 HAMA in PDF.
| Product type | Weather station |
| Brand | Hama |
| Model | WFC970 |
| Main unit power supply | 2 LR6/AA batteries (1.5 V) |
| Outdoor sensor power supply | 2 LR03/AAA batteries (1.5 V) |
| RF transmission frequency | 433 MHz |
| Number of outdoor sensor channels | 3 (1 included) |
| Measurement types | Indoor/outdoor temperature, indoor/outdoor relative humidity |
| Indoor temperature range | -5 °C to +50 °C |
| Outdoor temperature range (sensor) | -40 °C to +70 °C |
| Humidity display range | 1% to 99% RH |
| Temperature resolution | 0.1 °C |
| Humidity resolution | 1% |
| Radio reception | DCF77 (clock) and METEOTIME (weather) |
| Weather forecast | Up to 4 days for 60 regions, 2 days for 30 additional regions |
| Number of predefined cities | 470 |
| Display | LCD with weather icons and text |
| Display languages | 7 (German, English, Spanish, French, Italian, Dutch, Swedish) |
| Clock functions | Radio-controlled, adjustable time zone, dual alarm (weekdays/single), programmable pre-alarm |
| Reception test function | Yes (TEST button) |
| Low battery indicator | For main unit and outdoor sensor |
| Care and cleaning | Clean with a soft, dry cloth. Do not use solvents or water. Avoid moisture. |
| Safety | Do not open the device. Use only recommended batteries. Keep out of reach of children. |
| Spare parts and repairability | No spare parts available. Device not user-repairable. |
Frequently Asked Questions - WFC970 HAMA
User questions about WFC970 HAMA
0 question about this device. Answer the ones you know or ask your own.
Ask a new question about this device
Download the instructions for your Weather Station in PDF format for free! Find your manual WFC970 - HAMA and take your electronic device back in hand. On this page are published all the documents necessary for the use of your device. WFC970 by HAMA.
USER MANUAL WFC970 HAMA
Weather Forecast Centre
"WFC-970"
Wettervorsage-Center
Bedienungsanleitung
Operating Instructions
Mode d'emploi
PykoBoDCTBO nO 3KcPnyatauH
Your Weather Station is different to traditional weather stations which measure the prevailing conditions only, the data of this weather station is based on the METEOTIME which is worked out on a daily basis by highly professional meteorologists using state-of-art instruments.
The Weather Station is engineered in such a way that it is able to receive the coded METEOTIME signal containing the weather information. The information is broadcasted via the stations for radio-controlled clocks DCF77 (located in Germany). For this reason, your Weather Station is also a radio-controlled clock with all the known advantages, such as always showing the exact time, and automatic change to daylight saving the time in winter and in summer.
You are able to receive weather forecast for 60 meteorological regions within Europe for up to 4 days in advance, and offer a 2-day-advance forecasts for an additional 30 regions.
WHAT DOES IT TAKE TO GET GOOD RECEPTION?
Similar to wireless signals like the mobile phone network or Radio/TV broadcasts, it is possible that the Weather Stations do not receive signals all the time and everywhere. The following are some tips you should follow by all means to make sure that your device works properly:
The location for Weather Station is very important. For this reason we have equipped all of them with an innovation test function (the TEST button) which enables you to test the quality of reception in your environment and to place the device where the best conditions prevail.
Try your reception by testing your Weather Station as stated in the manual. To do this, in the room you want to install the device, please turn on all the potential sources of interference (for example a TV set). Then put the Weather Station in the place and direction you want it to be, but always at least in one meter from the potential source of interference.
Watch the symbol GOOD RECEPTION or BAD RECEPTION on the display. Once you have found the right location for GOOD RECEPTION, you may leave the Weather Station there, it will collect its data by radio controlled signal. Within a few minutes time and the date will appear. However, the transfer of the very large amount of data (forecast for all regions and days) will take much longer. To completely receive all data will take up to 24 hours from the time of the initial setup.
FEATURES
This package comes with a main unit which is Weather Station, and a remote outdoor Thermo-hygrometer sensor.
This Weather Station has equipped the thermo-hygrometer sensor to measure the indoor temperature and humidity, and also has a wireless outdoor thermo-hygrometer sensor to measure the outdoor temperature and humidity.
Key Features:
- Weather Status for today and coming three days for 470 cities
- Precipitation Probability for Today
Wind speed and Wind Direction for Today - 3 channel outdoor 433MHz wireless Thermo-hygrometer (channel 1 sensor is included, additional sensors are required for channels 2 and 3)
-IndoorThermo-hygmeter
Maximum and minimum memories of temperature and humidity readings
- Temperature and humidity trends (UP/FLAT/DOWN)
- Temperature unit in degree C only
Regional Day-time temperature and Night-time Temperature information
- 7-languages abbreviation (English / Espanol / Francais / Italiano / Dutch / Swedish / Deutsch)
Critical Weather Alert
Maximum of 5 cities weather information can be selected and displayed
Personalized a place name / city
- Radio-controlled clock and calendar (24 hour format only)
- Time-zonesetting
- Dual alarm (weekday alarm / single alarm, Alarm sound for 2 minutes)
- Pre-alarm (programmable) for outdoor sensor - Channel 1 only
- Battery low indicator for main unit and wireless sensor
- Powered by 2x AA batteries for main unit, and 2x AAA batteries for the outdoor sensor
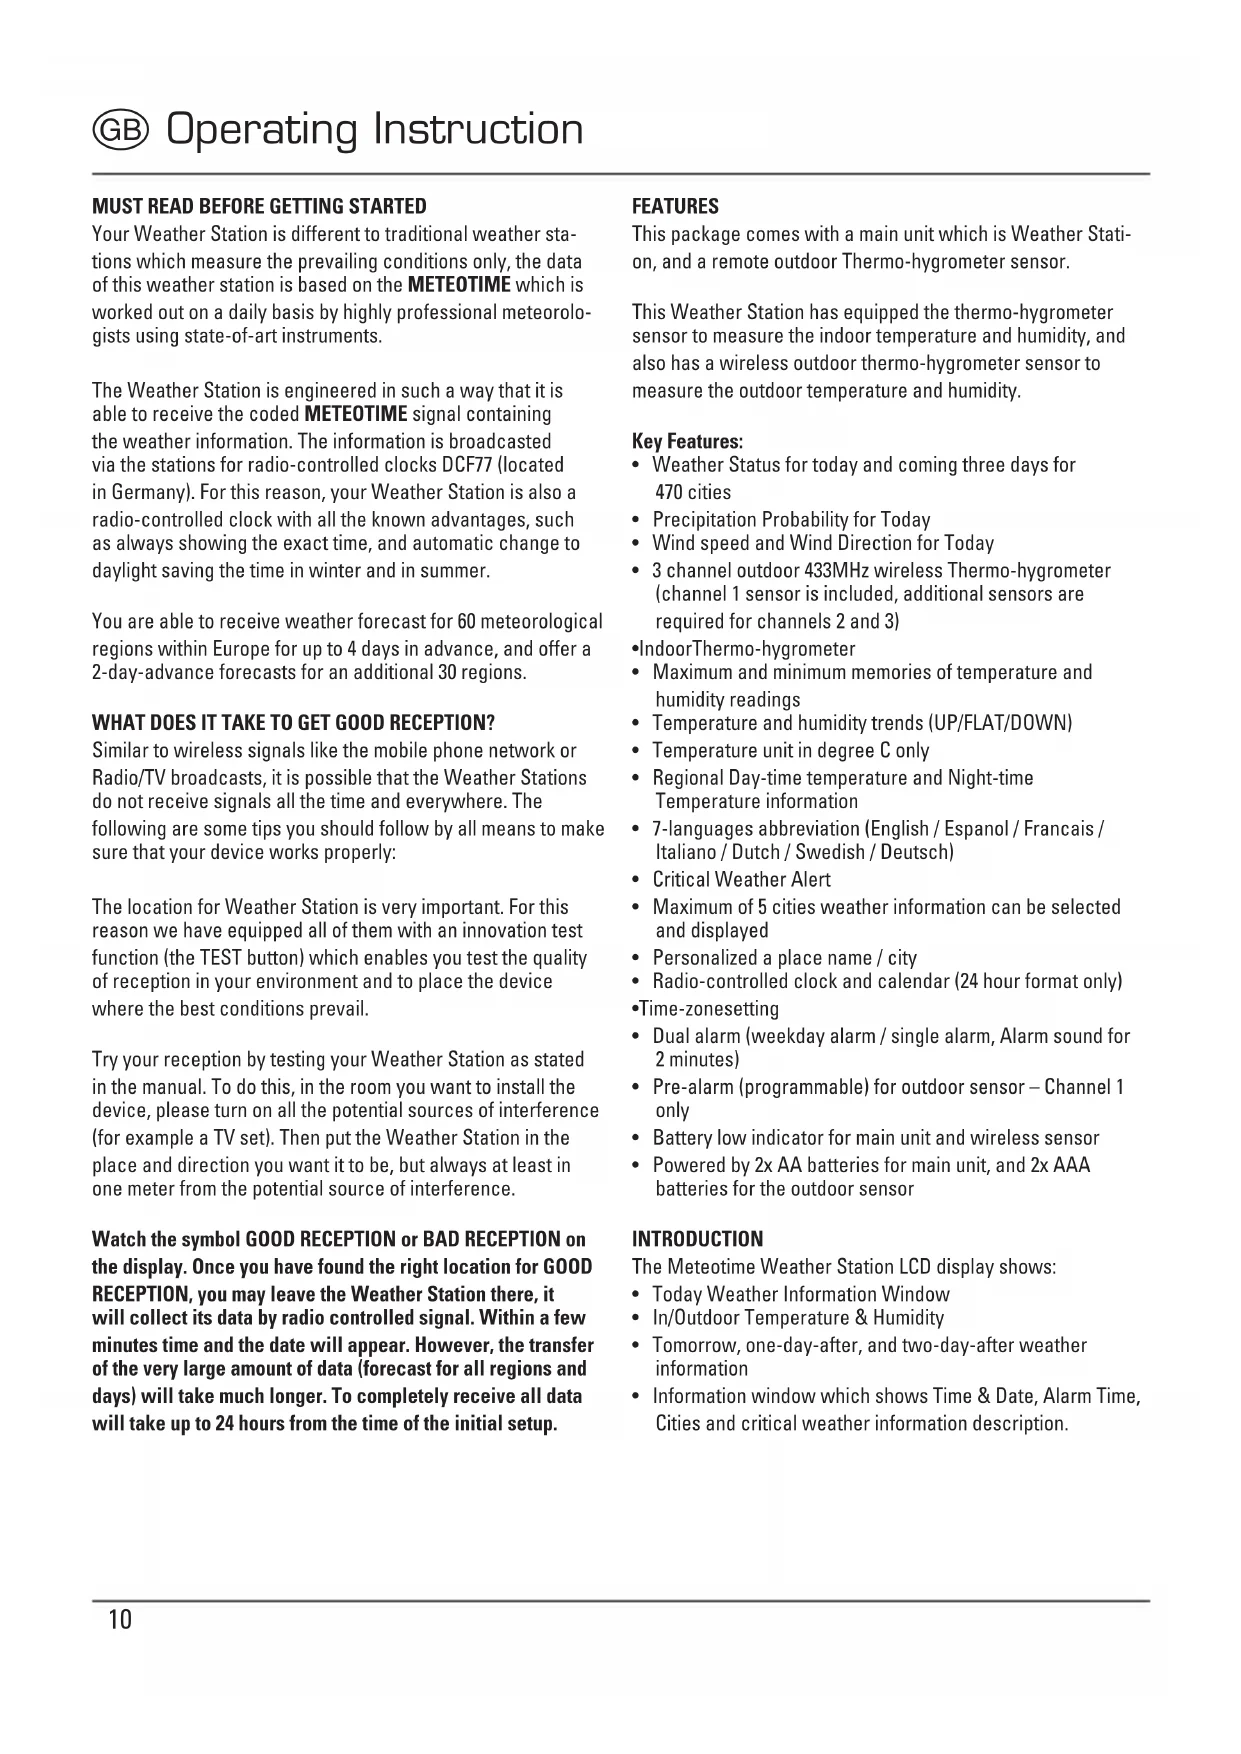
INTRODUCTION
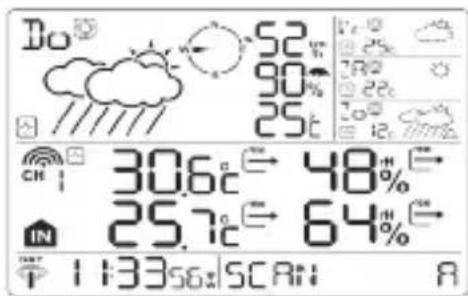
The Meteortime Weather Station LCD display shows:
Today Weather Information Window
In/Outdoor Temperature & Humidity
- Tomorrow, one-day-after, and two-day-after weather information
Information window which shows Time & Date, Alarm Time, Cities and critical weather information description.
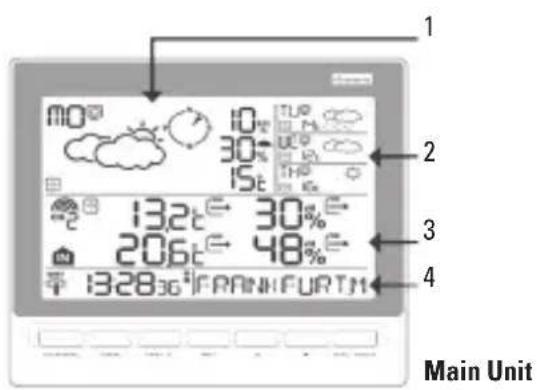
Remote Thermo-Hygrometer
- Today Weather Information including Wind Speed, Wind Direction and the probability of Rain/Snow/Hail, Day & Night Temperature, Day & Night Weather Status.
- Tomorrow, One-Day-After and Two-Day-After Weather Information including Day & Night Temperature, Day & Night Weather Status.
- In/Outdoor Temperature/Humidity
4.InformationWindow.
There are total 7 buttons on the Main unit, namely:
SET
- selected city DATE Weekday alarm "OFF W-ALM" single alarm "OFF S-ALM" Pre-alarm "OFF P-ALM"
- Press and HOLD [SET] for 3 seconds to select your (1) country, (2) time zone, (3) language, (4) exit to city display mode
DAY/NIGHT
Critical weather information day/night weather status change
- Read critical weather information one by one

increasing the value during setting
- turn ON the alarm
- Press and hold for 3 seconds to enforce a radio controlled clock DCF signal search
- switch to next day's weather information

- decreasing the value during setting
- Chose one of the pre-selected cities
- Turn OFF the alarm
- Press and hold or 3 seconds to enforce a wireless RF signal search from remote sensor
MEM
- display the maximum and minimum measured temperature and humidity readings in record
- Press and hold for 3 second to clear all the max. and min. record
TEST
Find the place for the device which has a good reception
- add the city into the list of your desired cities OR
Remove the city out of the list of desired Cities
edit your home town
CHANNEL
- switch to rear outdoor temperature and humidity readings of channels 1, 2 and 3
- press and hold for 3 seconds to enter into the auto-circulation display mode
GETTING START
- Insert 2pcs AAA batteries for remote sensor, and then insert 2pcs AA batteries for the main unit.
- The main unit will automatically scan for the radio-controlled clock signal and the Meteorite Weather signal
- The time and date will appear in a few minutes. Since there is a large amount of Weather information for all regions and days, the unit needs about 24 hours from the time of the initial setup to complete the reception of all data.
After the time and the date signal is being received successfully, the display shows SELECT COUNTRY and then FRANKFURT as default city in the information window. To change the country and the city please see the information below.
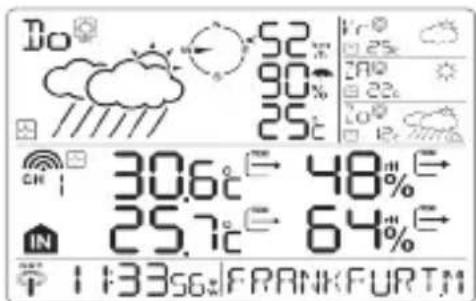
If the unit is able to receive the Meteotime signal successfully, the Meteotime icon is appeared in the second row of display. Otherwise, the Meteotime will be
- means it successfully receive today's weather information. Otherwise, it will be
- means it successfully receive weather information of one-day-after. Otherwise, it will be
- means it successfully receive tomorrow weather information. Otherwise, it will be
- means it is able to receive the Meotime weather signal. Otherwise, it will be
- means it successfully receive weather information of two-day-after. Otherwise, it will be
In the event the Meteotime icon change to that means there are potential sources of interference on the unit. The sources of interference may come from the electronics equipment such as TV-set, computers, household machines etc. It may also be due to lots of concrete, metal parts and electrical equipment in the building. It may also be due to your living area if it is very far away from the Radio-controlled clock tower.
You are able to use the TEST function to look for a better location
- Press TEST button, SCAN is shown in the Information window
-
pick the unit to find a good location.
-
flashing: the test is running and the Meteotime signal reception is good. You are able to leave the device in this position. Flashing: the test is running and the Meteotime signal reception is poor. You need to keep on looking for a better location.
- The test lasted for around 1 minute. You can restart the test with the [TEST] key at any time, and also discontinue the test by press the TEST key.
SCAN A: the signal strength will be represented from 0 (very bad) to 9 (very good).
SWITCH CITY DATE ALARM
After inserting the batteries, the weather station searches for the radio controlled time signal as well as the Meteor Time signal. After it has successfully received the Meteor Time signal, the display shows in the information window the default city
- You are able to press [SET] to switch from the display of the city to date, weekday alarm, single alarm and pre-alarm.

SELCET THE COUNTRY AND THE CITIES
- Press and hold [SET] for 3 seconds, in the information window COUNTR is shown, and then press [ ] or [ ] to select the country. For example: If you see in the information window GER, that means you have selected "Germany".
- Press[SET] to confirm the country. Assuming you have selected Germany, then the information window will show
- Then, press [▲] or [ ] to select the city, and the city name will be shown in the information window. Example: FRANKFURT means the city of "Frankfurt am Main"
Press now [SET] to accept the setting. From now on, the selected city will now be shown in the information window.
ACTIVATE FAFOURITES
Once you have set your city as described above, you may select more cities for easy access. Instead of terminating the setting with the key [SET], you continue as follows:
If "Frankfurt am Main" is your selection as one of your favorite cities, then press [TEST] to confirm. A will be shown on top of your selected city, and it will be stored into your personal memory list.
Now you may press [ ] or [ ] to select more cities in the same country, and then press [TEST ] to confirm.
- If you wish to select cities from different countries, you have to exit the setting with [SET] and re-enter it again as described above in order to change the country
You may select maximum FIVE cities as favorites. If you want to add more cities, then MEMFULL will show in the information window.
When all settings are done, press [SET] to confirm and exit the setting mode.
REMARK:
If, after inserting the batteries the first time, you are skipping the city selection, the product will select by default "Frankfurt am Main" as your selected city.
DISPLAY OF FAVOURITES
If you have selected more than one city as favorite, as an example Frankfurt am Main, Paris and Stockholm, then you are able to scroll through these cities by pressing when the Information window shows the CITY NAME (Press SET until it displays the City name).
FRANKFURTM [▼] PARIS [▼] STOCKHOLM
REMOVE A CITY FROM THE LIST OF FAVOURITES
- Press and hold [SET] for 3 seconds, as shown in the information window, then press [ ] or [ ] to select the country.
- Press[SET] key to confirm the country
- Then press [ ] or [ ] to go to your selected city with the
- Press[TEST] to remove the . now this city is removed from the favorites
- Repeat this if you wish to remove more cities from your list
- Now you may also press [ ] or [ ] to select another favorite city.
Once you have made all your changes, press [SET] to quit.
Ex: will be shown in the information window. After 4 seconds, it will go to the City-Date-Time Mode.
PERSONALIZED A PLACE NAME
- Press and hold [SET]) for 3 second. In the information window, is shown, and then press or key to select the country. Let's said you have selected the country Germany which is represented in
-
Press[SET] key to confirm the country (let's said we select Germany right now), and then the information window will show [City].
-
Then press [▲] or [Key to select the city, and the city name will be shown in the information window such as FRANKFURT means the city "Frankfurt am Main", and you would like to enter a new city which is near the region of Frankfurt am Main.
PresstheMEM key; a cursor flashes on the first position of the information window.
The following input commands then apply:
| Key Funtion | |
| [ ]ar [ ]▼ | Selection of a letter |
| [SET] | (1) Accept the selected letter and jumps to the next position. OR (2) If you have not entered any letter (in other words, if only the cursor is flashing at the last position, confirm the entry with this key and your place will also be included in the memory with immediate effect |
| [TEST]√ | One position back in the data entry process |
** The place that you have selected to enter your own description will still exist under its own name.
-Press[SET] key to confirm and exit
SET THE TIME ZONE and LANGUAGE
- Press and hold [SET] for 3 second, is shown in the information window.
- Press[SET] again, the ZONE is shown in the information window, press [ ] or [ ] key to adjust the time zone.
- Press[SET] again, then the language will be shown in the information window, press [ ] or [ ] key to select your desired language. There are total seven language for selection, namely German, English, Spanish, French, Italiano, Dutch, Swedish.
- Press[SET] again and will be shown at the information window. After 4 seconds, it will change to the City-Date-Time Mode.
REMARK:
If you do not have any selection into the setup mode up to 60 seconds, it will automatically exit the setup mode. The information window will show City / Date & Alarm.
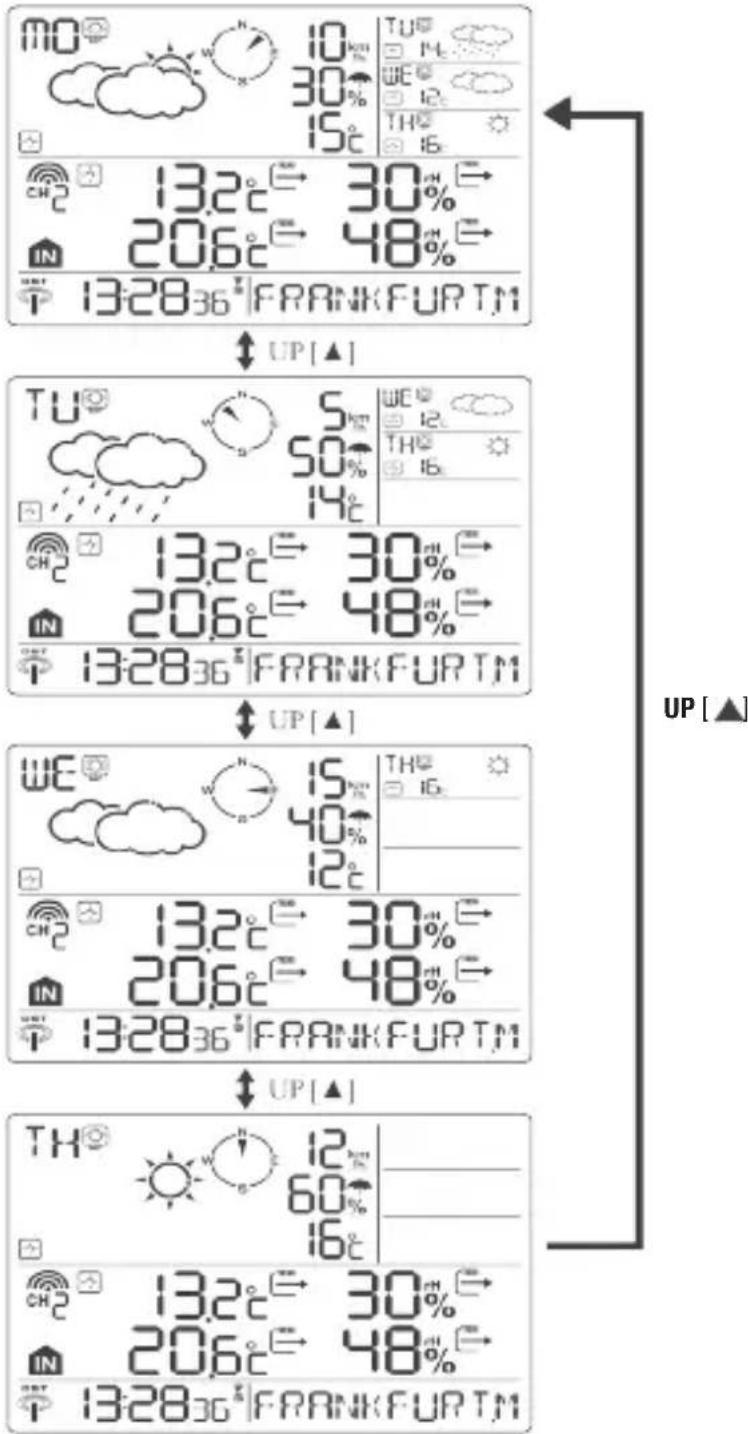
SWITCH TO NEXT DAY'S WEATHER INFORMATION
For each press of the UP [▲] button, the user can switch and view the weather information from today to tomorrow, one-day-after and two-day-after.
Today's weather information:
Tomorrow's weather information:
One-day-after's weather information:
Two-day-after's weather information:
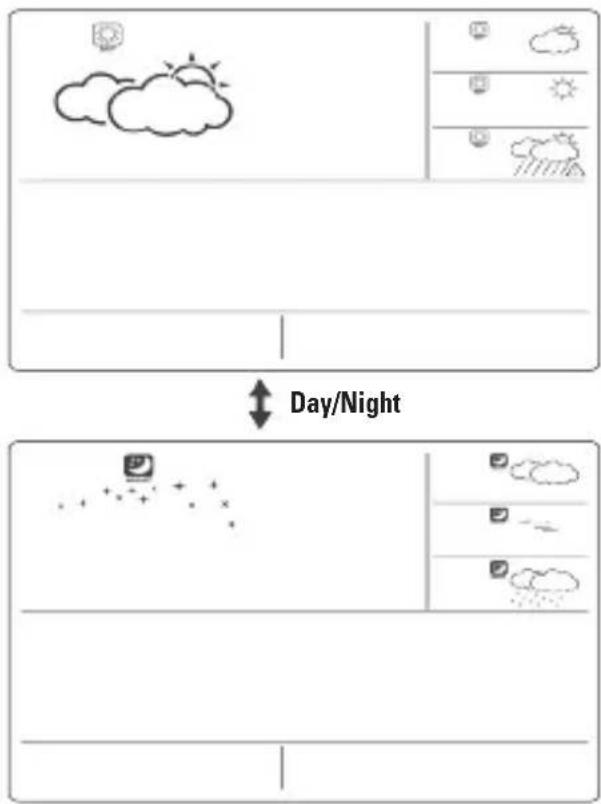
SWITCH DAY WEATHER INFORMATION-NIGHT WEATHER INFORMATION
The device is able to automatically switch to DAY-WEATHER and NIGHT-WEATHER respectively. The user can press the (DAY/NIGHT) button to see the DAY-Weather (for 10-second period) if currently show the NIGHT-WEATHER, or vice versa.
CRITICAL WEATHER INFORMATION
Meteor signal contains the critical weather information such as Gust, Frozen Rain, Heavy Snow, Thunder, Strong UV, Dense Fog, Bise, Mistral, etc. for today and coming three days. A critical weather alert signal will be turned on in case that day has critical weather that the user must know.
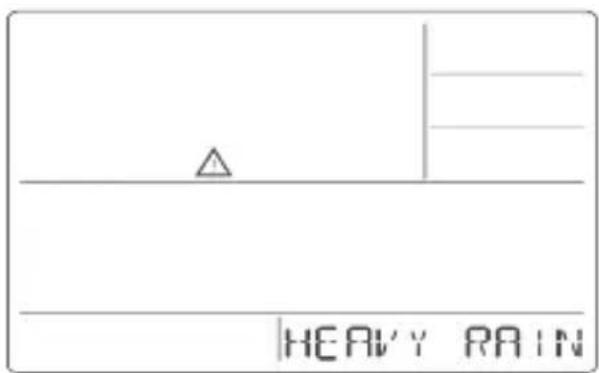
Sometimes there are more than one critical weather information in the 4-days. Press (DAY/NIGHT) key to read the critical weather information one by one. The special icon of the day will be flashed when you read the information.
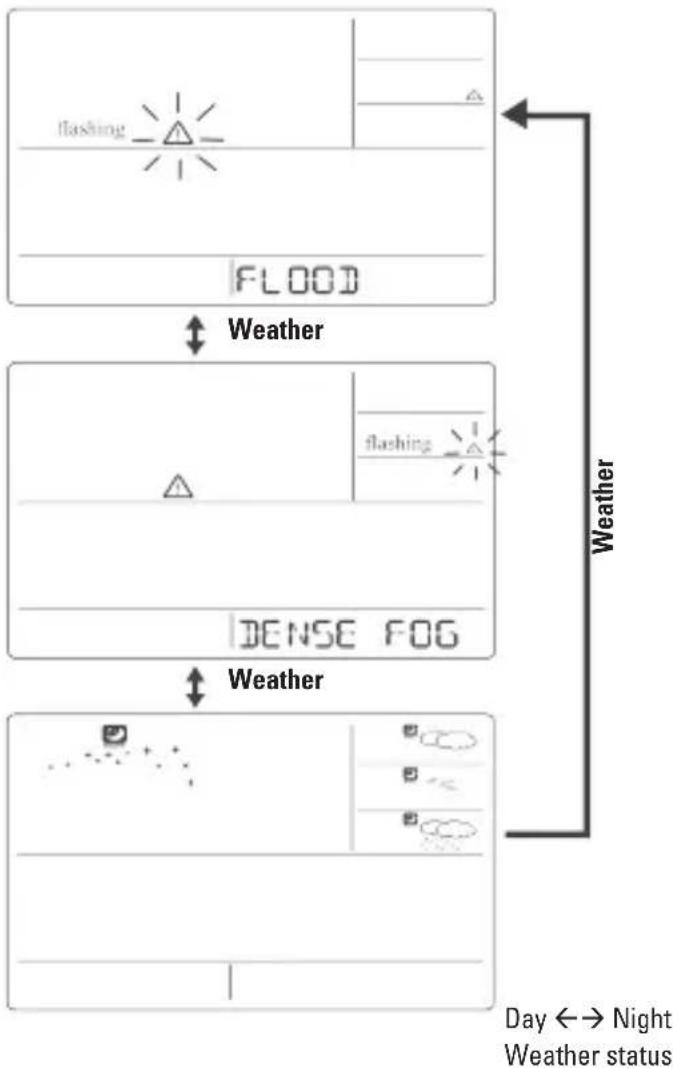
- Press [SET] key to go back to the display of CITY DATE WEEKDAY ALARM SINGLE ALARM PRE-ALARM. If you would like to read the weather information in the information window, then press [DAY(NIGHT] key to display DAY NIGHT weather information and also the critical weather information.
If no key is pressed, the critical weather information will be toggle to display, so as to make sure you are aware of the critical weather details.
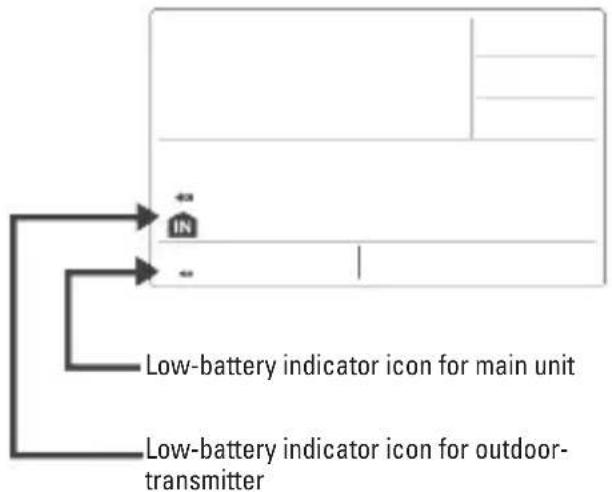
LOW BATTERY INDICATION
When it is time to replace batteries, the respective low-battery indicator (see graphics) will appear next to the weather forecast for the display unit or next to the outdoor temperature for the outside sensor.
Weather Status
There are total 15 weather status for Day and 15 weather status for Night.
| Significance Day Night | |
| Sun (Clear at night) | |
| Light Cloudy | |
| Mostly Cloudy | |
| Overcast | |
| Stratus Clouds | |
| Fog | |
| Showers | |
| Light Rain | |
| Heavy Rain | |
| Frontal Storms |
| Significance Day Night | |
| Heat Storms | |
| Sleet Showers | |
| Snow Showers | |
| Sleet | |
| Snow |
REMOTE SENSOR STATUS
The wave icon above the current channel icon shows the connection status of the corresponding remote sensor:
| Icon Status | |
| Searching for the signals from the remote sensor | |
| Corresponding remote sensor signal received successfully | |
| No signals received for over 1 hour |
SEARCH FOR REMOTE SENSOR
The main unit can be manually activated to search for the signals from remote sensors by pressing and holding DOWN [▼] button.
VIEWING REMOTE (CHANNEL) TEMPERATURE AND HUMIDITY
Static Display:
- Press[CHANNEL] keys to select measurements from different remote sensors, each is mode to a unique channel 1, 2, or 3

Channel Auto-Scan Display:
- Press to enable an automatic scan of all channels, press and [CHANNEL], until the icon is displayed. The measurements from each remote channel will be alternately displayed with a 5 seconds viewing.
NOTE: the channel auto-scan feature can be active only if there are more than one remote sensors operating and are set to different channels.
MAXIMUM AND MINIMUM TEMPERATURES
- The maximum and minimum record indoor and outdoor temperatures and humidity will be automatically stored in the memory of the main unit. To display them, press [MEM] button and the respective indicators, [MAX] or [MIN] will be displayed.
- To clear the memory, hold [MEM] button for 3 seconds. The maximum and minimum temperature records will be erased.
ALARM FEATURE
Weekday Alarm:
- This is a repeat alarm that will activate daily from Monday to Friday at a set time.
Single Alarm:
- This is a single alarm that will activate once at a set time
HOW TO SET ALARM
- Press[SET] to toggle between weekday, single alarm time or pre-alarm. If the alarm is disarmed, the time will be displayed as "OFF W-ALM"
- Hold[SET] for 3 seconds, the hour digits will blink
- Enter the hour by using UP [ ] or DOWN [ ] button
- Press[SET]) to confirm, the minute digits will blink
- Enter the hour by using UP [ ] or DOWN [ ] button
- Press[SET] to exit and the respective alarm icons and will be activated.
HOW TO STOP ALARM
- When alarm is on, the respective alarm icons and will be flashing. Press UP [ ] or DOWN [ ] button to stop the alarm immediately.
To turn off the alarm press UP [ ] or DOWN [ ] button to change the alarm time display as "OFF W-ALM" - If no button is pressed, the alarm will be sounded for 2 minutes and then deactivated automatically.
SETTING THE ICE WARNING ALARM (PRE-ALM)
- If weekday (W) or Single day (S) alarm is set, the ice warning alarm (Pre-ALM) can be programmed.
- Press and hold [SET] button for 3 seconds once to enter into the ice warning alarm setting mode on "PRE-ALM" display mode
- The number 15 will flash, meaning that if selected, the alarm will sound 15 minutes earlier than the weekday or single alarm.
- select the desired ice warning alarm interval in 15 minutes increments between 15 and 90 minutes, using UP [▲] or DOWN [ ] buttons
- Press[SET] button to confirm and exit from the alarm setting mode.
SPECIFICATION ON IN/OUTDOOR TEMPERATURE AND HUMIDITY MEASUREMENT
Temperature Resolution: 0.1 degree ^ C
Temperature operating range (main unit) -5 degree ^ C to +50 degree ^ C
Temperature operating range (sensor unit) -40 degree ^ C to +70 degree ^ C
Temperature accuracy +/- 1 degree ^ C
Humidity Display Range r.H. 1% to 99%
Humidity resolution 1%
Humidity accuracy + / - 5% (within 25% -80% at 25^)
RF Transmission frequency 433MHz
RF transmission range maximum 30 meters (open area)
Main unit is powered by AA batteries x 2pcs.
Outdoor thermo-hygrometer is powered by AAA batteries x 2pcs.
12. Declaration of Conformity

Hereby, Hama GmbH & Co KG declares that the radio equipment type [123131] is in compliance with
Directive 2014/53/EU. The full text of the EU
declaration of conformity is available at the following internet address: www.hama.com->123131->Downloads.
Frequency band(s)
433MHz
Maximum radio-frequency power transmitted
0,021mW
DAY/NIGHT (JOUR/NUIT)
FRANFURTM [SET] 1 [SET] OFF H-ALM [SET] OFF S-ALM [SET] OFF P-ALN
INDICATION DE PILES FAIBLES
Porte de transmission RF: 30 metres maxi
FRANFURTM [SET] 1 [SET] OFF H-ALM [SET] OFF S-ALM [SET] OFF P-ALN
SELECTIONDELPAeseE DELLE CITTÀ
FRANFURTM [SET] 1 [SET] OFF W-ALM [SET] OFF S-ALN [SET] OFF P-ALN
WYBOR KRAJUMIASTA
FRANFURTM [SET] 1 [SET] OFF W-ALM [SET] OFF S-ALN [SET] OFF P-ALN
VOLBA ZEMÉ A MIST
GB Setup manual short form
| SEARCH SIGNAL SEARCH SIG. | |
| SELECT CITY CITY | |
| SELECT COUNTRY COUNTRY | |
| TIME ZONE ZONE | |
| HOURS HR | |
| RECEPTION TEST SCAN | |
| MEMORY FULL | MEM.FULL |
| exit setmode EXIT |
① Setup forma manuale breve
| RICERCA SEGNALE | SEARCH |
| SCELTA DELLA CITTA | S. CITTA |
| SCELTA DEL PAESE | S. PAESE |
| ZONA ORARIA | ZONA |
| ORE | HR |
| PROVA RICEZZIONE | PROVA RX. |
| MEMORIA PIENA | MEM PIENA |
| REGOLAZIONE FATTA | SALVATO |
| D Deutsch [German] | Hiermit erklär die Hama GmbH & Co KG, dass der Funkanlageotyp [00123131] der Richtlinie 2014/53/EU entspricht. Der vollständige Text der EU-Konformitäserklarung ist unter der folgenden Internetadresse verfügbar: www.hama.com ->00123131 ->Downloads. | |
| Frequenzband/Frequenzbänder 433 kHz | ||
| Abgestrahlte maximale Sendeleistung 0,021 mW | ||
| GB English | Hereby, Hama GmbH & Co KG declares that the radio equipment type [00123131] is in compliance with Directive 2014/53/EU. The full text of the EU declaration of conformity is available at the following internet address: www.hama.com ->00123131 ->Downloads. | |
| Frequency band(s) 433 kHz | ||
| Maximum radio-frequency power transmitted 0,021 mW | ||
| F Français [French] | Le soussigné, Hama GmbH & Co KG, déclare que l'équipment radioélectrique du type [00123131] est conforme à la directive 2014/53/UE. Le texte complet de la déclaration UE de conformité est disponible à l'adresse internet suivante: www.hama.com ->00123131 ->Downloads. | |
| Bandes de fréquences 433 kHz | ||
| Puisance de radiofréquence maximale 0,021 mW | ||
| ESpanish [Spanish] | Por la presente, Hama GmbH & Co KG, declar que el tipo de equipo radioeléctrico [00123131] es conforme con la Directiva 2014/53/UE. El,textocomplete de la déclaration UE de conformidad está disponible en la direction Internet suiviente: www.hama.com ->00123131 ->Downloads. | |
| Banda o bandas de Frequencia 433 kHz | ||
| Potencia maxima de radiofrecuencia 0,021 mW | ||
| I Italiano [Italian] | Il fabbricante, Hama GmbH & Co KG, dichiara che il tipo di apparecchiatura radio [00123131] è conforme alla direttiva 2014/53/UE. Il testo complete della dichiarazione di conformità UE è disponibile al seguito indirizzo Internet: www.hama.com ->00123131 ->Downloads. | |
| Bande di frequenza 433 kHz | ||
| Massima potenza a radiofrequenza trasmessa 0,021 mW | ||
| Português [Portuguese] | 0(a) abaixo assinado(a) Hama GmbH & Co KG declara que o presente tipo de equipamento de rádio [00123131] está em conformidade com a Diretiva 2014/53/UE. O texto integral da declaração de conformidade está disponível noPLLmente endereço de Internet: www.hama.com->00123131->Downloads. Banda(s) de freqüências 433 kHz Potência maior transmitida 0,021 mW | |
| RUS Poussy [Russian] | Hactoшим Компаньа Hama GmbH & Co KG заавлиет, что радиооборUDование ТИпа [00123131] овецейт tradeboанядripeктувы 2014/53/EC. С польный tradekTom Деклараша о coOTВЕТСВИ NТ tradeboаням EC можно ознakOMITься 3десь: www.hama.com->00123131->Downloads. Диапазон/диапазонь частOT | 433 kHz |
| Мakсимална илочаемая мошноctь | 0,021 mW | |
| NEDer-lands [Dutch] | Hierbij verkaar ik, Hama GmbH & Co KG, dat het type radioapparatuur [00123131] conform is met Richtlijn 2014/53/EU. De volledige tekst van de EU-conformiteitsverklaring kan worden geraadpleegd op het volgende internetadres: www.hama.com->00123131->Downloads. Frequentieband(en) | 433 kHz |
| Maximaal radiofrequent vermogen | 0,021 mW | |
| POLski [Polish] | Hama GmbH & Co KG ninejszym oswiadcza, ze typ urzadzenia radiowego [00123131] jest zgodny z dyrektywa 2014/53/UE. Pelny tekst deklaraju zgodnosci UE jest dostepny pod nastepujacym adresem internetwym: www.hama.com->00123131->Downloads. Częstotliwość transmisji | 433 kHz |
| Maksymalna moc transmisji | 0,021 mW | |
| H Magyar [Hungarian] | Hama GmbH & Co KG igazolja, hogy a [00123131] tipusu rádioberendezés megfelela a 2014/53/EU irányelvnek. Az EU-megfelelõségi nyilatkozat teljes szövege elérhető a kõvetkező internetes címen: www.hama.com->00123131->Downloads. Az(ok) a frekvenciasáv(ok) | 433 kHz |
| Maximális jelerösség | 0,021 mW | |
| GR Eλληνική [Greek] | Με την παρούσα o/η Hama GmbH & Co KG, δηλώνει στίοραδιοεξοπλιομός [00123131] πληροί την σθηγία 2014/53/EE. To παύρες κείμενο της δηλωσις συμμόρφωσις EE διατίθεται στην ακόλουθη έτοσελίδα στο διαδίκτυο: www.hama.com ->00123131->Downloads. | |
| Zών Σουχνοτήτων/Zώνες Σουχνοτήτων | 433 kHz | |
| Μέγιοτη εκπεμπόμενη ιοχύς | 0,021 mW | |
| ÇZ Česky [Czech] | Timto Hama GmbH & Co KG prohlasuje, ze typárdiového zařizení [00123131] je v souladu se směrnicić 2014/53/EU. Üplné zněni EU prohlášeni o shodě je k dispozici na tétoto interneto-vé adrese: www.hama.com ->00123131->Downloads. | |
| Kmitočtové pásmo (kmitočtová pásma) | 433 kHz | |
| Maximálóní radiofrekvenčné výkon vysilaný | 0,021 mW | |
| SK Slovens-ky [Slovak] | Hama GmbH & Co KG támto vyhlasuje, ze radiosvé zariadenie typu [00123131] je v súlade so smernicou 2014/53/EU. Üplné EU vyhlasenie o zhode je k dispozici na tejto internetovej adrese: www.hama.com ->00123131->Downloads. | |
| Frekvenčné pásmo resp. pásma | 433 kHz | |
| Maximálny vysokofrekvenčné | 0,021 mW | |
| TR Türkiye [Turkish] | İş bu belge ile Hama GmbH & Co KG kablosuzystem tipin [00123131] 2014/53/AB sayılı direktfte uygün olduğunu belyan eder. AB Uygünlik Beyerinin tam metni asaqidaki internet adresinde incelenebilir: www.hama.com ->00123131->Downloads. | |
| Frekans bandı/frekans bantlari | 433 kHz | |
| İletilen maksimum radyo frekans güçü | 0,021 mW | |
| S Svenska [Swedish] | Härmed försäkrar Hama GmbH & Co KG, attenna typ av radioutrustning [00123131] overensstämmer med direktiv 2014/53/EU. Den fullständiga texten till EU-försäkran om überensstämme finns på foljande webbadress: www.hama.com ->00123131->Downloads | |
| Eller de frekvensband | 433 kHz | |
| Maximala radiofrekvenseffekt | 0,021 mW | |
| FIN Suomi [Finnish] | Hama GmbH & Co KG vakuuttaa, että radiolaitetyppi [00123131] on direktivin 2014/53/EU mukainen. EU-vaatustemmukaisuusvakuutuksen tãysimittainen teksti on saatavilla seuraa-vassa internetosoitteessa:www.hama.com ->00123131 ->Downloads. | |
| Radiotaajuudet | 433 kHz | |
| Suurin mahdollinen lähetysteho radiotaajuiksilla | 0,021 mW | |
| RO Romania [Romanian] | Prin preventa, Hama GmbH & Co KG, declară că tipul de echipamente radio [00123131] este în conformitate cu Directa 2014/53/UE. Textul integral al declarației UE de conformitate este disponibil la următoarea adresă internet: www.hama.com ->00123131 ->Downloads. | |
| Banda (benzile) de frecvențe | 433 kHz | |
| Puterea maximă | 0,021 mW | |
CE
hama®
Hama GmbH & Co KG 86652 Monheim/Germany www.hama.com
All listed brands are trademarks of the corresponding companies. Errors and omissions excepted, and subject to technical changes. Our general terms of delivery and payment are applied.

- Weather Forecast Centre
- "WFC-970"
- Wettervorsage-Center
- WHAT DOES IT TAKE TO GET GOOD RECEPTION?
- FEATURES
- Key Features:
- INTRODUCTION
- Remote Thermo-Hygrometer
- There are total 7 buttons on the Main unit, namely:
- SET
- DAY/NIGHT
- MEM
- TEST
- CHANNEL
- GETTING START
- SWITCH CITY DATE ALARM
- SELCET THE COUNTRY AND THE CITIES
- ACTIVATE FAFOURITES
- REMARK:
- DISPLAY OF FAVOURITES
- REMOVE A CITY FROM THE LIST OF FAVOURITES
- PERSONALIZED A PLACE NAME
- SET THE TIME ZONE and LANGUAGE
- SWITCH TO NEXT DAY'S WEATHER INFORMATION
- SWITCH DAY WEATHER INFORMATION-NIGHT WEATHER INFORMATION
- CRITICAL WEATHER INFORMATION
- LOW BATTERY INDICATION
- Weather Status
- REMOTE SENSOR STATUS
- SEARCH FOR REMOTE SENSOR
- VIEWING REMOTE (CHANNEL) TEMPERATURE AND HUMIDITY
- Static Display:
- Channel Auto-Scan Display:
- MAXIMUM AND MINIMUM TEMPERATURES
- ALARM FEATURE
- Weekday Alarm:
- Single Alarm:
- HOW TO SET ALARM
- HOW TO STOP ALARM
- SETTING THE ICE WARNING ALARM (PRE-ALM)
- SPECIFICATION ON IN/OUTDOOR TEMPERATURE AND HUMIDITY MEASUREMENT
- Declaration of Conformity
- DAY/NIGHT (JOUR/NUIT)
- FRANFURTM [SET] 1 [SET] OFF H-ALM [SET] OFF S-ALM [SET] OFF P-ALN
- INDICATION DE PILES FAIBLES
- FRANFURTM [SET] 1 [SET] OFF H-ALM [SET] OFF S-ALM [SET] OFF P-ALN
- SELECTIONDELPAeseE DELLE CITTÀ
- FRANFURTM [SET] 1 [SET] OFF W-ALM [SET] OFF S-ALN [SET] OFF P-ALN
- WYBOR KRAJUMIASTA
- VOLBA ZEMÉ A MIST
- GB Setup manual short form
- ① Setup forma manuale breve
- hama®
Brand : HAMA
Model : WFC970
Category : Weather Station