
KM 1395 CB - Food Processor BOMANN - Free user manual and instructions
Find the device manual for free KM 1395 CB BOMANN in PDF.
| Product Type | Multifunction food processor |
| Brand | Bomann |
| Model | KM 1395 CB |
| Net weight | Approximately 5.3 kg |
| Power supply | 220-240 V ~ 50 Hz, 1200 W |
| Protection class | II |
| Main functions | Dough kneader, meat grinder, blender |
| Mixing bowl capacity (light dough) | Max. 3.5 kg |
| Mixing bowl capacity (heavy dough) | Max. 1.5 kg |
| Blender capacity | Max. 1500 ml |
| Speeds | 10 levels + pulse mode |
| Electronic timer | Up to 9 min 59 s |
| Included accessories | Dough hook, mixing hook, whisk, meat grinder with 3 plates, sausage attachment, kebbe attachment, cookie attachment, 3 pasta attachments, dough divider, splash guard, measuring cup |
| Safety | Safety features on the lid, swivel arm and bowl; automatic shut-off after 10 min; electronic overload protection |
| Care and cleaning | Clean by hand; do not immerse the housing; accessories washable in soapy water; not dishwasher safe |
| Repairability | Contact authorized after-sales service; do not repair yourself |
| Intended use | Household use only; do not use outdoors |
Frequently Asked Questions - KM 1395 CB BOMANN
User questions about KM 1395 CB BOMANN
0 question about this device. Answer the ones you know or ask your own.
Ask a new question about this device
Download the instructions for your Food Processor in PDF format for free! Find your manual KM 1395 CB - BOMANN and take your electronic device back in hand. On this page are published all the documents necessary for the use of your device. KM 1395 CB by BOMANN.
USER MANUAL KM 1395 CB BOMANN
WAARSCHUWING: Verwondingsgevaar!
WAARSCHUWING: Verwondingsgevaar!
WAARSCHUWING: Verwondingsgevaar!
WAARSCHUWING: Verwondingsgevaar!
4. Attacchi accessory:
Thank you for choosing our product. We hope you will enjoy using the appliance.
Symbols in this Instruction Manual
Important safety information is explicitly marked. Please follow these instructions exactly in order to avoid injuries and damages to the appliance:

WARNING:
Warns against health hazards and indicates possible risks of injury.

CAUTION:
Indicates possible damage to the appliance or to other objects.

NOTE: Highlights tips and information for you.
Contents
Overview of the Components. 3
Assembly of the Meat Grindera 4
General Notes. 56
Special Safety Instructions for This Appliance. 57
Intended Use 58
Unpacking the Appliance 58
Overview of the Components / Scope of Delivery. 58
Electrical Connection 58
Functionality of the Appliance 58
Protective Features. 58
Display 58
Turning the Appliance On 58
Timer (Electronic) 59
Interrupt Process. 59
Turning the Appliance Off 59
The Kneading Machine. 59
Installation and Operation of the Kneading Machine....59
Table of Dough and Tools 59
Interruption of Operation 60
Completion of Operation and Removal of the Bowl.....60
Recipes 60
MeatGrinder 60
Application Notes for the Meat Grinder 60
Preparation 61
Assembling the Mincer (See Fig. A) 61
Assembling the Sausage Attachment (See Fig. B) 61
Assembling the Attachment for
Oriental Dough Pouches (See Fig. C). 61
Assembling the Cookie Maker (See Fig. D) 61
Assembly of the Pasta Attachments (See Fig. E) 62
Attach Preassembled Worm Housing 62
Operation of the Meat Grinderr. 62
Complete Operation 62
The Mixer 62
Application Instruction for the Mixer 62
Preparation 63
Operation of the Mixer 63
Complete Operation. 63
Cleaning 63
Motor Housing. 63
Accessories of the Kneading Machine and the Meat Grinding 63
Mixing Bowl, Lid and Measuring Cup 64
Storage 64
Troubleshooting 64
Technical Data 64
Disposal 64
Meaning of the Symbol "Dustbin" 64
General Notes
Before operating this appliance, read the operating instructions carefully, and keep them on file, including the warranty receipt and, if possible, the box with the internal packing. If you pass the appliance on to a third party, please pass on the manual.
- Use the appliance privately and only for its intended purpose. This appliance is not intended for commercial use.
- Do not use the appliance outdoors. Keep it away from heat, direct sunlight, moisture (never dip it into any liquid), and sharp edges. Do not use the appliance with wet hands. Unplug the appliance if it is exposed to moisture or liquid.
- The appliance and the power cord must be regularly inspected for signs of damage. If damage is detected, the appliance may no longer be used.
- Use only original accessories.
- In the interest of child safety, do not leave any packaging components (plastic bags, cardboard, polystyrene, etc.) lying around.

WARNING:
Do not let little children play with foil. Danger of suffocation!
Special Safety Instructions for This Appliance
WARNING: Risk of injury!
- Prior to replacing accessories or attachments that are moved during operation, the appliance must be turned off and unplugged.
- Do not touch any moving parts.
- The knives in the mixing bowl and the meat grinder are sharp!
- Before switching on the appliance, make sure that the accessory attachment is mounted correctly and firmly seated.
- Always disconnect the appliance from the supply if it is left unattended and before assembling, disassembling or cleaning.
- This appliance shall not be used by children.
- Keep the appliance and its cord out of the reach of children.
Children shall not play with the appliance. - Appliances can be operated by persons with reduced physical, sensory, or mental capabilities or lack of experience and / or knowledge if they have been given supervision or instruction concerning the use of the appliance in a safe way and understood the hazards involved.
- Do not repair the appliance by yourself. Always contact an authorized technician. If the supply cord is damaged, it must be replaced by the manufacturer, its service agent or similarly qualified persons in order to avoid a hazard.
CAUTION:
Do not immerse the appliance into water for cleaning. Please follow the instructions as stipulated in the chapter "Cleaning".
- Do not manipulate any safety switches.
- Use this appliance only for the processing of food.
- The abuse for any other purposes may result in injury.
Intended Use
This appliance serves as
- kneading / mixing appliance for making dough, creams, cream, whipped egg whites;
- mixer for puréeing, beating, mixing;
- meat grinder for crushing of food. You can form a paste or dough with different attachments.
It is intended for the use in private households and similar applications.
It is only to be used as instructed in this user manual. The appliance is not intended for commercial use.
Use the appliance as either a kneading / mixing appliance or a mixer or meat grinder. Never use multiple functions simultaneously.
Any other use is considered improper and may result in material damage or even personal injury.
The manufacturer is not liable for damages caused by improper use.
Unpacking the Appliance
- Remove the appliance from the package.
- Remove all packaging material such as films, filler, cable holders and cardboard.
- Check the delivery contents for completeness.
- Should the package contents be incomplete or damages be found, do not take the appliance into operation. Take it immediately back to the dealer.
NOTE:
Dust or production residues can be located on the appliance. We recommend to clean the appliance as described under "Cleaning".
Overview of the Components / Scope of Delivery
Page 3
1 Cap of the lid (measuring cup)
2 Grip recess on lid
3 Lid
4 Unlock button
5 Mixing bowl
6 Safety cover for mixing engine
7 Swivel arm
8 Display
9 Operating buttons
10 Release button for lowering / raising the arm
11 Knob
12 Motor housing
13 Mixing bowl
14 Splash guard
15 Cover for meat grinder engine
16 Meat grinder with filling tray and danner
17 Whisk
18 Stirring hook
19 Dough hook
20 Protection shield
Page 4: Assembly of the Meat Grinder
21 Pusher
22 Filler tray
23 Worm housing filler neck
24 Spiral
25 Silicone coupling
26 Knife
27 3 sieves (fine, medium, coarse)
28 Locking ring
29 Dough divider
30 Sausage attachment
31 2-part attachment "Kebbe"
32 Biscuits attachment
33 Biscuits cutter form
34 3 pasta attachments (different pasta shapes)
Electrical Connection
Check whether the power supply that you want to use coincides with that of the appliance. The information can be found on the nameplate.
Functionality of the Appliance
Protective Features
- The appliance is equipped with safety switches.
The appliance can only be operated if the following is observed:
- The safety cover (6) is installed or
- The mixing vessel is attached to the base unit with the lid locked in place and
-
the swivel arm is locked in place in the lowest position.
-
The electronic speed regulation prohibits a motor drive overload automatically. The revolutions per minute are automatically regulated in the case of an overload.
Display
0000
Speed levels 01 to 10
00:00
Time (Timer)
Turning the Appliance On
- After you have connected the appliance to a power supply and all safety switches are closed, the display lights up. In case the appliance has not been used for approx. 5 minutes, the display turns off. The appliance remains in standby mode, however.
- Turn the rotary knob clockwise to select the desired speed level. The appliance starts to operate. If you do not turn off the appliance, it will turn itself off automatically after an operation time of 10 minutes.
Timer (Electronic)
With the buttons and + you can determine when the process should end.
Time maximum: 9 minutes and 59 seconds.
- Press the button once.
You can set the minutes with the buttons+/-.
- Press the button again.
You can set the seconds with the buttons+/-
- If you want to delete your time input again, press the buttons + and -simultaneously.
- When the appliance starts, the remaining time is displayed. The countdown runs.
Interrupt Process
- Turn the rotary knob anticlockwise until the display shows "0000". The timer is stopped.
- The timer continues to count down if the appliance is started again within 5 minutes.
Turning the Appliance Off
You can end every process ahead of time.
- Turn the rotary knob anticlockwise until the display shows "0000".
- Disconnect the mains plug from the socket.
The Kneading Machine
Installation and Operation of the Kneading Machine

CAUTION:
- Never press the release button (10), if you have placed the mixing bowl! The mixing bowl tilts.
- Never use the kneading machine with the mixing vessel attached!

NOTE:
A safety switch prevents operation without cover for the mixing engine.
Unless you have previously used the mixer or meat grinder, cover the drive shaft of the mixing engine and the spiral housing with the respective safety cover.
- Open the swivel arm: Press the release button (10). Move the arm by hand to the highest position.
- If you need the splash guard, attach it now to the swivel arm from below. Hold the splash guard (14) in such a way that the fill opening is positioned in front of you. On the bottom of the swivel arm, there are two recesses on the front and back. Insert the splash guard with its guide lugs into these recesses. Turn the splash guard towards LOCK to lock it.
-
If you want to use the dough hook (19) or mixing hook (18), first attach the hook splash guard (20). It will prevent the drive shaft from getting in contact with the dough. Hold the guard like a bowl. Insert the dough hook or the mixing hook from below through the recess of the guard and then lock it by turning it one quarter of a turn.
-
Attaching accessories:
On the top end of the accessories, there is a recess for the drive shaft and the splint. Slide the accessory over the drive shaft. Push down and at the same time turn the accessory anticlockwise in order for t shaft to lock into the accessory.
- Mixing bowl: Place the mixing bowl into its holder. Turn the bowl towards LOCK to its limit.
- Fill your ingredients into the mixing bowl.

NOTE:
If you knead heavy doughs, do not put all the ingredients at once into the mixing bowl. Start the kneading with flour, sugar and eggs. Add fluids slowly during the kneading.
- Press the release button (10) to lower the arm. You now need to press on the arm from above until it snaps into the lowest position.
- Plug the power cord into an approved mains socket.
- If you would like to work with the timer, set the operating time.
- Select a speed using the following table.
Table of Dough and Tools
| Doughs Tool Levels Quantity Max. Operating Time | ||||
| Heavy doughs (e.g. bread or short pastry) | Dough hook | 1-3 | max. 1.5kg | 3-4 minutes |
| Moderate doughs (e.g. cake mix) | Stirring hook | 3-4 | min. 0.5kg max. 3.5 kg | 2-4 minutes |
| Light doughs (e.g. waffle or crêpe batter, pudding) | Whisk | 4-5 | min. 500 ml max. 3.5 litre | 2-4 minutes |
| Cream | Whisk | 10 | min. 200 ml max. 1 litre | 3-5 minutes |
| Beaten egg whites | Whisk | 10 | 4-10 egg white | 3-5 minutes |

NOTE:
- Short-term operation: Operate the appliance with heavy doughs no longer than 4 minutes, and allow the appliance to cool down for 10 minutes.
- You can enter a pulse mode by pressing the P button. Press the button shortly, then release it again.
Interruption of Operation

WARNING: Risk of injury!
- Turn the rotary knob anticlockwise until the display shows "0000".
- Disconnect the power plug if you want to change the tool.
- Wait for the standstill of the tool!
- If you use the release button during operation (10) to pivot up the arm, a safety switch will shut off the motor.
Completion of Operation and Removal of the Bowl
- Turn the rotary knob anticlockwise until the display shows "0000". Disconnect the power plug.
- Press the release button (10), the arm raises.
- Remove the tool.
- Turn the mixing bowl briefly anticlockwise to remove it.
- The finished dough can be removed from the mixing bowl with the help of a dough scraper.
- Clean the parts used as described under "Cleaning".
Recipes
Cake Mix (Basic Recipe) Level 3-4
Ingredients:
250 g soft butter or margarine, 250 g sugar, 1 pack. Vanilla sugar or 1 sachet lemon flavour, a pinch of salt, 4 eggs, 500 g flour, 1 sachet baking soda, about 18 milk.
Preparation:
Add wheat flour with the remaining ingredients into the mixing bowl, stir with the stirring hook for 30 seconds at level 3, then 3 minutes at level 4. Apply a thin layer of grease to the baking tin or line it with baking paper, pour in the batter and bake it. Before removing the pastry from the oven, perform a readiness test: pierce with a pointed wooden stick in the center of the pastry. If no dough sticks to it, the cake is done. Overthrow the cake on a wire rack and let it cool.
Conventional Oven:
Loading height: 2
Heating: electric oven top and bottom heat 175 - 200°, gas oven: level 2 - 3
Baking time: 50-60 minutes
This recipe can be modified depending on your taste, e. g. with 100 g raisins, nuts, or grated chocolate. There are no limits to your imagination.
Flaxseed Bread Rolls Level 1 - 3
Ingredients:
500 - 550 g wheat flour, 50 g flaxseed, 12 of water, 1 cube of yeast (40 g), 100 g low-fat cheese, well drained, 1 teaspoon salt.
To glaze: 2 tablespoons water
Preparation:
Soak flaxseed in 18 lukewarm water. Fill the remaining lukewarm water ( 14 ) into the mixing bowl, crumble the yeast into it, add curd and mix well with the dough hook at level 1. The yeast should be completely dissolved. Add the flour with the soaked flaxseeds and salt to the mixing bowl. Knead at level 1, then switch to level 3 and knead for another 3 - minutes. Cover the dough, and let it rise in a warm place for 45 - 60 minutes. Knead the dough once again, remove it from the bowl and shape it into 16 rolls. Line a baking sheet with wet baking paper. Position the rolls on the sheet, let them rise for 15 minutes, sprinkle them with lukewarm water and bake them.
Conventional Oven:
Loading height: 2
Heating: electric oven: top and bottom heat 200 - 220 (5 minutes preheating), gas oven level 2 - 3
Baking time: 30-40 minutes
Chocolate Mousse Level 4-5
Ingredients:
200 ml whipping cream, 150 g semisweet chocolate couverture, 3 eggs, 50 - 60 g sugar, a pinch of salt, 1 sachet vanilla sugar, 1 tablespoon cognac or rum, chocolate leaves.
Preparation:
Whip the cream in the mixing bowl with a whisk to stiff peaks, remove it from the bowl and store it in a cool place. Melt the chocolate couverture according to package instructions, or in the microwave at 600W for 3 minutes. In the meantime, beat eggs, sugar, vanilla sugar, cognac or rum and salt in the mixing bowl with the whisk at level 4 until it is foamy. Add the melted chocolate couverture and stir it well at level 4 - 5. Set aside some of the whipped cream for garnishing. Add the remaining cream on the creamy mass and stir briefly by selecting the pulse function. Garnish with chocolate cream garnish and serve well chilled.
MeatGrinder
Application Notes for the Meat Grinding

WARNING:
The blade of the meat grinder (26) is sharp! Handle the knife of the meat grinder with the necessary care during assembly and cleaning. There is a risk of injury!
- Do not mince any hard objects, such as bones or shells.
- Cut the meat into 2.5cm pieces. Ensure that there are no bones or tendons in the meat.
- To shred the meat coarsely, use the disc with the largest holes.
- In a second step, select the disc with the finer or center holes. Depending on how finely you want to shred the meat.
- Before you start, lightly coat the sieves with vegetable fat.
- If you mince meat, place a container under the outlet.
- With the help of the "Kebbe" attachment (31) tubes of meat or dough can be formed.
- Use the meat grinder as pasta maker, prepare an area where you can lay out the pasta later.
Making Sausage
- You can use both natural and synthetic casings.
- If you have opted for a natural casing, soak this casing some time in water before using it.
- Tie a knot at one end of the casing.
- Slide the casing over the sausage attachment.
- Feed the sausage meat through the sausage attachment and fill the sausage casing.
- Make sure that the sausage meat is "loosely" stuffed into the casing as the sausage expands in volume during cooking or frying and may cause the casing to burst open.
- When the first sausage reaches the desired length, squeeze the sausage at the end of the sausage attachment together with your fingers.
- Turn the sausage once or twice around its own axis.
- Until you have established some exercise routine, you can turn off the appliance after each sausage length.
Shaping Biscuits
- Prepare a surface on which you can lay the cookies afterwards.
- With the cookie cutter form (33) you can create different cookie shapes.
- After having mounted the spiral housing with the cookie attachment (32) onto the appliance, slide the cookie cutter form into the cookie attachment.
- Select the desired cookie form.
- Hold the dough strand in your hand at the opening and cut off the desired length.
Preparation
Please refer to our overviews on page 3 and 4.
- Assemble the bowl without tools.
- Cover the drive shaft of the mixing drive with the safety cover (6).
- The access to the worm housing is protected by a cover (15) on the appliance. To remove the cover, push it up.
-
Push the silicone coupling (25) onto the worm shaft (24).
-
Set the worm, sprocket first, into the horizontal section of the worm housing.
Assembly of the accessories is described by the following sections. Prepare the mincer according to your requirements.
Assembling the Mincer (See Fig. A)

NOTE:
Depending on how fine you want to mince, select a finer or a courser mincing plate.
Lightly coat the mincing plate beforehand with vegetable oil.
Proceed as described under "Preparation".
- Set the knife (26) onto the shaft of the worm with the sharp side facing outwards.
- Select a mincing plate (27). Use the recesses on the plate to insert it into the worm housing.
More details can be found under "Attach Preassembled Worm Housing".
Assembling the Sausage Attachment (See Fig. B)
Proceed as described under "Preparation".
- First, set the dough divider (29) onto the shaft of the worm. To do so, use the recesses on the dough divider.
- Set the sausage attachment (30) onto the dough divider. To do so, use the recesses on the sausage attachment.
More details can be found under "Attach Preassembled Worm Housing".
Assembling the Attachment for Oriental Dough Pouches (See Fig. C)

NOTE:
Use the attachment for oriental dough pouches to form pouches from meat or dough paste.
Proceed as described under "Preparation".
- Place the 2 part attachment for oriental dough pouches (31) onto the shaft of the worm. Use the recesses to do so.
- More details can be found under "Attach Preassembled Worm Housing".
Assembling the Cookie Maker (See Fig. D)
Proceed as described under "Preparation".
- First place the dough divider (29) onto the shaft of the worm. Use the recesses on the dough divider.
- Place the cookie maker (32) onto the dough divider. Use the recesses on the cookie maker.
More details can be found under "Attach Preassembled Worm Housing".
Assembly of the Pasta Attachments (See Fig. E)
NOTE:
If the pasta dough is very sticky, lubricate the worm with a few drops of cooking oil.
Proceed as described under "Preparation".
- Select a pasta attachment (34).
- Place the attachment on the axis of the spiral. Pay attention to the recesses on the pasta attachment.
More details can be found under "Attach Preassembled Worm Housing".
Attach Preassembled Worm Housing
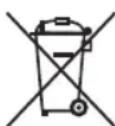
- Screw the locking ring (28) clockwise onto the spiral housing.
- Attach the pre-assembled worm housing to the appliance. Position the worm housing with the arrow () aligned with () on the appliance. Turn to the upright position. The arrow on the worm housing must be opposite the arrow on the appliance. (Refer to the figure.)

CAUTION:
If you open and close the ring nut again after attaching it, hold the worm housing securely with one hand on the filler neck (23), otherwise the worm housing may accidentally come loose.
- Position the filler tray (22) so that the bed of the tray lies above the arm (7).
Operation of the Meat Grinder

WARNING: Risk of injury!
- Once you turn on the appliance, the drive shaft of the kneading machine starts rotating. Do not reach into the rotating drive shaft during operation!
Always mount the bowl for your safety.
Always use the supplied pusher. Never put fingers or tools into the filler neck!

CAUTION:
Never use the meat grinder with attached bowl! Cover the drive shaft of the mixing drive with the safety cover (6).
- Put the pieces of meat (meat paste / sausage mass or dough) on the filling tray and into the filler neck.
- Plug the power cord into a properly installed earthed socket.
- You can select a speed from level 4 to 8.
- Stuff, if necessary, the meat respectively the dough with the stuffer (21).
NOTE:
Short-term operation: Operate the appliance with the meat grinder no longer than 10 minutes and allow the appliance to cool down for 10 minutes.
Complete Operation
- Tum the rotary knob anticlockwise until the display shows
- Disconnect the power plug.
- Disassemble all parts of the meat grinder.
- Clean the parts used as described under "Cleaning".
- Cover the uptake for the spiral housing with the cover (15).
The Mixer
Application Instruction for the Mixer

WARNING: Risk of injury!
- The knife in the mixer is sharp! Handle the blades of the mixer with the necessary care, especially when emptying and cleaning the mixing bowl!
- Once you turn on the appliance, the drive shaft of the kneading machine starts rotating. Do not reach into the rotating drive shaft during operation!
Always mount the bowl for your safety.

CAUTION:
- Never press the release button (10), if you have placed the mixing bowl! The mixing bowl tilts.
- Do not operate the mixer without food!
- The glass could crack at high temperatures! Do not fill in liquids over 60^ .
- Do not overfill the mixing bowl! Fill in a maximum of 1500ml (fruit and liquid).
- Foam takes a lot of volume. Reduce the capacity for liquids that foam vigorously.
- Cut the food into small pieces before operating the appliance.
- Do not fill any hard ingredients such as nuts or coffee beans into the mixing bowl.
- Objects like spoons or scrapers never may be in the mixing vessel during operation.
NOTE:
The knives in the mixing vessel are also suited to crush small amounts of pure ice. Remember, however, that the operation may blunt the knife.
Recommendation:
If you want to prepare drinks with crushed ice, add the ice cubes during mixing. The ice is crushed during mixing.
Place the mixing bowl on a stable level surface when filling it. So you can better place the cover afterwards.
Preparation
Please refer to our overviews on page 3 and 4.
- Assemble the bowl without tools.
- Cover the uptake for the spiral housing with the cover (15).
- Fill in the crushed ingredients into the mixing bowl.
- Press the lid firmly onto the mixing vessel. It has to snap in audiably.
- Press the lid firmly on the mixing bowl. Set the cap into the filling opening and tighten it by turning it anticlockwise.
Operation of the Mixer
- Make sure that the arm is lowered and locked.
- Remove the safety cover (6) from the shaft drive of the mixer motor. Press and slide the grooved surface simultaneously.
- Place the mixing bowl on the drive shaft of the mixing engine. Set the mixing jug with the arrow over the dot of the base unit. Turn the mixing jug clockwise up to the stop. The two arrows and must be one above the other.
- Plug the power cord into an approved mains outlet.
- Select a speed level.
NOTE:
- Short-term operation: Operate the appliance no longer than 2 minutes when mixing. Allow it to cool down for 1 minute before using it again.
- To refill ingredients, turn off the appliance. Remove the lock by turning it clockwise and pulling it up. Continue operation only with the refill opening closed.
Complete Operation
- Turn the rotary knob anticlockwise until the display shows "0000".
- Disconnect the power plug.
- Remove the mixing bowl.
- Lift the lid before pouring out the contents. Place a finger in the grip recess on the lid (2). Press the unlock button (4) down and at the same time pull the lid up.
- Clean the parts used as described under "Cleaning".
- Cover the drive shaft of the mixing engine with the safety cover.

IMPORTANT NOTE:
Never keep citrus juices or acidic foods in metal bowls.
Cleaning

WARNING:
- Always disconnect the power plug before cleaning.
- Never immerse the appliance in water for cleaning. It could cause an electric shock or fire.
- The knives in the mixing bowl and the meat grinder are sharp! There is a risk of injury! Proceed carefully when disassembling, cleaning and assembling the individual parts.

CAUTION:
- Do not use wire brushes or other abrasive objects.
- Do not use any sharp or abrasive cleaning agents.
Motor Housing
For cleaning of the housing, only use a damp cloth and mild detergents.
Accessories of the Kneading Machine and the Meat Grinding

CAUTION:
The components are not suitable for cleaning in the dishwasher. Under the influence of heat and strong detergents, they could deform or discolour.
- Components that have come into contact with food, can be cleaned in soapy water.
- Allow the parts to dry thoroughly before assembling the appliance again.
Mixing Bowl, Lid and Measuring Cup

NOTE: Vorreinigung
Fill the mixing bowl halfway with water and turn on the appliance for about 10 seconds. Empty out the liquid afterwards.
- For proper cleaning, remove the mixing bowl.
- Clean these parts in a bowl of hot water. Then dry everything before assembling the parts again.
Storage
- Clean the appliance as described. Let the accessories dry completely.
- We recommend that you keep the appliance in the original packaging, if you do not want to use it for a longer period.
Always store the appliance out of reach of children in a well ventilated, dry place.
Troubleshooting
| Problem Possible cause Solution | ||
| The appliance is not working. | The appliance has no power supply. | Check the mains connection. |
| Your appliance is equipped with safety switches. They prevent accidental starting of the motor. | Check correct position of - the swivel arm (7) - the mixing vessel (5) and - the lid on the mixing vessel or - the safety cover (6) | |
| The appliance is defect. | Consult our service department or an expert. | |
Technical Data
Model: KM 1395 CB
Power supply: 220-240V\~,50Hz
Power consumption: 1200 W
Protection class: II
Net weight: approx. 5,3kg
The right to make technical and design modifications in the course of continuous product development remains reserved.
This appliance has been tested according to all relevant current CE guidelines, such as electromagnetic compatibility and low voltage directives, and has been constructed in accordance with the latest safety regulations.
Disposal
Meaning of the Symbol "Dustbin"
Protect our environment; electrical appliances do not belong in household waste.
Use the collection points for the disposal of electrical equipment and submit your electrical and electronic equipment to these points that you will no longer use.
You help reduce the potential impact of incorrect disposal on the environment and human health.
You contribute to recycling, and other forms of recycling of electrical and electronic equipment.
Information concerning the disposal of appliances can be obtained from your local or municipal authorities.
Instrukcja obslugi
Netto to meg: .5,3kg
UcTaHOBKa n3KcPJIyataaTnTeCTomeaJANK. 89
Ta6nua TINOB TcTa NINCOJb3yEmbIX HacaDOK. 90
IpepbBaHne pa6oTbI c yctpoiCTBOM. 90
3aBepseHne pa6oTbI c yctpoiCTBOM
n CHrTne Yauu dIy CMeUINBaHn. 90
Peuentbl 90
Mycopy6ka. 91
3aMeuHnno nCNoBbOBAHmO mAcopy6kn. 91
Iodrotobka 92
C60ka mrcopy6kn (cm. pnc. A) 92
C60pKa HacaKn IJy KOnbAcOc (cm. pnc. B) 92
C60pKa HacaKn DnKneok (cm. pnc. C) 92
C60pKa HacaKn DnI neeHbY (CM.pnc.D) 92
C6opka Hacaikn IpnIPOTOBHeHnnaCTbI (cm.pnc.E) 92
UcTaHObKa co6paHnHO KOKxHa YepBryHoI nepeaun..92
Pa6ota c mrcopy6koi 93
3aBepueHne pa6oTbI 93
Mikcep. 93
INHCTpykunno npo pImHeHnIO MKKepa. 93
IodroTobka 93
Pa6ota c MmKcepom 94
3aBepueHne pa60TbI 94
OuncTka. 94
KopnycDbiratela 94
PnHaIeXHocT N TeCTomeaIKN I Mrcopy6Kn 94
Yama dansmeunbaHnKpbuKa n MepHbI cTakah....95
XpaHHeHne 95
Peuene npo6nem 95
Texnueckne daHHbIe 95
06aHΦopMaun
Ipepepa60ToC yctpoiCTBOM BHNMaTeNbHO npOHTnPe pyKOBODCTBO nO 3KcNlPyatauM, coXpaHITe erO BMecTe C rapaHTmHBIM TaIOHOM u, ecnB03MOxHc, cyNaKOBko. Pnppepaue yctpoiCTBa dpym Nuaam, pnpIoKHTe K Hemy pyKOBODCTBO nO 3KcNlPyatauM.
- IcnoJb3yIte yctpoiCTBO 6epeXHO nToIbKO nIaIeBoro Ha3HaueHn. YcTPOCTBO He npedHa3HaueHo dN KOMMepueckOro IcNoJIb30BaHn.
He nCnoB3yIte yCTpoiCTBO BHE NOMEUENH. 3aunuatae erO OT BO3dEInCTBnTENla, npMoro COJIneHOro CBeta, BnaXHoCTn (3anpeuaetcN IORpykaTb B XnDKoCTb) IN OCTpbIX pPeIMTeOB. He noB3yIteCb yCTpoiCTBOM, ecn y Bac BlaKhbIe pyKn. Ecn yCTpoiCTBO NOdBeprIOcb BO3deINCTBnIO XnDKoCTn, OTKJIOHTe erO OT CETn. - UcTpoIcTBO nUHyp nITaHnIe CNeIyET perYIpaHIO npOBePbHa hAHLINue NOBpeXJeHn.Ipn ObHApUKeHnIOBpeXJeHn, 3aNpeUaETCa B DaIbHeM IcNoIb3oBaTb yCTpoIcTBO.
-ПОЛьзуITEcBTOЛьКООРИНHAньHbIMNпрИнадпeхнOCTЯМN.
BueX oecneuhen 6e3onacnoctn He octabnTe BOKpy ynaKOBOCHbI MaepnAbI (PiactNKOBbln NaKeTbI, KapToH, nONCTpOnn T.I.) eCN B NOMEUeHHe IMeHT DoCTyn Detn.

IPEyIpyEKeHHeHc:
He no3BOJnIe TeTmIrpaTb c nOIN3TuIneHOBOI nIeHKO. OnachocTb ydyueHnIa
CneuaNbHbIe yka3aHnI NO 6e3OpaCHOCTN IJRA 3TORO yCTpOiCTBa

Tabnua TnOB TeTa NcNoJIb3yeMbIX HacaDOK
HnKOrda He XpaHNTe COKIN LITpyCOBbIX INN KNCbIe NIIeBbIe PNOyKTbIB METaJIINHECKNX EMKOCTX.
Ounstka
I PENEYPEXKDEHNE:
Bcerda otKJIouaIte cTeBOI wTeNCeIb nepeI ouNCTKOJ.
He onyckaIte yctpoiCTBO B BODy IJIa OUHCTKN. 3TO MOxET Bbl-3BaTb NopaxeHne 3JIeKTPnueCKM TOKOM IJIIN NOXap.
B yaahe dIy cmeunBaHnI Mrcopy6ke haxoJrTcOCTpbie Hox! OnaChocb nolUyeHn TpaBMbl! Pa36opky, ouNCTky n c60pky OTdJIbHbIX y3IOB BblIOJHnIte C BHImaHnecTbIO.
BHIMAHNE:
He nIcIb3yIte MeTaJIHueCKeIe IeTKn IIN dpyrIe abpa3nBhIe IpeDMtbl.
- He pRIMeHraTe eKne nn a6pa3nBhIe YnCTaUne cpeiCTBa.
Kopnyc DvuraTeia
IIO ONUCTKIN KOPNyCA NCOJb3yTe TOJIbKO MRAKyo TKaHb IN ⅡAADUUE YNCTRNE BEECTBa.
PpnaadJeXHOCT TeCTOMEaIK N Mscopy6Kn
BHIMAHNE:
PnHaIeXHOctn HeNb3MbITb B NocyDOMoeUHO MaUNHe.
PiDeICTBnEM BbICOKoTtempeatpyb IIN CNbHOeI- CTByOuNX YNCTraux CpeCTB OHN MOY TdeOpMnpoBAtbcr IIN ObecuBetNTbcr.
- Yactn yctpoicBa, cOpnKacabHneC C NIIeBbIMnpoDyKTAMMOKHO OCHUaTb BMbIbHOI BOE.
-ДаTe pInHaIeNEXHOCTM NOIHOCTbIO BbICOXHyTb NepeTe TEM, KAK co6upaTb yCTPOICTBO.
Ya7a dIy cMeunBaHn, KpbIuKa n MepHyI CTaKaH
IINPIMEUYAHN:IpeBapntenbnaHuaCTka
3aONHnTe yAuy DnT CMeuBnHaN HAnoBHy BDoi n BkHOnTe yCTpoCTBO npMepHo Ha 10 cekyH. BbIeTe KIKOCTb N3 aWn DnT CMeuBaHn.
-ⅡTtIaTeJIbHOOCHCTKNaUyIINcMeUNBaHnHEo6XoDMO CHrTb.
- MoIte 3tN DeTAN B EMKoCTN C TROPue BOIOI. Pocne 3TOrO BbCyWIne IN N CO6epNTe yCTPOIcTB OHOBA.
XpaHeHne
OHTTEyCTPOINCTBO B COOTBETCTBUN C INHCTpyKUJAMN. TaTe npHaIeXHOCTM NIOHOCTbO BBICOXYTb.
- EcIN Bbl XOTNTe IPODnITb CpOK CnyKbI yCTpoiCTBa, peKOMeHdyETcXpaHTb erO BOpRHaJIbHOyNAKOBe.
Bcerda xpaHNTe yctpoINCTBO HHeIOCTyINOM dIaTei, XopoOIO npOBETpNBaEMOM N CYXOM MecTe.
PeueHne npo6Jem
"abill" p03 1260 g0s05 a0ailll jglll 1 1 ab5
.1111111111111111111111111111
:ololo abo-
1.111 1
1
Ag3jaoaal 3 jaoai goo
.(15) 2
-
① 2x + 5y = 4 x + 3y = - 1 .
-
.Bolsg 3
ab 1000000000000000000000000000000000000000000
.
JcIaQyAogzaiqaldoa dcIeBglgJiaolpluuiyaiqaiao15
aclalw wlae aee ygdo
y
- a1b1 = a2b2·s anbn 且
gao zai jia jil 1200000000000000000000000000000000000000000
a.aa b.8g 34
paalalalalalalalalalalalalalalalalalalalalalal
olal 3 bll o1y ggyg yg 3 aegg
gagwll 15 gSg jj jrgnJg
jai jai
Jao 100
asfullgiossldb.
#
y
#
.
. 1
paa!aLo! aGoo b. a. ooo ooo oo
aJ 1
wlll gellal, blll ceg
:
a.b.c.11 Llo :aloo
jlll g jg 10 jgo jgal Joo a btttaa
山
.
Iaagahall oiae eae aoe aegghell ao
S_ OBC = 12 · CO · BC = 12 × CD × 5
#
Lolc 1
aagbclalalwai waiy 1 y 1 aaii gai bao
yjgjj j 10 k jk jkljgl jgl jgl jgl j
ab + 12 = 10
, aboB 50 60 60
00b1
a 1
aai aag jaoi aoL oao
4
cbblg b jyj yco jcbll aalc 1a bcll ae
- i 1.
.
jagglgaoa ooljbslae aljz
:
joe jololl gajdl sgaac aeby p!Sy oleg go 10d ao jao paas
(6) | b( x) - a^2( x) | = | b^2 + a^2|
10 100
.
1.12
8.4 (5) 100 100 100 100 100 100 100 100 100 100 100 100 100 100 100 100 100
.(21) gaooll 1ol plaoowu jaoonggaoo waiy aai 13.14
4a = 5a
juy y jaii aoi ao jao pluizuiy jiaoll Jauo 3: aoua oui
10 8 jglg 10
JouSJI Joz
aulll yjx jaoeell wylas oolul uus
0000
aBbBwBwBwBwB
aouu auaa 10
"abii" pW 3 pOg ge loa oiai jIqoi Ijki A
.5
bok
Jolal alalal
aoluyl jubj:
A
yblbgo bsloll 1g o Jolal 1slo sbol 3gogbl
Ibalalolag uabtsg jaiw wulag ayjll
gill gaaal y. jglgul 3 jglgull aay jglpall
1
4
#
100
.
y1 = - 43x1 + 2,y2 = 43x2 + 4
yj jll jll jll aai paa ydlal all joll qai
a1 = 2,a2 = 3,a_3 = 4
aI11)J 1500 oJoo aai Jllal bai all cag aai y
.()g
Jgogj gill 1gul aae joo dooln jao 50g jy
b > 0
jglal jai jao gao jplalal gao
ab = 3a
JJJ Jallbll jIg 0xg Cgssg aas bllal oeg
1
:
ailll Cllsso aolil gylbl lalwly bglr joln
Jalll aLus JdIgdl
Jalll gog cki go aaii iginag abi gla bll alg
.
(CJJIJIJI)JUJIJIJIJIJIJIJIJIJIJIJIJIJIJIJIJIJIJIJIJIJIJIJIJIJIJIJIJIJIJIJIJIJIJIJIJIJIJIJIJIJIJIJIJIJIJIJIJIJIJIJIJIJIJIJIJIJIJIJIJIJIJIJIJIJIJIJIJIJIJIJIJIJIJIJIJIJIJIJIJIJIJIJIJIJIJIJIJIJIJIJIJIJIJIJIJIJIJIJIJIJ
:
aal 1 aal uauu uauu uauu uauu uauu uauu
"StsyyI" Jgsic 100
.00000000000000000000000000000000000000
gdlgl 1 glll 1 1 1 1 1 1 1 1 1 1 1 1 1 1 1 1 1 1 1
"Laas Lsjg
(EJJIJIJI) ajiJSAJI JIJIa
:da
j j 1000000000000000000000000000000000000000000
.ql2n
"blssy" jgsic 1jcb jglil
(34) = ( x,y) , = ( x,y - 1)
gda dagglal jlaol gjyall gaaill gga 7
.
glll glll cccccc 1000000000000000000000000000000000000000
S_ AOB = 12 · OB · AB = 12 × 4t
L 1
jglllgssll 3dell lalacolul (28) gyll algoIbJ.8
Lg 9. o
gjy jy ggsa Jzai aJzSb1 90 ga jgill
a 1000
(USU
:
jll Caa 13, bajl 20 g jol aal algal all cttg
.0g 23
.(7)gjglgjglg22)d0.10
0001 42
iayoyl jokj:jiok
#
jglll gaa jolly. jlgll jgwl glw lglal
- a : a b a : b : c a : c : b
L
Sjglcogslgclgclgwl JwJ.ogglplalglg 00
Laeell gie lds
sill
aclioagaaedzilalol
15 15
. colIDow
yolai ygi si oia
glll jaaa 101 ggs xell
gaii 10xie gilg jia Jao jao jao jao jao jao
gai jie gai jie jie jie jie jie jie jie jie jie jie jie jie jie jie jie jie jie jie jie jie jie jie jie jie jie jie jie jie jie jie jie jie jie jie jie jie jie jie jie
a#g jll gai j Sg glal g
aaii 1
gll pall ag g aal lol d ooy jill pall aoai aon
aill jssssll syyj pjj 8z
"Shuoyi" Ugs Coo jiu gai de gai
(20 1
1000 12000000000000000000000000000000000000000
golll jolll wll lccu w s jnn no ja uolalil ju u jao gl gall elis
1
(BJJJI) jaiy Jauy aaiy aaiy 0y
"Shuill" 15
1011111111111111 29) jssll sssu 6
joc011 5joc030
puiu piai: jaoj (30) gaiia aolai aaii 1
aaiy aaiy aaiy aiy
gduu uuuu uuuu uuuu uuuu uuuu uuuu uuuu uuuu uuuu uuuu uuuu uuuu uuuu uuuu uuuu uuuu uuuu uuuu uuuu uuuu uuuu uuuu uuuu uuuu uuuu uuuu uuuu uuuu uuuu uuuu uuuu uuuu uuuu uuu
1
3-1 gg
:U561
800 1 8/3 jj j j j j j j j j j 50 50 50 50 50 50 50 50 50 50
j0a aaleo lalee oovd 100.(40)
slo oJxS afo 2: gatoiU
1,2,3\
(14/1)11 11 11 11 11 11 11 11 11 11 11 11 11 11 11 11 11 11 11 11 11 11 11 11 11 11 11 11 11 11 11 11 11 11 0000000000000000000000000000000000000000000000000000000000000000000000000000000
15
:
2:JUaJglgJll
a100g 8g0g0g0g0g0g0g0g0g0g0g0g0g0g0g0g0g0g0g0g0g0g0g0g0g0g0g0g0g0g0g0g0g0g0g0g0g0g0g0g0g0g0g0g0g0
j(5)5 2020-200
3-2|e|u|y|j|a|
40-30
5-4g#u#1 dySg#uWg0
:UgSb
Jb,60-503jy11a 150.8g200
aill 1
:
aegll jao gillj ly po aolwio 0aiae phuwo boll oog aq sll
aagaaagaaagaaagaaagaaagaaagaaagaaagaaagaaagaaagaaagaaagaaagaaagaaagaaagaaagaaagaaagaaagaaagaaagaaagaaagaaagaaagaaagaaagaaagaaagaaagaaagaaagaaagaaagaaagaaagaaagaaagaaagaaagaaagaaagaaagaaagaaagaaagaaagaaagaaa
.5-4 aol alal alalalal alalal alal alal alal alal alal alal alal alal
aSsOla aSla la aol aagaa
05yIgOggySgAa 1gJyIa2bgjLzI JyIeYIg
aai 10
paui 1o jao puiuaiui ciia
:
#
10 26) a o j o j
olol 100gag g, aolal Jalol jcbl 5
aale psojoo
Gggl gooool
(aawlll aaggl) uug aall
:
250 250
8/1
: 1.5cy_1
a 10000000000000000000000000000000000000000000000000000000000000000000000000
3y 4y
aai jai
2 :j
120 < x < 160
y ydclldg jglge g jglal Jn 3:00a 0
10 6j 4 j
aaij jilde baiol. Pjj lalbail jail aag jiai d
45
Jusulil abllo
:
#
aLlal a 1000
.051y 3 1
1010000000000000
zlaq gaaa 10)
a1 = 20,an + 1 = an + an + 1
aeglljgljg jao
aLall jao acll ylae 5y ool sae jgll qai
aI 0000
10 2
S OBC = S COD + S_ BOC
ailll ylls ool s 0d aol jy jai jai jai jai jai jai
"abii" J 3 0061 10000000000000000000000000000000
.
·s · p^ B J S
.
gglllggy
1
1
2
3
4
a 1
pduowdy
jglll llo paaai a
gazd jall oag. dallg, caglg nqalld yaoaal bao / jao aylos 1bllg qzalll g wll b35 1pdaasly jlaeall g abgsdl jkssd. ajjell alg gaw poa ayos 2elizco 10
allog adjzbl cdoanwyl g bao jgal plu
g jgal ploaiy y .plaiiwl Jld g ale yogai gs lo s jgal pluoiy g
ayjolil jolr
sllg pracn s,pal aiaa gblbla gblbla aysla/ jae iS la! jgal plau
.10g Cg 3 ssio
g lgal jracl glls y y y y y jgal paoy y
A
cagglgglgall gaaal joll aal
Lg
- 103
- 102
- 101
101
101
101
101 - 101 (35) Timer
101
1,2,3
101
101
400 1000000000000000000000000000000000000000000
100
900 25 all 25 gl .
100 111g 12211 13211 14211 15211 16211 17211 18211 19211 20211 2121
99 1 - 5uoy
jI 1J J aol jaoLwJ
!dloyj:


- WAARSCHUWING: Verwondingsgevaar!
- Attacchi accessory:
- Symbols in this Instruction Manual
- WARNING:
- CAUTION:
- Contents
- General Notes
- Special Safety Instructions for This Appliance
- WARNING: Risk of injury!
- Intended Use
- Unpacking the Appliance
- NOTE:
- Overview of the Components / Scope of Delivery
- Page 3
- Page 4: Assembly of the Meat Grinder
- Electrical Connection
- Functionality of the Appliance
- Protective Features
- Display
- Turning the Appliance On
- Timer (Electronic)
- Interrupt Process
- Turning the Appliance Off
- The Kneading Machine
- Installation and Operation of the Kneading Machine
- Interruption of Operation
- Completion of Operation and Removal of the Bowl
- Recipes
- Cake Mix (Basic Recipe) Level 3-4
- Ingredients:
- Preparation:
- Conventional Oven:
- Flaxseed Bread Rolls Level 1 - 3
- Chocolate Mousse Level 4-5
- MeatGrinder
- Application Notes for the Meat Grinding
- Making Sausage
- Shaping Biscuits
- Preparation
- Assembling the Mincer (See Fig. A)
- Assembling the Sausage Attachment (See Fig. B)
- Assembling the Attachment for Oriental Dough Pouches (See Fig. C)
- Assembling the Cookie Maker (See Fig. D)
- Assembly of the Pasta Attachments (See Fig. E)
- Attach Preassembled Worm Housing
- Operation of the Meat Grinder
- Complete Operation
- The Mixer
- Application Instruction for the Mixer
- Recommendation:
- Operation of the Mixer
- Cleaning
- Motor Housing
- Accessories of the Kneading Machine and the Meat Grinding
- Mixing Bowl, Lid and Measuring Cup
- NOTE: Vorreinigung
- Storage
- Troubleshooting
- Technical Data
- Disposal
- Meaning of the Symbol "Dustbin"
- Instrukcja obslugi
- 06aHΦopMaun
- IPEyIpyEKeHHeHc:
- CneuaNbHbIe yka3aHnI NO 6e3OpaCHOCTN IJRA 3TORO yCTpOiCTBa
- Ounstka
- I PENEYPEXKDEHNE:
- BHIMAHNE:
- Kopnyc DvuraTeia
- PpnaadJeXHOCT TeCTOMEaIK N Mscopy6Kn
- IINPIMEUYAHN:IpeBapntenbnaHuaCTka
- XpaHeHne
- :ololo abo-
- 1
- .
- y
- #
- :
- a.b.c.11 Llo :aloo
- 00b1
- aai aag jaoi aoL oao
- 4
- 4a = 5a
- bok
- aoluyl jubj:
- A
- ab = 3a
- :da
- iayoyl jokj:jiok
- sill
- (BJJJI) jaiy Jauy aaiy aaiy 0y
- 3-1 gg
- :U561
- 1,2,3\
- :
- 5-4g#u#1 dySg#uWg0
- :UgSb
- aai 10
- paui 1o jao puiuaiui ciia
- (aawlll aaggl) uug aall
- < x < 160
- Jusulil abllo
- aeglljgljg jao
- gglllggy
- pduowdy
- Lg
- jI 1J J aol jaoLwJ
Brand : BOMANN
Model : KM 1395 CB
Category : Food Processor