
TYWK42PR4W - Wall mount PANASONIC - Free user manual and instructions
Find the device manual for free TYWK42PR4W PANASONIC in PDF.
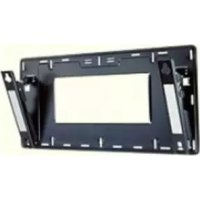


| Product Type | Swiveling wall mount for plasma TV |
| Brand | Panasonic |
| Model | TYWK42PR4W |
| Dimensions (mount only) | Approx. 700 x 400 x 60 mm (W x H x D) |
| Mount weight | Approx. 10 kg |
| Tilt angle | 0° to 20° (adjustable in 5° increments) |
| Material | Robust steel (estimate) |
| Compatibility | Panasonic plasma TVs (specific models, see manual) |
| Wall mounting | Minimum 6 screws (nominal diameter 6 mm) on solid vertical wall |
| Distance from wall | Minimum 10 cm clearance around the TV |
| Maximum supported weight | Consult TV manual (estimate: up to 50 kg) |
| Package contents | Mounting plate (1), insulating spacers (4), fan washers (4), hex key (1), fixing screws (2 M5x35), hex socket screws (4 M8x60, 4 M8x32) |
| Installation | Must be performed by a qualified technician |
| Safety | Do not block ventilation openings; avoid heat, humidity, dust; do not mount on non-vertical surface |
| Care and cleaning | Soft dry cloth; mild detergent if needed; avoid solvents, thinners, wax |
| Warranty | Standard Panasonic (see conditions) |
| Repairability | Spare parts available from manufacturer; installation/removal by professional recommended |
Frequently Asked Questions - TYWK42PR4W PANASONIC
User questions about TYWK42PR4W PANASONIC
0 question about this device. Answer the ones you know or ask your own.
Ask a new question about this device
Download the instructions for your Wall mount in PDF format for free! Find your manual TYWK42PR4W - PANASONIC and take your electronic device back in hand. On this page are published all the documents necessary for the use of your device. TYWK42PR4W by PANASONIC.
USER MANUAL TYWK42PR4W PANASONIC
Ensure that the installation location is strong enough to support long-term use.
- If its strength becomes insufficient over the course of long-term use, the plasma TV may drop, possibly causing injury.
Fitting work and connection equipment expansion should never be done by any other than a qualified installation specialist.
- Incorrect fitting may cause equipment to fall, resulting in injury.
Include a safety factor when considering the strength of the proposed fitting location.
- If strength is not sufficient the equipment may fall, resulting in injury.
Do not fit at a location that cannot bear the load.
- If the fitting location lacks sufficient strength the equipment may fall.
Do not disassemble or modify the wall-hanging bracket.
- Otherwise the unit may be dropped and become damaged, and personal injury may result.
CAUTION
Do not use any television and displays other than those given in the catalogue.
- Otherwise the unit may be dropped and become damaged, and personal injury may result.
Do not fit at any locations subject to humidity, dust, smoke, steam or heat.
- This may have an adverse effect on the plasma TV and cause fire or electric shock.
The work of fitting or removing the plasma TV must be performed by at least two people.
The plasma TV may fall and cause injury.
Do not fit facing upwards, sideways or upside down.
- This may cause heat to build up inside the plasma TV unit, resulting in a fire.
Provide spacing around the plasma TV of at least 10 cm to the top, the side and the bottom, leave a clearance between the rear panel and the wall.
- The plasma TV unit has air blow holes on the top, and air suction holes on the bottom and rear. Covering these may result in a fire.
Install the plasma TV by taking only the steps which are specified in these instructions: Do not install it in any other way.
- Otherwise the unit may be dropped and become damaged, and personal injury may result.
Install the mounting screws and power cable in such a way that they will not make contact with the inside parts of the wall.
- Electric shocks may result from contact with any metal objects inside the wall.
For installation, use the special-purpose constituent parts.
- Otherwise, the plasma TV may fall off the wall, possibly causing injury.
Remove the product that will not be used any longer.
- Otherwise the product may fall down and personal injury may result.
Requests regarding handling
1) Exercise care when selecting the location for the TV because it may discolor or deform due to light or heat if it is placed where it is exposed to direct sunlight, or near a heater. 2) For cleaning, wipe the display using a soft dry cloth (made of cotton or flannel). If the unit is particularly dirty, clean it using a cloth soaked with water to which a small amount of neutral detergent has been added, and then wipe with a dry cloth. Do not use products such as solvents, thinner or household wax for cleaning, as they can damage the surface coating. (If using a chemically-treated cloth, follow the instructions supplied with the cloth.) 3) Do not affix adhesive tape or stickers to the product. Doing so may dirty the surface of the wall-hanging bracket. Do not allow long-term contact with rubber, vinyl products or the like. (Doing so will cause deterioration.) 4) Take care during installation as shocks can cause 'panel cracks' to the plasma television unit.
Caution:
This bracket is intended for only Panasonic plasma TV models (See page 46-50).
Use with other apparatus is capable of resulting in instability causing possible injury.
PROFESSIONAL INSTALLATION IS REQUIRED.
PANASONIC DISCLAIMS ANY PROPERTY DAMAGE AND/OR SERIOUS INJURY, INCLUDING DEATH
RESULTING FROM IMPROPER INSTALLATION OR INCORRECT HANDLING.
TY-WK42PR4W Wall-hanging bracket (Adjustable angle type)
| A Wal-hanging bracket (1) | D Allen wrench (included tool) (1) | |
| E Unit fastening screws (2) M5x35 | ||
| B Insulation spacers (4) | C Dished toothed washers (4) | F Allen head countersunk screws (4) M8x60 |
| G Allen head countersunk screws (4) M8x32 | ||
Precautions for wall-hanging bracket fitting
Installation and removal work must be carried out only by a qualified technician. If the unit is installed or removed improperly, the display may fall down and personal injury may result. The wall-hanging bracket is for use in attaching a plasma TV unit to a vertical wall for viewing. Do not fit to any surface other than a vertical wall. To ensure correct plasma TV performance and prevent trouble, do not fit at any of the following locations.
Near sprinklers or fire/smoke detectors - Where there is a risk of exposure to vibration or impact - Near high-voltage wires or dynamic power supplies - Near sources of magnetism, heat, water vapor or soot - Locations exposed to air blown from heating equipment - Where droplets of condensation from an air conditioner or other unit may form. ♠ Fit using techniques suited to the structure and materials of the fitting location. ♠ Use commercially available screws with a nominal diameter of 6 mm that are suited to the wall material (wood, steel frame, concrete etc.) you are fitting the bracket to. ♠ For the TV power supply plug, use a power supply outlet that can be reached easily. ♠ Ensure good air flow so that the equipment ambient temperature does not exceed 40°C. Failure to do this may cause heat to build up inside the plasma TV, resulting in malfunction. ♠ Spread a soft blanket or cloth over the floor so that the plasma TV and floor will not be marked or scratched during the assembly and installation work. ♠ When screwing down the parts, ensure that the screws are neither insufficiently tightened nor over tightened. ♠ Take sufficient care to ensure safety around you when performing the assembly and installation work or while moving about during the course of the work. ♠ Do not install the Plasma TV underneath ceiling lamps (spotlights, halogen lamps, etc.). Otherwise, the cabinet may be bent or damaged by high heat.
Fitting procedure
[Never use any other method than specified to install.]
1. Confirm the strength of the proposed fitting location.
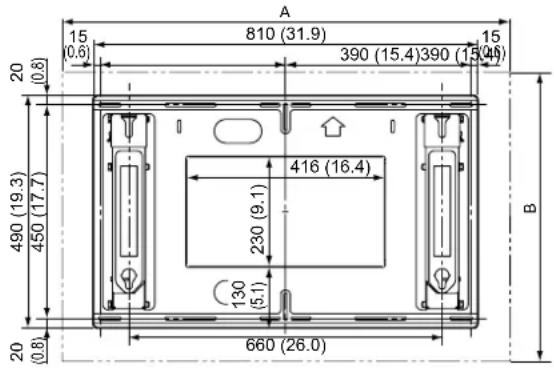
(1) The weight of the wall-hanging bracket is approximately 10 kg (22.0 lbs). For the weight of the plasma TV attached to the wall-hanging bracket, please see manual for the plasma TV. (2) Check the wall strength at the 6 attachment locations by referring to the dimension drawing of the wall-hanging bracket (given at right), and provide adequate reinforcement if strength is not sufficient.
Notes
- There are 16 holes in the wall-hanging bracket. If the wall material is wood, and adequate attachment strength cannot be ensured by fastening at the 6 points at right, use as many spare holes as necessary. However, exercise care because some wall materials may crack if screws are located too close together.
- For detailed dimensions for attaching the plasma TV, refer to the separate External Dimension Drawing (page 46-50).
- Do not attach or place anything other than the plasma TV on the bracket.
* Be sure to fit screws and tighten securely.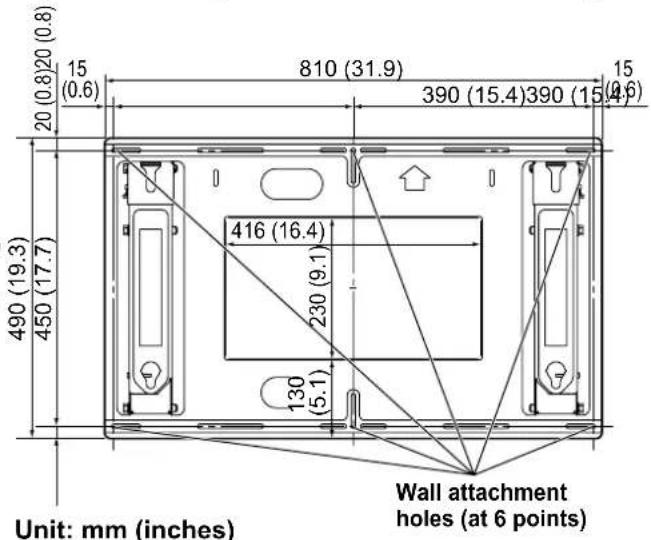
2. Fit wall-hanging bracket to wall.
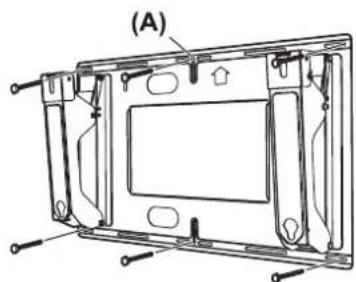
(1) Fit so that the arrow marks on the wall-hanging bracket point upward. (2) Fasten the screw at the top center hole (A) first. (3) Using a level, correct any bracket inclination, and then fasten screws at the remaining 5 locations.
Notes
- If the wall consists of a material such as concrete, and bolts or nuts must be embedded beforehand, determine the hole positions using the actual wall-hanging bracket, or calculate hole positions based on the dimension drawing and then embed bolts or nuts with a nominal diameter of 6 mm. When embedding bolts, locate so that the bolts protrude from the wall by 10 to 15 mm (25/64 to 19/32 inches).
- Use commercially available screws with a nominal diameter of 6 mm that are suited to the wall material you are fitting the bracket to. Always fix firmly more than 6 places with a screw.
3. Angle adjustment of wall-hanging bracket.
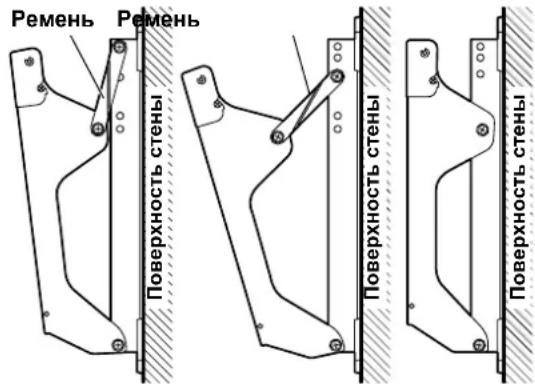
The angle of the wall-hanging bracket can be adjusted from "no incline" to 20° incline in 5 settings at intervals of 5°.
The bracket is set to 5° before shipment from the factory.
To change the angle, move the attachment position of the strap.
Note
- The strap is not required for the 'no incline' setting. Store the strap and the attaching screws in a safe place (as they will be needed for the inclined settings.)
The bolt should be securely tightened to the torque given below.
(11-13 N·m)
Angle adjustment hole positions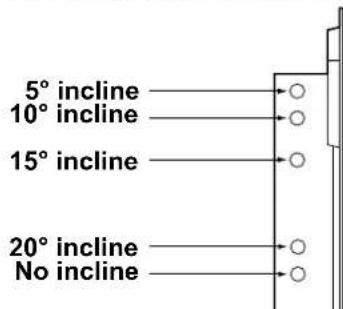
At 5° incline At 15° incline No incline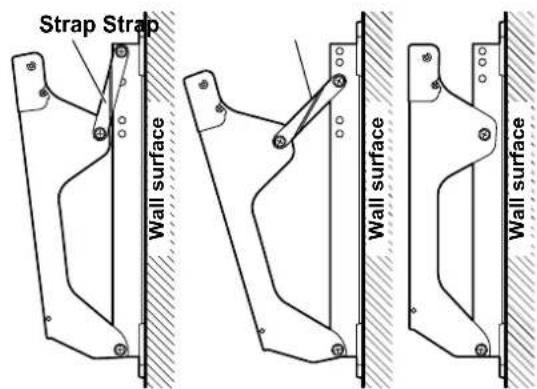
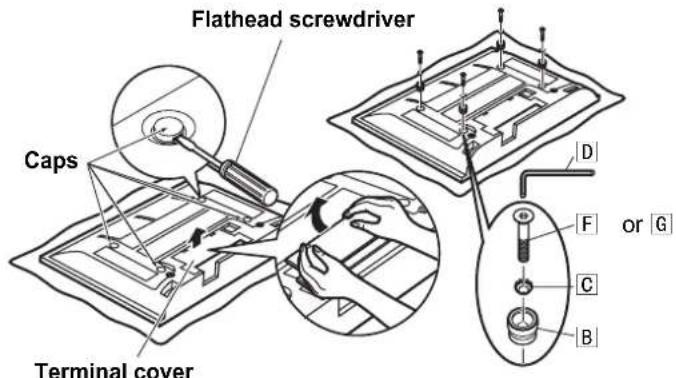
4. Fit the insulation spacers to the plasma TV.
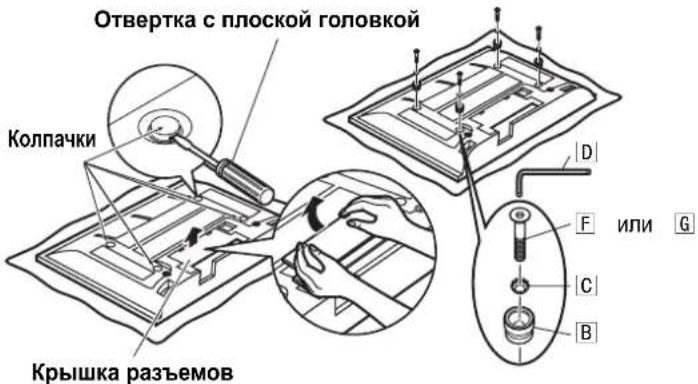
(1) Place the plasma TV unit face down on a blanket or other soft cloth that is clean and free of debris, and follow the procedure below. (2) Remove terminal covers (if fitted) from the plasma TV. (3) Using a flathead screwdriver, remove the four caps from the plasma TV.
Note
- Carefully retain the removed terminal cover and caps in a safe place. (They will be needed again later should it be required to use the special-purpose stand or standalone stand.) (4) Using the included Allen wrench [D], fit the included Allen head countersunk screws F or G, dashed toothed washers C and insulation spacers B (4 sets) into the holes from where the caps were removed. (See the diagram at right.) Refer to the page 46-50 for type selection of Allen head countersunk screws F, G.
The bolt should be securely tightened to the torque given below.
(3-4 N·m)
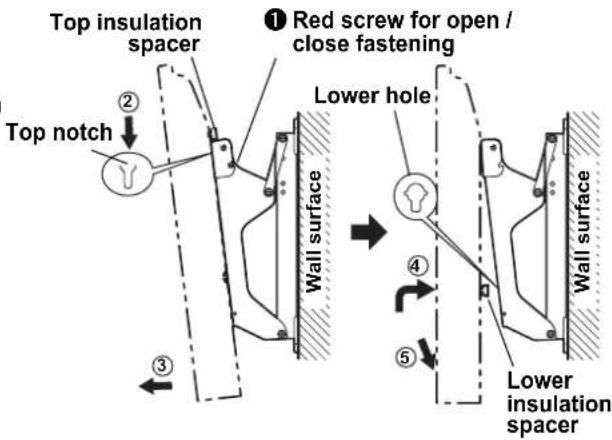
5. Attaching the plasma TV to the wall-hanging bracket and connecting the wiring.
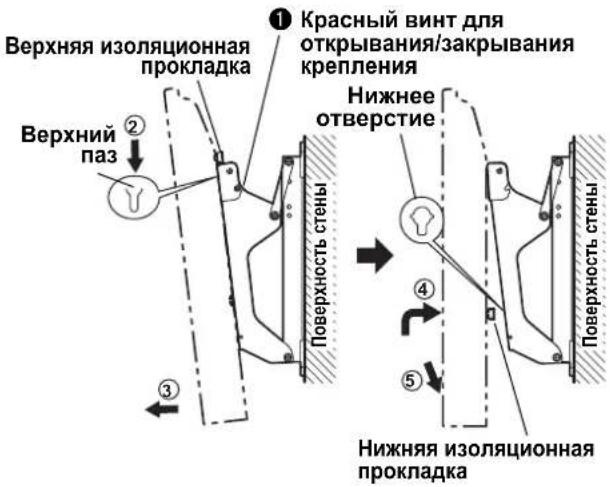
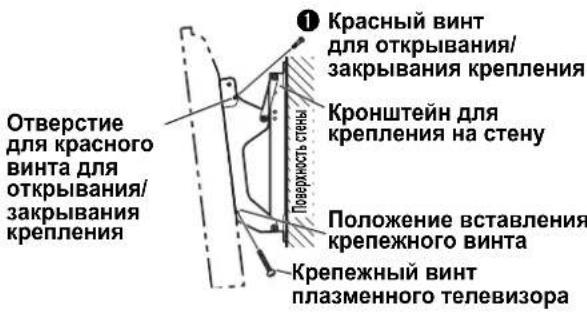
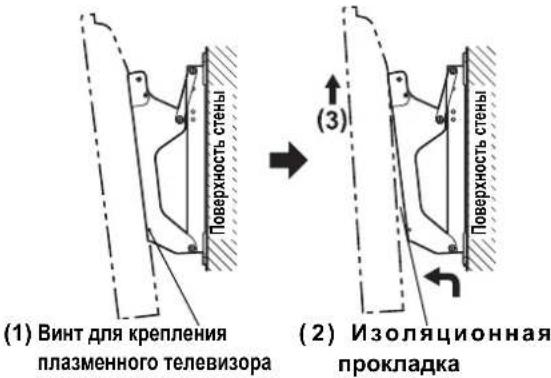
(1) Remove the red screws for open/close fastening (one each on the left and right) ① (2) Hook the insulation spacers on the top of the plasma TV over the notches on the bracket, and allow the TV to hang from the bracket. (3) Pull the plasma TV body forward, as shown in the diagram at right, and connect the wiring. (4) After wiring is finished, slightly raise the plasma TV and insert the insulation spacers at the lower back into the holes at the base of the wall-hanging bracket. (5) Lower the plasma TV into place.
Caution
- If the plasma TV is raised too far, there is a risk it may become unhooked from the top of the bracket.
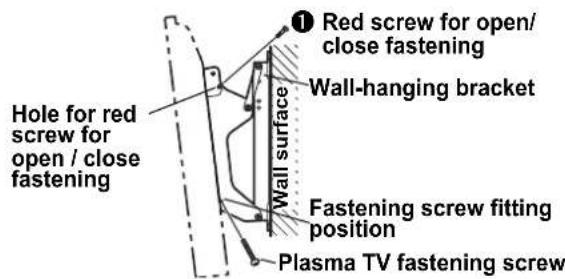
6. Fastening the plasma TV.
(1) Fit the included fastening screws in the indicated holes at the sides of the wall-hanging bracket (left and right). (2) Securely refit the red screws for open/close fastening (one each on the left and right) 1 in the indicated holes on the sides of the wall-hanging bracket.
The bolt should be securely tightened to the torque given below. (1.2 - 1.5 N·m)
Note
- Be sure to fit the fastening screws on the left and right to keep the plasma TV from falling off the wall-hanging bracket.
7. Removal of plasma TV unit.
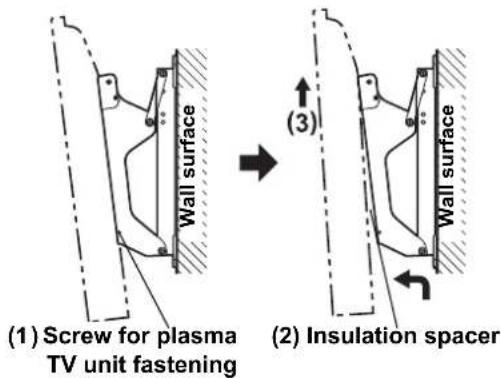
(1) Remove the screws for unit fastening (1 each on the left and right) that are fitted to the wall-hanging bracket sides. (2) While lifting the bottom of the plasma TV unit, pull it towards yourself. (3) When the lower insulation spacers are freed, keep lifting upward.
Warning
Safety precautions
Warning
Make sure that the installation location is sufficiently sturdy to withstand prolonged use.
- If, as a result of prolonged use, the strength becomes insufficient, the device may tip over, which could lead to injury.
Do not allow installation work to be carried out by unqualified personnel who have not been trained and certified for installation.
- Incorrect installation may cause the equipment to tip over, which could lead to injury.
When considering the strength of the recommended installation position, take into account the load factors.
Insufficient strength may cause the equipment to tip over, which could lead to injury.
Do not install in locations that cannot bear the load.
- If the strength at the installation site becomes insufficient, the equipment may fall.
Do not disassemble or modify the brackets for wall mounting.
- This may cause breakage or falling of the device, and may also lead to injury.
Warning
Do not use televisions or devices that differ from those listed in the catalog.
Otherwise, the device may fall and be damaged, and this may lead to injury.
Install the unit in locations not exposed to the effects of moisture, dust, steam, or heat.
- This can have a negative effect on the plasma TV and can lead to fire or electric shock.
Installation and removal of the plasma TV should be performed by at least two people.
Install the plasma TV only in the manner described in this manual: do not install the TV in any other way.
- This can cause an adverse effect on the operation of the plasma display, which can lead to fire or electric shock.
Install the mounting screws and power cord in such a way that they do not come into contact with internal parts.
As a result of contact with any metal objects inside the wall, electric shock may occur.
When performing installation, use the special components.
Otherwise, the plasma TV may fall from the wall, which could cause injury.
Remove the product that will no longer be used.
Otherwise, the product may fall and this could cause injury.
Handling precautions
1) When choosing a location for the TV, care must be taken because it may change color or deform due to the effects of light or heat, if it is placed under direct sunlight or near a heater. 2) Clean it with a cloth moistened with water to which a small amount of neutral detergent has been added, and then wipe with a dry cloth. Do not use substances such as thinner, benzine, or household wax for cleaning, as they may damage the surface coating. (When using chemically treated cloths, follow the instructions supplied with the cloth.) 3) Do not attach adhesive tape or stickers to the product. Such actions may lead to contamination of the surface of the bracket for wall mounting. Do not allow prolonged contact with rubber, vinyl products, or anything similar. (Such actions will cause damage.) 4) Be careful during installation, as impacts may cause cracking of the plasma TV's cabinet.
WARNING
This bracket is intended only for Panasonic plasma TV models (see pages 51-55). Use with other devices may lead to instability, which could result in injury.
PROFESSIONAL INSTALLATION. PANASONIC COMPANY BEARS NO RESPONSIBILITY FOR ANY INJURY AND/OR SERIOUS INJURY, INCLUDING DEATH, RESULTING FROM INCORRECT INSTALLATION OR INCORRECT HANDLING.
Wall-mount bracket TY-WK42PR4W (model with adjustable angle)
Tilt 5° Tilt 15° No tilt
4. Attach the insulating pads to the replacement plasma TV.
(1) Place the replacement plasma TV face down on a flat, soft cloth or similar material that is free of dirt and debris, and follow the procedure described below. (2) Remove the terminal covers from the replacement plasma TV (if attached). (3) Using a flat-head screwdriver, remove the four caps from the replacement plasma TV.
Note
- Carefully store the terminal covers and caps in a safe place. (They will be needed again when using the optional or separate unit.) (4) Using the supplied screws D, insert the supplied screws with flat washers or G, convex toothed washers, and insulating pads B (4 sets) into the holes from which the caps were removed. (See diagram on the right.) Regarding the flatness of the screw heads, refer to pages 51-55.
Be sure to tighten the screws with the specified torque.
(3-4 N·m)
5. Attach the replacement plasma TV to the wall-mount bracket and connect the cable.
(1) Remove the red screws for opening/closing the bracket (one on the left and one on the right). (2) Attach the insulating pads to the upper part of the replacement plasma TV, align them with the grooves of the bracket, and hang the TV on the bracket. (3) Push the body of the replacement plasma TV forward as shown in the diagram on the right, and connect the cable. (4) After connecting the cable, slightly lift the replacement plasma TV and insert the insulating pads from the bottom rear into the holes on the base of the wall-mount bracket. (5) Lower the replacement plasma TV into place.
Caution
- If you lift the plasma TV too strongly, there is a danger that it may detach from the upper part of the bracket.
6. Securing the plasma TV.
(1) Insert the supplied mounting screws into the specified holes on the side of the wall-mount bracket (left and right). (2) Again securely insert the red screws for opening/closing the bracket (one on the left and one on the right) into the specified holes on the side of the wall-mount bracket. Be sure to tighten the screws with the specified torque. (1.2-1.5 N·m)
Insert the mounting screws on the left, right, and top, so that the plasma TV does not fall off the wall mounting bracket.
7. Removing the plasma TV.
(1) Remove the screws securing the device (one on each side) that are inserted into the side blocks of the wall mounting bracket. (2) Lifting the lower part of the plasma TV, pull it towards you. (3) When the lower insulating pads are released, lift upwards.
WARNING
Make sure that the wall is strong enough to support the TV. If the wall is not strong enough, the TV may fall and cause injury.
Do not install the TV in places that are not suitable for supporting its weight.
- If the wall is not strong enough, the TV may fall.
Do not disassemble or modify the bracket.
- This may cause damage or injury due to falling.
CAUTION
Use only the TV and display listed in the catalog.
- Such a TV may fall and cause injury, posing a risk of electric shock.
Do not install the TV in places with high humidity, dust, soot, steam, or high temperature.
This may adversely affect the operation of the plasma TV and also cause electric shock or fire.
Installation and dismantling of the plasma TV must be performed by qualified personnel.
- Such a unit may also cause injuries.
Do not install the plasma display on the upper side, on a slope, or on the lower side of the ceiling.
- It may cause heat buildup inside the TV, which could result in fire or damage.
When installing the unit, leave sufficient space around it: at least 10 cm on the top and sides, 10 cm on the left side, 10 cm on the bottom, and leave sufficient space between the rear of the unit and the wall.
For ventilation, leave openings at the top and bottom and rear.
When installing the plasma TV, use only the brackets specified in their instructions: do not install the device in any other way.
- Improper installation may lead to damage to the device and also cause injury.
Tighten the mounting screws and cables in such a way that they do not protrude into the interior parts of the ceiling.
- Improper installation may lead to electric shock from contact with any metal parts inside the ceiling.
Use special mounting components for installation.
- Improper installation may lead to the plasma TV falling from the ceiling with possible injury.
Remove the unit that will no longer be used.
- Such a unit may also cause injuries.
Recommendations regarding handling
1) Choose the installation location for the TV carefully, because due to the influence of light or heat (if placed near heating appliances or under direct sunlight), the color may be lost or deformed. 2) Clean the screen with a soft dry cloth (cotton or flannel). If it is heavily soiled, clean it with a cloth moistened with water and a small amount of neutral detergent, then wipe the device with a dry cloth. Do not use thinner, benzene, or wax-based cleaners, as they may damage the cabinet coating. (When using chemically treated cloths, follow the instructions.) 3) Do not touch the screen or panel with your hands. This may cause contamination of the surface of the plasma display. Avoid prolonged contact with rubber, vinyl, or similar products. (This will degrade the performance of the device.) 4) Be careful during installation, as shocks may cause damage to the plasma display.
WARNING
This plasma display is intended for use with Panasonic plasma displays (see pages 51-55). Use with other devices may result in improper installation, which could pose a risk of injury.
INSTALLATION SHOULD BE PERFORMED BY QUALIFIED PERSONNEL. PANASONIC IS NOT RESPONSIBLE FOR ANY DAMAGE TO PROPERTY OR SERIOUS INJURY, INCLUDING DEATH, RESULTING FROM IMPROPER INSTALLATION OR INCORRECT OPERATION.
Plasma Display TY-WK42PR4W
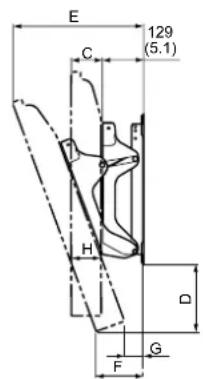
Wall-hanging bracket (Adjustable angle type) External dimensions drawing
Wall-hanging bracket (Adjustable angle type) Wall-mounting bracket (with adjustable angle) Wall-mounting bracket (with adjustable angle) Wall-mounting bracket (with adjustable angle) Wall-mounting bracket (with adjustable angle) Wall-mounting bracket (with adjustable angle)
External dimensions drawing External dimensions drawing External dimensions drawing External dimensions drawing External dimensions drawing
(Unit: mm (inches))
(Unit: mm)
(Unit: mm)
(Unit: mm)
(Unit: mm)
(Unit: mm)
External dimensions table
Wall-hanging bracket (Adjustable angle type) External dimensions drawing
Wall-hanging bracket (Adjustable angle type) Wall mounting bracket (with adjustable mounting angle) Wall mounting bracket (with adjustable mounting angle) Wall mounting bracket (with adjustable mounting angle) Wall mounting bracket (with adjustable mounting angle) Wall mounting bracket (with adjustable mounting angle)
Drawing with external dimensions Drawing with external dimensions Drawing with external dimensions Drawing with external dimensions Drawing with external dimensions
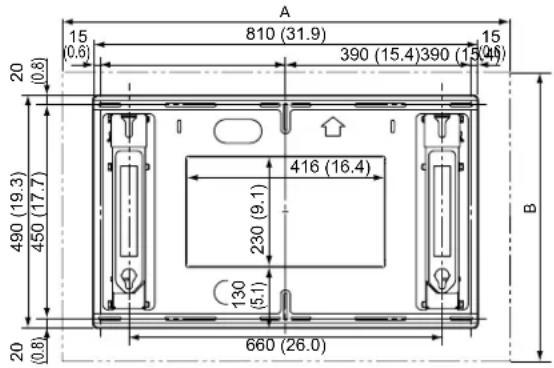
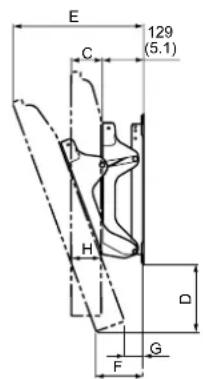
(Unit: mm (inches))
(Unit: mm)
(Unit: mm)
(Unit: mm)
(Unit: mm)
(Unit: mm)
External dimensions table
Matsushita Electric Industrial Co., Ltd.
Web Site: http://panasonic.net

- CAUTION
- REQUESTS REGARDING HANDLING
- TY-WK42PR4W WALL-HANGING BRACKET (ADJUSTABLE ANGLE TYPE)
- PRECAUTIONS FOR WALL-HANGING BRACKET FITTING
- FITTING PROCEDURE
- CONFIRM THE STRENGTH OF THE PROPOSED FITTING LOCATION
- NOTES
- FIT WALL-HANGING BRACKET TO WALL
- ANGLE ADJUSTMENT OF WALL-HANGING BRACKET
- NOTE
- FIT THE INSULATION SPACERS TO THE PLASMA TV
- ATTACHING THE PLASMA TV TO THE WALL-HANGING BRACKET AND CONNECTING THE WIRING
- FASTENING THE PLASMA TV
- REMOVAL OF PLASMA TV UNIT
- WARNING
- SAFETY PRECAUTIONS
- HANDLING PRECAUTIONS
- WALL-MOUNT BRACKET TY-WK42PR4W (MODEL WITH ADJUSTABLE ANGLE)
- ATTACH THE INSULATING PADS TO THE REPLACEMENT PLASMA TV
- ATTACH THE REPLACEMENT PLASMA TV TO THE WALL-MOUNT BRACKET AND CONNECT THE CABLE
- SECURING THE PLASMA TV
- REMOVING THE PLASMA TV
- RECOMMENDATIONS REGARDING HANDLING
- PLASMA DISPLAY TY-WK42PR4W
- MATSUSHITA ELECTRIC INDUSTRIAL CO., LTD
Brand : PANASONIC
Model : TYWK42PR4W
Category : Wall mount