
10032444 - Oven Klarstein - Free user manual and instructions
Find the device manual for free 10032444 Klarstein in PDF.
User questions about 10032444 Klarstein
0 question about this device. Answer the ones you know or ask your own.
Ask a new question about this device
Download the instructions for your Oven in PDF format for free! Find your manual 10032444 - Klarstein and take your electronic device back in hand. On this page are published all the documents necessary for the use of your device. 10032444 by Klarstein.
USER MANUAL 10032444 Klarstein
natural_image
Symbol of a trash bin crossed with a diagonal line, no text or numbers presentCongratulations on purchasing this equipment. Please read this manual carefully and take care of the following hints to avoid damages. Any failure caused by ignoring the mentioned items and cautions mentioned in the instruction manual are not covered by our warranty and any liability.
CONTENT
Safety Instructions 23
Product Description 26
Control Panel and Buttons 27
Before first Use 27
Operation 28
Accessories Using Manual 36
Function List 37
Care and Cleaning 38
Troubleshooting 38
Error Codes 39
Hints on Disposal 40
TECHNICAL DATA
| Item number 10032444 | |
| Power supply 220-240 V ~ 50-60 Hz | |
| Power consumption 1600 W | |
| Capacity 26 L |
DECLARATION OF CONFORMITY

Producer:
Chal-Tec GmbH, Wallstraße 16, 10179 Berlin, Germany.
This product is conform to the following European Directives:
2014/30/EU (EMC)
2014/35/EU (LVD)
2011/65/EU (RoHS)
2009/125/EG (ErP)
SAFETY INSTRUCTIONS
General Hints
- Read all instructions.
- Do not touch hot surfaces. Use handles or knobs.
- To protect against electrical shock do not immerse cord, plugs, or (state specific part or parts in question) in water or other liquid.
- Close supervision is necessary when any appliance is used by or near children.
- Unplug from outlet when not in use and before cleaning. Allow to cool before putting on or taking off parts.
- Do not operate any appliance with a damaged cord or plug or after the appliance malfunctions or has been damaged in any manner. Return appliance to the nearest authorized service facility for examination, repair, or adjustment.
- The use of accessory attachments not recommended by the appliance manufacturer may cause injuries.
- Do not use outdoors (this item may be omitted if the product is specifically intended for outdoor use).
- Do not let cord hang over edge of table or counter, or touch hot surfaces.
- Do not place on or near a hot gas or electric burner, or in a heated oven.
- Extreme caution must be used when moving an appliance containing hot oil or other hot liquids.
- Always attach plug to appliance first, then plug cord into the wall outlet. To disconnect, turn any control to „off“, then remove plug from wall outlet.
- Do not use appliance for other than intended use. - Oversize foods, metal foil packages, or utensils must not be inserted in a toaster as they may involve a risk of fire or electric shock.
- A fire may occur if toasters are covered or touching flammable material, including curtains, draperies, walls, and the like, when in operation.
- Do not attempt to dislodge food when toaster is plugged in. (This may be omitted if toaster employs sheathed type heating elements.)
- This appliance has a polarized plug (one blade is wider than the other). As a safety feature, this plug will fit in a polarized outlet only one way. If the plug does not fit fully in the outlet, reverse the plug. If it still does not fit, contact a qualified electrician. Do not attempt to defeat this safety feature.
- Household use only.
Short Cord Instructions
- A short power supply cord is provided to reduce the risk resulting from becoming entangled in or tripping over a longer cord.
- Extension cords are available and may be used if care is exercised in their use.
- If an extension cord is used, (1) the marked electrical rating of the extension cord should be at least as great as electrical rating of the appliance, and (2) the longer cord should be arranged so that it will not drape over the counter or table top where it could be pulled on by children or tripped over unintentionally.
Special Instructions
- Please make sure connect the earth wire correct.
- Don't connect on the gas pipe, water pipe, lightning rod and telephone line. Otherwise
• will lead to accident. - Should be placed in the horizontal plane that avoid damage and loss.
- Please don't placed the oven in the hot place.
- Please keep more than 150mm distance with other kitchen equipment
• for the flank and top side of oven. - The oven only can use for indoor, can not be used outdoor or others.
| PROHIBITEDNo operating | No changing the diagram if you are not specialist of repairingNo repairing by yourselvesThe power cord should be changed by service manager or manufacturesDo not keep any In ammable and explosive easyKeep the children away from the ovenDo not use the damaged or loose switchDo not crash or attackPlease only use 120V-60Hz power supplyPlease don't take out the sealing circle. |
| CAUTIONOperate as per strict instructions | Pull the head of the plug rmly, no touch any metal part of the plugDo not touch the oven in the cooking processDo not touch the heating elements when the cooking is endOr you may be scarldedOpen the oven carefully as the hot steam may come out to hurt youDo not use the high pressure or steaming cleaner to clean the oven.Please Set 200°C and 30 minutes time when you use it initially.Keep the children away from the heating elementsThe surface with high temperature logo will be hot in the cooking process |
| CAREFULCareful before operating | Do not use crude cleaner or knife to shave the glass surfaceDo not use the metal brush to clean the ovenPull o the plug after nished usingDo not heat paper, plastic, temperature resistance or other inflammable materialDo not control by remote or outside timer.Do not put cotton and similar material into oven.Do not use outdoors. |
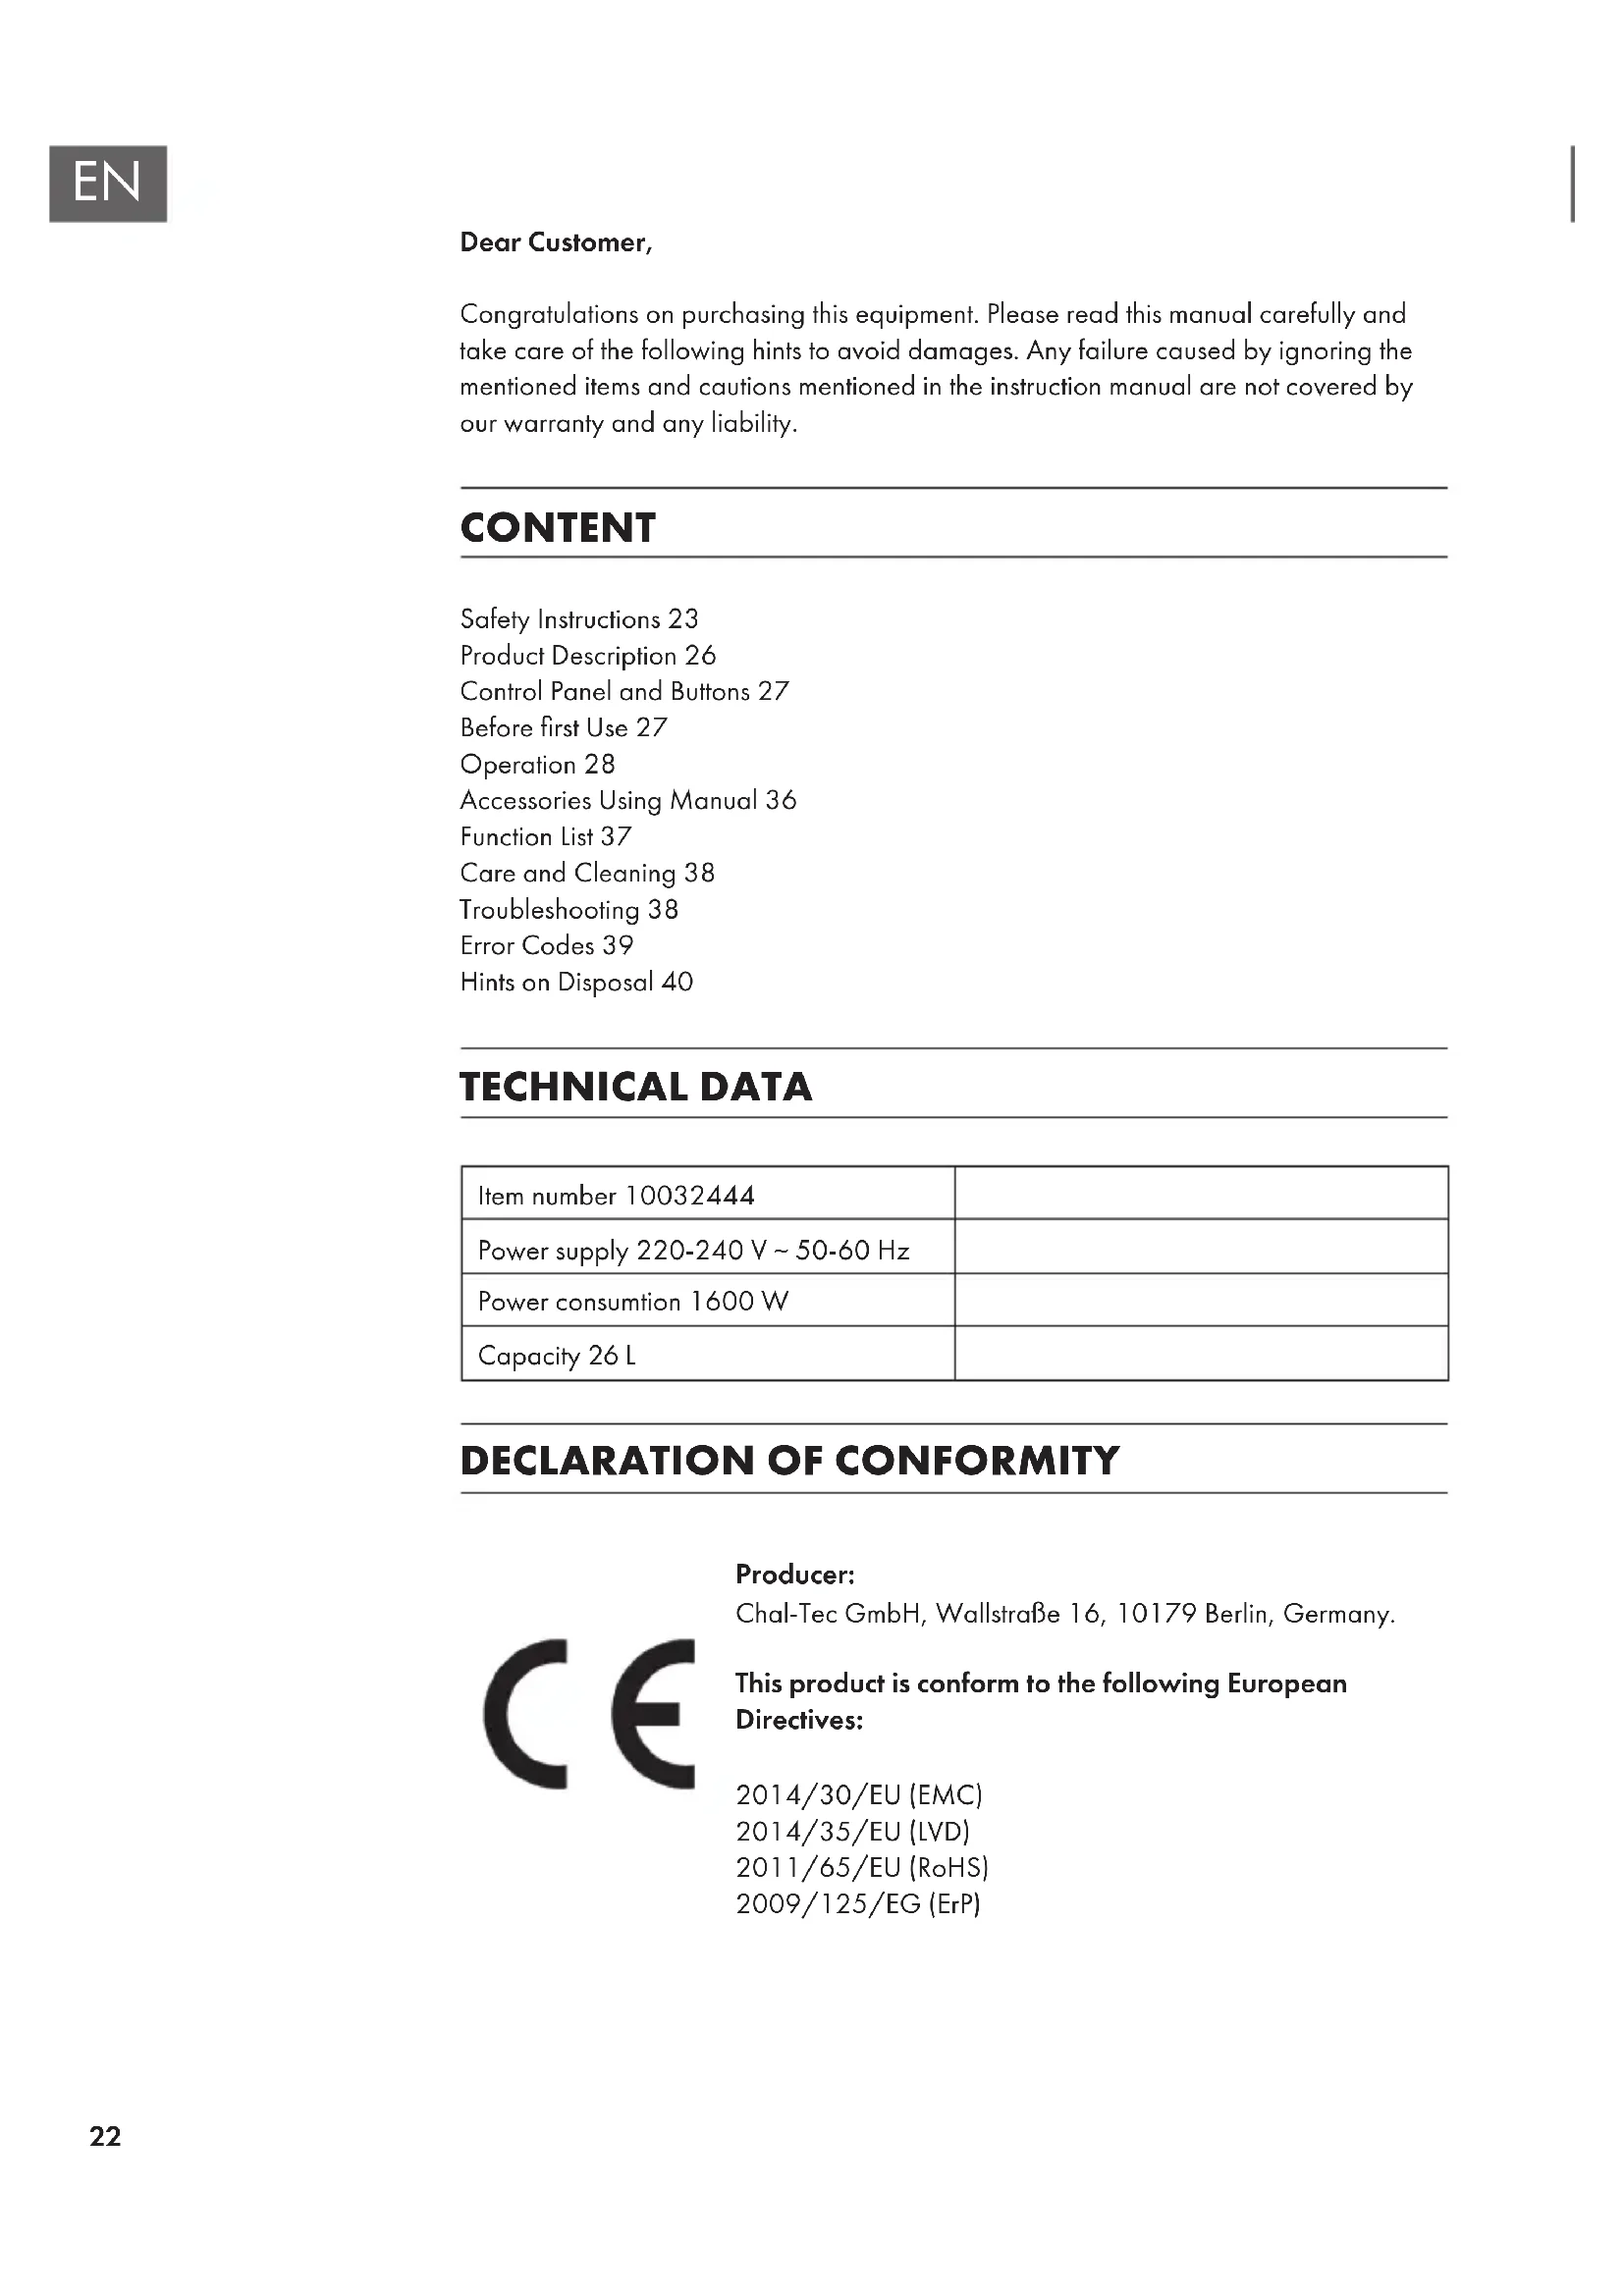
PRODUCT DESCRIPTION
Note: The parts (8) and (9) are NOT included with all appliances, but can be purchased together with the grill cage (not illustrated) on our website hifi-tower.co.uk under item number 10032445.
| No. | Parts name Function introduce | |
| 1 | Heating Tube Produce heat and heating the food. | |
| 2 | Rotisserie Removal Tool Used for taking food on the rotisserie to. ol | |
| 3 | Pressure Release Valve Exhaust steam and pressure from it. | |
| 4 | Rotisserie Tool Fixed food, uniform heating food when rotation. | |
| 5 | Oven Handle For opening oven door. | |
| 6 | Glass Window Observe inside situation of oven. | |
| 7 | Control Panel See details in control panel instructions. | |
| 8 | Roasting Tray Place cook food | |
| 9 | Roasting Rack Place cook food | |
| 10 | Crumb Tray | Place under the bottom heating tube to collect oil while roasti |
| 11 | Rack Removal Tool | Take out the roasting tray or roasting rack. |
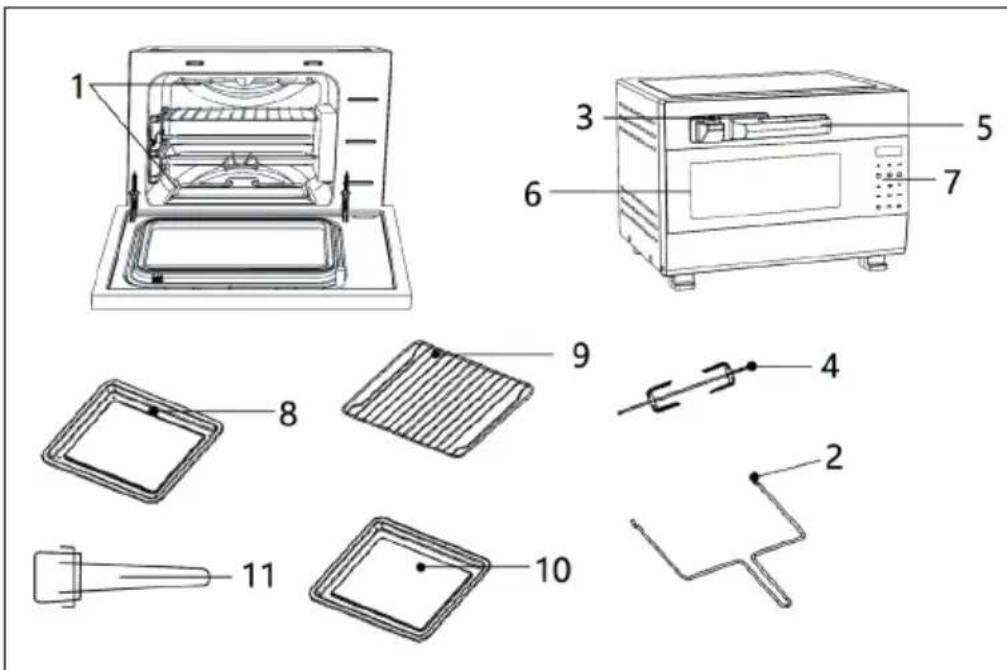
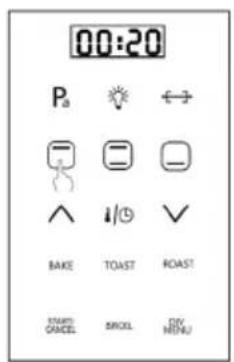
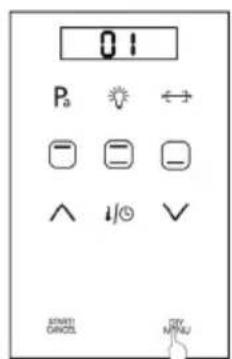
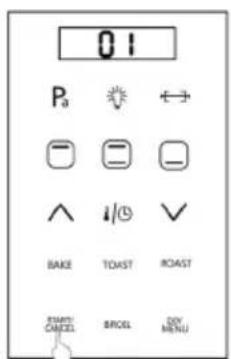
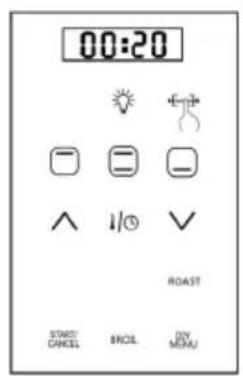
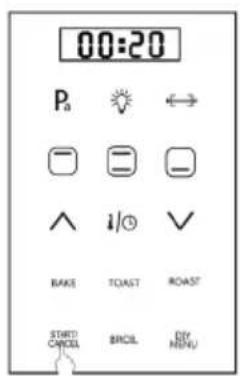
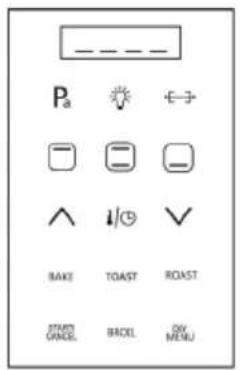
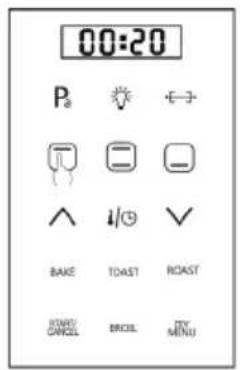
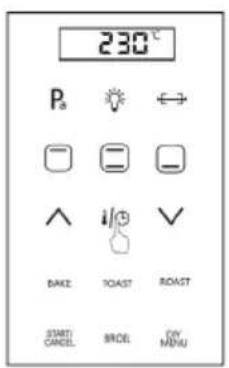
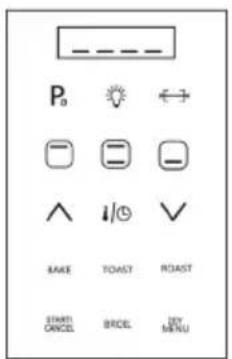
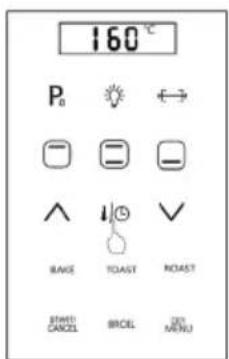
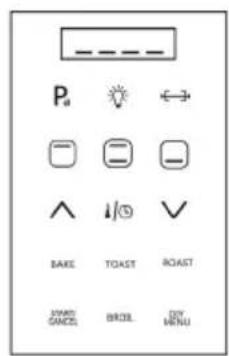
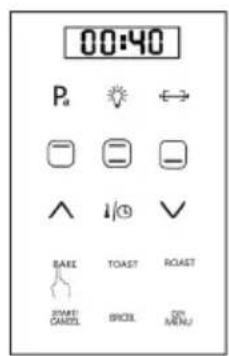
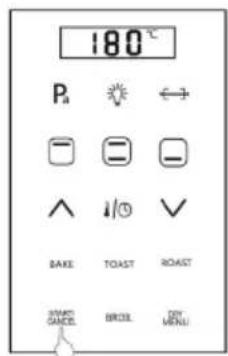
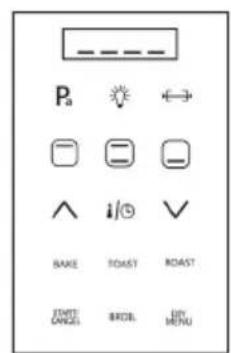
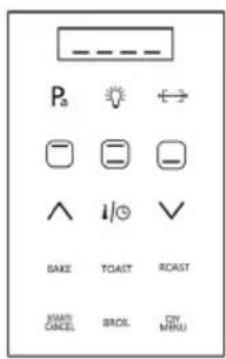
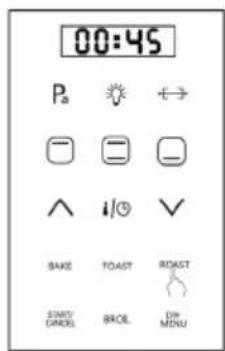
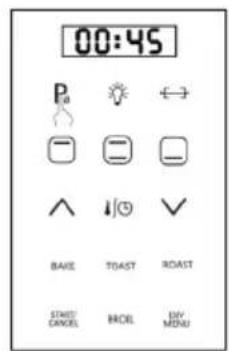
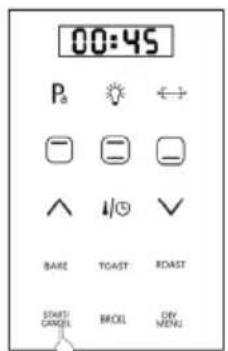
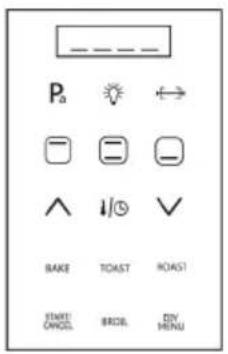
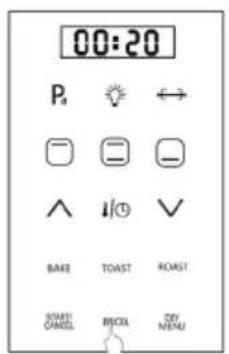
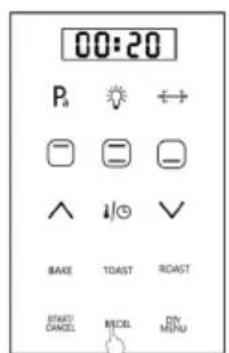
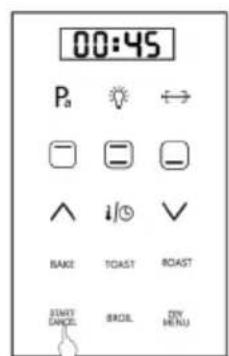
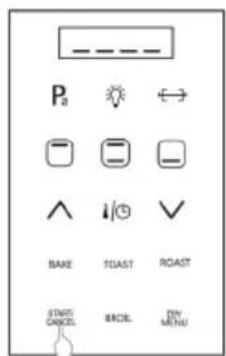
CONTROL PANEL AND BUTTONS
| Button Name | Function Description Button | Name | Function Description |
 | Pressure roast | [05DW] | Decrease time or temperature scale |
 | Oven lamp BAKE Cake | ||
 | Rolling fork TOAST Bread | ||
| [YYAK] | Top Grill ROAST Chicken, etc | ||
 | Both Grill | START/CANCEL | Use for start working or cancel programs |
 | Bottom Grill BROIL Meat/Fish/Vegetable, etc | ||
 | Increase time or temperature scale | DIY DIY | Menus |
 | Adjust Temperature/Timer | ||
BEFORE FIRST USE
Before Operation
- Keep using environment ventilated. And equipped with effective ventilation equipment.
- The socket should be setinthe position easy plug. And avoid the place such as the power cord touch the sharp edge, high temperature cause the damage.
- Suggest to use the oven on the kitchen table. And make sure can bear the oven weight and accept above
- 80^ C if placed other place.
Installation
1 Take off the packing case, take out all the accessories and packages.
2 Find the right location to place the oven to keep the effective distance for the both side.
3 Confirm the socket supply power and earth wire connect correct.
4 Power on, according to the instruction manual to operate.
OPERATION
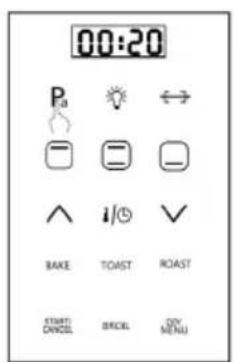
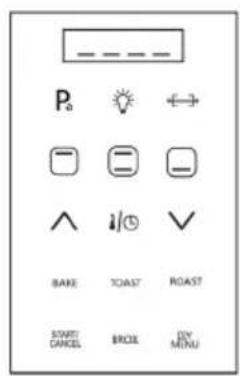
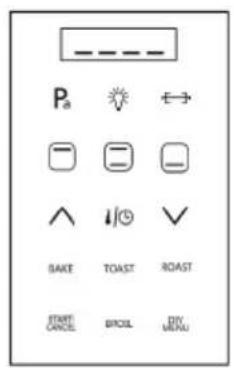
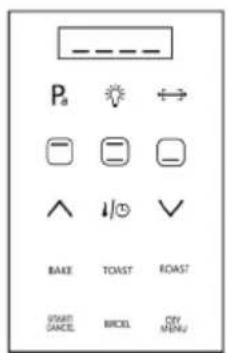
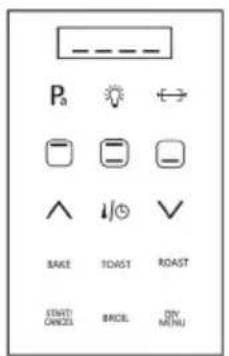
1. Power On
All buttons light 1 second, then LED display shows [----]. START/CANCEL button will light and flicker, others buttons will light o.
2. Pa Function
- Press TOP GRILL button.
- Press Pa.
- Press START/CANCEL button to start.
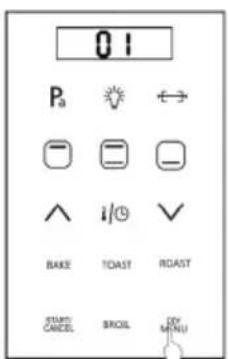
3. DIY Menus
Press DIY/MENU button. The LED display shows "01", means first DIY function. Default time is 00:10 shown on LED display. Working temperature 200^ . Then set the time/temperature/function as per recipe, choose Top/Bottom/Both Grill, Pa, Rolling fork, Temperature/Time. Then press START/CANCEL for starting. Note: Can save DIY 10 cooking functions.

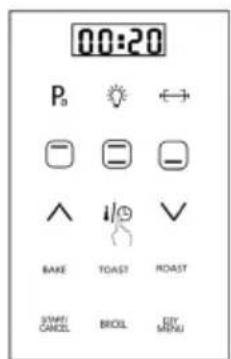
4. Rolling fork
- Press ROAST button.
- Press ROLLING FORK.
- Press START/CANCEL button to start.
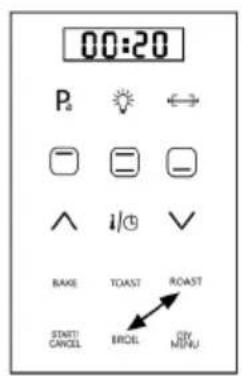
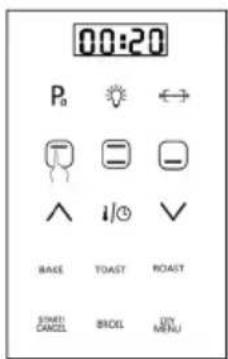
5. Top Grill
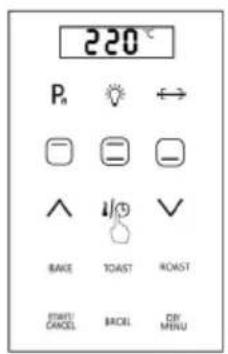
- Press TOP GRILL button, the default time is 00:20 shown on LED display. Press TEMPERATURE/TIMER button.
• The default temperature is 160^ C shown on LED display.
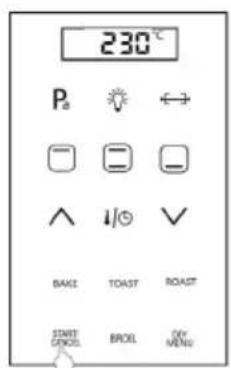
6. Both Grill
- Press BOTH GRILL button, the default time is 00:20 shown on LED display.
- Press TEMPERATURE/TIMER button, the default temperature is 230°C shown on LED display.
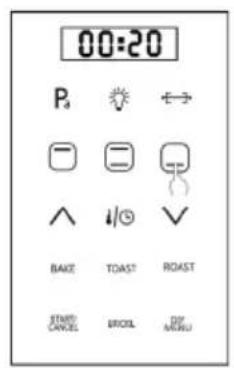
7. Bottom Grill
- Press BOTTOM GRILL button, the default time is 00:20 shown on LED display.
- Press TEMPERATURE/TIMER button, the default temperature is 200°C shown on LED display.


8. Increase Temperature
Press this button to increase the time/temperature.
9. Decrease Temperature

Press this button to decrease the time/temperature.
10. Adjust Temperature/Timer
- Choose one of manual function first.
- Then press TEMPERATURE/TIMER button to set the temperature or time.
For example:
- Press TOP GRILL button, the LED display shown the time is 00:20.
- Press TEMPERATURE/TIMER button one time, the LED display shown default time, then adjust time as per recipe.
- Press TEMPERATURE/TIMER button twice, the LED display shown default temperature, then adjust temperature as per recipe.
11. Bake
- Press BAKE, the default time is 00:40 shown on LED display.
- Press TEMPERATURE/TIMER button, the default temperature is 180°C shown on LED display.

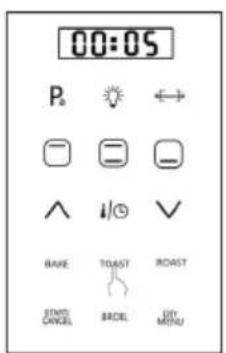
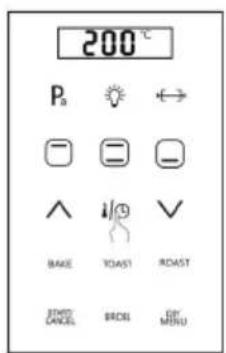
12. Toast
- Press TOAST, the default time is 00:05 shown on LED display.
- Press TEMPERATURE/TIMER button, the default temperature is 200°C shown on LED display.
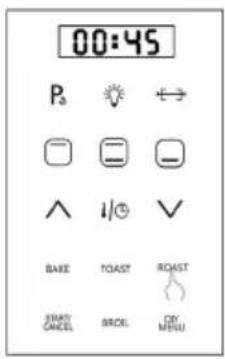
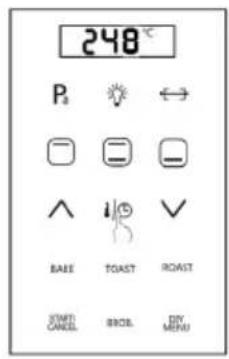
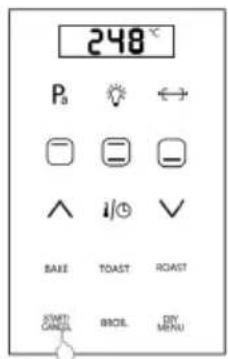
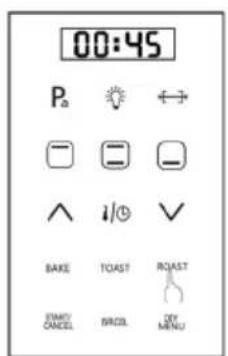
13. Roast
Press the key of ROAST, the default time is 00:45 shown on LED display.
Press TEMPERATURE/TIMER button, the default temperature is 248°C shown on LED display.
Pressure mode:
- Press ROAST button, the default time is 00:45 shown on LED display.
- Press Pa button.
- Press START button to start cooking

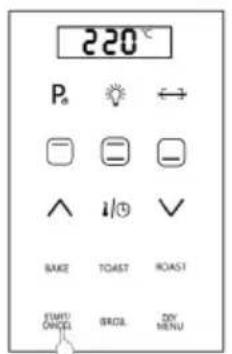
14. Broil
- Press the key of BROIL, the default time is 00:20 shown on LED display.
- Press TEMPERATURE/TIMER button, the default temperature is 220 C shown on LED display.
Pressure mode:
- Press BROIL button, the default time is 00:20 shown on LED display.
- Press Pa button.
- Press START button to start cooking

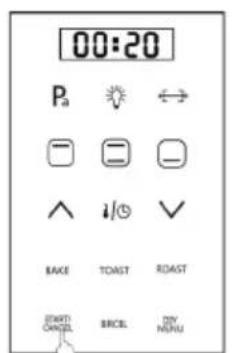
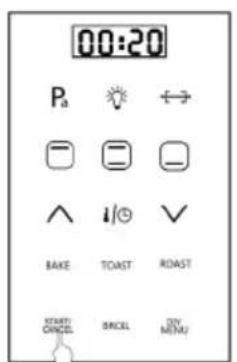
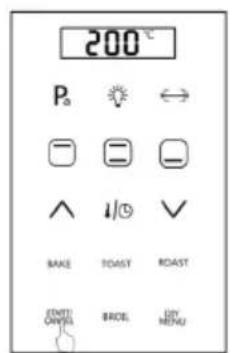
15. Start/Cancel
- Press START/CANCEL button to start the cooking after you set up function, time and temperature.
- If you want to stop the oven working, press the START/CANCEL button when the oven is working. Then the oven will stop.
ACCESSORIES USING MANUAL
Roasting Rack
Use for placing food or containers with food. Can be pushed in the notches on the inside of the oven.
Tray
Use for place food. For example, put cake on the tray when cook cake. Use for collect the oil. For example, place under the food to collect the oil when cook chicken.
Important Notes
- It will be high temperature when cooking. To avoid burns, please take protective when put in and take out the accessory.
- Don't use the bottom grill working mode when use for the tray collect the oil.
- Don't put the food on the glass of oven after opening the window, avoid oven topple over.
FUNCTION LIST
| Function | Pressure | Time (hr:min) | Default time (hr:min) | Temperature Range (°C) | Initial Temperature (°C) | Top Grill | Bottom Grill | Rolling fork | Preheat | Remark |
| Bake no Pa | 0:01-1:00 | 0:40 | 150-220 | 180 yes no no | 200 yes no no Bread | Cake, Cookies | ||||
| Toast no Pa | 0:01-0:12 | 0:05 | 160-248 | 200 yes no no | 248 yes yes no | |||||
| Roast | ||||||||||
| Roast + Rolling fork | no Pa | 0:01-2:00 | 0:45 | 180-248 | 248 yes yes no | Meat | ||||
| 10 KPa | 0:01-2:00 | 0:45 | 180-248 | 248 yes yes no | ||||||
| Broil | no Pa | 0:01-2:00 | 0:45 | 180-248 | 248 yes yes no | Whole chicken | ||||
| 10 KPa | 0:01-2:00 | 0:45 | 180-248 | 248 yes yes no | ||||||
| Top Grill Pa | no Pa | 0:01-1:30 | 0:20 | 180-248 | 220 yes yes no | Fishe | ||||
| 10 KPa | 0:01-1:30 | 0:20 | 180-248 | 220 yes yes no | ||||||
| Both Grill Pa | 0:01-2:00 | 0:20 | 60-248 | 160 yes no no | ||||||
| Bottom Grill Pa | 0:01-2:00 | 0:20 | 60-248 | 230 yes yes no | ||||||
| Pa 10 KPa | 0:01-2:00 | 0:20 | 60-248 | 200 no yes no | ||||||
| After Choosing Roast, Broil, Both Grill, Top Grill or Bottom Grill then you can use the pressure toast function. | ||||||||||
CARE AND CLEANING
- Unplug the plug after cooking, let the oven cool down before cleaning the oven.
- Need to clean the cavity of oven and all accessories after use.
- If oven not be used for a long time, drying cavity of oven and all accessories. And keep all accessories into cavity.
Important Notes
- To avoid change colour and crack the painting. Never use gasoline, alcohol, organic solvents and cleaning powder to clean.
- To avoid corrosion oven parts, please use soft cleaning solvent to clean and maintenance.
• To avoid damage oven or electric shock, never use the metal brush to clean.
TROUBLESHOOTING
| Problem Possible Cause Suggested Solution | ||
| Unable to start oven. | Not connect to power supply C | connect to the correct socket. |
| Socket no power. Switch on the | socket switch or call Professional maintenance electrician. | |
| Function button failure. Contact | after-sale service center. | |
| Oven does not work. | Function button failure. Contact | after-sale service center. |
| Improper operation Check oper | rate manual or after-sale service center. | |
| Heating tube does not work. | Wire connecting terminal unflexed. | Contact after-sale service center. |
| Heating pipe failure. | ||
| Peculiar smell when cooking. | Have residue inside. Clean residue. | |
| Clean incomplete last time. Clean oven cavity and accessory. | ||
| Buttons do not work. | Conducting electricity rubber in bad installation or damaged. | Contact after-sale service center. |
| Master P.C.B damaged. | ||
| Oven lamp fails to light. | Lamp damaged. Contact after-sale service center. | |
| Master P.C.B damaged. | ||
ERROR CODES
| Code | Possible Cause Suggested | Solution |
| E1 | Temperature sensor open circuit protection. | When temperature sensor open, will stop working after 2 minutes. Show "E1". Buzzer sound 10 times. |
| E2 | Temperature sensor short circuit protection. | When temperature sensor short out, will stop working. Show "E2". Buzzer sound 10 times. |
| E4 | Sensor connection failure. | Can not recognize temperature change after start working 10 minutes. Show "E4". Buzzer sound 10 times. |
HINTS ON DISPOSAL
natural_image
Symbol of a trash bin crossed with a diagonal line, no text or numbers presentAccording to the European waste regulation 2012/19/EU this symbol on the product or on its packaging indicates that this product may not be treated as household waste. Instead it should be taken to the appropriate collection point for the recycling of electrical and electronic equipment. By ensuring this product is disposed of correctly, you will help prevent potential negative consequences for the environment and human health, which could otherwise be caused by inappropriate waste handling of this product. For more detailed information about recycling of this product, please contact your local council or your household waste disposal service.
Estimado cliente:
natural_image
Symbol of a trash bin crossed with a diagonal line, no text or labels presentDÉCLARATION DE CONFORMITÉ

Fabricant :
Chal-Tec GmbH, Wallstraße 16, 10179 Berlin, Allemagne.
natural_image
Symbol of a trash bin crossed with a diagonal line, no text or numbers presentnatural_image
Symbol of a trash bin crossed with a diagonal line, no text or numbers presentbar
| Category | Value | |---|---| | Category 1 | 100 | | Category 2 | 100 | | Category 3 | 100 | | Category 4 | 100 | | Category 5 | 100 | | Category 6 | 100 | | Category 7 | 100 | | Category 8 | 100 | | Category 9 | 100 | | Category 10 | 100 | | Category 11 | 100 | | Category 12 | 100 | | Category 13 | 100 | | Category 14 | 100 | | Category 15 | 100 | | Category 16 | 100 | | Category 17 | 100 | | Category 18 | 100 | | Category 19 | 100 | | Category 20 | 100 | | Category 21 | 100 | | Category 22 | 100 | | Category 23 | 100 | | Category 24 | 100 | | Category 25 | 100 | | Category 26 | 100 | | Category 27 | 100 | | Category 28 | 100 | | Category 29 | 100 | | Category 30 | 100 | | Category 31 | 100 | | Category 32 | 100 | | Category 33 | 100 | | Category 34 | 100 | | Category 35 | 100 | | Category 36 | 100 | | Category 37 | 100 | | Category 38 | 100 | | Category 39 | 100 | | Category 40 | 100 | | Category 41 | 100 | | Category 42 | 100 | | Category 43 | 100 | | Category 44 | 100 | | Category 45 | 100 | | Category 46 | 100 | | Category 47 | 100 | | Category 48 | 100 | | Category 49 | 100 | | Category 50 | 100 | | Category 51 | 100 | | Category 52 | 100 | | Category 53 | 100 | | Category 54 | 100 | | Category 55 | 100 | | Category 56 | 100 | | Category 57 | 100 | | Category 58 | 100 | | Category 59 | 100 | | Category 60 | 100 | | Category 61 | 100 | | Category 62 | 100 | | Category 63 | 100 | | Category 64 | 100 | | Category 65 | 100 | | Category 66 | 100 | | Category 67 | 100 | | Category 68 | 100 | | Category 69 | 100 | | Category 70 | 100 | | Category 71 | 100 | | Category 72 | 100 | | Category 73 | 100 | | Category 74 | 100 | | Category 75 | 100 | | Category 76 | 100 | | Category 77 | 100 | | Category 78 | 100 | | Category 79 | 100 | | Category 80 | 100 | | Category 81 | 100 | | Category 82 | 100 | | Category 83 | 100 | | Category 84 | 100 | | Category 85 | 100 | | Category 86 | 100 | | Category 87 | 100 | | Category 88 | 100 | | Category 89 | 100 | | Category 90 | 100 | | Category 91 | 100 | | Category 92 | 100 | | Category 93 | 100 | | Category 94 | 100 | | Category 95 | 100 | | Category 96 | 100 | | Category 97 | 100 | | Category 98 | 100 | | Category 99 | 100 | | Total (Total) = [sum of bars] / [bar chart] + [line chart] = [bars] * (sum of bars + line chart) * (bars). The total bar is divided into two parts: 'Number of items' and 'Percentage'. The total bar is divided into two parts: 'Percentage' and 'Number of items'. The total bar is divided into two parts: 'Percentage' and 'Number of items'. The total bar is divided into two parts: 'Percentage' and 'Number of items'.KLARSTEIN NIEIJSRYA EIN NIEIJSRYA KLARS KLARSTEIN NIEIJSRYA EIN NIEIJSRYA KLARS KLARSTEIN NIEIJSRYA EIN NIEIJSRYA KLARS KLARSTEIN NIEIJSRYA


- CONTENT
- DECLARATION OF CONFORMITY
- SAFETY INSTRUCTIONS
- General Hints
- Short Cord Instructions
- Special Instructions
- PRODUCT DESCRIPTION
- CONTROL PANEL AND BUTTONS
- BEFORE FIRST USE
- Before Operation
- Installation
- OPERATION
- Power On
- Pa Function
- DIY Menus
- Rolling fork
- Top Grill
- Both Grill
- Bottom Grill
- Increase Temperature
- Decrease Temperature
- Adjust Temperature/Timer
- For example:
- Bake
- Toast
- Roast
- Pressure mode:
- Broil
- Start/Cancel
- ACCESSORIES USING MANUAL
- Roasting Rack
- Tray
- Important Notes
- FUNCTION LIST
- CARE AND CLEANING
- TROUBLESHOOTING
- ERROR CODES
- HINTS ON DISPOSAL
- Estimado cliente:
- DÉCLARATION DE CONFORMITÉ
Brand : Klarstein
Model : 10032444
Category : Oven