USER MANUAL MasterFresh Klarstein
Member of Berlin Brands Group
Handwerkerstr. 11
15366 Dahlwitz-Hoppegarten
Deutschland
Berlin Brands Group UK Ltd
PO Box 1145
Oxford,OX1 9UW
United Kingdom
Dear Customer,
Congratulations on purchasing this device. Please read the following instructions carefully and follow them to prevent possible damages. We assume no liability for damage caused by disregard of the instructions and improper use. Scan the QR code to get access to the latest user manual and more product information.

CONTENTS
Product Data Sheet 28
Safety Instructions 29
Product Overview 31
Control Panel and Button Functions 32
Display Indicators and Programs 33
Operation 35
DIY Function Modes 39
Menu and Programs 41
Other Functions 43
Cleaning and Care 45
Shelves Installation 45
Troubleshooting 46
Disposal Considerations 48
Manufacturer & Importer (UK) 48
TECHNICAL DATA
| Item number 10033284 | |
| Power supply 220-240 V ~ 50/60 Hz | |
| Power consumption 1900-2200 W | |
| Max. filling quantity water tank 1.45 L | |
Information according to 66/2014
| Symbol Value Unit | |
| Model identification | |
| Type of oven Domestic electric oven | |
| Mass of the appliance M 19,5 kg | | | |
| Number of cavities 1 | |
| Heat source per cavity (electricity or gas) | Electricity |
| Volume per cavity V 24 I | | | |
| Energy consumption (electricity) required to heat a standardised load in a cavity of an electric heated oven during a cycle in conventional mode per cavity (electric final energy) | EC electric cavity | 0.59 kWh/cycle |
| Energy consumption required to heat a standardised load in a cavity of an electric heated oven during a cycle in fan-forced mode per cavity (electric final energy) | EC electric cavity | 0.57 kWh/cycle |
| Energy consumption required to heat a standardised load in a gas-fired cavity of an oven during a cycle in conventional mode per cavity (gas final energy) | EC gas cavity | - | MJ/cycle kWh/cycle (1) |
| Energy consumption required to heat a standardised load in a gas-fired cavity of an oven during a cycle in fan-forced mode per cavity (gas final energy) | EC gas cavity | - | MJ/cycle kWh/cycle (1) |
| Energy Efficiency Index per cavity EEI cavity 87.7 | | | |
(1) 1 kWh/cycle = 3,6 MJ/cycle .
SAFETY INSTRUCTIONS
- Never wash the cabinet with running water to prevent damage to the electrical components.
- To prevent electric shock, do not allow water or other liquids to enter the unit.
- Children over the age of 8, mentally and physically handicapped persons may only use the device if they have been thoroughly familiarized with its functions and safety precautions by a supervisor responsible for them. Make sure that children do not play with the device. Children over the age of 8 are only allowed to clean the appliance under supervision.
- Before use, check the voltage on the device's sticker. Only connect the device to sockets that correspond to the voltage of the device.
- Do not use this product if the plug, power cord, or product is damaged.
- If the power cord or plug is damaged, it must be replaced by the manufacturer, an authorized service center, or a similarly qualified person.
- Do not allow children to play with the product.
- Do not handle the plug or control panel with wet hands.
- Do not place this product on or near tablecloths, curtains, or other combustible materials.
- Allow at least 10cm of space around the product on all sides. Do not place any objects on top of the unit.
- Do not leave the unit unattended during use.

CAUTION
Danger of burns! Hot steam may escape when the oven door is opened. Keep a safe distance to avoid scalding.
- Danger of burns! Hot steam may escape when the oven door is opened. Keep a safe distance to avoid scalding.
- Do not insert any foreign bodies into the openings of the appliance.
- Do not use a steam cleaner for cleaning.
- Make sure that the appliance is switched off before replacing the lamp to avoid electric shock.
- Do not install the unit in a cabinet, as it may overheat.
Instructions for Safe Use

CAUTION
Danger of burns! The appliance becomes hot during use. Take care not to touch the heating elements inside the oven and use oven gloves.
- Before cleaning, unplug the appliance from the wall outlet and allow it to cool completely.
- Install the appliance on a dry, fl at surface and leave at least 10cm of space around the appliance in all directions so that the air can circulate suffi cientsly.
- Do not plug the appliance into an outlet that is already connected to other kitchen appliances.
- Do not place the appliance near flammable objects. Install it away from window curtains, door curtains, wallpaper, and similar objects to prevent fire. Do not place or place any objects on the unit.
- Clean the door panel of the stove with a soft and damp cloth. Do not use abrasives or metal scrapers as they will scratch the surface.
- Do not connect the unit to external timers or remotely controlled power sockets.
- Before use, check that your cookware is suitable for this product. We recommend that you use heat-resistant glass containers or ceramic containers. Fill the container to a maximum of two thirds.
- Do not overfill the water tank. When filling, use the MAX mark in the tank as a guide.
- Do not place any containers on the open oven door.
- Do not heat food in a sealed container, otherwise the container may explode. Transfer the food into a heat-resistant container before heating.
4
⑤

12
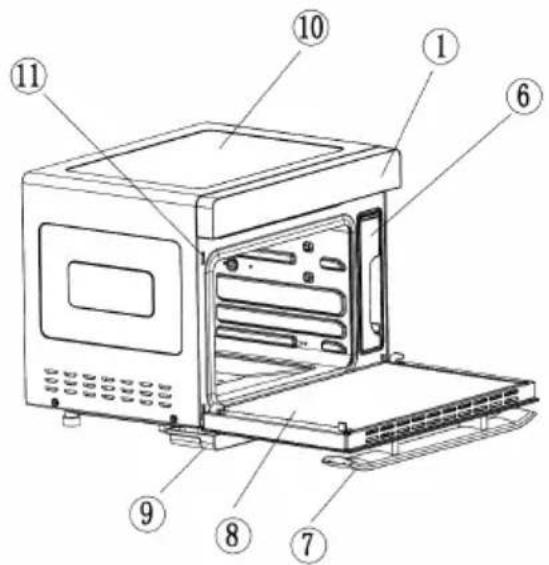
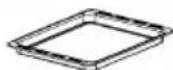
| 1 Control Panel 8 Door | | |
| 4 Grill 9 Water tray | | |
| 5 Bakeware 10 Body | | |
| 6 Water Tank 11 Door switch | | |
| 7 Handle 12 Glove | | |
| 7
0030 456 |
| 1 | % | Oven lamp/child lock button |
| ·Touch it once, oven lamp is ON; touch it again, oven lamp is OFF.
·Oven lamp will be ON for three minutes after the work is over.
·Oven lamp will be ON for three minutes when the oven door is opened.
·The button turns to child lock by holding it down for three seconds; in the standby mode, hold it down once, it is locked; press it again to unlock. |
| 2 | | Setting button |
| ·In any programs standby mode, press this button to enter the preset mode and preset icon is ON.
·After any programs working end, Press this button to enter the time-delay function sates and the time-delay icon is ON. |
| 3 | | Back button |
| Press this button to return to the previous setting mode before start working, and press it again to return again. |
| 4 | < | Selection button (reverse function) |
| ·Select 9 DIY regular function modes and 10 specific working modes.
·Adjust the time.
·Adjust the temperature. |
| 5 | | On/Off button |
| Press this button to activate all icons to light up; In the activation or working status of the machine press this button to exit the running mode, and the machine will return to the standby status. |
| 6 | > | Selection button (forward function) |
| ·Select 9 DIY regular function modes and 10 specific working modes in a forwarding sequence.
·Adjust the time.
·Adjust the temperature. |
| 7 | || | Start/Pause & Enter button |
| Start/Pause and Enter. |
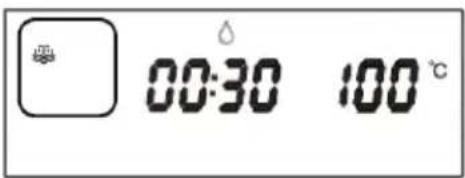
| 88:88 | Time |
| The front two digits indicate the hours (0-24). The two rear digits indicate the minutes (0-59). |
| 2 | 888°C | Temperature |
| Adjustable range: 30-230 °C. |
| 3 | L | Timer |
| Lights up when the timer is active. |
| 4 | | Time delay |
| Indicates an active time delay. |
| 5 | | Water level |
| The symbol lights up during operation. If the symbol flashes, water must be refilled. |
| 6 | | Water tank cleaning |
| Indicates tank cleaning. |
| 7 | | Child lock |
| Indicates that the child lock is active. |
| 8 | | Decalging |
| Indicates that decalcification is in progress. |
| 9 | = | Top heat |
| Indicates that the upper heater is on. |
| 10 | = | Lower heat |
| Indicates that the lower heater is on. |
| 11 | | High temperature |
| Warning of danger of injury at high temperatures. |
| 12 | | Fermentation |
| For dough that must go before processing. |
| 13 | | Preheating |
| For preheating to a certain temperature. |
| 14 | | Yoghurt |
| Program for the production of yoghurt. |
| 15 | | Air Fryer |
| This menu contains 9 preset programs and recipes. |
| 16 | | Drying and roasting |
| This menu contains 9 preset programs and recipes for various fruits and nuts. |
| 17 | | Steaming / Steaming |
| This menu contains 9 preset programs and recipes for various foods. |
| 18 | | Roasting |
| This menu contains 9 preset programs and recipes for fish and various meats. |
| 19 | | Baking |
| This menu contains 9 preset programs and recipes for various breads and cakes. |
| 20 | | DIY Mode (Custom Mode) |
| The cooking mode and time are set by the user. |
| 21 | | Descaling |
| Reminds you to clean the scale in the evaporator (steam heater). |
OPERATION
1. Start-up
The machine enters the full-screen standby interface after a "beep" sound when it is energized firstly by touching power ON.
Note: During the setting process, if there is no operation for continuous in three minutes all current settings will be cancelled and the machine will return to the standby interface for a standby status.
In standby mode, press the selection buttons (< >) to switch to the menu selection. Steam cooking is the default setting. Use the selection buttons (< >) to select another program.
| Fermentation: The steam function is active in this mode. The preset temperature is 40 °C. The temperature can be set between 30-50 °C. The time can be set between 0-7 hours. |
| Preheating: The preset temperature is 180 °C. When the oven has heated up to 180 °C, the display shows [END] and a 10-fold beep sounds. You can now proceed with baking or any other function. |
| Yogurt: The preset temperature is 45 °C and cannot be changed. The preset time is 8 hours and cannot be changed. |
| Air Fryer: When you select this menu, the corresponding icon will appear on the display. The temperature display shows [P-1], the time display shows the corresponding working time. Press the select button (> ) to select the desired program [P-1] to [P-9] (see MENUS AND PROGRAMS). Press the Start/Pause button to start the program. |
| Drying and Roasting: When you select this menu, the corresponding icon will appear on the display. The temperature display shows [L-1], the time display shows the corresponding working time. Press the select button (> ) to select the desired program [L-1] to [L-9] (see MENUS AND PROGRAMS). Press the Start/Pause button to start the program |
| Steaming: If you select this menu, the corresponding symbol in the display will appear. The temperature display shows [E-1], the time display shows the corresponding working time. Press the selection button (> ) to select the desired program [E-1] to [E-9] (see MENUS AND PROGRAMS). Press the Start/Pause button to start the program. |
| Roasting: When you select this menu, the corresponding icon will appear on the display. The temperature display shows [F-1], the time display shows the corresponding working time. Press the select button (> ) to select the desired program [F-1] to [F-9] (see MENUS AND PROGRAMS). Press the Start/Pause button to start the program. |
| Baking: When you select this menu, the corresponding icon will appear on the display. The temperature display shows [H-1], the time display shows the corresponding working time. Press the select button (> ) to select the desired program [H-1] to [H-9] (see MENUS AND PROGRAMS). Press the Start/Pause button to start the program. |
| DIY | DIY mode: When you select this menu, the corresponding icon in the display will appear. Press the select button (> ) to start the function selection. On the left side of the display the corresponding symbol is shown (see picture). There are 9 different functions. Each time you press a button, you switch to the next function and the symbol changes according to the function (see DIY Modes). |
| 00:30 180° |
| Dscaling: If you select this menu, the corresponding symbol in the display will appear. Descaling takes 50 minutes and cannot be stopped. |
3. Setting of Working Hours and Temperature
After the desired function is selected, it shall be confirmed by pressing the ENTER button to enter the setting of working hours. The hour bit will flash. Press the selection button to set the hour bit. After it is confirmed by pressing the ENTER button, the minute bit will flash, and then press the selection button to set the minute bit. After it is confirmed by pressing the ENTER button, the temperature bit will flash, and then press the selection button to set the working temperature for "Top heater pipe" and "Bottom heater pipe".
After the setting of working temperature is finished, press the ENTER button to start working.
Example: Setting of top heater pipe working mode
| 1 | Select function: |
| 00:30 :80° |
| 2 | Setting of working hours: |
| 00:30 :80° 0:30 :80° |
| 3 | Setting of working hours and temperature, top heater pipe icon will flash. |
| 0:40 :80° |
| 4 | Start work: |
| 0:40 200° |
Note: If you select a program with steam, the water tank symbol lights up in the display (see picture).
| 5 | During the work: |
| ·Pause: Press the Start/Pause button to stop the unit during operation. The working time will no longer be counted down. The display continues to show the program data. The time display flashes and indicates that the unit is pausing. Press the Start/Pause button again to continue with the program.
·Add the time and adjust the temperature in the midway: Press the SET button until the time delay symbol appears. At this point, the minute display will start flashing. Use the selection buttons (<>) to adjust the time afterwards. Press the Start/Pause button and adjust the temperature with the selection buttons (<>) OR press the Start/ Pause button again to continue with the program without adjusting the temperature. |
| 6 | End of work: |
| ·After the program process is ended, [END] appears on the display screen, and the buzzer will beeps for 10 times, which indicates that the cooking is completed. Afterwards, you can open the door to take out the food or the system will automatically exit to the standby status five minutes later.
·After the program is over or in the standby state, for a pause or stop in the midway, the display screen will show the high-temperature prompt icon so long as the oven cavity temperature is over 50 °C and the centrifugal fan will delay the working time for 3 minutes.
·After the program is completed with the steam function, descending icon will flash on the screen, which remind the user to take out the water tank and drain the water in the evaporator, and then pour away the residual water from water holder. This icon will flash for 1 minute. |
DIY FUNCTION MODES
| 1 Steaming / Steam cooking |
| 2 | Circulating air + top heat + bottom heat |
| 3 Top heat | |
| 4 | Top and bottom heat |
| 5 | Circulating air + top heat |
| 6 | Circulating air |
| 7 | High-temperature steam cooking |
(1) Steam

The temperature can be adjusted in 5^ increments from 50-110 °C. Before using the function, open the oven door, remove the water tank and fill it with water to the MAX mark. Replace the water tank and close the oven door.
Press the selection button (≥) to select the steam cooking function. The corresponding symbol will flash on the display. Press the Start/Pause button, the hour indicator will light up. Press the select button (≥) and set the desired time (0-6). Press the Start/Pause button, the minute indicator will light. Press the select button (≥) and set the desired time.
(0-59) on. The default setting is 30 minutes. Press the Start/Pause button, the temperature indicator lights up. Press the selection button (>) and set the desired temperature (50 - 110^) . The default setting is 100^ . Press the Start/Pause button again to confirm and start.
Note: If the water tank has not been inserted or there is insufficient water in it, an alarm sounds and the water level icon flashes. Open the oven door, remove the tank and fill it with water to the MAX mark. As soon as you have inserted it and close the door, the appliance will automatically continue with the program.
When the program is finished, the descending symbol flashes on the display to remind you to empty the water tank. Also empty the water that has accumulated in the water sump.
When the program is finished, you will hear a 10 beeps. The appliance will then stop. You can now open the door and remove the food. After 5 minutes, the appliance automatically switches to standby mode.
(2) DIY Roast Modes


The temperature can be adjusted between 10 - 230^ . The preset temperature is 180^ .
In standby mode, open the oven door, place the food in the oven and close the door. Press the select button (>) to select one of the roasting functions. The corresponding symbol will flash on the display. Press the Start/Pause button, the hour indicator will light up. Press the select button (>) and set the desired time (0-3). The default is 0 hours. Press the Start/Pause button, the minute indicator will light. Press the selection button (>) and set the desired time (0-59). The default setting is 30 minutes. Press the Start/Pause button, the temperature indicator will light. Press the selection button (>) and set the desired temperature (100 - 230^) . The default setting is 180^ . Press the Start/Pause button again to confirm and start the program.
When the program is finished, you will hear a 10-fold beep. The device then stops. You can now open the door and remove the food. After 5 minutes, the appliance automatically switches to standby mode.
As long as the temperature in the interior is still above 50^ , the high temperature warning symbol lights up in the display.
MENUS AND PROGRAMS
Programs in the Steaming Menu
| Food Style Working Time
(minutes) | Temperature (°C) |
| E-1 Vegetables 16 100 | | |
| E-2 Rice 50 100 | | |
| E-3 Fish 20 100 | | |
| E-4 Shrimps 15 100 | | |
| E-5 Crabs 30 100 | | |
| E-6 Eggs 16 100 | | |
| E-7 Chicken 30 100 | | |
| E-8 Papaya | 35 100 | |
| E-9 Potatoes | 50 100 | |
Programs in the Roasting Menu
| Food Style Working Time
(minutes) | Temperature (°C) |
| F-1 Chicken 45 230 | | |
| F-2 Steak | 12 230 | |
| F-3 Mutton | 35 | 200 |
| F-4 Salmon | 20 | 220 |
| F-5 Chicken legs | 26 | 200 |
| F-6 Saury | 20 220 | |
| F-7 Chips | 13 220 | |
| F-8 Shrimps 15 180 | | |
| F-9 Sausages | 10 | 200 |
Programs in the Bake Menu
| Food Style Working Time
(minutes) | Temperature (°C) |
| H-1 Baguette 16 180 | | |
| H-2 Wheat bread 20 180 | | |
| H-3 Pizza 22 180 | | |
| H-4 Cheesecake 60 150 | | |
| H-5 Cake base 50 150 | | |
| H-6 Chocolate cake 50 150 | | |
| H-7 Cookies | 14 180 | |
| H-8 Puff pastry | 32 | 180 |
| H-9 Egg tart | 22 180 | |
Programs in the Air Fryer Menu
| Food Style Working Time
(minutes) | Temperature (°C) |
| P-1 | Pork chops | 20 |
| P-2 | Chicken wings | 23 |
| P-3 | Chicken kabob | 18 180 |
| P-4 | Meatballs | 18 |
| P-5 | Pita chips | 7 |
| P-6 | Chips | 13 220 |
| P-7 | Croutons 14 140 | |
| P-8 | Mini pizza | 18 180 |
| P-9 | Bacon | 15 200 |
Programs in the Drying and Roasting Menu
| Food Style Working Time
(minutes) | Temperature (°C) |
| L-1 Banana 360 65 | | |
| L-2 Apple 360 65 | | |
| L-3 Raisins 420 90 | | |
| L-4 Kiwi 360 65 | | |
| L-5 Lemon 360 65 | | |
| L-6 Almonds 10 140 | | |
| L-7 Walnut 12 160 | | |
| L-8 Macadamia 12 160 | | |
| L-9 Cashew 12 160 | | |
OTHER FUNCTIONS
Dscaling
The preset time is 50 minutes and cannot be changed.
After the evaporator has been in operation for about 100 hours, the unit will remind the user to descale. Alternatively, you can start the function manually at any time. The descending symbol flashes on the display.

- Mix water and descending agent in a ratio of 1:8 and pour the mixture into the water tank. The filling quantity should be based on the descending scale on the tank.
- Insert the tank and close the oven door. Press the selection button (<>) and select the descending function. Press the Start/Pause button to start the program. 20 minutes before the end of descending, the unit will remind you to dispose of the descending solution in the tank and fill the tank with fresh water. As soon as you have reinstalled the tank and closed the door, the unit will automatically resume descending.
10 minutes before the end, you will be reminded again to fill the water tank with fresh water. At the end of decalcification a signal sounds.
Setting a Start Timer
- Switch on the appliance, press the On/Off button , the appliance goes into standby mode.
- Press the Setting button and make the desired time preselection (0-24 hours), for example: 30 min (0:30). Press the ENTER button to confirm.
- Select the desired programme, for example F-1. Press the ENTER button to start. The screen then alternately displays the time 30 minutes and F-1.
- After 30 minutes, the F-1 programme starts automatically.
Switching on the Light
Press the light/child lock button to turn on the light for 3 minutes. Press the button again to turn off the light.
Child Lock
When a program is running, press and hold the Light/Child Lock button to turn on the child lock. Now all buttons are inactive until you press and hold the button again.
Low Water Protection
When a program is started with steam and the appliance detects a lack of water, it stops working and an alarm sounds. At this moment all buttons are inactive. The appliance will continue working as soon as the water in the tank has been refilled.
Protective Mechanisms when the Oven Door is open
As long as the door is open, no program can be started. If the door is opened during a program, the device stops automatically and does not continue with the program until the door is closed again.
CLEANING AND CARE
- Turn off the appliance and unplug the appliance from the wall outlet before cleaning the cooking chamber.
- Do not clean the baking tray with metal scrapers or scouring agents as they will damage the non-stick coating on the surface.
- Clean the interior regularly. If grease has been sprayed onto the inside wall, remove it with a damp cloth and a little detergent. Do not use abrasive cleaners to clean the interior.
- When using the steam cooker, always use pure water or distilled water. If stale tap water is used, there will be deposits on the inside walls of the cooking chamber.
- Also check the water tank regularly. Remove it horizontally. Clean it and dry it with a soft cloth. Put it back in its original place.
- When cooking is complete, remove the remaining water from the water container.
- Regularly clean the sealing surface of the oven door with a soft, dry cloth.
- If the steam cooker is not to be used for an extended period of time, the mains plug must be disconnected and the interior cleaned. Store the appliance in a dry place.
- The unit contains parts that are not accessible to the user. Repairs may only be carried out by qualified specialists.
- Do not use abrasive cleaners or a sharp metal scraper to clean the furnace door glass, as this may cause the glass to break.
- Disconnect the power cord before cleaning the interior or replacing the bulb.
- Do not use steam cleaner.
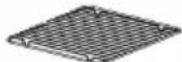
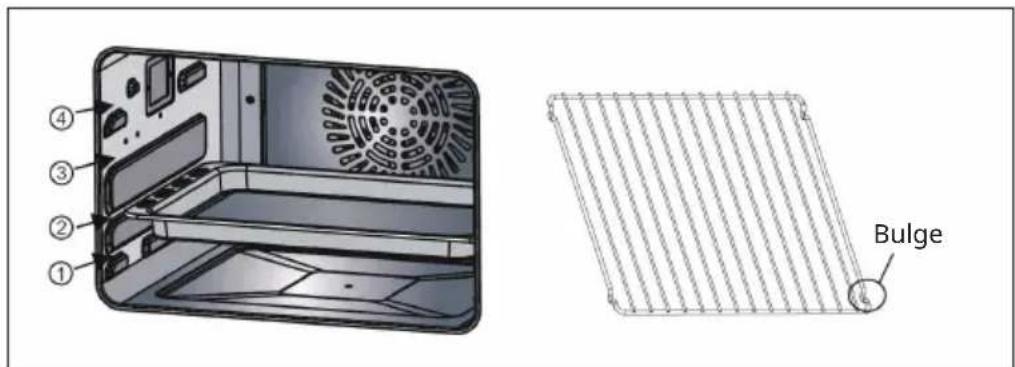
SHELVES INSTALLATION
There are 4 layers for shelf. Please keep the bulge downward and push shelf into oven, according to different food or recipe to choose different layer.
TROUBLESHOOTING
| Problem Possible Cause | Suggested Solution | |
| Error code Er1 Upper sensor | error switch off the appli | ance, open the door and let it cool down for 10 minutes. Restart the appliance. If the problem persists, contact a service center for inspection and repair. |
| Error code Er2 Short circuit | of the upper sensor |
| Error code Er3 Error of the lower sensor | lower sensor |
| Error code Er4 Short-circuit | of the lower sensor |
| Error code Er7 Evaporator | sensor error Contact a specialist | company for inspection and repair. |
| Error code Er8 Short circuit | of the evaporator sensor |
| No display on the screen | Check whether the power supply plug is plugged | Re-energize. |
| Display panel in poor contact | Contact a specialist company for inspection and repair. |
| Oven lamp does not light. | Oven lamp is damaged Replace the lamp. |
| Poor contact Contact a specialist company for inspection and repair. |
| Exhaust fan does not work | Fan is damaged Contact a specialist company for inspection and repair. |
| No response from the button | PCB is failed or damaged Contact the after-sales department for repair |
| Control panel Just time LED flashes, other buttons no response. | Make sure that the water tank is filled with water and is in the oven. |
| No steam Water pipe is blocked | Contact a specialist | company for inspection and repair. |
| Evaporator heater is damaged |
| Water intake system is damaged |
| Problem Possible Cause Suggested Solution | |
| Steam oven does not work | Door is not closed tightly Re-close the oven door. |
| Poor contact of door control switch | Contact a specialist company for inspection and repair. |
| Control panel Just time LED flash, other buttons no response. | Be sure the water tank have water and tank is put into Oven. |
| Steam leakage from oven door | Door is not closed tightly Re-close the oven door. |
| Door sealant is off or damaged | Replace the gasket. |
| Door structure is damaged or not assembled in place | Contact a specialist company for inspection and repair. |
DISPOSAL CONSIDERATIONS

If there is a legal regulation for the disposal of electrical and electronic devices in your country, this symbol on the product or on the packaging indicates that this product must not be disposed of with household waste. Instead, it must be taken to a collection point for the recycling of electrical and electronic equipment. By disposing of it in accordance with the rules, you are protecting the environment and the health of your fellow human beings from negative consequences. For information about the recycling and disposal of this product, please contact your local authority or your household waste disposal service.
MANUFACTURER & IMPORTER (UK)
Manufacturer:
Chal-Tec GmbH, Wallstrasse 16, 10179 Berlin, Germany.
Importer for Great Britain:
Berlin Brands Group UK Ltd
PO Box 1145
Oxford,OX1 9UW
United Kingdom
Chere cliente, cher client,
FICHE DE DONNÉES PRODUIT
CHOIX DES FONCTIONS DIY
Berlin Brands Group UK Ltd
PO Box 1145
Oxford,OX1 9UW
United Kingdom
Estimado cliente:
Berlin Brands Group UK Ltd
PO Box 1145
Oxford,OX1 9UW
United Kingdom
Gentile clientele,
PRODUTTORE E IMPORTATORE (UK)
Produtlore:
Chal-Tec GmbH, Wallstraße 16, 10179 Berlin, Germania.
Berlin Brands Group UK Ltd
PO Box 1145
Oxford,OX1 9UW
United Kingdom
Geachte klant,
INSTRUCTIES VOOR AFVOER

Berlin Brands Group UK Ltd
PO Box 1145
Oxford,OX1 9UW
United Kingdom


KLARSTEIN


