
KA 1806 - Other kitchen appliances ADE - Free user manual and instructions
Find the device manual for free KA 1806 ADE in PDF.
| Product Type | Electric slicer with integrated sharpening |
| Brand | ADE |
| Model | KA 1806 |
| Power supply | 230 V~, 50 Hz |
| Rated power | 140 W |
| Protection class | I |
| Blade diameter | 22 cm |
| Adjustable cutting thickness | 0 – 15 mm |
| Overall dimensions | 34.5 × 48 × 33.5 cm |
| Weight | Approx. 11 kg |
| Rectangular cutting surface | 17 × 14 cm |
| Maximum duty cycle | 25 minutes continuously, then cool down |
| Blade material | Stainless steel |
| Sharpening device | Integrated, with two grinding wheels |
| Warranty | 2 years |
| Intended use | Household, for slicing deli meats, meat, bread, cheese, seedless fruits, vegetables |
| Package contents | Slicer, hex key, instruction manual |
| Cleaning | Manual disassembly, cut-resistant gloves recommended, do not wash in dishwasher |
| Safety | Protected blade, emergency STOP stop, pusher with spikes |
| Maintenance | Lubrication of rails and pusher shaft with food-grade non-resinous oil |
Frequently Asked Questions - KA 1806 ADE
User questions about KA 1806 ADE
0 question about this device. Answer the ones you know or ask your own.
Ask a new question about this device
Download the instructions for your Other kitchen appliances in PDF format for free! Find your manual KA 1806 - ADE and take your electronic device back in hand. On this page are published all the documents necessary for the use of your device. KA 1806 by ADE.
USER MANUAL KA 1806 ADE
natural_image
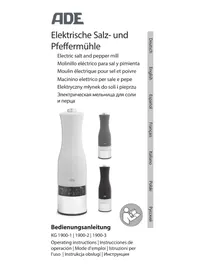
White commercial microwave oven with a transparent glass lid and metal blade, no visible text or symbols.Bedienungsanleitung
KA 1806
Operating instructions | Instrucciones de operación | Mode d'emploi
natural_image
Icon of a person reading a book inside a circular frame (no text or symbols)22089 Hamburg, Germany
natural_image
Line drawing of a mounted solar water heater with control panel and dial indicator (no text or symbols)Abb. 1
natural_image
Line drawing of a solar water heater with a rotating blade and control panel (no text or symbols)Abb. 2
natural_image
Line drawing of a solar water heater with a rotating fan and internal components (no text or symbols)Abb. 3
natural_image
Technical line drawing of a mechanical device with internal components and directional arrows indicating motion (no text or symbols)Abb. 4
natural_image
Line drawing of a solar water heater with control panel and rotary dial (no text or symbols)Abb. 5
natural_image
Technical line drawing of a mounted watermelon or sater machine with an inset showing its internal mechanism (no text or symbols present)Abb. 6
natural_image
Illustration of hands using a lathe tool to clean or adjust a circular component, no text or symbols presentAbb. 7
natural_image
Technical line drawing of a hand using a lathe machine to clean or adjust a circular component (no text or symbols present)
Abb. 11
Schlittenwelle ölen (A)

natural_image
Line drawing of a solar water heater with a rotating blade and control panel (no text or symbols)Abb. 12
natural_image
Diagram of a mechanical device with directional arrows indicating motion or force (no text or symbols)Abb. 13
ADE Germany GmbH & Co. KG

Entsorgen
You have chosen to purchase a high-quality ADE brand product, which combines intelligent functions with an exceptional design. The wealth of experience of the ADE brand ensures a high technical standard and proven quality for more freshness in your kitchen.
We wish you much pleasure and enjoyment!
Your ADE Team
General information
About this operating manual

This operating manual describes the safe handling and maintenance of the product. Keep this operating manual in a safe place for future reference. If you pass this product on to someone else, pass on this operating manual as well.
Failure to observe this operating manual may result in injuries or damage to your product.
Explanation of symbols

This symbol combined with the word DANGER warns of serious injuries.

This symbol combined with the word WARNING warns of moderate and mild injuries.

This symbol combined with the word NOTE warns of material damage.

This symbol indicates additional information and general notes.
Table of Contents
General information 26
Intended use 28
Safety 28
Scope of delivery 30
Technical data 31
Warranty 31
Overview 32
Before first use....34
Notes on installation site 34
Unpacking and setting up the machine ....34
Turning the machine on and off 34
Slicing foods....35
Cleaning 39
Replacing the circular blade 43
Servicing and maintenance 43
Grinding the blades 45
Preparing the machine 46
Grinding the blades 47
Storing and transporting 47
Declaration of Conformity....48
Disposal....48
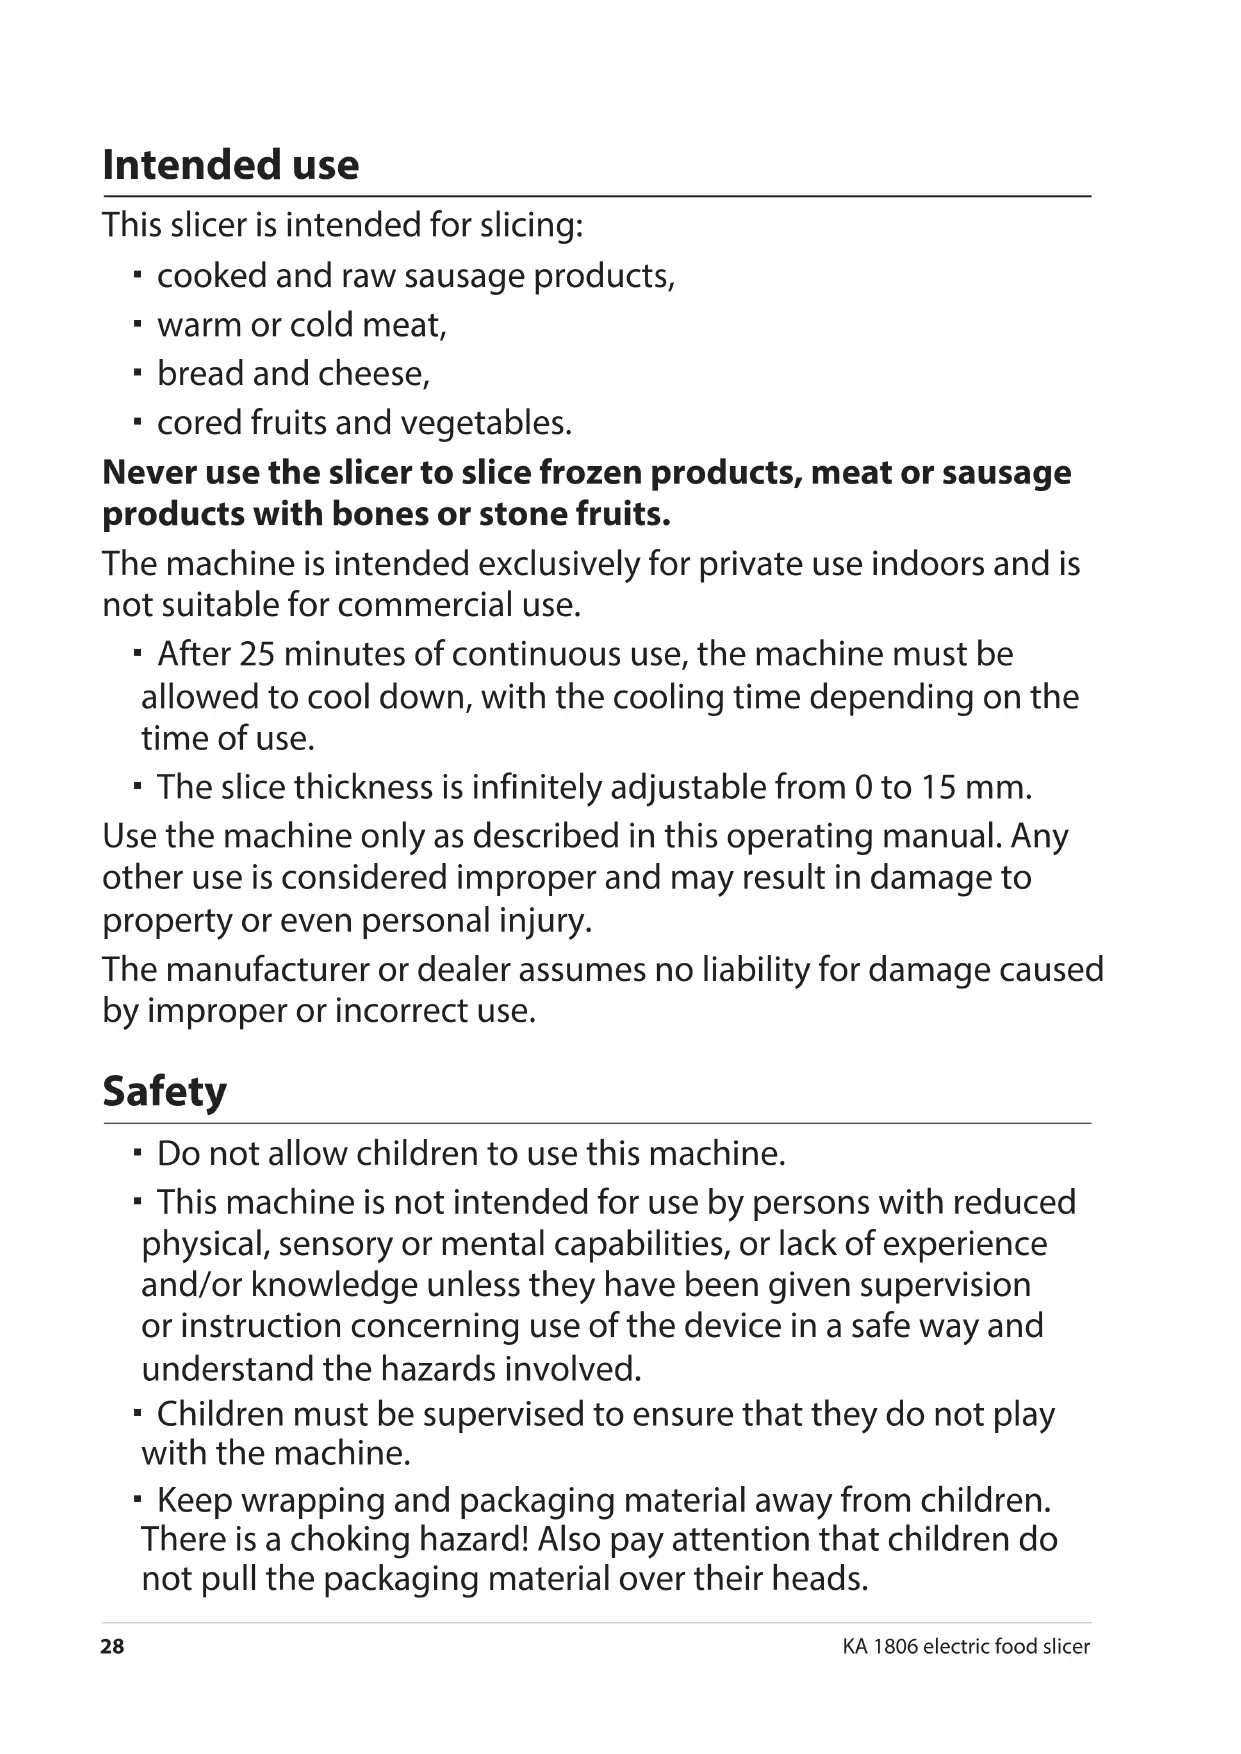
This slicer is intended for slicing:
- cooked and raw sausage products,
- warm or cold meat,
- bread and cheese,
- cored fruits and vegetables.
Never use the slicer to slice frozen products, meat or sausage products with bones or stone fruits.
The machine is intended exclusively for private use indoors and is not suitable for commercial use.
- After 25 minutes of continuous use, the machine must be allowed to cool down, with the cooling time depending on the time of use.
- The slice thickness is infinitely adjustable from 0 to 15 mm.
Use the machine only as described in this operating manual. Any other use is considered improper and may result in damage to property or even personal injury.
The manufacturer or dealer assumes no liability for damage caused by improper or incorrect use.
Safety
- Do not allow children to use this machine.
- This machine is not intended for use by persons with reduced physical, sensory or mental capabilities, or lack of experience and/or knowledge unless they have been given supervision or instruction concerning use of the device in a safe way and understand the hazards involved.
- Children must be supervised to ensure that they do not play with the machine.
- Keep wrapping and packaging material away from children. There is a choking hazard! Also pay attention that children do not pull the packaging material over their heads.
- If the power cord of this machine is damaged, it must be replaced by the manufacturer or its after-sales or customer service to avoid hazards.
Danger from electricity
- Do not immerse the machine, power cord or power plug in water or other liquids.
- Place the machine in such a way that no liquids can spill over the device plug connection. Observe the notes in chapter "Notes on installation site".
- Do not operate the machine with wet hands.
- Do not operate the machine outdoors.
- Connect the device to a correctly installed socket that has a voltage corresponding to that described under "Technical Data".
- Make sure that the mains outlet is readily accessible so that you can quickly unplug the power cord, if necessary.
- Do not use the machine:
- if the machine or its parts are damaged,
- if the power cord or plug is damaged,
- if the machine has fallen down.
- Unwind the power cord completely before each use. Make sure that the power cord is not damaged by sharp edges or hot objects.
- Unplug the power cord from the mains outlet:
- if you do not use the machine,
- after each use,
- before cleaning or storing the machine,
- if, during operation, there appears to be interference,
- during a storm.
To unplug, always grasp the power plug; do not pull on the power cord.
- Do not modify the machine or power cord. Have repairs carried out only by a specialist workshop, as improperly repaired devices endanger the operator.
- Do not use an extension cable.
WARNING of risk of injury
- The blade is very sharp. Often you cannot tell if the blade is rotating or not. Thus, never touch the blade with your fingers or other parts of the body.
- Take extreme care when handling the leftover holder. The mandrels inside it for better fixation of food to be sliced are sharp.
-
Always wear suitable protective gloves which protect against cuts during cleaning or maintenance works.
-
While working, put up long hair, tie it up backwards or cover it under a cap. Avoid loose or loose hanging clothes such as scarves, ties, etc.
- Lay the power cord so that it does not pose a tripping hazard.
BEWARE of material damage
- Never place the machine on or near hot surfaces (for example, hot plates, etc.).
- Avoid contact of the power cord with hot parts.
- Never expose the machine to a high temperature (heating, etc.) or adverse weather conditions (rain, etc.).
- Place the machine on a robust, smooth, and easy-to-clean worktop. When processing foods, occasional splashes are unavoidable. Observe the notes in chapter "Notes on installation site".
- Use only original accessories and spare parts.
- The machine and its parts must not be cleaned in the dishwasher.
Scope of delivery
- Slicer with integrated grinder
- Allen key
- Operating Manual

The Allen key is attached to the underside of the machine when delivered.
Technical data
Model: KA 1806 electric food slicer
Power supply: 230 V\~, 50 Hz
Rated power: 140 W
Protection class: I
Short-time operation: max. 25 minutes without interruption, then cooldown
Weight: approx. 11 kg
Machine dimensions: approx. 34.5 x 48 x 33.5 cm
Required footprint dimensions: approx. 26.5 x 40.5 cm
Blade diameter: ∅ 22 cm
Slice thickness selector: 0 – 15 mm
Square cutting area: 17 x 14 cm
Distributor (no service address): ADE Germany GmbH & Co. KG
Hammer Steindamm 27-29
22089 Hamburg, Germany
Our products are constantly being developed and improved.
For this reason, design and technical modifications are possible at any time.
Warranty
ADE Germany GmbH & Co. KG warrants for 2 years from the purchase date the cost-free rectification of defects in material and workmanship through repair or exchange.
In the event of a warranty claim, please return the product with the proof of purchase (specifying the reason for claim) to your dealer.
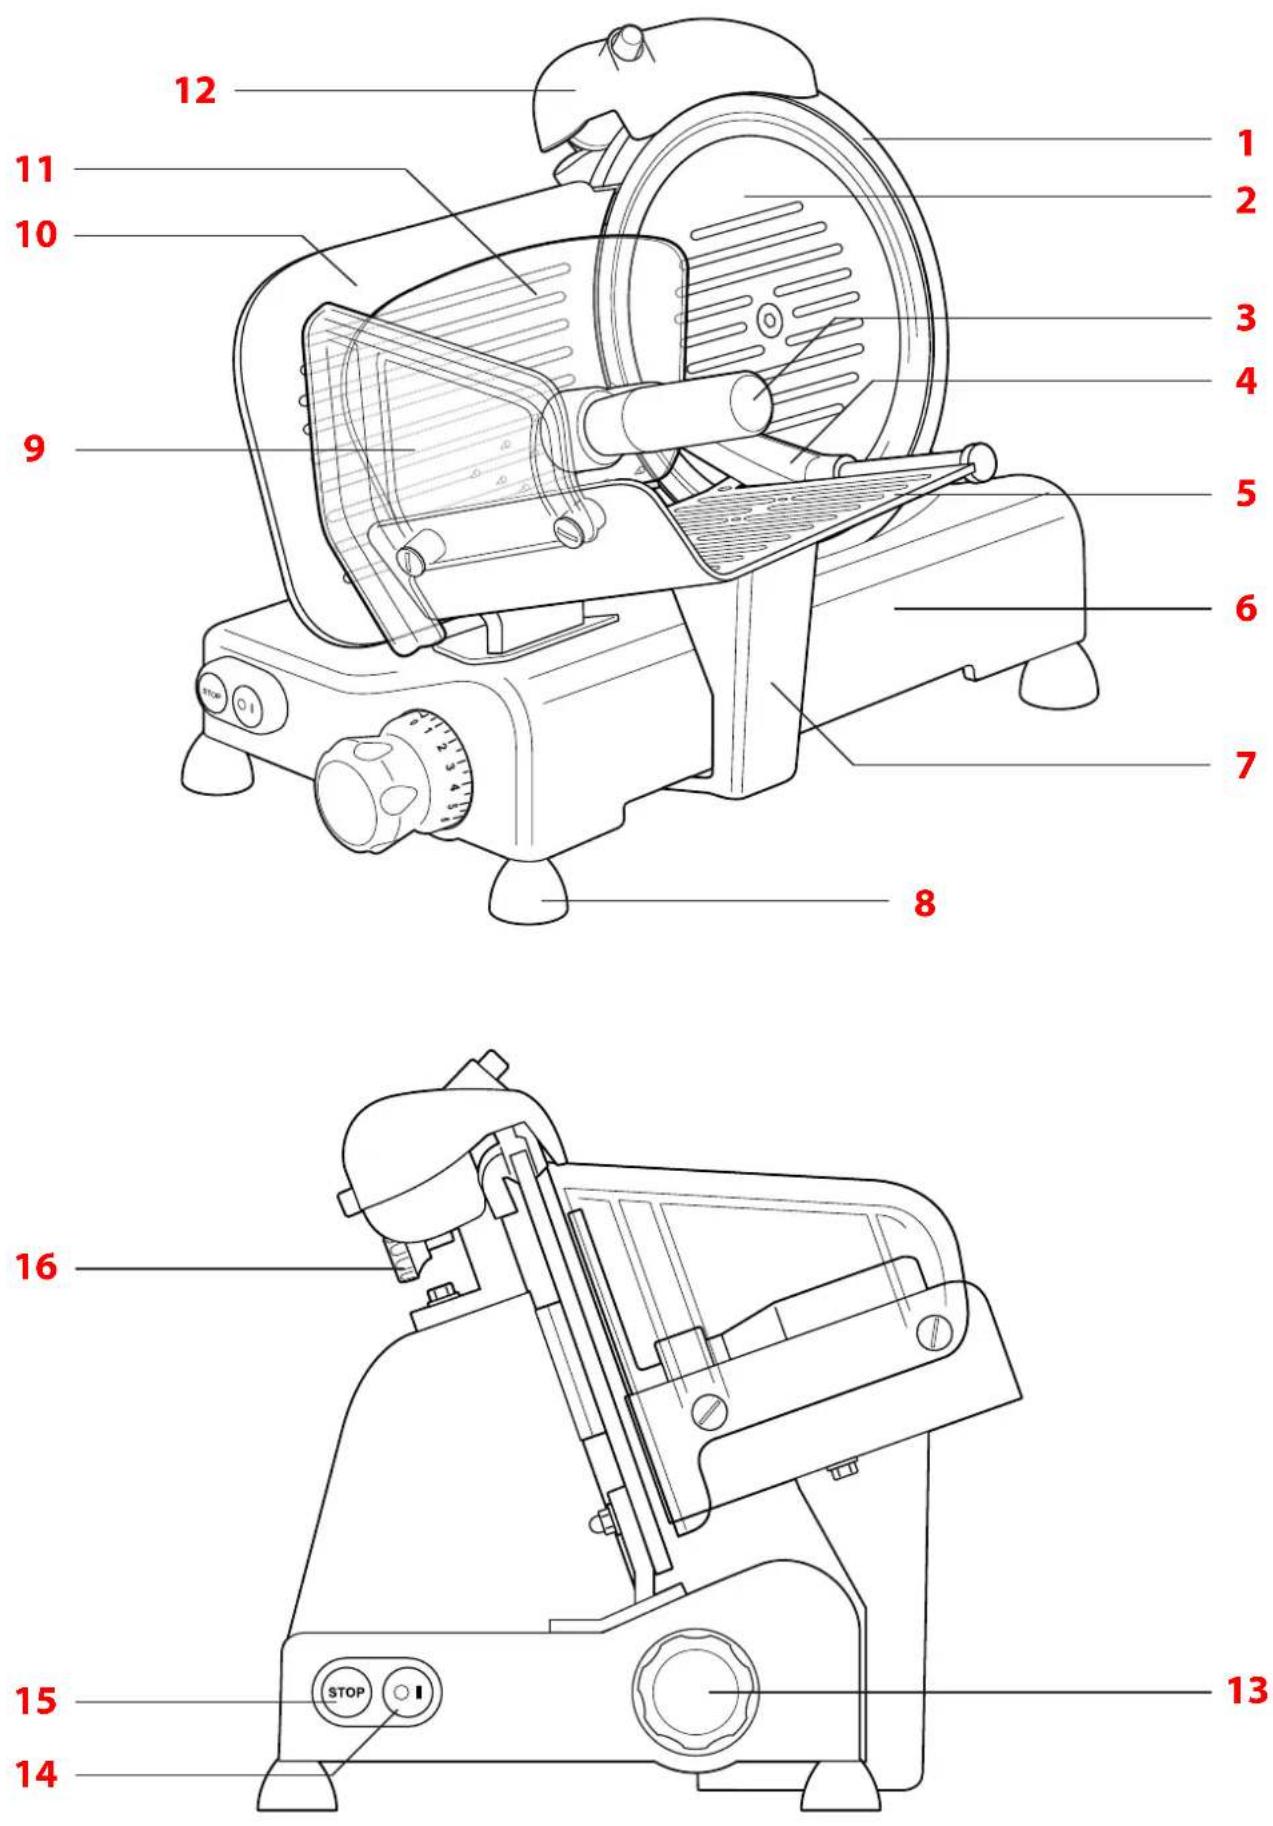
Parts and controls
1 Blade protection
2 Blade cover plate
3 Handgriff für Restehalter
4 Leftover holder
5 Food carriage
6 Outer housing
7 Food carriage arm
8 Foot
9 Hand guard
10 Feed plate
11 Protective plate
12 Grinder
13 Slice thickness adjustment knob
14 Green I power on button with integrated power light
15 Red STOP power off button
16 Knurled nut for loosening the grinder
Notes on installation site
Note the following points when selecting the installation site:
- Proper operation of the machine is guaranteed at a relative humidity of up to 80% and in the immediate vicinity of heat sources with a maximum temperature of 40 °C.
- The surface must be flat, smooth, vibration-free, and easy-to-clean. Recommended height above ground: max. 80–90 cm.
- There must be at least 30 cm free space around the slicer to ensure fault-free operation, cleaning and maintenance of the machine.
- The area should be well lit. There must also be a readily accessible mains outlet with protective contacts nearby.
Unpacking and setting up the machine

- You will need a hand to help you unpack the machine. The machine is heavy and unwieldy.
-
Please keep the outer packaging at least until expiry of the warranty.
-
Check the packaging for any damage.
- Carefully remove the machine from the packaging.
- Place the slicer on a flat, smooth, and vibration-free surface.
- Remove the transparent outer packaging of the machine.
- Before first use, clean the machine as described in chapter "Cleaning".
Turning the machine on and off

NOTE on material damage
- Do not operate the machine continuously for more than 25 minutes. Allow it to cool down afterwards.
Switching on
- To turn on the machine, press the green I power on button. The power light will signal the operation.
Switching off
- To turn off the machine, press the red STOP power off button. Note the blade run. Risk of injury!

RISK of injury
- Do not turn on the machine until it is ready for immediate slicing. - Observe the safety instructions in chapter "Safety".
natural_image
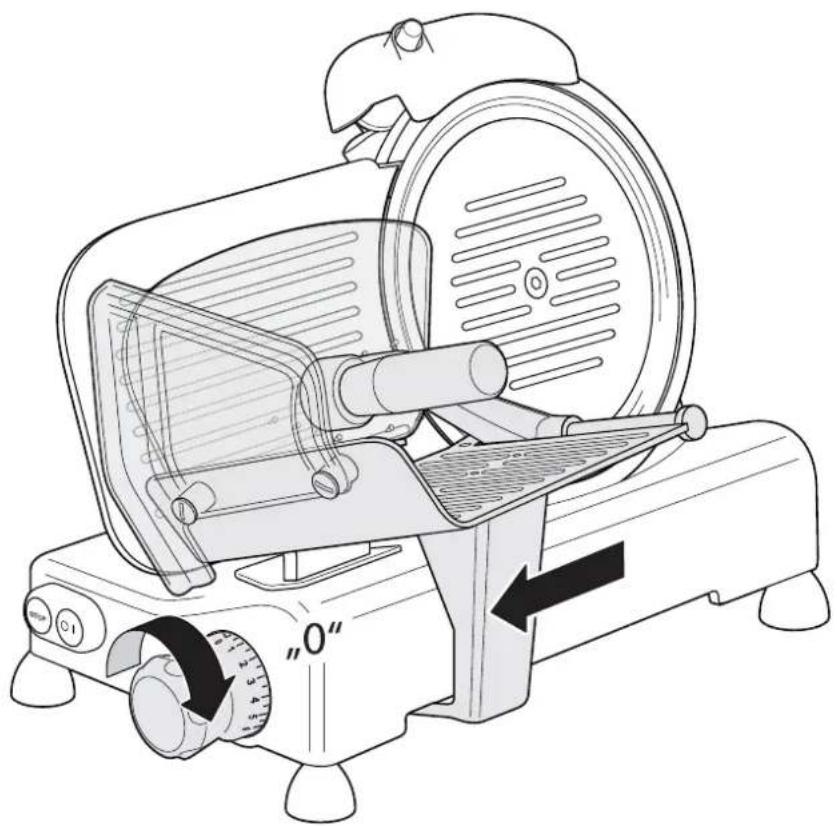
Line drawing of a solar water heater with control panel and rotary dial (no text or symbols)Fig. 1
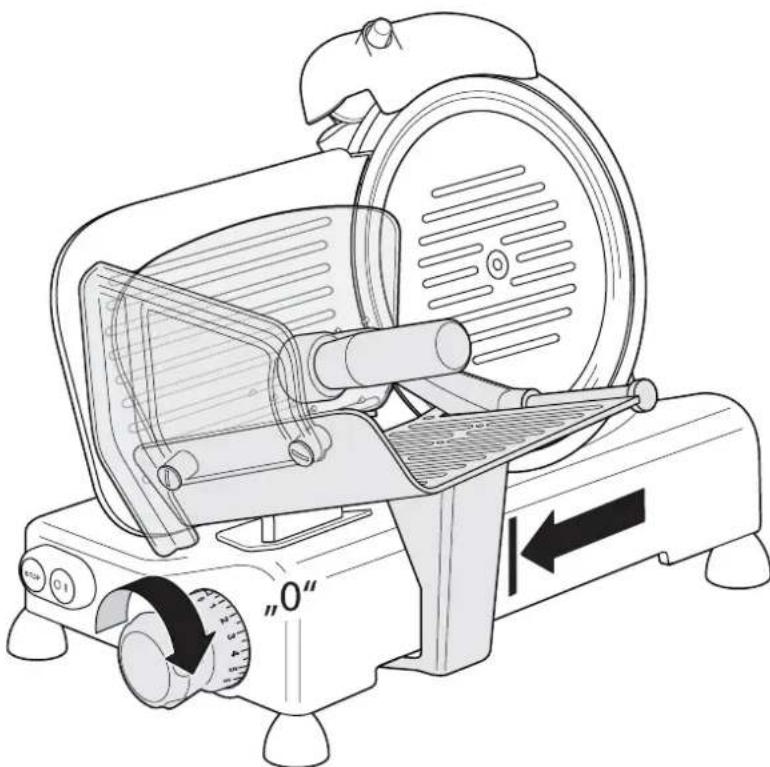
-
Set the slice thickness adjustment knob to "0" or turn until it stops.
-
Pull the food holder to yourself as far away from the blade as possible.
natural_image
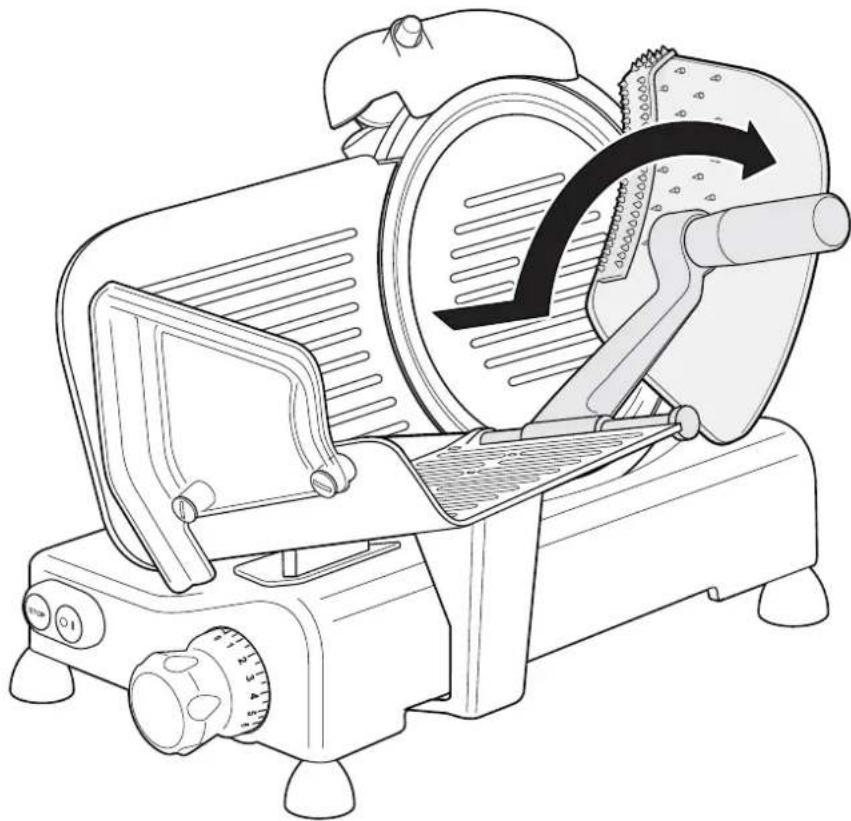
Line drawing of a solar water heater with a rotating blade and control panel (no text or symbols)Fig. 2
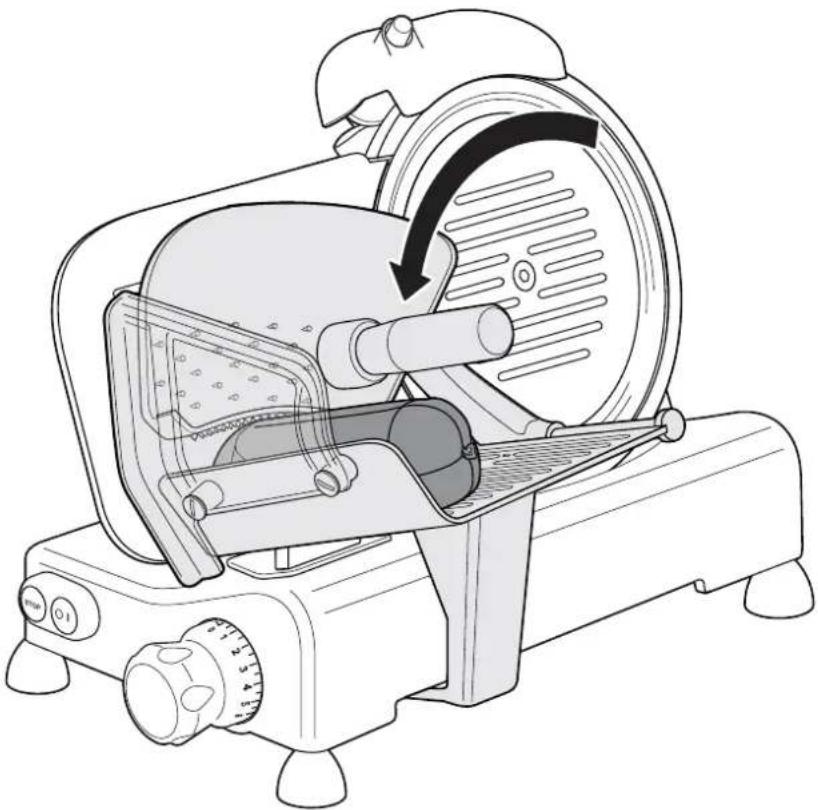
- Lift the leftover holder and place the food to be sliced on the food carriage.
-
If you need both hands to place the food to be sliced, you can fix the leftover holder:
-
Pull the leftover holder completely to yourself.
- Fold it completely to the right.
- Then push it forward again until it stops.
The leftover holder will be fixed in this position and you will have your both hands free.
natural_image
Line drawing of a solar water heater with internal components and a rotating fan (no text or symbols)Fig. 3
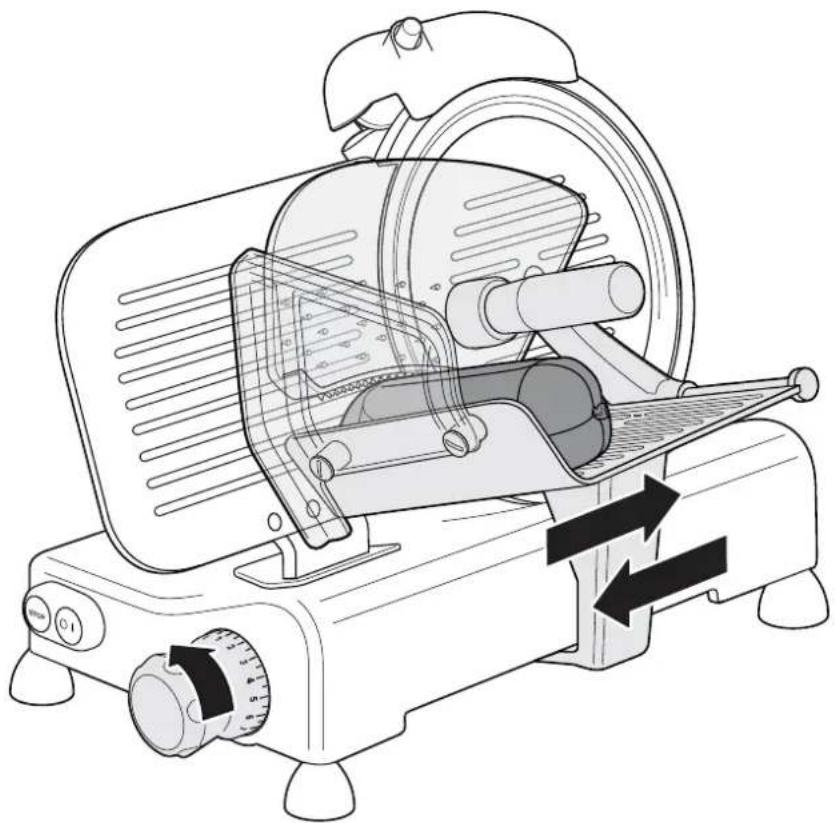
- Fold the leftover holder on or behind the food to be sliced depending on its size.
- Use the slice thickness adjustment knob to set the desired slice thickness.
- Turn on the machine. The blade will start to rotate.
natural_image
Technical line drawing of a microwave oven with internal components and directional arrows indicating motion (no text or symbols)Fig. 4
- Move the food carriage back and forth steadily and smoothly to slice the food. Use the handle of the leftover holder to guide the food carriage.

If it is not possible to slice the food properly due to its size (the leftover holder is placed on the food to be sliced):
- Grasp the food carriage and guide it (possibly together with the food to be sliced) to the carriage wall. Never guide the food carriage to the hand guard!
- Alternatively, you can guide the food carriage with the food carriage arm.
- Turn off the machine after slicing.
- Set the slice thickness adjustment knob to 0.
Brief cleaning
If the blade, protective sickle and/or blade cover plate are only slightly soiled after use, it may be sufficient just to clean them briefly before slicing the other food.
Note the following points concerning brief cleaning:
- The feed plate must be closed during cleaning and also remain closed (set the slice thickness adjustment knob to 0 or turn until it stops).
-
We recommend that you wear suitable cut-resistant gloves. There is a risk of injury!
-
Turn off the machine.
- Put on a cut-resistant glove (recommended).
- Using a damp cloth, press it on the blade surface and slowly move it from centre to edge on both sides.
- Wipe the blade cover plate clean with the cloth.
- Wipe the surfaces dry with a dry, soft cloth.
Cleaning

RISK of injury
- The circular blade is very sharp. Take extreme care. We recommend that you wear suitable cut-resistant gloves.

WARNING against injury
- Only clean the machine with suitable and approved cleaning agents. Only products suitable for this purpose may be used (available from specialist retailers).

NOTE on material damage
- The machine and its parts must not be cleaned in the dishwasher.
The machine must always be clean for hygienic reasons. It must be cleaned at the end of each day on which it was used and whenever you change the type of food to be sliced (for example, if you want to slice roasted meat after fresh meat).
For thorough cleaning, the machine parts must be disassembled and later reassembled.
- Turn off the machine and unplug the power cord from the mains outlet.
- If necessary, remove any food to be sliced from the food holder.
natural_image
Line drawing of a simple watermelon maker with a cutting tool and control panel (no text or symbols)Fig. 5
- Set the slice thickness adjustment knob to "0". The feed plate must be closed during cleaning and also remain closed.
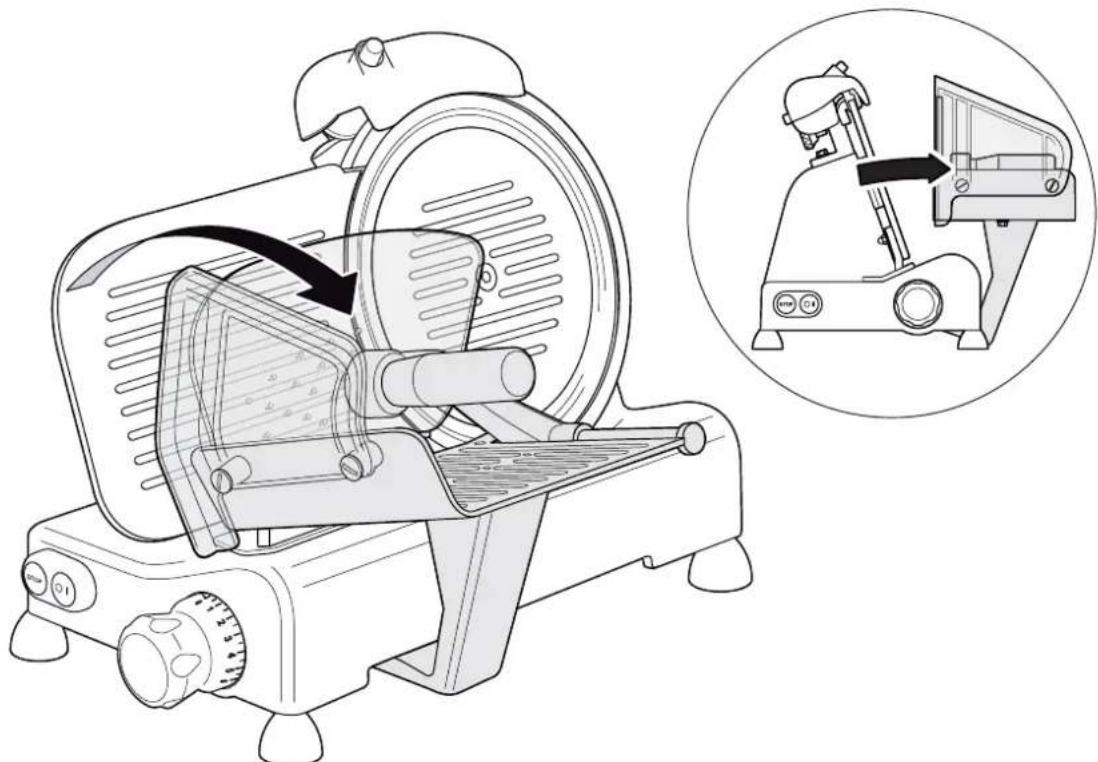
Fig. 6
- Pull the food carriage completely to yourself (apply some force to overcome the spring force) and fold it down.

If the food carriage does not fold down, the slice thickness adjustment knob is not properly positioned. The feed mark on the outer housing must be in the ▶ area.
natural_image
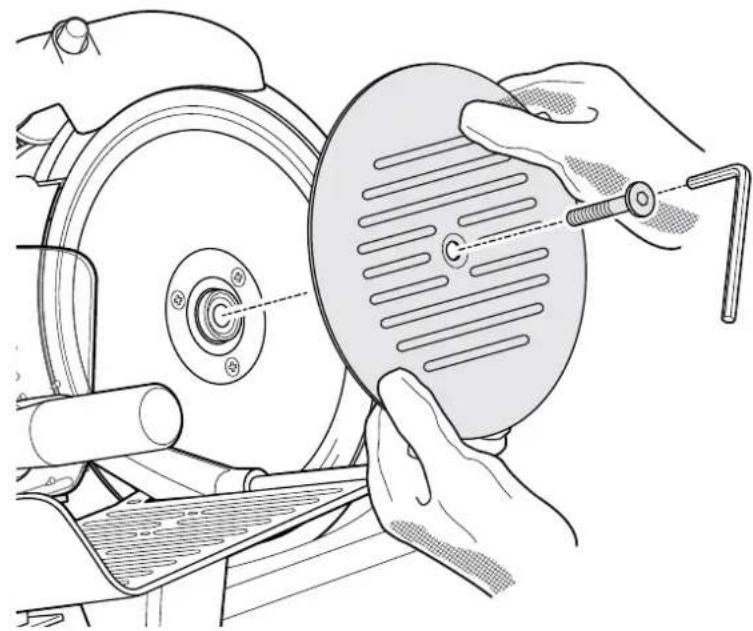
Illustration of hands using a lathe tool to clean or adjust a circular component, no text or symbols presentFig. 7
- Loosen the fixing screw with the included Allen key.
- Remove the blade cover plate.
natural_image
Technical line drawing of a mechanical device with hands operating a workpiece (no text or symbols present)
Fig. 8
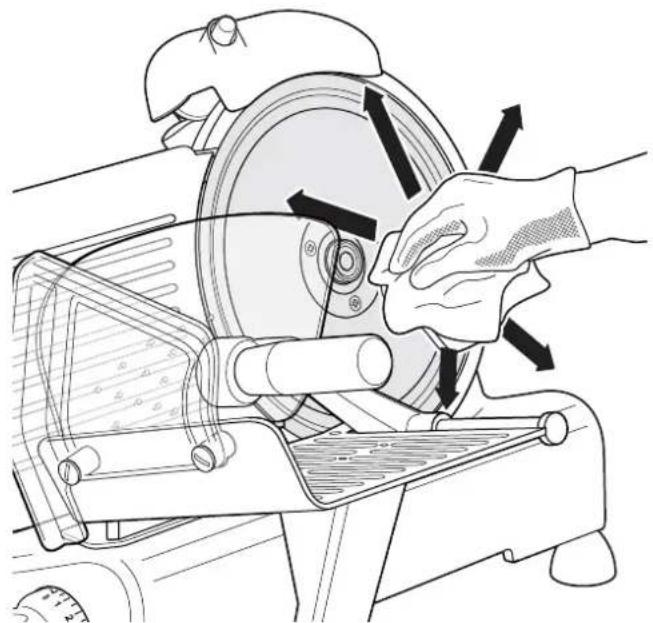
- Wipe the blade surface and the feed plate clean with a damp cloth as shown. Then wipe the blade and the feed plate dry with a soft cloth in the same way. Prevent moisture from getting into the blade hub.
natural_image
Line drawing of hands operating a mechanical grinding machine (no text or symbols present)Fig. 9
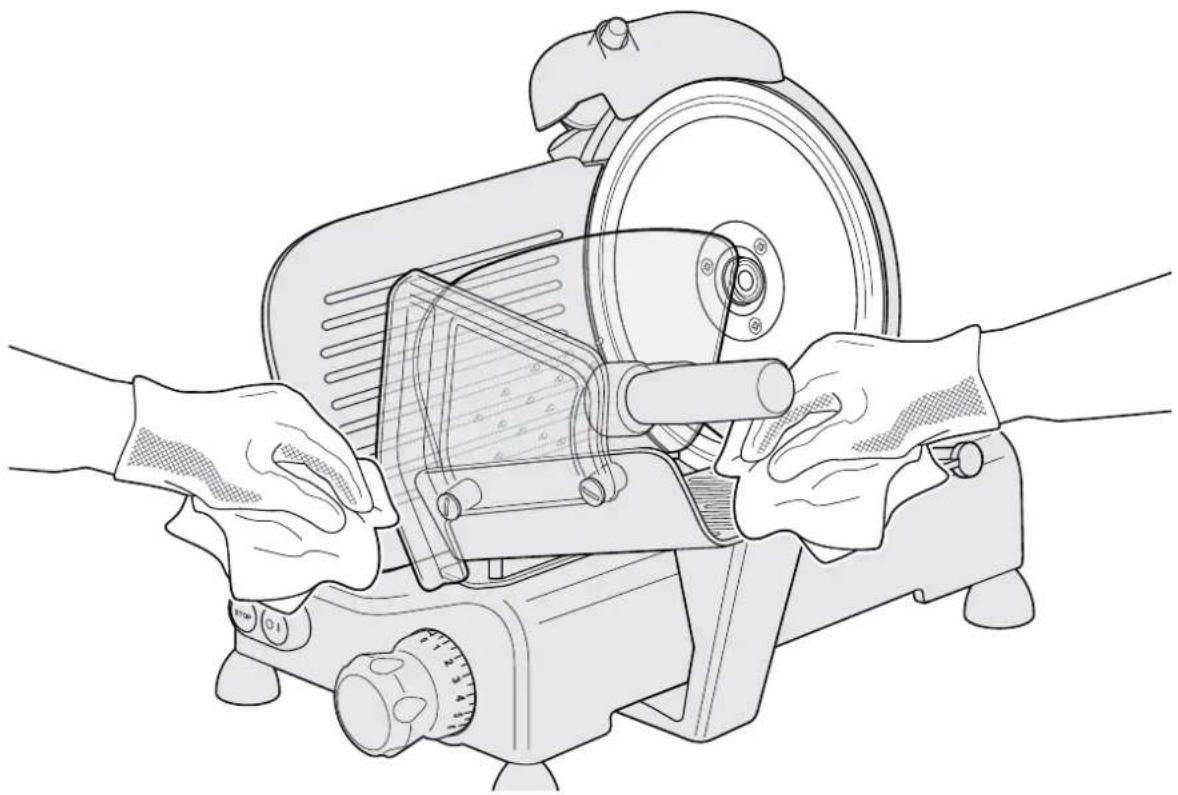
-
Clean the outer housing with a damp cloth or sponge using a suitable cleaning agent and warm water. Then thoroughly wipe the machine dry with a soft cloth. Prevent moisture from getting into the machine.
-
Then the machine should be assembled in reverse order.
If the blade is heavily soiled:
If the blade is heavily soiled, it must be removed before cleaning. For this purpose, we recommend that you wear cut-resistant gloves. Risk of injury!
- Proceed as described in the previous chapter and remove the blade cover plate (see Fig. 7).
- Using a Phillips screwdriver, loosen the screws that secure the blade and remove the blade.
- Clean the removed blade with a little liquid cleaning agent and rinse it with hot water.
Never use scouring cleaning agents. Do not clean the blade in the dishwasher.
- Dry the blade thoroughly afterwards.
Replacing the circular blade

RISK of injury
- The circular blade is very sharp. Take extreme care. We recommend that you wear suitable cut-resistant gloves.

WARNING against injury
- Before replacing the blade, turn off the machine and unplug the power cord from the mains outlet.
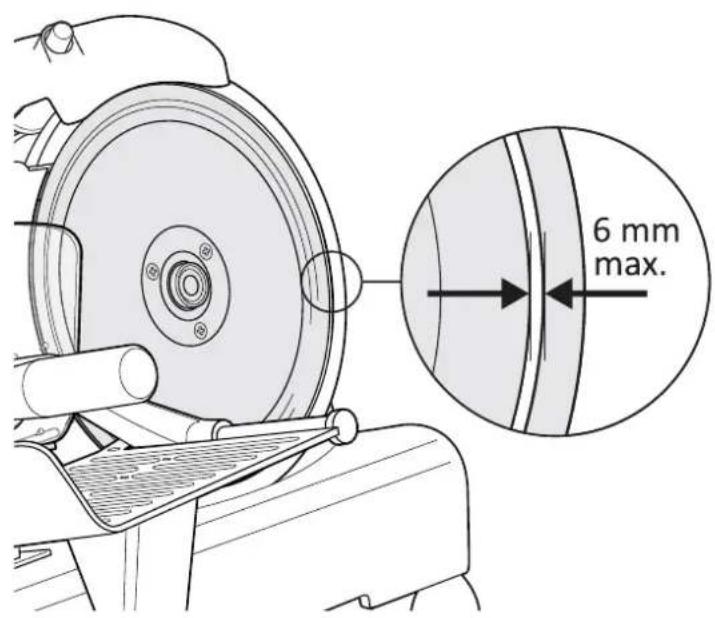
The circular blade must be replaced if the distance between the protective sickle and the blade exceeds 6 mm.
- To disassemble or replace the blade, proceed as described in chapter "Cleaning".
Fig. 10

Replacement blades can be ordered for a fee via the following e-mail address: service@ade-germany.de.
Servicing and maintenance

WARNING against injury
- Before servicing and maintaining, turn off the machine and unplug the power cord from the mains outlet.

NOTE on material damage
- Only use food-grade, resin-free oils for greasing. For example, never use cooking or vegetable oils.
The moving parts of the machine should be greased, if necessary.
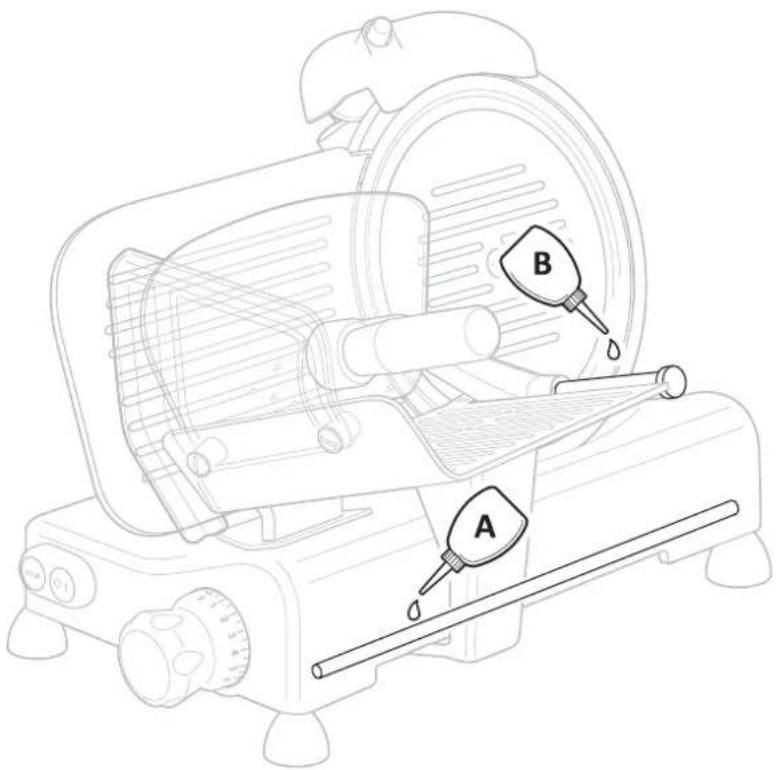
Fig. 11
Greasing the carriage shaft (A)

In doing so, the machine must be lifted. You will thus need a hand to accomplish this work.
- Lift the machine.
- Apply a few drops of oil directly from above on the carriage shaft.
- Lower the machine to the ground.
- Move the food holder back and forth a few times.
Greasing the leftover holder shaft (B)
- Apply a few drops of oil on the shaft.
- If necessary, remove excess oil with a soft and clean cloth.
- Move the leftover holder to the left and right a few times.

RISK of injury
- Before grinding the blade, turn off the machine and unplug the power cord from the mains outlet.

WARNING against injury
- The circular blade is very sharp. Take extreme care. We recommend that you wear suitable cut-resistant gloves.
- Take extreme care when handling the leftover holder. The mandrels inside it for better fixation of food to be sliced are sharp.

NOTE on material damage
- The blade to be sharpened must be clean. Grinding a blade with leftovers on it can damage the grinding wheels.
Pay attention to the following:
- The blade can and may no longer be ground if the distance between the protective sickle and the blade is more than 6 mm, as shown in Fig. 10.
- Regular brief grinding is better than an extensive grinding process.
- The blade may only be ground if it has been cleaned before or is clean.
- After grinding, remove any grinding residues from the blade or machine with a cloth soaked in alcohol.
- Any dirt deposits remaining on the grinding wheels after grinding must be removed as well.
Preparing the machine
- Turn off the machine and unplug the power cord from the mains outlet.
natural_image
Line drawing of a solar water heater with a rotary dial and mechanical components (no text or symbols)Fig. 12
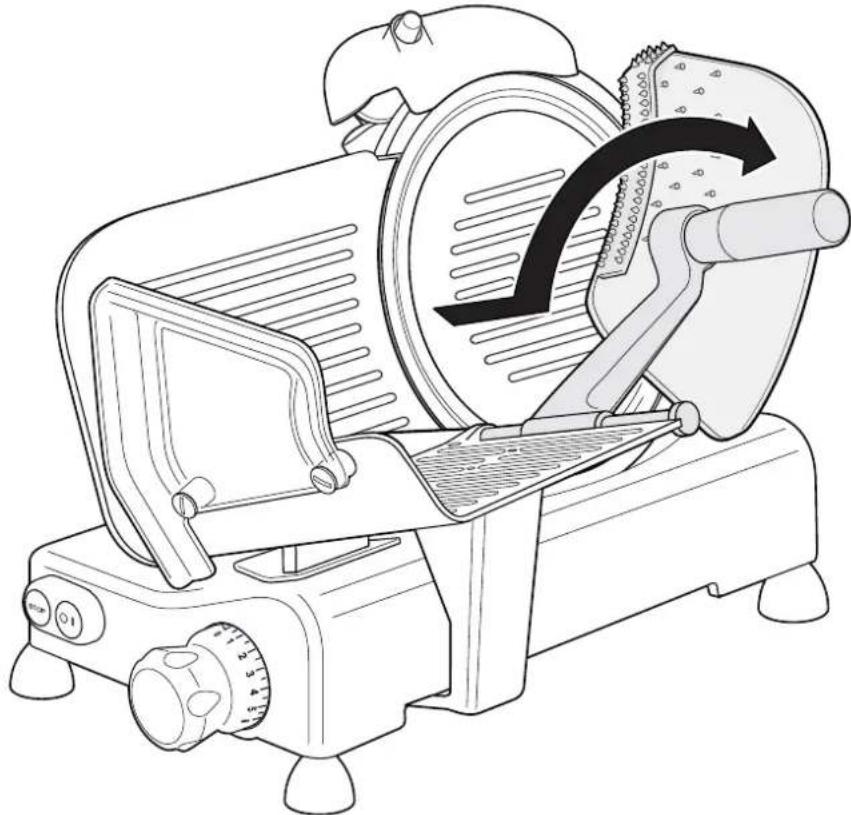
- Fold the leftover holder completely back so that it is fixed in this position (see also description in Fig. 2).
To grind the knife, the grinder must be rearranged.
natural_image
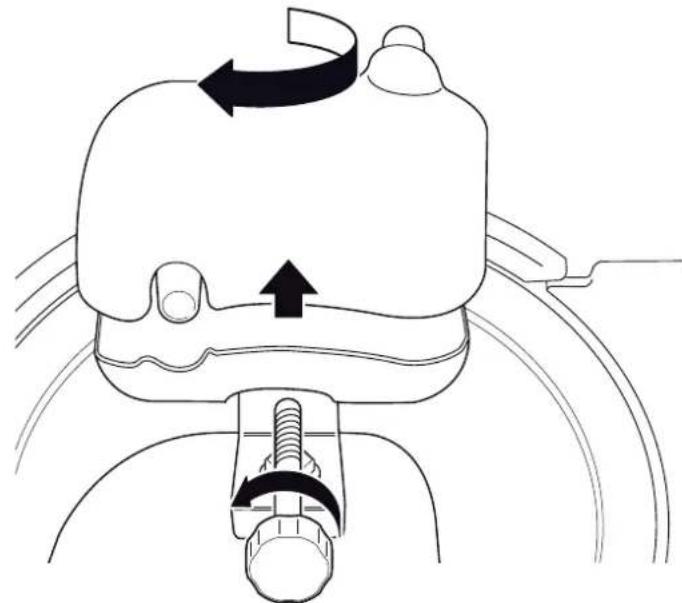
Diagram of a mechanical device with directional arrows indicating motion or force (no text or symbols)Fig. 13
-
Loosen the knurled nut that secures the grinder on the back (note: Fig. 13 shows the device from the back).
-
Pull out the grinder, turn it by 180^ and re-insert, as shown in Fig. 14.
-
Tighten the knurled nut on the back. In this position, you can proceed with grinding.
Grinding the blades
- Plug the power cord into the mains outlet.
- Turn on the machine.
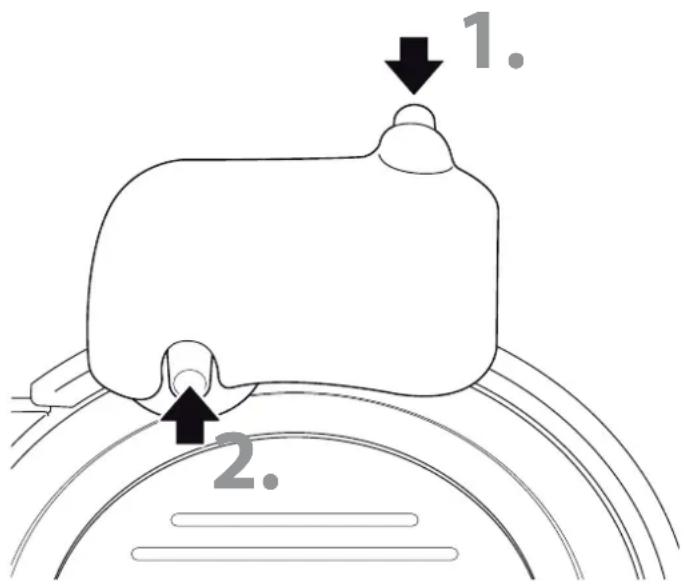
Fig. 14
- Press and hold down the back button (1) for a few seconds to sharpen the blade.
- To deburr the blade, briefly press the front button (2) on the grinder.
- Turn off the machine and unplug the power cord from the mains outlet.
- Reassemble the grinder.
- Clean the blade and the machine with a suitable cleaning agent.
Storing and transporting
Note the following points when storing or transporting the machine:
- You will need a hand to handle the machine. Grasp the machine by the four feet as a reference point.
- Clean the machine and accessories before storing them.
- Keep the device out of reach of children in a dry, frost-free place. You can use the original packaging as outer packaging.
Declaration of Conformity
ADE Germany GmbH & Co. KG hereby declares that the KA 1806 food slicer complies with EU directives 2014/30/EU, 2014/35/EU, and 2011/65/EU.
The declaration will lose its validity if any modification is made to the device without our consent.
Hamburg, february 2019
ADE Germany GmbH & Co. KG

Disposal
Disposing of the packaging

Dispose of the packaging with similar materials. Dispose of cardboard with waste paper and of films with recyclable materials.
Disposing of the product
Dispose of the product in accordance with the regulations that apply in your country.
Devices must not be disposed of in normal household waste
At the end of its life, the product must be disposed of in an appropriate way. In this way, valuable materials contained in the device will be recycled and the burden on the environment avoided. Bring the old device to a collection point for electronic waste or to a recycling depot.
For more information, contact your local waste disposal firm or your local administrative body.
natural_image
Line drawing of a mounted solar water heater with internal components and directional arrows indicating motion (no text or symbols)Fig. 1
natural_image
Line drawing of a solar water heater with a rotating blade and control panel (no text or symbols)Fig. 2
natural_image
Line drawing of a solar water heater with a rotating fan and internal components (no text or symbols)Fig. 3
natural_image
Technical line drawing of a mechanical device with internal components and directional arrows indicating motion (no text or symbols)Fig. 4
natural_image
Line drawing of a simple watermelon maker with a cutting tool and control panel (no text or symbols)Fig. 5
natural_image
Technical line drawing of a mounted water heater with an inset showing the internal mechanism (no text or symbols present)Fig. 6
natural_image
Technical illustration of hands using a lathe tool to adjust a circular component on a machine (no text or symbols present)Fig. 7
natural_image
Technical illustration of a hand using a lathe tool to cut a circular component, showing motion arrows (no text or symbols)
Fig. 8
natural_image
Line drawing of hands operating a mechanical grinding machine (no text or symbols present)Fig. 9
Fig. 11
natural_image
Line drawing of a solar water heater with a rotary dial and mechanical components (no text or symbols)Fig. 12
natural_image
Diagram of a mechanical device with directional arrows indicating motion or force (no text or symbols)Fig. 13
ADE Germany GmbH & Co. KG

Eliminación
natural_image
Line drawing of a solar water heater with cooling fan and pump, showing internal components and directional arrows (no text or symbols)Fig. 1
natural_image
Line drawing of a solar water heater with a rotating blade and control panel (no text or symbols)Fig. 2
natural_image
Line drawing of a solar water heater with a rotating fan and internal components (no text or symbols)Fig. 3
natural_image
Technical line drawing of a microwave oven with internal components and directional arrows indicating motion (no text or symbols)Fig. 4
natural_image
Line drawing of a simple watermelon or sater machine with a rotary dial and control knob (no text or symbols)Fig. 5
Fig. 6
natural_image
Illustration of hands using a tool to clean or adjust a circular component, no text or symbols presentFig. 7
natural_image
Technical line drawing of a mechanical device with hands operating a cutting tool (no text or symbols)natural_image
Line drawing of hands operating a cutting tool on an industrial machine (no text or symbols)Fig. 9
Fig. 11
natural_image
Line drawing of a solar water heater with a rotating blade and control panel (no text or symbols)Fig. 12
natural_image
Diagram of a mechanical device with directional arrows indicating motion or force (no text or symbols)Fig. 13
natural_image
Line drawing of a solar water heater with control panel and fan (no text or symbols)Рис. 1
natural_image
Line drawing of a solar water heater with a rotating blade and control panel (no text or symbols)Рис. 2
natural_image
Line drawing of a solar water heater with a rotating fan and internal components (no text or symbols)Рис. 3
natural_image
Technical line drawing of a microwave oven with internal components and directional arrows indicating flow (no text or symbols)Рис. 4
natural_image
Line drawing of a simple watermelon or sater machine with a rotary dial and control knob (no text or symbols)Рис. 5
Рис. 6
natural_image
Illustration of hands using a lathe tool to clean or adjust a circular component, no text or symbols presentРис. 7
natural_image
Technical line drawing of a mechanical device with hands operating a cutting tool (no text or symbols present)Рис. 8
natural_image
Line drawing of hands operating a mechanical grinding machine (no text or symbols present)Рис. 9
Рис. 11
natural_image
Line drawing of a solar water heater with a rotating blade and control panel (no text or symbols)Рис. 12
natural_image
Diagram of a mechanical device with directional arrows indicating motion or force (no text or symbols)Рис. 13
ADE Germany GmbH & Co. KG

Утилизация
Утилизация упаковки

natural_image
Line drawing of a solar water heater with internal components and directional arrows indicating flow (no text or symbols)Rys. 1
natural_image
Line drawing of a solar water heater with a rotating blade and control panel (no text or symbols)Rys. 2
natural_image
Line drawing of a solar water heater with a rotating fan and internal components (no text or symbols)Rys. 3
natural_image
Technical line drawing of a microwave oven with internal components and directional arrows indicating motion (no text or symbols)Rys. 4
natural_image
Line drawing of a simple watermelon maker with a cutting tool and control panel (no text or symbols)Rys. 5
natural_image
Technical line drawing of a mounted water heater with an inset showing the internal mechanism (no text or symbols present)Rys. 6
natural_image
Illustration of hands using a lathe tool to clean a circular component, no text or symbols presentRys. 7
natural_image
Technical line drawing of a mechanical device with hands operating a cutting tool (no text or symbols)
natural_image
Line drawing of hands operating a mechanical grinding machine (no text or symbols present)Rys. 9
Rys. 11
natural_image
Line drawing of a solar water heater with a rotary dial and mechanical components (no text or symbols)Rys. 12
natural_image
Diagram of a mechanical device with directional arrows indicating motion or force (no text or symbols)Rys. 13
ADE Germany GmbH & Co. KG

Utylizacja


- Bedienungsanleitung
- Abb. 1
- Abb. 2
- Abb. 3
- Abb. 4
- Abb. 7
- Schlittenwelle ölen (A)
- Entsorgen
- General information
- About this operating manual
- Explanation of symbols
- Table of Contents
- Never use the slicer to slice frozen products, meat or sausage products with bones or stone fruits.
- Safety
- Danger from electricity
- WARNING of risk of injury
- BEWARE of material damage
- Scope of delivery
- Technical data
- Warranty
- Parts and controls
- Notes on installation site
- Unpacking and setting up the machine
- Turning the machine on and off
- NOTE on material damage
- Switching on
- Switching off
- RISK of injury
- Brief cleaning
- Cleaning
- WARNING against injury
- If the blade is heavily soiled:
- Replacing the circular blade
- Servicing and maintenance
- Greasing the carriage shaft (A)
- Greasing the leftover holder shaft (B)
- Preparing the machine
- Grinding the blades
- Storing and transporting
- Declaration of Conformity
- Disposal
- Disposing of the packaging
- Disposing of the product
- Devices must not be disposed of in normal household waste
- Eliminación
- Рис. 1
- Утилизация
- Утилизация упаковки
- Rys. 1
- Utylizacja
Brand : ADE
Model : KA 1806
Category : Other kitchen appliances