
SBG90E - Loudspeaker TECHNICS - Free user manual and instructions
Find the device manual for free SBG90E TECHNICS in PDF.
| Product type | Bookshelf speaker, 4-driver, 3-way, bass-reflex |
| Brand | Technics |
| Model | SBG90E |
| Drivers | Bass: 2× 16 cm cone; Midrange/Tweeter: coaxial 16 cm cone + 2.5 cm dome |
| Impedance | 4 Ω |
| Power handling (IEC) | 200 W (max), 100 W (nominal) |
| Sound pressure level | 88 dB (2.83 V/m); 85 dB (W/m) |
| Frequency response | 27 Hz – 100 kHz (-16 dB); 32 Hz – 85 kHz (-10 dB) |
| Crossover frequencies | 480 Hz, 3.2 kHz |
| Dimensions (W × H × D) | With spikes: 302 × 1114 × 375 mm; With pads: 302 × 1093 × 375 mm |
| Weight | Approximately 32 kg per speaker |
| Cabinet material | Wood (unspecified) with black finish |
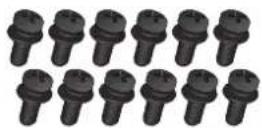
| Included accessories | Spikes (4), spike supports (4), base screws (12), A/B bases (4), spacers (4), speaker grille, cleaning cloth |
| Main features | Balanced mounting architecture, coaxial 2-way system, long-throw woofers with low distortion |
| Care and cleaning | Wipe with the provided cloth; for stubborn dirt, damp cloth then dry; no solvents |
| Safety and precautions | Do not disassemble, do not place on unstable surface, keep out of reach of children, do not insert objects into the reflex port |
| Recommended amplifier | Technics SU-G700 or SU-G30 (not included) |
| Warranty | 5 years (parts and labor) in Canada |
| Operating temperature | 0°C to 40°C |
| Operating humidity | 20% to 80% (non-condensing) |
Frequently Asked Questions - SBG90E TECHNICS
User questions about SBG90E TECHNICS
0 question about this device. Answer the ones you know or ask your own.
Ask a new question about this device
Download the instructions for your Loudspeaker in PDF format for free! Find your manual SBG90E - TECHNICS and take your electronic device back in hand. On this page are published all the documents necessary for the use of your device. SBG90E by TECHNICS.
USER MANUAL SBG90E TECHNICS
natural_image
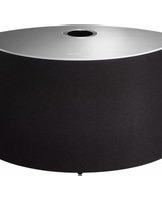
Black electronic speaker tower with visible sound waves and a central aperture (no text or symbols)SB-G90
Speaker System Enceinte acoustique Lautsprecheranlage Enceintes acoustiques Cassa acustica Cajas acústicas Højttalersystem Luidsprekersysteem Högtalarsystem Kaiutinjärjestelmä Zestaw głośników
Owner's Manual Manuel d'utilisation Bedienungsanleitung Mode d'emploi Istruzioni per l'uso Instrucciones de funcionamiento Betjeningsvejledning Gebruiksaanwijzing Bruksanvisning Käyttöohjeet Instrukcja obsługi
Music is borderless and timeless,
touching people's hearts across cultures and generations.
Each day the discovery of a truly emotive experience
from an unencountered sound awaits.
Let us take you on your journey to rediscover music.
Rediscover Music™
Technics
Delivering the Ultimate Emotive Musical Experience to All
At Technics we understand that the listening experience is not purely about technology but the magical and emotional relationship between people and music.
We want people to experience music as it was originally intended and enable them to feel the emotional impact that enthuses and delights them.
Through delivering this experience we want to support the development and enjoyment of the world's many musical cultures. This is our philosophy.
With a combination of our love of music and the vast high-end audio experience of the Technics team, we stand committed to building a brand that provides the ultimate emotive musical experience by music lovers, for music lovers.
Director
Michiko Ogawa
Micholske Ogawa
Thank you for purchasing this product.
Please read these instructions carefully before using this product, and save this manual for future use.
For the U.S.A. and Canada
If you have any questions, visit:
U.S.A.: www.shop.panasonic.com/support
Canada: www.panasonic.ca/english/support
Register online at www.shop.panasonic.com/register(U.S. customers only)
For the United Kingdom and Ireland customers
Sales and Support Information
Customer Communications Centre
●For customers within the UK: 0333 222 8777
●For customers within Ireland: 01 447 5229
- Monday–Friday 9:00 am – 5:00 pm, (Excluding public holidays).
- For further support on your product, please visit our website: www.technics.com/uk/
Safety precautions
WARNING
- Do not disassemble or modify the product. Doing so may cause damage or fire.
- Do not place the speakers in unstable locations, such as on a wobbly table or sloping surface. Do not place the speakers on high or uneven surfaces or on surfaces vulnerable to vibrations or shocks. If the speakers tip over or fall, personal injury may result.
- Keep small accessories out of reach of children. If accidentally ingested, there will be adverse physical effects. Should you suspect that small accessories have been ingested, consult your physician immediately.
- Do not hang the speakers from the ceiling or on the wall. Doing so may cause the speaker to fall off, causing personal injury.
- Do not insert objects into the holes of the bass reflex ports on the rear side. Doing so may cause a fire or personal injury. Be extra cautious when children are near.
CAUTION
- Do not stand on or hang down from the speakers. If the speakers tip over or are damaged, personal injury may result.
- Do not use the speakers over a long period of time when the sound is distorted. Doing so may cause the speakers to overheat, resulting in a malfunction or fire.
-
Do not place heavy or large items on the speakers. If the speakers tip over or fall, personal injury may result.
-
Do not touch the diaphragms. Doing so may deform the diaphragms, and as a result, sound may not be output correctly.
- Keep the speakers out of reach of children, including infants. Not doing so may cause personal injury if the speakers tip over.
- Do not place the speakers in locations subject to extremely high temperatures. In particular, avoid locations exposed to direct sunlight and near heating equipment. Please also note that doing so may cause the outer casing or internal components to deteriorate.
- Do not place the speakers in locations subject to greasy fumes or steam, or in humid or dusty locations. Doing so may cause electricity to be conducted through oil, moisture or dust, resulting in a fire or electric shock.
- Keep magnetic items away from the product. Powerful magnets inside the speakers and speaker nets may damage debit cards, travel cards (transit passes), clocks and other objects.
- Do not insert a finger into the bass reflex ports on the rear of the speakers. Pay close attention to children as doing so may cause personal injury.
- Do not connect the speakers to an amplifier with an output greater than their allowable input. Doing so may cause the speakers to overheat, resulting in a fire.
- Each speaker must be carried and installed by at least two people. Dropping it may cause injury.
- Secure the speakers against tipping over. If they tip over in a disaster such as a powerful earthquake or in an accident, personal injury may result.
- Before use, be sure to attach the base plates and either the spikes or the rubber foot. Otherwise, the product may tip over, causing injury.
Disposal of Old Equipment
Only for European Union and countries with recycling systems
This symbol on the products, packaging, and/or accompanying documents means that used electrical and electronic products must not be mixed with general household waste.
For proper treatment, recovery and recycling of old products, please take them to applicable collection points in accordance with your national legislation.
By disposing of them correctly, you will help to save valuable resources and prevent any potential negative effects on human health and the environment.
For more information about collection and recycling, please contact your local municipality.
Penalties may be applicable for incorrect disposal of this waste, in accordance with national legislation.
Table of contents
Safety precautions....06
Accessories....07
About this unit....08
Installation 09
Connections 16
Attaching the speaker nets 18
Notes on use....19
Unit care....19
Specifications 19
Limited Warranty (ONLY FOR U.S.A.).... 160
Limited Warranty (ONLY FOR CANADA) 161
About descriptions in this Owner's Manual
●The illustrations shown may differ from your unit.
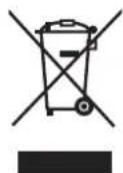
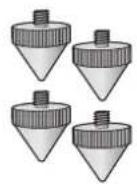
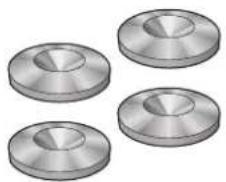
Accessories
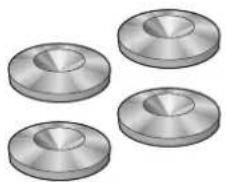
□ 4 Spikes (TBLA40861)
□ 4 Spike shoes (TYL0079)
natural_image
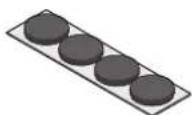
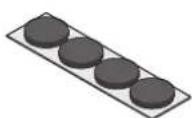
Four metallic washers arranged in a 2x2 grid (no text or symbols visible)4 Rubber feet (TBLG32691)
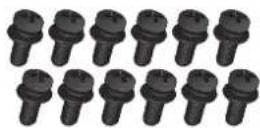
□ 12 Base plate screws (THEL155Z)
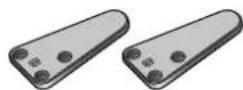
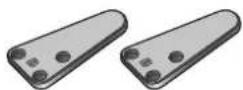
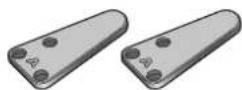
□ 2 Base plates A (TBLA40852)
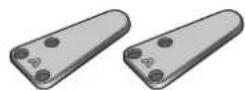
2 Base plates B (TBLA41091)
□ 4 Spacers (TMKK653)

□ 1 Speaker net (TTJ0006-A)
□ 1 Cleaning cloth (TXFPE01LHUU)

Before use, be sure to attach the base plates and either the spikes or the rubber foot.
- Keep small accessories out of reach of children to prevent swallowing.

- Product numbers provided in this Owner's Manual are correct as of February 2017. These may be subject to change.
- The speakers are not supplied with speaker cables. For connection, use commercially-available speaker cables.
About this unit
■ Names of parts and features of the speakers
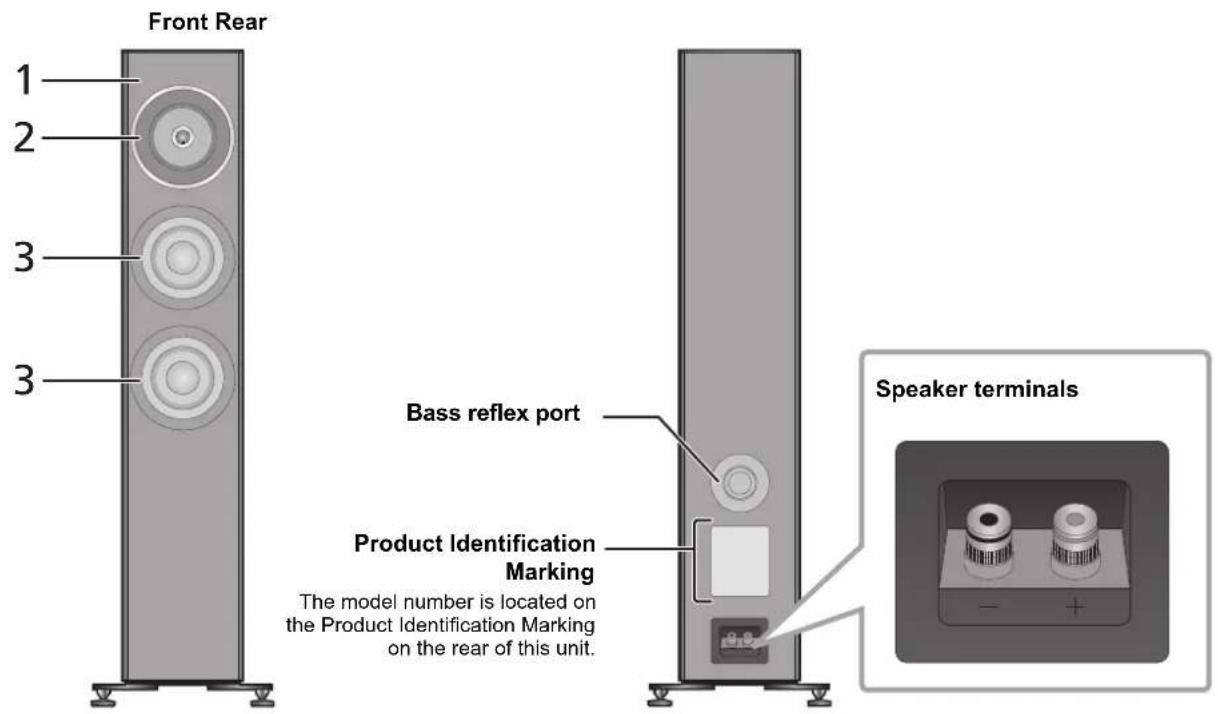
1 Balanced Driver Mounting Architecture
The speaker unit, mounted on the sub-baffle inside the cabinet at its center of gravity, is designed to suppress the vibration it generates. The speaker unit is not mounted on the front baffle to minimize the transmission of unwanted vibration from the speaker unit to the baffle. The result is a speaker that delivers a realistic, spacious soundstage made of penetrating and crisp sound with frequencies ranging from low to super-high.
Coaxial Two-Way Unit
The newly developed mid-to-high frequency unit features a coaxial two-way system that inherits the design concepts developed for our high-end models: a point sound source and linear phase reproduction. The system, which is designed for accurate sound localization, allows the speaker to deliver various sounds produced by musical instruments with clarity to recreate a three-dimensional soundstage.
2 Low Distortion Long Stroke Woofers
The speaker incorporates two woofers made of components such as double-magnets, long-voice coils, and copper rings. As a result, the speaker can deliver bass sound that offers low distortion and superb response in reproducing frequencies even with large amplitude.
■ Recommended devices
We recommend using Technics devices (optional) for superior audio quality.
| Product name Model number | |
| Stereo Integrated Amplifier | SU-G700 |
| Network Audio Amplifier SU-G30 |
Installation
e.g.,
※ Speaker units
• Each speaker must be carried and installed by at least two people.
- Do not touch the speaker units. Doing so may result in incorrect audio quality.
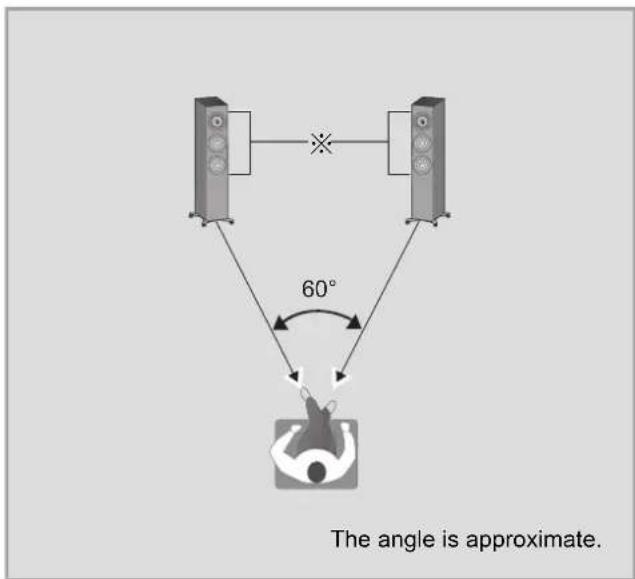
- Place the speakers at approximately the same distance from the listening position.
- The speakers produce bass sound from the bass reflex ports on the rear as well as from the front. Install the speakers at least 5 cm (2") away from the walls so that they do not cover the bass reflex ports on the rear.
- Keep the amplifier or any other device and the speakers at least 1 cm ( ^13/32 ) away from each other.
■ For optimum position
The quality and volume of the bass sound, sound localisation performance, sound ambience, and other factors that determine the audio quality vary depending on the installation location of this unit, listening position, room conditions, and other factors. Refer to the information below when installing the speakers.
Determining an installation location.
- Each speaker has a mass of approximately 32 kg (71 lbs). Check that the installation location is strong enough to bear this mass.
- If you need to secure the speakers against tipping over, consult an installation specialist. The strength of the floor and wall must be verified. (⇒ 15)
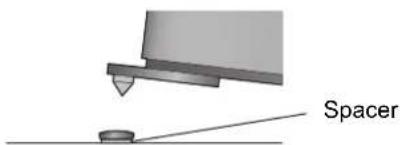
- Put the speakers on a flat safe surface. If the speakers wobble when placed, use the spacers. (→ 13, 14)
- To minimise the gap in audio quality between the left and right speakers, install them so that acoustic conditions (reflection and absorption of sound) around them are the same.
Adjusting the distances between the rear of the speakers and the walls
If you install the speakers close to a wall or in a corner, the bass sound will be more powerful; however, when the speakers are too close to it, sound localisation performance and sound ambience may deteriorate. If this occurs, adjust the distance between the speakers and the front wall, which should be between 30 cm (12") to 60 cm (24"). (Please note that the distance between the speakers and the side walls should be greater than 60 cm (24").)
- Do not drag the speakers by force. Doing so may damage the speaker and the floor.
Adjusting the angle of the speakers
Angle the front side of the speakers toward the listener. Following these steps will help the speakers deliver more precise sound localisation.
Adjusting the acoustics of the room and speaker layout
Depending on the room environment (including the size and shape of the room, distance to the walls and reverberation level), certain sounds may be exaggerated or suppressed, making them difficult to hear. In such cases, adjusting the reverberation level by moving the speakers, changing your listening position or covering the walls and windows with thick curtains may help resolve the problem.
- The spikes may enhance the audio quality. (→ 12)
Attaching the base plates
① Remove the accessories.
- Remove the accessories from the styrofoam blocks, and place them in a location away from children.
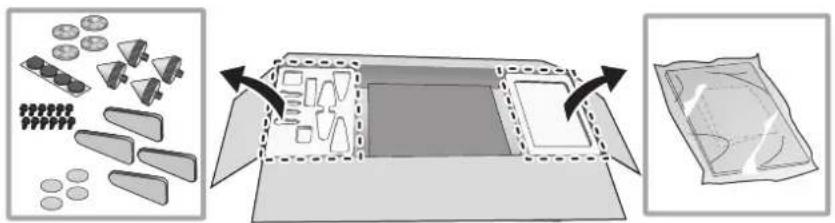
② Place the styrofoam blocks in an area suitable for work.
③ Remove the packaging box of the speaker net.
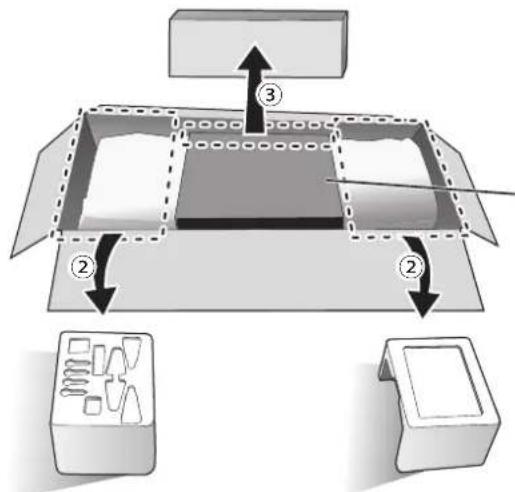
Leave the cardboard in place to protect the speaker unit.
④ Place the speaker on the styrofoam blocks removed in Step ②.
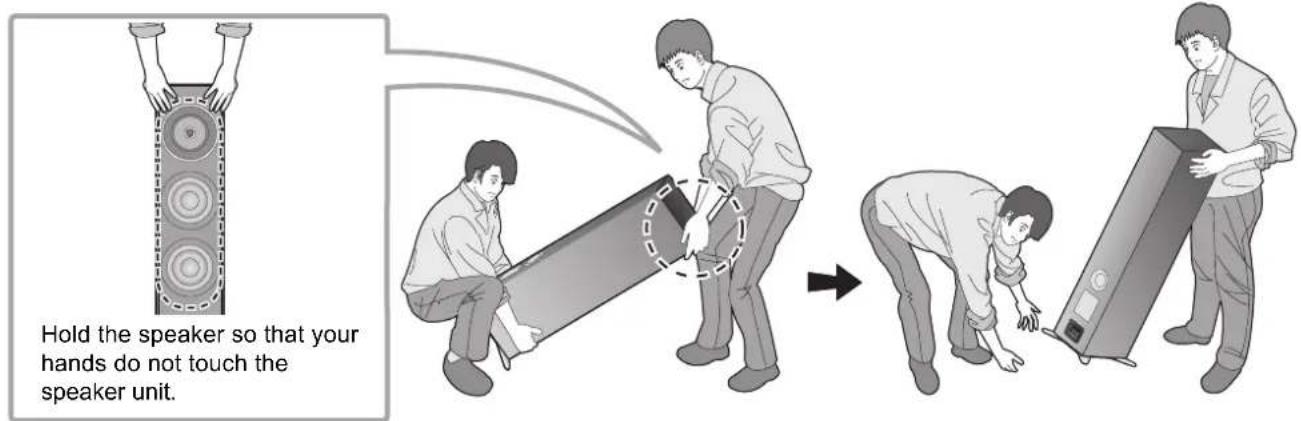
- Keep the following points in mind when lifting up the speaker. - Hold the bottom so that your hands do not slip.
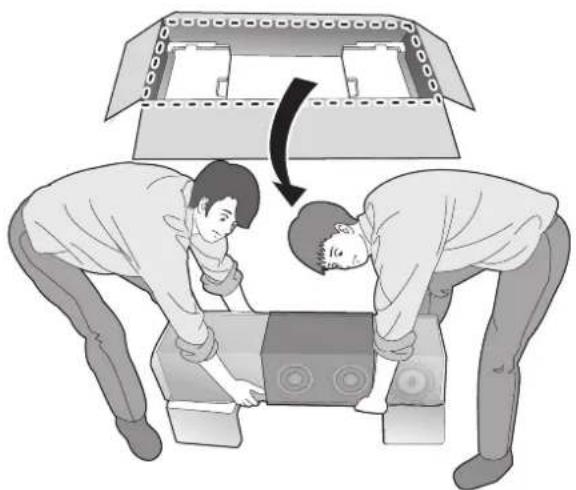
natural_image
Illustration of two people assembling a vehicle chassis under a roof structure, with one person bending forward (no text or symbols)5 Roll up the protective bags (2 pcs) to uncover the bottom of the speaker.
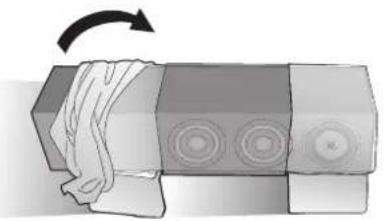
natural_image
Diagram of a mechanical device with a rolled-up component and an arrow indicating rotation (no text or symbols)6 Attach the base plates (4 pcs) to the speaker securely with the supplied screws.
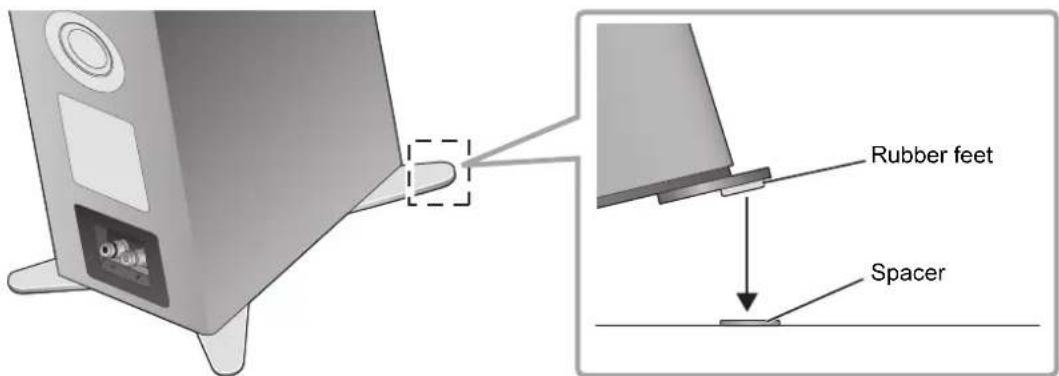
Placing the speaker using the rubber foot
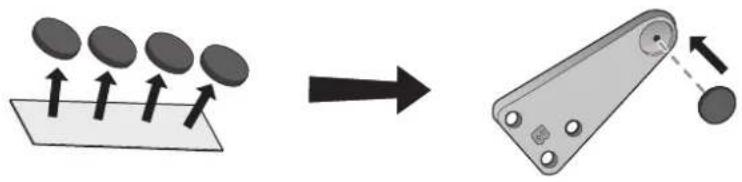
Attach the rubber feet (4 pcs) to the recesses on the base plates in advance.
- Peel off the backing paper from the rubber feet, and push them firmly into the base plates without touching the adhesive surface of the rubber feet.
natural_image
Diagram showing a device with circular elements on a surface before and after transformation, no text or symbols present.- Loosely pre-mount the three screws with your hands first, and then tighten them with a screwdriver.
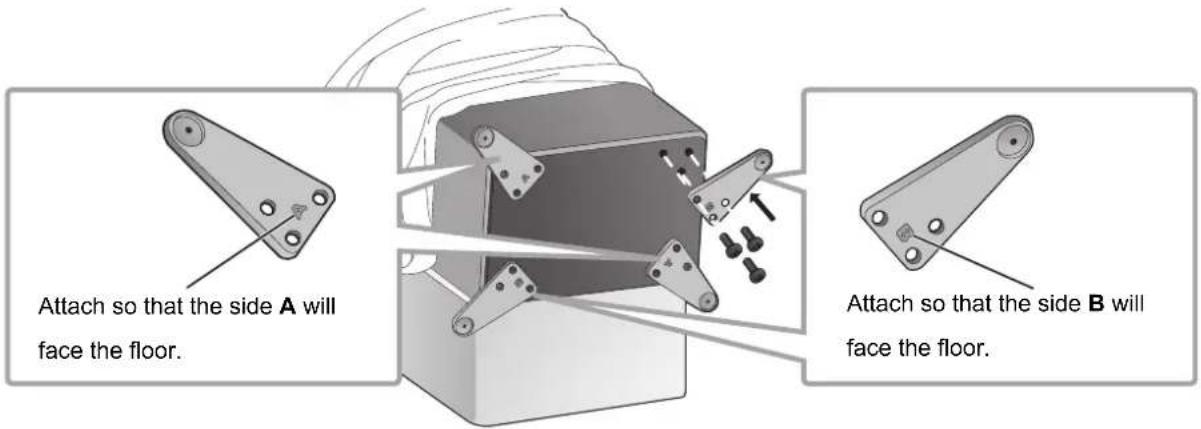
●After attaching the base plates, ensure that they do not wobble.
Placing the speaker using the spikes ( 12)
Placing the speaker using the rubber foot ( 14)
Placing the speakers using the spikes
The spikes may enhance the audio quality.
- Panasonic is not responsible for any accidents or damage caused by improper assembly or handling of the product. Do not attach the accessories in any other way than instructed in this Owner's Manual.
- Each speaker has a mass of approximately 32 kg (71 lbs). When tilting the speakers to attach the spikes, ensure that the work is done by at least two people. When attaching the spikes, exercise caution to avoid catching your fingers or toes between the speakers and floor or tipping the speakers over. In addition, ensure that you spread a thick mat or similar item on the side of the floor where you will be tilting the speakers to prevent damage to the floor.
- Since each spike supports a mass of at least approximately 8 kg (17.6 lbs), the spikes may leave marks and indentations on the installation location. To prevent the spikes from damaging the area, use the supplied spike shoes or purchase spike shoes with large contact surfaces and adequate strength.
- Moving the speakers with the spikes attached may cause damage to the floor. Before changing the installation location, remove the spikes.
To avoid floor damage, have two thick mats (or similar) available. Place them in the unpacking location and the installation location in advance.
① Place the speaker vertically on a thick mat (or similar).
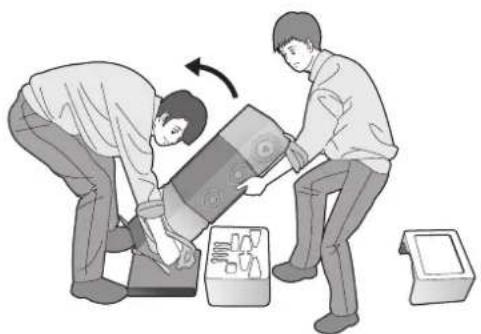
natural_image
Two people handling equipment with boxes and a device, no visible text or symbols② Remove the protective bags (2 pcs) and the cardboard covering the speaker.
③ Carry the speaker to the installation location while tilting it forward, and place it on a thick mat (or similar).
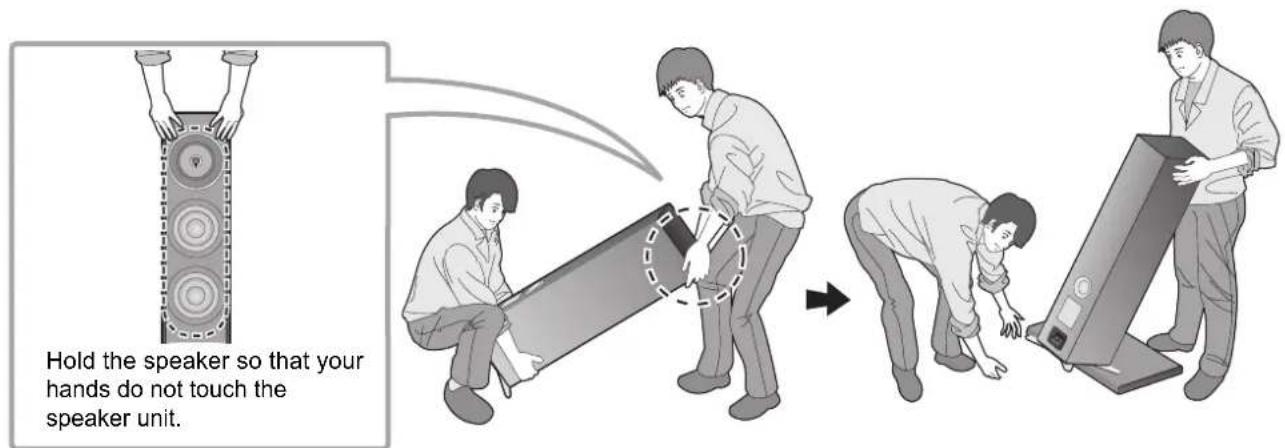
④ Tilt the speaker forward, and screw the spikes into the two rear-side base plates. When using the spike shoes, place them under the spikes.
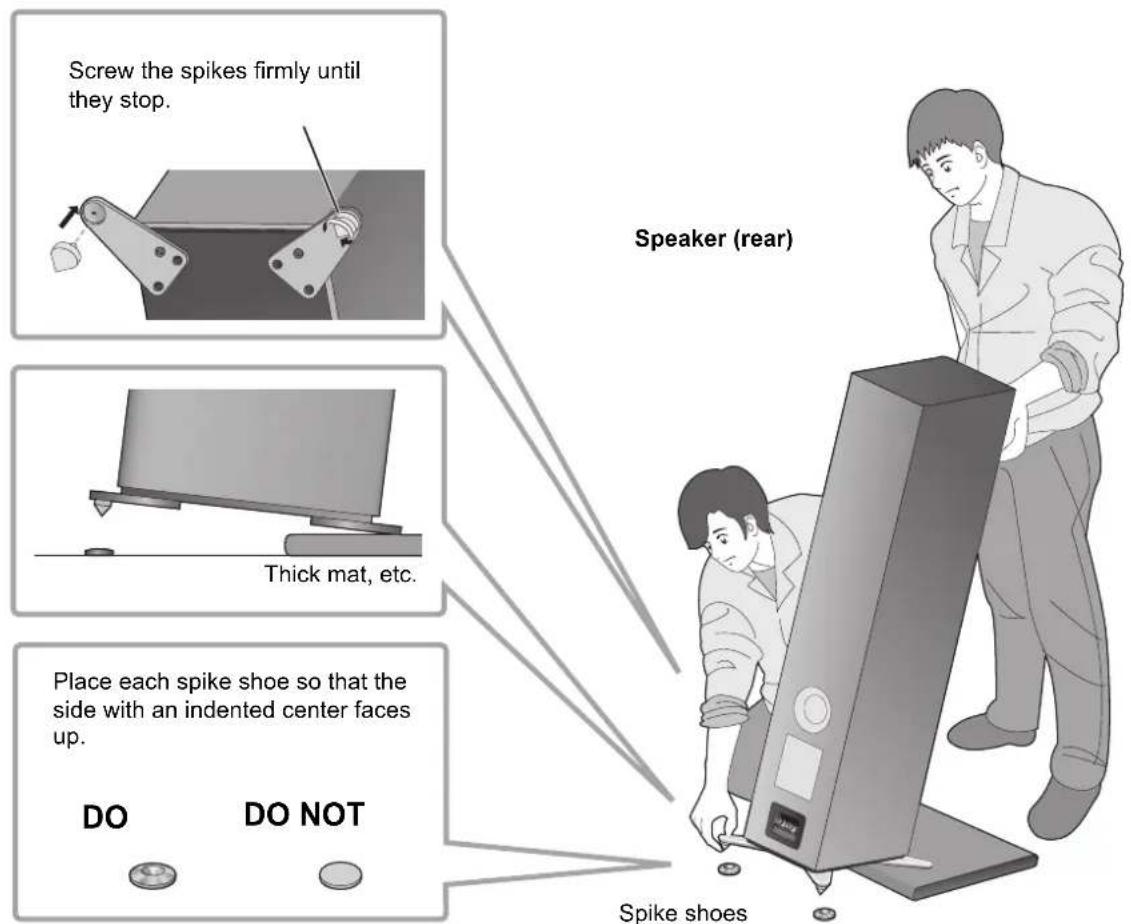
⑤ While aligning the tips of the spikes with the indentations on the spike shoes, slowly bring the speaker back to the upright position.

⑥ In the same way as Step ④, tilt the speaker backwards and remove the thick mat (or similar).
⑦ Screw the spikes into the two front-side base plates.
When using the spike shoes, place them under the spikes.
⑧ If the speakers wobble, place the spacers under the spike shoes.
Placing the speakers using the rubber feet
Attach the rubber feet (4 pcs) to the recesses on the base plates in advance. (→ 11)
- Panasonic is not responsible for any accidents or damage caused by improper assembly or handling of the product. Do not attach the accessories in any other way than instructed in this Owner's Manual.
- Each speaker weighs approximately 32 kg (71 lbs). Ensure that the work is done by at least two people. Be careful not to catch your fingers or toes between the speaker and the floor or tip over the speaker.
- Since each rubber foot supports a weight of at least approximately 8 kg (17.6 lbs), the rubber feet may leave marks and indentations on the installation location.
- Dragging the speaker along the floor may cause the rubber feet to peel off. When changing the installation location of the speaker, always use at least two people to lift it.
To avoid floor damage, have a thick mat (or similar) available. Place it in the unpacking location in advance.
① Place the speaker vertically on a thick mat (or similar).

natural_image
Illustration of two people handling a large object with a device, no text or symbols present② Remove the protective bags (2 pcs) and the cardboard covering the speaker.
③ Hold the speaker so that it is tilted forward and move it to the installation location.
④ If the speakers wobble after being placed, place the spacers under the rubber feet. This will prevent the rubber feet from wobbling on the installation surface.
Preventing the speakers from tipping over
The speakers may tip over in a disaster such as a powerful earthquake or in an accident. For your safety, be sure to secure the speakers against tipping over.
Each speaker weighs approximately 32 kg (71 lbs) in total. Verify that the speaker locations are strong enough to withstand this weight.
For details, consult an installation specialist.
■ When securing the speakers to a horizontal surface (floor, etc.)
Secure each speaker to the floor with wires or similar items as shown in the illustration.

natural_image
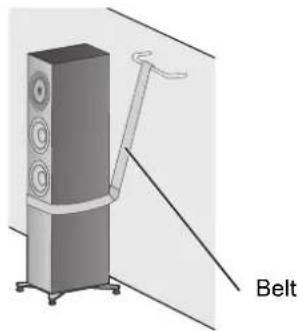
3D rendering of a server rack with wheels and a labeled 'Wire' component (no other text or symbols)■ When securing the speakers to a vertical surface (wall, etc.)
Loop a band or similar item around each speaker, and connect it to a sturdy wall or column with a stout wire, chain or similar item, as shown in the illustration.
natural_image
Illustration of a speaker tower with a belt and fan, no text or symbols present
- The measures described above do not guarantee protection against all disasters and accidents, including earthquakes. Please note that Panasonic is not responsible for any damage to the speakers, their installation locations or other objects caused by the work performed to secure the speakers from tipping over.
- Use of the spikes will make the speakers more vulnerable to tipping over.
Connections
Connecting the speaker cables
The speakers are not supplied with speaker cables. For connection, use commercially-available speaker cables.
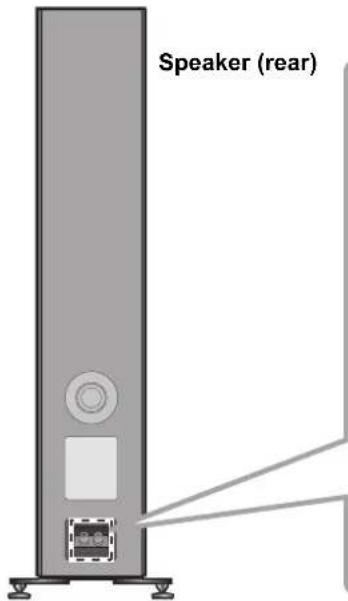
① Turn the knobs to loosen them, and insert the core wires into the holes.
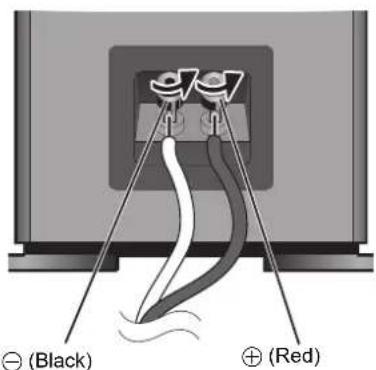
② Tighten the knobs.
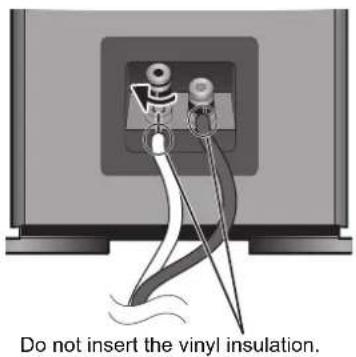
If it is difficult to connect the speaker cables, remove the knobs before connecting them.

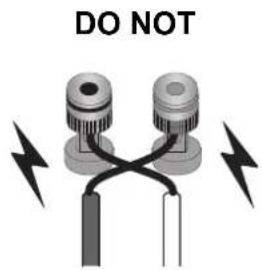
- Be careful not to cross (short-circuit) or reverse the polarity of the speaker wires as doing so may damage the amplifier.
Connecting with an amplifier
- Before connection, turn off the amplifier and disconnect its power cord.
- For details, refer to the operating instructions of the amplifier.
Connect the amplifier and speakers with speaker cables (commercially-available).
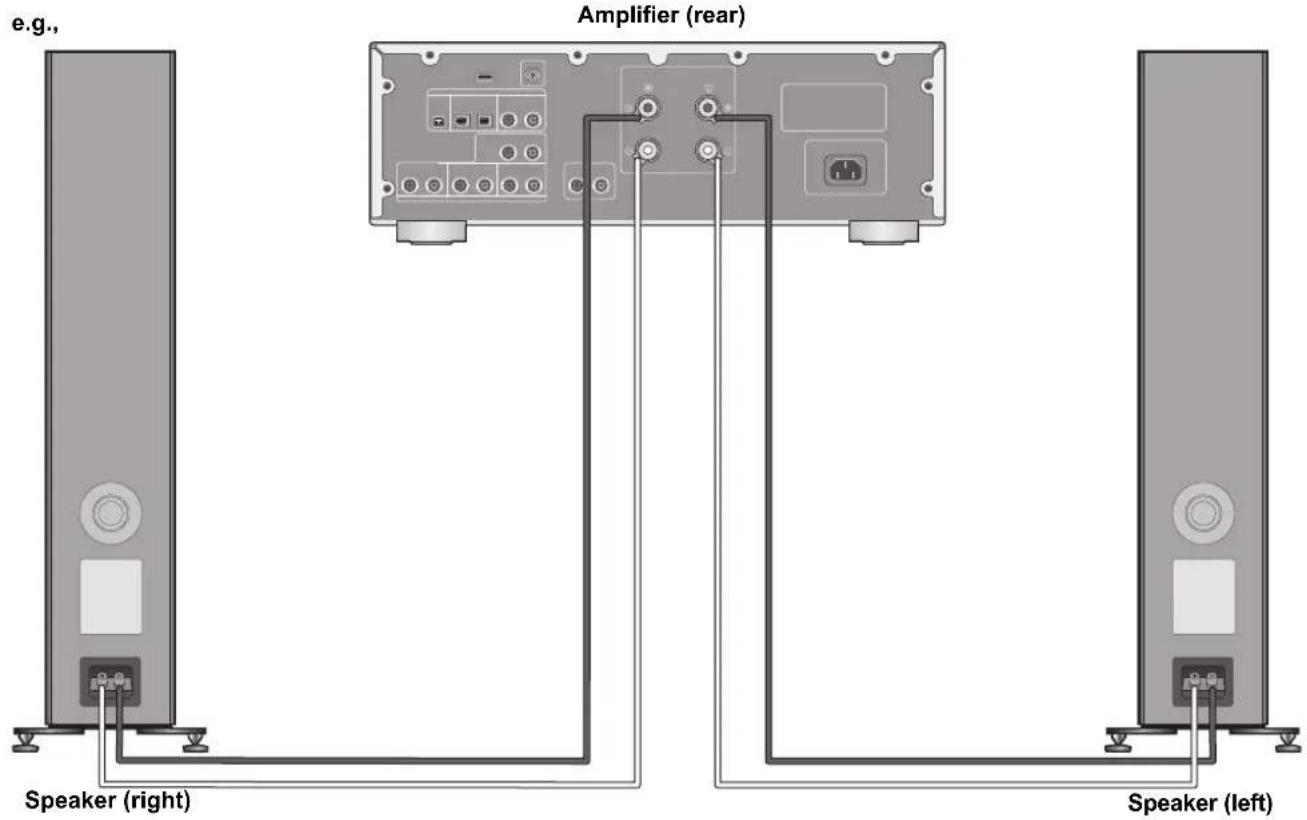

- Do not move the speaker while the speaker cables are connected. This may cause a short circuit.
- When the connections are completed, pull the speaker cables lightly to check that they are connected firmly.
- Wire the polarity (+/-) of the terminals correctly. Not doing so may adversely affect stereo effects or cause malfunction.
Attaching the speaker nets
The speakers are supplied with speaker nets, which protect the speaker units from dust. Use the magnets to fix the speaker nets to the speaker units.
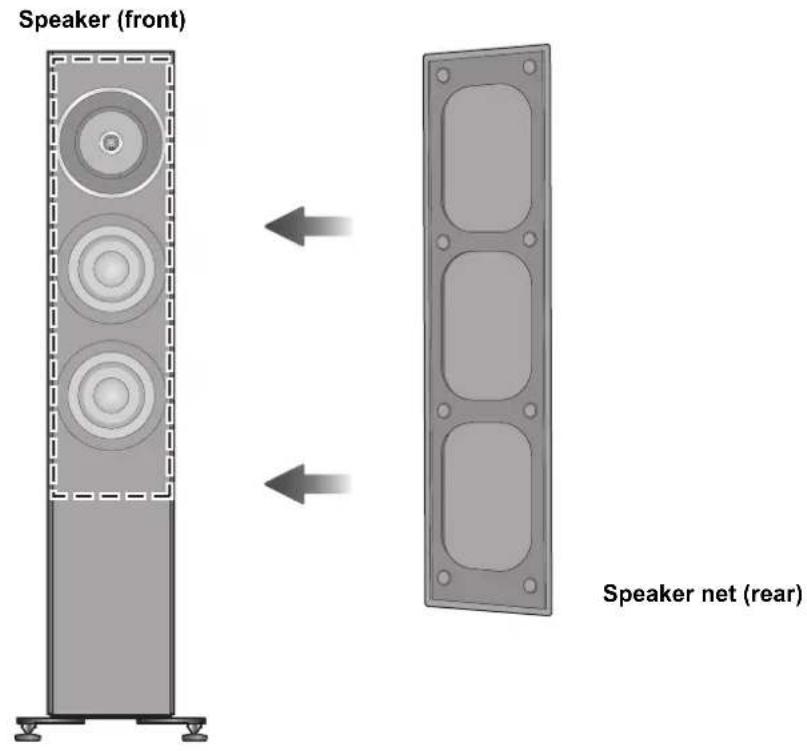

- You can enjoy superior quality audio by removing the speaker nets before playback.
Notes on use
To protect the speakers from damage caused by excessive input, observe the following precautions:
- Reduce the volume in the following cases to avoid damage:
—When playing distorted sound.
—When the speakers are receiving howling from a microphone or record player, noise from FM broadcasts, or continuous signals from an oscillator, test disc, or electronic instrument.
—When adjusting the sound quality.
—When turning the amplifier on or off.
- Avoid raising the volume level too much when enhancing the treble sound with a graphic equalizer or any other controls.
- Avoid outputting excessively loud sound with a small power amplifier. Doing so will increase the amplifier's harmonic distortion and may damage the speakers.
- You can damage your speakers and shorten their useful life if you play sound at high levels over extended periods.
- Do not touch the speaker terminals with your hands or other objects while the speakers are in use. Depending on the conditions of use, doing so may expose you to high voltage.
Unit care
Wipe the speakers with the supplied cleaning cloth.
- When dirt is heavy, wring a wet cloth tightly to wipe the dirt, and then wipe it with a dry cloth.
- Do not use solvents including benzine, thinner, alcohol, kitchen detergent, a chemical wiper, etc. This might cause the exterior case to be deformed or the coating to come off.
Specifications
Type 3-way 4 speakers, bass-reflex type
(coaxial 2-way midrange/built-in tweeters)
Speaker unit
Woofer 16 cm (6
^1/_2 ) cone type ×2
Midrange/Tweeter Coaxial 16 cm (6
^1/_2 ) cone type ×1 / 2.5 cm (1") dome type ×1
Impedance 4 Ω
Input power (IEC) 200 W (MAX)
100 W (RATED)
Sound pressure level 88 dB (2.83 V/m)
85 dB (W/m)
Frequency range
27 Hz to 100 kHz (-16 dB)
32 Hz to 85 kHz (-10 dB)
Crossover frequency 480 Hz, 3.2 kHz
Dimensions (W×H×D)
With the spikes
With the rubber feet
Mass (Weight)
Operating temperature range
Operating humidity range
302 mm×1,114 mm×375 mm (11 ^7/8 "×43 ^27/32 "×14 ^3/_4 ")
302 mm×1,093 mm×375 mm (11 ^7/8 "×43 ^1/32 "×14 ^3/_4 ")
Approx. 32 kg (71 lbs)
0^ to +40^ (+32^ to +104^)
20% to 80% RH (no condensation)

- Specifications are subject to change without notice.
• Mass and dimensions are approximate.
natural_image
Four identical metallic washers arranged in a 2x2 grid (no text or symbols visible)□ 4 pieds en caoutchouc (TBLG32691)
natural_image
Illustration of two people assembling a mechanical component with a curved arrow indicating rotation (no text or symbols)natural_image
Mechanical component with a curved arrow indicating rotation or motion (no text or symbols)natural_image
Illustration of two people handling a device with tools and boxes (no text or symbols)natural_image
Illustration of two people handling a device with an arrow indicating rotation (no text or symbols present)natural_image
3D rendering of a small industrial machine with mounting legs and control panel (no visible text or symbols)Fil
natural_image
Pure electrical circuit lines without any symbolsEnviron 32 kg (71 lb)
0^ +40^(+32^ +104^)
□ 4 Spikes (TBLA40861)

4 Spike-Schuhe (TYL0079)
natural_image
Four metallic washers with flanges, shown in a row (no text or symbols)natural_image
Illustration of two people assembling or inspecting a mechanical component, with one person bending forward and the other looking down (no text or symbols present)natural_image
Diagram of a mechanical component with a rotating arrow indicating rotation (no text or symbols)natural_image
Illustration of two people assembling or repairing a mechanical device with a box nearby (no text or symbols)natural_image
Illustration of two people performing a physical maneuver with equipment (no text or symbols)natural_image
3D rendering of a mechanical device with labeled components, showing mounting legs and a central panel (no readable text or symbols)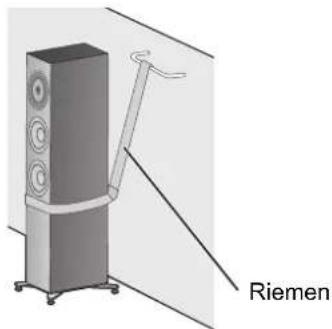
natural_image
Illustration of a Liemen audio amplifier with speaker tower and antenna (no text or symbols on the device itself)[NO TEXT]
natural_image
Pure electrical circuit lines without any symbolsnatural_image
Four metallic washers arranged in a 2x2 grid (no text or symbols visible)4 Patins en caoutchouc (TBLG32691)
![TECHNICS SBG90E - [NO TEXT] - 1](/content/2026/03/466666/images/d627ae497339892893cb704064254fe47a32899559a8c290ae59b77895358061.jpg)
2 Embases A (TBLA40852)
![TECHNICS SBG90E - [NO TEXT] - 2](/content/2026/03/466666/images/5afd1d3360ff7f3d0fa8d50be0014be94fbfbe94e2cf3cd24e460f3c3170d94e.jpg)
2 Embases B (TBLA41091)
![TECHNICS SBG90E - [NO TEXT] - 3](/content/2026/03/466666/images/f2788f906a66be63ed7ec1625a3c64483a62bfd94c58369e7cce0feddd37ab2c.jpg)
□ 4 Boulons d'espacement (TMKK653)

natural_image
Illustration of two people assembling a vehicle chassis with a curved arrow indicating rotation (no text or symbols)natural_image
Diagram of a mechanical component with a curved arrow indicating rotation (no text or symbols)natural_image
Illustration of two people handling equipment with a device and boxes (no text or symbols)natural_image
Illustration of two people assembling or repairing a mechanical device with tools (no text or symbols visible)natural_image
3D rendering of a portable electronic device with mounting legs and a labeled 'Fil' (no other text or symbols)natural_image
Pure electrical circuit lines without any symbolsnatural_image
Four metallic washers with flanges, shown in a 3D rendering (no text or symbols)□ 4 Piedini in gomma (TBLG32691)
![TECHNICS SBG90E - [NO TEXT] - 5](/content/2026/03/466666/images/fa54c63c721c4d85153e2b2d65b221815e95456fbda7fc0f70e2d1dd31f2e737.jpg)
□ 12 Viti piastre base (THEL155Z)
![TECHNICS SBG90E - [NO TEXT] - 6](/content/2026/03/466666/images/73e72618b52c902cab30a200e86234361787556a147c0993beba9a15a73cb824.jpg)
□ 2 Piastre base A (TBLA40852)
![TECHNICS SBG90E - [NO TEXT] - 7](/content/2026/03/466666/images/cbad08e2651fe894d1524e627b5be65dd48b0dc32a855dbbda94f67364d4bb2c.jpg)
□ 2 Piastre base B (TBLA41091)

natural_image
Illustration of two people assembling a mechanical component with a curved arrow indicating rotation (no text or symbols)natural_image
Diagram of a mechanical device with a curved arrow indicating rotation or movement (no text or symbols present)natural_image
Illustration of two people handling equipment with a device and boxes (no text or symbols)natural_image
Illustration of two people handling a device with boxes and a switch, no text or symbols presentnatural_image
3D rendering of a mechanical device with labeled 'Filo' and no visible text or symbols on the device itselfnatural_image
Illustration of a Cinghia speaker tower with attached lever mechanism (no text or symbols on the device itself)![TECHNICS SBG90E - [NO TEXT] - 9](/content/2026/03/466666/images/4057f5fa0d80813fe9635d011775b3ba04be487f3601a25dc95c80582431df9c.jpg)
![TECHNICS SBG90E - [NO TEXT] - 10](/content/2026/03/466666/images/14ddb462ee0203d0b8d2e4401cc02357f0eb41336ab0b7c85e1f10ff7fdbca85.jpg)
The Ground Truth image displays a single, solid horizontal line. According to Rule 2 (UNDERSCORE & LINE RULES), this is a stylistic or background line, not a placeholder underscore. Therefore, the OCR result must ignore it and output nothing or only meaningful text. The provided OCR content is "____", which consists of four underscores. This is an incorrect interpretation of the line as a placeholder, violating the rule that stylistic lines must be ignored. The OCR has hallucinated underscores where none should exist based on the GT's visual context. Hence, the OCR result is inconsistent with the Ground Truth.
natural_image
Four metallic washers arranged in a 2x2 grid (no text or symbols visible)4 Pie de goma (TBLG32691)
![TECHNICS SBG90E - [NO TEXT] - 11](/content/2026/03/466666/images/25eeb5d8f4228e3f9d3f875c508a43292304743c8e0cd18e51ef0ebd13ccc019.jpg)
12 Tornillos de la placa de asiento (THEL155Z)
natural_image
Illustration of two people assembling a mechanical component with a curved arrow indicating rotation (no text or symbols)natural_image
Diagram of a mechanical component with a curved arrow indicating rotation (no text or symbols present)natural_image
Diagram showing a device with three circular components and an arrow indicating transformation (no text or symbols)natural_image
Illustration of two people handling a device with an arrow indicating rotation (no text or symbols present)natural_image
Illustration of two people handling equipment with a device and boxes (no text or symbols)natural_image
3D rendering of a small industrial machine with mounting legs and control panel (no visible text or symbols)Cable
natural_image
Illustration of a speaker tower with a Cinta-mounted stand, no text or symbols present![TECHNICS SBG90E - [NO TEXT] - 13](/content/2026/03/466666/images/dedab655e696b7d599285afb0f8759e7ecf2ec5d4df4d29ac33d129ba3b36420.jpg)
natural_image
Diagram of cable routing from a TV outlet to a monitor (no text or symbols)⊖ (Negro)
natural_image
Illustration of a cable being inserted into a TV screen, showing cable routing and cable attachment (no text or symbols)natural_image
Four metallic washers arranged in a 2x2 grid (no text or symbols visible)4 Gummifødder (TBLG32691)

natural_image
Illustration of two people assembling a vehicle chassis with a curved arrow indicating motion (no text or symbols)natural_image
Diagram of a mechanical component with a curved arrow indicating rotation (no text or symbols)natural_image
Diagram showing a device with circular elements on a surface before and after transformation, no text or symbols present.natural_image
Two people handling equipment with a device and boxes, no visible text or symbolsnatural_image
Illustration of two people assembling or repairing a device with tools and boxes (no text or symbols visible)natural_image
3D rendering of a small electronic device with labeled 'Ledning' and no visible text or symbols on the device itself.natural_image
Illustration of a speaker tower with extended arm and label 'Rem' (no text or symbols on the device itself)![TECHNICS SBG90E - [NO TEXT] - 15](/content/2026/03/466666/images/1d4f6412500df188b79d9478b6e10ae2a41b0585a1980b38b414e5851e75334a.jpg)
natural_image
Pure electrical circuit lines without any symbolsnatural_image
Four metallic washers arranged in a 2x2 grid (no text or symbols visible)natural_image
Illustration of two people assembling a vehicle chassis with a rotating arrow indicating rotation (no text or symbols)natural_image
Diagram of a mechanical component with a curved arrow indicating rotation (no text or symbols)natural_image
Illustration of two people performing a physical exercise with equipment and tools (no text or symbols visible)natural_image
Illustration of two people handling a device with boxes and a gear, no text or symbols presentnatural_image
3D rendering of a mechanical device with labeled 'Draad' and no visible text or symbols on the device itselfnatural_image
Illustration of a speaker tower with a stand and a labeled component 'Riem' (no text or symbols on the device itself)![TECHNICS SBG90E - [NO TEXT] - 16](/content/2026/03/466666/images/7ee1f67974eefdca8363f0f727b8c36888a43a84588065fc687abd377fd1802b.jpg)
natural_image
Diagram of cable routing from a monitor to cables, showing cable attachment and cable disassembly (no text or symbols)⊖ (Zwart)
⊕ (Rood)
natural_image
Illustration of a computer monitor with cable connectors inserted into the socket (no text or symbols)natural_image
Pure electrical circuit lines without any symbolsnatural_image
Four metallic washers arranged in a 2x2 grid (no text or symbols visible)4 Gummifötter (TBLG32691)
![TECHNICS SBG90E - [NO TEXT] - 17](/content/2026/03/466666/images/d236b74a74c45f135488409d2a72e8acfda53e6d1f3a3a6ab40498cf61da09c9.jpg)
12 Skruvar till bottenplattor (THEL155Z)
![TECHNICS SBG90E - [NO TEXT] - 18](/content/2026/03/466666/images/c01275d764f687dbdc69008efb50ba84c5f41f6a560d4dda9467598ec2decba1.jpg)
□ 2 Bottenplattor A (TBLA40852)
![TECHNICS SBG90E - [NO TEXT] - 19](/content/2026/03/466666/images/4a8a9a89f2f1af3ce99a29ee672988368d80e26b127f4919505a7b294deeddb7.jpg)
□ 2 Bottenplattor B (TBLA41091)
natural_image
Illustration of two people assembling or adjusting a mechanical component, with no visible text or symbols.natural_image
Diagram of a mechanical component with a curved arrow indicating rotation or movement (no text or symbols present)natural_image
Two people handling equipment with a device, one lifting the other (no text or symbols visible)natural_image
Illustration of two people assembling or repairing a device with tools and components (no text or symbols visible)natural_image
3D diagram of a mechanical device with labeled 'Vajer' and no other text or symbols![TECHNICS SBG90E - [NO TEXT] - 21](/content/2026/03/466666/images/84b3a4feaddcc7923a2b7bd09a6962167c273de3e54f512c220a1a58b75b85bd.jpg)
natural_image
Illustration of a speaker tower with extended arm and label 'Rem' (no text or symbols on the device itself)![TECHNICS SBG90E - [NO TEXT] - 22](/content/2026/03/466666/images/e6005dfd167c710330afee41b90cd03b5de8813851a0c6862a50acfd2995fd99.jpg)
natural_image
Pure electrical circuit lines without any symbolsnatural_image
Four metallic washers arranged in a 2x2 grid (no text or symbols visible)4 Kuminen jalka (TBLG32691)
![TECHNICS SBG90E - [NO TEXT] - 23](/content/2026/03/466666/images/869617aba20f6b0c39e4cd4301bccafa8071d83b34c544232209410125c6c94c.jpg)
12 Aluslevyjen ruuvit (THEL155Z)
![TECHNICS SBG90E - [NO TEXT] - 24](/content/2026/03/466666/images/c707c5470c30bb052d470a884309a485837a9cf445b4782390e571341cea23e0.jpg)
□ 2 Aluslevyt A (TBLA40852)
natural_image
Illustration of two people assembling a vehicle chassis under a roof structure, with one person bending forward (no text or symbols)natural_image
Diagram of a mechanical device with a roller being compressed, showing motion direction (no text or symbols)natural_image
Diagram showing a device with three circular components and an arrow indicating transformation (no text or symbols)natural_image
Illustration of two workers assembling a mechanical component with tools and boxes (no text or symbols)natural_image
Illustration of two people handling a device with boxes and equipment (no text or symbols)natural_image
3D rendering of a Kaapeli industrial machine with mounting legs and control panel (no text or symbols on the device itself)natural_image
Pure electrical circuit lines without any symbolsnatural_image
Four metallic washers arranged in a 2x2 grid (no text or symbols visible)natural_image
Illustration of two people assembling a vehicle chassis with a mechanical component, no text or symbols presentnatural_image
Diagram of a mechanical component with a rotating arrow indicating rotation (no text or symbols)natural_image
Illustration of two people assembling or repairing a mechanical device with a box nearby (no text or symbols)natural_image
Two people handling a device with boxes and a box nearby, no visible text or symbolsnatural_image
3D rendering of a small industrial machine with wheels and mounting base (no visible text or symbols)natural_image
Diagram of cable routing from a TV to a monitor (no text or symbols)natural_image
Illustration of a cable being inserted into a monitor (no text or symbols visible)natural_image
Pure electrical circuit lines without any symbolsLimited Warranty (ONLY FOR U.S.A.)
Technics Products – Limited Warranty
Limited Warranty Coverage (For USA Only)
If your product does not work properly because of a defect in materials or workmanship, Panasonic Corporation of North America (referred to as "the warrantor") will, for the length of the period indicated on the chart below, which starts with the date of original purchase ("warranty period"), at its option either (a) repair your product with new or refurbished parts, (b) replace it with a new or a refurbished equivalent value product, or (c) refund your purchase price. The decision to repair, replace or refund will be made by the warrantor.
| Product or Part Name Parts Labor | ||
| Technics Network Audio Amplifier | 3 (three) years | 3 (three) years |
| Technics Music Server | ||
| Technics CD Stereo System | ||
| Technics Turntable System | ||
| Technics Speaker System | ||
During the "Labor" warranty period there will be no charge for labor. During the "Parts" warranty period, there will be no charge for parts. This Limited Warranty excludes both parts and labor for non-rechargeable batteries, antennas, and cosmetic parts (cabinet). This warranty only applies to products purchased and serviced in the United States. This warranty is extended only to the original purchaser of a new product which was not sold "as is".
Mail-In Service—Online Repair Request
Online Repair Request
To submit a new repair request and for quick repair status visit our Web Site at
http://shop.panasonic.com/support
When shipping the unit, carefully pack, include all supplied accessories listed in the Owner's Manual, and send it prepaid, adequately insured and packed well in a carton box. When shipping Lithium Ion batteries please visit our Web Site at http://shop.panasonic.com/support as Panasonic is committed to providing the most up to date information. Include a letter detailing the complaint, a return address and provide a daytime phone number where you can be reached. A valid registered receipt is required under the Limited Warranty.
IF REPAIR IS NEEDED DURING THE WARRANTY PERIOD, THE PURCHASER WILL BE REQUIRED TO FURNISH A SALES RECEIPT/PROOF OF PURCHASE INDICATING DATE OF PURCHASE, AMOUNT PAID AND PLACE OF PURCHASE. CUSTOMER WILL BE CHARGED FOR THE REPAIR OF ANY UNIT RECEIVED WITHOUT SUCH PROOF OF PURCHASE.
Limited Warranty Limits and Exclusions
This warranty ONLY COVERS failures due to defects in materials or workmanship, and DOES NOT COVER normal wear and tear or cosmetic damage. The warranty ALSO DOES NOT COVER damages which occurred in shipment, or failures which are caused by products not supplied by the warrantor, or failures which result from accidents, misuse, abuse, neglect, mishandling, misapplication, alteration, faulty installation,
set-up adjustments, misadjustment of consumer controls, improper maintenance, power line surge, lightning damage, modification, introduction of sand, humidity or liquids, commercial use such as hotel, office, restaurant, or other business or rental use of the product, or service by anyone other than a Factory Service Center or other Authorized Servicer, or damage that is attributable to acts of God.
The model number and serial number of this product can be found on either the back or the bottom of the unit. Please note them in the space provided below and keep for future reference.
MODEL NUMBER SB-G90
SERIAL NUMBER TELEPHONE NUMBER
THERE ARE NO EXPRESS WARRANTIES EXCEPT AS LISTED UNDER "LIMITED WARRANTY COVERAGE".
THE WARRANTOR IS NOT LIABLE FOR INCIDENTAL OR CONSEQUENTIAL DAMAGES RESULTING FROM THE USE OF THIS PRODUCT, OR ARISING OUT OF ANY BREACH OF THIS WARRANTY.
(As examples, this excludes damages for lost time, travel to and from the servicer, loss of or damage to media or images, data or other memory or recorded content. The items listed are not exclusive, but for illustration only.)
ALL EXPRESS AND IMPLIED WARRANTIES, INCLUDING THE WARRANTY OF MERCHANTABILITY, ARE LIMITED TO THE PERIOD OF THE LIMITED WARRANTY.
Some states do not allow the exclusion or limitation of incidental or consequential damages, or limitations on how long an implied warranty lasts, so the exclusions may not apply to you.
This warranty gives you specific legal rights and you may also have other rights which vary from state to state. If a problem with this product develops during or after the warranty period, you may contact your dealer or Service Center. If the problem is not handled to your satisfaction, then write to:
Consumer Affairs Department
Panasonic Corporation of North America
661 Independence Pkwy
Chesapeake, VA 23320
PARTS AND SERVICE, WHICH ARE NOT COVERED BY THIS LIMITED WARRANTY, ARE YOUR RESPONSIBILITY.
Shop Accessories!
for all your Technics gear
Go to
http://shop.panasonic.com/support
Get everything you need to get the most out of your Technics products
Accessories & Parts for your Camera, Phone, A/V products, TV, Computers & Networking, Personal Care, Home Appliances, Headphones, Batteries, Backup Chargers & more…
Customer Services Directory
For Product Information, Operating Assistance, Parts, Owner's Manuals, Dealer and Service info go to http://shop.panasonic.com/support
For the hearing or speech impaired TTY: 1-877-833-8855
As of December 2015
User memo:
| DATE OF PURCHASE | |
| DEALER NAME | |
| DEALER ADDRESS | |
Limited Warranty (ONLY FOR CANADA)
Panasonic Canada Inc.
5770 Ambler Drive, Mississauga, Ontario L4W 2T3
TECHNICS PRODUCT – LIMITED WARRANTY
Panasonic Canada Inc. warrants this product to be free from defects in material and workmanship under normal use and for a period as stated below from the date of original purchase agrees to, at its option either (a) repair your product with new or refurbished parts, (b) replace it with a new or a refurbished equivalent value product, or (c) refund your purchase price. The decision to repair, replace or refund will be made by Panasonic Canada Inc.
| Technics Stereo Power Amp | 5 (five) years parts and labourTechnics Network Audio Control Player |
| Technics Speaker System |
This warranty is given only to the original purchaser, or the person for whom it was purchased as a gift, of a Technics brand product mentioned above sold by an authorized Panasonic dealer in Canada and purchased and used in Canada, which product was not sold "as is", and which product was delivered to you in new condition in the original packaging.
IN ORDER TO BE ELIGIBLE TO RECEIVE WARRANTY SERVICE HEREUNDER, A PURCHASE RECEIPT OR OTHER PROOF OF DATE OF ORIGINAL PURCHASE, SHOWING AMOUNT PAID AND PLACE OF PURCHASE IS REQUIRED
LIMITATIONS AND EXCLUSIONS
This warranty ONLY COVERS failures due to defects in materials or workmanship, and DOES NOT COVER normal wear and tear or cosmetic damage. The warranty ALSO DOES NOT COVER damages which occurred in shipment, or failures which are caused by products not supplied by Panasonic Canada Inc., or failures which result from accidents, misuse, abuse, neglect, mishandling, misapplication, alteration, faulty installation, set-up adjustments, misadjustment of consumer controls, improper maintenance, power line surge, lightning damage, modification, introduction of sand, humidity or liquids, commercial use such as hotel, office, restaurant, or other business or rental use of the product, or service by anyone other than an Authorized Servicer, or damage that is attributable to acts of God.
Dry cell batteries are also excluded from coverage under this warranty.
THIS EXPRESS, LIMITED WARRANTY IS IN LIEU OF ALL OTHER WARRANTIES, EXPRESS OR IMPLIED, INCLUDING ANY IMPLIED WARRANTIES OF MERCHANTABILITY AND FITNESS FOR A PARTICULAR PURPOSE. IN NO EVENT WILL PANASONIC CANADA INC. BE LIABLE FOR ANY SPECIAL, INDIRECT OR CONSEQUENTIAL DAMAGES RESULTING FROM THE USE OF THIS PRODUCT OR ARISING OUT OF ANY BREACH OF ANY EXPRESS OR IMPLIED WARRANTY. (As examples, this warranty excludes damages for lost time, travel to and from the Authorized Servicer, loss of or damage to media or images, data or other memory or recorded content. This list of items is not exhaustive, but for illustration only.)
In certain instances, some jurisdictions do not allow the exclusion or limitation of incidental or consequential damages, or the exclusion of implied warranties, so the above limitations and exclusions may not be applicable. This warranty gives you specific legal rights and you may have other rights which vary depending on your province or territory.
WARRANTY SERVICE
For product operation, repairs and information assistance, please visit our Support page on:
www.panasonic.ca/english/support
IF YOU SHIP THE PRODUCT TO A SERVICENTRE
Carefully pack and send prepaid, adequately insured and preferably in the original carton. Include details of the defect claimed, and proof of date of original purchase.
Panasonic Canada Inc.
5770, Ambler Drive, Mississauga (Ontario) L4W 2T3
PRODUIT TECHNICS - GARANTIE LIMITÉE
Kadoma, Osaka, Japan
Panasonic Testing Centre
Winsbergring 15, 22525 Hamburg, Germany
For the U.S.A.
Panasonic Corporation of North America
Two Riverfront Plaza, Newark, NJ 07102-5490
www.shop.panasonic.com
For Canada / Pour le Canada
Panasonic Canada Inc.
5770 Ambler Drive,
Mississauga, Ontario,
L4W 2T3
www.panasonic.com
For the United Kingdom and Ireland
For Continental Europe
Panasonic Corporation
Web Site: http://www.panasonic.com
En Cf Ge Fr It Sp Da Du Su Wi Po


- SB-G90
- Delivering the Ultimate Emotive Musical Experience to All
- For the U.S.A. and Canada
- For the United Kingdom and Ireland customers
- Sales and Support Information
- Safety precautions
- WARNING
- CAUTION
- Disposal of Old Equipment
- Table of contents
- Accessories
- About this unit
- Installation
- ■ For optimum position
- Determining an installation location.
- Adjusting the distances between the rear of the speakers and the walls
- Adjusting the angle of the speakers
- Adjusting the acoustics of the room and speaker layout
- Attaching the base plates
- Placing the speaker using the rubber foot
- Placing the speakers using the spikes
- Placing the speakers using the rubber feet
- Preventing the speakers from tipping over
- ■ When securing the speakers to a horizontal surface (floor, etc.)
- ■ When securing the speakers to a vertical surface (wall, etc.)
- Connections
- Connecting the speaker cables
- Connecting with an amplifier
- Attaching the speaker nets
- Notes on use
- Unit care
- Specifications
- [NO TEXT]
- Limited Warranty (ONLY FOR U.S.A.)
- Technics Products – Limited Warranty
- Limited Warranty Coverage (For USA Only)
- Online Repair Request
- IF REPAIR IS NEEDED DURING THE WARRANTY PERIOD, THE PURCHASER WILL BE REQUIRED TO FURNISH A SALES RECEIPT/PROOF OF PURCHASE INDICATING DATE OF PURCHASE, AMOUNT PAID AND PLACE OF PURCHASE. CUSTOMER WILL BE CHARGED FOR THE REPAIR OF ANY UNIT RECEIVED WITHOUT SUCH PROOF OF PURCHASE.
- Limited Warranty Limits and Exclusions
- THERE ARE NO EXPRESS WARRANTIES EXCEPT AS LISTED UNDER "LIMITED WARRANTY COVERAGE".
- THE WARRANTOR IS NOT LIABLE FOR INCIDENTAL OR CONSEQUENTIAL DAMAGES RESULTING FROM THE USE OF THIS PRODUCT, OR ARISING OUT OF ANY BREACH OF THIS WARRANTY.
- ALL EXPRESS AND IMPLIED WARRANTIES, INCLUDING THE WARRANTY OF MERCHANTABILITY, ARE LIMITED TO THE PERIOD OF THE LIMITED WARRANTY.
- Shop Accessories!
- for all your Technics gear
- Customer Services Directory
- Limited Warranty (ONLY FOR CANADA)
- TECHNICS PRODUCT – LIMITED WARRANTY
- IN ORDER TO BE ELIGIBLE TO RECEIVE WARRANTY SERVICE HEREUNDER, A PURCHASE RECEIPT OR OTHER PROOF OF DATE OF ORIGINAL PURCHASE, SHOWING AMOUNT PAID AND PLACE OF PURCHASE IS REQUIRED
- LIMITATIONS AND EXCLUSIONS
- WARRANTY SERVICE
- PRODUIT TECHNICS - GARANTIE LIMITÉE
- For the U.S.A.
- For Canada / Pour le Canada
- For the United Kingdom and Ireland
- For Continental Europe
Brand : TECHNICS
Model : SBG90E
Category : Loudspeaker