
BS 1949 A CB - Vacuum Cleaner BOMANN - Free user manual and instructions
Find the device manual for free BS 1949 A CB BOMANN in PDF.
| Brand | Bomann |
| Model | BS 1949 A CB |
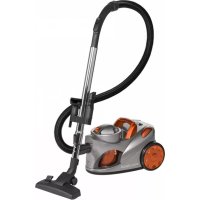
| Device Type | Cordless stick vacuum cleaner |
| Net weight (manual unit with crevice tool) | Approx. 1.5 kg |
| Battery type | Integrated rechargeable lithium-ion |
| Battery voltage | 3.6 V (6 cells) |
| Battery capacity | 2200 mAh |
| Charging time | Approx. 5 hours |
| Max runtime | 30 minutes |
| Power supply | Mains adapter (model ZD12D265050EU) |
| Adapter input voltage | 100-240 V, 50/60 Hz |
| Adapter output voltage | 26.5 V, 500 mA |
| Filtration system | HEPA filter, coarse filter, exhaust filter |
| Included accessories | Floor nozzle with turbo brush, crevice tool and brush, upholstery brush, hose attachment adapter, wall mount, plugs and screws |
| Power levels | 2 levels (low and high) |
| Additional features | LED charge indicator, LED on floor nozzle for visibility, motorized turbo brush, wall mount with charging function |
| Maintenance | Water-washable filters, transparent and removable dust container |
| Safety | Electronic overcharge protection, protected adapter |
Frequently Asked Questions - BS 1949 A CB BOMANN
User questions about BS 1949 A CB BOMANN
0 question about this device. Answer the ones you know or ask your own.
Ask a new question about this device
Download the instructions for your Vacuum Cleaner in PDF format for free! Find your manual BS 1949 A CB - BOMANN and take your electronic device back in hand. On this page are published all the documents necessary for the use of your device. BS 1949 A CB by BOMANN.
USER MANUAL BS 1949 A CB BOMANN
HEPA filter
Grof filter
Thank you for choosing our product. We hope you will enjoy using the appliance.
Symbols in these Instructions for Use
Important information for your safety is specially marked. It is essential to comply with these instructions in order to avoid accidents and prevent damage to the machine:

WARNING:
This warns you of dangers to your health and indicates possible injury risks.

CAUTION:
This refers to possible hazards to the machine or other objects.

NOTE: This highlights tips and information.
Contents
Overview of the Components. 3
General Notes 40
Special Safety Instructions for this Device 40
Special Safety Information Concerning
the Rechargeable Built-in Battery 41
Overview of the Components / Delivery Scope 42
Unpacking the Device 42
Notes on Use 42
Multifunction Button (0 / + / -) 42
Start-up. 42
Suction Tube 42
Floor Nozzle with Turbo Brush 42
Nozzle Attachments (16) and (17) 43
Assembly the Wall Holder. 43
Inserting the Plug of the Power Supply Unit 43
Fastening the Wall Holder. 43
Charging the Battery 43
Using the Device 44
End of Operation 44
Maintenance 44
Emptying the Dust Collector 44
The Filter System 44
Cleaning 45
Floor Nozzle 45
Dust Container with Filter Unit 45
Storage 45
Troubleshooting 45
Technical Data 46
Disposal 46
Accumulator/Battery Disposal 46
Meaning of the "Dustbin" Symbol. 46
General Notes
Read the operating instructions carefully before putting the appliance into operation and keep the instructions including the warranty, the receipt and, if possible, the box with the internal packing. If you give this device to other people, please also pass on the operating instructions.
- The appliance is designed exclusively for private use and for the envisaged purpose. This appliance is not fit for commercial use.
- The mains adaptor is only suitable for use in dry rooms.
- Check if the output current, voltage and the polarity of the mains adaptor match the information on the connected appliance!
- Do not touch the connected mains adapter with wet hands!
- If necessary, disconnect the appliance from the power adaptor.
- Ensure that the cable of the mains adapter does not become kinked, jammed, driven over or come into contact with heat sources.
- Do not use a damaged mains adapter.
- Do not repair the appliance yourself, but visit an authorized specialist.
- The device and the mains lead have to be checked regularly for signs of damage. If damage is found the device must not be used.
- Use only original spare parts.
- In order to ensure your children's safety, please keep all packaging (plastic bags, boxes, polystyrene etc.) out of their reach.

WARNING:
Do not allow small children to play with the foil. There is a danger of suffocation!
Special Safety Instructions for this Device
- This appliance can be used by children aged from 8 years and above and persons with reduced physical, sensory or mental capabilities or lack of experience and knowledge if they have been given
supervision or instruction concerning use of the appliance in a safe way and understand the hazards involved.
Children shall not play with the appliance.
- Cleaning and user maintenance shall not be made by children without supervision.
- The device is intended for use with safety extra-low voltage. Connect only to a power supply according to the specifications on the rating label.
- If the connection cable of this device has been damaged, it must be replaced with a special connection cable available from the manufacturer or its customer service.
- Do not suck in combustible substances or liquids!
- Avoid vacuuming sharp or pointed objects!
- Never vacuum without the filter installed.
Special Safety Information Concerning the Rechargeable Built-in Battery

CAUTION:
- The device contains rechargeable lithium-ion batteries that may not be replaced by the user.
- Risk of explosion in case of improper replacement of the rechargeable battery. Replace only by the same or an equivalent type.
- Do not expose the rechargeable built-in battery to hard impacts or pressure. Do not drop the device!
- Do not expose the device to intense heat such as sunlight. Also keep the device away from heat sources like radiators, stoves, etc!.

CAUTION:
- The ambient temperature should be between 0^ and max. 45^ . Heat damages the rechargeable battery. Increasingly lower temperatures reduce the capacity and the life of the rechargeable battery.
- Do not charge the rechargeable battery unsupervised.
- Use only the mains adapter "ZD12D265050EU" included in the scope of deliveries.
- Disconnect the power supply unit from the mains when you will not use the device for a longer time.
Overview of the Components / Delivery Scope
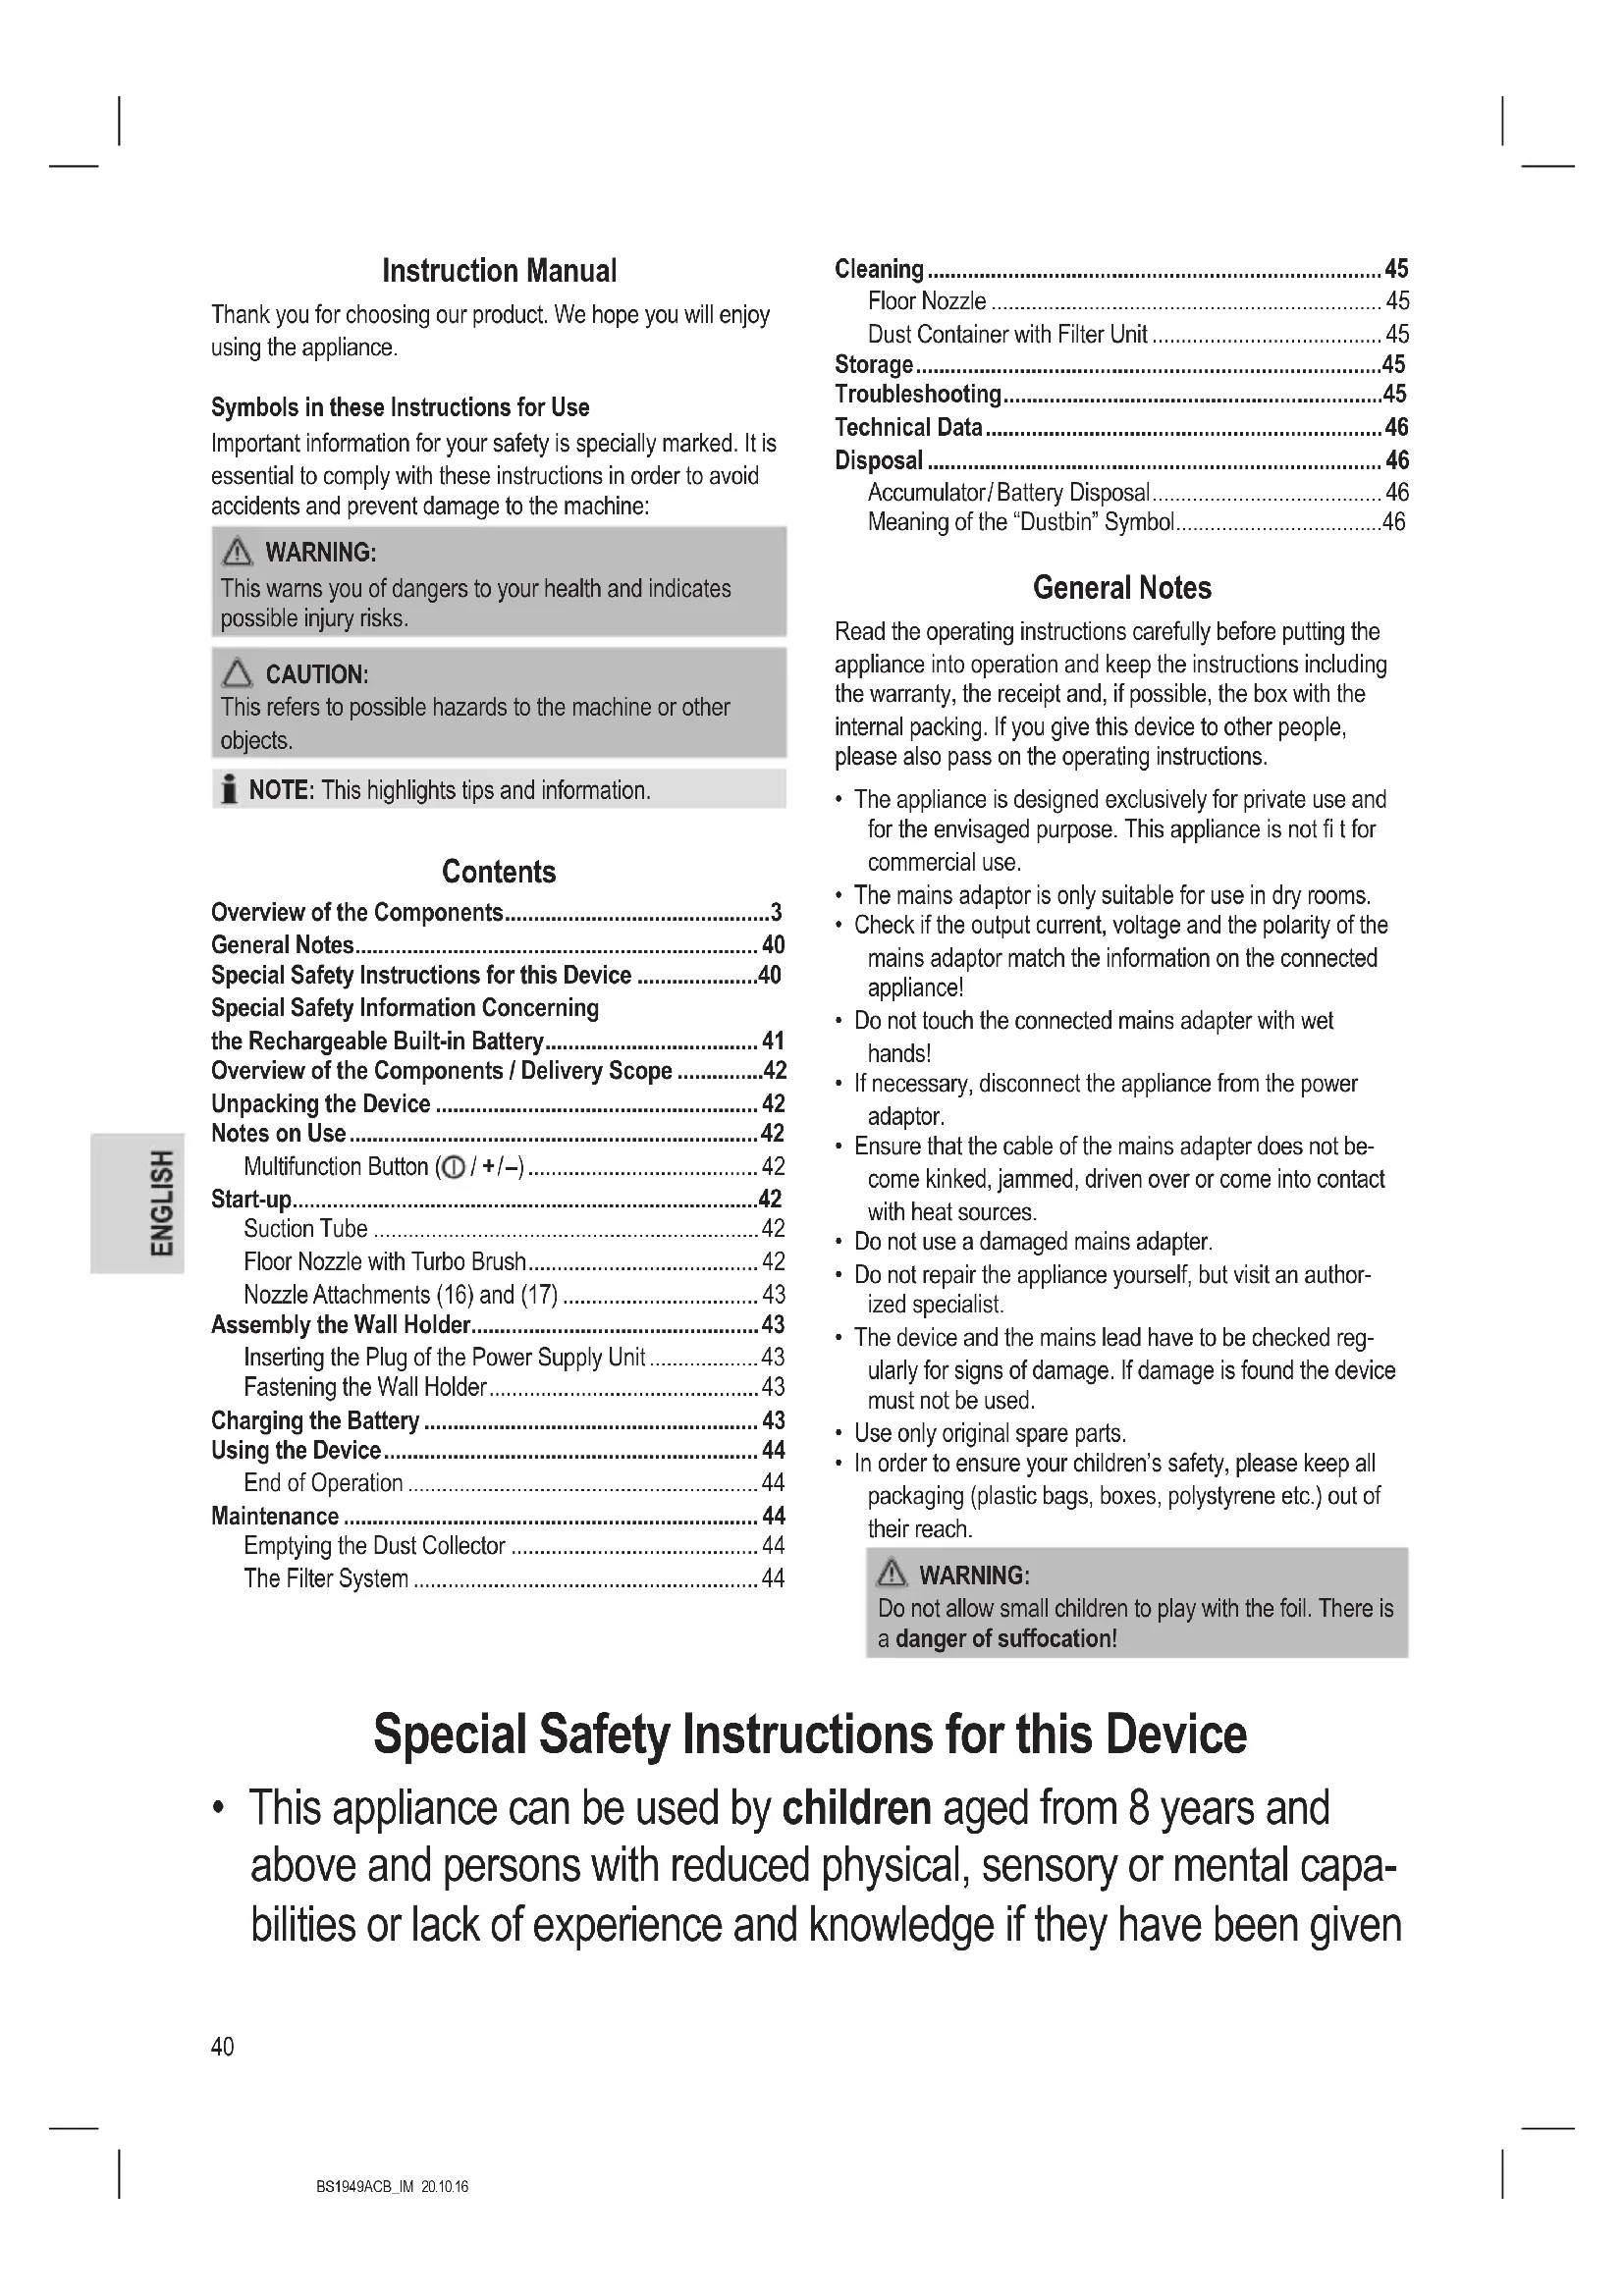
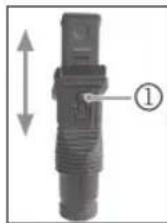
1 Button for unlocking / locking the fi Iter unit
2 LED charge indication
3 Multifunction button 日 / + / -
4 Carrying handle
5 Socket for connection of the power supply unit
6 Dust collector base plate
7 Dust collector with HEPA filter
8 Lock of the dust collector
9 Opener of the dust collector
0 Suction tube
11 Unlocking the floor nozzle
12 Button for unlocking the brush roller
13 Floor nozzle with turbo brush
14 Unlocking for suction pipe or nozzle attachment
15 Adapter for the nozzle attachment
16 Combined crevice / brush nozzle
17 Upholstery brush
18 Wall holder
Not shown:
1xMainsadapter
2x Wall plug
2xScrew
Unpacking the Device
- Remove the device from its packaging.
- Check the delivery scope for completeness.
- Check the device for any transport damage, in order to prevent hazards.

NOTE:
In case of any transport damage, contact your dealer immediately. Do not use a damaged device!
- Remove the transport lock from the multifunction button. 42
Notes on Use
- The device is especially suitable for quickly vacuuming small amounts of dry dirt or dust.
- The device is operated via charged battery. Charging is done via the supplied power supply unit.
- Direct power supply via mains adapter is not possible.
Multifunction Button (1 / + / -)
Use the multifunction button to turn the device on and off.
Also select a power level with this button.
Press once = Turn on the device, low power level
Press twice = Select high power level
Press three times = Turn off the device
Start-up
Suction Tube
- Insert the suction pipe with the two contact pins into the connection on the hand unit. It must audibly engage.
- To disconnect the suction pipe, press the release (14) and pull out the pipe at the same time.
Floor Nozzle with Turbo Brush
The foor nozzle is suitable for any foor covering. During operation, the LEDs on the foor nozzle light up for better visibility in dark areas.

CAUTION:
You cannot replace the LEDs.
- Slip the lower end of the suction pipe onto the connector on the floor nozzle. Pay attention to the contact pin. The suction pipe must audibly engage.
- To release the suction pipe, push the release (11) away from the suction pipe and pull out the pipe at the same time.
Nozzle Attachments (16) and (17)
You can attach these two nozzle attachments directly to the hand unit or to the already installed suction pipe.
Connection at the Hand Unit
- Insert a nozzle attachment with the marking facing up into the connection at the hand unit. It must audiably engage.
- To disconnect the nozzle attachment, press the release (14) and pull out the attachment at the same time.
Connection to the Suction Pipe
You need the adapter (15) for connection to the suction pipe.
- Insert the adapter with the angular side into the lower end of the suction pipe.
- Now you can slip a nozzle attachment onto the round side of the adapter.
- For removal of the nozzle attachment and the adapter, just pull the parts off.
Combined Crevice / Brush Nozzle
With this nozzle, you can selectively vacuum corners and slots.
Use the nozzle with locked brush to prevent scratching of the surface to be cleaned.
- For this, press the button and push the brush to the end of the nozzle. It must engage.
- Press the button again to unlock the brush.
Upholstery Brush
This nozzle is especially good for gentle cleaning of larger susceptible surfaces.
Assembly the Wall Holder
Inserting the Plug of the Power Supply Unit
If you want to use the wall holder also as the charging station, attach the plug of the power supply unit first. Refer to the illustrations (A to C) on page 3.
NOTE:
- Turn the plug at the metal end, not at the cable. Use a pliers if necessary.
-
There is an opening at the rear of the wall holder. You can turn the plug additionally with a finger through this opening.
-
Set the plug of the power supply unit with the flattened side into the wall holder. (Fig. A)
- Turn the plug of the power supply unit by 90^ . It must sit solidly in the holder and sliding no longer shall be possible. (Fig. B)
- Fix the cable in the cable guide. (Fig. C)
Fastening the Wall Holder

WARNING:
Make sure beforehand whether there are cables in the wall which could be damaged!

CAUTION:
Place the wall holder so that the appliance is not exposed to direct sunlight or other heat sources.

NOTE:
A power outlet must be near.
- Measure the height for the wall holder. Hold the vacuum cleaner against the wall with the suction pipe and the floor nozzle installed.
- Hold the wall holder against the wall as shown on page 3. Mark 2 drill holes.
- Drill the holes and insert the wall plugs into the wall.
- Insert the screws through the holes of the wall holder.
- Tighten the screws with a screwdriver hand-tight.
Charging the Battery
- Tum off the device.
- Connect the power supply unit with the connection socket (5). If you have prepared the wall holder as a charging station, suspend the appliance from the wall holder.
- Connect the mains adapter to a certified wall socket. Charge the device for approx. 5 hours before first-time use.

NOTE:
The LED charge indication shows the charging status of the rechargeable battery. (25%, 50%, 100%)
- The appliance has electronic charge control, which prevents overcharging.
- Charging has been completed when all 3 LEDs are lit.
- The LEDs go out after a while.
- It is normal for the device to heat up during charging.
- The rechargeable battery must be charged when the LED charge indication shows only 25% of capacity.
- Disconnect the power supply unit from the outlet once the rechargeable battery has been charged completely.
NOTE:
Even when switched off, the rechargeable battery discharges continuously. If the device is out of use for a longer period of time, charge the rechargeable battery at least once every 6 to 12 weeks.
Using the Device
You can use the appliance as a floor vacuum cleaner or as a handheld and upright vacuum cleaner (basic unit).
- Disconnect the appliance from the mains when changing the accessory.
- Tum on the device.
- Select a power level.

NOTE:
We recommend the higher power level for using the appliance with the floor nozzle.
End of Operation
- Turn off the device.
- If you have already installed the wall holder, hang up the vacuum cleaner. You can attach the crevice / brush nozzle and the upholstery nozzle at the left and the right of the vacuum cleaner.
Maintenance
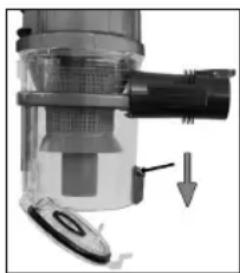
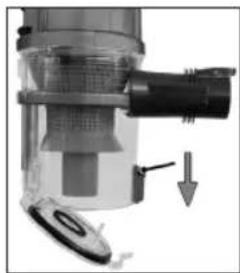
Emptying the Dust Collector
- Disconnect the appliance from the power supply unit.
- If necessary, remove the suction tube or the nozzle attachment from the appliance.
- Hold the appliance with the bottom plate of the dust collector over a dustbin.
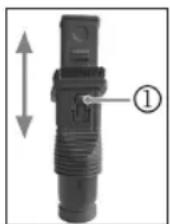
- Empty the contents of the dust collector. Slide the opener of the dust collector downwards to open the bottom plate.
- Then close the base plate again. The lock on the dust collector must engage.
The Filter System
Your appliance features 3 filters. The common dust bag system has been replaced by a transparent dust collector. The higher flow speed of the collector allows for heavy dirt and smallest floating particles to be separated from the "sucked-in air".
It is thus not necessary to buy dust bags.
The filters must be cleaned periodically.

CAUTION:
- Never wash the filter in the washing machine.
- Do not use a hairdryer for drying.
- Only put the appliance back into operation when all filters are completely dry and correctly assembled.
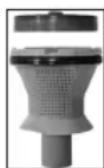
The Filter Unit
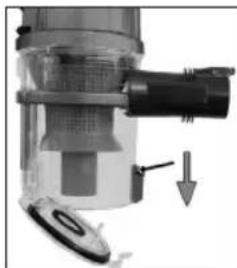
The filter unit is composed of:
HEPA filter
- Coarse filter
Proceed as follows to clean the filter unit:
- Empty the dust container as described above. (Steps 1 - 5)
- Disassembly of the filter unit
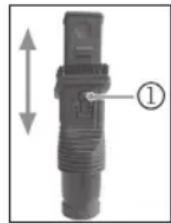
2.1 Press the dotted area of the button (1) to disconnect the dust container from the motor housing.
2.2 Turn the cover of the dust container in the direction Remove the cover.
2.3 Pull the filter unit from the dust container.
2.4 Turn the HEPA filter to remove it from the coarse filter.
- You can brush out the HEPA filter. In case of heavy staining, clean the filters under running water.
- Let the filters air-dry completely before refitting them!
- Wipe the dust collector with a damp cloth and then wipe it dry.
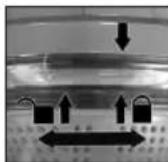
- Assembly of the filter unit
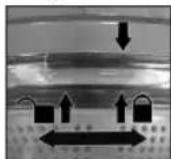
6.1 The HEPA filter has 3 guide lugs. Set the largest guide lug into the largest recess of the coarse filter. Tighten the HEPA filter by turning it clockwise. It must audiably engage.
6.2 Set the filter unit into the dust container. The rounded guide lug must sit exactly in the rounded recess.
6.3 Reattach the cover to the dust container. Set the arrow on the cover just over the arrow at the side of the symbol
6.4 Tighten the cover in the direction must audiably engage.
6.5 Reattach the dust container to the motor housing. Set the dust container first at the bottom part to the motor housing, so that the electric contacts are matched. Then engage it to the top. For this, press the smooth area of the button (1).
Outlet Filter
The appliance is also equipped with an outlet filter. It is on the right side of the appliance.

CAUTION:
You cannot remove this filter.
Cleaning

WARNING:
- Always disconnect the appliance from the power supply unit before cleaning!
- Under no circumstances should you immerse the motor housing in water in order to clean it. Otherwise this might result in an electric shock or fire.

CAUTION:
- Do not use a wire brush or any abrasive items.
- Do not use any acidic or abrasive detergents.
-
The single components are not dishwasher-safe.
-
Wipe the casing with a damp cloth.
- You can wipe the mains adapter unit with a dry cloth.
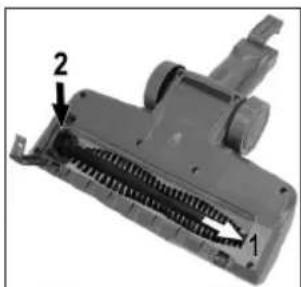
Floor Nozzle
- Disconnect the floor nozzle from the suction pipe.
- Turn the floor nozzle around, so that you see the lower side. Press the button (12) on the floor nozzle to unlock the lock of the brush roller on the left side.
- Pull out the brush roller.
- Remove threads and hair wound to the brush. Use scissors, if required.
- Assembly: Refer to the adjacent figure.
5.1 Set the brush roller at position (1). Make sure that the triangular recess on the brush roller is positioned correctly.
5.2 Return the bearing of the brush roller into the housing of the floor nozzle (position 2).
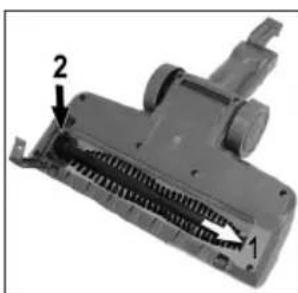
- Close the lock of the brush roller. It must audibly engage.
Dust Container with Filter Unit
Please read the chapter "Maintenance" for cleaning of these components.
Storage
- Clean the appliance as described and allow it to dry.
- You can use the previously installed wall holder for storage.
We recommend that you keep the appliance in the original packaging if it will not be used for long periods.

NOTE concerning the life of the rechargeable battery:
Even when switched off, the rechargeable battery discharges continuously. When the device is out of use for a longer period of time, charge the rechargeable battery at least once every 6 to 12 weeks.
Always store the appliance out of the reach of children in a dry, well ventilated place.
Troubleshooting
| Problem Possible | le cause Remedy | |
| The device does not function. | The rechargeable battery is empty. | Charge the battery. |
| The power supply unit is connected. | Disconnect the appliance from the power supply unit. | |
| The rechargeable battery is defect. | Contact our service or your dealer. | |
| Weak suction power. | The battery is nearly discharged. | Charge the battery. |
| The dust container is full. | Empty the dust container. | |
| The filters are dirty. | Clean the filters as described under "Maintenance". | |
| Noise during operation. | A foreign body has been sucked into the floor nozzle. | Remove the foreign body. If required, disconnect the floor nozzle from the suction pipe |
| The floor nozzle with turbo brush is not operating. | The brush roller is blocked by dirt. | Clean the floor nozzle as described under "Cleaning". |
| Incorrect assembly of suction pipe and / or floor nozzle. | Check the assembly. | |
| Dust escapes from the dust container. | The dust container is not closed correctly. | Check the installation of the filter unit, the cover, and the base plate. |
| The rechargeable battery does not keep the charge. | The rechargeable battery has reached the end of its life. | Contact our service or your dealer. |
Technical Data
Model: BS 1949 A CB
Net weight (Hand unit with crevice nozzle): ....approx. 1.5 kg
Mains Adapter
Protection class: II
Input: AC 100-240V, 50/60 Hz, 0.5A
Output: DC 26.5V, 500mA
Polarity:
Battery: 6x3.6V,2200mAh Li-Ion
Operating time: 30 minutes maximum
Charging time: approx. 5 hours
The right to make technical and design modifications in the course of continuous product development remains reserved.
This device has been tested according to all relevant current CE guidelines, such as electromagnetic compatibility and low voltage directives, and has been constructed in accordance with the latest regulations.
Disposal
Accumulator/Battery Disposal

The unit contains a rechargeable battery. Used batteries / accumulators (rechargeable batteries) do not belong in household waste.
The battery must be removed before the product is recycled. Contact qualified personnel.
Information, where batteries / accumulators are to be disposed of can be obtained from your local or municipal authorities.
Meaning of the "Dustbin" Symbol
Protect our environment: do not dispose of electrical equipment in the domestic waste.
Please return any electrical equipment that you will no longer use to the collection points provided for their disposal.
This helps avoid the potential effects of incorrect disposal on the environment and human health.
This will contribute to the recycling and other forms of reutilisation of electrical and electronic equipment.
Information concerning where the equipment can be disposed of can be obtained from your local authority.
Instrukcja obslugi
CTC Clatronic Sp. z 0.0
Yka3bIbaeT Ha BO3MOxHyO ONaCHOCT bIgN3dEINnI dpynx OKpyXaIOxN ppeMeTOB.

PIMMEUHIA: Daet COBETI INHOPMaHIO.
CoepkaHne
O63op deTanei npnbopa. 3
O6uhe 3ameyannn 62
Ocobie yka3aHnno TExnke 6e3onacHocTn
IINr 3TOr yCTpOncBa. 62
CneuaNbHbIe yka3aHnno 6e3oNaChocTN, kacaOnueceBCTpoEHHOaKKyMylTopHO6aTapeN..63
063op deTaeIepn6opa/KomnJIeK TnoCTaBKn 64
PacnaKOBka yctpoNCTBa. 64
PpmeaHn no nCnoB3oBaHn 64 MHorofyHKUHOHaJIbHaK HonKa (1 / + / - ) .65
Hauano pa6oTbI 65
Bcacbibaioua Tpyba 65
Conno nona c typ6-oetko 65
Hacaikn (16) n (17) 65
MoTax HacteHHoro depkaTeIa 65
BCTabKa BnIKN B 6nOK nTahna. 65
MOnTax HacTeHHoro DepeKaTeIa 65
3apd akymyTopoB 66
3Kcnnyataa.. 66
3akOHHTb nOlbzOBaHne np6Opom. 66
O6cnykBaHne 66
OnyctoWeHne nbIeSc6OpHnka. 66
CnCTema qinbtpoB 66
Ynctka 67
Hacadka nna nona 67
TbIe6OpHc 6JOKOM qnIbTpOB .68
Xpahene 68
Ponck n yctpaHene HncnpaBHOCTeI 68
TexHHueckne daHHbIe 68
06zne 3ameyann
Ipeep naHOM 3KcNpyatauIN np6opa BHMaTeNbHO npouHTaTe npnlaraymyIO HCTpykUIO NO 3KcNpyatauIN COxpaHNTe ee B HAdEJXHom MeCTe, BMeCTe C rapaHTnHbIM TaHOOM, KaccOBbIM YekOM I, PO BO3MOXHOCTN, KAPTOHHO KOPO6KO C yNAKOBOyHBIM MaTeHApON. EcIn daete KOMy-1n6o nonoJIb3OBAtBCsra np6obopm, O6BaTeNbHO daTBe B pnpdauy DaHHyo IHCTpykUIO IO 3KcNpyatauIN.
ПользуITECBпибормTOЛБКОчASTHBIMобразOMиnoHa3HaueHIO.IpNi6Op He npedHa3HaueHДЯ KOMMepueCKOTOИСПЛБ3OBAHIA.
CeteBOn aadantep npirodeH nIcnoJb30BaHnra TOnbKO B CYNXN NOMeJeHHx.
- PioBepbTe corIacOBaHHocTb BbIXoHOrO ToKa, HAnpJKeHnI INONJIphOCTN CTeBOrO aAnTepa C INHΦopMaucneiHa NODKJIIOUcAemom np6ope!
He npikacaiTecb K ceTeBOMy aanTepy BnaXhIMnykamn!
Korda Heo6xOIMa YnCTka, OTKnHouHTe npHbOp ot cTeBoro aanTepa.
- Y6eIntecb, YTO Ka6eIb cTeBOrO aIaIITepa He I30rHyT, He NpejXaT, He HaTaNHT N He KacaetcNtOCHNKOB TENJa.
- He npimehnreTne nobpeckdeHbI cTeBoi aadntep.
He bItaTecb camOCToTeNbHO pEmOHtnpOBaT npBOp 6paTntEcK yNoHOMOeHHOMy Ha 3TO CnEuaJIInCTy.
- Pn6bOp n Ka6eJIb cTeBOrO nHTaHnHa Heo6xoJIMOp peYnIpaHO o6cneIOBaTb Ha hAInuue CneDob NOpeXKeHn. PnI O6hApUkeHn IOpeXKeHn nonb30BaTbCnPn6pOpom 3aIpeuaetc.
IcnoJb3yTeToJIbKOOpnHaHaBHe 3aHacTn.
- I3 coobpaxeHn 6e3oNaChOCTn dIa DeTe Hc octabnIte JexKaTb ypaKOBky (PiactNKOBbIe MeJKN, KapToH, neHO-nPnact n T.d.) 6e3 npncmOTpa.

PENEYIPPEXDEHNE:
He no3B0JnTe DeTm nIpaTb C nOINaTHneHOBOI nIEHKO. Onachocb ydyub!
Oco6bIe yka3aHnI NO TexHnke 6e3OpacHocTn DJIy 3TOrO yCTpOiCtBa
HaxaTb Dba pa3a = Bbl6paTb BbICOKn ypoBeHb MOUHOCTN
HaxkaTb Tpu paa = OTKnHouHTb npu6op
HauaNo pa6oTbI
Bcacbbaoza Tpy6a
BCTaBbTe BCaCbBaHOuTo Tpy6y C DByMg KOHTaKTHbIMNtBtpmN B CoeINHeHne Ha pyHOM 6nKe. OHa dOnxHaBOITN B 3auePHeHne CO 3ByKOM.
ДпготоюненьВсаьванцeТубиНжмITEHa KhoNKу OcBO6oxKdENHn(14),ODHOBpeMeHNO BbITIgNBA Tpy6y.
CBeToOnoDbI 3aMeHe He nOndexKaT.
HaedeHbTe HxKHN KOHeu BCacbBaIOUeI Tpy6bl Ha co- eHNHTeJIb HacaDN Ia. O6paTte BnHMaHne Ha KOHTaKTbIy 7btpb. BcacbBaOua Tpy6a DOJxHa BOITN B 3aCenHeHne CO 3ByKom.
-Дяocbo6oxdeHnBcacbIbaIOueTpy6blOTOdBnHbTe KhoNkyocbo6oxdeHn(11)OTBCacbIbaIOueTpy6bl OndHOBpeMeHHo BbITaHNTE Tpy6b.
Hacaan (16) n (17)
3TN DBe HacaKIMoXHO NOcOeINHrTb HenocpeCTBeHHO KpyHOMy 6nOKy INN K yKe yCTaHOBHeHHOB BCacbBaIOSeI Tpy6e.
IodcoeduneHueKpyHomy6noky
BCTaBbTe HacaKy TaKIM O6pa3OM, YTO6bl MapKnipOBKa 6blHaHnPaBHeHa K CoeDInHeHIO Ha pyHOM 6I0Ke. OHa DOJIxHa BOITN B 3aCenPHeHc CO 3ByKOM.
-ⅡTЯOTCOEINHEHNAHACDNHAXMNTHeKHONKYOCBO60XJDeHn(14),OHOHBpeMeHHOBbITrNBaHacdky.
IodcoeunHeue Kecacblaaoue umpy6e
III NOIOCoEIMHeHnK BCaCbIBaHOuSeI Tpy6e noHaIObntcpepexoHnK (15).
BCTaBbTe NepexoDnK yTIOBOI CTOPHOI B HIXHNI KOHeC BCacbBAIOe Tpy6bl.
Tepeb MoxHo HaJeTb HacaKy Ha KpyIyIO CTOpOHy nepexoHnka.
-Дя удаленин Насади и nepexodnka npocTo BbITAHTe 3tNi DeTaniN.
KombuHupoeaHHa 1eEea HacaKa / HacaKa co eMkoJ
C NOMOUIHO 3TOH HacaIKMOXHO BbI6OpOHO bJIIEOCINbB yTnax nIeJAX.
Дпгпсдгбгьнгьпогьнгьцарпн Ha Oчиаимо ПоверхноюнспльзутЕ наcaДКу CЗФИКСИРОВАНСО шETKО.
ДЯЗTOROHAKMMTeHaKHONky npOTOnKHnTEUETKYDO KOHua HacadKn. OHa DOnxHa BoITN B3aCenneHne.
- YTo6bI pa36IOKIpOBaTb 电Ky,HaKMITE Ha KHONKy epepa3.
Lemka dna oBueku
3Ta HacaKa Oc06eHNO XopoWIO NOxOuNT DnAuaIeY6OpKn 6oJIbuxyBCTBnTeJbHbIX NOBepxHOCTe.
MOHTAX HAcTeHHoro DepKaTeJIa
Bctabka BnIkn B 6JOK NITaHn
EcnBbXOTHe NcNoIb3ObaTb HAcTeHbI DepeKaTeIb TaKe B KaueCTBe 6a3bl DnA 3apJkn, Chauana NoKIOuHTe BNky K 6NOKy NtAHn. Cm. nllnoctpaun (A - C) Ha cTpaHnue 3.

ПИМЕЧАнЯ:
-
Поворачиразе влку 3a Meталпчecкий конц, a He 3a Kaбел. Рр Нeoхдимости Исюлььт e Плоскогубцl.
B3aHHeJuaCTnHaCTeHHOrOJePkaTeTnIIMeTcR OTBepCTne. Upe3 3TO OTBepCTne MOKHO DOnONHITeNbHO NOBOPaHBt BNIky C NOMOuHbNo NaIbua. -
BctaBtBe BNky 6Ioka NHTAHNA CnHIOeHHO CTOpHOH B HAcTeHHbI DePKeTaTeJIb. (Pnc.A)
2.ПовернITEВИКу 6лka nITaHЯ Ha 90°.ОаdoJIХHaJaExKHO 3akpeNTbCЯ BДерхаTeNe I 6OJIbSe HeCKoJIb3NtB.(Pnc.B) - 3akpenTe Ka6eJIb B HnpaBnaIooe nn Ka6eJIa. (Pnc.C)
MOnTaX HAcTeHHoro DepeKaTeTnA

IPENDYPENPEKDEHNE:
PpeBapnteBHO y6eIITecB OTCyTCTBnB C tHe Ka6eJen (npoBODKn), KOTOpBle MOrYt 6bItb NOBpeKdEh!

BHIMAHINE:
Pa3meaIte HacteHbI DePkaTeIb TaKIM O6pa3OM, YTO6bl pIb6Op He noDBepraIcAeiCTBIO IprMbIX COJIHeuHbIX Lyuei nn Dpynx IXOCHNkoB TEIIa.

PIMMEAHNIA:
B6Jn3n DoJnKha 6bIt bJeKeTpueeckar po3Etka.
- N3mepbTe BbICOTy DnI MOHTaxa HaCTeHHoro DepeXaTeYI. PnKMMTe PbJNEcOC K CTeHe C yCTaHOBJIeHHoB BCacbIbaHoue Tpy6oN HacaJKO dNn oNa.
2.ПиЖМITEHaCTeHHbIДeрKaTeIbKCTeHcKnOKa3aHO Ha cTpaHnIe 3.OTMeTbTe 2 MeCTa IINBbICBepNIBaHmOr OTBepCTnI.
3. Пороверпге OTьрстги в Встытг В сеньд.
4.BctabTe BnHtby Upe3 OTBepCTnB HacteHHOM DepeXaTeIe. BBePHTbIC HaCTeHHbIM DepxaTeIeM B IIO6eJIi.
5. 3aTnHTe BnHTbI BpyHyIO Do ynpa C nOmoBTOBepTKN.
3apäd akkymnytoPOB
- BbIKJIOHHTe yCTPOIcTBO.
- POKHOTNE 6NOK NITAHNA K COEINHTeNBHO My (5). Ecnn Bbl NOIROTOBUN HAcTeHHb I depKaTeNB KaueCTBe 6a3bl IJn 3apAkn, NOBecbTe Ha HEm npi6op.
3.Поdkнчte cTeBoi aanTep K ceptnuPnoBaHHo 3JIeKTPnueckoPo3eTke.3apJkaTe yCTpoIcTBO npIM. 5 YacOB nepeI nepBbIM nCIOJIb3OBAHnEM.

ПРИМЕЧАнЯ:
- CBeToIIOHbI INHIMKaTOP 3apJKn IOKa3bIBaET CTATYC 3apJKn AKKyMnTOpHO6BaTapeN. (25%, 50%, 100%)
- Pn6bop cna6keh 3neKToHHbIM ycTpoCtBOM KOH TPOJ3apJdkn, npdeOTbpaaioUoIm nepe3apJky.
3apraKa 3aBepWeHa, KOrTa rOpyr Bce 3 CBeToDIOda. - Upe3 HeKOTOpoe Bpemc CBToDIOdbI NoraChyT.
- HarpeB yctpoiCTBa npn 3aprKe rBnIeTcHOpMaJIbHbIM.
4.AkkymyIaTOpHy6bTaapeHHe Heo6xOIMo 3apnTb, KOrdaCBeToDIOHbI INDkAToP 3aprKn NOKa3bBaet ToNbKO 25% ee EMKoCTN.
5. Nocne noJHO3apAkn akKymIyTOpHoi 6aTapeoOTcoeHNHTe 6JOK nITAHnO T p03eKN.

ПРIMЕЧАЙ:
Даже пи Вькlioуновприбора AkkyMnyTOpHЯ 6batapeя постогно pa3ржaeTc.Есп пибор He IcnoIb3yETcB TeueHneДптELhOROпepnoDAВpeMeHn, 3a\rjkaite AkmyTApHyO batapeIe He pexe,чem pa3 B6-12 HeJeIb.
3Kcnnyatauia
Mожно ИспοньзовытnpиборВкayесТБпьлесocаДпяпona ИлиВВиDEперhoeCHOrОпьлесocаДпЯВерТКальногчNTК(6a30BbI 6ПOK).
- Пи заме He npHaJIeXHocTn OTCoeHInTe npi6op ot cetn.
- BkIIOUHTe npH6Op.
- BbIbepnTe ypoBeHb MoUHocTH.

ПИМЕЧАнЯ:
PnncnoIb3ObaHnn np6opa c hacaKoI nna peKoMeHdyETcAcbIyBICOKm ypoBeHb MOUHOCTN.
3aKoHHTb nOJIb3OBaHne npi6opom
- BbIKHouHTe yCTPOICTBO.
2.Послme мотхан acteHOrO epxatena NOBecTe Ha Hero nbIeococ.CneBa n cnpaba OT nbIeococa moXHO 3akpenTb ueleByu HacaKy / HacaKy CO ueTKoI N HacaKy IINCTKN ONBKN.
06cnykmbaHne
OnyctoWeHne nbIeScbOpnka
-
OTKHIOUHTe npBOp OT 6noka nHTaHm.
2.Пи Heo6xOIMOCnY ydaJIInTe c yctpoiCTBa BCacbIBAIOU ty6y nHn HacaNk.
3.Деркinte yctpoiCTBO TaK,чTObI HmKHЯ nAHeJIb nbI- nec6opHnka pacnoIaranaIacb HaI MyCOpHbIM BeDpOM. -
Onopoxhnte nbIe6bOpHnK. CdbHbTe OTKpbIBaTeJIb nbIe6bOpHnKa BHN3, YTO6bl OTKpbITb HNKHIO NaHeJIb.
- 3aTeM 3aKpOte OCHOBaHne. 3aUeIka nbJIeC6OpHnKa DOJXHa 3aФИКСИРОВаТСЯ.
Cnctema nJbTpOB
B yctpoiCTBe npedyCMOTpeHo 3 fnhbTpa. O6bHna CnCTema C MeUKOM dIa c6opa nbII IN 6bla 3aMeHeHa Ha npO3paUHbI nbIeC6OpHnik. BoJee BbcOKaK ckopocTb c6opa nbIN N03BOJAAET pa3dJIaTb TjKeJyIO nbIN MAnEInuue qactNUBI B 3acacbIBaEMOM BO3dyxa.
TakIM 6pa3OM, OTCyTCTByET Heo6xOaMocTb NOKyNaTb MEsKn.
Фильт彬тpebyOTперади ueckочNTkn.

BHIMAHHE:
- 3aippeuaetcmaBtbpCTpBCTpaHmMaHHe.
-3anpeaaetcncnojIb3OBaTbΦeHdIa cyuKn.
Bo3BpaaTaB yctpoiCtBO B pa60Tu MoKHO B TOM Cny- yae,ecn BCE pNbTpbl a6coNIOTHO cyxne n npabNbHo co6paHbI.
Enok qunbmpoe
BIOK qIbTPOB BKNUaET B C6eCneJeUoee:
ΦnltpHEPA
ΦnIbTp rpy6oOuNCTkn
IЯ OYCTK6NOKa FInbTPOB BbINONHITcNeDyUoee:
- Onopoxhnte emKoCTb IaI naIIN corlacho npBedeHHbIM BIIe HCTpykuaM. (War 1-5)
- Pa36epnte 6Jok knbtpoB
2.1 HaxMMTe Ha 6bIacTb C ToKAMN KOnKn (1) nT OToeDnHeHn Nblnc6OpHnKa OT KopnyCa DniratEna.
2.2 NobeprHnTe KpbIuKy nbInec6opNkaB HappaBneHmCHHMnTe KpbIuKy.
2.3 BbIaIe 6nok qnnbTPOB n3 nbJInc6OpHnka.
2.4 TObepHnte pNbTp HEPA, yTo6bl ydaNTb erO n3 pNbTpra rpyboon ouhctkn.
- BbICOKo3ΦeKTHBHy cyxO BO3dyuHbI ΦnIbTp MOxHO npOuNCTnTb 电Tko.Bcnyae CnIbHoro 3aPra3HeHn npOMOteΦnIbTpbl NO pTOUHO BOdo.
4.ДаiteФиltpbI NOHOCbBbICOXHyTb NepeJ yCTaHOKoH Ha MeCTO!
5.ПоТРИЕ nbIe6bOPHnK BnaJHoT KaHbHO,3aTeM BbITPHT Hacyxo.
6.C60ka 6noka qnIbTpOB
6.1 Φильър HEPA cha6keH 3 HanpaBnIooMm BbICTy-namN.YcTaHOBITe cambl 60JIbwoi HanpaBnIooMn BbICTyn Bcamoe 60JIbwoe yrrJy6neHne FInbTpa rpy6oOnCTKn. 3aTrHNTe FInbTp HEPA, nobopa- uHBa erO IO YacOBoi CTpeJIke. OH DoJIxeh BoITn B 3aCenIIeHne CO 3ByKOM.
6.2 YcTaHOBnTe 6nOK φnIbTpOB B nIeScbOpHnK.3aKpyIeHHbI HnPaBnAIOuMn BbICTyn DOJIKeH TOHOb BCtAtb B 3aKpyIeHHoe yIy6JIeHne.
6.3 ChOBA noCoEHHNTE KpbIuKy K nbIeC6OpHky.YcTaHOBnTe CTpeIKy Ha KpbIuKe HenoCpeDCTBeHHo HAD CTpeIKoN C6
6.4 3aTAYHHe KpbIshky B HappaBHeHH OHa DoJIHK Ha BOITN B 3aueJIeHne CO 3ByKOM.
6.5 ChOba noIcoeHInTe nbIine6OpHnK K KopnyCy Dniratena. Chayana yctahOBITE nbIine6OpHnK HxHne YactbIO B Kopnyc Dniratena TAKIM 06pa3OM, 706bl COBnAIN 3JekTpueckne KOHTaKTb. 3aTeM NOdcoeHNITe ero B BepXHeuactn. IJIr 3TOrO Haxmnte Ha IJaKyIO 6bnactb KNONK (1).
Bbinyckhofunbmp
Pnp6op TaKe ImeeT BbIyckHOI pIbTp. OHa HaxOHTcH Na npaBoi CTOpHe np6opa.

BHIMAHHE:
BbHe MoKTe ydaTb 3OT qnIbTp.
UncTka

ПЕДУПЕЖДЕНЕ:
- Пераюстков Всета OTКлочаite пибор ot ьoka ппаня!
- Hn B Koem clyuae He OkyHaIte Kopnyc DBrIaTeJIЯ ДЯ MbITbЯ B BodY. 3TO MOxET 6bITb npUHoi 3JIeKTPnueCKOro ydapa nIII noXapa.

BHIMAHHE:
He nnonb3yte npoBOnOuHbe uetkn nn npyrne pa-panaoune npedmetbl.
He nCIOJIb3yIe CINbHbIe IINI capanaIOUne YnCTraUne cpeDCTBA.
OTdJIbHbIe KOMNoHEtI He npEHa3NaYeHbI noc cydomoeHoi MaunHbl.
Kopnyc moXho npToPaTb cIerKa BnaJHo TpIKnO.
- MoXHO BbITnPaTb 6NoK 3JIeKTponItaHnA cyXoTtkaHbI.
Hacaika nla nona
-
OToeHNHTe Hacaiky dIra noJa OT BCacbIbAIOuei Tpy6bl.
2.ПовернITE наcodу ДЯ NOЯТК,чTOБу YBIDeT b ee HIXKHOIO CTOPOHy.HaXMMTE Ha KONKY (12)Ha HacaKe DЯ NOJA,чTO6bI pa36NoKIpOBaTb 3amOK polNKOBoi ΜETKN C JneBOI CTOPOHbl. -
BbITaHHTe poJINKOByU cTeKy.
4.YdaJInteIeTkoHHTKNBOJOCbI.IcNoJIb3yIteHOxHNuIbI,PnHEoXoDMOCTN. - C6opka
Cm.coeedn pncyHok.
5.1 UCTaHOBIne POINKOByIO ueTky B NOLOKHeNc (1). IPOBepbTe, YTO6bl 6bIIO npaBnBHO paONoXKeHO TpeyroIbHoe yIy6JIeHne Ha POINKOBoI ueTke.
5.2BepHnTe noDunnnHnK pOJIKNOBOI UeTKN B KOpNc HacadKn DnI Na (noJoxHe 2).
- 3aKpoIte 3amOK poJIHKOBoi 5eTKn. OHdoJIKeH BOITN B 3aUeJIpeHne CO 3ByKOM.
IbIe6OpHc C 6JIOKOM qJIbTpOB
Дя OчNTK 3Тnx KOMnoHETOB npOHTaTe, noXaNyIcTa, rnaBy "ObcyKbAHne".
XpaHeHne
-ПОИСТЛЕ yCTPONCTBO KAK ONICAHOBpyKOBOCTBE,I daiTe EMY NOJIHOCTbO BbICOXYTb.
-ДяхраненmaожноИспользоватипебарntьho yctahOBJIeHHbI NaCTeHHbI DePkaTeNb.
- PekomeHnyeTc xpaHnTB yctpOcTBO B erOpunHaJIb-HoYNAKOBKe,ecJNo OHO He NcIOnb3yeTcRdIITeJIbHoeBpeM.
I I PIMMEUHNE no cpoky cnjxkbI aKKymyTOp-HoH 6aTapeu:
BS 1949 A CB. 120g
15 13. (a a a a a a a a a a a a a a a a a a a a a a a a a
gjJUg261
- 240
20560/50-22jLg240-100
500-22jLg26,5 2
:olal jolal oolay ayll ayjaiy jia jia abo
ab = 120
afo 1 aoe ge gao jglaln aluun yolb gina jaiuyu gosi
a
- jglj
1e,Jeally Jalaal Jalalil Cua 2. aagaiu
aui 11 11 11 11 11 11 11 11
aI
jul 100000000000000000000000000000000000000
-
a11103gj0gj
-
gao jia hao zai
jglgl
a jj 1000 a j. 1111 1000 20 jijg 10 .3
a y 1s g
glgagaiyjgao gao yigao 4
a 1 a0g1 gai jw
a1 = 2,a2 = 3,b1^2 + b2^2 = 5
aJJIg
julil
a 3 4 5 j0j
aJ1 Jaa: gaoaal aas jI 3aall aa n aannn nn annnnn
"0g01 3a0ab lgljol" jdoj yooal aollll 0y01 g
aJyIg aolal 1, yj g all j.
4.235 20
:
ailllalil 100
jaiy jaiy
1
#
:
!
·a#
.
jilal Jolal
2a1110g080g 5
Sgaiabll 230 a20g wgl Sj.aaabaaal blll llo plaol
- a all (C J I) gall
ab = 10
a 151 a233 151 151 151 151 151 151 151 151 151 151 151 151 151 151 151 151 151 151 151 151 151 151 151 151 151 15
(AJSJ)Jalol Jala 1jlll jlll 0g 0g C.1
9 Jalol jalol jalol 90 Jalol jalol 0g 0g 2.
(BJSJ).Sj 3r jj j S
(CJSJI).LSSI 4g 5JSSI
Jalol Jale C
≤
1.2023 JSG 1.2023 JSG 1.2023 JSG
:
Jolab j,olab Jauaill aayy aoy jalall jguy y Caiil Jala 0
ab = 12
ailll llo loo o
4ab = y_0
Jaua Jauu aal ayal alal yalal jaooogll Jauaie 1ue Jaua Jauaal oaley alal alal yalal jaoa Jaoa Jaoa Jaoa Jaoa Jaoa Jaoa Jaoa
(-4)3uabla 12
gina uis 0aog.1agaa 1aog 1aog 1aog 1aog 1aog 1aog 1aog 1aog 1aog 1aog 1aog 1aog
jiaotao aibg jyduj gaiu 1jzai = buiog ybaeol
gaiyao zabg jyduj = ybaeol
jglaiu jiai jiai = cyo
#
biw
.4g5g0d2g9g0g2g9
aagaae aegaae 1
gjbjolwjgeoo
LED 1jg0 gai jglall lcl, aolb e y aaiy aag aeg aalbl bblf f aay jwaii aag ae
:
Jusg 1aue aag Jogao jzaiu wjai Jauai jblal . 2auiu uua uua uua uua uua uua uua uua uua uua uua uua uua uua uua uua uua uua uua uua uua uua uua uua uua uua uua uua uua uua uua uua uua uua uua uua uua uua uua uua uua uua uua uua uua uua uua uua uua uua uUA UUUA UUA UUA UUA UUA UUA UUA UUA UUA UUA UUA UUA UUA UUA UUA UUA UUA UUA UUA UUA UUA UUA UUA UUA UUA UUA UUA UUA UUA UUA UUA UUA UUA UUA UUA UUA UUA UUA UUA UUA UUA UUA UUA UUA UUA UUA UUA UUA UUA UAA
(17)g(16)aaol
Izaiy 13g 4g 10g 10g 10g 10g 10g 10g 10g 10g 10g 10g 10g 10g 10g 10g 10g 10g 10g 10g 10g 10g 10g
aagaaagaaagaaagaaagaaagaaagaaagaaagaaagaaagaaagaaagaaagaaagaaagaaagaaagaaagaaagaaagaaagaaagaaagaaagaaagaaagaaagaaagaaagaaagaaagaaagaaagaaagaaagaa
g 100 g 100 g 100 g 100 g 100 g 100 g 100 g 100 g 100 g 100 g 100 g 100 g 100 g 100 g 100 g 100 g 100 g 100 g 100 g 100 g 100
bodoll
10000000000000000000000000000000000000000
sJU 1u 1u 1u 1u 1u 1u 1u 1u 1u 1u 1u 1u 1u 1u 1u 1u 1u 1u 1u 1u 1u 1u 1u 1u 1u 1u 1u 1u 1u 1u 1u 1u 1u 1u
aalalj aalal jlaal 2
jglalg jaii. 10a 15 g9g pao gao jao jao jao
12/12
:ab>la i
p 1
1
aBbjjjJaa Jaa
pIzIyI Cld
aalh lglsln aalj calsall y glll jy
1
pulit gblb/ cglgblge aole yjbi
jallaoogla/2
LED 2
-/+/①souuuiuuiuuij3
Jouu 4
aall 0goooogoo 5
jglgao 6
HEPA 7
Jus Jus 8
jollgao zuo 9
10
4a0y14a0g2 11
aJ aai j 12
gjolj g0u j 13
Iaill ggl dagll gdo 14
aagai jao 15
aaoaa aagaaog/olwaa 16
j 17
bailol Jolo 18
70
70
70
70
69.
69. 证: ① 若 a > 0 ,则 a > 1. ,若 b < 0 ,
69
69
69.
ole lue
Jlalll 153 Jlalll 153 Jlalll 153 Jlalll 153 Jlalll 153
Cld
jglallalwuygaiy jolL.iguaeJgaiJe gla
pLzzyuUydo j0gj
gjol jio. daiu laa aal cglal oia de coe g
jollll 1000000000000000000000000000000000000000
aiaaa aaii iiaaa
aL

.5jai jai jia jia jia jia aiaaa jaoa oao gao jaoi iao
clogslg jlllgl gall jylls y
.
jgl111 1000000000000000000000000000000000000000000
Ugob
. 45615
73 111 111 111 111 111 111 111
73
1. 106672 13. 106672 14. 106672 15. 106672 16. 106672 17. 106672 18. 106672 19. 106672
aill 72000 aalal jallai bai bai
72 11 91 11 11 11 11 11 11 11 11 11 11
. 与 W 72.31 J, J a a1b1 , P a a2c2
10000000000000000000
71
71 12.
71
71. (17) 3 (16) a
71
71 45
71 150
71
70
70
jIJI IJy aolil aolll
Jn Jn Jn Jn Jn Jn Jn Jn Jn Jn Jn Jn Jn Jn Jn Jn Jn Jn Jn Jn Jn Jn Jn Jn Jn Jn Jn Jn Jn Jn Jn Jn Jn Jn Jn Jn Jn Jn Jn Jn Jn Jn Jn Jn Jn Jn Jn Jn Jn Jn Jn
jlll jably
gssuogoo y. 1j jol jol jol jol jol jol
- Symbols in these Instructions for Use
- WARNING:
- CAUTION:
- Contents
- General Notes
- Special Safety Instructions for this Device
- Special Safety Information Concerning the Rechargeable Built-in Battery
- Overview of the Components / Delivery Scope
- Not shown:
- Unpacking the Device
- NOTE:
- Notes on Use
- Multifunction Button (1 / + / -)
- Start-up
- Suction Tube
- Floor Nozzle with Turbo Brush
- Nozzle Attachments (16) and (17)
- Connection at the Hand Unit
- Connection to the Suction Pipe
- Combined Crevice / Brush Nozzle
- Upholstery Brush
- Assembly the Wall Holder
- Inserting the Plug of the Power Supply Unit
- Fastening the Wall Holder
- Charging the Battery
- Using the Device
- End of Operation
- Maintenance
- Emptying the Dust Collector
- The Filter System
- The Filter Unit
- Outlet Filter
- Cleaning
- Floor Nozzle
- Dust Container with Filter Unit
- Storage
- NOTE concerning the life of the rechargeable battery:
- Technical Data
- Mains Adapter
- Disposal
- Accumulator/Battery Disposal
- Meaning of the "Dustbin" Symbol
- Instrukcja obslugi
- CoepkaHne
- 06zne 3ameyann
- PENEYIPPEXDEHNE:
- Oco6bIe yka3aHnI NO TexHnke 6e3OpacHocTn DJIy 3TOrO yCTpOiCtBa
- HauaNo pa6oTbI
- Bcacbbaoza Tpy6a
- Hacaan (16) n (17)
- IodcoeduneHueKpyHomy6noky
- IodcoeunHeue Kecacblaaoue umpy6e
- KombuHupoeaHHa 1eEea HacaKa / HacaKa co eMkoJ
- Lemka dna oBueku
- MOHTAX HAcTeHHoro DepKaTeJIa
- Bctabka BnIkn B 6JOK NITaHn
- ПИМЕЧАнЯ:
- MOnTaX HAcTeHHoro DepeKaTeTnA
- IPENDYPENPEKDEHNE:
- BHIMAHINE:
- PIMMEAHNIA:
- 3apäd akkymnytoPOB
- ПРИМЕЧАнЯ:
- ПРIMЕЧАЙ:
- 3Kcnnyatauia
- 3aKoHHTb nOJIb3OBaHne npi6opom
- 06cnykmbaHne
- OnyctoWeHne nbIeScbOpnka
- Cnctema nJbTpOB
- BHIMAHHE:
- Enok qunbmpoe
- Bbinyckhofunbmp
- UncTka
- ПЕДУПЕЖДЕНЕ:
- Hacaika nla nona
- IbIe6OpHc C 6JIOKOM qJIbTpOB
- XpaHeHne
- :olal jolal oolay ayll ayjaiy jia jia abo
- a
- aI
- jul 100000000000000000000000000000000000000
- julil
- #
- jilal Jolal
- ab = 10
- Jalol Jale C
- ≤
- :
- ab = 12
- 4ab = y_0
- biw
- gjbjolwjgeoo
- (17)g(16)aaol
- aagaaagaaagaaagaaagaaagaaagaaagaaagaaagaaagaaagaaagaaagaaagaaagaaagaaagaaagaaagaaagaaagaaagaaagaaagaaagaaagaaagaaagaaagaaagaaagaaagaaagaaagaaagaa
- bodoll
- :ab>la i
- pIzIyI Cld
- pulit gblb/ cglgblge aole yjbi
- ole lue
- Cld
- Ugob
- jIJI IJy aolil aolll
Brand : BOMANN
Model : BS 1949 A CB
Category : Vacuum Cleaner