
Bravia KD55XG8599 - Television SONY - Free user manual and instructions
Find the device manual for free Bravia KD55XG8599 SONY in PDF.
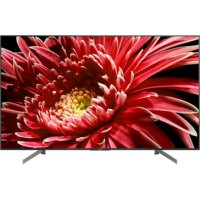


| Product type | LED TV 4K UHD |
| Brand | Sony |
| Model | Bravia KD55XG8599 |
| Screen size | 55 inches (139 cm) |
| Dimensions without stand (W x H) | 1231 x 713 mm |
| Resolution | 3840 x 2160 pixels (4K Ultra HD) |
| Operating system | Android TV |
| Wall mount compatibility | Sony SU-WL450 bracket (sold separately) |
| Power supply | 220-240 V AC, 50/60 Hz |
| Power consumption | Approx. 150 W (estimated) |
| Connectivity | HDMI (x4), USB (x3), Ethernet, Wi-Fi, Bluetooth |
| HDR functions | HDR10, HLG |
| Refresh rate | 100 Hz native |
| Number of speakers | 2 |
| Audio power | 20 W (2 x 10 W) |
| Maintenance and cleaning | Use a soft, dry cloth. Do not use chemical products. |
| Operating temperature | 0°C to 40°C |
| Weight (estimated) | Approx. 18 kg (without stand) |
| Included accessories | Tabletop stand, remote control, batteries, power cable |
| Available spare parts | Wall mount SU-WL450, stand, remote control |
| Safety | Wall mounting by a certified installer recommended. Use screws appropriate for the wall. |
| General information | Manual available in multiple languages. Keep the reference guide. |
Frequently Asked Questions - Bravia KD55XG8599 SONY
User questions about Bravia KD55XG8599 SONY
0 question about this device. Answer the ones you know or ask your own.
Ask a new question about this device
Download the instructions for your Television in PDF format for free! Find your manual Bravia KD55XG8599 - SONY and take your electronic device back in hand. On this page are published all the documents necessary for the use of your device. Bravia KD55XG8599 by SONY.
USER MANUAL Bravia KD55XG8599 SONY
- In the actual model names, the "□□" indicates numbers and/or characters specific to each model.
To Customers: For product protection and safety reasons, Sony strongly recommends that installation of your TV be performed by Sony dealers or licensed contractors. Do not attempt to install it yourself.
To Sony Dealers and Contractors: Provide full attention to safety during the installation, periodic maintenance, and examination of this product.
Sufficient expertise is required for installing this product, especially to determine the strength of the wall for withstanding the TV's weight. Be sure to entrust the attachment of this product to the wall to Sony dealers or licensed contractors and pay adequate attention to safety during the installation. Sony is not liable for any damage or injury caused by mishandling or improper installation.
For safety and proper installation, follow the Wall-mount Bracket Operation Instructions, TV Setup Guide, and the directions in this manual.
On Safety
Thank you for purchasing this product.
To Customers
Sufficient expertise is required for installing this product. Be sure to subcontract the installation to Sony dealers or licensed contractors and pay special attention to safety during the installation. Sony is not liable for any damages or injury caused by mishandling or improper installation, or installing any other than the specified product. Your Statutory Rights (if any) are not affected.
To Sony dealers
Sufficient expertise is required for installing this product. Be sure to read this instruction manual thoroughly to do the installation work safely. Sony is not liable for any damages or injury caused by mishandling or improper installation. Please give this manual to the customer after installation.
This instruction manual shows the correct handling of the product and important precautions necessary to prevent accidents. Be sure to read this manual thoroughly and use the product correctly. Keep this manual available for future reference.
Products by Sony are designed with safety in mind. If the products are used incorrectly, however, it may result in a serious injury through fire, electric shock, the product toppling over, or the product dropping. Be sure to observe the precautions for safety to prevent such accidents.
CAUTION
Specified products
This Wall-Mount Bracket is designed for use with the products specified TVs. For TVs, refer to their Reference Guide to verify that the Wall-Mount Bracket can be used.
To Customers
WARNING
If the following precautions are not observed, serious injury or death through fire, electric shock, or the product dropping can result.
Be sure to subcontract the installation to licensed contractors and keep small children away during the installation.
If the Wall-Mount Bracket or the TV is not installed correctly, the following accidents may occur. Be sure licensed contractors carry out installation.
The TV may fall and cause a serious injury such as a bruise or a fracture. - If the wall on which the Wall-Mount Bracket is installed is unstable, uneven, or not perpendicular to the floor, the unit may fall and cause injury or property damage. The wall should be capable of supporting a weight of at least four times the TV weight. (Refer to your TV's Reference Guide for its weight.) - If the installation of the Wall-Mount Bracket on the wall is not sufficiently sturdy, the unit may fall and cause injury or property damage.
Be sure to subcontract moving or dismounting of the TV to licensed contractors.
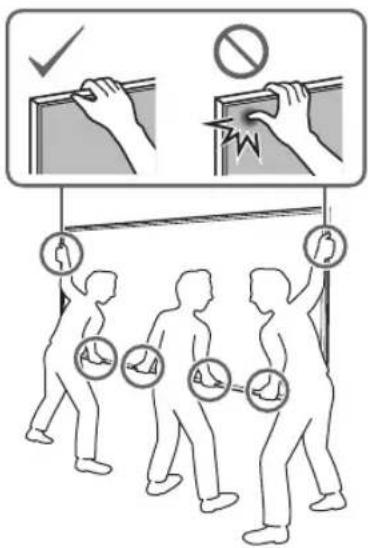
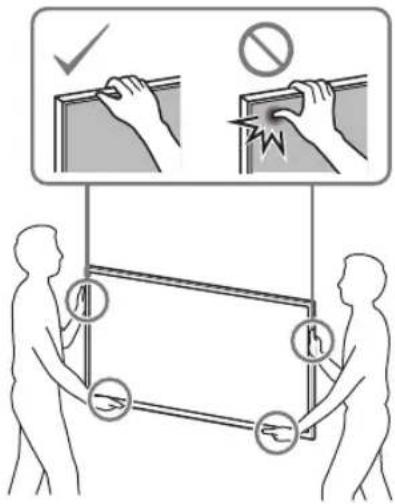
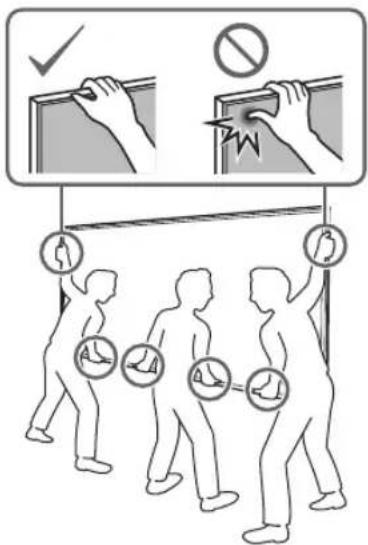
If persons other than licensed contractors transport or dismount the TV, it may fall and cause injury or property damage. Be sure that two or more persons (three or more persons for 75 inches and above TV set) carry or dismount the TV.
Do not remove screws, etc., after mounting the TV.
If you do so, the TV may fall and cause injury or property damage.
Do not make alterations to the parts of the Wall-Mount Bracket.
If you do so, the Wall-Mount Bracket may fall and cause injury or property damage.
Do not mount any equipment other than the specified product.
This Wall-Mount Bracket is designed for use with the specified product only. If you mount equipment other than specified, it may fall or break, and cause injury or property damage.
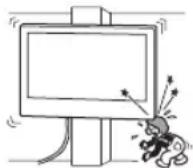
Do not apply any load other than the TV on the Wall-Mount Bracket. Do not shake the TV left/right, up/down.
If you do so, the TV may fall and cause injury or property damage.
Do not lean on or hang from the TV.
Do not lean on or hang from the TV as it may fall on you and cause serious injury.
CAUTION
If the following precautions are not observed, injury or property damage may occur.
Do not handle the product with excessive force during cleaning or maintenance.
Do not apply excessive force on the topside of the TV. If you do so, the TV may fall and cause injury or property damage.
Precautions
- If you use the TV installed on the Wall-Mount Bracket for a long time, the wall behind or above the TV may become discolored or the wallpaper may come unstuck, depending on the material of the wall.
- If the Wall-Mount Bracket is removed after installing it on the wall, the screw holes are left.
- Do not use the Wall-Mount Bracket in a place where it is subjected to mechanical vibrations.
Installing the Wall-Mount Bracket
To Sony Dealers
WARNING
The following instructions are for Sony dealers only. Be sure to read the safety precautions described above and pay special attention to safety during the installation, maintenance, and checking of this product.
Do not install the Wall-Mount Bracket on wall surfaces where the corners or the sides of the TV protrude away from the wall surface.
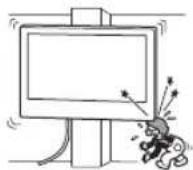
Do not install the Wall-Mount Bracket on wall surfaces such as a pillar, where the corners or the sides of the TV protrude away from the wall surface. If a person or object happens to hit the protruded corner or side of the TV, it may cause injury or property damage.
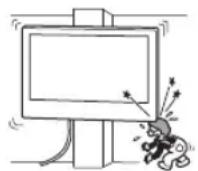
Do not install the TV over or under an air conditioner.
If the TV is exposed to water leaks or air current from an air conditioner for a long time, it may cause a fire, an electric shock, or a malfunction of the TV.
Be sure to install the Wall-Mount Bracket securely to the wall following the instructions in this instruction manual.
If any of the screws are loose or fall out, the Wall-Mount Bracket may fall and cause injury or property damage. Be sure to use the appropriate screws for the material of the wall and install the unit securely using four or more screws of 8 mm diameter (or equivalent).
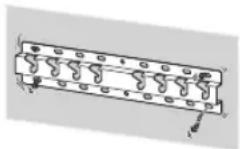
Be sure to use the supplied screws and attachment parts properly following the instructions given in this instruction manual. If you use substitute items, the TV may fall and cause bodily injury to someone or damage to the TV.
Be sure to assemble the bracket properly following the instructed procedure explained in this instruction manual.
If any of the screws are loose or fall out, the TV may fall and cause bodily injury to someone or damage to the TV.
Be sure to tighten the screws securely in the designated position.
If you fail to do so, the TV may fall and cause bodily injury to someone or damage to the TV.
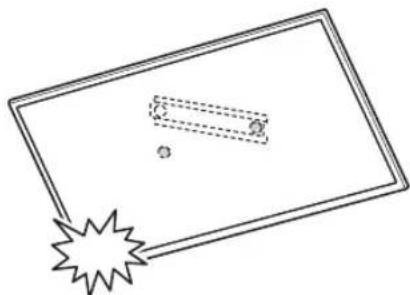
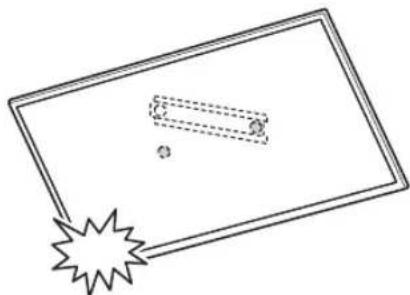
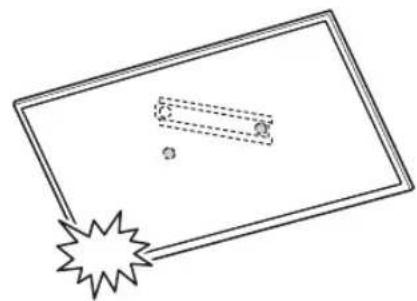
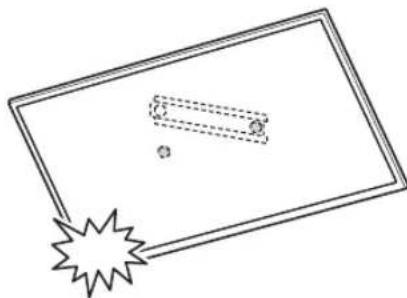
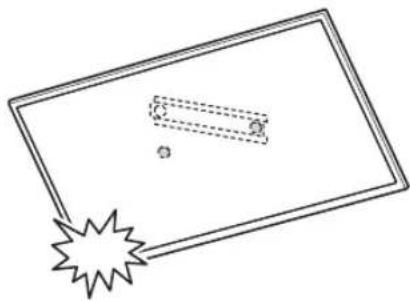
Be careful not to subject the TV to shock during installation.
If the TV is exposed to shock, it may fall or break apart. This may cause injury.
Be sure to install the TV on a wall that is both perpendicular and flat.
If you fail to do so, the TV may fall and cause injury.
After proper installation of the TV, secure the cables properly.
If people or objects get tangled with cables, this may result in injury or damage to the TV.
Do not allow the mains lead or the connecting cable to be pinched.
If the mains lead or the connecting cable is pinched between the unit and the wall or is bent or twisted by force, the internal conductors may become exposed and cause a short circuit or an electrical break. This may cause a fire or an electric shock.
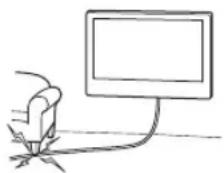
The screws needed to secure the Wall-Mount Bracket to the wall are not supplied.
Use the appropriate screws for the wall material and structure when mounting the Wall-Mount Bracket.
Table of Contents
Preparing for installation. 5
Checking the parts. 5
Deciding on the installation location 6
Installing the Base on the wall 8
Preparing for the installation of the TV. 9
KD-85/75XG85□□, KD-75XG87□□
KD-65/55XG87□□, KD-65/55XG85□□.11
Installing the TV on the wall 13
KD-85/75XG85□□, KD-75XG87□□.13
KD-65/55XG87□□, KD-65/55XG85□□.15
Confirming the completion of the
installation 18
Other information. 18
Specifications. 18
Installing the TV onto the wall
Installation procedure differs, depending on your TV.
Use the Wall-Mount Bracket SU-WL450 to install the TV to the wall.
Note
- Be sure to store the removed screws in a safe place, keeping them away from children.
Preparing for installation
- Have the TV's Reference Guide and Setup Guide at hand before installation.
- Be sure to have a Phillips screwdriver that fits the screws prior to the assembly.
- Confirm the installing position of your TV.
- Prepare four or more screws of 8 mm diameter and one screw of 5 mm or equivalent (not supplied). Select screws suitable for the material of the wall.
Checking the parts
Supplied with SU-WL450
- Verify that all the parts are included.
| A Base (20) (1) B Pulley (2) | |
| ◎ PSW 6x20 (4)◎ PSW 4x20 with Bush (2) | |
| ◎ Spacer (20) (2)◎ Belt (1) | |
| ◎ Bush (20) (M4) (2)◎ PSW 4x20 (2) | |
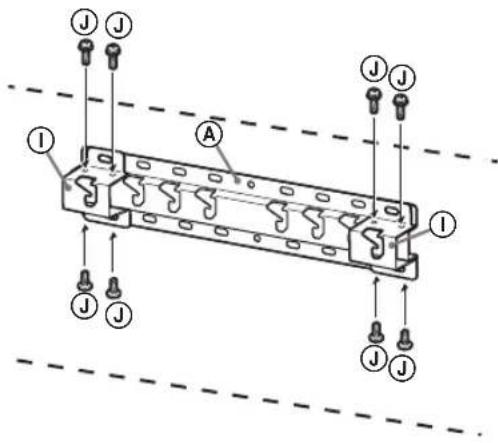
| ① Base Adaptor (2)① | PSW 4x10 (8) |
| ◎ Spacer (60) (2)◎ PSW 6x50 (2) | |
| ◎ Bush (M4) (2)◎ PSW 4x50 (2) | |
Deciding on the installation location
1 Decide on the installation location.
Make sure that the wall has enough space for the TV and is capable of supporting a weight of at least four times that of the TV.
Refer to the following table on installing the TV to the wall. Refer to your TV's Reference Guide for the TV's weight.
Standard mounting Slim mounting Screen centre point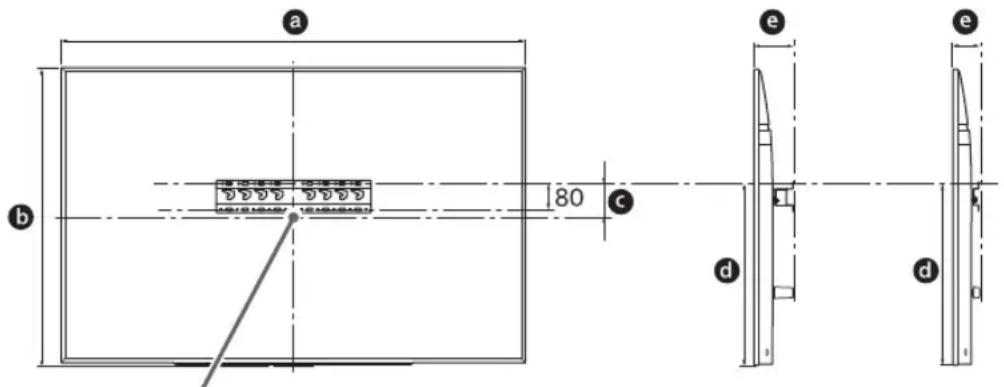
Unit: mm
| Model Name | Display dimensions | Screen centre dimension | Length for mounting | |||
| a | b | c | d | e | ||
| Standard mounting | Slim mounting | |||||
| KD-85XG85□□ | 1,909 | 1,097 | 251 | 803 | 142 | 100 |
| KD-75XG87□□ KD-75XG85□□ | 1,673 | 963 | 107 | 595 | 116 | 75 |
| KD-65XG87□□ KD-65XG85□□ | 1,450 | 836 | 99 | 523 | 115 | 73 |
| KD-55XG87□□ KD-55XG85□□ | 1,231 | 713 | 106 | 468 | 115 | 73 |
Note
- Figures in the table may differ slightly depending on the installation.
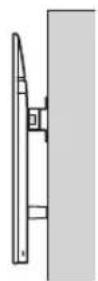
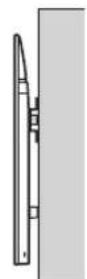
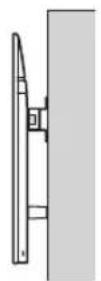
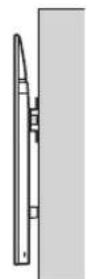
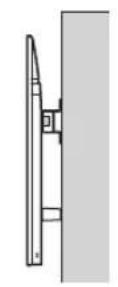
- When your TV is installed on the wall, the upper side of the TV slightly leans forward.
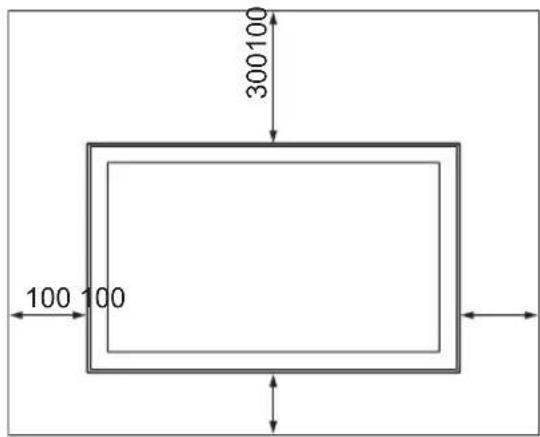
Allow for suitable clearance between the TV and the ceiling and protruding parts of the wall as shown below.
Unit: mm
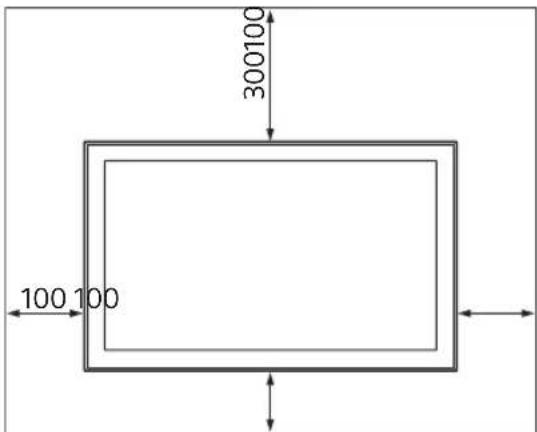
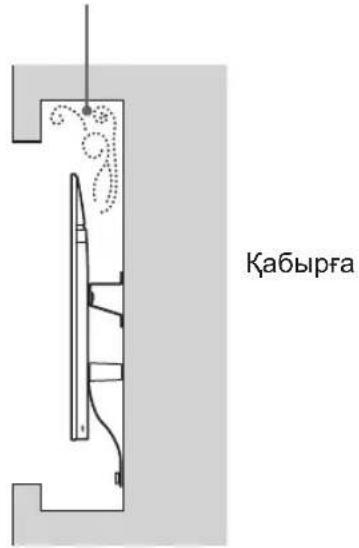
To ensure proper ventilation and prevent the collection of dirt or dust:
- Do not lay the TV set flat, install upside down, backwards, or sideways.
- Do not place the TV set on a shelf, rug, bed or in a closet.
- Do not cover the TV set with a cloth, such as curtains, or items such as newspapers, etc.
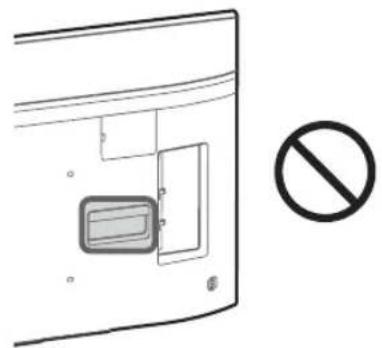
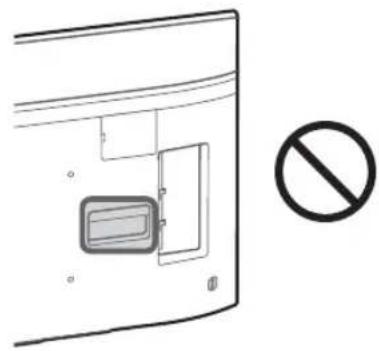
- Do not install the TV set as shown below.
Air circulation is blocked.
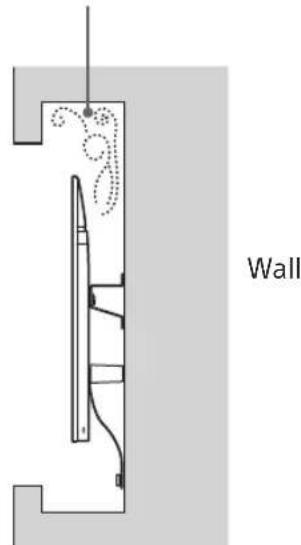
Note
If you intend to route the cables in the wall, make a hole in the wall to insert the cables before beginning the installation.
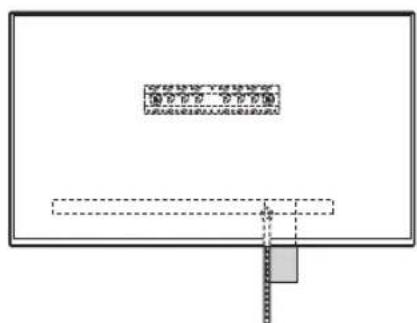
To prevent pinching the cables, prepare a hole in the wall somewhere outside the perimeter of the Base (20) A, Base Adaptor 1 and Spacer (20) E, Spacer (60) K.
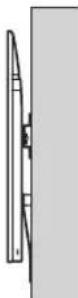
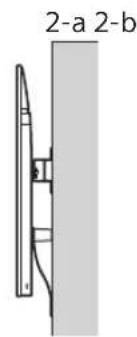
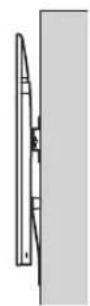
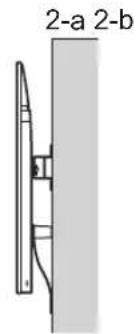
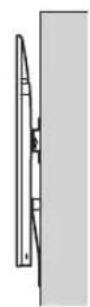
2 Select Wall mounting style. It is selectable as shown below.
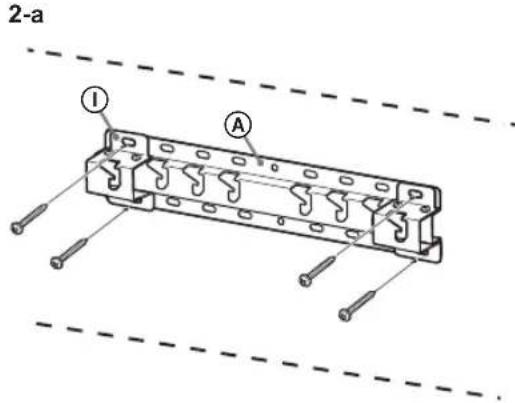
2-a Standard mount
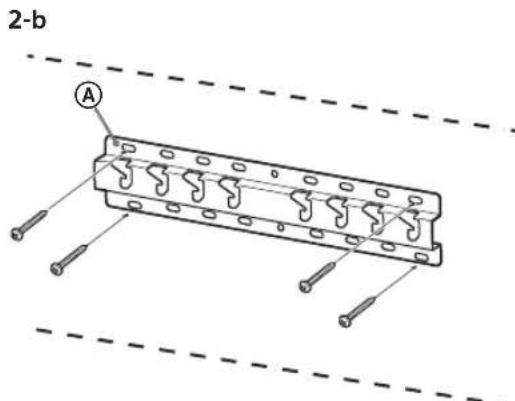
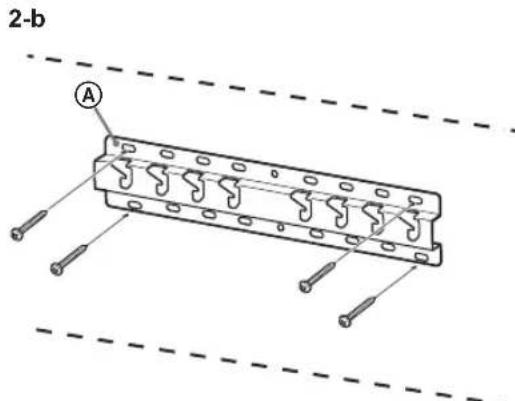
2-b Slim mount
Refer to the table of step 1.
WARNING
- When 2-b is selected, rear terminal access is limited.
2-a 2-b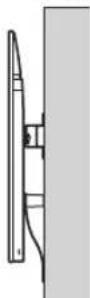
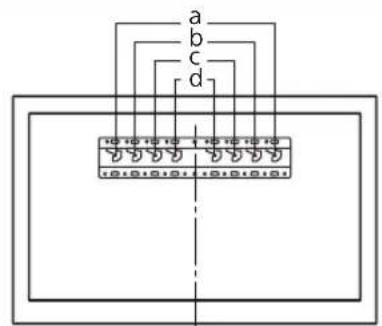
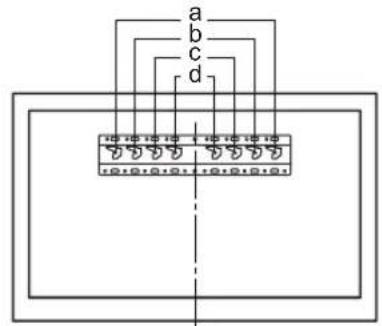
3 Refer to the table below for the Base Adaptor fitting location. If you select 2-b, skip this step.
| Model Name Hook location | |
| KD-85XG85□□ | |
| KD-75XG87□□ | a |
| KD-75XG85□□ | |
| KD-65XG87□□ | |
| KD-65XG85□□ | b |
| KD-55XG87□□ | |
| KD-55XG85□□ | |
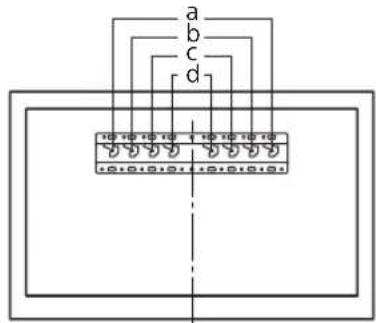
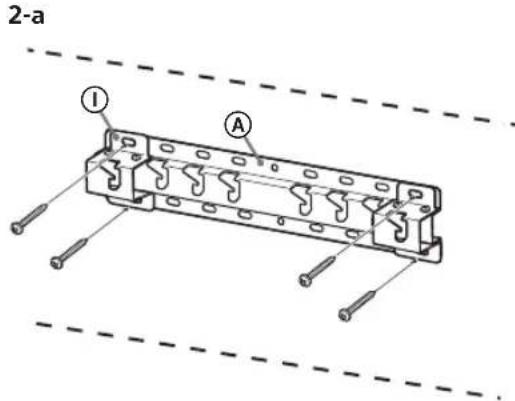
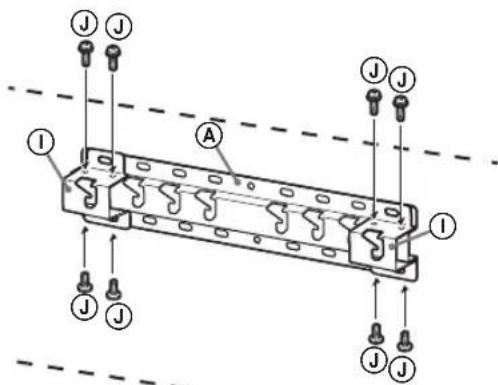
Fit Base Adaptor ① to Base (20) ④ using Screw (PSW 4x10) ② when selecting 2-a.
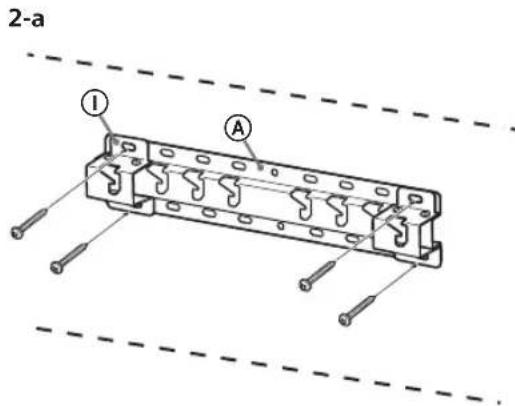
4 Decide the positions of the screws for installing the Base (20) A.
Refer to the specifications on page 18. When selecting 2-a, use the hole positions of Base Adaptor ①.
WARNING
The wall that the TV will be mounted on should be able to support a weight of at least four times that of the TV (Refer to your TV's Reference Guide for its weight.). - Determine the strength of the wall the TV will be mounted on. Reinforce the wall sufficiently, if necessary.
Installing the Base on the wall
- Use four or more screws of 8 mm diameter or equivalent (not supplied).
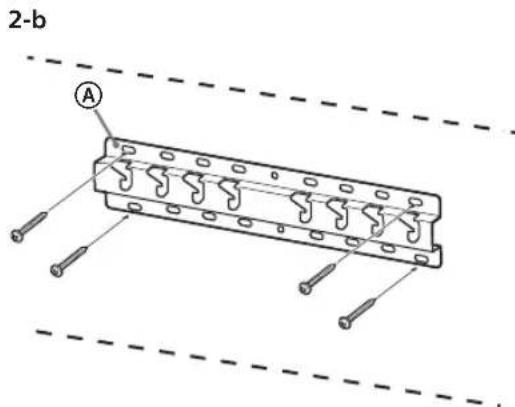
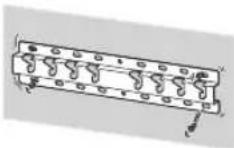
- Fit four screws to the holes of Base Adaptor ① with Base (20) A (2-a only). Install the Base (20) A on the wall horizontally.
Preparing for the installation of the TV
Refer to the Setup Guide for stand installation.
KD-85/75XG85□□, KD-75XG87□□
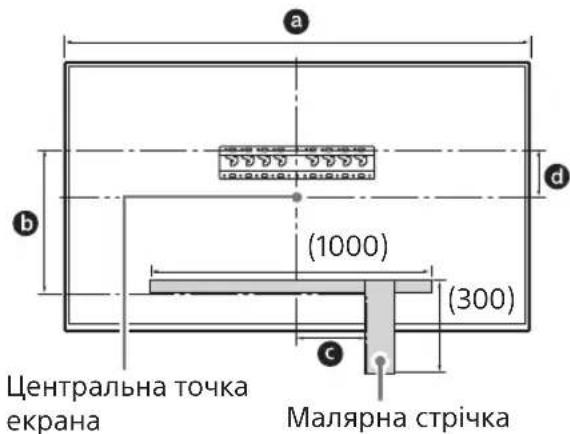
1 Mark the installation location on the wall.
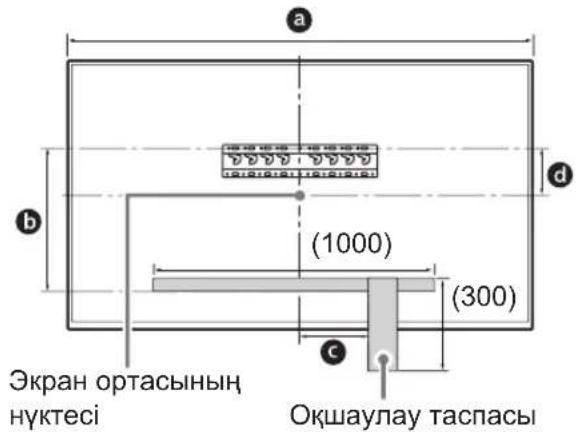
- Use masking tape, etc. (not supplied) to mark the location of the TV near the Base or Base Adaptor. Refer to the following table.
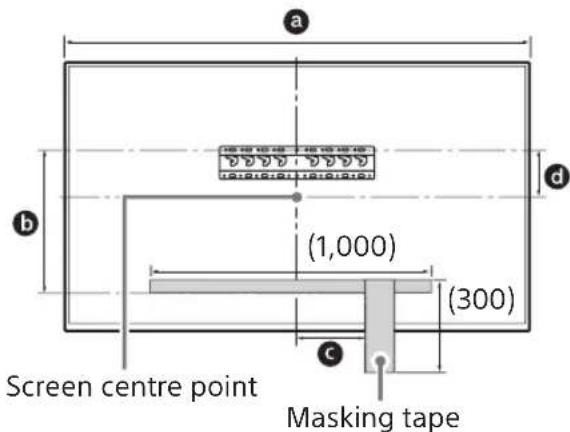
| Model Name | Length for marking | Screen centre dimension | ||
| a | b | c | d | |
| KD-85XG85□□ | 1,909 | 683 | 200 | 251 |
| KD-75XG87□□ KD-75XG85□□ | 1,673 | 468 | 200 | 107 |
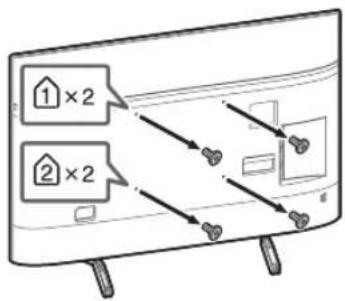
2 Remove the screws from the rear of the TV.
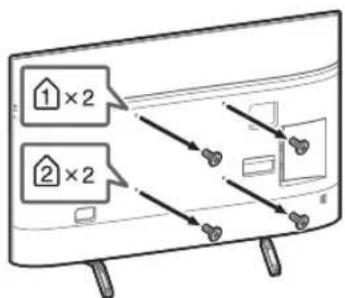
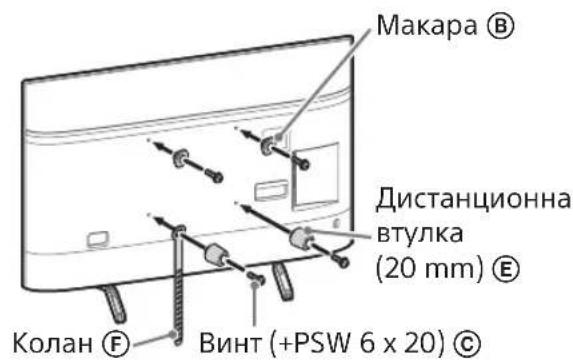
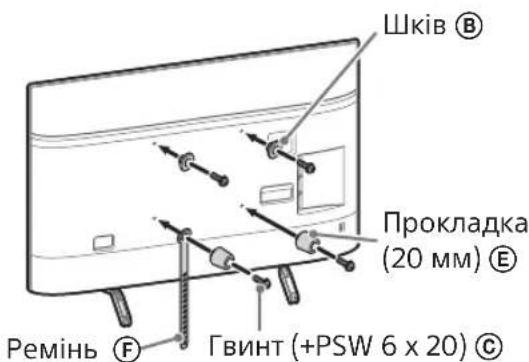
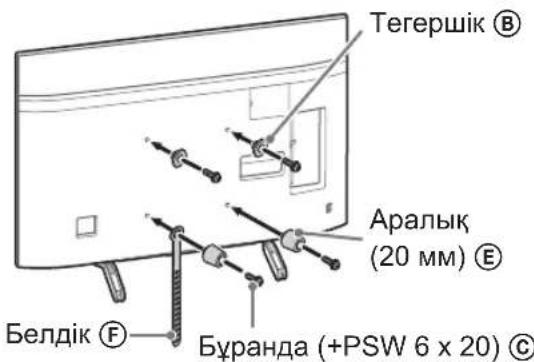
3 Attach the Attachment parts for Wall-Mount Bracket. Check the Attachment parts by referring to "Supplied with SU-WL450" in "Checking the parts" on page 5.
Note
- Firmly secure the Attachment parts using screws.
- When using an electric screwdriver, set the torque setting to approximately 1.5N· m {15 kgf·cm}.
- Be sure to store the used or unused parts in a safe place for future use. Retain this manual for future reference.
Standard mounting (2-a) Slim mounting (2-b)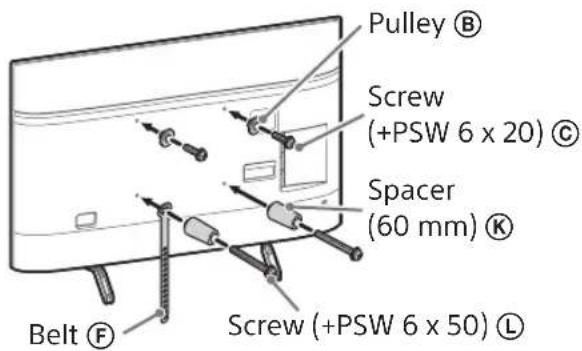
Note
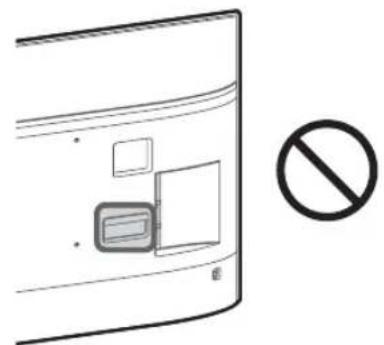
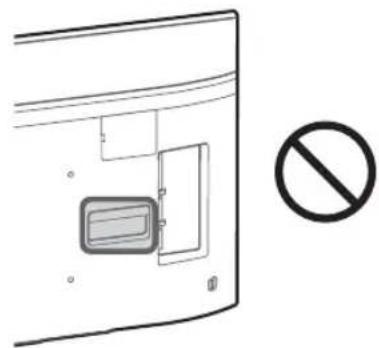
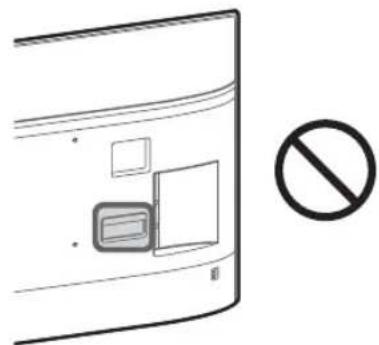
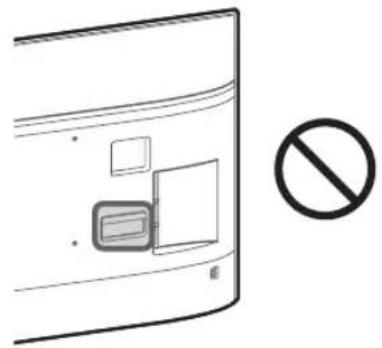
- You cannot use some of the terminals on the rear of the TV when using this mounting style.
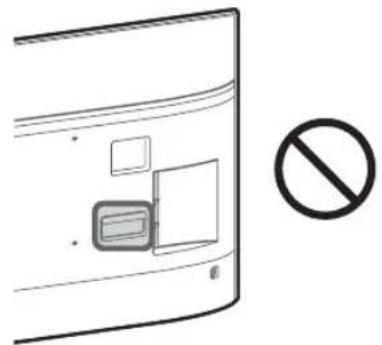
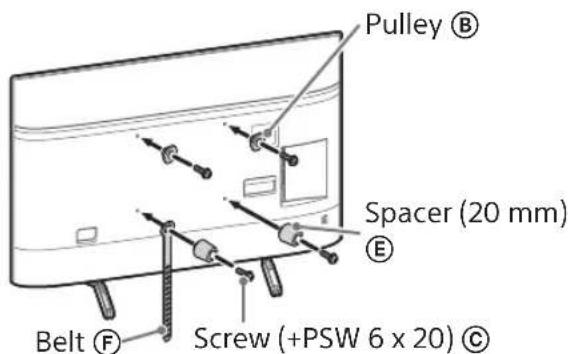
4 Connect the necessary cable(s) to the TV.
Make sure to connect the cables before installing the TV on the wall. You will be unable to connect the cables when the TV is installed. Refer to the Reference Guide supplied with your TV.
Note
- Subcontract the cable routing in the wall to a licensed contractor.
- Bundle the connecting cables to prevent stepping on them before wall mounting.
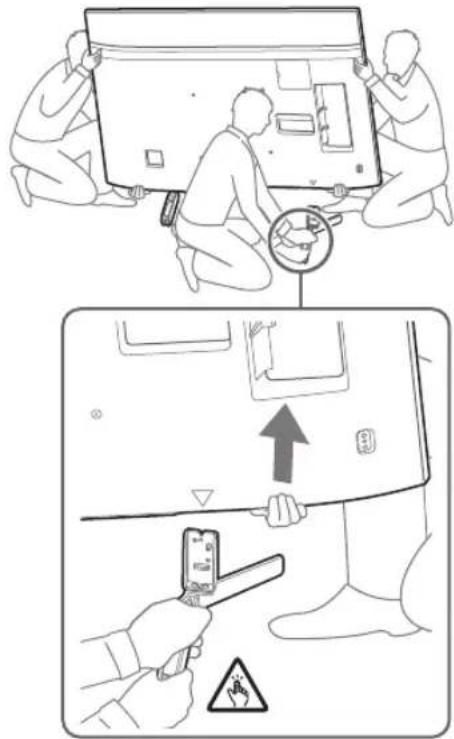
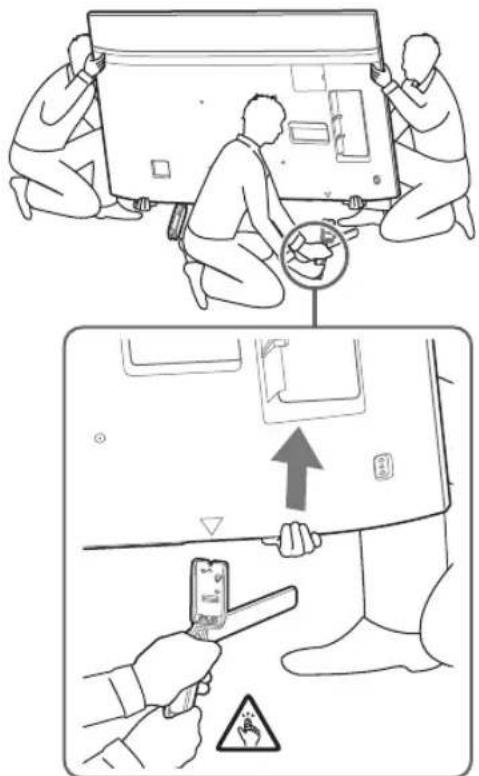
5 Detach the Table-Top Stand from the TV.
- Remove one side of the Table-Top Stand at a time. Firmly hold the Table-Top Stand securely with both hands while the other people lift up the TV.
KD-85XG85□□
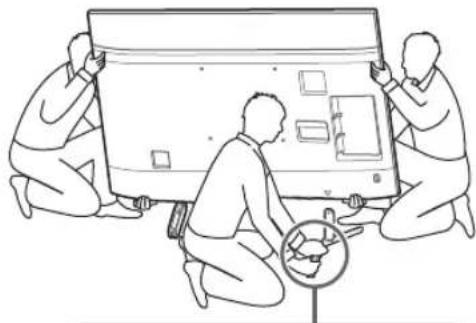
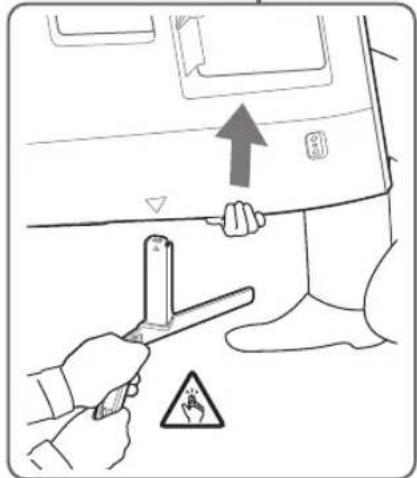
KD-75XG87□□, KD-75XG85□□
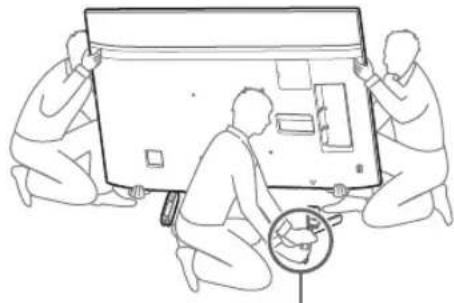
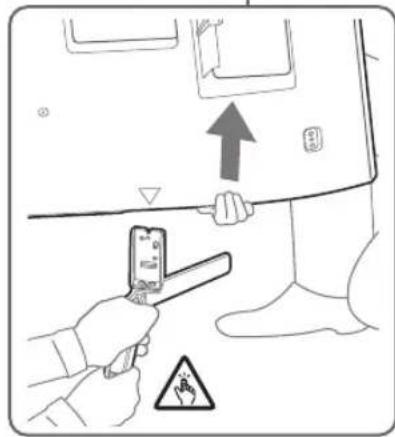
- Repeat the previous step and remove the other side of the Table-Top Stand.
Note
- Three or more people are required to detach the Table-Top Stand.
- Be careful not to use excessive force while detaching the Table-Top Stand from the TV as it may cause the TV set to fall resulting in personal injury or physical damage to the TV. Take care when handling the Table-Top Stand to prevent damage to the TV.
- Be careful when lifting the TV as the Table-Top Stand is detached, the Table-Top Stand may topple over and cause personal injury. Take care when removing the Table-Top Stand from the TV to prevent it from falling over and damaging the surface that the TV is sitting on.
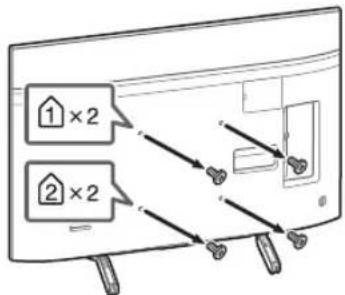
1 Remove the screws from the rear of the TV.
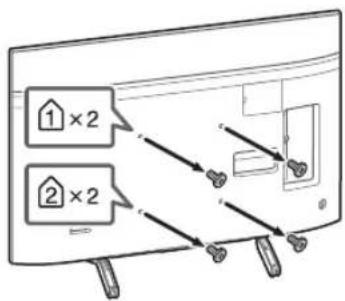
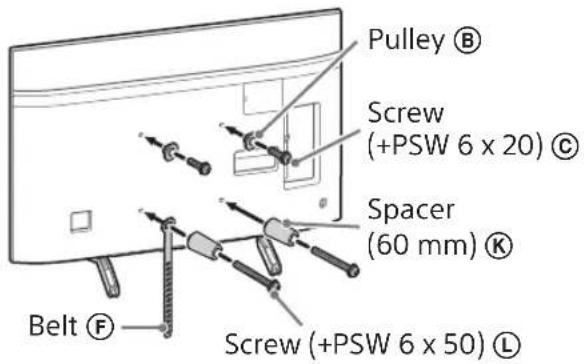
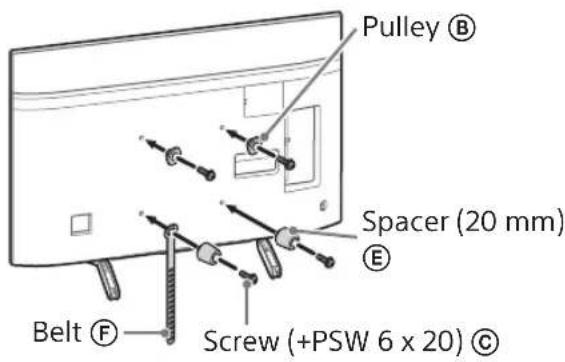
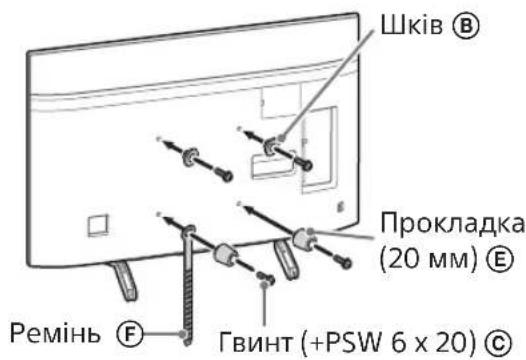
2 Attach the Attachment parts for Wall-Mount Bracket. Check the Attachment parts by referring to "Supplied with SU-WL450" in "Checking the parts" on page 5.
Note
- Firmly secure the Attachment parts using screws.
- When using an electric screwdriver, set the torque setting to approximately 1.5 N·m {15 kgf·cm}.
- Be sure to store the used or unused parts in a safe place for future use. Retain this manual for future reference.
Standard mounting (2-a)
Slim mounting (2-b)
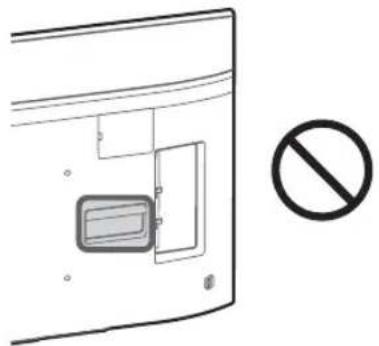
Note
- You cannot use some of the terminals on the rear of the TV when using this mounting style.
3 Connect the necessary cable(s) to the TV.
Make sure to connect the cables before installing the TV on the wall. You will be unable to connect the cables when the TV is installed.
Refer to the Reference Guide supplied with your TV.
Note
- Subcontract the cable routing in the wall to a licensed contractor.
- Bundle the connecting cables to prevent stepping on them before wall mounting.
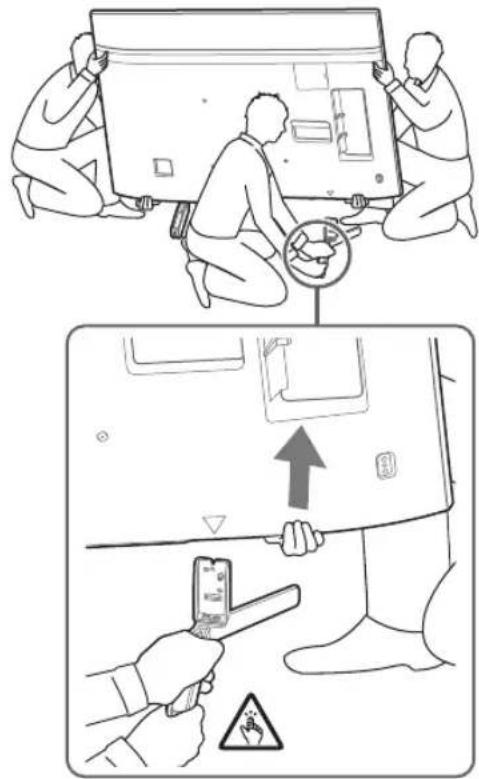
4 Detach the Table-Top Stand from the TV.
- Remove one side of the Table-Top Stand at a time. Firmly hold the Table-Top Stand securely with both hands while the other people lift up the TV.
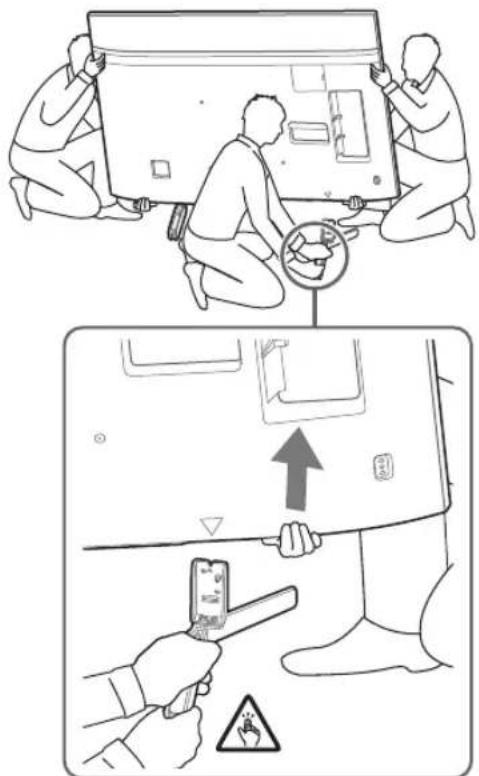
- Repeat the previous step and remove the other side of the Table-Top Stand.
Note
- Three or more people are required to detach the Table-Top Stand.
- Be careful not to use excessive force while detaching the Table-Top Stand from the TV as it may cause the TV set to fall resulting in personal injury or physical damage to the TV. Take care when handling the Table-Top Stand to prevent damage to the TV.
- Be careful when lifting the TV as the Table-Top Stand is detached, the Table-Top Stand may topple over and cause personal injury. Take care when removing the Table-Top Stand from the TV to prevent it from falling over and damaging the surface that the TV is sitting on.
Installing the TV on the wall
KD-85/75XG85□□, KD-75XG87□□
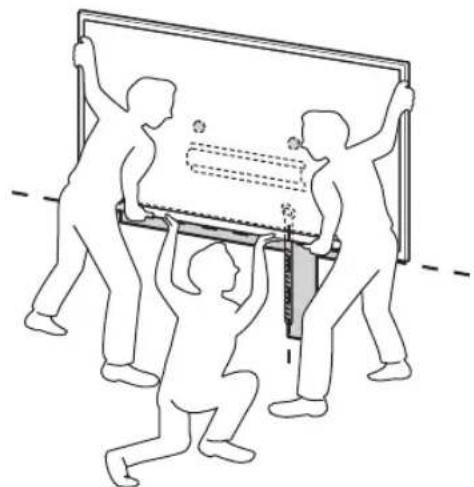
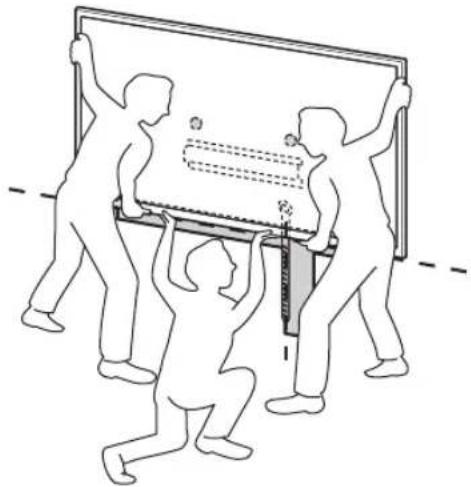
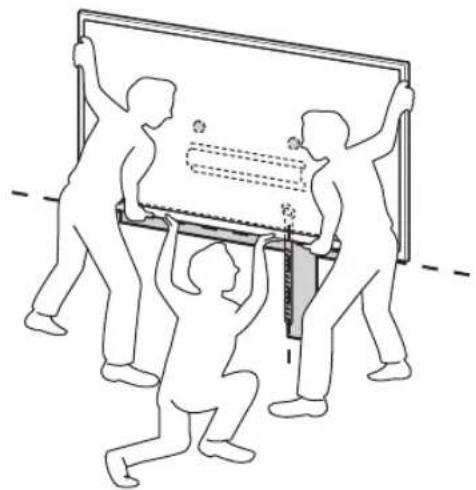
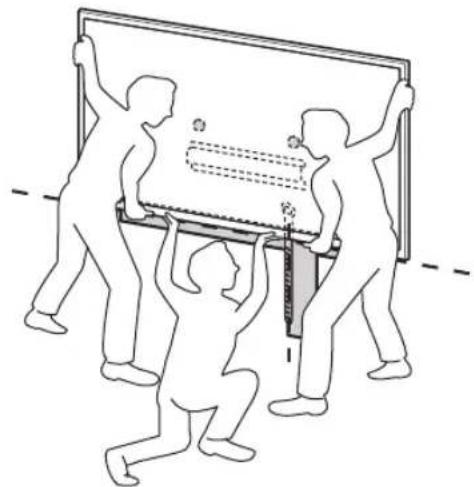
1 Lift the TV.
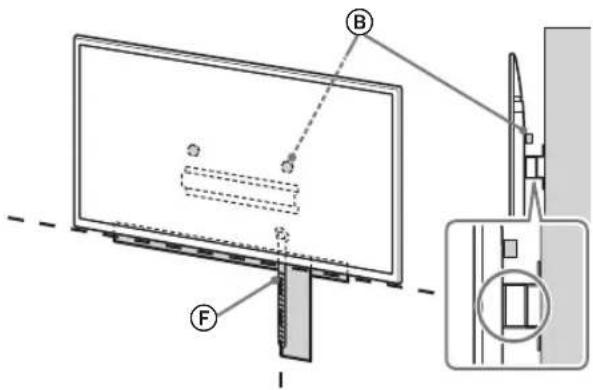
- For the location of the Pulleys (B) to hang on the Base or Base Adaptor, refer to the table of step 3 in "Deciding on the installation location" on page 7.
- Make sure that the rear of the TV touches the Base or Base Adaptor when holding the TV.
Note
- Hold the TV securely with both hands and make sure the Belt (F) and the bottom of the TV align with the masking tape.
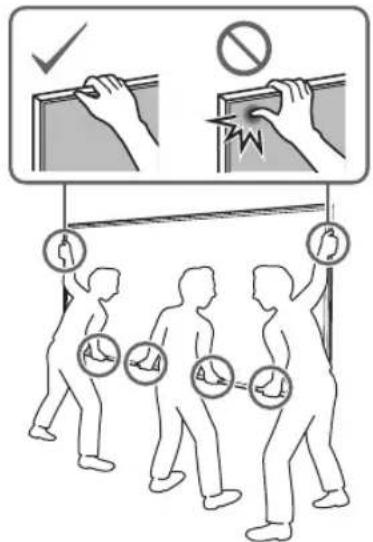
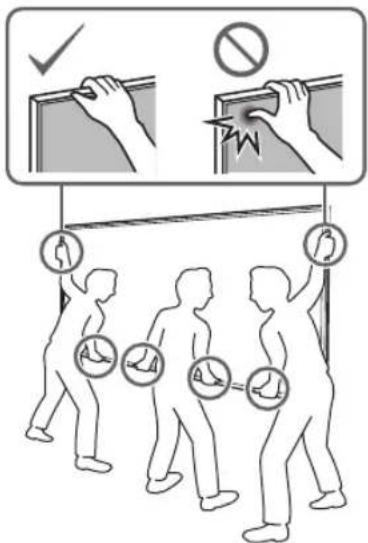
- Carry the TV with three people and the person who is in front of the TV leads the others to adjust the position.
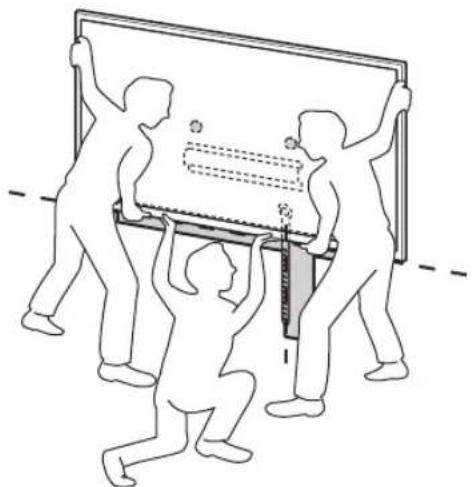
Take great care when installing the TV to the wall especially for the person who is supporting the TV from below, the television set may fall, causing serious bodily injury or even death.
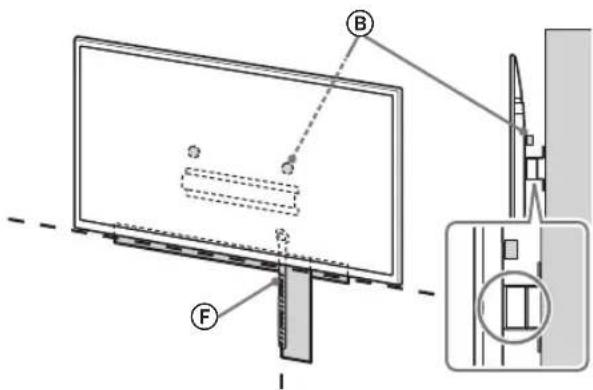
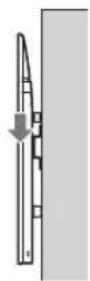
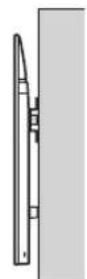
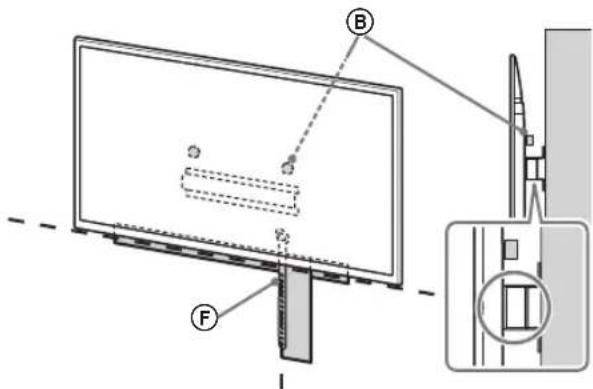
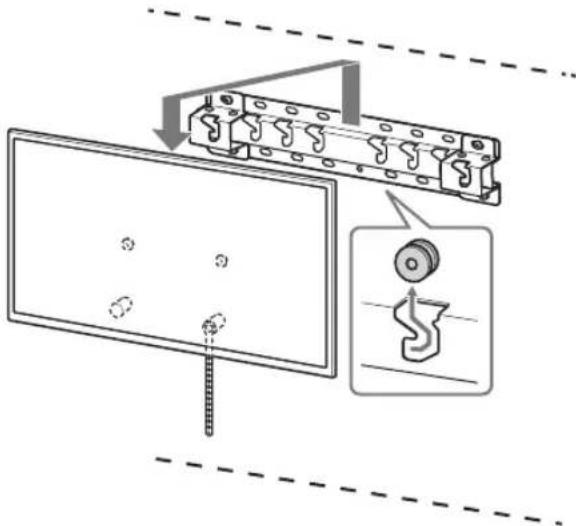
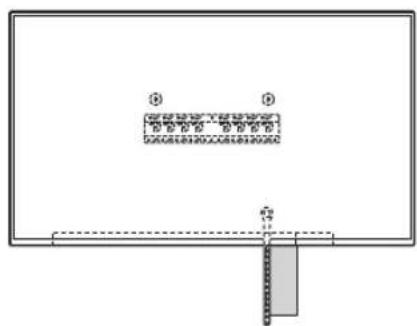
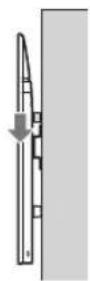
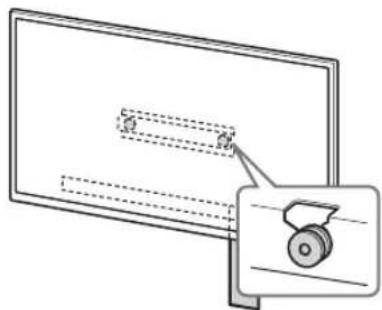
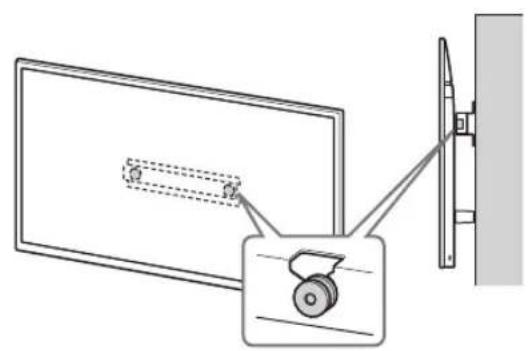
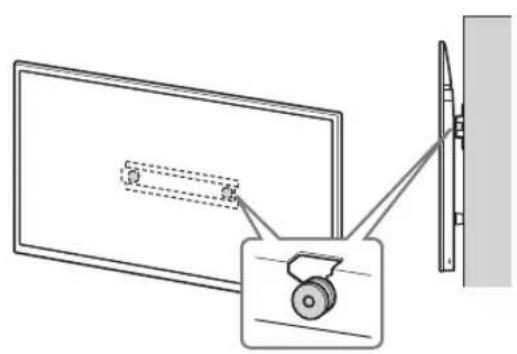
2 Install the TV onto the Base or Base Adaptor.
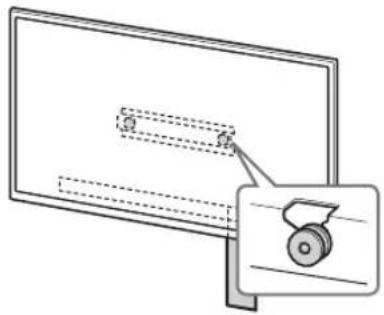
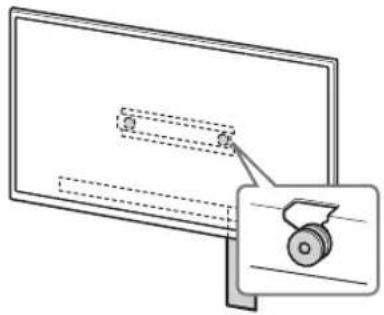
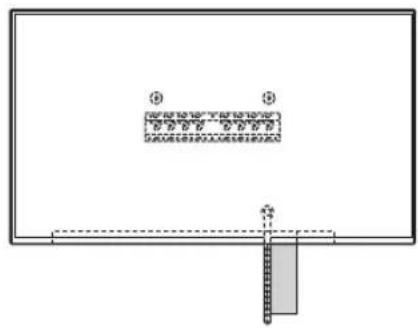
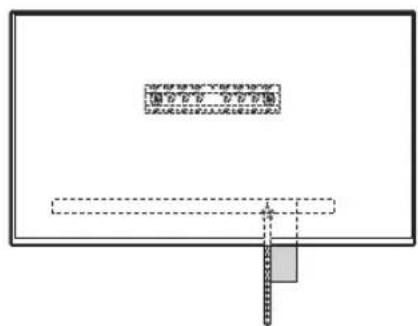
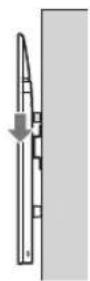
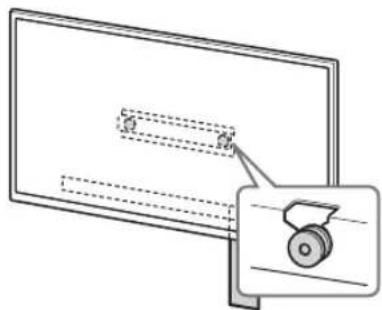
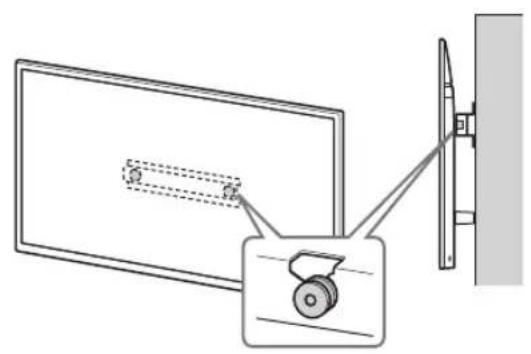
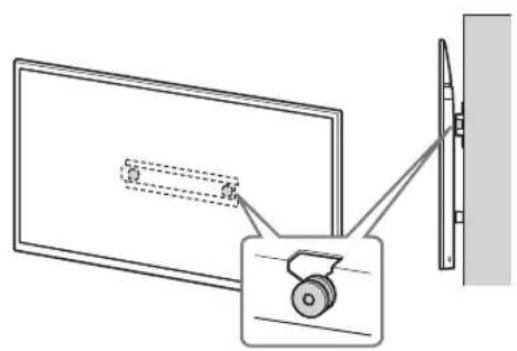
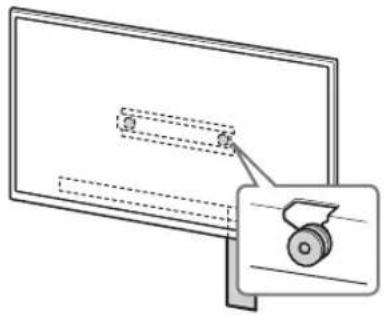
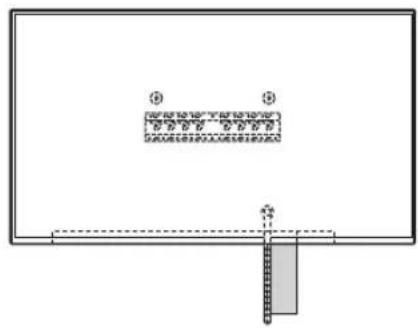
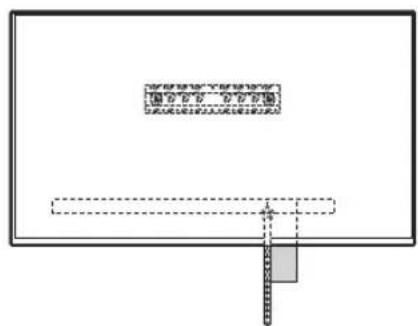
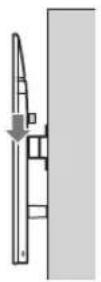
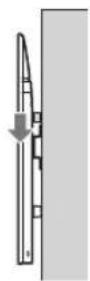
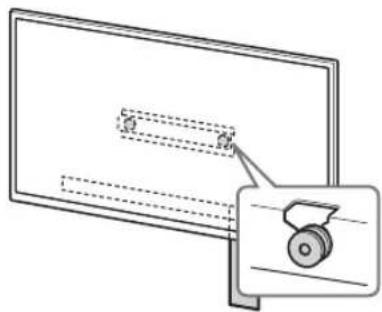
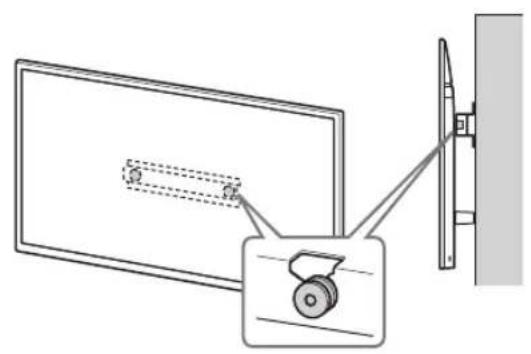
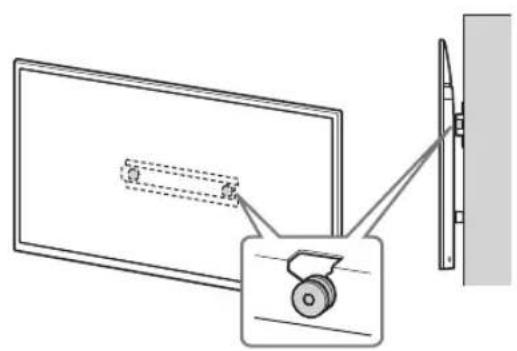
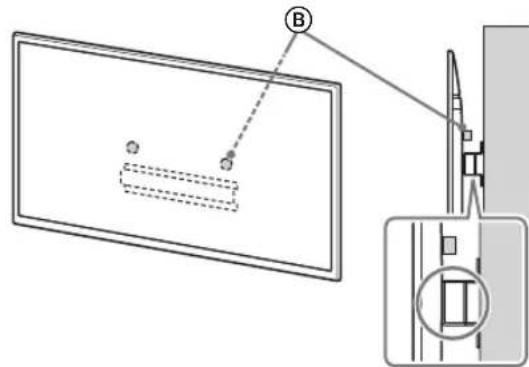
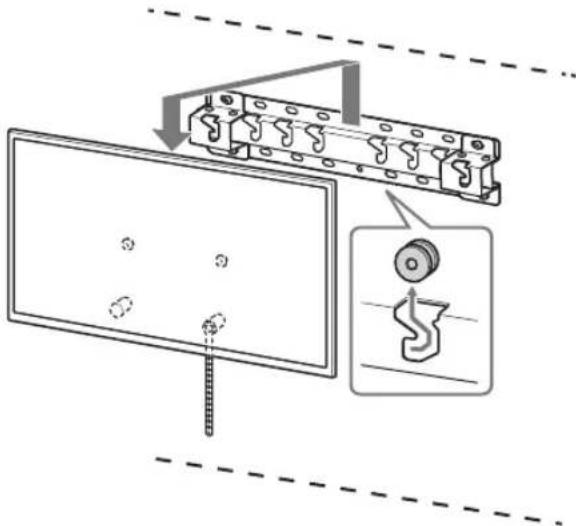
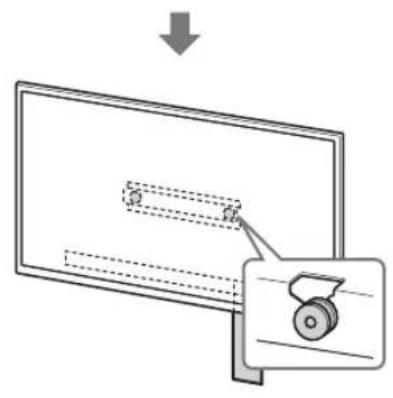
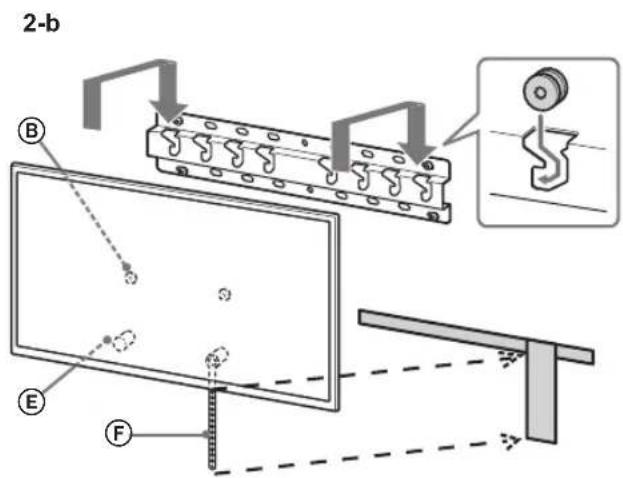
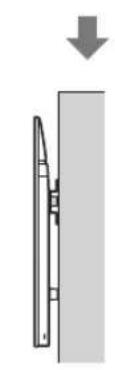
- Gently slide down the TV and hang the Pulleys (B) attached to the rear of the TV to the Base or Base Adaptor, making sure to confirm the shape of the holes. After installing the TV on the wall, confirm the Pulleys (B) are firmly latched into the Base or Base Adaptor.
- Release both hands slowly to ensure that the TV does not fall.
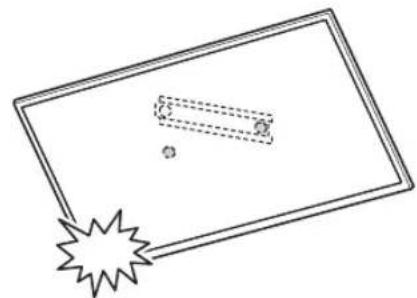
After installing the TV on the wall, remove the masking tape, etc. from the wall.
2-a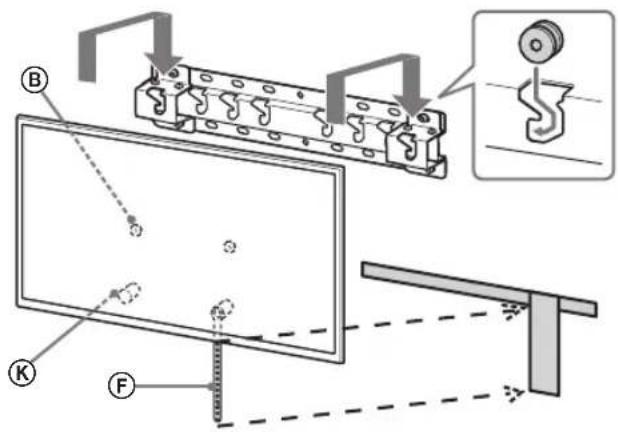

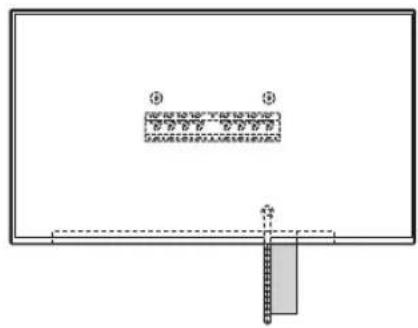

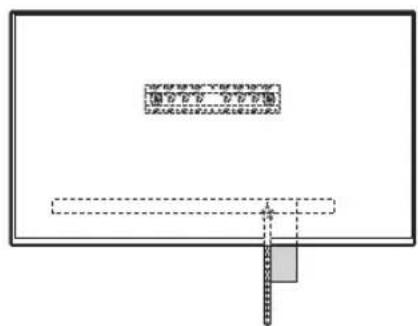

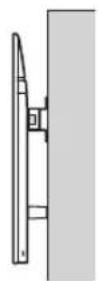
2-b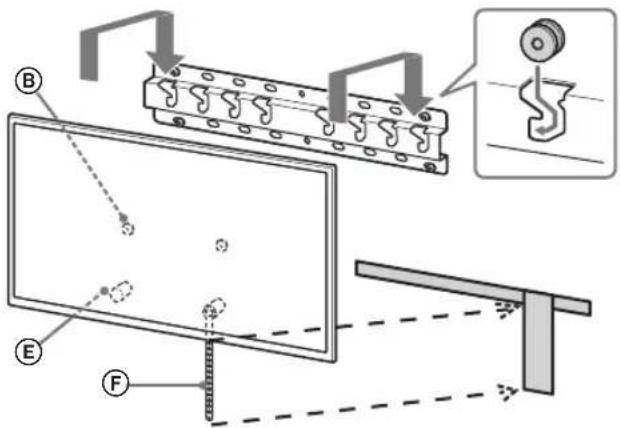
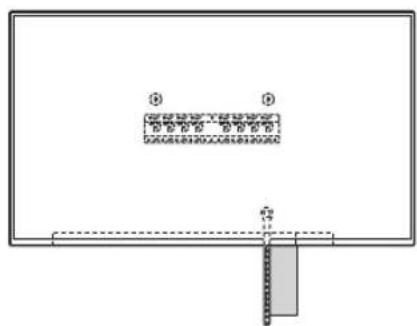

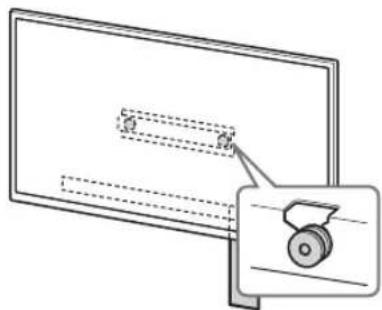

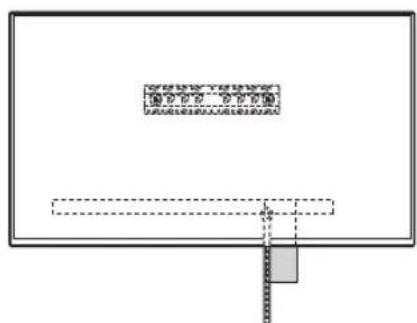

WARNING
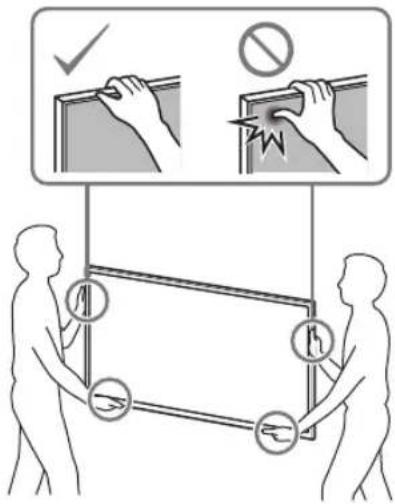
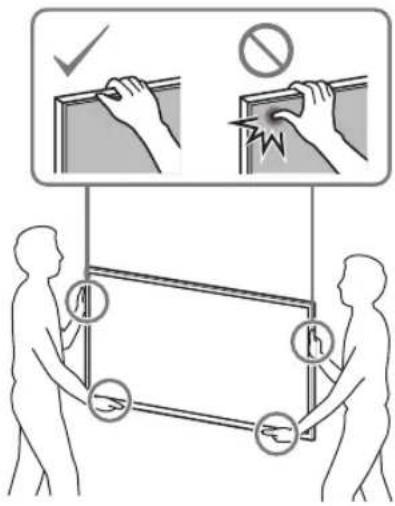
- Be sure that two or more persons (three or more persons for 75 inches and above TV set) hold the TV when carrying it.
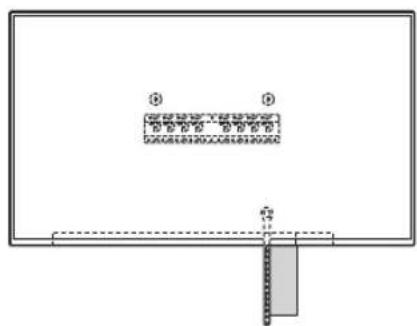
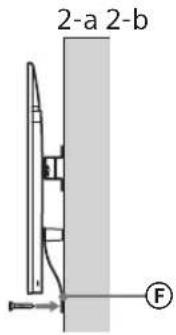
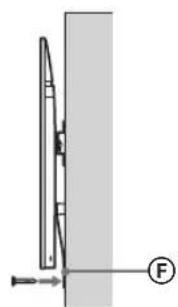
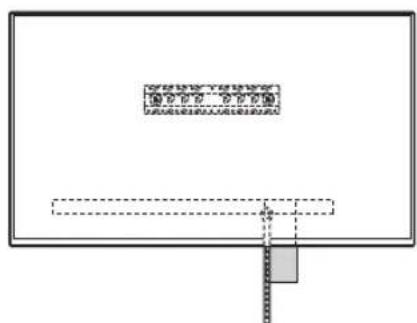
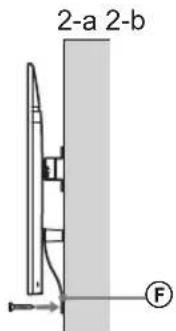
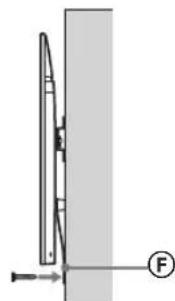
3 Preventing the bottom of the TV from shifting.
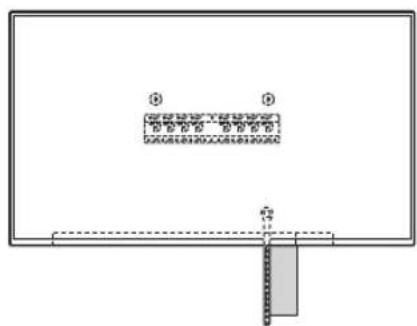
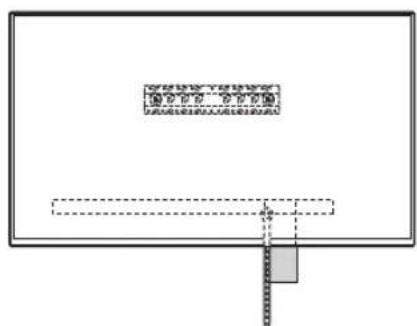
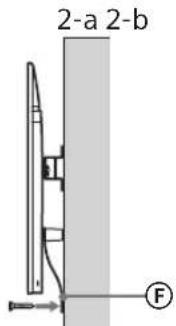
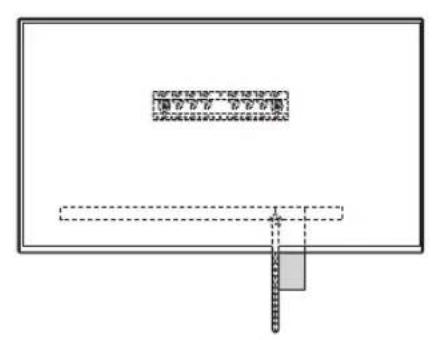
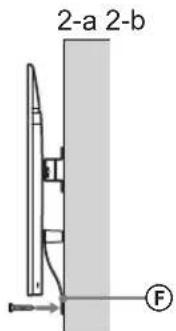
Take up the slack of Belt F and attach it to the wall tightly.
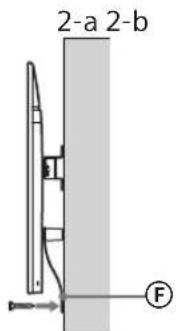
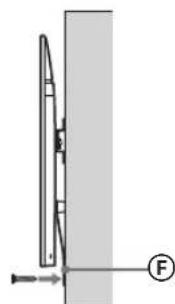
- Use a 5 mm diameter screw or equivalent (not supplied).
Note
Try to pull the bottom of the TV towards yourself slightly, to make sure that it does not move forward. If there is any movement, it is not fixed correctly, and the Belt should be secured firmly again.
KD-65/55XG87□□
KD-65/55XG85□
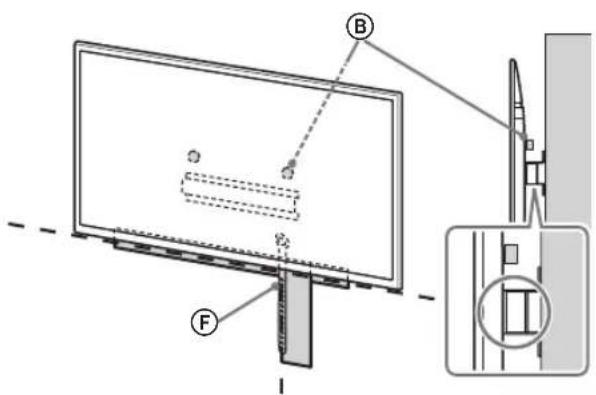
1 Lift the TV.
- For the location of the Pulleys to the hang on the Base or Base Adaptor, refer to the table of step 3 in "Deciding on the installation location" on page 7. Make sure that the rear of the TV touches the Base or Base Adaptor when holding the TV.
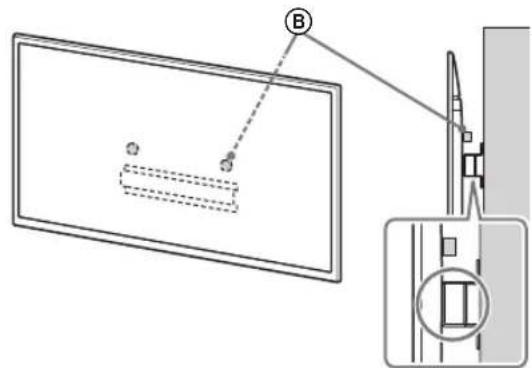
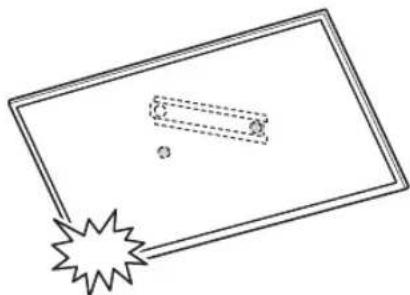
Note
- Hold the TV securely with both hands.
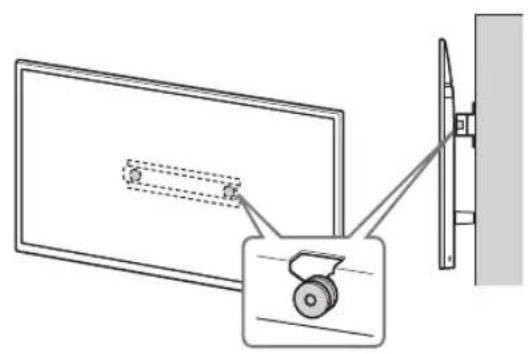
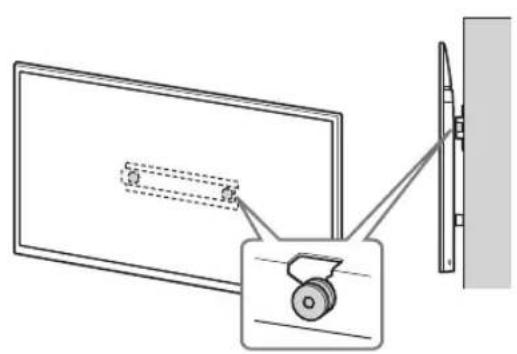
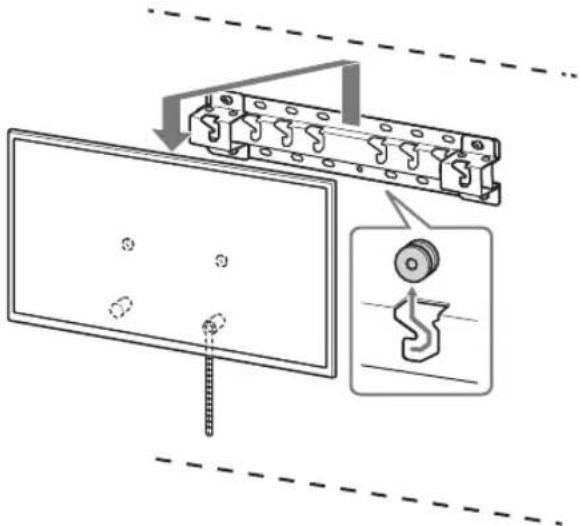
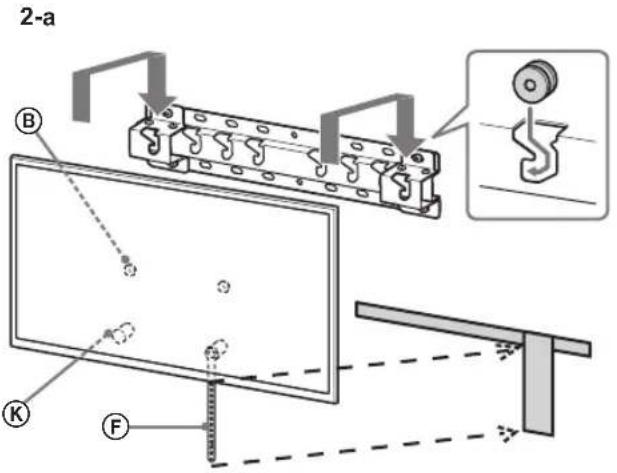
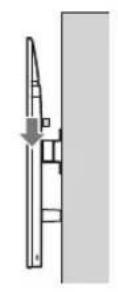
2 Install the TV onto the Base or Base Adaptor.
- Gently slide down the TV and hang the Pulleys ⑧ attached to the rear of the TV to the Base or Base Adaptor, making sure to confirm the shape of the holes. After installing the TV on the wall, confirm the Pulleys ⑧ are firmly latched into the Base or Base Adaptor.
- Release both hands slowly to ensure that the TV does not fall.
2-a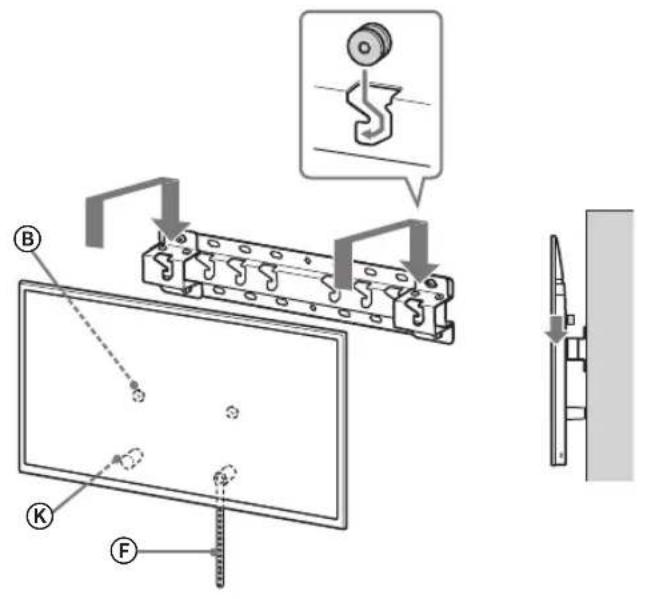
2-b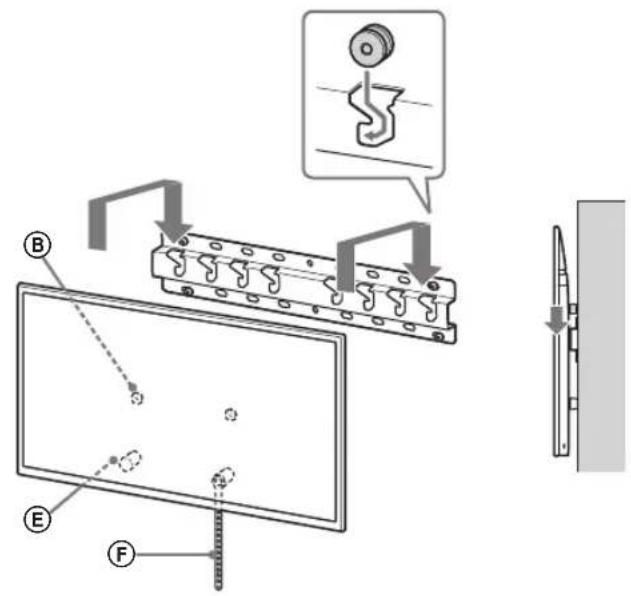
↓
↓
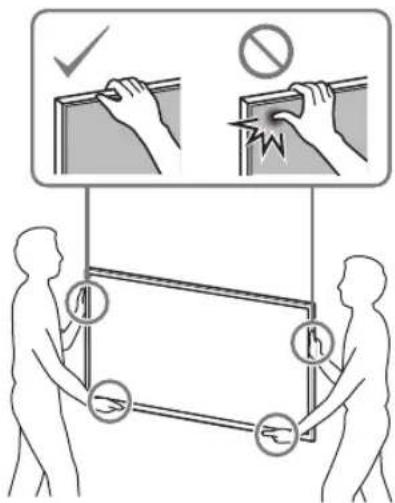
WARNING
- Be sure that two or more persons (three or more persons for 75 inches and above TV set) hold the TV when carrying it.
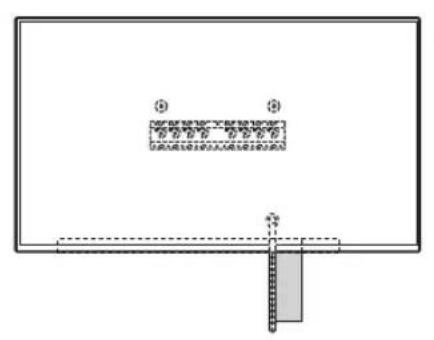
3 Preventing the bottom of the TV from shifting.
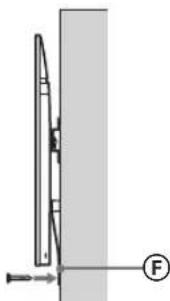
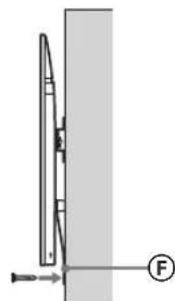
Take up the slack of Belt F and attach it to the wall tightly.
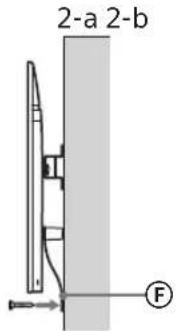
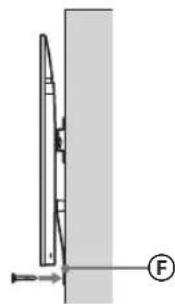
- Use a 5 mm diameter screw or equivalent (not supplied).
Note
Try to pull the bottom of the TV towards yourself slightly, to make sure that it does not move forward. If there is any movement, it is not fixed correctly, and the Belt should be secured firmly again.
Confirming the completion of the installation
Check the following points.
The Pulleys are firmly hung onto the Base or Base Adaptor. - The cord and the cable are not twisted or pinched. - The Belt is tight with no slack.
WARNING
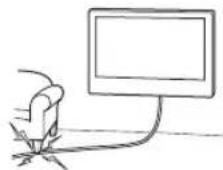
- Improper placement of the mains lead, etc. may cause fire or electric shock through a short circuit. Be sure to confirm the completion of the installation for safety.
Other information
When removing the TV, reverse the previous installation procedure.
WARNING
- Be sure that two or more persons (three or more persons for 75 inches and above TV set) hold the TV when removing it.
Specifications
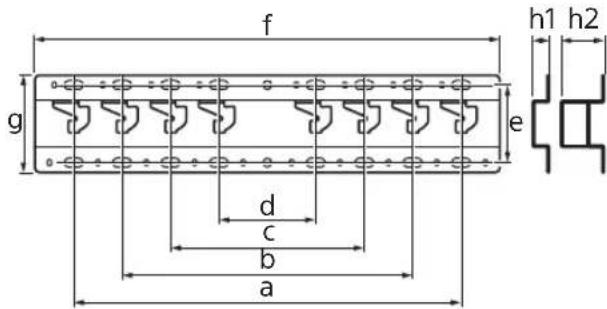
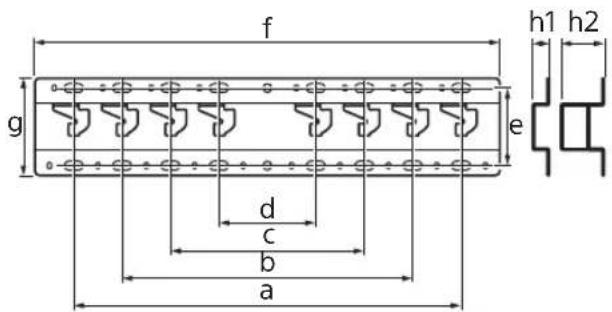
Dimensions: (Approx.) [mm]
a:400
b : 300
c:200
d:100
e:80
f: 480
g: 100
h1: 20 (case 2-b)
h2: 60 (case 2-a)
Weight (base only): (Approx.) [kg]
0.8
Design and specifications are subject to change without notice.
Dimensions: (Approx.) [mm]
a: 400
b: 300
c: 200
d: 100
e: 80
f: 480
g: 100
h1:20 (case 2-b)
h2:60 (case 2-a)
Dimensions: (Approx.) [mm]
a: 400
b: 300
c: 200
d: 100
e: 80
f: 480
g: 100
h1: 20 (case 2-b)
h2: 60 (case 2-a)
Weight (base only): (Approx.) [kg]
0.8
Clearance for installation. 5
Checking the parts 5
Finding a location 6
Preparing for installation
1 Find the TV's location.
Remove the TV from the box.
- You have the installation guide
- and the installation guide
- before installation.
- Before positioning, make sure you have a Phillips screwdriver that fits the screws.
- Verify the position of the TV. Prepare one or more screws with a diameter of 8 mm and one screw with a diameter of 5 mm (if needed). Choose screws that are suitable for the wall material.
Checking the parts
Dimensions: (approx.) [mm]
a:400
b:300
c:200
d: 100
e: 80
f: 480
q: 100
h1: 20 (case 2-b)
h2: 60 (case 2-a)
Remove all screws and other items from the TV before mounting.
If you do not, the TV may fall and cause personal injury or property damage.
Do not skip the wall-mounting bracket parts.
If you do not, the wall-mounting bracket may fall and cause personal injury or property damage.
Do not mount any other equipment except the specified product.
This wall-mounting bracket is designed for use only with the specified product. If you mount other equipment, it may fall and cause personal injury or property damage.
Do not place the bracket on any other product except the TV. Do not place the TV on a slant or upside down.
If you do not, the TV may fall and cause personal injury or property damage.
Do not lean on or hang from the TV.
This television may fall and cause serious injury.
WARNING
If the safety measures described are not followed, injury or damage to property may occur.
Do not subject the product to excessive force during cleaning or maintenance.
Do not apply excessive force to the top part of the television. If you do, the television may fall and cause injury or damage to property.
Safety Measures
- If you use the television for a long time, mounted on a wall mount bracket, the wall behind it may become discolored or crack, depending on the wall material.
- If the wall mount bracket is removed from the wall after installation, screw holes will remain. Do not reuse the wall mount bracket on the same wall, as it may be mechanically weakened.
Wall Mount Bracket Installation
To Sony dealers
WARNING
These instructions are intended solely for Sony dealers. Read the safety measures described above and pay special attention to safety during installation, maintenance, and inspection of the product.
Do not install the wall mount bracket on a wall surface where the television's screws or sides protrude from the wall surface.
Do not install the wall mount bracket on a wall surface, such as a column, where the television's screws or sides protrude from the wall surface. If the television is subjected to impact or falls, it may cause injury or damage to property.
Do not install the television above or below air conditioners.
If the television is placed in a location that is exposed to direct sunlight, this may cause an electric shock or malfunction of the television.
Mount the wall mount bracket securely to the wall by following the instructions in this manual.
If any of the screws are loosened or damaged, the wall mount bracket may fall and cause injury or property damage. Use appropriate screws for the wall material and mount the bracket securely by using at least four screws with a diameter of 8 mm (or equivalent).
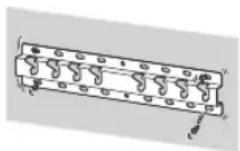
Use the correct screws and mounting parts as instructed in this manual. If you use substitute parts, the television may fall and cause personal injury or damage.
Make sure you use the bracket correctly by following the procedure described in this manual.
If any of the screws are loosened or damaged, the television may fall and cause personal injury or damage.
Tighten the screws securely in the indicated position.
If you do not do this, the television may fall and cause personal injury or damage.
Be careful not to drop the television during installation.
If the television is subjected to an impact, it may fall and break. This could lead to injury.
Mount the television on a wall that is perpendicular and flat.
If you do not do this, the television may fall and cause injury.
After correctly mounting the television, ensure the cables are properly connected.
If people or objects get caught in the cables, this may cause injury or damage to the television.
Do not allow the power cable or connecting cable to be pinched.
If the TV is installed or connected to the TV, the cables must be attached between the TV and the structure. If they are pulled or pulled with force, the internal conductors may break and cause a short circuit or electric shock. This may cause a fire or electric shock.
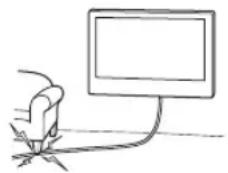
The screws required for fixing the wall-mount bracket to the wall are not included in the package.
Use appropriate screws for the wall material and structure when mounting the wall-mount bracket.
Contents
Preparation for installation. 5
Checking the parts. 5
Determining the installation location 6
Mounting the base on the wall 8
Preparation for TV installation...9
KD-85/75XG85□□,KD-75XG87□□
KD-65/55XG87□□,KD-65/55XG85□□.11
Mounting the TV on the wall.13
KD-85/75XG85□□,KD-75XG87□□.13
KD-65/55XG87□□,KD-65/55XG85□□.15
Checking the connection
MOHTaxa 18
Dpyra uHΦopMaun 18
Cneunphiauu.. 18
Mounting on the TV on the wall
The mounting procedure is different depending on the TV.
Use the console for mounting the KBM wall SU-WL450, to mount the TV on the wall.
Note
Do not lose the supplied screws; keep them in a safe place, away from children.
Mounting instructions
The TV adjustment instructions must be at hand before starting the mounting. - Use a Phillips screwdriver that matches the bolts. - Choose the mounting position for the TV. - Prepare four screws with a diameter of 8 mm and one screw with a diameter of 5 mm or equivalent (not included in the kit). Select the screws suitable for the wall material.
Parts selection
Left with SU-WL450
Mounting the base on the wall
- Use four screws with a diameter of 8 mm or equivalent (not provided). Secure the four screws into the holes of the base adapter ① with the base (20) A (only 2-a).
- Mount the base (20) A horizontally on the wall.
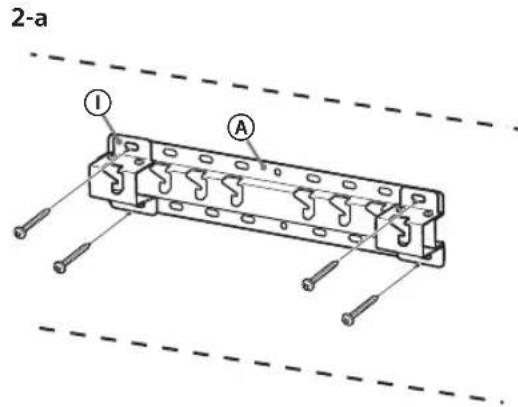
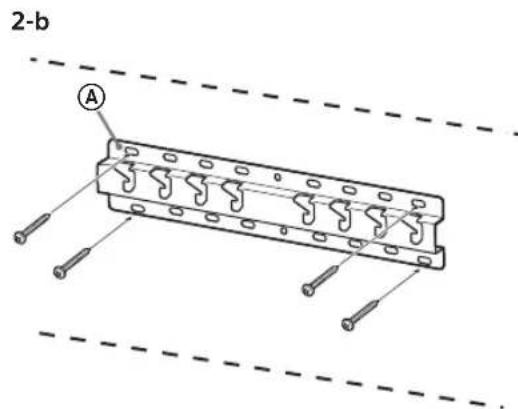
Preparation for mounting the TV
When mounting, follow the setup instructions.
KD-85/75XG85□□,KD-75XG87□□
1 Mark the mounting position on the wall.
- Use the self-tapping screws (not supplied) to mark the TV position near the base of the stand. See the following table.
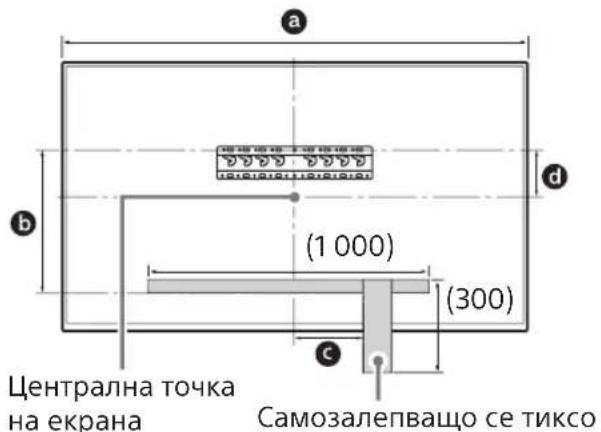
| Мернейнци: mm | ||
| Име на м odeл | Дыжина 3a otбелязвае | Размер на центьра на ekранa |
| a b c d | ||
| KD-85XG85□□ | 1909 683 200 251 | |
| KD-75XG87□□ | 1673 468 200 107 | |
| KD-75XG85□□ | ||
2 Remove the screws from the back of the TV.
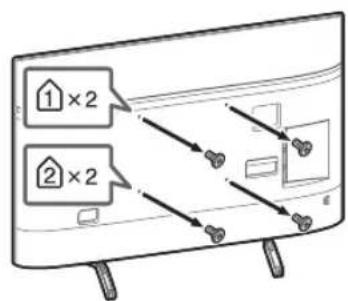
3 Attach the wall-mount brackets. Check the brackets by comparing with "Supplied with SU-WL450" in "Checking the parts" on page 5.
Note
Secure the brackets with the screws. When using an electric screwdriver, set the torque to approximately 1.5 N·m {15 kgf·cm}. Store the used and unused parts in a safe place for future use. Keep the manual for future reference.
Standard mounting (2-a)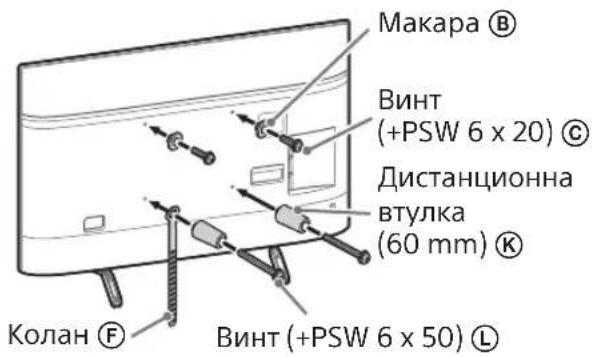
Tight mounting (2-b)
Note
When using this mounting style, you can use the terminals on the back of the TV.
4 Connect the necessary cables to the TV.
Make sure you have connected the cables before mounting the TV on the wall. You may not be able to connect them after the TV is mounted. Refer to the manual supplied with your TV.
Route the cables through the wall and use the supplied cable ties. - Attach the cable ties to the wall so that they do not protrude above it.
5 Remove the table-top stand.
- Remove one side of the table-top stand. While holding the table-top stand securely with both hands, have another person assemble the TV.
KD-85XG85□□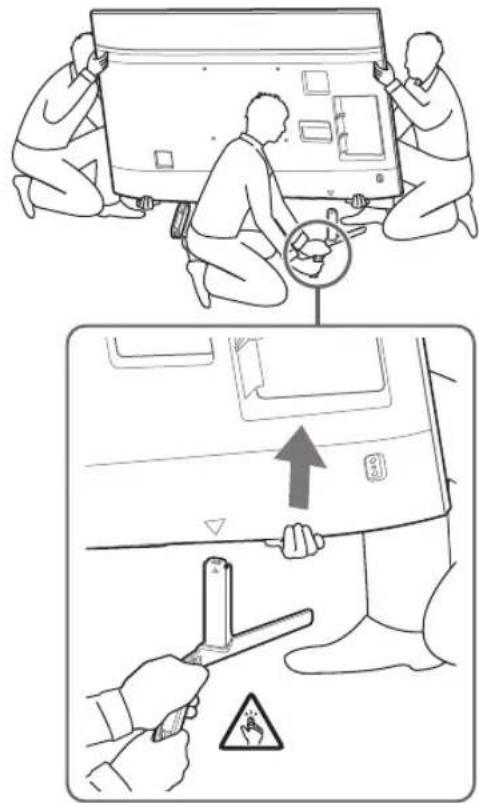
KD-75XG87□□, KD-75XG85□□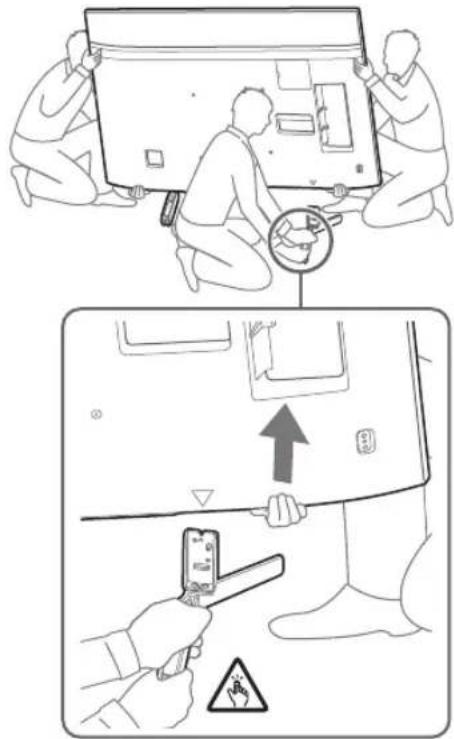
- Repeat the procedure and remove the other side of the table-top stand.
Removing the table-top stand should be done by two or more people. Be careful not to apply excessive force when removing the table-top stand from the TV, as the TV may fall and cause personal injury or damage to the TV itself. - Be careful when working with the table-top stand to avoid damaging the TV. Be careful when lifting the TV, as the table-top stand is not secured and may come off and cause injury. Be careful when moving the table-top stand away from the TV to prevent it from falling and damaging the surface on which the TV is placed.
KD-65/55XG87□□,
KD-65/55XG85□
1 Remove the screws from the rear of the TV.
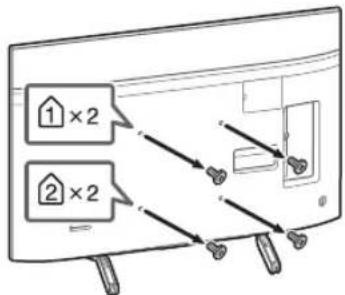
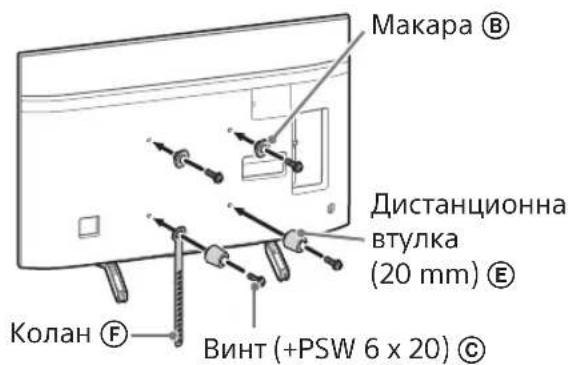
2 Attach the wall-mount brackets to the console. Check the brackets by comparing them with "Supplied with SU-WL450" in "Checking the parts" on page 5.
Secure the wall-mount brackets with the supplied screws. When using an electric screwdriver, set the torque to approximately 1.5 N·m {15 kgf·cm}. - Store the supplied and non-supplied parts safely for future use. Store the instruction manual for future reference.
Wall mount installation (2-a)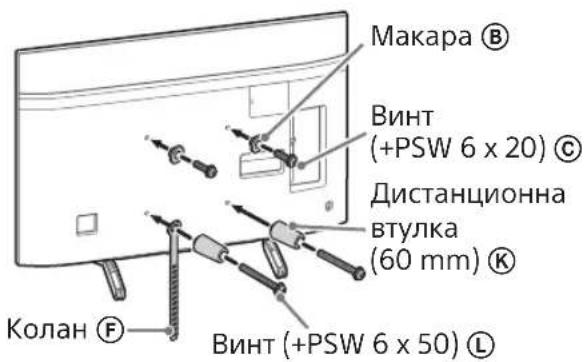
Ceiling mount installation (2-b)
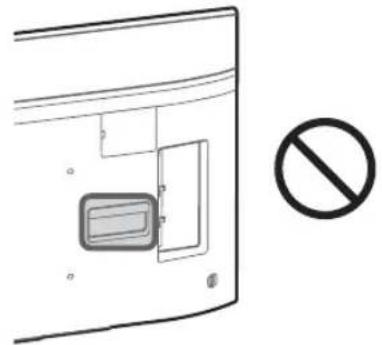
Caution
To use the installation tools, you can use the terminals on the back of the TV.
Connect the necessary cables to the TV.
Make sure you have connected the cables before mounting the TV on the wall. You can connect them after the TV is mounted. See the manual provided with your TV.
Caution
Route the cables through the wall or use cable covers. - Connect the cables before mounting to the wall, so you don't step on them.
4 Remove the stand from the TV.
- Remove one side of the stand. Hold the stand firmly with both hands, while lifting the TV.
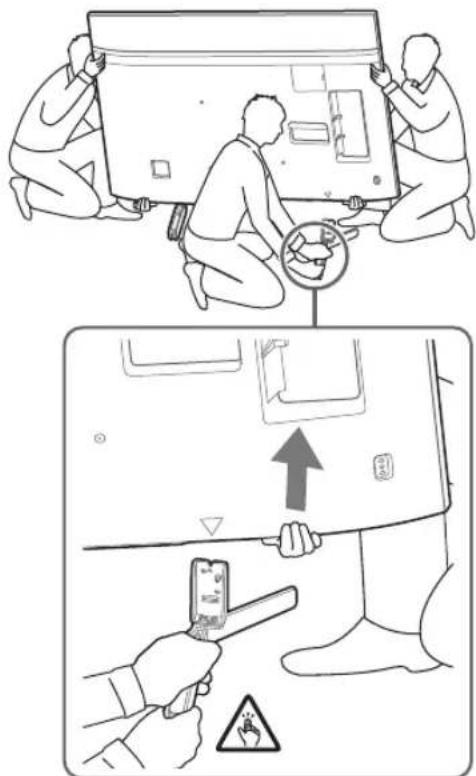
- Repeat the same procedure and remove the other side of the stand.
Caution
Removing the stand from the left to complete the process. Be careful not to apply excessive force when removing the stand from the TV, as the TV may fall and be damaged. Be careful when working with the stand to avoid damage to the TV. Be careful when lifting the TV, as the stand is not secured and may slip and fall. Be careful when moving the stand away from the TV to prevent damage to the surface on which the TV is placed.
Mounting the TV on the wall
KD-85/75XG85□□,KD-75XG87□□
1 NOBdInrHeTe TeJeBn3opa.
3a MeCTOnONoXeHHeTo Ha MaKapnte ⑧ 3a OKaUBaHe BbPxy OCHOBaTa NnnaTepa 3a OCHOBaTa, BnKTe TaBnIuata B CTbnka 3 B "OnpeJeIHa MRCTO Ha MOHTaX"OT CTpaHnua 7. - YBepete ce, Ye 3aHaTa CtpaHa Ha TeJIeBn3Opa IOKOCBa OCHOBaTa NII aIaITepa 3a OCHOBaTa, KOraTO IbpxNTE TeJIeBn3Opa.
3a6eJekka
-ДьжTe 3дравTo TeleBnOpa CдVе рьсиce YBepete, Ye KOnaHbT FИ ДОЛнATA CtpaHa Ha TeLEBnOpa Ca HapabHOb CbC CamO3aJIenBaUcOTo Ce TUKCO. TpmaDyuHOCTe TeneBn3opa,nto3N KOTo e nped TeJeBn3opa Da BOIN OCTaHaNTe, 3a da perynpa no3nIOHOHPaHeTo.
MHOROBHIMBaIte, KORATo MOHTnpaTe TeneBUN3Opa KbMCTeHaTa,OCo6eHa 3a YOBeKa,KoITo rO DbpxN OTdony,TbKATO TeneBUN3Opa MoKe Da NaDHe N da npuHHcepNo3Ha KOHTy3Nn IIN DOpN Cmbpt.
2 MoNTpaIte TeIeBn3Opa B OCHOBaTa IJIaIaITePa 3a OCHOBaTa.
BHHMaTeHNO NJIb3HeTe HaOJy TeJeBn3Opa n 3aKaayTe MaKapnte B, 3aKpeHn KbM 3aHaTa CtpaHa Ha TeJeBn3Opa, KbM OCHOBaT aAnTepa 3a OCHOBaTa, KaTo npOBepnte fOpMaTa Ha OTBOpTe. Cne MoNTax Ha TeJeBu3opa npOBepTe DaIIM MaKApITE B ca 3dpaBO 3aKaueH NbM OCHOBaTa IIN aAnTepa Ha OCHOBaTa. Babno npchete n DBeTe cn pbce, 3a da cte cnpyn, ye TeJeBn3OpbT HMa da naHe.
CneI KaTo MOHTnPaTe TeJIeBn3Opa KbM CteHaTa, IpemaxHeTe cAm0aJIeNBAUToCe TUKCO I np. OT CteHaTa.
2-a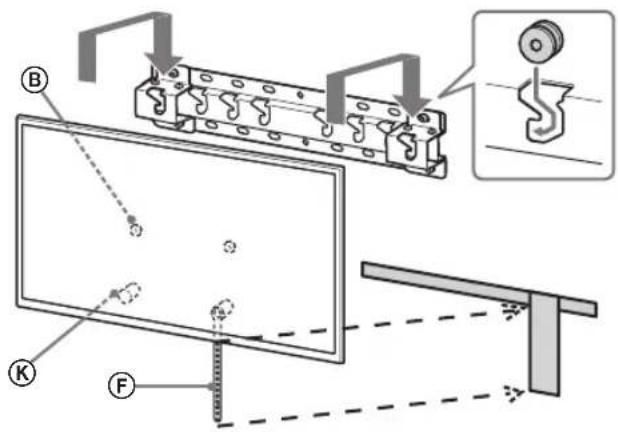



2-b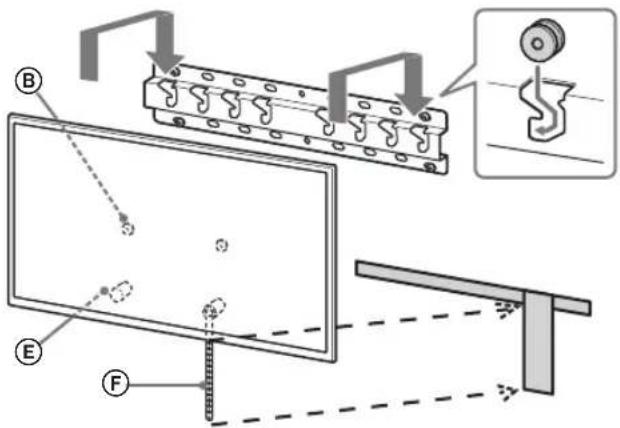



PNEyIpyEKdEHNE
- YBepete ce, ye Dbama nn noBee dyu (TPma nn noBee duw 3a KOMnKeT TeeBu3Op c pa3MePn OT 75 uHa) dbpxat TeeBu3Opa, koraTo ro Hocnte.
2 MoHTnpaIte TeIeBn3Opa B OCHOBaTa IJIaIaNTepa 3a OCHOBaTa.
BHHMaTeHNO NJIb3HeTe HaOJTy TeJIeBn3Opa n 3aKaUte MaKapuTe (B, 3aKpeNeHn KbM 3aJaHaTa CtpaHa Ha TeJIeBn3Opa, KbM OCHOBaTa IIN aAnTepa 3a OCHOBaTa, KaTo npOBepuTe fOpMaTa Ha OTBOpuTe. Cne MoTack Ha TeJeBn3opa npOBepTe daH MaKapnte 8 ca 3dpaBO 3aKaueH NbM OCHOBaTa nn aanTepa Ha OCHOBaTa. - BaBHO nCyHete N DBeTe Cn PbCe, 3a Da CTe CNrpyH, Ye TeJIeBn3OpbT HMa Da naHe.
2-a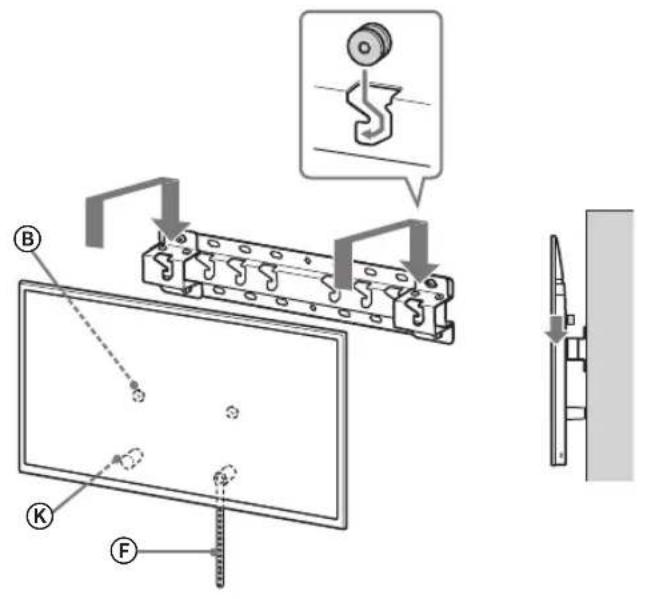
2-b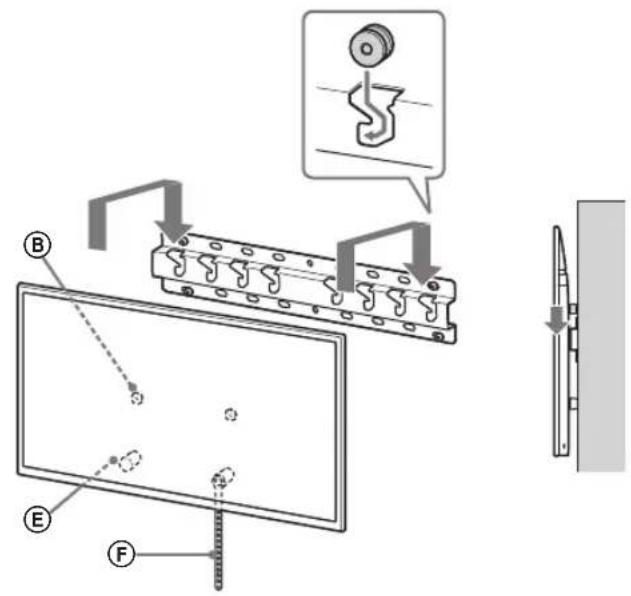
↓
↓
PNEyIpyEKdEHNE
- Repeat this, and do the same for the TV (for the TV with sizes from 75 inches) to hold the TV when carrying it.
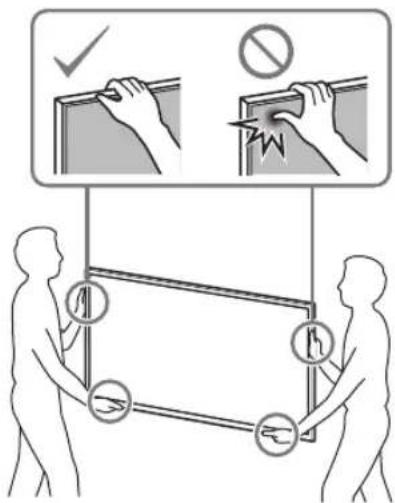
3 Prevention
Prevention of damage to the TV.
- Select the detached part of the stand and attach it to the wall.
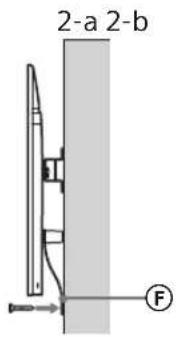
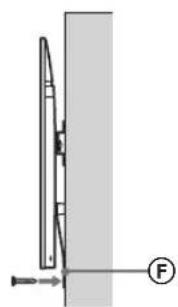
- Use a screw with a diameter of 5 mm or equivalent (not included in the package).
Care
Tilt the TV towards you to make sure it is not loose. If it moves, it is not attached correctly and the stand needs to be reattached properly.
Check
Supported models:
KD-85XG85□□*/75XG87□□*/75XG85□□*/65XG87□□*/ 65XG85□□*/55XG87□□*/55XG85□□*
* In actual model names, "□□" denotes digits and/or symbols specific to the model.
For customers
To ensure the safety of the product, Sony strongly recommends that you have the TV installed only by Sony dealers or licensed contractors. Do not attempt to do it yourself.
For Sony dealers and contractors
Pay special attention to safety during installation, periodic maintenance, and inspection of this product.
Do not allow children to climb on the TV. Keep small parts out of the reach of children so they cannot accidentally swallow them.
For moving or removing the TV, be sure to contact licensed contractors.
If the TV is transported or removed by unlicensed contractors, it may cause injury or damage to property. Make sure that the TV is carried or removed by two or more people (three or more people for TVs with a screen size of 75 inches or larger).
After installing the TV, do not remove the screws, etc.
Otherwise, the TV may fall and cause injury or damage to property.
Do not disassemble or modify the parts and brackets for wall mounting.
Otherwise, the wall-mount bracket may fall and cause injury or damage to property.
Do not install any equipment other than the specified one on the bracket.
This wall-mount bracket is intended for use only with the specified products. If you install equipment on this mounting bracket that is not intended for such installation, it may fall or be damaged, and may also cause injury or damage to property.
To avoid overloading the wall-mount bracket, do not place anything on it other than the TV. Do not tilt the TV left/right or up/down.
Otherwise, the TV may fall and cause injury or damage to property.
Do not lean on the TV or hold onto it.
Do not lean on the TV or hold onto it, as it may fall and cause serious injury.
WARNING
The following precautions exist: there is a risk of injury or property damage.
When cleaning, it is necessary to do so without applying excessive force.
Do not overload the top of the TV. Otherwise, the TV may fall and become a cause of injury or property damage.
Precautions
If the TV, installed on a bracket for wall mounting, is used for a long time, depending on the wall material, the wall behind or above it may discolor or peel. After removing the bracket for wall mounting, holes will remain in the wall. Do not use the bracket for wall mounting in places with mechanical vibrations.
Do not install the bracket for wall mounting on walls where the edges of the TV will protrude beyond the edge of the wall.
Do not install the bracket for wall mounting on surfaces of walls (for example, on columns) where the edges of the TV will protrude beyond the edge of the wall surface. Hitting the protruding edges of the TV may result in injury or property damage.
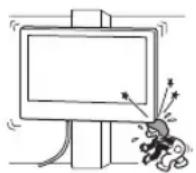
Do not install the TV under an air conditioner or under it.
If the TV is damaged by the effects of an air conditioner or airflow from an air conditioner over a long period of time, this may cause a fire, electric shock, or malfunction of the TV.
Be sure to securely attach the bracket for wall mounting to the wall, following the instructions provided in this manual.
If any of the screws are loose or missing, the bracket for wall mounting may fall and become a cause of injury or property damage. When performing installation, use screws that match the wall material, securely install the device, using no less than four 8 mm screws (or equivalent).
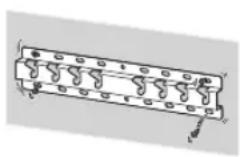
Be sure to use the screws and parts included in the kit for fastening and strictly follow the instructions provided in this installation manual. If other fastening materials were used during installation, the TV may fall and be damaged or become a cause of injury.
Perform the bracket assembly strictly following the instructions set out in this installation guide.
If any of the screws are loose or fall out, the TV may fall and get damaged or cause injury.
Firmly tighten the screws in the designated mounting holes.
Otherwise, the TV may fall and get damaged or cause injury.
Make sure that during installation the TV is not subjected to impacts.
Impacts can cause the TV to fall and be damaged. This can lead to injury.
Install the TV on a wall only if it is vertical and positioned at a right angle to the floor.
Otherwise, the TV may fall and cause injury.
After proper installation of the TV, ensure safe routing of cables.
Cables that present a tripping hazard can cause serious injury or damage to the TV.
Do not allow the power cord and connecting cables to become tangled.
If the power cord or connecting cables are pinched between the device and the wall, or are sharply bent or twisted, the insulation of the internal wires may be damaged, which can cause a short circuit or break. This can cause a fire or lead to electric shock.
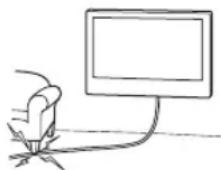
The screws for attaching the bracket for wall mounting to the wall are not included in the delivery set.
When mounting the bracket for wall installation, use screws that match the material and structure of the wall.
The brackets should be stored in the cardboard packaging in a dry, clean, well-ventilated room, away from heat sources. Storage temperature: from -20°C to +60°C. Storage humidity: <80%.
Copekane
Preparation for installation. 6
Checking the contents 6
Determining the installation method 7
Wall-mounted installation 9
Preparation for installing the TV...10
KD-85/75XG85□□, KD-75XG87□□ 10
KD-65/55XG87□□, KD-65/55XG85□□.12
Installing the TV on the wall.14
KD-85/75XG85□□, KD-75XG87□□ 14
KD-65/55XG87□□, KD-65/55XG85□□ 16
Checking the installation 19
Profile information 19
Technical specifications. 19
Use the bracket for wall-mounted installation SU-WL450 or for installing the TV on the wall.
Store the supplied screws in a safe place out of the reach of children.
4 Determine the location of the screws for the installation of the base (20) A.
See the specifications on page 19. When selecting point 2-a, use the position of the base adapter hole ①.
WARNING
The wall on which the TV will be mounted must be able to support a weight exceeding the weight of the TV by at least four times (to find out the weight of the TV, see the reference guide).
- Determine the strength of the wall on which the TV will be mounted. If necessary, reinforce the wall.
Mounting the base on the wall
- Use four or more screws with a diameter of 8 mm or equivalent (not included in the supply). Insert four screws into the holes of the base adapter ①, and attach it to the base (20) A (only 2-a).
- Mount the base (20) A horizontally on the wall.
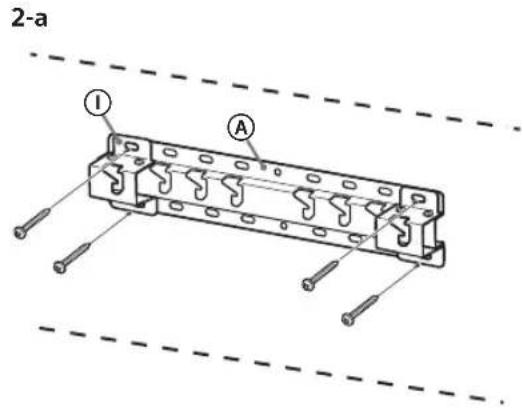
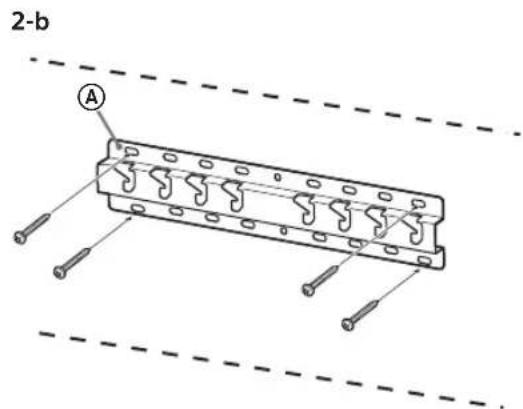
1 Mark the installation location on the wall.
- Use adhesive tape (not included) to mark the location of the TV next to the base or base adapter. See the following table.
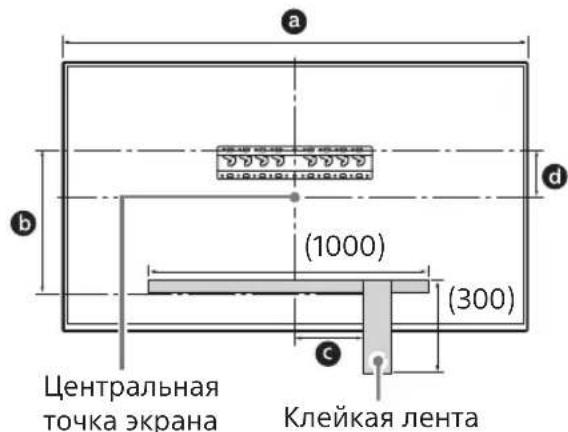
Units of measurement: mm
- Remove the tabletop stand. Hold the tabletop stand firmly with both hands while others lift the TV.
KD-85XG85□□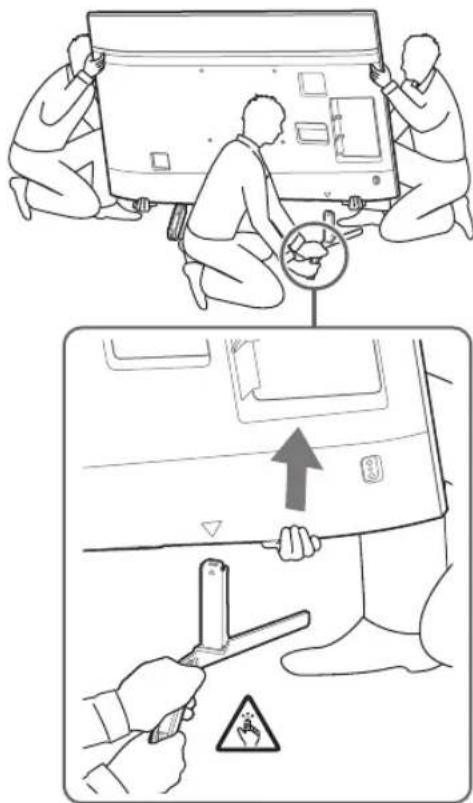
KD-75XG87□□, KD-75XG85□□
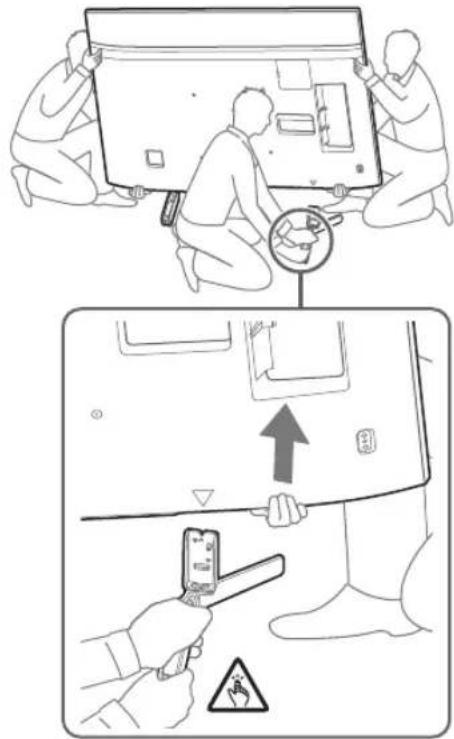
- Perform the specified action and pull out the other side of the tabletop stand.
Note
- Disconnecting the tabletop stand requires two people. - Be careful not to use excessive force when disconnecting the tabletop stand from the TV, as this may cause the TV to fall and result in injury or damage to the TV. - Be careful when handling the tabletop stand to prevent damage to the TV. - Be careful when lifting the TV, as the tabletop stand may detach and fall, which could cause injury. - Be careful when disconnecting the tabletop stand from the TV to avoid tipping over the device and damaging the surface on which the TV is placed.
KD-65/55XG87□□
KD-65/55XG85□
1 Remove the screws from the rear panel of the TV.
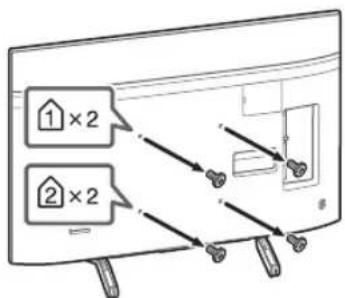
2 Attach the mounting parts to the tabletop stand. Perform the check of the mounting parts according to the section "Checking the accessories" on page 6, under "For SU-WL450".
Note
- Tighten the mounting parts securely with screws. - When using an electric screwdriver, set the tightening torque to approximately 1.5 N·m {15 kgf·cm}. Keep used and unused parts in a safe place for future use. Keep this instruction for future reference.
Standard mounting (2-a)
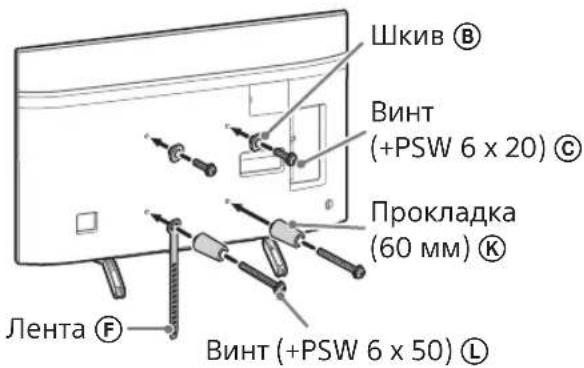
Compact installation (2-b)
Note
- Depending on the TV installation, some connectors on its rear panel may become inaccessible.
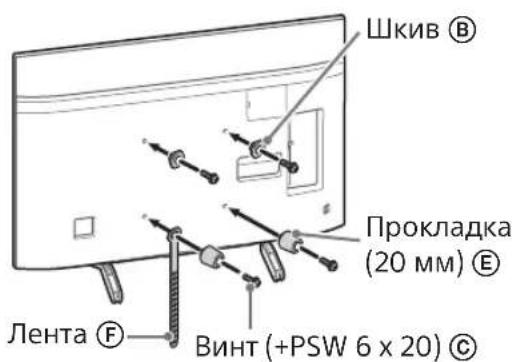
3 Connect the necessary cables to the TV.
Before installing the TV on the wall, be sure to connect the cables. After installing the TV, cable connection will become impossible. See the Reference Guide supplied with the TV.
Note
-For cable routing through the wall, use a wall-mounting bracket of the appropriate type. -Before mounting the device on the wall, connect the connecting cables so that the signal is not interrupted.
4 Detach the table-top stand from the TV.
- Remove the screws of the table-top stand. Hold the table-top stand firmly with both hands while others lift the TV.
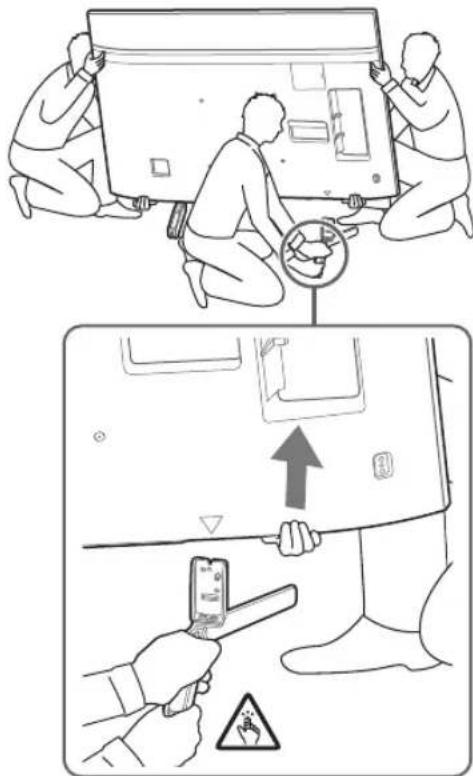
Repeat the indicated action and remove the other side of the table-top stand.
Note
-Detaching the table-top stand requires three or more people. -Be careful not to use excessive force when detaching the table-top stand from the TV, as this may cause the TV to fall and result in injury or damage to the TV. -Be careful when handling the table-top stand to prevent damage to the TV. -Be careful when lifting the TV, as the table-top stand may detach and fall, which could cause injury. Be careful when detaching the table-top stand from the TV to avoid tipping over the device and damaging the surface on which the TV is placed.
Installing the TV on the wall
KD-85/75XG85□□, KD-75XG87□□
1 Lay the TV down.
Positioning of the screws and mounting of the base or adapter base: See step 3 in the section "Determining the mounting location" on page 8. -Make sure the rear panel of the TV is in contact with the base or adapter base when holding the TV.
Note
- Hold the TV with both hands and make sure the front and bottom of the TV are aligned with the stand.
- The TV must be carried by three or more people. The person in front of the TV should guide the others to place the TV in the proper position.
When installing the TV on the wall, caution must be exercised, especially by the person supporting the TV from below, as it may fall and cause serious injury or even death.
2 Install the TV on the base or adapter base.
- Carefully lower the TV and hang the hooks (B) installed on the rear panel of the monitor onto the base or adapter base, following the shape of the holes.
- After installing the TV on the wall, make sure that the hooks ⑧ are securely fixed to the base or adapter base. Slowly remove both hands and verify that the TV is securely installed.
- After installing the TV on the wall, remove the adhesive tape and D. from the wall.
2-a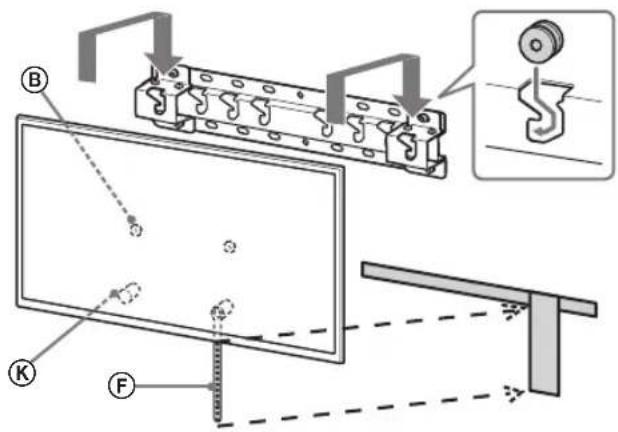
↓
↓
↓
2-b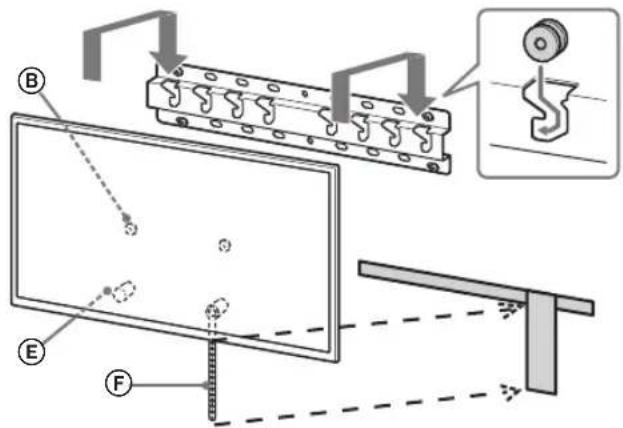
RU
↓
↓
↓
WARNING
- This TV set requires two or more people to carry it (three or more people for TVs with a 75-inch screen or larger) when moving it.
To prevent the TV from tipping over.
- Remove the stand and securely attach it to the wall.
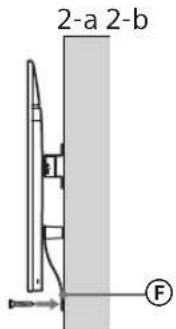
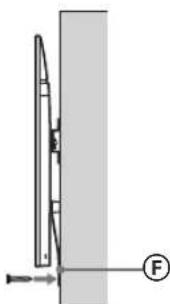
- Use a 5 mm diameter screw or its equivalent (not supplied).
Note
Slightly tilt the TV toward you to make sure it does not tip forward. If there is any play, the TV is not securely fastened, and the strap F should be tightened.
KD-65/55XG87□□,KD-65/55XG85□□
1 Lift the TV.
The location of the hooks on the mounting base or the base adapter is shown in Table 3 in the section "Determining the mounting location" on page 8. - Make sure the rear panel of the TV is in contact with the mounting base or the base adapter while holding the TV.
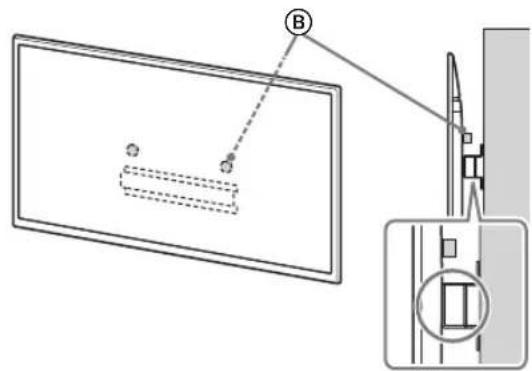
Note
- Hold the TV firmly with both hands.
2 Place the TV on the mounting base or the base adapter.
- Carefully lower the TV and align the hooks (8) on the rear panel of the TV with the mounting base or the base adapter, following the shape of the holes.
- After mounting the TV on the wall, make sure that the hooks are securely locked in the base or the base adapter. Slowly release both hands and make sure the TV is securely mounted.
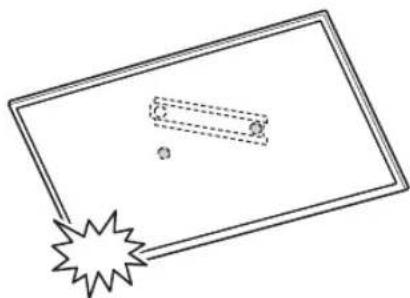
2-a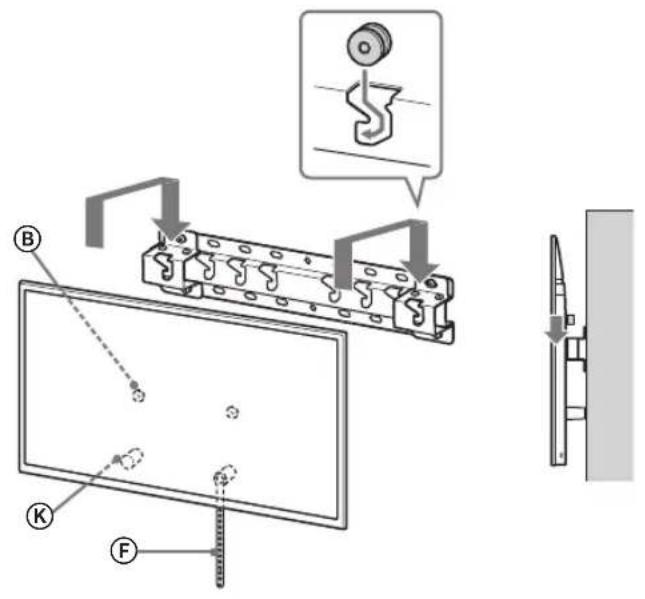
2-b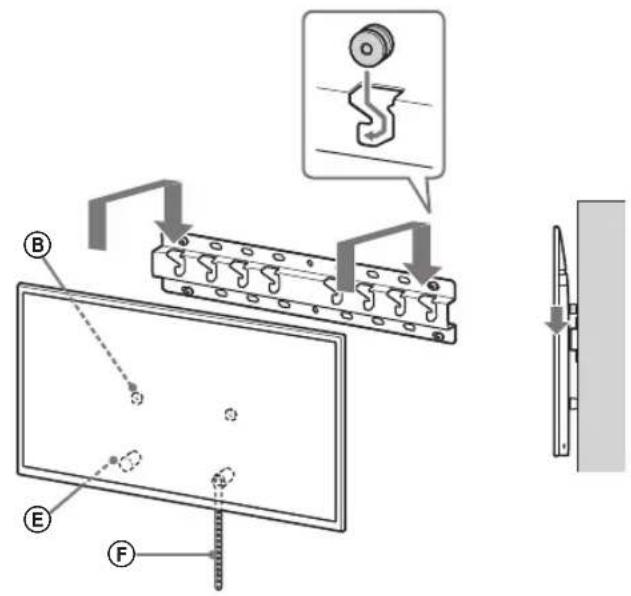
↓
↓
RU
PNEyIpyEKdEHNE
- Y6eDntecb,уTo TeBn3Op yIepKnaBoT dBa nnn 60onee chOBek (Tpnu nnboee chOBek nny TeBn3Opa c DnaRoHaNbIO 75 IIOmOB n BoJbWe npn ero nepeHoce.
3 PpeIoTbpaueHne CmeueHn HxKHeu actn TeJeBn3opa.
- YctpaHnTe cnaBnHy IeHTa F n HaJeKHO npNKpeNITe erO K CTeHe.
- NcnoB3yIe BnHT dNaMeTpom 5 MM nIeero KBBaIeHT (He npnaeraTc).
PpimechaHne
Cnerka NotrHnTe HnKHO Yo Acb TeNeBn3Opa Ha ce6y, YTO6blY6eDntBCa, YTO OHa He DnHexTcB Bnepe. EcnECTb HeoJbWOn IIOFT, To TeneBn3Op He 3akpenHe HndJeKaUIM oBa3OM, a JeHTa F CneIyET 3akpenNTb HaJeXHee.
- WKNBbI ⑧ HaJExHHO HaBeWeHbI Ha OCHOBaHHe NnN aDanTeP OCHOBaHn.
- Hyp n Ka6eJb He nepeKpyeHb i He 3aueMneHbI.
- JeHtA F HAnExHHO npNkpeHnEh 6e3 Cna6nHbI.
PNEyNPEKDEHNE
- Incorrect placement of the cable may lead to fire or electric shock due to a short circuit. To ensure safety, make sure that all installation steps are completed.
Additional Information
To remove the TV, perform the procedure described above in reverse order.
Precautions
- Make sure that the monitor is held by two or more people (three or more people for TVs with a diagonal of 75 inches or more) when removing it.
Technical Specifications
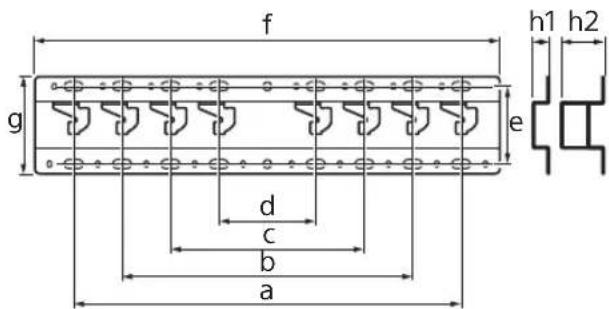
Dimensions: (approx.) [mm]
Tighten the screws, too, when mounting the TV.
If you do not do this, the TV may cause serious injury or harm to children.
Do not remove the parts of the bracket for partial mounting.
If you do this, the bracket for partial mounting may cause serious injury or harm to children.
Do not install any other devices other than the specified product.
The bracket for partial mounting is intended for use only with the specified product. If you install other devices, they may fall and cause serious injury or harm to children.
Do not use the bracket for partial mounting for hanging anything other than the TV. Do not tilt the TV left/right or up/down.
If you do this, the TV may cause serious injury or harm to children.
He cnpuaTecna TeleBizop i ne yinJaTec3a Hboro.
He cnnpaTecHa TeJIeB3Op I He cINnIteTec 3a HbOro, OCKInbKn BiH MoKe Bnactn Ha Bac Ta 3aBdAn CepNo3HNx TpaBM.
PONEPEIXEHH
Kkuo He DOTPmMyBaTnca HabeDeHnx HNxue 3aCTepeXHHx 3axoDb, CE MoKe Jpn3BcTN Do cepno3HN TpaBM Yn NnOkoDkeHHMaHa.
Пд часочишениаобocnyrobyBaHЯВИробу He пнКладаitedo HbOrHaMipHoiCnI.
He npknadaTne HaidmipHOi CnIN Do BepXhBoJtAHnH TeneB1Opa.JKUO 3pOuNTnCe,TeNEBiOp MOKe Bnactn Ta 3aBdATn cepo3nXtpaBM Nn PnPn3BeCTn Do noWKoDKeHHMaHa.
3acTepeKHi 3axoDi
Kkuo TeBcIOp,ycTaHOBneHnHa KPOHHTeIN DnH NaCTIHHO KpINHeHHy, 6yde BnKOpNCbOByaTInc npOTAROM TpMaNo rO Oacy,3AnExHo BiD MaTePiaNy, kIMM BkPITa CTiHa, NObepXrH CTiHn 3aTeBcIOpOM Hn HaHMM MoKe 3He6apBtnc a60 BiD CTiHn MOKytb BiKnEitncswnanepe.
KpOHNHTINHOro KpIeHHN3HnTNIcToro,AKNoroBNO BCTAHOBHeHO H CTHi, B CTHi 3aJIuWbTaBCr OTBOPu Bid WypnIB. He BnKOpNCTOBYTe KPOHUITeHN DnA HactiHHOrO KpInJIeHHB MicuX, De BiIDbYaBaTcBcMEXAHUHa B6paIa.
BcTaHOBLeHnKpOnuTeHnA dIHa nactiHHoro KpInJeHHa
IiHcMOHTyBaHHKPOHHTeHa DnHactiHOrO KpInJIeHHB NKOpNCTOByTeBnHTN BiINOBiHo Do CTpykTpyn CTHN TaMaTepiAly, kIM BOHA BkPNTa.
36epiraTe BnB KAPTOHHI KopoBcU, y TEMHOMY, CYXOMY, NCTOMy PnMIiueHHI 3 Do6pOo BEHTNIIuIeIO, OKPEmo BiD MiCtB 36epiraHHa KNCOT I LyrIB. TemnepaTpya 36epirAHHa: BiD -20°C Do +60°C. Bonorictb 36epiraHHA: <80%.
3mict
PiIroTOBka Do BCTaHOBJeHHra 5
Ipebeipka deTaJei. 5
Installing the TV on a wall
Preparing for TV installation......9 KD-85/75XG85□□,KD-75XG87□□ KD-65/55XG87□□,KD-65/55XG85□□ 11
Installing the TV on a wall.13 KD-85/75XG85□□,KD-75XG87□□ 13 KD-65/55XG87□□,KD-65/55XG85□□ 15
Checking after installation is complete 18 Other information 18
Technical specifications 18
Installing the TV on a wall
The installation procedure depends on the TV model.
To install the TV on a wall, use the bracket for wall mounting SU-WL450.
Screw
Keep the screws away from children.
Preparation
Installation
- Before installation, carefully read the manual and guide for the TV. Before assembling, make sure you have a Phillips screwdriver that fits the screws.
- Check the installation location of the TV. Prepare four screws with a diameter of 8 mm and one screw with a diameter of 5 mm or equivalent (not included in the package). Choose the screws according to the material of the wall.
Part details
Model WL450
- Check that all parts are included in the delivery set.
| AБаза(20)(1)ВШК | В(2) |
| CГВИNTPSW6x20(4) | DГВИNTPSW4x20i3Втулков(2) |
| EПөкалдka(20)(2) | FРемиь(1) |
| GВтулka(20)(M4)(2) | HГВИNTPSW4x20(2) |
| IПерекладka(60)(2) | JГВИNTPSW4x10(8) |
| KПөрекладka(60)(2) | LГВИNTPSW6x50(2) |
| MВтулka(M4)(2) | NГВИNTPSW4x50(2) |
Installation location
1 Determine the installation location.
Make sure the wall has sufficient dimensions and can support the weight, which is at least four times the weight of the TV.
The required installation depth for the TV on the wall can be found in the table below. The TV weight can be found in the TV's user manual.
Standard mounting kit
Center of the screen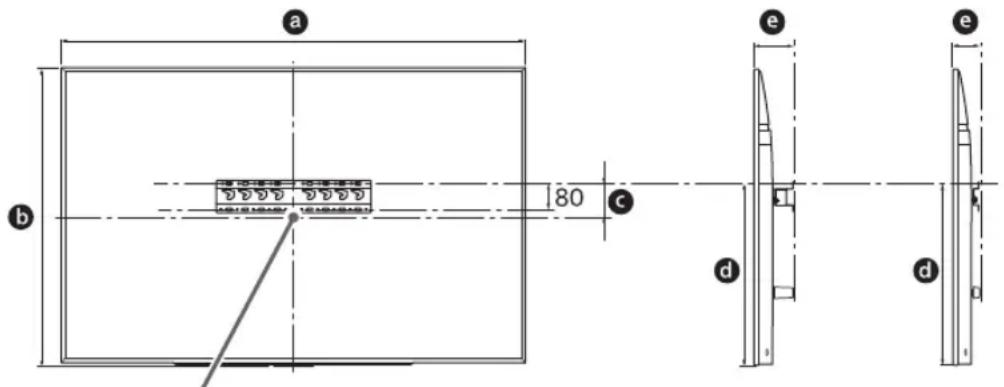
Dimensions in mm
- The values in the table may vary depending on the model. The top of the wall-mounted TV will be slightly tilted forward.
Leave sufficient clearance between the TV and the wall and protruding parts of the wall, as shown in the figure below.
Dimensions in mm
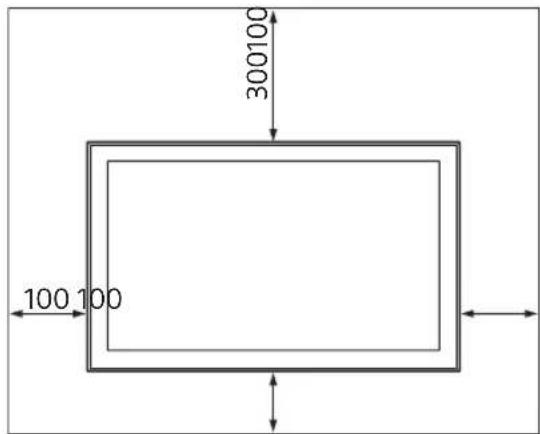
Ensure proper ventilation and prevent accumulation of dust:
Do not place the TV horizontally, do not install it with the bottom facing up, down, forward, or sideways.
- Place the TV on a flat, stable surface or in a cabinet. Do not cover the TV with cloth (curtains) or other materials, such as newspapers. Do not install the TV as shown below.
The plug is damaged.
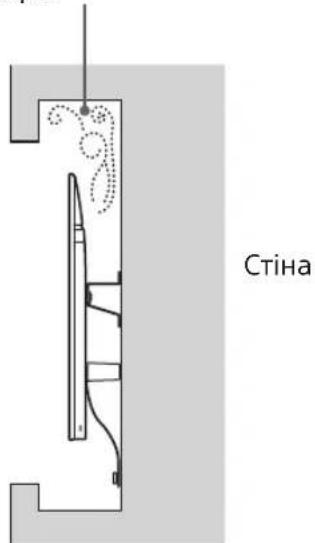
Stand
To route cables through the wall, make a hole in the wall and insert the cables before starting installation.
To avoid cable damage, make a hole in the wall outside the perimeter of the base (20) A, passing through the base 1 and the grommet (20) E, and the grommet (60) K.
2 Selecting the wall mounting method. Choose the height of the TV on the wall as shown below.
2-a Standard mounting
2-b Slim mounting
See Table 1.
CAUTION
- If 2-b is selected, access to the connectors on the back of the TV will be limited.
3 From the installation position of the base, refer to the table below. If 2-b is selected, skip this step.
| Назва модени Розташуванни raков | |
| KD-85XG85□□ | a |
| KD-75XG87□□ | |
| KD-75XG85□□ | |
| KD-65XG87□□ | b |
| KD-65XG85□□ | |
| KD-55XG87□□ | |
| KD-55XG85□□ | |
Determine the wall strength where the TV will be installed. If necessary, reinforce the wall with appropriate means.
Installing the wall mount
Use straight screws with a diameter of 8 mm or equivalent (not included in the delivery). Screw the screws into the holes on the bracket (20) A with the base (20) A (only 2-a). Install the base (20) A horizontally on the wall.
Preparing the TV for installation
User's Guide for installation and setup.
KD-85/75XG85□□,KD-75XG87□□
1 Make a hole in the wall for mounting.
Using the supplied paper pattern or similar material (not included in the delivery set), make holes for the TV base or stand. See the following table.
Hole spacing: mm
Mounting point (2-b)
Stand
If using this type of mounting, do not use the holes on the back of the TV separately.
4 Connect the TV to the necessary cable.
Check the cable connection before installing the TV on the wall. After installation, it will be impossible to connect the cables.
User's Guide for the TV.
Stand
The cable in the wall must be laid by a licensed electrician. - Route the cables so that you do not step on them when mounting them on the wall.
5 Attach the TV to the wall bracket.
Turn the stand over and attach it three times. Hold the stand with both hands, and be careful not to pinch your fingers against the TV.
KD-85XG85□□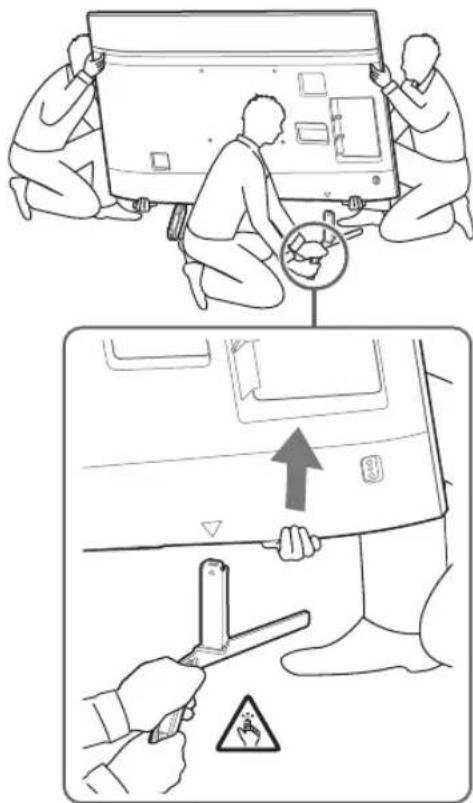
KD-75XG87□□, KD-75XG85□□
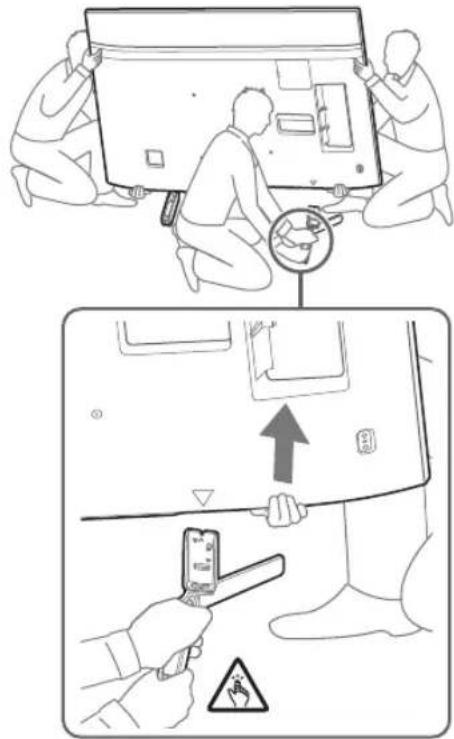
- Repeat the previous step and remove the stand from the other side.
Note
- It is necessary to remove the stand from the TV. Be careful when using force to detach the stand from the TV, as it may cause damage to the TV or result in personal injury. - Handle the stand carefully to avoid damaging the TV. - Lift the TV carefully, as the stand may tip over and cause injury. - Be extra careful when removing the stand from the TV. If the stand falls, it may damage the surface on which the TV is placed.
KD-65/55XG87□□
KD-65/55XG85□
1 Remove the screws from the back of the TV.
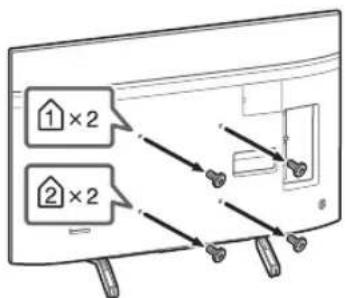
2 Secure the mounting brackets to the wall mounting plate. Check the available mounting brackets using the list "SU-WL450" in the "Checking the parts" section on page 5.
Note
Secure the mounting brackets with the screws. - For the tightening torque, set the moment to 1.5 N·m (15 kgf·cm). - Be sure to keep the used or unused components in a safe place for future use. Keep these instructions for future use.
Standard mounting (2-a)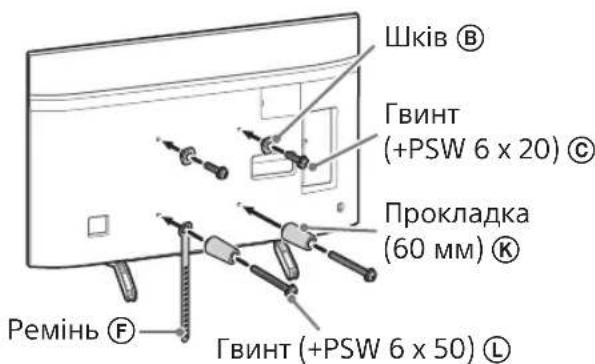
Thin mounting (2-b)
Note
Using this type of mounting is not possible separately and for the fingers of the TV.
Connect the TV cables.
Before installing the cables, reposition the TV on the wall. After repositioning the TV, it will be impossible to connect the cables. Note: Connect to the TV.
Stand
Cables should be installed by a licensed professional. - Route the cables, do not step on them, before mounting on the wall.
Remove the stand from the TV.
Remove one side of the stand at a time. Hold the stand firmly with both hands, while another person removes the TV.
- Repeat the previous step and remove the other side of the stand.
Stand
- Three people are required to remove the stand from the TV. Be careful when applying force, removing the stand from the TV may cause the TV to fall and cause injury to people or damage to the TV. - Carefully handle the stand to avoid damaging the TV. Lift the TV carefully, as the stand may tip over and cause injury.
- Be careful when removing the stand from the TV. If the stand falls, it may damage the surface on which the TV is placed.
Installing the TV on the wall
KD-85/75XG85□□,KD-75XG87□□
1. Lift the TV.
- Remove the screws ⑧, by which the TV is attached to the base or the base stand, see Table I in step 3 in the section "Identifying the Installation Location" on page 7.
- To mount the TV, use the base or the wall mount bracket for the base.
Note
Hold the TV with both hands. The lower part of the TV must be aligned with the mounting holes. - Hold the TV upright. What is located on the back of the TV should give instructions on how to adjust the position of the TV.
- Be careful when installing the TV on the stand. The stand must be strong enough to support the TV from below. Damage to the TV can lead to serious injuries or even death.
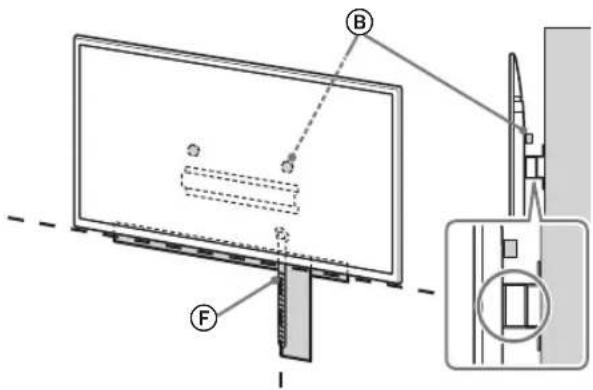
2 Install the TV on the base or the wall mount bracket for the base.
- Carefully lower the TV and insert the screws (provided with the TV) into the holes on the base or the wall mount bracket (they must match the size of the holes).
- After installing the TV on the stand, tighten the screws that are already attached to the base or the wall mount bracket.
- Gently release the TV with both hands to make sure it does not fall.
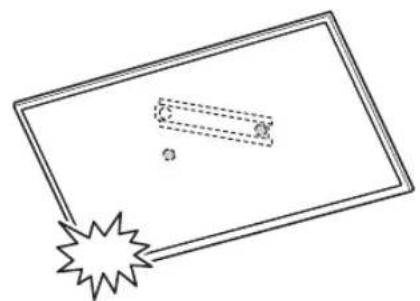
- After installing the TV on the stand, remove the protective film (or similar material) from the stand.
2-a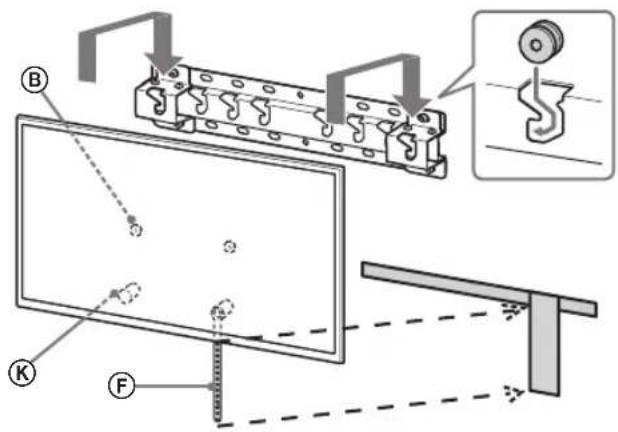

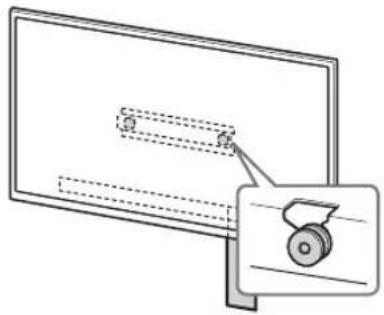
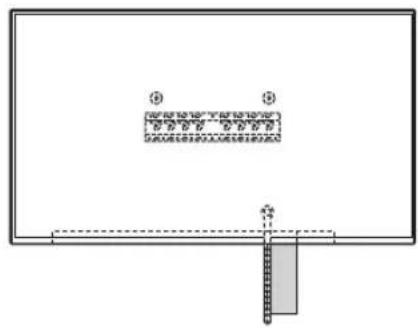

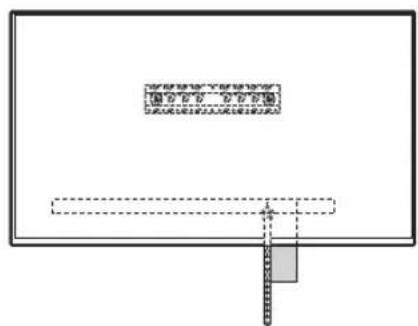

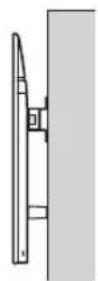
2-b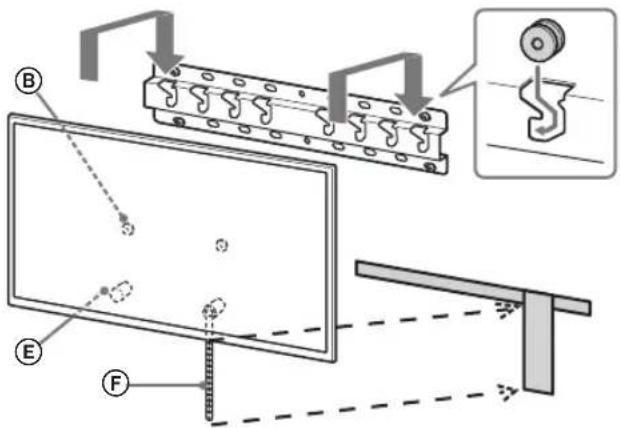



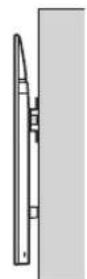
WARNING
When moving the TV, hold it with at least two people (or at least three if the diagonal of the TV is 75 inches or more).
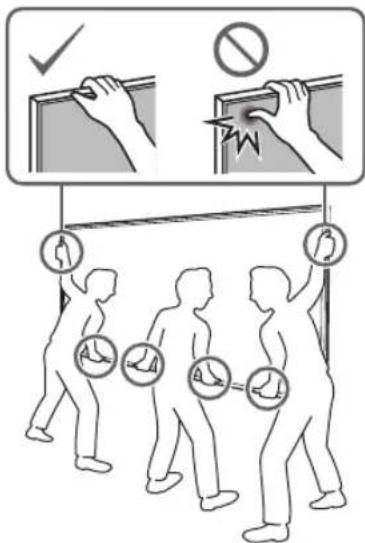
Be careful not to damage the lower part of the TV.
Choose a suitable part of the wall and securely attach it to the wall.
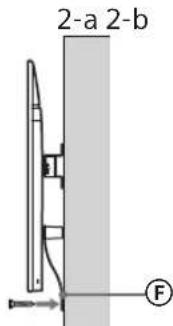
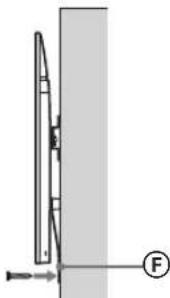
Use a screwdriver with a diameter of 5 mm or equivalent (not included in the delivery package).
Stand
Try to gently push the upper part of the TV away from you to check that it does not move forward. If the TV moves, close the stand correctly and press again on the stand until it is properly closed.
KD-65/55XG87□□, KD-65/55XG85□□
Lift the TV.
- Press the stand cover ⑧, so that the TV is lifted onto the base or the stand base. See the table in the section "Identifying the installation location" on page 7. Hold the TV and check that the stand does not protrude from the base or the stand base.
Stand
- Hold the TV with both hands.
2 Place the TV on the base or the stand base.
- Carefully lower the TV and press the stand cover ⑧, attached to the rear of the TV, onto the base or the stand base (the holes must match the openings).
- After placing the TV on the stand, check that the stand cover is securely attached to the base or the stand base.
- Slowly release the TV with both hands to make sure it does not fall.
2-a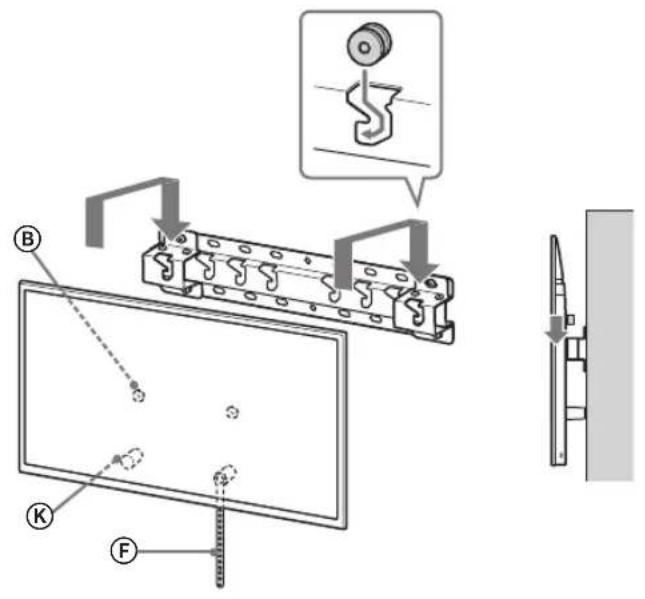
2-b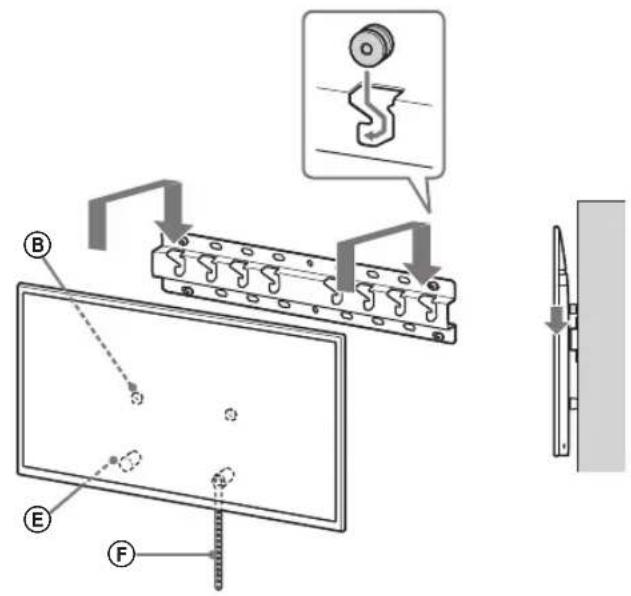
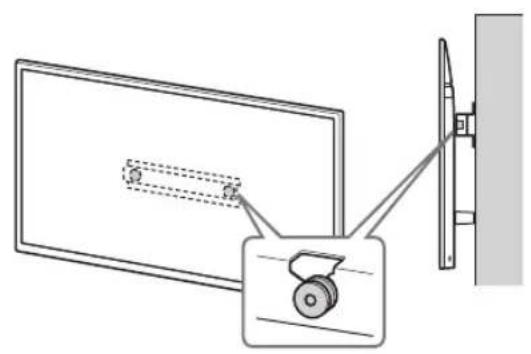
↓
WARNING
Before connecting the TV to the power supply, check that the nameplate (nameplate, which indicates the diagonal of the TV screen is 75 inches or more).
To replace the stand
Lower part of the TV.
Choose a flat surface for repair, and be sure to cover it with a cloth.
Use a screwdriver with a diameter of 5 mm or equivalent (not included in the delivery set).
Screw
Try to gently lift the lower part of the TV and make sure it does not move forward. If the TV moves, close it incorrectly and you need to close the repair again.
Check after installation is complete
Check the specified lower point.
- If the stand is installed in the base or the adapter for the base.
- The cord and cable are not crossed or pinched.
- Repair F is securely closed without gaps.
WARNING
- The device must be connected to a power source with a protective earth connection or be protected against electric shock by a short-circuit. For safety, always check all parts after installation is complete.
Other information
Under no circumstances should you touch the TV during the specified installation procedure in reverse order.
Warnings
The TV is heavy. To avoid injury, use at least two people to carry it (or use a stand, wall mount, or TV stand rated for the TV's weight).
Technical specifications
Dimensions: (approx.) [mm]
a: 400
b: 300
c: 200
d: 100
e: 80
f: 480
g: 100
h1: 20 (for model 2-b)
h2:60 (Bunapok2-a)
Bara (Tilbkn 6a3a): (npn6J.) [Kr]
0,8
KoHCTpykui Ta texHiXapaKTepnTKMOKyTb 6yTN 3MiHeHi 6e3 nonepeJKeHH.
Ohuke paigaldus (2-b)
Markus.
Ohuke paigaldus (2-b)
Markus.
Mass (ainult alus): (umbes) [kg]
0.8
h1:20 (2-b variants)
KypbIINfbIHbTa3aJay He OraH KYTIM Xacay Ke3iHde KaTbI KYW CaImHaB13.
Teneiapdbh korapb beneriH kattbkyu mamahbi. Erep coaI cTeHTIH 60ncabhi, Teneiapbp Knyalb Hemece MyntkTH 3aKbIMDaHybl MYMkiH.
AldbH any shaapanapbl
Ka6biprafa 6eKty KpOnHteHiHe opHbIInaTneIeNIdapdbI y3ak YakBt 60bln naIaIaNcaHbI3, Ka6bIpaHbIH MaTePnaIbHa 6aIIaHbIcTb TneIeNIdap aptbHdAr He yctHderI TycErepyi MeMece Tyckara3dbH TYCI KEty MYMKH. Ka6bprara 6kty kpoohuetaHH opHaTkaHHaH KeiHa KaIaTa aCaHa3, Ka6bprada 6ypaHa cBaHaIaynapb KaIaBb. Kabipara 6kity kpoHtTeHH mexankanbTep6eic acep eTeIH opbHa naiDanaHaB13.
Cabinet mounting crown format
Sony distribution unit
EXPERT
The instructions given in this manual are for the Sony distribution unit. Please read the information given in the manual carefully and follow the correct procedure when using it, and keep it for future reference.
Cabinet mounting crown
Bodies
Do not install the bodies in places where they may be exposed to rain or water.
The bodies of the cabinet mounting crown can be installed in places where they may be exposed to rain or water, but if the bodies are exposed to rain or water, they may be damaged or malfunction.
Do not install the bodies on an unstable surface.
If the bodies are not installed on a stable surface, they may fall and cause injury or damage.
Cabinet mounting crown
Use the instructions carefully and follow them.
If any of these instructions are not followed, the cabinet mounting crown may be damaged or malfunction. Please read the instructions carefully and follow them.
The instructions and precautions in this manual should be followed carefully. If the instructions are not followed, the bodies may be damaged or malfunction.
Follow the procedures given in the manual carefully.
The wires must be connected to the terminals in accordance with the markings.
The wires must be connected to the terminals in accordance with the markings.
If the wires are not connected correctly, the terminals may be damaged or the device may malfunction.
During installation, the wires must not be pulled.
If the wires are pulled, they may break or malfunction. This may cause damage.
The wires must be installed perpendicular to the terminal block and the board.
If this is not the case, the wires may break or cause damage.
After the wires are correctly installed, secure the cable ties.
If other devices or other parts are installed, they must not come into contact with the terminals.
The power supply wires or the ground wire must be connected.
If the power supply wires or the ground wire are connected between the terminal and the board, and if they are twisted or bent, they may cause a short circuit or electric shock. This may cause a fire or electric shock.
The holes for securing to the board are provided.
When securing to the board, do not damage the board material around the holes.
Installing the TV 9 KD-85/75XG85□□,KD-75XG87□□.9 KD-65/55XG87□□,KD-65/55XG85□□.11
Installing the TV to the wall 13 KD-85/75XG85□□,KD-75XG87□□ 13 KD-65/55XG87□□,KD-65/55XG85□□ 15
Checking the accessories supplied 18 Opening the TV 18
Technical specifications 18
Installing the TV to the wall
The procedure for installing the TV to the wall is described below. To install the TV to the wall, you need the SU-WL450 wall-mount bracket.
Safety
- Keep the brackets away from children.
Preparing for installation
Before installation, remove the TV from the stand and remove the stand. Before mounting, make sure the wall is strong enough to support the TV. Determine the location of the TV. Use a drill bit of 8 mm diameter or larger for the holes, and a 5 mm or similar (not supplied) drill bit for the pilot holes. Select the appropriate screws for the wall material.
Parts check
Supplied with the SU-WL450
The text of the instruction manual is provided.
| A Heri3 (20) (1) B Terepušík (2) | |
| ◎ PSW 6x20 (4) D TbIFbIH PSW 4x20 (2) | |
| E Apaŋbɪk (20) (2) E TēnπiK (1) | |
| G TbIFbɪH (20) (M4) (2) | H PSW 4x20 (2) |
| I Herižrì ādānTpērp (2) | J PSW 4x10 (8) |
| K Apaŋbɪk (60) (2) L | PSW 6x50 (2) |
| M TbIFbɪH (M4) (2) N P S W 4x50 (2) | |
Installation of the device
1. Installation of the device.
Before installing the device, read the instruction manual carefully and follow the safety instructions.
For installation instructions, see the relevant section. For the device's technical specifications, see the specification section.
Standard installation: installation point on the wall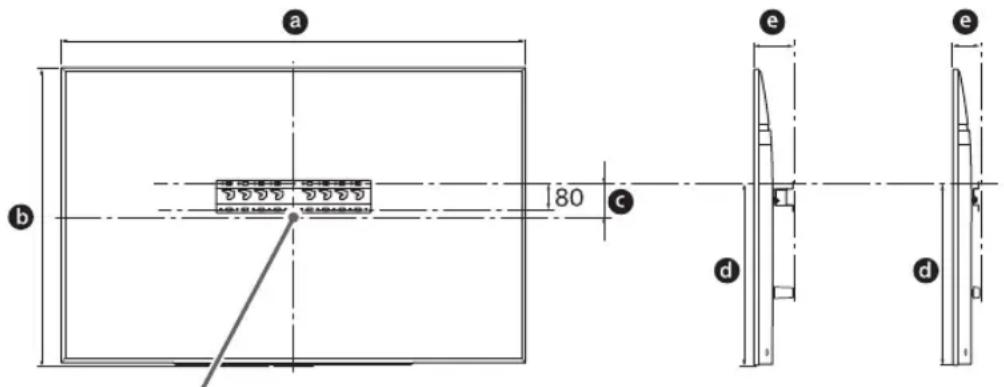
Note:
| Ynliri hemipi | Зкразецемерi | Зкразецьим �шемi | Орнау узbingьгi | ||
| a | b | c | d | ||
| Столарты opнау | Жасын opнау | ||||
| KD-85XG85□□ | 1909 | 251 | 803 | 142 | |
| KD-75XG87□□ | 1673 | 963 | 107 | 595 | |
| KD-75XG85□□ | |||||
| KD-65XG87□□ | 1450 | 836 | 99 | 523 | |
| KD-65XG85□□ | |||||
| KD-55XG87□□ | 1231 | 713 | 106 | 468 | |
| KD-55XG85□□ | |||||
Instruction
The installation may be carried out by a qualified specialist. The device must be installed in a well-ventilated area.
Ensure that there is sufficient space between the device and the wall or other objects.
Note:
To ensure proper ventilation and prevent overheating:
- Do not cover the device's vents. Install the device in a place with adequate air circulation. Do not place the device on soft surfaces such as carpets, beds, or sofas. Do not place the device near heat sources such as radiators, stoves, or in direct sunlight. Do not place the device in a confined space without ventilation.
The device is now ready for use.
Instruction
Check the cable connections, tighten the bolts, and make sure the cable is properly secured.
For the cable clamp, use the base (20) A, base washers ① and lock washers (20) E, and lock washers (60) K, and tighten to the specified torque.
2. Check the cable installation. The rear of the device must be connected to the cable grounding terminal.
2-a Standard installation 2-b Cable installation
1. Check the connection.
WARNING
-2-b When installing, be careful not to touch the rear terminal.
3. Check the connection for the base mounting holes. When installing, insert the screws and tighten them.
| Yürgi Hämipi İnmek Öpnbı | |
| KD-85XG85☐☐ | |
| KD-75XG87☐☐ | a |
| KD-75XG85☐☐ | |
| KD-65XG87☐☐ | |
| KD-65XG85☐☐ | b |
| KD-55XG87☐☐ | |
| KD-55XG85☐☐ | |
Tighten the base ① (PSW 4x10) with the washers during 2-a installation.
4. For the base (20) @ installation, check the position of the washers.
Refer to the signals on page 18. During 2-a installation, tighten the base ① securely.
WARNING
For cable installation, check the cable sheath for any cuts or damage before installation (refer to the cable sheath inspection procedure).
Check the cable installation for tightness. If necessary, reinforce the cable installation.
Cable installation procedure
- Diameter 8 mm. Do not exceed the torque specified for the mounting screws (provided). ① For the wall mounting screws (20) and the base screws (see step 2-a). Insert the screws (20) into the holes and tighten them.
To install the TV
Before installation, check the screws.
KD-85/75XG85□□, KD-75XG87□□
1. The installation position is not specified.
To determine the position of the TV on the base or wall, use the supplied template (provided). Follow the next steps.
Unit: mm
| Yntri hemipi | Белriney Узblдыflы | Зкран optacblblн элшемi | ||
| a | b | c | d | |
| KD-85XG85□□ | 1909 | 683 | 200 | 251 |
| KD-75XG87□□ | 1673 | 468 | 200 | 107 |
| KD-75XG85□□ | ||||
2. Remove the screws from the back of the TV.
3. To install the TV on the wall, use the screws provided. See the "SU-WL450" section in the "Wall-Mount Bracket" instructions for the installation procedure.
Note
- Tighten the screws securely. Do not overtighten them, as this may damage the TV or cause it to fall. - If the screws are not tightened properly, the TV may fall and cause injury. Tighten the screws firmly.
Standard installation (2-a)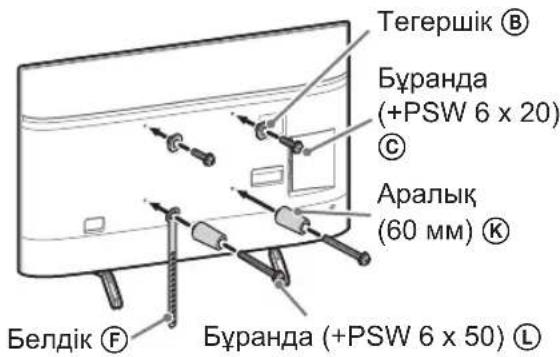
Inclined installation (2-b)
Note
- This installation is not suitable for TVs with protruding connectors on the back. Do not install the TV in this manner.
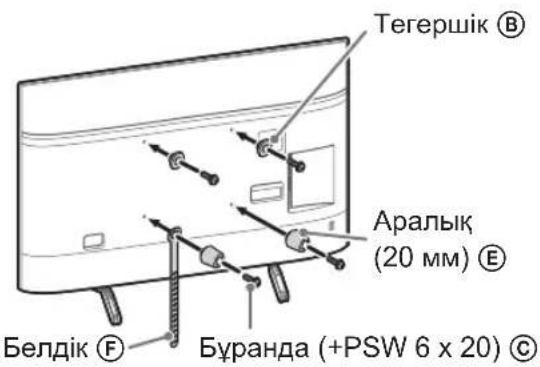
4. Insert the cables into the cable holders.
Before installing the cables, check the cable holders and the text on the labels. After installation, the cable holders must be removed. See the instructions provided with the cables.
Instruction
Insert the cables into the holders. During installation, to prevent them from coming loose, secure the cables with the holders.
5. Do not touch the upper part of the TV.
- Place the TV on a flat surface with the screen facing down. Then, install the stand base on the bottom of the TV.
KD-85XG85□□
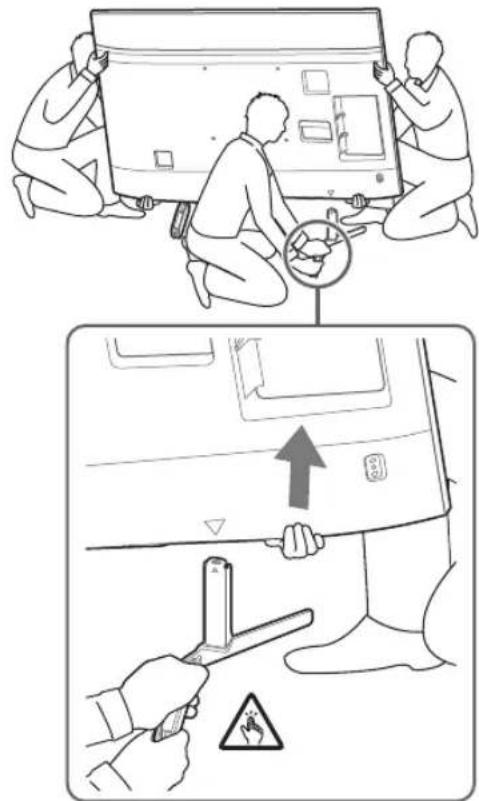
KD-75XG87□□, KD-75XG85□□
Remove the stand base from the TV and then install the stand base on the bottom of the TV.
Instruction
- To remove the TV from the stand, first disconnect all cables. When removing the TV from the stand, be careful not to pinch your fingers or damage the cables. To prevent the TV from falling, hold the TV firmly while removing it from the stand. Do not lift the TV by the stand; instead, hold the TV by the sides and lift it straight up. When the TV is not on the stand, keep it in a safe place and do not place it on the floor.
1. Remove the screws from the back of the TV.
2. To install the wall mount bracket, refer to the instructions provided with the wall mount bracket. See the section "Removing the Wall Mount Bracket" in the manual for the SU-WL450.
Instruction
Tighten the screws securely. When installing the TV on the wall, make sure to leave at least 15 cm of space. If the screws are not tightened properly, the TV may fall. Keep this instruction for future reference.
Standards of the format (2-a)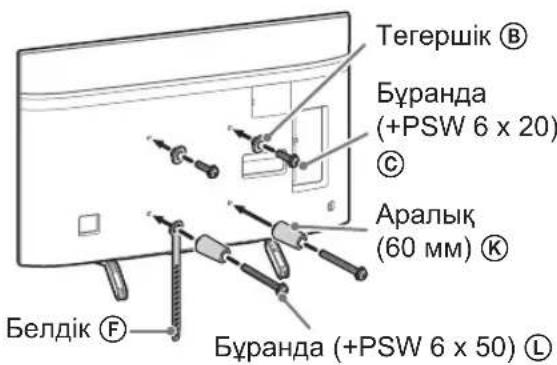
Cables of the format (2-b)
Instruction
To connect the TV to the network, use the cables that are included in the package.
Connect the cables (cable) to the TV.
The TV is equipped with a cable holder. The cables should be inserted into the holder. For more information, see the instructions provided with the TV.
Instruction
Connect the cable to the TV. If the cable is too long, you can coil it and secure it with the cable holder.
4. Do not place the TV on top of the stand.
- Place the TV on the stand so that the bottom of the TV is aligned with the base of the stand. Do not place the TV on the stand if the base is not properly attached.
Align the holes on the TV with the holes on the stand and then attach the base.
Instruction
To place the TV on the stand, you need at least two people. When placing the TV on the stand, be careful not to pinch your fingers, and make sure that the TV is stable. Do not place the TV on the stand if the stand is not properly attached. When placing the TV on the stand, be careful not to damage the TV or the stand.
Connecting the TV to the stand
KD-85/75XG85□□, KD-75XG87□□
1. Install the antennas.
Before installing the antennas, make sure the device is turned off and disconnected from the power source. Install the antennas by screwing them clockwise until they are tight.
Instruction
When installing the antennas, do not use excessive force. The antennas should be screwed in by hand until they are snug. Do not use tools to tighten them.
When installing the antennas on the device, be careful not to damage the connectors (e.g., do not install the antennas at an angle). If the antennas are not installed correctly, they may not function properly or may be damaged.
2. Install the antennas on the device or on the antenna bases.
Before installing the antennas, check the antenna connectors and the device connectors for any damage. If the connectors are damaged, do not install the antennas and contact the manufacturer. To ensure proper antenna performance, do not touch the antenna connectors.
After installing the antennas, check the device's power indicator, i.e., the LED.
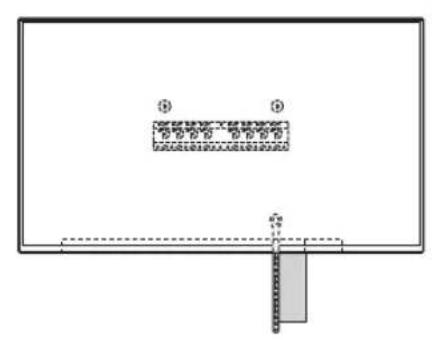
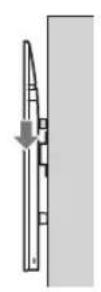
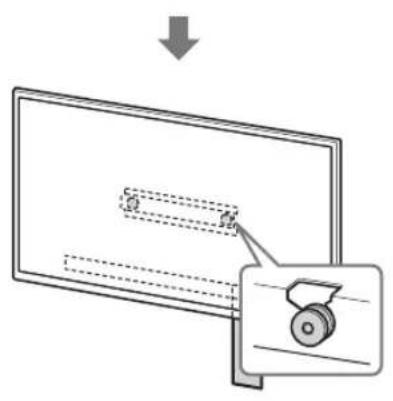
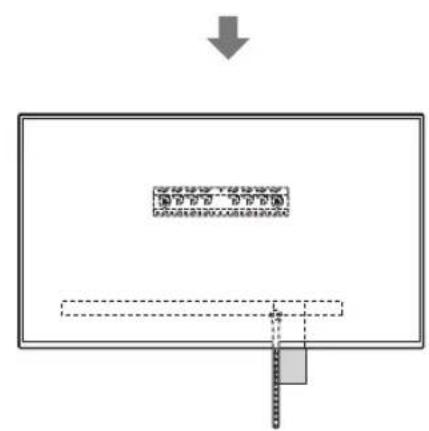
Warning
Before installing the antennas, make sure that the device is turned off and disconnected from the power source. Do not install the antennas while the device is powered on.
3. Do not bend the antennas excessively.
- Hold the antenna base (F) and screw it onto the device by hand.
- Use a 5 mm diameter screwdriver or a suitable tool (not provided).
Instruction
To adjust the antenna angle, hold the antenna base and gently rotate the antenna to the desired position. If it is difficult to rotate, do not force it; loosen the base and then rotate the antenna.
KD-65/55XG87□□, KD-65/55XG85□□
1. Connect the TV.
Follow the instructions below to connect the TV to the mains using the supplied 7-8 mm screws. When installing the TV, be careful not to pinch the cables between the TV and the wall.
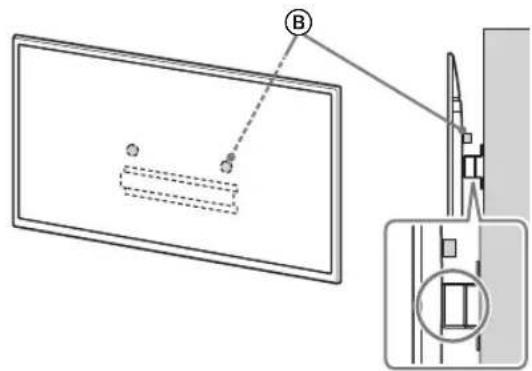
Stand
Install the TV with two people.
2. Attach the TV to the wall or wall mount.
After removing the screws from the back of the TV, attach the mounting brackets to the wall or wall mount, and then secure them. After placing the TV on the wall, make sure the brackets are firmly attached to the wall or wall mount. To avoid the TV falling, use two hands to hold it.
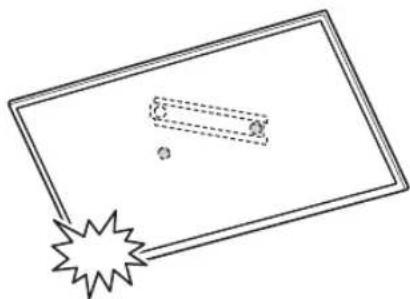
2-a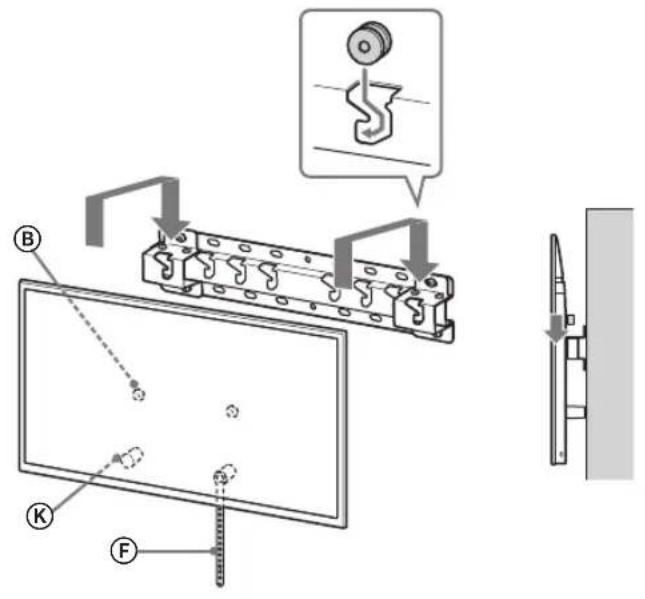
2-b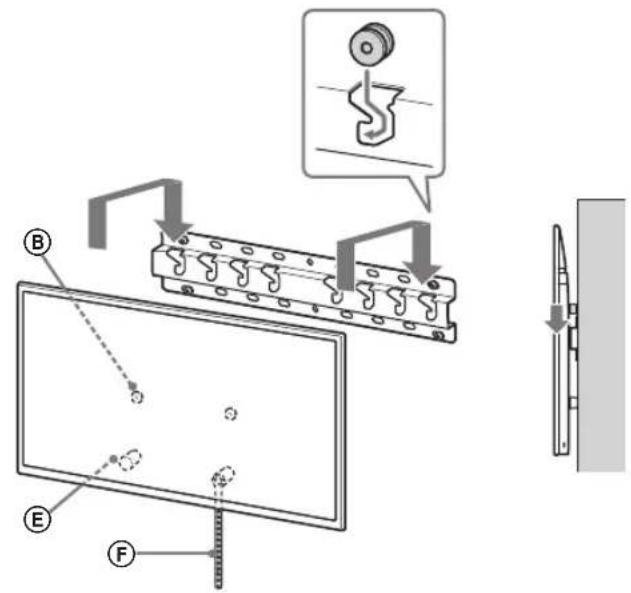
↓
↓
NOTE
Do not install the TV with only one or more people (for 75-inch and larger TVs, use three or more people).
3. Do not pull the power cord out by the plug.
- Hold the plug firmly and pull it out of the socket.
- Diameter 5 MM 60nataBH HeMece yKcac 6ypaHdaHbI naDanaHbIHb3 (6epimereH).
Hyckay
TeIeIaIapbH anFa Kapai KblKbMaTbIHbH TeKcepy yuiH TeIeIaIapbH TEmehri 6enirih 3iH3re Kapai akbpH TaTpBn KePiH. XblNkTuH 6onca, Dypic 6ekITINmereh 6onFaHbXHe 6enDikTI KaTa 6ekITiH3.
OpHaTydbIH aKaTaNfAHDbIFbIH Tekcepy
Kenecinepei TekepiHiz.
TerepuikTepeHemerceHerizirandepre aantepihe bekem iniHdi. - CbIM MeH Ka6eNb opaImaFaH Hemece KbICbIImaHaH. - BeNDiK (F) MbykTan 6ekitijreH.
ECKEPTY
AinbimbltOKcmbihHemeceT.5.KateophaIacyb KbickaTyibkTanyCaIaapbIHHaepTTiNaJa6OlybHa Hemece TokcofYKayniHEeKeJyIMKIn.OpHaTy KMybICTapbHbIKayinc3dk TaanTapbHa caI opbHdaTaNbHaKa3XeTK3H3.
BacaaknapaT
TeneiIapbl anfah Ke3de andbHfb opHaTy npoeDypacbH KepiciHwe opbIHdaHbI3.
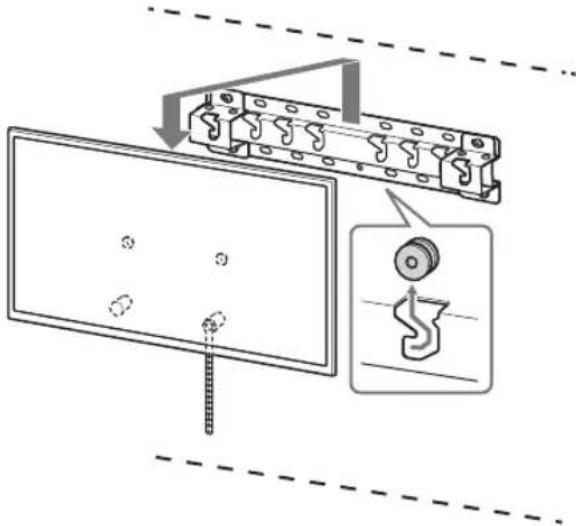
ECKEPTY
TeIeIaIapbIweuYKe3Hde eKHeMeceOaN HKe aam (75IOHMdiXaHE OaN yIKEN TeEINdAp KNaHArbI yWIn YH Hemece OaN HcN aAM) YCTaFaHBi TkCEpiHj3.
TexHnKaJIbIK cHnTaTamaJapbl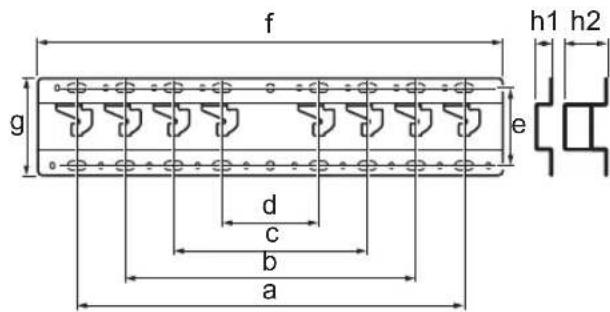
,yn by npnnn nn n npnnn nn n nn n nn n nn n nn n nn
nni nni nn nnnn nn nnnnnnnnnnnnnnnnnnnnnnnnnnnnnnnnnnnnnnnnnnnnnnnnnnnnnnnnnnnnnnnnnnnnnnnnnnnnnnnnnnnnnnnnnnnnnnnnnnnnnnnnnnnnnnnnnnnnnnnnnnnnnnnnnnnnnnnnnnnnnnn
177
07712 0316 7-5y 1310777777 .
Sony
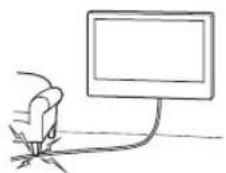
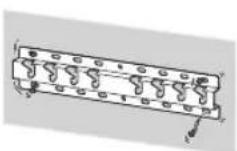
0
N 5 100
yN TNN NNTN, npnnn 5 . . . . . . . . . . . . . . . . . . . . . . . . . . . . . . . . . . . . . . . . . . . . . . . . . . . . . . . . . - 6 · 8 9 KD-65/55XG87□11 KD-65/55XG85□ 13. 13. KD-85/75XG85□□,KD-75XG87□□ KD-65/55XG87□ . KD-65/55XG85□
#
SU-WL450 1
(1)(20) (A)(2) 防火手B
18 18. 0792

PSW 4x20 (2)

(4)PSW6x20

(2) (20) nnnn

(2)PSW4x20 H

(2) (M4) (20) ⑥

(2) OVAON
E(1)
F
Su-WL450


(2) (60)
①⑧)PSW4x10 ⑥
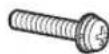

(2) (M4)
M(2)PSW4x50 N
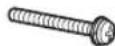
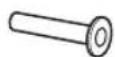
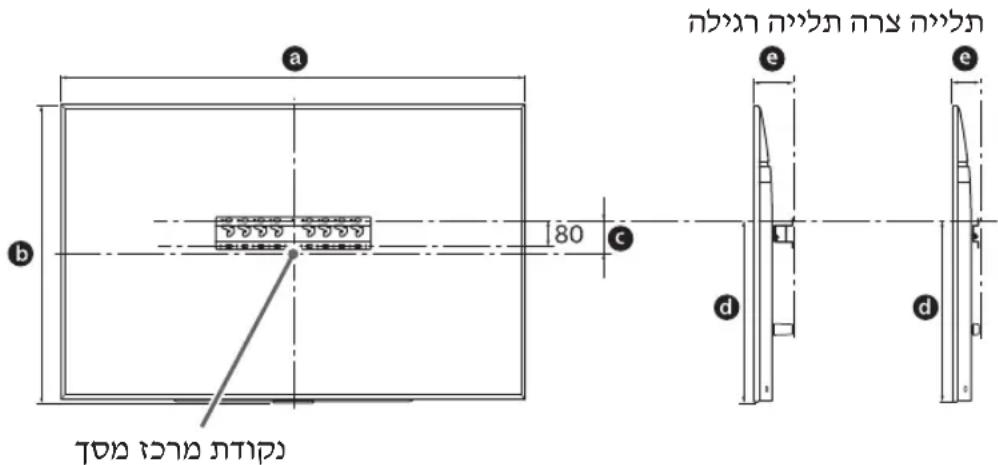
y:n
| e | d | c | b | a | b+10 | |
| n/a | n/a | |||||
| n/a | n/a | |||||
| 1,9091,097KD-803X4860□ | ||||||
| 1,67396310752511675KD-75XG85□□ | ||||||
| 1,450836952311573KD-65XG87□KD-65XG85□□ | ||||||
| 1,23171310646811573KD-55XG87□KD-55XG85□□ |
2-a
npt nvn 2-b
12wyy
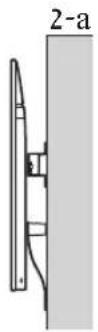
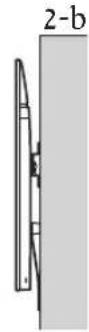
| a | KD-85XG85□□KD-75XG87□□KD-75XG85□□ |
| b | KD-65XG87□□KD-65XG85□□KD-55XG87□□KD-55XG85□□ |
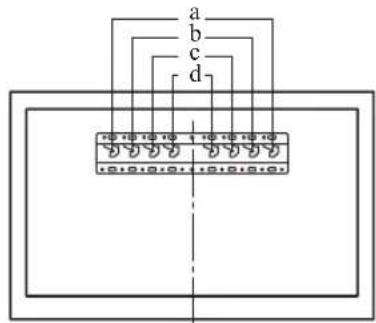
2-a
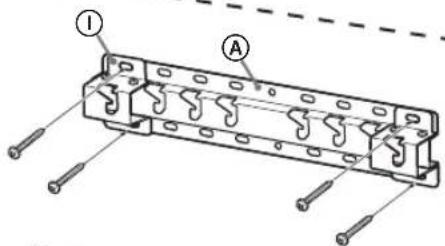
2-b
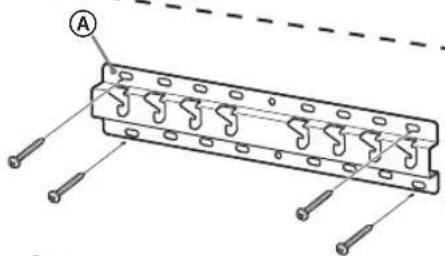
ONnnn,2-a nno ny
· 87
A (20) v'v'v'v (PSW 4x10)
- ANNAN
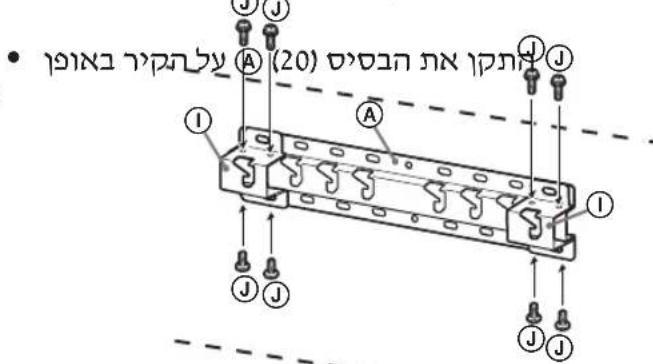
4 npnn
A(20)
.18 0y
yinnn nipnwn,2-annny
.①
77
·
ynnn nnb npnnn
KD-85/75XG85□□
KD-75XG87□□
1. (2015) 1.5-5n
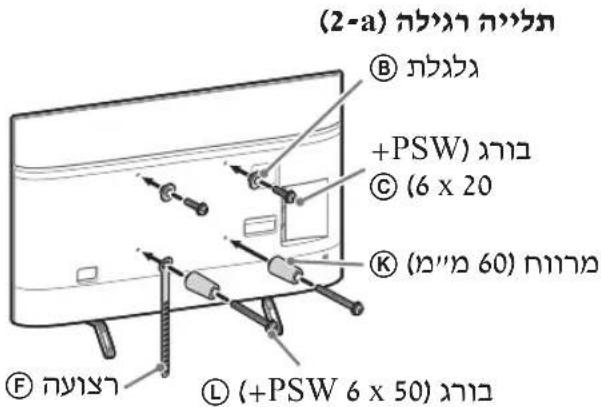
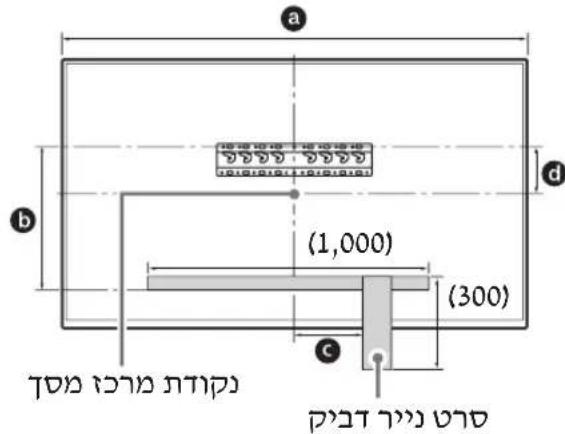
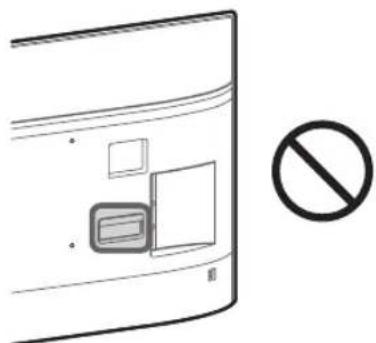
1,9096KJ120025G85□□
KD-75XG87□□
68200XRGD-75XG85□□
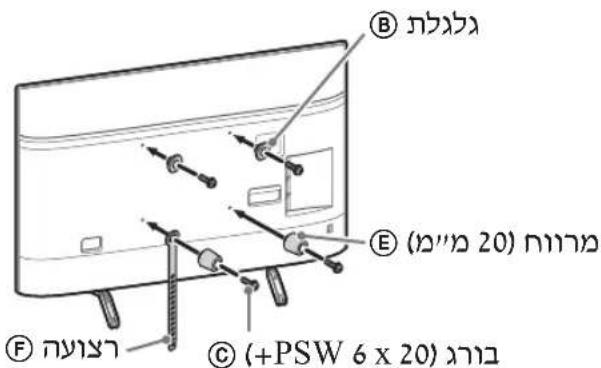
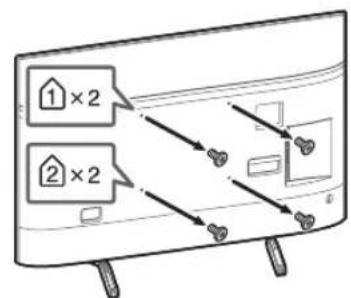
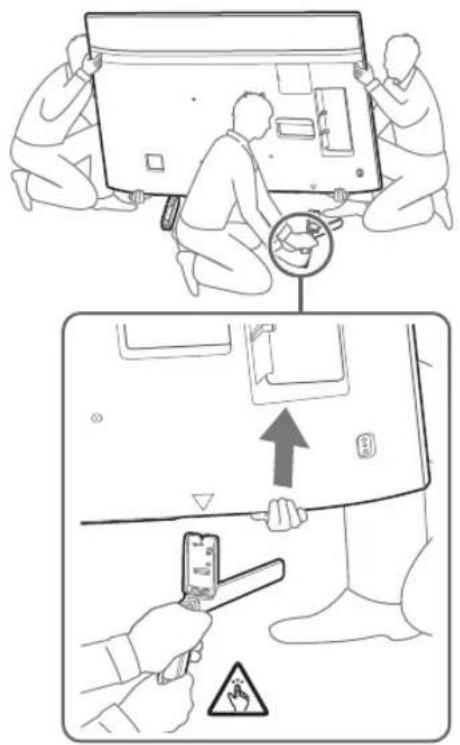
Therefore, n^2 + 2n = 5
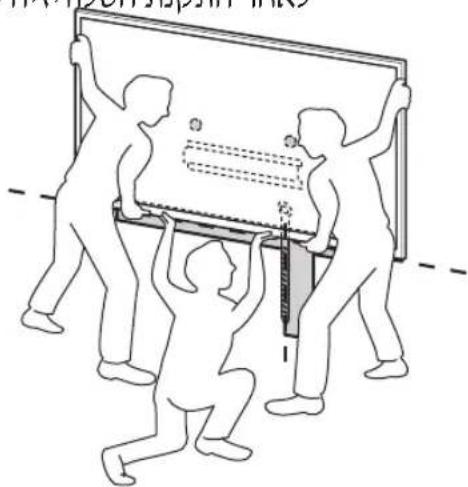
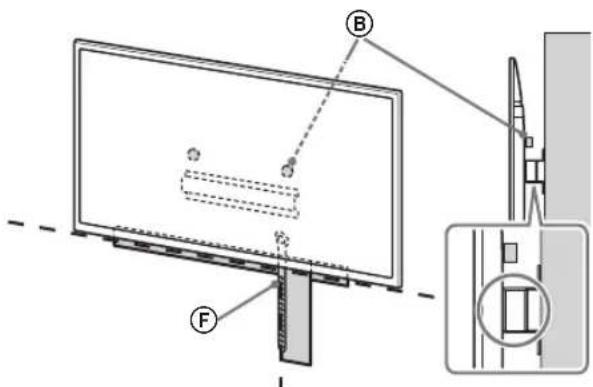
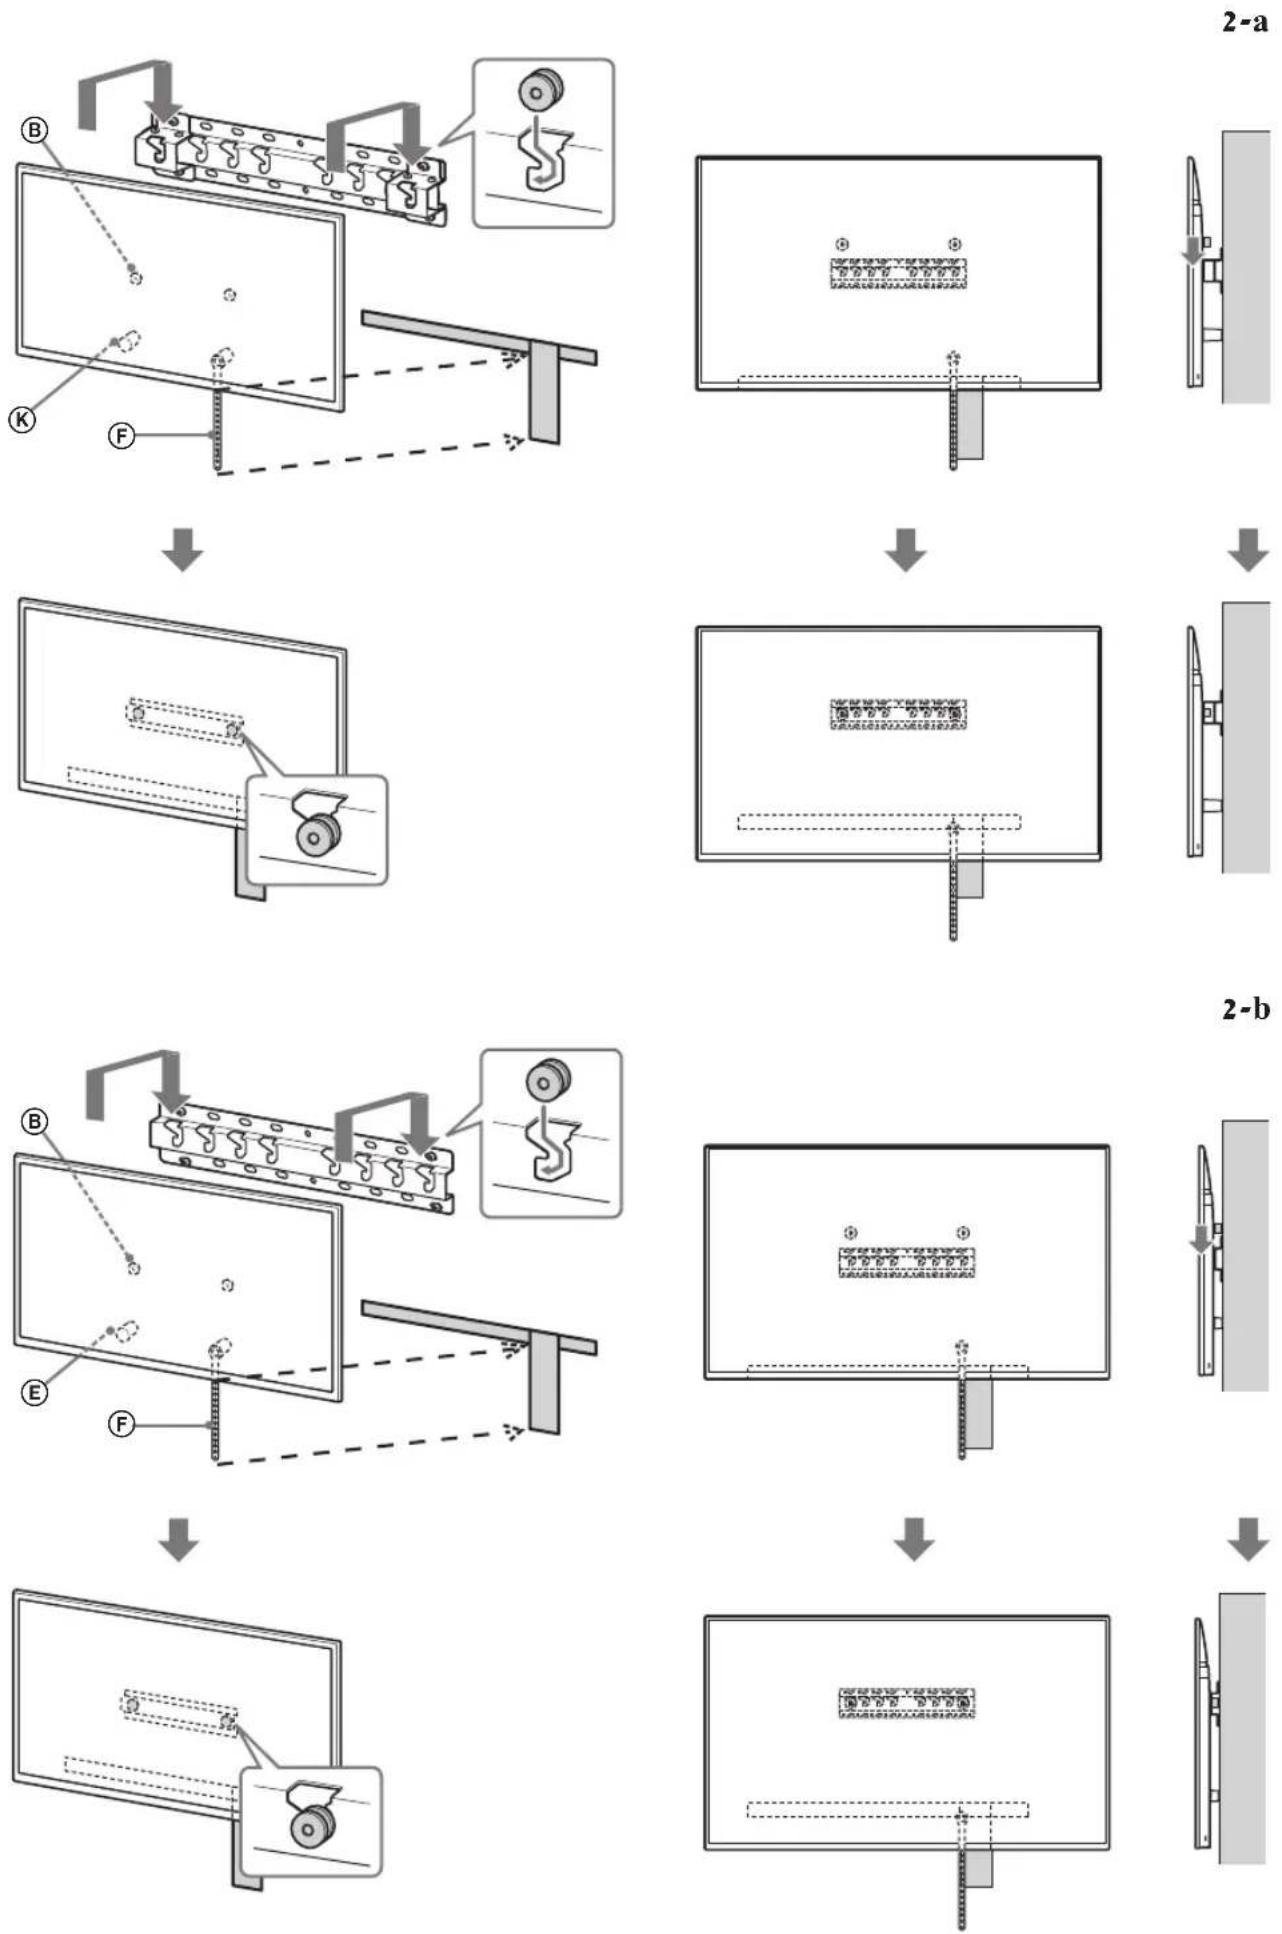
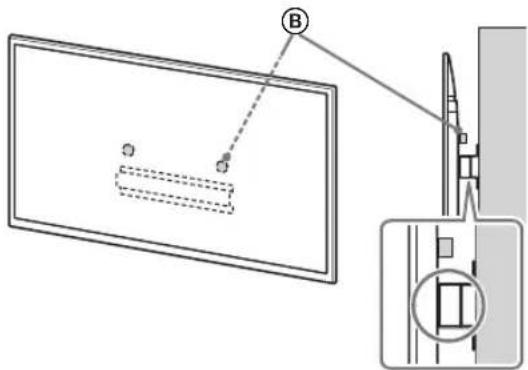
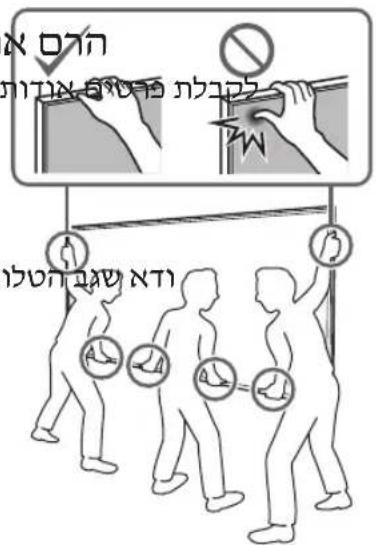
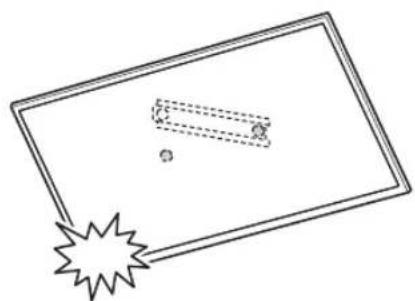
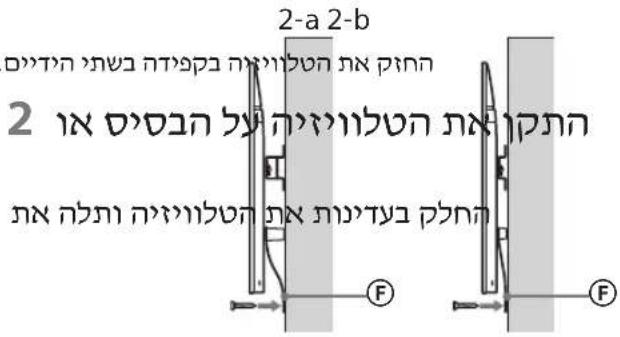
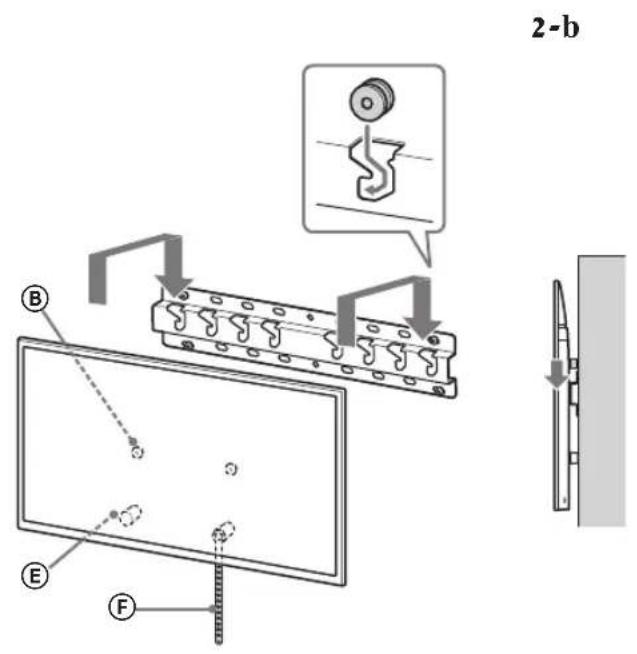
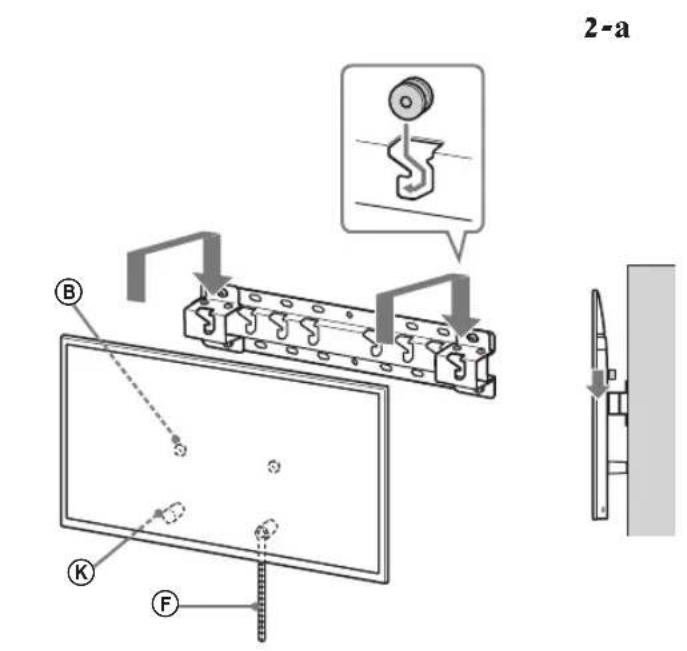
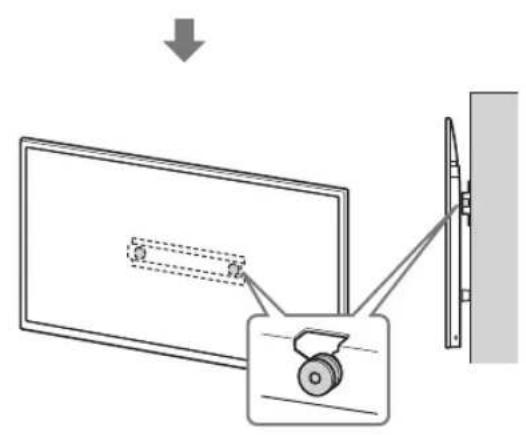
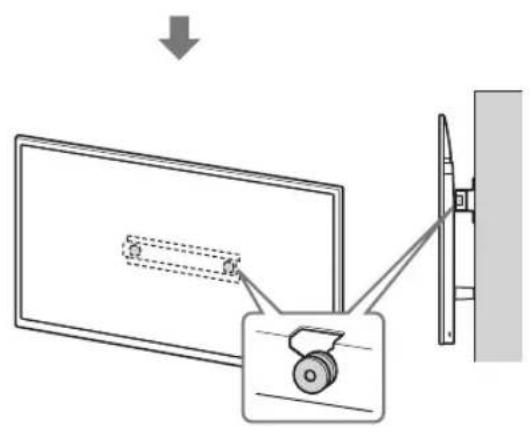
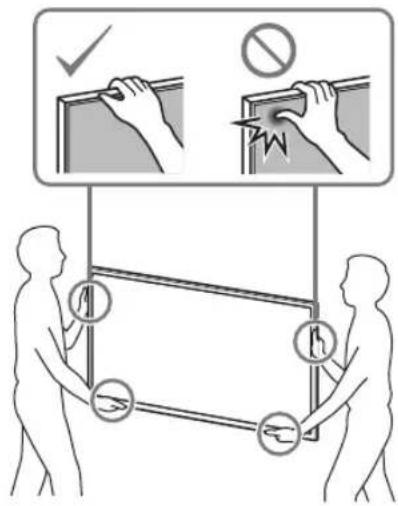
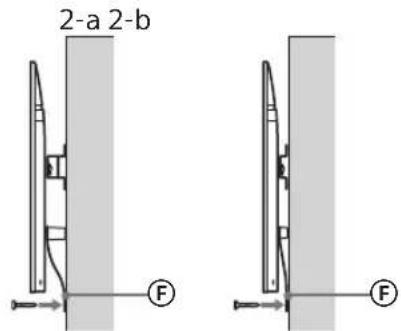
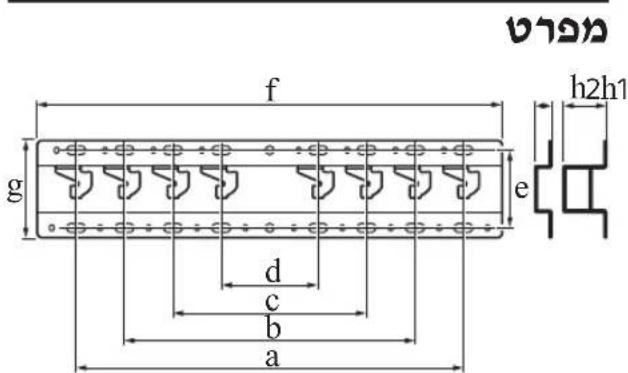
300:b
200:c
100:d
80:e
480:f
100:g
(2-b nppn) 20:h1
(2-a nnp) 60 : h2
[1](7y):(v)
0.8
y
nppnn nnuyn
.
.07070
∴ S ΔAPQ = S ΔAQP + SΔPQR
.01
.
77
·
nn nn nnnn nn
mivan yn npnn
77
nppnn nn nn yy, nnnn nn ny
∴ PB BA
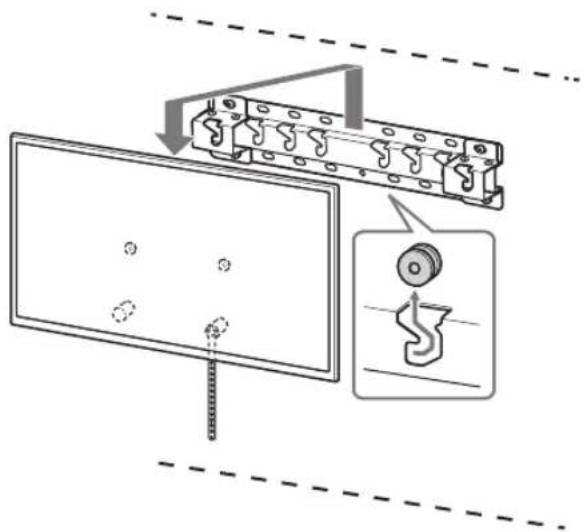
77
ybn75
nannnny
- ON SAFETY
- TO CUSTOMERS
- TO SONY DEALERS
- CAUTION
- SPECIFIED PRODUCTS
- WARNING
- BE SURE TO SUBCONTRACT THE INSTALLATION TO LICENSED CONTRACTORS AND KEEP SMALL CHILDREN AWAY DURING THE INSTALLATION
- BE SURE TO SUBCONTRACT MOVING OR DISMOUNTING OF THE TV TO LICENSED CONTRACTORS
- DO NOT REMOVE SCREWS, ETC., AFTER MOUNTING THE TV
- DO NOT MAKE ALTERATIONS TO THE PARTS OF THE WALL-MOUNT BRACKET
- DO NOT MOUNT ANY EQUIPMENT OTHER THAN THE SPECIFIED PRODUCT
- DO NOT LEAN ON OR HANG FROM THE TV
- DO NOT HANDLE THE PRODUCT WITH EXCESSIVE FORCE DURING CLEANING OR MAINTENANCE
- PRECAUTIONS
- INSTALLING THE WALL-MOUNT BRACKET
- DO NOT INSTALL THE TV OVER OR UNDER AN AIR CONDITIONER
- BE SURE TO INSTALL THE WALL-MOUNT BRACKET SECURELY TO THE WALL FOLLOWING THE INSTRUCTIONS IN THIS INSTRUCTION MANUAL
- BE SURE TO ASSEMBLE THE BRACKET PROPERLY FOLLOWING THE INSTRUCTED PROCEDURE EXPLAINED IN THIS INSTRUCTION MANUAL
- BE SURE TO TIGHTEN THE SCREWS SECURELY IN THE DESIGNATED POSITION
- BE CAREFUL NOT TO SUBJECT THE TV TO SHOCK DURING INSTALLATION
- BE SURE TO INSTALL THE TV ON A WALL THAT IS BOTH PERPENDICULAR AND FLAT
- AFTER PROPER INSTALLATION OF THE TV, SECURE THE CABLES PROPERLY
- DO NOT ALLOW THE MAINS LEAD OR THE CONNECTING CABLE TO BE PINCHED
- THE SCREWS NEEDED TO SECURE THE WALL-MOUNT BRACKET TO THE WALL ARE NOT SUPPLIED
- TABLE OF CONTENTS
- INSTALLING THE TV ONTO THE WALL
- NOTE
- PREPARING FOR INSTALLATION
- CHECKING THE PARTS
- SUPPLIED WITH SU-WL
- DECIDING ON THE INSTALLATION LOCATION
- DECIDE ON THE INSTALLATION LOCATION
- INSTALLING THE BASE ON THE WALL
- PREPARING FOR THE INSTALLATION OF THE TV
- KD-85/75XG85□□, KD-75XG
- MARK THE INSTALLATION LOCATION ON THE WALL
- REMOVE THE SCREWS FROM THE REAR OF THE TV
- CONNECT THE NECESSARY CABLE(S) TO THE TV
- DETACH THE TABLE-TOP STAND FROM THE TV
- KD-85XG
- KD-75XG87□□, KD-75XG
- SLIM MOUNTING (2-B)
- INSTALLING THE TV ON THE WALL
- LIFT THE TV
- INSTALL THE TV ONTO THE BASE OR BASE ADAPTOR
- PREVENTING THE BOTTOM OF THE TV FROM SHIFTING
- CONFIRMING THE COMPLETION OF THE INSTALLATION
- OTHER INFORMATION
- SPECIFICATIONS
- DIMENSIONS: (APPROX.) [MM]
- WEIGHT (BASE ONLY): (APPROX.) [KG]
- FIND THE TV'S LOCATION
- REMOVE THE TV FROM THE BOX
- REMOVE ALL SCREWS AND OTHER ITEMS FROM THE TV BEFORE MOUNTING
- DO NOT SKIP THE WALL-MOUNTING BRACKET PARTS
- DO NOT MOUNT ANY OTHER EQUIPMENT EXCEPT THE SPECIFIED PRODUCT
- DO NOT PLACE THE BRACKET ON ANY OTHER PRODUCT EXCEPT THE TV. DO NOT PLACE THE TV ON A SLANT OR UPSIDE DOWN
- DO NOT SUBJECT THE PRODUCT TO EXCESSIVE FORCE DURING CLEANING OR MAINTENANCE
- SAFETY MEASURES
- WALL MOUNT BRACKET INSTALLATION
- DO NOT INSTALL THE WALL MOUNT BRACKET ON A WALL SURFACE WHERE THE TELEVISION'S SCREWS OR SIDES PROTRUDE FROM THE WALL SURFACE
- DO NOT INSTALL THE TELEVISION ABOVE OR BELOW AIR CONDITIONERS
- MOUNT THE WALL MOUNT BRACKET SECURELY TO THE WALL BY FOLLOWING THE INSTRUCTIONS IN THIS MANUAL
- MAKE SURE YOU USE THE BRACKET CORRECTLY BY FOLLOWING THE PROCEDURE DESCRIBED IN THIS MANUAL
- TIGHTEN THE SCREWS SECURELY IN THE INDICATED POSITION
- BE CAREFUL NOT TO DROP THE TELEVISION DURING INSTALLATION
- MOUNT THE TELEVISION ON A WALL THAT IS PERPENDICULAR AND FLAT
- AFTER CORRECTLY MOUNTING THE TELEVISION, ENSURE THE CABLES ARE PROPERLY CONNECTED
- DO NOT ALLOW THE POWER CABLE OR CONNECTING CABLE TO BE PINCHED
- THE SCREWS REQUIRED FOR FIXING THE WALL-MOUNT BRACKET TO THE WALL ARE NOT INCLUDED IN THE PACKAGE
- CONTENTS
- MOUNTING ON THE TV ON THE WALL
- MOUNTING INSTRUCTIONS
- PARTS SELECTION
- LEFT WITH SU-WL
- MOUNTING THE BASE ON THE WALL
- PREPARATION FOR MOUNTING THE TV
- KD-85/75XG85□□,KD-75XG
- MARK THE MOUNTING POSITION ON THE WALL
- REMOVE THE SCREWS FROM THE BACK OF THE TV
- TIGHT MOUNTING (2-B)
- CONNECT THE NECESSARY CABLES TO THE TV
- REMOVE THE TABLE-TOP STAND
- KD-65/55XG
- ATTACH THE WALL-MOUNT BRACKETS TO THE CONSOLE. CHECK THE BRACKETS BY COMPARING THEM WITH "SUPPLIED WITH SU-WL450" IN "CHECKING THE PARTS" ON PAGE
- CEILING MOUNT INSTALLATION (2-B)
- REMOVE THE STAND FROM THE TV
- MOUNTING THE TV ON THE WALL
- NOBDINRHETE TEJEBN3OPA
- A6EJEKKA
- MONTPAITE TEIEBN3OPA B OCHOBATA IJIAIAITEPA 3A OCHOBATA
- PNEYIPYEKDEHNE
- MOHTNPAITE TEIEBN3OPA B OCHOBATA IJIAIANTEPA 3A OCHOBATA
- PREVENTION
- CARE
- CHECK
- SUPPORTED MODELS
- FOR CUSTOMERS
- FOR SONY DEALERS AND CONTRACTORS
- FOR MOVING OR REMOVING THE TV, BE SURE TO CONTACT LICENSED CONTRACTORS
- AFTER INSTALLING THE TV, DO NOT REMOVE THE SCREWS, ETC
- DO NOT DISASSEMBLE OR MODIFY THE PARTS AND BRACKETS FOR WALL MOUNTING
- DO NOT INSTALL ANY EQUIPMENT OTHER THAN THE SPECIFIED ONE ON THE BRACKET
- TO AVOID OVERLOADING THE WALL-MOUNT BRACKET, DO NOT PLACE ANYTHING ON IT OTHER THAN THE TV. DO NOT TILT THE TV LEFT/RIGHT OR UP/DOWN
- DO NOT LEAN ON THE TV OR HOLD ONTO IT
- COPEKANE
- STANDARD MOUNTING (2-A)
- COMPACT INSTALLATION (2-B)
- LAY THE TV DOWN
- INSTALL THE TV ON THE BASE OR ADAPTER BASE
- TO PREVENT THE TV FROM TIPPING OVER
- KD-65/55XG87□□,KD-65/55XG
- PLACE THE TV ON THE MOUNTING BASE OR THE BASE ADAPTER
- PPEIOTBPAUEHNE CMEUEHN HXKHEU ACTN TEJEBN3OPA
- PPIMECHAHNE
- PNEYNPEKDEHNE
- ADDITIONAL INFORMATION
- TECHNICAL SPECIFICATIONS
- TIGHTEN THE SCREWS, TOO, WHEN MOUNTING THE TV
- DO NOT REMOVE THE PARTS OF THE BRACKET FOR PARTIAL MOUNTING
- DO NOT INSTALL ANY OTHER DEVICES OTHER THAN THE SPECIFIED PRODUCT
- DO NOT USE THE BRACKET FOR PARTIAL MOUNTING FOR HANGING ANYTHING OTHER THAN THE TV. DO NOT TILT THE TV LEFT/RIGHT OR UP/DOWN
- HE CNPUATECNA TELEBIZOP I NE YINJATEC3A HBORO
- PONEPEIXEHH
- ПД ЧАСОЧИШЕНИАОБOCNYROBYBAHЯВИРОБУ HE ПНКЛАДАITEDO HBORHAMIPHOICNI
- ACTEPEKHI 3AXODI
- BCTAHOBLEHNKPONUTEHNA DIHA NACTIHHORO KPINJEHHA
- MICT
- INSTALLING THE TV ON A WALL
- SCREW
- PREPARATION
- INSTALLATION
- PART DETAILS
- MODEL WL
- INSTALLATION LOCATION
- DETERMINE THE INSTALLATION LOCATION
- STAND
- INSTALLING THE WALL MOUNT
- PREPARING THE TV FOR INSTALLATION
- MAKE A HOLE IN THE WALL FOR MOUNTING
- MOUNTING POINT (2-B)
- CONNECT THE TV TO THE NECESSARY CABLE
- ATTACH THE TV TO THE WALL BRACKET
- THIN MOUNTING (2-B)
- CONNECT THE TV CABLES
- INSTALL THE TV ON THE BASE OR THE WALL MOUNT BRACKET FOR THE BASE
- BE CAREFUL NOT TO DAMAGE THE LOWER PART OF THE TV
- KD-65/55XG87□□, KD-65/55XG
- PLACE THE TV ON THE BASE OR THE STAND BASE
- TO REPLACE THE STAND
- CHECK AFTER INSTALLATION IS COMPLETE
- WARNINGS
- OHUKE PAIGALDUS (2-B)
- MARKUS
- MASS (AINULT ALUS): (UMBES) [KG]
- KYPBIINFBIHBTA3AJAY HE ORAH KYTIM XACAY KE3IHDE KATBI KYW CAIMHAB
- ALDBH ANY SHAAPANAPBL
- CABINET MOUNTING CROWN FORMAT
- SONY DISTRIBUTION UNIT
- EXPERT
- CABINET MOUNTING CROWN
- BODIES
- DO NOT INSTALL THE BODIES IN PLACES WHERE THEY MAY BE EXPOSED TO RAIN OR WATER
- DO NOT INSTALL THE BODIES ON AN UNSTABLE SURFACE
- USE THE INSTRUCTIONS CAREFULLY AND FOLLOW THEM
- FOLLOW THE PROCEDURES GIVEN IN THE MANUAL CAREFULLY
- THE WIRES MUST BE CONNECTED TO THE TERMINALS IN ACCORDANCE WITH THE MARKINGS
- DURING INSTALLATION, THE WIRES MUST NOT BE PULLED
- THE WIRES MUST BE INSTALLED PERPENDICULAR TO THE TERMINAL BLOCK AND THE BOARD
- AFTER THE WIRES ARE CORRECTLY INSTALLED, SECURE THE CABLE TIES
- THE POWER SUPPLY WIRES OR THE GROUND WIRE MUST BE CONNECTED
- THE HOLES FOR SECURING TO THE BOARD ARE PROVIDED
- INSTALLING THE TV TO THE WALL
- SAFETY
- PARTS CHECK
- SUPPLIED WITH THE SU-WL
- INSTALLATION OF THE DEVICE
- INSTRUCTION
- CABLE INSTALLATION PROCEDURE
- TO INSTALL THE TV
- THE INSTALLATION POSITION IS NOT SPECIFIED
- INCLINED INSTALLATION (2-B)
- INSERT THE CABLES INTO THE CABLE HOLDERS
- DO NOT TOUCH THE UPPER PART OF THE TV
- CABLES OF THE FORMAT (2-B)
- CONNECT THE CABLES (CABLE) TO THE TV
- DO NOT PLACE THE TV ON TOP OF THE STAND
- CONNECTING THE TV TO THE STAND
- INSTALL THE ANTENNAS
- INSTALL THE ANTENNAS ON THE DEVICE OR ON THE ANTENNA BASES
- DO NOT BEND THE ANTENNAS EXCESSIVELY
- CONNECT THE TV
- ATTACH THE TV TO THE WALL OR WALL MOUNT
- DO NOT PULL THE POWER CORD OUT BY THE PLUG
- HYCKAY
- OPHATYDBIH AKATANFAHDBIFBIH TEKCEPY
- ECKEPTY
- BACAAKNAPAT
- Y
- SONY
- THEREFORE, N^2 + 2N
- NPPNN NNUYN
Brand : SONY
Model : Bravia KD55XG8599
Category : Television