
Bravia KD55XG8196 - Television SONY - Free user manual and instructions
Find the device manual for free Bravia KD55XG8196 SONY in PDF.
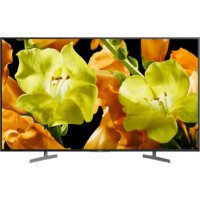



| Product Type | 4K LED TV |
| Brand | Sony |
| Model | Bravia KD55XG8196 |
| Screen Size | 55 inches (139.7 cm) |
| Resolution | 4K Ultra HD (3840 x 2160) |
| Operating System | Android TV |
| Dimensions (without stand) | 1241 x 721 x 95 mm |
| Weight (without stand) | Approximately 17 kg |
| Power Supply | 220-240 V AC, 50 Hz |
| Power Consumption (typical) | Approximately 120 W |
| Connectivity | HDMI (x3), USB (x2), Ethernet, Wi-Fi, Bluetooth |
| VESA Standard | 300 x 200 mm |
| Compatible Wall Mount | SU-WL450 (optional) |
| Main Features | Smart TV, HDR, Dolby Vision, X1 Processor |
| Care and Cleaning | Soft dry cloth, non-abrasive products |
| Safety | Professional installation recommended, do not block ventilation |
| Spare Parts and Repairability | Remote control included, tabletop stand included, repair by authorized center |
| General Information | Manual available in multiple languages, software update via internet |
Frequently Asked Questions - Bravia KD55XG8196 SONY
User questions about Bravia KD55XG8196 SONY
0 question about this device. Answer the ones you know or ask your own.
Ask a new question about this device
Download the instructions for your Television in PDF format for free! Find your manual Bravia KD55XG8196 - SONY and take your electronic device back in hand. On this page are published all the documents necessary for the use of your device. Bravia KD55XG8196 by SONY.
USER MANUAL Bravia KD55XG8196 SONY
- In the actual model names, the "□□" indicates numbers and/or characters specific to each model.
To Customers
For product protection and safety reasons, Sony strongly recommends that installation of your TV be performed by Sony dealers or licensed contractors. Do not attempt to install it yourself.
To Sony Dealers and Contractors
Provide full attention to safety during the installation, periodic maintenance and examination of this product.
Sufficient expertise is required for installing this product, especially to determine the strength of the wall for withstanding the TV's weight. Be sure to entrust the attachment of this product to the wall to Sony dealers or licensed contractors and pay adequate attention to safety during the installation. Sony is not liable for any damage or injury caused by mishandling or improper installation.
For safety and proper installation, follow the Wall-mount Bracket Operation Instructions, TV Setup Guide, and the directions in this manual.
On Safety
Thank you for purchasing this product.
To Customers
Sufficient expertise is required for installing this product. Be sure to subcontract the installation to Sony dealers or licensed contractors and pay special attention to safety during the installation. Sony is not liable for any damages or injury caused by mishandling or improper installation, or installing any other than the specified product. Your Statutory Rights (if any) are not affected.
To Sony dealers
Sufficient expertise is required for installing this product. Be sure to read this instruction manual thoroughly to do the installation work safely. Sony is not liable for any damages or injury caused by mishandling or improper installation. Please give this manual to the customer after installation.
This instruction manual shows the correct handling of the product and important precautions necessary to prevent accidents. Be sure to read this manual thoroughly and use the product correctly. Keep this manual available for future reference.
Products by Sony are designed with safety in mind. If the products are used incorrectly, however, it may result in a serious injury through fire, electric shock, the product toppling over, or the product dropping. Be sure to observe the precautions for safety to prevent such accidents.
CAUTION
Specified products
This Wall-Mount Bracket is designed for use with the specified TVs. For TVs, refer to their Reference Guide to verify that the Wall-Mount Bracket can be used.
To Customers
WARNING
If the following precautions are not observed, serious injury or death through fire, electric shock, or the product dropping can result.
Be sure to subcontract the installation to licensed contractors and keep small children away during the installation.
If the Wall-Mount Bracket or the TV is not installed correctly, the following accidents may occur. Be sure licensed contractors carry out installation.
The TV may fall and cause a serious injury such as a bruise or a fracture. - If the wall on which the Wall-Mount Bracket is installed is unstable, uneven, or not perpendicular to the floor, the unit may fall and cause injury or property damage. The wall should be capable of supporting a weight of at least four times the TV weight. (Refer to your TV's Reference Guide for its weight.) - If the installation of the Wall-Mount Bracket on the wall is not sufficiently sturdy, the unit may fall and cause injury or property damage.
Be sure to subcontract moving or dismounting of the TV to licensed contractors.
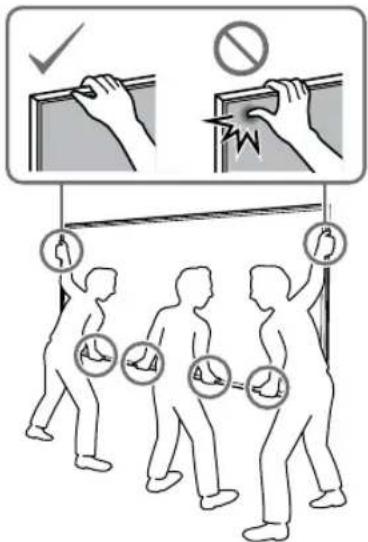
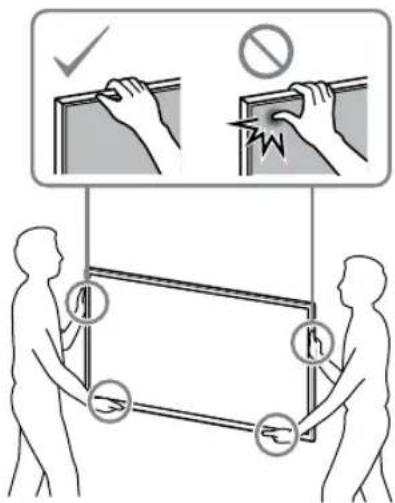
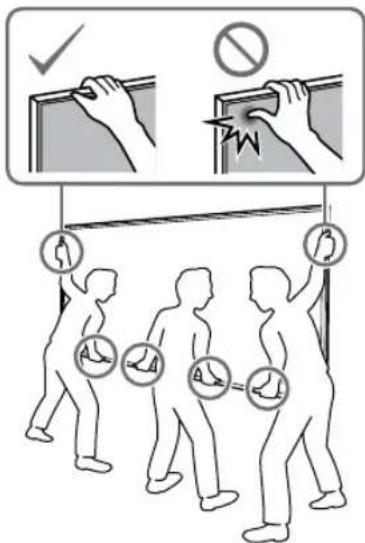
If persons other than licensed contractors transport or dismount the TV, it may fall and cause injury or property damage. Be sure that two or more persons (three or more persons for 75 inches and above TV set) carry or dismount the TV.
Do not remove screws, etc., after mounting the TV.
If you do so, the TV may fall and cause injury or property damage.
Do not make alterations to the parts of the Wall-Mount Bracket.
If you do so, the Wall-Mount Bracket may fall and cause injury or property damage.
Do not mount any equipment other than the specified product.
This Wall-Mount Bracket is designed for use with the specified product only. If you mount equipment other than specified, it may fall or break, and cause injury or property damage.
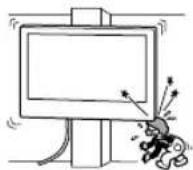
Do not apply any load other than the TV on the Wall-Mount Bracket. Do not shake the TV left/right, up/down.
If you do so, the TV may fall and cause injury or property damage.
Do not lean on or hang from the TV.
Do not lean on or hang from the TV as it may fall on you and cause serious injury.
CAUTION
If the following precautions are not observed, injury or property damage may occur.
Do not handle the product with excessive force during cleaning or maintenance.
Do not apply excessive force on the topside of the TV. If you do so, the TV may fall and cause injury or property damage.
Precautions
- If you use the TV installed on the Wall-Mount Bracket for a long time, the wall behind or above the TV may become discolored or the wallpaper may come unstuck, depending on the material of the wall.
- If the Wall-Mount Bracket is removed after installing it on the wall, the screw holes are left.
- Do not use the Wall-Mount Bracket in a place where it is subjected to mechanical vibrations.
Installing the Wall-Mount Bracket
To Sony Dealers
WARNING
The following instructions are for Sony dealers only. Be sure to read the safety precautions described above and pay special attention to safety during the installation, maintenance, and checking of this product.
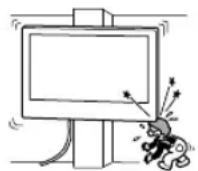
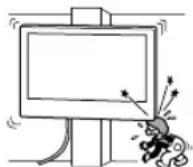
Do not install the Wall-Mount Bracket on wall surfaces where the corners or the sides of the TV protrude away from the wall surface.
Do not install the Wall-Mount Bracket on wall surfaces such as a pillar, where the corners or the sides of the TV protrude away from the wall surface. If a person or object happens to hit the protruded corner or side of the TV, it may cause injury or property damage.
Do not install the TV over or under an air conditioner.
If the TV is exposed to water leaks or air current from an air conditioner for a long time, it may cause a fire, an electric shock, or a malfunction of the TV.
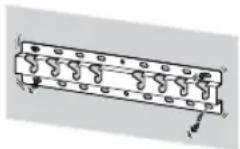
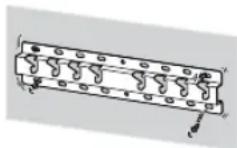
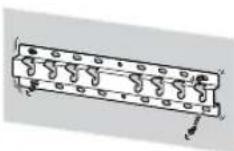
Be sure to install the Wall-Mount Bracket securely to the wall following the instructions in this instruction manual.
If any of the screws are loose or fall out, the Wall-Mount Bracket may fall and cause injury or property damage. Be sure to use the appropriate screws for the material of the wall and install the unit securely using four or more screws of 8 mm diameter (or equivalent).
Be sure to use the supplied screws and attachment parts properly following the instructions given in this instruction manual. If you use substitute items, the TV may fall and cause bodily injury to someone or damage to the TV.
Be sure to assemble the bracket properly following the instructed procedure explained in this instruction manual.
If any of the screws are loose or fall out, the TV may fall and cause bodily injury to someone or damage to the TV.
Be sure to tighten the screws securely in the designated position.
If you fail to do so, the TV may fall and cause bodily injury to someone or damage to the TV.
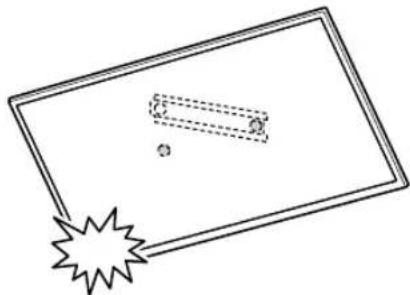
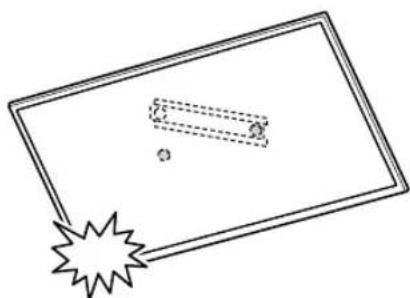
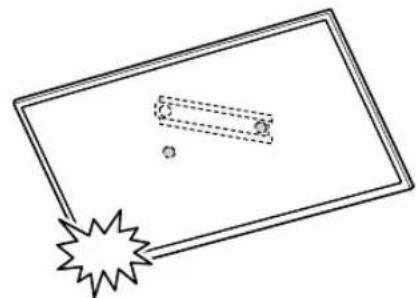
Be careful not to subject the TV to shock during installation.
If the TV is exposed to shock, it may fall or break apart. This may cause injury.
Be sure to install the TV on a wall that is both perpendicular and flat.
If you fail to do so, the TV may fall and cause injury.
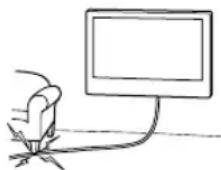
After proper installation of the TV, secure the cables properly.
If people or objects get tangled with cables, this may result in injury or damage to the TV.
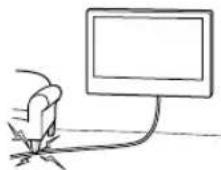
Do not allow the mains lead or the connecting cable to be pinched.
If the mains lead or the connecting cable is pinched between the unit and the wall or is bent or twisted by force, the internal conductors may become exposed and cause a short circuit or an electrical break. This may cause a fire or an electric shock.
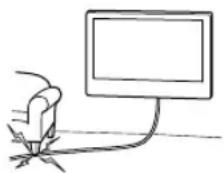
The screws needed to secure the Wall-Mount Bracket to the wall are not supplied.
Use the appropriate screws for the wall material and structure when mounting the Wall-Mount Bracket.
Table of Contents
Preparing for installation. 5
Checking the parts. 5
Deciding on the installation location 6
Installing the Base on the wall 8
Preparing for the installation of the TV. 9
KD-75XG80□□ 9
KD-65XG81□□/65XG80□□ 10
KD-55XG81□□/55XG80□□ 11
KD-49XG81□/49XG80□/43XG81□/43XG80□
Installing the TV on the wall 14
KD-75XG80□□ 14
KD-65XG81□□ / 65XG80□□ / 55XG81□□ / 55XG80□□ / 49XG81□□ / 49XG80□□ / 43XG81□□ / 43XG80□□
Confirming the completion of the
installation 19
Other information. 19
Specifications 19
Installing the TV onto the wall
Installation procedure differs, depending on your TV.
Use the Wall-Mount Bracket SU-WL450 to install the TV to the wall.
Note
- If the Table-Top Stand is attached to the TV, detach the Table-Top Stand beforehand. See the Setup Guide and follow in reverse order the steps to detach the Table-Top Stand.
- Place the TV with its screen facing down on a level and stable surface covered with a thick and soft cloth, when securing the Attachment parts for Wall-Mount Bracket or when removing the Table-Top Stand from the TV to prevent damaging the surface of the LCD display.
- Be sure to store the removed screws in a safe place, keeping them away from children.
Preparing for installation
- Have the TV's Reference Guide and Setup Guide at hand before installation.
- Be sure to have a Phillips screwdriver that fits the screws prior to the assembly.
- Confirm the installing position of your TV.
- Prepare four or more screws of 8 mm diameter and one screw of 5 mm or equivalent (not supplied). Select screws suitable for the material of the wall.
Checking the parts
Supplied with SU-WL450
- Verify that all the parts are included.
| A Base (20) (1) B Pulley (2) | |
| ◎ PSW 6x20 (4)◎ PSW 4x20 with Bush (2) | |
| E Spacer (20) (2) E Belt (1) | |
| G Bush (20) (M4) (2) G PSW 4x20 (2) | |
| ① Base Adaptor (2) ① PSW 4x10 (8) | |
| K Spacer (60) (2) L PSW 6x50 (2) | |
| M Bush (M4) (2) N PSW 4x50 (2) |
Deciding on the installation location
1 Decide on the installation location.
Make sure that the wall has enough space for the TV and is capable of supporting a weight of at least four times that of the TV.
Refer to the following table on installing the TV to the wall. Refer to your TV's Reference Guide for the TV's weight.
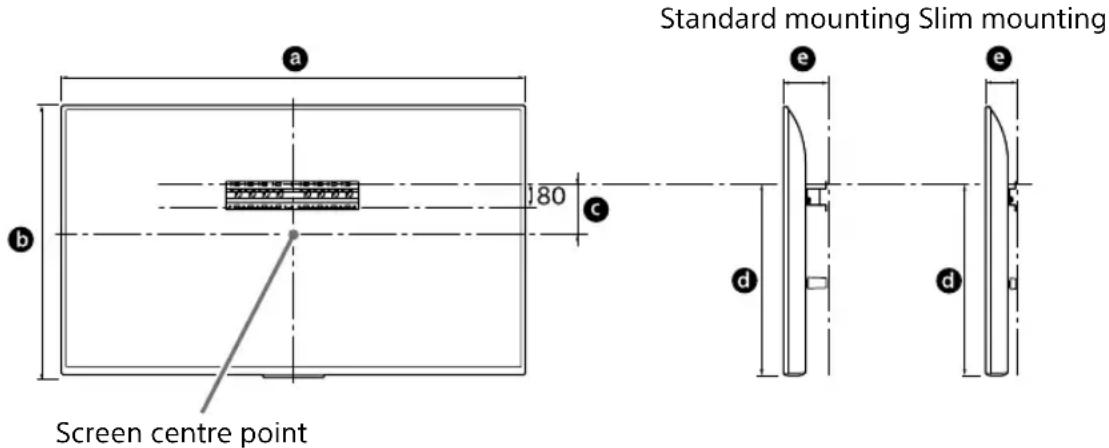
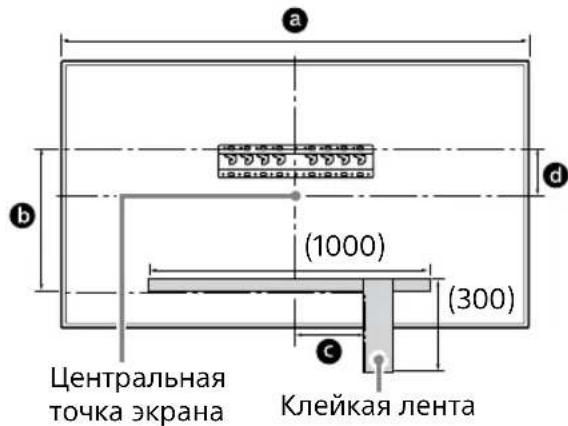
Unit: mm
| Model Name | Display dimensions | Screen centre dimension | Length for mounting | |||
| a | b | c | d | e | ||
| Standard mounting | Slim mounting | |||||
| KD-75XG80□□ | 1,686 | 970 | 202 | 690 | 142 | 100 |
| KD-65XG81□□ | 1,463 | 845 | 173 | 597 | 142 | 100 |
| KD-65XG80□□ | 1,463 | 845 | 173 | 597 | 142 | 100 |
| KD-55XG81□□ | 1,241 | 721 | 95 | 460 | 141 | 100 |
| KD-55XG80□□ | 1,241 | 721 | 95 | 460 | 141 | 100 |
| KD-49XG81□□ | 1,101 | 645 | -15* | 314 | 119 | 78 |
| KD-49XG80□□ | 1,101 | 645 | -15* | 314 | 119 | 78 |
| KD-43XG81□□ | 970 | 570 | 23 | 315 | 119 | 77 |
| KD-43XG80□□ | 970 | 570 | 23 | 315 | 119 | 77 |
- Bracket positioning is below the screen centre point.
Note
- Figures in the table may differ slightly depending on the installation.
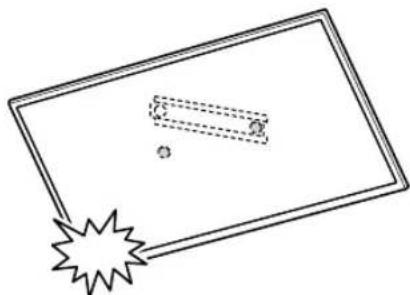
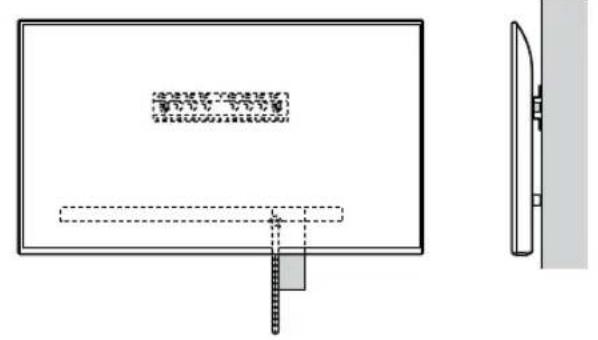
- When your TV is installed on the wall, the upper side of the TV slightly leans forward.
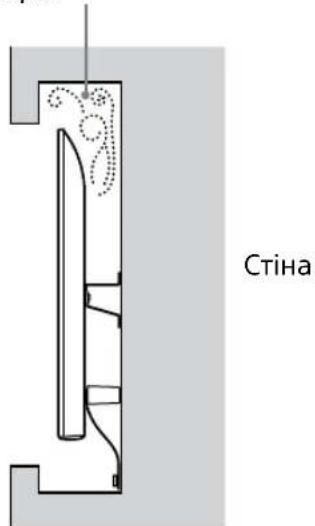
Allow for suitable clearance between the TV and the ceiling and protruding parts of the wall as shown below.
Unit: mm
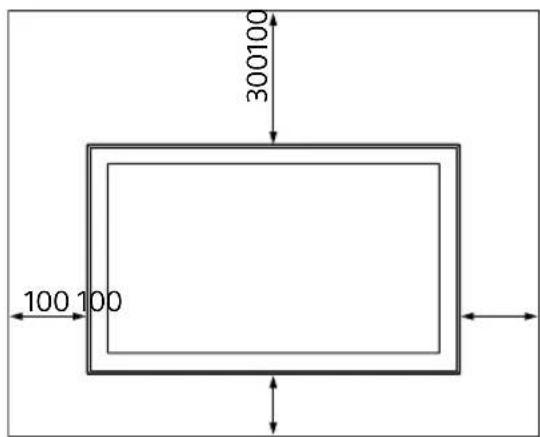
To ensure proper ventilation and prevent the collection of dirt or dust:
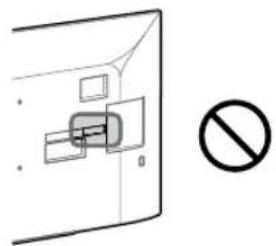
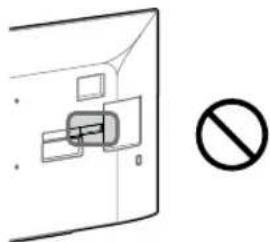
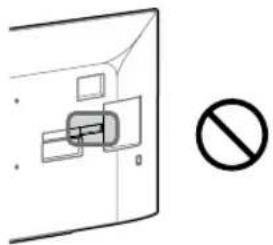
Do not lay the TV set flat, install upside down, backwards, or sideways. - Do not place the TV set on a shelf, rug, bed or in a closet. - Do not cover the TV set with a cloth, such as curtains, or items such as newspapers, etc. - Do not install the TV set as shown below.
Air circulation is blocked.
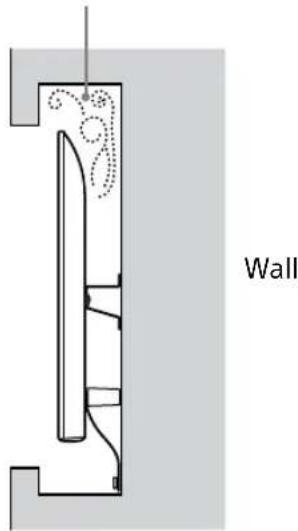
Note
- If you intend to route the cables in the wall, make a hole in the wall to insert the cables before beginning the installation.
To prevent pinching the cables, prepare a hole in the wall somewhere outside the perimeter of the Base (20) A,Base Adaptor 1 and Spacer (20) E, Spacer (60) K.
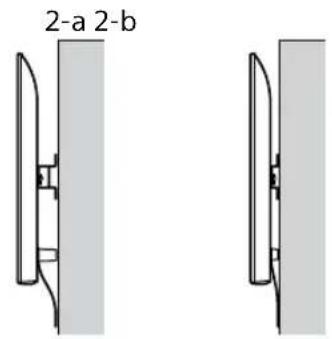
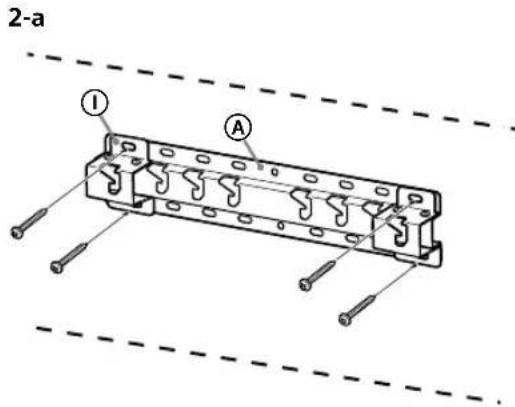
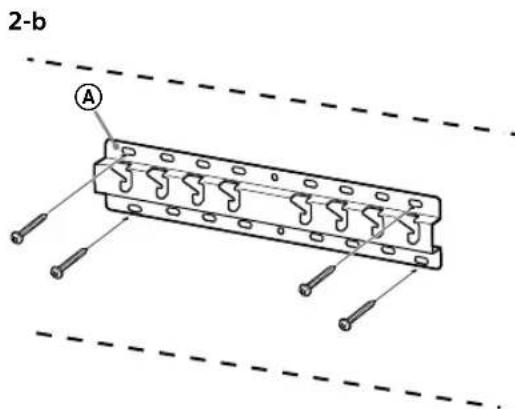
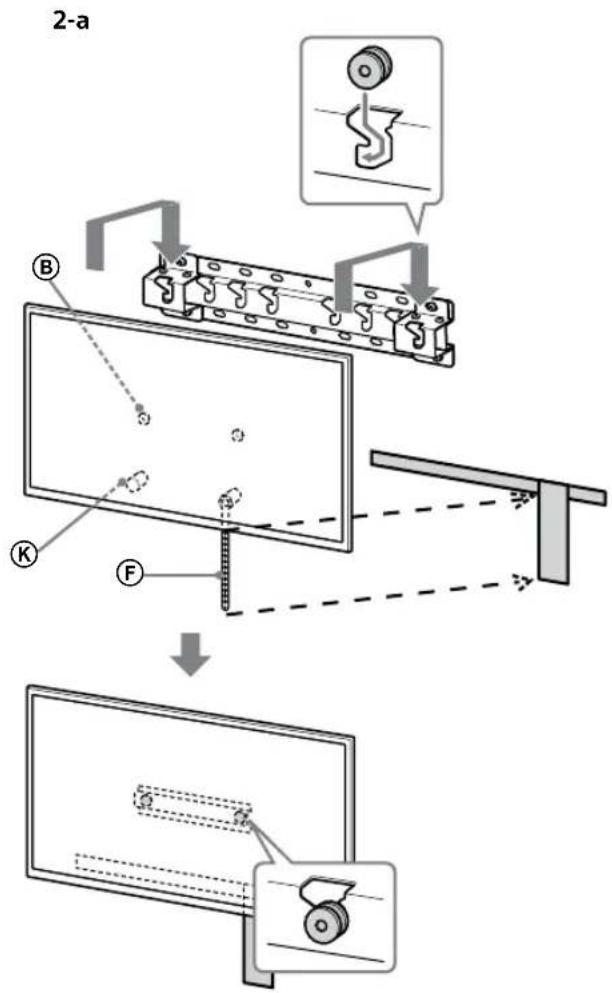
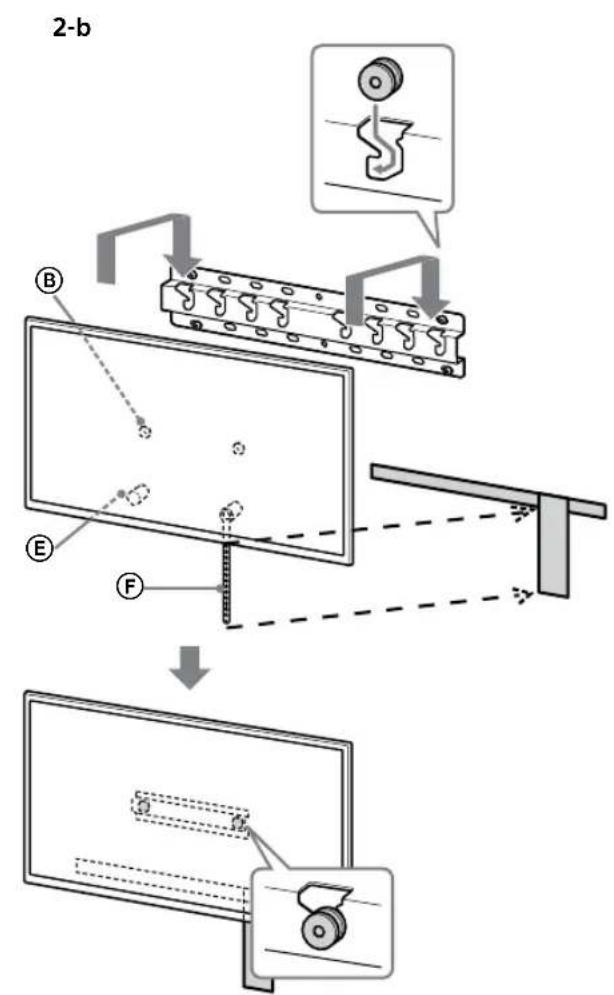
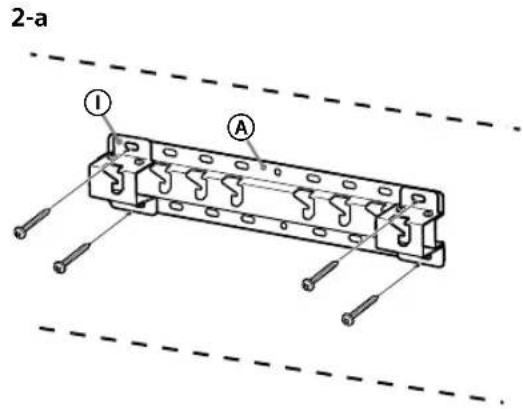
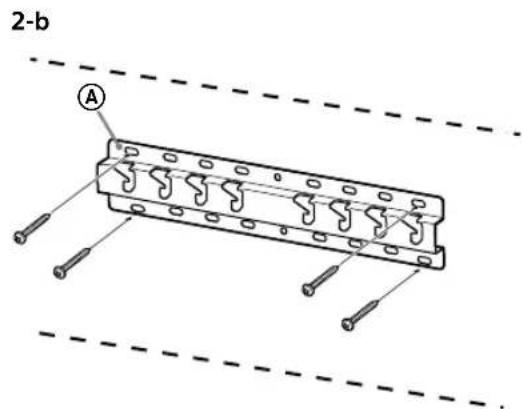
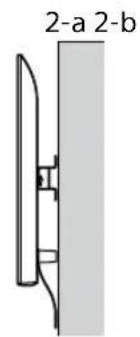
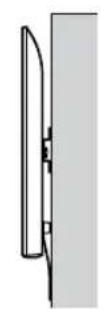
2 Select Wall mounting style. It is selectable as shown below.
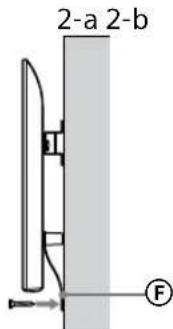
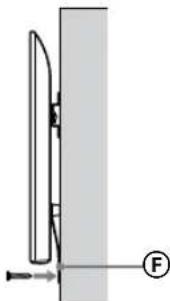
2-a Standard mount 2-b Slim mount
Refer to the table of step 1.
WARNING
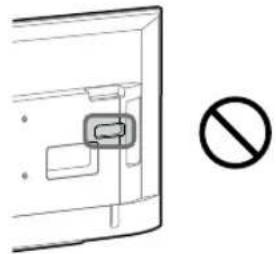
- When 2-b is selected, rear terminal access is limited.
2-a 2-b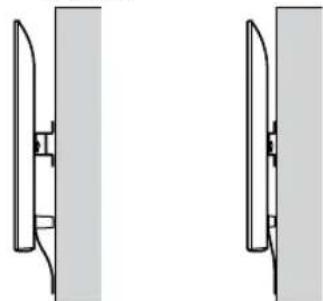
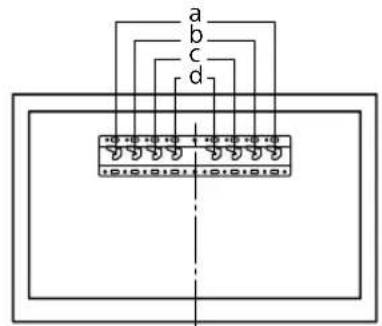
3 Refer to the below table about the Base Adaptor fitting location. In case of selecting 2-b, then skip this step.
| Model Name Hook location | |
| KD-75XG80□□ | |
| KD-65XG81□□ | b |
| KD-65XG80□□ | |
| KD-55XG81□□ | |
| KD-55XG80□□ | |
| KD-49XG81□□ | c |
| KD-49XG80□□ | |
| KD-43XG81□□ | d |
| KD-43XG80□□ | |
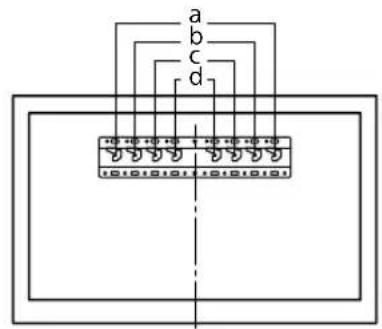
Fit Base Adaptor ① by using Screw (PSW 4x10) ⑧ to Base (20) ④ when selecting 2-a.
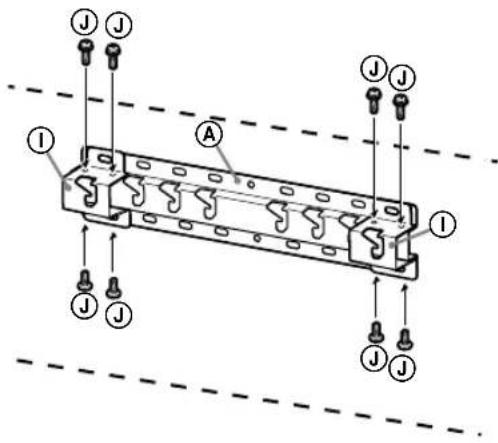
4 Decide the positions of the screws for installing the Base (20) A.
Refer to the specifications on page 19. When selecting 2-a, please use the hole positions of Base Adaptor ①
WARNING
The wall that the TV will be mounted on should be able to support a weight of at least four times that of the TV (Refer to your TV's Reference Guide for its weight.). - Determine the strength of the wall the TV will be mounted on. Reinforce the wall sufficiently, if necessary.
Installing the Base on the wall
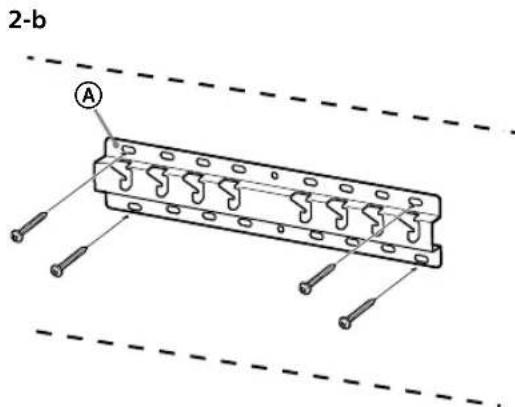
- Use four or more screws of 8mm diameter or equivalent (not supplied).
- Fit four screws to the holes of Base Adaptor ① with Base (20) A (2-a only).
- Install the Base (20) ④ on the wall horizontally.
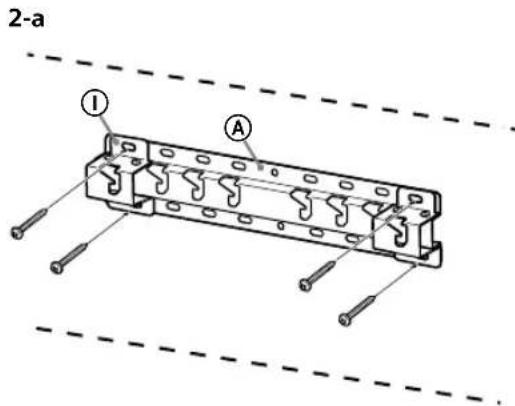
Preparing for the installation of the TV
Refer to the Setup Guide for stand installation.
KD-75XG80□□
1 Mark the installation location on the wall.
- Use masking tape, etc. (not supplied) to mark the location of the TV near the Base or Base Adaptor. Refer to the following table.
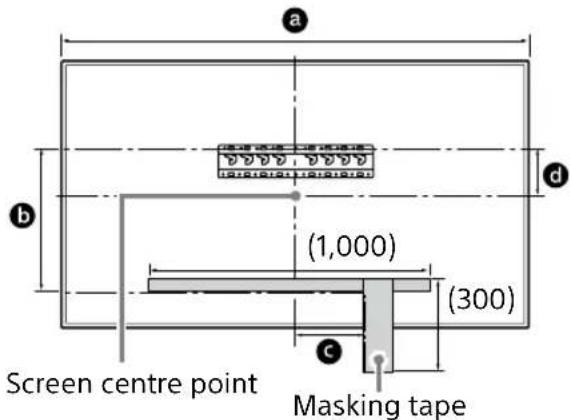
Unit: mm
| Model Name | Length for marking | Screen centre dimension | ||
| a | b | c | d | |
KD-75XG80□□ 1,686 564 150 202
2 Attach the Attachment parts for Wall-Mount Bracket. Check the Attachment parts by referring to "Supplied with SU-WL450" in "Checking the parts" on page 5.
Note
- Firmly secure the Attachment parts using screws.
- When using an electric screwdriver, set the torque setting to approximately 1.5 N·m {15 kgf·cm}.
- Be sure to store the used or unused parts in a safe place for future use. Retain this manual for future reference.
Standard mounting (2-a)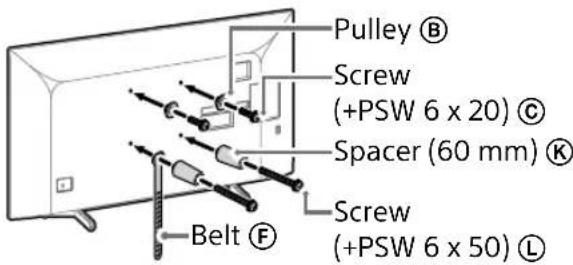
Slim mounting (2-b)
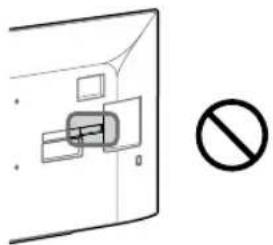
Note
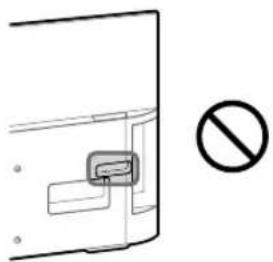
- You cannot use some of the terminals on the rear of the TV when using this mounting style.
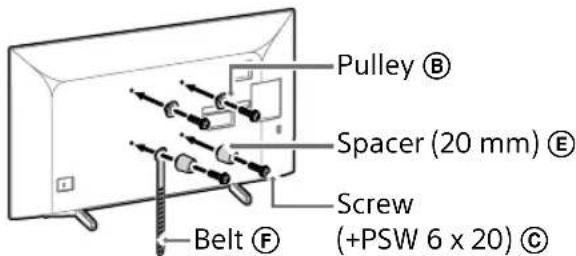
3 Connect the necessary cable(s) to the TV.
Make sure to connect the cables before installing the TV on the wall. You will be unable to connect the cables when the TV is installed.
Refer to the Reference Guide supplied with your TV.
Note
- Subcontract the cable routing in the wall to a licensed contractor.
- Bundle the connecting cables to prevent stepping on them before wall mounting.
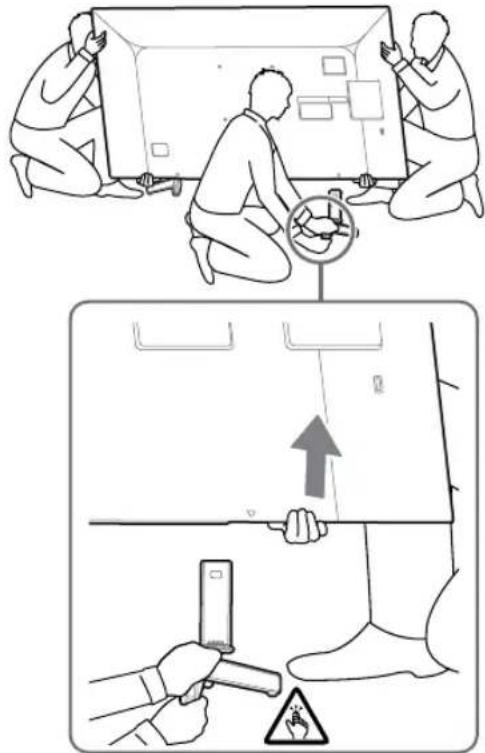
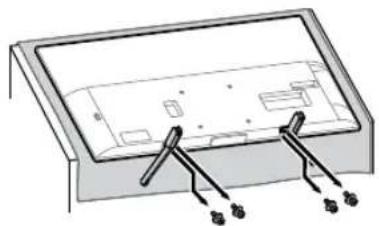
4 Detach the Table-Top Stand from the TV.
- Remove one side of the Table-Top Stand at a time. Firmly hold the Table-Top Stand securely with both hands while the other people lift up the TV.
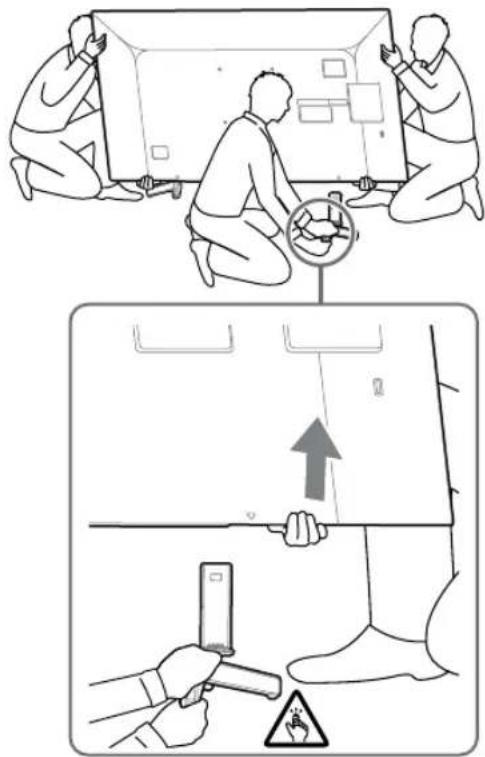
- Repeat the previous step and remove the other side of the Table-Top Stand.
Note
- Three or more people are required to detach the Table-Top Stand.
- Be careful not to use excessive force while detaching the Table-Top Stand from the TV as it may cause the TV set to fall resulting in personal injury or physical damage to the TV. Take care when handling the Table-Top Stand to prevent damage to the TV.
- Be careful when lifting the TV as the Table-Top Stand is detached, the Table-Top Stand may topple over and cause personal injury. Take care when removing the Table-Top Stand from the TV to prevent it from falling over and damaging the surface that the TV is sitting on.
KD-65XG81□□/65XG80□□
1 Attach the Attachment parts for Wall-Mount Bracket. Check the Attachment parts by referring to "Supplied with SU-WL450" in "Checking the parts" on page 5.
Note
- Firmly secure the Attachment parts using screws.
- When using an electric screwdriver, set the torque setting to approximately 1.5 N·m {15 kgf·cm}.
- Be sure to store the used or unused parts in a safe place for future use. Retain this manual for future reference.
Standard mounting (2-a)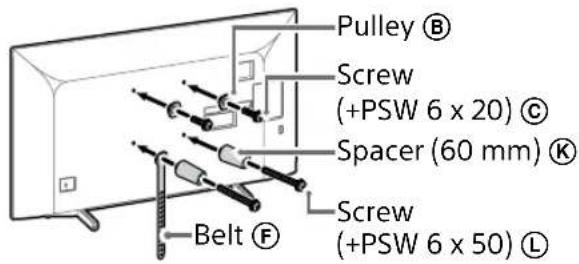
Slim mounting (2-b)
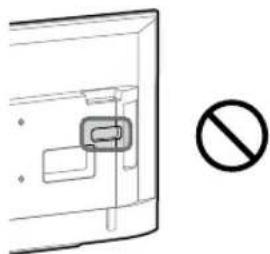
Note
- You cannot use some of the terminals on the rear of the TV when using this mounting style.
2 Connect the necessary cable(s) to the TV.
Make sure to connect the cables before installing the TV on the wall. You will be unable to connect the cables when the TV is installed.
Refer to the Reference Guide supplied with your TV.
Note
- Subcontract the cable routing in the wall to a licensed contractor.
- Bundle the connecting cables to prevent stepping on them before wall mounting.
3 Detach the Table-Top Stand from the TV.
- Remove one side of the Table-Top Stand at a time. Firmly hold the Table-Top Stand securely with both hands while the other people lift up the TV.
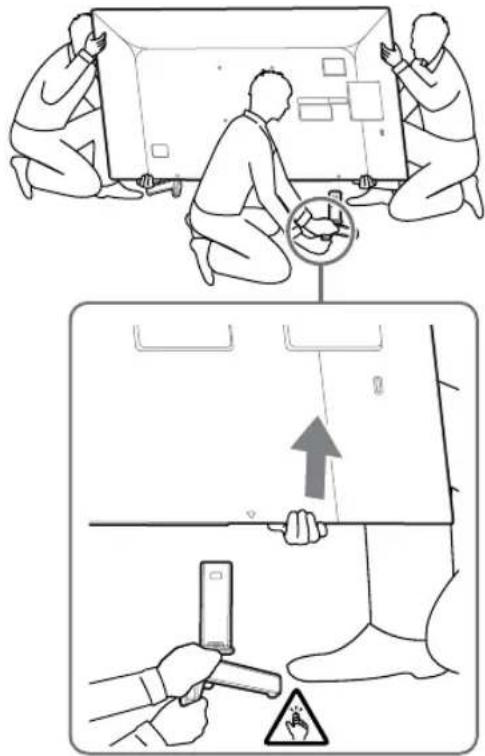
- Repeat the previous step and remove the other side of the Table-Top Stand.
Note
- Three or more people are required to detach the Table-Top Stand.
- Be careful not to use excessive force while detaching the Table-Top Stand from the TV as it may cause the TV set to fall resulting in personal injury or physical damage to the TV. Take care when handling the Table-Top Stand to prevent damage to the TV.
- Be careful when lifting the TV as the Table-Top Stand is detached, the Table-Top Stand may topple over and cause personal injury. Take care when removing the Table-Top Stand from the TV to prevent it from falling over and damaging the surface that the TV is sitting on.
KD-55XG81□□/
55XG80□□
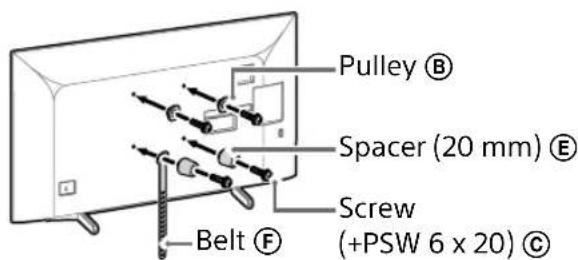
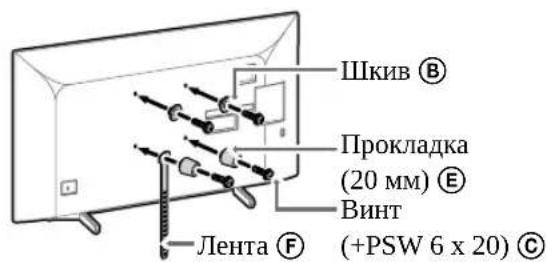
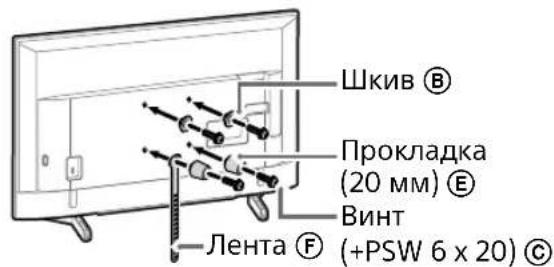
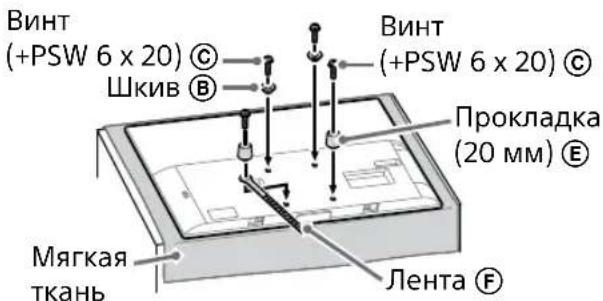
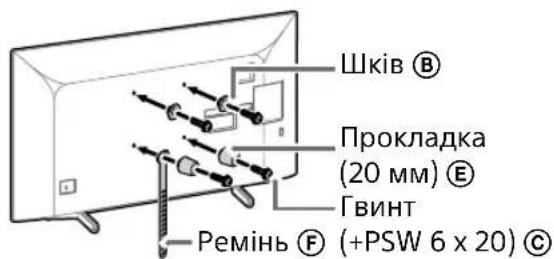
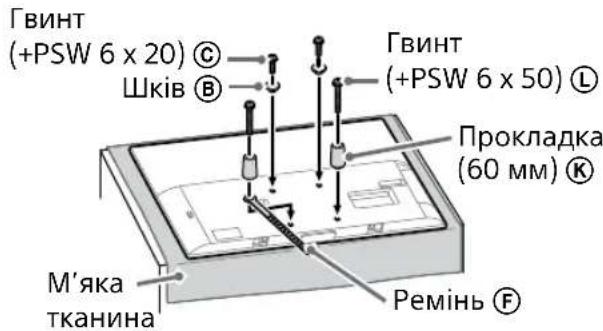
1 Attach the Attachment parts for Wall-Mount Bracket. Check the Attachment parts by referring to "Supplied with SU-WL450" in "Checking the parts" on page 5.
Note
- Firmly secure the Attachment parts using screws.
- When using an electric screwdriver, set the torque setting to approximately 1.5 N·m {15 kgf·cm}.
- Be sure to store the used or unused parts in a safe place for future use. Retain this manual for future reference.
Standard mounting (2-a)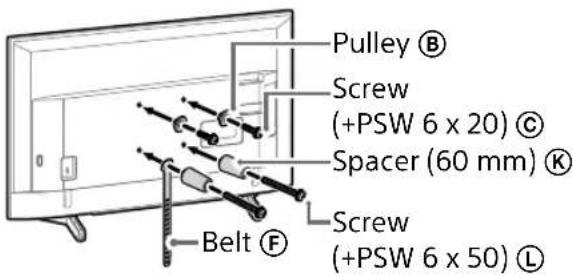
Slim mounting (2-b)
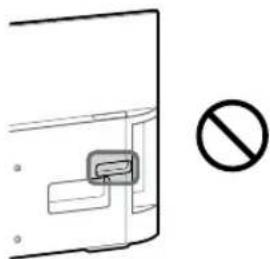
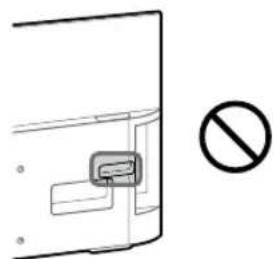
Note
- You cannot use some of the terminals on the rear of the TV when using this mounting style.
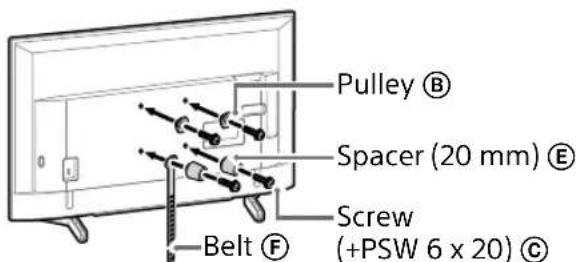
2 Connect the necessary cable(s) to the TV.
Make sure to connect the cables before installing the TV on the wall. You will be unable to connect the cables when the TV is installed. Refer to the Reference Guide supplied with your TV.
Note
- Subcontract the cable routing in the wall to a licensed contractor.
- Bundle the connecting cables to prevent stepping on them before wall mounting.
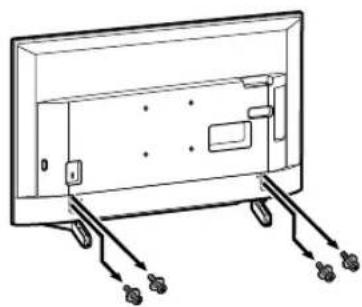
3 Detach the Table-Top Stand from the TV.
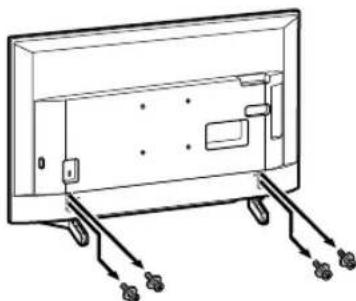
Note
- Be careful when lifting the TV as the Table-Top Stand is detached, the Table-Top Stand may topple over and cause personal injury. Take care when removing the Table-Top Stand from the TV to prevent it from falling over and damaging the surface that the TV is sitting on.
KD-49XG81□□/
49XG80□□ / 43XG81□□ /
43XG80□□
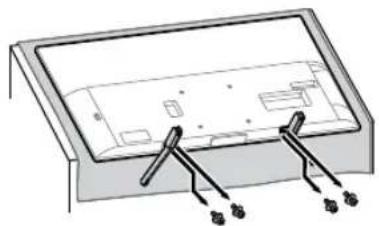
1 Detach the Table-Top Stand from the TV.
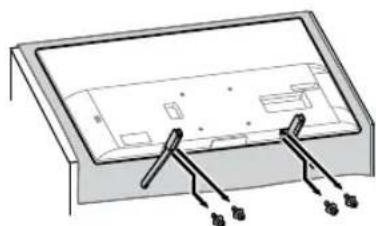
Note
Make sure to place the TV on a soft cloth to prevent damaging the display's surface. - When installing the Wall-Mount Bracket, do not use the screws removed from the Table-Top Stand.
- Be sure to store the removed Table-top Stand and its screws in a safe place, keeping them away from children. You will need them if you want to use the TV on a table in the future. The Table-Top Stand cannot be purchased separately.
WARNING
- Be sure the TV is in the vertical position before switching on. The TV set must not be powered on with the LCD panel face down to avoid uneven picture uniformity. If pressure or shock is applied to the surface of the TV, the TV may break or become damaged.
- Lay the TV face down on a stable and level surface with the Table-Top Stand hanging over the edge of the surface. Having the TV face and the base of the Table-Top Stand on the same level surface will create an unstable working condition and can damage the TV.
- When detaching the Table-Top Stand from the TV, hold the Table-Top Stand securely with both hands.
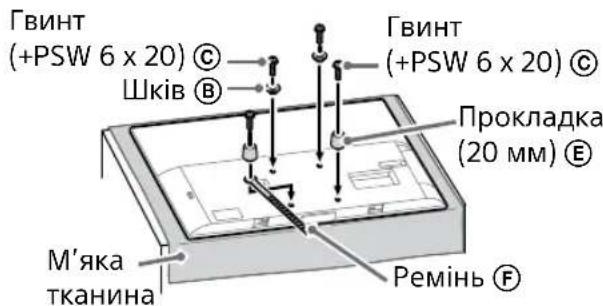
2 Attach the Attachment parts for Wall-Mount Bracket. Check the Attachment parts by referring to "Supplied with SU-WL450" in "Checking the parts" on page 5.
Note
- Firmly secure the Attachment parts using screws.
- When using an electric screwdriver, set the torque setting to approximately 1.5N· m {15 kgf·cm}.
- Be sure to store the used or unused parts in a safe place for future use. Retain this manual for future reference.
Standard mounting (2-a)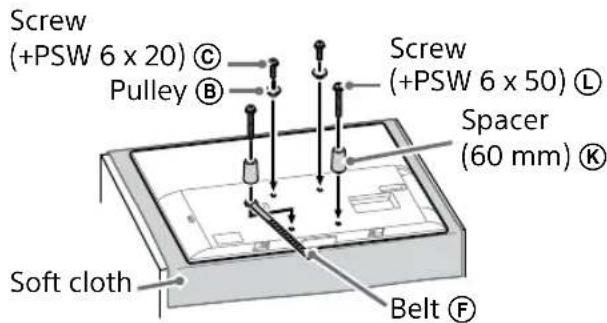
Slim mounting (2-b)
Note
- You cannot use some of the terminals on the rear of the TV when using this mounting style.
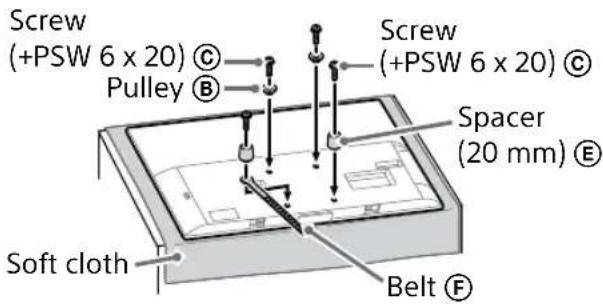
3 Connect the necessary cable(s) to the TV.
Make sure to connect the cables before installing the TV on the wall. You will be unable to connect the cables when the TV is installed.
Refer to the Reference Guide supplied with your TV.
Note
- Subcontract the cable routing in the wall to a licensed contractor.
- Bundle the connecting cables to prevent stepping on them before wall mounting.
Installing the TV on the wall
KD-75XG80□□
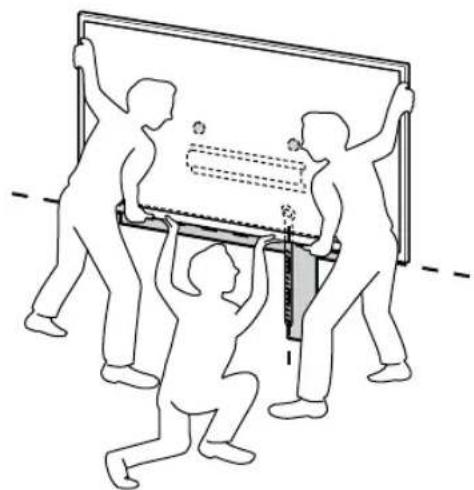
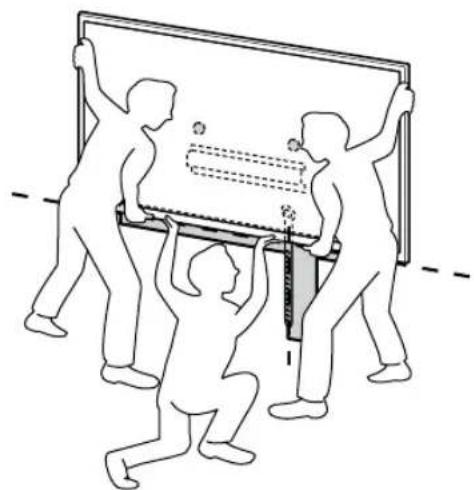
1 Lift the TV.
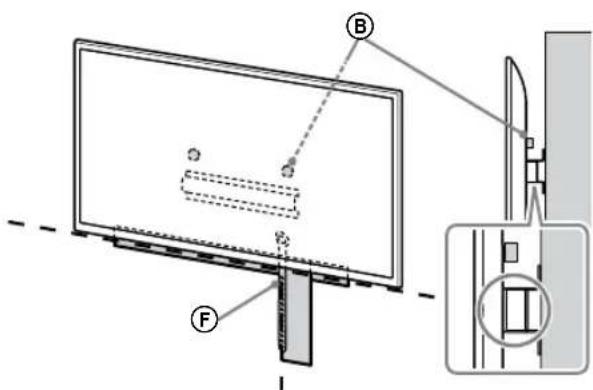
- For the location of the Pulleys (B) to the hang on the Base or Base Adaptor, refer to the table of step 3 in "Deciding on the installation location" on page 7.
- Make sure that the rear of the TV touches the Base or Base Adaptor when holding the TV.
Note
- Hold the TV securely with both hands and make sure the Belt (F) and the bottom of the TV align with the masking tape.
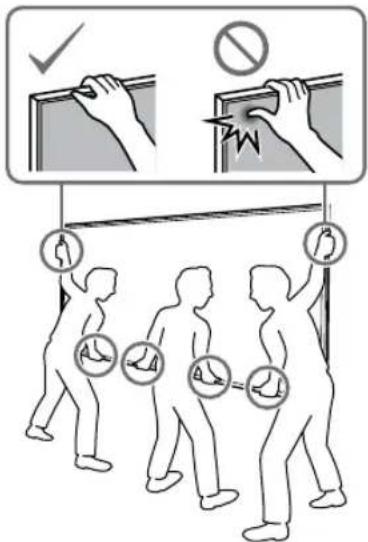
- Carry the TV with three people, and the person in front of the TV leads the others to adjust the position.
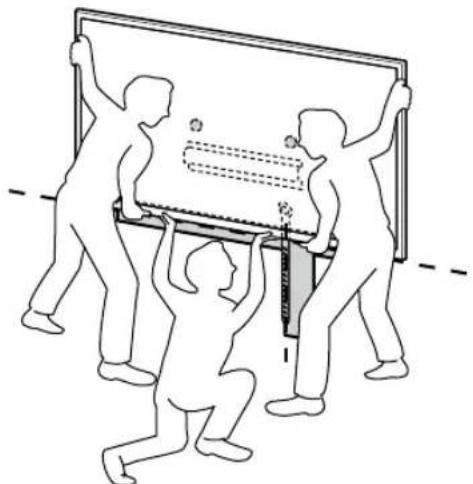
Take great care when installing the TV to the wall, especially for the person who is supporting the TV from below. The television set may fall, causing serious bodily injury or even death.
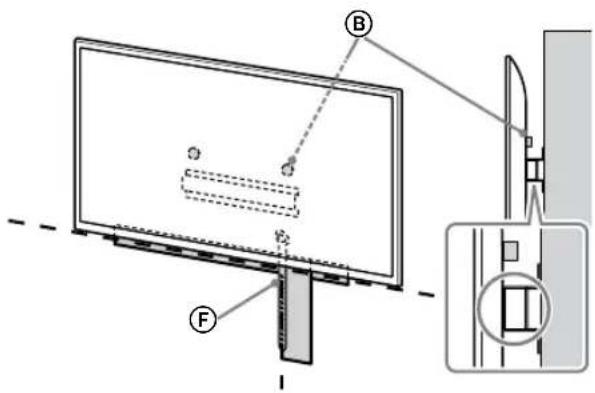
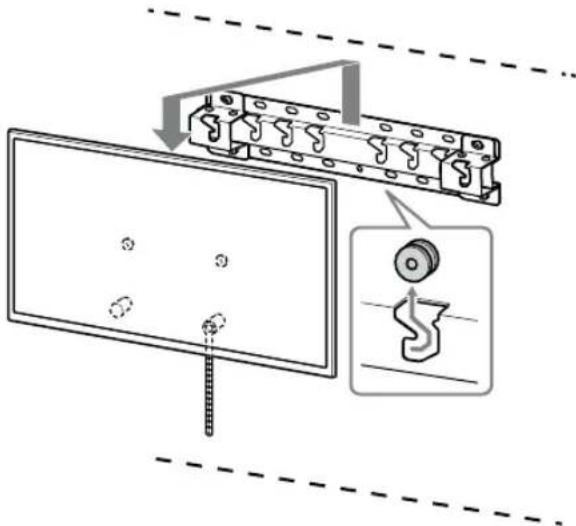
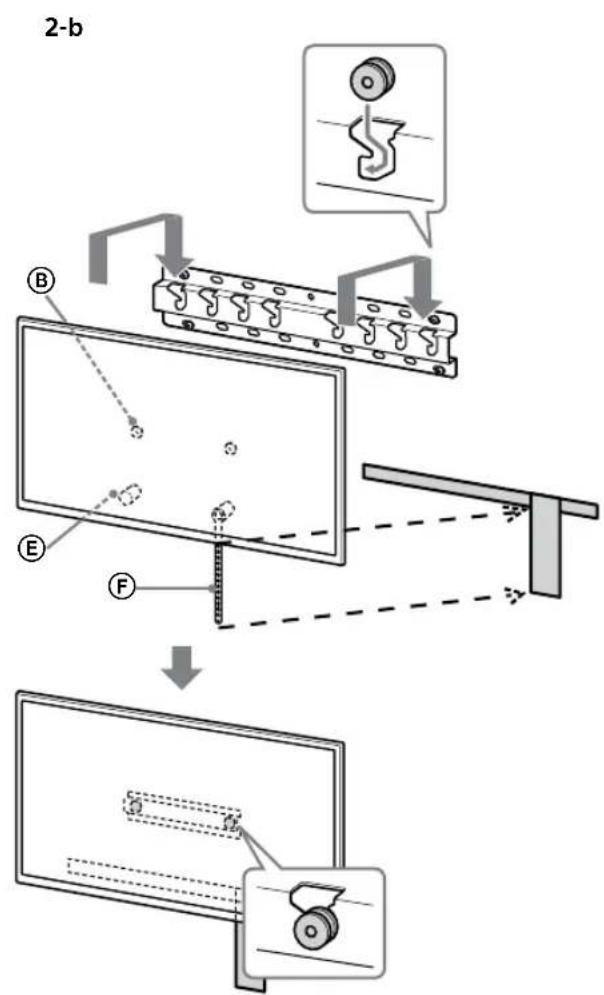
2. Install the TV onto the Base or Base Adaptor.
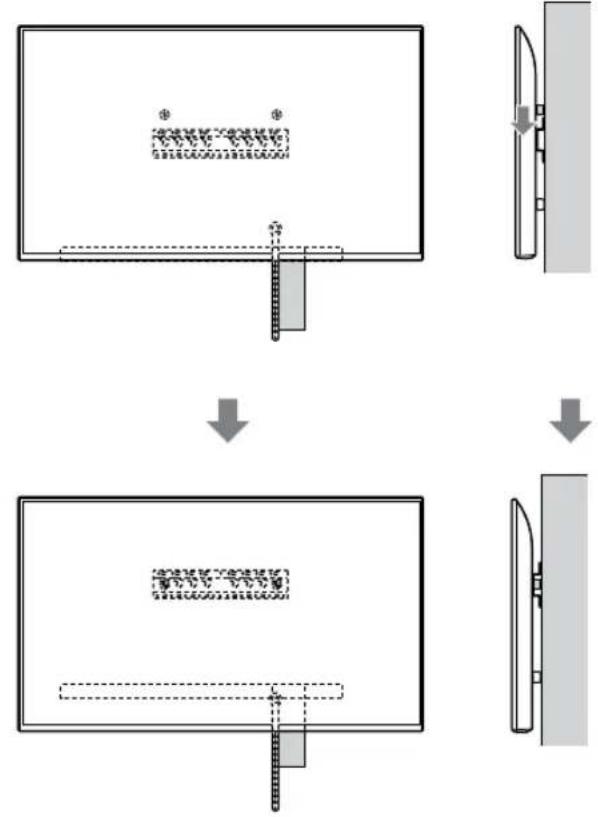
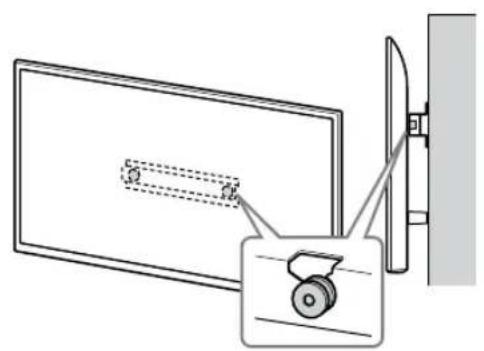
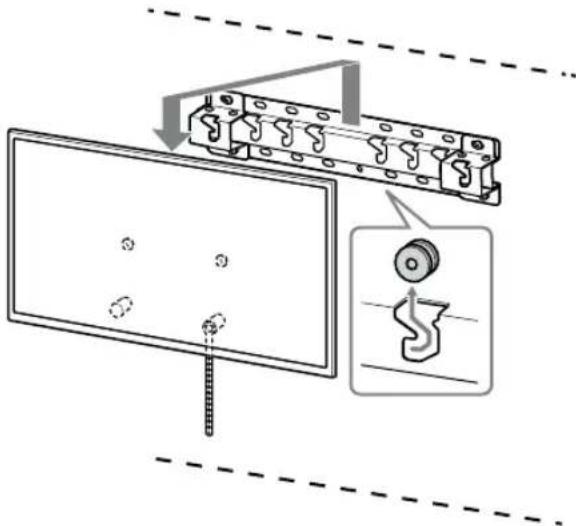
Gently slide down the TV and hang the Pulleys (B) attached to the rear of the TV onto the Base or Base Adaptor, making sure to confirm the shape of the holes. After installing the TV on the wall, confirm that the Pulleys (B) are firmly latched into the Base or Base Adaptor. Release both hands slowly to ensure that the TV does not fall.
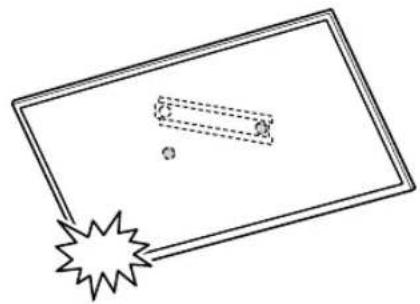
After installing the TV on the wall, remove the masking tape, etc. from the wall.
WARNING
- Be sure that two or more persons (three or more persons for 75 inches and above TV sets) hold the TV when carrying it.
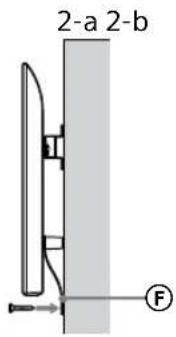
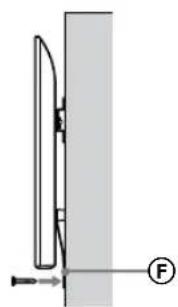
3. Preventing the bottom of the TV from shifting.
Take up the slack of Belt F and attach it to the wall tightly.
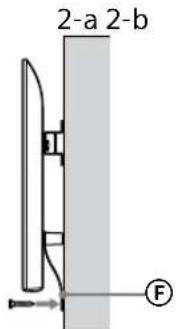
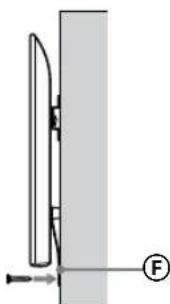
- Use a 5 mm diameter screw or equivalent (not supplied).
Note
Try to pull the bottom of the TV towards yourself slightly to make sure that it does not move forward. If there is any movement, it is not fixed correctly, and the Belt (F) should be secured firmly again.
KD-65XG81□□/65XG80□□ / 55XG81□□ / 55XG80□□ / 49XG81□□ / 49XG80□□ / 43XG81□□ / 43XG80□□
1. Lift the TV.
- For the location of the Pulleys to hang on the Base or Base Adaptor, refer to the table of step 3 in "Deciding on the installation location" on page 7.
- Make sure that the rear of the TV touches the Base or Base Adaptor when holding the TV.
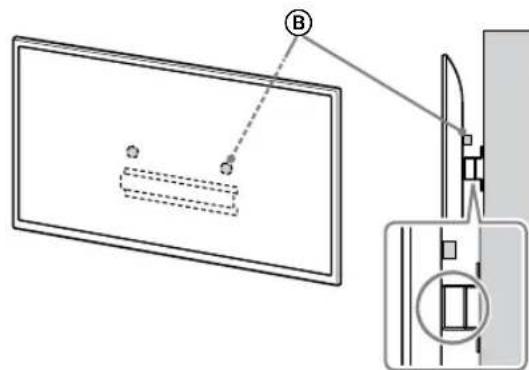
Note
- Hold the TV securely with both hands.
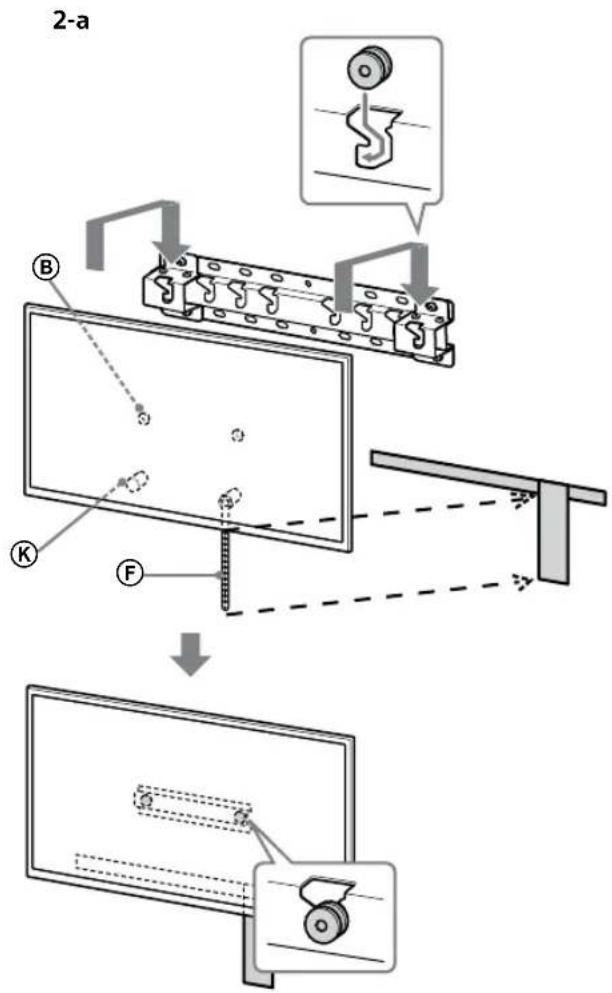
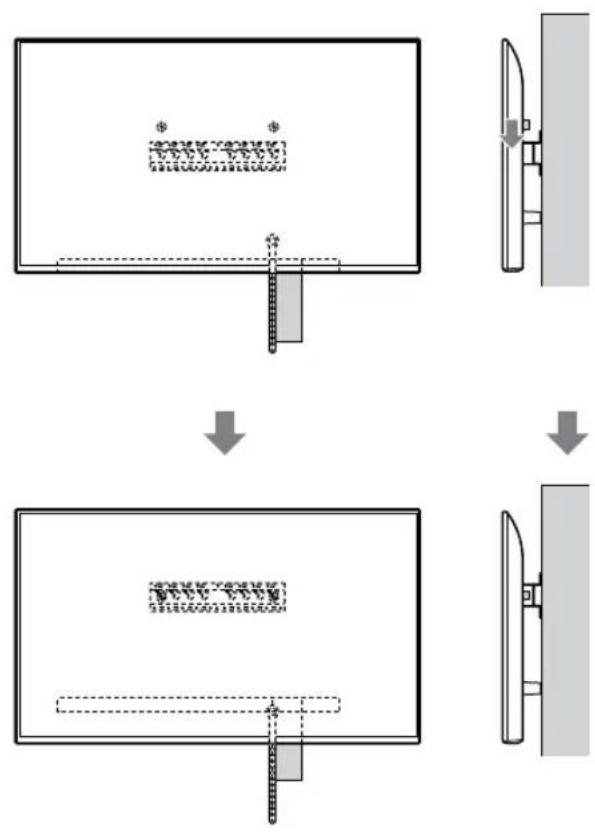
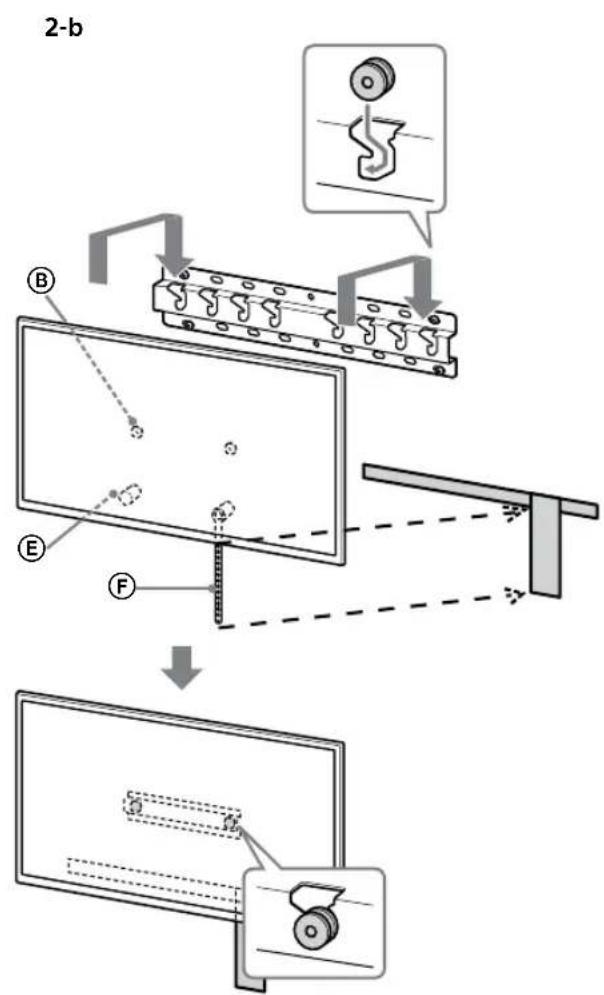
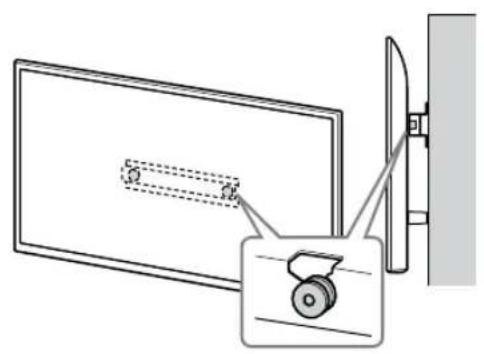
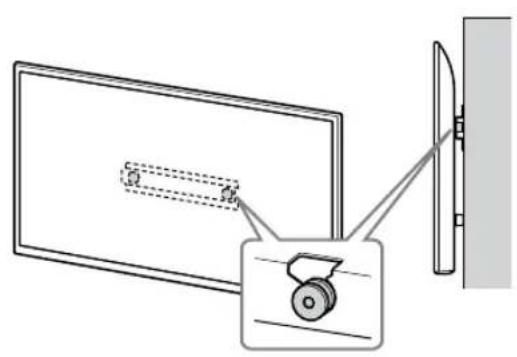
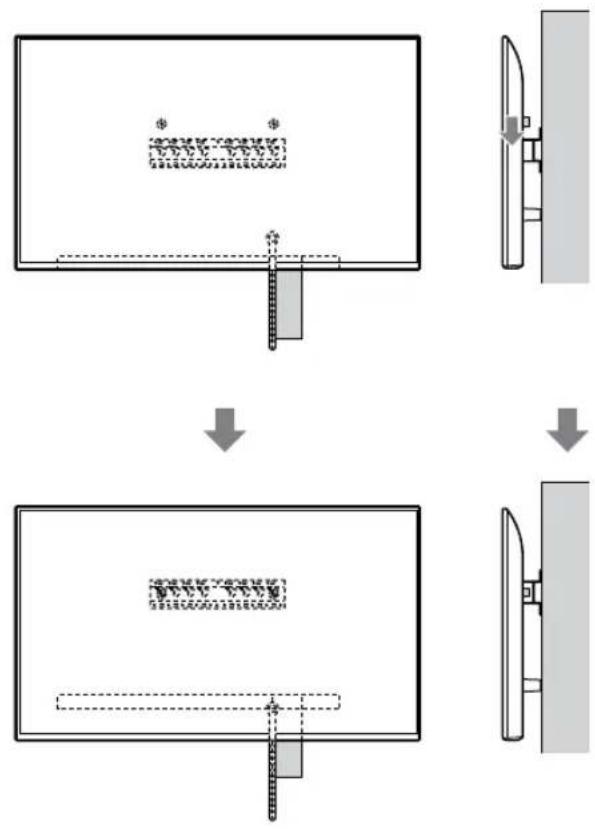
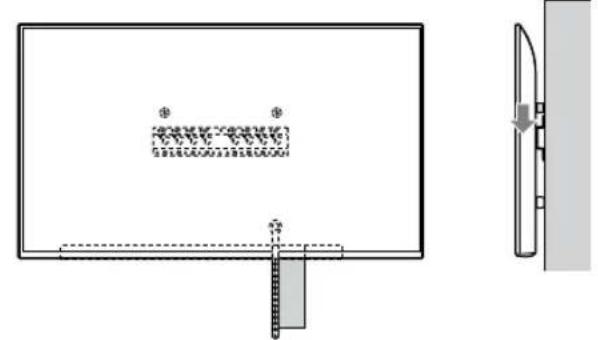
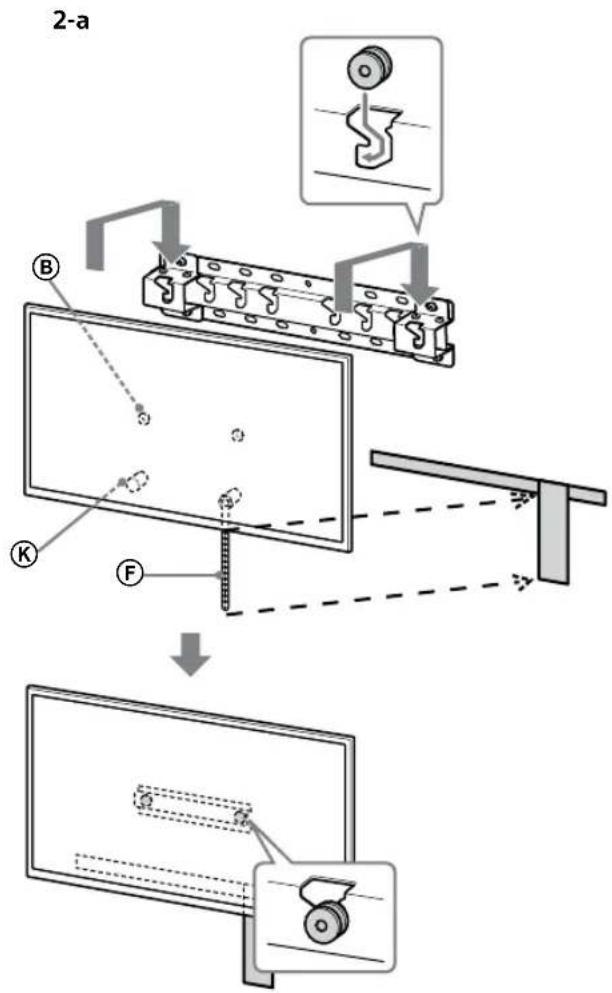
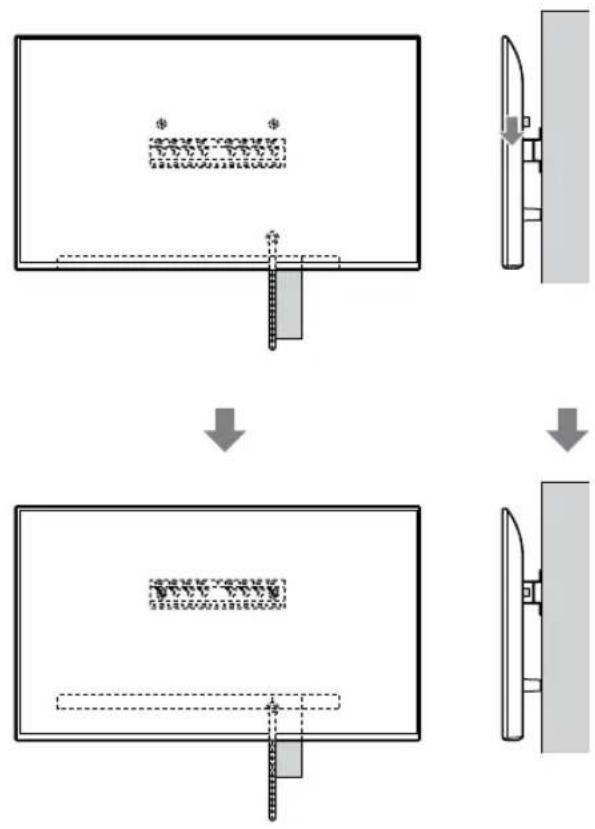
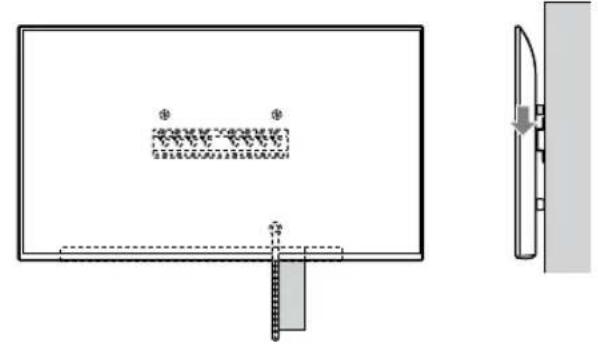
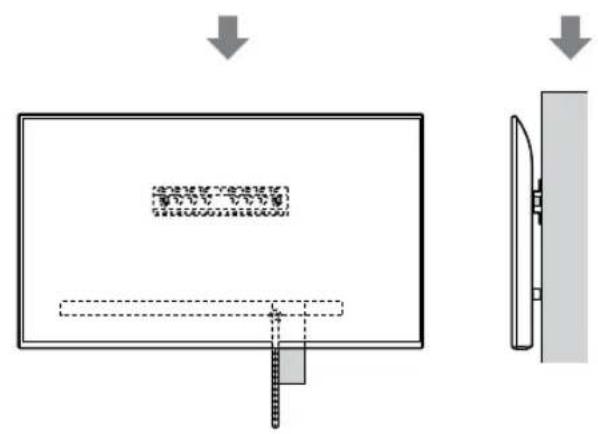
2 Install the TV onto the Base or Base Adaptor.
Gently slide down the TV and hang the Pulleys attached to the rear of the TV to the Base or Base Adaptor, making sure to confirm the shape of the holes. After installing the TV on the wall, confirm the Pulleys are firmly latched into the Base or Base Adaptor. Release both hands slowly to ensure that the TV does not fall.
2-a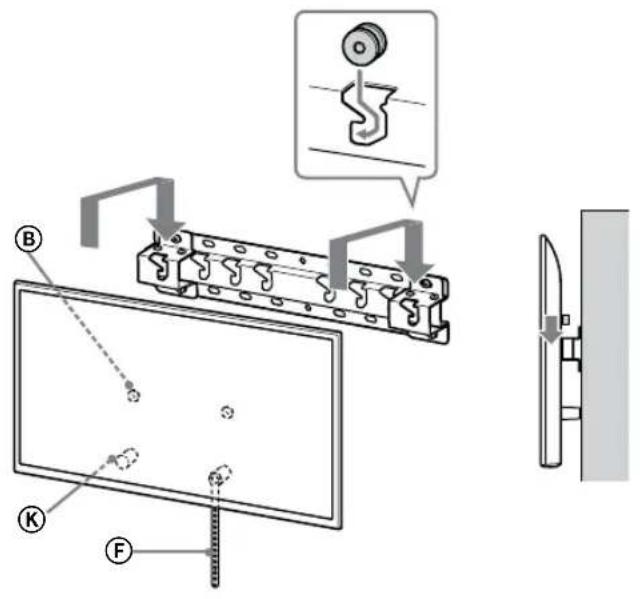
2-b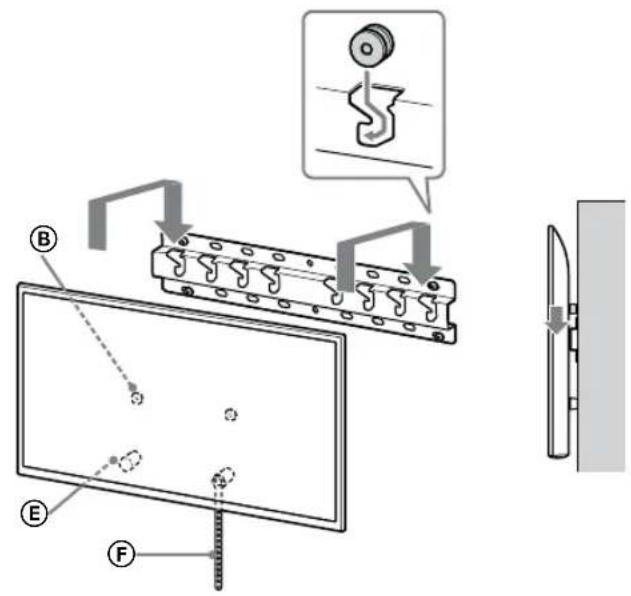
↓
↓
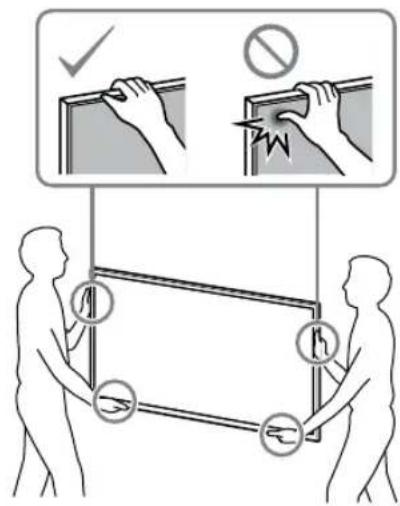
WARNING
- Be sure that two or more persons (three or more persons for 75 inches and above TV set) hold the TV when carrying it.
3 Preventing the bottom of the TV from shifting.
Take up the slack of Belt F and attach it to the wall tightly.
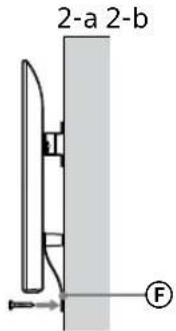
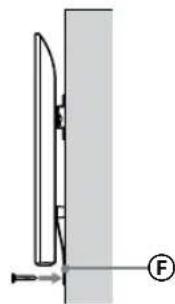
- Use a 5 mm diameter screw or equivalent (not supplied).
Note
Try to pull the bottom of the TV towards yourself slightly, to make sure that it does not move forward. If there is any movement, it is not fixed correctly, and the Belt should be secured firmly again.
Confirming the completion of the installation
Check the following points.
- The Pulleys (B) are firmly hung onto the Base or Base Adaptor.
- The cord and the cable are not twisted or pinched.
- The Belt (F) is tight with no slack.
WARNING
- Improper placement of the mains lead, etc. may cause fire or electric shock through a short circuit. Be sure to confirm the completion of the installation for safety.
Other information
When removing the TV, reverse the previous installation procedure.
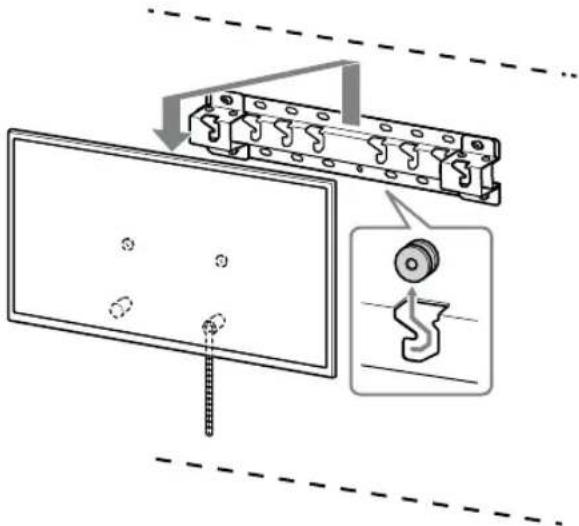
WARNING
- Be sure that two or more persons (three or more persons for 75 inches and above TV set) hold the TV when removing it.
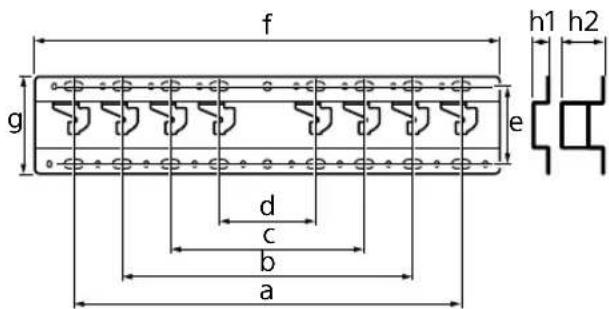
Specifications
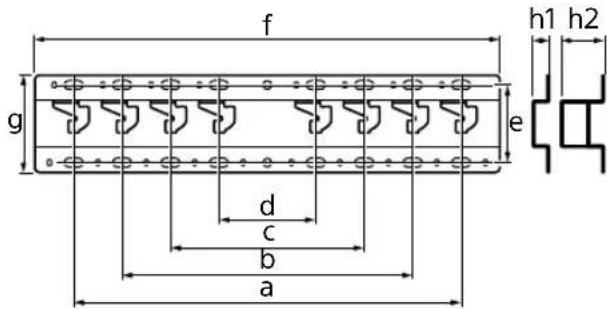
Dimensions: (Approx.) [mm]
a:400
b: 300
c: 200
d: 100
e: 80
f: 480
g: 100
h1: 20 (case 2-b)
h2: 60 (case 2-a)
Weight (base only): (Approx.) [kg]
0.8
Design and specifications are subject to change without notice.
55XG80□□*/49XG81□□*/49XG80□□*/43XG81□□*/
43XG80□□*
Dimensions: (approx.) [mm]
a: 400
b : 300
c:200
d:100
e:80
f : 480
g : 100
h1:20 (case 2-b)
h2:60 (case 2-a)
Weight (base only) : (approx.) [kg] 0.8
55XG80□□*/49XG81□□*/49XG80□□*/43XG81□□*/
43XG80□□*
55XG80□□*/49XG81□□*/49XG80□□*/43XG81□□*/
43XG80□□*
55XG80□□*/49XG81□□*/49XG80□□*/43XG81□□*/
43XG80□□*
55XG80□□*/49XG81□□*/49XG80□□*/43XG81□□*/
43XG80□□*
In the current model names, "□□" indicates digits and/or characters that are specific to each model.
To customers
55XG80□□*/49XG81□□*/49XG80□□*/43XG81□□*/
43XG80□□*
Dimensions: (Approx.) [mm]
a: 400
b: 300
c: 200
d: 100
e: 80
f: 480
g: 100
h1: 20 (case 2-b)
h2:60 (case 2-a)
Weight (base only): (Approx.) [kg]
0.8
55XG80□□*/49XG81□□*/49XG80□□*/43XG81□□*/
43XG80□□*
* The □□ in the model names indicate numbers and/or characters for each model.
For customers
Preparation for installation. 5
Checking parts 5
Finding a location 6
Preparation for installation
1 Find the TV's location.
55XG80□□*/49XG81□□*/49XG80□□*/43XG81□□*/
43XG80□□*
55XG80□□*/49XG81□□*/49XG80□□*/43XG81□□*/
43XG80□□*
* This is a general model name, the "□" indicates the numbers/characters of the specific model.
For customers
For safety and protection of the product, Sony recommends that installation of the TV be carried out by Sony dealers or licensed contractors. Do not attempt to install it yourself.
For Sony dealers and contractors
Precautions for installation
Keep the instruction manual and installation manual for the TV from the installation. - Before installation, make sure you have a Philips screwdriver that fits the screws. - Verify the position of the TV stand. - Prepare three or more screws of 8 mm diameter and one screw of 5 mm diameter (if necessary). Choose screws that are suitable for the wall material.
Checking the accessories
55XG80□□*/49XG81□□*/49XG80□□*/43XG81□□*/
43XG80□□*
55XG80□□*/49XG81□□*/49XG80□□*/43XG81□□*/
43XG80□□*
55XG80□□*/49XG81□□*/49XG80□□*/43XG81□□*/
43XG80□□*
Dimensions: (approx.) [mm]
a: 400
b: 300
c: 200
d: 100
e: 80
f: 480
g: 100
h1: 20 (case 2-b)
h2: 60 (case 2-a)
55XG80□□*/49XG81□□*/49XG80□□*/43XG81□□*/
43XG80□□*
Do not place the TV on a wall or other surface other than the TV stand. Do not place the TV on a slanted or unstable surface, or on top of another object.
If you place it incorrectly, the TV may fall and cause injury or damage.
Do not stand or sit on the TV.
Do not lean on or push the TV; it may fall and cause serious injury.
If the safety measures are not observed, there is a risk of injury or damage to property.
Do not operate the product with a damaged power cord during cleaning or maintenance.
Do not apply excessive force to the front part of the television. If you do, the television may fall and cause injury or damage to property.
Safety Measures
If you use the TV for a long time, the wall mount bracket may become loose from the wall. The wall must be strong enough to support the TV. If the wall mount bracket is detached from the wall after installation, holes from the screws will remain. Do not install the wall mount bracket in the same location, as it may be subject to mechanical vibration.
Wall Mount Bracket Installation
For Sony dealers
WARNING
These instructions are intended solely for Sony dealers. Read the safety measures described above, paying special attention to safety during installation, maintenance, and inspection of the product.
Do not install the wall mount bracket on a wall surface where the TV or its edges protrude from the wall surface.
Do not install the wall mount bracket on a wall surface, such as a column, where the TV or its edges protrude from the wall surface. If the TV is subjected to impacts or vibrations from the side, this may cause injury or damage to property.
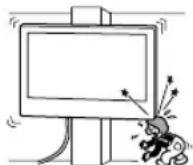
Do not install the TV on a ceiling or in a climate-controlled environment.
If the TV is exposed to prolonged heat or humidity from the climate, this may cause fire, electric shock, or malfunction of the TV.
Install the wall mount bracket securely to the wall by following the instructions in this manual.
If the screws are loosened or fall out, the wall mount bracket may fall and cause property damage. Use suitable screws for the wall material. Mount the bracket securely by using four or more screws with a diameter of 8 mm (or equivalent).
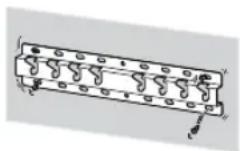
Use the correct screws and mounting parts as described in the installation instructions. If you use replacement parts, the TV may fall and cause personal injury or damage.
Make sure you install the bracket correctly by following the procedure described in this manual.
If any screws become loose or fall out, the TV may fall and cause personal injury or damage.
Tighten the screws securely in the indicated position.
If you do not do this, the TV may fall and cause personal injury or damage.
Be careful not to hit the TV during installation.
If the TV is subjected to impact, it may fall and be damaged. This could lead to injury.
Mount the TV on a wall that is perpendicular and flat.
If you do not do this, the TV may fall and cause injury.
After proper installation of the TV, route the cables correctly.
If people or objects get caught on the cables, this may cause injury or damage to the TV.
Do not pinch the power cord or connecting cables.
If the power cord or connecting cables are pinched between the bracket and the wall, or if they are bent or pulled with force, the internal wires may be damaged and cause a short circuit or electric shock. This could result in fire or electric shock.
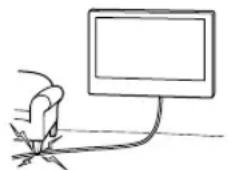
The screws required to secure the wall mount bracket to the wall are not included in the package.
Mounting the TV on a wall or structure, when installing the bracket for wall mounting.
Contents
Preparation for mounting. 5
Checking the parts. 5
Determining the mounting position. 6
Mounting on the wall base 8
Preparation for mounting the TV...9
KD-75XG80□□ 9
KD-65XG81□/65XG80□ 10
KD-55XG81□□/55XG80□□ 11
KD-49XG81□/49XG80□/43XG81□/43XG80□
Mounting the TV on the wall.14
KD-75XG80□□ 14
KD-65XG81□□ / 65XG80□□ / 55XG81□□ / 55XG80□□ / 49XG81□□ / 49XG80□□ / 43XG81□□ / 43XG80□□
Checking the connection of
MOHTaxa 19
Dpyra NHΦopMaunr 19
Cneunphiauu.. 19
Mounting on the TV on the wall
Procedure for mounting different TVs.
Use the wall-mount bracket SU-WL450 to mount the TV on the wall.
Caution
If the stand is attached to the TV, remove the stand beforehand. Follow the setup instructions and follow the steps in reverse order to remove the stand. - Place the TV with the screen facing down on a flat and stable surface covered with a soft cloth, while you fasten the parts for the wall-mount bracket or when you remove the stand from the TV, to prevent damage to the surface of the LCD display. Do not forget to store the removed screws in a safe place, keeping them away from children.
Preparation for mounting
The setup instructions for the TV should be at hand before starting the mounting. - Before use, prepare a Phillips screwdriver that matches the screws. - Choose the mounting position for the TV. - Prepare four screws with a diameter of 8 mm and one screw with a diameter of 5 mm or equivalent (not included in the package). Select screws suitable for the wall material.
Parts check
Supplied with SU-WL450
- Check that all parts are present.
| A Oснова (20) (1) B Мakара (2) | |
| ◎ PSW 6x20 (4)◎ PSW 4x20 c Втулka (2) | |
| ◎Дистанц inorderна Втулka (20) (2) | ◎Колан (1) |
| ◎Втулka (20) (M4) (2) | ◎PSW 4x20 (2) |
| ◎Адамер на Оснobа时报 (2) | ◎J PSW 4x10 (8) |
| ◎Дистанц inorderна Втулka (60) (2) | ◎L PSW 6x50 (2) |
| ◎Втулka (M4) (2)◎PSW 4x50 (2) | |
Determining the mounting position
1 Select the mounting position.
Make sure the wall is strong enough to support the TV. Check the wall's load-bearing capacity. Refer to the TV's user manual for its specifications.
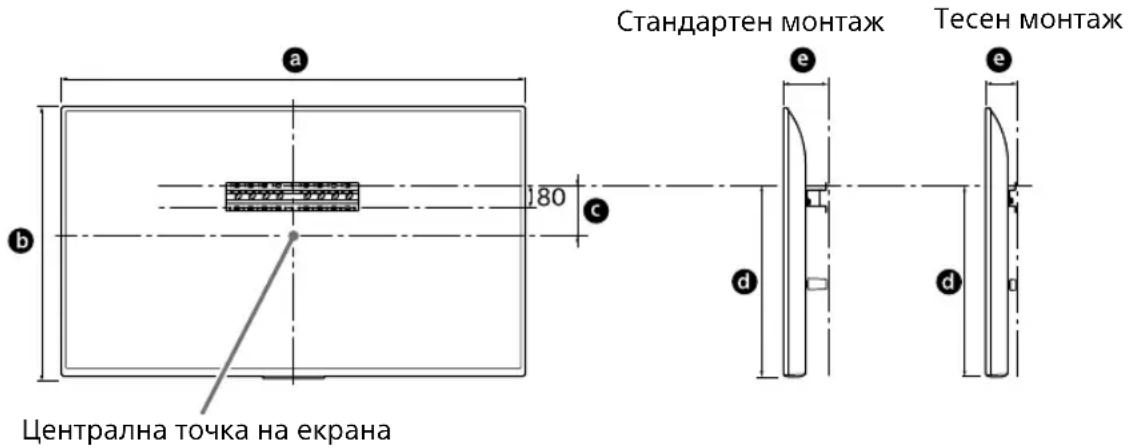
Dimensions: mm
| Иme на мозел | Размери на ekрANA | Размер на ceentьра на ekрANA | Дылжина на моNTаж | |||
| a | b | c | d | e | ||
| Стондануten MOHTаж | Тecен MOHTаж | |||||
| KD-75XG80□□ | 1686 970 202 690 142 100 | |||||
| KD-65XG81□□ | 1463 845 173 597 142 100 | |||||
| KD-65XG80□□ | 1463 845 173 597 142 100 | |||||
| KD-55XG81□□ | 1241 721 95 460 141 100 | |||||
| KD-55XG80□□ | 1241 721 95 460 141 100 | |||||
| KD-49XG81□□ | 1101 645 -15* 314 119 | 78 | ||||
| KD-49XG80□□ | 1101 645 -15* 314 119 | 78 | ||||
| KD-43XG81□□ | 970 570 23 315 119 | 77 | ||||
| KD-43XG80□□ | 970 570 23 315 119 | 77 | ||||
- The center of the bracket should be at the center point of the screen.
Note
- The values in the table may vary depending on the installation method. When your TV is mounted on the wall, its top part may tilt forward slightly.
Leave an appropriate distance between the TV, the wall, and the protruding parts of the wall, as shown below.
Dimensions: mm
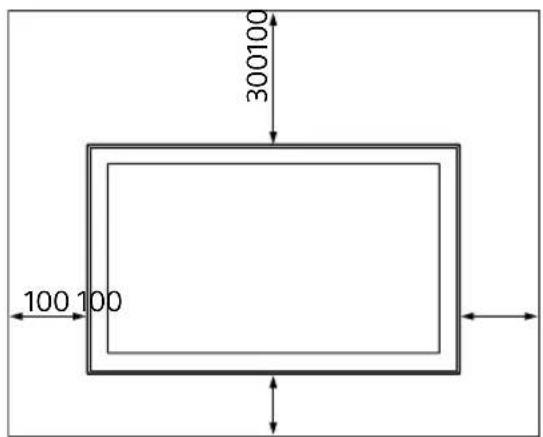
To ensure proper ventilation and prevent dust accumulation:
Do not place the TV on its side, do not mount it upside down or sideways. Do not place the TV on radiators, stoves, or heaters. Do not cover the TV with cloth, such as curtains, or items like newspapers. Do not mount the TV as shown below.
Air circulation is blocked.
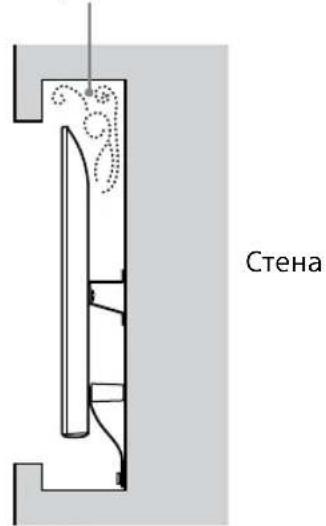
Note
If you plan to route cables through the wall, make an opening in the wall to pass the cables before installation. To prevent cable damage, make the opening outside the perimeter of the base (20) A, behind the base (20) E, and behind the base (60) K.
2 Wall mount installation. The distance from the rear of the TV to the wall can be adjusted as shown below.
2-a Standard mount
2-b Tilt mount
See Table 1.
WARNING
If you have selected 2-b, proceed to the next step without restriction.
See Table No. 1 for the position of the alternative fixing for the base. If you have selected 2-b, skip this step.
| Име на мозел | Мосторожения На Кукatinga |
| KD-75XG80□□ | |
| KD-65XG81□□ | b |
| KD-65XG80□□ | |
| KD-55XG81□□ | |
| KD-55XG80□□ | |
| KD-49XG81□□ | c |
| KD-49XG80□□ | |
| KD-43XG81□□ | d |
| KD-43XG80□□ |
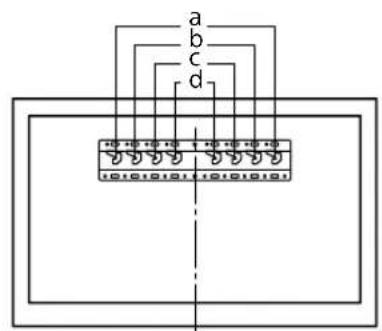
Mount the base antenna ① using the screw (PSW 4x10) to the base (20) A, if you have selected 2-a.
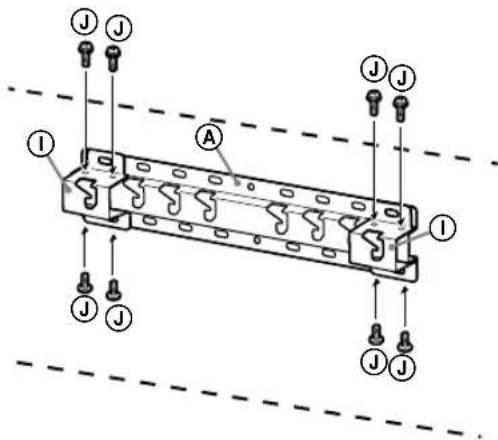
Determine the positions of the screws for mounting the base (20) A.
See the specifications on page 19.
When you select 2-a, use the specific positions of the holes for the antenna on the base ①.
WARNING
The wall on which the TV is to be mounted must be able to support at least four times its weight (see the TV's user manual regarding its weight).
- Determine the correct position of the wall where the TV will be mounted. If necessary, reinforce the wall sufficiently.
Mounting the base on the wall
- Use four M8 diameter screws or equivalent (not supplied). Tighten the four screws into the holes of the base antenna ① with the base (20) A (only 2-a).
- Mount the base (20) A horizontally on the wall.
Preparation for mounting the TV
Installation and setup guide.
KD-75XG80□□
1 Mark the mounting location on the wall.
- Use the self-tapping screws (not supplied with the TV) to mark the location of the TV base. See the following table.
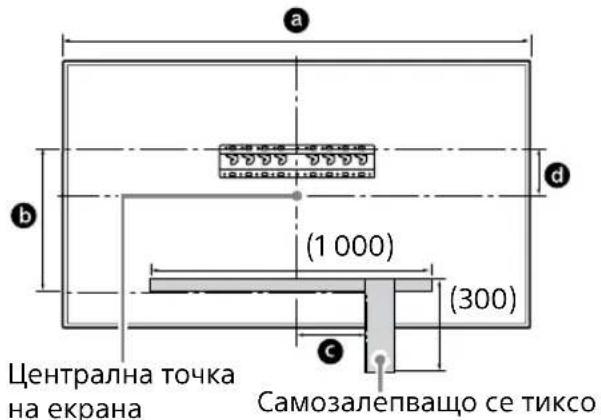
Unit: mm
2 Mount the TV on the table-top stand.
Carefully lift the TV and insert the marks B, attached to the side of the TV, into the base stand, checking the hole format. After mounting the TV, check that the marks B are securely inserted into the base stand. It is important to pull both cords to ensure the TV is stable.
After mounting the TV to the wall, remove the self-tapping screws from the wall.
WARNING
- Make sure that two or more people (three or more people for a 75-inch TV) hold the TV when carrying it.
2 Mount the TV on the table-top stand.
Carefully lift the TV and insert the marks B, attached to the side of the TV, into the base stand, checking the hole format. After mounting the TV, check that the marks B are securely inserted into the base stand. - It is important to pull both cords to ensure the TV is stable.
2-a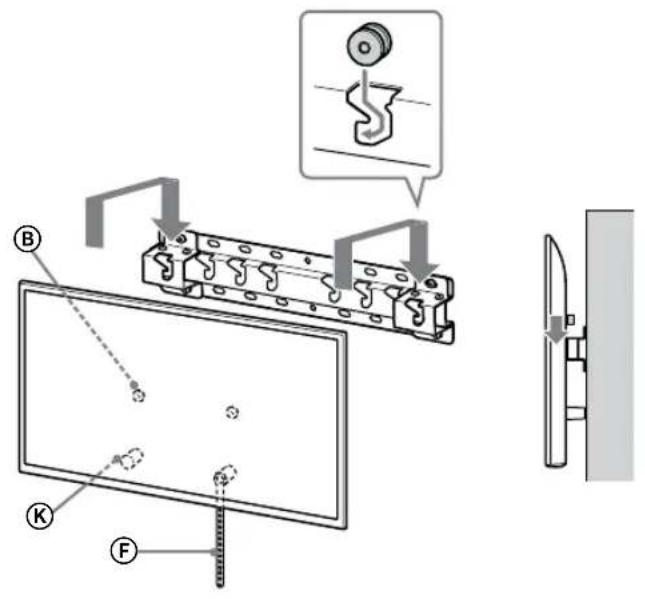
2-b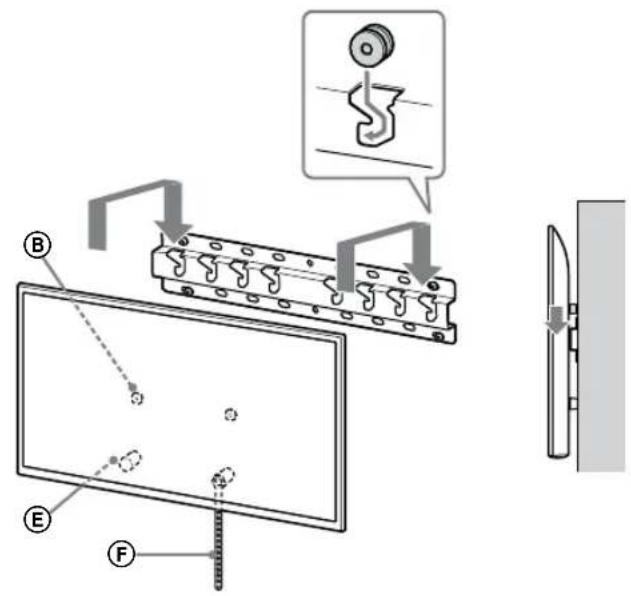
↓
- Remove the TV from the packaging and place it on a flat surface. (For TV sizes from 75 inches, hold the TV when carrying it.)
3. Installation
Place the TV on the stand.
- Select the appropriate part of the stand and attach it to the TV.
- Use a screw with a diameter of 5 mm or equivalent (not included in the package).
Caution
Before attaching the stand to the TV, make sure it is properly aligned. If it is not, it is not attached correctly and the stand must be reattached securely.
Wall Mounting
Supported models:
KD-75XG80□□*/65XG81□□*/65XG80□□*/55XG81□□*/
55XG80□□*/49XG81□□*/49XG80□□*/43XG81□□*/
43XG80□□*
The actual names of models "□□" denote the model number with symbols characteristic of a specific model.
Do not allow children to play with the device. Keep small parts out of reach of children to prevent accidental ingestion.
After mounting the TV, do not remove the screws, etc.
Otherwise, the TV may fall and cause injury or damage to property.
Do not disassemble or modify the bracket for wall mounting.
Otherwise, the bracket for wall mounting may fall and cause injury or damage to property.
Do not install any other equipment on the bracket other than that specified.
This wall-mount bracket is intended for use only with the specified products. If equipment not intended for such installation is mounted on this bracket, it may fall or be damaged, and may cause injury or damage to property.
To avoid overloading the wall-mount bracket, do not place anything on it other than the TV. Do not push the TV left/right or up/down.
Otherwise, the TV may fall and cause injury or damage to property.
Do not lean on the TV or hold onto it.
Do not lean on the TV or hold onto it, as it may fall and cause serious injury.
WARNING
When following the precautions below, there is a risk of injury or damage to property.
Care must be taken not to apply excessive force.
Do not place the TV on top of the upper part. Otherwise, the TV may fall and cause injury or damage to property.
Precautions
If the TV is installed on a wall mount and used for a long time, the wall material may lose its strength and the wall may become damaged. After removing the wall mount, holes will remain in the wall. Do not use the wall mount in places with mechanical vibrations.
Do not install the wall mount on walls where the edges of the TV will protrude beyond the edges of the wall.
Do not install the wall mount on surfaces such as columns where the edges of the TV will protrude beyond the surface of the wall. If you trip over the protruding edges of the TV, you may be injured or damage property.
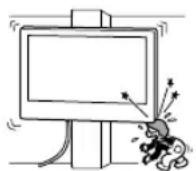
Do not install the TV on a stand or on the floor.
If the TV is exposed to condensation or airflow from an air conditioner for a long period of time, it may cause fire, electric shock, or malfunction of the TV.
Be sure to securely attach the wall mount to the wall, following the instructions in this manual.
If any of the screws are loose or missing, the wall mount may fall and cause injury or damage to property. When performing installation, be sure to use screws that match the wall material and securely install the device, using at least four 8 mm screws (or equivalent).
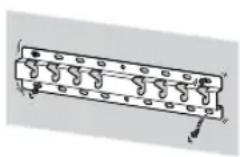
Be sure to use the screws and parts included in the kit for mounting, and strictly follow the instructions in this installation manual. If other mounting materials are used during installation, the TV may fall and be damaged or cause injury.
Be sure to perform the assembly of the mount, exactly following the instructions in this installation manual.
If any of the screws are loose or missing, the TV may fall and be damaged or cause injury.
Securely tighten the screws in the designated mounting holes.
Otherwise, the TV may fall and be damaged or cause injury.
Make sure that the TV is not subjected to impacts during installation.
Do not place the TV on an unstable surface. This may cause injury.
Mount the TV on the wall only if the wall is perpendicular to the floor.
Otherwise, the TV may fall and cause injury.
After proper installation of the TV, ensure safe routing of cables.
Cables that pose a tripping hazard may cause serious injury or damage to the TV.
Do not allow cables or connector cables to become tangled.
If cables or connector cables are routed between the device and the wall, or are bent or crossed, the internal wires may be damaged, which could cause a short circuit or break. This may result in fire or electric shock.
Screws for mounting the wall-mount bracket to the wall are not included in the package.
When installing the bracket for wall mounting, use screws appropriate for the material and structure of the wall.
The device should be stored in its original packaging in a dark, dry, clean, and well-ventilated room, away from direct sunlight. Storage temperature: -20°C to +60°C. Storage humidity: <80%.
Contents
Preparation for installation. 6
Checking the package contents 6
Determining the installation method 7
Wall mounting installation 9
Preparation for TV installation...10
KD-75XG80□□ 10
KD-65XG81□□/65XG80□□ 11
KD-55XG81□□/55XG80□□ 12
KD-49XG81□/49XG80□/43XG81□/43XG80□
Installing the TV on the wall. 15
KD-75XG80□□ 15
KD-65XG81□□ / 65XG80□□ / 55XG81□□ / 55XG80□□ / 49XG81□□ / 49XG80□□ / 43XG81□□ / 43XG80□□
Use the wall-mount bracket SU-WL450 for wall-mounting the TV.
Note
- If the table-top stand is attached to the TV, first detach the table-top stand. Perform the steps for attaching the table-top stand in reverse order, as described in the Setup Guide.
Place the TV on a stable horizontal surface covered with a soft cloth, so that it is positioned with the screen facing down, and attach the wall-mount bracket parts to the TV. To avoid damaging the LCD screen of the TV, be careful when attaching or detaching the table-top stand.
Keep the removed screws in a safe place out of the reach of children.
4 Determine the screw positions for installing the base (20) A.
See the specifications on page 20. If you select option 2-a, use the base adapter hole positions ①.
The wall on which the TV will be mounted must be able to support a weight exceeding the TV's weight by at least four times (to find out the TV's weight, see the reference manual).
- Determine the strength of the wall on which the TV will be mounted. If necessary, reinforce the wall.
Wall-mount installation
- Use four or more screws with a diameter of 8 mm or equivalent (not included in the package). Insert four screws into the holes of the base plate ① and attach it to the base (20) A (only 2-a).
- Install the base (20) A horizontally on the wall.
1 Mark the installation location on the wall.
- Use adhesive tape or similar (not included) to mark the TV's position next to the base or base plate. See the following table.
Units of measurement: mm
Compact installation (2-b)
Note
- With this installation, some connectors on the back of the TV will be inaccessible.
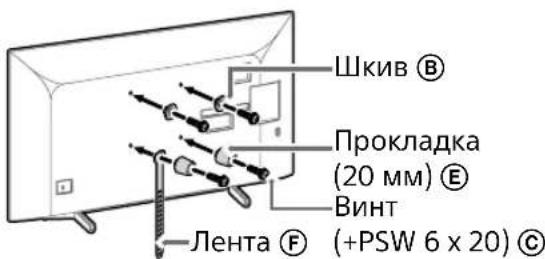
3 Connect the necessary cables to the TV.
Before mounting the TV on the wall, be sure to connect the cables.
After mounting the TV, connecting the cables will be impossible.
See the supplied manual that comes with the TV.
Note
- Route the cables in the wall before mounting the TV. - Before mounting the TV on the wall, connect the cables to avoid accidentally stepping on them.
4 Detach the table-top stand from the TV.
- Remove the side of the table-top stand alternately. Hold the table-top stand firmly with both hands while others lift the TV.
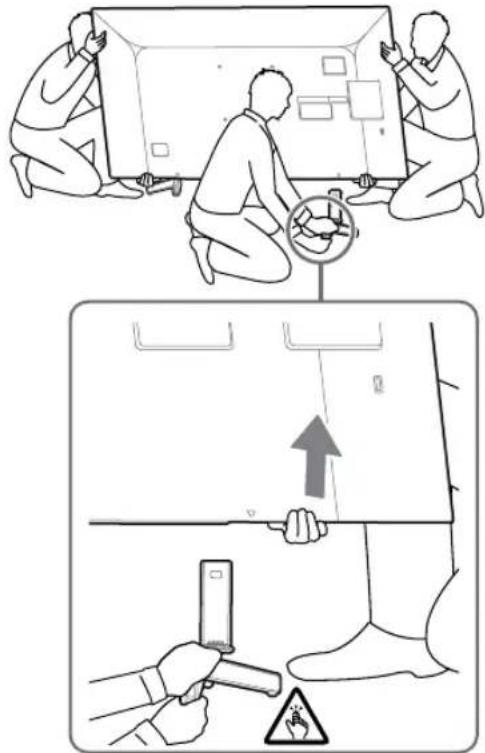
- Repeat the procedure and remove the other side of the table-top stand.
Note
To detach the table-top stand, two or more people are required. - Be careful not to use excessive force when detaching the table-top stand from the TV, as this could cause the TV to fall and result in injury or damage to the TV. Be careful when handling the table-top stand to prevent damage to the TV. - Be careful when lifting the TV, as the table-top stand may detach and fall, which could cause injury. - Be careful when detaching the table-top stand from the TV to avoid tipping over the device or damaging the surface on which the TV is placed.
KD-65XG81□□/65XG80□□
1 Attach the wall-mount brackets and the wall-mount base. Perform the bracket check according to the "Attaching to the SU-WL450" section in the "Checking the accessories" section on page 6.
Note
Tighten the brackets securely with screws. - When using an electric screwdriver, set the tightening torque to approximately 1.5 N·m {15 kgf·cm}. Keep the used and unused parts in a safe place for future use. Keep this instruction manual for future reference.
Standard mounting (2-a)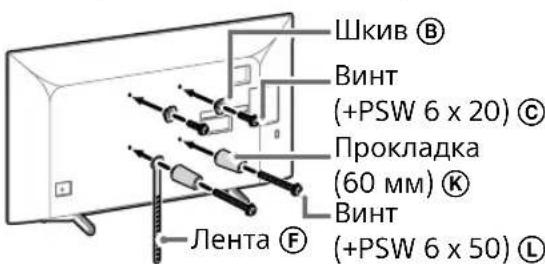
Compact installation (2-b)
Note
When installing the TV, some connectors on its rear panel may become inaccessible.
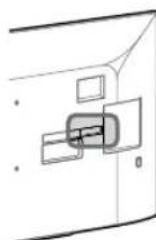

2 Connect the necessary cables to the TV.
Before mounting the TV on the wall, be sure to connect the cables.
After installing the TV, connecting the cables will become impossible.
See the instruction manual supplied with the TV.
Note
When routing cables, use the cable holder. - When mounting the device on the wall, connect the cables so that you do not accidentally step on them.
3 Detach the table-top stand from the TV.
- Remove the sides of the table-top stand one by one. Firmly hold the table-top stand with both hands while others lift the TV.
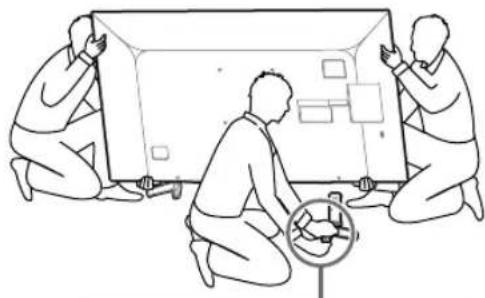
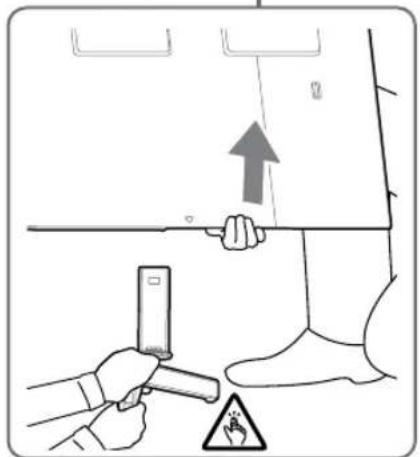
Repeat the described action and remove the other side of the table-top stand.
Note
- Detaching the table-top stand requires 3 or more people. - Be careful and do not use excessive force when detaching the table-top stand from the TV, as this may cause the TV to fall and result in injury or damage to the TV. - Be careful when handling the table-top stand to prevent damage to the TV. - Be careful when lifting the TV, as the table-top stand may detach and fall, which could cause injury. - Be careful when detaching the table-top stand from the TV to avoid tipping over the device and damaging the surface on which the TV is placed.
KD-55XG81□□/55XG80□□
1 Attach the mounting brackets for wall mounting.
Perform the check of the mounting brackets according to the item "Supplied with SU-WL450" in the section "Checking the accessories" on page 6.
Tighten the mounting screws with a screwdriver. When using an electric screwdriver, set the tightening torque to approximately 1.5 N·m {15 kgf·cm}. Store used and unused parts in a safe place so they can be used in the future. Keep this instruction manual for future reference.
Standard mounting (2-a)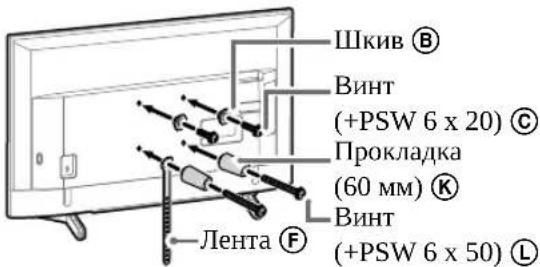
Compact installation (2-b)
Note
- With this installation, some connectors on the TV may become inaccessible.
Connect the necessary cables to the TV.
Before mounting the TV on the wall, be sure to connect the cables.
After mounting the TV, connecting the cables will be impossible.
See the instruction manual supplied with the TV.
Note
To route cables along the wall, use a cable guide. Before mounting, secure the connecting cables to the wall so they are not accidentally stepped on.
Remove the tabletop stand from the TV.
Note
- Be careful when lifting the TV, as the tabletop stand may detach and fall, which could cause injury.
- Always detach the table-top stand from the TV to avoid the device tipping over and damaging the surface on which the TV is placed.
KD-49XG81□□/ 49XG80□□ / 43XG81□□ / 43XG80□□
1 Detach the table-top stand from the TV.
Note
Place the TV on a soft cloth to avoid damaging the screen. - When installing the wall-mount bracket, do not use the screws removed from the table-top stand. Keep the removed table-top stand and its screws in a safe place out of the reach of children. They will be needed if you want to install the TV on a table in the future. The table-top stand is not sold separately.
CAUTION!
-Before turning on the TV, make sure the TV is in a vertical position. It is prohibited to turn on the TV if it is placed with the screen facing down to avoid unevenness of the image. Applying mechanical pressure to the TV may cause damage or breakage. -Place the TV with the screen facing down on a stable, flat surface so that the table-top stand extends beyond the edge of the surface. Positioning the TV screen and the table-top stand on the same level may create unstable working conditions and damage the TV. -When detaching the table-top stand from the TV, hold the table-top stand with both hands.
2 Attach the wall-mount bracket's mounting parts. Perform the check of the mounting parts according to the section "Attaches to SU-WL450" in the "Checking the accessories" section on page 6.
Note
Tighten the mounting parts firmly with screws. -When using an electric screwdriver, set the tightening torque to approximately 1.5 N·m {15 kgf·cm}. Keep the used and unused parts in a safe place so that they can be used in the future. Keep this instruction manual for future reference.
Standard mounting (2-a)
Screw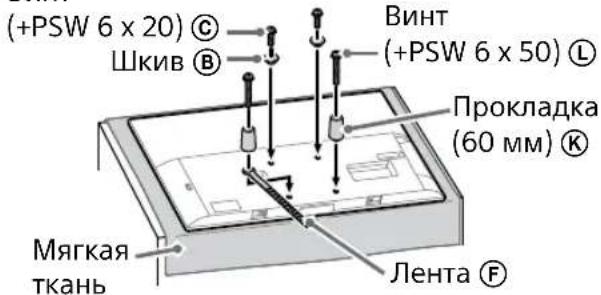
Compact mounting (2-b)
Note
-With this mounting, some terminals on the rear panel of the TV will be inaccessible.
Connect the necessary cables to the TV.
Before installing the TV on the wall, be sure to connect the cable. After installing the TV, connecting the cable will be impossible. See the instruction manual supplied with the TV.
Note
-For laying cables in the wall, follow the prescribed procedure. -Before attaching the device to the wall, connect the connector cables so that you do not accidentally step on them.
Installing the TV on the wall
KD-75XG80□□
1 Prepare the TV.
Position of the screws for attaching the base or base adapter. See Table 3 in the section "Determining the installation position" on page 8. - Make sure that the rear panel of the TV is in contact with the base or base adapter when holding the TV.
Note
- Hold the TV with both hands and make sure that the center of the TV is level and aligned with the tape measure.
- Carrying the TV should be done by three people: the person in front of the TV should guide the others when placing the TV in the appropriate position.
- Use screws with a diameter of 5 mm or equivalent (not supplied).
Note
Gently tilt the bottom of the TV toward you to make sure it does not tip forward. If there is a slight gap, the TV is not secured properly, and the tape should be secured firmly.
- The hooks ⑧ are securely attached to the base or base adapter.
- The cables are not twisted or tangled.
- The cable is securely attached without slack.
WARNING
- Incorrect cable routing, etc., can lead to fire or electric shock due to a short circuit. To ensure safety, make sure all installation steps are completed.
Initial Information
To remove the TV, perform the procedure described above in reverse order.
CAUTION
Make sure that the monitor is held by two or more people (three or more people for TVs with a screen size of 75 inches or more) when removing it.
Technical Specifications
Dimensions: (approx.) [mm]
Do not unscrew the screws used for mounting the TV.
If you do, the TV may fall and cause serious injury or damage.
Do not remove the bracket parts for wall mounting.
If you do, the wall mount bracket may fall and cause serious injury or damage.
Do not install any other devices other than the specified one.
The bracket for wall mounting is intended for use only with the specified TV. In the event of installation of other products, in addition to the specified ones, they may fall and cause serious injury or damage.
Do not use the bracket for wall mounting for any equipment other than a television. Do not tilt the television to the right or left.
If you do, the television may fall and cause serious injury or damage.
Do not lean on the television or hang on it.
Do not lean on the television or hang on it, as it may fall on you and cause serious injury.
WARNING
If the safety precautions listed below are not observed, this may lead to serious injury or damage.
During cleaning or maintenance, do not apply excessive force to the product.
Do not apply excessive force to the top of the television. If you do, the television may fall and cause serious injury or damage.
Safety Precautions
If the television, bracket for wall mounting will be used for a long period of time, depending on the material of the wall, the wall surface behind the television or the bracket may become discolored or the wallpaper may peel off.
The bracket for wall mounting must be installed on the wall before the TV is mounted. Holes for screws will remain in the wall. Do not use the bracket for wall mounting in places where mechanical vibration occurs.
Installing the bracket for wall mounting
For Sony customers
WARNING
This device is intended for use with Sony brand TVs. However, please read the safety precautions described below and pay special attention to safety during installation, inspection, and testing of the device.
Do not install the wall-mount bracket on a wall where the sides of the TV protrude beyond the wall surface.
Do not install the wall-mount bracket on surfaces such as columns, because the sides of the product may protrude beyond the wall surface. If the product falls and hits the side of the TV, it could cause injury or damage.
Do not install the TV on a ceiling or under a desk.
If the TV is exposed to water, moisture, or condensation for a long period, it may cause a fire, electric shock, or malfunction of the TV.
Install the wall-mount bracket on the wall according to the instructions in this manual.
If the screws are loose or fall out, the wall-mount bracket may fall and cause injury or damage. The screws must match the material of the wall. To ensure secure installation, use pilot holes with a diameter of 8 mm (or equivalent).
Use the screws provided in the accessory kit and tighten them securely according to the instructions in this manual. Using other screws may cause the TV to fall and result in injury or damage.
Assemble the bracket securely, following the procedure described in this manual.
If the screws are loose or fall out, the TV may fall and cause injury or damage.
Tighten the screws firmly in the specified positions.
If you do not do this, the TV may fall and cause injury or damage.
During installation, be careful not to pinch your fingers between the TV and the wall.
The TV may fall or break if it is dropped. This could cause injury.
Install the TV on a perpendicular wall with a flat surface.
If the TV is not used properly, it can cause serious injuries.
When mounting the TV on a wall, use the screws specified for the wall structure and material.
Store the TV in its original carton in a dark, dry, clean place with good ventilation, away from places where acids and alkalis are stored. Storage temperature: from -20°C to +60°C. Storage humidity: <80%
Contents
Preparation for installation 5
Checking the parts.. 5
Identifying the TV and installation.. 6
Installing the TV on a wall 8
Preparation for installing the TV .... 9
KD-75XG80□□ 9
KD-65XG81□□/65XG80□□ 10
KD-55XG81□□/55XG80□□ 11
KD-49XG81□/49XG80□/43XG81□/43XG80□
Installing the TV on a wall. 14
KD-75XG80□□ 14
KD-65XG81□□ / 65XG80□□ / 55XG81□□ / 55XG80□□ / 49XG81□□ / 49XG80□□ / 43XG81□□ / 43XG80□□
Completion checklist
Installation 19
Information 19
Technical specifications 19
Installing the TV on a wall
The installation procedure depends on the TV.
To install the TV on a wall, use the bracket for wall mounting SU-WL450.
Removal
- If a wall mount is attached to the TV, remove it. Refer to the instruction manual and perform the steps in reverse order to remove the wall mount.
- To avoid damaging the bracket for wall mounting during installation of wall mount parts, change the wall mount position, place the TV with the screen facing down on a level surface covered with thick, soft cloth. Keep the screws in a safe place.
Preparation
Installation
- Before installation, carefully read the manual and the instruction manual for the TV.
- Before assembling, make sure you have a screwdriver that fits the screws.
- Installation of the TV bracket. Use the four M8 screws and one M5 screw or equivalent (not included in the delivery set). Select the screws according to the wall material.
Checking the parts
Consists of SU-WL450
- Check that all parts are included in the delivery set.
| AБаза(20)(1)ВШК | В(2) |
| CГВИNTPSW6x20(4) | DГВИNTPSW4x20i3Втулков(2) |
| EПрокадka(20)(2) | FРемиь(1) |
| GВтулka(20)(M4)(2) | HГВИNTPSW4x20(2) |
| IПерекдддддддддддддддддддддддддддддддддддддддддддддддддддддддддддддддддддддддддддддддддддддддддддддддддддд徳6a3n(2) | JГВИNTPSW4x10(8) |
| KПрокадka(60)(2) | LГВИNTPSW6x50(2) |
| MВтулka(M4)(2)N | ΓВИNTPSW4x50(2) |
Determining the installation location
1. Determine the installation location.
Make sure the wall has sufficient dimensions and can support the weight, at least four times the weight of the TV.
The required dimensions for installing the TV on the wall can be found in the table below. The weight of the TV can be found in the TV's manual.
Standard mounting
Center of the screen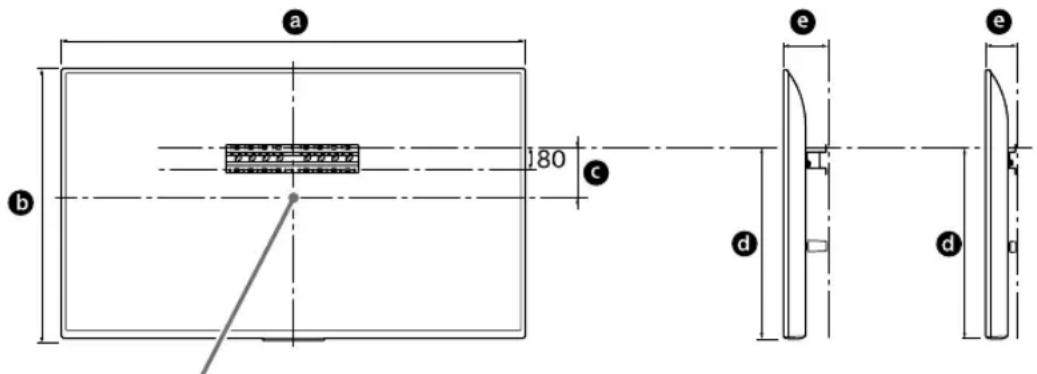
Unit: mm
Do not install the TV as shown below.
Air circulation is obstructed.
Bracket
It is recommended to route the cables through the wall. Make a hole to insert the cables before starting the installation.
Remove the protective film from the adhesive strips, then attach the TV to the wall at the location within the perimeter of the base (20) A, the base bracket (20) E, and the gasket (60) K.
2. Select the wall mounting method. Choose the height for the TV according to the table below.
2-a Standard mounting
2-b Slim mounting
See Table 1.
WARNING
- If you choose 2-b, access to the connectors on the back of the TV will be restricted.
3. The mounting position of the TV is given in the table below. If you choose 2-b, skip this step.
| Назва м odeлі | Розташуваннrayakiv |
| KD-75XG80□□ KD-65XG81□□ KD-65XG80□□ | b |
| KD-55XG81□□ KD-55XG80□□ KD-49XG81□□ KD-49XG80□□ | c |
| KD-43XG81□□ KD-43XG80□□ | d |
Slim mounting (2-b)
Spacer
- When using this type of mounting, you cannot use the separate connectors on the back of the TV.
Connect the TV cables.
Connect the cables before mounting the TV on the wall. After mounting the TV, it will be possible to connect the cables. See the TV manual.
Spacer
The cable in the wall must be laid by a licensed installer. - Route the cables without pinching them, and mount them on the wall first.
4. Remove the table-top stand.
Carefully lift one side of the table-top stand at a time. Hold the table-top stand firmly with both hands, while another person lifts the TV.
- Repeat the previous step and remove the other side of the table-top stand.
Note
Three people are required to remove the table-top stand from the TV. Be careful when using force, as removing the table-top stand from the TV may cause the TV to fall and result in injury or damage to the TV. -Handle the table-top stand carefully to avoid damaging the TV. -Lift the TV carefully, as the detached table-top stand may tip over and cause injury. -Be careful when removing the table-top stand from the TV. If the stand falls, it may damage the surface on which the TV is placed.
KD-65XG81□□/65XG80□□
1. Attach the wall-mount brackets for wall mounting. Check that all wall-mount brackets are present, using the list "Supplied accessories SU-WL450" in the "Checking the Parts" section on page 5.
Note
Attach the wall-mount brackets using the screws. -For the screws, tighten them to a torque of approximately 1.5 N·m {15 kgf·cm}. -Be sure to store the unused or used components in a safe place for future use. Keep these instructions for future reference.
Standard mounting (2-a)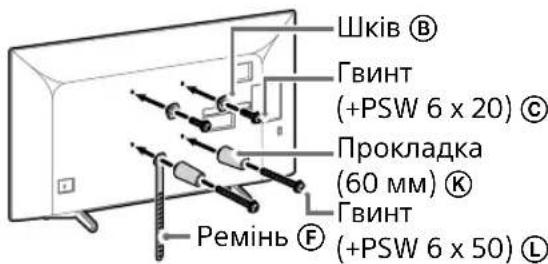
Thin mounting (2-b)
Note
- When using this type of mounting, the screws on the rear of the TV cannot be used.
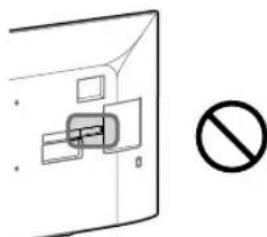
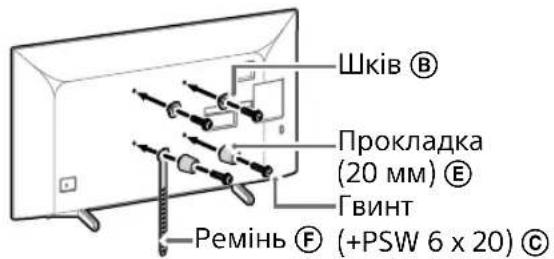
2. Connect the necessary cables to the TV.
Check that the cables are connected before placing the TV on the stand. After placing the TV, it will be difficult to connect the cables. Note: Connect the cables to the TV.
Cables and brackets must be installed by a licensed professional. Route the cables so that you do not step on them before mounting them on the wall.
Disconnect the TV from the wall outlet.
Remove one side of the wall mount at a time. Firmly hold the wall mount with both hands while another person lifts the TV.
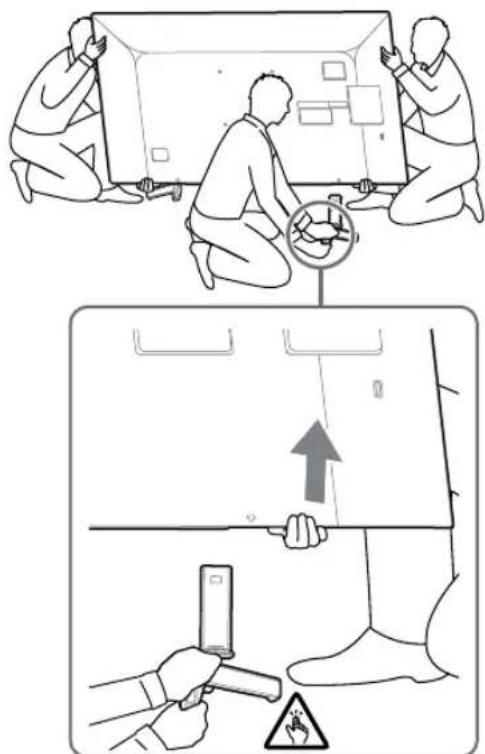
- Repeat the previous step and remove the other side of the wall mount.
- Three people are needed to remove the wall mount from the TV.
- Be careful when applying excessive force to remove the wall mount from the TV, as this may cause the TV to fall and result in injury or damage to the TV. - Carefully handle the wall mount to avoid damaging the TV. - Lift the TV carefully, as the removed wall mount may tip over and cause injury. - Be careful when removing the wall mount from the TV. If the mount falls, it may damage the surface on which the TV is placed.
KD-55XG81□□/55XG80□□
1. Secure the wing elements of the bracket for the wall mount. Check the tightness of all wing elements using the list "Supplied parts WL450" in the "Checking the parts" section on page 5.
Tighten the wing elements with a screwdriver. - For an electric screwdriver, set the torque to approximately 1.5 N·m {15 kgf·cm}. - Be sure to keep unused components in a safe place for future use. Keep these instructions for future use.
Standard mounting (2-a)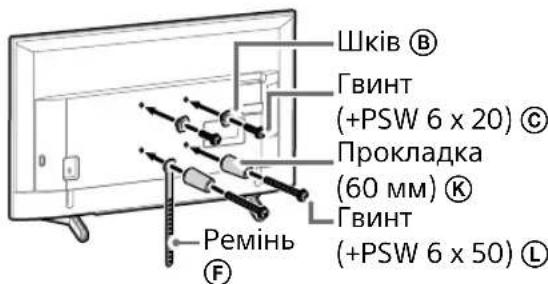
Thin mounting (2-b)
This type of mounting cannot be used for individual holes on the rear panel of the TV.
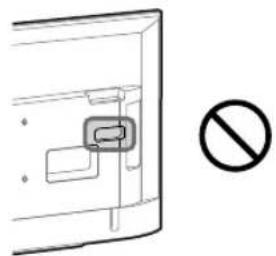
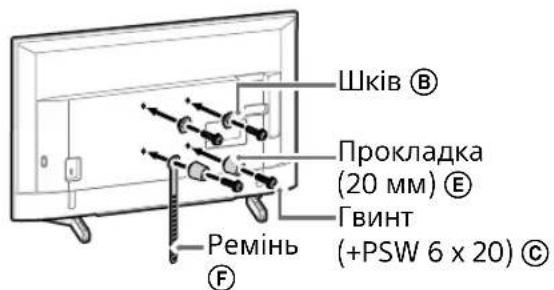
2 Connect the TV cable.
Before connecting the cable, reposition the TV on the wall. After installing the TV, it will be impossible to connect the cable. See the TV connection section.
Note
The cable in the wall must be laid by a licensed contractor. - Route the cables so that they do not get stepped on before mounting them on the wall.
Disconnect the TV from the wall mount.
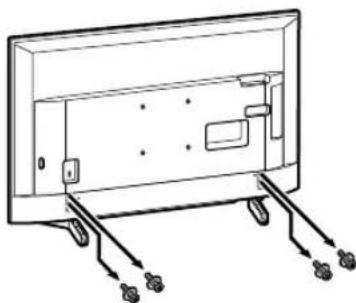
Note
- Lift the TV carefully, as the detachable tabletop stand may tip over and cause injury. - Be careful when removing the tabletop stand from the TV. If the stand falls, it may damage the surface on which the TV is placed.
KD-49XG81□□ / 49XG80□□ / 43XG81□□ / 43XG80□□
1 Remove the tabletop stand from the TV.
Note
- To avoid damaging the panel, place a soft cloth on the surface where you will place the TV. Do not use the screws that came with the tabletop stand when installing the wall mount. Hold the tabletop stand and the removed screws securely, as they may be needed if you later decide to install the TV on a table. The tabletop stand is sold separately.
WARNING
- Before moving the TV, install it vertically. To avoid uneven picture distortion, do not turn on the TV with the panel facing down. If the TV is dropped or hit, the panel may break or cause injury. Place the TV with the screen facing down on a flat, soft surface so that the tabletop stand protrudes beyond the edge. If the TV surface and the tabletop stand are not on the same level, the working conditions will be unstable and the TV may be damaged. When removing the tabletop stand from the TV, hold the tabletop stand with both hands.
2 Secure the wall mount bracket components for wall mounting. Check that all bracket components are present using the list "Supplied items: SU-WL450" in the "Checking the parts" section on page 5.
Note
Secure the mounting elements with screws. - For the tightening torque, set it to approximately 1.5 N·m {15 kgf·cm}. - Be sure to store unused components in a safe place away from children, as they may be swallowed. Keep this manual for future reference.
Standard mounting (2-a)
Thin mounting (2-b)
Note
When using this type of mounting, do not use the holes on the rear panel of the TV.
Connect the TV to the required cables.
Before moving the TV, disconnect the cables. After moving the TV, reconnect the cables. Refer to the TV manual.
Note
The cables in the wall must be properly insulated. Arrange the cables so that you do not step on them before mounting them on the wall.
Installing the TV on the wall
KD-75XG80□□
1. Lift the TV.
- Check the screws that secure the TV to the base or the stand for the base. See the table for the installation step in the section "Determining the installation location" on page 7. While holding the TV, make sure the TV is securely attached to the base or the stand for the base.
Note
Hold the TV with both hands. The lower part of the TV must be aligned with the arrow direction. - To hold the TV, at least three people are required. The person positioned in the middle of the TV should give instructions to the others to properly position the TV.
- Be careful when placing the TV on the stand. Especially be careful to anyone who holds the TV from below. Dropping the TV can cause serious injury or even death.
2 Install the TV on the base or on the stand for the base.
- Carefully lower the TV and align the holes on the back of the TV with the base or the stand for the base (they must match the size of the openings). - After installing the TV on the stand, make sure that the screws (B) are securely fastened to the base or the stand for the base.
- Gently release the TV with your hands to make sure it does not fall.
- After installing the TV on the stand, remove the protective film (or material) from the stand.
WARNING
When carrying the TV, hold it with at least two people (at least three people if the TV diagonal is 75 inches or more).
3 Be careful not to pinch your hands or fingers when installing the lower part of the TV.
Check the lower part of the TV and securely attach it to the stand.
Use a screwdriver with a 5 mm diameter or equivalent (not included in the package).
Screw
Try gently pulling the lower part of the TV towards you to make sure it does not move forward. If the TV moves, it is not attached correctly and you need to reattach it securely.
KD-65XG81□□/ 65XG80□□ / 55XG81□□ / 55XG80□□ / 49XG81□□ / 49XG80□□ / 43XG81□□ / 43XG80□□
Installation complete.
The device is intended for indoor use only.
- The device has not been inserted into the base or into the previous base.
- The cable is not crossed or pinched.
- The fuse is securely closed without soldering.
WARNING
Incorrectly placed live parts can cause electric shock or damage from electric current. For safety, always disconnect all power after installation.
Additional information
Under no circumstances should you touch the TV during the specified installation procedure.
WARNING
The TV stand is designed for TVs with a screen size of 75 inches or larger.
Technical specifications
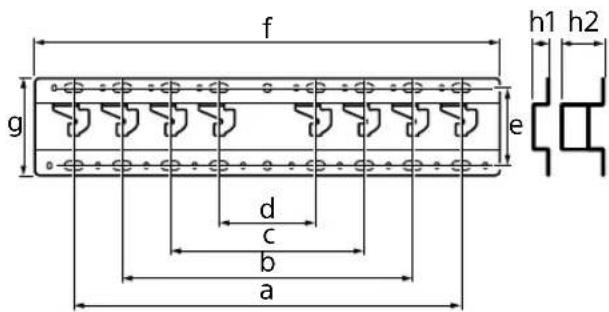
Dimensions: (approx.) [mm]
a:400
b:300
c:200
d: 100
e: 80
f: 480
g: 100
h1: 20 (BunaDOK2-b)
h2: 60 (Bunapok 2-a)
Bara (Tilbkn 6a3a): (npn6J.) [Kr]
0.8
Construction and technical characteristics may be changed without prior notice.
55XG80□□*/49XG81□□*/49XG80□□*/43XG81□□*/
43XG80□□*
- In the names of similar models, "□□" denotes numbers and/or marks that are specific to each model.
For customers
Thin installation (2-b)
Markus.
Wall mounting (2-b)
Mark.
Wall mounting (2-b)
Mark.
Wall mounting (2-b)
Mark.
Mass (base only): (approx.) [kg]
0.8
55XG80□□*/49XG81□□*/49XG80□□*/43XG81□□*/
43XG80□□*
- In the model names, "□□" indicates unique numbers and/or letters for each model.
For customers
For product protection and safety reasons, Sony strongly recommends that TV installation be performed by Sony dealers or licensed contractors. Do not attempt to install it yourself.
h1:20 (2-b variant)
55XG80□□*/49XG81□□*/49XG80□□*/43XG81□□*/
43XG80□□*
55XG80□□*/49XG81□□*/49XG80□□*/43XG81□□*/
43XG80□□*
- In the actual model names, "□□" indicates digits and/or letters specific to each model.
For users
For product protection and safety reasons, Sony strongly recommends that TV installation be performed by Sony dealers or authorized contractors. Do not attempt to install it yourself.
For Sony dealers and contractors
Pay full attention to safety during installation, periodic maintenance, and testing of this product.
Installing this product, especially determining the wall strength to support the TV's weight, requires appropriate expertise. Ensure that mounting this product on the wall is entrusted to Sony dealers or authorized contractors, and that due attention is paid to safety during installation. Sony is not liable for any damage or injury caused by improper handling or installation.
For safety and proper installation, follow the Wall-Mount Bracket Installation Instructions, the TV Installation Guide, and the instructions in this manual.
About safety
Do not place the TV in an unstable location where it may fall and cause injury or death.
The TV must be securely attached to the floor or wall. If the wall is not strong enough, the TV may fall and cause injury.
Installation precautions
If the wall-mount bracket is not installed securely, the TV may fall and cause injury or damage. After installing the wall-mount bracket, do not hang anything on it. Do not install the wall-mount bracket on a wall that is not strong enough to support the TV's weight.
Cable entry for the crown terminal
Sony dnilnepepi ywiH
EXPERT
Necessary instructions for using the Sony dnilnepepi. The data given in the table should be checked and the crown terminal, if necessary, should be installed correctly.
Cable entry for the crown terminal
Television
The bolts and nuts should be installed in the places where the cable is connected.
The cable entry for the crown terminal should be installed in the place where the television bolts and nuts are connected. If the bolts and nuts are not connected, they may be damaged or broken.
The television should be installed on the surface of the stand.
If the television is not properly secured and falls, it may be damaged or broken.
Cable entry for the crown terminal
Use the instructions provided in the manual.
If the bolts are not properly tightened, the cable entry for the crown terminal may be damaged or broken. The bolts should be tightened to the specified torque and diameter of 8 mm (or more) should be used.
The bolts and nuts should be used according to the instructions provided in this manual. If the elements are not used, the television may be damaged or broken.
Use the procedures given in the manual.
Crosspieces.
The drill must be used with the protective guard for drilling into walls, ceilings, or floors, and for making holes in walls, ceilings, or floors.
The guards must be secured with the screws provided.
If the guard is not used, there is a risk of injury from the drill bit or from making holes in walls, ceilings, or floors.
During operation, do not touch the drill bit.
If the drill bit is touched, it may cause injury. This is a risk of injury.
The drill bit must be positioned perpendicular to the wall and ceiling.
If this is not done, the drill bit may cause injury or damage.
After the drill is correctly positioned, secure the cables properly.
If wires or other objects are in the way of the cable, there is a risk of injury or damage to the drill.
The power cord or extension cable must be kept away from the drill bit.
If the power cord or extension cable is cut or damaged between the drill and the wall, it may cause a short circuit, electric shock, or fire. This may result in injury or damage to the tool.
The screws required for securing the guard are provided.
When securing the guard, do not damage the guard or the screws with the drill bit.
Lubricant.
OpHaTyf aaibIHbIK 5
BaiwekeTepdi TeKcepy 5
OpHaTbIaTbIH opBHbI aHbIKay 6
Ka6bipraTaYfbIpDbI opHaTy 8
| Teilenidapdbi opHaTyfara daBbHday | 9 |
| KD-75XG80□□ | 9 |
| KD-65XG81□□ / 65XG80□□ | 10 |
| KD-55XG81□□ / 55XG80□□ | 11 |
| KD-49XG81□□ / 49XG80□□ / 43XG81□□ / 43XG80□□ | 12 |
| Кабырара Телегдарды opнату | 14 |
| KD-75XG80□□ | 14 |
| KD-65XG81□□ / 65XG80□□ / 55XG81□□ / 55XG80□□ / 49XG81□□ / 49XG80□□ / 43XG81□□ / 43XG80□□ | 16 |
OpHaTydbiH aayKaTaNfAHaDbIfbIH TeKcepy 19 BaCa aKnapaT 19
TexHnKaIbIK cunTaTamaIapbl 19
TeJeIaIapIbI ka6bIpraFa oPHaTy
TepeiapdbH Typhe 6aIHaHbICTbI opHaTy npoceypacbi e3rewe 60anaBbl. TД-ды Ka6bipraFa opHaTy ywiH SU-WL450 Ka6bipraFa opHaTaTBH KPOHHTeHIn naiDalaHbIHbI3.
Hyckay
YcTeN TyfblpTJ-fa6kITince,YcTeN TyfblpH anDbH ana axbipatbHb3.OpHAty HcyckaylbHbH Kapan,yTeN yci Tiperin wewy KaamdapbH Kepi peTneH opBHaB3. CKD nncnnei 6etihin 3akbIMdanybiH 60ndbpMay yuH Kabiprafa ophaTbH kpoHHTeHi Tipkey 6eJwekTePH 6ekemdey Hemece T-DAH YCTEN TYfblH anBt Tactay Ke3iHe TTDkpaHBTHemEH KAPaTBIN KaJIbIH XyMCaK WBepeKeNeh XaBbJFaH Teric, TypAeTb6EtKE KObHbI3. - AInbIHFaH 6paHaIaIapDbI 6anaIapdaH anbc, kayinci3 opbIHfKaOnbIHbI3.
Ophatyfa daHbIHdbIK
OpHaTy aIbIHda TД aHbIKTaMaJIbIK HcayIbIFbIH XHe opHaTy HcayIbIFbIH aIbIHbI3. Kypacbipmac 6ypbH 6paHda napra cai keletih Phillips 6ypaybIbI 6OJyI kepek. Teeneiap6ekitineH opbIHbI aHbIKTaHb3. -Диametpi8MM6OJIaTBH TePHTHeMece OdaHdaKeIb6ypaHaJxHe5MM-NiKHeMeceYKcac(6epiImereH)6ypaHa daBihHaHbI3.KabipraHbIH MaTePnaHbHa caN KeJeTIn6ypaHdaanapDbITaHdaHbI3.
БошектордTekcepy
SU-WL450 KypbIrfbcImeH 6epinei
- Bapnbik 6eIweKTepeH 6ap eKeHirH TeKcepiH3.
| A Heri3 (20) (1) B Terepiik (2) | |
| ◎ PSW 6x20 (4)◎ TbIFbIH PSW 4x20 (2) | |
| E ApaIbIK (20) (2) E | Belenik (1) |
| ◎ TbIFbIH (20) (M4) (2) | H PSW 4x20 (2) |
| ① Heri3ri aandaTep (2) | J PSW 4x10 (8) |
| K ApaIbIK (60) (2) L | PSW 6x50 (2) |
| M TbIFbIH (M4) (2) N | PSW 4x50 (2) |
Operational tests
1 Operational tests.
The cabinet has a special place for the TD and the TD must be installed in the place specified in the technical description.
See the instructions for installing the cabinet. See the instructions for checking the cabinet's operation.
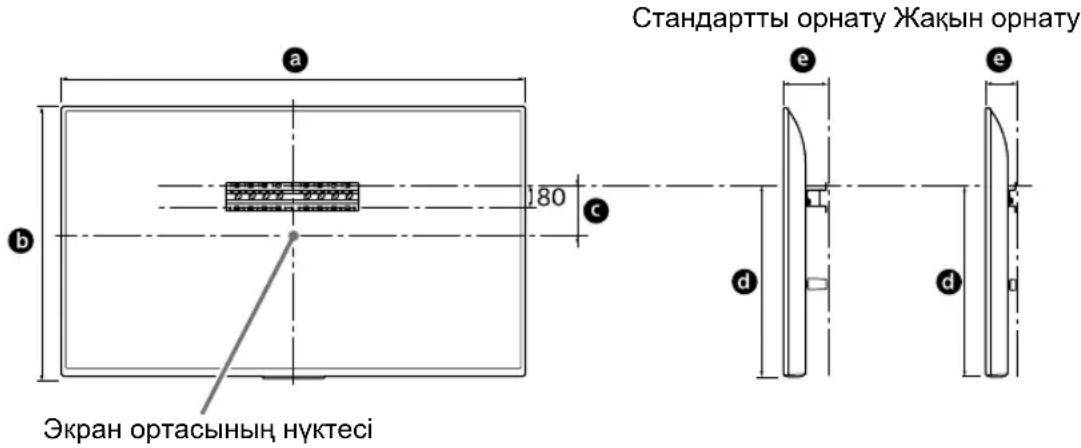
Tools: MM
| Yilri hemipi | Зкран салемерi | Зкран ортасьин салемi | Орнату узbingыflu | ||
| a | b | c | d | ||
| Стацарты орнату | Жа KBИ орнату | ||||
| KD-75XG80□□ | 1686 970 202 690 142 100 | ||||
| KD-65XG81□□ | 1463 845 173 597 142 100 | ||||
| KD-65XG80□□ | 1463 845 173 597 142 100 | ||||
| KD-55XG81□□ | 1241 721 95 460 141 100 | ||||
| KD-55XG80□□ | 1241 721 95 460 141 100 | ||||
| KD-49XG81□□ | 1101 645 -15* 314 119 78 | ||||
| KD-49XG80□□ | 1101 645 -15* 314 119 78 | ||||
| KD-43XG81□□ | 970 570 23 315 119 77 | ||||
| KD-43XG80□□ | 970 570 23 315 119 77 | ||||
- The cabinet's operation is checked with the screen center button.
Startup
- It is possible to start the device without the cabinet. When the TD is installed, the TD's upper sign is installed first.
The cabinet and the device are installed in the open place between the upper signs of the cabinet.
Tools: MM
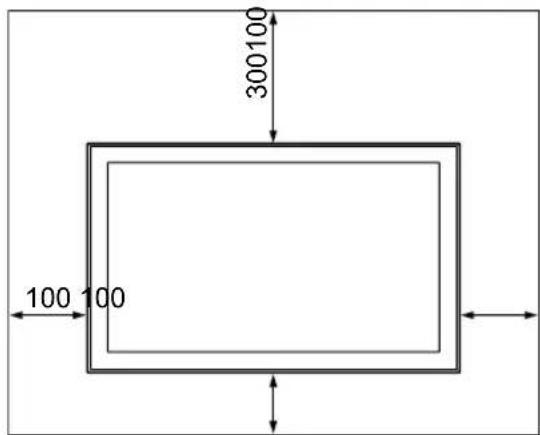
To avoid damage to the device and the cabinet:
- Do not install the TD in a place with high humidity, do not install it in a place with excessive heat or cold. Do not place the TD in a place with dust, moisture, or in a cabinet.
- Do not cover the TD with a curtain or newspaper, etc. Do not install the TD in a place where it is indicated in the technical description.
The unit is blocked.
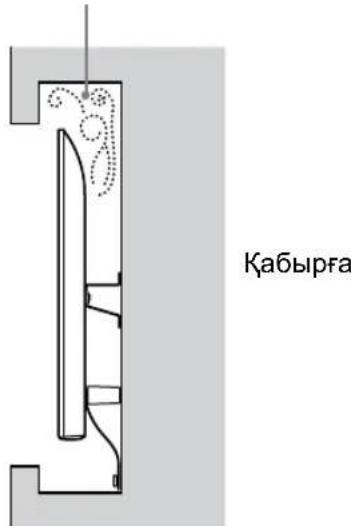
Startup
Before connecting the cable, make sure to check the cable for damage.
For cables not to be short-circuited, connect the main (20) A, main terminals 1 and branch (20) E, branch (60) K to the perimeter as indicated in the diagram.
Select the installation method for the cable. The choice of installation method depends on the conditions at the installation site.
Standard installation method 2, installation method 2
1. Check the connection.
EXPERT
-2. When selecting, the terminal must be tightened.
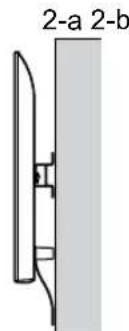
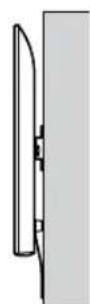
3. Check the installation location of the main terminals. When selecting, follow this procedure.
| Y NFLI HEMIPİ LIMEK OPHBİ | |
| KD-75XG80□□ | |
| KD-65XG81□□ | b |
| KD-65XG80□□ | |
| KD-55XG81□□ | |
| KD-55XG80□□ | |
| KD-49XG81□□ | c |
| KD-49XG80□□ | |
| KD-43XG81□□ | d |
| KD-43XG80□□ | |
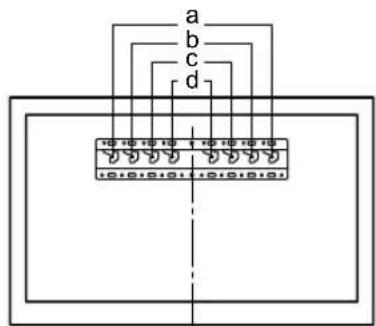
Terminal ① main (PSW 4x10) ② when selecting with the branch, connect to the main (20) A.
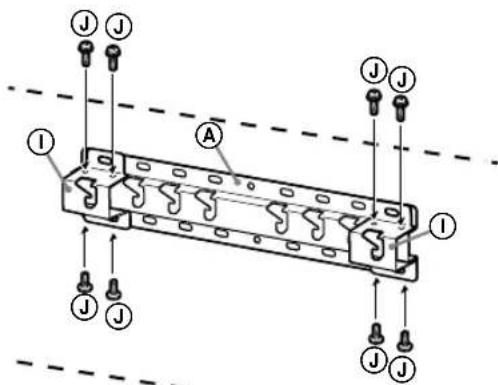
4. For the main (20) @ installation, determine the location of the branch.
See the diagrams on page 19. When selecting, check the installation location of terminal ①.
EXPERT
To connect the cable to the terminal, tighten the screw securely (for secure tightening, use a torque wrench).
After tightening the cable, check that it is secure. If necessary, tighten the cable further.
Cable installation method
Diameter 8 mm. Do not use the supplied wall mount bracket or the supplied screws. The wall mount bracket (20) must be attached to the wall (Fig. 2-a). Attach the brackets (20) to the wall securely.
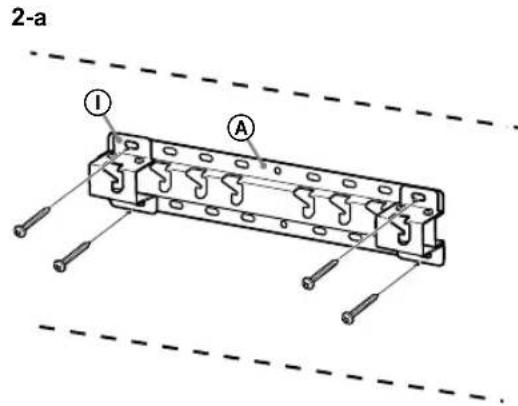
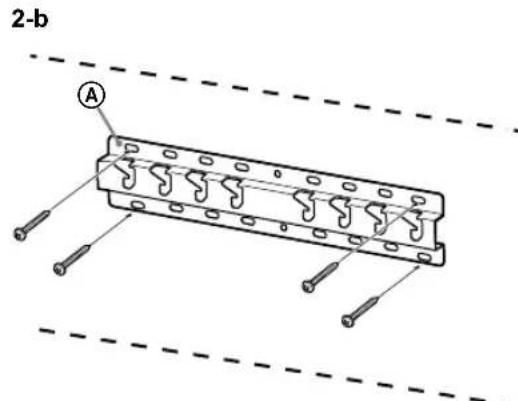
Attach the TV to the wall mount.
Before attaching, check the screws.
KD-75XG80□□
1 Attach the wall mount bracket to the wall.
Use the supplied screws to attach the wall mount bracket to the wall. Do not use the screws supplied with the TV. Check the screws.
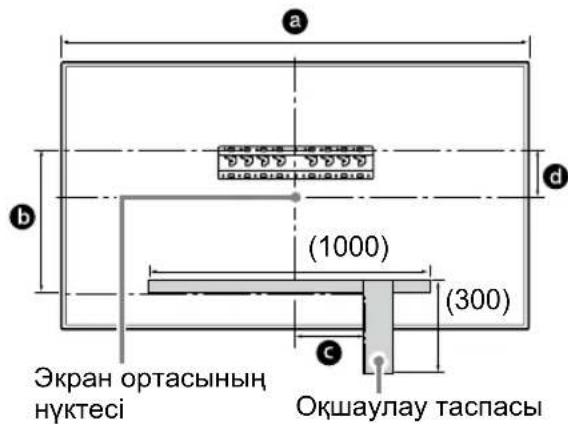
Screws: M6
| Ynlri hemipi | Белriney узblычы | Зкран ортысын的企业 |
| a b c d | ||
| KD-75XG80□□ | 1686 564 150 202 |
2 To attach the wall mount bracket, use the supplied screws. See the "SU-WL450" instructions for the "Attaching the TV to the wall mount" section.
Note
Do not attach the TV to the wall mount if the wall is not strong enough.
- If the TV is not attached to the wall mount, do not install the wall mount. This is to prevent injury.
Standard mounting (2-a)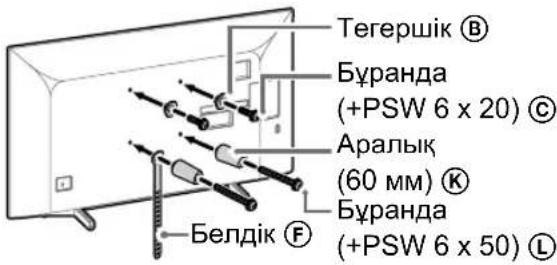
Inclined mounting (2-b)
Note
Do not attach the TV to the wall mount if the wall is not strong enough. Check the wall strength before attaching.
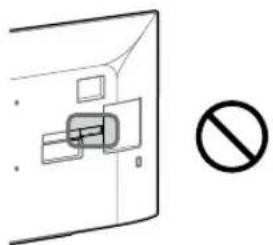
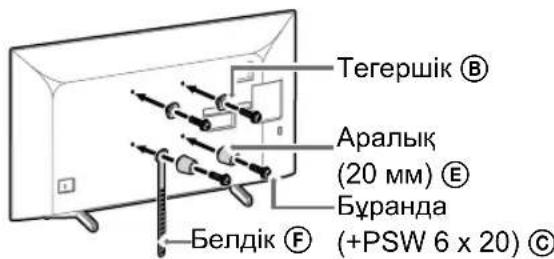
3 Connect the cables (cable holders) to the TV.
Before connecting the cables, check the cable holders' text. After installing the TV, it may be possible to connect the cables. Keep the supplied accessories away from the TV.
Note
Connect the cables to the cable holders before mounting. When mounting the TV, to avoid bending, connect the cables to the cable holders.
4 Do not place the TV above the T-D.
- Place the TV's stand on a flat surface as one unit. Do not place the TV's stand on other surfaces.
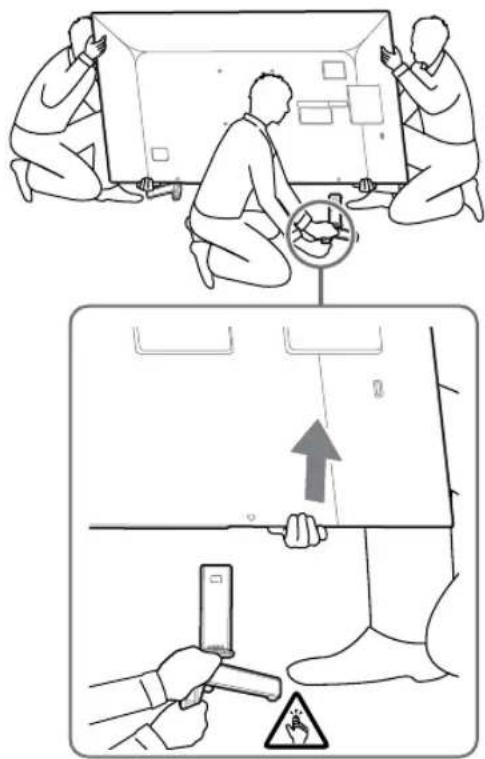
Remove the TV's stand and place it on a flat surface.
Note
To install the TV stand, you need more than one person. Do not attempt to install the TV stand by yourself, as it may cause injury or damage. To install the TV stand, follow the steps below. Do not use the TV stand for any other purpose. - After installing the TV stand, do not remove it. - When installing the TV stand, use the screws provided.
KD-65XG81□□/65XG80□□
1 Install the wall-mount bracket (not supplied) to the TV. Refer to the "Wall-Mount Bracket" section on pages 5-6 for the SU-WL450 bracket installation instructions.
Note
- Install the wall-mount bracket using the screws provided. Tighten the screws to a torque of 1.5 N·m {15 kgf·cm}. - Refer to the instructions supplied with the wall-mount bracket for installation. Keep this manual for future reference.
Standard installation (2-a)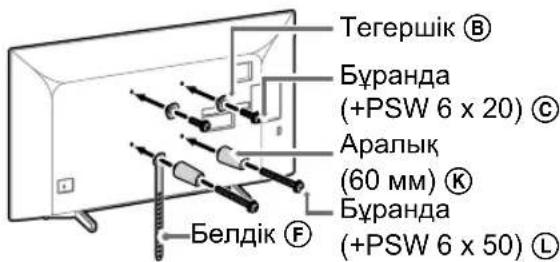
Inclined installation (2-b)
Hyckay
- By operating this device, you agree to the terms of the user agreement for the device's functions and contacts.
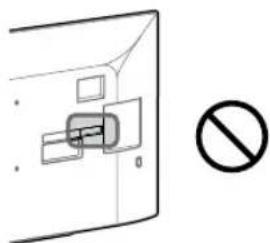
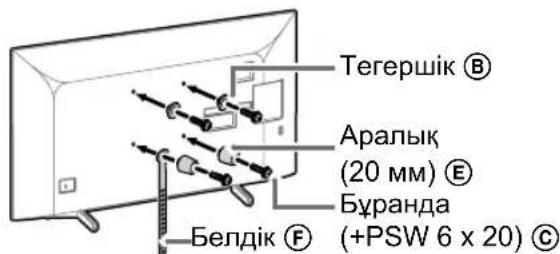
2. Connect the cables to the appropriate terminals.
Before connecting the cables, check the terminals. After connecting the cables, the cables must be secured. Refer to the accompanying operating instructions for details.
Instructions
Connect the cables to the appropriate terminals. When installing, do not pull the cables to avoid damage.
3. Tighten the terminal screws.
- Remove the terminal cover by pulling it straight off. For other terminals, remove the terminal cover by pulling it straight off.
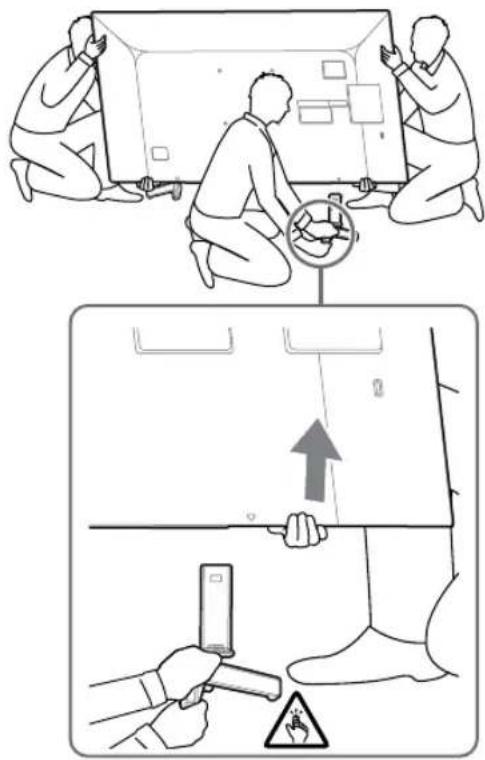
Do not remove the terminal cover and do not pull the terminal cover straight off.
Instructions
- To remove the terminal cover, pull it straight off. Do not pull the cables when removing the terminal cover; instead, hold the cables and remove the cover carefully. To avoid damaging the cables, do not pull them.
Do not pull the cables when removing the terminal cover; instead, hold the cables and remove the cover carefully. To avoid damaging the cables, do not pull them.
KD-55XG81□□/55XG80□□
1. To install the TV on a wall, use the mounting screws. See the “Wall-Mount Bracket” section in the “Mounting the TV” instructions for the SU-WL450 bracket.
Instructions
- Remove the protective film from the device. If the film is left on, it may cause overheating or malfunction.
- Do not remove the label attached to the device. Removing it may cause damage or malfunction. This label is required for warranty service.
Standard installation (2-a)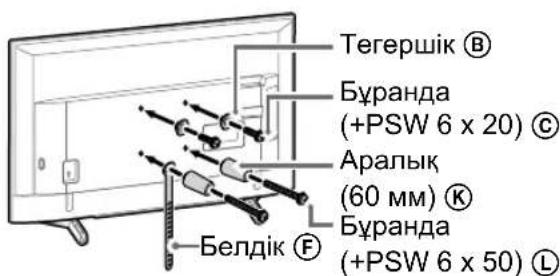
Wall installation (2-b)
Note
- When installing this product, ensure that the contacts on the rear panel are not touched.
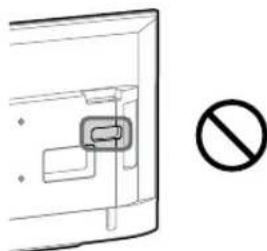
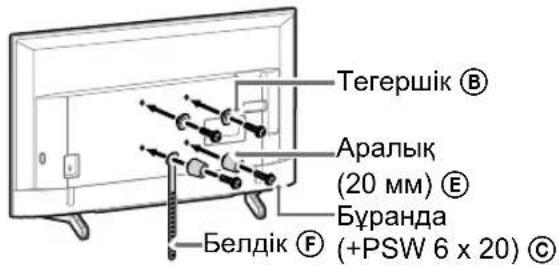
Connect the two cables (cable leads) to the terminals.
Before installing the terminals, make sure the cables are not connected to power. After installing the terminals, connecting the cables is not possible. Check the connection with the terminals before proceeding.
Note
Connect the cable to the terminal with the specified torque. When installing the cable, do not bend or stress the cable.
Tighten the screws from the T-D side.
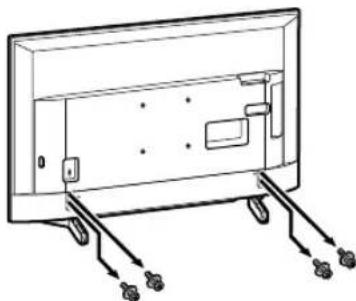
Note
If the terminals are not properly tightened, they may overheat and cause a fire. When tightening the terminal screws, use a torque wrench and ensure the terminals are securely fastened.
KD-49XG81□□ / 49XG80□□ / 43XG81□□ / 43XG80□□
Tighten the terminal screws from the T-D side.
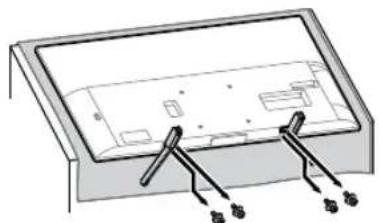
HycKay
Do not place the device in a location where it may be exposed to direct sunlight or near heat sources. When installing the bracket, use the screws provided. Keep the screws and their washers out of reach of children. If the device is to be mounted on a wall, it must be securely attached. The bracket must not be subjected to excessive force.
ECKEPTY
Before cutting the cables, disconnect the power supply. To avoid electric shock, the cable insulation must be checked with a suitable tool. If the cables are damaged or worn, they may cause short circuits or fire. Ensure that the bracket is firmly attached to the wall and that the cables are properly insulated. If the cable insulation is damaged, replace the cable immediately. When installing the bracket, use the appropriate tools.
2 For bracket installation, follow the instructions in section 5, "Mounting the SU-WL450 bracket". Refer to the manual for proper installation.
Hycay
Secure the bracket with the screws provided. Do not overtighten; leave a gap of 15 cm.
- If the device is not properly installed or the bracket is not securely attached, it may fall and cause injury. Keep this manual for future reference.
Standard installation (2-a)
Bracket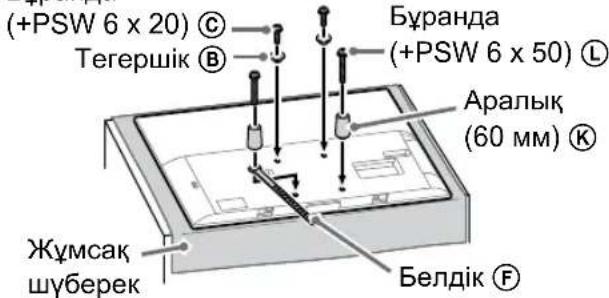
Correct installation (2-b)
Hycay
When installing, ensure that the cables are not pinched or damaged.
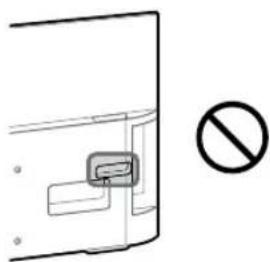
Bracket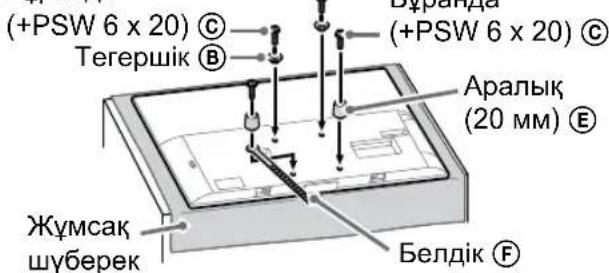
3 Connect the cable(s) to the device.
Before installing the cable, check the cable and connector terminals. After installation, the cables may be pulled. Follow the safety instructions given by the manufacturer.
Note
Do not install the cable in a place with a sharp edge. When installing the cable, do not bend it excessively or pull it forcibly.
Installing the TV
KD-75XG80□□
1 Remove the stand.
Refer to step 3 in “Removing the stand from the TV” for the basic or basic alternative procedures. When installing the stand, be careful not to pinch your fingers between the stand and the TV.
Note
Install the stand with two people, and be careful not to pinch your fingers between the stand and the TV. When installing the stand, do not use the screws provided with the TV for other purposes.
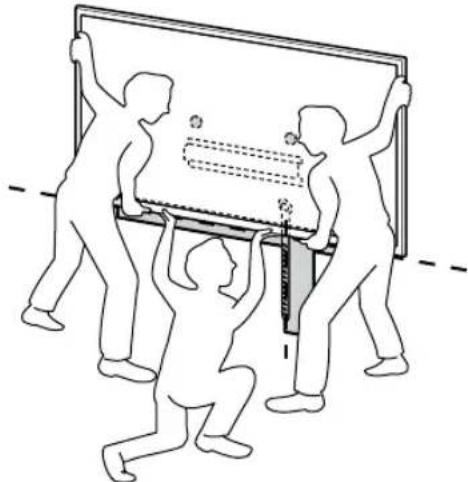
Do not install the stand on a soft surface (e.g., carpet) or where it may be unstable, as the stand may fall and cause injury or damage.
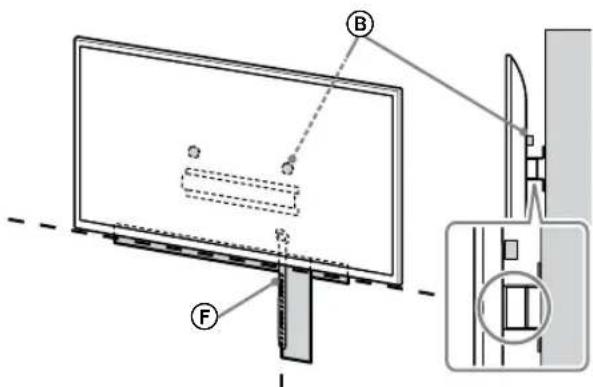
2 Install the stand to the TV or the alternative base.
After installing the stand, place the TV on a stable surface, and then connect the cables. After installing the stand, do not hold the TV by the stand; hold it by the TV body. To avoid damaging the TV, use both hands when carrying it.
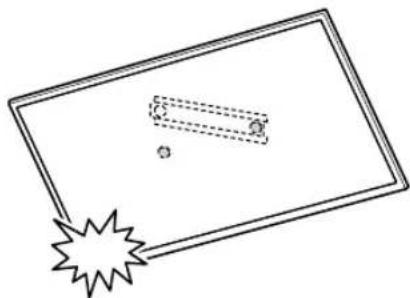
After installing the stand, remove the protective film from the TV.
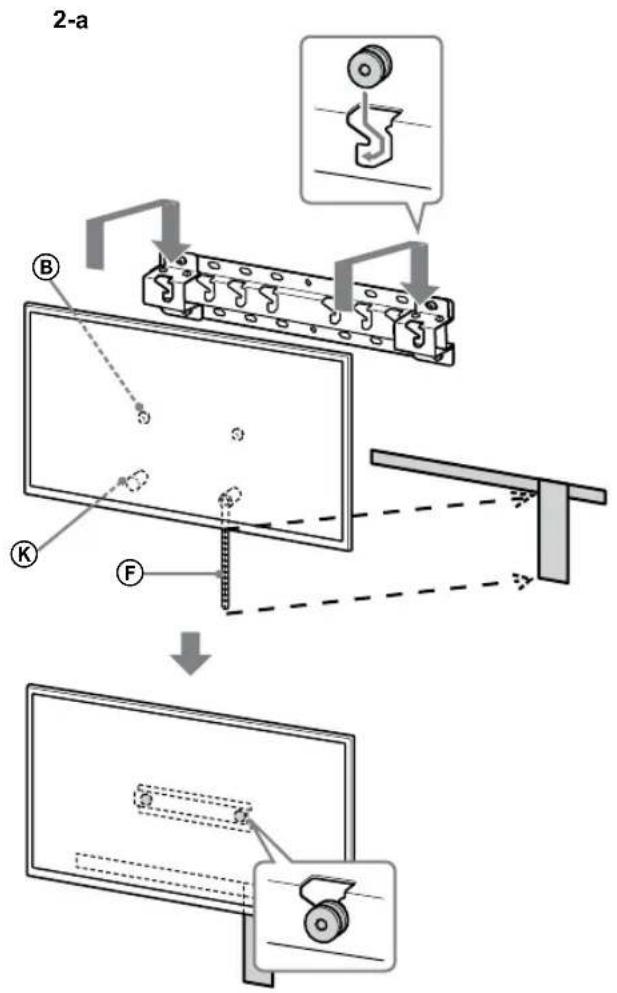
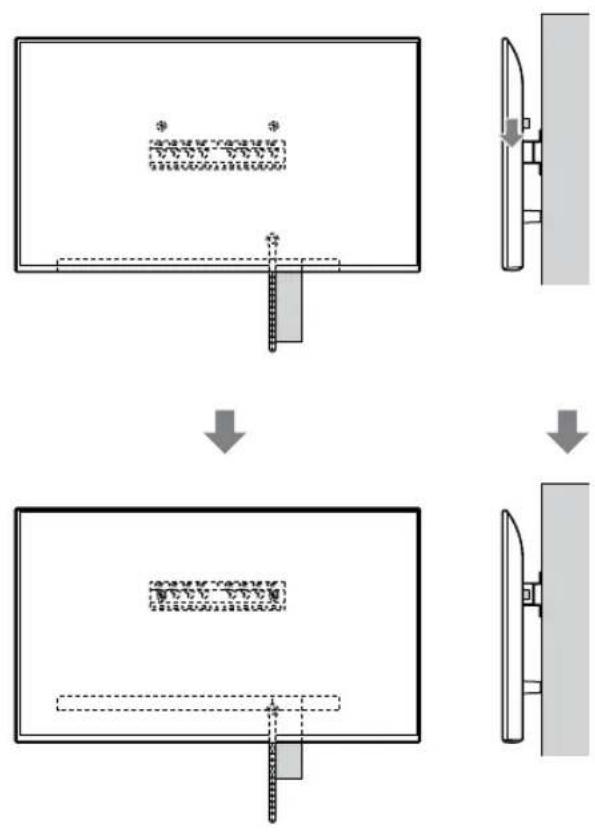
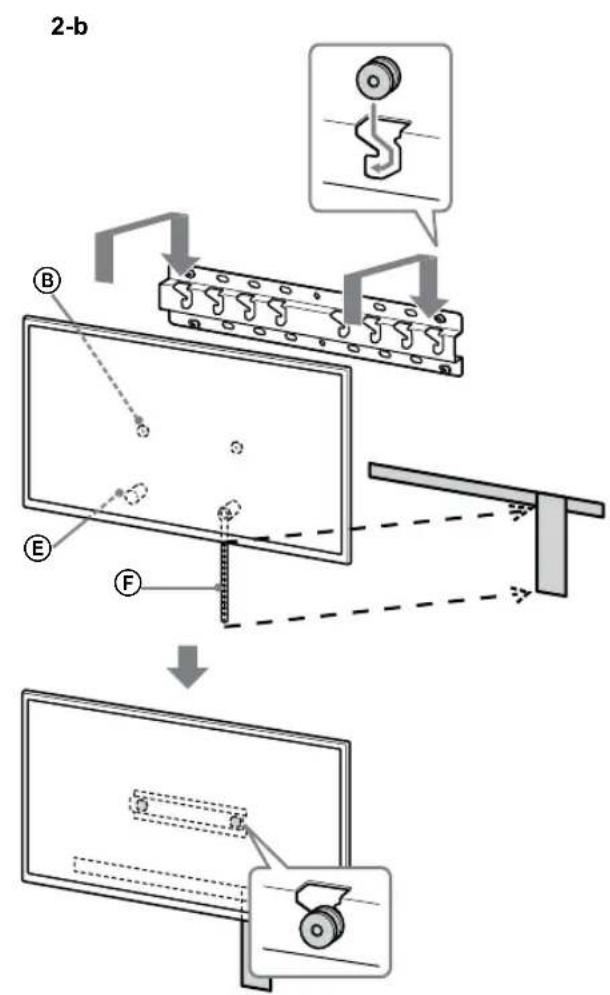
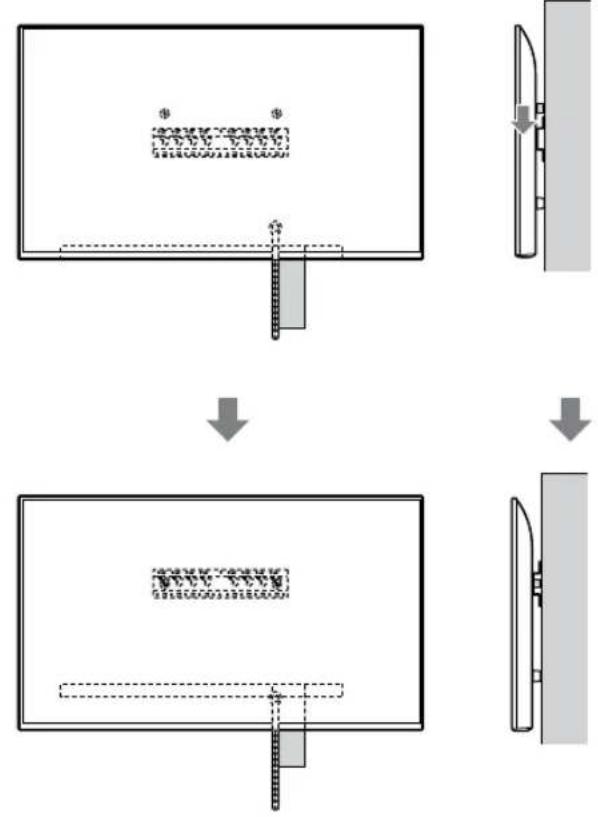
CAUTION
After installing the stand, do not hold the TV by the stand; hold it by the TV body. To avoid damaging the TV, use both hands when carrying it.
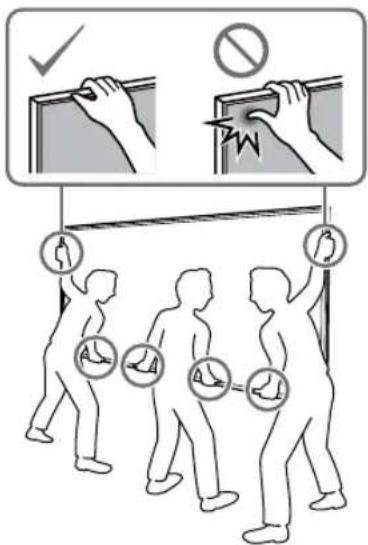
3 Remove the TV from the table stand.
- When installing the TV, be careful not to pinch your fingers.
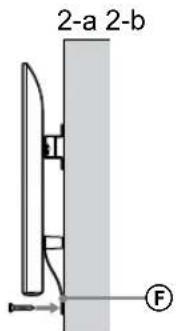
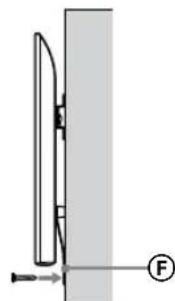
- If the diameter is 5 mm, it may break or crack (be careful).
Note
Before connecting the TV, refer to the table stand installation instructions. If you have any questions, contact the service center.
KD-65XG81□□/ 65XG80□□ / 55XG81□□ / 55XG80□□ / 49XG81□□ / 49XG80□□ / 43XG81□□ / 43XG80□□
1 Remove the TV.
Refer to step 3 in the "Installing the Table-Top Stand" section on page 7 for the basic or optional stand installation. When installing the TV, be careful not to pinch your fingers between the TV and the stand.
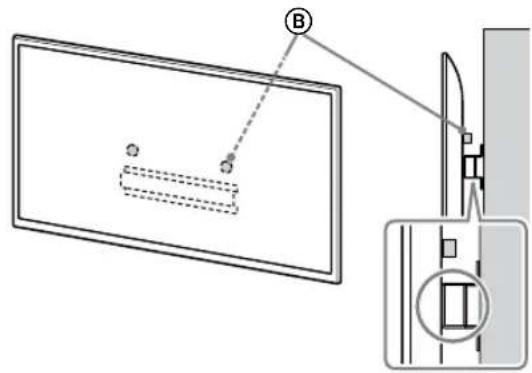
Note
-Do not use the TV without the stand.
2 Install the TV on the basic or optional stand.
After removing the TV from the table stand, place the TV on a soft cloth or the basic/optional stand, and then install the stand. After installing the stand, secure the TV to the basic or optional stand. To avoid injury, use two people to lift the TV.
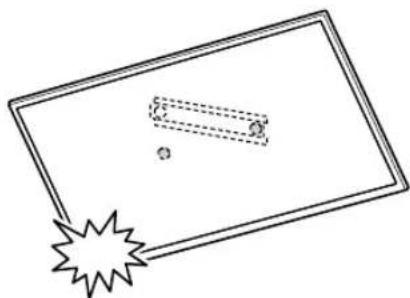
2-a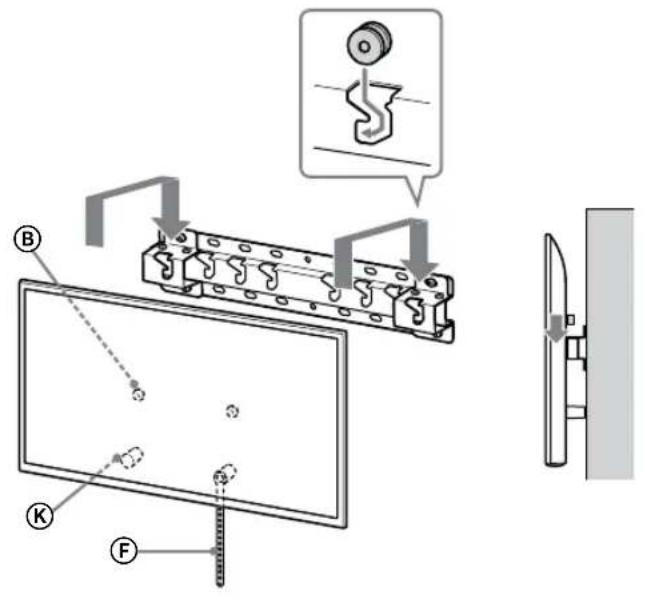
2-b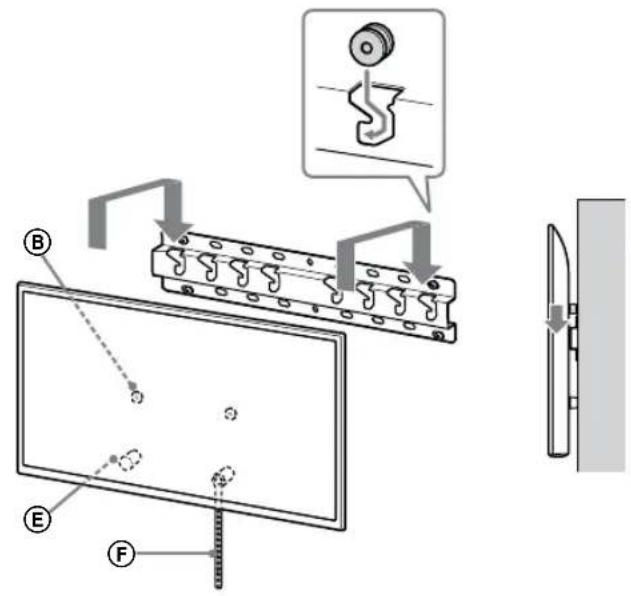
↓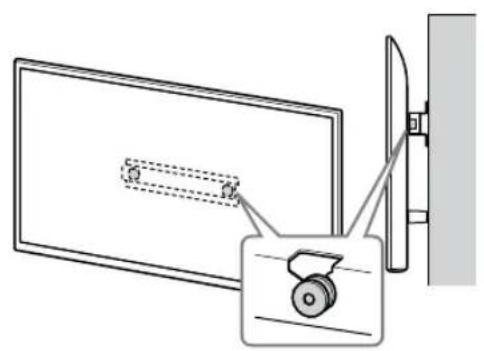
WARNING
Television sets may be left in standby mode for a short time (75 minutes) or left on for a long time (one hour or more) as specified by the manufacturer.
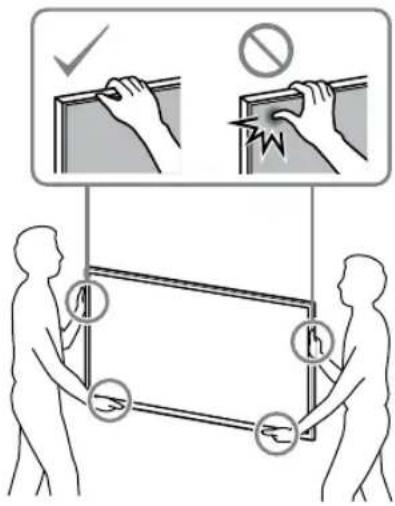
Do not leave the television in standby mode for extended periods.
- Take the remote control (F) and press it firmly against the button.
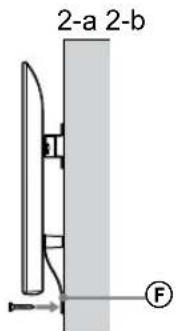
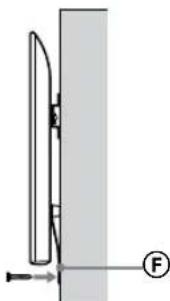
- If the diameter is 5 mm or more, replace it (if necessary).
Instruction
To operate the television using the remote control, point the remote control at the sensor on the television. Press the button firmly until the indicator lights up.
Operating instructions
Consult the following.
Check the antenna connections. - If the image is distorted or unclear. - Press the remote control (F) firmly.
WARNING
Do not use the device if the power cord or plug is damaged, or if it has been dropped or damaged. Do not attempt to repair it yourself. Contact a qualified technician.
Other equipment
Before connecting other equipment, follow the appropriate procedure.
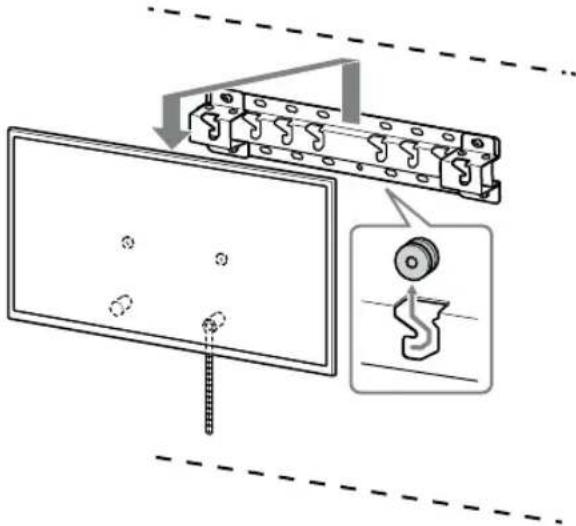
Installation and user manual (air conditioner) for room air conditioners. Installation manual.
Technical specifications
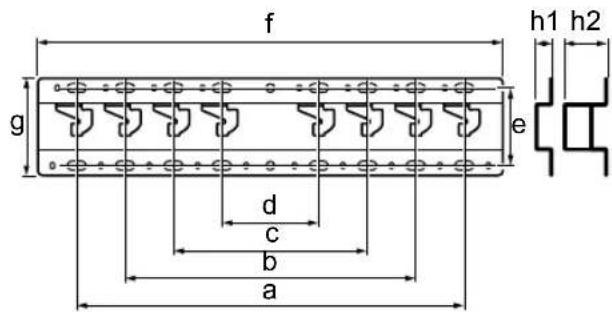
55XG80□□*/49XG81□□*/49XG80□□*/43XG81□□*/
43XG80□□*
- In specific model names, "☐☐" indicates numbers and/or letters specific to each model.
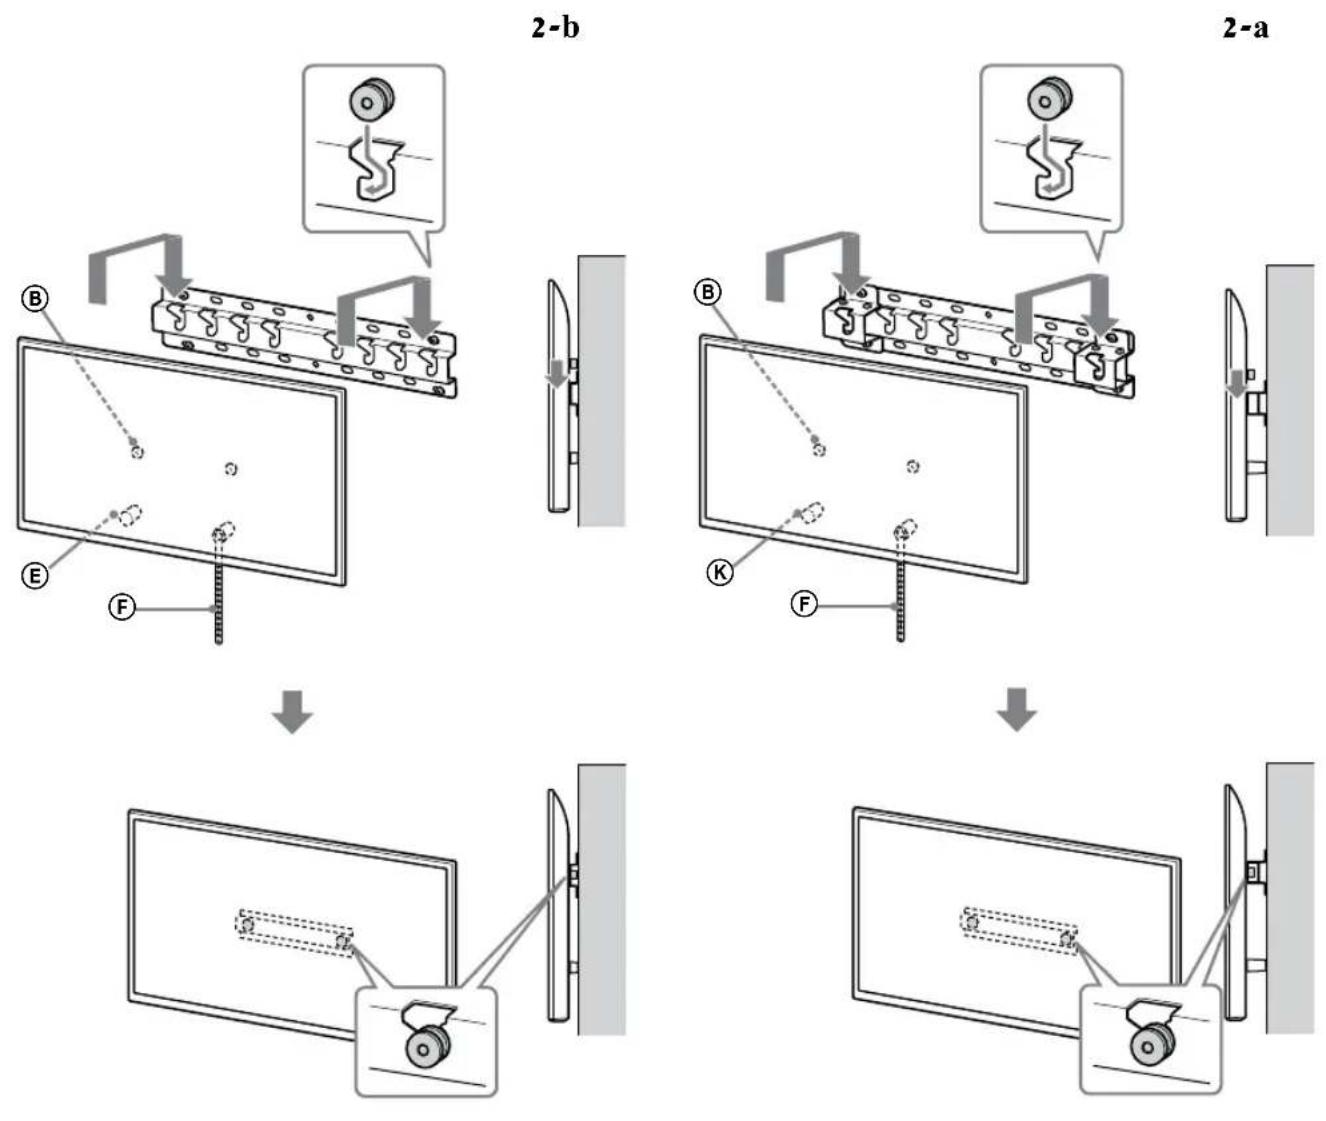
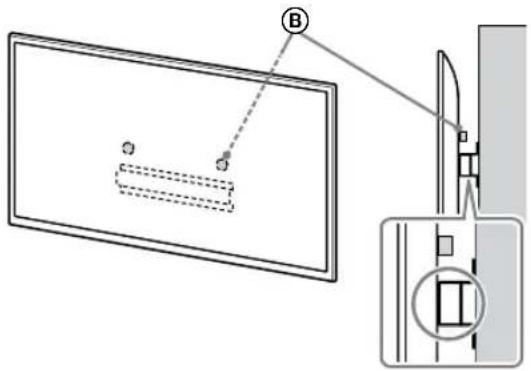
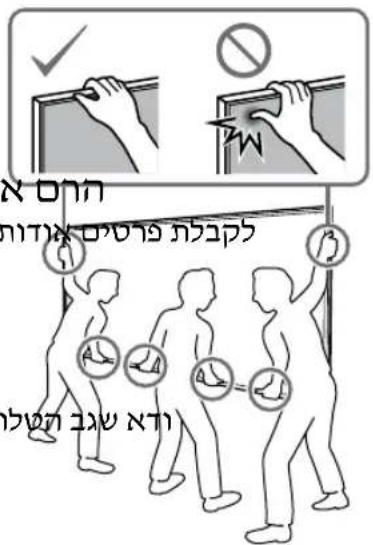
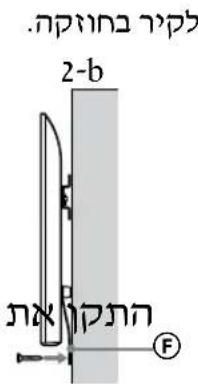
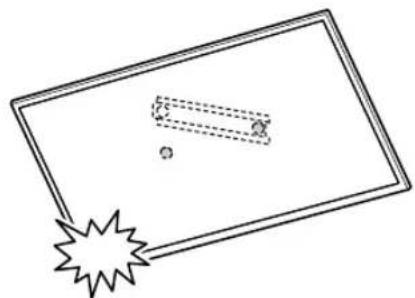
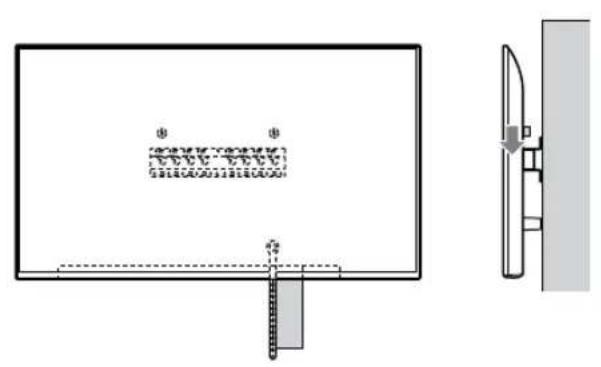

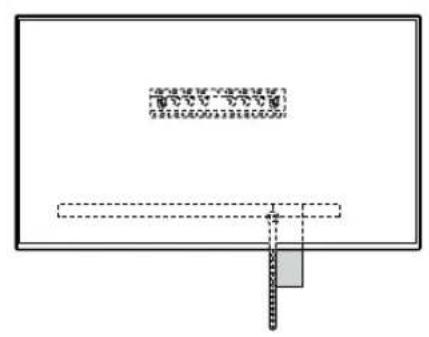
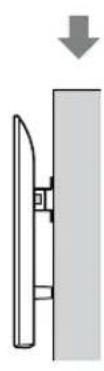
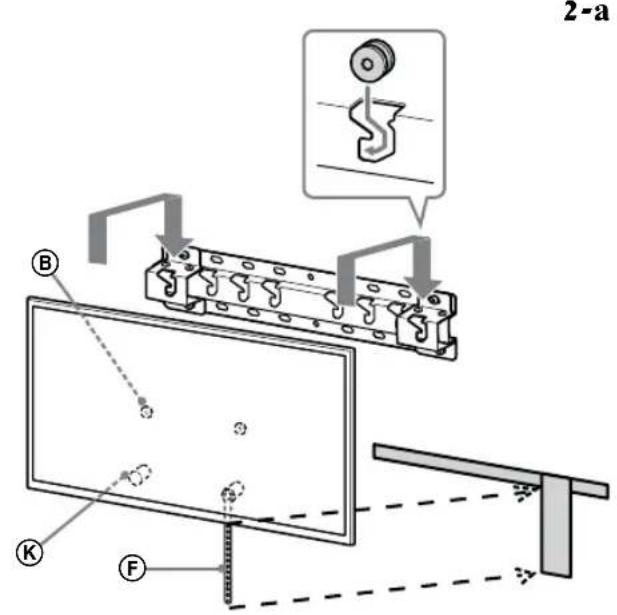

2-b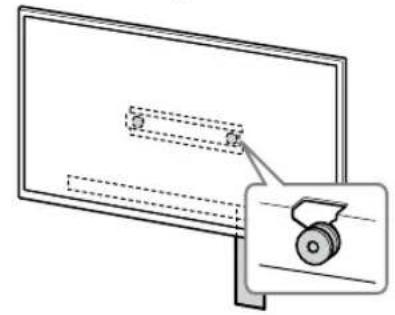
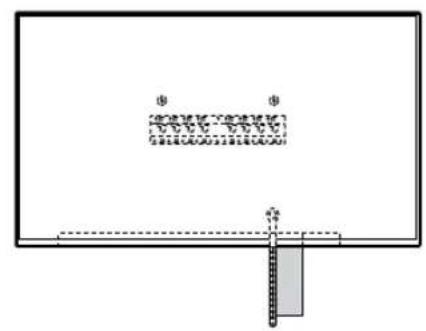

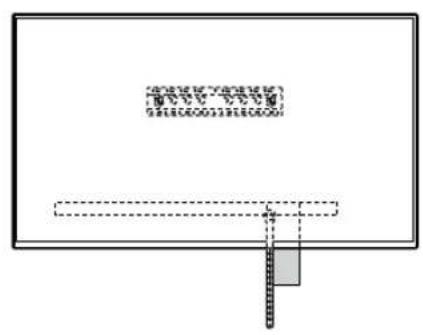
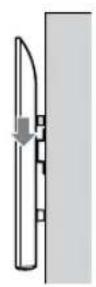

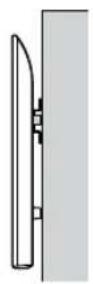
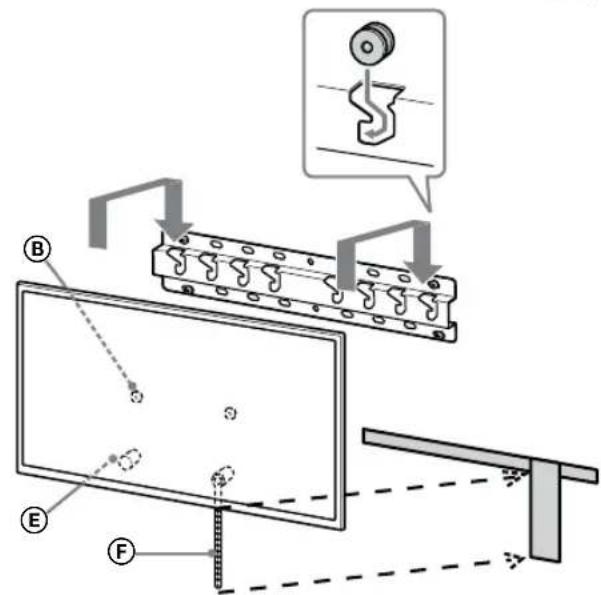

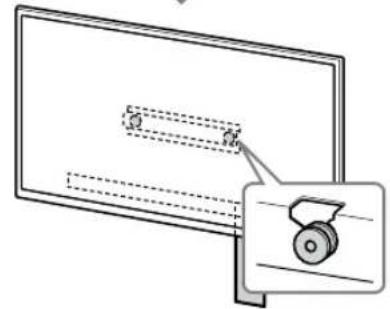
2 IN D
.
-
KD-75XG80□□
OoNnIN OoNn nn n 8nnnnnnnnnnnnnnnnnnnnnnnnnnnnnnnnnnnnnnnnnnnn
n nn 8 nn nn nn nn nn nn nn nn nn nn nn nn nn nn nn nn nn nn nn nn nn nn nn nn nn nn nn nn nn nn nn nn nn nn nn nn nn nn nn nn nn nn nn nn nn nn nn nn nn nn nn nn nn nn nn nn nn nn nn nn nn nn nn nn nn nn nn nn nn nn nn nn nn nn nn nn nn nn nn nn nn nn nn nn nn nn nn nn nn nn nn nn nn nn nn nn nn nn nn nn
n nn nnnn
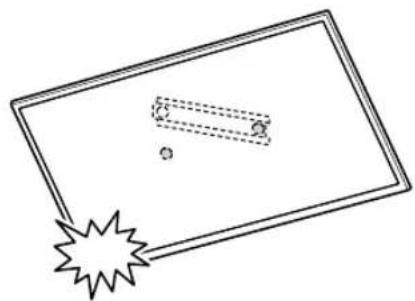
nnnnnnnnnnnnnnn
·D7777777777777
ONN BY IN OIN BY NIN
TAYNIN "nppnn nnn noann"
nnnnnnnnnnnnnnnnn
1.
B
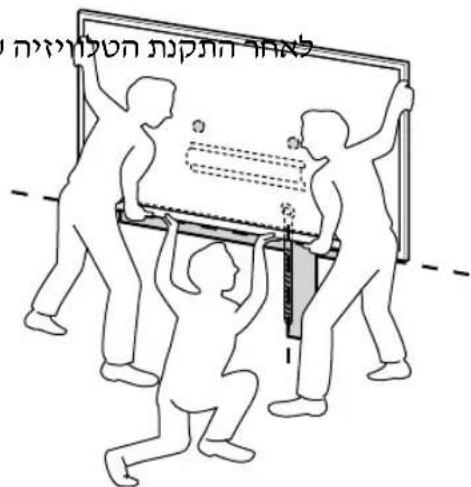
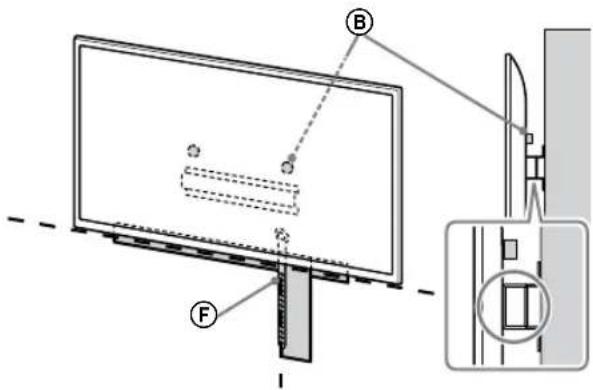

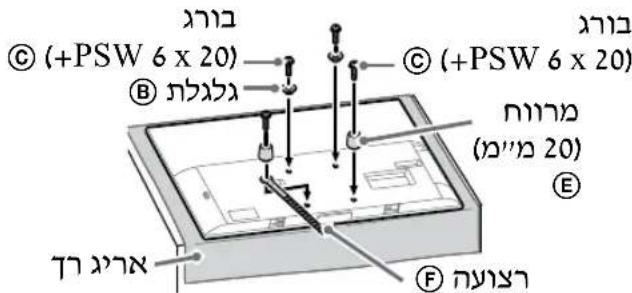
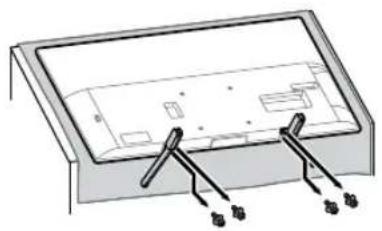
| b | KD-75XG80□□KD-65XG81□□KD-65XG80□□ |
| c | KD-55XG81□□KD-55XG80□□KD-49XG81□□KD-49XG80□□ |
| d | KD-43XG81□□KD-43XG80□□ |
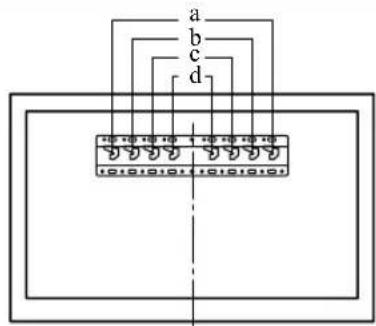
n:n IN PON 5V - by in Tn, -NNnNn , ∴ m : x = 1 或 3x + 4y + 1 = 0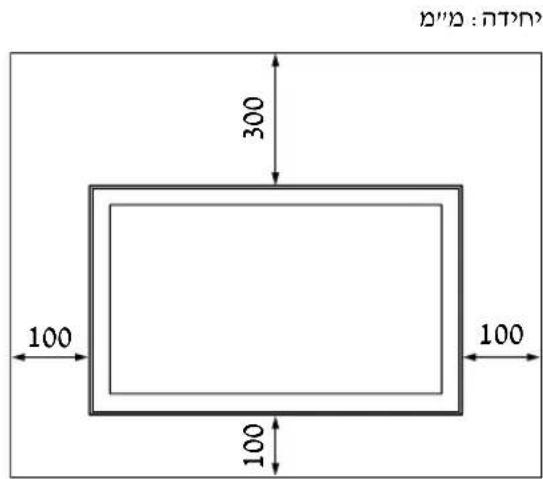
3 npovv nnv noo
N N 1000
一,
-
.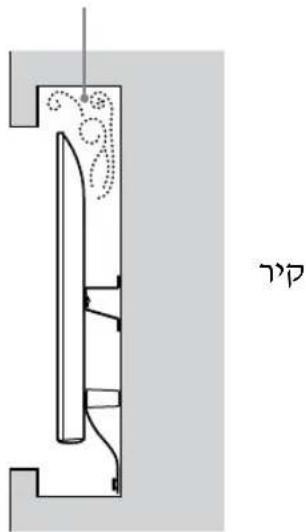
n nn n
nnpnn nn nnn noon noon np
yinnnnn nn, nnnn nn
(20) nnnn ① v nn, (20) v nn
(60) nnnn
nppnn npny noyn
1.nppnn
yNnNnNnNnNnNnNnNnNnNnNnNnNnNnNnNnNnNnNnNnNnNnNnNnNnNnNnNnNnNnNnNnNnNnNnNnNnNnNnNnNnNnNnNnNnNnNnNnNnNnN
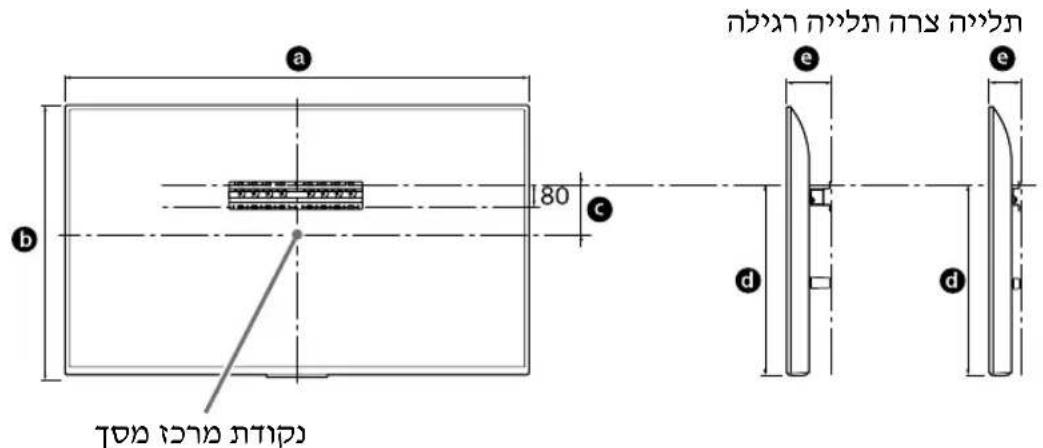
n:n
| e | d | C | b | a | a | |
| n | n | |||||
| n | n | |||||
| 1,6869702K2DP05A2C80□□ | ||||||
| 1,4638451K3DP25A2C80□□ | ||||||
| 1,4638451K3DP25A2C80□□ | ||||||
| 1,2417219K4D055N0B1□□ | ||||||
| 1,2417219K4D055N0B1□□ | ||||||
| 1,101645-15f3144X781□□ | ||||||
| 1,101645-15f3144X780□□ | ||||||
| 97057023K15143XG81□□ | ||||||
| 97057023K15143XG80□□ | ||||||
- KD-75XG80□□
- KD-65XG81□/65XG80□ 11.KD-55XG81□/55XG80□
5 10N
SU-WL450 1
- KG-75XG80□
(1) (20) ④(2) ⑤
KD-65XG81□/65XG80□/55XG81□/55XG80□/49XG81□/49XG80□/43XG81□/43XG80□

PSW 4x20 (2)

(4) PSW 6x20

E (1) yin
(2) (20) nnn

(2) PSW 4x20 H

(2) (M4) (20) ⑥

① (8) PSW 4x10 J
n nn nnnnnnnnn
nnuu nn nnuu npnnn nu npnn Su-WL450 npnnn wwn npn by
- TAYLOR JN
·


.075v07v07opnnn
(2) (60) nnnn K (2) PSW
6x5n p, nnnn nn nn nn nn nn nn nn nn nn nn nn nn nn nn nn nn nn nn nn nn nn nn nn nn nn nn nn nn nn nn nn nn nn nn nn nn nn nn nn nn nn nn nn nn nn nn nn nn nn nn nn nn nn nn nn nn nn nn nn nn nn nn nn nn nn nn nn nn nn nn nn nn nn nn nn nn nn nn nn nn nn nn nn nn

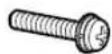
(2) (M4) mnnm (2) PSW 4x50 N
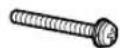
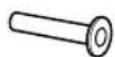
n nn nnnn nn nnnn nn nnnn nn nnnn nn
1000000000000000000000000000000000000000000
yannnnn79p7 7yinn nn yipn
yabnyn,ynyn nON
NNyNbO.
in nnnn nn nnnn nn nnnn
NNPnN TpN 1nnn nn.
ybnbynnbn,ynynnON .nybn
5vnnn nnN 107 p7n, n77n
000000000000000000000000000000000000000
IN nn an 7yannnN .nnn nn
Onnn nn nnnn nn nnnn nn nnnnn nn nnnnn nn nnnnn nn nnnnn nn nnnnn nn nnnnn nn nnnnn nn nnnnn nn nnnnn nn nnnnn nn nnnnn nn nnnnn nn nnnnn nn nnnnn nn nnnnn nn nnnnn nn nnnnn nn nnnnn nn nnnnn nn nnnnn nn nnnnn nn nnnnn nn nnnnn nn nnnn nn nnnn nn nnnn nn nnnn nn nnnn nn nnnn nn nnnn nn nnnn nn nnnn nn nnnn nn nnnn nn nannn nn nannn nn nannn nn nannn nn nannn nn nannn nn nannn nn nannn nn nannn nn nannn nn
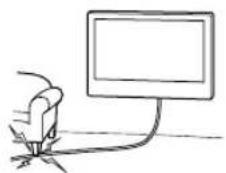
yipn 0
ywnn nnynnnn nn nnnn
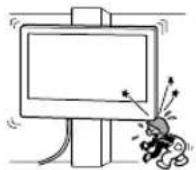
Sony
55XG80□□*/49XG81□□*/49XG80□□*/43XG81□□*/
43XG80□□*
Sony
- TO CUSTOMERS
- TO SONY DEALERS AND CONTRACTORS
- ON SAFETY
- TO SONY DEALERS
- CAUTION
- SPECIFIED PRODUCTS
- WARNING
- BE SURE TO SUBCONTRACT THE INSTALLATION TO LICENSED CONTRACTORS AND KEEP SMALL CHILDREN AWAY DURING THE INSTALLATION
- BE SURE TO SUBCONTRACT MOVING OR DISMOUNTING OF THE TV TO LICENSED CONTRACTORS
- DO NOT REMOVE SCREWS, ETC., AFTER MOUNTING THE TV
- DO NOT MAKE ALTERATIONS TO THE PARTS OF THE WALL-MOUNT BRACKET
- DO NOT MOUNT ANY EQUIPMENT OTHER THAN THE SPECIFIED PRODUCT
- DO NOT LEAN ON OR HANG FROM THE TV
- DO NOT HANDLE THE PRODUCT WITH EXCESSIVE FORCE DURING CLEANING OR MAINTENANCE
- PRECAUTIONS
- INSTALLING THE WALL-MOUNT BRACKET
- DO NOT INSTALL THE TV OVER OR UNDER AN AIR CONDITIONER
- BE SURE TO INSTALL THE WALL-MOUNT BRACKET SECURELY TO THE WALL FOLLOWING THE INSTRUCTIONS IN THIS INSTRUCTION MANUAL
- BE SURE TO ASSEMBLE THE BRACKET PROPERLY FOLLOWING THE INSTRUCTED PROCEDURE EXPLAINED IN THIS INSTRUCTION MANUAL
- BE SURE TO TIGHTEN THE SCREWS SECURELY IN THE DESIGNATED POSITION
- BE CAREFUL NOT TO SUBJECT THE TV TO SHOCK DURING INSTALLATION
- BE SURE TO INSTALL THE TV ON A WALL THAT IS BOTH PERPENDICULAR AND FLAT
- AFTER PROPER INSTALLATION OF THE TV, SECURE THE CABLES PROPERLY
- DO NOT ALLOW THE MAINS LEAD OR THE CONNECTING CABLE TO BE PINCHED
- THE SCREWS NEEDED TO SECURE THE WALL-MOUNT BRACKET TO THE WALL ARE NOT SUPPLIED
- TABLE OF CONTENTS
- INSTALLING THE TV ONTO THE WALL
- NOTE
- PREPARING FOR INSTALLATION
- CHECKING THE PARTS
- SUPPLIED WITH SU-WL
- DECIDING ON THE INSTALLATION LOCATION
- DECIDE ON THE INSTALLATION LOCATION
- INSTALLING THE BASE ON THE WALL
- PREPARING FOR THE INSTALLATION OF THE TV
- KD-75XG
- SLIM MOUNTING (2-B)
- DETACH THE TABLE-TOP STAND FROM THE TV
- KD-65XG81□□/65XG
- CONNECT THE NECESSARY CABLE(S) TO THE TV
- KD-55XG
- XG
- ATTACH THE ATTACHMENT PARTS FOR WALL-MOUNT BRACKET. CHECK THE ATTACHMENT PARTS BY REFERRING TO "SUPPLIED WITH SU-WL450" IN "CHECKING THE PARTS" ON PAGE
- INSTALLING THE TV ON THE WALL
- LIFT THE TV
- INSTALL THE TV ONTO THE BASE OR BASE ADAPTOR
- PREVENTING THE BOTTOM OF THE TV FROM SHIFTING
- CONFIRMING THE COMPLETION OF THE INSTALLATION
- OTHER INFORMATION
- SPECIFICATIONS
- DIMENSIONS: (APPROX.) [MM]
- WEIGHT (BASE ONLY): (APPROX.) [KG]
- WEIGHT (BASE ONLY) : (APPROX.) [KG]
- FOR CUSTOMERS
- PREPARATION FOR INSTALLATION
- FIND THE TV'S LOCATION
- PRECAUTIONS FOR INSTALLATION
- CHECKING THE ACCESSORIES
- DO NOT PLACE THE TV ON A WALL OR OTHER SURFACE OTHER THAN THE TV STAND. DO NOT PLACE THE TV ON A SLANTED OR UNSTABLE SURFACE, OR ON TOP OF ANOTHER OBJECT
- DO NOT STAND OR SIT ON THE TV
- DO NOT OPERATE THE PRODUCT WITH A DAMAGED POWER CORD DURING CLEANING OR MAINTENANCE
- SAFETY MEASURES
- WALL MOUNT BRACKET INSTALLATION
- DO NOT INSTALL THE WALL MOUNT BRACKET ON A WALL SURFACE WHERE THE TV OR ITS EDGES PROTRUDE FROM THE WALL SURFACE
- DO NOT INSTALL THE TV ON A CEILING OR IN A CLIMATE-CONTROLLED ENVIRONMENT
- INSTALL THE WALL MOUNT BRACKET SECURELY TO THE WALL BY FOLLOWING THE INSTRUCTIONS IN THIS MANUAL
- MAKE SURE YOU INSTALL THE BRACKET CORRECTLY BY FOLLOWING THE PROCEDURE DESCRIBED IN THIS MANUAL
- TIGHTEN THE SCREWS SECURELY IN THE INDICATED POSITION
- BE CAREFUL NOT TO HIT THE TV DURING INSTALLATION
- MOUNT THE TV ON A WALL THAT IS PERPENDICULAR AND FLAT
- AFTER PROPER INSTALLATION OF THE TV, ROUTE THE CABLES CORRECTLY
- DO NOT PINCH THE POWER CORD OR CONNECTING CABLES
- THE SCREWS REQUIRED TO SECURE THE WALL MOUNT BRACKET TO THE WALL ARE NOT INCLUDED IN THE PACKAGE
- CONTENTS
- MOUNTING ON THE TV ON THE WALL
- PREPARATION FOR MOUNTING
- PARTS CHECK
- DETERMINING THE MOUNTING POSITION
- SELECT THE MOUNTING POSITION
- DETERMINE THE POSITIONS OF THE SCREWS FOR MOUNTING THE BASE (20) A
- MOUNTING THE BASE ON THE WALL
- PREPARATION FOR MOUNTING THE TV
- MARK THE MOUNTING LOCATION ON THE WALL
- MOUNT THE TV ON THE TABLE-TOP STAND
- INSTALLATION
- WALL MOUNTING
- SUPPORTED MODELS
- AFTER MOUNTING THE TV, DO NOT REMOVE THE SCREWS, ETC
- DO NOT DISASSEMBLE OR MODIFY THE BRACKET FOR WALL MOUNTING
- DO NOT INSTALL ANY OTHER EQUIPMENT ON THE BRACKET OTHER THAN THAT SPECIFIED
- TO AVOID OVERLOADING THE WALL-MOUNT BRACKET, DO NOT PLACE ANYTHING ON IT OTHER THAN THE TV. DO NOT PUSH THE TV LEFT/RIGHT OR UP/DOWN
- DO NOT LEAN ON THE TV OR HOLD ONTO IT
- WALL-MOUNT INSTALLATION
- MARK THE INSTALLATION LOCATION ON THE WALL
- COMPACT INSTALLATION (2-B)
- CONNECT THE NECESSARY CABLES TO THE TV
- KD-55XG81□□/55XG
- ATTACH THE MOUNTING BRACKETS FOR WALL MOUNTING
- REMOVE THE TABLETOP STAND FROM THE TV
- ATTACH THE WALL-MOUNT BRACKET'S MOUNTING PARTS. PERFORM THE CHECK OF THE MOUNTING PARTS ACCORDING TO THE SECTION "ATTACHES TO SU-WL450" IN THE "CHECKING THE ACCESSORIES" SECTION ON PAGE
- STANDARD MOUNTING (2-A)
- COMPACT MOUNTING (2-B)
- PREPARE THE TV
- INITIAL INFORMATION
- TECHNICAL SPECIFICATIONS
- DO NOT UNSCREW THE SCREWS USED FOR MOUNTING THE TV
- DO NOT REMOVE THE BRACKET PARTS FOR WALL MOUNTING
- DO NOT INSTALL ANY OTHER DEVICES OTHER THAN THE SPECIFIED ONE
- DO NOT USE THE BRACKET FOR WALL MOUNTING FOR ANY EQUIPMENT OTHER THAN A TELEVISION. DO NOT TILT THE TELEVISION TO THE RIGHT OR LEFT
- DO NOT LEAN ON THE TELEVISION OR HANG ON IT
- DURING CLEANING OR MAINTENANCE, DO NOT APPLY EXCESSIVE FORCE TO THE PRODUCT
- SAFETY PRECAUTIONS
- INSTALLING THE BRACKET FOR WALL MOUNTING
- FOR SONY CUSTOMERS
- DO NOT INSTALL THE WALL-MOUNT BRACKET ON A WALL WHERE THE SIDES OF THE TV PROTRUDE BEYOND THE WALL SURFACE
- DO NOT INSTALL THE TV ON A CEILING OR UNDER A DESK
- INSTALL THE WALL-MOUNT BRACKET ON THE WALL ACCORDING TO THE INSTRUCTIONS IN THIS MANUAL
- ASSEMBLE THE BRACKET SECURELY, FOLLOWING THE PROCEDURE DESCRIBED IN THIS MANUAL
- TIGHTEN THE SCREWS FIRMLY IN THE SPECIFIED POSITIONS
- DURING INSTALLATION, BE CAREFUL NOT TO PINCH YOUR FINGERS BETWEEN THE TV AND THE WALL
- INSTALL THE TV ON A PERPENDICULAR WALL WITH A FLAT SURFACE
- INSTALLING THE TV ON A WALL
- REMOVAL
- PREPARATION
- CONSISTS OF SU-WL
- DETERMINING THE INSTALLATION LOCATION
- DETERMINE THE INSTALLATION LOCATION
- BRACKET
- SPACER
- CONNECT THE TV CABLES
- REMOVE THE TABLE-TOP STAND
- THIN MOUNTING (2-B)
- DISCONNECT THE TV FROM THE WALL OUTLET
- SECURE THE WING ELEMENTS OF THE BRACKET FOR THE WALL MOUNT. CHECK THE TIGHTNESS OF ALL WING ELEMENTS USING THE LIST "SUPPLIED PARTS WL450" IN THE "CHECKING THE PARTS" SECTION ON PAGE
- CONNECT THE TV CABLE
- DISCONNECT THE TV FROM THE WALL MOUNT
- SECURE THE WALL MOUNT BRACKET COMPONENTS FOR WALL MOUNTING. CHECK THAT ALL BRACKET COMPONENTS ARE PRESENT USING THE LIST "SUPPLIED ITEMS: SU-WL450" IN THE "CHECKING THE PARTS" SECTION ON PAGE
- CONNECT THE TV TO THE REQUIRED CABLES
- INSTALL THE TV ON THE BASE OR ON THE STAND FOR THE BASE
- BE CAREFUL NOT TO PINCH YOUR HANDS OR FINGERS WHEN INSTALLING THE LOWER PART OF THE TV
- SCREW
- INSTALLATION COMPLETE
- ADDITIONAL INFORMATION
- THIN INSTALLATION (2-B)
- MARKUS
- WALL MOUNTING (2-B)
- MARK
- MASS (BASE ONLY): (APPROX.) [KG]
- FOR USERS
- FOR SONY DEALERS AND CONTRACTORS
- ABOUT SAFETY
- DO NOT PLACE THE TV IN AN UNSTABLE LOCATION WHERE IT MAY FALL AND CAUSE INJURY OR DEATH
- INSTALLATION PRECAUTIONS
- CABLE ENTRY FOR THE CROWN TERMINAL
- SONY DNILNEPEPI YWIH
- EXPERT
- TELEVISION
- THE BOLTS AND NUTS SHOULD BE INSTALLED IN THE PLACES WHERE THE CABLE IS CONNECTED
- THE TELEVISION SHOULD BE INSTALLED ON THE SURFACE OF THE STAND
- USE THE INSTRUCTIONS PROVIDED IN THE MANUAL
- USE THE PROCEDURES GIVEN IN THE MANUAL
- CROSSPIECES
- THE GUARDS MUST BE SECURED WITH THE SCREWS PROVIDED
- DURING OPERATION, DO NOT TOUCH THE DRILL BIT
- THE DRILL BIT MUST BE POSITIONED PERPENDICULAR TO THE WALL AND CEILING
- AFTER THE DRILL IS CORRECTLY POSITIONED, SECURE THE CABLES PROPERLY
- THE POWER CORD OR EXTENSION CABLE MUST BE KEPT AWAY FROM THE DRILL BIT
- THE SCREWS REQUIRED FOR SECURING THE GUARD ARE PROVIDED
- LUBRICANT
- TEJEIAIAPIBI KA6BIPRAFA OPHATY
- HYCKAY
- OPHATYFA DAHBIHDBIK
- БОШЕКТОРДTEKCEPY
- SU-WL450 KYPBIRFBCIMEH 6EPINEI
- OPERATIONAL TESTS
- STARTUP
- CABLE INSTALLATION METHOD
- ATTACH THE TV TO THE WALL MOUNT
- ATTACH THE WALL MOUNT BRACKET TO THE WALL
- INCLINED MOUNTING (2-B)
- CONNECT THE CABLES (CABLE HOLDERS) TO THE TV
- DO NOT PLACE THE TV ABOVE THE T-D
- INCLINED INSTALLATION (2-B)
- CONNECT THE CABLES TO THE APPROPRIATE TERMINALS
- INSTRUCTIONS
- TIGHTEN THE TERMINAL SCREWS
- TO INSTALL THE TV ON A WALL, USE THE MOUNTING SCREWS. SEE THE “WALL-MOUNT BRACKET” SECTION IN THE “MOUNTING THE TV” INSTRUCTIONS FOR THE SU-WL450 BRACKET
- WALL INSTALLATION (2-B)
- CONNECT THE TWO CABLES (CABLE LEADS) TO THE TERMINALS
- TIGHTEN THE SCREWS FROM THE T-D SIDE
- KD-49XG81□□ / 49XG80□□ / 43XG81□□ / 43XG
- TIGHTEN THE TERMINAL SCREWS FROM THE T-D SIDE
- ECKEPTY
- FOR BRACKET INSTALLATION, FOLLOW THE INSTRUCTIONS IN SECTION 5, "MOUNTING THE SU-WL450 BRACKET". REFER TO THE MANUAL FOR PROPER INSTALLATION
- HYCAY
- STANDARD INSTALLATION (2-A)
- CORRECT INSTALLATION (2-B)
- CONNECT THE CABLE(S) TO THE DEVICE
- INSTALLING THE TV
- REMOVE THE STAND
- INSTALL THE STAND TO THE TV OR THE ALTERNATIVE BASE
- REMOVE THE TV FROM THE TABLE STAND
- REMOVE THE TV
- INSTALL THE TV ON THE BASIC OR OPTIONAL STAND
- DO NOT LEAVE THE TELEVISION IN STANDBY MODE FOR EXTENDED PERIODS
- INSTRUCTION
- OPERATING INSTRUCTIONS
- OTHER EQUIPMENT
- IN D
- NPPNN NPNY NOYN
- SU-WL
- N NN NNNNNNNNN
- N NN NNNN NN NNNN NN NNNN NN NNNN NN
- YANNNNN79P7 7YINN NN YIPN
- NNYNBO
- NNPNN TPN 1NNN NN
- VNNN NNN 107 P7N, N77N
- IN NN AN 7YANNNN .NNN NN
- YIPN
- SONY
Brand : SONY
Model : Bravia KD55XG8196
Category : Television