
Racer GTX - Stroller HARTAN - Free user manual and instructions
Find the device manual for free Racer GTX HARTAN in PDF.
| Product type | Single stroller |
| Brand | Hartan |
| Model | Racer GTX / R1 GTX |
| Suitable from | 6 months (adaptable for less than 6 months with appropriate carrycot) |
| Maximum child weight | Up to 22 kg |
| Number of children | 1 |
| Uses not recommended | Jogging, rollerblading |
| Materials | Textiles tested according to Oko-Tex 100, anti-corrosion treated chassis |
| Safety harness | 5-point with magnetic buckle |
| Brakes | Central locking brake (red/green) + optional handbrake (adjustable) |
| Suspension | Adjustable spring suspension (comfort/sport) |
| Wheels | Lockable swivel wheels, air tires (1.2-1.5 bar) |
| Hood | Adjustable hood with climate zone (rear opening) |
| Seat | Adjustable backrest (reclining positions), adjustable footrest, removable seat with automatic locking |
| Handlebar | Height adjustable, foldable |
| Cleaning | Machine washable textiles at 30°C (delicate wash), clean chassis with dry cloth |
| Wheel maintenance | Lubricate axles every 4 weeks, tire pressure between 1.2 and 1.5 bar |
| Power supply | None (manual stroller) |
| Warranty | 2 years after product delivery |
| Safety standards | Complies with applicable standards, Oko-Tex 100 textiles |
Frequently Asked Questions - Racer GTX HARTAN
User questions about Racer GTX HARTAN
0 question about this device. Answer the ones you know or ask your own.
Ask a new question about this device
Download the instructions for your Stroller in PDF format for free! Find your manual Racer GTX - HARTAN and take your electronic device back in hand. On this page are published all the documents necessary for the use of your device. Racer GTX by HARTAN.
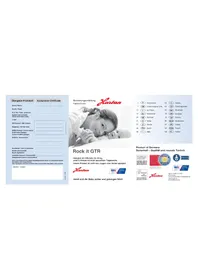
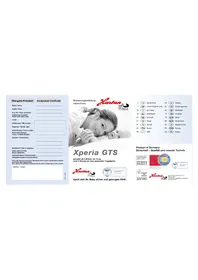
USER MANUAL Racer GTX HARTAN
Acceptance Certificate
Name/Name:
StraBe/Road:
PLZ.Orr/Town.postcode:
Phone (with area code):
e-mail:
Colour of fabric (design):
Zubehor / Accessories:
Kaufdatum / Date of purchase:
Salesperson (name in block letters)
Note: signing this acceptance certificate does not restrict the legal rights of the purchaser.
Handler/Dealer
10.2022/2000
-
Completeness
-
Functor
Folding mechanism
■ Road behaviour
Wheels
Adjusting mechanism
■ Brakes check
■ Suspension check
- Intactness
Frame check
Fabric check
Plastic parts check
2 I have checked the product and have ascertained that it is supplied
complete has no external visible faults and that all functions are intact.
2.1 have received sufficient information concerning the product and its
functions before purchase and have been instructed on care and
maintenance.


Deutschland
Hartan
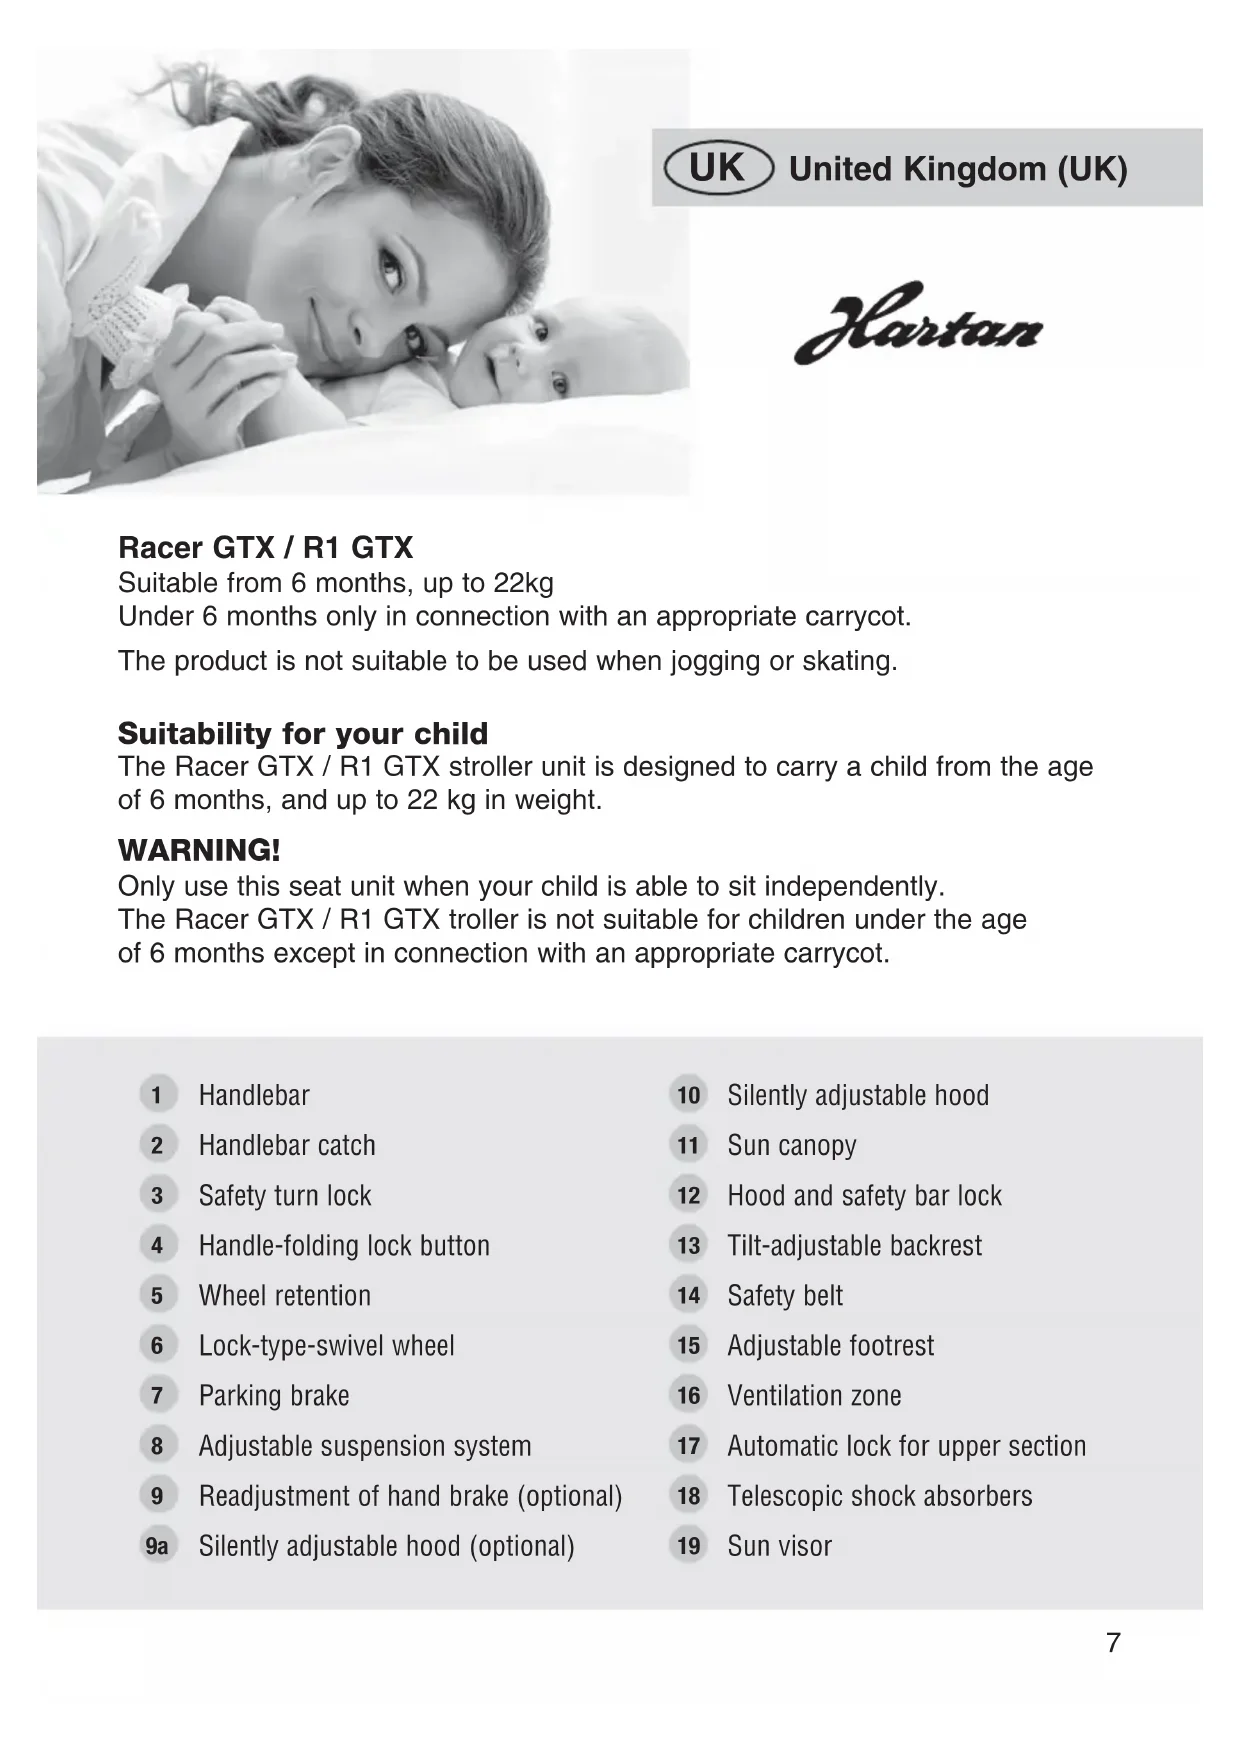
Racer GTX / R1 GTX
Suitable from 6 months, up to 22kg
Under 6 months only in connection with an appropriate carrycot.
The product is not suitable to be used when jogging or skating.
Suitability for your child
The Racer GTX / R1 GTX stroller unit is designed to carry a child from the age of 6 months, and up to 22kg in weight.
WARNING!
Only use this seat unit when your child is able to sit independently.
The Racer GTX / R1 GTX troller is not suitable for children under the age of 6 months except in connection with an appropriate carrycot.
1 Handlebar
2 Handlebar catch
3 Safety turn lock
4 Handle-folding lock button
5 Wheel retention
6 Lock-type-swivel wheel
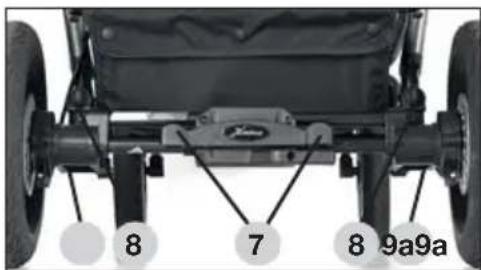
7 Parking brake
8 Adjustable suspension system
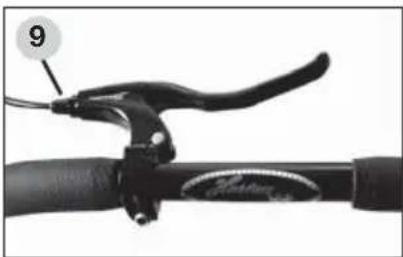
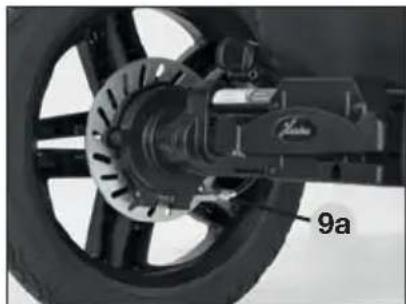
9 Readjustment of hand brake (optional)
9a Silently adjustable hood (optional)
10 Silently adjustable hood
11 Sun canopy
12 Hood and safety bar lock
13 Tilt-adjustable backrest
14 Safety belt
15 Adjustable footrest
16 Ventilation zone
17 Automatic lock for upper section
18 Telescopic shock absorbers
19 Sun visor
Congratulations on your purchase
You want your baby to feel safe and secure, that's why you have purchased a high-quality product. You have made an excellent choice. Products are manufactured with the greatest possible care and monitored constantly by rigorous quality control assuring that your pram will provide life-long satisfaction. The textiles used for our products have been tested for harmful substances (chemical residues) according to the indu-sty's own, Oko-Tex-Standard 100^ to guarantee that all the fabric parts of your pram are safe for your baby.
IMPORTANT! PLEASE DO NOT USE THIS PRAM BEFORE READING THE INSTRUCTIONS CAREFULLY, AND KEEP THESE INSTRUCTIONS FOR QUERIES OR FUTURE REFERENCE. YOUR CHILD'S SAFETY MAY BE AFFECTED IF YOU DO NOT FOLLOW THESE INSTRUCTIONS.
If you do not understand the instructions or if you require more detailed information, contact your dealer. Please ensure that other users are also informed about the functions of the carriage and the notes on safety.
For the safety of your child
WARNING! - Before using the pram, make sure all catches are locked.
WARNING! - Before use, conduct an initial check of the carriage, and do not use it if it is damaged or if parts are torn or broken.
WARNING! - Make sure when unfolding the pram and folding it together that your child is at a safe distance, to avoid any injuries
WARNING! - Never leave your child unattended in the pram.
WARNING! - Make sure before using it that the carrycot or the seat unit or the child's car seat is correctly latched into place.
WARNING! - Negotiating stairs or steps as well as overloading may damage the pram and endanger your child.
WARNING! - When parking the pram, make sure the brake is engaged.
When using public transport, ensure the pram stands safely.
WARNING! - A pram, stroller or carrycot is not a substitute for a cradle or a bed. It is intended to be used exclusively as a means of transport.
WARNING! - Using this pram while jogging, skating, etc. can be dangerous and is therefore not allowed.
WARNING! - Do not allow children to play either near or with the pram.
WARNING! - Always use the restraint system.
WARNING! - Fix no bags, handbags or other loads to the handle, backrest or sides of the carriage, as this will affect its stability.
WARNING! - This model has been designed for 1 child.
WARNING! - A second child seat is not allowed for this model.
WARNING! - The seat unit and carrycot are not to be used for transporting in a car.
WARNING! - The rain cover may not be used when the hood is taken off (danger of suffocation). Never expose the rain cover hood to sun while the child is in the carriage (overheating).
WARNING! - Keep the carriage away from open fires or other sources of heat.
WARNING! - Remove immediately all film packaging, and do not allow your child to play with it (asphyxiation).
WARNING! - Accessories and spare or replacement parts not approved by the manufacturer must not be used.
WARNING! When opening out and folding down the frame and when adjusting the back-rest, pinch-points may be caused in which fingers etc. can be trapped unless care is exercised. Ensure that your child has plenty of clearance space.
Unfolding the pram
By pushing the lock buttons 4, unfold the upper section to bring the handle in horizontal position. Pull handle 1 upwards until handle catch 2 has engaged.
Folding the pram
Turn safety turn-lock 3 inward until the handle's catch 1 has released. Push handle downwards to fold the pram. By pushing the lock buttons 4, fold the handle's upper section inward.
Height adjustment of handlebar
Press the two handle-folding lock buttons 4 to bring the upper section of the handlebar 1 in the desired position.
Removing the wheels
Release the parking brake 7. To remove or replace the wheels, press button 5. If replacing the wheel, make sure that it is correctly latched into place.
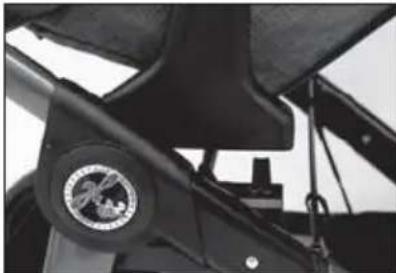
Lock-type-swivel wheels
Turn the cap 6 so that the red point is visible to pre-select the straight-line motion mode, which will be activated the moment the wheels point in forward direction. Turn the cap 6 so that the green point is visible to release the swivel lock. To remove, press the button in the centre of the cap 6 and withdraw the wheel from its seating. To fix the wheel in place, push the wheel with its fixing pin into the seating until it audibly clicks into place.
Adjust the handbrake (optional)
Readjust the hand brake by means of the cable adjusting barrel 9 (above). A different brake effect on the two rear wheels can be corrected by means of the cable adjusting barrel 9a (below).
Adjustable suspension system
By turning the selector 8, a "hard" or "soft" position can be selected for suspension.
Parking brake
Push the red brake button 7 to engage the brake. Having parked the pram, try to push it to check the brake. Push the green brake button 7 to release the brake.
WARNING! Make sure the brake is always closed when placing the baby in the carriage or taking it out of it.
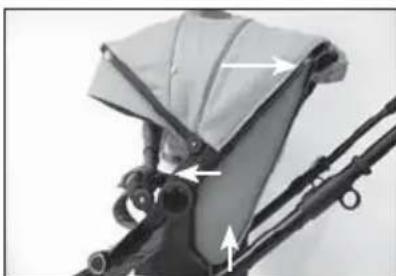
Hood and safety bar
Press the button 12 to extend the canopy or the hoop guard. When inserting it, make sure the safety bar locks into place correctly and be careful not to pinch any of the fabric parts. By pressing the buttons, the safety bar position can be changed.
WARNING! You cannot carry the weight of the buggy using the
canopy hoop 10.
Instructions
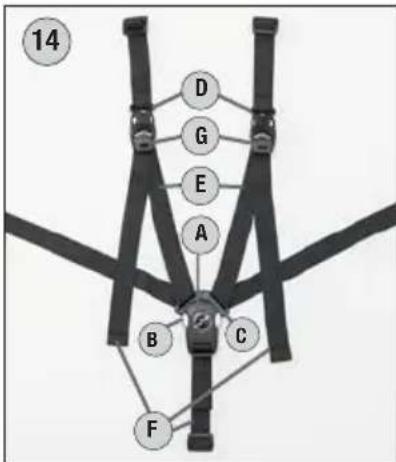
Safety harness WARNING!
Secure your child with the 5-point belt system 14.
Make sure that the shoulder belts D are inserted and the belt fits snugly against your child. You can adjust the length and tautness of the belts with the belt ends F. You can adjust the width of the shoulder and lap belts by tilting open the quick-release slider G and pulling on the belt E.
Opening the belt: Press the two buttons B at the same time and remove the magnetic closer A. The bottom fixing C can then be removed easily.
Closing the belt: Hold together the two fixings C and attach the magnetic closer A; the fastener locks automatically.
Adjusting the footrest
By pressing the two red safety buttons 15 at the same time, the footrest can be lowered. When lifting it, adjustment of positions is effected automatically. The footrest can be lengthened. To do this, pull the two red pins 16 and turn the footrest by 180^ .
Automatic locking of the upper section
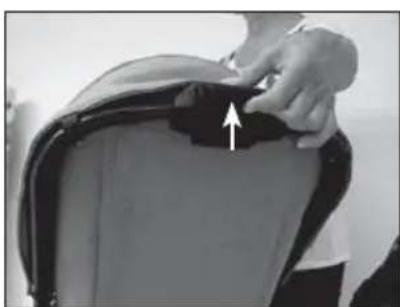
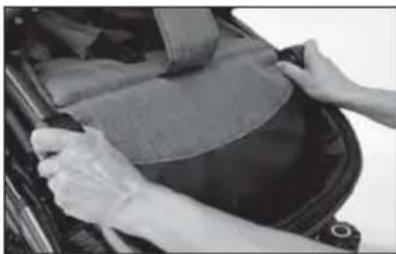
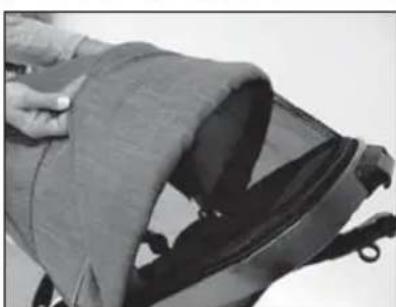
Place the seat frame on the chassis so that the two upper fastening components rest on the locking bolts provided for this purpose. Both sides of the lock mechanism 17 will automatically close when you press the seat frame down.
WARNING! Ensure that the seat frame is securely in place before use!
To release the lock mechanism, press the safety button to the right of the release button on the back of the inclining seat frame and then press the release button until the release is activated.
Grasp the hoop guard with your other hand to remove the seat frame.
Adjust the back rest to incline the seat frame
Tilt the adjustment lever 13 at the rear to bring the seat frame from the sitting to the lying position in two stages.
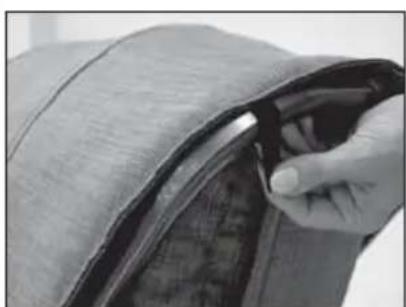
Sun and weather protection 16 on the canopy
Open the two brackets on the rear canopy hoop to extend the canopy hoop forwards over the canopy
All the materials we use can easily be cared for.
Care of the fabric parts
Clean soiled fabrics when dry using a clothes-brush or lukewarm water (then use hair dryer). Do not rub fabrics extensively. Remove tenacious stains using a soft detergent. All removable fabric parts may be machine washed in lukewarm water at a gentle setting and reduced agitation, at 30^ . Let's say you have encountered a heavy rain shower. Dry your carriage with the hood still on in a dry and airy room using a cloth. This prevents marking as well as the underlining fabrics from moist soaking in through the seams. As a guaranteed protection against rain, we recommend that you use our rain cover, which is either included or can be purchased at your dealer's. Our fabrics have quite a number of distinctive features. However, they are very sensitive to excessive sunlight. That's why you should park your carriage in the shade whenever possible.
Care of the chassis
The chassis requires regular care. You should clean and slightly lubricate the wheel axles at a regular 4-weeks interval. Before oiling the wheels and push-in axles, make sure these are absolutely clean and free of sand etc., in order not to compromise the proper working of the locking mechanism. Use a silicone based lubricant spray for all moving plastic parts to maintain them in an operative condition. Keep all coated and chrome-plated metal parts in dry condition, and use a finish restorer or chrome paste if necessary. Remove smaller chassis paint damages by means of a touch-up applicator.
Do not use high-pressure cleaners when cleaning your carriage, due to risk of damaging the ball bearings of the wheels (greased) and other functional parts (grinding and creaking noise).
Wheels: Overpressure may result in accidents and personal injuries. Replace worn plain wheel bearings and springs in time. Replace worn plain wheel bearings and springs in time. Little stones in the thread, etc. may just as well damage the floor covering. When parking the carriage in the blazing sun or cramming it in the boot at temperatures of above 40^ , the semi pneumatic tires may flatten or become deformed.
For pneumatic tires
When using pneumatic wheels, make sure they have got enough air in the tire. Specified tire inflation pressure should be between 1.2 and 1.5bar max.
WARNING! Max. tire pressure will be reached quickly. Tires tend to lose air over time. When blowing up a flat tire, inflate it only halfway first, and make sure the tire is evenly seated, to avoid "wobble". Replace worn plain wheel bearings and springs in time. Then continue to inflate it to the proper pressure.
Quality agreement
2 YEARS WARRANTY
This product is guaranteed for a period of 2 years by your contract partner. For possible submission of proof, please keep your receipt, the completed warranty card as well as the hand-over check bearing your signature for the length of the warranty period. These documents must be submitted to qualify for service under the warranty.
IN CASE OF WARRANTY CLAIM
This product is warranted against defects in materials and workmanship that existed at the time it was handed over.
THIS WARRANTY DOES NOT COVER ....
We disclaim liability for defects in the object of purchase that are beyond our control.
This especially applies to:
natural wear and tear (wear-related defects) and defects due to excessive stress
■ consequential defects, originally caused by neglect of defects/damagesbut developing into conditions necessitating a more difficult repair
defects due to improper or inappropriate use (see Instructions)
defects due to incorrect assembly or operation
■ defects due to negligent handling or lack of maintenance of the product
defects due to improper alteration of the product.
Quality agreement
WARRANTYCLAIM-YESORNO?
Rust: To provide a proper basic protection of the chassis, it has undergone a rust-proofing treatment. However, rust-stains may be found when lacking maintenance. This case will not be covered by the warranty.
Scratches: Scratches caused by wear and tear will not be covered by the warranty.
Mould formation: Fabric parts, having become wet, should be dried properly to prevent mould formation (see Instructions). Mould formation will not be covered by the warranty.
Bleaching of the fabrics: We confirm that the fabrics comply with the established standards. It cannot be ruled out that colours of the fabrics may fade while the parts are exposed to direct sunlight, washed too frequently, come into contact with sweat and detergents, or suffer abrasive wear (especially on those parts where the pram is handled). Consequently, colour fading is excluded from the warranty. It is unavoidable that colours sometimes differ slightly from one individual batch to the next, which is why this case will not be covered under the warranty.
Knob formation on fabrics: We recommend that you apply general clothes care. As with woollen sweaters, the knobs can easily be removed by using a clothes-brush or burling machine.
Tearing of seams, fabrics, press studs: At the time of purchase, please check carefully that all the fabric parts, seams and snap fasteners have properly been sewn and fastened. In case of a possible complaint concerning seams/defective snap fasteners, a claim must immediately be reported to your dealer after the defect has been discovered.
Wheels: As wheels used on prams will not be balanced, they may show slight run-outs ("wobbles"). Worn tires will be regarded as natural wear and tear. No claim can be raised if your pram, using pneumatic tired wheels, has a "flat". This will be attributed to extraneous causes - a small hole caused by a pointed object, or pushing the pram about when it has not got enough air in the tire. This case will not be covered by the warranty.
WHAT TO REMEMBER WHEN BUYING YOUR PRAM
Check that your pram is complete when it is handed over and no parts are missing. Check the function of all parts and confirm this by signing the hand-over check.
WHAT TO DO IN CASE OF A COMPLAINT
Call your dealer, from whom you bought the pram, to file the complaint and to discuss how to handle the matter. In case of defects concerning safety regulations, your complaint must be filed at your dealer within a 30 days period from the date the defects have occurred, otherwise these defects will not be warranted for. When handling your warranty claims, we will apply product-specific depreciation rates. We refer you to our general terms and conditions displayed at our premises.
Make sure that the pram is in a clean condition before being sent in for repair. Repairs will not be carried out on prams which are in a dirty condition.
USE, CARE AND MAINTENANCE
To maintain the original quality of your pram as a means of transportation for your child, it requires care and maintenance according to the instructions.


La France

Racer GTX / R1 GTX
O CEMU MORATE VODITI RACUNA PRILIKOM KUPNJE
Provjerite da li su kolica kompletna prilikom isporuke i da li nedostaju neki dijelovi. Provjerite da li sve funkcije kolica fungkioniraju u potpunosti i potvrdite ovo na listi o primopredaji.
POSTUPAK KOD REKLAMACije
DAnHn npOdyKT He nixoOnTb IaBnKOpncTaHHn iI qac 6iry, Hn KaTaHHHa KOB3aHax.
KoMΦopt Baоoi dntnHn
IporyraHKOBn 6loK po3po6neHo dIa ITeB BIKOM BiD 6 MicaiB, i nixoHTb dIa BIKOPNCtAHNr DITkAMN BarOIO do 22 Kr.
3BEPHITb YBARY!IIOJIbKa MoJKe BnKOpNCTOByBaTnC dIa nepeBe3eHHra ITei, aKi Ie He BMIOTb cnDITn, nepeKooyBaTnC rNo Hi 3 60ky B 6ik, NiTAYBaTnC Ha pykax, uN CTOARn Ha KOJIihax. MaKcImaJIbHa Bara dHTIHn He MaE nepeBnUyBaTn 9 Kr.
Hi B yKOMy pa3i He BnKOpNCTOByTe IIOIbky dIa nepeBe3eHHA dIte, Aki BMIOt b CTOTN.
1 Puyka
2 Puyhi ralbma
3 3amok6e3neKeN
4 IOB3yHKOBN 3rH
5 BLOKyBaHH KoJeca
6 Nobopothi Koneca 3 cncTeMoIO 6IokyBaHHa
7 TaIbMa
8 PerylboBaHa cnCTema amOpTn3aui
9 PeryIbOBaHe pyUHe raIbMo (doaTKOBO)
9a PeryIbOBAHe BnCOKoeΦeKTHNBHe ralbMo (doataKOBO)
10 Be3wymHa peryIbObaHa BepxHuaCTnHa Ka6pioJeTa
11 Habic BiD coHua
12 Habic Ta 3axnchm 3amok uTaHn
13 PerylboBaHa no Haxny cHnHa
14 Pemehi 6e3nekn
15 PeryIIOBaHHHOxHoi Kopo6Kn
16 3OHa BeHTnlaucii
17 ABTomatnue He 6lokyBaHHa 3'EMHOro 6loky
18 TeileckoniuHa niDbicka
19 CoHue3axnchN Ko3npok
Bitaemo 3 Bdannm npnd6aHnram
Bn xoyete, uo6 Ba7a dntna noyba nce6 y 6e3neu? Came toMy, Bn 3po6nln npekpachn Bn6ip i npnd6aII npodyKT Bucokoi kocti ipmN
IpoDyKua Hantan CTBOpIOeTbca 3 BEnuye3HO IO BiNobiDaIaHbHiCTTO Ta Tpy6oToIO NO BiHooHeHHIO Do CnoXnBaUIB, a TAKOx npoxoHTb NoCTIHn CyOBpN KOHTPOJI bIKoCTI, 0o 3a6e3neuye DOBROTPINBAIICTb BHKOpNCtAHHn HaHnx KOLACOK, Ta 3aIOBilbHNTb HaBn6aRlnBWiOro NOKynu. TeKCTINb, 0o BNKOpNCOTByETbcB H HAIIN pOdykuii, TcTeYETBCa HA npeDMET BiIDcyTHocTi WkiDInBnx peOBOH (XiMiyHnx 3aIIWkIB) BiNObiDHO Do BnMOr BlaChoro BnPo6HntBa, Ta Oko TexStandard 100, 0o rapaHTye 6e3neuHicTB BHKOpNCtAHHn HaHnx KOLACOK dIra 3DoopOB' BaWoRo MaIIOka.
BAKJIINBO! ByIb IACKA, HE BUKOPNCTOBYTE KOJRACKY NONEPEHbO DOCKOHANO HE O3HANOMNBUNCb 3 IHCTPYKUIEIO NO EKCNIYATAUII, TA 3BEPI RAITE II DIA BNPIIeHHRA PI3HOMAHITHNX NITAHb, IIO MOKHTb BHNKHYTN B NODAJIbWOMY. 3AE3NEUYTE BE3NEKY BAWOI DIHTIHN DOTPMYIOUChc BCIX BNMOR NO EKCNIYATAUII DAHOrTOBAPY.
Kaio B iNctpykuii Bn 3NaHwIu Iocb dIy Bac He 3pOzymine, yI BBaXaTe iHOpMaIIO BnKlaJeHy B Hi H NOBHOIO, 3BeptaIteCra Do npodabua daHoro Tobapy.
BybIaCKa, nepeKoHaITeCg, 0c BcXTo MoKe KOpNCTyBaTnCdAHOIO KOJaCKOIO,O3HaHOMLeHi 3 Ooc6lnBOCTAm II fYHKIOHyBaHHa, Ta npabnlaMn 6e3neuHoro BkOpNCtAHH.
Дя 6e3neKn BaWooi dntnHn
3BEPHTb YBARY! -Ipeep BnKOpNCTaHnM KOJACKn, nepekoHaTecra, 0o Bci fikcaTopn BiDpeYJbOBAHO.
3BEPHTb YBARY! -IpeD BnKOpNCtAHHm, npOBeITb nepBnHHN orJrKaRKn, 0o6 nepekoHaTncra, 0o Bci eJeMeHTn Ta Detani He nowKOJKeHi. B pa3i BnBLeHHaTKNX - He BnKOpNCTOByTe KOLrCKy.
3BEPHTb yBARY! -3aIyHnKHeHH TaPabMyBaHH BaWoI dntHH, nepeKoHaTecra, 0iD yac cKaJaAHHa Ta po3KaJaAHHa KOJrCKn, BOHa 3HaXoDntbcra Ha 6e3neuHi Bic Bac BiDcTaHI.
3BEPHTb yBAry- Hikoln He 3aIuwaTe dntnHy B KoIacci 6e3 HaarLy.
3BEPHTb yBARY! -IpeE, BnKOpncTaHHa M IIOJbKn, npOryJHKOBO 6LOky uN dITyoro abTOKpicna nepekoHaTeC, 0o BOH npaBnJbHO yCTaHOBneHi.
3BEPHTb YBARY! -BnKOpncTaHn KOLaCKn IJn nepeBe3eHH CXoJaMn, a TaKoX npeBaHTaKeHH MoKyTb npu3BecTN Do II NowKOJKeHH, 0E BkpaH He6e3neuHm dNra BaWoI dntuHn.
3BEPHTb YBARY! -3ynnHraUOu KOLrCKy, nepeKoHaTeC8 B cnpaBHOCTI raIbM. NepeBo3aHn KOJIaCKy B rpoMaDcbKOmy TpaHCnOPTi, nepeBipte u6e3neuHO BOHa CToITb.
3BEPHTb yBAR! -KoJcKa - k npOryJIHKnOBn 6Iok, TaK i IIOJIbKa - Hi B YAKOMy pa3i He MOXe BNKOpNCTOByBaTnCBA KIOCTI KOJNCKN qN LiXKa, BOHa MaE BNKOpNCTOByBaTnCBAKJIHOHk 3acI6InepeCyBaHH.
3BEPHTb YBAR! - 3a6OpOHReTbcBnKOpHCTaHH KOLJCKN iId Yac 6iry, KaTaHHHa KOB3aHax Ta iH. , TaK Ye MoKe 6yTu BkpaH He6e3neuHIM.
3BEPHTb yBARY! -He Do3BOJnTe DnTHi rpaTnc 6iJa Ta 3 KOJIaCKHO. 3BEPHTb yBARY! -3aBxKn BnKOpNCTOByte peMeHi 6e3neKn.
3BEPHTb YBARY! -He BiwaTe pIOK3aKn, CymKn, Ta iHwi npeMeTu Ha pyuKy, cnNkUy 6iHi eJeMeHTn KOJIaCKN, Ta kUc Ue MoKe HeRaTINBHO N03HaunTnca Ha II CTiIKOCTi.
3BEPHTb yBAY! -Dana MoedeJIb KOJIaCKn npN3HaueHa IJn nepeBe3eHHr IJHwe OdHiie dIHTHN.
3BEPHITb yBARY! -HaABHictb Micu Iy InepeBe3eHHa DpyroI dHTnH B daHi MoJeI He nepe6ayHo.
3BEPHTb yBARY! -PporyIaHkoBn 6loK Ta IIOJIbKa He npncTOcoBaHi dJa TpaHCnOpTyBaHHa B aBTOMo6iI.
3BEPHTb yBARY! -He Do3BOJRAETbcBnKOpNCtAHHr DOoOBnKa npn BiCyTHOCTi KaHOWOHa (e He6e3neKa ydyweHH).PiYac nepe6yBaHHr dHTuHn B KOJAcci He HAKPnBAtu KaIOwOH DooOBnKOM B COHry HOrOy (e He6e3neKa neperepy)
3BEPHTb'YBAty! -TpmaTe KOJrCKy noaI BiD BORHTo ta iHnXx DkepeI TeIIa.
3BEPHTb yBAY! -HeraHIO 3HIMITb BcIO nIIbKY, IIO MICTNtBCa BYnakOBci, Ta, Hi B JAKOMy pa3i He Do3BOJrTe BaWiI dUTnHi rpaTncs 3 Heo (E He6e3neKa ydyweHHra).
3BEPHTb yBARY! -3a6oPoHReTbcBnKOpNCtAHnAkceCyapib Ta 3anacnX qactnH, 0 He nepe6aueHi Bnp6HnKOM.
3BEPHTb YBARY! -Pn BnKOpncTaHHi KOJIaCKN 3 NOBOPOTHOpyKOIO 36Oky NOBOPOTHO KOIeCa, nepeKoHaITeCra, 10 NOBOPOTHi KOJIeCa 3aΦIKCOBaHl Ha Micci.
YBABA! Pn cKaadaHHi Ta po3KdaaHHi waci Bi3ka, a taKoJ npn 3miHi nO3nii CnHHK moKlnBO 3aueemleHn, lo MoKe npn3BeCTn Do noWkoJHeh yepe3 HeyBaXHicTb. CniDkyIte 3a Tm, Io6 B Taki ci Tuayi dntHa He 6yla nopuy 3 Bi3kOM.
BctaHOBHTn Bi3O0OK
HaTnCHiB cTOnopHi KhoNKn 4, IIO6 nepeBecrN BepXHIO qactHy pyKu B rOpN3OHTaJIbHe nIoXeHH.
Notim NiIITarHtB pyKu 1 Brpy do 6loKyBaHH 3amKa pyKu 2.
ChJaactn Bi3OyOK
IobepaTe rBnHTOBn 3axnCHn 3AMOK 3 y BHyTpiliHIO CTOpOHy Do po36NoKyBaHHra 3AmKa pyKn 1, nicna Yoro HATNCiTB pykU y HapnMky Bn3 iCKlaaditb KOnRcKy. HATNCiTB cTOnopHi KOnKn 4, 0o6 CKlaCTn BepxHIO uactInHy pyKn BCEpeDInHy.
TapaHriHe 06cIyROByBaHH He Hadaetbca
Mn He Hecem BoiNbOBIaJIbHocTi 3a DephiKTH BnBbIeHi Ha npodykui, kki E no3a HauWM KOHTPOJEM To6To:
3BnuHn 3HOC npOdyku, Ta dekeTN, OtpmaHi BHaClIOK HAdMpHOro BkOpncTAH
■ BiDpa3y He nomiuehi defeKTn / nowkoJxHHeH, kI nepepcTaIOb y 6ilbW cyTTeBi ta notpe6yOtB cKaIHoro DOCKHOHaoro peMOHTy
■ DekeTN, 3'BUNICB HAcNIOK HnnpaBnBHorO BkOpncTahHn (INBtbc nHCTpykuio no ekcnnyataii)
I Deefektn, 03'BunncBhacnIDok HnnpabnlbHoro MOHTaKy n ekcnnyatau
Ieefktn, 3'BNnca BHaCIOK He6aIIOBnKOpNCTAHH N BiCyTHOCTi TexHiHOro 6cLyroByBaHH npodykuii
I DekeTN, 03'BUNiCBAHcNIOK BHeceHHaMnB KOHCTpyKciO daHO npodykii
TAPAHTIHNI BUNADOK-TAK YHI
Ipxa: 106 B6epertn waci BiD ipx, noTpi6HNo npoBOnTu Horo aHTNKOpO3iHy o6p6ky. IpoTe nIamn ipx MoKyTB 3'ABLANTcra PnB iDCyTHocTi texHiUHoro 6CnyroByBaHHra npOdykuii. B TAKOMy BnnaKry rapaTtiHe 6CnyroByBaHH He hadaetbcra.
IopraHH: IopraHH OtpmaH I BhaCNIOK 3HOCY (noCTiHoro BnKOpNCtAHN) npOdykTy He e rapaHTiHm BnnaKom, i TOMy rapaHTiHe o6cLyROByBaHH He hadaetbca.
YTBOPENHn nnichBn: Pn HAMOKaHHI TEKCTNbHnx elemehTIB BOH nOtp6yIO TB raphoI npocuKN, 06 yHnKHyTN YTBOPENHn nnichBn (DnBiTbcra IHcTpkyciio no ekcnlyataci). YTBOPENHn nnichBn He e rapaHTiINHM BnnaKom, i TOMy rapaHTiNe OBCnyroByaHHr He hadaetbcra.
BnucitahnTkAHHH: Mn CTBepdKyuEmo, 0o Bci TeKCTNbHi eIemehTI, BnKOpNCaHI Ha Haui npodykui, BnroTOBJIeHi 3 doTpImaHnM BiIDNoBIdHnx cTaHdaptIB. AJe Mn He BnKJIoucEMO MoKJIuBicTB BnCbiTAHn KOBopB iPrn HAdMpHOMy nepe6yBaHHi Hawoi npOdyKcii nD npAmm COHAnHM CbitlOM, qAcTomy npaHHi, KOHTAKI 3 NOTOM uN MInOChm 3acO6amu y bHaHbHorO cTnpAHn (OCO6JIbBO B THX Micx De 3a KoJACky 6epTybcra pykami). TOMy BnCItaHHr TKAHNH He e rapaTtiHMM BnJaKom. Be3ymOBHO, KolbOpn piHnX napTi npOdyKcII MOKyTB TPOXn BiDiPI3HraTncs, npote rapaTtiHe o6ClyROByBaHHr y TaKNX BnPaAdkax He HaDaETbcra.
YTBOpEH3KaTyBaHHHa TKAHHi: PeKomeHdyEmo Bam DoTpmyBaTnC3aRaBnX npaBnI DOrJy 3aTKaHHaMn. HanpNKlaI, 3 wepcTHnx Bnpo6ib 3KaTyBaHHa IerKO MoXHa np6paTN 3a Donomoro 3BnuAHOI ZITKN Iy Ondy a6o CneuaJIbHorO npicToPO.
P03xodxehnhaib,po3pmbTKaHHH,HecnpabHicb KNONK:PiJvacNOKynnpOdykui,6ydbnaKa, yBaJHO nepeBipTe akicTb npoWbKn, BIDcyTHicb po3xoJxehnhaWBIB Ta cnpabHicb BCix 3actiok. Y pa3i BnABLeHHAdeekTy Takoro nlaHy, BiPa3y 3BepHITbcdo BaWoropnoDabua.
KoIeCa: KIO KoIeCa KOJIaCKn He 36aHaHcObaHi, II MOKe KNaTn (BOiHTN B p3Hi 6OKn). 3Hoc HHe e rapaHTiHm Bnapakom, TaK cAmO kI npo6bTa WnHa, YH HeDokauHa, IIO MoKe npn3Becn Do p03rOyBaHHaKOJIaCKn. B TaKnx Bnapkax rapaHTiHe o6ClyroByBaHHa He HaDaETbcra.
HA IIO TPE6A 3BEPHTN YBAY KYNYIOU KOLRCKY
IpebipTe, n nobHicTIO ykomnleKToBaHa KOJcKa, kky Bn 36npaTeC npnd6atN, nn cnpabHi Bci II elementn, ta 3acBidtbc niDnncabwn dorobip Kynibni.
LIOPOBNTYPA3I BUNHKHEHHCKAP
3aTelefoHyte BaWOMy npoabu,po3kaKtB npo npo6lemy,ka y Bac BNHKla,ta o6roBopiTb 7Iaxn II BnpiHHe. Y BnpaKky BnABLeHHn DeΦeKtIB, 0c CTocyIObC npuyWeHHn npaBn 6e3neKn, Bam TpeBa noatn ckapry do BaWoRo npoabua npotrrom 30 dHb 3 acy ix BnABLeHHn, iHaKwe, ce He 6yde po3raTncrak rapaHTiHn BnAdoK. OTPmabHn Bawi BmOrn CTocOBHO rapaHTiHoro o6cLyROByBaHHn MN pO3raJaEMo nHTaHHN 3MeHseHHn BapTOcti daHoro npOdykTy. Mn 3aBxDn cnnpaEmocn Ha Haui 3araJIbHi npaBnLa Ta yMOBN, 3 kIMM Bu MoKeTe O3HaNoMTncs B HaNX Mara3NHax.
IpepeTm, kB iDnabTu Bawy KOLaCKy B peMOHT, nepeKoHaTeCg 0o Bci ii eIemEnTuHcTi. BpydHi KOJIACKN B peMOHT He npuMaHObCg.
BVKOPNUCTAHN,IOJIA,TATEXHICHEOBCNYROBYAHHH
Kolra - ue, B nepuy eprpy, 3acio npebe3eHn Baooi dHTHH. Tomy, 3aTTO, 06 36epertn ii B 6e3doarHOMy cTahi, BOHa notpe6ye noctiHoro dOgrAry ta texHiHoro oCnyroByBaHH, BiNobIDHO do IHctpykui no ekcnlyatauii.


Racer GTX / R1 GTX
primeren za otroke od 6 mesecev do 22kg za mlajse od 6 mesecev s primerno nosilno turbo.
Ta izdelek ni primeren za tek, rolanje ali kotalkanje.
Primernost za otroka
O CEMU MORATE VODITI RACUNA PRILIKOM KUPNJE
Provjerite da li su kolica kompletna prilikom isporuke i da li nedostaju neki dijelovi. Provjerite da li slev funkcije kolica funkcioniraju u potpunosti i potvrdite ovo na listi o primopredaji.
POSTUPAK KOD REKLAMACije
TapaHTnHbIe 6aTeJIbCTBa
TAPAHNTHbI TAOH
Y Bac ecTB npaBra rapaHTnHoro 06cIyKbAHnna daHHoro npOdykTa napTepom no DorOBOpBy TeueHne 2-x let. rapaHTnHbCpOK nCucnAETc C dAbl nokynKn. Iy noTBePckJeHn npaba Ha rapaHTnHOe 6cIyKbAHne, coxpaHnTe 3anONHeHbI rapaHTnHbI TaIoh, noDnncAHhB Bamn foOpMylap KOHTpOla npn nokynke, a TAKKe KaccobBm Nn TOBAPHb Yek Ha BeCb nepNOd JeicTBnra rapaHTnHbIX o83aTeJIbCTB.
TapaHTnBcIyaepeKlamaun
Pn npEbAeHn peKlamau K KOJLace DOnJKe 6bItb npInloJe HraPaTHN HbI TaHO. RaPAHTN HbIe 6o3aTeJIbCTBa paacnpocTaHOTc TOBko Ha DeTCKne KOJLcK, C KOToPbIMn ObaaIncb HaDLeJkaUm O6pa3OM n KOTOpBie 6bln npeCtAbHebl dJa PemOHTa B YCHcTOM n AKKypaTHOM BVdE.
TAPAHINHbIE O83ATEbCTBA HE PACIPOCTPAHJOTC:
Ha eCTeBcHHbI N3HOC, a TaKHe Ha NOBpeHnIy, BbI3BaHHbI Yepe3MePHo Harpy3Koi;
Ha NOBpeKdEHHa, BO3HKnUe BCLeCTBnE pImHeHHe H No Ha3HaueHIO IIN He npBaBbHOH 3KnIpyTaun;
peMOHTn 3aMeHy DeTaJIeB CBa3N C INX ECTeCTBeHHbIM N3HOCM, a TaKke KaMepbIu WInHbl;
nOBpeKdEHne PnactIKOBbIX DeTaJIe B npocece 3KnIyataun;
peMOHT TOBapa B HeaBTOpH3OBAHHbIX CepBnCHbIX Yehtpax;
Hannue Heoepmaun H Tpeunn BO3HNKuINB npocece 3KnIyataun;
3IeMeHTbI, BbINOHeHbIe I3 TkaHn IIBX, MoHn, 3aKneKn;
npi BheceHn NOKyNaTeJeM N3MeHeHn B KOHCTpyKuHIO N KOMPiKeTAuHIO;
nocne BO3deICTBna HTOBap 6cToaTeNbCTB HenpeoOnMoCnblb (3emntpcHe, ydpbl MOHnnoKap, HABOHeHne, Hae3d TpaHCnopta n T.d.) a TaKke XmNueckn AKTNBHOp CpeDb n Kpacntenei, KOJIUope-pexyuxn PpeMTOB, pa3JIuNbbx 3aTpr3HTeNei.
Ppne pemOHTe nIcMHe 3eMeHToB KOJIaCKn MaTePuaTbe NOKpbITnHE MeHReHTCA.
TapaHTnHbIe 6aTeJIbCTBa
TapaHTnHbI cIyaua IIN HeT?
PkaHHa: Kopnyoc o6pa6oTah coCTaBOM, npedotbpaauOuIm npoueCC NOABHeHn pKaBHyI, OTCyTCTBne 06cnyKbAHn KOLrCKN MOKeT npBecTe NOBLeHIO MeCT, nopaKeHHbIX pKaBHyOH. Ha taKne cnyaH rapaHTn He pacnpocTaHReTc.
UapanHbI: NOBLeHHe capanHH He BXoNt B CnyaH, Ha KOTOpBie paCnpoCTpaHReTcRAPaHTN, T.K. OHN ABJIOTc HOpMaJIbHbIMn npn3HaKaAMn n3HOca.
06pa3oBaHne rpn6ka: B cnyae ecn MaTePnaJ KOJIaCKN CInbHO npOMOK, erO Heo6xOIMTOatEJIbHO npoCuyuHTb, YTo6bl IppeDcTBPaTHTb o6pa3oBaHne rpn6ka. NOrBJIeHne rpn6ka He RAJIaETcR rapaHTnHbIM cnyaem.
BbIcBtAHne MaTePnaIOB: Bce MaTePnaIbI, IcNoJIb3yUOUIeCS B HaUHX N3dEINHX, COOTBETCTBYOT TeKyuIM HOpMaM. BcJeDCTBHe BO3DeIcTBnCOnHeuHbIX LyueN i CInuKOM qAcTOrO Mblr He NCKlHOeHO BbIcBeTaHne MaTePnAna, n 3To He RaJIeTc npUHHo peKlaMaun. He3NaHTeNbHoe OTnUHe MeJdy pa3NJHbIM NaCTaMnpOdykTa He BCerDa ydaetcN 36eKaTb npn npOn3BOdCTBe, PO3tOMy TaKHe cLuyan TaKKe He RAJIaOTc npUHHo peKlaMaun.
CkTaBbAHne TKAHN: CnyaHn CKaTbBAHHe TKAHN He OTHOcTcK rapaHTnHBIM CNYaM, OHN MOryT 6bIbYdaJIeHbI CTaHdapTHbIMn CNOcO6aMn No yXoDy 3a WepCTraHbIMn n CnHTeTneCKmN BeUaMn, C NOMOuHcNEuaJIbHOJ UETKN HIN MaunHKn.
Pacxohdene wBOB: IoxaIyIcTa, npOBepbTe WbI IN KHOKN pRn NOKynN 3dEINr. B cnyae O6HapyKeHn IOBpeKdEHNr wBOB nIN KHOON, He3aMeDInTeJbHO o6paTInTeCb B MaRa3INr, rDe 6blno npno6peTeHo 3dEINe.
Koneca: TaK KaK Koneca Ha KOnrCKe He 6aHaHcHpyOTc, BO3MOKeH JeRKn DnC6aHaHC. CTeptbIe Koneca RaBIAOTc HAtypaIbHbIM n3HOCOM. IpokoJIb B Konecax MOryT 6bITb BbI3BaHbI TOJIbKO BHeUHM Bo3DeJCTBHeM, PO3TOMy BCE 3TN CInuH He RaBIAOTc rapaHTnHbIMN.
Kak cJeNyet Ce6y Bectn B cnyae peKlaMaun
He3aMeIeHbHO COO6uHte O npo6JeMe B CneuaJIH3nPoBaHHb MaRa3H, B KOTOpOM Bbl npno6peN KOJcKy, PpeCTabTeH MaRa3Ha COo6uHT O TOM, KaK DeiCTBOBaT bdaJIbWe. Ha HEnoJaKn, CBra3AHbIE C 6e30NaChOCtBuO, O KOTOpBX He 6blIO 3aBHeO B CneuaJIH3nPoBaHHbIMaRa3HN B TeueHne 30 dHe c DaTb NOKyIKN rapaHTnH He paCnpocTpahReTcA.
C noDpo6HocTAMn CB3aHHbIMN C o6pa60TKo peKnaMaunHOHBIX 3aABNeHN, KacaOuXxCn npOdyKcHn HaWei npMbI, Bbl MoKeTe O3HaKOMtbcB YCTabe HaWero npednpnTn.
Ha chTo cIeJyET o6paTntb BnImaHne npn nokynke.
IpoBepbTe ynaKOBky c npno6peTeHHo KOLaCKo Ha HalaUne Bcex Heo6xoDmBix 3aunacteH pa6Otocnoc6HoCTb Bcex fYHKuHaJIbHbIX uacTei.
IcnoIb3OBAHne, yXoN o6cnyxuBaHne.
Kolrka rBlaeTcra cpeCTbOM TpaHcnpTnpoBKn BaWero pe6eHka, no3Tomy 3a Hei Heo6xOdmo yxaJHBaTB B COOTBeTCTBnC INHCTpyKuzneI NO 3KcPnyatauN, UTO6bl CoXpaHHTb ee n3HaayalbHoe KaueCTBO.
Pn OtnpabKe cIeIb 3a TeM, yTo6bl KOLrCKa 6bla YnCToN. rpa3HbIe KOJIACKn Ha peMOHT He npHHMaOTcR.
ΦOPMUYIAP KOHTPOJI IPN IOKYIke
MoeJIbTeTcKoKoJIaCKn
UBeT
Дараз noKупки
I npOBepnKOMnJIeKTHOCTb DeTcKOJ KOJIaCKN I NOJIHOCTbU O yDOCTOBepnLc, YTO KOJIaCKa nepeDaHa MHe B NOIHOM KOMnJIeKTe N BCE ee yHKuN DeHCTBYOT B NOIHOM o6beMe
IyIyHnIOCTaTOHyIO HOpMaUIO 6 n3dEINn I npHnK CBeDeHNIO yKa3AHnNo ee 3KcNlyatauIN
Подпсь покураеля
IITamnpoDabua/NoDnncb


Racer GTX / R1 GTX
GWARANCJA NIE OBEJMUJE...
O CEMU MORATE VODITI RACUNA PRILIKOM KUPNJE
Provjerite da li su kolica kompletna prilikom isporuke i da li nedostaju neki dijelovi. Provjerite da li sve funkcije kolica fungkioniraju u potpunosti i potvrdite ovo na listi o primopredaji.
POSTUPAK KOD REKLAMACije


- Deutschland
- Hartan
- Racer GTX / R1 GTX
- Suitability for your child
- WARNING!
- Congratulations on your purchase
- For the safety of your child
- Unfolding the pram
- Folding the pram
- Height adjustment of handlebar
- Removing the wheels
- Lock-type-swivel wheels
- Adjust the handbrake (optional)
- Adjustable suspension system
- Parking brake
- Hood and safety bar
- Instructions
- Safety harness WARNING!
- Adjusting the footrest
- Automatic locking of the upper section
- WARNING! Ensure that the seat frame is securely in place before use!
- Adjust the back rest to incline the seat frame
- Sun and weather protection 16 on the canopy
- Care of the fabric parts
- Care of the chassis
- For pneumatic tires
- Quality agreement
- YEARS WARRANTY
- IN CASE OF WARRANTY CLAIM
- THIS WARRANTY DOES NOT COVER ....
- WARRANTYCLAIM-YESORNO?
- WHAT TO REMEMBER WHEN BUYING YOUR PRAM
- WHAT TO DO IN CASE OF A COMPLAINT
- USE, CARE AND MAINTENANCE
- O CEMU MORATE VODITI RACUNA PRILIKOM KUPNJE
- POSTUPAK KOD REKLAMACije
- KoMΦopt Baоoi dntnHn
- Bitaemo 3 Bdannm npnd6aHnram
- Дя 6e3neKn BaWooi dntnHn
- BctaHOBHTn Bi3O0OK
- ChJaactn Bi3OyOK
- TapaHriHe 06cIyROByBaHH He Hadaetbca
- TAPAHTIHNI BUNADOK-TAK YHI
- HA IIO TPE6A 3BEPHTN YBAY KYNYIOU KOLRCKY
- LIOPOBNTYPA3I BUNHKHEHHCKAP
- BVKOPNUCTAHN,IOJIA,TATEXHICHEOBCNYROBYAHHH
- Primernost za otroka
- TapaHTnHbIe 6aTeJIbCTBa
- TAPAHNTHbI TAOH
- TapaHTnBcIyaepeKlamaun
- TAPAHINHbIE O83ATEbCTBA HE PACIPOCTPAHJOTC:
- TapaHTnHbI cIyaua IIN HeT?
- Kak cJeNyet Ce6y Bectn B cnyae peKlaMaun
- ΦOPMUYIAP KOHTPOJI IPN IOKYIke
- GWARANCJA NIE OBEJMUJE...
Brand : HARTAN
Model : Racer GTX
Category : Stroller