
VIP GTS - Stroller HARTAN - Free user manual and instructions
Find the device manual for free VIP GTS HARTAN in PDF.
| Product type | Stroller |
| Brand | Hartan |
| Model | VIP GTS |
| Recommended age | From 6 months (seat); from birth with suitable carrycot |
| Maximum weight capacity | 22 kg (seat); 9 kg (carrycot) |
| Handlebar type | Telescopic adjustable height |
| Wheels | Swiveling with removable lock |
| Brake | Locking brake with red/green push button |
| Suspension | Adjustable (soft or sporty) |
| Backrest | Adjustable from seated to reclined position |
| Hood | With removable sun visor and climate zone |
| Safety harness | 5-point with magnetic buckle |
| Footrest | Adjustable and extendable |
| Carrycot | Removable with automatic lock |
| Anti-tip protection | Yes, via push buttons on the hood |
| Fabric care | Machine washable at 30°C (gentle cycle) |
| Axle maintenance | Cleaning and lubrication every 4 weeks |
| Textile materials | Tested according to Oeko-Tex 100 |
| Warranty | 2 years |
| Accessories | Rain cover available as an option |
Frequently Asked Questions - VIP GTS HARTAN
User questions about VIP GTS HARTAN
0 question about this device. Answer the ones you know or ask your own.
Ask a new question about this device
Download the instructions for your Stroller in PDF format for free! Find your manual VIP GTS - HARTAN and take your electronic device back in hand. On this page are published all the documents necessary for the use of your device. VIP GTS by HARTAN.
USER MANUAL VIP GTS HARTAN
Acceptance Certificate
Name/Name:
StraBe/Road:
Phone (with area code):
e-mail:
Colour of fabric (design):
Zubehor / Accessories:
Kaufdatum/Date of purchase:
Salesperson (name in block letters)
Note: signing this acceptance certificate does not restrict the legal rights of the purchaser.
Handler/Dealer
11.2022/2000
-
Completeness
-
Function
Folding mechanism
Road behaviour
■ Wheels
Adjusting mechanism
■ Brakes check
Suspension check
- Intactness
■Frame check
■Fabric check
Plastic parts check
I have checked the product and have ascertained that it is supplied
complete, has no external, visible faults and that all functions are intact.
2.1 have received sufficient information concerning the product and its
functions before purchase and have been instructed on care and
maintenance.
Suitable from 6 months, up to 22kg
Under 6 months only in connection with an appropriate carrycot.
The product is not suitable to be used when jogging or skating.
1 Handle
2 Handlebar catch
3 Twist grip for telescopic adjustment
4 Wheel retention
5 Lock-type-swivel wheels
6 Swivel wheel holder
7 Parking brake
8 Adjustable suspension system
10 Climatic zone
11 Safety bar adjustment
12 Hood bar and safety bar removal
13 Tilt-adjustable backrest
14 Safety belts
15 Adjustable footrest
16 Footrest extension
17 Automatic lock for upper section
19 Fall-out protection
20 Sun visor
21 Unlatching stop
22 front wheel suspension
27 Canopy attachment
Congratulations on your purchase
You want your baby to feel safe and secure, that's why you have purchased a high-quality product. You have made an excellent choice. Products are manufactured with the greatest possible care and monitored constantly by rigorous quality control assuring that your pram will provide life-long satisfaction. The textiles used for our products have been tested for harmful substances (chemical residues) according to the industry's own, Oko-Tex-Standard 100^ to guarantee that all the fabric parts of your pram are safe for your baby.
IMPORTANT! PLEASE DO NOT USE THIS PRAM BEFORE READING THE INSTRUCTIONS CAREFULLY, AND KEEP THESE INSTRUCTIONS FOR QUERIES OR FUTURE REFERENCE. YOUR CHILD'S SAFETY MAY BE AFFECTED IF YOU DO NOT FOLLOW THESE INSTRUCTIONS.
If you do not understand the instructions or if you require more detailed information, contact your dealer. Please ensure that other users are also informed about the functions of the carriage and the notes on safety.
For the safety of your child
WARNING! - Before using the pram, make sure all catches are locked.
WARNING! - Before use, conduct an initial check of the carriage, and do not use it if it is damaged or if parts are torn or broken.
WARNING! - Make sure when unfolding the pram and folding it together that your child is at a safe distance, to avoid any injuries
WARNING! - Never leave your child unattended in the pram.
WARNING! - Make sure before using it that the carrycot or the seat unit or the child's car seat is correctly latched into place.
WARNING! - Negotiating stairs or steps as well as overloading may damage the pram and endanger your child.
WARNING! - When parking the pram, make sure the brake is engaged. When using public transport, ensure the pram stands safely.
WARNING! - A pram, stroller or carrycot is not a substitute for a cradle or a bed. It is intended to be used exclusively as a means of transport.
WARNING! - Using this pram while jogging, skating, etc. can be dangerous and is therefore not allowed.
WARNING! - Do not allow children to play either near or with the pram.
WARNING! - Always use the restraint system.
WARNING! - Fix no bags, handbags or other loads to the handle, backrest or sides of the carriage, as this will affect its stability.
WARNING! - This model has been designed for 1 child.
WARNING! - A second child seat is not allowed for this model.
WARNING! - The seat unit and carrycot are not to be used for transporting in a car.
WARNING! - The rain cover may not be used when the hood is taken off (danger of suffocation). Never expose the rain cover hood to sun while the child is
in the carriage (overheating).
WARNING! - Keep the carriage away from open fires or other sources of heat.
WARNING! - Remove immediately all film packaging, and do not allow your child to play with it (asphyxiation).
WARNING! - Accessories and spare or replacement parts not approved by the manufacturer must not be used.
Instructions for use
WARNING! When opening out and folding down the frame and when adjusting the back-rest, pinch-points may be caused in which fingers etc. can be trapped unless care is exercised. Ensure that your child has plenty of clearance space.
Unfolding the carriage
Lift the handle 1 until the two lateral handle catches 2 have engaged.
WARNING! Before using the pram, make sure all catches are locked. Take care that you keep your child's body parts at a safe distance.
Folding the carriage
Turn the twist grip 3 inwards and push at the same time the telescopic handle to the stop. With the grip 3 still twisted, depress the red button 21, and push the handle 1 forcibly until it disengages.
Height-adjustable Telescopic handle
Turn the twist grip 3 inward and slide the handle 1 in the desired position until it engages on both sides.
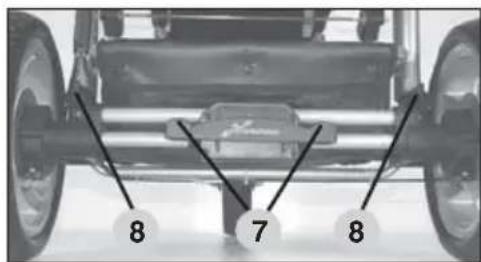
Changing the rear wheels
Release the parking brake 7. Depress push button 4 and pull the wheel off. Push the wheel right to the axle's stop. Make sure, all wheels are held in place properly. Then, depress the button again.
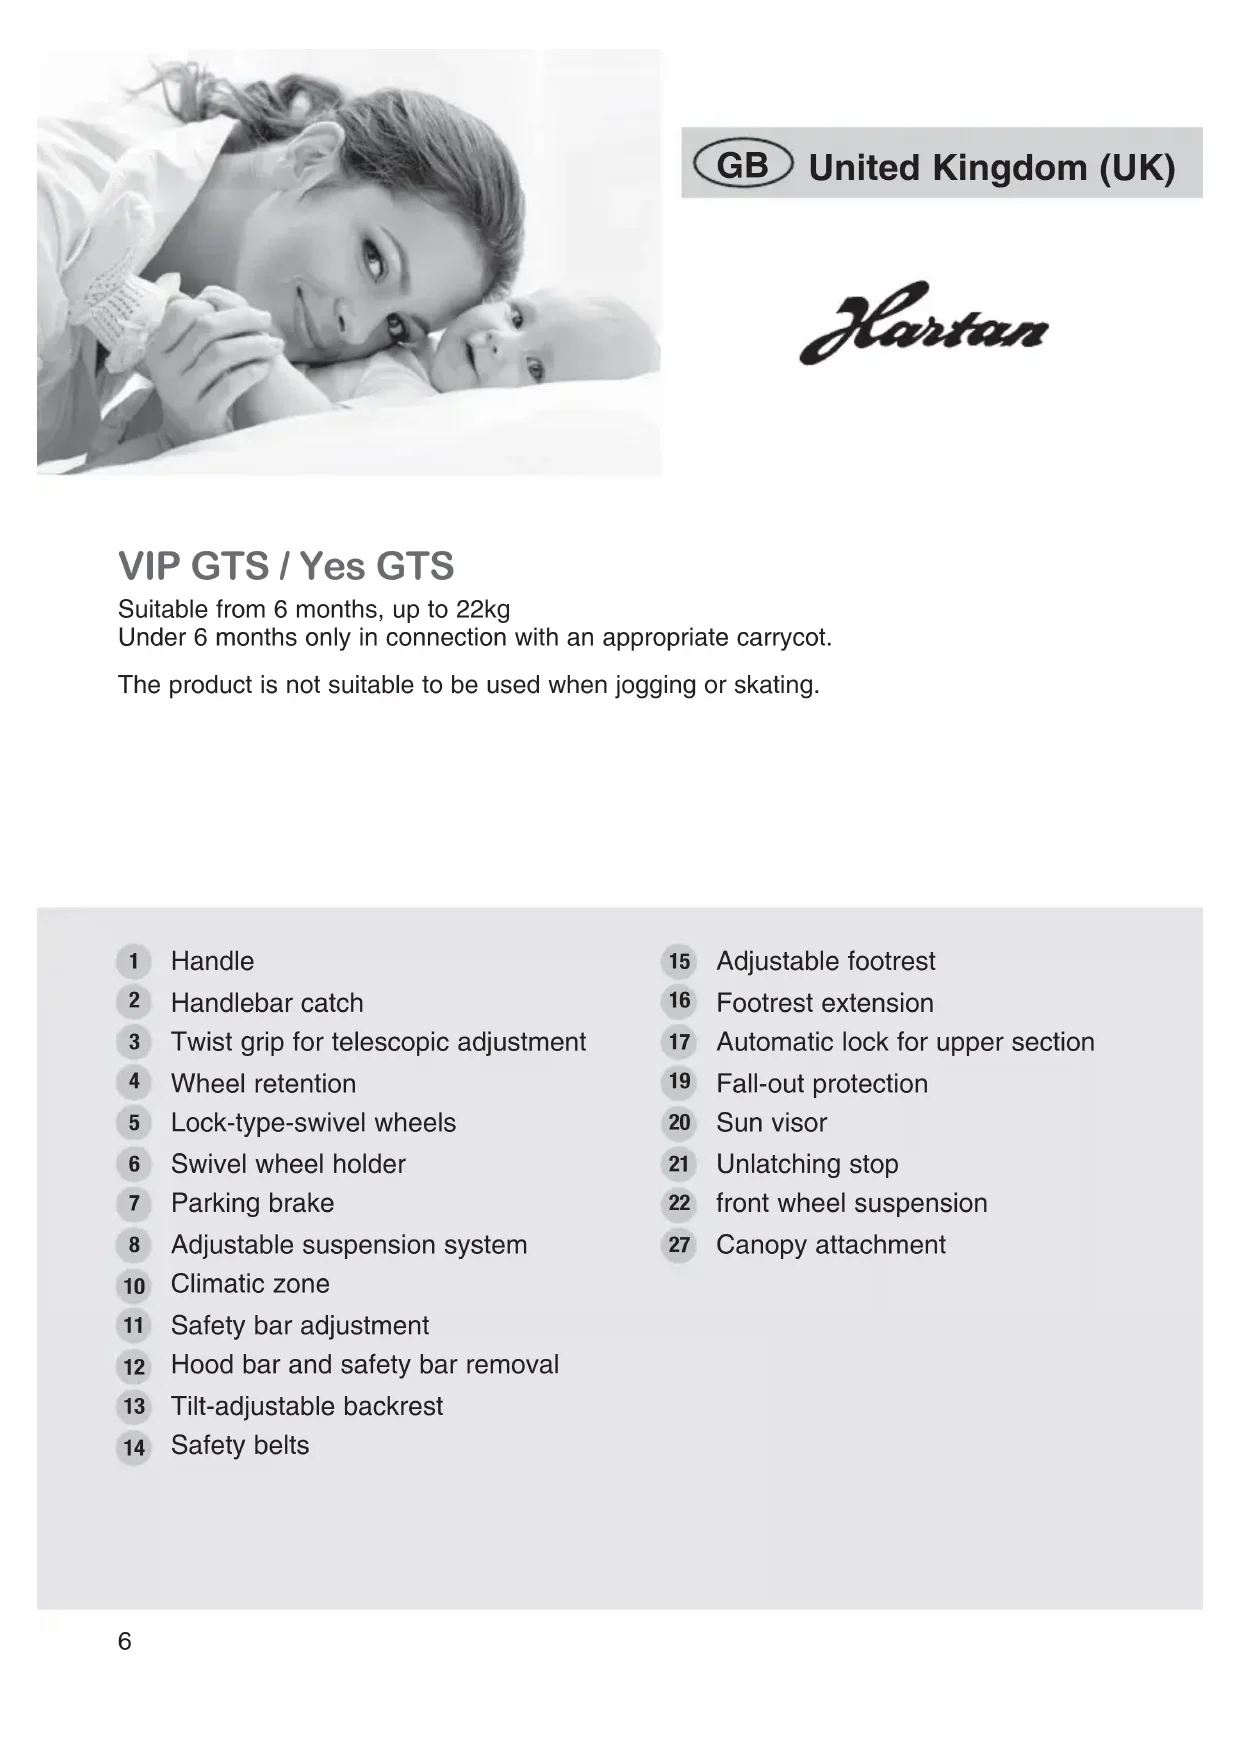
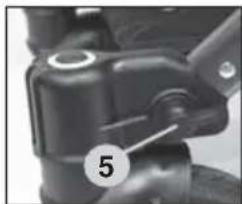
Lock-type-swivel wheels
Turn down the lock lever 5 to pre-select the straight-line motion mode, which will be activated the moment the wheels point in forward direction. To allow the wheels to swivel freely again, turn the lever 5 back to the horizontal position. On very uneven surfaces, and when going very fast, we recommend locking the swivel movement, to prevent the wheels from blocking.
Changing the swivel wheels
To remove the wheel, release the push-button in the centre of the cap 6 and pull the wheel off the holding device. To assemble the wheel, insert the fastening pin in the holding device, and engage it by a forcible push, which is indicated by a click sound.
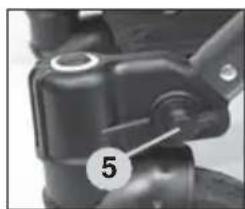
Parking brake
Push the red brake button 7 to engage the brake. Having parked the pram, try to push it to check the brake. Push the green brake button 7 to release the brake.
WARNING! Make sure the brake is always closed when placing the baby in the carriage or taking it out of it.
Adjustable suspension system
By turning the selector 8, a "hard" or "soft" position can be selected for suspension.
Sun canopy
The sun shade can be folded down or removed using the zipper.
Climatic zone 10
You may open the hood flap to prevent heat from accumulating.
To do so, pull the top cover up. You can fold out the sun shade 20 for additional protection.

Hood and safety bar
By pressing the bayonet joint 12, the hood or the safety bar can be pulled out. When inserting it, make sure the safety bar locks into place correctly and be careful not to pinch any of the fabric parts. By pressing the buttons 11, the safety bar position can be changed.
WARNING! The hood bar of the stroller and the safety bar are not suitable for carrying the stroller.
Adjusting the backrest
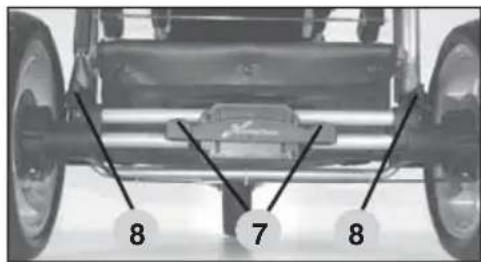
By raising adjustment lever 13 on the back, the seat-back can be precisely adjusted to any incline between an upright seated position and a lying position.
WARNING! When adjusting the backrest, take care that no movable parts jam the baby's limbs or fingers, etc. Finally, make sure the backrest has reengaged properly.
Protection from falling out.
As additional protection against falling out, fix the press Buttons 19 of the hood to the metal frame of the backrest.
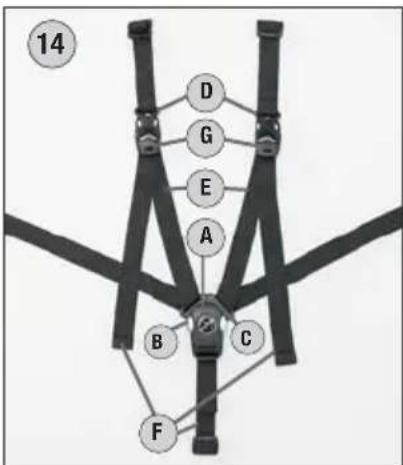
Safety harness WARNING!
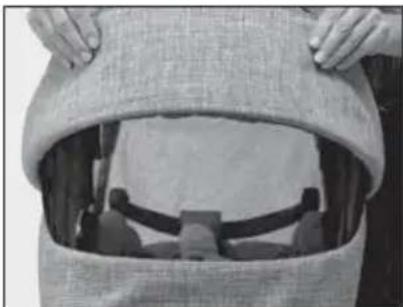
Secure your child with the 5-point belt system 14.
Make sure that the shoulder belts D are inserted and the belt fits snugly against your child. You can adjust the length and tautness of the belts with the belt ends F. You can adjust the width of the shoulder and lap belts by tilting open the quick-release slider G and pulling on the belt E.
Opening the belt: Press the two buttons B at the same time and remove the magnetic closer A. The bottom fixing C can then be removed easily.
Closing the belt: Hold together the two fixings C and attach the magnetic closer A; the fastener locks automatically.
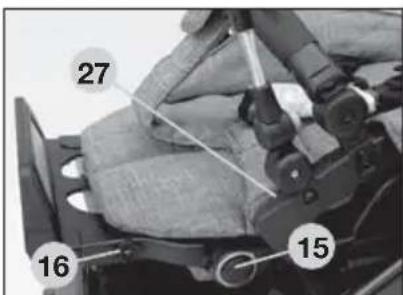
Canopy attachment 27
Insert then the fixing peg of the canopy in the slot of the canopy attachment.
Adjusting the footrest
By pressing the two red safety buttons 15 at the same time, the footrest can be lowered. When lifting it, adjustment of positions is effected automatically. The footrest can be lengthened. To do this, pull the two red pins 16 and turn the footrest by 180^ .
Automatic lock for upper section 17
Place the seat unit on the frame in such a way that both locking handles are sitting on top of the support studs. The latches on both sides lock automatically as soon as you let go of the handles.
WARNING! Check before use that the seat unit is securely fixed! To open the lock, pull the red knob out slightly, then the seat unit can be removed. The seat unit can also be turned round.

Suitability for the child
The seat unit is designed for a child from 6 months, and weighing up to 22kg (33 lbs).
WARNING! Only use this seat unit when your child can sit up on their own and from an age of 6 months.
For children under 6 months and with a maximum body weight of 9kg who cannot yet sit up or roll onto their side or support themselves on their hands and knees, only use it in combination with an appropriate baby carrier.
Checking and care instructions
All the materials we use can easily be cared for.
Care of the fabric parts
Clean soiled fabrics when dry using a clothes-brush or lukewarm water (then use hair dryer). Do not rub fabrics extensively. Remove tenacious stains using a soft detergent. All removable fabric parts may be machine washed in lukewarm water at a gentle setting and reduced agitation, at 30^ . Let's say you have encountered a heavy rain shower. Dry your carriage with the hood still on in a dry and airy room using a cloth. This prevents marking as well as the underlining fabrics from moist soaking in through the seams. As a guaranteed protection against rain, we recommend that you use our rain cover, which is either included or can be purchased at your dealer's. Our fabrics have quite a number of distinctive features. However, they are very sensitive to excessive sunlight. That's why you should park your carriage in the shade whenever possible.
Care of the chassis
The chassis requires regular care. You should clean and slightly lubricate the wheel axles at a regular 4-weeks interval. Before oiling the wheels and push-in axles, make sure these are absolutely clean and free of sand etc., in order not to compromise the proper working of the locking mechanism. Use a silicone based lubricant spray for all moving plastic parts to maintain them in an operative condition. Keep all coated and chrome-plated metal parts in dry condition, and use a finish restorer or chrome paste if necessary. Remove smaller chassis paint damages by means of a touch-up applicator. Do not use high-pressure cleaners when cleaning your carriage, due to risk of damaging the ball bearings of the wheels (greased) and other functional parts (grinding and creaking noise). Wheels: Overpressure may result in accidents and personal injuries. Replace worn plain wheel bearings and springs in time. Replace worn plain wheel bearings and springs in time. Little stones in the thread, etc. may just as well damage the floor covering. When parking the carriage in the blazing sun or cramming it in the boot at temperatures of above 40^ , the semi pneumatic tires may flatten or become deformed.
2 YEARS WARRANTY
This product is guaranteed for a period of 2 years by your contract partner. For possible submission of proof, please keep your receipt, the completed warranty card as well as the hand-over check bearing your signature for the length of the warranty period. These documents must be submitted to qualify for service under the warranty.
IN CASE OF WARRANTY CLAIM
This product is warranted against defects in materials and workmanship that existed at the time it was handed over.
THIS WARRANTY DOES NOT COVER ....
We disclaim liability for defects in the object of purchase that are beyond our control.
This especially applies to:
natural wear and tear (wear-related defects) and defects due to excessive stress
■ consequential defects, originally caused by neglect of defects/damages but developing into conditions necessitating a more difficult repair
defects due to improper or inappropriate use (see Instructions)
defects due to incorrect assembly or operation
■ defects due to negligent handling or lack of maintenance of the product
defects due to improper alteration of the product.
WARRANTY CLAIM - YES OR NO?
Rust: To provide a proper basic protection of the chassis, it has undergone a rust-proofing treatment. However, rust-stains may be found when lacking maintenance. This case will not be covered by the warranty.
Scratches: Scratches caused by wear and tear will not be covered by the warranty.
Mould formation: Fabric parts, having become wet, should be dried properly to prevent mould formation (see Instructions). Mould formation will not be covered by the warranty.
Bleaching of the fabrics: We confirm that the fabrics comply with the established standards. It cannot be ruled out that colours of the fabrics may fade while the parts are exposed to direct sunlight, washed too frequently, come into contact with sweat and detergents, or suffer abrasive wear (especially on those parts where the pram is handled). Consequently, colour fading is excluded from the warranty. It is unavoidable that colours sometimes differ slightly from one individual batch to the next, which is why this case will not be covered under the warranty.
Knob formation on fabrics: We recommend that you apply general clothes care. As with woollen sweaters, the knobs can easily be removed by using a clothes-brush or burling machine.
Tearing of seams, fabrics, press studs : At the time of purchase, please check carefully that all the fabric parts, seams and snap fasteners have properly been sewn and fastened. In case of a possible complaint concerning seams/defective snap fasteners, a claim must immediately be reported to your dealer after the defect has been discovered.
Wheels: As wheels used on prams will not be balanced, they may show slight run-outs (wobbles). Worn tires will be regarded as natural wear and tear. No claim can be raised if your pram, using pneumatic tired wheels, has a flat. This will be attributed to extraneous causes - a small hole caused by a pointed object, or pushing the pram about when it has not got enough air in the tire. This case will not be covered by the warranty.
WHAT TO REMEMBER WHEN BUYING YOUR PRAM
Check that your pram is complete when it is handed over and no parts are missing. Check the function of all parts and confirm this by signing the hand-over check.
WHAT TO DO IN CASE OF A COMPLAINT
Call your dealer, from whom you bought the pram, to file the complaint and to discuss how to handle the matter. In case of defects concerning safety regulations, your complaint must be filed at your dealer within a 30 days period from the date the defects have occurred, otherwise these defects will not be warranted for. When handling your warranty claims, we will apply product-specific depreciation rates. We refer you to our general terms and conditions displayed at our premises.
Make sure that the pram is in a clean condition before being sent in for repair. Repairs will not be carried out on prams which are in a dirty condition.
USE, CARE AND MAINTENANCE
To maintain the original quality of your pram as a means of transportation for your child, it requires care and maintenance according to the instructions.


VIP GTS / Yes GTS
Lock-type-swivel wheels
Lamplighet for barnet
O CEMU MORATE VODITI RACUNA PRILIKOM KUPNJE
Provjerite da li su kolica kompletna prilikom isporuke i da li nedostaju neki dijelovi. Provjerite da li sve funkcije kolica fungkioniraju potpunosti i potvrdite ovo na listi o primopredaji.
POSTUPAK KOD REKLAMACJE
Pn WbNdki XOdb6i Y npOpyIaHkax No HepIBHX NOBepxHx M N peKoMeHdyEmo 06mExHTn NobopoTHi pyX, 3aJyYHNKHeHH 6LOKyBaHH KOnic.
3amiha nobopothnx kolic
Iyra toro, 3nHtN KOleco, HATNCHTb KhoNky, 03haoDntbcr no ceHTpy Kpnwn 6, i CTaHITb KOleco 3 TpMaay (ytpmyOoi oci). 106 nocTabTu KoIeCo Ha Micue, BCTabTe fikcaTOp B TpMaay, Ta 3aikcyte, HATNCHyBmHa HbOrO 3 yCunlM do BiIDNOIBHOrO KnaaHn.
TalbMa
HaTnCHiB YepeBOHy KhoNky ralm 7, 06 BOH npaOBoAHI.
3aIIuauOn KoIaCKy cToaTI, IereHbKO wTOBXHITb II, 06
nepeKoHaTncsA, 0r RaIbMa npaioToB. dIra TOrO, 06 3HrTa n RaIbMa,
notpi6HO HATnCHyTN 3eJeHy KhoNky 7.
3BEPHTb YBARY! He caJkaIte dntnHy B KOJIaCKy, Ta He BnMaTe 3 Hei, He nepeKoHaBunCb, 10 KoJIaCKa CToITb Ha rAlbMaX.
PerylboBaHa cnctema amOptn3aui
IobepHyBwHn nepemukay 8 B noJIOxehHRA TBePdo》/《M'ko》Bn MoKeTe Bn6upatn dnyce stynb amOptn3aui.
KlimatnHa 30Ha 10 B cKaJaHomy BepxY
BiDkpyTe 6nDbi npncTe6HyTi HaKlaAdKn Ha 3aHni Dy3i TeHTy i NotarHITb eIemEnT cKlaHaHO Bepxv BpepeHaCklaDaHm Bepxom.
KanHouOn Ta 6amnep
KanHooH Ta 6amnep moXHa 3HrTn HaTnCHyBwn npeemnkau 12.
Ctablayn 6amnp Ha Micue, nepekoHaTecra, 0o Bin npabNbHO
3aikcoBaHm i B Micu 3'eHaHH He Notpann TeKCTnbHi eIemEn KOLsKn. IonoKeHH 6amnpa MoXHa peYIOBAtn 3a DOnOMOHO KHONK 11.
3BEPHITb YBARY! He nepehocte nporyaHkoBn 6Jok, Tpmaoun noo 3a 6amnpu duy Ha KaIOHOHI.
BidperyIIOte cnnHky, Bn6paBun 6aXaHn Haxn CndiHn IotarHtB BaJIb perYIOBaHHr 13, 0o 3NaXOAnTbcN no3aDy cnDiHH, 0o6 o6patn Jexaue qn CndJe noloxeHH.
3axnCT BiD BnnaaHn 3BEPHTb yBAfY!
ДяdoataKOBOrO 3axncty BiD BnnaaHnnpncTe6hItb ryd3NKKNHONKn 19 KaHIOHOHa Do metaJeBOrO Kapkacy cnHHKn.
Pemih6e3nekeyYBAY!
PnncTe6HtB dHTNHy 3a donomoroio 5-TOUKOBOro peMeHa 6e3neKn 14.
PepeKoHaIteCra, 00 nLeuOBI JAMKn D BCTabJIeHi, a pemInb uJbHO npnlaRae.Bn MoKeTe 3aTARHyTN JAMKn NO DOBXNI Hi 3a DonOMoTO KINcIB F, a TAKOX BiDperyIIOBaTn O6cI r NleUOBOro i NORCHOro peMeHIB, HaxININBUn PpAKKy G i NotarHyBwn 3a JeHTy E.
Pozte6HyT peMH 6e3neKn: HATNCHTb Ha 0bDi KhoNKn B OdoHocHO i BnMIb MaHiTHy 3acti6ky A. Picna uboro MoKHa Ierko BuaNTn HxKHi fikcatop C.
3acte6hytn pemihb 6e3nekn: 3'EnHaHTe o6nDb aikcaTopa C i BCTAHOBITb MaHHTy 3acti6ky A - pemihb 3acti6aetbca ABTomatnuHO .
Tpma npacolbkn 27
3HIMITb HxKHO yactHy aabkypa, a NOTIM BCTaBte KpinnbHn mTnOFTnAfoHa BOTBip y TpImaqui TiHi NiIDNOKITHNK.
KoHnHaadaetcbra papaHTiHe 06cLyroByBaHHa
Tapahtihe 06cnyrobybaHHa Hdaetbca y BnnaKy BnBHeHHa deeKtib daHoro npOyKty, 0o 6yIn OTpMaHi npBipobhnti Ta Ha cac nepeadai Noro do cnoknbaba Bke ichybnn.
TapahtiHe 06cIyroByBaHH He Hadaetbcra
Mn He HecemO BiINoBIaIbHocTi 3a DeΦeKTH BnRbNeHi Ha npOdyku, iKi E nO3a HauIM KOHTpOJeM To6To:
3BnuaHn 3Hoc npodykui, Ta dephiKTH, OTPMaHI BHaClIOK HAdMIPHO BRKOpNCtAHH
Bidpa3y He nomiuehi defeKTn / nowkoJxHHe, kI nepepocTaOb y 6ilbW cyTTeBi ta notpe6yIOt bCKlaHOro DOCKHOHaIoro pemOHTy
IekeTn, 30 3Bnnc BHaCNIoK HenpaBnBHO BnKOpNCaHHA (NbITbc iHCTpyKuio NO eKnnyatauii)
I DeΦeKTH, 30 3' BnllncB Hacniok HenpaBnHOro MoTAtKy uEcknlyatauii
IeΦeKTH, 30 3'BnncB Hacniok He6aIOno BnKOpncTahH N BiCyTHOCTi TexHiHOro 6cLyroBaHH npOdykui
I DeΦeKTH, 30 3' BUNNcB HAcNIIDOK BHeceHHaMnB KOHCTpyKuIO daHOI npOduKyiii
TAPAHINH BUNADOK-TAK HHI
IOPOBNTN YPA3I BUNHKHEHHCKAP
3aTelefohyte Baowmy npoabuio, po3kaixtb npo npo6lemy, kya y Bac BnHKla, ta orobopitb wJnx II BnpiweHH. Y BnnaDky BnBLeHHn Deefektib, 0c CTocyIotcb npuyweHH npabn 6e3neKn, Bam Tpe6a noatn ckapry do BaWoro npoabua npotgrom 30 dHIB 3acy ix BnBLeHH, iHaKwe, ce He 6yde po3rJaTncs r rapantHn BnAdoK. Otpmabwn BaWi BnMOrn cTocoBHO rapaHTiHorO obClyroBvBaHH Mn po3rJaDAEMo nTaHH 3MeHweHH BapTOCTi daHoro npodkTy. Mn 3aBXn CnpaEmoc Ha HAI 3araIbHi npabNt a YMOBN, 3 KIMN Bn MoKeTe 03HaNoMTncB H AINX maraunhax. Ipeed TmM, kB iDdaBatn BaWy KoJIaCKy B peMOHT, nepekoHaTeC8 0c Bci ii elementu ncti. bpydi KoJIaCKn B pemOHr He npinMaOTbcra.
BKNKOPNCTAHH, D0TJAD TA TEXHICHE OBCNYTOBYBAHH
KoIaKa - ue, B nepuy epry, 3acib dlya nepebeeHHBaaoi dHTHNN. Tomy, 3adToro, 06 36epertn II B 6e3doarHOMy CTahi, BOHa notpe6ye noctiHoro dOrrny Ta texHCHoro oCcyroBaHHB, BiNobIDHO do IHCTpykui no ekcnnyataii.

SLO Slovenija
K
VIP GTS / Yes GTS
primeren za otroke od 6 mesecev do 22kg - za mlajse od 6 mesecev s primerno nosilno turbo.
Tento vyrobok nie je urceny na beh ani na jazdu na kolieskovych korculiach ci skatebarde.
GWARANCJA NIE OBEJMUJE...
KoJRA Ka PpeHa3HauEHa Ira DeTei OT 6 MecaeB, BecOM Do 22 Kr.
Ira DeTei MnaDwe 6 MeaueB BO3MOxHO NcNoIb3OBAHne KOJACKn C NOxOJaIe
IpeHoCHOn CymKoN.
Данныnpodукт He npedHa3HaueH dIЯ 6era nIi KaTAHnHa poNkoBbIX KOhbKaX.
1 PyuKa
2 ΦнксаTop сложенpaMbI
3 Perynpyemar Teleckonuecka pyka
4 Khonka-ΦNKCaTOpДЯСHTNkoJIeC
5 ΦικcaTOp HαnpaBνηня Kολeca
6 Φиксатор креленя Кoleca
7 TopMo3
8 PerynipobKa JecTKoCTn amOpTu3aTopa
10 CklaadnoBepxIa3aunTbIOTcOnHua
11 Perynnpobka yrna haKloHa 3aunTHoI dyru
12 ΦнкcaTop 3auntHOJ dyrn
13 Perynipobka yrna haKloHa cnnHKn
14 Pemn 6e3oNaCHOCTN
15 PerynilpoBka yrla haKloHa noHOKKn
16 PerynpoBka ypoBna noHOKKN
17 ΦИКcaTOp KpeПлЕнЯ CMeHHorO 6Ioka
19 3aunTa OT BbinaaHnA
20 CoHnue3aunTHbI K03bIpeK
21 Puyka cnojkeHHpaMbI KOJIaCKN
22 PoiDBecka nepeHero KoIeca
27 KpenJIeHn e coJIHcE3aUHTHOrO 3OHtNka
CepdeHbIe nO3dpaBJIeHnIa
Дя toro,убь Baaw pe6eHOK yBCTBOBaI ce6a 6e30nacHOCTn 3aunuHbIM, Bbl npHHJIpeWeHne npO6peCTn BbICOKOKaueCTBeHHbI npOdyKT fnpMbI Hantan n Tem caMbIM CdeJAN npABINbHbN BbIOOp. BbICOKOKaueCTBeHHaN O6paOOTka n NOCTOrHHbIK KOHTpOJI KaueCTBa dAyt Bam yBcTBO yBepEHOCTHn B TOM, qTO BbyDeTe DOJrno c 6OJIbWoJ paOCTbU HCNoJIb3OBaTb KOLRCKy fnpMbI Hantan NcNoJIb3OBaHne TEKCTIneJ, npOBepeHHbIX Ha ToKcnHocTb, daCt Bam rapaHTnIO toro, qTO Bam He haIo 6yDet onacatbcra 3a 3dopoBbe BaWero pe6eHka.
BAKHO! NOKALYICTA, INPEID NCHOJIb3OBAHHEM KOJRACKN O3HAKOMbTECb C INHCTPYKUENI IO PPIMEHEHIO U COXPAHNT EE IJRA PEWEHNA BO3MOXHBIX BONPOCOB. HECOJIIOJEHNE 3TINX IPNABNJ MOKET IOBJLEy CHNXEHNYE YPOBHJA BE3ONACHOCTN BAWETO PEBEHKA.
B cnyae, ecnn nHctpyKnna Bam He noHrTa Hn Bbl XOTNe NOJyHTb DOONHtEnbHyIO HHOpMaunHO, 6oPaTHTeCB CneuaHn3HPOBaHHb Maar3HN.
YIOCTOBePbTeCb TaKHe B TOM, UTO HpyrHe NOnb3OBATeH N KOJIaCKN O3HaKOMnEhBc C e ee FyHKnA M N yKa3aHnMn, KacaIoUzHMnC 6e3oNaChocTH.
ПразвILA 6e3oNaChocTn Baшero pe6eHka
BHHMaHHe! - Ipeed nCnoNb3OBAHNem y6eIntecb, YTO BCE 3aMKn 3akpyItbI.
BhmuHne! - Ipeep nCnOJb3OBaHHem KOnrCKn y6eIITecb B TOM, uTO OHa He NOBpeKDeHa H TO Hn OHa qactb KOnrCKn He HaOpBaHa Nn HaIOMHe. B cnyae, ecn BbluTo - Jnbo 0bHapxHnn, Hn B KOem Cnyae HeIb3r nCNoJb3OBaTb KOnrCKy.
BhImaHne!-- CteIte 3a TeM, UTo6bI BaW pe6eHok He HaxOuINcR no6n30cTn npn cKJaDbIBaHIn paCKlaDbIBaHHN KOJIaCKN BO n36exKaHne TpaBM.
BHHMaHHe! HIKoRda He octaBnIte pe6eHka 6e3 npcMOTpa B KOJIrAKe.
BhImaHne!--peed 3Kcnpnyatauhey6eNTecb B TOM,TO pOpyloHbI 6JOK KOJIaCKN, CHeHne Hn ABTomOboHbHO KpeCNO npabHbHO 3aKpePJIeHbl.
BhImaHne! - E3da no CTyneHbKaM, a TaKHe nepeBo3Ka TJeNoTo rpy3a B KOJIaCKe MOryT pInBeCTN K NOIOMke I noDBePrHytB BaWero pe6eHka onaChOCTn.
BHHMaHHe! - OctaBnay KOLrAcy, BcERda HcNoIb3yIte TOpMo3, OcO6eHHO npi nepeBo3Ke B TpaHCnOpTe.
BhImaHne! - KolrKa He rBnEeTcKpoBaTbH N MoXeT 6bITb NcNoIb3OBAHa TOnbKO B cIeJAX TpaHCnOpTnPOBKn.
BnMaHne!-- NcnoIb3OBaHne KOJIaCKn npi 6ere, nporykax Ha polnkax, cKeIe n T.D. onaCHO, IIO3tOMy He pa3peWaaTcR.
BnMaHne! He onyckaIte, yTo6bl nrgpaIOUne Detn HaxoHNncb B6NI3N KOJIaCKN, He daBaIte IM nrgpTaC KOJIaCKOJ.
BHHMaHHe!-- Bcerda nCnoJb3yIte peMeHb 6e3OnaCHOCTn.
BhImaHne! - He 3akpeIJIe cyMkn IIN TaeJeIbIe BeIu Ha pyUke, cInHKe I IO 6OKam KOJrCKN, 3TO MOKET NOBnIaTb Ha ee yCTOnuBOcTb.
BHHMaHHe!-- NaHn MaOeJIb KOJIaCKn IpeHa3HaueHa dIa OJHO pe6eHka.
BHHMaHHe! - PpIMeHHeN DOnOJIHHTeJIbIc NcIeHn IaI 3ToI MoJeI Hpea3peWeHo.
BHHMaHHe! - BepxHIOU qacTb KOJIaCKn HeIb3r INCNoIb3OBaTb IINpeBo3Kn pe6eHaB MaunHe.
BhMaHne! 3aHTbIKoNnKOTdoJHe MoKet 6bITb HcNoJb3OBaH npn CHrTOM BepXe (Oanchoctb ydyueHn). TaKke HeIb3a OCTabJIaTb 3aHTbIKoNnK Ha cOnHc, ecIn B KOJrCKe HaxoNTcrape6EHK (pepepeBaHne).
BhImaHne!-- CTe3a TeM, YTO6bI KOJIaCKa He HaxOJInacb B6JIIN3N OTKpbITOrO OrHa N dpyrnx HCTOuHKnOB Japbl.
BhImaHne! - He3aMeIInTeIbHO I3BnEKeNte KOJrCKy I3 BCEx yNaKOBOHyBX MaTePnaIOB n He daBaTBe BaWemy pe6EHKy C HmM NrgpTaB (OnaCHOCTb yDyWeHn).
BnMaHne! 3aPpeSeHO nCnoIb3OBaHne npHaJNeKHOCTe N CMeHHbIX DeTaeN, He ODo6peHHbIX npOn3BOdnteJIem.
HCTPYKUNI NO 3KcNJYATAUIN
BHIMAHNE! PncklaadbHaHnn paKladaBHaHnn paMbI KOJIaCKN, a TaKHe npu N3MeHeHHIO3uHN CnIHKN KOJIaCKN BO3MOXHO 3aueMLeHne, YTO MoKeT npVBecTN K NOBpeJdeHnM BCJeCTBnE HeBHmAtelbHOCTN. O6raTeNbHO CNeDHTb 3a TEM, YTO6bI B TAKO cnTuayau nn pe6eHOK He HaxoINcPRAOM.
PaklaDbBaHne KOJcKn
IOnHmnte pyky 1 do TORO MOMENTa, noka 3amok pykN 2 c DByX CTOpOH He 3aΦHKpHyOTcA.
BHHMAHNE! Ipeed nCNOb3OBAHNem y6eDnTeCb, YTO BCE 3aMKN 3akpbItbl. Ppi packlaDbBaHne KOJIaCKN
CJeITe 3a TEM,
TTo6bI Baw pe6eHok HaxoDnnc Ha 6e3onacHom paccToHHN OT KOJIaCKN.
CklaDbBaHne KOJIaCKn
BnHTOBO 3aunTHbI 3AMOK 3 CneDyET KpyTntb BO BHyTpEHOIO CTOpOHY N ODNHOpeMeHHO BblBnraTb pyKy -TeJeCKON Do 6loKnipOBKn. DePKeNTe BnHTOBO 3AMOK 3 OTKpbITbIM N HaxMnTe Ha KpachyIO KNONKY 21 N BblBnraTe pyKy 1, noka OHa He 3a6NoKnpyeTc.
Pyka - Teleckon C BO3MOXHOCTbIO nepeCTaHOBKn NO BBICOTE
IyHn3MeHeHHNo3uHn pyKn Heo6xOJIMo KpyTb BpaAioUyHOc pyKy 3 BO BHyTppeHHIO CTOpOH N BbICTaBnTb pyKy 1 B HxKHyIO No3uHIO Do TORO MOMeHTa, noka OHa He 3a6NkpyETc C DByX CTOpOH.
Charthe 3aHnx KOlec
CHIMITE KOJACKY CO CTORHOUHORO TOPMO3A 7. HAKMITE Ha KONKY 4 N BbIHbTe KOJECO. BcTaBBte KOJECO DO ynpaB CCOOTBeCTBYOUSeE MeTO Ha OCN. POKAYIcTA, ObpaTne BHNMaHHe Ha TO, YTO6bl BCE KOJecCa 6bln npabNbHO BCTABJIeHbI, a NOTOM YTONITE KONKY.
PnppeMOHTe nHcMeHe 3nEMeHTOB KOJIaCKn MaTepuTbIe NOKpbITHa He MeHApOTca.
TapaHTnHbI clyaH nn He?
PxabHnHa: Kopnyc o6pa6oTaH coCTaBOM, npedTbpaauiouM npocecc noBHe Hn pKaBunHbI, OTCyTcBne 06CnyKnBaHHn KOJIaCKN MoKeT npBecTN NOBHeHHIO MeCT, nopAkeHHbIX pKaBHHoH. Ha TAKNE cIyuaH rapaHTna He pacnpocTpaHaretca.
UapannHbI: IoBHeHne 1apanHH He BXOHT B CnyaH, Ha KOTOpbIe pacnpocTpaHReTcra papaHTn, T.K. OHn ABJIHOCTC HOpMaJIbHbIMn npn3HaKaMn n3HOca.
06pa3oBaHne rpn6ka: B clyae ecnn MaTePnA1 KOJcCKn CnIbHO npOMOK, eO Heo6xoJIMO TuaTeNbHO npocuHTb, yTo6blnpedOTBpaTntb o6pa3oBaHne rpn6ka. POnBHeHne rpn6ka He RaJIeTcra pAraHTnHbIM cLyuaem.
BbCBeTahne MaTePnaIaOB: Bce MaTePnaIbI, nCIOJIb3yHOUeNCB HauINx N3DeJIINx, COOTBeCTByIOT KcYUM HopMaM.
BcneCTBnBE 03deNCTBnCOnHehBxI LyueH n CInuKOM uactoroMbItb He NCKLIOeHO BbUcBeTahne Maepnana, n 3TO He ABJRAETCA npunHno peKlamaucn. He3NaHTeNbHO eONuHme MeJy pa3NuHbIMu qactmnpOdykTA He Bcerda ydaetca H36ekaTb npn pOn3BOODCTBE, no3TOMy TaKne Cnyan TaKxe He ABJIOTc npunHno peKlamaucn.
CkTaBHaHne TkaHN: Cnyaun cKaTbIbAHne TkaHN He OTHocTcR K rapaHTnHbIM Cnyaam, OHN MOrYt 6bIty dAJIeHbI CTaHApTHbIM nCnoc6Amn no yxOdy 3a WepctraHbIM N CInTeTuueckmM BeaAMn, C NOMoUbIO CneuaJbHO UeTKN IIN MaHHK.
Pacxoxkdenne wBOB: IoxaIyIcTa, npOBepbTe Wbbl N KONKn npn nOKynn 3denn. B cnyae o6hApyeHn noBpeJdHn wBOB HN KHOK, He3aMeIInTeIbHo 06paTntecb B Maar3Hn, rde 6blno npno6peTeHO 3denn.
Koneca: Tak KAK KOleca Ha KOJrcke He 6aHaHcnpyIOTc, BO3MOKeH IerKn Dnc6bAnaHC. CTePbIe KOleca RaBIAOTc HAtypaIbHbIM n3HOCOM. IpOKoJIb B KOlecax MOryT 6bITb Bbl3BaHbI TOIbKO BHeSHmB03JeICTBnEM, PO3tOMy BCE 3TN CInyAn He RAIBAOTc rapaHTnHbIMN.
Kac cne dyet ce6y BcTn B cIyuae peKnaMaun
He3aMeIInTeBHO coo6uHrE O npOBeMe B cneuaHnIOBaHb MaarH, B KOTOpOM Bbl npNo6peN KOJIcKy, PpeCTaBtEnb MaarHa COo6uHT O TOM, KaK DeHCTBOBaTb DaJIbe. Ha HenoJaIKN, CBraaHHbIe C 6e3OnaHocTbO, O KOTOpBX He 6blIO 3aABLeHO B CneuaHn3IOpaOBaHb MaarH B TeueHne 30 DHe C daTbI NOKyKN rapaHTnE He paNpOcTaPAnreTcR.
C npo6hocTmN C83aHHbIMn C o6pa60Ko peKlamauHbIX 3aBHeHn, kacaOuXcra npOyKun Hawei pnpMbI, Bbl MoKeTe O3HaKOMtbcra B UcTaBe HaWero npedpntna.
Ha cIeJyET 6paTb BHMaHne npn NOKynke.
IpoBepbTe ynaKOBky c npno6peTeHHo KOLaCKo Ha HalaUne Bcex Heo6xoJIMbIX 3aunacteH pa6OTocnOco6HoCTb Bcex fYHKuHaJIbHbIX qacTei.
IcnoIb3OBaHne, yXoI n o6cIyXuBaHne.
Kolacka YBlaeTcra CpeDCTBOM TpaHcnpTnpoBKn BaWero pe6eHka, no3Tomy 3a Hei Heo6xOJIMO yXaJNBAb B COOTBeTCTBNN C INHCTpyKuznei NO eKcIpyaTuIN, UTo6bl CoXpaHHTb ee n3HaayalbHOe KaueCTBO.
Pn otnpaBke cIeINTb 3a TeM, yTo6bl KoJcKa 6bla YHCToN. rpa3HbIe KoJcKn Ha peMOHT He npHHMaIOTcR.
ΦOPMUYIAP KOHTPOJI IPII NOKYNIKE
MoeJIbTeTcKoKolrKn
UBeT
Даразпокурки
I npOBepnKOMnJIeKTHOcTb DeTcKOJ KOJIaCKN I NOJIHOCTbIO yDOCTOBepnLcra, YTO KOJIaCKa NepeDaHa MHe B NOJHOM KOMnJIeKTe N BCE ee yHKuN DeiCTBYOT B NOJHOM Osbeme
I noIyHn IocTaOHTHyIO nHΦopMauio 6 n3dEeINn npHnK CBeDeHNO yKa3aHnNo ee 3KcNpyaTuin
Iopnnscb nokynatela
UtamnpoDabua/npdncb


- Congratulations on your purchase
- For the safety of your child
- Instructions for use
- Unfolding the carriage
- Folding the carriage
- Height-adjustable Telescopic handle
- Changing the rear wheels
- Lock-type-swivel wheels
- Changing the swivel wheels
- Parking brake
- Adjustable suspension system
- Sun canopy
- Climatic zone 10
- Hood and safety bar
- Adjusting the backrest
- Protection from falling out.
- Safety harness WARNING!
- Canopy attachment 27
- Adjusting the footrest
- Automatic lock for upper section 17
- Suitability for the child
- Checking and care instructions
- Care of the fabric parts
- Care of the chassis
- YEARS WARRANTY
- IN CASE OF WARRANTY CLAIM
- THIS WARRANTY DOES NOT COVER ....
- WARRANTY CLAIM - YES OR NO?
- WHAT TO REMEMBER WHEN BUYING YOUR PRAM
- WHAT TO DO IN CASE OF A COMPLAINT
- USE, CARE AND MAINTENANCE
- VIP GTS / Yes GTS
- Lamplighet for barnet
- O CEMU MORATE VODITI RACUNA PRILIKOM KUPNJE
- POSTUPAK KOD REKLAMACJE
- 3amiha nobopothnx kolic
- TalbMa
- PerylboBaHa cnctema amOptn3aui
- KlimatnHa 30Ha 10 B cKaJaHomy BepxY
- KanHouOn Ta 6amnep
- 3axnCT BiD BnnaaHn 3BEPHTb yBAfY!
- Pemih6e3nekeyYBAY!
- Tpma npacolbkn 27
- KoHnHaadaetcbra papaHTiHe 06cLyroByBaHHa
- TapahtiHe 06cIyroByBaHH He Hadaetbcra
- TAPAHINH BUNADOK-TAK HHI
- IOPOBNTN YPA3I BUNHKHEHHCKAP
- BKNKOPNCTAHH, D0TJAD TA TEXHICHE OBCNYTOBYBAHH
- SLO Slovenija
- K
- GWARANCJA NIE OBEJMUJE...
- CepdeHbIe nO3dpaBJIeHnIa
- ПразвILA 6e3oNaChocTn Baшero pe6eHka
- HCTPYKUNI NO 3KcNJYATAUIN
- PaklaDbBaHne KOJcKn
- CklaDbBaHne KOJIaCKn
- Pyka - Teleckon C BO3MOXHOCTbIO nepeCTaHOBKn NO BBICOTE
- Charthe 3aHnx KOlec
- TapaHTnHbI clyaH nn He?
- Kac cne dyet ce6y BcTn B cIyuae peKnaMaun
- ΦOPMUYIAP KOHTPOJI IPII NOKYNIKE
Brand : HARTAN
Model : VIP GTS
Category : Stroller