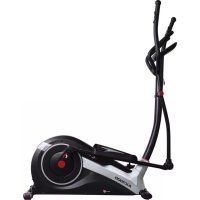
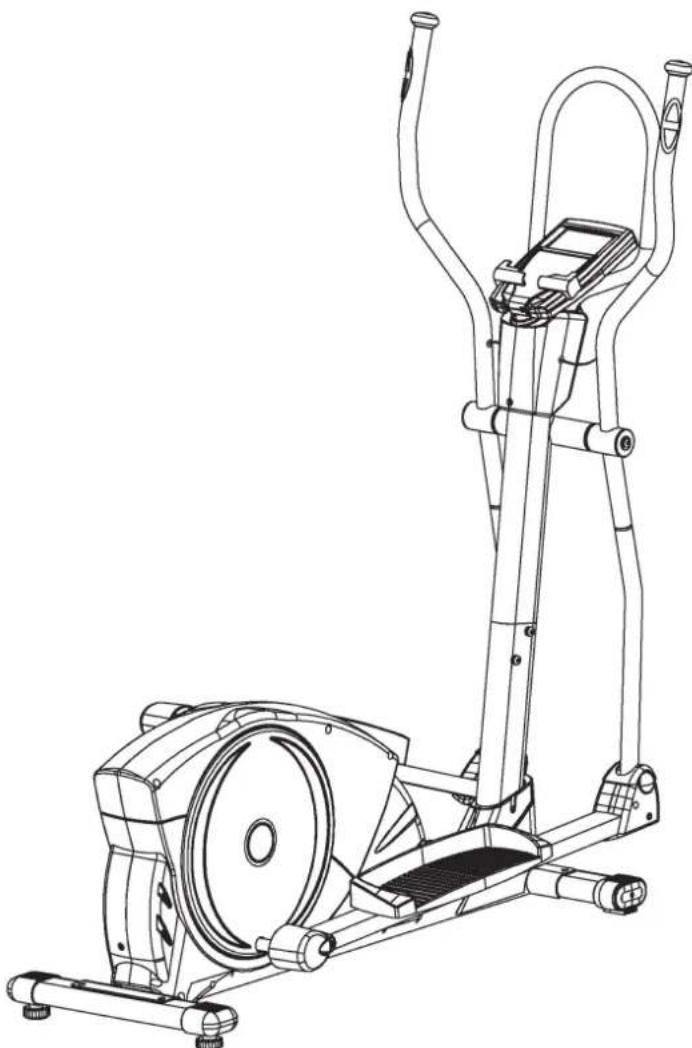
BLUE T2 - Elliptical bike Christopeit - Free user manual and instructions
Find the device manual for free BLUE T2 Christopeit in PDF.

| Product Type | Elliptical Bike |
| Brand | Christopeit |
| Model | BLUE T2 |
| Dimensions (L x W x H) | 138 x 66 x 158 cm |
| Product Weight | 54 kg |
| Power Supply | AC adapter 26V AC / 2.5 A |
| Flywheel Weight | Approximately 12 kg |
| Maximum User Weight | 150 kg |
| Resistance | 24 levels, automated adjustment |
| Training Programs | 12 preset programs, 4 cardio programs (55%, 75%, 90% and target), 4 customizable programs, 1 manual program, 1 constant watt program (25-280 W) |
| Display | Time, speed, distance, calories, heart rate, watts, recovery |
| Heart Rate Measurement | Sensors on the fixed handles |
| Connectivity | Bluetooth (compatible with Track on Earth, Fitconsole apps, etc.), USB port (charges smartphone/tablet) |
| Pedals | Adjustable to 3 positions |
| Transport | Transport wheels on front foot |
| Required Space | At least 3.5 m² |
| Usage | Private domestic, indoor (HA classification according to EN 957-9) |
| Maintenance | Clean with a damp cloth (no solvents); check all screws every 50 hours; lubricate the foot connections and the handlebar axis every 100 hours with spray oil |
| Storage | Disconnect the adapter if not used for more than 4 weeks; store in a dry place, away from dust and sunlight |
| Safety | Do not exceed 90 min/day; consult a doctor before training; stop if dizziness/pain; keep out of reach of children without supervision |
| Spare Parts | Available at www.christopeit-service.fr (references in the manual) |
Frequently Asked Questions - BLUE T2 Christopeit
User questions about BLUE T2 Christopeit
0 question about this device. Answer the ones you know or ask your own.
Ask a new question about this device
Download the instructions for your Elliptical bike in PDF format for free! Find your manual BLUE T2 - Christopeit and take your electronic device back in hand. On this page are published all the documents necessary for the use of your device. BLUE T2 by Christopeit.
USER MANUAL BLUE T2 Christopeit
Assembly and exercise instructions for Order No. 1504
NL
Fitness = Fitness Testprogramm
- Summary of Parts Page 3 - 4
- Important Recommendations and Safety Information Page 15
- Parts List-List of spare parts-tec. Data Page 16 - 17
- Assembly Instructions With Exploded Diagrams Page 18 - 21 Mount, use and dismount
- Watt table Page 21
- Computer instructions-trouble shooting Page 22-23
Cleaning, Check and Storage
- Training Instructions-Warm-up Page 24
Dear customer,
We congratulate you on your purchase of this home training sports unit and hope that we will have a great deal of pleasure with it. Please take heed of the enclosed notes and instructions and follow them closely concerning assembly and use.
Please do not hesitate to contact us at any time if you should have any questions.
Important Recommendations and Safety Instructions
Our products are all TUV-GS tested and therefore represent the highest current safety standards. However, this fact does not make it unnecessary to observe the following principles strictly.
- Assembly the machine exactly as described in the installation instructions and use only the enclosed, specific parts of the machine contained in the parts list. Before assembling, verify the completeness of the delivery against the delivery notice and the completeness of the carton.
- Check the firm seating off all screws, nuts and other connections before using the machine for the first time and at regular intervals to ensure that the trainer is in a safe condition.
- Set up the machine in a dry, level place and protect it from moisture and water. Uneven parts of the floor must be compensated by suitable measures and by the provided adjustable parts of the machine if such are installed. Ensure that no contact occurs with moisture or water.
- Place a suitable base (e.g. rubber mat, wooden board etc.) beneath the machine if the area of the machine must be specially protected against indentations, dirt etc.
- Before beginning training, remove all objects within a radius of 2 metres from the machine.
- Do not use aggressive cleaning agents to clean the machine and employ only the supplied tools or suitable tools of your own to assemble the machine and for any necessary repairs. Remove drops of sweat from the machine immediately after finishing training.
- WARNING! Your health can be impaired by incorrect or excessive training. Consult a doctor before beginning a planned training programme. He can define the maximum exertion (pulse, Watts, duration of training etc.) to which you may expose yourself and can give you precise information on the correct posture during training, the targets of your training and your diet. Never train after eating large meals.
- Only train on the machine when it is in correct working order. Use original spare parts only for any necessary repairs. WARNING: Replace the worm parts immediately and keep this equipment out of use until repaired.
- When setting the adjustable parts, observe the correct position and the marked, maximum setting positions and ensure that the newly adjusted position is correctly secured.
-
Unless otherwise described in the instructions, the machine must only be used for training by one person at a time. The exercise time should not overtake 90 min./daily.
-
Wear training clothes and shoes which are suitable for fitness training with the machine. Your clothes must be such that they cannot catch during training due to their shape (e.g. length). Your training shoes should be appropriate for the trainer, must support your feet firmly and must have non-slip soles.
- WARNING! If you notice a feeling of dizziness, sickness, chest pain or other abnormal symptoms, stop training and consult a doctor.
- Never forget that sports machines are not toys. They must therefore only be used according to their purpose and by suitably informed and instructed persons.
- People such as children, invalids and handicapped persons should only use the machine in the presence of another person who can give aid and advice. Take suitable measures to ensure that children never use the machine without supervision.
- Ensure that the person conducting training and other people never move or hold any parts of their body into the vicinity of moving parts.
- At the end of its life span this product is not allowed to dispose over the normal household waste, but it must be given to an assembly point for the recycling of electric and electronic components. You may find the symbol on the product, on the instructions or on the packing.
The materials are reusable in accordance with their marking. With the re-use, the material utilization or the protection of our environment. Please ask the local administration for the responsible disposal place. - To protect the environment, do not dispose of the packaging materials, used batteries or parts of the machine as household waste. Put these in the appropriate collection bins or bring them to a suitable collection point.
- For speed dependent operation mode, the braking resistance level can be adjustable manually and the variations of power will depend on the pedaling speed. For speed independent operation mode, the user can set the wanted power consumption level in Watt, constant power level will be kept by various braking resistance levels, that will be determined automatically by system. That is independent on the pedaling speed.
- The unit has a resistance device with 24 levels. This makes it possible to increase or reduce the braking resistance and thus the amount of effort required in the training. Pressing the button with n , " reduces the braking resistance and thus the amount of effort required in the training. Pressing the button n + 1 increases the braking resistance and thus the amount of effort required in the training.
- This machine has been tested in compliance with EN ISO 20957-1 and EN 957-9, H/A". The maximum permissible load (=body weight) is specified as 150kg . The classification of HA means this exercise bike is designed foe home use only and with good accuracy class, the variations of power consuming are within ± 5W up to 50W and ± 10% over 50W. This item's computer corresponds to the basic demands of the EMV Directive of 2014/30/EU.
Parts list - List of spare parts
BLUE T2 order No. 1504
Technical data: Issue: 01.04.2017
Ergometer of Class HA / EN 957-1/9 with high accuracy
Electric induction braking
24 stepped Computer controlled resistance
Approx. 12 kg flywheel mass
12 stored training programs
4 heart rate programs
4 individual programs
1 manual program
- 1 speed independent program (25-280 Watt, resistance adjustable in 5 Watt steps)
- Hand pulse measurement at moveable grips
- Pedals 3-times adjustable
- Floor level compensation
Transport rollers
Power plug (Adapter)
- Back Light LCD Display, 6 window display shows simultaneously: Time, Speed,
Distance, approx. Calorie consumption, RPM, Watt and pulse frequency
- Inputs of limits: Time, Distance, approx. Calories,
Pulse frequency and Watt
Announcement of
Fitness-Test
- Integrated holder for smartphones and tablets
USB port
- Apps such as Track on Earth, Fit Console and other available
- Load max. 150 kg (Body weight)
Space requirement approx.: L 138 x W 66 x H 158 cm
Items weight: 54kg
Exercise space approx: min. 3,5m^2

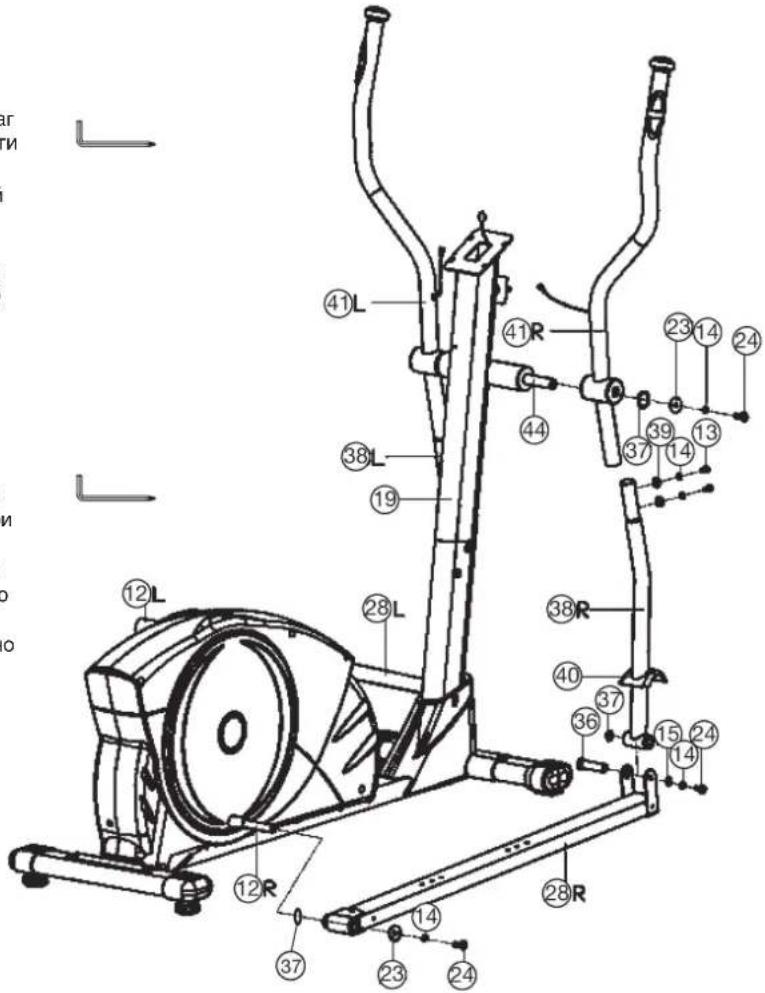
| Illustration No. mm Illustration No. | ||||||
| 1 Main frame | 1 33-9128-10-SI | |||||
| 2 Front bottom tube | 1 | 1 | 33-9128-1 | 1-SI | ||
| 3 Rear bottom tube | 1 | 1 | 33-9128-12-SI | |||
| 4L | Front end cap left | 1 | 2 | 36-9108-54-BT | ||
| 4R | Front end cap right | 1 | 2 | 36-9108-55-BT | ||
| 5 | Rear end cap | 2 | 3 | 36-9108-56-BT | ||
| 6 | Bolt | M10x57 | 4 | 1,2+3 | 39-10026 | |
| 7 | Washer | 10//20 | 4 | 6 | 39-10206-CR | |
| 8 | Spring washer | for M10 | 4 | 6 | 39-9995-CR | |
| 9 | Cap nut | M10 | 4 | 6 | 39-10021 | |
| 10 | Adjustable foot | 2 | 3 | 36-9805-24-BT | ||
| 11 | Screw | 4.2x18 | 17 | 4,35,53,58,67+91 | 36-9111-38-BT | |
| 12 | Crank | 2 | 79 | 33-9128-13-SI | ||
| 13 | Screw | M8x16 | 10 | 19+38 | 39-9888-CR | |
| 14 | Spring washer | for M8 | 16 | 13+24 | 39-9864-VC | |
| 15 | Washer | 8//16 | 10 | 13,21+24 | 39-10018-CR | |
| 16 | Curve washer | 8//20 | 2 | 13 | 39-9966-CR | |
| 17 | Motor cable | 1 | 18+67 | 36-9128-55-BT | ||
| 18 | Connection cable | 1 | 18+55 | 36-9128-56-BT | ||
| 19 | Handlebar post | 1 | 1 | 33-9128-14-SI | ||
| 20 | Plastic bushing for pedal support holder | 8 | 38+94 | 36-9128-57-BT | ||
| 21 | Bolt | M8x50 | 2 | 28+73 | 39-9811 | |
| 22 | Nylon nut | M8 | 4 | 19+21 | 39-9918-CR | |
| 23 | Washer | 8//30 | 4 | 24 | 39-10180 | |
| 24 | Screw | M8x25 | 7 | 12,36,44+70 | 39-9809 | |
| 25 | Pedal tube rear end cover | 2 | 28 | 36-9128-58-BT | ||
| 26 | Screw | M5x12 | 10 | 25,35,53+82 | 39-9988 | |
| 27 | Plastic bushing pedal support | 4 | 28 | 36-9128-59-BT | ||
| 28L | Pedal support left | 1 | 38L+73 | 33-9128-15-SI | ||
| 28R | Pedal support right | 1 | 38R+73 | 33-9128-16-SI | ||
| 29 | Bolt | M6x50 | 4 | 31 | 39-10450 | |
| 30 | Oval washer | 4 | 31 | 36-9128-60-BT | ||
| 31 | Pedal | 2 | 28 | 36-9128-61-BT | ||
| 32 | Washer | 6//16 | 4 | 39 | 39-10013-VC | |
| 33 | Spring washer | for M6 | 13 | 29,71,75+88 | 39-9865-SW | |
| 34 | Hand grip nut | M6 | 4 | 39 | 36-9925521-BT | |
| 35L | Pedal tube cover front left | 2 | 28+35R | 36-9128-62-BT | ||
| Illustration No. mm Illustration No. | Designation Dimensions Quantity Attached to ET number | |||||
| 35R Pedal tube cover front right 2 28+35L 36-9128-63-BT | ||||||
| 36 Bolt | 2 | 28+38 | 36-9128-64-BT | |||
| 37 | Wave washer | 16x21 | 5 | 12, 36+44 | 36-9824-21-BT | |
| 38 | Swing tube | 2 | 28+41 | 33-9128-17-SI | ||
| 39 | Curve washer | 8//19 | 6 | 13+19 | 39-9966-CR | |
| 40 | Swing tube cover | 2 | 38 | 36-9126-09-B | ||
| 41L | Hand grip left | 1 | 38 | 33-9128-18-SI | ||
| 41R | Hand grip right | 1 | 38 | 33-9128-19-SI | ||
| 42 | Plastic bushing for hand grip | 4 | 41 | 36-9128-65-BT | ||
| 43 | Plastic bushing for handlebar post | 2 | 19 | 36-9128-66-BT | ||
| 44 | Grip axle | 1 | 19 | 33-9128-20-SI | ||
| 45 | Hand grip foam | 2 | 41 | 36-9128-67-BT | ||
| 46 | Pulsable | 2 | 46a + 50 | 36-1504-07-BT | ||
| 46 a | Pulse sensor | 2 | 50 | 36-9128-68-BT | ||
| 47 | Cable protector | 4 | 41+53 | 36-9821-13-BT | ||
| 48 | Fixed hand grip | 1 | 19 | 33-9128-21-SI | ||
| 49 | Fixed hand grip foam | 1 | 48 | 36-9128-69-BT | ||
| 50 | Pulse connection cable | 1 | 46+55 | 36-1507-08-BT | ||
| 51 | Fixing plate | 1 | 19+48 | 33-9128-22-SI | ||
| 52 | Round plug | 2 | 48 | 36-9128-70-BT | ||
| 53a Computer cover a | 1 19+53b 36-9128-71-BT | |||||
| 53b Computer cover b | 1 19+53a 36-9128-72-BT | |||||
| 54 | Hand grip end cap | 1 | 41 | 36-9128-73-BT | ||
| 55 | Computer | 1 | 19 | 36-1504-03-BT | ||
| 56 | AC adapter | 26V~/2.5A | 1 | 63 | 36-9109-11-BT | |
| 57 Screw | 4 | 55 | 39-9903-SW | |||
| 58L | Chain cover left | 1 | 1+58R | 36-1504-01-BT | ||
| 58R | Chain cover right | 1 | 1+58L | 36-1504-02-BT | ||
| 59 | Axle nut | M10x1.25 | 2 | 79 | 39-9820-SI | |
| 60 | Turn plate | 2 | 12 | 36-1504-04-BT | ||
| 61 | Screw | 4.2x25 | 6 | 58L+58R | 39-9909-SW | |
| 62 | Screw | 4.2x10 | 14 | 12+60 | 39-10188 | |
| 63 | AC connection cable | 1 | 67 | 36-9109-71-BT | ||
| 64 | C-clip | C 20 | 2 | 79 | 36-9925520-BT | |
| 65 | Bearing | 6904Z | 2 | 1+79 | 36-9217-32-BT | |
| 66 | EMS connector cable | 1 | 67+70 | 36-9128-74-BT | ||
| 67 | Controller PC board | 1 | 1+17 | 36-1504-05-BT | ||
| 68 | Square plug | 1 | 1 | 36-9128-76-BT | ||
| 69 | Oval plug | 1 | 1 | 36-9128-77-BT | ||
| 70 | EMS flywheel | 1 | 1 | 33-9128-23-SI | ||
| 71 | Screw | M6x12 | 4 | 70 | 39-10078-SW | |
| 72 | Washer | 6//12 | 4 | 71 | 39-9863 | |
| 73 Pedal tube support 2 28 33-9128-24-SI | ||||||
| 74 | Bushing 1 | 2 | 85 | 36-9128-12-BT | ||
| 75 | Bolt | M6x16 | 4 | 76 | 39-9826 | |
| 76 | Idle wheel support | 1 | 70 | 33-9128-25-SI | ||
| 77 | Wave washer | 20//27 | 1 | 79 | 36-9217-31-BT | |
| 78 | Belt wheel | 1 | 79 | 36-9128-78-BT | ||
| 79 Axle | 1 | 78 | 33-9128-26-SI | |||
| 80 | Steel disk | 1 | 78 | 33-9128-27-SI | ||
| 81 | Nylon nut | M6 | 4 | 75 | 39-9861 | |
| 82 | Handlebar support cover | 1 | 1 | 36-9128-79-BT | ||
| 83 Spring | 1 | 76 | 36-9128-80-BT | |||
| 84 | Washer | 5//16 | 3 | 85 | 39-10130-CR | |
| 85 | Screw | M5x15 | 3 | 76 | 39-9988 | |
| 86 | Bearing | 6203-RS | 2 | 76 | 36-9805-31-BT | |
| 87 Washer | 1 | 88 | 39-9993 | |||
| 88 | Screw | M6x15 | 1 | 76 | 39-10120-SW | |
| 89 Flat belt | PJ6 480 | 1 | 70+78 | 36-9128-81-BT | ||
| 90 Turn plate cover | 2 | 60 | 36-9128-82-BT | |||
| 91 Sensor | 1 | 1+67 | 36-9128-83-BT | |||
| Illustration No. mm Illustration No. | |||||
| 92 Nut M8 1 | 24 39-9818 | ||||
| 93 Bushing 2 | 1 85 36-9128-84-BT | ||||
| 94 | Magnet | 1 | 78 | 36-9128-85-BT | |
| 95 | Washer | 5//10 | 2 | 62 | 39-10111-SW |
| 96 | Tool Set | 1 | 36-9128-86-BT | ||
| 97 | Assembly and exercise instruction | 1 | 36-1504-06-BT | ||
| Assembly and exercise instruction | |||||
Installation instructions
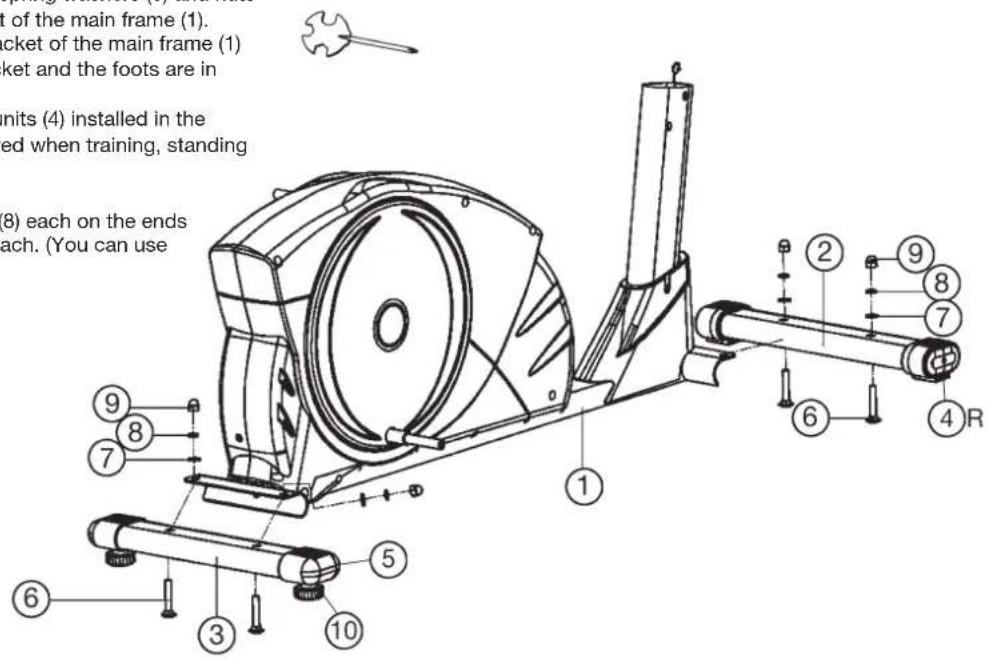
Remove all the separate parts from the packaging, lay them on the floor and check roughly that all are there on the base of the assembly steps. Please note that a number of parts have been connected directly to the main frame and preassembled. In addition, there are several other individual parts that have been attached to separate units. This will make it easier and quicker for you to assemble the equipment. Assembly time: 45 -60 min.
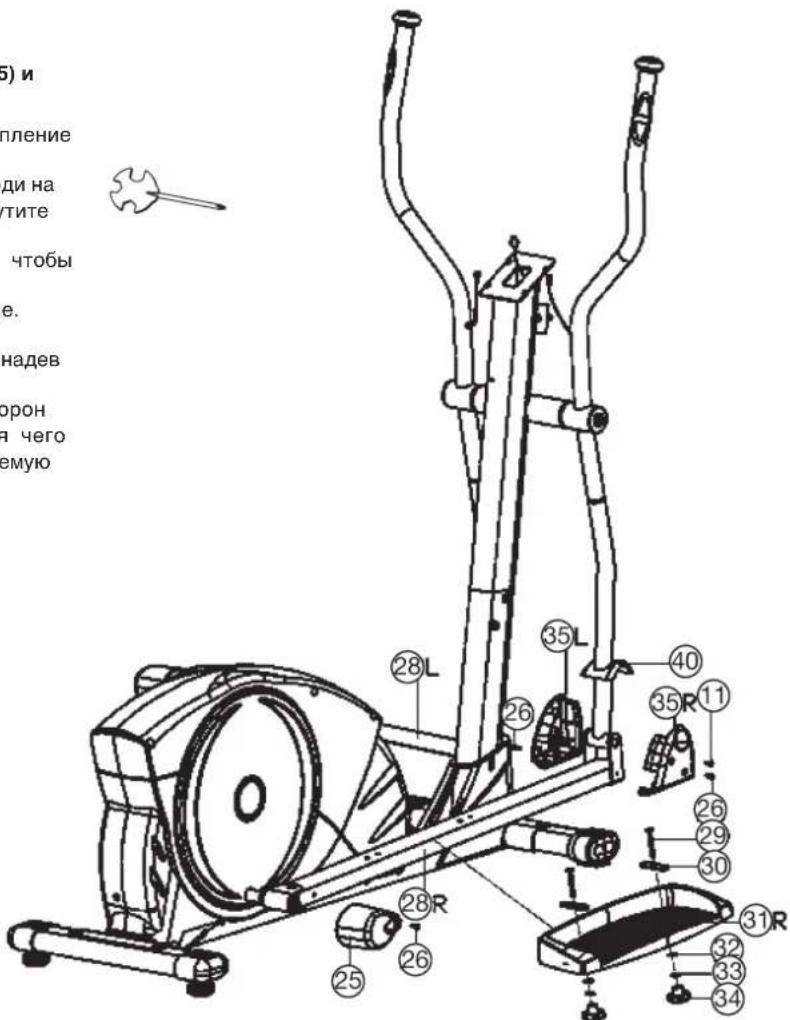
Step 1:
Installation of front and rear foot (2+3) at the main frame (1).
- Place the bolts (6) and each two washers (7), spring washers (8) and nuts (9) ready for use beside the front and rear part of the main frame (1).
- Place the front and rear foot (2 + 3) into the bracket of the main frame (1) and align so that the hole patterns of the bracket and the foots are in conformance.
(Note: The front foot caps with transport roller units (4) installed in the front foot bar (2) must point forwards (as viewed when training, standing on the machine).
- Push one screw (6) each through the bores.
- Install one washer (7) and one spring washer (8) each on the ends of the screws (6) and fasten with one nut (9) each. (You can use adjustable screw (10) to level the bike.)
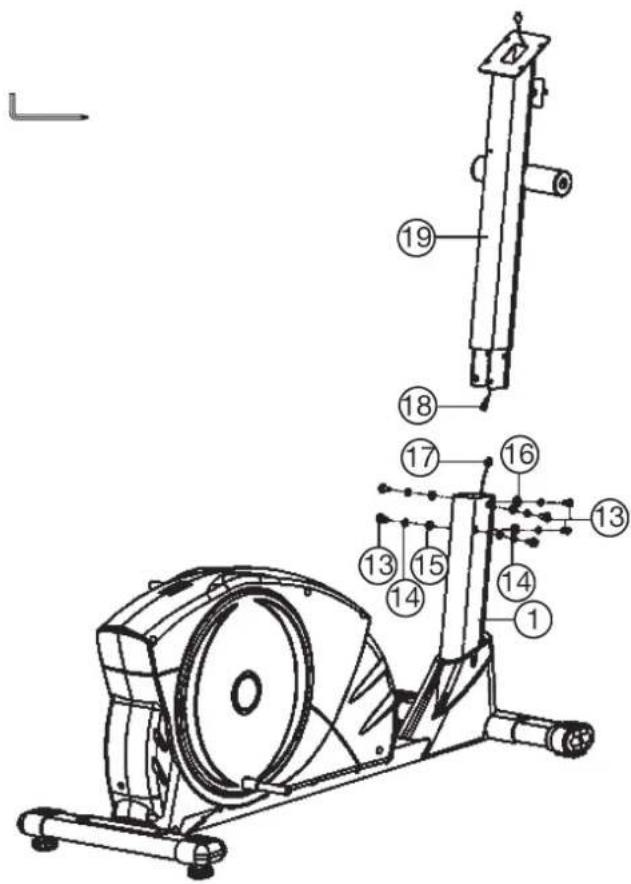
Step 2:
Connecting the computer cables (17+18) and installation of handlebar post (19).
- Place the lower end of the handlebar post (19) against the main frame (1). Connect the two ends of the computer cable (17) and (18) projecting from (1) and (19).
- When the electrical cable connections have been made, push the handlebar post (19) into the main frame (1). (Note. When pushing the tubes together, ensure that the electrical cable connection is not trapped. The short tube welded crosswise to the upper end of the tubular support (19) must point forwards (as viewed when training standing on the machine).
- Push one spring washer (14) and one washer (15) or curved washer (16) on each of the bolts (13). Push the bolts (13) through the bores in the main frame (1), screw into the threaded holes of the handlebar post (19) and tighten firmly.
Step 3: Installation of the right and left handgrip (41) on the handlebar post (19) with the grip axle (44).
- Put one spring washer (14) and one washer (23) on screw (24) and screw tightly on one end of the grip axle (44).
- Push the wave washer (37) onto the grip axle (44) and then push the grip axle (44) step by step through the right hand grip (41R), handlebar post (19) and left hand grip.
(Note. The handgrips are heavier at the top than at the bottom. Twist the handgrips downwards until further installation is conducted.) - Push one spring washer (14) and one washer (23) onto the second screw (24) and tighten the screw (24) at grip axle (44) firmly.
Step 4: Installation of the pedal tubes (28) at swing tubes (38) and hand grips (41) and connection at pedal cranks (12).
- Push a wave washer (37) and the end of the right pedal tube (28R) onto the right pedal crank (12R) and tighten it with screw (24), washer (23) and spring washer (14) firmly.
- Push one save cover (40) onto the right swing tubes (38R). Push the swing tube (38R) into the right handgrip (41R) and tighten it with screws (13), spring washers (14) and washers (39) firmly.
- Install the left pedal tube (28L) with all additionally required parts on the left hand side of the machine as described in 1. - 2.
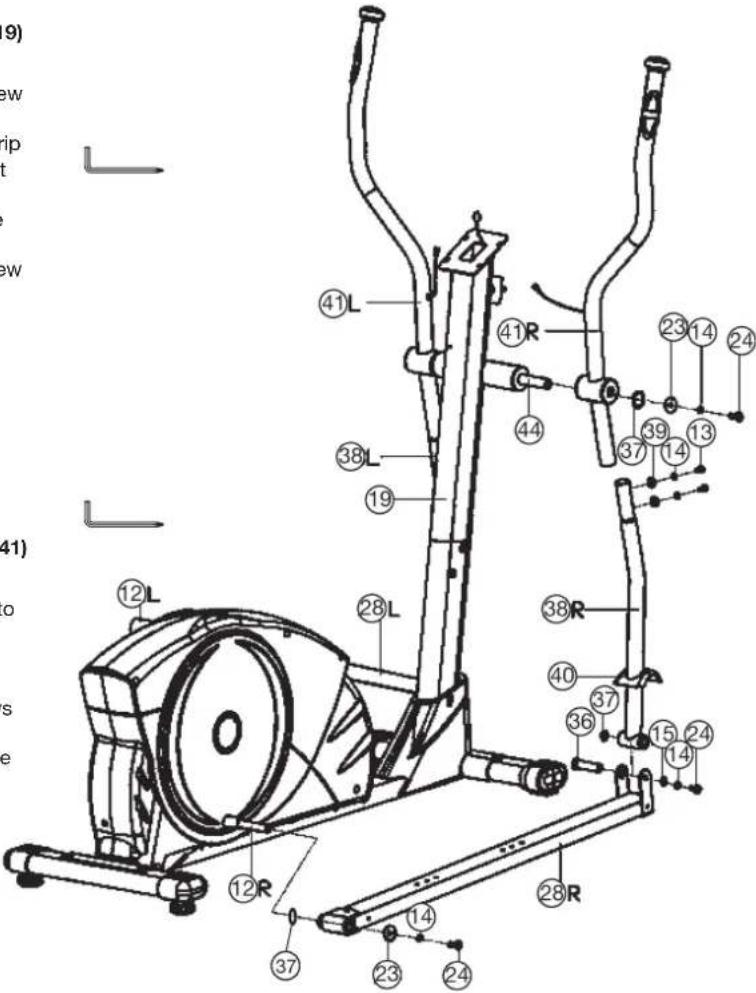
Step 5: Installation of the front/rear pedal tube covers (25+35) and pedals (31) on pedal tubes (28).
- Push the rear pedal tube covers (25) onto the rear end of pedal tubes (28) and fasten it with screws (26).
- Put each one of left and right pedal front cover (35L + 35R) onto the front end of pedal tubes (28) together and fasten them with screws (11 + 26) .
- Place the footrest (31) onto the pedal tubes (28) so that the bores of pedals (31) are aligned with one of the possible installation positions at pedal tubes (28). (Note. The high edge on the long side of the footrest must point inwards (towards the main frame (1).
- Put one oval washer (30) on each carriage bolt (29) and push through the bores from the top and fasten from the bottom with washers (32), the spring washers (33) and the hand grip nut (34).
(Note. The position adjusted in this way should always be equal at both sides. The positions can be change as desired at all times by removing the carriage bolts (29) and sliding the footrests on the footrest brackets.)

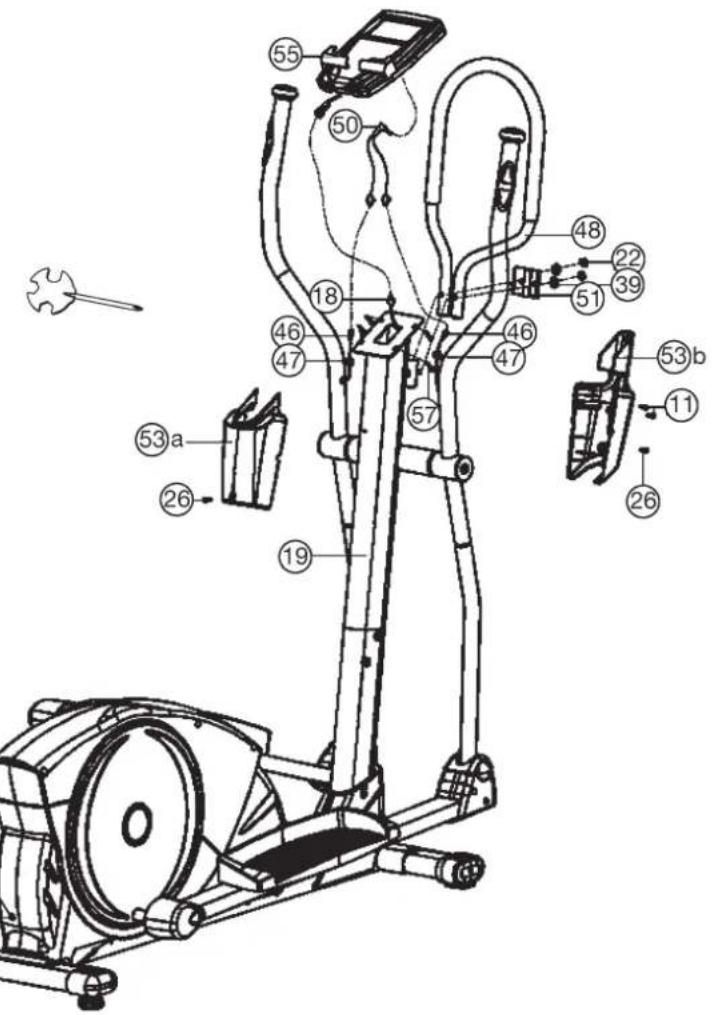
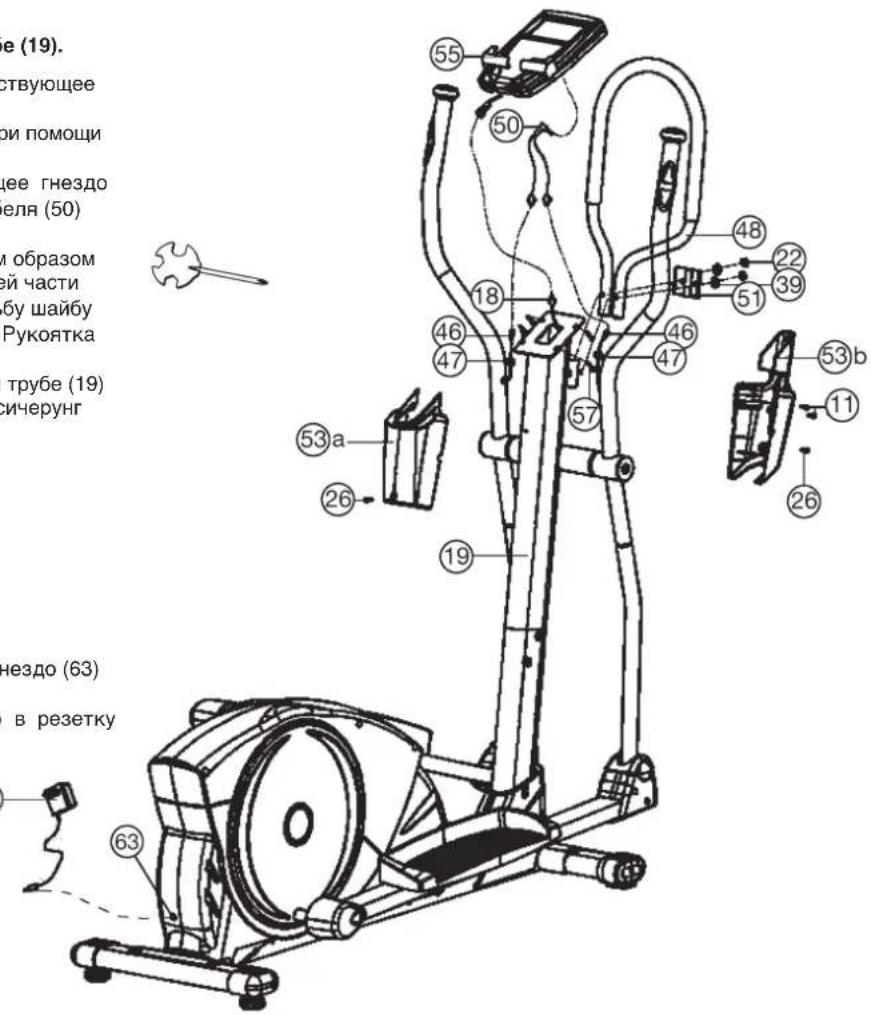
Step 6: Installation of the fixed handgrip (48) and computer (55) at handlebar post (19).
- Put the plug of the connection cable (18) into the socket at the backside of the computer (55).
- Place the computer (55) onto the plate at the upper end of the handlebar post (19) and tighten firmly with screws (57). (Note: When pushing on the computer onto handlebar post (19) take care that the cables cannot be trapped.)
- Put the plug of the pulse connection cable (50) into the socket at the backside of the computer (55) and connect with pulse cables (46).
- Place the fixed handgrip (48) with lower borings onto the threat of handle bar post (19) in and tighten it with fixing plate (51), washers (39) and self-lock nut (22) firmly. (Note: The position of fixed handgrip should have inclination away from the handlebar post (19).)
- Put the front and back handlebar cover (53a+53b) onto the upper end of handlebar post (19) together and fix them with screws (11+26). Hide the pulse cables as most as possible into handle bar cover (53) and use cable save (47) to lead the cables.
Step 7: Attach the AC adapter (56).
- Please insert the plug of adaptor (56) to the jack (63) of chain guard.
- Please insert the adaptor (56) to the jack of wall power (230V 50Hz)
Step 8: Checks
- Check the orderly installation and function of all bolted and plug connections. Installation is then complete.
- When everything is in order, familiarise yourself with the machine at a light resistance setting and make the individual adjustments of the footrests (31L+31R).
Note: Please keep the tool set, the puller and the instructions carefully because these may be required later for repairs or spare parts orders. If you ever remove the covers (58L+58R), observe that these are attached not only outwardly with the screws (11+61), but also inwardly at the rear end of the cover with the screws (61).
Mount, Use & Dismount
Transportation of Equipment:
There are two rollers equipped on the front foot. For moving, you can lift up the rear foot and drive it to where you would like to locate or store it.
Mount, Use & Dismount
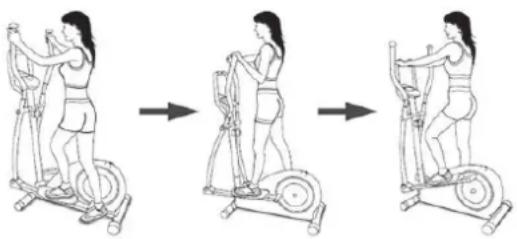
Mount:
a. Stand beside the item, put the nearest footrest into deepest position and hold the fixed handlebar tightly.
b. Put your foot onto the footrest, try to put whole body weight on your foot and simultaneously cross over with your another foot on the other side footrest and place there on the footrest too.
c. Now you are in the position to start your training.
Use:
a. Keep your hands in desired position on the fixed handlebar.
b. Pedal your exercise item by step your feet on footrests and balance the body weight to left and right side of footrest
c. If you like to exercise the upper body too, you can place the hands from fixed handle bar to the left and right handle grips.
d. Then you can increase the pedaling speed gradually and adjust braking resistance levels to increase the exercise intention.
e. Keep always your hands on fixed handle bar or hand grips left and right.
Dismount:
a. Slow down the pedaling speed until it comes to rest.
b. Keep the hands grabbing the fixed handlebar tightly, put one foot cross over the equipment and land on the floor, then land the other one.
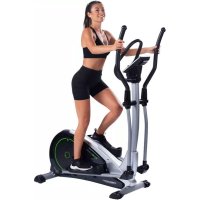
This training equipment is a stationary exercise machine used to simulate a combination of biking, stepping and walking without causing excessive pressure to the joints, hence decreasing the risk of impact injuries.
Exercise this item offer a non-impact cardiovascular workout that can vary from light to high intensity based on the resistance preference set by the user. It will strengthen your muscles of upper and lower body and increase cardio capacity and maintain fitness of your body also.
RPM and Level in Watt of Level 1 - Level 24 for BLUE T2 Art.-No. 1504
| Level/RPM 20 30 ↓ | 405060708090100110120 | ||||||||
| L1 7 12 18 25 30 36 | 42 48 56 6368 | ||||||||
| L2 10 16 26 35 44 52 | 60 69 78 8896 | ||||||||
| L3 13 21 35 46 58 70 81 93 102 | 116 127 | ||||||||
| L4 16 26 42 57 72 84 100 116 125 141 157 | |||||||||
| L5 20 33 51 69 86 102 118 139 | 154 174 192 | ||||||||
| L6 24 39 61 81 100 | 119 138 160 | 178 202 223 | |||||||
| L7 28 46 70 93 114 | 137 159 183 | 206 228 257 | |||||||
| L8 31 52 79 103 128 | 152 177 201 | 229 254 283 | |||||||
| L9 35 58 87 113 142 | 166 192 220 | 251 282 308 | |||||||
| L10 38 64 96 124 | 156 182 214 | 240 276 306 | 336 | ||||||
| L11 41 70 104 136 | 170 199 236 | 265 298 330 | 364 | ||||||
| L12 45 77 114 148 | 184 216 253 | 287 321 359 | 394 | ||||||
| L13 49 84 124 161 | 198 233 270 | 308 348 388 | 425 | ||||||
| L14 52 89 132 171 | 212 248 284 | 327 372 413 | 451 | ||||||
| L15 54 95 140 183 | 226 265 305 | 349 391 439 | 478 | ||||||
| L16 57 100 149 195 | 240 281 325 | 370 409 464 | 505 | ||||||
| L17 60 106 158 206 | 254 295 346 | 389 428 490 | 532 | ||||||
| L18 63 112 166 217 | 268 313 366 | 412 454 513 | 561 | ||||||
| L19 65 117 174 229 | 282 331 386 | 434 480 537 | 591 | ||||||
| L20 68 123 182 241 | 296 349 404 | 454 508 565 | 620 | ||||||
| L21 71 129 191 253 | 310 365 423 | 479 536 594 | 651 | ||||||
| L22 73 133 197 263 | 324 377 438 | 499 558 618 | 675 | ||||||
| L23 75 138 204 272 | 338 392 454 | 517 579 641 | 701 | ||||||
| L24 77 142 210 280 | 352 407 470 | 535 600 663 | 726 |
Remarks:
- The power consumptions (Watt) are calibrated by measuring the driving speed (min-1) of axle and the braking torque (Nm).
- Your equipment was calibrated to fulfill the requirements of its accuracy classification before shipment, If you have doubts about the accuracy, please contact with your local retailer or send it to accredited test laboratory to ensure or calibrate it.
(Pleases note that a deviation tolerance as noted on page 15, is permissible.)
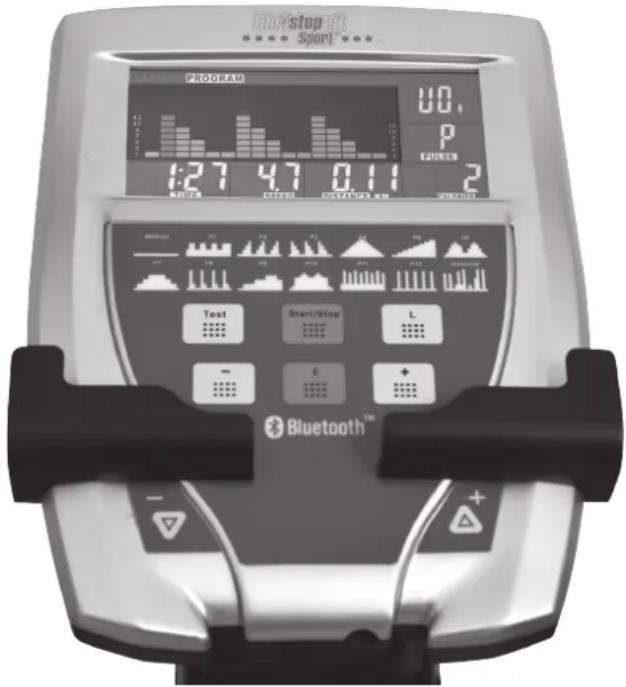
Computer Instructions for 1504
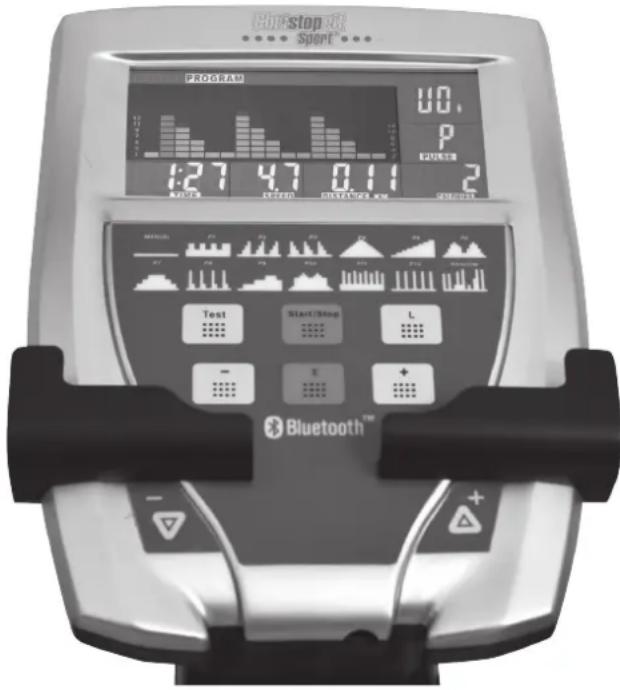
FUNCTION
SCAN : Alternates between WATTS/CALORIES and RPM/ SPEED. 5 seconds per display.
RPM : 15~999
SPEED : 0.0~99.9 km/h
TIME : 00:00~99:59.
DISTANCE:0.00~99.99 km
CALORIES:0~999.(1kcal=4,186kjoule)
WATTS CONSTANT : 25~280
HEART SYMBOL : ON/OFF flashes
MANUAL : 1~24 level
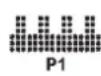
PROGRAM:P1\~P12
H.R.C :55% 75% 90% TAG (TARGET)
PULSE : P~30~240, max value is available.
USER DATA : U0 ~U4 memorized Personal
KEY FUNCTIONS
- UP (+) -key: To select function and increase resistance level. This button is duplicated to adjust the resistance at any smartphone / tablet operating.
- DOWN (-) -key: To select function and decrease resistance level. This button is duplicated to adjust the resistance at any smartphone / tablet operating.
- START/STOP -key: Start or Stop the program
- RESET (L) -key: Reverse to main menu during presetting workout value or stop mode. Hold on pressing for 2 sec. Computer will reboot and start from user setting.
- MODE (E)-key: confirm setting or selection and change to next function.
- RECOVERY (Test) -key: test the heart rate recovery status.
OPERATION
1) You can select any User U0-U4 by using the + / - knob, press the E key to confirm. Input user data, sex, age, height, weight on top-right window. Then press E key for confirmation.
2) Function Control display will flash indicating you can select the Programs P1-P12 by using + / - knob and then press E key for confirmation. Any of the default values can be changed by pushing the + / - key until the desired program profile is flashing. Press E key again to confirm.
3) When the Program and other protocols are entered press START/STOP key and begin your workout.
4) The computer switches off automatically approx. 4 minutes after training stopped. All values attained until that time are stored and keep displayed. It is possible to continue training from these values or to reset all functions to zero using the L- key.
In General:
- If user stop cycling within 4 min, you can continue the program by pressing START/STOP -key again. After 4 min, without any key function the computer switched off to power save mode
-
The display which flashes is adjustable
-
Only use a suitable AC adapter with Output data of 26Volt-AC/2500mA.
- If the computer act abnormal please plug out the AC adapter and plug in again
- Keep moisture away from computer.
- The USB port socket on side of the computer can use for charging of small devices during exercising.
The loading data are 5V / 0.35A-1A

FUNCTION DESCRIPTION
- MANUAL Plug in power supply, computer will power on and display show all segments on LCD for 2 sec. Set the resistance level using the +/-key. Set exercise parameters with E-key TIME / DISTANCE / CALORIES then press START/STOP to START manual program.
2.PROGRAM 12 automatic adjusting programs with control exercise (P1\~P12), Resistance level can be adjusted during PROGRAM DIAGRAM is finishing. Set exercise parameters with E-key TIME / DISTANCE / CA- LORIES.


- FITNESS Select the fitness program from the program selection to find out your health status. This program provides a fitness test phase of 8 minutes, and then you will be a fitness grade of F 1-F5 appears.
| Condition | Score |
| Excellent | F1 |
| Good | F2 |
| Average | F3 |
| Poor | F4 |
| Very Poor | F5 |
- PERSONAL Create your own Program profile through U0~U4 by setting the resistance level for each individual segment. Then the Program will be automatically saved for future use. Set exercise parameters with E-key for 3 sec. TIME / DISTANCE / CALORIES.
- WATTS In Steps of 5 watts from 25 watts to 280 watts user can adjust value using the +/- knob. The entered WATTS will be maintained automatically regardless of speed. Set exercise parameters with E-key TIME / DISTANCE / CALORIES.
- H.R.C HEART RATE CONTROL- Select your own target Heart Rate of choose one of the preset programs 55% 75% or 90% . Please enter your age into the User Data U0-U4 to ensure that your target heart rate is set correctly. The PULSE display will flash when you have reached your target heart rate according to the Program you have chosen. Set exercise parameters with E-key TIME / DISTANCE / CALORIES.
55%--DIET PROGRAM
75% -- HEALTH PROGRAM
III 90% -- SPORTS PROGRAM
IV TAG-USER SET TARGET HEART RATE
- RANDOM This exercise computer creates amazing exercising program chart by autorandom producing. Sometimes user is tired of user pre-setting program charts, he/she can choose RANDOM to let computer autoproducing it's program chart. There are over hundred programs can be offered playing. Set exercise parameters with E-key TIME / DISTANCE / CALORIES.
TEST (RECOVERY):
When you have finished a workout with pulse measurement, press Testkey. For TEST to function correctly, it needs your Heart Rate input. TIME will count down from 1 minute and then your fitness level from F1 to F6 will be displayed.
NOTE: During TEST, no other displays will operate.
F 1 ~ F6 = RECOVERY HEART RATE LEVEL
User press Test-key to start the H.R.C RECOVERY
Get the result from F1 - F6.
| 1.0 Outstanding | |
| 1.0 < F < 1.9 Excellent | |
| 2.0 < F < 2.9 | Good |
| 3.0 < F < 3.9 | Fair |
| 4.0 < F < 5.9 | Below average |
| 6.0 | Poor |
Pulse Rate:
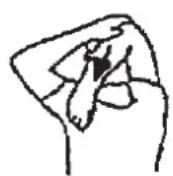
The whole set of heart rate detector include 2 sensors each side. Each sensor has 2 pieces of metal parts. The correct way to detect is, to hold gently both metal parts each hand. With the good signals picked up by the computer, the heart symbol in the HEART RATE Display shall flash. Sometimes the heart rate value is not useable, based on wet hands or any other contact problems during exercising. If you need high accuracy heart rate value, you have to use an external heart rate measurement with a pulse belt and pulse watch.
Exercising with App feature:
- Download a desired APP depending on the operating system (APP Store / Play Store) on your Smartphone/Tablet. (Note: The downloading of apps may be costs. Please observe the notes on any APP costs.)
- Plug in the power for ergometer and place the smartphone/tablet directly to the tray of the computer to get a good connection continuously.
-
Activate the Bluetooth connection on your smartphone/tablet. (Should this be already activated, deactivate the Bluetooth for short time and activate new to terminate any remaining existing connections and thus to obtain an interference-free Bluetooth connections. The smartphone/tablet show you either immediately shortlist of available Bluetooth devices in your environment or after open/launch the APP.
-
Select from the list the right devices and connect your smartphone/ tablet with the ergometer. On the backside of your ergometer computer is a label with the Bluetooth device name, such as VISTA-BE - ??? ,
- The ergometer computer beeps as soon as a Bluetooth connection is done and displays the message "BT". If the Bluetooth connection is terminated the computer beep again and the display switch to start screen.

Cleaning, Checks and Storage of the Ergometer bike:
1. Cleaning
Use only a less wet cloth for cleaning. Caution: Never use benzene, thinner or other aggressive cleaning agents for surface cleaning as this damage caused.
The device is only for private home use and for use suitable indoors. Keep the unit clean and moisture from the device.
2. Storage
Plug out the power supply unit while intending the unit for more than 4 weeks not to use. Choose a dry storage in-house and put some spray oil at front & rear foot tube connection point and hand grip axle. Cover the bike to protect it from being discolor by any sunlight and dirty through dust.
3. Checks
We recommend every 50 hours to review the screw connections for tightness, which were prepared in the assembly. Every 100 operating hours, you should put some spray oil at front & rear foot tube connection point and hand grip axle.
Troubleshooting
If you cannot solve the problem with the following information, please contact the authorized service center.
| Problem Possible | Cause Solution | |
| Computer has no value at Dis-play if you press any key. | No power adapter is well plugged or wall power is without power. | Check that the power adapter is properly plugged in, possibly with another electric device check if the wall power is fine. |
| Computer is not counting data and do not switch on after start cycling. | Sensor impulse missing base on not well plugged connection | Check the plug connections at computer and inside of handle-bar support. |
| Computer is not counting data and do not switch on after start cycling. | Sensor impulse missing base on not correct position of sensor. | Take off the cover and check the distance between magnet and Sensor. The magnet at turning belt wheel should have only less than < 5mm distance against the sensor position. |
| No pulse value Pulse | Lse cable is not plugged in. | Check the separately pulse cable is well connected with computer. |
| No pulse value Pulse | Lse sensors not well connected | Screw out the screw for pulse measurement and check if plugs are well connected and no damage at pulse cable. |
Training instructions
You must consider the following factors in determining the amount of training effort required in order to attain tangible physical and health benefits:
1. Intensity:
The level of physical exertion in training must exceed the level of normal exertion without reaching the point of breathlessness and / or exhaustion. A suitable guideline for effective training can be taken from the pulse rate. During training this should rise to the region of between 70% to 85% of the maximum pulse rate (see the table and formular for determination and calculation of this).
During the first weeks, the pulse rate should remain at the lower end of this region, at around 70% of the maximum pulse rate. In the course of the following weeks and months, the pulse rate should be slowly raised to the upper limit of 85% of the maximum pulse rate. The better the physical condition of the person doing the exercise, the more the level of training should be increased to remain in the region of between 70% to 85% of the maximum pulse rate. This should be done by lengthening the time for the training and / or increasing the level of difficulty.
If the pulse rate is not shown on the computer display or if for safety reasons you wish to check your pulse rate, which could have been displayed wrongly due to error in use, etc., you can do the following:
a. Pulse rate measurement in the conventional way (feeling the pulse at the wrist, for example, and counting the number of beats in one minute).
b. Pulse rate measurement with a suitable specialised device (available from dealers specialising in health-related equipment).
2.Frequency
Most experts recommend a combination of health-conscious nutrition, which must be determined on the basis of your training goal, and physical training three times a week. A normal adult must train twice a week to maintain his current level of condition. At least three training sessions a week are required to improve one's condition and reduce one's weight. Of course the ideal frequency of training is five sessions a week.
3. Planning the training
Each training session should consist of three phases: the warm-up phase, the training phase, and the cool-down phase. The body temperature and oxygen intake should be raised slowly in the warm-up phase. This can be done with gymnastic exercises lasting five to ten minutes.
Then the actual training (training phase) should begin. The training exertion should be relatively low for the first few minutes and then raised over a period of 15 to 30 minutes such that the pulse rate reaches the region of between 70% to 85% of the maximum pulse rate.
In order to support the circulation after the training phase and to prevent aching or strained muscles later, it is necessary to follow the training phase with a cool-down phase. This should be consist of stretching exercises and /or light gymnastic exercises for a period of five to ten minutes.
You find further information on the subject warm-up exercises, stretch exercises or general gymnastics exercises in our download area under www.christopeit-sport.com
4. Motivation
The key to a successful program is regular training. You should set a fixed time and place for each day of training and prepare yourself mentally for the training. Only train when you are in the mood for it and always have your goal in view. With continuous training you will be able to see how you are progressing day by day and are approaching your personal training goal bit by bit.
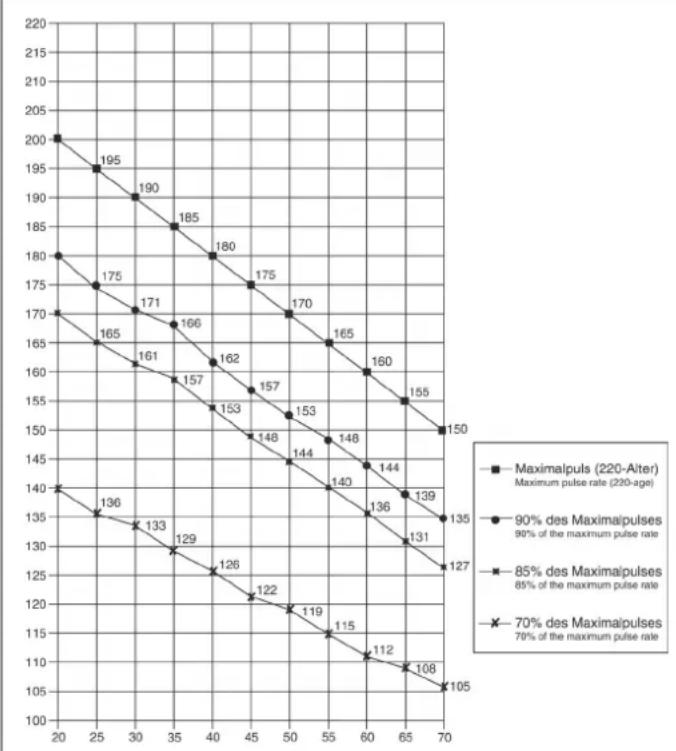
Calculation formula: Maximum pulse rate = 220 - age (220 minus your age)
90% of the maximum pulse rate = (220 - age) x 0.9
85% of the maximum pulse rate = (220 - age) x 0.85
70% of the maximum pulse rate = (220 - age) x 0.7
Warm up exercises (Warm Up)
Start your warm up by walking on the spot for at least 3 minutes and then perform the following gymnastic exercises to the body for the training phase to prepare accordingly. The exercises do not overdo it and only as far run until a slight drag felt. This position will hold a while.
Reach with your left hand behind your head to the right shoulder and pull with the right hand slightly to the left elbow. After 20sec. switch arm.
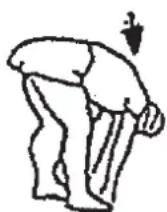
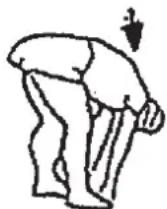
Bend forward as far forward as possible and let your legs almost stretched. Show it with your fingers in the direction of toe. 2 x 20sec.
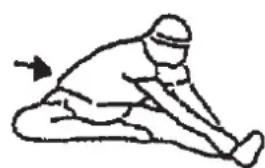
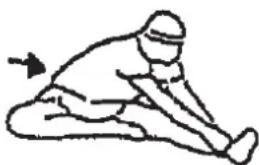
Sit down with one leg stretched out on the floor and bend forward and try to reach the foot with your hands. 2 x 20sec.
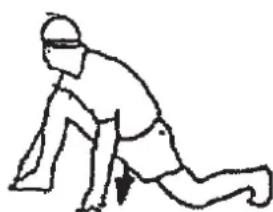
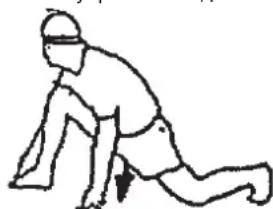
Kneel in a wide lunge forward and support yourself with your hands on the floor. Press the pelvis down. Change after 20 sec leg.
Chere cliente, cher client,
3. Fitness programma
3. Planning van de training
Warming-up oefingen (Warm Up)
Uar 4: MoHTaX HOxHbIX pbIarOB (28) c coeJeHnteJbHOJ Tpy6oB (38) HpyHbIe pbIaru (41) n KpeJIeHn neJaIe (12)
- Hadehte rhyta noeknaednaa 7aib6a (37) n KOhe npaboro HOxHoro pbHaara (28R) Ha Kpeennene ne daan (12R) n 3akpenite ero ha He npn nomouin BInTa (24), 7aib6bI (23) n npyXHHo 7aib6bI (14)
- BdeneTc coeHnTeIbHyIO Tpy6y (38R) n npabBiy pyHOn pbHar (41R) n 3aKpyTInTe INx BNHTOM (13) nAedeB BorHyTuO wai6y (39) n npyXHHyo wai6y (14).
- MoTAtK IeBOrO HOxHOrO pIyara (28L) npOn3BeCTn TaKke KaK OnncAo H B NYHKTe 1.-2. TOJbKO C yHTOM IeBOI CTOpOHbl.
War 5: MoHTax nepeDnHex n 3aHnHex KOJInaUcKOB HOxHOro pbIarra (25 + 35) HoxHbIX pbIarax (31) Ha HOxHbIX pbIarax (28).
- Hadehbe Te 3aHn KojnaeK HoXhoro pbuara (25) Ha KpeIneHne neJaIe (28) npNKpyTte nx npn nomOu BNHTa (26).
- HadeheIte nebyIO npaByIO yacb KoIINaUka (35L+35R) BnpeEn Ha coeDNHeHne HOXHOro pbuHa n CoeDEHNTeBHO Tpy6bl npNKpyTnTe npn NOMOUs BNHTa (11+26).
3.ФИКCATOP cTOnbI (31) HANOKNtB Ha HOXHON pbUar (28) TaK YTO6bl COBnadann MOHTaXHbIe OTBepCTnR
(BHIMAHHe! BbICOKn KaHT OJnxKeH 6bITb C BHyTppeHHe CTOpOHe T.e. 6nnke K OCHOBHO pame (1)
- Bont (29) c nlaactnoH (30) BBecTN B OTBepCTne Ha (31) n CHn3bl HaDeB Wey6y (32), n npyXHHHyo Wbmy6y (33) 3aTnHYt raikoN (34).
(BHIMMaHHe! P03nIa QmKcatopOB DoJXHa 6bItb C 06Enx CTOpOH OAnHaKoBa. P03nIa MoKet MeHrTa B IIO6oe BpEmA DnA Yero HAO6xoDmO BblHyTb 6oNT (29) npepeBnHyTb QmKcatop B XeNaemyIO CTOpOHy.
War 6: MoHTax pyKoAaTKn (48) n KOMnbIoTepa (55) Ha onOpHoN Tpy6e (19).
- WTekep CoeHntEnbHoro Ka6enr (18) BCTaBnTb B COOTBeTcTByUoee RHe3do Ha o6paTHoI CTOpOHe KOMNbIoTepa (55).
- Komlbotep (55) npkpyntb ha nlaTe onopHOn Tpy6bl (19) npn nmooun BnHTOB (57) He 3axmam npn 3TOM ka6eIa.
- WTekep n nybcKa6e (50) BCTaBtB B COOTBeTcByouee rHe3do Ha o6paTHoI CTOpOHe KOMNbIoTepe (55). WTekep n nybcKa6e (50) BCTaBtB B BnOK N3MePnte nnBa (46).
- KpeJIeHne pyKoRTKn (51) HANOJNTb Ha pyKOHTky (48) TaKMn o6pa3OM TtO6bI coBnaDAn BTOBcTnB.Cte 30 npINOKHTb K BepXHei cAChTn OOpHO Tpy6bl (19) BBeCTn bont C pe3b60n HAedeB Ha pe3b6y wai6y (39) n3aKpyTb camoctpaxyUoei raiKOn (22). (BHmAHne! PyKoRTKa npnpabNtBHom MOHTaxe IMeET hAKNoH HApKy.)
5.ПелединиЗадникохух(53a+53b)coeDEHHTbHaonopHOnTpy6e(19) n 3akpyTuTb BnHTamn (11+26).Iyncka6ebb (46)MNT Ka6enCnHepyHr (47)Bepc3H.
War 7: IopKIOUeHne 6JIOKa NITAHN (56).
- BCTABTE wTekep 6noka nHTaHna (56) B COOTBeTcTBYIOuee rHe3do (63) B KOHue o6wnBKn annapata.
- BCTaBTe nocne 3Toro dpyroKoHeu 6noka nHTaHn (56) B pe3eTKy (230V~50Hz).
Uar 8: KOnTpOJIb
- PpOBepnB BCE COeINHeHnHa npaBnHbOcTb IN c6OpKn n npoBeCTn PpOBepky cyHKUHOHaJIbHOcTn MOHTaK CHTaTeC3aKOHHeHHbIM.
- EcnB BCE B nopAikpe npn ManeHbKnx Harpy3kax npoBeCTn npo6HyTopeHPOBky, HAcTpoNTb HnDnBnDyalbHo fNkCaTopbl CTOnbl (31L+31R) n CoedneHTenbHyTOpy6y
3ameyane:
IoxaIycta coxpaHeIte BCE KIOUH IIN NO3dHnIX BO3MOXhIX peMOHTOB.
Pn CHTmN 6bWBOK (58) Heo6xOJIMO yueCTyTO OHn pnpKpyeHbI He ToJIbKO cHapyKn 6oNTAMN (11+61) Ho n Ha 3aJHem KOHe 6oWBOK 6oNTAMN (61)

NcnoIb3ObaHne Tpehaxkepa
Ipb3oBaHne TpeHaXepom
Ha nepeHHe HoxKe HaxOaTcB Db TpaHCnOpTnpOBOHybIX pOInka.ДЯTORo,TO6bI NepeDINHTb TpeHaeKep Ha DpyrOe MeTo INN NOMeCTNbHa MECTo XpaHEnH,Bo3BMTeCb 3a pyJb IN KaKHOHnTE TpeHaeKep Ha nepeDHOIO HOKky TaK,TO6bI TpeHaeKep MOxHO 6bIJOIerKO nepeDHNyTc C NOMuBIO TpaHCnOpTnpOBOHybIX pOInkOB Ha HyXHOe MecTo.
Caunbca n cnyckaTbcn TpeHaekepa:
CaNTbCnHa TpeHaxKeP:
BctaHbTe pIOM C tpehaxepom N BO3BMNTecb 3a nOpuyHn. YcTaHOBtE 6bnkaWyo neJaB B HNXHIO NO3nUHO N NOCTabBe Ha Hee CTynHIO TaK, yTObOHa HaxoDnIacB H naExGHOM NLOXeHNn Ha neJaN. IpeKeINbTe dpyHyO Hory H npOTUBONOJNOXHyO CTOpOHy N HOCTaBte CTynHIO Ha neJaN. KpenKO depxNITec npI 3Tom DByM pykAMn 3a npoyHn.
Nonb30BaHHe:
Дерхитесь Дум руками сачana 3a ckobу B удбом дявас мсетишагайтпр по оновеменногесясca C odногпедади на дугутakим obpazOM,Тообt только пгтka HEMHORO npINODHMANacb OTпддИ N OCUSECTBлANOCb paBHomePHO DBNIXeHne.ДлodOBPemEHOH TpeHINBOKBExHNe YAcTN TeNa DePxNTec3a DBNXUHNEcR NOpYHn Cnpaba nCneBa.C yBeIuHEnHm IIMyEmhSeHn CKOPoCTN TTopMO3HOrO cOnpoTINBENHMOXHO pERyINPOBaTB INTEHCHNBHOCT TpeHINBOKN.ПocToHNO deprxntecb 3a ckobу ИлnpOHy BO BPEM TpeHINBOKN.
Cnyckatbch c Tpehaxkepa:
PpekpaTnTe TpeHnpOBky, KpENKO DePckac 3a HenoBnKhIe NOpuyHN. CHIMITE cchayana OChy CTynHO C neJdnn I NoCTabBe ee HaJeXHom NOLOXeHN HA noI. CHIMITE NOTOM dpyTuO CTynHO C neJdnn I NoCTabBe ee Ha noI n CoJnte M TpeHaepe.
3TOT TpeHaxep - HenoBnXhbl DomaHn TpeHaxep, NmHTpyIOuMn coeTaHne e3bl Ha BEnocnneDe, 6era n 3aHrtn Ha CTennepe. IV-3a TpeHnpBkn pni IIObOI NorOde, 6e3 BHeuHnx BO3dEiCTBn, a TAkKe 6e3 dABLeHn np E3eB rpyPne yMeHbwaetc BepoTHoCTb NaDeHHn I nepeyTomJeHHN.
I3-3a BO3MOXHOCTN 13MeHeHn COpOtnBLeHn, CoYeTaHne e3DbHa BeLoCnNeDe, 6era n 3aHrTn Ha CTeNNpe PnpoCTabJIeT BO3MOXHOCTb TpeHnpOBKn cepDeHNO-CocYdNtOc NcTeMbl 6e3 YpeE3MePHoro HapJxKHeHn. Ppi 3OM BO3MOxHn 6Ooe IIN MeHee INHTeHCNBnAra TpeHnpOBKa. Ppi 3OM TpeHpyOTc BepXHne INHXHne KOHeYHOCTN, YkpePnIeTc CpeDeyHo-CocyDnCTa CnCTema IN CnocO6CTByETcN NOdEPkaHne XopoWei CnpOTNbHoi FOpMbI.

O6opOtbl/MnHyTa n Noka3aTeIb B BaTax OCTyneHn 1 do CTyneHn 24 dJa Blue T2 No 3aka3a 1504
| Level/RPM 20.30↓ | 0 50 60 70 80 90 100 110 120 | ||||||||
| L1 7 12 18 25 30 36 | 42 48 56 63 68 | ||||||||
| L2 10 16 26 35 44 52 | 60 69 78 88 96 | ||||||||
| L3 13 21 35 46 58 70 | 81 93 102 | 116 127 | |||||||
| L4 16 26 42 57 72 84 | 100 116 125 | 141 157 | |||||||
| L5 20 33 51 69 86 102 | 118 139 | 174 192 | |||||||
| L6 24 39 61 81 100 | 138 160 | 202 223 | |||||||
| L7 28 46 70 93 114 | 159 183 | 228 257 | |||||||
| L8 31 52 79 103 128 | 177 201 | 254 283 | |||||||
| L9 35 58 87 113 142 | 192 220 | 282 308 | |||||||
| L10 38 64 96 124 156 | 214 240 | 306 336 | |||||||
| L11 41 70 104 136 | 236 265 | 330 364 | |||||||
| L12 45 77 114 148 | 253 287 | 394 | |||||||
| L13 49 84 124 161 | 308 348 | 425 | |||||||
| L14 52 89 132 171 | 372 413 | 451 | |||||||
| L15 54 95 140 183 | 391 439 | 478 | |||||||
| L16 57 100 149 195 | 409 464 | 505 | |||||||
| L17 60 106 158 206 | 428 490 | 532 | |||||||
| L18 63 112 166 217 | 454 513 | 561 | |||||||
| L19 65 117 174 229 | 480 537 | 591 | |||||||
| L20 68 123 182 241 | 458 620 | ||||||||
| L21 71 129 191 253 | 496 651 | ||||||||
| L22 73 133 197 263 | 498 675 | ||||||||
| L23 75 138 204 272 | 517 701 | ||||||||
| L24 77 142 210 280 | 606 726 |
3ameyahnra:
- NOKa3aTeJIb MOUHOCTN B BAATTpacHTbIbAeTcN 13 NOKa3aTeJIe YHcNla O6OpOTOB NepaJIbHOJ OCN B MInHyTu (UPM) n TOpMo3HOrO MOMeHTa (Nm).
- Tpehaep 6bI BbBepen Ha 3aObepe neped Otrpy3ko I 3TmU yDobIeTBopnE Tpe6oBaHn Knaaccnkaun "C BbICOK ToHoctbIO Hdkauin." Ecnn Bbl noDBepraete COMHeHIO noka3ateIN tpehajaep, o6paTntec b NpOdaBu DY KOHTPOHa/HacTPOKn Tpehajaep.
(O6paTHe BnHMaHne, YTO dOnyck OTKnHOHeHHa KaK OTMeaHocb Ha cTp. 47, dOnyCTmO.)
OnncanHe kOmnbIOTepa 1504
ФУHKUIM
SCAN:IpeeknuehmeMckyWATTS/KALORIEN/BATT/KAJIOPIN RPM/SPEED/TAKTIEAIEI/CKOPOCTb.5ceynHa noka3aTeIb.RPM/TAKTIEAIEI:15~999
SPEED/CKOPOCTb :0.0~99.9 KM/h
ZEIT/BPEM :00:00~99:59
ENTFERNUNG/ДИСТАЦИ :0.00~99.99 KM
KALORIEN / KAIOPIN : 0~999 (1kcal=4,186kjoule)
WATTS KONSTANT/BATT :25~280
HERZ-SYMBOL / NOKA3ATEJIb CEPДLLE : ON/OFF mɪraet
MANUELL/PyHAR HACTPOIKA :1~24 ypoBn
PROGRAMM / PPOPTPAMMA : P1~P12
H.R.C / KOHTPOJIb YACTOTbI CEPdEHyBIX COKPAUeHN
:55% 75% 90% TAG (LÉNEBOI ПуньС)
PULS/INbC:P~30~240MaKc.B03MOXHbI NOKa3aTeNb
PERSONAL / NOKA3ATEIIN NOJIb3OBATEI : U0~U4
BBeHeHHbIe NAMrTb NOKa3aTeJI INoJIb3OBaTeJIa
ФУHKUHOHAJIbHbIe KJIABUNI
1.BBEPX (+) :YBeIuHbAeTnoka3aTeJIb BbIbpaHHoro napameTpauINnepeKIOUaET npn BbIbope nporpamMbI cNe dyIOUyIO NO npoRdky nporpamMy/ФHyKcUNO.3Ta KONKa y6bIpnyetc dNp peryIpOBkCOnpOTNBENHa HJIOBOm CMapTfoH /PAnHwet nOynpaBHeHem OepaOnHOH.
2.BH3(-):YMeHb7aet nok3aTeJIb BbI6paHHoro napameTpau nnnepeKIIouaet npn BbIbope pnporpammblpeBdIyUHO no nopAky nporpammy/ФункцИ.3Ta KONka dy6Ipyetc dnyperynopOBKn cOpiOTNBENHaJIO6o CMapTfoh / PAnHwet NO ynpabHeHem OepaOnHOH.
3. START/STOP / CTAPT/CTONI: CTap INN ocTaHOBKa TpeHnpOBKn B Bbl-6paHHo nporpaMMe.
4.C5POC(L):YcTaHOBKa 3aHaHHoro NOKa3aTeNa B HOnb. PnBbI6ope nporpammbl pnp dInTeHbHom HkaTnN npOxCoNT Bo3BpaT K BbI6opy nporpamm. Ecn n depKatb KnaBnuy 6Oone 2 cek. Haxato, To npocxOHT Bo3Bpat B bI6Opny noIb3ObaTeNa U0-U4.
5. Moync (E): PoiTBePjDeHne BbIbOp nporpa Mmbl 3aDaHHbIX npametropnnpexoH nOHOH cyHKun 3aDaHHbIX npametropB CneDyUOyIO.
6. TEST / ΦYNTHEC-TECT: PAcCHET BOCCTaHOBNEHnA NyIbCa, OueHNBaEMbI no 1-6.
YINPABJIEHNE
1) Bctabte 6nkep 6noka nitaHnB po3eKhy. Ha dncnnee noaBtCn deyuee Hs06paKeHne. C nomoubI KnaBunu +/- BBbPabT bKeNaEMoro non3oBaTeJI. C NOMUbIO KnaBUNu E NOdTBePdNtB. BBeMTN noka3aTeNn nonA, BO3paCTa, POCTA N BeCA B npabOM BepxHem OKoWKe. NOdTBePdNtB c NOMOUBIO KnaBUNI E.
2)KoHTpObnFyHcunMnraet.BbI6Op nporpaMMbOT P1doP12cnomoBIO nlaBn+/-.KoHTpObnFyHcunMnraeT.BbI6Op nporpaMMbOT P1 do P12 cNOMOUbIO pnaBn+/-.NoTBePdNtCB NMOUbIO KNABnE.Bce yctaHOBBHeBIE NOkA3aTeIN MOHO 3MeHNTBo JKeNaeAMOro npocfNpnpaMMbC NMOUbIO KNABn+/-.NoTBePdNtCB NMOUbIO KNABnE.
3)NoCne BbI6Op nporpaMMuN yctaHOBNeHnO kNk3aTeEN HaxKaTb Ha KNABnY START/STOP /CTAPT/CTOIN HAvaTb TpeHnpOBky.
06nne3ameyannr:
- KomlbOpTeP oTKIOUaTcR, ecn TpeHnpOBKa npepbIbAeTc 60JIbSe Yem Ha 4 MInHyTbI. Haxab KnaBnSy START/STOP B TeHeHne 4 MNHT noCne OCTaHOBKn TpeHnpOBKn MOxHO DaJIbSe IpoDOnXaTb TpeHnpOBky OT NOcJeHNHX DOCTNIRHYbIX NOKa3aTeNei.
- Noka3aTeiC MmraOuE HnDnkaueM OMyT 6bTb N3MeHeHbI.
3.Исплььштб6нokитаня26Volt-AC/2500mA - Ecnn KOMnbIOTep He pearnyeT, NOBTOPnTE NOBTOpHb3anyCK KOMNbIO-Tepa NocpeDCTBOM BkNIOueHn/BOIOueHn B PO3ETKy.
5.Ппeохранг Te KOMnBHTep O T BJIaXHNoCTN n CbIPOCTN.
6.Поdkнчehнue USB-БИС CTOPOHA KOMNbHTepa ИСпОь3уETсДЯЗн He60Льши yCTPOnCTB.
DaHHbIe Harpy3Kn RaJIaIOTc: 5V / 0.35A-1,0A.

ONICAHNEΦYHKUIN
- MANUAL / Puchy: YctahOBka ypoBna cnpoTnBneHn C nOmoaToueHm MaTPuCbHa dncnnee. Ecn Hnoe6xOdMo, yCTAHOBKa nokaateNe TpeHnPOBKe ZEIT / ENTFERNUNG / KALORIEN / BPEM/ DnCTAHU/ KALOPIN. C haxatneHm Ha klaBnSy START/STOP / CTAPT/CTON NaHHaeTc nporpamma pyHOn yctahOBKn.
2.PROGRAMM /PPOPTPAMMA:12 BCtpoeHHbIX PnporpaMM TpeHnpOBK C KOHTpOeM TpeHnpOBKn (P1~P12).UpoBeHc conpoTINBneHm MOKeT 6bIb yCTaHOBHeN NocNe IcHc3HOBeHn C dncnner INdNkaUN PROGRAM DIAGRAM/ PPOPTPAMMA DnAΓPAMMA.Ecn Heo6xoDmO,yctaHOBKa nokataTeNe TpeHnpOBKn ZEIT /ENTFERNUNG/KALORIEN/BPEM/ JNCTAHLr/KAIOPN.


- FITNESS: BbIbepnte nporpammy fHTHeC OT BbIbopa nporpaMMbl, 4TO-6bI bIaCHNTb, C BaWero coCTOHaHn 3DOpOBb. 3Ta nporpMaMa npedocTabJnEETfHTHeC-TEcT 3tan 8 MmHyT, n TOrda Bbl 6yDeTe fHTHeC copt F1-F5 NOBNTcR.
u INdkauncaTcTeHn ot F1 do F6
| 1.0 OTПИЧNO | |
| 1.0 < F < 1.9 Хорошо | |
| 2.0 < F < 2.9 Среде | |
| 3.0 < F < 3.9 Достацно | |
| 4.0 < F < 5.9 Плобо | |
| 6.0 Oчenvь плобо | |
N3MepeHne nynbca:
B npabom n nebom nopuyne haojraTcRa daTuHKn N3MepeHnnybca BnuDe MeTaJIuCheKnx PnactNH. PnIMTe BO BNIMAHHe, YTO N3MepeHne Nylbca npOnCXoNIT TOkBO pO nOHOBeMHOM HanoKeHn pyk pN HopMaIb-HOM DaBHeHH Ha daTuHKn.CHTbBaHHe Nybca BnHO no MnraIoUeMy cepNecky prdOM C INDnKaTOPom nybca.
(Измерени hyьса nytem KOHTAKT pyKo CnyKu TOnbko Дяр opнentauN,notomy KaK Yepe3 DBNXKeHne,Not, TpeHne N.T.D.Bo3MOXHO OTKNOHe
Hne OTe DeIeCTBnTeNbHoro Nylba.C HeKOTopBx IHOe Bo3MOxHO OUn6OHyoe nokaahne nybcA.Ecnn BblncnbTBlaeTe TpydnoCTn CImpeHneMnybca, Mbl peKOMeHdyem Bam nCNoIb3ObaTb KapDNOaTnK nn YacblKapDnOdaTnK.
06yuHenCfynKcneiApp:
- CkaaTb keJaembl APP B 3aBncMocTn O T onepauOnHOHcNCTeMbI (App Store / Play Mapket) BnH3 Ha BaWem cMapTfoHe / Tablet. (PpImeHaHne: 3arpy3ka npInIOxehm moKeT 6bItb 3koHomueckn IoxaanyiTa coBjIoDaIte yka3aHnI NO IIO6bIM paCXoOOB APP ..)
2.ПОДКИОЧTEкавьпNTАнгВЕLOЗРOMETpeиnomeCTteСмApTФOH / ПЛаншET HeNOCpeDCTBeHHO JNotKY KOMNbIOTepa K XopoWeJ CB83N, YTO6bI NOJYHTb. - AktiBnyte coeHHe Bluteoth B cMaprfohe / nlaHwTe. (To doJHKHO 6bTb yke aktiBnpoBaHa, oTKIOHTb coeHHe He Bluteoth kpatKO npOBepNT bTO T HObl InpaDOK eIe MoKeT pactOPrHyb cyueCTByIOUne CBsN, TAKIM obpazom, YTObI NOnyUTb INTEppeHcHNOHHyO Be3 Bluetooth coeHHeNA. CMaprFO / TabETky yka3bIAeT INo60 cpa3y cnCOK i3 DocTyNHbX yctPoiCTB Bluetooth B bauem paiohe nn nocne OTKpbBAHn / 3aNyCTNb npinnoKeHne.
- Bb6epTe n3 npaBoi CB8n IN NOkHIOueHnRA TAK CMapTpOHa /nnAHeTa C BeNo3oPROMeTe. Ha 3aDHei NaHeNn KOMNbIotepa BenOpromeTepeBnEETCA ETKeTc Ka HsBaHnem YcTpOncTBa Bluetooth, HanpImep, VISTABE -???
- noTBepeKdae BeNo3pOmeTpE-KOMNbIOpTe 3ByKObIM CnHAnOM, KaK ToNko CoeInHeHne Bluetooth npOn3BODntc N oTo6paKaET COo6ZeHne «BT». EcIn CoeInHeHne Bluetooth 3aBep7aeTc3yMMep 3ByuNT ChOBa N KOMNbIOTe pepxoDNT B peKIM OxndaHna.


YnpaxHeHn Ipa pa3MHKn nepeed TpeHnpOBKo
HaHnTe pa3MnKHy C XoDb6bl Ha MeCTe B TeueHne 3 MInyT. Iocne 3TOr0 BbINONHtE CJeDyUOuNe ynpaxKHeHn, KOtOpBte NOMOT Bam ONTmAbHo NOrTOBnTBcR K TpeHnPOBe. Bo BpemBaBbINONHeHn ynpaxKHeHn Bbl He DoJXhbl NCbIbTaBb60nb. BbINONHraTe ynpaxKHeHne do NoRBHeHn TRHyUeO OYBCTaBA Mbluie.

BCTaHbTe poBHO n 3aBeDnTe Ondy pyky 3a rONoBy. BToPyIO pyKy IonoKxNte CBepxy, Bo3bMnTEcB 3a loKoTb N NotAHNte Do OuyueHnpaTaeKeHn TpNiueCa. OctaHbTeC b ATOM NOONOeHn Ha 20 cekyH, NoBTOpIe DpyroI pykoJ.
HaKIOHNTecb BnepeI He cRbBa HOr NnOblTaIeTcB dOCTaTb NaIbCaMn pyk do nona. BInOnHnTe ynpaxKeHHe 2 p3a no 20 cekyHd.
CaBte Ha non N BbITAHTE OdHy Hory. HaknoHITecb Bnepei nonpo6yIte DOCTaTb CTynIO.
B noJoxhenn shipokoro BbIaJa oobonpntecb pykamn B nONnNotAHnTeMbIuHb Hor. Ype3 20 cekyHn NOMEHnTe Hory.
BbINOHNrTe ynpaxHeHne 2 pa3a no 20 ckyHd.
Pocie pa3MNHNIO TnPcNTE HorAMNpykAMN,TO6bI paccna6ntbMbIuBc. He npeKpaauTe TpeHnpOBky Bhe3aHNO.Chaana yMeHBWte TEM TpeHnpOBKn, 7TO6bl nybc onyctncdo oblyHoro noka3aTeJRA (Cool down).MbI peKomeHdyem B KOHue TpeHnpOBKn CHOBA BBINOHNtB KOMnJIeKC ynpaxHeHm dna pa3MNHNK.
Ynctka,TexHnueckoe 6ObJyXnBaHne XpaHeHne TpeHaxKepa
1. UcTka
IINCTKNNCN0Nb3yNTe NCTCYBnXHyO CaIepETK.
BHHMaHHe HcKOrda He NcNoJIb3yIte dIa YNCTKn 6eH3nH, pa36aBntTe bIIN dpyIne arpeCCNBbIe YNCTAunie CpeCDTa, KOTOpble MOrYT NOBpeDHT NobepxHOCTb. TpeHaxep PpeDHa3NaYe HToNbKO dIa DOMaHrero IcNOJIb3OBAHnB INOMeUeHN. PpeDOxpaHnTe TpeHaxep OCBIOCTn Iblnn.
2. XpaHHeHne TpeHaXePe
Pn He nCnoB3OBAHm TpeHaxKepa 6oJIe 4 HeJeIb, Heo6xOIMO OTKIOHHT bero OT cETn. IocTAbTe TpeHaxEep B cyXoe NOMEueHne n pacMbJInTE HEMHOrO MaCJa Ha DoCTyINhBe OcN U WapHnpiIb.
HaKpOte TpeHaeKep, YTo6bI 3aUHTb ERO OT COHeHbIX LyHeN n bJIIN N 3TmM pPeoBpaTb N3MeHeHne OKpackn.
3. Texmueckoe 6cbnykBaHne
Mbl pekomehyem nocJe KaJbix 50 yacob noJb3oBaHn npObePrtb 6oIToBbIe coeDHeHHn nocJe KaJbIX 100 yacob noJb3oBaHn cMa3bIBaTb OCN u WapHnpbl Macnom n3 pacNbJIInTeHa.
IcnpabHeHne HenoJaok:
Ecn npo6nema He moKet 6bIbpeWeHa c NMOUH HJKeCTOaux yka3aHnn, noXaanyIcTa, o6paTntecb B ueHTp, rDe BBI Kynnn TpeHaxep.
© by Top-Sports Gilles GmbH
D-42551 Velbert (Germany)
Service:
Tel.: +49 (0)2051/6067-0
Fax: +49 (0)2051/6067-44