USER MANUAL Alyx TC 1211 011 HOOVER
THIS APPLIANCE IS DOUBLE INSULATED AND MUST NOT BE EARTHED.
IMPORTANT: THE WIRES IN THE MAINS LEAD ARE COLOURED IN ACCORDANCE WITH THE FOLLOWING CODE: BLUE - NEUTRAL BROWN - LIVE
*FEATURE VARIOUS ACCORDING TO MODEL
TELESCOPIC TUBES (1) *
PUSH THE LATCH FORWARDS TO
UNLOCK TUBES.
PULL OUT TO REQUIRED LENGTH.
RELEASE THE LATCH TO LOCK
HOSE FITTING (2)
PUSH INTO HOSE INLET, UNTIL HOSE
LATCH LOCKS. TO RELEASE, PRESS THE
LATCH AND PULL OUT.
SUCTION REGULATOR (3) MOVE SLIDER TO ADJUST SUCTION.
ON/OFF PEDAL (4)
PUSH TO SWITCH ON.
PUSH AGAIN TO SWITCH OFF.
CORD REEL PEDAL (5)
PUSH TO AUTOMATICALLY REEL IN SUPPLY CORD.
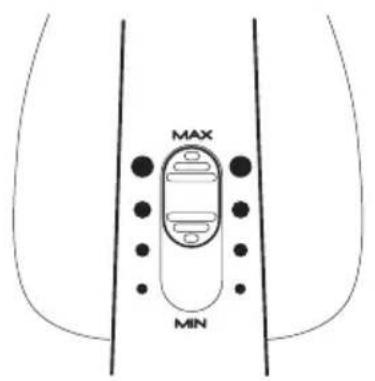
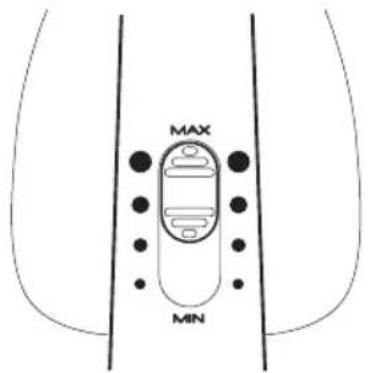
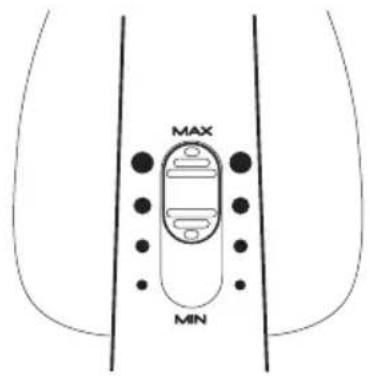
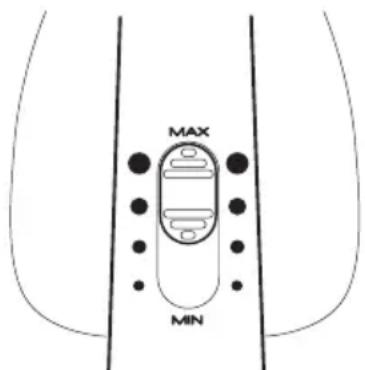
POWER CONTROL (6)
MOVE SLIDE CONTROL TO SET POWER LEVEL.
STORING THE CLEANER (7) USE STORAGE CLIP AS SHOWN WHEN STORING THE CLEANER.
PARK POSITION (8) FOR TEMPORARY STORAGE DURING CLEANING.
ENGLISH
CARPET/FLOOR NOZZLE (9)
A) CARPET POSITION - BRUSHES IN
B) HARD FLOOR POSITION - BRUSHES OUT
A MULTI CLEANING TOOL IS SUPPLIED WITH YOUR PRODUCT. THIS TOOL IS STORED ON BOARD THE CLEANER AS SHOWN.
THE MULTI TOOL BRUSHES CAN BE DEPLOYED TO CREATE A DUSTING BRUSH.
EMPTYING AND CLEANING DUST CONTAINER AND FILTER
IMPORTANT: SWITCH CLEANER OFF AND REMOVE PLUG FROM ELECTRICITY SUPPLY BEFORE EMPTYING DUST CONTAINER OR REMOVING ANY FILTERS
DO NOT USE THE CLEANER WITHOUT THE DUST CONTAINER OR FILTERS IN PLACE.
EMPTYING THE DUST CONTAINER (11)
FOR OPTIMUM PERFORMANCE HOOVER RECOMMENDS THAT YOU EMPTY THE DUST CONTAINER AFTER EACH USE.
TO EMPTY THE DUST CONTAINER:
- PUSH THE RELEASE BUTTON ON THE DUST CONTAINER TOP (IIA).
- LIFT OUT THE DUST CONTAINER USING THE CARRY HANDLE (11B).
- POSITION THE DUST CONTAINER OVER A BIN BEFORE OPENING
- PRESS THE LATCH ON THE HANDS TO OPEN THE DUST CONTAINER DOORS AND DISPOSE OF THE DUST (IIC).
- CLOSE DUST CONTAINER DOOR AND REFIT THE CONTAINER IN ITS ORIGINAL POSITION IN THE CLEANER.
ACCESSING THE HEPA PRE MOTOR FILTER (12)
IN ORDER TO ACCESS THE HEPA PRE MOTOR FILTER, FOLLOW THESE STEPS.
- REMOVE THE DUST CONTAINER FROM THE CLEANER.
- WHILE HOLDING THE DUST CONTAINER HANDLE, GRIP THE TOP COVER.
- ROTATE THE TOP COVER
ANTICLOCKWISE TO THE UNLOCKED POSITION AND REMOVE FROM THE DUST CONTAINER (12A, B).
MAINTAINING THE HEPA PRE MOTOR FILTER (13)
HOOVER RECOMMENDS THAT YOU WASH THE FILTER AFTER FIVE CONTAINER EMPTIES.
- REMOVE THE HEPA PRE-MOTOR FILTER BY ROTATING IT CLOCKWISE
TAP THE HEPA PRE-MOTOR FILTER OVER A BIN.
- RINSE UNDER HAND WARM WATER, IF NECESSARY (13C).
- LEAVE TO DRY FOR 24 HOURS OR UNTIL COMPLETELY DRY BEFORE REFITTING.
- REPIT FILTER BY ALIGNING THE FILTER LOCKING FEATURES TO THE LOCATIONS IN THE COVER AND ROTATING THE FILTER ANTI-CLOCKWISE UNTIL LOCKED.
IMPORTANT: NEVER USE THE CLEANER WITHOUT PRE-MOTOR FILTER FITTED
CHANGING THE EXHAUST FILTER (14)
HOOVER RECOMMENDS THAT YOU REPLACE THE EXHAUST FILTER EVERY 3 MONTHS.
- PRESS THE EXHAUST FILTER GRID LATCH TO GAIN ACCESS TO THE EXHAUST FILTER.
- REMOVE THE FILTER.
- FIT NEW FILTER AND REFIT THE COVER IN ITS ORIGINAL POSITION.
CALLING FOR SERVICE
A CHARGE WILL BE MADE IF THE CLEANER IS FOUND TO BE IN WORKING ORDER OR HAS NOT BEEN ASSEMBLED IN ACCORDANCE WITH THESE INSTRUCTIONS OR HAS BEEN USED INCORRECTLY.
BEFORE CALLING A HOOVER SERVICE ENGINEER RUN THROUGH THE FOLLOWING CHECKLIST:
- IS THERE A WORKING ELECTRICITY SUPPLY TO THE CLEANER? CHECK WITH ANOTHER APPLIANCE.
- IS THE DUST CONTAINER FULL?
- IS THE HOSE BLOCKED?
- ARE THE FILTERS BLOCKED?
IF THERE IS ANY DOUBT CALL YOUR LOCAL HOOVER SERVICE OFFICE FOR ADVICE, THEY MAY BE ABLE TO ASSIST YOU OVER THE TELEPHONE.
GUARANTEE STATEMENT
THE GUARantee CONDITIONS FOR THIS APPLIANCE ARE AS DEFINED BY OUR REPRESENTATIVE IN THE COUNTRY IN WHICH IT IS SOLD. DETAILS REGARDING THESE CONDITIONS CAN BE OBTAINED FROM THE DEALER FROM WHOM THE APPLIANCE WAS PURCHASED. THE BILL OF SALE OR RECEIPT MUST BE PRODUCED WHEN MAKING ANY CLAIM UNDER THE TERMS OF THIS GUARantee.
SUBJECT TO CHANGE WITHOUT NOTICE.
GIAS CUSTOMER SERVICE 08705 400600
HOOVER SPARES 01204 556111
ENVIRONMENT

THIS APPLIANCE IS MARKED ACCORDING TO THE EUROPEAN DIRECTIVE 2002/96/EC ON THE WASTE OF ELECTRICAL AND ELECTRONIC EQUIPMENT (WEEE). BY EnsURING THIS PRODUCT IS DISPOSED OF CORRECTLY, YOU WILL HELP PREVENT POTENTIAL NEGATIVE CONSEQUENCES FOR THE ENVIRONMENT AND HUMAN HEALTH, WHICH COULD OTHERWISE BE CAUSED BY INAPPROPRIATE WASTE HANDLING OF THIS PRODUCT.
THE SYMBOL ON THE PRODUCT INDICATES THAT THIS PRODUCT MAY NOT BE TREATED AS HOUSEHOLD WASTE. INSTEAD IT SHALL BE HANDED OVER TO THE APPLICABLE COLLECTION POINT FOR THE RECYCLING OF ELECTRICAL AND ELECTRONIC EQUIPMENT. DISPOSAL MUST BE CARRIED OUT IN ACCORDANCE WITH LOCAL ENVIRONMENTAL REGULATIONS FOR WASTE DISPOSAL. FOR MORE DETAILED INFORMATION ABOUT TREATMENT, RECOVERY AND RECYCLING OF THIS PRODUCT, PLEASE CONTACT YOUR LOCAL CITY OFFICE, YOUR HOUSEHOLD WASTE DISPOSAL SERVICE OR THE SHOP WHERE YOU PURCHASED THE PRODUCT.
VEUILLEZ LIRE CES INSTRUCTIONS ATTENTIVEMENT
CET APPAREIL DOIT ETRE MONTE ET UTILISE EN CONFORMITE AVEC DES INSTRUCTIONS ET RESERVE AU NETTOYAGE DOMESTIQUE, POUR ENLEVER LA POUSSIÈRE ET LES SALETÉS SECHES DES TAPIS ET SOLS.
LES ACCESSOIRES PEUVENT ETRE UTILISÉS POUR ENLEVER LA POUSSIERÉ ET LES SALETTE DES MEUBLES ET DES TISSUS D'AMEBULEMENT.
CONSIGNES DE SECURITÉ
MANUEL D'UTILISATION.
CET ASPIRATEUR DOIT ETRE UTILISÉ UNIQUÉMENT POUR LE Rôle AUQUÉL IL EST DESTINÉ, TEL QUE DÉCRIT DANS CES INSTRUCTIONS. CES INSTRUCTIONS DOIVENT ETRE BIEN COMPRISES AVANT D'UTILISER CET APPAREIL.
LORSQUE VOUS ASPIREZ DE LA POUDRE OU DE LA POUSSIÈRE FINE, OU LORSQUE VOUS ASPIREZ DES MOQUETTES NEUVES, PROCEDEZ À L'ENTRETIEN DES FILTRES PLUS SOUVENT.
N'UTILISEZ PAS L'ASPIRATEUR À L'EXTÉRIEUR OU SUR DES SURFACES MOUILLEES OU POUR RAMASSER DES OBJETS MOUILLES.
N'UTILISEZ PAS L'ASPIRATEUR
POUR ASPIRER DES D'OBJETS DURS
OU TRANCHANTS, D'OBJETS EN
COMBUSTION TELS QU'ALLUMETTES,
CENDRES CHAUDES, MÉGOTS DE
CIGARETTEs OU AUTRES OBJETS
SIMILAIRES.
ELECTRICITE STATIQUE.
CERTAINS TAPIS PEUVENT CAUSER L'ACCUMULATION D'UNE PETITE CHARGE D'ÉLECTRICTE STATIQUE. LES DECHARGES D'ÉLECTRICTE STATIQUE NE SONT PAS DANGEREUSES POUR LA SANTÉ.
UTILISEZ UNIQUEMENT LES
ACCESSOIREs RECOMMANDES OU FOURNIS PAR HOOVER.
N'TUTILISEZ PAS L'ASPIRATEURPOUR RAMASSER LES LIQUIDESINFLAMMABLES COMME LES LIQUIDES
DE NETTOYAGE, L'ESSENCE ETC... OUI LEURS VAPEURS.
LES PRODUITS TELS QUE LES
AEROSOLS PEUVENT ETRE
INFLAMMABLES. NE VAPORISEZ PAS
PRÉS DE L'ASPIRATEUR.
CORDON D'ALIMENTATION. NE
DEBRANCHES PAS L'APPAREIL AU SECTEUR EN TIRANT SUR LE CORDON. SI LE CORDON D'ALIMENTATION EST ENDOMMAGÉ VÉILLEZ À LE FAIRE REMPLACER P UN TECHNIÇIEN DE SERVICE AGRÉ PAR HOOVER POUR QUE VOITRE ASPIRATEUR NE PRESENTE PAS D DANGER.
PANNES. SI VOITRE ASPIRATEUR NE FONCTIONNE PAS NORMALEMENT, OUSI LE CORDON D'ALIMENTATION EST ENDOMMAGE, ARRETÉZ DE L'UTILISER.
APRÉS UTILISATION. ARRÊTEZ
L'ASPIRATEUR ET DEBRANCHEZ-LE DU SECTEUR. ARRÊTEZ TOUTJOURS L'APPAREIL, DEBRANCHEZ-LE DU SECTEUR ET ATTENDEZ QU'IL REFROIDISSE AVANT DE LE NETTOYER OU DE RÉALISER TOUTE OPÉRATION D'ENTRETIEN.
LE SERVICE APRES-VENTE
HOOVER. POUR ASSURER LE FONCTIONNEMENT SÜR ET EFFICACE DE CET APPAREIL, NOUS RECOMMANDONS QUE LES RÉPARATIONS ET L'ENTRETIEN SOIENT EFFECTUÉS UNIQUÉMENT PAR UN TECHNIÇIEN HOOVER AGRÉE.
ALIMENTATION ÉLECTRIQUE
ATTENTION
L'ÉLECTRICITE PEUT ÉTRE EXTRÉMEMENT DANGEREUSE.
CET APPAREIL EST EQUIRE D'UNE DOUBLE ISOLATION ET NE DOIT PAS ETRE MIS A LA TERRE.
IMPORTANT : LA COULEUR DES FILS DU CABLE D'ALIMENTATION CORRESPOND AU CODE SUIVANT :
BLEU - NEUTRE MARRON - PHASE
TUBESETELESCOPIQUES(1)*
POUSSEZ LE TAQUET VERS L'AVANT
POUR LIBERER LES TUBES.
TIREZ LA LONGUEUR SOUHAITEE.
RELÂCHEZ LE TAQUET POUR
VERROULLER EN POSITION.
EMMANCHEMENT DU TUBE (2)
POUSSEZ DANS L'ENTREE DU FLEXIBLE JUSQU'À CE QUE LE TAQUET DU TUBE SE BLOQUE. POUR LE LIBERER, APPUYEZ SUR LE TAQUET ET TIREZ.
RÉGULATEUR D'ASPIRATION (3)
DéPLACEZ LE CURSEUR POUR RÉGLER L'ASPIRATION.
PEDALE MARCHE/ARRET (4)
APPUYEZ POUR METTRE L'APPAREIL EN MARCHE.
APPUYEZ A NOUVEAU POUR L'ARRÊTER.
PEDALE D'ENROULAGE DU CORDON (5)
APPUYEZ POUR ENROULER
AUTOMATIQUEMENT LE CORDON
D'ALIMENTATION.
CONTROLE DE LA PUISSANCE (5)
DéPLACEZ LE CURSEUR POUR RÉGLER LE Niveau DE PUISSANCE.
RANGEMENT DE L'APPAREIL (7)
LORSQUE VOUS RANGEZ L'APPAREIL,
UTILISEZ L'ATTACHE DE RANGEMENT.
POSITION PARKING (8)
POUR UN RANGEMENT TEMPORAIRE
PENDANT L'UTILISATION DE L'APPAREIL.
BROSSE POUR SOL DUR/MOQUETTE (9)
A) POSITION MOQUETTE - BROSSES RETRACTÉES
B) POSITION SOL DUR - BROSSES SORTIES
OUTILS DE NETTOYAGE (10)
UN OUTIL DE NETTOYAGE POLYVALENT
EST FOURNI AVEC VOITRE APPAREIL.
L'OUTIL SE LOGE DANS L'ASPIRATEUR,
COMME ILLUSTRÉ.
LES BROSSES DE L'OUTIL PEUVENT ETRE DEPLOYÉES POUR OBTENIR UNBROSSE À ÉPOUSSETER.
VIDAGE ET NETTOYAGE DU RÉCIPIENT À POUSSIÈRE ET DU FILTRÉ
IMPORTANT: ÉTEIGNEZ L'ASPIRATEUR ET DÉBRANCHEZ-LE AVANT DE VIDER LE RÉCIPIENT ÀPOUSSIÈRE OU DE RETIRER DES FILTRES.
N'UTILISEZ PAS L'ASPIRATEUR SANS RÉCIPIENT À POUSSIÈRE OU FILTRÉ EN PLACE.
VIDAGE DU RÉCIPIENT À POUSSIÈRE (11)
POUR UNE ASPIRATION OPTIMALE,
HOOVER RECOMMANDE DE VIDER LE RÉCIPIENT À POUSSIÈRE APRES CHAQUE UTILISATION.
POUR VIDER LE RÉCIPIENT À POUSSIQUE :
- APPUYEZ SUR LE BOUTON D'ÉJECTION SUR LA PARTIE SUPérieURE DU RÉCIPIENT À POUSSIÈRE (IIA).
RETIREZ LE RÉCIPIENT À POUSSÉRE À L'AIDE DE LA POIGNÉE DE TRANSPORT (11B).
- POSITIONNEZ LE RÉCIPIENT àPOUSSIÈRE AU-DESSUS D'UNEPOUBELLE AVANT DE L'OUVRIR.
- APPUYEZ SUR LE TAQUET DE LA POIGNEE POUR OUVRIR LA PORTE DU RÉCIPIENT À POUSSIÈRE ET JETER LA POUSSIÈRE (IIC).
FERMEZ LA PORTE DU RÉCIPIENT ÀPOUSSIÈRE ET REMETTEZ LE RÉCIPIENT EN PLACE DANS L'ASPIRATEUR.
ACCÉS AU FILTRÉ HEPA DE PROTECTION DU MOTEUR (12)
POUR ACCÉDER AU FILTRÉ HEPA DE PROTECTION DU MOTEUR, VÉUILLEZ PROCÉDER AINSI.
- RETIREZ LE RÉCIPIENT À POUSSIQUE DE L'ASPIRATEUR.
- EN TENANT LA POIGNEE DU RÉCIPIENT À POUSSIÈRE D'UNE MAIN, SAISISSEZ LE COUVERCLE SUPÉRIEUR DE L'AUTRE.
FAITES TOURNER LE COUVERCLE DANS LE SENS ANTI-HORAIRE JUSQU'A LA POSITION DE DÉBLOCAGE PUIS RETIREZ LE RÉCIPIENT À POUSSIÈRE (12A, B).
ENTRETIEN DU FILTRÉ HEPA DE PROTECTION DU MOTEUR (13) HOOVER RECOMMANDE DE NETTOYER LE FILTRÉ TOUS LES CINQ VIDAGES DE RÉCIPIENT.
RETIREZ LE FILTRE HEPA DE PROTECTION DU MOTEUR EN LE FAISANT TOURNER DANS LE SENS HORAIRE.
- TAPEZ SUR LE FILTRE AU-DESSUS D'UNE POUBELLE.
RINCEZ-LE A L'EAU TIEDE SINÉCESSAIRE (13C).
LAISSEZ-LE SECHER PENDANT 24 HEURES OU JUSQU'À CE QU'IL SOIT COMPLÉTEMENT SEC AVANT DE LE REMETTURE EN PLACE.
- REMETTEZ LE FILTRÉ EN PLACE EN ALIGNNANT LES DISPOSITIFS DE VERROUILLAGE DU FILTRÉ AVEC LES EMPLACEMENTS DU COUVERCLE ET EN FAISANT TOURNER LE FILTRÉ DANS LE SENS ANTI-HORAIRE JUSQU'À CE QU'IL SE BLOQUE EN POSITION.
IMPORTANT: NE JAMAIS UTILISER L'ASPIRATEUR SANS AVOIR INSTALLÉ DE FILTRÉ DE PROTECTION DU MOTEUR
REEMPLACEMENT DU FILTRDE DE SORTIE (14) HOOVER RECOMMANDE DE REMPLACER LE FILTRDE DE SORTIE TOUS LES 3 MOIS.
- APPUYEZ SUR LE TAQUET DE LA GRILLE DU FILTRÉ DE SORTIE POUR GAGNER L'ACCès AU FILTRÉ DESORTIE.
RETIREZ LE FILTR.
- INSTALLLEZ LE NOUVEAU FILTRE ET REMETTEZ LE COUVERCLE EN PLACE.
IHR PRODUKT WIRD MIT EINER
UNIVERSALDUSE GELIEFERT. DIESSE LÄSST SICH IM STAUBSAUGER VERSTAUEN.
DIE VERSCHIEDEN EN STAUBBÜRSTEN KÖNNEN AUCH ZUM REINIGEN VON MOBELN BENUTZT WERDEN.
ENTLEEREN UND REINIGEN VON STAUBBEHÄLTER UND FILTER
WICHTIG:VOR DEM LEEREN
DES STAUBBEHÄLTERS ODER DEMENTFERNEN EINES FILTERS DEN
DAS AM PRODUKT ANGEBRACHE SYMBOL GIBT AN, DASS DIESES
PRODUKT NICT ALS HAUSMULL BEHANDELT WERDEN DARF,
SONDERN IN EINEM ENTSPRECHENDEN RECYCLINGZENTRUM FÜR ELEKTRISCHE
HJEMMET SOM FORESKREVET I
DENNE BRUGSVEJLEDNING. DU BØR
SIKRE DIG, AT DU HAR FORSTÅET
INDHOLDET AF DENNE
BRUGSVEJLEDNING, INDEN
STØVSUGEREN TAGES I BRUG.
FILTRENE SKAL VEDLIGEHOLDES
HYPPIGT, NAR DER OPSAMLES
MATERIALS SÄSOM PULVER ELLER
FINT STØV, ELLER VED
STØVSUGNING AF NYE TæPPER.
STØVSUGEREN Må IKKE BRUGES
UDENDORSELLERPAVAD
OVERFLADER ELLER TIL OPSAMLING
AF VAEDE.
SORG FOR IKKE AT OPSAMLE HARDE
PEDAL TIL LEDINGSSPOLE (5)
TRYK PÀ DEN FOR AUTOMATISK AT VINDE LEDNINGEN OP.
SUGEKRAFT (6) *
FLYT SKYDEKNAPPEN FOR AT INDSTILLE SUGEKRAFTNIVEAUYET.

OPBEVARING AF STØVSUGEREN (7)
BRUG BESLAGET SOM VIST VED OPBEVARING AF STØVSUGEREN.
OPBEVARINGSPPOSITION (8)
TIL MIDLERTIDIG OPBEVARING VED RENGØRING.
DANSK
TAEPPE-/GULVMUNDSTYKKE (9)
A) TAPPEPOSITION - BORSTER INDE
B) HARD GULVBELAEGNING - BØRSTER UDE
RENGORINGSREDSKABER (10)
DER FOLGER ET
MULTIFUNKTIONSREDSKAB MED
PRODUKTET.DETTE REDSKAB
OPBEVARES I ET RUM I STØVSUGEREN
SOM VIST.
BØRSTERNE TIL
MULTIFUNKTIONSREDSKABET KAN
BENYTTESSOMSTVEBORSTER.
TOMNING OG RENGORING AF
STØVBEHOLDEREN OG FILTERET
VICTIGT: SLUK FOR
STØVSUGEREN, OG TAG STIKKET
UD AP STIKKONTAKTEN, FØR
STØVBEHOLDEREN TØMMES, ELLER
FØR FILTRENE FJERNES
BRUGIKKE STOVSUGERENUDEN,AT STOVBEHOLDER ELLER FILTRE ER SAT PAPLADS.
TOMNING AF STVBEHOLDEREN (11)
VI ANBEFALER, AT DU TOMMER
STØVBEHOLDEREN EFTER HVER BRUG
FOR AT SIKRE, AT STØVSUGEREN
FUNGERER OPTIMALT.
FOR AT TOMME STVBEHOLDEREN SKAL
DU GORE FOLGENDE:
SKUB UDLØSERKNAPPEN PÅ
STØVBEHOLDEREN OPAD (IIA).
TAG STØVBEHOLDEREN UD VED
HUJELP AF HändTAGET (11B).
PLACER STOVBEHOLDEREN OVER EN
SKRALDESPAND, FØR DU ÅBNER DEN.
TRYK PÁ UDLØSERMEKANISMEN PÁ
HANDTAGET FOR AT ABNE
STØVBEHOLDERÉNS LAG, OG
BORTSKAF STØVET (IIC).
LUK STOVEBEHOLDERENS LAG,OG
PLACER BEHOLDEREN I DEN
OPRINDELIGE POSITIONI
STØVSUGEREN.
SADAN FAS ADGANG TIL HEPA
PRAEMOTORFILTERET (12)
FOR AT F A ADGANG TIL HEPA
PRAEMOTORFILTERET SKAL FOLLGENDE
TRIN FOLGES:
TAG STØVBEHOLDEREN UD AF
STØVSUGEREN.
TAG FAT I DET ØVERSTE LAG, MENS
DU HOLDER FASTI
STØVBEHOLDERÉNS HändTAG.
- DREJ DET ØVERSTE LAG MOD URET
FOR AT LØSNE DET, OG TAG DET AF
STØVBEHOLDEREN (12A, B).
VEDLIGEHOLDELSE AF HEPA
PRAEMOTORFILTERET (13)
HOOVER ANBEFALER, AT DU VASKER
FILTRENE EFTER HVER 5.
BEHOLDERTOMNING.
FJERN HEPA-PRAMOTORFILTERET
VED AT DREJE DET MED URET.
BANK LET PÅ HEPA-
PRAEMOTORFILTERET HEN OVER EN
SKRALDESPAND.
SKYL DET OM NODVENDIGT RENT
UNDER LUNKENT VAND (13C).
INDTIL DET ER HELT TØRT, FØR DET
SÄTTES LIGEN:
SAET FILTERET PA IGEN VED AT
JUSTERE
FILTERFASTGORELSESFUNKTIONERNEI
FORHOLD TIL PLACERINGSRILLERNE I
LAGET OG DREJE FILTERET MOD URET,
INDTIL DET ER FASTGJORT.
VICTIGT: BRUG ALDRIG
STØVSUGEREN UDEN
PRAEMOTORFILTERET
PAMONTERET
UDSKIFTNING AF UDSUIGNINGSFILTERET (14)
HOOVER ANBEFALER, AT DU UDSKIFTER
UDSUGNINGSFILTERET HVER 3. MANED.
TRYK PÅ UDSUGNINGSFILTERETS
UDLÖSERMEKANISME FOR AT FÁ
APGANG TIL HPSHONGNINGSEFILTERET:
SAET DET NYE FILTER I,OG PLACER
LAGET PÄ DETS OPRINDELIGE
POSITION.
KONTAKT KUNDESBERVICE
DER VIL BLIVE OPKRAEVET BETALING FOR SERVICE, HVIS STØVSUGEREN UNDERSOGES, OG DET KONSTATERES, AT DEN ER FULDT FUNKTIONSDYGTIG, IKKE ER SAMLET I OVERENSSTEMMELSE MED DENNE BRUGERVEJLEDNING ELLER HAR VÆRET ANVENDT FORKERT.
För du RINGER TIL EN AUTORISERET TEKNIKER FRA HOOVER, SKAL DU GENNEMGA FÖLGENDE TJEKLISTE:
- VIRKER STRÖMFORSYNINGEN TIL STÖVSUGEREN?
KONTROLLER STRÖMFORSYNINGEN PÅ ET ANDET APPARAT.
- ER STØVBEHOLDEREN FULD?
- ER SLANGEN BLOKERET?
- ER FILTRENE BLOKEREDE
HVIS DU HAR TVIVLSSPÖRGSMÁL, SKAL DU RINGE TIL DIN LOKALE HOOVER-FORHANDLER. DENNE KAN MULIGVIS VEJLEDE DIG OVER TELEFONEN.
GARANTIERKLÄERING
GARANTIBETINGELSERNE FOR DETTE APPARAT ER SOM DEFINERET AF VORES REPRAESENTANT I DET LAND, HVOR DET ER SOLGT. OPLYSNINGER VEDRORENDE DISSE BETINGELSER KAN INDHENTES HOS DEN FORHANDLER, APPARATET ER KOBT HOS. KVITTERINGEN SKAL FREMVISES I FORBINDESE MED ETHVERT KRAV UNDER DISSE GARANTIBETINGELSER.
DISSE BETINGELSER KAN AENDRES UDEN VARSEL.
CANDY HOOVER A/S FRYDENBORGVEJ 27 K DK-3400 HILLERØD CVR-NR.: DK 18777231 TLF.: +45 48 24 58 20 FAX, SERVICE: +45 48 24 58 21
MILU
DENNE STØVSUGER ER MAERKET I OVERENSSTEMMELSE MED DET EUROPÄEISKE DIREKTIV 2002/96/EF VEDRØRENDE AFFALD AF ELEKTRISK OG ELEKTRONISK UDSTYR (WEEE). VED AT SIKRE AT DETTE PRODUKT BORTSKAFFES KORREKT, ER DU MED TIL AT FORHINDRE POTENTIELLE NEGATIVE KONSEKVENSER FOR MILJÖET OG SUNDHeden, SOM ELLERS KAN FOREKOMME SOM FØLGGE AF FORKERT BORTSKAFFALSE AF PRODUKTET.
SYMBOLET PÀ PRODUKTET ANGIVER, AT PRODUKTET IKKE MÀ BEHANDLES SOM HUSHOLDNINGSAFFALD. DET SKAL I STEDET AFLEVERES TIL EN RELEVANT AFFALDSSTATION FOR GENBRUG AF ELEKTRISK OG ELEKTRONISK UDSTYR. BORTSKAFFALSE SKAL SKE I OVERENSSTEMMELSE MED DEN LOKALE MILJÖLOVGIVNING VEDRÖRENDE BORTSKAFFALSE AF AFFALD. DU KAN FÀ MERE DETALJERIDE OPLYSNINGER OM BEHANDLING, GENVINDING OG GENBRUG AF DETTE PRODUKT VED AT KONTAKTE DIN LOKALE KOMMUNE, RENOVATIONSFIRMAET ELLER DEN BUTIK, HVOR DU KÖBTE PRODUKTET.
VENNLIGST LES DISSE INSTRUKSJONENE NOYE
DETTE PRODUKTET MÁ MONTERES OG BRUKES I SAMSVAR MED DISSE INSTRUKSJONENE, OG MÁ BARE BRUKES TIL FJERNING AV SMUSS OG STÖV FRA INNENDÖRS TEPPER OG GULV VED HJEMMERENGJÖRING.
REDSKAPSSETTET KAN BRUKES TIL Å FJERNE SMUSS OG STØV FRA MØBLER OG TEKSTILER.
SIKKERHETSPÄMINNELSER
BRUKERVEILEDNING DENNE
STØVSUGEREN MÁ KUN BRUKES TIL DET FORMAL DEN ER TILTENKT, SLIK DET ER BESKREVET I DISSE INSTRUKSJONENE. SØRG FOR Å SETTE DEG GRUNDIG INN I DEM, FØR DU TAR I Bruk STØVSUGEREN.
VEDLIKEHOLD FILTRENE OFTE NAR DU STØVSUGER MATERIALER SOM PULVER ELLER FINT STØV, ELLERVED RENGUØRING AV NYE TEPPER.
BRUK IKKE STOVSUGEREN UTENDORS, PÁ VÂTE OVERFLATER, ELLER TIL Å SUGE OPP VÄESKE.
MAIKKE BRUKES TIL A SUGE OPP
HARDE ELLER SKARPE
GJENSTANDER, FYRSTIKKER, VARM
ASKE, SIGARETTSTUMPER ELLER
LIGNENDE TING.
STATISK ELEKTRISITET. ENKELTE
TEPPER KAN FORÁRSAKE NOE
OPPYBYGNING AV STATISK
ELEKTRISITET. EVENTUELL STATISK
UTLADNING ER IKKE HELSESKADELIG.
MA IKKE BRUKES TIL Å SUGE OPP BRENNBARE VÅESKER SOM RENGJØRINGSMIDLER, BENSIN OSV., ELLER DAMPER AV SLIKE.
AEROSOLSPRAYER KAN VÄERE
BRANNFARLIGE,IKKE BRUK SLIK SPRAY I NAERHETEN AV STØVSUGEREN
STRÖMLEDNINGEN, IKKE TREKK UT KONTAKTEN VED Å DRA I LEDNINGEN. HVIS STRÖMLEDNINGEN ER SKADET, MÅ STØVSUGEREN AV SIKKERHETSGRUNNER REPARERES AV EN AUTORISERT TEKNIKER FRA HOOVER.
FEIL, IKKE FORTSETT Å BRUKESTOVSUGEREN DERSOM DET ER FEIL PÄ DEN, ELLER HVISSTRÖMLEDNINGEN ER ØDELAGT.
ETTER BRUK. SLÅ AV
STØVSUGEREN, OG TA UT
STØPSELET FRA STRØMUTTAKET.
SLÅ ALLTID AV STØVSUGEREN OG
TA UT STØPSELET FØR RENGJØRING,
ELLER FØR DU STARTER MED
VEDLIKEHOLD.
HOOVER SERVICE. FOR Å SIKRE AT APPARATET FORTSATT VIRKER SOM DET SKAL, OG ER TRYGT Å BRUKE, ANBEFALER VI AT ALL SERVICE OG ALLE REPARASJONER BLIR UTFØRT AV EN AUTORISERT HOOVER-TEKNIKER.
ELEKTRISKE KRAV
ADVARSELI
ELEKTRISITET KAN VAERE SVAERT FARLIG.
DETTE APPARATET ER DOBBELTISOLERT, OG Må IKKE JORDES.
VIKTIG: LEDNINGSTRÄDENE I STRÖMLEDNINGENE HAR FÖLGENDE FARGEKODER:
BLÁ - NÖYTRAL BRUN - STRÖMFÖRENDE
- ANGIR EGENSKAPER SOM VARIERER ETTER MODELLVALG.
TELESKOPISKEROR(1)
SKYV HAKEN FRAMOVER FOR A LØSNERRET.
TREKK UT TIL ØNSKET LENGDE.
BRUK HAKEN TIL Å LASE.
MONTERE SLANGEN (2)
SKYV SLANGEN INN I SLANGEINNTAKET
TIL SLANGEHAKEN GÄR I LÄS. LØSNE
DEN VED Å TRYKKE PÅ HAKEN OG
TREKKE DEN UT.
SUGEKRAFTREGULATOR (3)
BEVEG PÁ GLIDEBRYTEREN FOR Å REGULERE SUGEKRAFTEN.
AV/PA-PEDAL (4)
TRYKK FOR A SLA PA. TRYKK P A NYTT FOR A SLA AV.
PEDAL TIL LEDNINGSTVINNE (5)
TRYKK FOR A TREKKE INN
STRÖMLEDNINGEN AUTOMATISK.
EFEKTVELGER (6)
BEVEG PÁ GlideKNAPPEN FOR Å STILLE INN EFFEKTNIVA.
LAGRING AV STØVSUGEREN (7)
NAR DU SKAL SETTE VEKK
STØVSUGEREN, BRUKER DU KLEMMESE
SOM VIST.
STILLINGVEDPARKERING(8)
FOR MIDLERTIDIG PARKERING UNDER RENGJØRING.
TEPPE-/BULVMUNNSTYKKE (9)
A) TIL TEPPE - BØRSTENE INNE
B) TIL HARDT GULV - BØRSTENE UTE
RENGJØRINGSREDSKAPER (10)
PRODUKTET LEVERES MED ET UNIVERSALREDSKAP. REDSKAPET OPPBEVARES PÅ SELVE STØVSUGEREN, SOM VIST.
UNIVERSALBØRSTENE KAN REGULERES SLIK AT DE BLIR EN STØVBØRSTE.
TOMMING OG RENGJORING AVSTÖVBEHOLDER OG FILTER
VIKTIG: SLÅ AV
STØVSUGEREN OG TREKK UT
KONTAKTEN FRA STÖPSELET, FÜR DU TÖMMER STÖVBEHOLDEREN ELLER EVENTUelt FJERNER FILTRE.
IKKE BRUK STØVSUGEREN HVIS IKKES TØVBEHOLDEREN ELLER FILTRENE ER PÅ PLASS.
TOMMING AV STVBEHOLDEREN (11)
FOR BEST MULIG RESULTAT ANBEFALER
HOOVER AT DU TOMMER
STØVBEHOLDEREN ETTER HVER GANGS
BRUK.
SLIK TOMMER DU STOVBEHOLDEREN:
TRYKK PÁ UTLØSERKNAPPEN PÁ TOPPEN AV STØVBEHOLDEREN (IIA).
- L°FT AV STÖVBEHÖLDEREN ETTER BÄEREHändTAKET (IIIB).
HOLD STØVBEHOLDEREN OVER EN SØPPELBØTTE NÄR DU ÅPNER DEN.
TRYKK PÅ HAKEN PÅ HANDTAKET FOR Å APNE DEKSELET PÅ BEHOLDEREN, OG TOM UT INNHOLET (IIC).
LUKK DEKSELET PASTVBEHOLDEREN,OG SETTBEHOLDEREN TILBAKE PASA MAMEPLASS PASTVSUGEREN.
SLIK FINNER DU HEPA PREMOTORFILTERET (12)
FOLG TRNNENE UNDER FOR A FINNER FRAM TIL HEPA PRE-MOTORFILTER.
TA STOVBEHOLDEREN AV STOVSUGEREN.
TA TAK I TOPPDEKSELET, MENS DU HOLDER I HändTAKET PASTVBEHOLDEREN.
- Drei TOPPDEKSELET MOT URVISEREN SLIK AT DET ÅPNES, OG TA DET AV STÖVBEHOLDEREN (12A, B).
VEDLIKEHOLD AV HEPA PRE-MOTORFILTERET (13)
HOOVER ANBEFALER AT DU VASKER FILTERET HVER FEMTE GANG DU TOMMER BEHOLDEREN.
TA AV HEPA PRE-MOTORFILTERET VED A DREIE DET MOT URVISEREN.
BANK LETT PÁ FILTERET MENS DU HOLDER DET OVER SÖPPELBÖTTA.
- DERSOM DET ER NÖDVENDIG, SKYLLER DU DET UNDER LUNKENT VANN (13C).
LA DET TØRKE I 24 TIMER, ELLER TIL DET ER HELT TØRT, FØR DU SETTER DET PÅ PLASS IGJEN.
- SETT FILTERET TILBAKE IGJEN VED Å PLASSERE LASEFUNKSJONEN PÅ FILTERET DER DEN PASSER INN I DEKSELET, OG DREIE MOT URVISERENT TIL DET GÄR I LÄS.
VIKTIG: BRUK ALDRI STØVSUGEREN UTEX AT PRE-MOTORFILTERET ER PÅ PLASS
SKIFTE EKSOSFILTERET (14)
HOOVER ANBEPALER AT DU SKIFTER EKSOSFILTER HVER TREDJE MANED.
TRYKK PÅ HAKEN PÅ GITTERET TIL EKSOSFILTERET FOR Å KOMME FRAM TIL SELVE FILTERET.
TA UT FILTERET.
- SETT INN DET NYE FILTERET, OG SETT DEKSELET TILBAKE PÅ PLASS.
RINGE KUNDESERVICE
DU VIL MOTTA EN REGNING DERSOM DET VISER SEG AT STØVSUGEREN FUNGERER, ELLER IKKE HAR BLITT MONTERT I HENHOLD TIL DISSE INSTRUKSJONENE, ELLER HAR BLITT BRUKT PÁ FEIL MÁTE.
GÀ GJENNOM FÖLGENDE SJEKKLISTE, FÜR DU RINGER EN AUTORISERT TEKNIKER FRA HOOVER:
- FÁR STÓVSUGEREN TILFÖRT STRÖM?
PROV Å KOPLE EN ANNEN ENHET TIL STIKKONTAKTEN.
- ER STØVBEHOLDEREN FULL?
- ER SLANGEN TETT?
- ER FILTRENE BLOKKERT?
HVIS DU ER I TVIL, KAN DU RINGE DITT LOKALE HOOVER SERVICEKONTOR FOR RAD, OG DE KAN EVENTUelt HJELPE DEG PER TELEFON.
HOOVER SERVICE
APPARATSERVICE
GRORUDVEIEN 55
N-0976Oslo9
TELEFON: 22 25 85 50 TELEFAX: 22 25 87 11
GARANTI
GARANTIBETINGELSENE FOR DETTE APPARATET ER SOM DEFINERT AV VÄR REPRESENTANT I DET LANDET DER DEN BLE SOLGT. DETALJER VEDRÖRENDE DISSE BETINGELSENE FÄS FRA FORHANDLEREN DER APPARATET BLE KJÖPT. SALGSKVITTERINGEN MÄ FREMVISES VED FREMSETTING AV KRAV UNDER BETINGELSENE I DENNE GARANTIEN.
VI FORBEHOLDER OSS RETTEN TIL Å FORETA ENDRINGER UTEN FORVARSEL.
MILU

DETTE APPARATET ER MERKET I HENHOLD TIL EU-DIREKTIV 2002/96/EF OM KASSERING AV ELEKTRISK OG ELEKTRONISK UTSTYR (WEEE-DIREKTIVET). GJENNOM Å SIKRE AT DETTE PRODUKTET KASSERES PÅ RIKTIG MÄTE, BIDRAR DU TIL Å FORHINDRE MULIGE NEGATIVE FÖLGER FOR MILJØ OG MENNESKELIG HELSE, SOM VIL KUNNE OPPSTA DERSOM PRODUKTET KASSERES PÅ FEIL MÄTE.
SYMBOLET PÅ PRODUKTET ANGIR AT DET IKKE KAN BEHANDLES SOM HUSHOLDNINGSAVFALL. I STEDET SKAL DET OVERLEVERES TIL DET AKTUELLE OPPSMELINGSPUNKTET FOR RESIRKULERING AV ELEKTRISK OG ELEKTRONISK UTSTYR. AVHENDING MÅ UTFÖRES I SAMSVAR MED LOKALE MILJØBESTEMMELSER FOR AVFALLSHANDTERING. DU KAN FÅ MER INFORMASJON OM BEHANDLING, GJENVINNING OG RESIRKULERING AV DETTE PRODUKTET VED Å KONTAKTE COMMUNALE MYNDIGHETER, RENOVASJONSTJENESTENE ELER BUTIKKEN DER DU KJØPTE PRODUKTET.
APPARATSERVICE
VESTVOLDVEIEN 8
2019 SKEDSMOKORSET
TLF: 64838120 FAX: 63878233
© REGISTRETR VAREMERKE TRYKT PÅ KLORFRITT PAPIR
LÄS DE HÄR ANVISNINGAR NOGA
DEN HÄR PRODUKTEN MÄSTE MONTERAS OCH ANVÄNDAS I ENLIGHTET MED DESSA ANVISNINGAR OCH FÄR ENDAST ANVÄNDS FÜR PRIVATE BRUKI SYFTE ATT TA BORT TORR SMUTS OCH DAMM FRAN MATTOR OCH GOLV.
VERKTYGEN KAN ANVANDAS FÜR ATT TA BORT SMUTS OCH DAMM FRÁN MÖBLER OCH TYG.
SÄKERHETSPÄMINNELSER
ANVÄNDARHANDBOKEN.
DEN HÄR DAMMSUGAREN FÄR
ENDAST ANVÄNDAS I AVSETT SYFTE
I ENLIGHTET MED DESSA
ANVISNINGAR. FÖRSÄKRA DIG OM
ATT DU HAR FÖRSTÄTT ALLA
ANVISNINGAR INNAN DU BÖRJAR
ANVANDA DEN.
SE OVER Filtren OFTA OM DU
DAMMSUGER UPP MATERIAL SOM
T.EX.PUDER ELLER FINT DAMM OCH
NAR DU DAMMSUGER NYA MATTOR.
ANVÄND INTE DAMMSUGAREN
UTOMHUS, PÁ VÁTA YTOR ELLER
FÖR ATT SUGA UPP VÄTSKA.
ANVÄND INTE DAMMSUGAREN FÖR
ATT SUGA UPP HARDA OCH VASSA
OBJEKT, TÄNDSTICKOR, HET ASKA,
CIGARETTFIMPAR ELLER ANDRA
LIKNANDE FÖREMÁL.
STATISK ELEKTRICITET. EN DEL
MATTOR KAN ORSAKA EN MINDRE
ACKUMULERING AV STATISK
ELEKTRICITET. STATISK URLADDNING
ÄR INTE FARLIGHT FÜR HÄLSAN.
OCH DRA UT KONTAKTEN INNAN DU
GÖR RENT DAMMSUGAREN ELLER
UTFOR UNDERHALL.
HOOVER- SERVICE. VI
REKOMMENDERAR ATT EVENTUELL
SERVICE OCH REPARATION ENDAST
UTFÖRS AV EN AUKTORISERAD
HOOVER- SERVICETEKNIKER.
ELEKTRISKA KRAV
WARNING!
ELEKTRICITET KAN VARA MYCKET FARLIGHT.
DEN HÄR APPARATEN AR DUBBELISOLERAD OCH FÄR INTE JORDAS.
VIKTIGT: TRÄDARNA I NÄTKABELN ÅR FÄRGKODADE ENLICT FÖLJANDE: BLÅ - NEUTRAL BRUN - SPÄNNINGSFÖRANDE
*ANDRA EGENSKAPER SOM VARIOERAR EFTER MODELLVAL
POLYSÄLION TYHJENNYS (II)
HOOVER SUOSITTELEE, ETTÄ
POLYSÄILIÖ TYHUENNETÄAN JOKAISEN
KAYTÖN JÄLKEEN.
TYHJENNÄ POLYSÄLIO SEURAAYASTI:
PAINAPOLYSÄILION PÄALLÖLEVAA VAPAUTUSPAINIKETTA (11A).
- IRROTA POLYSÄILIÖ NOSTAMALLA KAHVASTA (11B).
AVAA POLYSÄLIO VASTA AVOIMEN JATEASTIAN YLÄPUOLELLA.
AVAA POLYSÄLION LUUKKUPAINAMALLA KAHVASSA OLEVASALPAA JA TYHJENNÄ POLY (IIC).
SULJE POLYSÄLION LUUKKU JA ASENNA POLYSÄLIO TAKAISIN PAIKALLEEN IMURIIN.
HEPA-MOOTTORINSUOJASUODATTIMEN OTTAMINEN ESIIN (12)
OTA HEPA-MOOTTORINSUOJASUODATIN ESIIN SEURAAVASTI:
- IRROTA POLYSÄILIÖ IMURISTA.
- PIDÄ KIINNI PÖLYSÄILIÖN KAHVASTA
JA OTA KIINNI YLÄKANNESTA.
- KIERRA YLAKANTTA VASTAPÄIVÄN, KUNNES SE ON AUKI, JA IRROTO SE POLYSÄILIÖSTÄ (12A, B).
HEPA-MOOTTORINSUOJASUODATTIMEN HUOLTO (13)
HOOVER SUOSITTELEE, ETTA SUODATIN
PESTÄAN POLYSÄILION VIIDEN
TYHJENNYSKERRAN VÄLEIN.
- IRROTA HEPA-MOOTTORINSUOJASUODATIN KIERTÄMALLA SITÄ VASTAPÄIVÄN.
NAPAUTA HEPA-MOOTTORINSUOJASUODATINTAJATEASTIAN PALLA.
HUUHTELE TARVITTAESSA KÄDENLÄMPÖISESSÄ VEDESSÄ (13C).
JATASUODATIN KUIVUMAAN VUOROKAUBEKSITAIKUNNESSEON TAYSIN KUIVA ENNEN KUIN ASENNAT SEN TAKAISIN.
- ASENNA SUODATIN TAKAISIN KOHDISTAMALLA SUODATTIMEN LUKITSIMET KANNESSA NIILLE OLEVIIN PAIKKOIHIN JA KIERTÄMALLA SUODATINTA VASTAPÄIVÄÄN, KUNNES SE LUKITTUU.
TÄRKEÄÄ: IMURIA EI SAA KÄYTTÄIILMAN
MOOTTORINSUOJASUODATINTA
POISTOILMAN SUODATTIMEN VAIHTO (14)
HOOVER SUOSITTELEE, ETTÄ POISTOILMAN SUODATIN VAIHDETAAN KOLMEN KUUKAUDEN VÄLEIN.
- OTA POISTOILMAN SUODATIN ESIIN PAINAMALLA POISTOILMAN SUODATTIMEN SÄLEIKÖN SALPAA.
- IRROTA SUODATIN.
- ASENNA UUSI SUODATIN JA ASENNA KANSI TAKAISIN ALKUPERÄISILLE PAIKALLEEN.
YHTEYDENOTTO HUOLTOON
HUOLLOSTA PERITÄAN MAKSU, JOS IMURIN TODETAAN TOIMIVAN KUNNOLLA, JOS SITA E I OLE KOOTTU NÄIDEN OHJEIDEN MUKAISESTI TAI JOS SITA ON KÄYTETTY VÄÄRIN.
ENNEN KUIN OTAT YHTEYTÄ HOOVER-HUOLTOTEKNIKKOON, KÄY LÄPI SEURAAVA TARKISTUSLISTA:
- SAAKO IMURI SÄHKÖVIRTAA?
TARKISTA TÄMÄ TOISELLA SÄHKÖLAITTEELLA.
- ONKO POLYSÄILIÖ TÄYNNÄ?
- ONKO LETKU TUKOSSA?
- OVATKO SUODATTIMET TUKKEUTUNEET?
EPASELVISSA TAPAUKSISSA VOIT OTTAA YHTEYDEN PAIKALLISEEN HOOVERHUOLTOEDUSTAJAAN, JOKA VOI AUTTAA JO PUHELIMITSE
TAKUU
TÄMÄN LAITTEEN TAKUUEHDOT MÄRITTELEE OSTOMAAN HOOVER-EDUSTAJA. YKSITYISKOHTAISET TIEDOT NÄISTÄ EHDOISTA SAA LAITTEEN MYYNEELTA JALLEENMYYYJALTÄ. TÄMÄN TAKUUN MUKAISIA VAATEITA ESITETTAESSÄ ON ESITETTÄVÄ MYNTITODISTUS TAI OSTOKUITTI.
VOIDAN MUUTTAA ILMAN ERI ILMOITUSTA.
GIAS-ASIAKASPALVELU 0600-98808
YMPÄRISTÖ


TÄMÄ LAITE ON MERKITTY EUROOPPALAISEN SÄHKÖ- JA
ELEKTRONIKKALAITEROMUN KIERRÄTYSTÄ KOSKEVAN DIREKTIIIVIN
2002/96/EY (WEEE) MUKAISESTI. HÄVITTÄMÄLLÄ TÄMÄN
LAITTEEN OIKEIN ESTÄT MAHDOLLISIA YMPÄRISTÖLLE JA
IHMISTERVEYDELLE AIHEUTUVIA HAITTAVAIKUTUKSIA, JOITA
SAATTAA SYNTÄ LAITTEEN VÄRÄNLAlSEN HÄVITTÄMISEN
SEURAUKSENA.
LAITTEESSA OLEVAMERKKI TARKOITTAA,ETTA LAITETTA EI SAA HAVITTAA KOTITALOUSJATTEEN MUKANA. SE ON TOIMITETTAYA ASIANMUKAISEEN KERÄYSPISTEESEEN SAHKÖ- JA ELEKTRONIIKKALAITTEIDEN KIERRÄTYSTA VARTEN.HAVITTÄMINEN ON SUORITETTAVA PAIKALLISTEN JATTEIDEN HAVITTÄMISTA KOSKEVIEN YMPÄRISTÖSÄNNÖSTEN MUKAISESTI. SAAT LISÄTIETOJA TÄMÄN TUOTTEEN KÄSITTELEMISESTÄ,HYÖTYKÄYTÖSTÄJA KIERRÄTYKSESTA PAIKALLISILTA VIRANOMAISILTA,KOTITALOUKSIIEN JATEHUOLLOSTA TAI LIKKEESTÄ, JOSTA OSTIT TUOTTEEN.
ΔIABASTI OAHFIE ME IPOOXH
IInktpo evepyoinoan/aevepyoinoan (on/off) (4)
Piote γia evpyonoin.
CTaTnueeCKoe 3NeKTPnuecTBO: B npoucece nctkn KObpoB HeKOToPbIX BnIOB MoKeT HaKaJIINBaTbcra CTaTnueeCKoe 3NeKTPnuecTBo. Pa3pI d cTaTnueeCKoro 3NeKTPnuecTBa He npEcdTabJreT onaCHOCTn IJRA 3DOpOBbJ.
IcnoJb3yIte TOnbKO npHaJneJXHocTn, peKOMeHDoBaHHbIe IJI NIOCTaBJIeMbIe KOMpaHNei Hoover.
He donyckaTe IonoadaHnB nbineCoc JERKOBOCJIaMeHraUxCRA KIOKCTe, TAKNX KaOChTNeI, 6eH3nH nIN IN Napbl.
PacnbIyembI a3p03Ob MoKET OKa3aTbC8 ORHeONaChbIM. He pacNbIYTe a3p03OJI B HENOCpeCTBeHHo6JIN3OCTOn OT PbInecoca.
Cetebo whyp. OTCOeHnRA BnIKy OT p03eTKn 3JIeKTPocETn, DEpXHTecb 3a BNkY, a He 3a shyp. B Cnyuae NOBpeJdeHncreTeBOrO Whpy naIeOCdoJIKeH 6bITb OTpeMOHTnpOBaH CNeuaJINCtOM nO cepBnCHOMy 06cIyXnBaHIO, IMeIoUm OfNuaJIbHOe pa3peWeHne KOMnHaHo Hoover. 3To Heo6xOIMO dJaIaNHeu We 6e3OpAChOH 3KcIIyatauIN nbIeCOca.
HEnCnpaBHOCTn. Ipn BO3HnKHOBEHN NIOO3peHnHa HEnCnpaBHOCTb INI NOBpeXdEHNe CTeBOrO shHypa 3KcIIyatauHIO nbIEcOca CneDyET HeMeDJIeHNO npekpATNTb.
Iocne nCnoJb3OBAHn. IIO OKOHaHN pa6oTbI CJIeDyET BbIKJUChITb IIJIeCOC N OTCOEiHNHTb BUNKy OT ICTOCHNkA NITAHN. HIKoRJa He 3a6bIBaIe TBeBikIHOuATb 3JIeKTPoPnBOpN OTCOEiHNrB BUNKy OT ICTOCHNkA NITAHN DO NaHaJa OcHCTKn ININ TEXHNueCKORO 06CJyXKBaHn.
CepBnchoe 6cbJxHbAHne 3eKtpponp6opa cneuaHCTOM KOMHaHN Hoover.
06cpeHnI npoJOnKHTeJIbHO, 6e3OpaHoi n 3ΦcEeTbHOB pa6Otbl DaHHORo 6bITOBoro 3eKTPponp6opA, KOMaHnI peKOMeHdyeT JIO6oe Texo6CbJxHbAHn IIN pEmOH TPOUN3BOIDt ToJIbKO OfNnAJIbHbIM CepBnCHbIM MaCTepom KOMaHN Hoover.
Tpe6obHnK 3neKtpnueckoYacTn
BHIMAHHE!
3JEKTPNUECKA 3HEPIMOXET PEPCTABTb ONACHOCTb IJI XN3HN. DAHHbI 3JEKTPONPMBOP IMEET DBOHUYIO N3OJALIO H E TPEBYET 3AEMJIENIA.
BAKHO: IPOBODA B CETEBOM LHYPE IMEOT CJLEYIOU YIO UBETOBYO MAPKNPOBKY: CINHI - HEITPAJIb KOPNUHEBBI - FA3A
- Haneluhe HeKoTOpbIX ΦyHKcH 3aBnCt OT MoJeH Nblncocca
Teleckonnueckne Tpy6b1 (1)
YtO6bI BblBnHyTb Tpy6bl, noBnHbTe 3aueIky Bnpei.
BbIDBnHyTb Ha Tpe6yEmyDnnHy.
OTnyctntb 3auejky Jnry pfikcaun.
Natpy6ok dIaIJIaHra (2)
BCTaBbTe B OTBepCTne ⅢaHra Do φικcaunn 3aueJIKN ⅢaHra. YTo6bI OTcoeHNHTb, HaxMnte 3aueJIky n BblTaUNTe.
PerynTop cnlb BcacbBaHn3
IpeRyIpOBKn CnJIb BCacbIBaHn yCTaHOBnTe DBNKOK B COOTBETCTBYOoee NOIOKeHne.
Peanb «On/off» (Bkn/Bbikn) (4)
ДяВКПЮЧЕнHAЖАТ.
ДЯ OTKЛIOHЯнHaKaTb BTOpNHO.
PENDAJIb CMATbBAHnI LHHyPA (5)
HaxaTb IJIa ABtOMaTHueCKOrO CMaTbIBaHnCeTeBOrO shhya.
PERYIIMPOBAHNE HANPRAJKEHNA (6)
PnabHoe peryInpOBaHne ypOBHn HaprrKeHHn npON3BOIDTCr C NOMOuBIO DnKkA.
XpaHHeHne nbJIeCocca (7)
Pomea nIeoc Ha xpaHHeHne, yCTaHOBte 3axm dIxApaHHeHn, KaN pOKa3aHo Ha pncyHke.
IcxoHoe noJoxKeHne (8)
ДяВременHorO xpaHEnBa BO BpeM y6OpKn.
HacaKa dIa KOBPOB/NoIOB (9)
Ponb30BaTbcn PbIeCocOM 3AIPELLAETc, ecnn KacceTb HIN fNtbpH He yCTaHOBJIeHb Ha tTaTHbIe MeCTa.
OnopoxHeHne uKIOHHO KaccTebl (11)
ДяdoctnxkeHnOONtMaNbHbIX pa6oUHXapaKTepeNCTNKOMnaHn HOOVER peKomeHnyet OOnpOxHnTb UKNIOHHyOKaccety nocne KaKDoTO NcNoB3OBaHnI PbInecoca.
Дя onopoxKHeHЯ nbIeSc6bOpHnka:
- HaXMMTE KHOKNy OTCOeINHeHnry, paCNOJIOKeHHyIO Ha BepxHeu cAChN PbIeNC6OpHnka (11A).
-ПОДнIMNTe И ВьIHbTe ПьIInec6OpHnK,В3ЯВшИсь 3a pyuKy (11B).
-Перед OTКрьИвием Деверbl nbilec6bOpHnka nOmeCTte erо habemKOctbO dIry Mycopa
- YTO6bI OTKpbITb DBepu NbJIeSc6OpHnKa, HaxMnte Ha 3aueKky, paCNOJoxKeHHyO Ha puYe IOnopoxHnTe NbJIeSc6OpHnK (11C).
3akpoTe DBepey KacceTbI IN BCTaBbTe ee B nbIeCoc B nepBOHaaybHoe NOIOXKeHne.
DocTyn K nepedHemy fNbtpy Hepa (12)
IocTyN K nepedHemy pInbtpy (Tnna Hepa) oecneuBaetc nJeDyoUIM 6pa30M:
- 3BJIeKInTe n3 nbIeCoca nbIeSc6OpHnK.
- YdepxkBa pyky nbIe6OpHnka, BO3bMntecb 3a BepxHIO KpbIuKy.
-Повернite Верхню Крblшky npOTив чабов CTpeлкь
В NOLOжене "OTКрblTO", И ChIMITE Крblшky C
пblесборнka (12A, B).
06cnyxmbaHne nepeDHeRo 0nIbTpHa Hepa (13)
KoMaHa Hoover peKoMeHnye Tocne nToro OOnopOxHeHn KaCCeTbI npOMbTb PnJIbTp KAcCtebl.
-ИЗБЛЕКИТЕпесDNинФильТР,повернУВ erо по уасовоь стpeлke.
-ПомecTNbIIEc6OpHnKHaI EMKOCTbIOДЯ MYCopa, 06ctyHTe KopNyc nbIIEc6OpHnKa.
-При Heo6xOДmOCTn npOMOte nOd TeNToB Odoi (13C).
-Перед установков посушпев Теймен 24 чаов плд д полною посьхаши.
- YctaHOBtE fNbTp 6paTHO CNeIyIOuIM O6pa3OM: yCTaHOBtE fNbTp TaK, UTObI erO 3anOpbl COBaJaA N C COOTBETCTBYUcIMM METKaAMn Ha KpbIiKe, I NOBepHtE fNbTp IpOTNB YacBOB CTpeJKN Do FHKcaUIM.
BAXHO: INCIOJIb3OBATb NbIIECOC 6E3 NEPEdHrO FNIbTPA 3ANPEUaETcR
CmeHa 3aAnHeo fNbIbTp a (14)
KoMaHaHr HoovEr peKOMeHnyet BaM MeHrTb 3aHnI qInlbTp KaXDbIe 3 Meca.
- HaxMMTE Ha 3aueKny peWetKn 3aHHeo fNlbTppa, YTO6bI DOCTaTb 3aHnI fNlbTp.
CHIMNTEIJIaHr.
BCTaBbTe HOBbI qnJIbTp n yCTaHOBtE KpbIuKy B nepBOHaayabHoe NOJIOKeHne.
BbI3OBdIaTexo6cnyxmbHnA
Bb3OBdoJxHc6bITbOIIaueH,ecIINOKaXeTcY,TOIbJIncOC HaxoIHTcB INCpabHom COCTOHN,INHe 6bl CO6paH B COOTBETCTBN C HAcToIzIMN INCTpyKzIyMn,INHEnPabINbHO NcNoJIb30BaJIc.
PpeKJe Yem Bbl3BaTb cepBnCHoro MaCTepa KomnaHm HOOVER, npou3BeDnte npOBepky no cIeNyUoSeMy KOHTpOJIbHOMy CnNcKy.
- PódaetcJn Ha nIbIeCoc paOoee HaprrKeHHe?
PpOBepTe Ha npyrom yCTpoiCTBe.
2.Пьilenc6bOpHnK3aOnHeN?
3.He 3akynopeh JIuJNaHr?
4. He 3acopehbl nI mIbTpbl?
B cnyuae IIO6bIX cOmHEnI IO3BOHInTe 3a COBeTOM B MeCTbI CepBnC-ueHTp HOOVER, BO3MOxHo, OHN CMOryT nOmoYb Bam no TenefoHy.
TapaHTnHbIe 6o83aTeJbCTBa
YcnoBra npantn daHoro 6bITOBORo 3neKtpueckoro np60pa onpeJeIOTc HauHm PpeCTaBtTeJEM B CTPaHe, rde 3OT 3neKtpopnp6op npOan. Boone noDpo6HyIO nHΦopMaunio 6 3TNx ycNoBnx Bbl MoKeTe NOyHTb y DInepa, npOabwero 3neKtpopnp6op. Pn npEpbAJIeHN npTeH3n IO yCNOBnM DaHHbIX rapaHTnHBix O83aTeJBCTB, DOJXeH 6b1b npEcdTabeH uek nn KBTaHucn Ha npOdaHHbI TOBap.
N3MeHeHnMoYb6bTB BHeceHb6e3yBeDOMJIeHn.
109034, Pocca, MockBa, CeueHOBckn nep.6 cTp. 3 TeI: +7-095-796.96.95 DaKc: +7-095-796.96.94
PpeCTaBnTeNbCTBO Ha YkpanHe: 01033, YkpanHa, KneB, yn. BonoMmnpckar 97/37
Tei: +38-044-490.59.54 ΦaKc: +38-044-490.59.57
Yka3aHbIe Texnueckne XapakTepeCTNKMOrT BapbnpoBaTbCnIO npuHHe BnnaHnHa HnX Bheunx oKTopOB.

IobOIM Do BaUero CBeDeHnry, UTo DaHHoe N3dEne CeptuФnCupOBaHO Ha COOTBETCTBNE Tpe6oBaHnM 6e3OpacHocTn OprAHOM IO cepTuФnKaunn IpomblJeHHoN pOdyKunn "POCTECT-MOCKBA". CBeDEHnO O Homepe cepTuФnkata n Cpoke erO DeJcTBn Bbl MoXeTe noJyHTb y npOdaBua MaRa3Ha, B KOTOpOM bblno npNo6peTeHo daHHoe N3dEne.
B COOTBETCTBm C NocTaHOBHeHem IpaBntbCTBa PocCnCKo Feepaun No 720 ot 16.06.1997 r.npOu3BOuTeBdoJxH eONpeDInTb cPOK CnyK6bl BbIpyckaembIX IM N3dEIN.
Cpok cnjx6bl Haunx H3denn, npu ycnoBn INH HopMaIbHOJ 3KcPnyataUN B DomaunHX ycNoBnX C CO6IOHeHem BCex Tpe6obAHn, coepkauxxcraB INHCTpykUn N O 3KcPnyataUN COCTABJIeT OT 7 do 10 let. Yactb cpoka cnjx6bl, COOTBETCTByOUSA TOMy, UTO B MEXdyHapOHOIN PpaKTKe I3BecTHO KAK CpOK rapaHTN, COCTABJIeT DBeHaDuaTb MecaueB.
3KOJIIOJNA

DaHHe yCTpoiCTBO npomapKnpoBaHO cOrIaCHO EBPOeNCKo IInpeKTHBe 2002/96/EC no YtIN3aunn 3JIeKTPnuEckoro n 3JIeKTPoHHoro 06OpyDoBAHnA (WEEE). Co6IIIOa npabnla yTIN3aunn daHHoro 3JIeKTPoPnpbopa, Bbl NOMOraTe IpeIoTbPaTb BO3MOXHbIE OTrpuaTeJbHbIE IOcNEIcTBnI dIg OkpykaHoue cpeDbI n 3IDOpOBbBy HeLOBeka, KOToPbIe MOrIb 6bl IMeTb MeCTO pRn HENpaBnBHOY tIN3aunn DaHHoro yCTpoiCTBa.

MapknpoBka Ha daHHOM yctpoiCTBE 03HauaET, YTO erO HeIb3y yTnIn3npoBaTb KAK 6bITOBbie OTXoDbI. Ero Heo6xOIMO DOCTABNTB B COOTBETCTBYUIN PnyKT yTnIn3aUNN 3JNEKTPnueCKORIO 3JNEKTPoHHORO 06OpuyOBAHNA. yTnIn3aUNN DOJXH aPBOOHTbC B COOTBETCTBIM C MeCTHBIM 3aKHOHaTeJIbCTBOM IIO
yTnIIN3aun OTxOIOB. IJIaIIOUe HIOpO6HOn IHOpMaun IO yXoY, BOCCTaHOBNeHIO INpepea6OTKe daHHoro yCTpoiCTBa 0bpaITecb K rOPOdCKM BIACTaM, B CnyK6y yTnIIN3aUN 6bITOBbIX OTxOIOB IN IN B MaRa3IN, B KOToPOM Bbl npNo6peN daHHO eYCTPOIcTBQ.
PROSIMY O UWAZNE PRZECZYTANIE TYCH INSTRUKCJI
TEN WYROB POWINIEN BYC UZYWANY ZGODNIE Z NINIEJSZYM INSTRUKCJAMI ORAZ WYKORZYSTYWANY TYLKO DO UZYTKU DOMOWEGO.
ZESTAW NARZEDZI MOZE BYC UZYWANY DLA USUWANIA BRUDU I KURZU Z MEBLI I TKANIN.
ab = 12
*(0)dLwIg
iabjlll 1
(14) Hepa
Hepa 1
.
yll lill lcll 1
acllll jaeolj sccgall lalil
Jlill 10000000000000000000000000000000000000000000000000
(1r) Hepa
Jia jia jia jia jia jia jia jia jia jia jia jia jia jia jia jia jia jia jia jia jia jia jia jia jia jia jia jia jia jia jia jia jia jia jia jia jia jia jia jia jia jia
2 1
gj ggo
(1)paley
J 5 Jdall jdua Hoover
y = - 12x + 1
Jgssallpalaegyfoablaewbc
palell
11
1
*(9)/
jIJIbuiyJyIyIyIyIyIyIyIyIyIyIyIyIyIyIyIyIyIyIy
(B
(1·)
i 1
Jue gLoS iWssall glg jai p 81
LwJ LwJy LwJy Jx Jx Jx Jx Jx Jx Jx
c
g aisall lalp
1 1
a
aall jll 100
4q ≤ 10 或
(11)
HOOVER
JuaaiuJS Juy juiiie
jlll 1
(11A)
(11B)
L
aiee eae aee
(11C)
g 1
a
aJy
a aal
HOOVER
:
1
j1j4p12uyl jll
sulio jullie J
HOOVER 1
j
a aalll llaall l lalall k y jg jy g y li y g y li y g y li y g y
Jaa
AV.0...yGIAS
11.8007111.HOOVER
25.11
2002/96/EC 12345678900000000000000000000000000000000000000000000000
Ciiill lla cllio co Caioll

aaii i 100000000000000000000000000000000000000000000
iikay Jlll jie yj 110
i 1

