
Digitradio 630 - Radio TECHNISAT - Free user manual and instructions
Find the device manual for free Digitradio 630 TECHNISAT in PDF.
| Product Type | Internet radio, DAB+, FM, CD, Bluetooth |
| Brand | TechniSat |
| Model | Digitradio 630 |
| Dimensions (W x H x D) | 400 x 215 x 175 mm |
| Power Supply | AC adapter 100-240 V AC, 50/60 Hz, output 18 V DC / 3300 mA |
| Power Consumption (Operating) | 59.4 W max |
| Power Consumption (Standby) | Less than 1 W |
| Reception Modes | Internet, DAB/DAB+, FM, Bluetooth, CD, USB, AUX |
| Speakers | 2.1 stereo system |
| Station Memory | 12 presets for DAB, FM and Internet |
| Network Connectivity | Built-in Wi-Fi, LAN Ethernet port |
| Streaming Functions | Spotify Connect, UPnP, Internet radio, Multiroom (via MyDigiRadio-Pro app) |
| Alarm Functions | Dual alarm with source selection (Internet, DAB, FM, CD, buzzer), snooze |
| Sleep Timer | Yes (15, 30, 45, 60 minutes) |
| Equalizer | Presets: Normal, Center, Jazz, Rock, Soundtrack, Classic, Pop, News, My EQ |
| CD Player | Audio CD and MP3 |
| USB Port | Music file playback |
| Bluetooth | Version not specified, range 10 m, NFC compatible |
| Display | Backlit screen with brightness adjustment (high, medium, low) |
| Remote Control | Infrared, range 5 m, AAA batteries included |
| Cleaning | Dry lint-free cloth, no solvents or abrasive products |
| Safety | Unplug before cleaning, do not expose to moisture, indoor use only |
| After-Sales Service | Contact manufacturer (TechniSat) for repairs |
Frequently Asked Questions - Digitradio 630 TECHNISAT
User questions about Digitradio 630 TECHNISAT
0 question about this device. Answer the ones you know or ask your own.
Ask a new question about this device
Download the instructions for your Radio in PDF format for free! Find your manual Digitradio 630 - TECHNISAT and take your electronic device back in hand. On this page are published all the documents necessary for the use of your device. Digitradio 630 by TECHNISAT.
USER MANUAL Digitradio 630 TECHNISAT
Digital Stereo Internet, DAB+ and FM radio with 2.1 speaker system plus Bluetooth,
USB connection, CD and Spotify Connect
CONTENTS
ENGLISH 3-60
FRANCAIS 61-118
ITALIANO 119-176
NEDERLANDS 177-238
NORSK 239-296
DANSK 297-354
POLsKE 355-412
CSTNA 413-470
SLOVENSKE 471-528

Instruction Manual
DIGITRADIO 600/630
Digital Stereo Internet, DAB+ and FM radio with 2.1 speaker system plus Bluetooth, USB connection, CD and Spotify Connect
EN
TechniSat
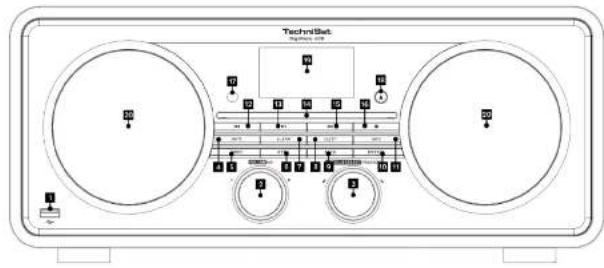
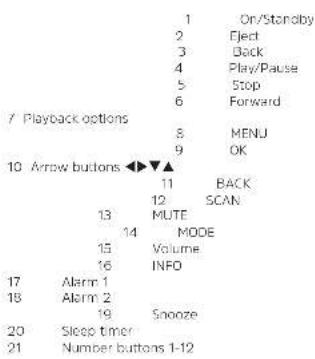
1 Illustrations
1 USB connection
2 VOLUME/OPower
3 SCROLL&SELECT/SNCOZE
4 MUTE
5 MODE
6 MENU
7 ALARM
8 SLEEP
9 BACK
10 PRESET
11 IN
12
13 Play/Pause
14SP compensation
15
Forward
Stop
IResponder
▲Fect
Display
Speaker
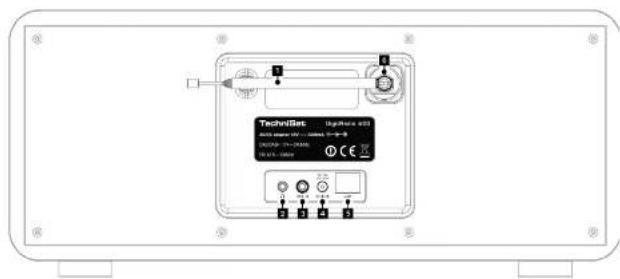
1 Telescopic antenna
2 Headphone connection
3 AUX input
4 DC connection
5 Network connection
6 External antenna connection (see Section 4.3.3)
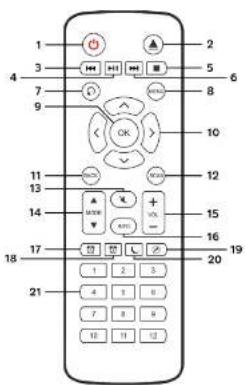
Remote control
Contents
1 Illustrations 4
2 Foreword 11
2.1 Target group for this instruction manual 11
2.2 Intended use 11
2.4 Satety 12
2.5 Disposal 10
2.6 Legal notices 16
2.7 Service instructions 18
3 Setting up the device 19
3.1 Remote control 21
4 Description of the DIGITRADIO 600/630. 21
4.1 Scope of delivery 21
4.2 The special features of the DIGTRADID 600/630
4.3 Preparing the DFG RABIO for operation 22
4.3.1 电能表的使用及维护 22
4.3.2 Improving the Antenna Reception 25
434. Inserting the batteries 24
4.4 General device functions 25
4.4.1 Switching on the device 25
4.4.2 Operating the device with the remote control 25
4.13 Adjusting the volume 25
4.4.4 Activating the mure function 20
4.4.5 Recieving displays 26
4.4.7 Switching off the device 28
5 Menu operation 28
5.1 Main menu 28
5.2 Source selection 28
6 Internet radio 29
6.2 Selecting internet radio stations 30
6.3 Saving Internet radio stations 30
6.4 Selecting the saved stations 31
6.5 Deleting a saved station 31
7 Playing music (UPnP & USB media) 32
71 Playing media 33
7.2 Creeting your own play list.. 33
7.4 Providing music via the Windows media player 34
73 OPHP renderer (DMR) 34
8 Spotify Connect 34
9 The DAB function 36
9.11 Data compression 36
9.12 Audio stream 36
0.2 PABSTRACT
9.2 Performng the station scan 37
9.2.2 Selecting stations 38
9.2.3 Saving LAB stations 38
9.2.4 Selecting the programmed stations 38
9.25 Deletng a saved station 39
9.26 Signal Intensity 39
9.27 Dynamic Label Plus 40
9.28 Setting DRC 40
9.2.9 Deleting inactive stations 40
10 FM mode 41
10.1 Switching on the radio mode 41
10.3 Manual station section 41
10.4 Automatic station selection 42
10.5 Setting mono/stereo 42
10.7 Selecting the programmed stations 13
10.8 Deletng a saved memory slot 43
11 Bluetooth 43
11.1 Activating the Bluetooth mode 43
11.3 Pwong music 44
11.4 Bluetooth connection using NFC 45
12 Audio/Playing MP3 CDs 45
13 Other functions 46
13.1 Sleep function 46
13.3 setting the alarm time.. 47
13.4 Switching off the alarm after being woken 48
13.5 Switching off the alarm 48
14 System settings 48
14.1 Equaliser 48
14.1.1 My EQcorer 49
14.1 My Eo setting 49
14.2.1 WPS connection 50
14.2.2 Deleting network sellings no longer required 50
14.3 Time settings 50
14.4 Language 51
14.5 Forewording 52
14.5 Factory setting 91
14.6 Software update 32
14.7 Set-up wizard 52
14.8 Info. 53
14.9 Display backlight 54
14.10 Multi-Room 54
14.10.1 Displaying details 55
14.10.2 Creating a new group 55
14.10.3 Add to group 55
14104 Show clients 55
619255
14.10.5 Exit group 55
14.10.6 Delete group 55
15 Cleaning 56
16 Troubleshooting 57
17 Technical specifications / manufacturer's instructions 59
2 Foreword
This instruction manual will help you to use your radio system. Hereinafter referred to as the DIGITRADIO 600" or "device", as intended and safe.
2.1 Target group for this Instruction manual
The Instruction manual is intended for anyone who is installing, operating, cleaning or disposing of the device.
2.2 Intended use
The device is designed for the reception of Internet/FM/DAB radio programmes. It has been designed for private use and not for commercial purposes.
2.3 Important Information
Please observe the following advice to avoid any risks to safety, to prevent damage to the device and to help protect the environment. Store this manual safely for future reference. Always observe all warnings and information in this Instruction manual and on the rear of the device.
Caution This Identifies Important Information that must be observed to prevent device defects, data loss/missuse or undesired operation.
Tip - Indicates a note about the function described, as well as other functions associated with it, and any others to be observed with reference to the respective place in the instruction manual.
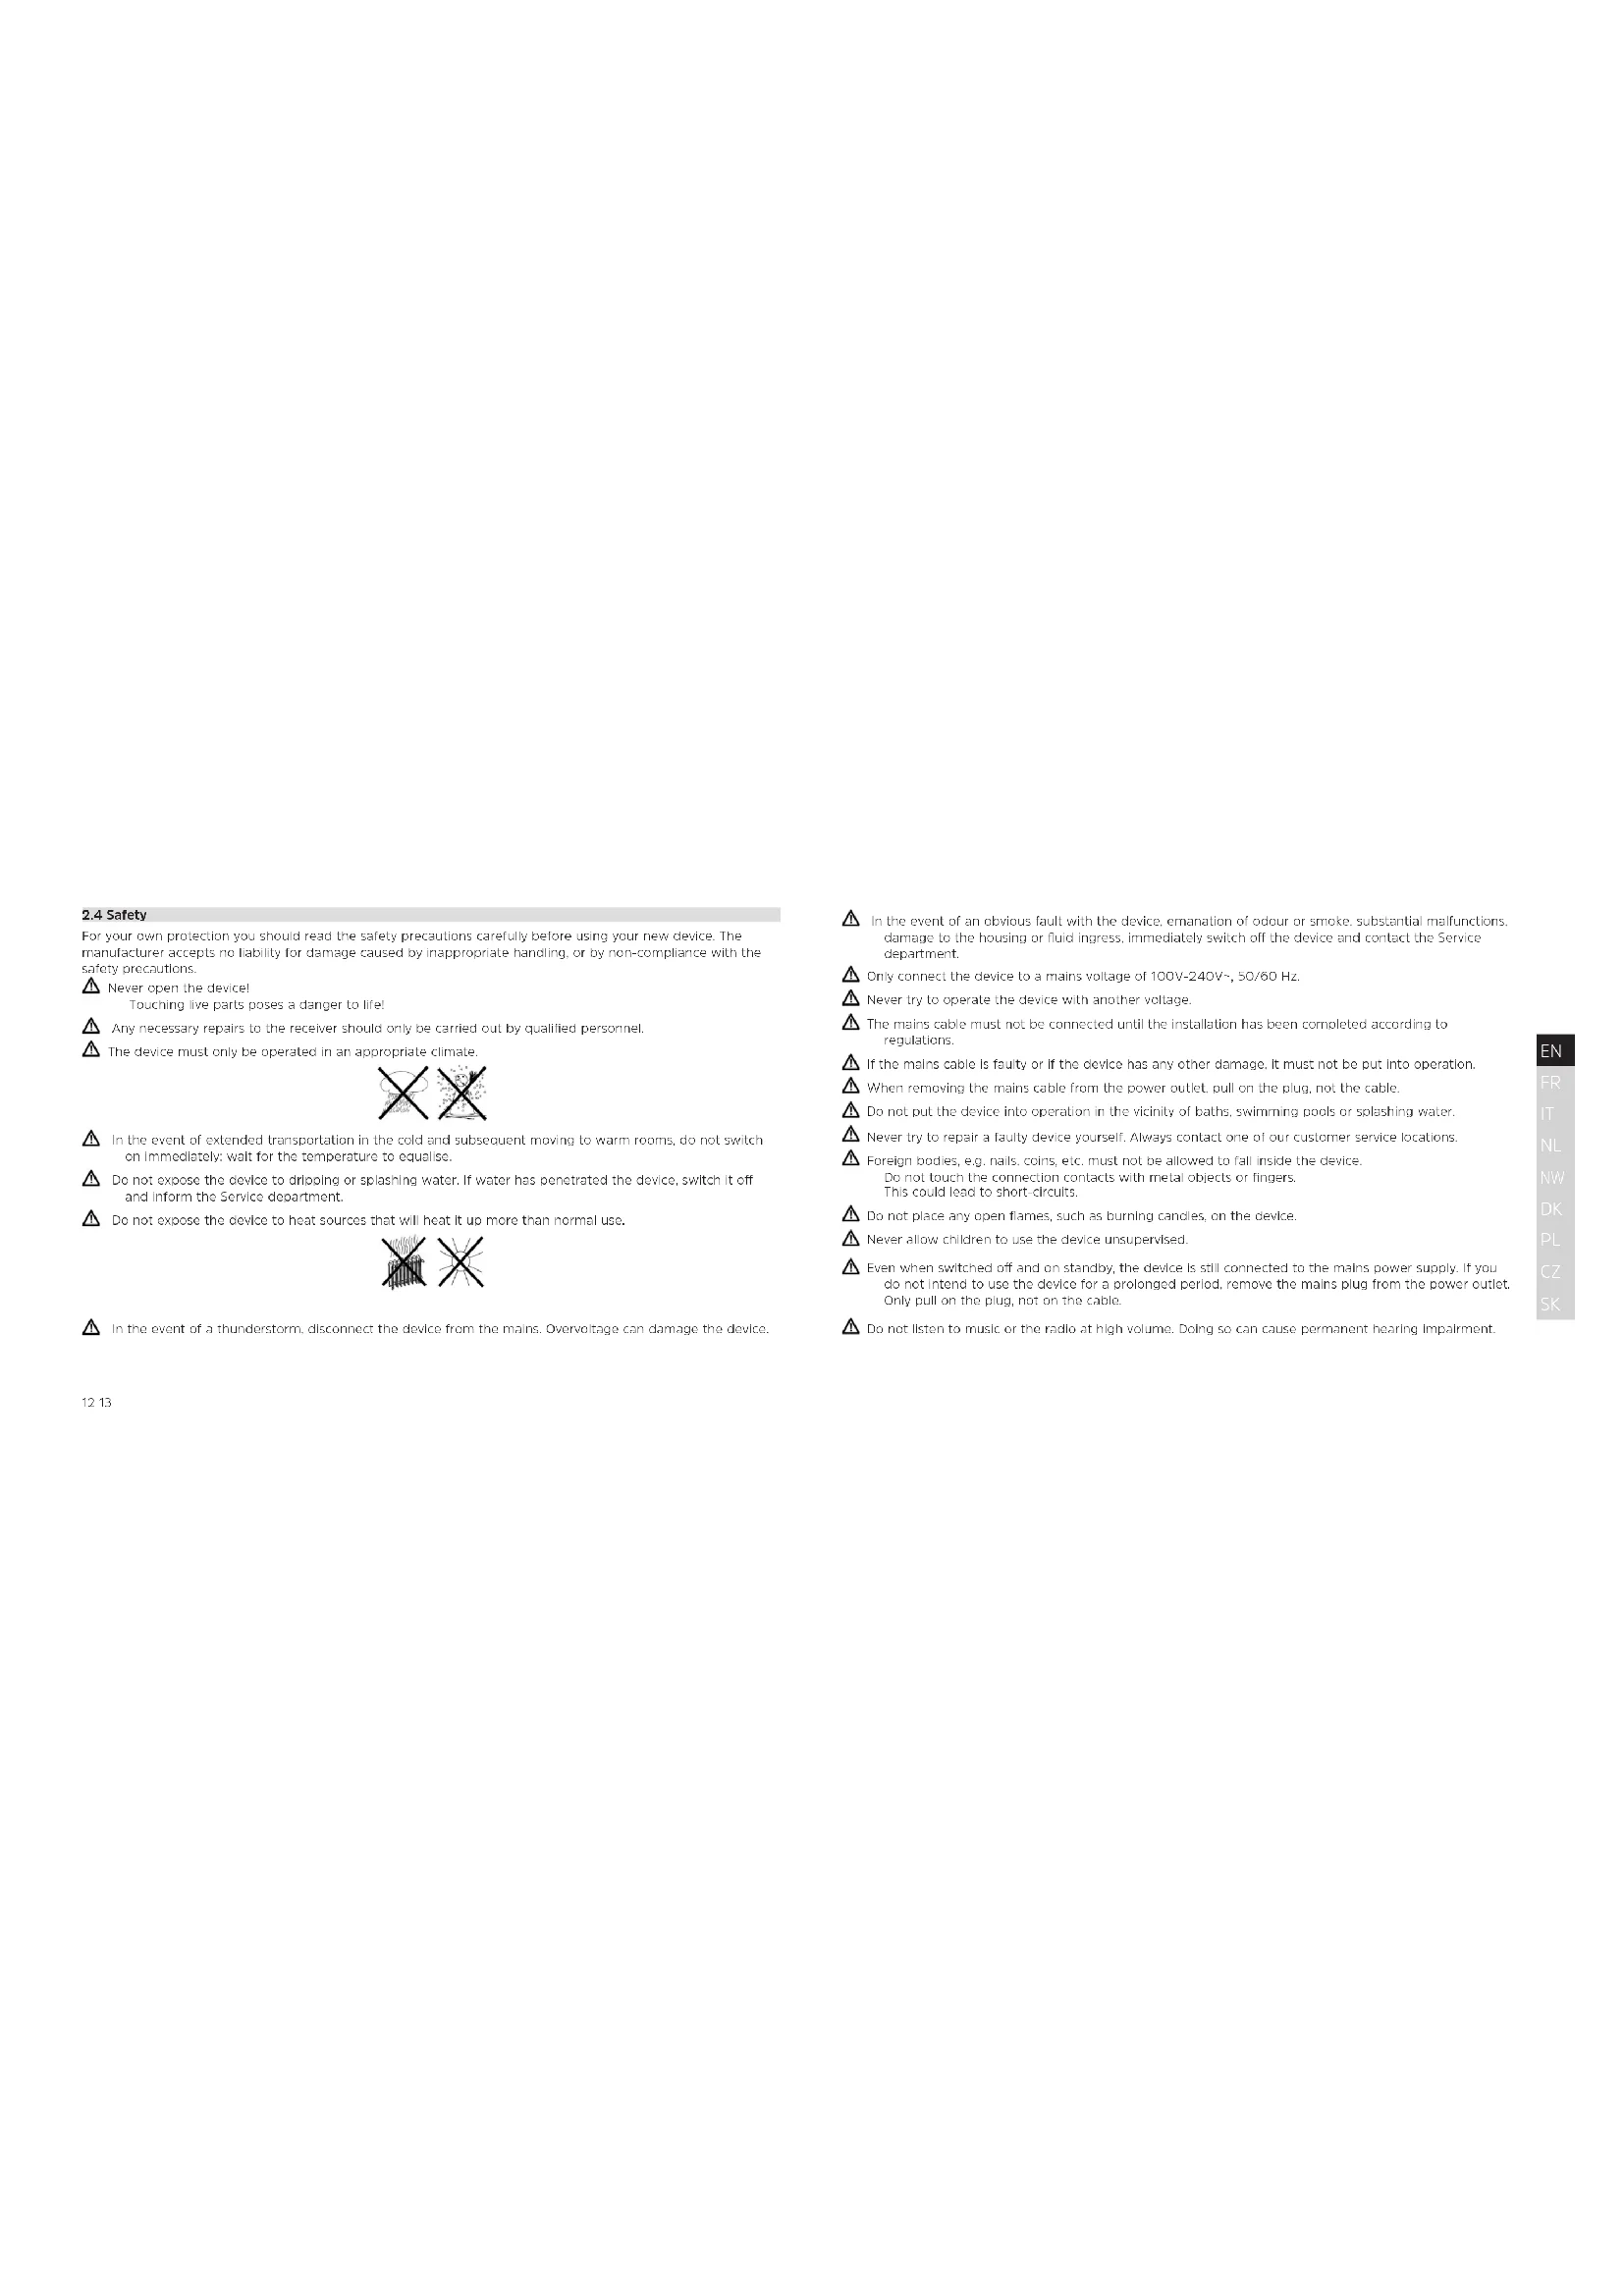
2.4 Safety
For your own protection you should read the safety precautions carefully before using your new device. The manufacturer accepts no liability for damage caused by inappropriate handling, or by non-compliance with the safety procedures.
A Never open the cowel
Touching live parts poses a danger to life!
Any necessary repairs to the receiver should only be carried out by qualified personnel.
The device must only be operated in an appropriate climate.

In the event of extended transportation in the cold and subsequent moving to warm rooms, do not switch on immediately; wait for the temperature to equate.
Do not expose the device to dripping or splashing water. If water has penetrated the device, switch it off and inform the Service department.
Do not expose the device to heat sources that will heat it up more than normal use.

In the event of a thunderstorm, disconnect the device from the mains. Overvoltage can damage the device.
In the event of an obvious fault with the device, emolation of odour or stroke, substantial malfunctions, damage to the housing or fluid ingress. Immediately switch off the device and contact the Service department.
Only connect the device to a mains voltage of 100V-50/60 Hz.
A Never try to operate the device with another voltage.
The main cable must not be connected until the installation has been completed according to regulations.
If the mains cable is faulty or if the device has any other damage, it must not be put into operation.
A When removing the mains cable from the power outlet, pull on the plug, not the cable.
A Do not put the device into operation in the vicinity of baths, swimming pools or splashing water.
A Never try to repair a faulty device yourself. Always contact one of our customer service locations.
Foreign bodies, e.g. nails, coins, etc. must not be allowed to fall inside the device.
Do not touch the connection contacts with metal objects or fingers. This could lead to short-circuits.
Do not place any open flames, such as burning candies, on the device.
Never allow children to use the device unsupervised.
Even when switched off and on standby, the device is still connected to the mains power supply. If you do not intend to use the device for a prolonged period, remove the mains plug from the power outlet. Only pull on the plug, no on the cable.
A Do not listen to music or the radio at high volume. Doing so can cause permanent hearing impairment.
This device is not intended to be used by people (including children) with limited physical, sensory or mental capacities or lack of experience and/or knowledge, unless they are supervised by a person responsible for their safety or they are instructed by them as to how to use the device.
Children must be supervised to ensure that they do not play with the device.
It is forbidden to carry out modifications to the device.
Damaged devices or damaged accessories must not continue to be used.
Using the batteries:
Ensure that the batteries are kept out of the reach of children. Children could put the batteries into their mouths and swallow them. This could lead to serious injuries. Therefore ensure that the batteries and remote control are out of reach of young children. Seek medical advice immediately if this occurs.
A Normal batteries may not be charged, reactivated using other means, disassembled, heated or disposed of in an open fire (explosion hazard).
Promptly change batteries that are losing power.
Clean the battery contact and device contacts prior to inserting them.
Always replace all batteries at the same time and use the same battery type.
There is an explosion hazard if a battery is inserted incorrectly.
Dispos of used baterios immediately. Only replace batteries with the correct type of batteries and the correct model number.
Caution! Do not expose batteries to extreme conditions.
Do not place them on radiators, or expose them to direct sunlight.
Leaking or damaged ballers can cause burns if they come into contact with the skin. In this case use suitable protective gloves. Clean the battery compartment using a dry cloth.
2.5 Disposal
The device packaging is exclusively comprised of recyclable materials. Please sort the components appropriately, and dispose of them in line with your local waste disposal regulations
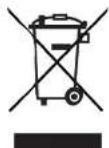
At the end of its service life, this device must not be disposed of with your regular household waste. It must be taken to a recycling collection point for electrical and electronic equipment. This device is identified in accordance with the Waste Electrical and Electronic Equipment (WEEE) Directive 2012/19/EU.
This is indicated by the Symbol on the product, the instruction manual or the packaging.
The materials are recyclable according to their identification. An important contribution is made to our environment by recycling, recovery of materials or other kinds of recycling for old devices.

Please ask local authorities for the location of the relevant disposal point. Please ensure that flat batteries and electronic waste are not disposed of in normal household refuse, but are correctly disposed of (returned to the specialist shop, bins for specific waste).
Batteries can contain polsoneysubstances which harm the environment.
They are subject to European Directive 2006/66/EC and may not be disclosed of in normal household waste.
2.6 Legal notices
1 TechniSat herewith declares that the radio system model DIGITRADIC 600/630 corresponds to Directive 2014/53/EU. The complete text of the EU declaration of conformity is available at the following website: http://konf.lusLc.de/7ID=10993
i TechniSai accepts no liability for product damage as a result of external influences, wear or improper handling, unauthorized repairs, modifications or accidents.
Changes and printing errors reserved. Version 04/18 Copy and reproduction are subject to the publisher's consent The respective current version of the instructions can be downloaded in pdf format in the download area of the TechnSat lomepage at www.technisat.de.
This device is intended for use in all countries of the European Union and in Switzerland, Norway, Liechtenstein and Iceland. Operation within the frequency range 5150 MHz - 5350 MHz is only permitted in enclosed spaces.
DIGTRADIO 600 and DIGTRADIO 630 and TechniSat are registered trademarks of:
D-54550 Daun/Elfe, Germany
www.technisat.oo

2.7 Service instructions
This product is quality tested and provided with the legal warranty period of 24 months as from the date of purchase. Please keep your receipt as proof of purchase.
i
Should you experience a problem with this device, or for queries and information, our Technical Hotline is
available:
Mon. Fri. 8:00 am - 8:00 pm on tel.:
-49(0)392592201800
If the device needs to be sent back please use the following address only:
The names of the companies, institutions or makes referred to are trademarks or registered trademarks of the respective owners.
3 Setting up the device
- Place the device on a firm, secure and horizontal base.
Make sure the area is well ventilated.
Caution
Do not place the radio on soft surfaces such as carpets and blankets or near to curtains and wall hangings. These could obstruct the ventilation openings. The necessary flow of air could be interrupted as a result. This could potentially lead to fire in the device.
The ventilation slots at the rear and the sides must always be unobstructed. They must not be
obstructed by curtains, blankets or newspapers.
Do not place the device near to sources of heat, such as radiators. Avoid direct sunlight and very dusty environments.
Do not select a location for the device with high air humidity, e.g. a kitchen or sauna, as the precipitation of condensation water could damage the device. The device is intended for use in a dry environment and in a moderate climate and must not be exposed to dripping or splashing water.
Please note that the device footings could potentially leave coloured marks on some types of furniture surfaces. Place a protective layer between your furniture and the device.
Do not use outdoors!
Keep the device and the discs away from equipment that emits intense magnetic fields
Do not place any heavy objects on the device.If you move the device from a cold environment to a hot environment, moisture could accumulate inside the devices. In this case, wait around an hour before using the radio.
Lay the mains cable in such a way that nobody can trip over it.
Ensure that the mains cable or the plug are always easily accessible so that the device can be quickly disconnected from the power supply.
The power outlet should be as close to the device as possible.
Insert the plug fully into the socket to ensure connection to the mains.
Use a suitable, easy-to-access mains connection and avoid using multiple socket strips.
Do not touch the mains plug with wet hands; electric shock hazard.
In the event of a malfunction or the detection of smoke or odour from the housing, remove the plug from the power outlet Immediately.
Remove the plug before a storm starts.
Remove the plug if the device is not going to be used for a prolonged period, e.g. before going away on a long trip.
If the device is not to be used for a long time, remove all the batteries since they could leak and damage the device.
Excessive volume, In particular when using headphones, can damage hearing.
Do not set up the device in the vicinity of equipment which emits intense magnetic fields (e.g. motors, speakers, transformers).
3.1 Remote control
If the device is not to be used for a long time, remove all the batteries since they could leak and damage the device.
4 Description of the DIGITRADIO 600/630
4.1 Scope of delivery
Please ensure that all the following accessories are present:
1x DIGITRADIO 600/630
1x power supply unit
1x remote control with batteries
1x instruction manual
4.2 The special features of the DIGITRADIO 600/630
The DIGITRADIO is comprised of a stereo Internet radio, UPNP media player and DAB+FM receiver with timer function, Bluetooth music streaming and AUX input.
In addition to a CD player, It also offers Spotify Connect and multi-room support
This enables the reception of digital radio or streaming of other media.
Digital radio offers a new digital format for listening to crystal clear sound, with no background noise.
- You can store up to 12 DAB, FM and Internet stations respectively.
The device has a time and date display.
The device has 2 alarm functions and a sleep function.
- You can select whether you wish to be woken by DAB, FM, CD or buzzer.
- You can operate the device easily using the remote control.
- In conjunction with the MyDigit Radio Pro app the device offers multi-room support (you can find more information in the MyDigit Radio Pro app and on the website www.technisat.de)
- Spotify Connect support.
Audio playback of USB.CD or UPnP
4.3 Preparing the DIGITRADIO for operation
4.3.1 Connecting the power supply unit
Connect the device to the mains network using the supplied power supply unit.
To supply power to the device, first of all connect the cable to the DigitRadio and then insert the power supply unit into the socket.
When you connect to the mains for the first time, "TechSal" appears on the display.
Ensure that the operating voltage of the radio coincides with the local mains voltage before you insert it into the wall socket.
When not in use, remove the power supply unit from the power outlet. In doing so, pull on the plug and not on the cable.
Remove the power supply unit before a storm.
Remove the power supply unit from the power outlet if the device is not going to be used for a prolonged period, e.g. before going away on a long trip.
The heat generated during operation must be dissipated by sufficient air circulation. Therefore the device must not be covered or installed in a closed cupboard. Ensure there is free space of at least 10 cm around the device.
4.3.2 Improving the antenna reception
The number and quality of the stations to be received depend on the reception conditions at the Installation location. Excellent reception can be achieved with the DAB/FM rod antenna.
Remove the telescopic antenna from its holder, align it and extend it.
It is often important to ensure the exact alignment of the antenna, in particular on the outskirts of the DAB reception area. You can quickly find the location of the nearest transmission mast on the Internet at, for example, www.dabplus.de.
i Start the first scan at a window in the direction of the transmission mast.
When the weather conditions are poor, DAB reception may be limited.
Using the signal intensity display in the status bar, you can find the optimum antenna alignment and it required, the best installation location.
4.3.3 Connecting external antennas
With the aid of the assembly key (Itern number 000/3445), you can remove the factory-mounted antenna and connect another suitable antenna (e.g. 0000/6022).
A Always follow the indications in the instruction manual corresponding to the external antenna used, or consult your installation company if required.
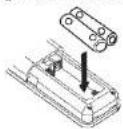
4.3.4 Inserting the batteries
Push open the battery compartment cover on the back of the remote control.
Insert two 'AAA' sized (Micro) batteries, 1.5V . In the battery compartment and ensure the correct polarity. A set of batteries is included in the scope of delivery.
Close the battery compartment lid carefully again until the lid engages.
1 Promptly change batteries that are losing power.
Always change both batteries at the same time and use the same type of batteries.
Leaking batteries can cause damage to the remote control
If the device is not being used for a prolonged period, remove the batteries from the remote control.
Important information for disposal: batteries can contain poisonous substances which harm the environment. Therefore, it is imperative to dispose of the batteries according to the legal provisions in force. Never dispose of the batteries with normal domestic waste.
4.4 General device functions
Settings can be carried out both using the buttons on the device and with the remote control.
The description of the operation refers to the buttons on the remote control
4.4.1 Switching on the device
You can use POWER on the device or On/Standby on the remote control to switch the device on or back to standby.
After switching on for the first time, you can launch the set-up wizard (Section 14.7). Here you can set the data and time either via DAB/PM. Internet or no update (manual). An attempt is then made to establish a connection to a WLAN network. To do so, select the corresponding WLAN network and if required, enter the WLAN password with the remote control.
4.4.2 Operating the device with the remote control
With the infrared remote control you can operate the most important device functions from the comfort of your armchair. When operating the device with the remote control, please take into account the following points:
Point the remote control towards the front of the device.
2. Visual contact between the station and the receiver must be guaranteed.
If the range of the remote control reduces, replace the batteries new ones.
The maximum range is approximately 5 metres from the front of the device.
4.4.3 Adjusting the volume
Adjust the volume using the Volume +/- buttons on the remote control or VOLUME on the device. The set volume is shown on the display.
4.4.4 Activating the mute function
You can switch off the volume at the touch of a button using the MUTE button. This mode is indicated on the status bar by a corresponding icon.
The sound is switched back on by pressing the MUTE button again.
4.4.5 Retrieving displays
By repeatedly pressing the INFO button during the playback of a source, the following information can be viewed and scrolled through:
Internet radio: Play music (UPnP media):
| track | artist | Artist | ||
| Description | Album | |||
| Genre | Bit | rate, | sound format | |
| Reliability | Playback | buffer | ||
| Bit rate, sound format | Date | |||
| Playback buffer | ||||
| Date | ||||
DAB mode:
DLS: continuous text with additional information which the stations may provide
Programme type
Ensemble/multiplex (group name) frequency channel
Signal intensity
Signal error rate bit rate in kbps sound format
Date
Station name
FM mode:
RT radio text. (if transmitted): PTY - programme type Frequency, date
Spotify
Track
Artist
Album
Bit and sampling rate Path
Playback buffer Bit and sampling rate
Duration
Connect:
e Path
Bit and sampling rate
Track
Artist
Album
Playback
D.
Duration
playback:
buffer
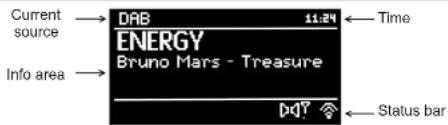
4.4.6 Visual display
Depending on the selected function/source, the visual display shown may vary. Please observe the indications on the display.
4.4.7 Switching off the device
Using the On/Standby button on the remote control you can switch the device to standby, the date and time appear.
5 Menu operation
Menu navigation primarily takes place using the MENU. ▲ ▲ and OK buttons.
Alternatively, you can rotate or press SCROLL&SELECT on the device.
The menu is divided into the respective submenu for the currently selected source and the main menu
To navigate in submenus, either press the OK button or alternatively the button.
highlights the current selection.
You can go back one step by pressing the MENU or button
Close menu: press MENU again or wait for approx. 15 seconds.
5.1 Main menu
The main menu takes you to all the functions and settings for the DIGITRADIO.
Press the MENU button to access the main menu.
If you are currently in a playback source, you can use the MENU button to access the submenu for this source. To reach the main menu, while in the open submenu use the or buttons to select the Main menu item and press OK.
5.2 Source selection
Press the MODE button as often as required until the desired source is shown on the display.
Alternatively:
Press the MENU button.
If you are in a submenu, select the Main menu as described in Section 5.1.
Using the or buttons, select the desired source and confirm your selection with OK.
6 Internet radio
The DIGITRADIO is equipped with an Internet radio receiver, in order to receive internet radio stations/channel, you need a WLAN coupler with Internet access or a LAN connection cable.
Press the MODE button as often as required until Internet Radio is shown on the display.
Alternatively:
Press the MENU button and select Internet Radio in the main menu.
If you are in a submenu, select the Main menu as described in Section 5.1.
If you are starting the Internet radio mode for the first time without having configured a LAN/WLAN connection during the initial set up, the search wizard appears which shows you all the WLAN stations within range, as well as the Cable option. Select the network using the OK button and, if required, enter the password using the keyboard displayed. Then select OK - less the OK button. If the password entered is correct, a connection to the network is now established.
To cancel the entry, select EANGLS the OK button.
If you make a typing error you can delete the last letter entered using
6.1 Last listened to
Select MENU > Last listened to, to display a list with the last stations listened to.
Select a station using the or buttons and play it by pressing OK.
6.2 Selecting Internet radio stations
Press the MENU button and select theStation list.
Under Station list, all Internet radio stations are displayed separated into different categories. Moreover, you also have access to your favourites here.
Based on a category/country/genre, select a station and press the OK button.
To add your own stations or, please register them on the website: www.wifiradio.frontier.com. To do this, you need to have an access code, which is obtained in the DIGITRADIO under Internet radio > MENU > Station list > Help > Access code.
The MyDigitRadio Pro app offers a search function for Internet radio stations.
6.3 Saving Internet radio stations
The programme memory can save up to 12 stations in the Internet radio range.
Alternativety.
To add a station to your favourites, hold down the PRESET button on the device during playback for approx. 5 seconds until the "Save preset" menu appears.
Now rotate SCROLL&SELECT to select a memory slot and press SCROLL&SELECT to save
Hold down one of the number buttons 1-12 on the remote control to save a station to one of the number buttons.
The number buttons 1-12 correspond to the 12 preset memory slots that can be accessed using the buttons on the device.
6.4 Selecting the saved stations
>Press the desired number button 1-12
Alternatively:
Press the PRESET button on the device and use SCROLL&SELECT to select the desired station.
Confirm your choice by pressing SCROLL&SELECT.
If no station is saved on the selected programme slot, 'Memory slot empty' appears.
6.5 Deleting a saved station
Simply save a new station to the memory slot of a station you no longer require.
i By retieving the factory settings, all memory slots (among other things) are deleted
7 Playing music (UPnP & USB media)
You have the option of playing music media located on a UPN server or on a USB data medium via the DIGITRADIO. To go this, firstly a connection to the LAN/WLAN network is required and, secondly, the USB medium must be attached to the USB connection.
Please observe the Instructions in Section 14.2 for setting up a LAN/WLAN connection.
The UPnP media server has to be located on the same network as the DIGITRADIO.
Press the MODE button as often as required until Play music is shown on the display.
Alternatively
Press the MENU button and select Main menu > Play music.
If you are in a submenu, select the Main menu as described in Section 5.1.
If you are starting the Internet radio mode for the first time without having configured a LAN/WLAN connection during the initial set-up, the search wizard appears which shows you all the WLAN stations within range, as well as the Cable option. Select the network using the OK button and, if required, enter the password using the keyboard displayed. Then select OK and press the OK button. If the password entered is correct, a connection to the network is now established.
To cancel the entry, select GAILY the OK button.
If you make a typing error you can delete the last letter entered using

7.1 Playing media
Select Shared media followed by the server or USB data medium on which the music is located.
The display of the folder structure depends on the folder structure on your medium server or data
medium.
The menu has random playback and repeat, playback options available.
A corresponding symbol appears in the status bar.
7.2 Creating your own playback list
The device allows you to add your own playback list which may contain the media files from UPnP server and
USBdata media.
Using the Arrow buttons on the remote control, or SCROLL&SELECT on the device, select the desired file or folder.
Hold down the OK button or SCROLL&SELECT until the message 'Added to the play list' appears.
7.3 Playing back own play list
Press the MENU button and select the Playback list item.
2. Now select any track by pressing OK or SCROLL&SELECT.
The list is now played.
7.4 Providing music via the Windows media player
As an alternative to a UPnP server, it is also possible for you to play music using Windows Media Player as from version 10. To do so, music sharing must be set up in Windows Media Player.
Ensure that the Windows PC and the DIGITRADIO are in the same network and switched on.
Start the Media Player and enable media streaming sharing.
In the device overview which appears select DIGITRADIO followed by Allow. 1 The procedure may vary depending on the Windows/Media Player version
7.5 UPnP renderer (DMR)
The DIGITRADIO can also be used as a UPnP media renderer.
The device can, to a certain extent, be remote controlled by corresponding programmes or other end devices.
8 Spotify Connect
Join us In welcoming Spotify Premium
With Spotify Premium you can listen to millions of songs without adverts. Your favourite and up-and-coming artists along with the latest hits - just for you! Simply press 'Play' and you can hear any song you want in top quality sound. Test Premium for 30 days free of charge or Spotify.com/foretital
Your new radio has Spotify Connect
With Spotify Connect you can use your mobile phone, tablet or PC to control the music playing on your radio. You can make calls, play games and even switch off your mobile phone - the music will play on. Find out more at spofity.com/connect
Press the MODE button as often as required until Spotify control appears on the display.
How to use Connect
You need Spotify Premium to be able to use Connect.
1. With your new radio, establish a connection to the same WLAN network as your mobile phone, tablet or PC.
2. Open the Spotify app on your mobile phone, tablet or PC and play a track.
3. If you are using the app on your mobile phone, tap on the Image corresponding to the track at the bottom left of the screen. Go to step 4 if using a tablet or PC.
4. Tap the connect symbol.
5. Select your radio from the list, if it is not displayed, ensure that it is connected to the same WLAN network as your mobile phone, tablet or PC. And that's it! Have fun listening to your music!
The Spotify software is subject to third party licences that you can find here: http://www.spotify.com/connect/third-party-licenses
9 The DAB function
9.1 What Is DAB+?
DAB+ is a new digital format through which crystal clear sound with no noise can be heard. Contrary to conventional analogue radio transmitters, with DAB multiple stations are transmitted on one and the same frequency. This is referred to as an ensemble or multilox. An ensemble is comprised of the radio station, as well as several service components or data services, which are broadcast individually by the radio stations. For more information go to e.g. www.dabpplus.de or www.dabpplus.cn.
9.1.1 Data compression
With this, digital radio takes advantage of the properties of human hearing. The human ear does not perceive sounds which are found under a specific minimum volume. Data which are found under the so-called audibility threshold can, therefore, be filtered out. This is possible because, in a digital data stream, the relevant relative volume for other units is saved for every unit of information. Moreover, in an audio signal, the quieter parts are superimposed by louder ones at a specific limit value. All audio information in a piece of music that is below the so-called listening threshold can be filtered out of the transmitted signal. This leads to a reduction of data in the data stream to be transmitted, with no perceptible difference in sound for the listener (HE AAC v2 - supplementary codification process for DAB).
9.1.2 Audio stream
With digital radio, audio streams are continuous data streams which contain the MPFG 1 audio layer 2 frames and thereby represent acoustic information. This enables standard radio channels to be broadcast and listened to on the receiver side. Digital radio provides you not only with excellent sound quality radio but also additional information. This could relate to the channel currently being broadcast (O.S.e.g. track, artist) or be independent of this (e.g. news, weather, traffic, tips).
9.2 DAB radio reception
Press the MODE button as often as required until DAB Radio appears on the display. Alternatively:
Press the MENU button and select Main menu > DAB.
If you are in a submenu, select the Main menu as described in Section 5.1.
If DAB is being started for the first time, a complete station scan is performed. The station list is then shown (see Section 9.2.2).
9.2.1 Performing the station scan
The automatic Complete scan scans all DAB Band III channels and thereby finds all stations being broadcast within the reception range.
In order to perform a complete scan, open the menu by holding down the Info/Menu button and use the Tune and Enter buttons to select the menu item [Complete Scan].
In order to perform a complete scan, press the SCAN button. "Scan" appears on the display. The scan starts and the progress bar appears on the display.
When completed, press or and OK to select a station.
Alternatively: press the MENU button and, using or , select the Complete scan item. Confirm by pressing OK.
If no stations are found, check the antenna and change the installation location if required (section 4.3.2).
9.2.2 Selecting stations
To listen to a station use the or , buttons or SCROLL&SELECT and then press OK or SCROLL&SELECT.
To select a station press OK.
Alternatively
Press the MENU button and, using or , select the Station list item.
9.2.3 Saving DAB stations
The programme memory can save up to 12 stations in the DAB range.
The saved stations remain stored even in the event of a power cut.
Select the desired station
Press one of the number buttons 1-12 and keep it pressed for a few seconds. 'Saved' appears on the display.
Repeat the procedure to save other stations.
Alternatively:
During playback keep the PRESET button on the device pressed for approx. 5 seconds until the "Save preset" menu appears.
Now rotate SCROLL&SELECT to select a memory slot and press SCROLL&SELECT to save.
9.2.4 Selecting the programmed stations
Press the desired number button 1-12. If no station is saved on the selected programme slot, 'Memory slot empty'.
Alternatively:
Press the PRESET button on the device and use SCROLL&SELECT to select the desired station.
9.2.5 Deleting a saved station
Simply save a new station to the memory slot of a station you no longer require.
1 By retrieving the factory settings, all memory slots (among other things) are deleted.
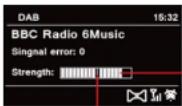
9.2.6 Signal Intensity
Press the INFO button as often as required until the signal intensity is shown.
The bar modulation shows the current level.
In the case of stations with a signal intensity below the required minimum signal intensity, adjust the antenna, if required, as described in Section 4.3.2.
Minimum signal intensity
Signal intensity
9.2.7 Dynamic Label Plus
It supported by the programme provider, the Dynamic Label Plus service also allows, for example, the name of the current programme or the track and artist to be displayed.
9.2.8 Setting DRC
The compression rate balances dynamic vibrations and thereby any volume variations that occur.
Press the MENU button and select the Volume adjustment item to select the desired compression rate.
With the compression rate choose:
DRC high High compression
DRC low - Low compression
DRC off - Compression switched off.
Confirm by pressing OK.
9.2.9 Deleting Inactive stations
Press the MENU button and, using or , select Delete inactive stations.
Confirm by pressing OK
Using or, select Yes and confirm by pressing OK.
9.2.10 Sorting the stations
Press the MENU button and then use or Station sorting
Select the sorting type with ▲ or ▼ and confirm your selection with OK.
i You can choose between: Alphanumeric, Provider and Valid.
10 FM mode
10.1 Switching on the radio mode
Press the MODE button as often as required until FM radio appears on the display.
Alternatively:
Press the MENU button and select Main menu > FM.
If you are in a submnu, select the Main menu as described in Section 5.1.
1 When switching on for the first time, the frequency 87.5 MHz is set.
If you have already set or saved a station, the radio plays the last station set.
1 Adjust the antenna to improve reception. (Section 4.32)
10.2 FM reception with RDS Information
RDS is a procedure for broadcasting additional information via FM stations. Broadcasters with RDS might, for example, broadcast their station name or the programme type. This is shown on the display. The device can show the following RDS information
RT (Radio text),
PS (Station name)
PTY (Programme type)
10.3 Manual station selection
Use ▲, ▼ or SCROLL&SELECT to set the desired station.
The display shows the frequency in steps of 0.05 MHz.
10.4 Automatic station selection
Press SCAN to start the automatic scan. The station frequency runs upwards on the display.
or
Keep ▲ or▼ pressed in FM mode for approx. 2 seconds to automatically search for the next station with a strong enough signal.
If a FM station with sufficient signal intensity is found, the scan stops and the station is played. If an RDS station is received, the station name, and possibly radio text appears.
1 Please use manual station selection for setting weaker stations.
In Menu > Scan setting you can set whether the scan only finds strong stations (Strong stations only). To do so, press the MENU button and Scan settings. Confirm the selection with OK.
10.5 Setting mono/stereo
Press the MENU button and using or , set the Audio setting Item.
Select YES or NO to play stations with weak FM reception in mono only.
Confirm by pressing OK.
10.6 Saving FM stations
The station memory can save up to 12 stations in the FM range.
Select the desired station
Press one of the number buttons 1-12 and keep it pressed for a few seconds. "Saved" appears on the display.
Repeat the procedure to save additional stations.
Alternatively:
During playback keep the PRESET button on the device pressed for approx. 5 seconds until the Save preset' menu appears.
Now rolate SCROLL&SELECT to select a memory slot and press SCROLL&SELECT to save.
10.7 Selecting the programmed stations
Press the desired number button 1-12. If no station is saved on the selected programme slot, "Memory slot empty".
Automatically:
Press the PRESET button on the device and use SCROLL&SELECT to select the desired station.
1 if no station is saved to the selected programme slot. "Memory slot empty" appears
10.8 Deleting a saved memory slot
Simply save a station to one of the memory slots.
11 Bluetooth
11.1 Activating the Bluetooth mode
Press the MODE button as often as required, until Bluetooth appears on the display.
Alternatively:
Press the MENU button and then select Main menu > Bluetooth
In the status bar on the display, a flashing it scales the pairing mode.
If the DIGIRADIO has already been paired with another device which is within range, the connection is automatically established.
11.2 Pairing
Activate Bluetooth on your music player, e.g. a smartphone or tablet.
If you activate Bluetooth on your music player, please consult the corresponding instruction manual for the devices which you wish to pair with the DigitRadio.
1 Please take into account that you can only ever connect 1 device to the DIGITRADIO.
Ensure that you do not exceed the maximum Bluetooth range of 10 metres to guarantee excellent playback quality.
Select the list of Bluetooth devices found on your music player.
Look for DIGITRADIO 600 or 630 in the list and select it.
If the selection requires a PIN, enter '0000' (4 x zero).
If the pairing has completed successfully, the Bluetooth symbol on the DIGITRADIO display sto flashing.
11.3 Playing music
Select a music track on your music player and play it.
The sound is now played via the DIGITRADIO.
With compatible devices you can control the playback on your music player with the help of the playback buttons on the DigiRadio.
1 Ensure that the volume on your music player is not set too low.
11.4 Bluetooth connection using NFC
It, for example, your smartphone or tablet has NFC, you can use this interface to connect this device to the DIGITRADIO.
Press the MENU button and select Main menu > Bluetooth.
Activate the NFC function on your music player.
Place your music player on the position with the NFC logo on top of the DIGITRADIO.
Then follow the instructions on your music player to set up the connection and to play music.
12 Audio/Playing MP3 CDs
Insert the desired CD into the CD compartment.
The DigitRadio now changes automatically to CD mode and the CD starts to play.
If a CD has already been inserted, press the MODE button as often as required until CD mode is displayed.
During playback, the other control features are available. Use them as follows:
P#ing or continuing playback
Steppingplayback
Fiie
Pto reach the last track hold to rewind
Pre to reach the next track hold to fast forward
Plaback options
13 Other functions
13.1 Sleep function
Press the MENU button and select Main menu > Sleep.
If you are in a submenu, select the Main menu as described in Section 5.1.
With the ▲ or ▼ buttons or SCROLL&SELECT, you can set the period to Sleep off, 15, 30, 45, 60 minutes. After the time has elapsed, the device switches to any operating mode on standby. Alternatively,
Press the SLEEP button device.
A clock symbol appears on the status bar of the display with the time remaining until the DIGITRADIO switches to standby.
13.2 Alarm
Press the MENU button and select Main menu > Alarm
Alternatively:
Press the ALARM button on the device.
If you are in a submenu, select the Main menu as described in Section 5.1.
13.3 Setting the alarm time
1 The wake-up function cannot be operated until the correct time has been set. Depending on the set-up, this other occurs automatically or has to be set manually.
The time can either be set manually or updated via DAB/FM or the Internet. See Section 14.3 for further information.
Select an alarm time memory (Alarm 1 or Alarm 2) using the or buttons or SCROLL&SELECT and confirm with OK.
Go through all the points one after the other.
Confirm each entry with the OK button:
Repeat> Off, Daily, Once, Weekend, Working days.
Time> Set the time you wish to be woken at with the ▲▼ and △▼ buttons.
Mode > Buzzer, Internet radio, DAB, FM
Station Last listened to or a station you have stored on the number buttons 1-12.
Volume > Using the / buttons, select the volume with which you wish to be woken.
To save the alarm with the settings configured, select Save.
The alarm is active as soon as you have set the alarm repeat to Daily, Once, Weekend, or Working days. The status bar shows an alarm symbol with the corresponding number of the active alarm
13.4 Switching off the alarm after being woken
Press the On/Standby button to switch the alarm off.
Press the SNOOZE button to switch on the snoozefunction.
By repeatedly pressing SNOOZ or rotating SCROLL&SELECT, the length of the pause can be selected from 5.10, 15 or 30 minutes.
The alarm symbol appears on the display again if the alarm repeat is set to Daily, Weekend or Working days.
13.5 Switching off the alarm
Select the corresponding alarm in the menu Repeat: off
14 System settings
14.1 Equaliser
Press the MENU button and select Main menu System settings > Equaliser
If you are in a submenu, select the main menu as described in Section 5.1.
Here you can carry out different equaliser settings to adapt the sound to your taste.
You can choose between:
Normal Middle Jazz Rock Soundtrack Classic, Pop News and My EQ.
14.1.1 My EQ setting
In the menu select Equaliser> My EQ
Select Bass. to increase/decrease the bass or Treble, to increase/decrease the treble.
Change the value with the or , bulions or SCROLL&SELECT and press OK.
This preset can be retrieved at any time in My EQ.
14.2 Internet settings
Press the MENU button and select Main menu System settings > Internet settings
If you are in a sub menu, select the main menu as described in Section 5.1.
In this menu you will find some settings and information on internet connection
Select Network wizard to establish a WLAN connection
The network wizard shows you all the WLAN stations within range and well as the cable option. Select the network using the OK button and, if required, enter the password using the keyboard displayed. Then select OK bss the OK button.
If the password entered is correct, a connection to the network is now established.
To cancel the entry, select a vANGE the OK button.
If you make a typing error you can delete the last letter entered using

14.2.1 WPS connection
Select WPS set-up If your router has the WPS function. This establishes a direct connection to the router without having to enter the WLAN password.
If you activate WPS on your router, please observe its Instruction manual.
Start WPS on your router by pressing the corresponding button.
On the DIGITRADIO select Press button and follow the instructions on the display.
If your router supports the WPS PIN, on the BigiTRADIO select PIN and take note of the PIN shown on the display. This PIN must then be entered on the router.
To find out more on the current connection select Settings.
1 Select Manual setting, If you know your network parameters and would like to configure them manually. Take note of the Instructions on the display.
14.2.2 Delet ing network settings no longer required
Select Delete network profile to delete connections no longer required.
14.3 Time settings
Press the MENU button and select Main menu System settings > Time settings.
If you are in a submenu, select the Main menu as described in Section 5.1.
Select Time/date setting to set the time and date manually.
Use the or buttons to select a value. Change it using the or buttons.
Confirm by pressing OKSelect Update settings to determine whether the time update should be automatic via DAB, FM or Internet or whether you would like to enter it manually.
To do so, select DAB update, FM update, NET update or No update.
Under the Set format option you can activate 12 or 24 hour format. Confirm your selection with the OK button.
Under Time zone, select the current time zone where you are located.
Under Summertime you determine whether summertime should currently be active.
14.4 Language
Press the MENU button and select Main menu System settings > Language
If you are in a sub menu, select the main menu as described in Section 5.1.
Using or or SCROLL&SELECT, select the language and confirm the selection by pressing OK.
14.5 Factory setting
It you change the location of the device, e.g. when moving house; it is possible that the saved stations can no longer be received. In this case you can reset the device to factory settings to delete all the saved stations and then launch a new scan.
Press the MENU button and select Main menu System settings > Factory settings
Confirm by pressing OK.
Use or to select Yes and confirm the confirmation prompt by pressing OK.
1 All previously stored stations and settings will now be deleted. After resetting you can start or skip the set-up wizard (Section 14.7).
14.6 Software update
From time to time software updates may be provided which could contain improvements or bug fixes. This keeps the DIGITRAID permanently up-to-date.
Press the MENU button and select Main menu System settings > Software update.
If you are in a submenu, select the Main menu as described in Section 5.1.
Select Auto Update if the DIGITRADIO should search for new software versions periodically.
Select Check now if you would now like to check whether there is a more recent software version available.
If a software update has been located, follow the instructions on the display.
In order to find software updates and upload them, the DIGITRAID must be connected to the Internet. Do not switch off the DIGITRAID during the update process.
14.7 Set-up wizard
Press the MENU button and select Main menu System settings > Set-up wizard.
If you are in a sub menu, select the main menu as described in Section 5.1.
When switching on for the first time the Set-up wizard starts automatically.
As soon as Run now is shown on the display, select YES.
If you select No, the wizard closes and you must perform the required settings manually. You will be taken through the settings in various steps.
Under Date/Time select the desired display format for the time display (Section 14.3).
During the next step you must select via which source the Time is to be synchronised (Section 14.3).
Then select whether summer or winter time is currently applicable.
Depending on the time and date sellings some network sellings are now performed.
Ensure that the device is within the reception range of the desired WLAN network and that you have access data or that a network cable is connected. In some cases it may be necessary to carry out some settings on the router. In this case, please refer to the corresponding instruction manual.
After a search for available wireless networks you are shown the result.
Select the desired wireless network or cable and confirm the selection with OK.
If It Is a protected network you will be asked to enter the corresponding access key.
To do so, highlight the corresponding character using the Arrow buttons or SCROLL&SELECT.
Enter the selected character by pressing the OK button or SCROLL&SELECT.
Proceed in this way until the complete access key can be seen in the Input field.
i Higlnting and confirmng the BKSP field enables you to delete the last character entered. The CANCEL field is used to abort the entry.
To close the wizard press the OK button or SCROLL&SELECT when Set-up wizard closed apocas on the display.
14.8 Info
Press the MENU button and select Main menu System settings > Info.
If you are in a submenu, select the Main menu as described in Section 5.1.
Confirm by pressing OK.
The software version is shown.
You exit this menu by pressing the MENU button.
14.9 Display backlight
It is possible to set the display brightness both for operation and standby.
Press the MENU button and select Main menu System settings >Backlight
If you are in a submenu, select the Main menu as described in Section 5.1.
Select Operation or Standby in order to set operation mode or standby mode
You can now set the brightness in three steps from High or Medium to Low
Confirm the selection with OK
14.10 Multi-room
In conjunction with the MyDigitRadio Pro app, the DIGITRADIO offers multi-room support (you can find more information in the MyDigitRadio Pro app and on the website www.technisaloe.com). With the MyDigit Radio Pro app it is possible to remotely control multi-room enabled devices or to combine groups on which the same music can then be played.
If a device is removed/added to a group, all other devices in the same group are likewise removed/added.
The group set up can be carried out in the menu under Main menu > System settings > Multi-room.
14.10.1 Displaying details
This menu shows the current grouping status. Amongst other things, here you can determine whether the DIGITRADIO is connected as the Server or Client in a group.
14.10.2 Creating a new group
First enter a group name.
Select the devices you wish to add to the group from the list shown.
- Identifies devices already added to the group.
14.10.3 Add to group
Use this menu to add more devices to an existing group.
- Identifies devices already added to the group.
- A group must first of all be created in order to add devices.
14.10.4 Show clients
This menu shows you all the devices (Clients) in the group.
14.10.5 Exit group
Use this menu item to exit the current group.
14.10.6 Delete group
This menu item deletes the current group and releases all the devices added to the group again.
15 Cleaning
A To prevent the risk of an electric shock you may not clean the device using a wet cloth or under running water. Remove the mains plug prior to cleaning!
You may not use scouring pads, scouring powder and solvents such as alcohol or petrol.
Do not use any of the following substances: salt water, insecticides, chlorine or acid-based solvents (ammonium chloride), scouring powder.
1 Cleaning the housing using a soft, moist cloth. Do not use solvents, spirit, tinners, etc.; you could damage the surface of the device.
Only clean the display with a soft, cotton cloth. If required, use a cotton cloth with small amounts of non-alkaline, diluted, water or alcohol-based soap solution.
Use the cotton cloth to gently rub the surface until it is completely dry.
16 Troubleshooting
If the device does not operate as intended, check the following tables for information.
| Symptom Possible cause/Remedy | |
| The device cannot be switched on. The device is not supplied with power. Connect the power supply unit correctly to the mains power outlet. | |
| No sound can be heard, increase the volume. Switch the playback device on or increase the volume. The incorrect source may have been selected. | |
| The display does not switch on. Switch off the device using POWER switch back on again. | |
| The remote control does not work. Batteries are inserted incorrectly or are low. Check the polarity, change the batteries. | |
| IR connection interrupted. Remove objects located between the remote control and the device. | |
| Distance too great. Max. Distance from the device: approx. 5 metres. | |
| Symptom Possible cause/remedy | |
| Poor DAB/FM reception. Adjust the antenna to a tonna or the position of the DigitRadio. | |
| Connection to the WLAN router does not work. | Check whether the signal strength of the router is sufficient. |
| Check in the router settings whether it accepts new connections. | |
| Check the WLAN password and enter it again. | |
If the malfunction has not been resolved, even after performing the checks described, please contact the manufacturer.
17 Technical specifications / manufacturer's instructions
Subject to technical changes and errors. The dimensions are approximate values.
| Reception channels internal, DAB/DAB-1, FM, USB, CD, Network | |
| Power supply AC input: 110-240V, 50-60HzDC Output: 18V, 3300mA | |
| Frequencies FM: 87.5-108MHz | DAB/DAB+: 1/4.928 - 239.200 MHz |
| Power consumption In operation: maximum 59.4W, on standby: < 1W | |
| Dimensions 400mm x 215mm x 175mm | |
Disposal Instructions:
Disposal of packaging
Your new device was protected by packaging on its way to you. All materials used are environmentally-friendly and recyclable. Please collaborate
and dispose of the packaging in an environmentally-friendly way. Ask for information from your dealer regarding current disposal means
or regarding your local disposal facility.
Risk of suffocation: Do not give packaging and parts thereof to children. Risk of suffocation by films and other packaging materials.
Disposing of the radio
Old devices constitute valuable waste. Valuable raw materials can be recovered through environmentally-friendly disposal. Consult your town or local authority as to the possibilities for environmentally-friendly and proper disposal of the device. The batteries must be removed before disposing of the device.
This radio is marked in accordance with the Waste Electrical and Electronic Equipment (WEEE) Directive 2002/96/EC.
At the end of its useful life span, this product may not be disposed of in your regular domestic refuse. It must be taken to a recycling collection point for electrical and electronic equipment. The symbol on the product, the operating manual or the packaging indicates this. The materials are recyclable according to their identification. An important contribution is made to our environment by recycling, recovery of materials or other kinds of recycling for old devices.
Life-threatening hazard Remove the mains plug in disused devices Cut through the mains cable and remove with the plug.

Mode d'emploi
DIGITRADIO 600/630
8 Spotify Connect 92
Spotify Connect: Lecture USB :
Titre
Interprete
Album
9.2.7 Dynamic Label Plus
9.2.9 Suppression des stations Inactives
PTY (type of programme)
8 Spotify Connect. 150
9.2.7 Dynamic Label Plus
10.2.7 Dynamic Label Plus
16.7 Software Update
16.8 Installatie assistant
8 Spotify Connect 270
9 DAB-modus 272
9.1 Om DAB+ 2/2
9.66 6
9.1.1 Kompositing Av data 272
9.2 Lyte na DAB 273
9.2.1 Starte et kanaisek 273
9.2.2 Velgekanal 274
9.2.3 Lagre DAB-Kanaier 274
9.2.4 Hente lagre de stasponer 274
24425
9.25 Tamme en minreposjon 275
9.26 Signaliva 275
09.3 Dynamic Labeling (DL) 976
9.2.7 Dynamic Lederplus (DL) 276
9.2.9 Sette Iike-aktive stasjoner 276
9.2.10 Redigere kanalrekefgeigen 276
10 FM-modus 277
10.1 Sia pa FM-rado 277
10.2 Mato FM- and PDS information 277
10.2 Mott FM med RDS-Informasone 277
10.3 Vans on raal manuil 277
10.5 Velge kapanai mani 277
10.4 Velge kapaler automatis 278
10.5 Stile im mono/stereo 278
10.6 Lagre FM-kanaler 278
10.7 Hente lagre de stesoner 279
10.8 Tens en mie sable 378
10.8 lamme en minneposition 279
11 Bluetooth 279
11.1 Aktivere Bluetooth-modus 279
11.7 Easysteia radio 380
11.2 Pate ermet og radio.. 280
11.3 Avspie musik 280
11.4BluetoothforbindelsevgedhelpayNFC 281
12 Spille en audio/MP3-CD 281
13 Flere funksjoner. 282
13.1 Innsowningsfunksjon 282
13.2 Vekkertokke 282
13.3 Stilleinnwckerdspunkt 283
13.4 Slaevyekkerkloken etaterden har rindt 284
13.5 5a av vekkerkloken for godt 284
14 Systeminnstillinger 284
14.1 Tonekontroll (Equalizer) 284
14.11 Frequallnachkeitsaturation 985
14.1 Egerwalttonkortlon 285
14.2 Netwerkspostlinger 285
14.2.1 WPS-forblindse 286
14.2.2 Slette nettvekinsnstlinger som nikke longer trengs 286
14.3 Tidsinnstillinger 286
14.4 Sprak 287
14.4 Sprink 287
14.5 Fabrikinnstillinger 287
14.6 Programvaropddatering 288
14.7 Ferslegangs-veiliser 288
14.8 Info 289
14.9 Dieplanabehörigung 390
14.9 Display Design 290
14.10 Multitrom 290
14.10.1 Vis info 291
14.10.2 Lag ny gruppe 291
14.10.3 Legg til gruppen 291
14.10.4 Vils bilanter 291
418.4 VRS klerer 291
1418.5 Forlet grpse 291
14.10.6 Slett gruppe 291
15 Rengloring. 292
16 Rette feil. 293
17 Tekniske data / Produktinfo. 295
2 Innledning
Siekk at all liblehber fugler med.
9.2.7 Dynamic Label Plus (DL+)
Huis kanalen statter det. kan DL+ tijensten vse programmarn, titel erer artist vid siden oy
9.2.8 Lydstyrkeutjevning (DRC)
Try pa tasten MENU for at hente howedmenuen.
Hvis du aktuel:befinder digien afsplinngs-kilde,bliver undermenen hieniet for danne kide med taster MENUFor at komme ind hovearenu,vog iden 3bnede undermenu mad taster ▲alerpunktet hovemenu ogtryk OK.
5.2 Valg af kilde
Tryk paa Iasten MODE indi den anskede kide vises padisplaye.
Alternarity
Tryk pa taston MENU.
322323
6.2 Vaelg Internet-radio station
Tryk pa casten MENU og vaelg stationistie.
Understationisstelle vises alle internet-radiotationer underdeti forskellige kategorier Ydermere har du her adgang uiline ciffer
Vaelg ved en kategori/land/genre erer station og tryk pa tasten OK
For at tifale agne statloner, regster dem venligst p hlemmesidom wwwwtradic frontler.com. Hertl har du brg for en agangskode, som zu far erer kan anmode om DCITRADIO under Internet Radio > MENU >kanalisthe > hlaep > adgangskode
1 App MyDigitRadio-Pro giver en sagefunktion for Internete radio-kanaler.
6.3 Gem Internet-radio stationer
Program-lagerat kan gemme op til 12 stallaner lnternet-radio omrAed
For at tiofe en station li dine flavoriter, hold under aflspnlng lasien PRESET trykket, pa enteden i ca, 5 sekundcr. Indit mnnon gem forudinst, gemmes. krommer from:
Vägel nu ved at drege à SCROLL&SELECT enagerplads og tryk på SCROLL&SELECT for at gamma. Alternatively:
Hold en at taltasterne 1...12 pa jembojeningen trykket for at gemme en station pa en at taltasterne.
324 325
Talaslerne 1.12 svarer lll 12 Presel-agerpladser, der kan n as over lasterne pa enteden.
9.2.3 Gem DAB station
9.2.7 Dynamic Label Plus
B viruses clostridium 103
10.4 Automatism stationsvalg
Tryk SCAN, for at starte den automatiske stationssegning. P displayet leber senderfrekvensen opad.
eller
Holl eiler fFIM drift trykeot I co.2 sekundcr for automadisk at soge don nostoe klanal med tistreakkeig signat.
Mode> Buzzer, internal-radio, DAB, FM.
Tryk pa taster On/standby, for at sikke for alarmen.
Tryk pà lasen SNOOZE for at laende for slumre-funktionen.
Du kan ved geniagel, iryk pa SNOOZ eiler dreie pa SCROLL&SELECT pausens isengde mellem 5.10, 15 ellr 30 minctor.
P4ckipler er vaekesymolet stadig pyst. nir vaekge-gentagaken er indskillet pagdigt, weknd aien hvedarge.
13.5 Sluk for alarm
Vaelg den passende alarmi menuen gentagelse Off.
14 Systemmindstillinger
14.1 Equalizer
14.6 Odpatering at software
Bckract valgetmed OK
14.10 Multiroom
DIGITRADIO byder I forolndelse me MyDigitRadio Pro-App pa Multroom understatte se (yderigere opyslninger finder du MyDigitRadio Pro-App og pa hjemmesiden (www.technicalite). Mad MyDigitRadio Pro-App er die mutl at hernstrytre multroom apparater, eiffer slute dem sammen til grupper, I wike den samme musik s synkontr aifspiles.
Spotify Connect: Odtwarzanle USB
Tyur
Wykonawca
Album
http://www.spoylty.com/connect/third-party-licenses
9 Funkcja DAB
9.1 Czym jest DAB+
DAB+ to nowy, cyfrowy formal, umzufliwajyc odorl kryslalzcnie czsiedgo dziewku, wolnogo od jakihtokwiek zumow. W odzroznienlu od tychwni, anachy, anachy radowch. Czostwiwo z do okreski wiznyu, wolnu staci radowch. Czostwiwo z do okreski wiznyu. lub wiznyu. lub wiznyu. lub wiznyu. lub wiznyu. lub wiznyu. lub wiznyu. lub wiznyu. lub wiznyu. lub wiznyu. lub wiznyu. lub wiznyu. lub wiznyu. lub wiznyu. lub wiznyu. lub wiznyu. lub wiznyu. lub wizny u. lub wiznyu. lub wiznyu. lub wiznyu. lub wiznyu. lub wiznyu. lub wiznyu. lub wiznyu. lub wiznyu. lub wiznyu. lub wiznyu. lub wiznyu. lub wiznyu. lub wiznyu. lub wiznyu. lub wiznyu. lub wiznyu. lub wiziuyu. lub wiziuyu. lub wiziuyu. lub wiziuyu. lub wiziuyu. lub wiziuyu. lub wiziuyu. lub wiziuyu. lub wiziuyu. lub wiziuyu. lub wiziuyu. lub wiziuyu. lub wiziuyu. lub wiziuyu. lub wiziuyu. lub wiziuyu. lub wiziuyu. lubwiziuyu. ubwiziuyu. ubwiziuyu. ubwiziuyu. ubwiziuyu. ubwiziuyu. ubwiziuyu. ubwiziuyu. ubwiziuyu. ubwiziuyu. ubwiziuyu. ubwiziuyu. ubwiziuyu. ubwiziuyu. ubwiziuyu. ubwiziuyu. ubwiziuyu. ubwiziuy u. ubwiziuy u. ubwiziuy u. ubwiziuy u. ubwiziuy u. ubwiziuy u. ubwiziuy u. ubwiziuy u. ubwiziuy u. ubwiziuy u. ubwiziuy u. ubwiziuy u. ubwiziuy u. ubwiziuy u. ubwiziuy u. ubwiziuy u. ubwiziuy u. ubwziuy u. ubwziuy u. ubwziuy u. ubwziuy u. ubwziuy u. ubwziuy u. ubwziuy u. ubwziuy u. ubwziuy u. ubwziuy u. ubwziuy u. ubwziuy u. ubwziuy u. ubwziuy u. ubwziuy u. ubwziuy u. ubwziuy u. UBWZU 10000000000000000000000000000000000000000000000000000000000000000000000000000000000000000000000000000
9.2.7 Dynamic Label Plus
8 Spotify Connect 444
9 Funkce DAB 446
9.1 CoJe DAB+ 416
9.2.2 Vyber stance 448
9.2.3 Ulozeni DAB stanic 448
9.2.4 Vyber naprogramovanych stanic 448
418419
9.25 Odstranen ulozené stanice 449
9.2.6 Sila signalu 419
9.27 Dynamic Label Plus 450
9.2.8 Rasservir BRC 450
9.210 Ugrava poradji slanic 450
10 Rezim FM 451
10.1 Zapnuli rezimu radia 451
10.2 VKV prijems informacemi RDS 451
10.3 Manua hi yber stanice 451
10.4 Automatickcyyberstanice 452
10.5 Nsnywni mpele
10.6 Uptonian (V) 459
10.7 yber npogrameyan stn 453
10.8 Vymazani uiozené programov pozlice 453
11 Bluetooth 453
11.1 Zapnutf rezimu Bluetooth 453
11.2 50jenl 154
11.3 Prehravani hudy 454
11.4 Bluetooth pripojen pomoci NFC 455
12 Prehravani audio/MP3 CD 455
13 Rozsirene funkce 456
13.1 Funkce Sleep (spanek) 456
13.2 Budik 456
13.3 Nastaveni doby buzeni 457
13.4 Vypnuti budiku po buzeni 458
13.5 Wecker ausschalten (Vypnuti budiku) 458
14 Systemovà nastaveni 458
14.1 Ekvalizer 458
14.11 VlastrinastavcrI EO 459
14.2 Nastaveni internetu 459
14.2.1 Pripojeni pries WPS 460
14.2.2 Smazani jiz nepotfebnych stovych naslayeni 460
14.3 Nastaveni casu 460
14.4 Jezyk 461
14.5 Toivani nastaveni 461
14.6 Actualizace software 162
14.7 Pruvodce naslavenim 462
14.8 Into 463
14.9 Podswiceni displeje 464
14.18 Multroom 154
14.10.1 Zobareni podrobnosti 465
14.10.2 Vytovoren nové skupiny 465
14.10.3 Pridani do skupiny 465
14.10.4 Zobrazeni kIeentu 465
14.10.5 Opusteni skupiny 465
14.10.6 Smazani skupiny 465
SoftwareSpolitypodemaiclicntreistranykterounaematezdehttp://www.spontpy.com/connect/third party licenses
9 Funkce DAB
9.1 Co Je DAB+
DAB+ie roy数字化 linf, kdy Kermu mizoe boloschut, kfrsodov clyt zvuk bez Suru. Niz odztil bebnyan analogoyoch stanc vysu a DAB nikolov stanc na stejne frekvnci. Tomu se fika ensemble bo nub multiplex. Multiplex tvof nikolov rozhoslavych stanci a nikolov servishn component noobydatovich slyzco. Kterok rozhoslav stanci vysu jliniadinul. Informace naprifed na www.dabplus.de bo neom dabplus.ch.
9.2.3 Ulozeni DAB stanic
Do programovepameti je mozne uloit az 12 stanic DAB.
Ulozené stanice zóstanou zachovány i pívýpadku proudu.
Vyberle pozadovanou starici
Stiskemiete nektener z cieselnich tlaetek 1...12 a pildrize je po nkelik sekund stisknule. Na dispiejse krakce zoobra uozomert, gespeichert' (ulozono).
≥ Pokud shcele ulozit dalsi slanice, costup opakulte.
Alternativne fesei:
Priorzte behem pfrenzahlt taktko PRESET na pristroj stisknute asi 5 sekund, dokur se neotevre nabika Vorenlz spelchen' (Uzilstpvolbu).
Nyni citizen otochno hlaicrscROLL&SELECT yberne parnov ro msto a slisknne lacilko SCROLL&SELECT pro ulozeni.
9.2.4 Vyber naprogramovanych stanic
9.2.7 Dynamic Label Plus
9 tripod, ze je topoporovano poskytovatcim programu, umozhujo sluzba Dynamic Label Plus navic naotrikad zorbrazny akvutki stanci nebo tili a interpreta.
9.2.8 Nastaveni DRC
Kompresn porer vrovnava kolsani dynamiky a s tim spojene zmemy hlasitost.
Pro yvbr pozadovanho komprisno hpoemr stsknefte tlaikte MUNA zvoite boo Lautstarkeanpassung (Cyladain hlasst) oro nastovn pozadovan miro komprimac.
Vybertekompresnipamr:
DRC yvsoka - Vysoka komprese
8 Spotify Connect 502
9 Funkcia DAB 504
91 Coje DAB+ 504
916 83
91.1 Kompresiaat 504
P17 Audio streamamounts 504
9.2 Priem DAB radia 505
9.2.1 Spustit vhyladavanie 503
9.2.2 Vyber stanice 506
9.2.3 Ulozenie DAB stanice 506
9.2.4 Vyber naprogramovanych stanc 506
476477
9.25 Wymazanie ulozenia stanice 507
9.2.6 Intenzita signel 507
9.27 Dynamic Label Plus 508
9.2.8 Nastavenie DRC 508
9.2.9 Vymazania peaktiynch stanc 508
9.210 Upraya poradla stanc 508
10 Rezim FM (VKV) 509
10:1 Zaprutiie rezmu radia 509
10.2 Priem FM s Informaciem RDS 509
10.3 Manuivaticn ician 509
10.4 Automaticity wiper steric 510
10.5 Nastaverie Mono/Stereo 310
10.6 Ulozenie FM stanic 510
10.7 Vyber naprogramovenych stanic 511
10.8 Vymazanle ulozeneho pamatoveho mlesta 511
11 Bluetooth 511
11.1 Aktivaclra rezimu Bluetooth 511
11.2 Parovanie 512
11.3 Probitablebudy 519
11.3 Prrnwnie hudy 512
11.4 Propotionie Bluetooth prostrectictom NFC 513
12 Prehravanie audio/MP3 CD diskov 513
13 Rozsirene funkle 514
13.1 Funkla vypnutla (sleep) 514
13.2 Budik 514
13.3 Nastavlenie casu budenia 515
13.4 yprutie budka po budern 516
13.5 yprutnic budka 516
| 14 | Nastavenia systemu. | 516 |
| 14.1 | Ekvalzer. | 516 |
| 14.1.1 | Vlaskná nastavenia EO. | 517 |
| 14.2 | Internetov nastavenia. | 517 |
| 14.9.1 | Propolener WPS. | 518 |
| 14.2.2 | Vymazanie nepotretbrnich siletvych nastaveni. | 518 |
| 14.3 | Nastavenia Času. | 518 |
| 14.4 | Jazyk. | 519 |
| 14.5 | Vyrobnié nastavenia. | 519 |
| 14.6 | Aktuizidzka software. | 520 |
| 14.7 | Sprevedica nastavenim. | 520 |
| 14.8 | Info. | 521 |
| 14.9 | Oswellerie dissolej. | 522 |
| 14.10 | Multroom. | 522 |
| 14.10.1 | Zobranenie udajov. | 523 |
| 14.10.2 | Vytvorenie novoj skupiny. | 523 |
| 14.10.3 | Pridanie do skupiny. | 523 |
| 14.10.4 | Zobranienie kilentov. | 523 |
| 14.10.5 | Opustenie skupiny. | 523 |
| 14.10.6 | Vymazanie skupiny. | 523 |
| 15 | Čistenie. | 524 |
| 16 | Odstrachenie chyby. | 525 |
| 17 | Technické udaje/upozornenia vyrobcu. | 527 |
2 Predslov
9.2.7 Dynamic Label Plus
Ak to poopoju pcoyotovate proprogramu, suzba Dynamic Label Plus umoznju okrom toho naprikod zozebranie nazu aktualneho programu alebo itiui a interpriat.
9.2.8 Nastavenie DRC
Miera kompressile kompenzule dynamické vykyva s tym suviace odchiky hlastost,
Stiacte tiadido MENU a zvolte poo2ku Prlsposoblenie hlaslosti preVyber miery kompressie.
Zvolta mieru kompressie:
DRC yvsoka yvsokakompresa
DRC nizka - Nizka kompressa
DRC vyp - Kompresia vypnuta
Polvrte stiaenim OK
9.2.9 Vymazanie neaktivnych stanic
10.3 ManuinyVyber stanic
Pouzhe kralka . aiele 100
10.4 Automaticky vber stanic
Stiacte tlaicn lscan na spustene autometickho yvmdavania stanic. Na cisplej sa zobrizae frekvendana stanic smcnp ohal.
aleo
Postive staclene baidio aiebo sia 2 sekundry, aby ste automatickv yhbnid dalskntkus dostatoconym signomol.
Ak sa najde stanci FM s distocne sinym signiom, vniladoviane sa zastav a stanci sa preh. Ak sa prjme slanica RSD, zobra na nazy stanci a pric, radiolct.
1 Pre nastaverie slanic so slabsim signaorn, pouzile prosim manuaire vhyladavanie.
1 VpolozeMenu Nastavenle yvlhdavania mozete nastavi;viyhdavania mozajn'len silne stanice (Len silne stane).As to cicate urobif, stace cladidio MENU a polo?ku Nastavenia yvlhdavania. Vyoper polyrofe laclidom OK.
10.5 Nastavenie Mono/Stereo
Stlaee tlaedio MENU a pomocou tlaediel A alebo Zyolte pokoN Nastavenle audio.
Ak chele prehravat stanice so slabym prjmon FM len y rezime mono, vberte ANO alebo NIE.
Potrtdste stacenim OK
10.6 Ulozenie FM stanic
Programovs pamat dokaze v oblasti VKV Ulozt' a2 12 stanic
2Najpyybertezeleni stancu
Staute nectorkz cieinelych taciidel 1...12 a podrte ho stacene na kienko sekind. Na dispiel sa krtio zo zobrazu oucozomeni, ulozené".
Na lozenerie dalsich stanic postup zoakujle.
510511
Alternative:
Pocas prahriivana stiaate tado PRESET na prestjnl na pnilzne 5 sekund, kym sa nezobran menu Uloiz' prevdvo!
Olaclarim ovadaia SCROLL&SELECT ybierte parniove miesto parniade a siliacte ovadaia SCROLL&SELECT na ulozenje.
10.7 Vyber naprogramovanych stanic
Sticte zolone cisele taticlo 12Aste no zvolenom programovom mieste nuciozii 2dnu stanciu, zopraia sa. Pamarové miesto prazná:
Alternative:
Stacte daicido PRESET na prestroil a ovladacom SCROLL&SELECT zolte zeianu stanluc.
Aki Ka sta no zylenom programovom mieste neuroliz 2adnu sianicu, zobrzai se Pamatov mesto prazdnye.
10.8 Vymazanie ulozeneho pamatoveho miesta
Jednoucho uozte novu stanluc na nlektorom programovom mleste.
11 Bluetooth
14.10.2 Vytvorenle novel skupiny
Najprzy zacagte nazov skupiny.
Polom wyberle zo zobrazenehu zozmamu zaradenia, klore cicele pridaf do skupiny.
- CONTENTS
- Instruction Manual
- Foreword
- Target group for this Instruction manual
- Intended use
- Important Information
- Safety
- Using the batteries:
- Disposal
- Legal notices
- Service instructions
- Setting up the device
- Caution
- Remote control
- Description of the DIGITRADIO 600/630
- Scope of delivery
- The special features of the DIGITRADIO 600/630
- Preparing the DIGITRADIO for operation
- Connecting the power supply unit
- Improving the antenna reception
- Connecting external antennas
- Inserting the batteries
- General device functions
- Switching on the device
- Operating the device with the remote control
- Adjusting the volume
- Activating the mute function
- Retrieving displays
- DAB mode:
- FM mode:
- Switching off the device
- Menu operation
- Main menu
- Source selection
- Internet radio
- Last listened to
- Selecting Internet radio stations
- Saving Internet radio stations
- Selecting the saved stations
- >Press the desired number button 1-12
- Deleting a saved station
- Playing music (UPnP & USB media)
- Playing media
- Creating your own playback list
- Playing back own play list
- Providing music via the Windows media player
- UPnP renderer (DMR)
- Spotify Connect
- Join us In welcoming Spotify Premium
- Your new radio has Spotify Connect
- How to use Connect
- The DAB function
- What Is DAB+?
- Data compression
- Audio stream
- DAB radio reception
- Performing the station scan
- Selecting stations
- Saving DAB stations
- Selecting the programmed stations
- Deleting a saved station
- Signal Intensity
- Dynamic Label Plus
- Setting DRC
- Deleting Inactive stations
- Sorting the stations
- FM mode
- Switching on the radio mode
- FM reception with RDS Information
- Manual station selection
- Automatic station selection
- Setting mono/stereo
- Saving FM stations
- Selecting the programmed stations
- Deleting a saved memory slot
- Bluetooth
- Activating the Bluetooth mode
- Pairing
- Playing music
- Bluetooth connection using NFC
- Audio/Playing MP3 CDs
- Other functions
- Sleep function
- Alarm
- Setting the alarm time
- Switching off the alarm after being woken
- Switching off the alarm
- System settings
- Equaliser
- My EQ setting
- Internet settings
- WPS connection
- Delet ing network settings no longer required
- Time settings
- Language
- Factory setting
- Software update
- Set-up wizard
- Info
- Display backlight
- Multi-room
- Displaying details
- Creating a new group
- Add to group
- Show clients
- Delete group
- Cleaning
- Troubleshooting
- Technical specifications / manufacturer's instructions
- Mode d'emploi
- DIGITRADIO 600/630
- Spotify Connect: Lecture USB :
- Suppression des stations Inactives
- Dynamic Label Plus
- Software Update
- Installatie assistant
- Innledning
- Dynamic Label Plus (DL+)
- Valg af kilde
- Vaelg Internet-radio station
- Gem Internet-radio stationer
- Gem DAB station
- Automatism stationsvalg
- Sluk for alarm
- Systemmindstillinger
- Equalizer
- Odpatering at software
- Multiroom
- Spotify Connect: Odtwarzanle USB
- Funkcja DAB
- Czym jest DAB+
- Funkce DAB
- Co Je DAB+
- Ulozeni DAB stanic
- Vyber naprogramovanych stanic
- Nastaveni DRC
- Predslov
- Nastavenie DRC
- Vymazanie neaktivnych stanic
- ManuinyVyber stanic
- Automaticky vber stanic
- Nastavenie Mono/Stereo
- Ulozenie FM stanic
- Vyber naprogramovanych stanic
- Vymazanie ulozeneho pamatoveho miesta
- Vytvorenle novel skupiny
Brand : TECHNISAT
Model : Digitradio 630
Category : Radio