WX254.4 - Screwdriver WORX - Free user manual and instructions
Find the device manual for free WX254.4 WORX in PDF.
| Product type | Cordless screwdriver (screwdriver) |
| Brand | Worx |
| Model | WX254.4 |
| Rated voltage | 4 V Max (3.6 V nominal) |
| No-load speed | 230 min⁻¹ |
| Weight | 0.5 kg |
| Charging time | 3 to 5 hours |
| Battery type | Integrated Li-ion |
| Charger | 230 V / 240 V ~ 50 Hz |
| Sound pressure level (LpA) | 65 dB(A), K=3 dB(A) |
| Sound power level (LwA) | 76 dB(A), K=3 dB(A) |
| Vibration emission value (ah) | 0.7 m/s², K=1.5 m/s² |
| Functions | Screwing, unscrewing, drilling (wood, metal, plastic) |
| Rotation direction | Reversible (forward/reverse) |
| Lighting | Integrated LED |
| Spindle lock | Automatic (chuck locks at rest) |
| Deep discharge protection | Yes (protection circuit stops the tool) |
| Included accessories | Screwdriver bits 25 mm (5 pieces), charger, bit holder cartridge |
| Usage | Indoor use only |
| Maintenance | Clean with a dry cloth; no user-serviceable parts |
| Conformity standard | EN 60745 |
Frequently Asked Questions - WX254.4 WORX
User questions about WX254.4 WORX
0 question about this device. Answer the ones you know or ask your own.
Ask a new question about this device
Download the instructions for your Screwdriver in PDF format for free! Find your manual WX254.4 - WORX and take your electronic device back in hand. On this page are published all the documents necessary for the use of your device. WX254.4 by WORX.
USER MANUAL WX254.4 WORX
WX254 WX254.1 WX254.3 WX254.4
WX254.6 WX254.7
EN Original instructions
D Originalbetriebsanleitung
F Notice originale
Istruzioni originali
ES Manual original
NL Oorspronkelijke gebruiksaanwijzing
PL Instrukcja oryginalna
HU Eredeti használatiutasítás
RO Instruetiuni originale
CZ Puvodni navod k použivani
SK Póvodný námod na použitie
| EN | P06 |
| D | P15 |
| F | P24 |
| I | P33 |
| ES | P42 |
| NL | P51 |
| PL | P60 |
| HU | P69 |
| RO | P78 |
| CZ | P87 |
| SK | P95 |

A1
A2
B
C1
C2
D
E1
E2
F
1. COVER
2. FORWARD/REVERSE ROTATION CONTROL
3. SOFT GRIP HANDLE
4. ON/OFF SWITCH
5. LED LIGHT
6. BIT HOLDER OR CHUCK
7. BIT CARTRIDGE
8. CHARGING INDICATOR
9. CHARGING SOCKET
Not all the accessories illustrated or described are included in standard delivery.
TECHNICAL DATA
Type WX254 WX254.1 WX254.3 WX254.4 WX254.6 WX254.7(250~269-designation of machinery, representative of Battery-powered Screwdriver)
| Charger voltage | 230V/240V~50Hz |
| Rated voltage 4V Max* | --- |
| Rated speed 230/min | |
| Machine weight 0.5kg | |
| Charging time 3-5 hours |
*Voltage measured without workload. Initial battery voltage reaches maximum of 4 volts. Nominal voltage is 3.6 volts.
NOISE INFORMATION
| A weighted sound pressure L | pA: 65dB(A) |
| A weighted sound power L | wA: 76dB(A) |
| KpA & KwA | 3.0dB(A) |
| Wear ear protection when sound pressure is over | 80dB(A) |
VIBRATION INFORMATION
| Vibration total values (triax vector sum) determined according to EN 60745: | |
| Drilling into metal | Vibration emission value ah = 0.7m/s2 |
| Uncertainty K = 1.5m/s2 | |
The declared vibration total value may be used for comparing one tool with another, and may also be used in a preliminary assessment of exposure.

WARNING: The vibration emission value during actual use of the power tool can differ from the declared value depending on the ways in which the tool is used dependant on the following examples and other variations on
how the tool is used:
How the tool is used and the materials being cut or drilled.
The tool being in good condition and well maintained.
The use the correct accessory for the tool and ensuring it is sharp and in good condition.
The tightness of the grip on the handles and if any anti vibration accessories are used.
And the tool is being used as intended by its design and these instructions.
This tool may cause hand-arm vibration syndrome if its use is not adequately managed.

WARNING: To be accurate, an estimation of exposure level in the actual conditions of use should also take account of all parts of the operating cycle such as the times when the tool is switched off and when it is running but not actually doing the job. This may significantly reduce the exposure level over the total working period.
Helping to minimize your vibration exposure risk.
ALWAYS use sharp chisels, drills and blades.
Maintain this tool in accordance with these instructions and keep well lubricated (where appropriate).
If the tool is to be used regularly then invest in anti vibration accessories.
Avoid using tools in temperatures of 10^ or less.
Plan your work schedule to spread any high vibration tool use across a number of days.
ACCESSIONS
| WX254 W | WX254.1 | WX254.3 | WX254.4 | WX254.6 | WX254.7 | ||
| 25mm Screwdriver Bits 5 11/6 | 5 5 11 | ||||||
| 25mm Pilot hole drill Bit 1 1/1 | 1 1 1 | ||||||
| 3-5hr Charger 1 1 1 1 1 1 | |||||||
| Bit Cartridge | 1 2 1 1 1 2 | ||||||
| Holster | / | 1 | / | / | / | 1 | |
| Cradle | 1 | 1 | / | / | / | / |
SAFETY WARNINGS FOR SCREWDRIVER
1. Hold power tool by insulated gripping surfaces, when performing an operation where the fastener may contact hidden wiring.
Fasteners contacting a "live" wire may make exposed metal parts of the power tool "live" and could give the operator an electric shock.
SAFETY WARNINGS FOR BATTERY CHARGERS

WARNING: Read all safety warnings and all instructions. Failure to follow the warnings and
instructions may result in electric shock, fire and/or serious injury.
Save all warnings and instructions for future reference.
- This appliance is not intended for use by persons (including children) with reduced physical, sensory or mental capabilities, or lack of experience and knowledge, unless they have been given supervision or instruction concerning use of the appliance by a person responsible for their safety.
- Children should be supervised to ensure that they do not play with the appliance.
ADDITIONAL SAFETY INSTRUCTIONS FOR YOUR BATTERY CHARGER
- Before charging, read the instructions.
- After charging, disconnect the battery charger from the supply mains. Then remove the chassis
connection and then the battery connection.
- Do not charge a leaking battery.
- Do not use chargers for works other than those for which they are designed.
- Before charging, ensure your charger is matching the local AC supply.
- For indoor use, or do not expose to rain.
- The charging device must be protected from moisture.
- Do not use the charging device in the open.
- Do not short out the contacts of battery or charger.
- Respect the polarity +- when charging.
- Do not open the unit and keep out of the reach of children.
- Do not charge the batteries of other manufactures or ill-suited models.
- Ensure that the connection between the battery charger and battery is correctly positioned and is not obstructed by foreign bodies.
- Keep battery charger's slots are free of foreign objects and protect against dirt and humidity. Store in a dry and frost-free place.
- When charging batteries, ensure that the battery charger is in a well-ventilated area and away from inflammable materials. Batteries can get hot during charging. Do not overcharge any batteries. Ensure that batteries and chargers are not left unsupervised during charging.
- Do not recharge non-rechargeable batteries, as they can overheat and break.
- Longer life and better performance can be obtained if the battery pack is charged when the air temperature is between 18^ and 24^ . Do not charge the battery pack in air temperatures below
4.5^ , or above 40.5^ . This is important as it can prevent serious damage to the battery pack.
- Charge only battery pack of the same model provided by WORX and of models recommended by WORX.
SAFETY WARNINGS FOR BATTERY PACK
a) Do not dismantle, open or shred cells or battery pack.
b) Do not short-circuit a battery pack. Do not store battery packs haphazardly in a box or drawer where they may short-circuit each other or be short-circuited by conductive materials. When battery pack is not in use, keep it away from other metal objects, like paper clips, coins, keys, nails, screws or other small metal objects, that can make a connection from one terminal to another. Shorting the battery terminals together may cause burns or a fire.
c) Do not expose battery pack to heat or fire. Avoid storage in direct sunlight.
d) Do not subject battery pack to mechanical shock.
e) In the event of battery leaking, do not allow the liquid to come into contact with the skin or eyes. If contact has been made, wash the affected area with copious amounts of water and seek medical advice.
f) Seek medical advice immediately if a cell or battery pack has been swallowed.
g) Keep battery pack clean and dry.
h) Wipe the battery pack terminals with a clean dry cloth if they become dirty.
i) Battery pack needs to be charged before use. Always refer to this instruction and use the correct charging procedure.
j) Do not maintain battery pack on charge when not in use.
k) After extended periods of storage, it may be necessary to charge and discharge the battery pack several times to obtain maximum performance.
I) Battery pack gives its best performance when it is operated at normal room temperature (20 °C ± 5 °C).
m) When disposing of battery packs, keep battery packs of different electrochemical systems separate from each other.
n) Recharge only with the charger specified by WORK. Do not use any charger other than that specifically provided for use with the equipment. A charger that is suitable for one type of battery pack may create a risk of fire when used with another battery pack.
o) Do not use any battery pack which is not designed for use with the equipment.
p) Keep battery pack out of the reach of children.
q) Retain the original product literature for future reference.
r) Remove the battery from the equipment when not in use.
s) Dispose of properly.
SYMBOLS
state directly into the
tool holder. When changing the tool insert, it can be thrown out toward the front

To reduce the risk of injury, user must read instruction manual

For indoor use only

Wear eye protection

Wear ear protection

Wear dust mask

The output plug is with positive center pole and negative outer pole

Do not burn

Do not expose to rain or water

Waste electrical products must not be disposed of with household waste. Please recycle where facilities exist. Check with your local authorities or retailer for recycling advice.

Do not dispose of batteries, Return exhausted batteries to your local collection or recycling point.
OPERATING INSTRUCTIONS

NOTE: Before using the tool, read the instruction book carefully.
INTENDED USE
The power tool is intended for driving in and loosening screws as well as for drilling in wood, metal and plastic.
The battery charger supplied is only for the Li-ion battery installed in the machine. Do not use another battery charger.
The Li-ion battery is protected against deep discharging. When the battery is empty, the machine is switched off by means of a protective circuit: The chuck no longer rotates.
When the Battery Pack is charged for the first time or after prolonged storage, the Battery Pack will accept a 100% charge after several charge and discharge cycles.
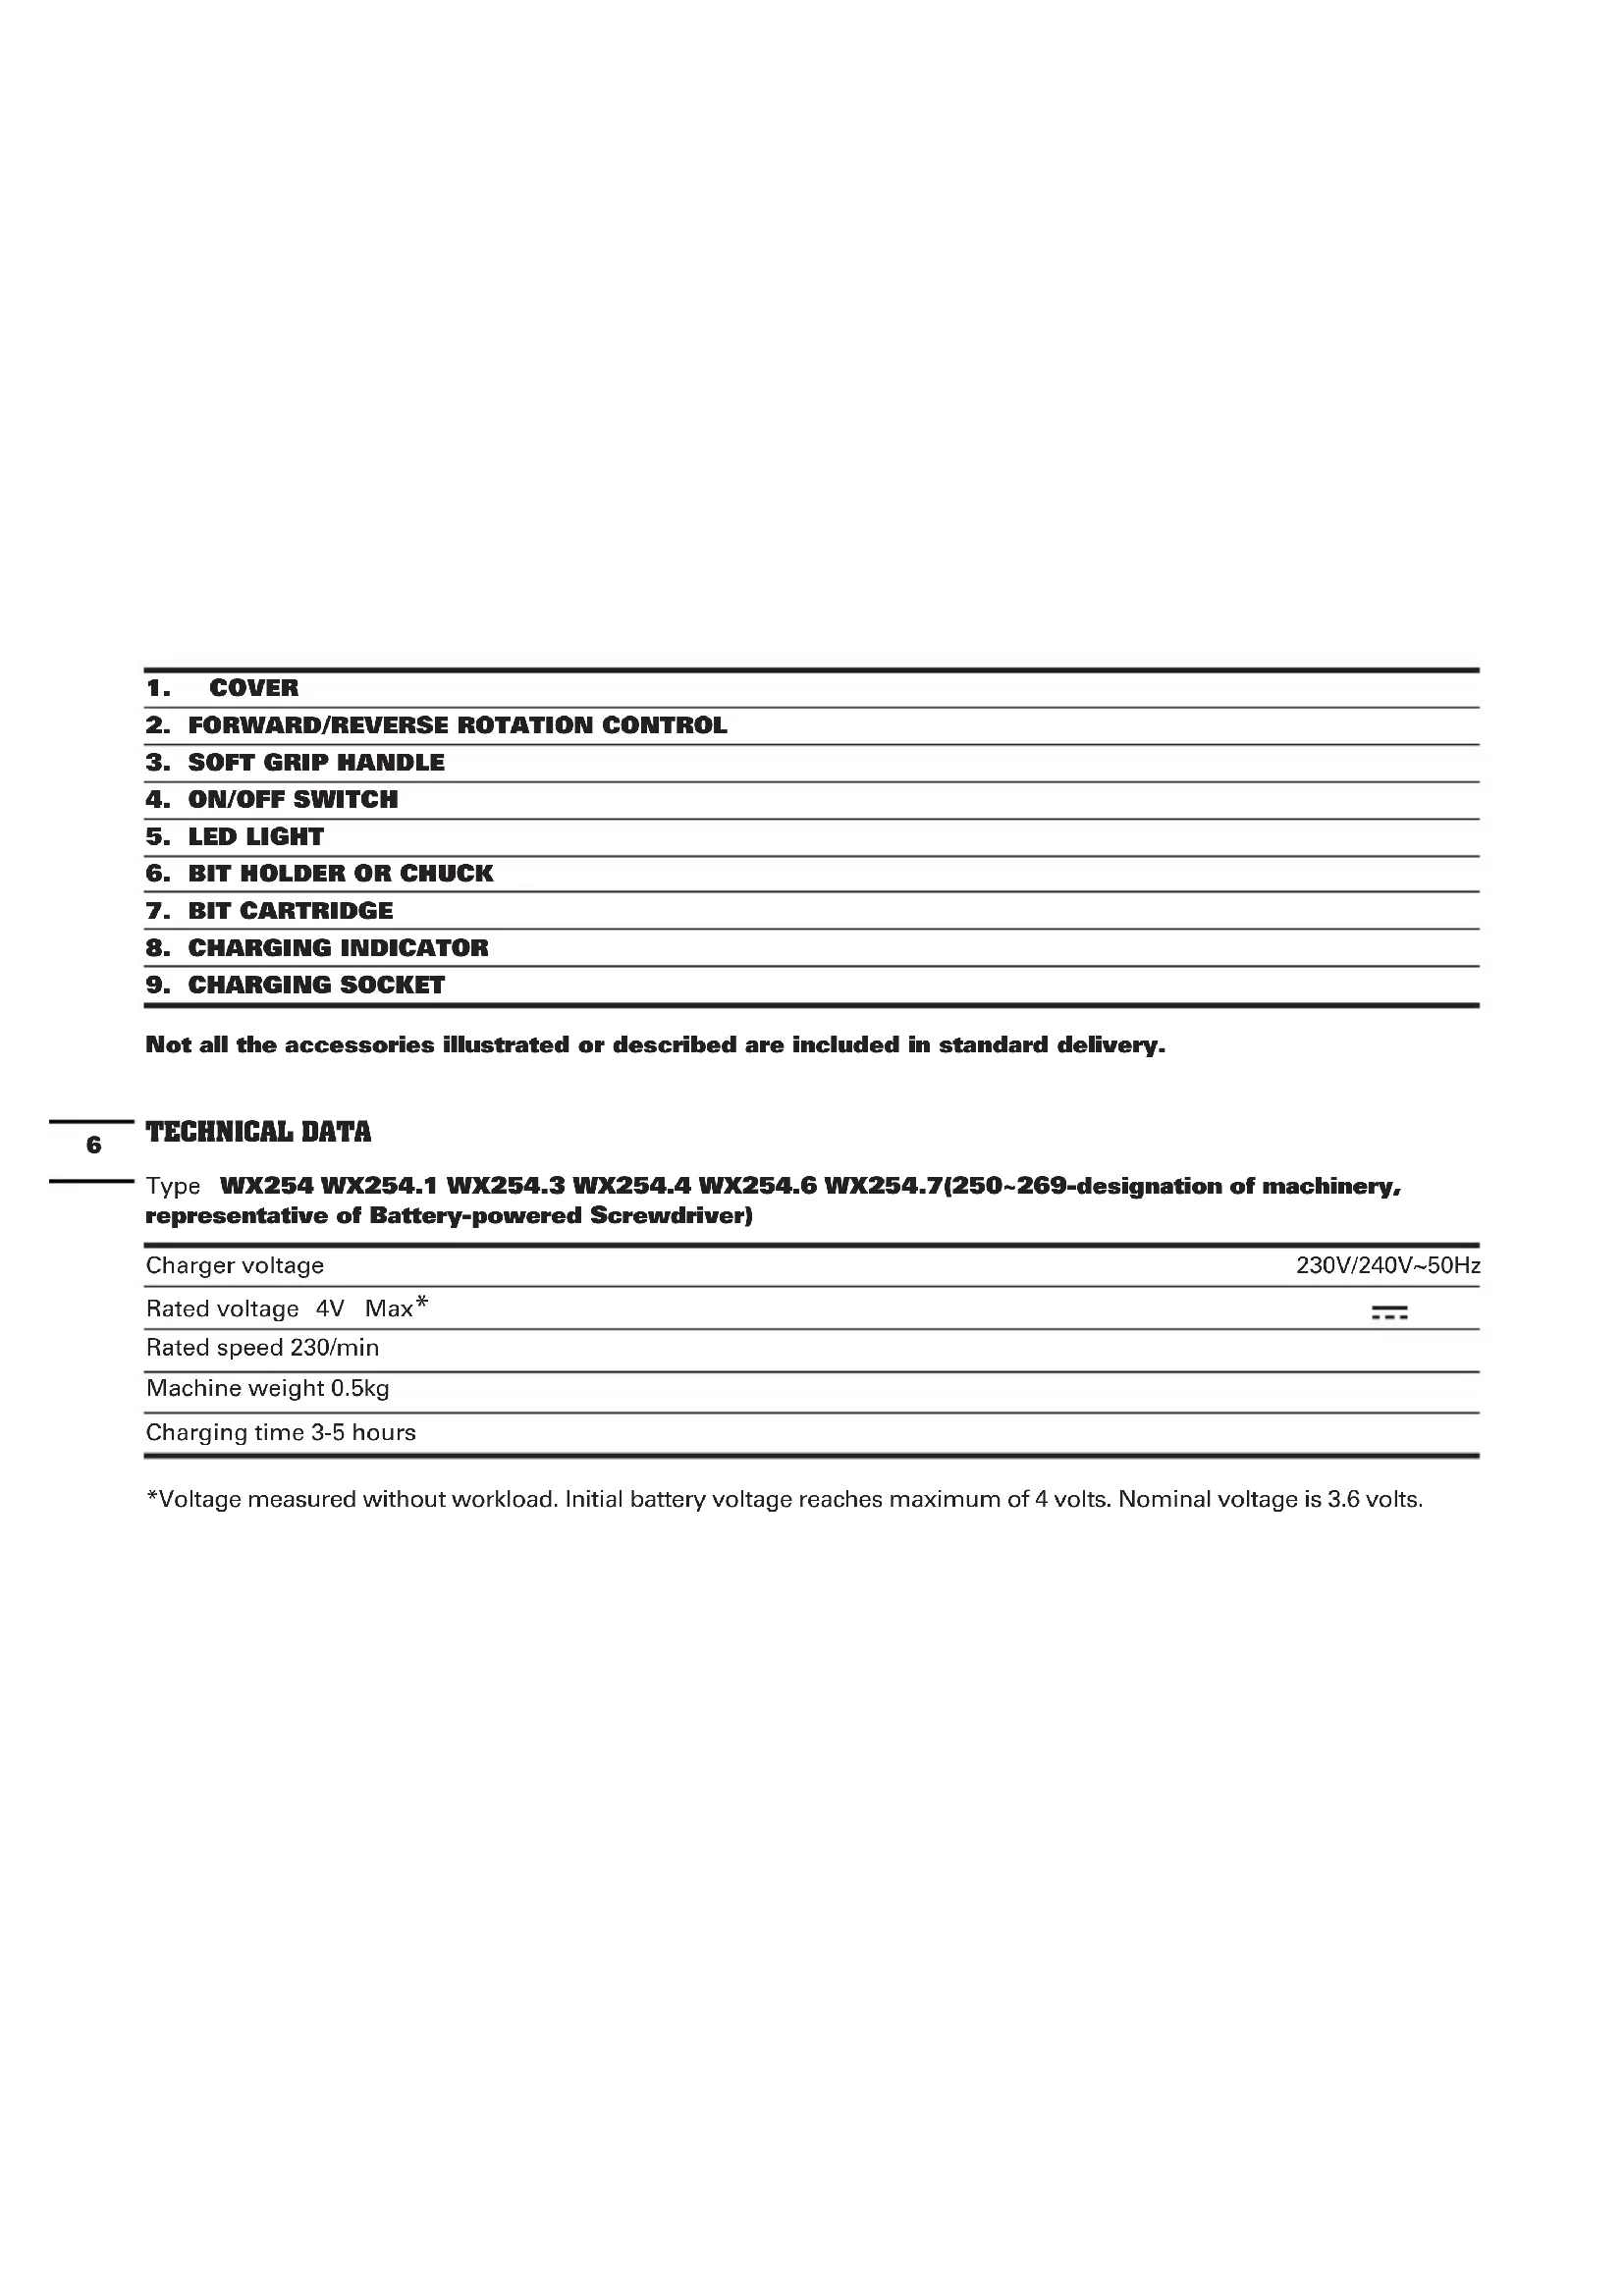
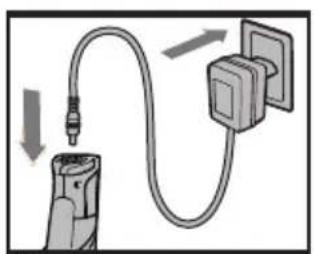
B) CHARGING (See Fig. A)
The screwdriver has two ways to charge.
- Plug the Charger into a suitable power outlet. Next, connect the screwdriver to the Battery Charger at the Charging Socket. The Indicator will illuminate Red during charging.
- Recharge the screwdriver from the charging base. Follow the same steps as above, plug the charger plug into a suitable power outlet, the indicator won't illuminate. Next, connect the base with the battery charger, the indicator (Red) will illuminate during charging.
Let the battery charge for 3-5 hours. The battery is fully charged as soon as the indicator is no longer lit. Then
unplug the Charger. Disconnect the Charger from the screwdriver. The screwdriver is ready to be used.
IMPORTANT:
When charging, the Charger and screwdriver may become warm to the touch; this is normal and does not indicate a problem.
2. OPERATING INSTRUCTIONS
Inspect the Screwdriver before using to ensure all the parts are running smoothly and there are no abnormal sounds or sparks. Before driving fasteners, check behind walls for wires and other electrical hazards or plumbing.
OPERATION
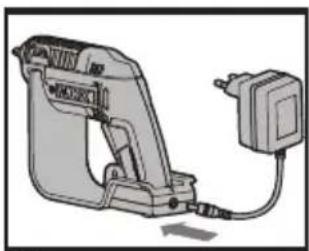
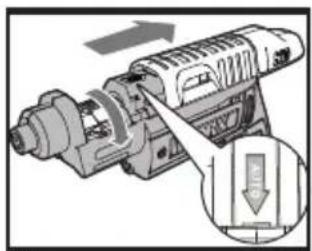
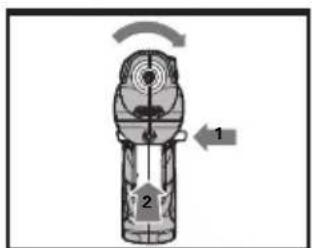
1. INSERTING THE BIT CARTRIDGE (See Fig. B)
Pull the Cover back completely to insert the Bit Cartridge (7).
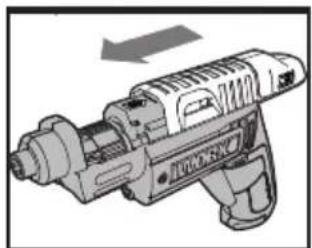
2. SELECTING A BIT
- Slide the Cover fully open, past the red line on the tool. The Bit Cartridge will advance automatically. (The Bit Cartridge can be manually rotated to left direction if preferred.) (See Fig. C1, C2).
- Move the top Cover back and forth until the desired Bit Is in place.
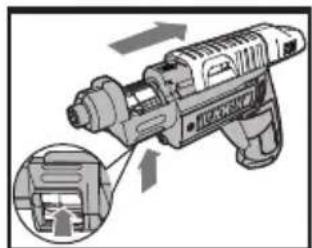
If the Bits in the Bit Cartridge need to be replaced, remove Bit Cartridge by pushing it up from the window underneath. Replace the Bits with the desired Bits. Ensure the Bits are properly positioned in the Cartridge and are not protruding from the back of the Bit Cartridge. Or, simply pull a Bit from the holder, and replace it with the desired Bit. It will load into the Cartridge
automatically when the cover is opened. (See Fig. D). NOTE:
- Only 25mm hex shank Bits are compatible with the screwdriver.
- If the Cover is not open fully, the Bit Cartridge will get stuck when taking it out from the tool. Pull the cover all the way back.
- The Cover may not fully close if the Bit Cartridge is not properly aligned inside. Make sure the Bit Cartridge has clicked into place when selecting the desired Bit to use. If the cover cannot properly close, just turn the Cartridge clockwise or counter-clockwise a little Bit and try again.
3. SWITCH LOCK
The On/off Switch can be locked in the OFF position. This helps to reduce the possibility of accidental starting when the screwdriver is not in use. To lock the On/off Switch, place the Forward/Reverse Rotation Control in the center position.
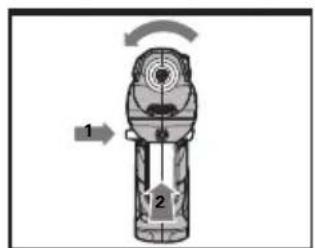
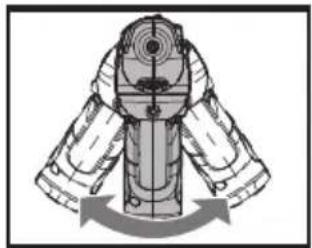
4. FORWARD/REVERSE ROTATION CONTROL (See Fig. E1, E2)
For drilling and screw driving in a clockwise rotation, move the switch marked "A" lever to the left. For reverse rotation, move the switch marked "B" lever to the right.
WARNING: Never change the direction of rotation when the Chuck is rotating, wait until it has stopped!
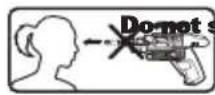
5. FULLY AUTOMATIC SPINDLE LOCKING (AUTOLOCK) (See Fig. F)
The screwdriver Chuck (6) is locked when the On/Off Switch (4) is not pressed.
This allows the driver to be used manually when needed.
IMPORTANT:
When using as a manual tool, do not press the On/Off Switch (4). Otherwise the screwdriver will be damaged.
6. USING THE LED LIGHT
To turn on the light simply press the On/Off Switch. When you release the On/Off Switch, the light will go off.
LED light increases visibility and is great for dark or enclosed areas.
7. PROTECTION AGAINST DEEP DISCHARGING
The Li-Ion battery is protected against deep discharging by the "Discharging Protection System". When the battery is empty, the machine is switched off by means of a protective circuit. The Chuck no longer rotates. When this occurs, recharge the battery.
MAINTENANCE
Your tool requires no additional lubrication or maintenance.
There are no user serviceable parts in your power tool. Never use water or chemical cleaners to clean your power tool. Wipe clean with a dry cloth. Always store your power tool in a dry place. Keep the motor ventilation slots clean. Keep all working controls free of dust. Occasionally you may see sparks through the ventilation slots. This is normal and will not damage your power tool.
ENVIRONMENTAL PROTECTION

- Waste electrical products must not be disposed of with household waste. Please recycle where facilities exist. Check with your local authorities or other for recycling advice.
DECLARATION OF CONFORMITY
We,
Declare that the product,
Description Cordless Screwdriver
Type WX254 WX254.1 WX254.3 WX254.4
WX254.6 WX254.7(250~269-designation of machinery, representative of Battery-powered Screwdriver)
Function Tightening and loosening screws, nuts
Complies with the following directives,
2006/42/EC 2006/95/EC
2004/108/EC 2011/65/EU
Standards conform to:
EN 55014-1 EN 55014-2
EN 60745-1 EN 60745-2-2
EN 60335-1 EN 60335-2-29
EN 61000-3-2 EN 61000-3-3
EN 62233
The person authorized to compile the technical file,
Name Russell Nicholson
Address Positec Power Tools (Europe) Ltd, PO
Box 152, Leeds, LS10 9DS, UK

2014/08/18
YujinTang
POSITEC Quality Manager
2006/42/EC 2006/95/EC
2004/108/EC 2011/65/EU
Werte nach,
EN 55014-1 EN 55014-2
EN 60745-1 EN 60745-2-2
EN 60335-1 EN 60335-2-29
EN 61000-3-2 EN 61000-3-3
EN 62233
INFORMATIONS RELATIVES AU BRUIT
INFORMATIONS RELATIVE AUX VIBRATIONS
2006/42/CE 2006/95/CE
2004/108/CE 2011/65/EU
Et conforme aux normes,
EN 55014-1 EN 55014-2
EN 60745-1 EN 60745-2-2
EN 60335-1 EN 60335-2-29
EN 61000-3-2 EN 61000-3-3
EN 62233
Responsible qualite POSITEC

1. COPERCHIO
- SELETTORE ROTAZIONE: NORMALE, INVERTITA E BLOCCO
- IMPUGNATURA MORBIDA
- INTERRUPTORE D'ACCENSIONE/SPEGNIMENTO
- LUCE LATERALE
- PORTAINSETI O MANDRINO
- CARTUCCIA PUNTE
- INDICATORE DI STATO DELLA CARICA DELLA BATTERIA
- PRESA DI RICARICA
Modelo WX254 WX254.1 WX254.3 WX254.4
WX254.6 WX254.7 (250~269- designación de maquinaria, representantes de Atornilladora a bateria)
2006/42/EC 2006/95/EC
2004/108/EC 2011/65/EU
WAARSCHUWING: Lees alle
Type WX254 WX254.1 WX254.3 WX254.4
WX254.6 WX254.7 (250~269-aanduiding
Tipus WX254 WX254.1 WX254.3 WX254.4 WX254.6
2006/42/EC 2006/95/EC
2004/108/EC 2011/65/EU
Director Calitate POSITEC
| 1. KRYT |
| 2. OVLÁDÁNÍ OTÁČEK DOPřEDU/DOZADU |
| 3. DRžADLO S MěKKYM ÚCHOPEM |
| 4. VYPÍNAČ |
| 5. SVěTLO LED |
| 6. DRžÁK VRTÁKÜ NEBO UPÍNADLO |
| 7. ZÁSOBNÍK VRTÁKÜ |
| 8. INDIKÁTOR NABITÍ |
| 9. KONEKTOR PRO NABÍJENÍ |
Typ WX254 WX254.1 WX254.3 WX254.4 WX254.6
2006/42/ES 2006/95/ES
2004/108/ES 2011/65/EU
Siphovane normy
EN 55014-1 EN 55014-2
EN 60745-1 EN 60745-2-2
EN 60335-1 EN 60335-2-29
EN 61000-3-2 EN 61000-3-3
EN 62233
BEZPECNOSTNÉ POKNY PRE NABIJACKY

VAROVANIE: Precitajte vsetky
DALSIE BEZPECNOSTNE POKNY TYKAJUCE SA NABIJACHKY BATERII
- Pred nabijanim si prečitajte námod.
- Po nabitif odpojte nabijaacku bateriei od sie'toveho privodu. Nasledne odpojte priopojenie kostry a potom priopojenie baterie.
- Baterie, z ktorych unika elektrolyt, nenabijajte.
- Nabijačku bateri nepoužívajte na Činnosti, na ktoré nie je určena.
- Pred nabijanim sa uistite, ci nabijačka vyhovuje miestnym charakteristikám napajania striedavým prudom.
- Určené na používanie v interiéri. Nevystavujte džd'u.
- Nabijace zariadenie musi byt'chranene pred vlhkostou.
- Nabijačku nepoužívajte v exteriéroch.
- Kontakty baterie ani nabijačky naskratujte.
- Pri nabijani dodržiavajte vyznacenu polaritu + / -
- Jednotku neotvárajte a uskladnujte ju mimo dosahu deti.
- Nenabijajte baterie inych vyrobcov.
- Presvedcte sa, ze spojenie medzi nabijačkou a bateriou ma spravnu polohu a nie je blokované inymi predmetmi.
- Otvory na nabijačke batérič chránte pred špinou a vlhkestou, ako aj pred vniknutim cudzorodych predmetov. Uskladnujte na suchom mieste bez výsktu mrazu.
- Pri nabijani baterie umiestnite nabijaacku v dobre vetranej miestnosti a v dostatočnej vdialenosti od horlavych materiav. Počas nabijania moze dojst' k ohriatiu nabijačky. Baterie nenabijajte nadmere. Počas nabijania nenechávaite baterie a nabijaacku bez dozoru.
- Nenabijajte nenabijatelné batérié, pretoze moze dojst' k prehrievaniu a poskodeniu.
- Dlhsiu zivotnost a lepsy vkyon dosiahnete v priapede nabijania baterie pri teplotach v Rozmedzi 18 ^ C a 24
°C. Bateriu nenabijaje pri teplotach nizsich aka 4,5^ alebo vyssich aka 40,5^. Je to dolezite, a zabrinite tak vaznemu poskodeniu baterie.
18. Nabijajte iba batrice rovnakého typu, aký je dodávaný spolocnostou WORX, a modely odporucané spolocnostou WORX.
BEZPEÇNOSTNÉ VAROVANIA TÜKAJÜCE SA BATERI
Typ WX254 WX254.1 WX254.3 WX254.4 WX254.6
WX254.7 (250~269- oznacenie zariadenia, zastupca Bateriovy skrutkovač)
Funkcia Ut'ahovanie a uvol'novanie skrutiek, matic
2006/42/ES 2006/95/ES
2004/108/ES 2011/65/EU
Spla posudzované normy:
EN 55014-1 EN 55014-2
EN 60745-1 EN 60745-2-2
EN 60335-1 EN 60335-2-29
EN 61000-3-2 EN 61000-3-3
EN 62233
you've got the power
www.worx.com
Copyright © 2014, Positec. All Rights Reserved.
2CSD16APK11011A1