
SRR 3.7 A1 - Razor SILVERCREST - Free user manual and instructions
Find the device manual for free SRR 3.7 A1 SILVERCREST in PDF.
| Product type | Rotary shaver |
| Brand | SilverCrest |
| Model | SRR 3.7 A1 |
| Power supply | Li-Ion battery 3.7 V / 700 mAh, rechargeable via power adapter 5 V / 1000 mA |
| Runtime | Approx. 60 minutes cordless |
| Charging time | Full charge: 90 minutes; quick charge: 5 minutes |
| Shaver protection rating | IPX6 (protected against powerful water jets) |
| Power adapter protection rating | IP20 |
| Power adapter input voltage | 100-240 V ~ 50/60 Hz |
| Main functions | Dry shaving, adjustable beard trimming (comb), contour shaving, use with adapter or battery |
| Package contents | Shaver, power adapter, trimming comb, protective cap, cleaning brush, storage pouch |
| Care and cleaning | Regular cleaning of cutting heads and trimmer with the provided brush; do not immerse the shaver |
| Safety | Water protection IPX6; automatic shut-off in case of blockage? Not specified but detailed safety instructions |
| Warranty | 3 years (manufacturer's warranty HOYER Handel GmbH) |
| Operating temperature | -10 °C to +40 °C |
Frequently Asked Questions - SRR 3.7 A1 SILVERCREST
User questions about SRR 3.7 A1 SILVERCREST
0 question about this device. Answer the ones you know or ask your own.
Ask a new question about this device
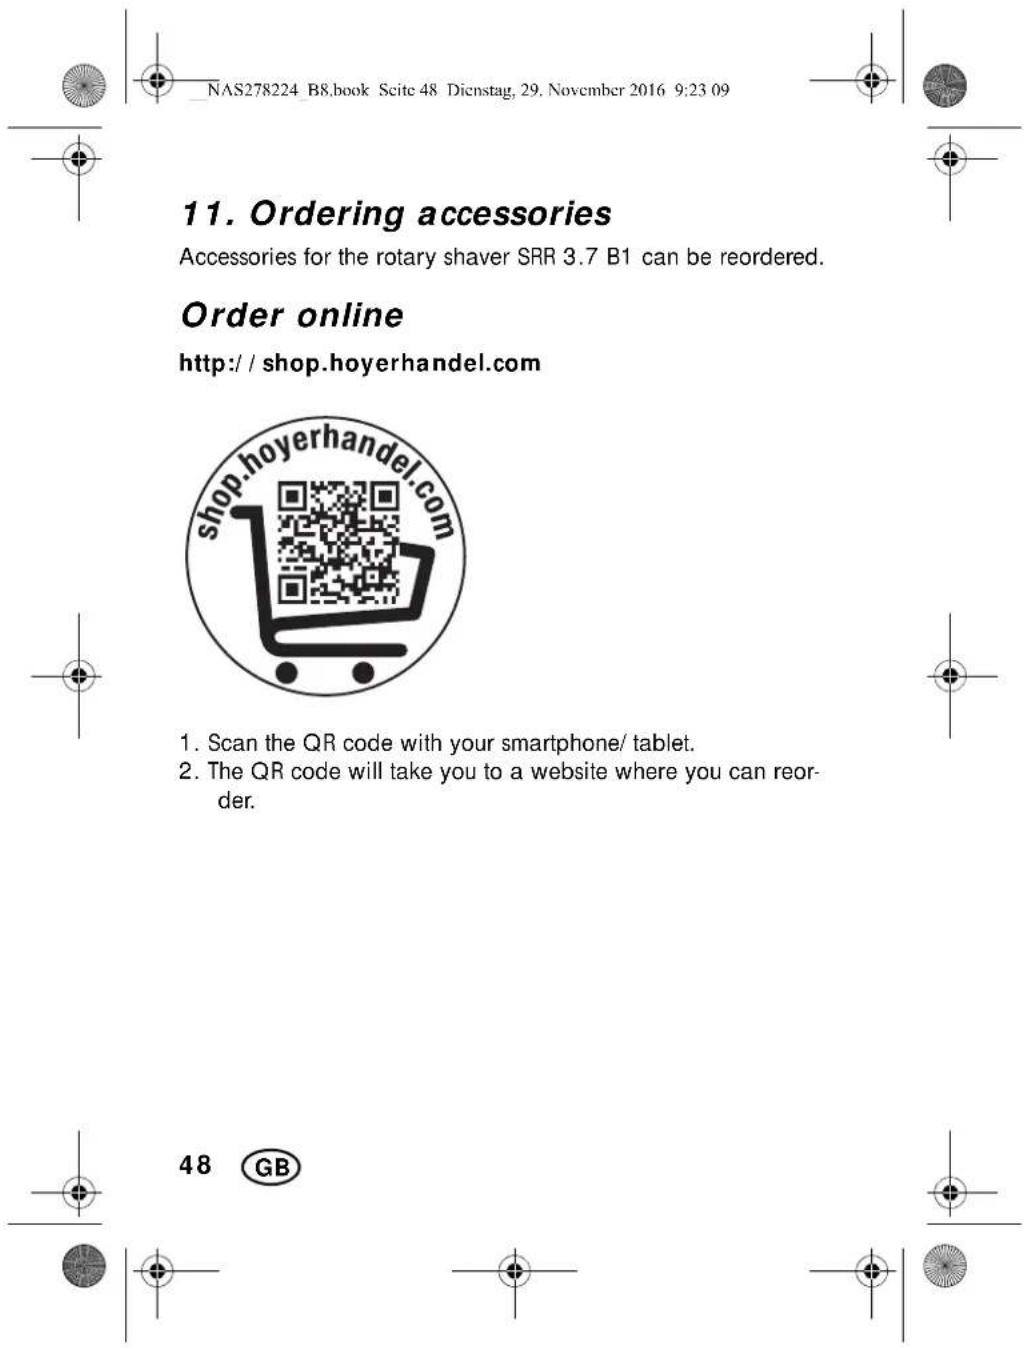
Download the instructions for your Razor in PDF format for free! Find your manual SRR 3.7 A1 - SILVERCREST and take your electronic device back in hand. On this page are published all the documents necessary for the use of your device. SRR 3.7 A1 by SILVERCREST.
USER MANUAL SRR 3.7 A1 SILVERCREST
Thank you for your trust!
Congratulations on your new rotary shaver.
For a safe handling of the device and in order to get to know the entire scope of features:
We hope you enjoy your new rotary shaver!

NAS278224 B8.book Scite 34 Dienstag, 29. November 2016 9:23:09


- If the device is used in a bathroom, the power unit must be pulled out after use, as the proximity of water represents a hazard, even when the device is switched off.
- Installation of a residual current device (FI/RCD) with a rated residual operating current of no more than 30mA is recommended to provide additional protection. Ask your electrician for advice. The installation should only be carried out by a qualified electrician.

DANGER! Risk of electric shock
- Never put the device into operation if there are visible damages to the device, the power unit or the cable or if the device has been dropped before.
- Connect the cable to the device before plugging the power unit into a wall socket.
- Only connect the power unit to a properly installed, easily accessible wall socket, the voltage of which corresponds to the specifications on the rating plate. The wall socket must continue to be easily accessible after the device is plugged in.
Ensure that the cable cannot be damaged by sharp edges or hot surfaces.
Ensure that the cable is not trapped or crushed. - When removing the power unit from the wall socket, always pull the power unit and never the cable.
Pull the power unit out of the wall socket, ... after every use,
... after each charging process,
... if there is a fault,
... before connecting the device to the cable,
... before you clean the device and
... during thunderstorms.


NAS278224 B8,book Scite 37 Dienstag, 29.November 2016 9:23 09


5. Charging
NOTES:
- Before the device is used for the first time, and during the following three charging procedures, the device should be charged for 90 minutes in each case.
The capacity/ charging state of the battery 10 is displayed in percent (00, 05, 10, ... , 100% in increments of 5%). - When the batteries are almost empty, the plug symbol 11 flashes in red. The device can then only be used for a short time without being connected to the electricity supply.
- It takes about 5 minutes to charge the device sufficiently for one shave.
-
When the battery is fully charged, the device can be used for approximately 60 minutes without being connected to the power supply.
-
Switch off the device with the on/off switch 9 if necessary.
- Connect the power unit 19 to the connection 14 at the device.
- Insert the power unit 19 into a readily accessible wall socket whose voltage matches the voltage stated on the rating plate.
- The plug symbol 11 is lit red and the battery is charged. When the battery is fully charged, 100% is displayed. When the battery is fully charged, the device can be used for approximately 60 minutes without being connected to the power supply.

NAS278224 B8.book Scite 40 Dienstag, 29. November 2016 9:23 09


Removing
- Push the comb attachment 1 upwards using a moderate amount of force. The comb attachment 1 separates from the beard trimmer attachment 3.
- Remove the comb attachment 1.
6.5 Shaving

DANGER! Risk of electric shock due to moisture!
- The shaver 8 and the power unit 19 are not waterproof and are therefore not allowed to be used in a shower/ bath.
WARNING!
Do not use the device on open wounds, cuts, sunburn or blisters.
Do not place excessive pressure on the shaving heads 4. They are thin and can be damaged easily.
NOTES:
- Shaving is possible both in battery mode and in mains operation.
- Initial use may cause temporary irritation or redness of the skin, as the skin has to adjust to shaving. This is normal and usually lasts between 2 to 4 weeks.
- Hold the blade unit 4 parallel to the surface of the skin, and gently move it over your face using circular motions.
- Shave against the direction of your beard growth.
- Stretch your skin in complicated areas, such as the chin, to achieve better results.
40


NAS278224 B8.book Scite 42 Dienstag, 29. November 2016 9:23:09


7. Cleaning and care

DANGER! Risk of electric shock!
The hand-held part must be disconnected from the power cable before it is cleaned in water.
WARNING! Risk of injury!
Always switch off the device before cleaning it.
WARNING! Risk of material damage!
The blade unit 4 of the shaving attachment 5 can be cleaned using water. Do not use any other liquids.
Do not use any astringent or abrasive cleaning agents.
NOTE: clean the device after every use.
7.1 Shaver
- Wipe down the housing of the shaver 8 with a damp cloth.
7.2 Shaving attachment / blade unit
Dry cleaning of the shaving attachment
- Clean the 3 shaving heads 4 after each shave using the cleaning brush 20.
- Press the release button 6 on the shaving attachment 5, so that the blade unit 4 opens.
- Carefully tap the blade unit 4 to empty it.
- Remove the hair remnants by using the cleaning brush 20.
42


NAS278224 B8,book Scite 46 Dienstag, 29.November 2016 9:23 09


9. Troubleshooting
If your device fails to function as required, please try this checklist first. Perhaps there is only a minor problem, and you can solve it yourself.

DANGER! Risk of electric shock!
Do not attempt to repair the device yourself under any circumstances.
| Fault Possible causes / Action | |
| No function | ·Has the device been connected to the power supply? ·Inspect the connections. ·Is the battery empty? |
| The device cannot be switched on. | ·Is the battery empty? ·Has the transport lock been activat- ed? |
| Cutting performance is deteriorating. | ·Bla de u n i t 4 |
| Battery cannot be charged or the bata- tery performance is very low. | The battery have reached the end of its service life. The device with the installed battery must be disposed of properly (see Chapter "Disposal" on page 45). |
46


NAS278224 B8.book Scite 47 Dienstag, 29. November 2016 9:23 09


10. Technical specifications
| Model: SRR 3.7 B1 | |
| Rotary shaver: Input: 5 V | 1000 mA --- |
| Power unit (model SW-050100EU-T): | Input: 100-240 V ~ 50/ 60 Hz, 0.2 A max. Output: 5 V ±000 mA |
| Protection class of the power unit: II | ☐ |
| Protection type of the shaver: | IPX6 (protection against strong jets of water) |
| Protection type of the power unit: | IP20 (protection against penetration by solid foreign objects with a diameter > 12.5 mm) |
| Ambient conditions: only approved for indoor use | |
| Battery: | 1x 3.7 V Li-ion, 700 mAh |
| Operating temperature: -10 °C to +40 °C | |
Subject to technical modification.


NAS278224 B8.book Scite 50 Dienstag, 29. November 2016 9:23 09


Warranty coverage
The device was produced carefully according to strict quality guidelines and tested diligently prior to delivery.
The warranty applies to material or factory defects.
Excluded from the warranty are wear parts subject to normal wear and damages to fragile parts, e.g. switches, batteries, lamps or other parts manufactured from glass.
This warranty expires if the product is damaged, not used as intended or not serviced. For the proper operation of the product, all instructions listed in the operating instructions must be observed carefully. Any form of use and handling that is advised against in the operating instructions or warned against must always be avoided.
The product is only intended for private and not for commercial use. In the case of incorrect and improper treatment, use of force and interventions not performed by our authorised Service Centre, the warranty shall cease.
Handling in case of a warranty claim
In order to ensure prompt processing of your matter, please observe the following notes:
- Please keep the article number IAN: 278224 and the purchase receipt as a purchase verification for all inquiries.
- The article number can be found on the rating plate, an engraving, the title page of your instructions (in the bottom left), or as a label on the rear or underside of the device.
- If faulty operation or other defects occur, first contact the Service Centre listed in the following by telephone or email.
50


NAS278224 B8,book Scite 54 Dienstag, 29.November 2016 9:23 09

Sommaire
Chere cliente, cher client,


- Thank you for your trust!
- DANGER! Risk of electric shock
- Charging
- NOTES:
- Removing
- Shaving
- DANGER! Risk of electric shock due to moisture!
- WARNING!
- Cleaning and care
- DANGER! Risk of electric shock!
- WARNING! Risk of injury!
- WARNING! Risk of material damage!
- Shaver
- Shaving attachment / blade unit
- Dry cleaning of the shaving attachment
- Troubleshooting
- Technical specifications
- Warranty coverage
- Handling in case of a warranty claim
- Sommaire
Brand : SILVERCREST
Model : SRR 3.7 A1
Category : Razor