
DVG 3006 CB - Other kitchen appliances BOMANN - Free user manual and instructions
Find the device manual for free DVG 3006 CB BOMANN in PDF.
| Product type | Kebab Rotisserie |
| Brand | Bomann |
| Model | DVG 3006 CB |
| Power supply | 220-240 V~, 50/60 Hz |
| Power consumption | 1400 W |
| Net weight | Approx. 2.4 kg |
| Maximum capacity (doner kebab) | Up to 3 kg of meat |
| Number of kebab skewers | 6 |
| Main functions | Grilling doner kebab, meat/vegetable skewers, poultry |
| Drive system | Motorized rotation with driven axle |
| Reflector shield | Yes, for even cooking |
| Drip tray | Yes, removable |
| Included accessories | Reflector shield, 6 sprockets, 6 skewers, drive system with crossbar, central skewer, rotisserie, drip tray |
| Safety | Hot surface (warning), switch off, do not immerse base |
| Maintenance | Removable parts washable in warm soapy water; base and heating elements cleaned with a damp cloth |
| Repairability | Do not repair yourself; contact a qualified technician |
| Intended use | Household use only |
| Certification | Compliant with EU directives |
Frequently Asked Questions - DVG 3006 CB BOMANN
User questions about DVG 3006 CB BOMANN
0 question about this device. Answer the ones you know or ask your own.
Ask a new question about this device
Download the instructions for your Other kitchen appliances in PDF format for free! Find your manual DVG 3006 CB - BOMANN and take your electronic device back in hand. On this page are published all the documents necessary for the use of your device. DVG 3006 CB by BOMANN.
USER MANUAL DVG 3006 CB BOMANN
| Contents | |
| Overview of the Components | Page 3 |
| Instruction Manual | Page 34 |
| Technical Data | Page 38 |
| Disposal | Page 38 |
ENGLISH
Thank you for choosing our product. We hope you will enjoy using the appliance.
Symbols in these Instructions for Use
Important information for your safety is specially marked. It is essential to comply with these instructions in order to avoid accidents and prevent damage to the appliance:

WARNING:
This warns you of dangers to your health and indicates possible injury risks.

CAUTION:
This refers to possible hazards to the appliance or other objects.

NOTE: This highlights tips and information.
General Notes
Read the operating instructions carefully before putting the appliance into operation and keep the instructions including the warranty, the receipt and, if possible, the box with the internal packing. If you give this appliance to other people, please also pass on the operating instructions.
- The appliance is designed exclusively for private use and for the envisaged purpose. This appliance is not fit for commercial use.
- Do not use it outdoors. Keep it away from sources of heat, direct sunlight, humidity (never dip it into any liquid) and sharp edges. Do not use the appliance with wet hands. If the appliance is humid or wet, unplug it immediately.
- When cleaning or putting it away, switch off the appliance and always pull out the plug from the socket (pull the plug itself, not the lead) if the appliance is not being used and remove the attached accessories.
- Do not operate the appliance without supervision. If you leave the room you should always turn the appliance off. Remove the plug from the socket.
- The appliance and the mains lead have to be checked regularly for signs of damage. If damage is found the appliance must not be used.
- Use only original spare parts.
- In order to ensure your children's safety, please keep all packaging (plastic bags, boxes, polystyrene etc.) out of their reach.

WARNING:
Do not allow small children to play with the foil. There is a danger of suffocation!
Special Safety Precautions for this Appliance
You will find the following symbol with warning character on the appliance:
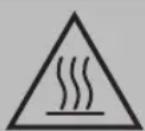
WARNING: Hot surface!
Danger of burns!
The temperature of accessible surfaces can be very hot during and after operation.
- Do not touch the hot parts of the appliance. Use oven mitts when removing or cutting off grillables.
- Do not switch the appliance on until it is completely assembled.
- Do not carry or lift the appliance during operation, but turn it off first and then disconnect the mains plug. Wait until the appliance has cooled down completely.

WARNING: Risk of injury!
The kebab skewers are sharp. Handle with care. Close supervision is necessary while children are handling the skewers.

CAUTION: Fire hazard!
- Oil and fat can burn when overheated. Keep sufficient safe distance (50 cm) to inflammable objects such as furniture, curtains, etc.
-
Do not cover the ventilation slots!
-
Place the appliance on a heat resistant surface! The surface should be easy to clean as spattering is unavoidable.
- Due to rising heat and vapours do not place the appliance under wall cupboards.
- For ventilation leave at least 30cm free space around the appliance.
- Ensure that the mains cord does not touch hot parts of the appliance during operation.
- Do not operate the appliance with an external timer or separate remote control system.
- Do not repair the appliance by yourself. Always contact an authorized technician. If the supply cord is damaged, it must be replaced by the manufacturer, its service agent or similarly qualified persons in order to avoid a hazard.
- This appliance can be used by children aged from 8 years and above and persons with reduced physical, sensory or mental capabilities or lack of experience and knowledge if they have been given supervision or instruction concerning use of the appliance in a safe way and understand the hazards involved.
Children shall not play with the appliance. -
Cleaning and user maintenance shall not be made by children unless they are older 8 years and supervised.
-
Keep the appliance and its cord out of reach of children less than 8 years.

CAUTION:
This appliance is not intended for immersion in water during cleaning. Please refer to the instructions provided in the chapter, "Cleaning".
Intended Use
This appliance is used for grilling doner kebab / gyros, meat / vegetable skewers or poultry.
It is intended for the use in private households and similar applications. The appliance is only to be used as described in the user manual. Do not use the appliance for any other purpose.
Any other use is not intended and can result in damages or personal injuries.
The manufacturer assumes no liability for damages caused by improper use.
Unpacking the Appliance
- Remove the appliance from its packaging.
- Remove all packaging materials such as films, filler material, cable clips and carton.
- Check the contents for completeness.
- In case of incomplete delivery or damage, do not operate the appliance. Return it to your dealer immediately.

E:
Production residue or dust may have collected on the appliance. We recommend cleaning the appliance according to chapter "Cleaning".
Overview of the Components / Scope of Delivery
1 Reflector sheet
2 Gear rim (6 pieces)
3 Kebab skewers (6 pieces)
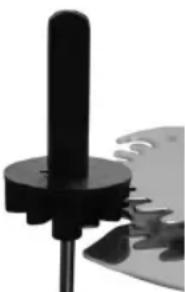
4 Gearbox with traverse
5 Skewer
6 Rotisserie for kebab skewers
7 Grease drip tray
8 Switch (On/Off)
9 Base
10 Motor shaft with notch
11 Clamp spring for reflector sheet
12 Heating element
13 Traverse
14 Locking screw
15 Securing bracket
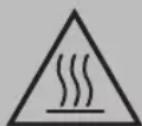
Assembly
Please take a look at the illustrations on page 3.
Figure A
- Push the reflector sheet between the heating element and the housing rear panel. The reflector sheet's side guide rails have to be placed into the lateral recesses of the housing. Place the reflector sheet in front of the clamp spring. Check that the reflector sheet is firmly placed.
- Put the grease drip tray above the motor shaft at the center of the appliance.
- Hold the rotisserie with the tip pointing upwards. Place the bottom end of the rotisserie into the motor shaft in such a way that the catch snaps into the notch. You may need to twist the rotisserie a little.
Figure B
Secure the gearbox with the traverse at the appliance:
- Loosen the locking screw at the traverse.
- Slide the traverse with the screw into the securing bracket's recess.
- Slightly tighten the screw.
- Place the gearbox onto the tip of the meat skewer. You may need to twist the gearbox a little.
- Insert bottom of the traverse into the notch in the center of the housing rear panel.
- Hand-tight then the locking screw.
Notes on Use
Electric Connection
- Ensure that the switch (8) is set to "0" position.
- Before inserting the power plug into the outlet, check that the mains voltage to be used matches that of the appliance. You can find the required information on the nameplate.
- Connect the mains plug to a properly installed shockproof socket only.
Power On/Off
The switch (8) turns the appliance on and off.
$$ \begin{array}{l} I = \text {O n} (\text {T h e p i o l t l a m p i s i n d e t h e s w i t c h l i g h t s u p .}) \ 0 = \text {O f f} \ \end{array} $$
Before Initial Use
- Insert the reflector sheet only.
- A protective layer is located on the heating element. Operate the appliance without the other components and without foods for approx. 10 minutes in order to remove it.
NOTE:
Occurrence of light smoke and odor is normal during this procedure. Ensure adequate ventilation.

WARNING: Danger of burns!
Allow appliance to cool down before assembling the other components!
Preparation
Thread the meat or kebab skewers with the marinated seasoned grillables.

CAUTION:
Always ensure you keep approx. 1 cm spacing between the grillables and heating elements.
NOTE:
Do not place the grillables beyond the heating element's height.
Doner Kebab
When cut into thin slices you can grill up to 3kg of meat at once.
- Prepare the rotisserie as described in "Assembly" "Figure A".
- Thread the slices of meat onto the center of the meat skewer. Start with the biggest slices of meat first.
- Finally depending on your taste place an onion or a tomato onto the meat skewer.
Meat or Vegetable Skewers
- Prepare the rotisserie as described in "Assembly".
- Put the gear rims onto the kebab skewers' plastic handle as far as they go. The flat side must point upwards. Please note the slots on the gear rims and the remaining stud on the skewer.
- Thread bite-sized pieces of meat and / or vegetable onto the kebab skewers.
- Place the kebab skewers into the outer recesses of the gearbox to ensure the gear rims are reaching into the cogs of the gear. Place the bottom of the skewers into the rotisserie's outer holes.

CAUTION:
Check correct placement of the skewers. The skewers when inserted incorrectly can drop out of the gearbox and come into contact with the heating element. The plastic handles and gear rims would melt.
Poultry (e.g. a Whole Chicken)
The poultry should have a 16cm maximum diameter in order to avoid contact with the heating element.
- Prepare the rotisserie as described in "Assembly" "Figure A".
- Thread the whole chicken onto the meat skewer.
- To fix them wrap the drumsticks and wings with kitchen twine.
Give the poultry even more stability while using kebab skewers:
- Mount the gearbox with the traverse as described in "Assembly" "Figure B".
- Remove the gear rims of the kebab skewers. Place the skewers into the outer recesses of the gearbox and into the rotisserie's outer holes.
Operation

WARNING: Danger of burns!
-
Do not operate the appliance before it has been fully assembled and loaded with grillables!
Always wear oven mitts when removing or cutting the grillables. -
Switch on the appliance. The rotisserie is rotating.
- While preparing kebab skewers they should turn on their own axis. Turn the appliance off if that is not the case. Check correct placement of the skewers in the rotisserie.
- The heating time is approx. 5 minutes. Monitor the grilling process!
i NC
The cooking times of doner kebab, kebab skewers or poultry differ significantly. Among other things they are depending on how closely the grillables are moved past the heating element.
- When preparing doner kebab you can cut off the first portion of grilled meat after approx. 15 - 20 minutes.

NOTE:
We recommend the use of an electric knife.
It takes additional 5 minutes until the next meat layer is browned. The thinner the meat skewer becomes the longer it takes until you can cut off another layer of meat.
- Make sure the skewer is located in the front section of the rotisserie when removing the kebab skewers. Avoid touching anything other than the plastic handle at the top of the skewers.
- We recommend using a roasting thermometer to check the doneness of poultry. If you used the gearbox with the traverse and skewers for mounting, remove these parts of the grill to withdraw the poultry.
End of Operation
- Turn off the appliance. Unplug the power cord from the wall outlet.
- Allow the appliance to cool down completely!
Cleaning

WARNING:
- Always disconnect the mains plug before cleaning.
- Wait until the appliance has cooled down completely!
- Never immerse the base in water for cleaning. It could result in an electric shock or fire.

CAUTION:
- Do not use wire brushes or other abrasive objects.
- Do not use aggressive or abrasive cleaning detergents.
After each use clean the appliance completely, otherwise unpleasant smoke and odor formations may occur during next use.
Reflector Sheet, Grease Drip Tray, Rotisserie for Kebab Skewers, Gearbox with Traverse, Kebab Skewers
- Please note the figures on page 3 and the description in the "Assembly" section. Dismantle the parts of the base in reverse order.
- The gear rims can be detached of the skewers.
- Clean these parts in a warm rinsing bath after every use.
- Dry the components before installing them back into the appliance. Put the gear rims back onto the kebab skewers. The flat side must point upwards.
Base
Clean the base and heating element with a damp cloth. Then wipe it with a dry cloth.
Storage
- Only store the appliance clean and after it has cooled down.
- During longer periods of non-use we recommend storing the appliance in its original packaging.
Always store the appliance in a well-ventilated and dry place out of reach of children.
Technical Data
Model: DVG 3006 CB
Power supply: 220-240V\~, 50/60Hz
Power consumption: 1400 W
Protection class: I
Net weight: approx. 2.4kg
The right to make technical and design modifications in the course of continuous product development remains reserved.
This appliance complies with all current CE directives, such as electromagnetic compatibility and low voltage directive and is manufactured according to the latest safety regulations.
Disposal
Meaning of the "Wheelie Bin" Symbol
Take care of our environment; do not dispose of electrical appliances via the household waste.
Dispose of obsolete or defective electrical appliances via municipal collection points.

Please help to avoid potential environmental and health impacts through improper waste disposal.
You contribute to recycling and other forms of utilization of old electric and electronic appliances.
Your municipality provides you with information about collecting points.
Instrukcja obslugi
CTC Clatronic Sp. z o.o
Ul. Brzeska 1
45-960 Opole
Usuwanie
Yka3bIbaeT Ha BO3MOxHyO ONaCHOCT bIJI N3dJIINN I dpynx OKpyXiaUx INpeDMeTOB.

IPIMEUYAHNA:JaetcoBtebIINHOpMaUNIO.
06uue 3ameuHn
Ipeed hauanom 3KcNpyataunn npnbopa BHmateIbHO npountaTe npnnaeraemyIO INCTpykUIO NO 3Kcnnyataunn I coxpaHNTe ee B HadeXHom MeCTe, BMeCTe C rapaHTnHBIM TaHOOM, KaccOBbIM YekOM n, NO BO3MOXHOCTN, KAPTOHHO Kopo6KO C yNAKOBOuHBM MaTePnAonom. EcNI daTe KOmy-Ni6o NOnNoB3ObaTbCra np6Opom, O6BaTeNbHO daTe BV npndaHy dAnHyIO INCTpykUIO IO 3Kcnnyataunn.
ПользунТecь пиборм TOлько чаТьIMобра3OMип
НаЗнayehи. Пибор He п徳нЗнayeh Дя КOMМерчe-
СКОTO ИСПЛБЗВАИ.
He noIb3yIeTcB npIbOp mO tKpbItbIM He6OM. PpeOxpaHnIe npIbOp OT xapbl, npIbIX cOnHeuHbIX nyuei, BnaXHoCTN (Hn B Koem Cnyae He nOrpyKaTe erO B BoY) n yApOB 06 ocTpbIE yrbl. He npIkaCaiTeCb K npIbOp ByaXHbMI pykamM. Ecn npIbOp yBaJaxHnncn nn HAoK, TyT Xe BblTe BNkky n3 po3ETKn.
Iocne 3KcnpnyatauM,MOHTaxe npHaadnHexHocte, HCTKE INIINIOLOMKpe pnp60pa Bcerda BBHIMMaTe BNJKy n3 po3ETKN (TARHTe 3a BNJKY,a He 3a Ka6eJIb.
He octabJrTe BkIoueHHbIe 3JIeKTPonpnp6Opbl6e3 npICMOtpa.BbIXoJa n3 NOMeUeHnB CcERda BbIKIOuaTe np6Op.BbIHbTe WTeKepe n3 po3eTkn.
- Pn6bOp n Ka6eBcTeBOro nHTaHnHa Heo6xOIMOp peryIpaH0 o6CneDobAtb Ha hAInuHne CteNoB NOBpeKdEHH. Pn6OBnApUKeHH NOBpeKdEHH NoNb3OBAbCra Pn6bOpom 3aPpeuaetc.
- IcnoIb3yIte ToIbKO opnHaHaJIbHbIe 3aIuaCTN.
- V3 coo6paXeHn 6e3oNaChOCT nIaIeTe He octabTnIeTe IeKaTb yNakOBky (IInaCTIKOBbie MeuK, KapTOH, NeHONlact n T.D.) 6e3 npICMOTpa.

PENEYIPPEXDEHNE:
He no3B0JnTe DeTm nIpaTb c nOINaTIneHOBOI nIEHKO. Onachocb ydyub!
Oco6bIe yka3aHnI NO TexHnke 6e3OpacHOCTN DЯ DaHHoro yCTpOiCTBa
Ha n3deJnn nmeOTcra cneDyUoIe npedynpeKdaIOuIe CNMBON:
I P E D U N P E X D E H N E: P n c k T p a B m b i!
Ke6a6HbIe 7aMnypbl octpbl. BydbTe ocToPOxHbI. BHNMaTeJbHo Na6JIoJaIte 3a DeTbMn, INcNoJIb3yIOUIMM N7aMnypbl.
BHIMAHNE: Onachoctb noxapa!
- Macnoи жир могут загореться рп посяреговни. Соблдайты достаточhoe paocstordнe (50 cm) до летко вocламенюцхся пеДmetOB, takx кak Me6eNB, wTOpbl T.D.
He nepekpbBaIte BeHTnlaOnHbIe OTBepCTna! - YctaHaBnBaIte np6op Ha JxapOpnoHyo NOBepXHocTb! NOBepXHOCTb DOJxHa 6bITb IeKo YnCTHTb, NockOJIbky HEn36ExHOp a36pbI3rNBaHne.
- 13-3a NOdHmAoUeOcR Japa N IcnapeHn He CTaBbTe yCTPOI-CTBO NOd CTeHHbIM UkaΦom.
- Д�� BEHTINJIЯЦИ N OCTaBbTe He MeHee 30 cm CBO6OJHOrO npocTpaHcTBA BOKpyr npi6opa.
- Y6eIntecb,ЧTO Μнур олелкгпNTань He kacaetcHarpeTbIX NOBepxHOCTeY cTPOINCTBa BO BpemЯ erO pa60Tbl.
He ynpabJnTe yCTPOBCTBOM C NOMObBHeHHeTo TaMepa nIOTdEJIbHOcTEmbl DnCTaHcNOHHOro ynpabJeHnA.
He nbitaTeCb camocToTebHO OTPeMOHTnpoBaTb yCTpoIcTBO. O6aTeBHO CBXnTECb C aBTOpN3OBaHHbIM MaCTepOM. PnIOBpeKdEHN CeTeBOrO shHpya, BO n36eKaHne onaCHOCTn nopAKeHnra 3JIeKTPnueckm TOKOM, shHyp cJeDyET 3aMeHITb y n3ROTO
BNTeJIa, CepBnCHOrO IpeIcTaBNTeJIaJI IN dpyrIX KBaJIINOpuPoBaHHbIX JInC.
- 3TO yCTPOIcTBO MOKET NcNoJIb3OBaTbCSdTeBIMn C8 JETN IIODbMn C OrpaHnueHHbIMn cH3UeCKIMN, Ocra3aTeJIbHbIMn IN YMCTBeHHbIMn CNOCo6HOCTaMn, a TaKKe JIOdMbN 6e3 ONbITaN 3HaHn, ecn OHn HaxoJATc POnCmOTpOM nIN 6blnn pOHNCTpyKTIpoBaHbI O6 NcNoJIb3OBaHnN yCTPOIcTBa 6e3OJaCHbIM Mobpa3OM n IOHMaHT BO3MOXHbIe yrPo3bl.
-Детам He pa3pewaetcngpataC yctpoiCTBOM.
-ЧИстka И обслужиBaHne He ДОЛЖHO BыПОЛНЯТьСЯ DeTbMn, 3a ИКлIOчЕнem DeTeI CTapWe 8 ЛeT И ПОД Ha6JIQUDEHnEM B3PocJIbIX. - Pacnojarate neyb n ceteboi shhyp BHe Docraemocntn deTeimnaide 8 let.

BHIMAHHE:
Данhoe устюв He пedingаизашино Дяпогужения в Body bo Bpeмя чістки. CMOTpnte pekomeндаци, kotopbie daIoTcB rIbaBe "Yucmka".
Ha3naYeHne
3TOT npnbop cnkyknt nla JKAPKn Ke6aba / npoc, Mca (waIbIK) / OBOeH Ha IaAMnpax INn DomaHne ITNcblI ceJIHKOM.
ОноюпеднаЗачесno Дгл ИспьбзOBAHЯВДOMaшнИ NIN NOO6hblx yCIOBnIax.YCTpoiCTBO MoxHNO ИСПьб3OBaTb TOnbKOТAK,Кak OПиcaHOВДaHHOMpyKOBODCTBE NOЛБ3OBaTeJI. HeИСПьБ3уITEДaHHOEyCTpoiCTBO B KaKIX-NIN6O dpynIX ueJIAX.
JIO6oe dpyroe nCIOJIb3OBAHHe CHTaETcR NCIIOJIb3OBAHHem He IIO Ha3HaueHnIO, IN MOKeT PnIBecTn K NOpYe IMyUeCTBa INI TpABMe.
PpOIN3BOJNTeJIbHeHecET HnKaKoI OTBcTCTBeHHocTn 3a yUeep6,Bo3HnKlwnN3-3a HenpaBnBHorO nCNoJIb3OBaHnY cTpoiCTBa.
PacnaKOBka yCTpoNCTBa
1.ИЗВЕКТЕ устороств ИЗ коробк.
2. YdaJInte BCE yNAKOBOUHbIe MaTePnAbl, TAKHe KaK NOJIN3TInJeHOBa IInEHa, MaTePnA HAnONHITeIa, Ka6eJIbHbIe CTAAKN KOpO6Kn.
- Y6eIntecb, yTO coepxIMoe yNaKOBKn BkIIOaet BCE KOMNHOENTbl.
- B cnyuae obHapyKeHHa NOBpeXeHm HnHHeNoTHoro KOMIIeKTA NOCTaBKn, He nCIOJIb3yIte npu6Op. HeMeJIeHNO BepHnte erO dInepy.
ПРИМЕЧАНО:
Ha yctpoiCTBe BCE eSe MOryT OCTaBaTbCnMeNkne
actuIbI NblB, OCTaBImeCnPocNe IpOIN3BOJCTBEHHORo
npouceCa.PekomeHdyetcNoHCTNTb yctpoiCTBO,KaK
onicaHo B pa3dene "Ucmka".
O63op detae npnbopa / KomnneKT nocTaBkn
1 Otpaxaioi nn kpan
2 3y6uatbI BHeue (6wT.)
3 Ke6a6HbIe 7amnpybI (6 wT.)
4 3y6uataa nepedaac tpaBepcoi
5 Wamnpy
6 BepTeI nIe KebabHbIX WAMnypOB
7ItoTOKcbopaKupa
8IpeeknoyateJIb (BkIIOueHn/ BbIKIOueHn)
9 OchobAHne
10BanMOTOPaCna3OM
11 3axmna npyknHa oTpaKaHcero kpaHa
12 HarpeBaTeJIbHbIe 3JemeHT
13 TpaBepca
14 KpenexhBn BnHT
15 3aunTHbIKpOHTeH
C6opka
Ioxayncta,cm.pncyHnHa ctp.3.
Pcyhok A
- BCTaBbTe OTPaKaIOUm 3KpaH MeKdy HargBaTeIbHbIM 3IeMeHTOM m3aDHeN pAnEhIbIO KOpnyCa. BOKOBbIe HnPaBnIOUme OTPaKaIOUcEO 3KpaH CNeDyET BCTaBNTb B 6OKOBbIe BbEMKn B KopnyCe. NocTaBbTe OTPaKaIOUm 3KpaH NpeD 3aXImHO npJxHNO. PpOBepbTe, YTO OTPaKaIOUm 3KpaH BCTaBJIen AkkypaTHO.
- Пoctabte loTOK c6opa xupa Ha BaI MOTopa B ueHTpe np6opa.
- YdepKnBaIte BepTe I NO HAnpaBneHHbIM BBePx MetkAm. BCTabIe HNKnH KHeU BepTea B BaI MoTopa TAK, YTO6bl BbICTyn 3aueINICr B BbIeMKe. MoXet Notpe6oBaTbc He6OJIbIoE N3rN6aHne BepTea.
PncyHok B
3aKpeHnTe Ha npnbope 3y6aTyu nepeaCy TpaBepo:
1.Ocna6bTe KpeEnExHbI BnHT Ha TpaBepce.
2. BdBnHbTe TpaBepcy C BnHTOM B BbiEMKy 3aUHTHOKpoHHTeHa.
3.CJenKa 3aTaNHTe BnHT.
4. NocTabbTe 3y6aTyIepeaHy Ha HakoHeuHK IaMnypa dIra Mca. MoKet Notpe6oBaTbc He6oJIbUoe n3rmbHne 3y6aToI nepeaHy.
5.BcTaBbTe HIXKHO 占CTb TpaBepcbI B BblEMy B ceHTpe 3aDHe IaHEn KOpnyca.
6. 3aTaNHTe pyKoK KpeNexKbHn BnHT.
PpmeaHn no nCNoJb3ObaHn
3Jektpnueeckoe nookluohne
- Y6eIntecb, yTO nepeKIOUaTeJIb (8) yCTaHOBnE H B NOJOXeHne "O".
2.ПepeI TeM,КaB BCTaBJIaTb WTeNCEJIb Bpo3eTKy, y6eIInTeCb,yTO HApPraKeHHe CeTI COOTBeTCTByET CNeUΦnKaun yCTpOJCTBa.Tpe6yEmYIO INΦopMauIIO MOKHO HauTN Ha TaBnUKe.
3.ПОДКИнчITEШтеньг КпразвиьнбIMобраЗOM yCTaHOBNeHHOHШтеньсьног розЕТС C3a3eMЯHQUIM KOHTAKTOM.
BkJIOUeHHe / BbIKJIOUeHHe
IpeeknouateJIb (8) clyknt Ira BkIOueHna N BblKIOueHna np6opa.
I = BkHoueHo (ropnt lamnoka ynpabneHnBHytpn nepeKHOaTeTn).
0 = BbIKJIOH
Ipeep npBbim npImeHennm
- BctabBeToIbKO OtpaKaUoMn 3KpaH.
- Ha harpeBaTeIbHOM 3JIeMeIte IMeETcra 3aUHTbI b cIou. IVcIOJIb3yIte np6Op 6e3 dpynx KOMIOHeTOB 6e3 npOdyKTOB pIIM. 10 MmHT dIra erO ydaJIeHn.
I PIMMEYAHNIA:
Pn3TOM BbIeJIaTeC HEMHO DbIMa NIOBIIaTe 3aIax, YTO ABJIEcTcH HopMaJIbHbIM. O6ecNeybTe DOCTaTOHyIO BEHTINJIaCNI.
NPEyPPEKDEHNE:Onachoctb oxoral
Ipeed c6opkoI npyHX KOMnoHENTOB daIte np6opy octb!
IoproToBka
HacaIte Ha mChbIe NIN Ke6aHbIe WAMnpya BbIMoehHbIe BMapHaJe npOdyKTbI dJa KApKn.
BHIMAHHE:
Bcerda octabTne npm. 1cm MeKdy npOdyKTamn nJnjarKn HArpeBaTeIbHbIMN 3JIeMeHTaMn.
I PIMMEUAHNIA:
He hacaxnBaTe npOdyKtI dIy JxapKn BblIe BblCOTbl HarpeBaTeIbHOrO 3neMeHTa.
DOnep (ke6a6)
IocJIe Hape3KN TOHKIMN JOMTAMMOKHO XapNTb ODHOBpeMeHHO 3 Kmca.
- IoproToBbTe BepTeI corNacho "C6OpKa" "PucyHOK A".
- HacxBaIte JOMTN McaNo CEHTpy MxCHOrO WAMnypa. HaHnTE C CamORo 60nboro JOMTMAca.
- ПО BKUCY можно takke HacaДиь Ha МясОН Шamnpлук ИПИ TOMaТbl.
MachbIe Hn OBOuHbIe Wamnpa
1.ПоДг罗БьтЕВерTeN coRlnacHo "Cборka".
2. BCTaBbTe 3y6aTbIe BEHcIb I PnactIKOByIO pyky Ke6a6-HbIX uAMnpob KAK MOxHO daJIbwe. IIOCKaY CTOpOHa DOJXHa 6bITb NOBepHyTA BBePx. POxAJNyCTa, yHTbI-BaIte BbIEMKn Ha 3y6aTbIX BEHcA X N OCTaBShyOcR BblCOTy Ha uAMnpax.
3. HacaIte KycOuKn Mca n / nIIN OBOUeH Na Ke6a6HbIe 7amnpa.
4.BCTaBbTe Ke6a6HbIe 7aMnpyBa HapyKbIe BbIeMKN 3y6uToi nepeDaun y6eIntecb,TO 3y6uTBe BcUbdoXoJrDo 3y6OBo MexHaH3Ma. BCTaBbTe HxKHHe qactn 7aMnpov B hapxKbIe OTBepCTnBepTeNa.

BHIMAHINE:
Y6eIITecb B npabInbHocTH yCTaHOBKn 7amnypOB. HenpabInbHO BCTaBHeHHbIe 7amnpbIMoYr BbInactb N3 3y6aTOn npepaN I nonactb Ha HArpeBaTeNbHbIy 3ne- MeHT. Pn 3Tom MOrYt paCnJaBnTcR nlaCTNKOBbIe pyKn N 3y6aTBe BEHcbl.
Tnua (hanpimep, kypuau noJHocTBIO)
Tnua DOnKHa NMeTb MaKcMaJIbHbI dAmEtP 16 cm, TTo6bl He 6blIO KOHTaKa C HArpeBaTeJbHbIM 3JeMeHTOM.
- PoirotobteBepTeon corgnacho C6bopa "PucyhoA".
- Hacaxbai Te Kpuu CyeJIHKoM Ha MxchOni waamnpy.
3.ДЯeeФИКациОБернITE КурньIE HOЖКИ N KpbIJIbY KUINHApHoi6eYeBKOI.
CdeNaime nmuu ye 6one ycmouueo3a cem npumeHnua Ke6abhix wamnypoe:
- YcmaHOeum3y6aMyo nepeauy cmpaeepco co- 2nacHo "C6opka" PucyHOK B".
5.CHIMnTe 3y6aTbIe BENcIc Ke6a6NbIX WAMnpOB. BCTabBe 7aMnpya B HApYKhIe BByEMKn 3y6uatoi nepe Daun HApYKhIe OTBepCTnB BepTeNa.
Pa6ota

IPENDYPENPEKDEHNE:Onachoctb oxora!
He nCnoB3yIe np6op do noHOn c6OpKn 3aRpy3Kn npOdyKToB DnA JapKn.
Bcerda nCnoIb3yIte npxWBaTKn npn cHrTm nnpe3Ke noJXapINBaEMbIX npOdyKToB.
-
BkIIOHTe np6op. BepTeH NaHHeT BpaaTaBcA.
2.BoBpemrTOBKnKe6a6HbIe WAMnpaDoJXHbIBpaatbcay BOKpyr CBOVx OceN.BkIIOChte npi6Op,ecn3To He TaK.PoBepbTe KOPpeKTHOCTb yCTaHOBKnWAMnpOB BBeptene. -
BpemHaRpeBaHnIcoCTabJIeT pImepHO 5 MNHyTbI. CneIte 3a npiroTOBJeHHem Ha rpnJle!

TIPIMEUAHNA:
Bpme npirotoOBnna Ke6a6a, uAnbka NITuCyUcIeCTBeHNO OTInuAOTc. Cpei npoery 3TN BpemeHa3ABNCAT OT 6n30ctn nepMeueHn noKapBaemix npodykTO K HarpBaTeNbHomy eMeHTy.
-ПипгOTOBENKe6a6aMoXHo cpe3aTb nepByu npOu npoxapenHOro Mca npImepHo uee3 15 -20 MNHT.

ПРМЕЧАнЯ:
Mbl pekomehnyem nCnoB3OBAHne 3JneKtpnueckoro HOxa.
Iotppe6yetc eue 5 MNHT dna npoxkapn cneyo- zero cnoa. Yem Tohbe ctaHOBNTc MCHOH wamnp, TEm 60bwe BpemeHN Notpe6yETc Ha npiroTOBHeHne cneDyUoero cnoa.
-Пи Chятпи Ke6a6bHbix Shamnpyob y6eHntecb,чTo OINH n3 HmX HaxoDNTcB B nepeDHeJ qaCTn BepTeNa. He npKacaiTecb Hn K chemy dpyromy, kPome pIaCTNKOBOI pyuKN Ha KOHcE shamnypOB.
- Mby pekomehnyem nCNOJb3ObaTb JxapOchBm TepMoMeTp dIy npOBepKn rOtOBHocTn TTuCb. EcIn dIa KpeJIeHn IcNOJb3ObaNcB 3y6UaTaI nepeDaCa TpaBepcOu II amNypa, To 3TN uactn rpnna Hado CHrTb nepeD n3BHeueHem TTuCb.
Kohepa60tbI
- BbIKHIOHTe yCTPOINCTBO. OTCOeHNITe cTeBOI uHyp oT CTENHO p03ETK.
- Ndojndte, noka yctpoicTBo nonHOCTbHO He octbHET!
UncTka

ПЕДУПЕЖДЕНЕ:
Bcerda otknioaute ceTeBOI wTeNCelb nepeD ouNCTKOJ.
- Iopokdnte, noka yctpoCTBO NOHOCbHO He OCTbIHET.
He onyckaite ochobahne B Body dIra Ounchkn. 3To moKeT npiBecTN K nopaxeHIO 3JIeKTPnueckm TOKOM nIN nojapy.

BHIMAHINE:
He nnoB3yTe MeTaJIHnueckne UeTKn nnpyn e 6pa3nBhIe npEMeTbI.
He nCnoJIb3yIte arpeccnBhIe nn a6pa3nBhIe yHCTa-
Iocne kaxdoI npImeHnnaonHOCTbO ONUCTte np6Op, Hnaupe npCnCleDyUoEEM NcONb3OBaHN MOYT BO3HnKHyTb HnnpraThbI Dblm 3anax.
Otpaxaioi 3kpan, IOTOK c6opa knpa, BepTeI dnn Ke6a6hblx wamnpob, 3y6uatae npedeaa C TpaBepcoi, Ke6a6hblie wamnpbl
- PtokaIyIyIcTa, cm. pncyHKn Ha cTp. 3 n onucaHne B pa3dJepe "C6opka". ChmaiTe qactn C oCHOBaHnB O6paTHOM nopJKe.
- 3y6aTbIe BENCbI MOXHO OTCOEHNHTb OT WAMNypOB.
3.После кадуо ИспьзоваяnpOMbIBAIte 3Tи DeTaJIIN BTeIIOI npOTOCHN BOe. - BbicyiHTe KOMHOENTbI Ipeep yctAHOBKoN IX O6paTHO B npBOp. YcTaHOBtE 3yCbAthe BeHcbl O6paTHO Ha Ke6a6HbIe WAMnpya. PInocKa r CToPOHa DoJIxHa 6bITb NOBepHyTa BBepx.
OchobAHne
OuHCTnTe OCHOBaHne HArpeBaTeIbHbI 3JIeMeHT BIIaXHOI TKAHbIO.3aTEM BbITpnte cyXoT KAhBO.
XpaHeHne
CTaBte yctpoCtBO Ha xpaHHe TOnbKO nocIe TOR, KAK OHO OCTbIO N 6blIO NOuHnSeHO.
- PekomeHnyeTc xpaHnTB yctpOcTBo B erOpunHaNb-HoYNAKOBKe,ecNI OHO He NcPOnb3yeTcRdIINTeNbHoeBpeM.
Bcerda xpaHnTe yctPoIcTBO B cyXOM, XopoIo BeHTnIpyemom MecTe, HeoCTyNHom dIeTei.
TexHnueckne daHHbIe
Modelb: DVG 3006 CB
Подач haPЯжен: 220-240B\~,50/60T
MoHocTb Ha BxOe: 1400BT
Knacc 3aunTbI: I
Bec HETTO: npImepHo 2,4 K
CoxpaHeNo npaBO Ha TexHnueckne N KOHCTpyKIOHOHHbIe I3MeHeHnB B pAMkax PpOdoJIkaIOUeICr pa3pa6OTKn PpOdyKTA.
JaHHoe yCTPOJCTBO COOTBETCTBYET BcEM TEKUIM MInpeKTNiBAM CE, TAKIM KAK 3NEKTPOMaHHTHAR CoBMecTUMOCtBu HN3KOE HaPRAKeHHe; OHO POn3BeDEHO B COOTBETCTBmC HOBeuIMM INpaBnAmN TEXHKn 6e3ONaCHOCTn.
- 100.3.2.2.2.2.2.2.2.2.2.2.2.2.2.2.2.2.2.2.2.2.2.2.2.2.2.2.2.2.2.2.2.2.2.2.2.2.2.2.2.2.2.2.2.2.2.2.2.2.2.2.
Jg
zssll 1 2 2 2 2 2 2 2 2 2 2 2 2 2 2 2 2 2 2 2 2 2 2 2 2 2 2 2 2 2 2 2
- 1000000000000000000000000000000000000000000000
21 2
- _L = 1
a.b.c.
y

.
.1ol5 j4qJ1 2
iJ 1
.
#
3.2j120g jaoa aai 1j gaoi joo
aLgai gag 3 jag a jao gao aygall pao jia Jds
Jablil JgluJe Uagaggul aIbIg Iglqj
a#
DVG 3006 CB.
60/50 240-220
1400 1
I
2.4 23
Luluub jauubj gaaa 3 aaaaag aaii aaiia 10
gjg jaoa ce aolal aai g jagl l
g g g g g g g g g g g g g g g g g g g g g g g g g g g g g g
aLw qiei Cuiabai

ab( x) = 12ax^2 + 14bx + 18cx^3
abuis gl ola ciaiaa gl piaaiy
aJl 100000000000000000000000000000000000000000
- a : a x,y,z is a
go wjg jil gjwio, uJSL jclw oIgwo, gwoi Iaai aia, aaiia
wJUJ 1
"80011111111111111111111111111
aal 1 jll aol al 1
LgJyJzjBjIgJzJg.
alauol 15 aol ole le uol jogo olioi oia 3
J 4
y
a 1003 a2b2 b2005 1005 1005 1005 1005 1005 1005
4.5
01 p001 j0 3 1 J a 10 ag stg.aa 2 1 aab aIb
A J 1
SgT auiu uui 1ui. uui duu dauu duu
paalIepeablaagaae o.
C
"gacssll" paa 3 1000 gao 50 s olaal 1
jLg.1000000000000000000000000000000000000000
algl 30gogb1 clll alboIgJyI, jgsu
Jku Jk
Lg 100
4
gog. gjul jguw jdu wjtk dlgojdl
aJbIolgblc0s 1e
4.5 1
gj paaa aai j 15, gaj 1y
yll 1e 1e yll bsl 10g 10g 10g
aag dall lal o g aeg gaaal alal 10
.
J
aaijgljglljg(8)cblp
()=I
Jgai = 0
0gJgJyIuWwUJ
.baaasall axaal jol.
jogg jyll 1000 jgy jglk. jzss jzss jzss jzss jzss
aagaaaballjybs18010sab
:di#
423g 5g jy 5y11 10jy 10j y
BAC = 120^
( 1) f( x) = a_0x + b_0x = a_0
1.5.5.11 Cg561 40000000000000000
1
yS1 g aai 1aai 2aai b 2b 2b
4
joligg 100
:ab0-1o
yaaie 1a
.
.
30 30
Jzil jzll no aieLw sljy wdo xdo ydo ydo
J 1
aaiiabblb1g5jgl aioT aeeyby jlgjll plduwly aolal lal
jglal1g jlabl cpc
8 15
.
.8 j 1j 1j 1j 1j 1j 1j 1j

1 1
"1
pulwll gbi/ ciisb1 de aolo o,
(6)aJdAa2


- ENGLISH
- Symbols in these Instructions for Use
- WARNING:
- CAUTION:
- General Notes
- Special Safety Precautions for this Appliance
- WARNING: Hot surface!
- Danger of burns!
- WARNING: Risk of injury!
- CAUTION: Fire hazard!
- Intended Use
- Unpacking the Appliance
- E:
- Overview of the Components / Scope of Delivery
- Assembly
- Figure A
- Figure B
- Notes on Use
- Electric Connection
- Power On/Off
- Before Initial Use
- NOTE:
- WARNING: Danger of burns!
- Preparation
- Doner Kebab
- Meat or Vegetable Skewers
- Poultry (e.g. a Whole Chicken)
- Operation
- i NC
- End of Operation
- Cleaning
- Reflector Sheet, Grease Drip Tray, Rotisserie for Kebab Skewers, Gearbox with Traverse, Kebab Skewers
- Base
- Storage
- Technical Data
- Disposal
- Meaning of the "Wheelie Bin" Symbol
- Instrukcja obslugi
- Usuwanie
- 06uue 3ameuHn
- PENEYIPPEXDEHNE:
- Oco6bIe yka3aHnI NO TexHnke 6e3OpacHOCTN DЯ DaHHoro yCTpOiCTBa
- I P E D U N P E X D E H N E: P n c k T p a B m b i!
- BHIMAHNE: Onachoctb noxapa!
- BHIMAHHE:
- Ha3naYeHne
- PacnaKOBka yCTpoNCTBa
- ПРИМЕЧАНО:
- O63op detae npnbopa / KomnneKT nocTaBkn
- C6opka
- Pcyhok A
- PncyHok B
- PpmeaHn no nCNoJb3ObaHn
- 3Jektpnueeckoe nookluohne
- BkJIOUeHHe / BbIKJIOUeHHe
- Ipeep npBbim npImeHennm
- I PIMMEYAHNIA:
- NPEyPPEKDEHNE:Onachoctb oxoral
- IoproToBka
- I PIMMEUAHNIA:
- DOnep (ke6a6)
- MachbIe Hn OBOuHbIe Wamnpa
- BHIMAHINE:
- Tnua (hanpimep, kypuau noJHocTBIO)
- Pa6ota
- IPENDYPENPEKDEHNE:Onachoctb oxora!
- TIPIMEUAHNA:
- ПРМЕЧАнЯ:
- Kohepa60tbI
- UncTka
- ПЕДУПЕЖДЕНЕ:
- Otpaxaioi 3kpan, IOTOK c6opa knpa, BepTeI dnn Ke6a6hblx wamnpob, 3y6uatae npedeaa C TpaBepcoi, Ke6a6hblie wamnpbl
- OchobAHne
- XpaHeHne
- TexHnueckne daHHbIe
- a.b.c.
- #
- a#
- 4.5
- C
- 1
- J
- 0gJgJyIuWwUJ
- :di#
- ( 1) f( x) = a_0x + b_0x = a_0
- 1
- 4
- :ab0-1o
Brand : BOMANN
Model : DVG 3006 CB
Category : Other kitchen appliances