USER MANUAL ZISTE1200IV Zipper
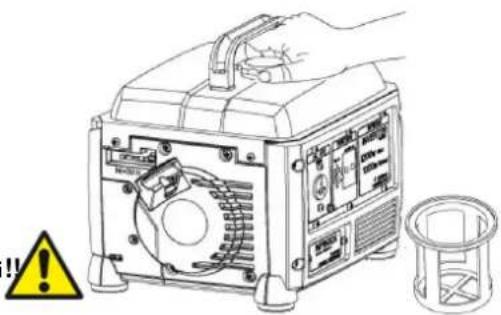
ATTENTION: Check Oil (SF 15W40)!
Engine doesn't start with low oil!!
10.1 Intended Use 19
10.2 Security instructions 20
10.3 Remaining risk factors 20
11 OPERATION
21
11.1 Pre-operation check 21
11.1.1 Check engine oil 21
11.1.2 Check fuel 21
11.2 Operation instructions 21
11.3 Operation 22
11.3.1 Start 22
11.3.2 Stop 22
12 MAINTENANCE
23
12.1 Maintenance plan 23
12.2 Cleaning 23
12.3 Engine oil change 24
12.4 Air cleaner 24
12.5 Spark plug 24
12.6 Fuel tank and fuel filter 25
12.7 Transport 25
12.8 Storage 25
12.9 Disposal 25
13 TROUBLE SHOOTING
26
14 PREFACE.(FR)
27
15 SECURITE
28
EN EC-CONFORM - This product complies with the EC-directives.
READ THE MANUAL! Read the user and maintenance manual carefully and get familiar with the controls in order to use the machine correctly and to avoid injuries and machine defects.
EN ATTENTION! Ignoring the safety signs and warnings applied on the machine as well as ignoring the security and operating instructions can cause serious injuries and even lead to death.
EN Danger of Intoxication! Only use outdoors and far from open windows and vents!
EN WARNING: Gasoline is highly flammable! Smoking and open flames are prohibited during refuelling. Do not refuel when the engine and carburettor are still very hot.
EN ATTENTION! For transport, oil has been drained. Fill up with 4-stroke quality motor oil before first operation! Failure to do so will result in permanent engine damage and void guarantee.
This manual contains important information and advice for the correct and safe use and maintenance of the generator ZI-STE1200IV.
Following the usual commercial name of the device (see cover) is substituted in this manual with the name "machine".
The manual is part of the machine and may not be stored separately. Read it profoundly before first use of the machine and keep it for later reference. When the machine is handed to other persons always put the manual to the machine.
Please follow the security instructions!
Please read the entire manual, to prevent misunderstandings, machine damage or even injuries!
Due to continuous development of our products illustrations, pictures might differ slightly.
If you however find errors in this manual, please inform us.

Technical changes excepted!
Copyright law
2017
This manual is protected by copyright law – all rights reserved. Especially the reprinting as well as the translation and depiction of pictures will be prosecuted by law. Court of jurisdiction is the Landesgericht Linz or the competent court for 4707 Schlüsslberg, AUSTRIA.
Customer Support
The machine must only be used for its intended purpose! Any other use is deemed to be a case of misuse.
To use the machine properly you must also observe and follow all safety regulations, the assembly instructions, operating and maintenance instructions lay down in this manual.
All people who use and service the machine have to be acquainted with this manual and must be informed about the machine's potential hazards.
It is also imperative to observe the accident prevention regulations in force in your area.
The same applies for the general rules of occupational health and safety.
The machine is used for:
For applications operated with a 230 V alternating current source. When using the device with household appliances, please check their suitability in accordance with the relevant manufacturer instructions.
Any manipulation of the machine or its parts is a misuse, in this case ZIPPER-MASCHINEN and its sales partners cannot be made liable for ANY direct or indirect damage.

WARNING
- The generator is to be operated only with equipment whose voltage specifications conform with the generator's output voltage.
- The generator has an oil pressure protection. If oil level is low, it is not possible to restart the engine.
- Never connect the generator to the power supply (socket-outlet)!
- Never connect the generator with other energy sources (generators)!
- Never change the motor and machine settings.
Ambient conditions
The machine may be operated:
humidity
max. 70%
temperature
+5°C to +40°C (+41°F to +104°F)
max. altitude above sea level
1500m
The machine shall not be operated in areas exposed to increased fire or explosion hazard.
Prohibited use:
- The operation of the machine outside the stated technical limits described in this manual is forbidden.
Operation of the machine function without safety devices is forbidden.
- The use of the machine not according with the required dimensions is forbidden.
The use of the machine not being suitable for the use of the machine and not being certified is forbidden
- Any manipulation of the machine and parts is forbidden.
The use of the machine for any purposes other than described in this user-manual is forbidden.
- The unattended operation on the machine during the working process is forbidden!
- Never cover the running generator.
10.2 Security instructions
Missing or non-readable security stickers have to be replaced immediately!
To avoid malfunction, machine defects and injuries, read the following security instructions!
The locally applicable laws and regulations may specify the minimum age of the operator and limit the use of this machine!
Use the machine only in good enough light to allow a safe operation can be guaranteed.
- In tiredness, decreased concentration or under the influence of alcohol or drugs, the work on the machine is prohibited!
- Unauthorized persons, especially children and not trained personnel must be kept away from the running machine!
The machine must be operated only by trained persons (knowledge and understanding of this manual), which have no limitations of motor skills compared with conventional workers.
If you pass the machine to third, these instructions must be attached to the machine.
- Danger of burns! During the operation flow of hot exhaust gases and engine parts such as the muffler and engine become hot.
- Never place a hot machine in dry grass or other easily flammable materials.
After the operation, the machine must cool down. Otherwise there is an imminent risk of burns
WARNING: Gasoline is highly flammable!
- Stop the engine before refuelling
Smoking and open flames are prohibited during refuelling. Do not refuel when the engine and carburettor are still very hot.
- Refuel only outdoors or in a well ventilated area.
- Avoid contact with skin and clothes (fire hazard).
- Check after refuelling tank cap and check for leaks.
- Start the engine at least 3 meters from the tank location.
Spilled fuel is wipe immediately.
- Keep the fuel in suitable containers only.
- Make sure the fuel does not overflow. If the fuel overflows, the engine must not be started. Remove any dirt from the appliance and prevent any attempt at ignition until fuel fumes have evaporated.
Damaged fuel tank or other tank cap must be replaced immediately
- After the operation the fuel cock must be closed (if available)
- Danger of Intoxication! Only use outdoors and far from open windows and vents!
Exhaust contains poisonous carbon monoxide. The exposure can cause unconsciousness and death.
- No other person, children or pets shall remain within 5m
- Place the generator at least 1m away from buildings and the equipment connected to it.
- Place the generator in a secure, level position. Do not turn, tip or change the generator's position while it is working.

TRANSPORTHINWEISE:
Always switch off the engine when transporting and refueling the generator!
- Secure the generator against shifting and toppling during transport.
10.3 Remaining risk factors
Even if the machine is used as required it is still impossible to eliminate certain residual risk factors totally. The following hazards may arise in connection with the machine's construction and design:
Touching the mufflers, exhaust and other machine components which can be hot after prolonged continuous operation or when the engine is hot cause severe burns.
- Risk of fire and explosion:
Gasoline is highly flammable and explosive under certain conditions.
NEVER refuel fuel or engine oil while the machine is in operation or is hot.
When refueling and at places where fuel is stored not smoke or allow open flames or sparks.
Do not overfill the fuel tank and avoid the spillage of gasoline during refueling. If fuel is spilled make sure the area is completely dry and cleaned before starting the engine.
Make sure that the filler cap is tightly closed again after refueling safely.
Chemical risks
Never use or refuel a gasoline or diesel engine in a closed area without adequate ventilation.
Carbon monoxide emissions from the internal drive units of the engine can cause in confined spaces through inhalation health effects and death. Therefore use the machine only in well-ventilated rooms or outdoors in operation
Liquid fuels can cause serious damage on the skin and the environment.
- Risk of electric shock
Direct electrical contact may cause electric shock.
Never touch the unit with wet hands. Provide adequate grounding.
- Hearing damage
A longer stay in the immediate vicinity of the running unit may cause hearing damage.
Wear ear protectors!
These risk factors can be minimized through obeying all security and operation instructions, proper machine maintenance, proficient and appropriate operation by persons with technical knowledge and experience. In spite of all safety is and remains her healthy common sense and their corresponding technical qualification / training for use of the machines most important safety factor!
11 OPERATION
Please check the product contents immediately after receipt for any eventual transport damage or missing parts. Claims from transport damage or missing parts must be placed immediately after initial machine receipt and unpacking before putting the machine into operation. Please understand that later claims cannot be accepted anymore.
11.1 Pre-operation check
11.1.1 Check engine oil

ATTENTION
The generator is delivered without engine oil and fuel! Engine oil 15W40 must be filled before first use!

See capture maintenance engine oil change
11.1.2 Check fuel
Place the machine on a firm and flat surface.
Open the fuel cap.
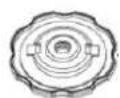
Check the fuel filter.
Never refuel without fuel filter!
Fuel must be unleaded gasoline
11.2 Operation instructions

NOTICE
Always place the machine on a firm and flat surface! No turning, tilting or moving during the engine is running
- Always check oil and fuel level before starting
- Do not connect the appliance before the unit is running at full speed. Disconnect the appliance before turning the unit off.
- Connected devices must be in perfect condition.
- Keep the cable length to the consumer as short as possible.
11.3 Operation
11.3.1 Start
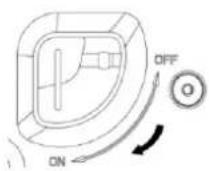
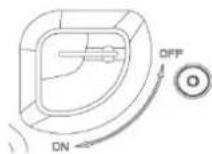
Turn the fuel cock to position "ON"
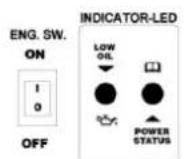
Switch the ON-OFF switch to position "1" ON.
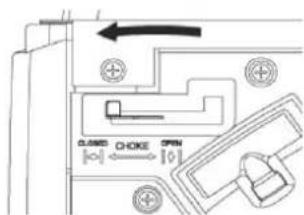
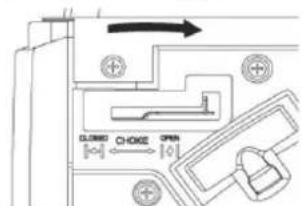
At cold start pull the choke to position "CLOSED".
At worm start (the engine was running and is still warm) pull choke to Position ,OPEN".
If the generator fails to start after 5 attempts, pull choke to position "CLOSED" and try again.
After the engine starts pull the choke to position "OPEN" after 20 s.
Start the engine with the recoil starter:
Grip the handle and pill the recoil starter.
If the engine does not start, try again.
Normally start: 3-4 attempts
When starting with the recoil starter, the motor may recoil suddenly as it starts up, resulting in hand injuries!


11.3.2 Stop

ATTENTION
In case of emergency stop the generator directly with the ON-OFF switch
In normal circumstances switch off the generator as follows:
Shut down the connected devices and disconnect them from the generator.
To cool down let the engine running for a while without any loads.
Switch off the generator by putting the ON-OFF switch to position "0" OFF
At longer breaks:
To cool down let the engine running for a while without any loads.
Thereafter close the fuel cock by turning to position "OFF".
The engine runs until the remaining fuel is consumed in the carburetor.
Switch off the generator by putting the ON-OFF switch to position "0" OFF
12 MAINTENANCE


ATTENTION
No cleaning, upkeep, checks or maintenance when machine is running! Shut off the machine and let it cool down before start servicing!
The machine does not require intense maintenance. However, to ensure a long lifespan, we strongly recommend following the upkeep and maintenance plan.
Repairs must be carried out by specialists! Use original ZIPPER parts only!
NOTICE
Only a properly maintained equipment may be a satisfactory tool. Care and maintenance deficiencies can cause unpredictable accidents and injuries.
Repairs should be performed only by authorized service centers.
Improper operation may damage the equipment or endanger your safety.
12.1 Maintenance plan
| Servicing period | Before any using | After: 1 month 5 HOO | After: 3 month 25 HOO | After: 6 month 50 HOO | After: 12 month 100 HOO | After: 25 month 250 HOO |
| Engine oil (15W40) | Inspection | X | | | | | |
| Change | | X | | X | | |
| Air filter | Inspection | X | | | | | |
| Change | | | | X | | |
| Spark plug | Inspection | | | | | X | |
| Change | | | | | | X |
| Fuel tank / fuel filter | Inspection | | | | | | |
| Change | | | | X | | |
Provide appropriate servicing upon the earlier of the following: in the given month or after the specified hours of operation (HOO) have expired.
12.2 Cleaning
- We recommend cleaning the machine immediately after each use.
- Keep all safety devices, air vents and the motor housing free of dirt and dust as far as possible
- Wipe the equipment with a moist cloth and some soft soap or blow it with compressed air at low pressure.
NOTICE
Do not use cleaning agents or solvents; these could attack the plastic parts of the machine!
12.3 Engine oil change

ATTENTION
Switch off the machine before starting the engine oil change!
Drain the used oil quickly and completely while the engine is still warm. For the purposes of environmental protection fill the oil in tight containers and dispose the oil in a recycling center. Do not dispose it with household waste
-
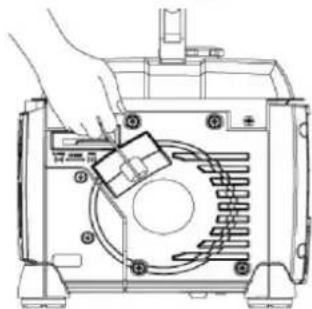
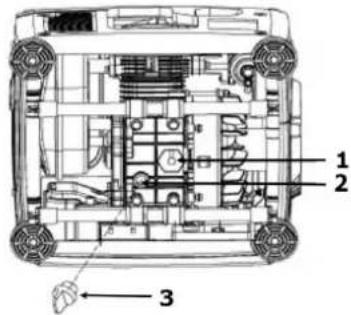
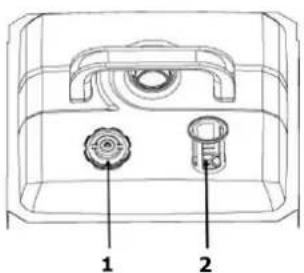
Unscrew the oil filler cap (3); tilt the machine and let the used oil run into a suitable container.
-
Add new engine oil (15W40, 260ml) (2) and close the oil cap.
- Clean it with a rag.
- Put the machine on an even area and start the engine. If there is sufficient oil level the oil-warning sensor (1) will be not activated.
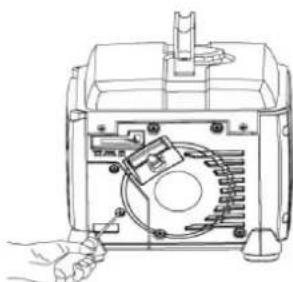
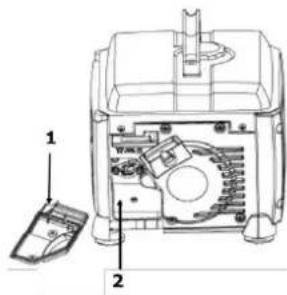
12.4 Air cleaner
- Loosen the screws and remove the air cleaner cover (1)
- Remove the air cleaner (2)
Clean the air filter with soapy water, then rinse with clear water and let it dry thoroughly before reassembling.
- Reassemble the air cleaner in reverse order
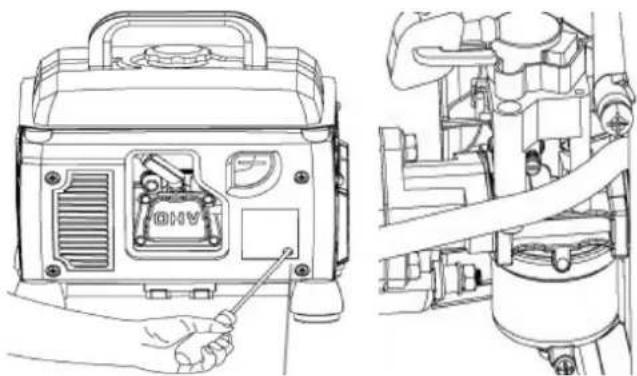
12.5 Spark plug
- Remove the spark plug cap (1).
- Loosen the spark plug (2) using a spark plug socket (3).
- Remove carbon deposits with a copper wire brush.
- Check electrode gap (0,6 - 0,7mm)
- Reassemble the spark plug in reverse order
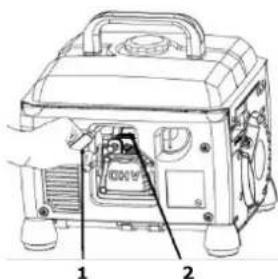

12.6 Fuel tank and fuel filter
- Unscrew the fuel cap (1)
- Remove and clean the fuel filter (2)
Check the fuel tank
- Replace the fuel filter
12.7 Transport
- Secure the machine to prevent slipping
- Do not let the fuel spill out of the fuel tank.
- When the generator is placed on vehicle, the engine may not run.
- During transport, protect the machine from excessive heat. If longer periods in an enclosed vehicle the fuel may ignite due to overheating.
12.8 Storage
If the machine is stored for longer than 30 days:
- Wait until the engine cools down sufficiently.
- Allow the fuel from the tank into a suitable container and store the drained fuel in a suitable container.
Clean and dry machine
- Store in a dry, out of reach of children place
- Cover the machine well and store it in a dry and clean place.
12.9 Disposal
Do not dispose the machine, machine components fuel and oil in residual waste. Contact your local authorities for information regarding the available disposal options. When you buy at your local dealer for a replacement unit, the latter is obliged to exchange your old.
13 TROUBLE SHOOTING
| Trouble | Possible cause | Solution |
| Engine does not start | Incorrect starting sequence | Observe the correct starting sequence |
| Dirty air cleaner | Clean/replace air cleaner |
| No fuel supply | Refuel |
| Fault in the fuel line | Check the fuel line for kinks or damages |
| Engine flooded. | Screw off, clean and dry the spark plug. Then pull the cranking rope several times and reinstall the spark plug |
| Spark plug connector not placed on. | Place on the spark plug connector |
| No ignition spark | Clean/replace spark plug Check ignition cable |
| Fuel cock closed | Open fuel cock |
| Engine oil to few | Check engine oil |
| Engine starts and is stalled immediately | Incorrect idle adjustment | Contact customer service |
| Machine works with interruptions | Carburetor incorrectly adjusted | Contact customer service |
| Spark plug fouled | Clean/replace spark plug Check spark plug connector |
| Oil alarm indicator light flashes | Check oil level | Fill engine oil |
| Oil alarm indicator light glows | To less or no oil | Fill engine oil |
| Output indicator light interval flash 1x | Low voltage protection activated | Engine speed to low |
| Output indicator light interval flash 2x | High temperature protection activated | Cool down the engine |
| Output indicator light interval flash 3x | Overload protection activated | To big loads |
| Output indicator light interval flash 4x | Short circuit protection activated | Check loads |

NOTICE
Should you in necessary repairs not able to properly to perform or you have not the prescribed training for it always attract a workshop to fix the problem.
14 PRÉFACE (FR)
Cher client!
+5°C to +40°C (+41°F to +104°F)
+5°C to +40°C (+41°F to +104°F)
With original ZIPPER spare parts you use parts that are attuned to each other shorten the installation time and elongate your machines lifespan.
IMPORTANT
The installation of other than original spare parts voids the warranty!
So you always have to use original spare parts
When you place a spare parts order please use the service formular you can find in the last chapter of this manual. Always take a note of the machine type, spare parts number and partname. We recommend to copy the spare parts diagram and mark the spare part you need.
You find the order address in the preface of this operation manual.
| 1 | Wiring box subassembly | 9 | Pipe |
| 2 | Cross recess tapping screw | 10 | Cross recess tapping screw |
| 3 | Left side plate | 11 | Gasket |
| 4 | Engine back cover | 12 | Handle |
| 5 | Right-side plate | 13 | Cross recess tapping screw |
| 6 | Fuel tank | 14 | Fuel filter |
| 7 | Fuel control valve | 15 | Fuel tank cover |
| 8 | Fuel hose clip | 16 | Box cover plate |
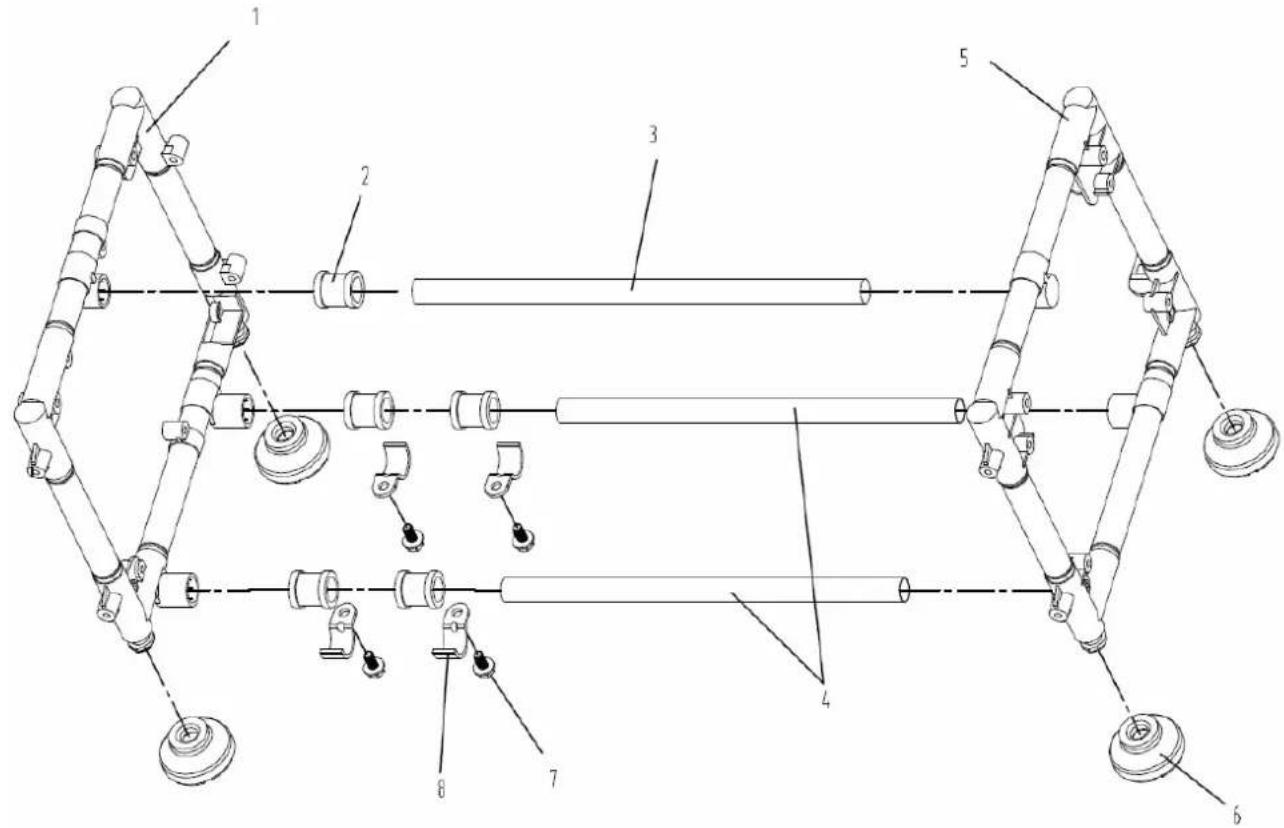
| 1 | The right support pipe fitting |
| 2 | Supporting tube rubber sleeve |
| 3 | Up the support tube |
| 4 | Under the support tube |
| 5 | The left brace fitting |
| 6 | Shockproof foot |
| 7 | Hexagon bolt with flange |
| 8 | Engine fixed plate |
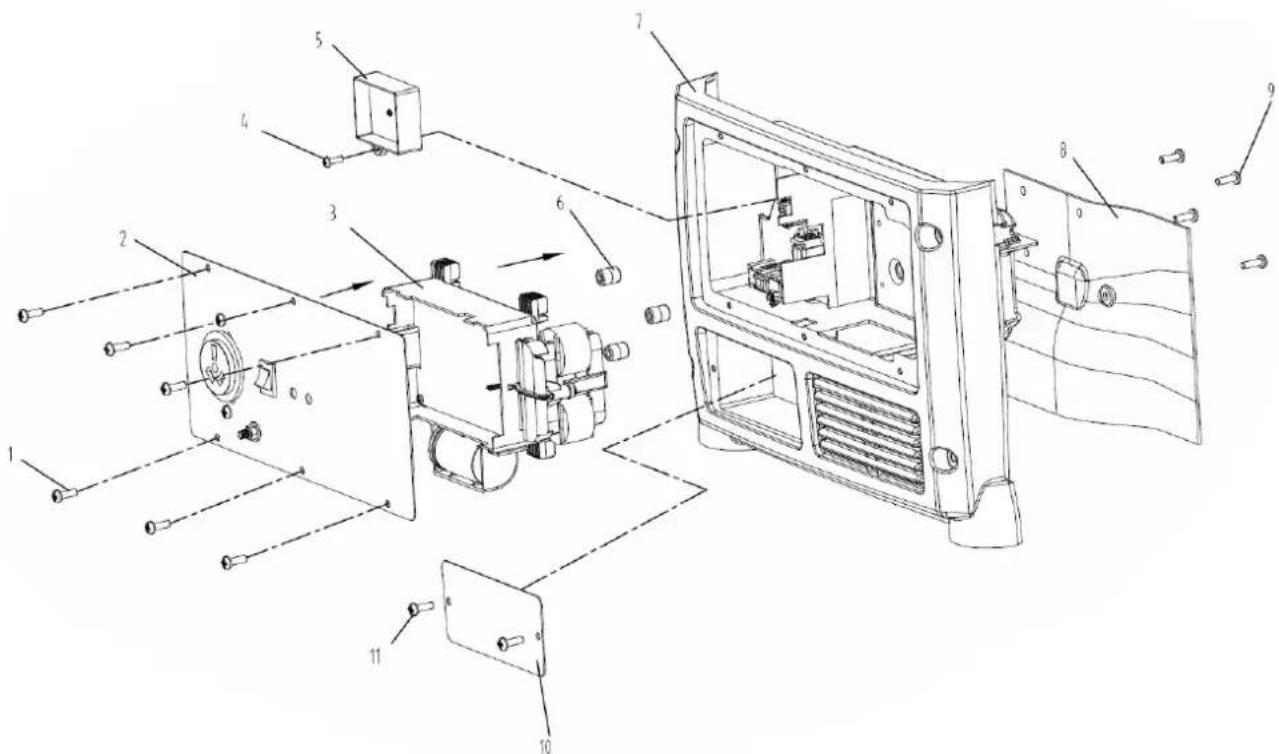
| 1 | Cross recess tapping screw |
| 2 | Panel subassembly |
| 3 | Inverter subassembly |
| 4 | Cross recess tapping screw |
| 5 | Igniter assembly |
| 6 | Rubber plug |
| 7 | Wiring box |
| 8 | Wind deflector |
| 9 | Cross recess tapping screw |
| 10 | Panel |
| 11 | Cross recess tapping screw |
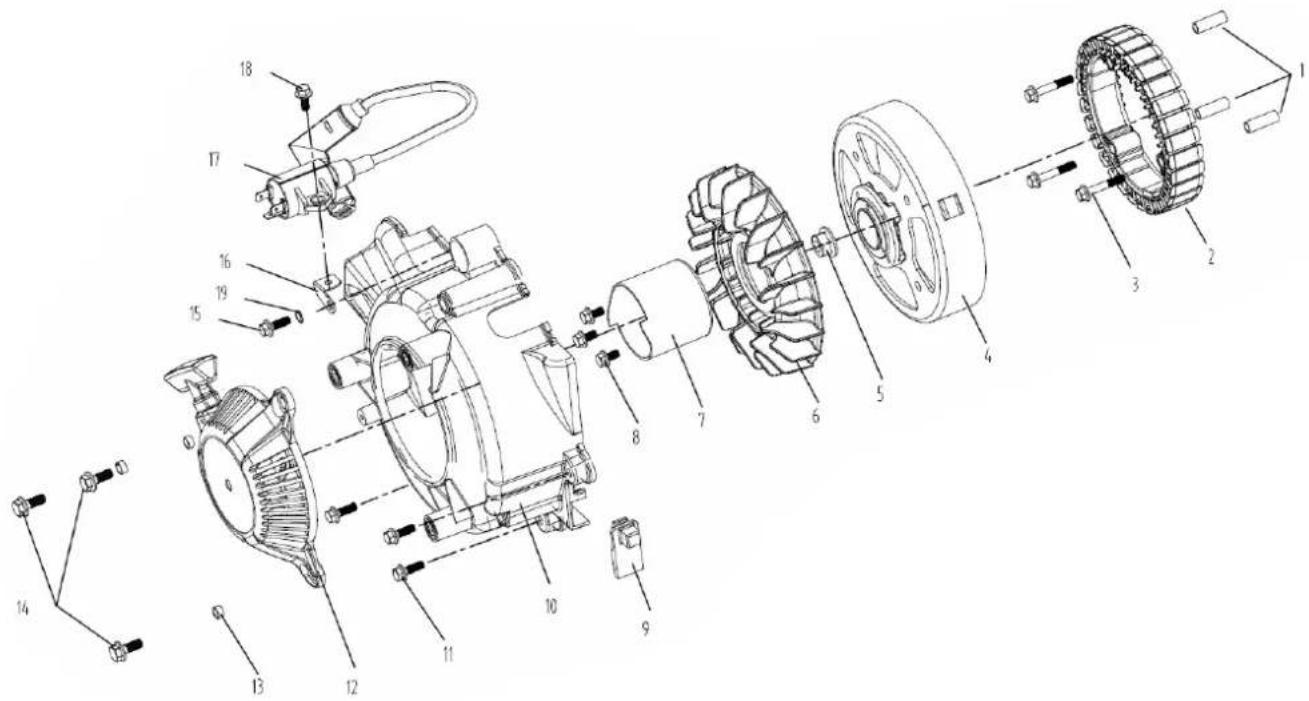
| 1 | Positioning pipe | 11 | Hexagon bolt with flange |
| 2 | Stator | 12 | Recoil starter |
| 3 | Hexagon bolt with flange | 13 | Safeguard tube |
| 4 | Flywheel subassembly | 14 | Hexagon bolt with flange |
| 5 | Hexagon nut with flange | 15 | Hexagon bolt with flange |
| 6 | Cooling fan | 16 | Ignition coil bracket |
| 7 | Starting claw | 17 | Ignition coil |
| 8 | Hexagon bolt with flange | 18 | Hexagon bolt with flange |
| 9 | Positioning pin | 19 | Spring washer |
| 10 | Wind leader | |
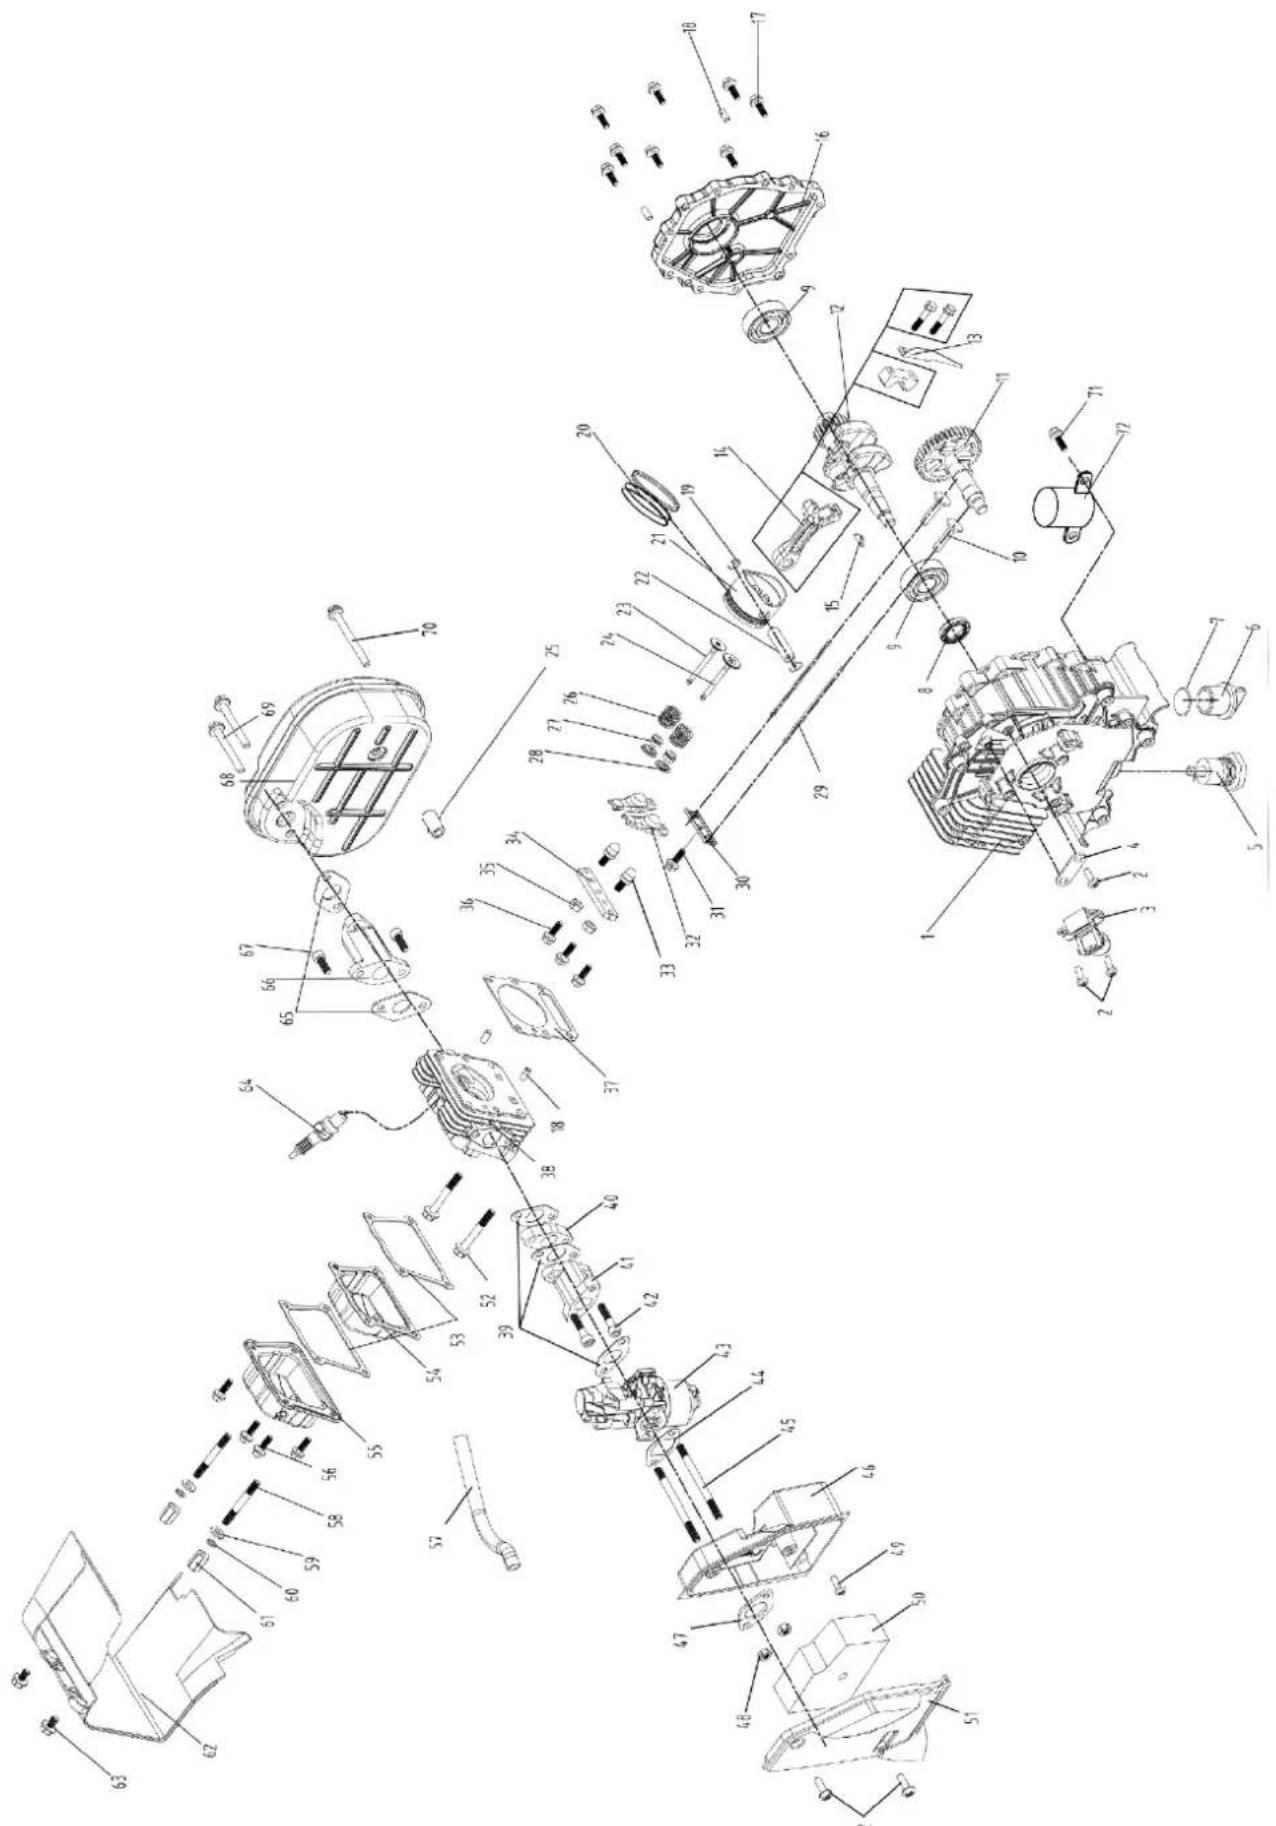
| 1 | Crankshaft tank cover assembly | 37 | Gasket |
| 2 | Cross recess tapping screw | 38 | Cylinder head |
| 3 | The trigger component | 39 | Carburetor seal gasket (out) |
| 4 | Line pressing piece | 40 | Thermal insulation gasket |
| 5 | Oil level gauge | 41 | Carburetor connecting pipe |
| 6 | Oil cover | 42 | Hexagonal cylindrical head screw |
| 7 | O-type seal ring | 43 | Carburetor assembly |
| 8 | Crankshaft oil seal | 44 | Carburetor seal gasket(in) |
| 9 | Bearing | 45 | Double head screw |
| 10 | Valve tappet | 46 | Air filter back cover |
| 11 | Cam shaft | 47 | Air filter fixed gasket |
| 12 | Crankshaft subassembly | 48 | Hexagon nut with flange |
| 13 | Oil scoop | 49 | Cross recess tapping screw |
| 14 | Connecting rod | 50 | Filter block |
| 15 | Woodruff key | 51 | Air filter front cover |
| 16 | Crankcase cover | 52 | Hexagon bolt with flange |
| 17 | Hexagon bolt with flange | 53 | Gasket |
| 18 | Case body guide pin | 54 | Inside Case |
| 19 | Piston pin circlip | 55 | Cylingder head cover |
| 20 | Piston ring subassembly | 56 | Hexagon bolt with flange |
| 21 | Piston subassembly | 57 | Gas pipe |
| 22 | Piston pin | 58 | Double head screw |
| 23 | Exhaust valve | 59 | Gasket |
| 24 | Intake valve | 60 | Spring washer |
| 25 | Muffler supporting tube | 61 | Columnar nut |
| 26 | Valve spring | 62 | Cylinder shroud |
| 27 | The valve sealing ring | 63 | Hexagon bolt with flange |
| 28 | Valve spring retainer ring | 64 | Sparkle plug |
| 29 | Valve push-rod | 65 | Muffler gasket |
| 30 | Push rod guide plate | 66 | Muffler connecting pipe |
| 31 | Hexagon head bolts | 67 | Hexagonal cylindrical head screw |
| 32 | Valve rocker arm | 68 | Muffler assy |
| 33 | Adjusting screw | 69 | Hexagon bolt with flange |
| 34 | The rocker fixed plate | 70 | Hexagon bolt with flange |
| 35 | 1-type hexagonal nut | 71 | Hexagon bolt with flange |
| 36 | Hexagon bolt with flange | 72 | Oil sensor cover |
CE
Inverkehrbringer / Distributor
2006/42/EG
2014/30/EG
2011/65/EG
2000/14/EG: noise: measured LWA=92.69dB(A) guaranteed LWA=95dB(A)
Annex VI notified body (0499) Société Nationale de Certification et d'Homologation
2012/46/EG (e1397/68SH3G32012/46082100)
Angewandte Normen / applicable standards
ISO 8528-13:2016
EN55012
EN61000-6-1
EN 12601
EN 60204-1
(DE) Hiermit erklaren wir, dass die oben genannten Maschinen aufgrund ihrer Bauart in der von uns in Verkehr gebrachten Version den grundlegenden Sicherheits- und Gesundheitsanforderungen der angeführten EG-Richtlinien entsprechen. Diese Erklärung verliert ihre Gültigkeit, wenn Veränderungen an der Maschine vorgenommen werden, die nicht mit uns abgestimmt wurden.
(EN) Hereby we declare that the above mentioned machines meet the essential safety and health requirements of the above stated EC directives. Any manipulation or change of the machine not being explicitly authorized by us in advance renders this document null and void.
(FR) Nous déclarons par la presente que l'équipment ci-dessus est conforme aux exigences de santé et de sécurité des directives CE. Cette déclaration devient invalide si des modifications sont faites à la machine sans avoir été coordonnés avec nous.
(HR) Izavljujemo da gore navedeni strojevi odgovaraju osnovnim sigurnosnim i zdravstvenim zahtjevima prema gore navenenim standardima i normama EU. Svaka manipulacija ili izmjena na stroju, a koja ici izricito odobrena od strane proizvodaca, rezultira poniistenjem ove izjave.
(SL) Izjavljamo, da zgoraj navedeni stroji s svjo izvedbo v verziji, ki jo distribuiramo, izpolnjujejo osnovne varnostne in zdravstvene zahteve glede na navedene direktive EU. Ta izjava izgubi svjo veljavnost, ce so bile na stroju opravljene spremembe brez naşa predhodnega soglasja.
(HU) Ezennel kijelentjuk, hogy a fent emlitett gepek az epitési modjuk alapjan, az altalunk forgalomba hozott verzioban, megfeelnek a felsorolt EK-iranyelvek alapvetoBiztonsagi es egeszsegugyi elfrasainak. Ez a nyilatkozat erenyét veszi, ha agepen altalunk nem engedelyezett modositasokat végez.
(CZ) Tímtó prohlássujeme, Že vyše uvedeny typ stroje splnjube bezpečnostnf a zdravotnf požadavy norem EU. Toto prohláseni ztrác svou platnost,Pokud by doslo kezměnám nebo upravém stroje, které námni nebyly odsouhlaseny
Company ZIPPER Maschinen GmbH grants for mechanical and electrical components a warranty period of 2 years for amateur use; and warranty period of 1 year for professional use, starting with the purchase of the final consumer. In case of defects during this period, which are not excluded by paragraph 3, ZIPPER will repair or replace the machine at its own discretion.
2.) Report:
In order to check the legitimacy of warranty claims, the final consumer must contact his dealer. The dealer has to report in written form the occurred defect to ZIPPER. If the warranty claim is legitimate, ZIPPER will pick up the defective machine from the dealer. Returned shipments by dealers which have not been coordinated with ZIPPER, will not be accepted and refused.
3.) Regulations:
a) Warranty claims will only be accepted, when a copy of the original invoice or cash voucher from the trading partner of ZIPPER is enclosed to the machine. The warranty claim expires if the accessories belonging to the machine are missing.
b) The warranty does not include free checking, maintenance, inspection or service works on the machine. Defects due to incorrect usage of the final consumer or his dealer will not be accepted as warranty claims either. Some examples: usage of wrong fuel, frost damages in water tanks, leaving fuel in the tank during the winter, etc.
c) Defects on wear parts are excluded, e.g. carbon brushes, collection bags, knives, cylinders, cutting blades, clutches, sealings, wheels, saw blades, splitting crosses, riving knives, riving knife extensions, hydraulic oils, oil/air/fuel filters, chains, spark plugs, sliding blocks, etc.
d) Also excluded are damages on the machine caused by incorrect or inappropriate usage, if it was used for a purpose which the machine is not supposed to, ignoring the user manual, force majeure, repairs or technical manipulations by not authorized workshops or by the customer himself, usage of non-original ZIPPER spare parts or accessories.
e) After inspection by our qualified personnel, resulted costs (like freight charges) and expenses for not. legitimated warranty claims will be charged to the final customer or dealer.
f) In case of defective machines outside the warranty period, we will only repair after advance payment or dealer's invoice according to the cost estimate (incl. freight costs) of ZIPPER.
g) Warranty claims can only be granted for customers of an authorized ZIPPER dealer who directly purchased the machine from ZIPPER. These claims are not transferable in case of multiple sales of the machine.
4.) Claims for compensation and other liabilities:
The liability of company ZIPPER is limited to the value of goods in all cases. Claims for compensation because of poor performance, lacks, damages or loss of earnings due to defects during the warranty period will not be accepted. ZIPPER insists on its right to subsequent improvement of the machine.
44 GARANTIE (FR)
1.) Garantie:
We observe the quality of our delivered products in the frame of a Quality Management policy.
Your opinion is essential for further product development and product choice. Please let us know about your:
- Impressions and suggestions for improvement.
- experiences that may be useful for other users and for product design
- Experiences with malfunctions that occur in specific operation modes
We would like to ask you to note down your experiences and observations and send them to us via FAX, E-Mail or by post:
Please describe amongst others in the problem: What has caused the problem/defect, what was the last activity before you noticed the problem/defect? For electrical problems: Have you had checked you electric supply and the machine already by a certified electrician?
3. Bitebeachten
INCOMPLETELY Filled SERVICE FORMS CANNOT BE PROCESSED!
FOR GUARANTEE CLAIMS PLEASE ADD A COPY OF YOUR ORIGINAL SALES/ DELIVERY RECEIPT OTHERWISE IT CANNOT BE ACCEPTED.
FOR SPARE PART ORDERS PLEASE ADD TO THIS SERVICE FORM A COPY OF THE RESPECTIVE EXPLODED DRAWING WITH THE REQUIRED SPARE PARTS BEING MARKED CLEARLY AND UNMISTAKABLE.
THIS HELPS US TO IDENTIFY THE REQUIRED SPARE PARTS FASTLY AND ACCELERATES THE HANDLING OF YOUR INQUIRY.